


Your external hard drive is detected but not opening. Windows can see it, and it may even appear in File Explorer, but when you try to access it, nothing happens, or you’re met with an error. The good news is that a drive Windows still detects (with the correct capacity) is usually fixable, and your files are often still there. This guide shows you how to check what is really wrong, get your data back safely, and make the drive open again, all in the right order. We’ve been helping people recover data from drives exactly like yours, so every step here is written to protect your files first.
How to Tell If Windows Detects Your External Hard Drive
Before trying any fixes, find out whether Windows detects the drive at a basic level. The place to look is Disk Management, a built-in tool that shows every disk connected to your PC, including ones that never appear in File Explorer.
To open it, right-click Start and click Disk Management. Alternatively, you can press Windows key + R, type diskmgmt.msc, and press Enter.
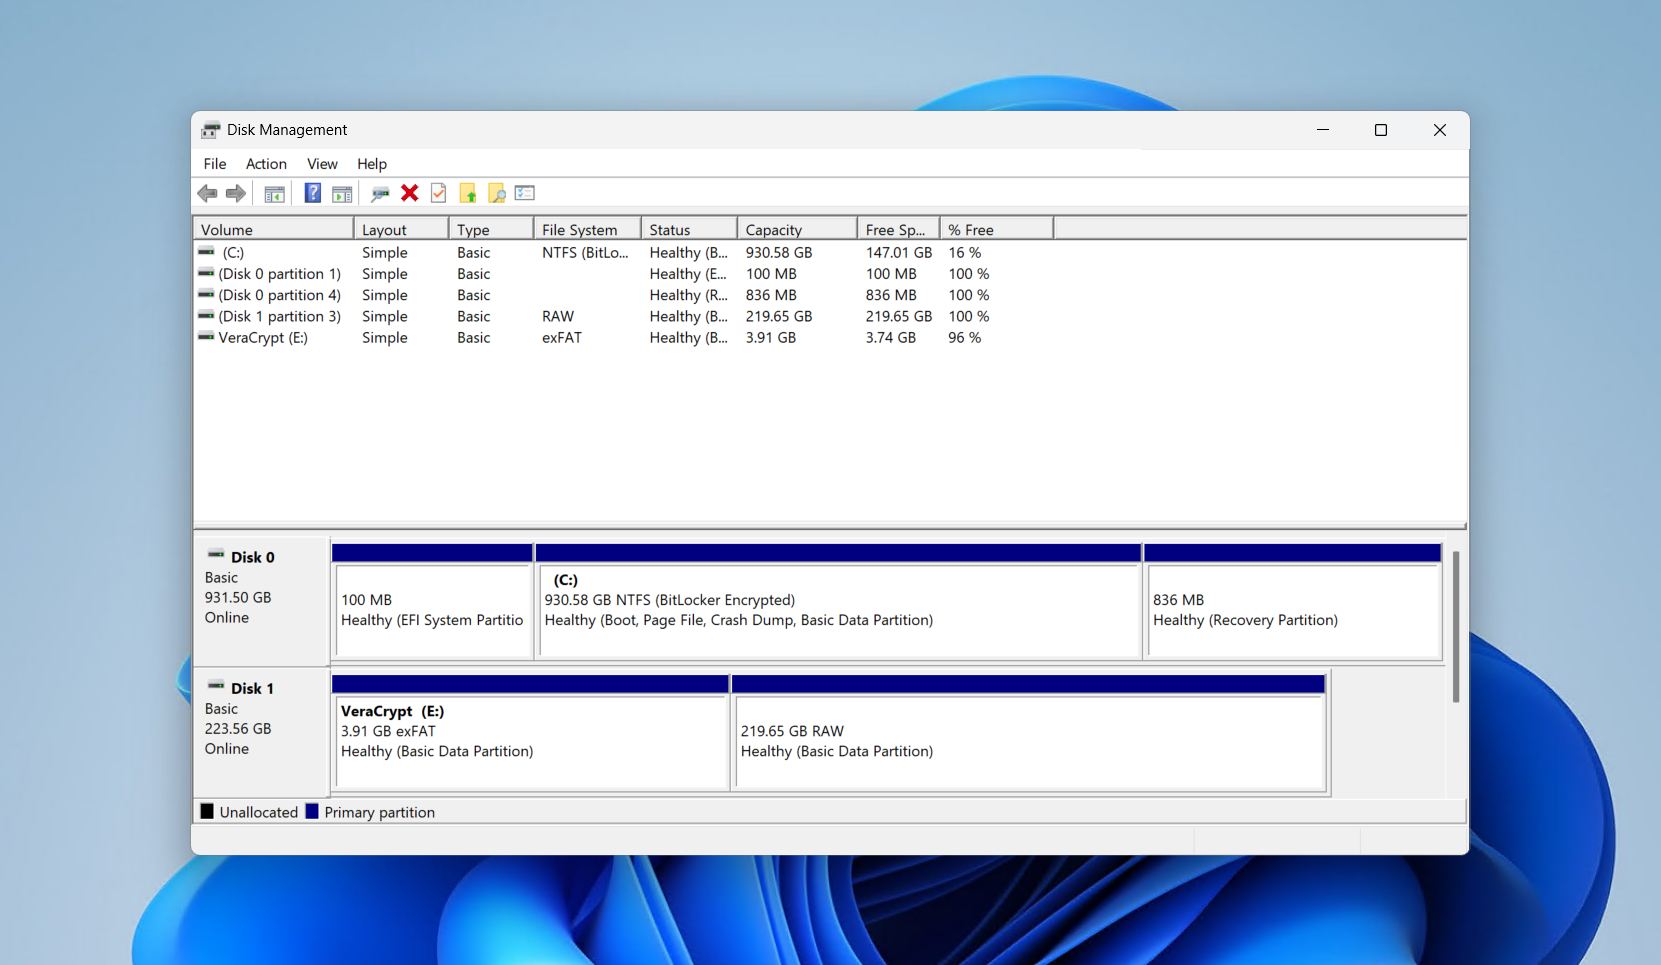
Look at five things:
- Does the drive appear? Find your external drive in the list of devices.
- Is the capacity correct? A 2 TB drive should show close to 2 TB. A much smaller size, or 0 bytes, is a warning sign.
- Does it have a partition, file system, and drive letter? A healthy volume will read as healthy with its own drive letter and file system.
- What state is the drive in? The common labels are Healthy (working), RAW (missing or damaged file system), Unallocated (no partition), and Not Initialized (no partition table).
- Are there any health warnings? Every modern drive keeps an internal health report that can be read with tools like CrystalDiskInfo and Disk Drill to show warnings, bad sectors, or signs of failure.
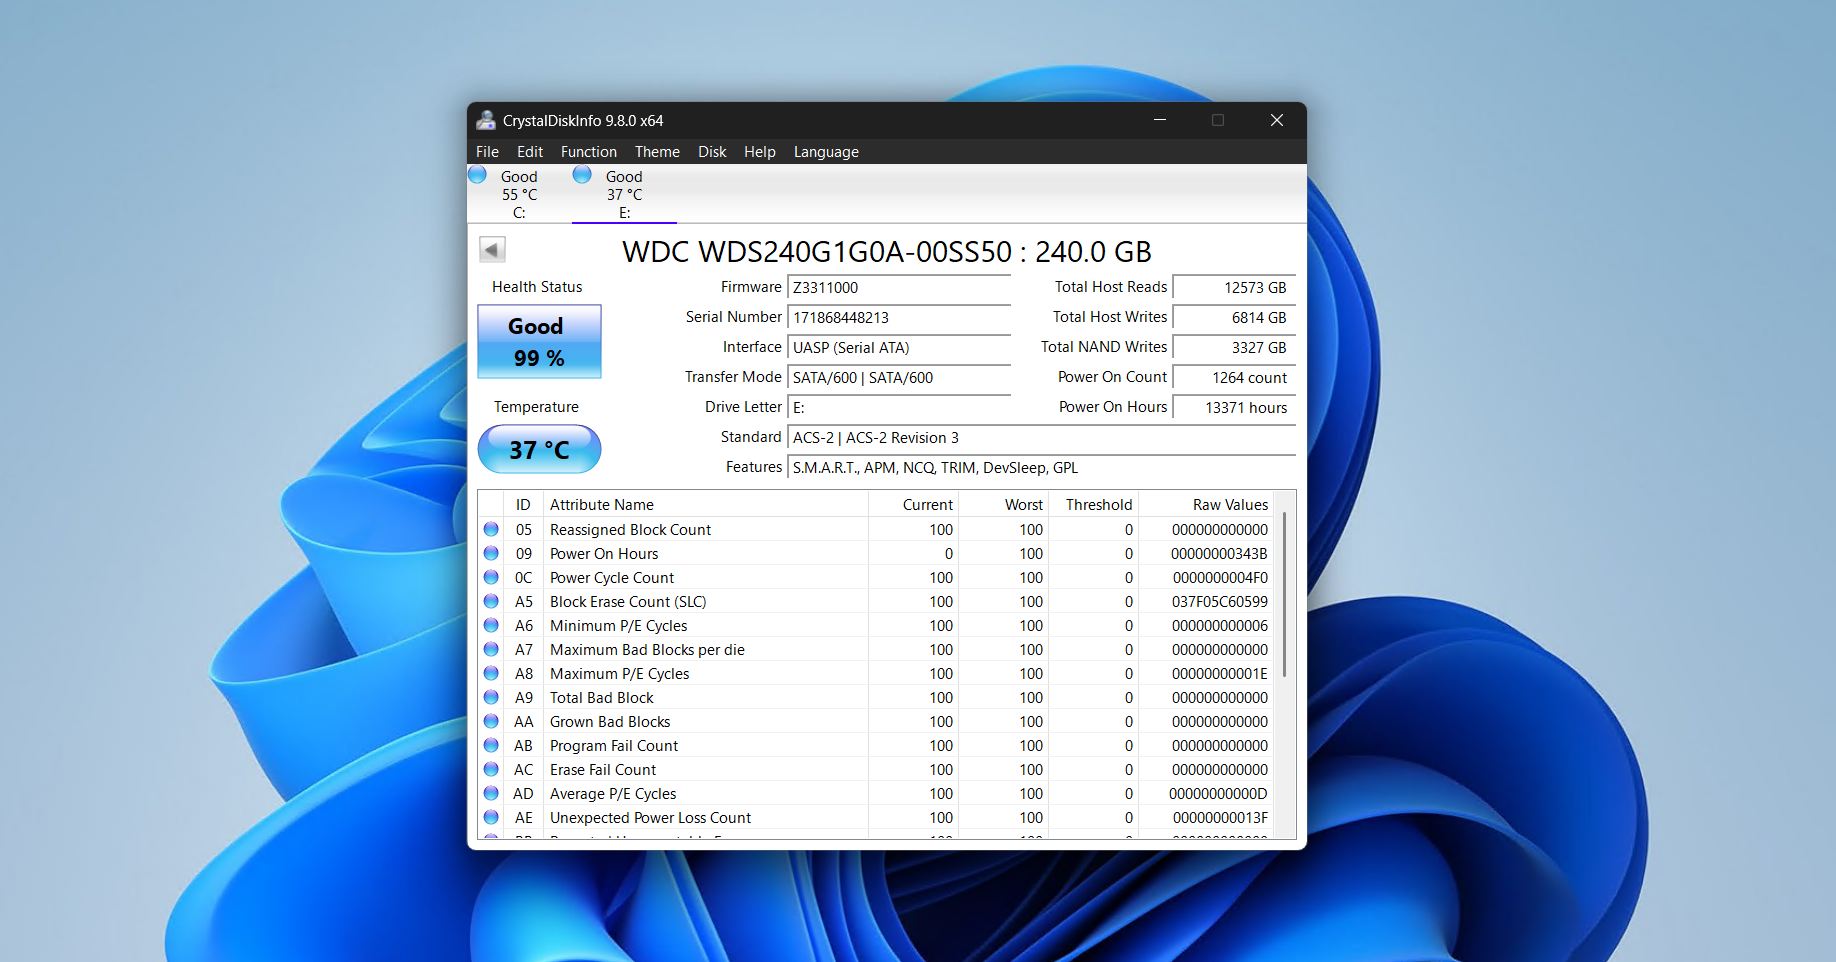
Basically, it comes down to a simple rule. If the drive appears in Disk Management with the correct size, you can usually fix it yourself. Exercise more caution if the drive doesn’t appear at all, shows the wrong size, keeps disconnecting, freezes Windows, or shows clear S.M.A.R.T. or physical warnings. In those cases, see our section on when DIY fixes aren’t safe instead.
Why is an External Hard Drive Detected but Not Opening?
Now that you’ve confirmed it’s something you can fix, it’s just about pinning down the issue. We’ve compiled the most common cases below, so check if any match your situation.
| What’s in Disk Management | What it usually means | What to do next |
| Shows in Disk Management with no drive letter, but missing from File Explorer | Missing or conflicting drive letter | Assign a drive letter to restore access |
| Shows as RAW | The file system is damaged | Recover the data, then try running CHKDSK to repair it. Otherwise, format it |
| Shows as Unallocated | The partition was lost or deleted | Recover the partition or format it if the data is recovered or unnecessary |
| Shows as Not Initialized | Partition table damage, or a genuinely new blank drive | Recover the data if the drive had files, then initialize and format |
| Shows the correct capacity but disconnects or takes a long time to load | A cable, port, or power problem | Try a different USB port or cable |
| Shows normally, but Windows asks you to format it | File system corruption, or a file system Windows cannot read | Recover the data, then format the drive |
One important warning before you go further. If the data matters to you, recover your files before you run CHKDSK, format the drive, create a new volume, or initialize the disk. These are all destructive processes, making recovery much harder if not impossible.
How to Recover Data From an External Hard Drive That Is Detected but Not Opening
When your external hard drive is recognized but not accessible, the safest first move is to get your files off it before any repairs. A data recovery tool reads the drive at a low level and pulls out files, even when Windows can’t open the drive. We will use Disk Drill. The only requirement is that the drive is visible in Disk Management with its correct, normal capacity.
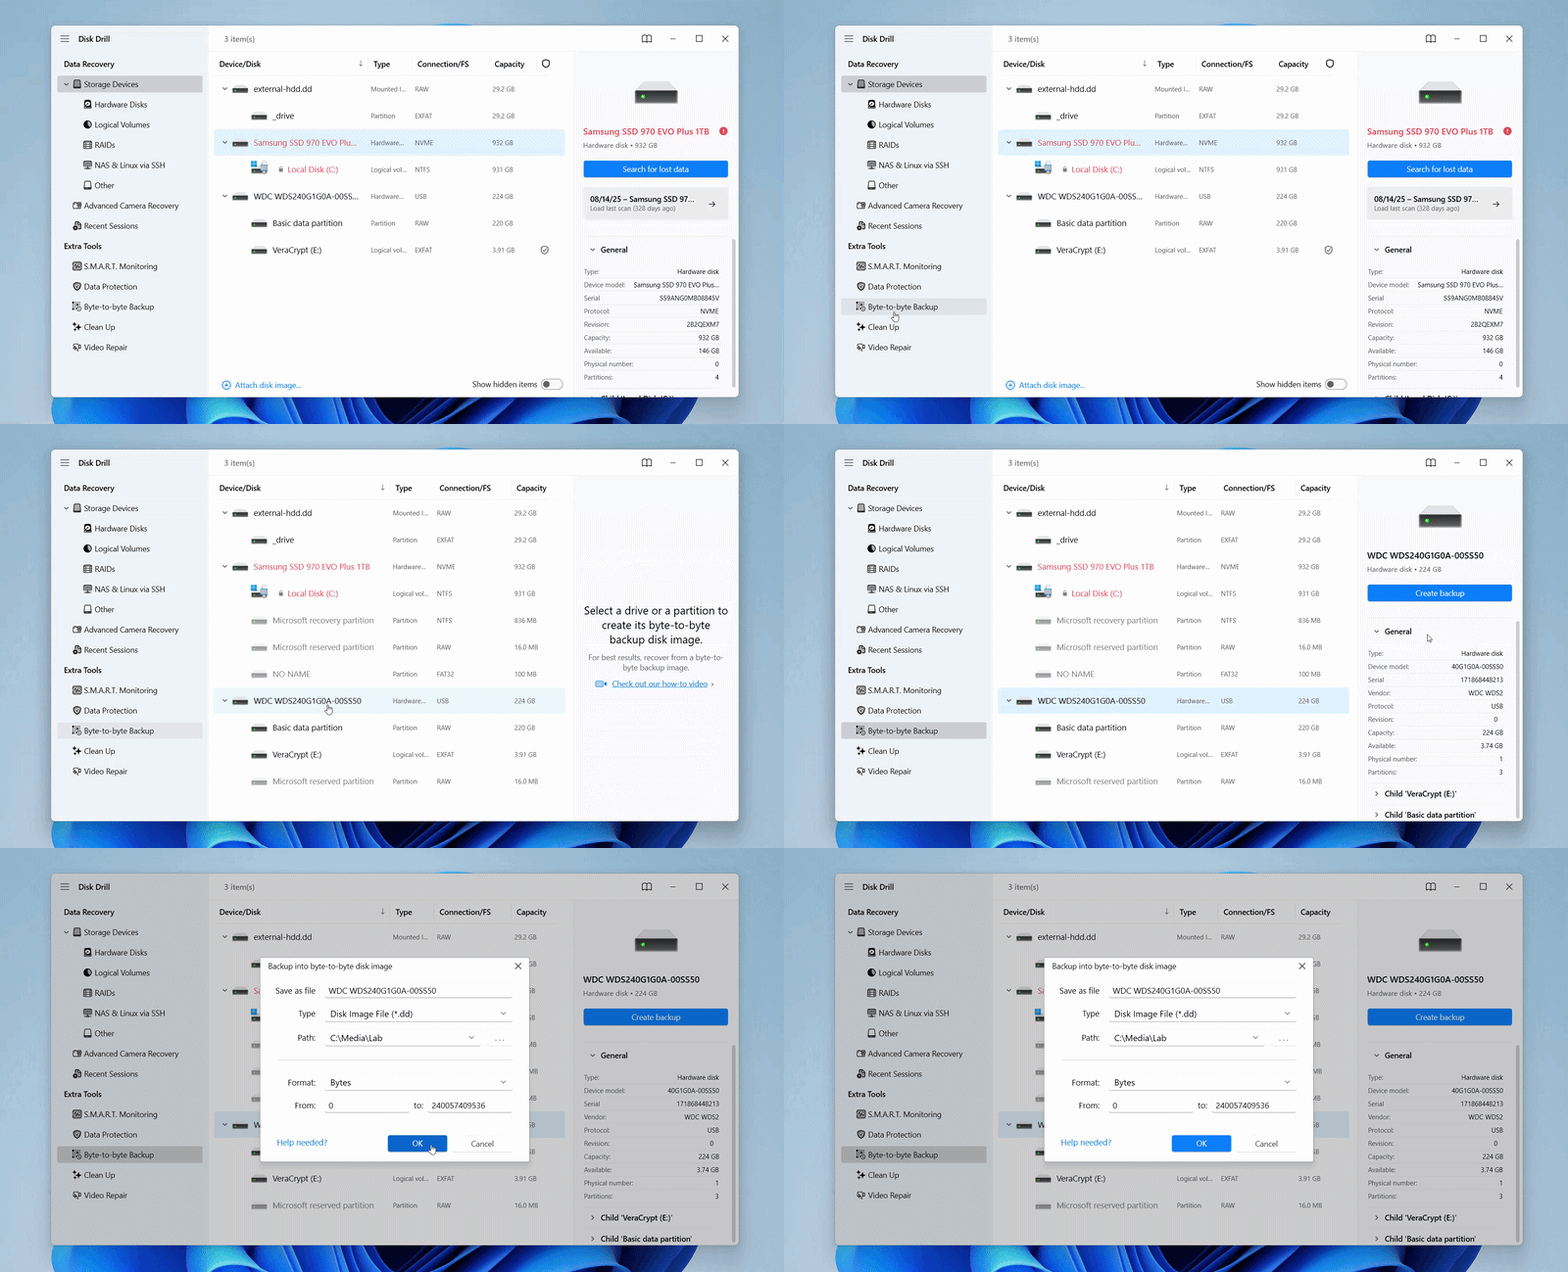
Once you’ve decided to scan the drive or image, follow these recovery steps:
- Download, install, and open Disk Drill.
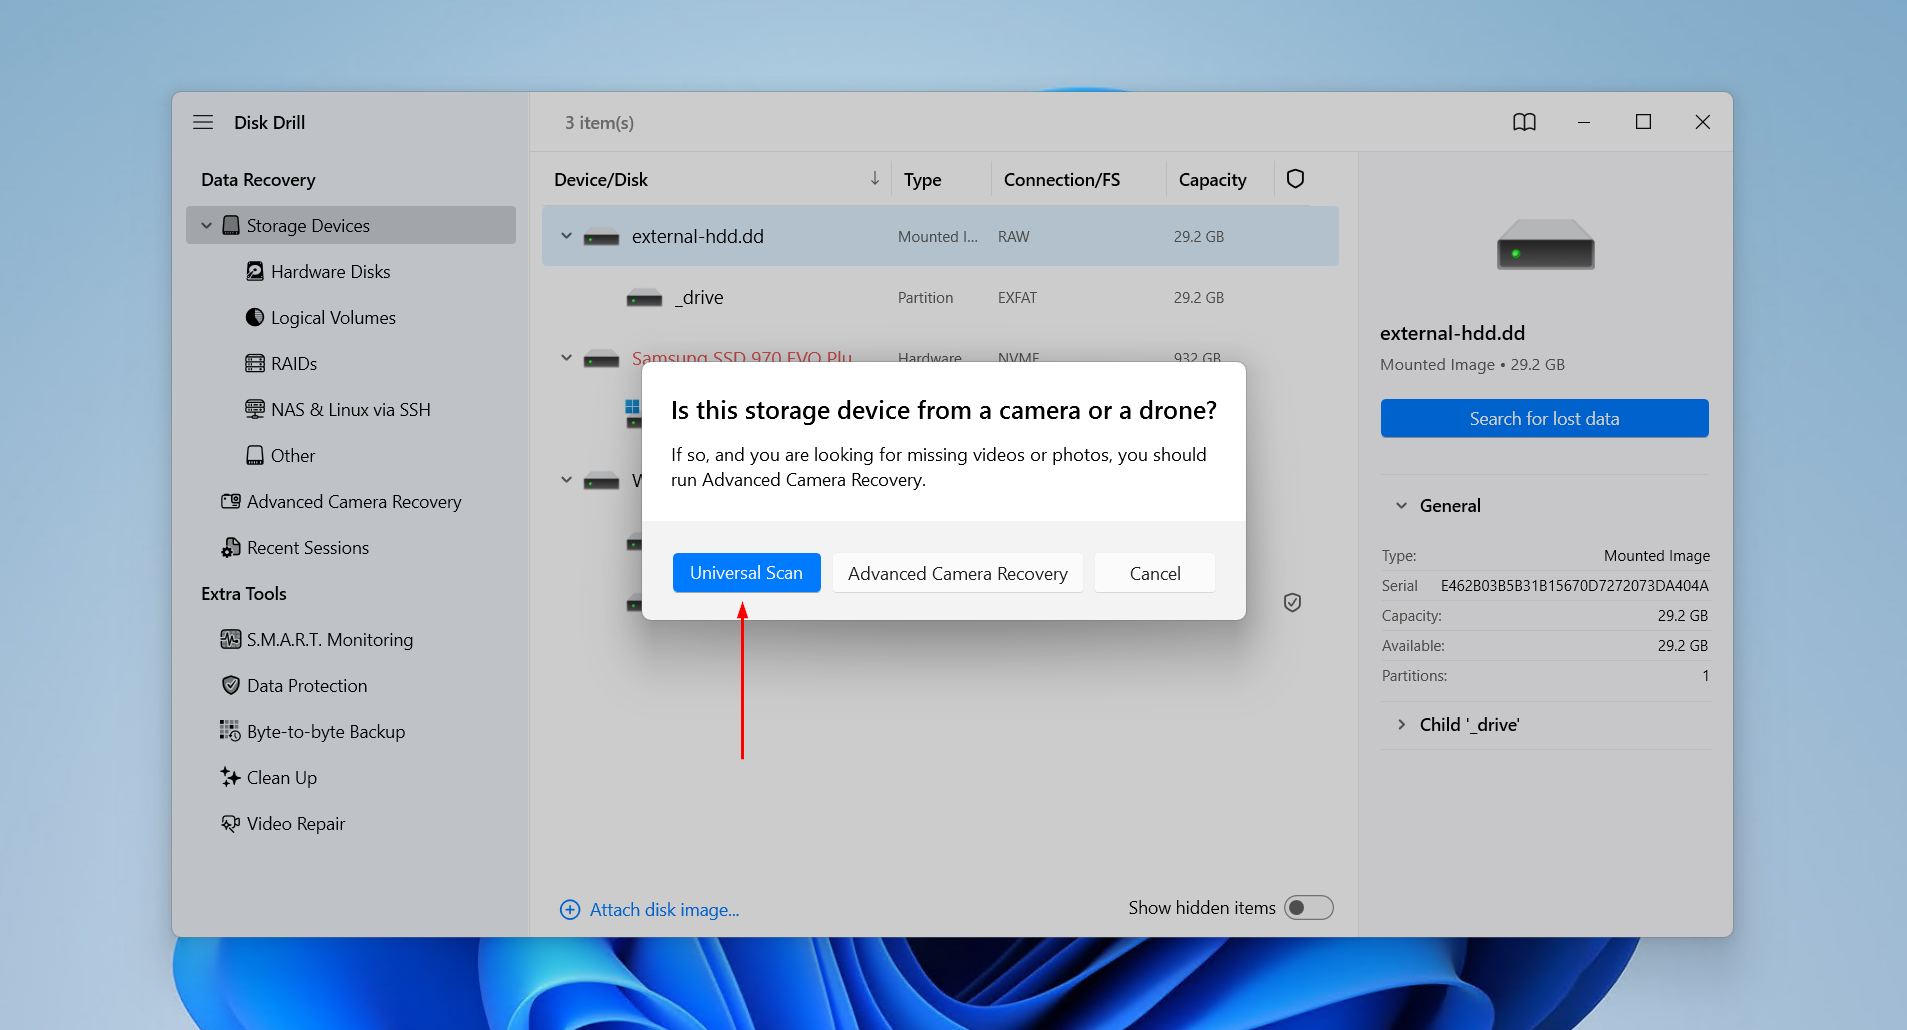
- Select your external hard disk from the list of devices, or click Assign disk image to add the disk image. Click Search for lost data.
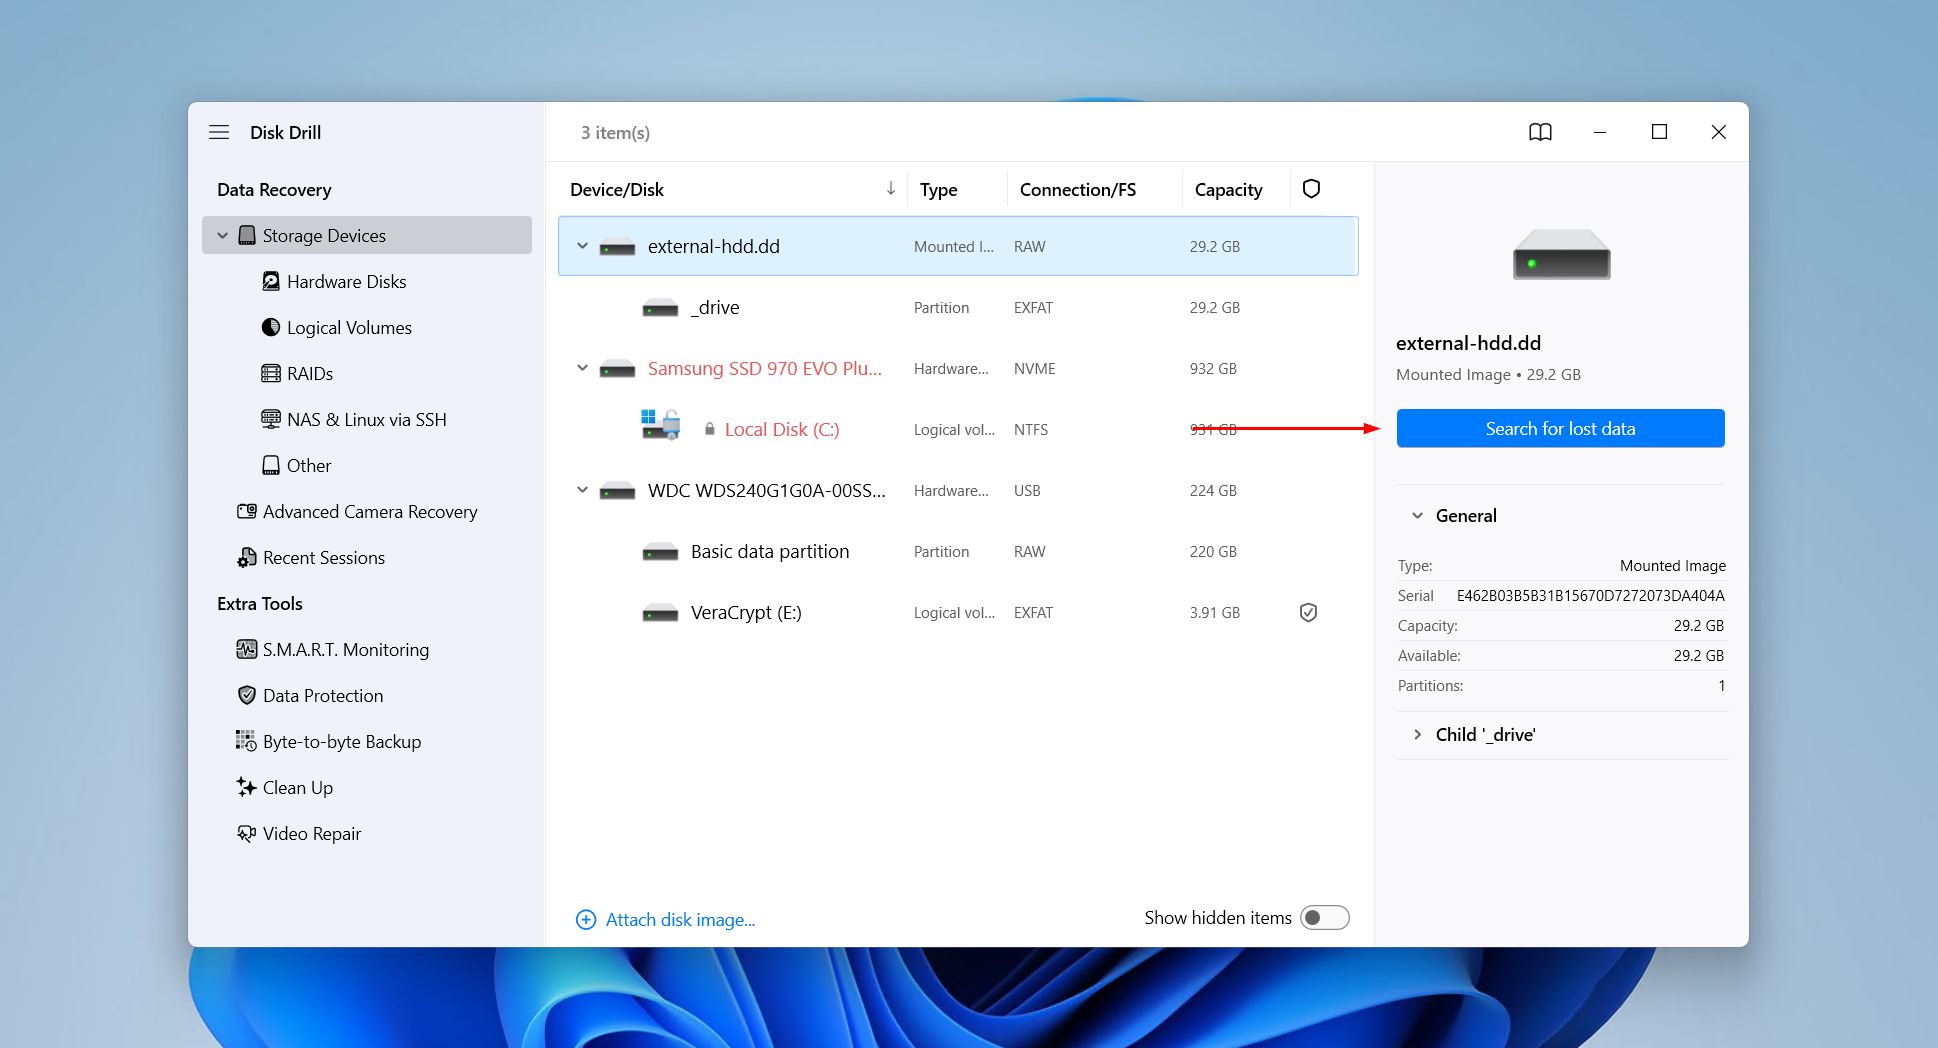
- Click Universal Scan when prompted to choose a scan type.
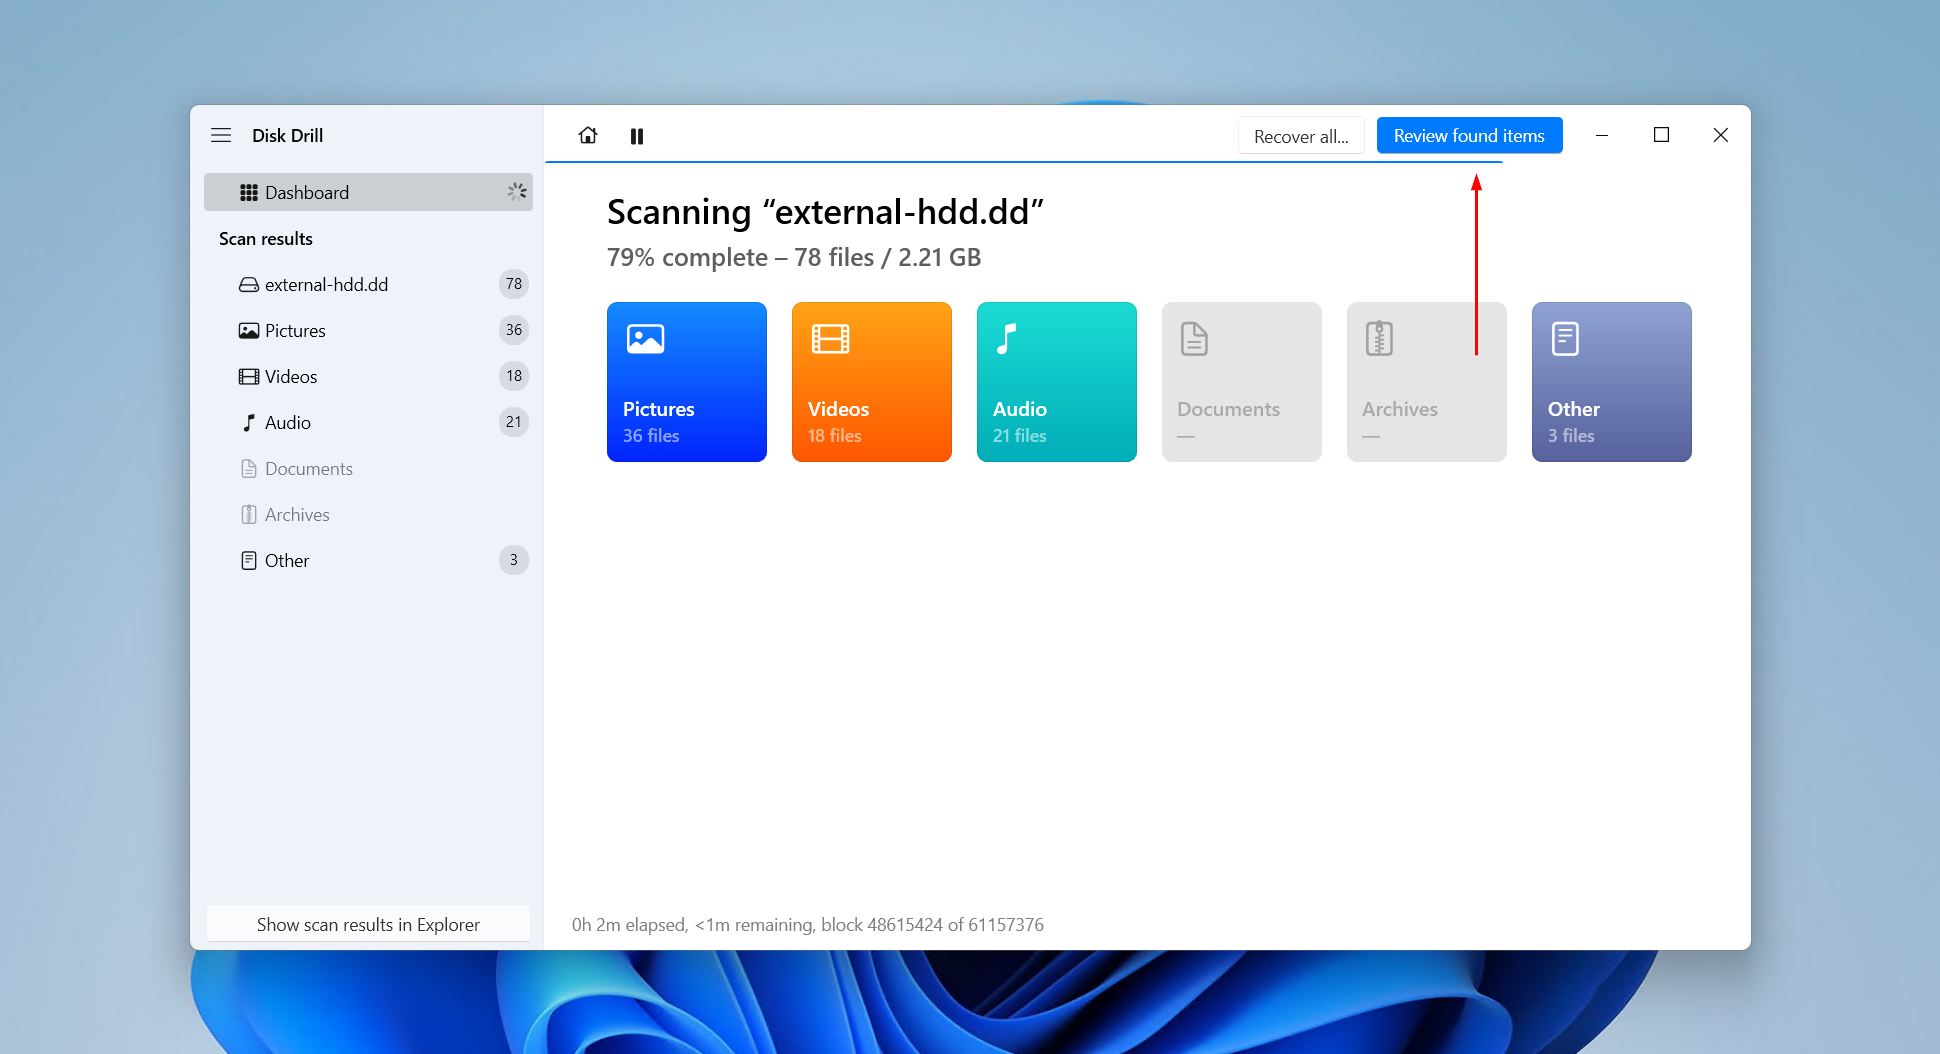
- Click Review found items to see what Disk Drill found. Filter the results by clicking one of the colored file icons if you want.
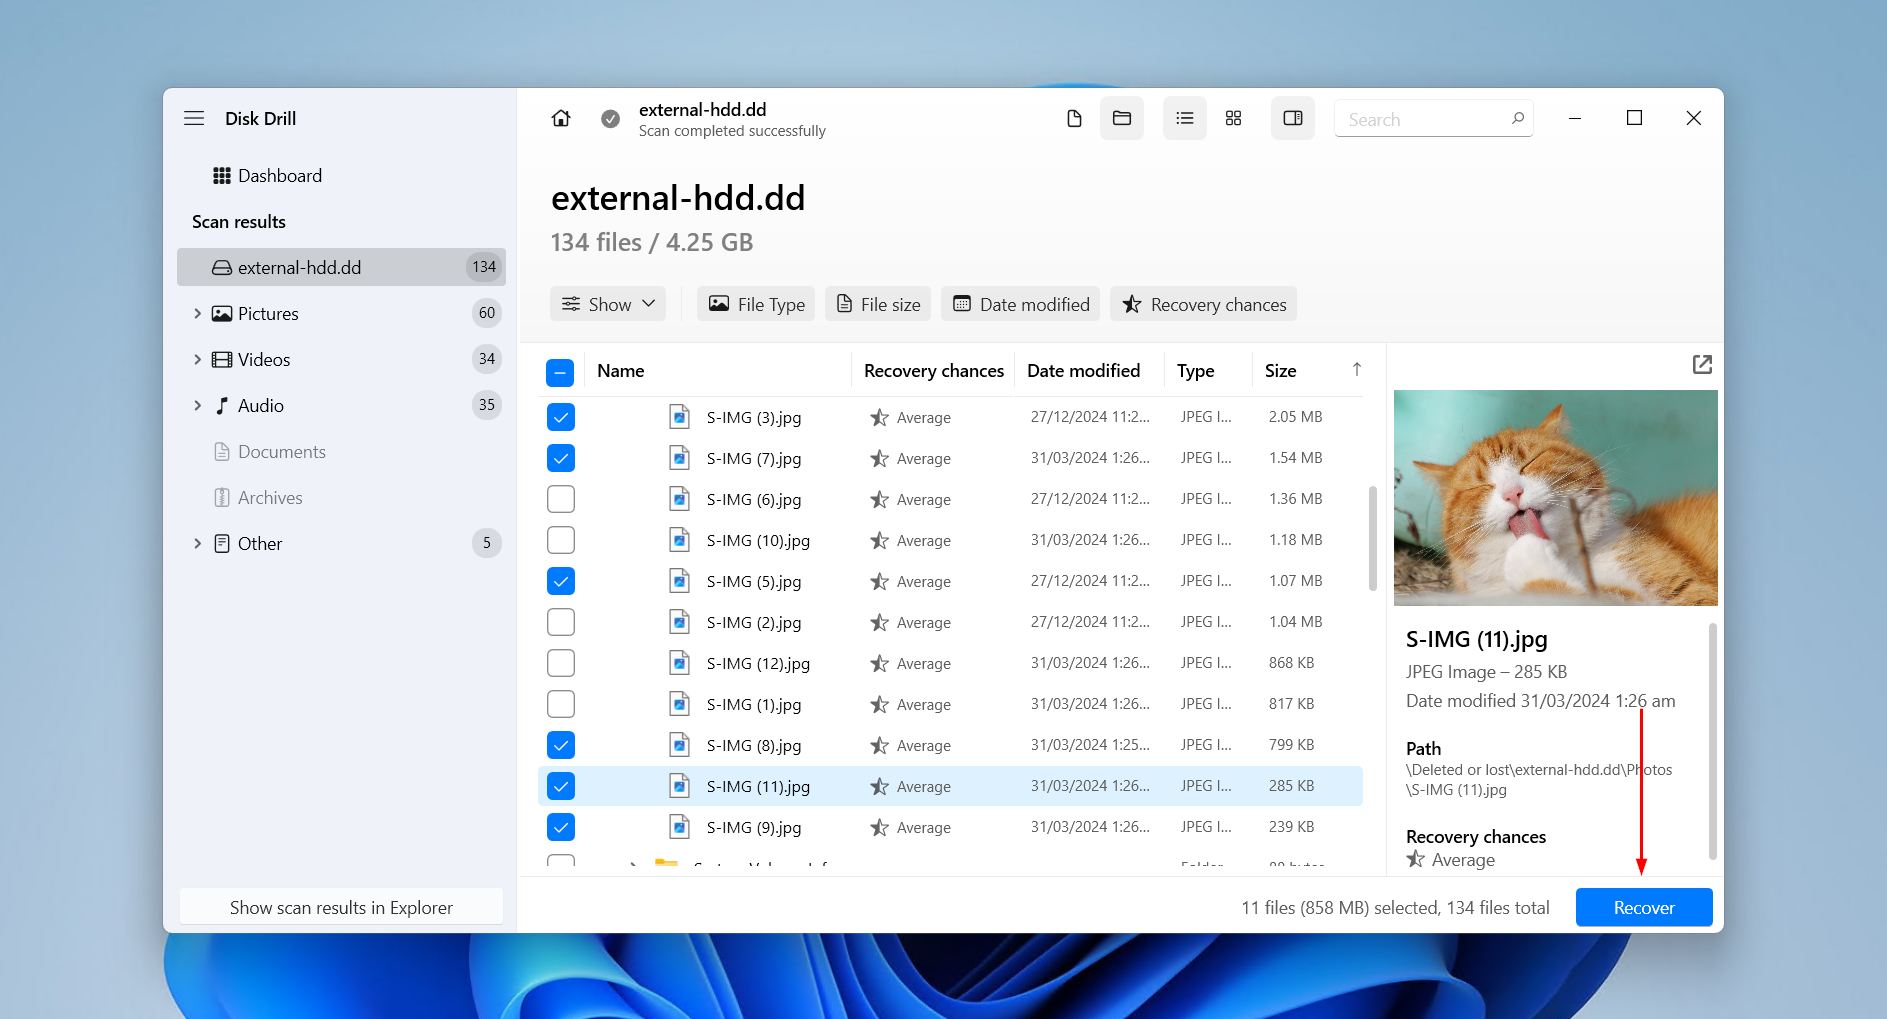
- Preview and select the data you want. If there are too many files, you can refine the results using filters or search for data by file name or extension. Any files with a preview can be recovered. When ready, click Recover.
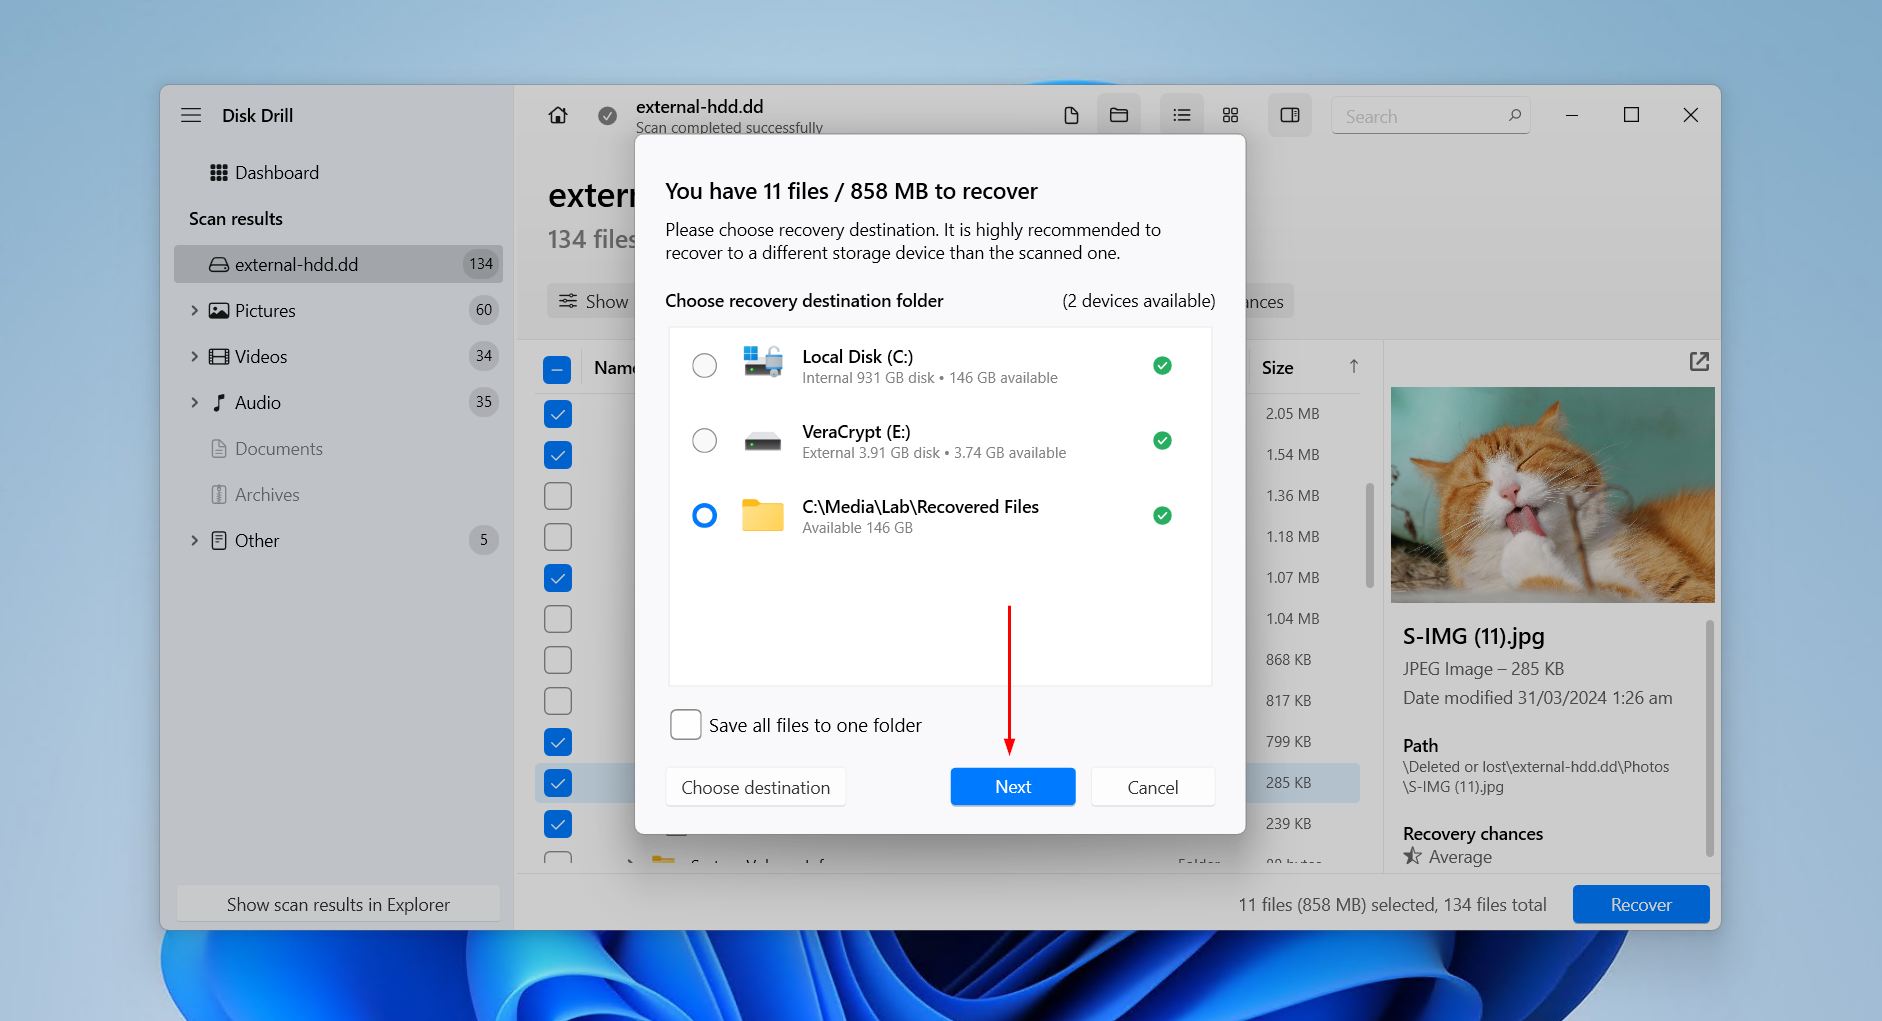
- Choose where the recovered files will be saved. Don’t choose anywhere on the external drive they’re being recovered from, instead it must be on a separate physical drive. Click Next to finish recovery.
How to Fix an External Hard Drive Detected but Not Opening on Windows
With the files safely recovered, the next methods will focus on making the external hard drive open in Windows again. Each one is demonstrated in Windows 11, but the steps are almost identical if you’re still running Windows 10.
Method 1. Try a Different USB Port or Cable
A drive can show up in Windows and still fail to open because of something simple. A worn USB cable, a loose connector, or a port that cannot supply enough power will all do it. A weak USB hub, dock, adapter, or front-panel port is a common cause because they share power with other devices. Work through these in order:
- Plug the drive straight into the computer, not through a USB hub or dock.
- Use a different USB port. On a desktop PC, use one of the ports on the back, which connect directly to the motherboard.
- Swap the USB cable, especially on portable drives that use a detachable cable. A cheap or damaged cable is a frequent culprit.
- Test the drive on another Windows computer if you have one. That quickly tells you whether the fault is the drive or the PC.
- For a 3.5-inch desktop drive with its own power brick, check the power adapter and power cable too. These drives need more power than a USB port alone can provide.
If the drive beeps, clicks, or grinds at any point, stop. Those sounds point to a physical fault inside the drive, and you should skip ahead rather than try any more of these methods.
Method 2. Assign or Change the Drive Letter
A quick fix for when Disk Management shows your drive with a normal, healthy partition but no drive letter. Without a letter, Windows won’t show the drive in File Explorer, even though nothing is actually wrong with it. This is one of the most common reasons an external hard drive is detected but not showing up. However, it will not help if the drive shows as RAW, Unallocated, or the wrong capacity, which need a different fix.
- Right-click Start and click Disk Management.
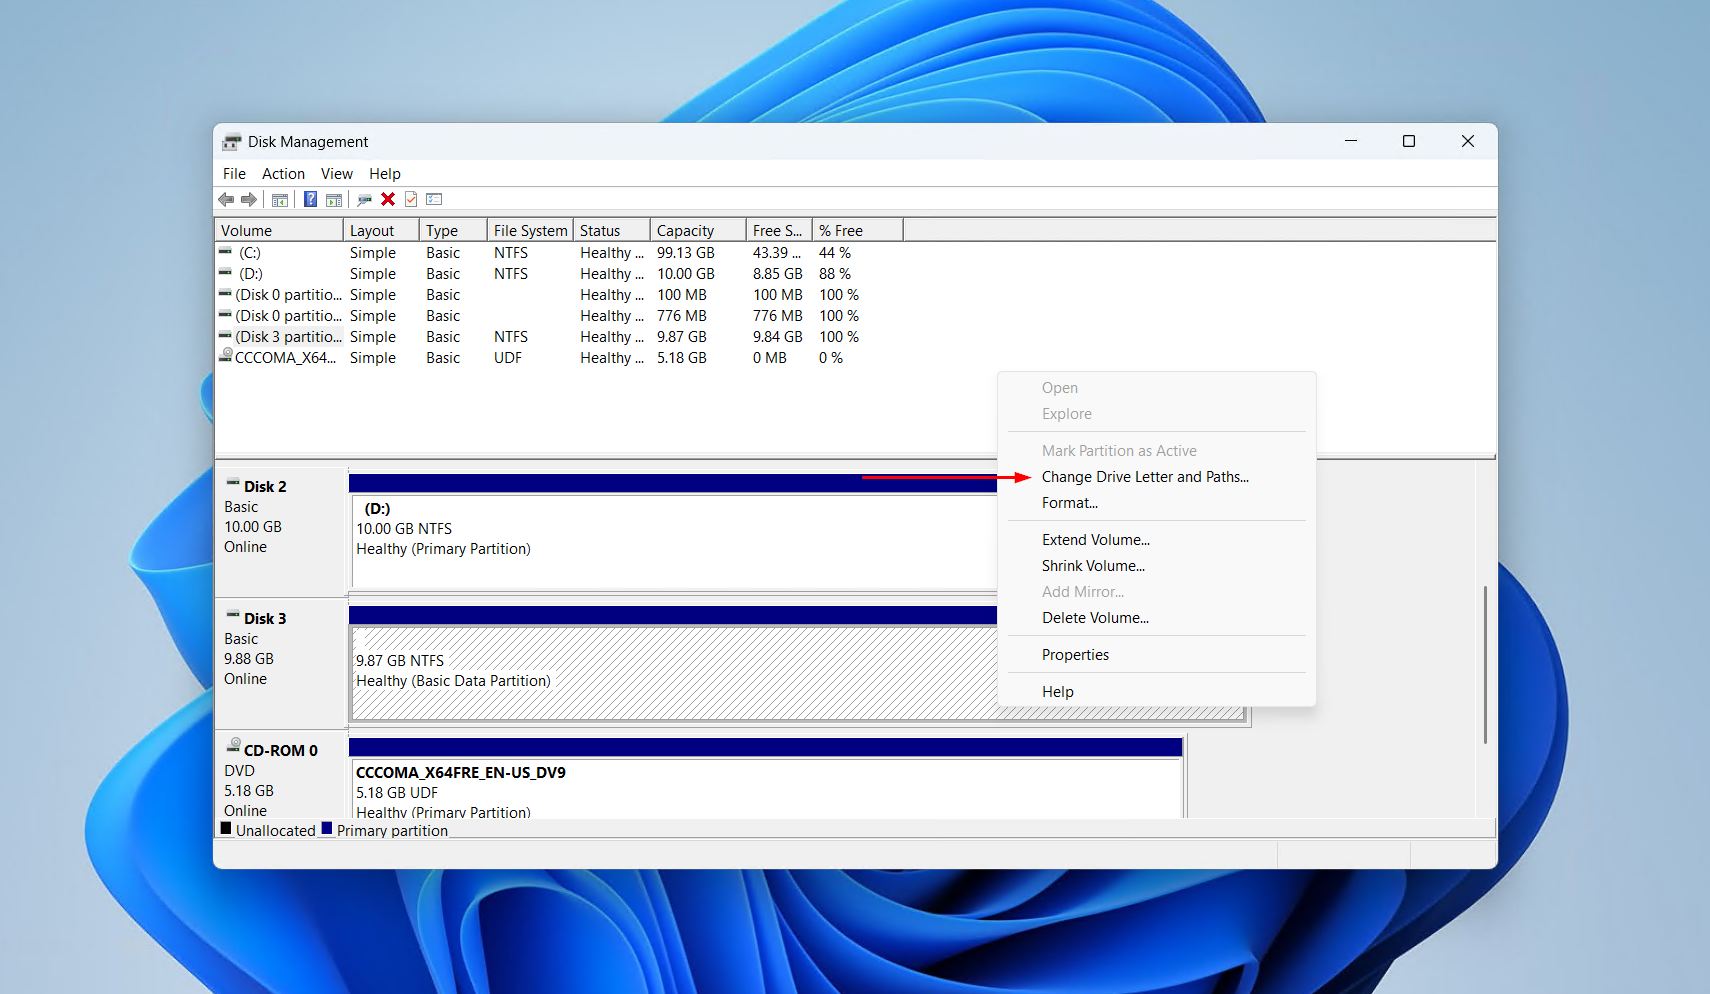
- Right-click the partition of your external hard drive, then click Change Drive Letter and Paths.
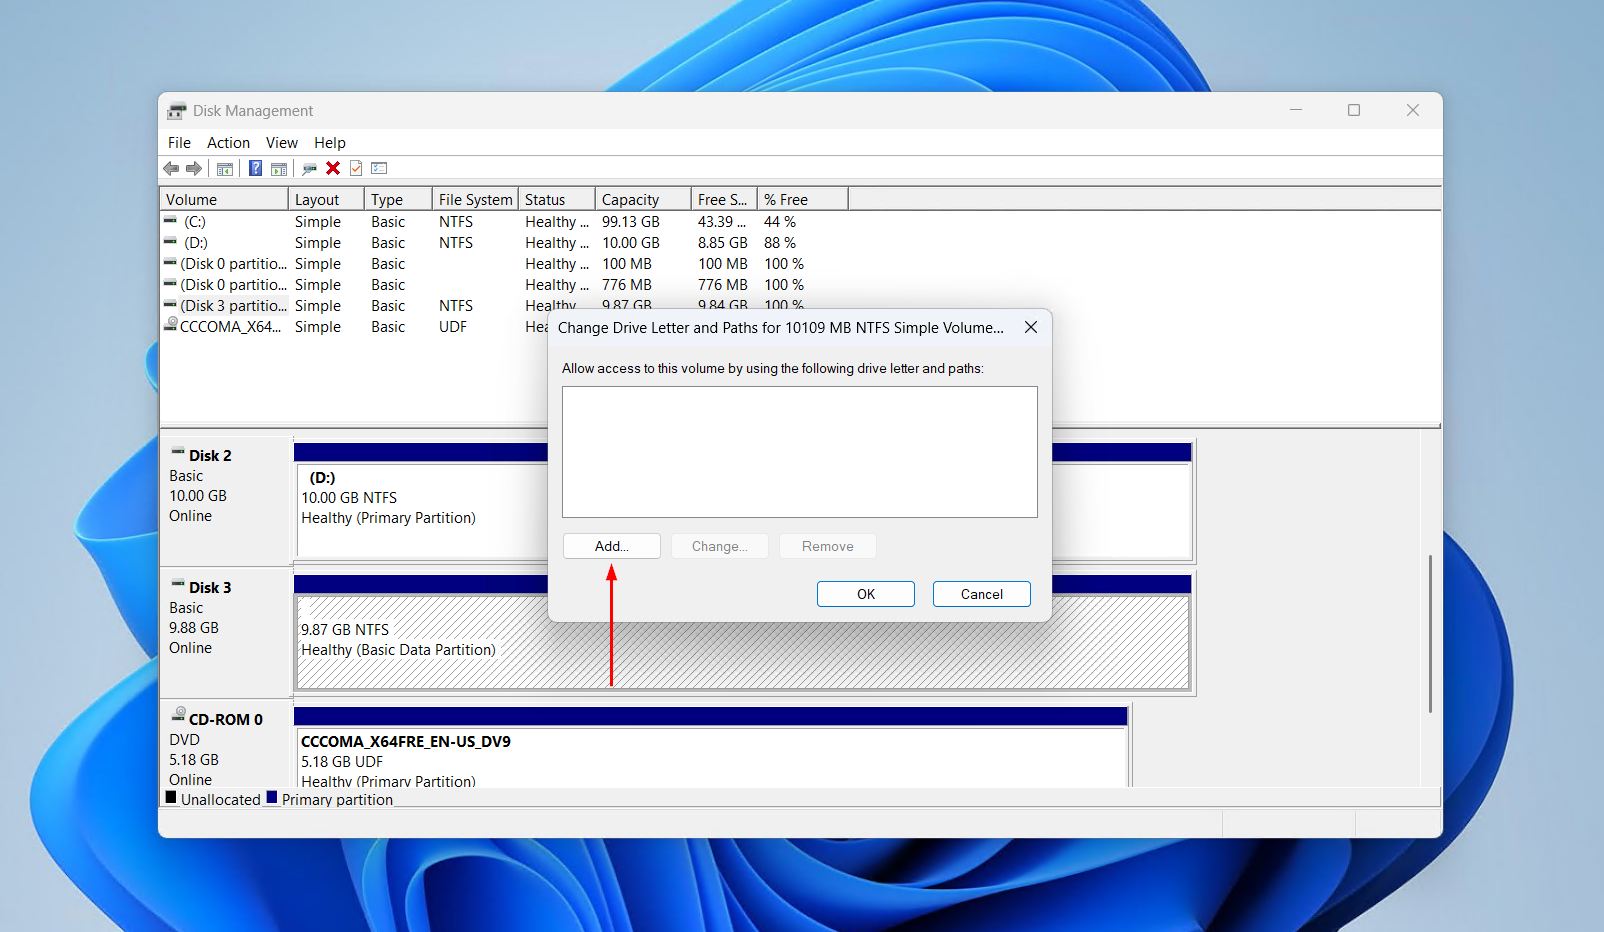
- Click Add (or Change if there is a drive letter there already).
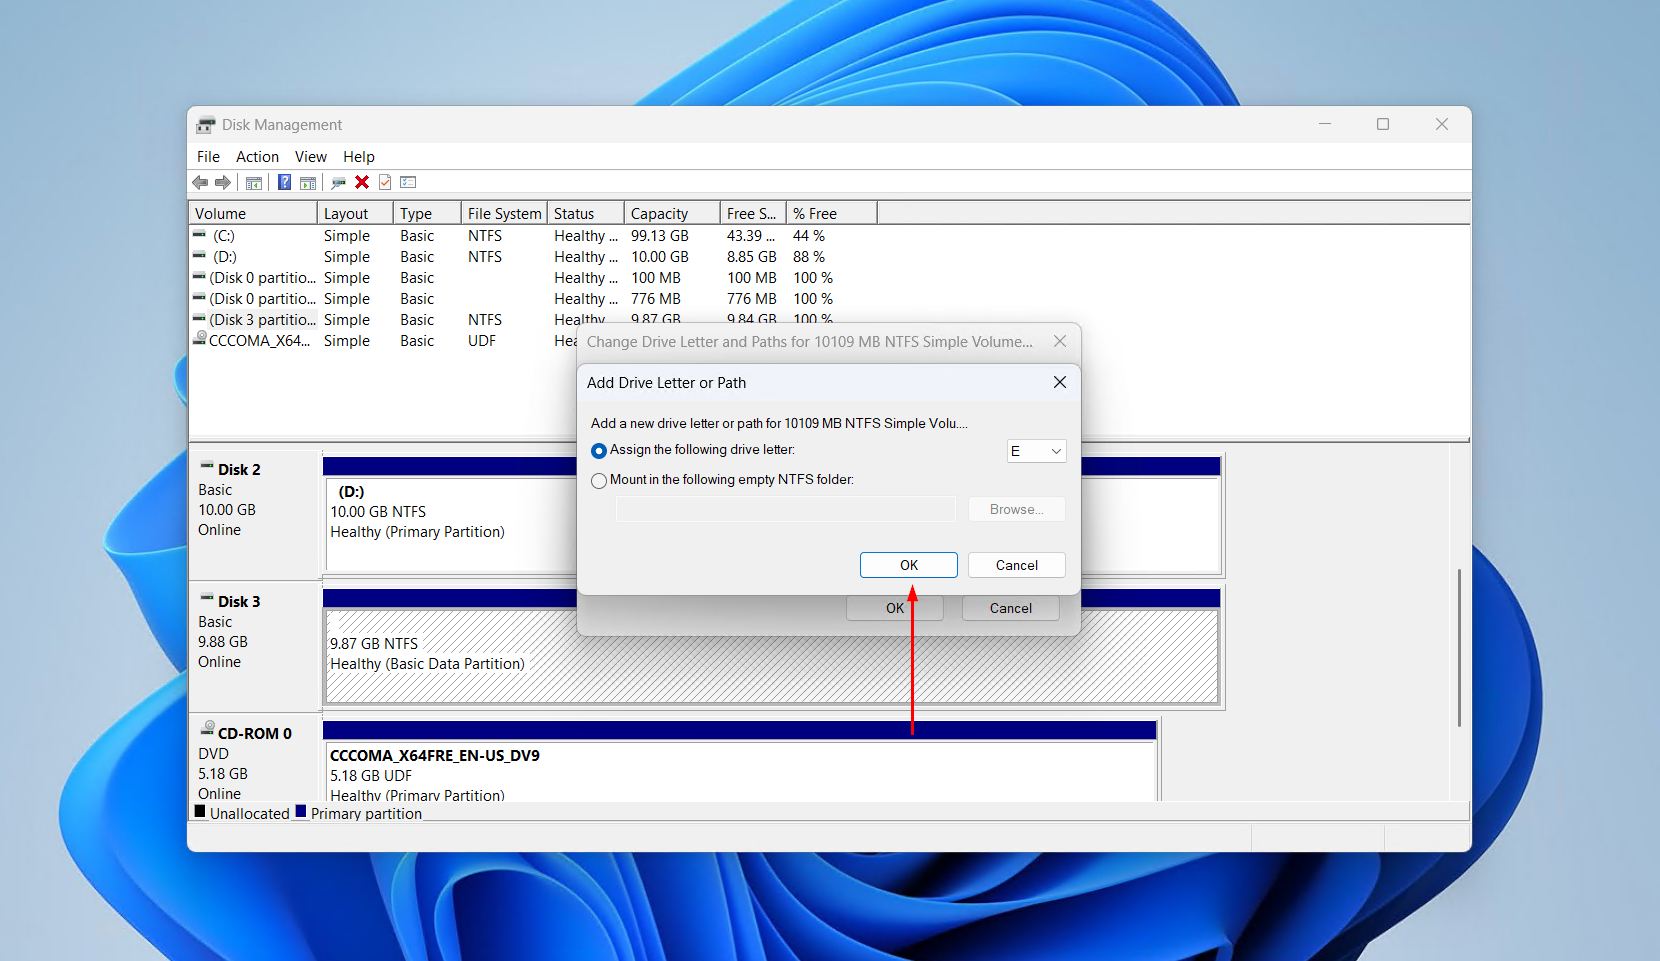
- Choose a drive letter from the list, then click OK.
Method 3. Initialize the External Hard Drive
You should only have to initialize a disk if it’s showing as Not Initialized in Disk Management. However, this should only be done in specific cases, so read the whole method before doing anything. For a brand-new, blank drive, this is fine and expected. But if your drive held data before and now reads as Not Initialized, it usually means the partition table is damaged.
These steps will show you how to initialize a drive:
- Right-click Start and click Disk Management.
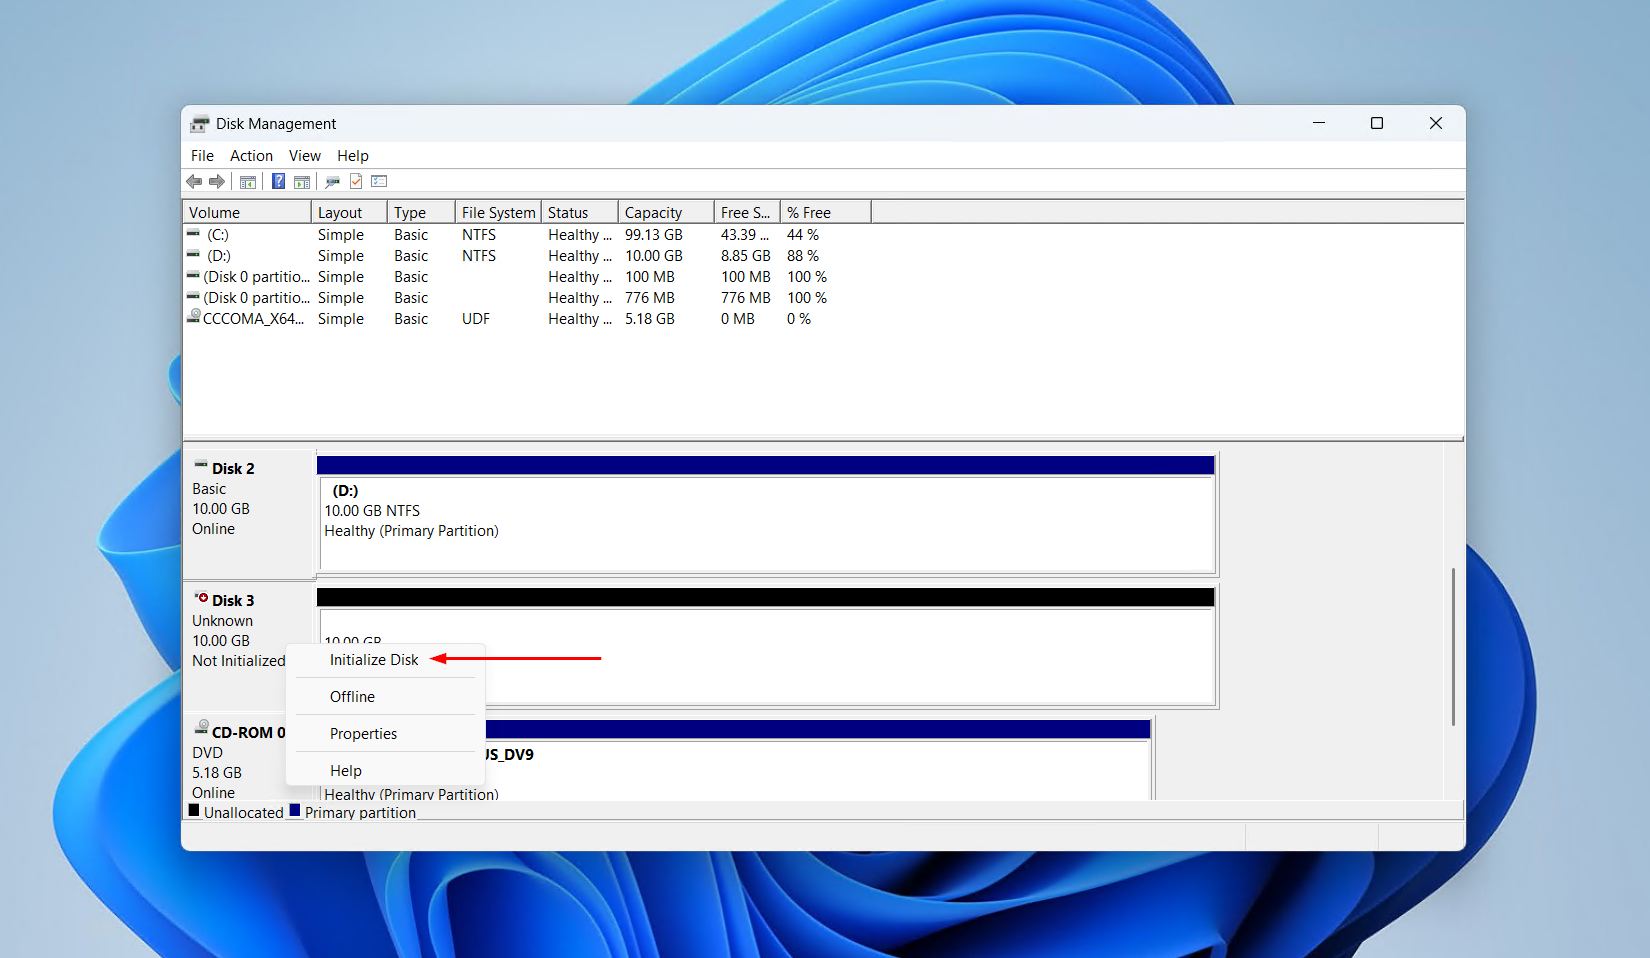
- Right-click on your disk, then click Initialize Disk.
- Choose a partition style and click OK.
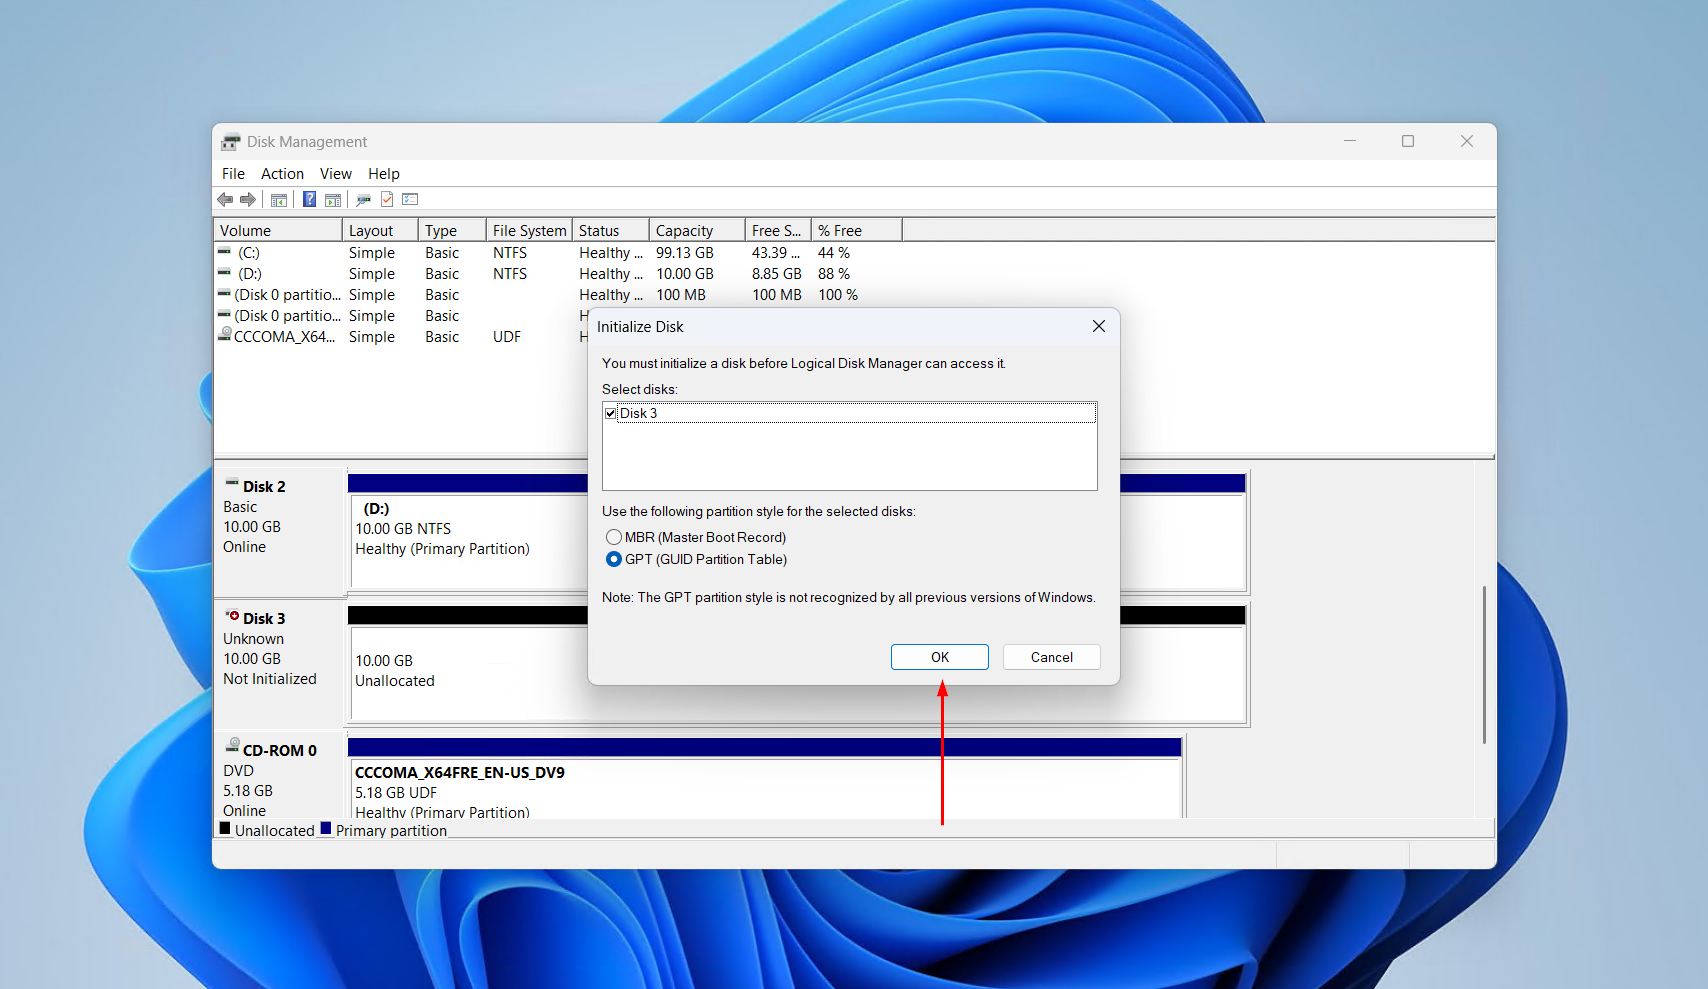
Once the drive is initialized, it will show as Unallocated, meaning you will need to format it.
Method 4. Run CHKDSK on the External Hard Drive
CHKDSK is a file system repair tool on Windows. It’s important to note that in many “detected but not opening” cases, CHKDSK may not be useful as it requires an intact file system to run. However, there is one particular case where it’s useful, and that’s if you had an NTFS drive that lost its main boot sector and now appears as RAW. CHKDSK can rebuild the boot sector from a backup copy kept on the drive.
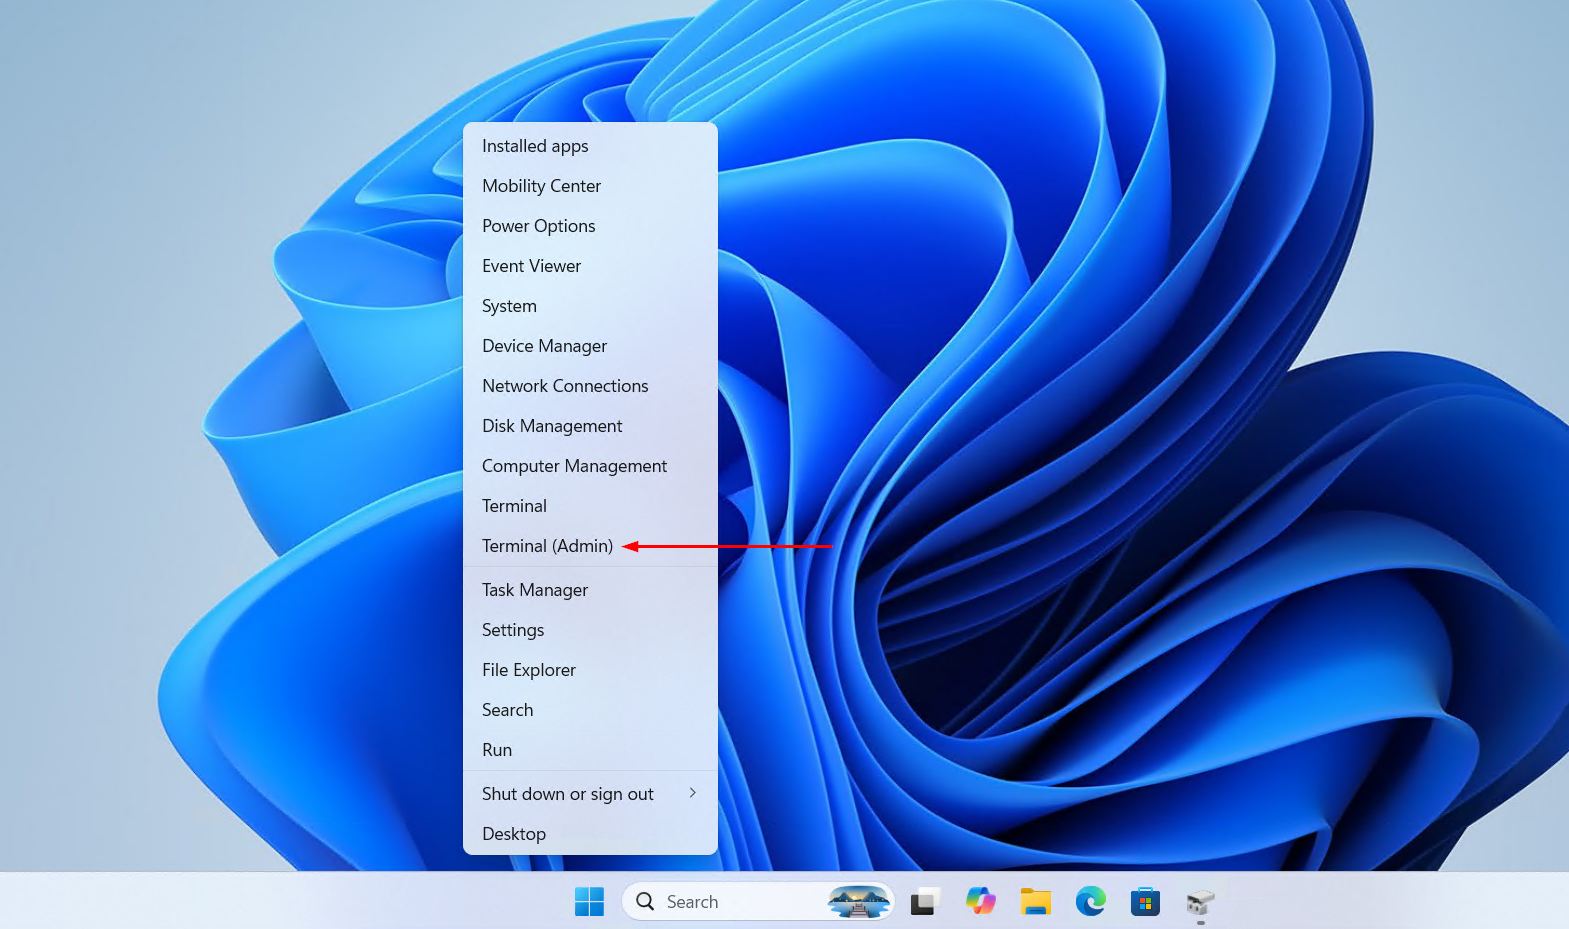
- Right-click Start and click Terminal (Admin). Windows 10 users will click Windows PowerShell (Admin) instead.
- Type chkdsk *: /r (replacing * with your external drive’s letter) and press Enter. This fixes any issues it finds and maps out bad sectors.
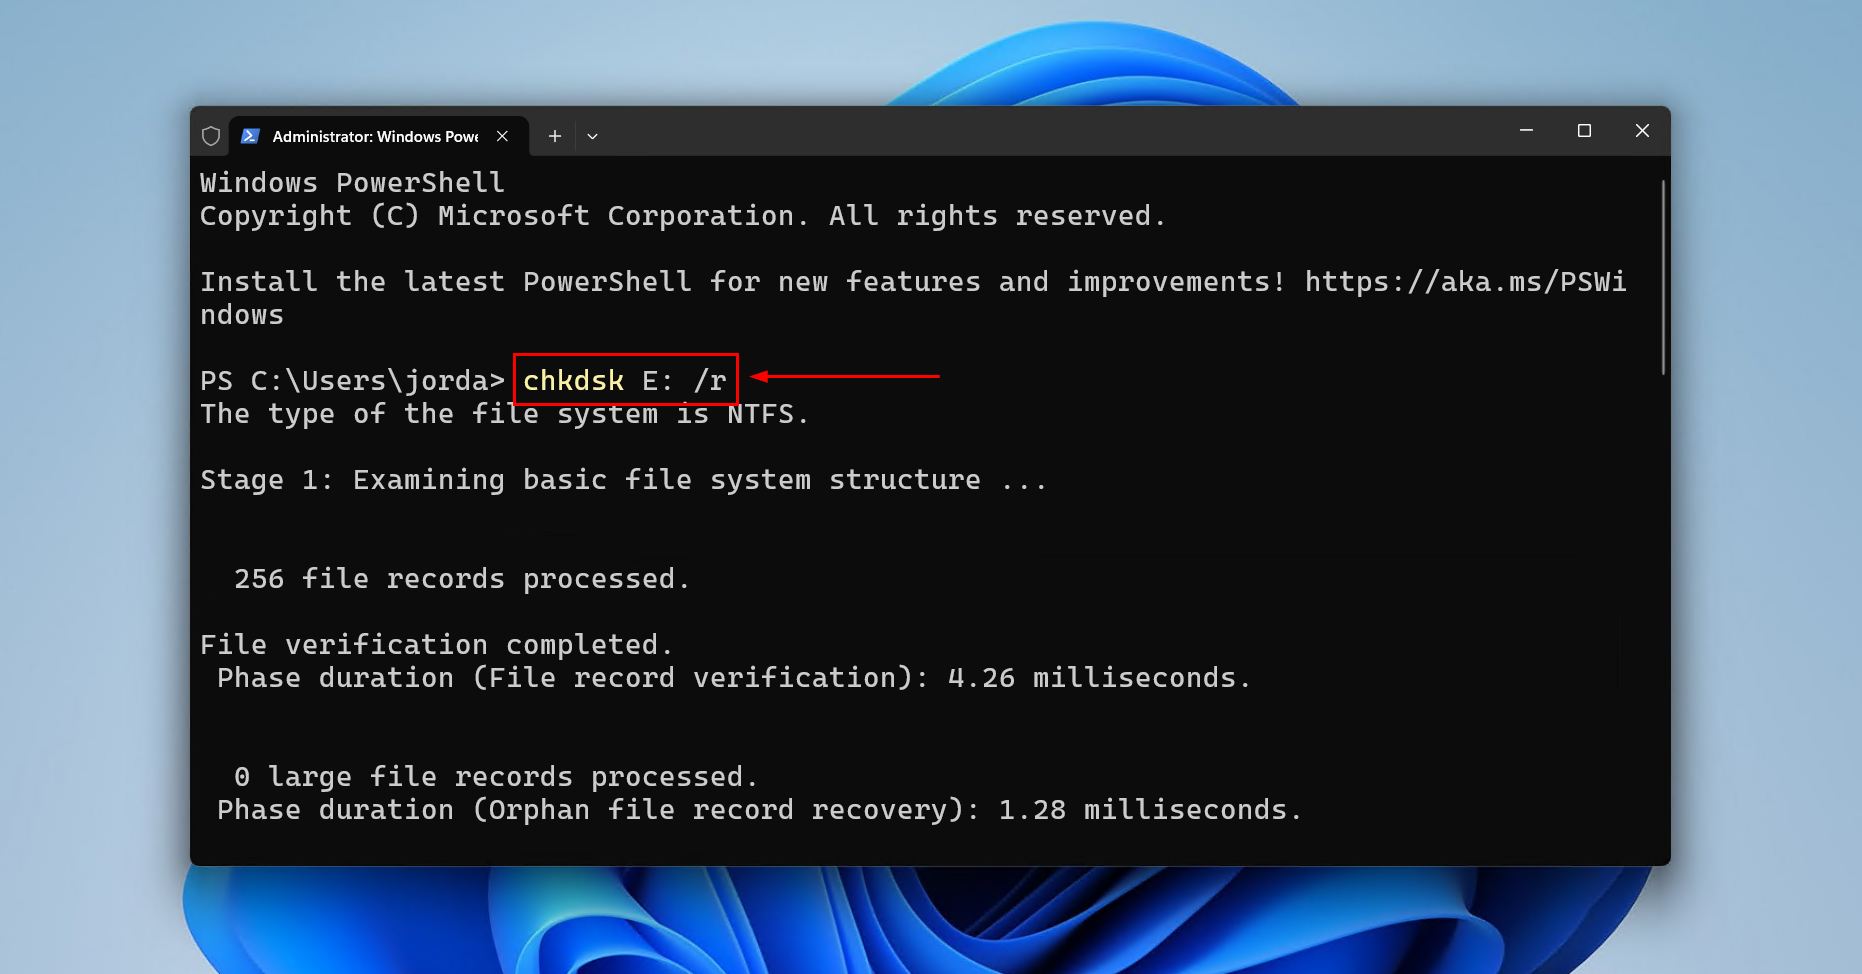
If CHKDSK says something like “The type of the file system is RAW. CHKDSK is not available for RAW drives,” move on to the next methods.
Method 5. Recover the Lost Partition
When your drive is reading the correct capacity, but the partition is missing, deleted, or shown as Unallocated, TestDisk may be able to recover it in its entirety. Don’t remember the state of your drive? Check it in Disk Management.
TestDisk is a free and open-source partition recovery tool that can rebuild the NTFS boot sector and repair the file table that lists your files, restoring the partition and your data back in place.
Follow these steps to restore a partition with TestDisk:
- Download and extract the contents of TestDisk. Open testdisk_win.exe.
- Press Enter to set up a log file.
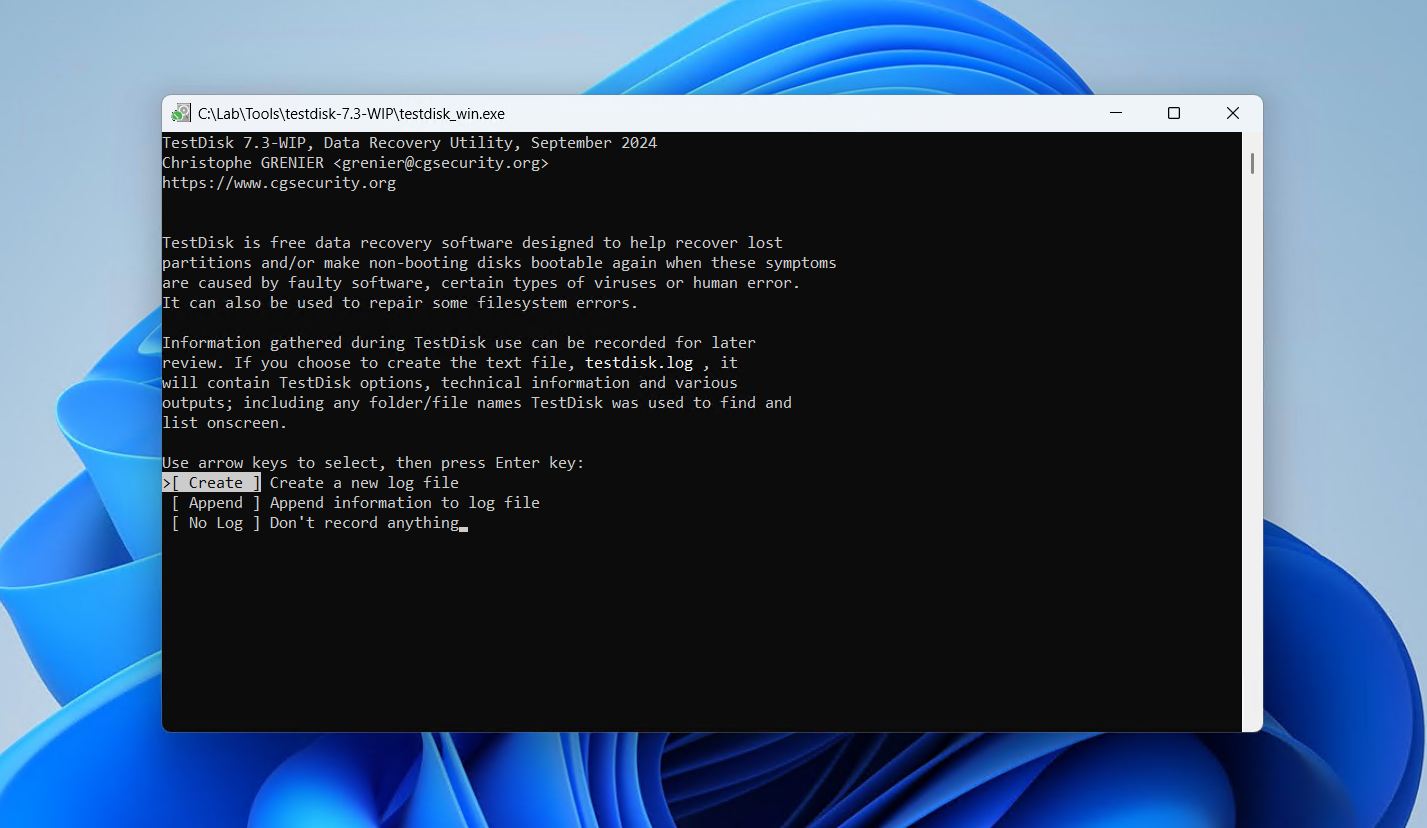
- Highlight your external drive using the up and down arrows, then press Enter.
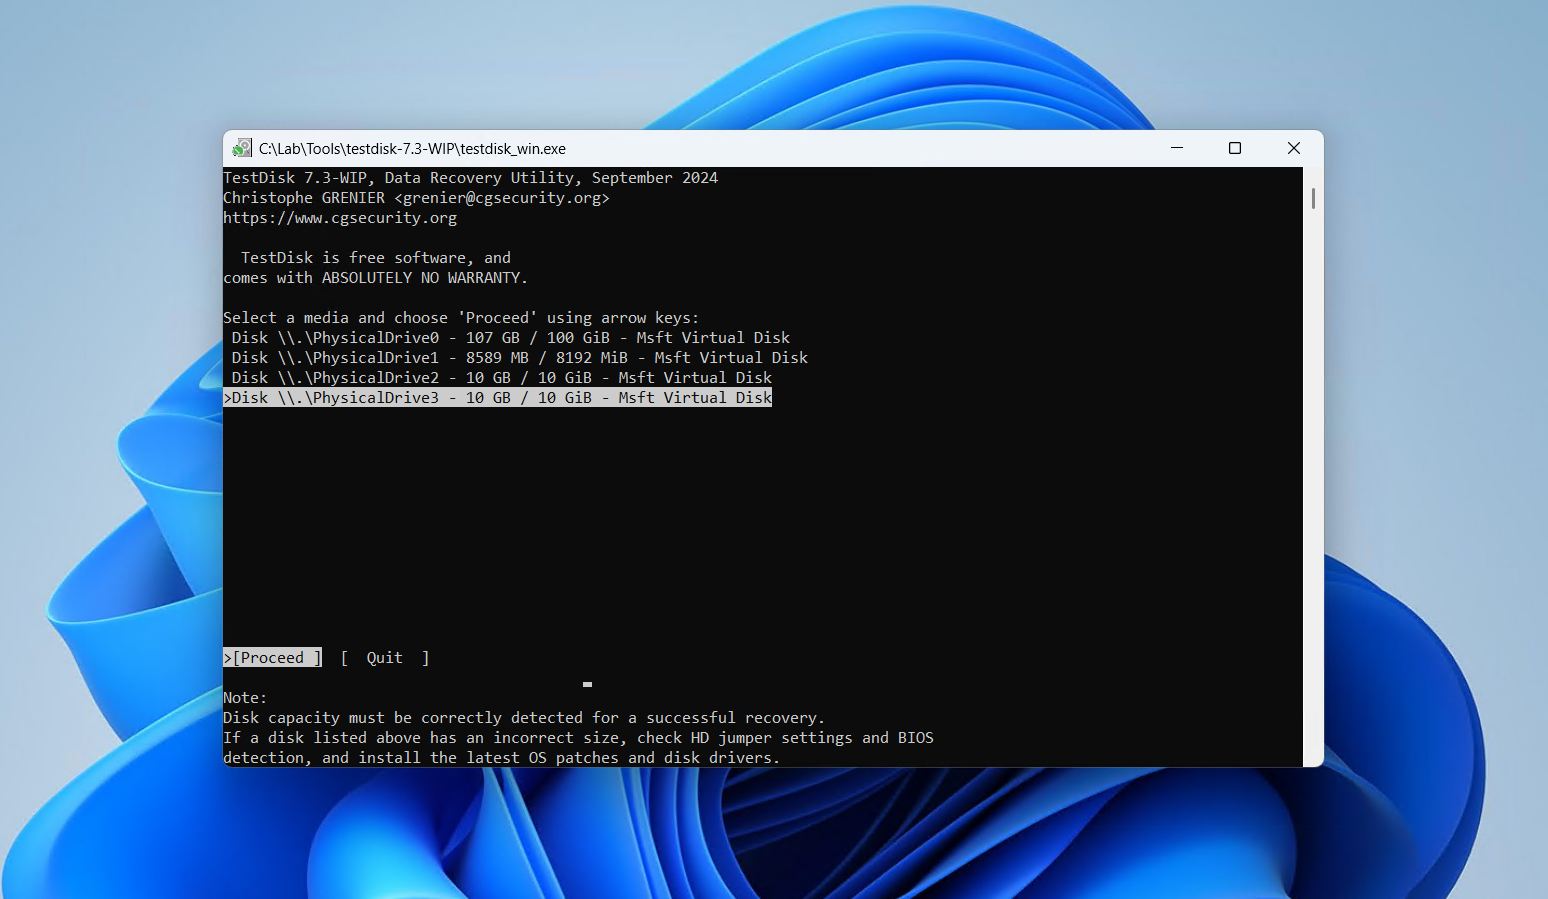
- Choose your partition table type. TestDisk will try to automatically detect it. Press Enter.
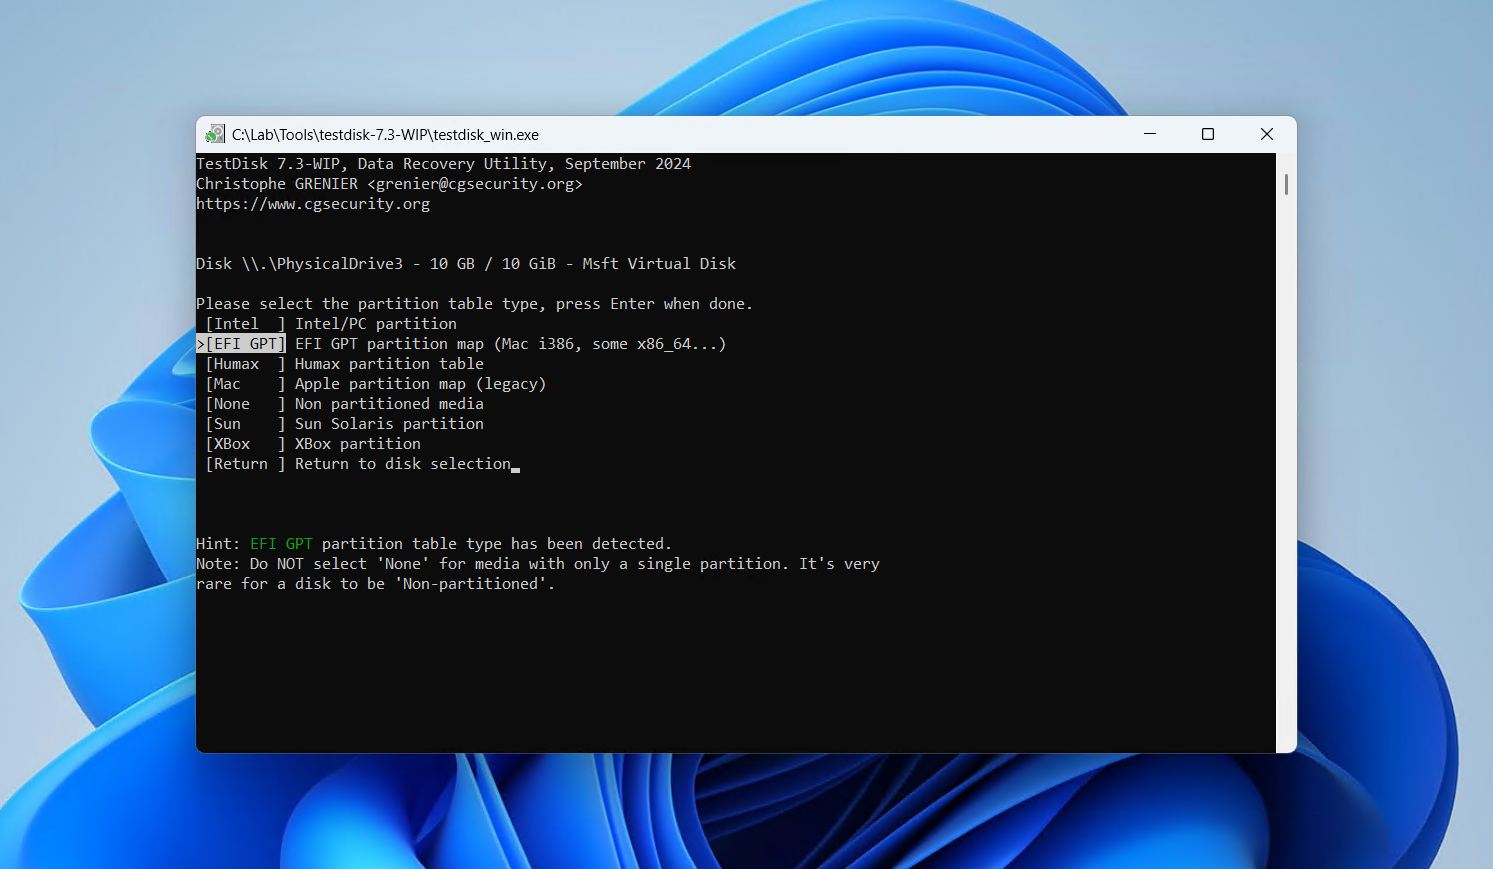
- Press Enter while over the Analyse option.
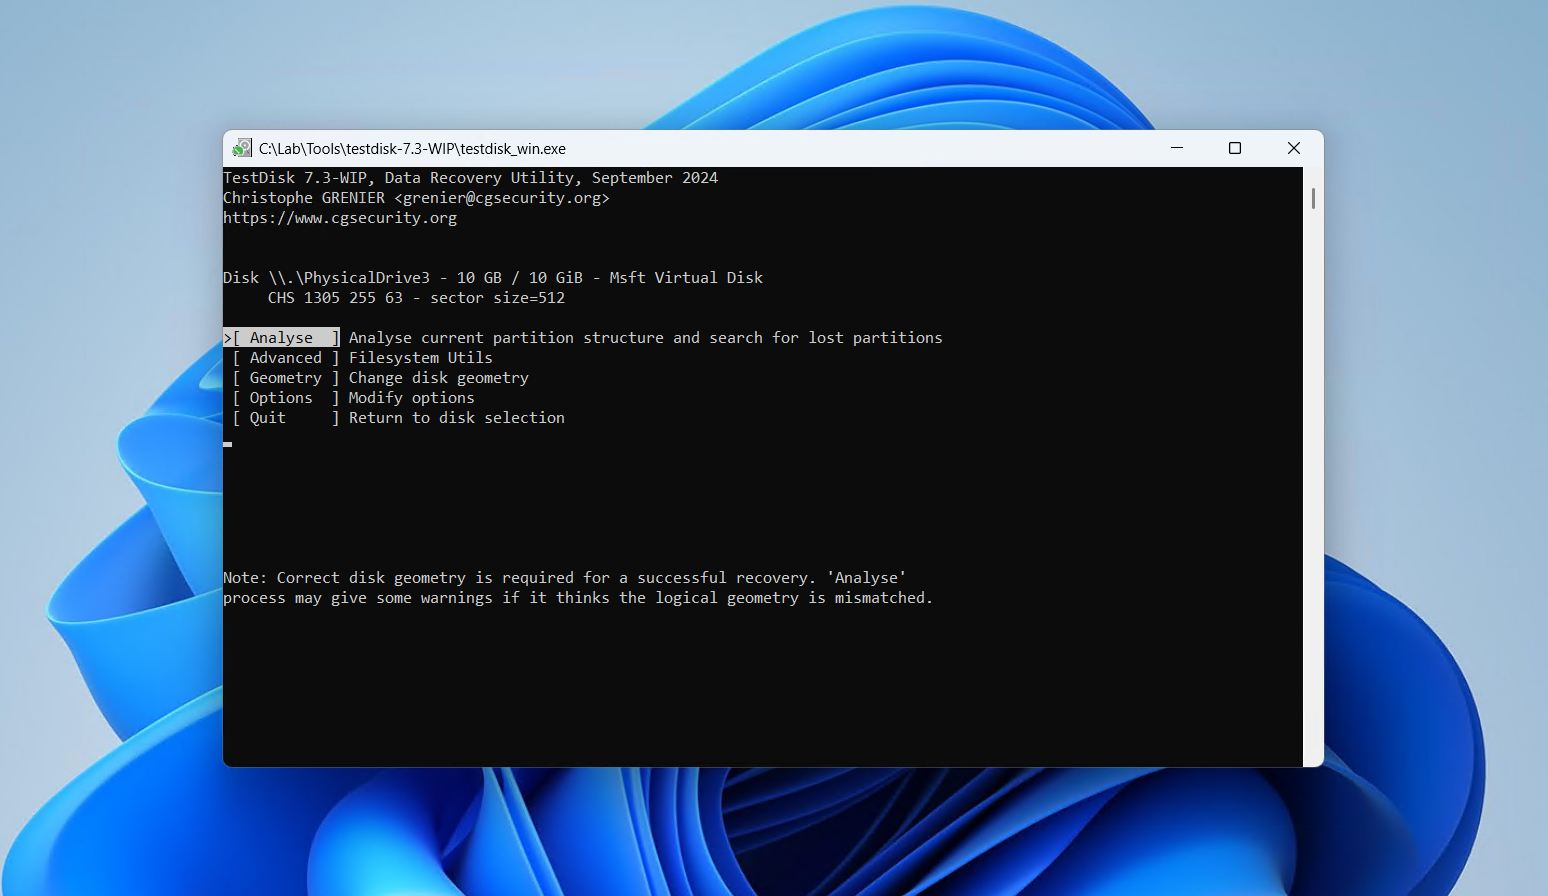
- Press Enter to start the quick search.
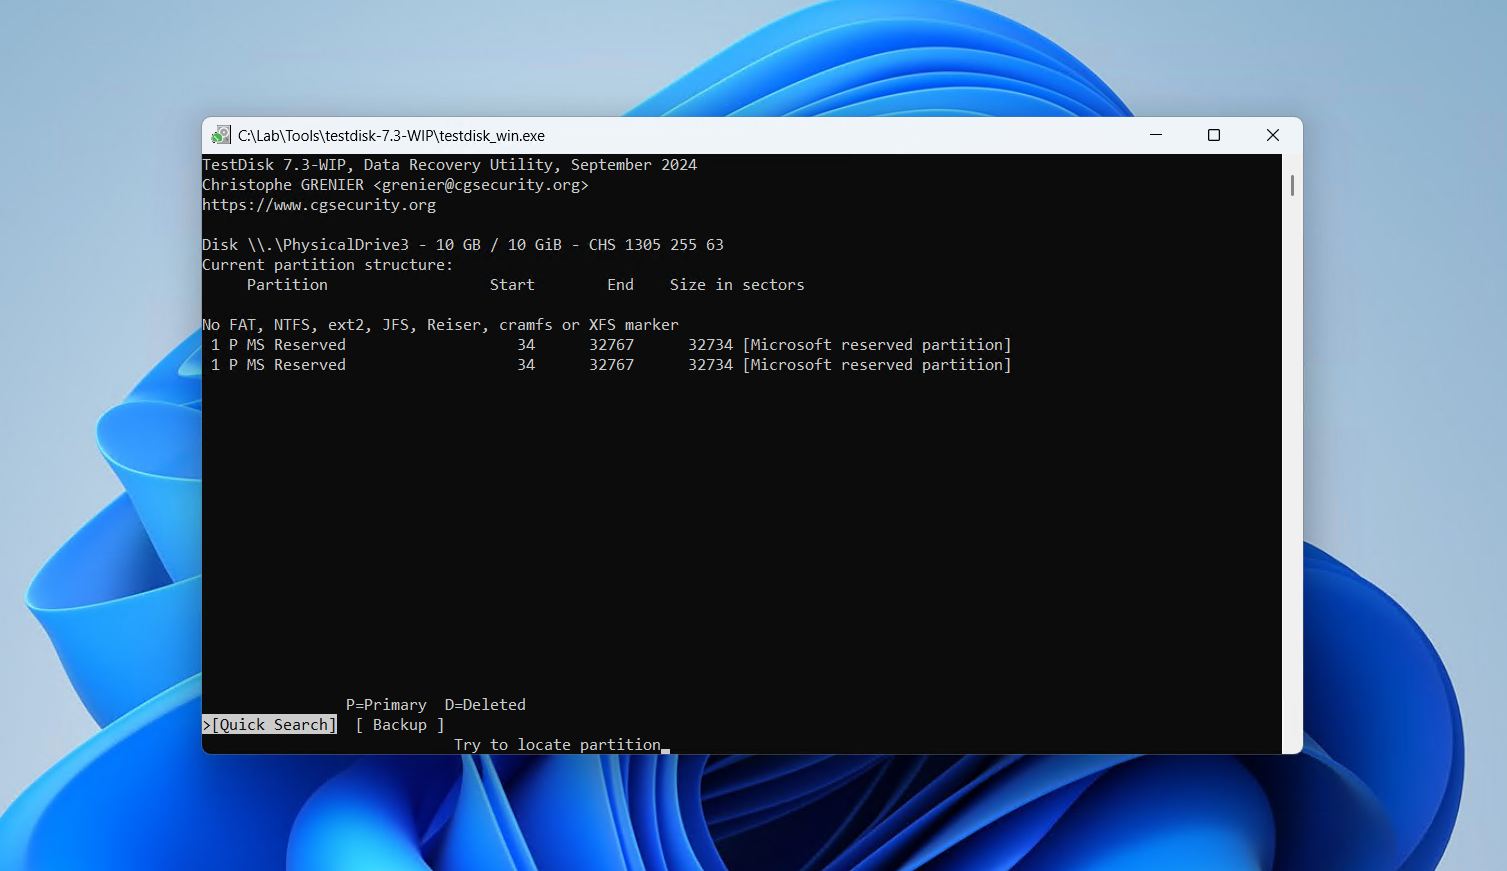
- Press Enter once the scan is complete.
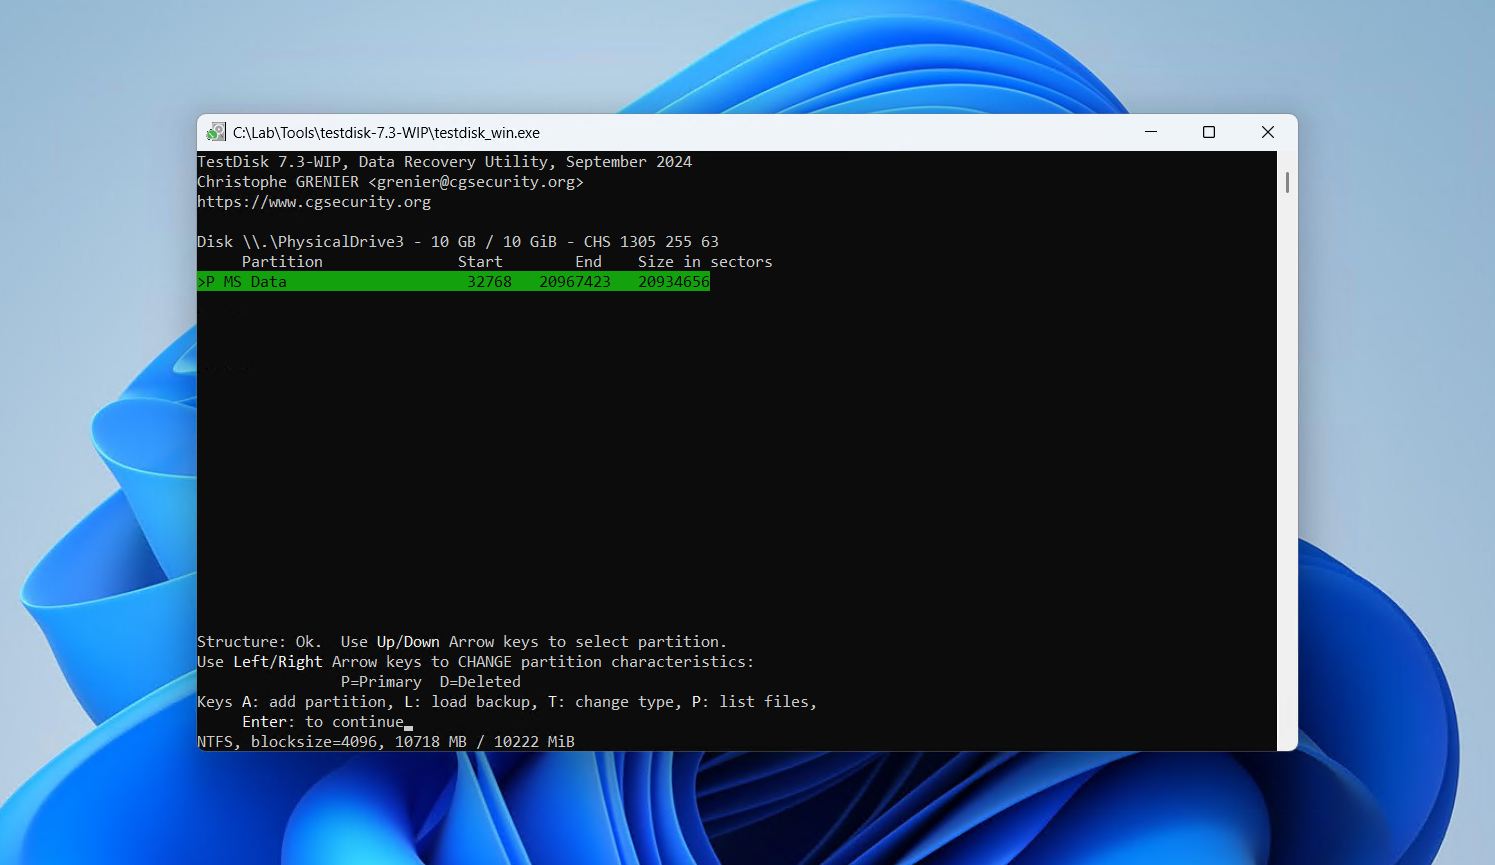
- Highlight the Write option using the left and right arrows if the partition was found. If it wasn’t found, you may need to perform a Deeper Search instead. Press Enter.
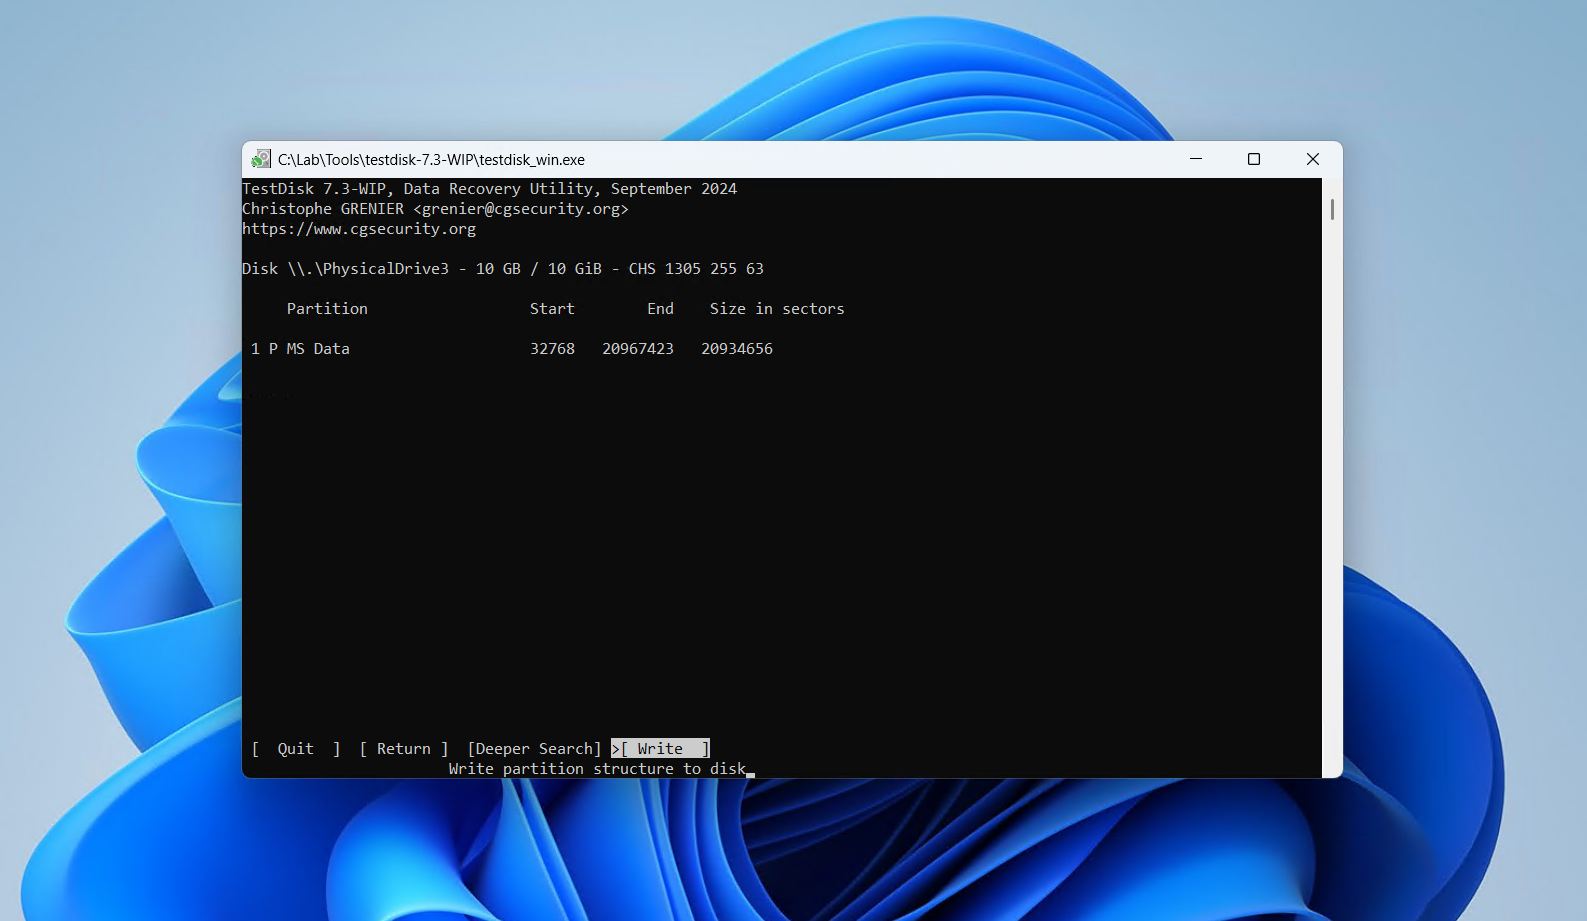
- Press Y to write the partition table.
Once finished, you’ll need to restart your PC or safely reconnect the external hard drive to see the changes.
Method 6. Create a New Volume or Format the External Hard Drive
Creating a new volume, deleting and recreating a partition, or formatting the drive erases your path to the data on it. Only use this method after you have recovered your files, or if you have decided you do not need them.
There are two cases here. Match yours to what Disk Management shows.
Case A: The Drive Shows as Unallocated
When Windows can see the physical drive but it appears to have no usable partition for File Explorer to open, add a volume and format it to make it usable.
- Right-click Start and open Disk Management.
- Right-click the unallocated space on your external hard drive, then click New Simple Volume.
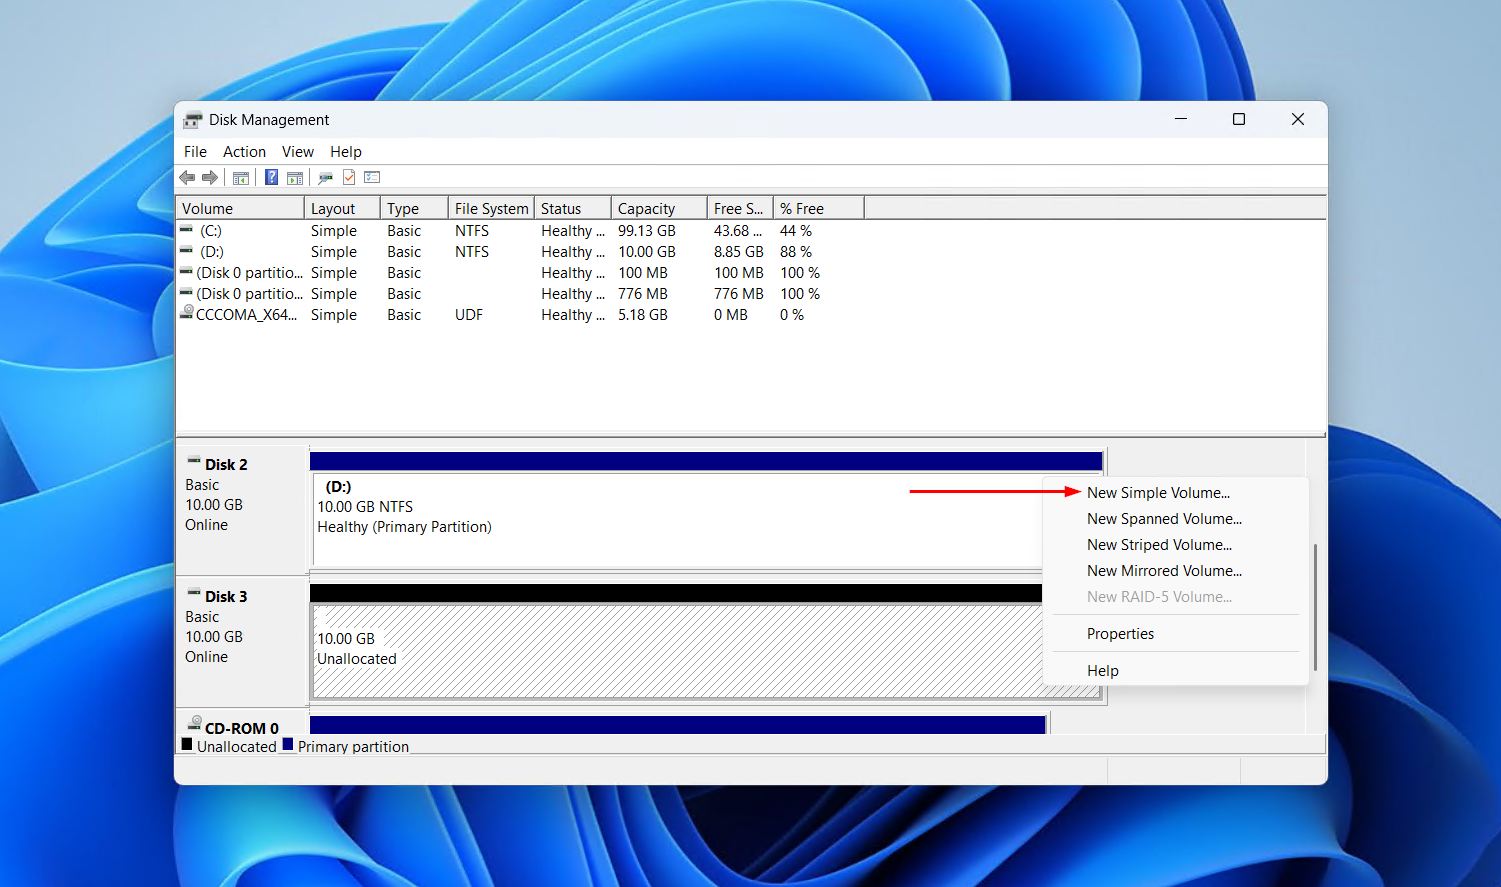
- Click Next.
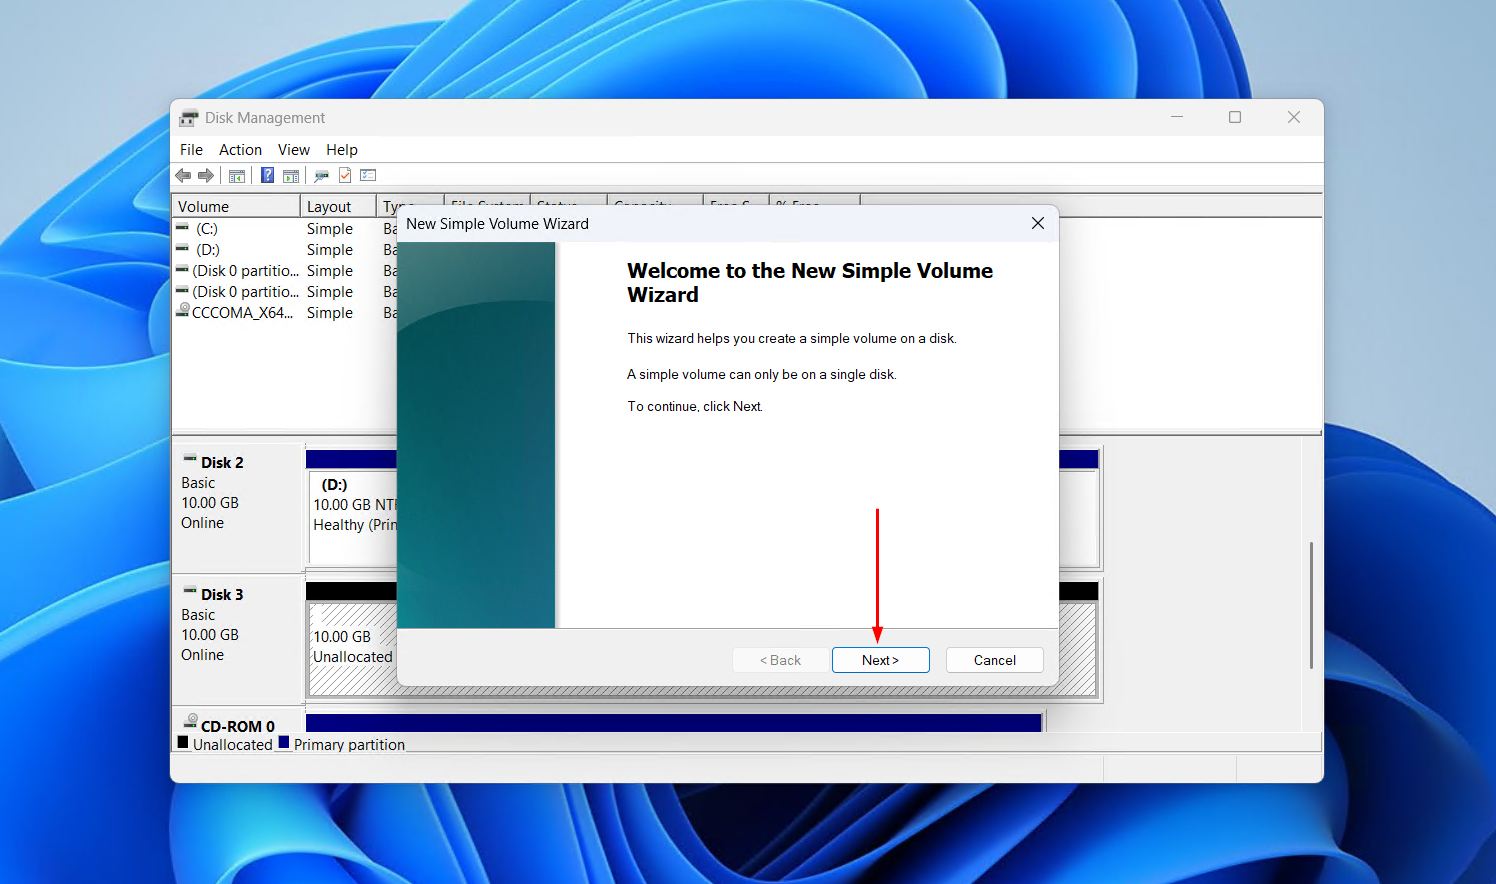
- Specify a volume size and click Next.
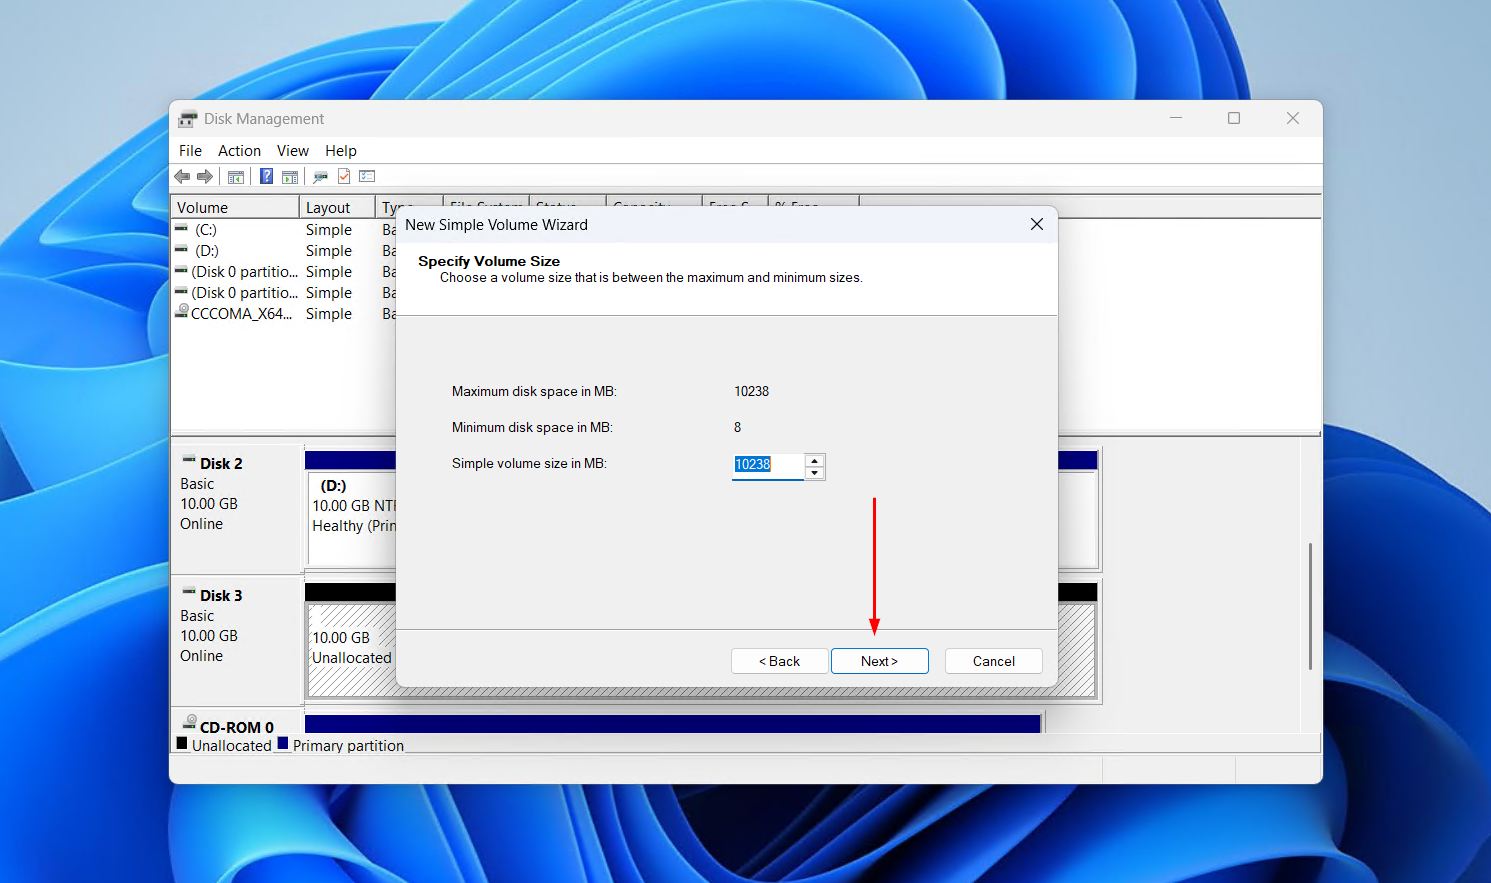
- Click Next to confirm your drive letter.
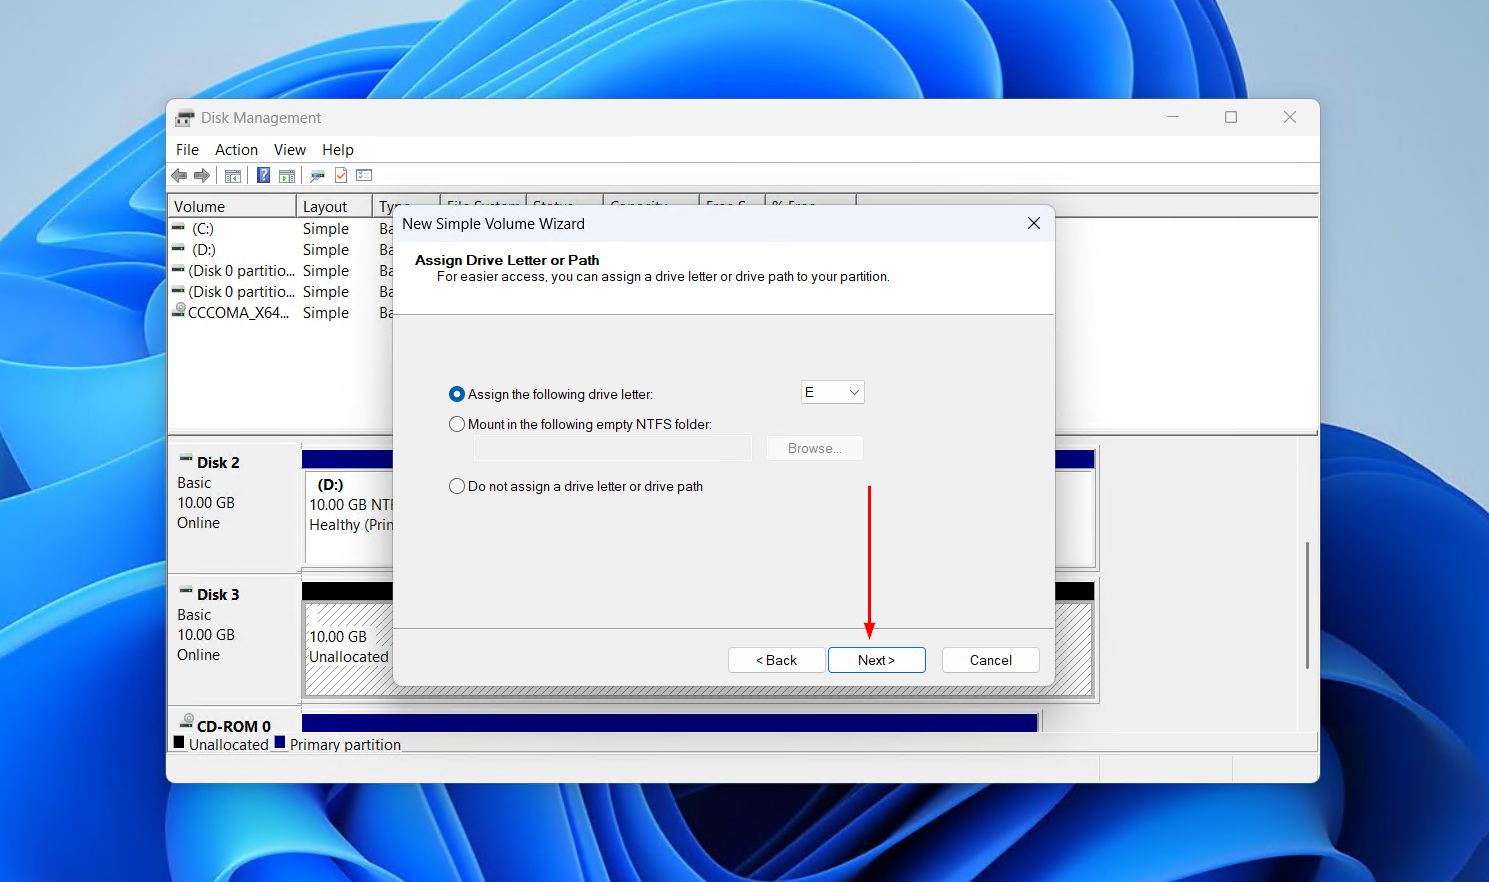
- Specify a file system, provide a volume label, and make sure Perform a quick format is ticked. Click Next.
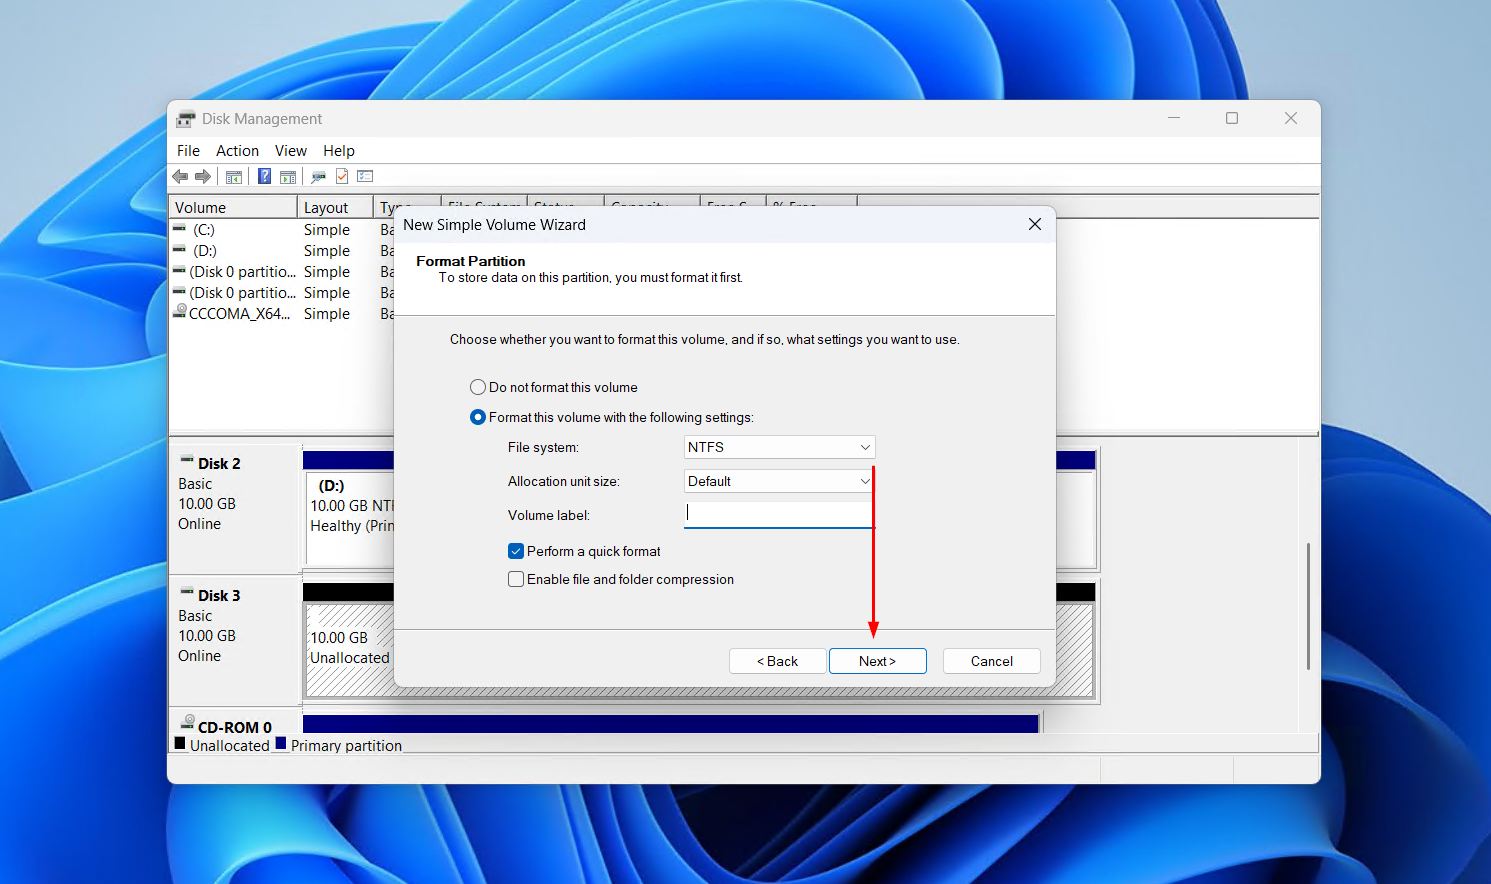
- Click Finish.
Case B: Format Existing Volume
When the drive shows as RAW, has a corrupted or unsupported file system, or Windows asks you to format it, then formatting the existing partition will be enough to restore the drive back to working order.
- Right-click Start and open Disk Management.
- Right-click the partition on your external hard drive, then click Format.
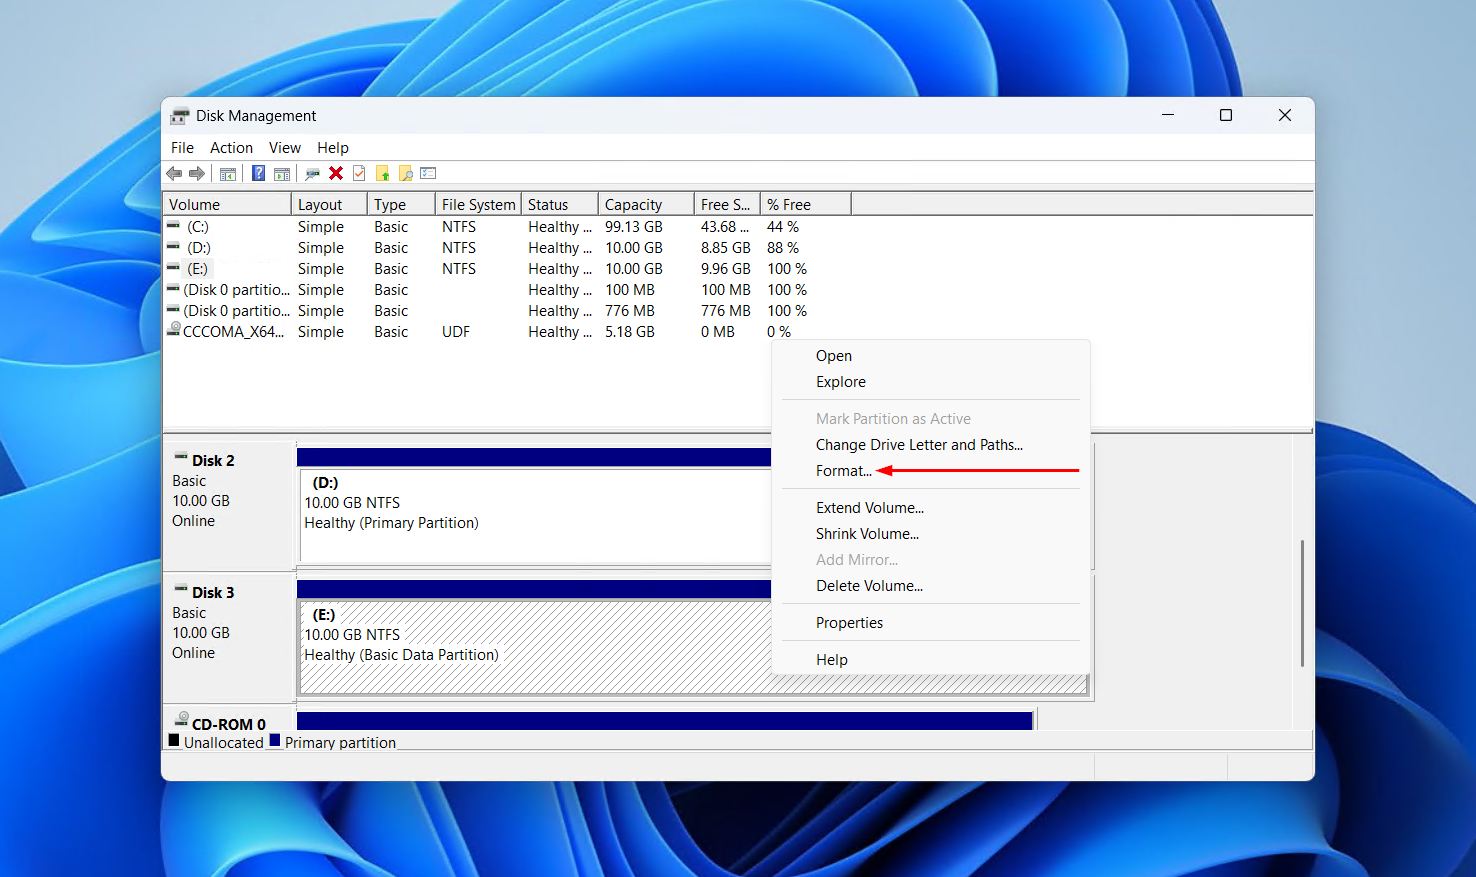
- Give the volume a label, choose its file system, and make sure Perform a quick format is ticked. Click OK.
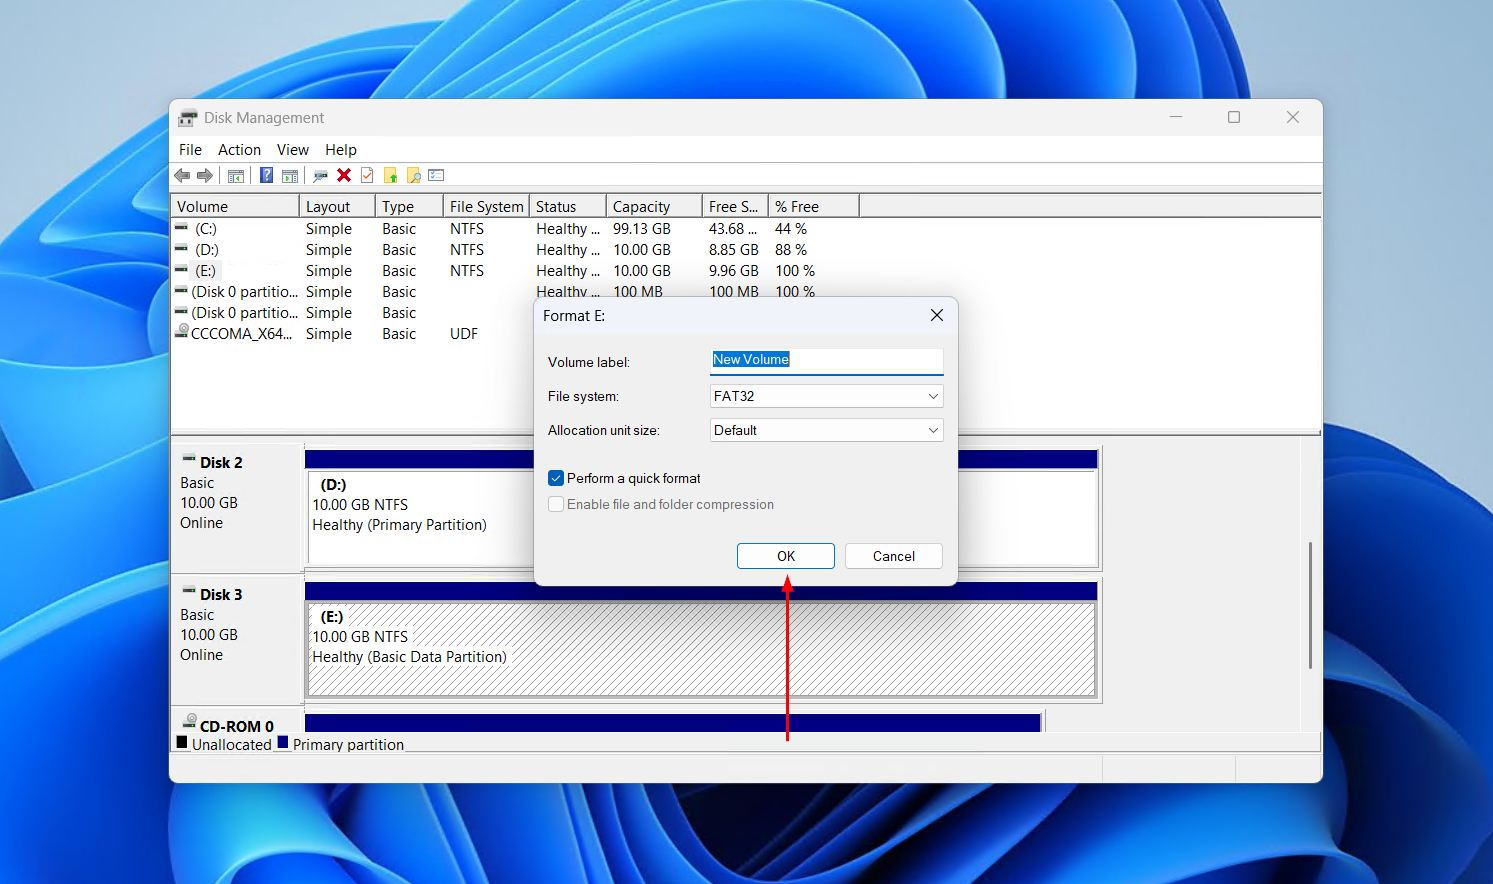
- Click OK again.
In both format cases, you’ll need to choose a file system. Which one you choose depends on what device the drive is being used with.
- Choose NTFS if the drive will mostly stay on Windows.
- Choose exFAT if the drive will move between Windows, macOS, cameras, TVs, or consoles.
If the format fails or Disk Management freezes partway through, the problem may be physical or firmware-related rather than just file-system damage. See the next section before you try again.
Commonly Recommended Fixes We Would Skip
There are a lot of generic fixes offered up when you research this problem. In real cases where an external hard drive is detected but not opening, most rarely address the actual fault. Here is what we usually skip, and why.
| Common recommendation | Why we usually skip it | When it might still make sense |
| Update the drivers | Windows uses a standard USB storage driver for almost all external drives, and it is normally already doing its job. | Only if the drive worked before and broke right after a bad driver update or a failed device install. |
| Change folder permissions | Permissions only matter when Windows can already read the file system but blocks certain folders. They cannot repair a RAW, Unallocated, or unlettered drive. | Only when the drive opens fine but one folder gives an “access denied” error. |
| Scan for malware | A scan will not fix a RAW partition, a missing volume, a damaged boot sector, or unallocated space. | As a safety check, especially if your files turned into shortcuts or went hidden. |
| Change USB power settings | If the drive is already detected, changing power-saving settings rarely makes a difference. | Rarely, on a drive that keeps dropping off after it sits idle. |
When DIY Fixes Are No Longer Safe
DIY is a reasonable choice when your drive shows in Disk Management with the correct capacity and no signs of physical failure. But some cases are risky because every extra scan, repair, or reconnect can push a dying drive further. Sometimes a drive looks alive but is not truly working. It spins up, its light comes on, it may even vibrate in your hand, yet it never appears in Disk Management.
Stop DIY fixes and consider a professional if you notice any of these:
- The drive clicks, beeps, or grinds. Those are clear sounds of mechanical failure.
- Disk Management shows the wrong capacity, such as 0 bytes or a size much smaller than the real drive.
- The data is extremely important and you have no backup.
In those cases, professional data recovery services are the safer choice. They work in controlled labs and can reach a drive that software cannot. Be aware that professional recovery carries a bigger price tag, so it makes the most sense for severe cases or for data you genuinely cannot afford to lose.
Conclusion
It can be intimidating at first figuring out what path to take, but with the right workflow, it’s very simple. Open Disk Management first and confirm the drive’s state: its capacity, drive letter, and status. In any instance where your files matter, recover them first. If the drive’s looking unstable, make a backup and scan that instead. Then, after recovery, implement the fix:
- No drive letter? Assign one.
- Correct size but disconnecting? Try another cable or port.
- Brand new and showing as Not Initialized? Initialize and format.
- Shows as RAW from a lost NTFS boot sector? Run CHKDSK.
- Unallocated or lost partition? Recover the partition.
- Want to reset it? Perform a format.
In short, a hard drive that’s detected but not showing up is easily fixed, but if you want to make sure your data is safe, always recover it first.
FAQ
An external hard drive that’s detected but not showing up in File Explorer is almost certainly because it has no drive letter or its file system is damaged. Start by checking Disk Management. If the drive shows a healthy partition with no letter, just assign one. If it shows as RAW, Unallocated, or Not Initialized, the file system or partition is the problem, and so you should recover your data before repairing it.
If Windows sees the drive somewhere but it is missing from Device Manager, it usually points to an inconsistent connection or power supply rather than a file-system one. Try a different cable and port, and if it is a desktop drive, check its power supply. Reconnect the drive and rescan. If it still never appears, and especially if it makes any noise, treat it as a possible hardware fault.
When the drive opens but certain files or folders will not, the file system is often starting to fail, or those files sit on bad sectors. Do not keep retrying, which only stresses the drive. Copy off everything you can right away, then run a recovery scan with Disk Drill to rescue the files you cannot reach. If just one folder gives an “access denied” message and the rest is fine, it may be a permissions issue instead.
A wrong capacity in Disk Management, such as 0 bytes or far less than the real size, is a warning sign. It points to file-system corruption or a firmware or physical fault, not a simple fix. Do not initialize or format the drive, because that can destroy your data. Recover your files first if you can, and if the drive seems to be failing or the data is valuable, use a professional recovery service instead.
