


Opened File Explorer and noticed that your D drive is missing? Even though it was full of files, Windows is treating it as though it never existed. Most of the time the data itself is fine, and the cause is something trivial like a missing drive letter. Nonetheless, you need to take the right approach in case it’s not something trivial. We’ll guide you through diagnosing the issue, recovering the data, and getting the drive back to working order. Missing data is our specialty, and these methods are the same used by our recovery experts who’ve seen this problem more times than they can count.
Why Is My D Drive Missing? Start in Disk Management
Disk Management is preferred over File Explorer when checking a D drive that’s suddenly missing, as it lists all physically connected drives, including those with no drive letter, marked as Offline, or showing as RAW or Unallocated. You first need to check how the drive is being read by Disk Management. Here’s how:
- Right-click Start and click Disk Management.
- Find your disk in Disk Management based on its capacity.
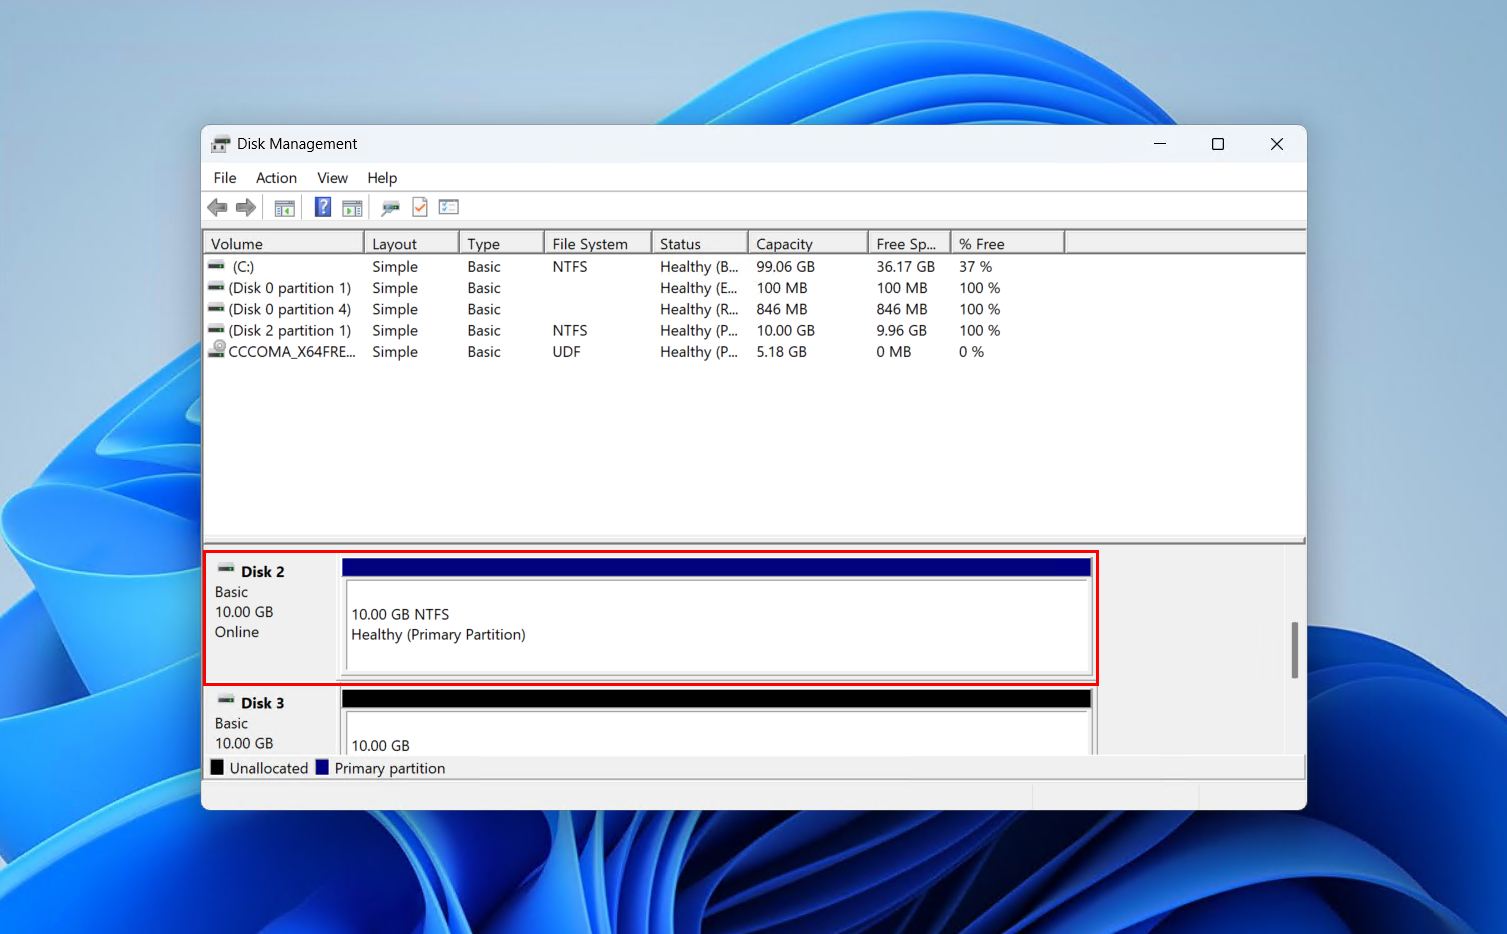
- Click Action, then Rescan Disks to have Disk Management scan for the drive one more time before we proceed.
Here’s what each reading means, and what you should do next:
| What the problem looks like | What it means | What you can do |
| The partition is visible in Disk Management, looks healthy, but has no drive letter | The D: drive letter was removed, so Windows is no longer mounting the partition | Assign a drive letter back to the drive |
| The partition is visible and healthy, but now uses E:, F: or another letter | Windows reassigned the letter, usually after a new storage device was connected | Change the drive letter back to D: |
| The physical disk appears in Disk Management as “Offline” | Windows can see the disk but is not making it available for use | Bring the disk back online |
| The space where D: used to be now shows as Unallocated | The partition has been deleted, damaged or lost. Your files remain in that space until something writes over them | Recover the important files first, then try restoring the partition with TestDisk. If that fails, format it |
| The D: partition shows as RAW, or Windows asks you to format it before you can use it | The partition is there, but its file system is damaged or unrecognized, so Windows cannot read it | Recover your data first, then format the drive |
| The drive is in neither File Explorer nor Disk Management | The fault is more likely to be physical: the connection, the enclosure, the controller, or the drive itself | See if the drive is visible in BIOS, and double-check all connections. If it’s not showing, consult a data recovery service |
How to Recover Files From the Missing D Drive
A missing D drive is a file problem as much as a drive problem, because everything you kept on the partition is out of reach for as long as Windows cannot mount it. Because several fixes further down this page also write to the disk, it’s extremely important that you get the files off first, then fix the drive second, or you otherwise risk the data being lost for good.
Of course, with any tool, the data recovery software you choose heavily depends on the quality of the results. That’s why we go with Disk Drill, because even with its advanced recovery capabilities and features, it’s usable even for beginners who don’t want to follow an overly technical recovery process. As long as the drive is visible in Disk Management and reading the correct size, it can be scanned.
Follow these steps to recover data from a D drive that’s not showing up:
- Download Disk Drill from the official site. Install it to your machine, and open it.
- Select your D drive from the list of connected storage devices, then click Search for lost data.
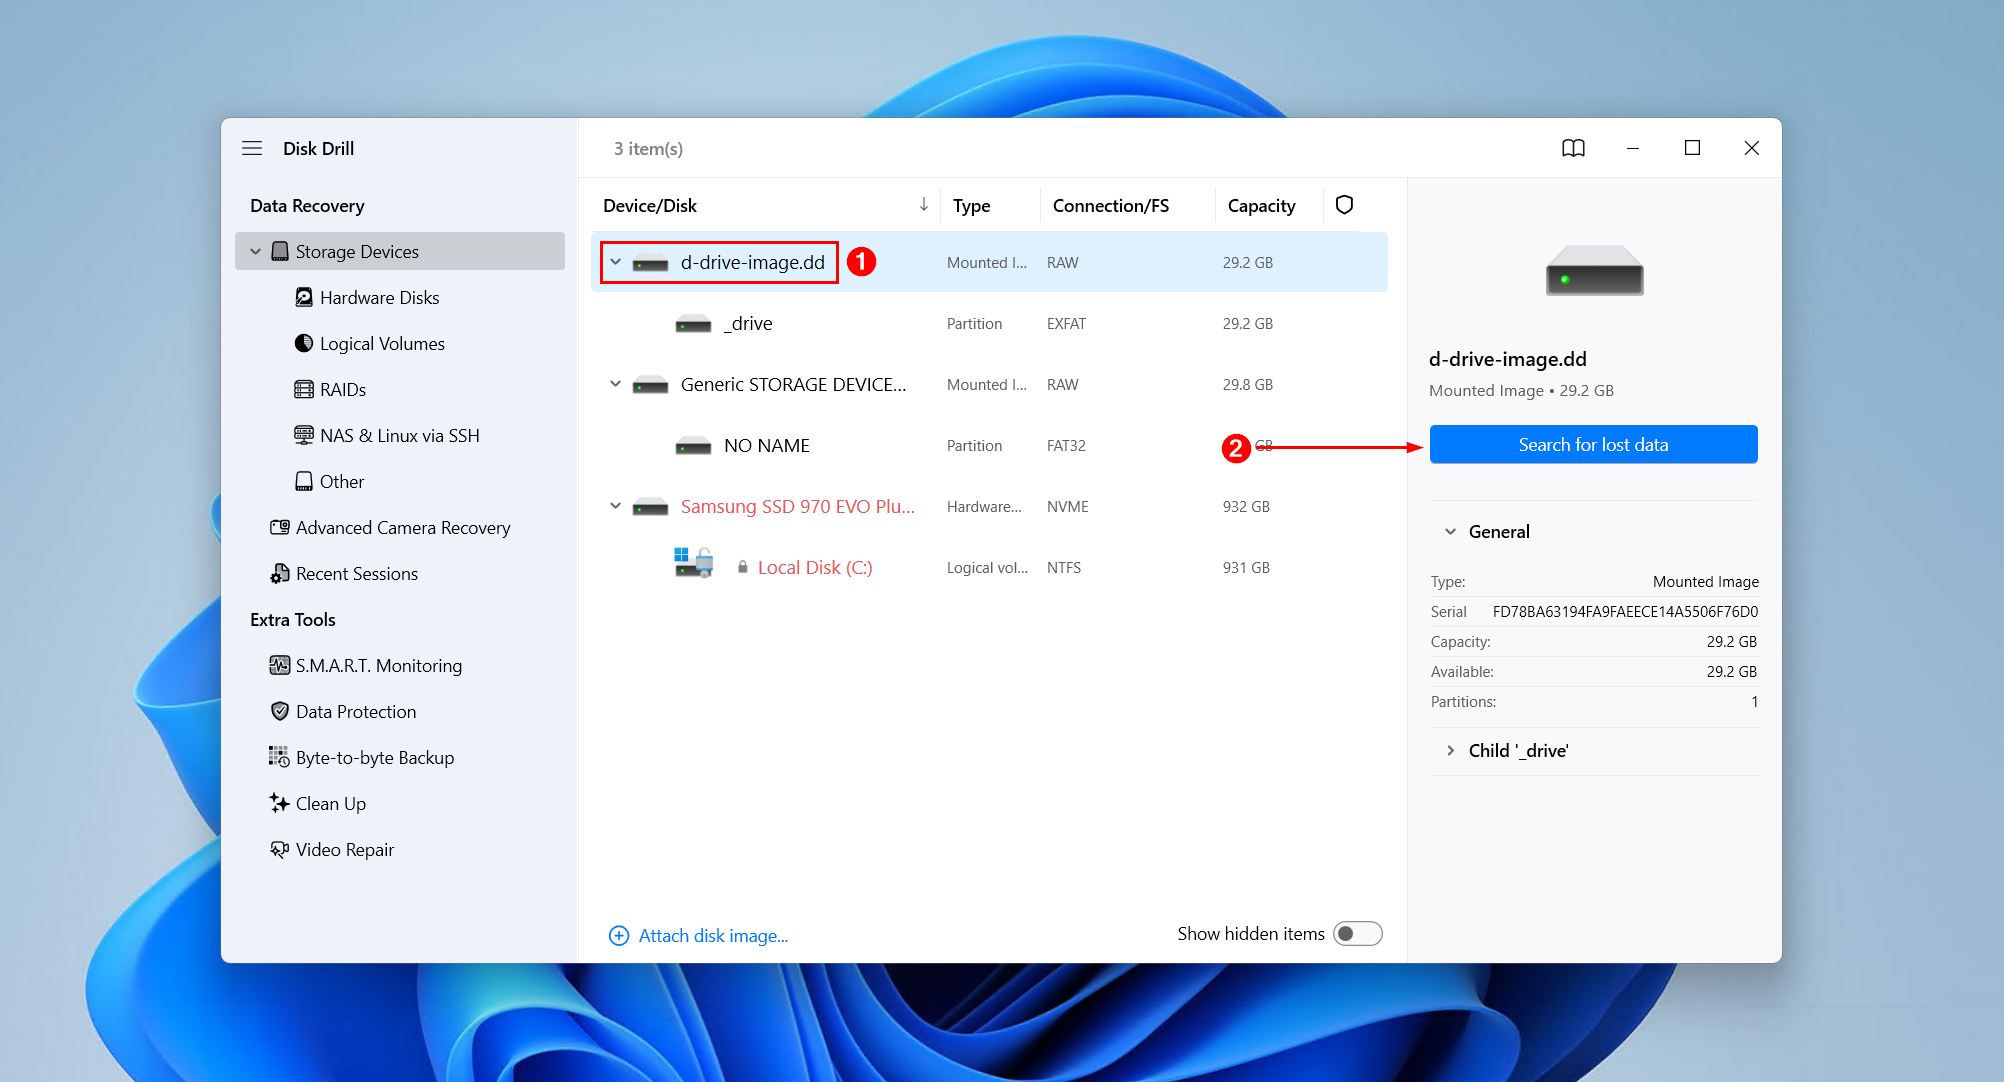
- Choose Universal Scan if prompted to choose a scan type, as Advanced Camera Recovery is best for recovering fragmented videos shot by cameras and drones.
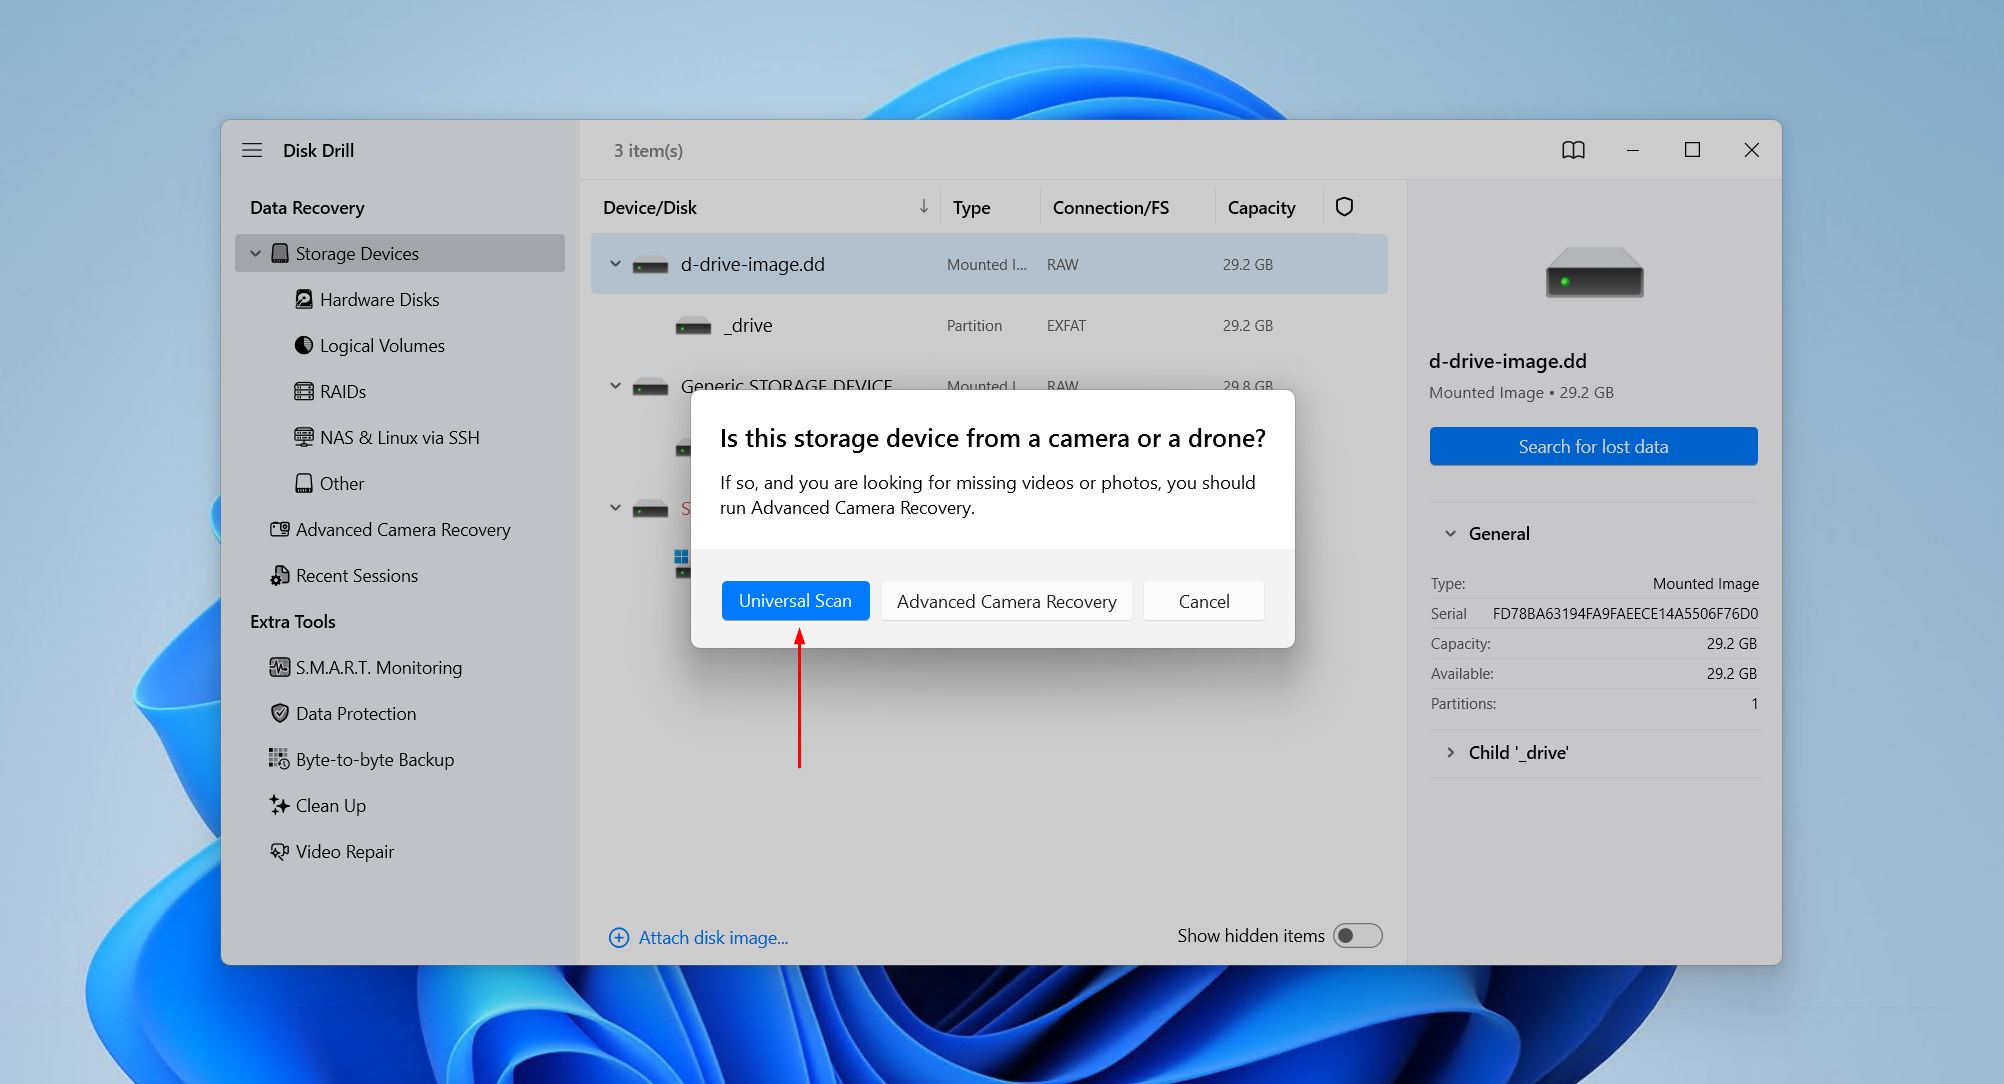
- Click Review found items when the scan is complete. Alternatively, if you simply want to recover everything, click Recover all now.
- Preview and select the D drive data that is missing and you want to recover. Your data will be organized by its state. Files under Existing are files that aren’t deleted but inaccessible, whereas Deleted or lost and Reconstructed holds data that has been deleted or recovered by file carving, respectively. Click Recover when ready.
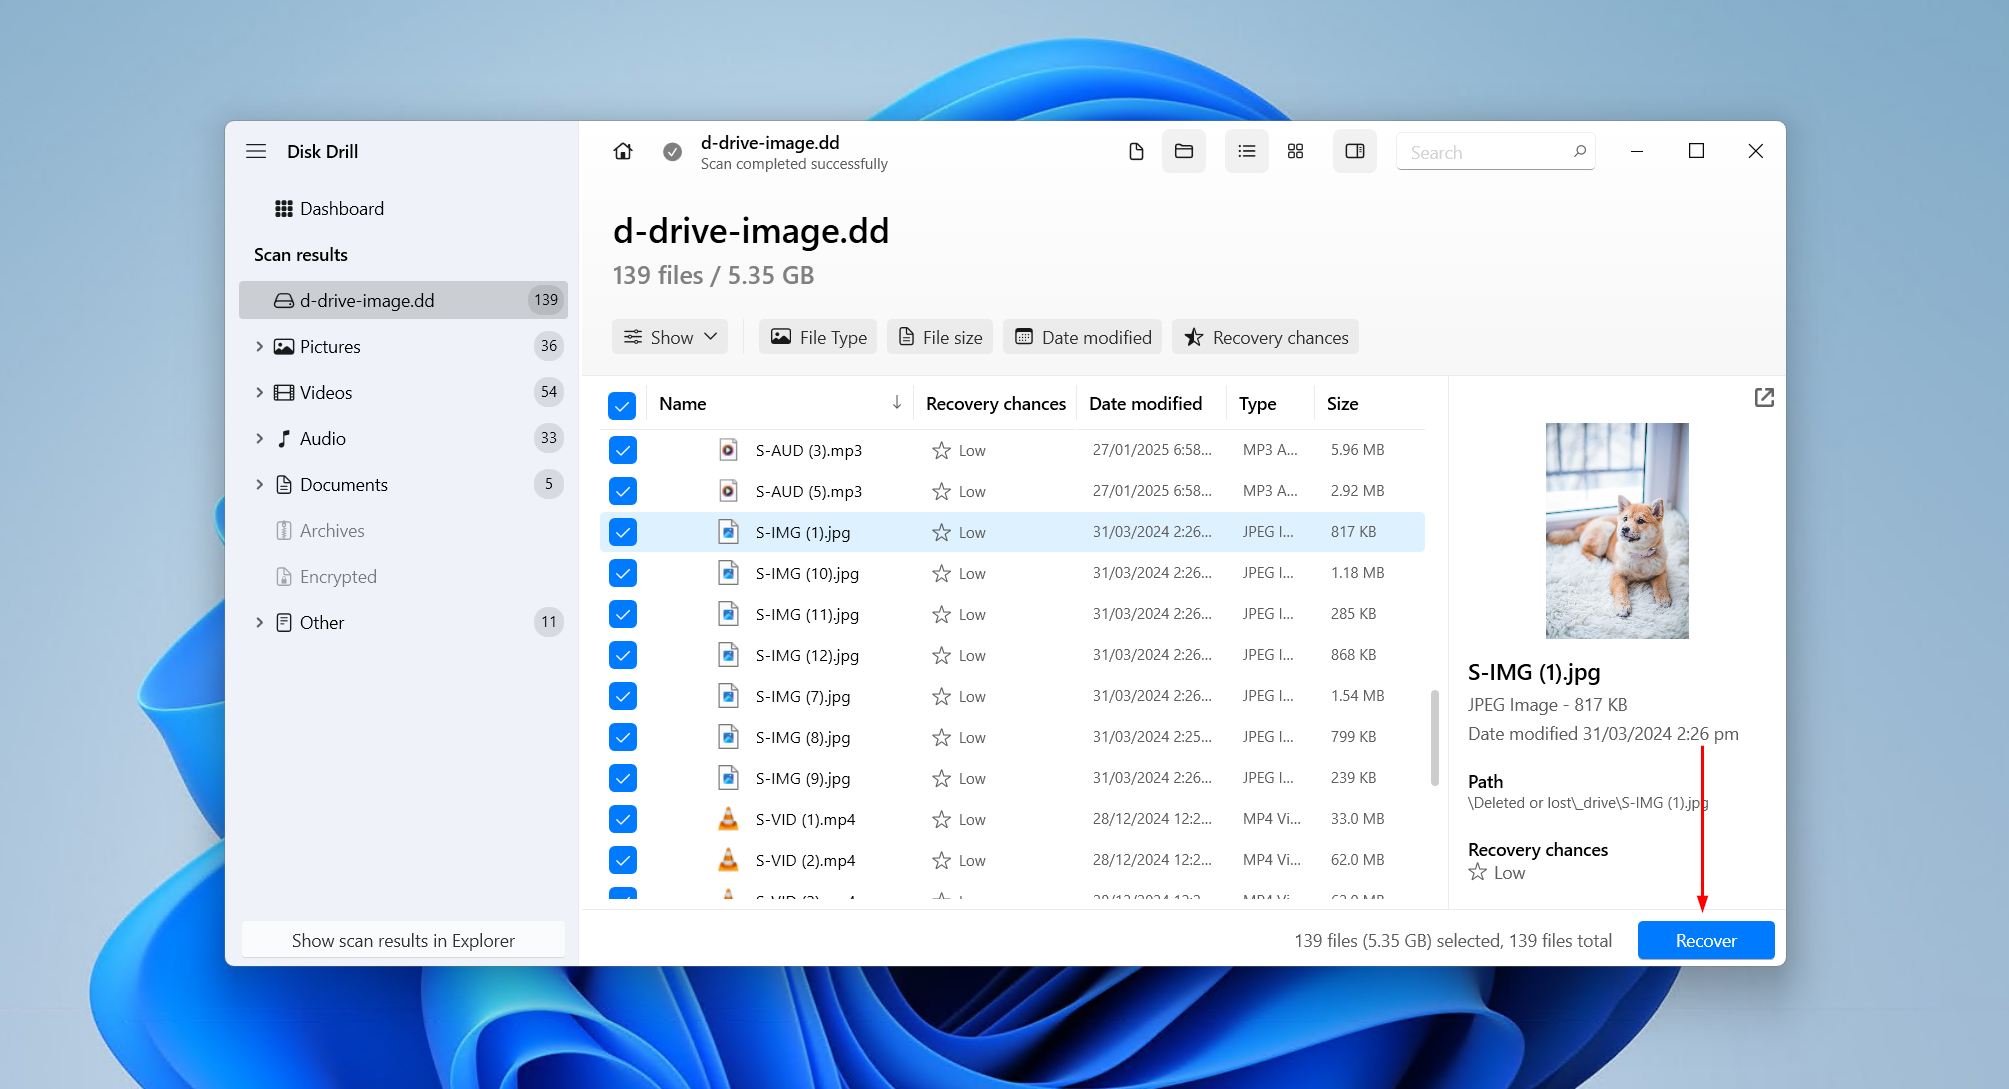
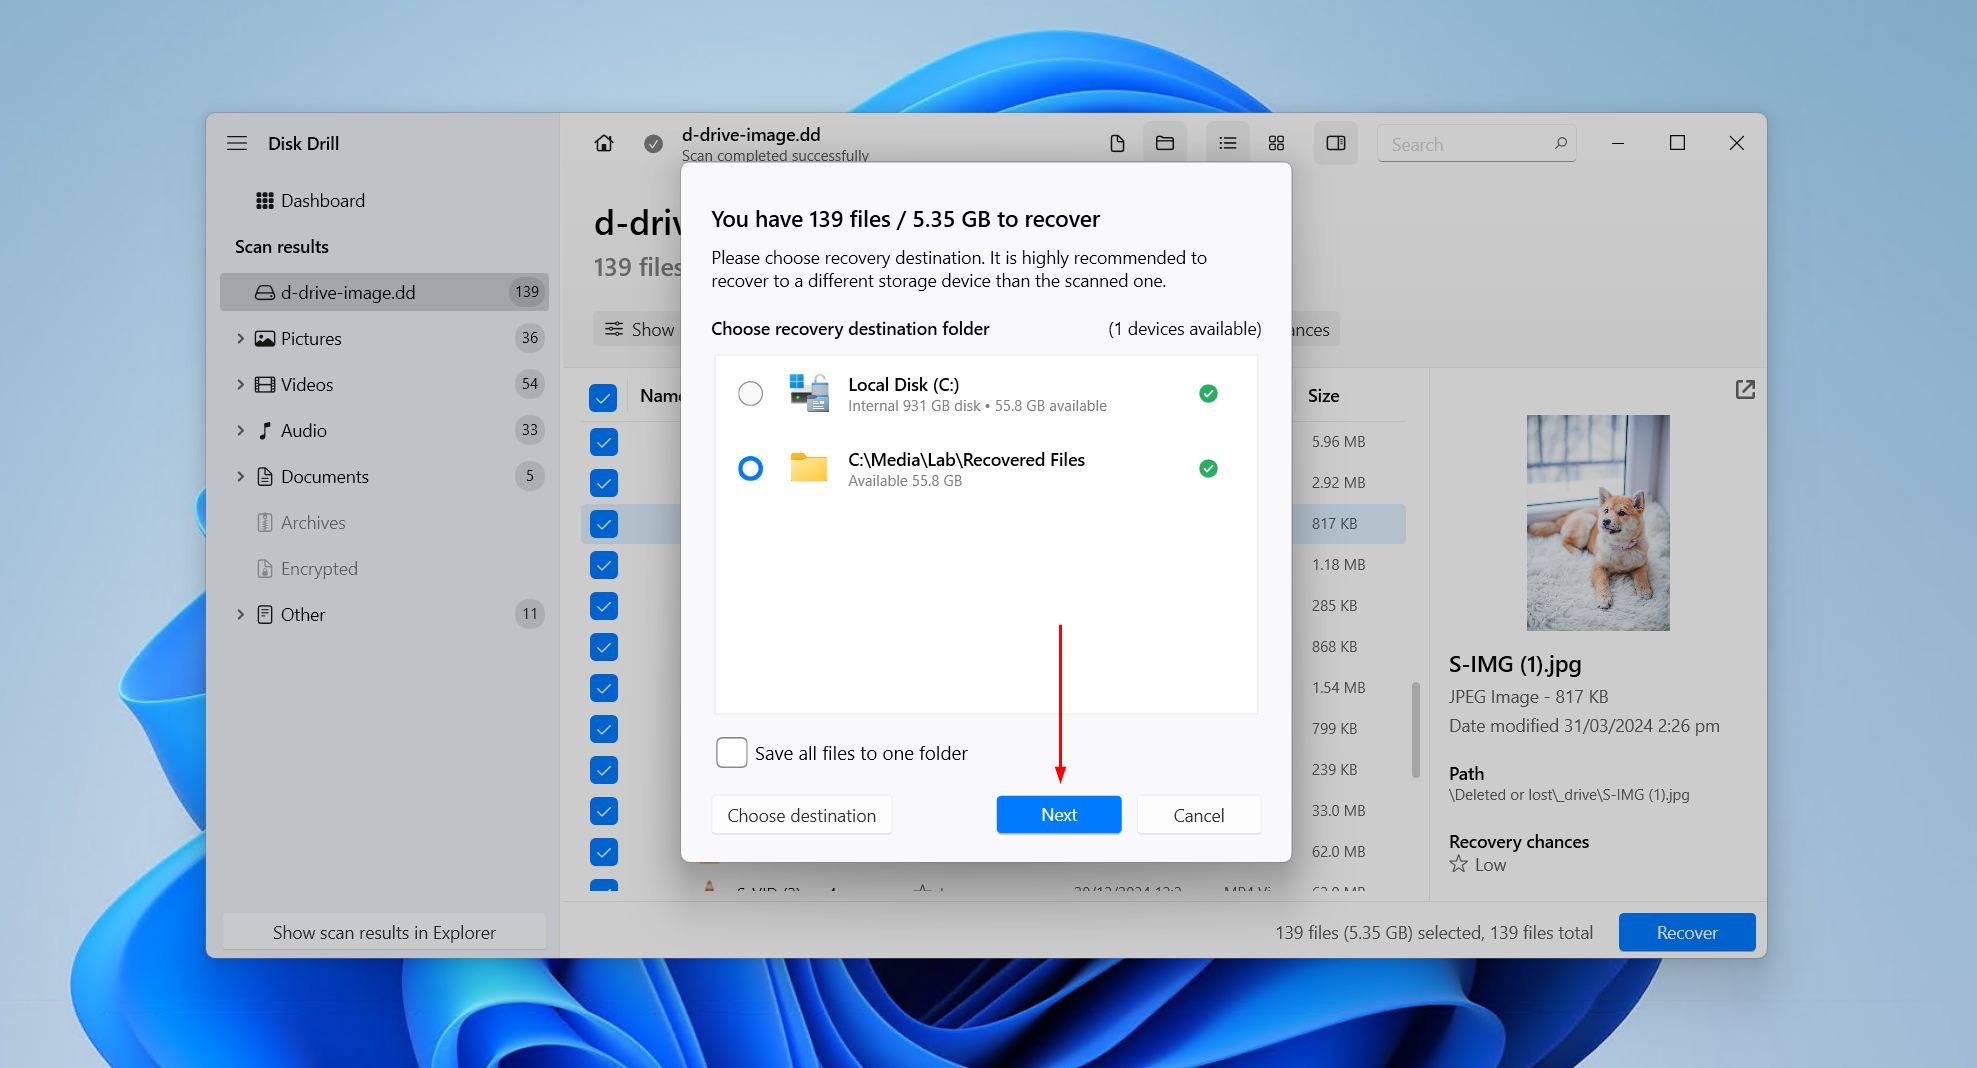
- Choose a separate physical drive to store the data, then click Next to complete recovery. Disk Drill lets you recover 100 MB for free; enough to recover critical files and make sure the software works.
How to Fix a Missing D Drive
Once you’ve recovered all the data you needed to, it’s safe to move on to fixes. Refer to the table at the beginning of the article for targeted solutions based on your situation, or follow through each method if you’re not sure.
Method 1: Assign the D Drive Letter in Disk Management
Start here if the partition is sitting in Disk Management saying Healthy at the correct size, with no letter beside it. It is the easiest case there is, and a common one. Windows only mounts a volume into File Explorer once that volume has a drive letter, so a partition without one is invisible to everything you normally use while staying completely intact.
These steps will show you how to reassign a drive letter to a D drive that’s missing it:
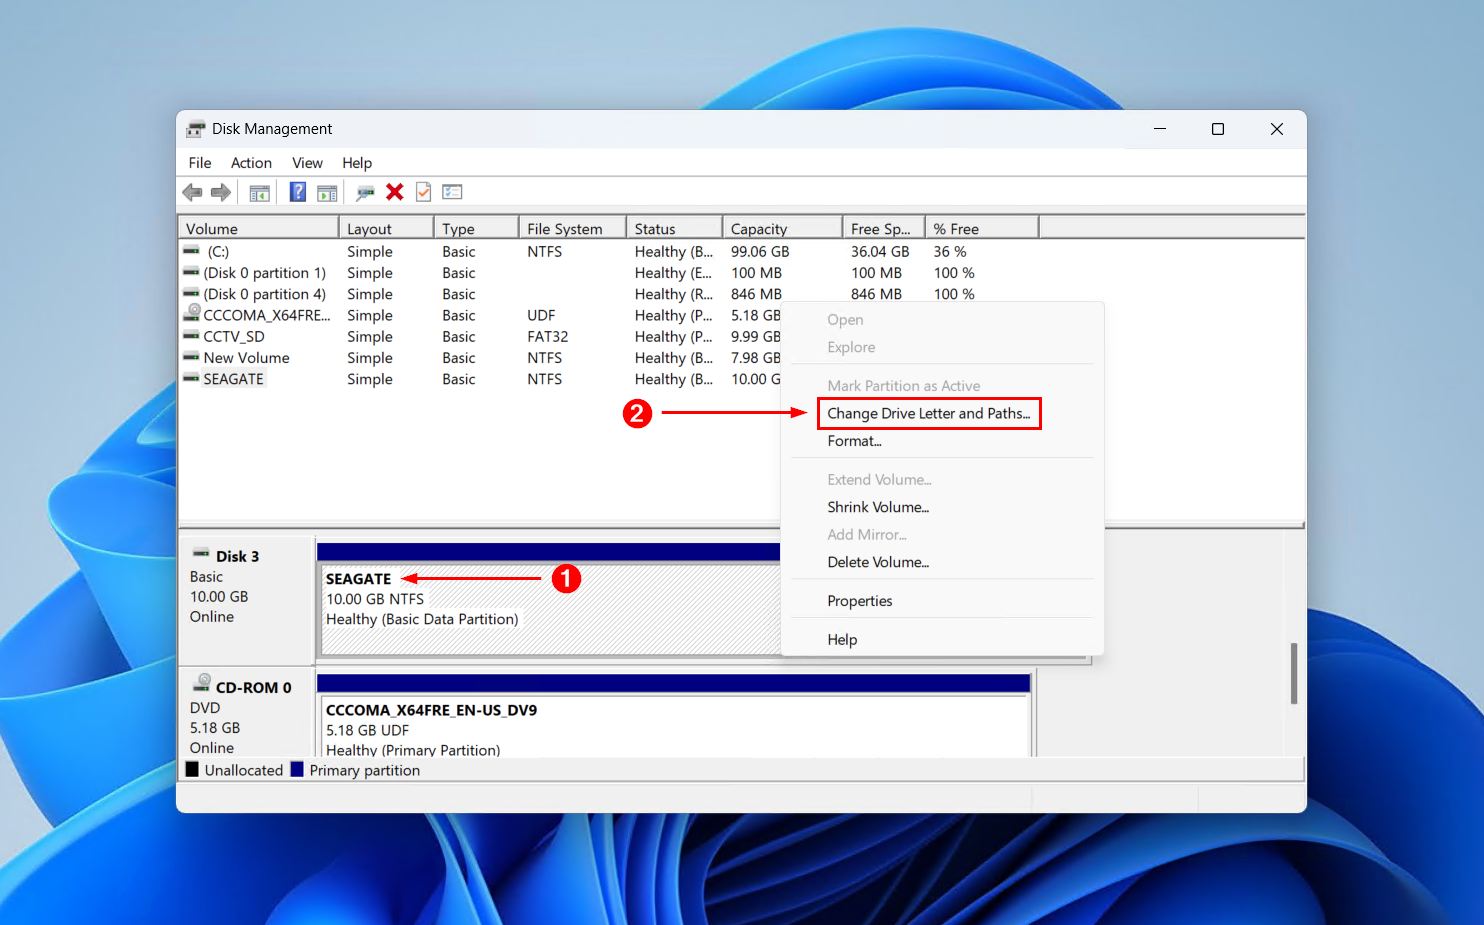
- Right-click Start and click Disk Management.
- Right-click the partition with no drive letter, then click Change Drive Letter and Paths.
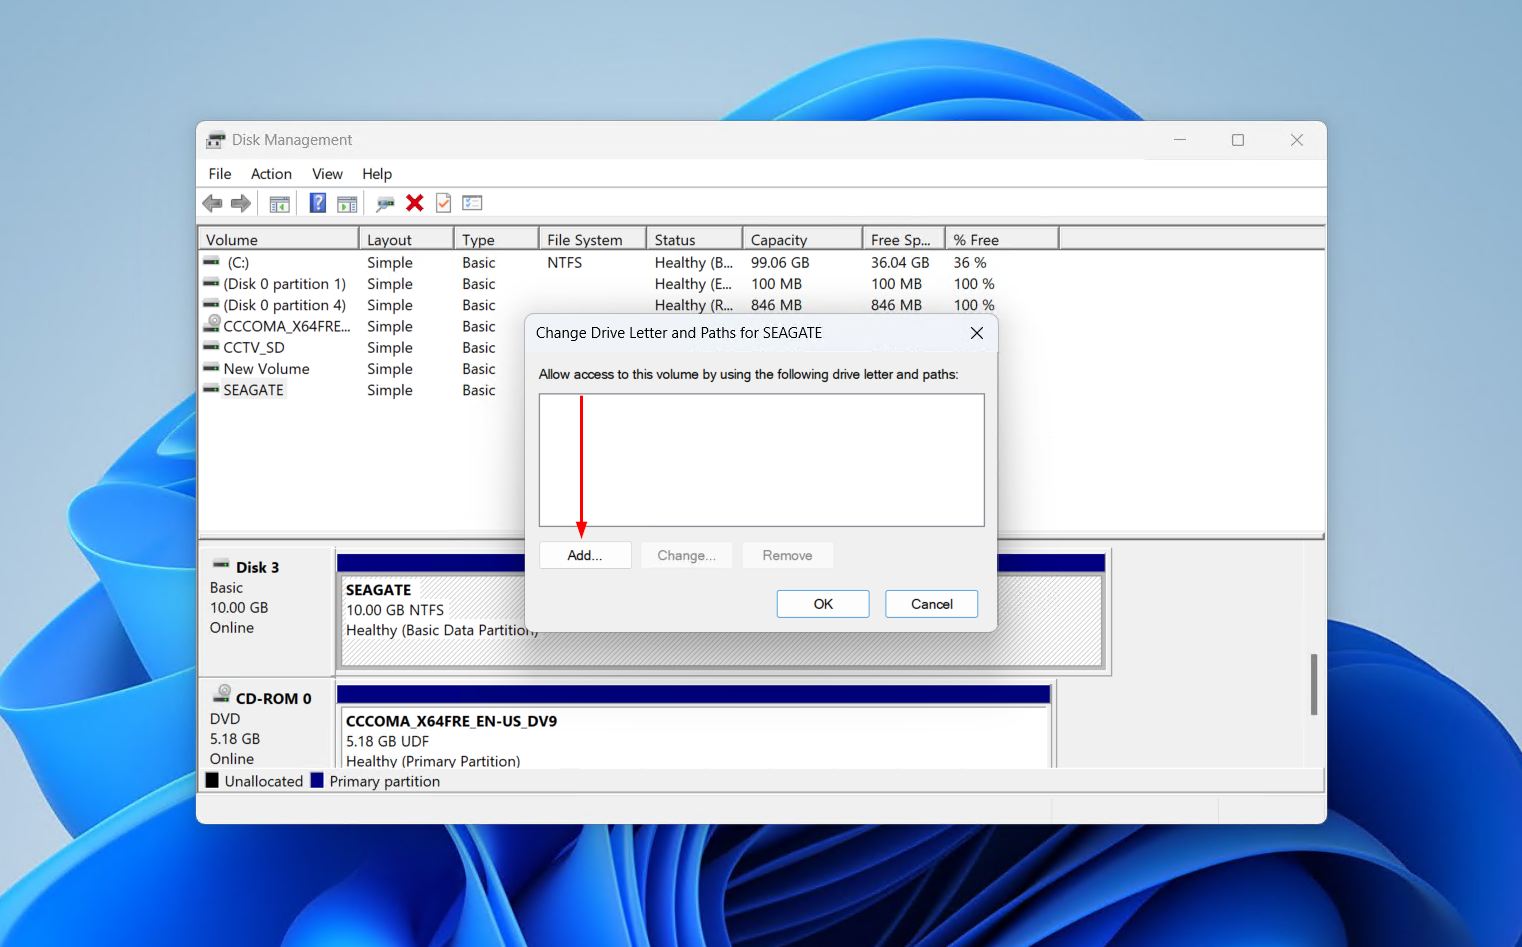
- Click Add.
- Select the D drive letter from the dropdown, then click OK.
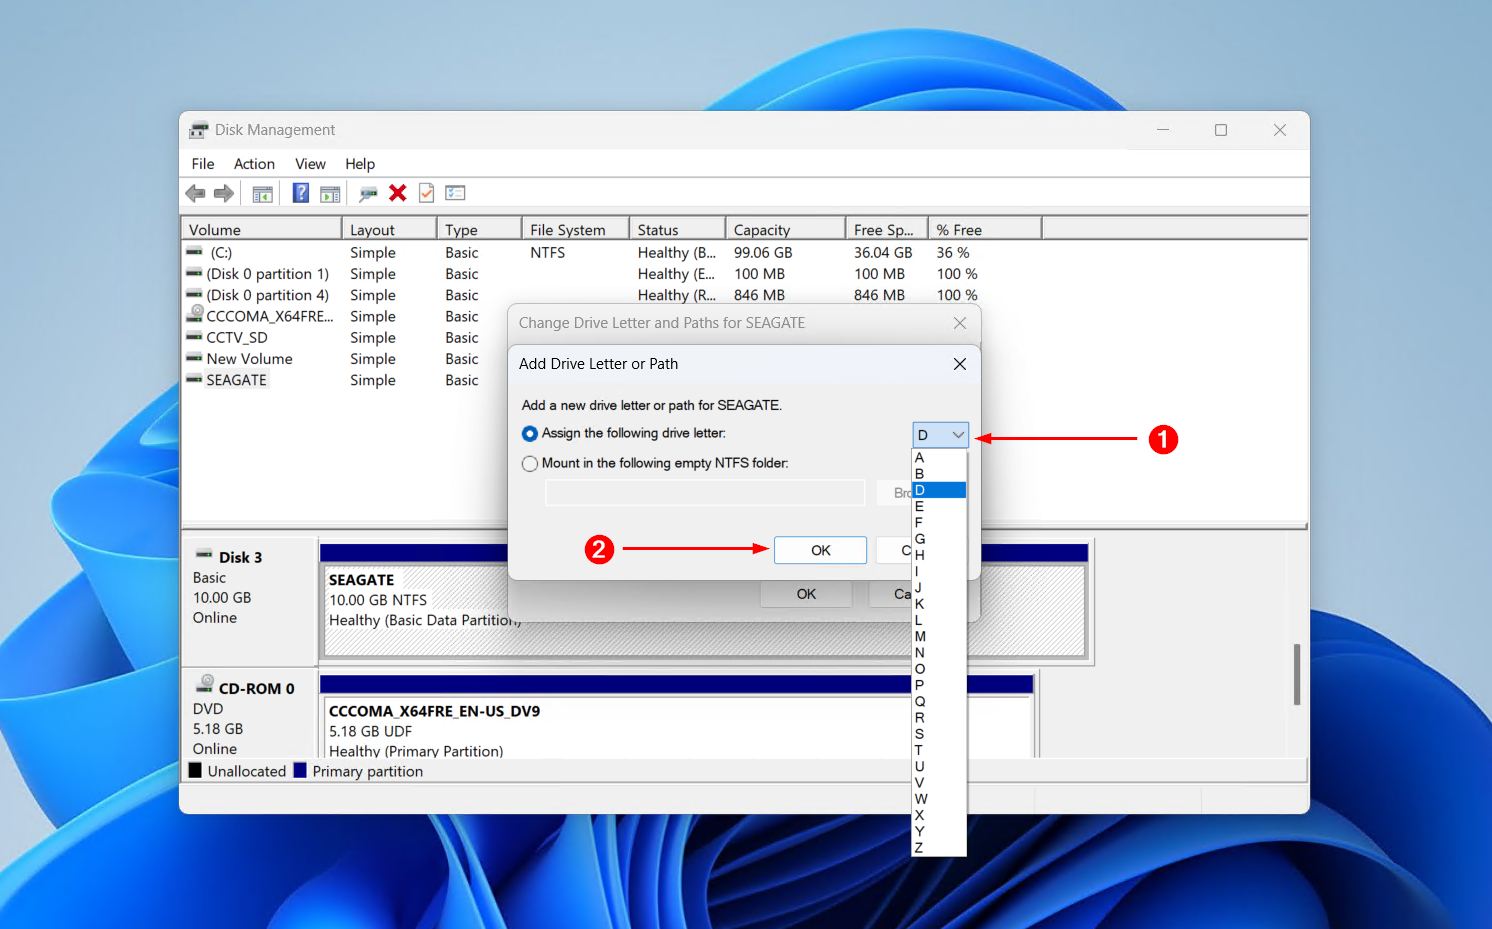
Method 2: Change the Drive Letter Back to D:
This method closely follows the one before, but is for times when the drive is appearing, just with the wrong drive letter (like E:, F:, etc). This can happen if the drive is reconnected, a new drive is added, or when Windows reassigns drive letters.
This is how you restore a missing D: drive letter after it has been reassigned:
- Right-click Start and click Disk Management.
- Right-click the partition with the incorrect drive letter, then click Change Drive Letter and Paths.
- Select the currently assigned drive letter, then click Change.
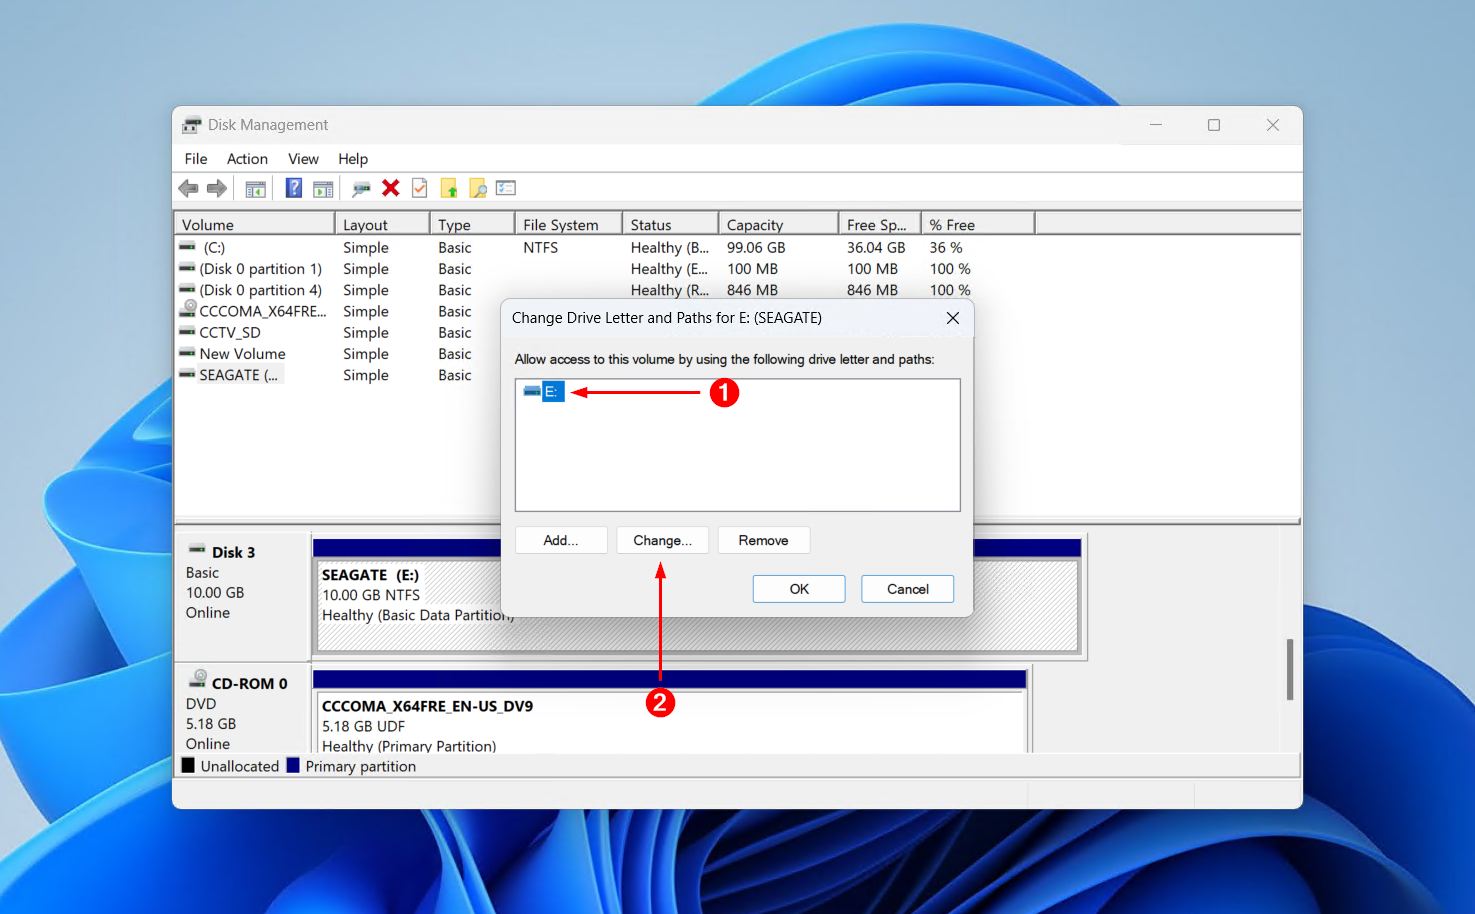
- Choose D: from the dropdown, then click OK.
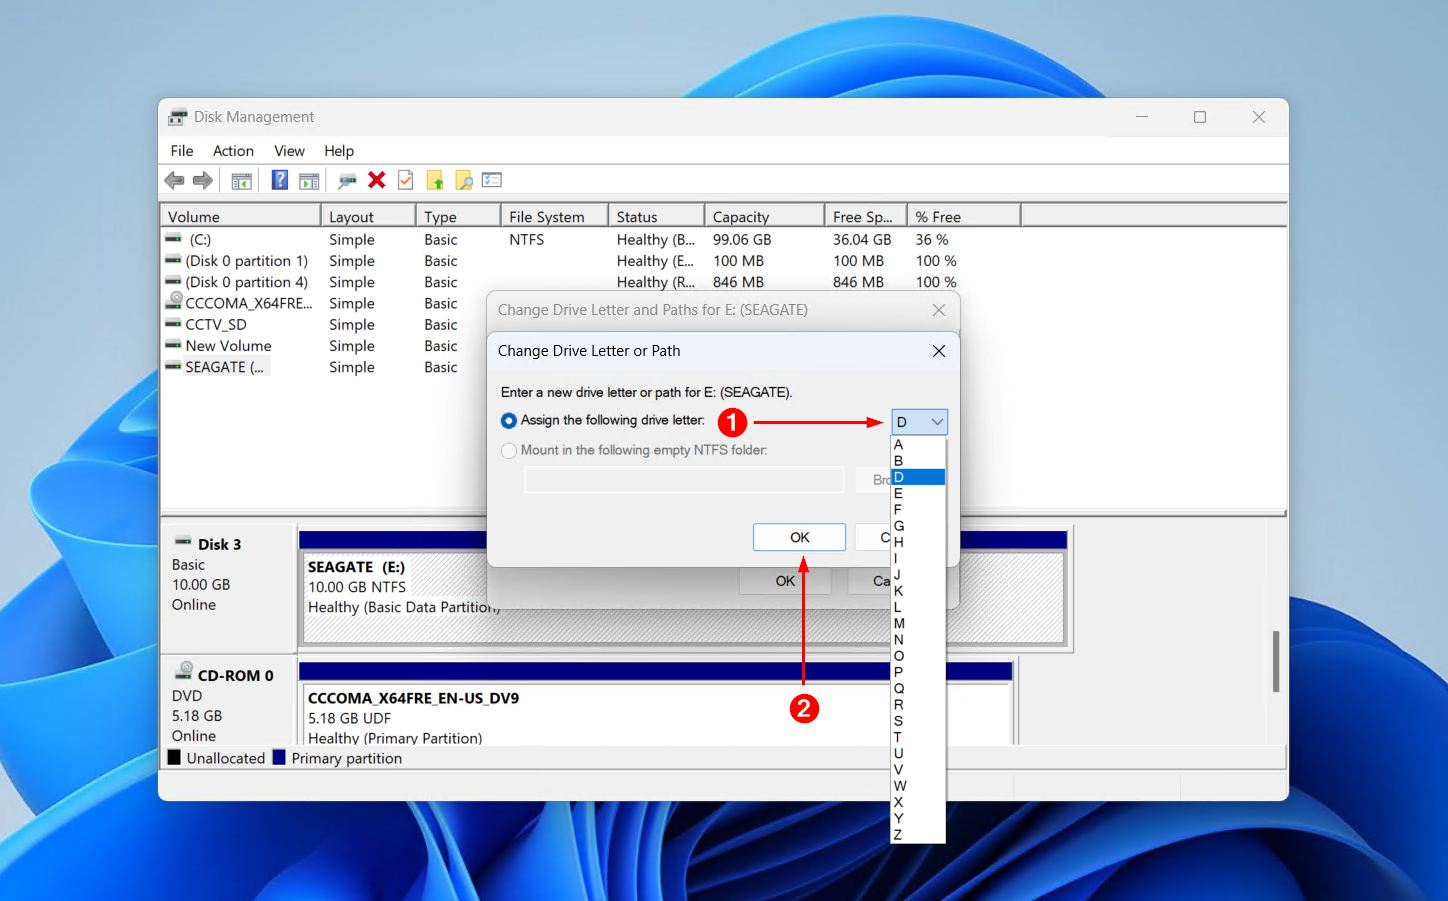
- Click Yes when asked to confirm.
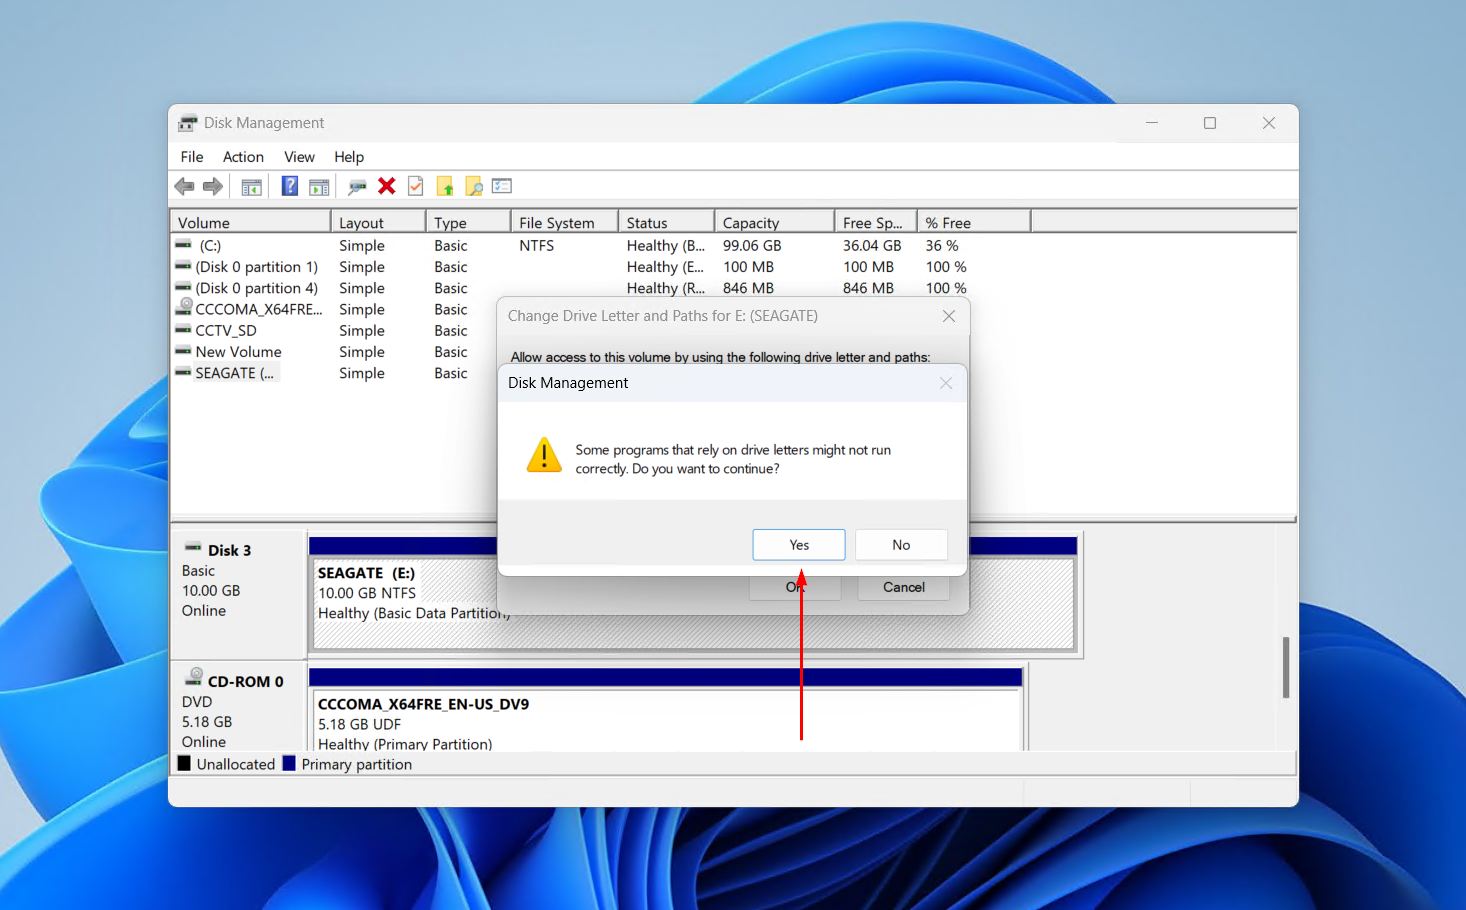
Method 3: Bring the Disk Online
Sometimes it’s not a problem with the partition, but the disk itself. If you see the drive in Disk Management and it’s showing as “Offline”, then Windows detects it, but is not reading it as available. Bringing it back online leaves the partition and data intact, allowing you to continue as if nothing happened.
This is how you bring a D: drive that disappeared back online:
- Right-click Start and click Disk Management.
- Right-click the grey box of the disk on the left, then click Online.
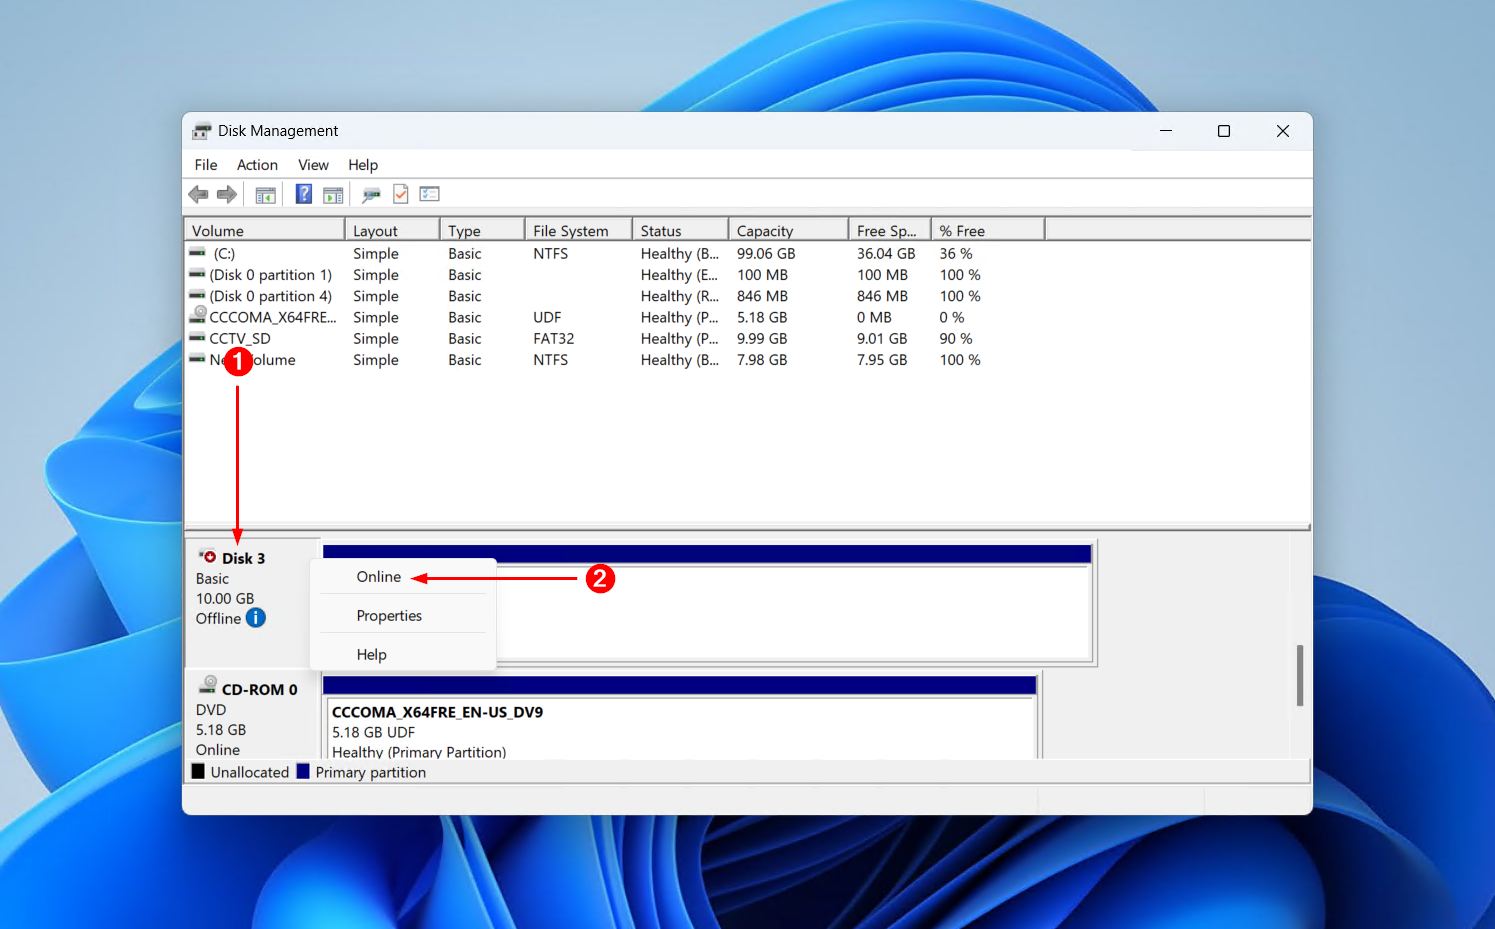
After a few seconds, the drive should now show as “Online”, and the partition (and its data) will be accessible through File Explorer.
Method 4: Recover the Missing D Partition
Is the drive showing as “Unallocated”, or the partition as “RAW”? It could be the case that the partition record itself is damaged rather than truly gone. In that case, it’s sometimes possible to recover the damaged partition and get the drive back exactly as it was, files and folder structure included, without creating a new one. This is where TestDisk comes in handy, a partition recovery tool that restores the partition by fixing the underlying problems.
Here’s how you restore a D: drive that’s missing with TestDisk:
- Download and extract the contents of TestDisk. Open testdisk_win.exe.
- Press Enter to create a log file.
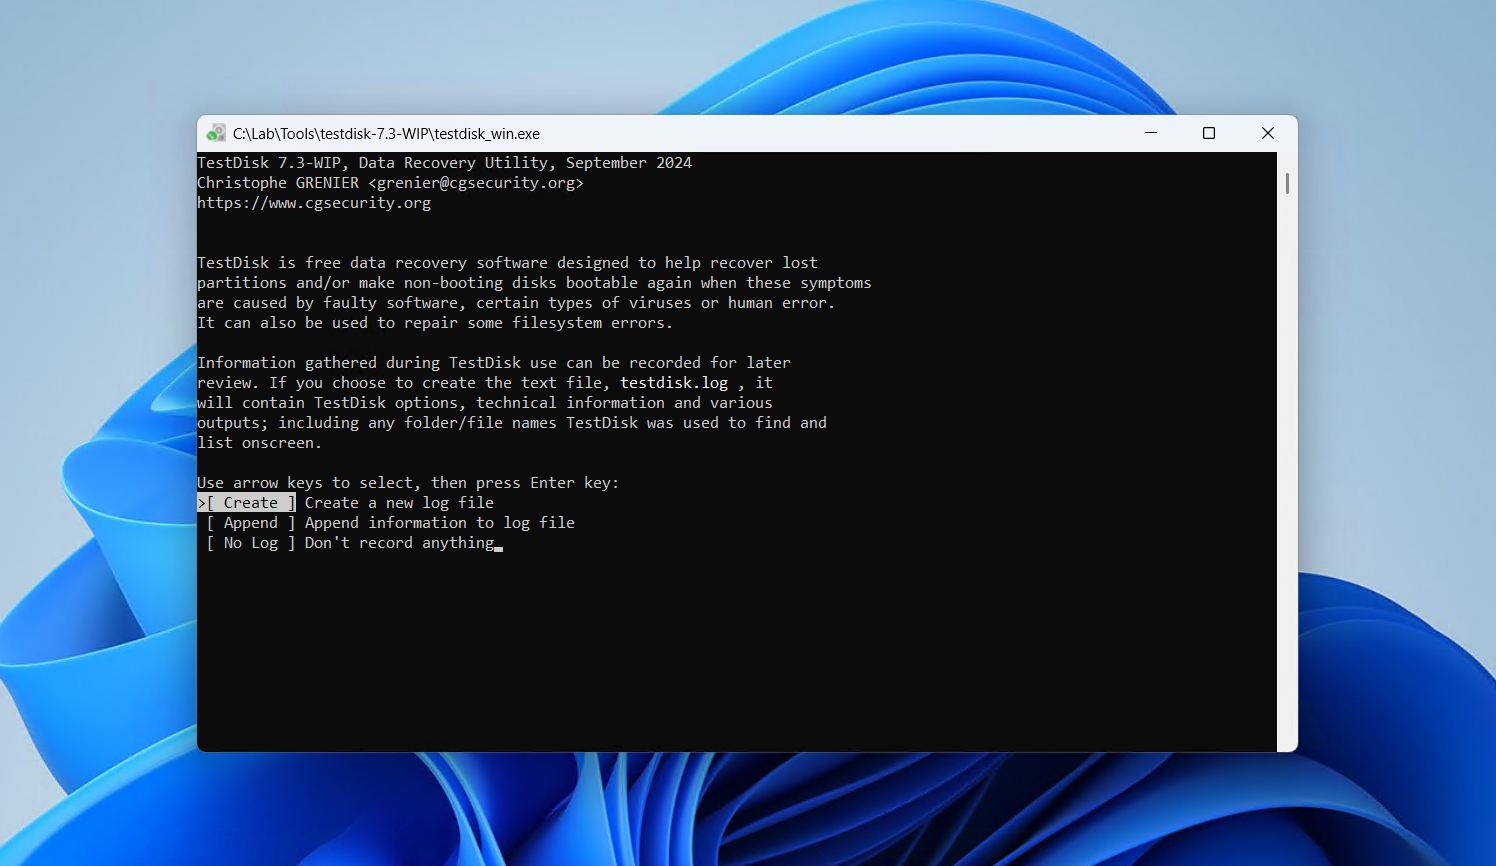
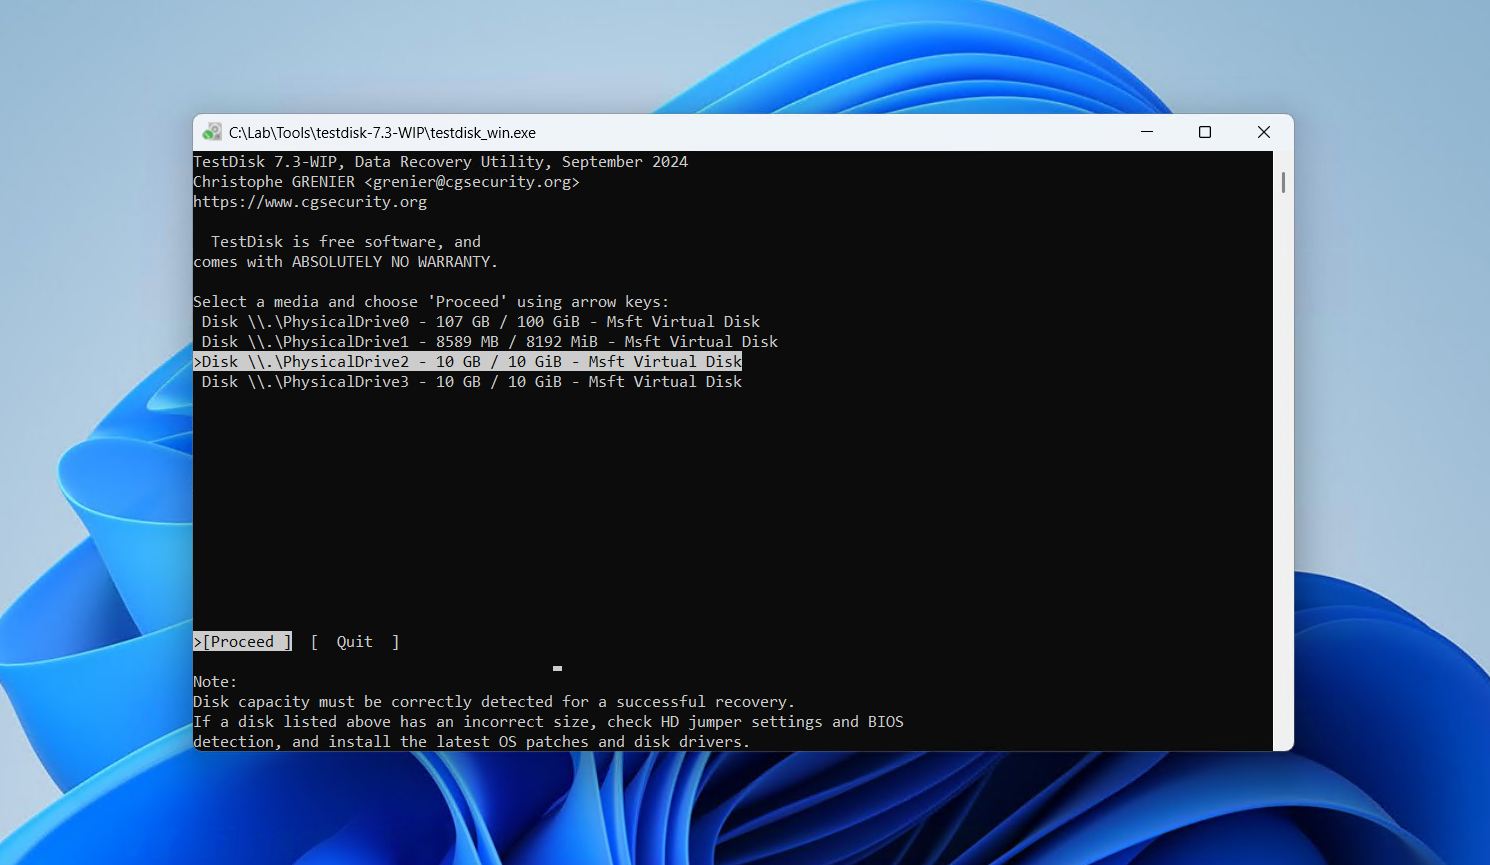
- Use the up and down directional arrows to highlight the drive, then press Enter.
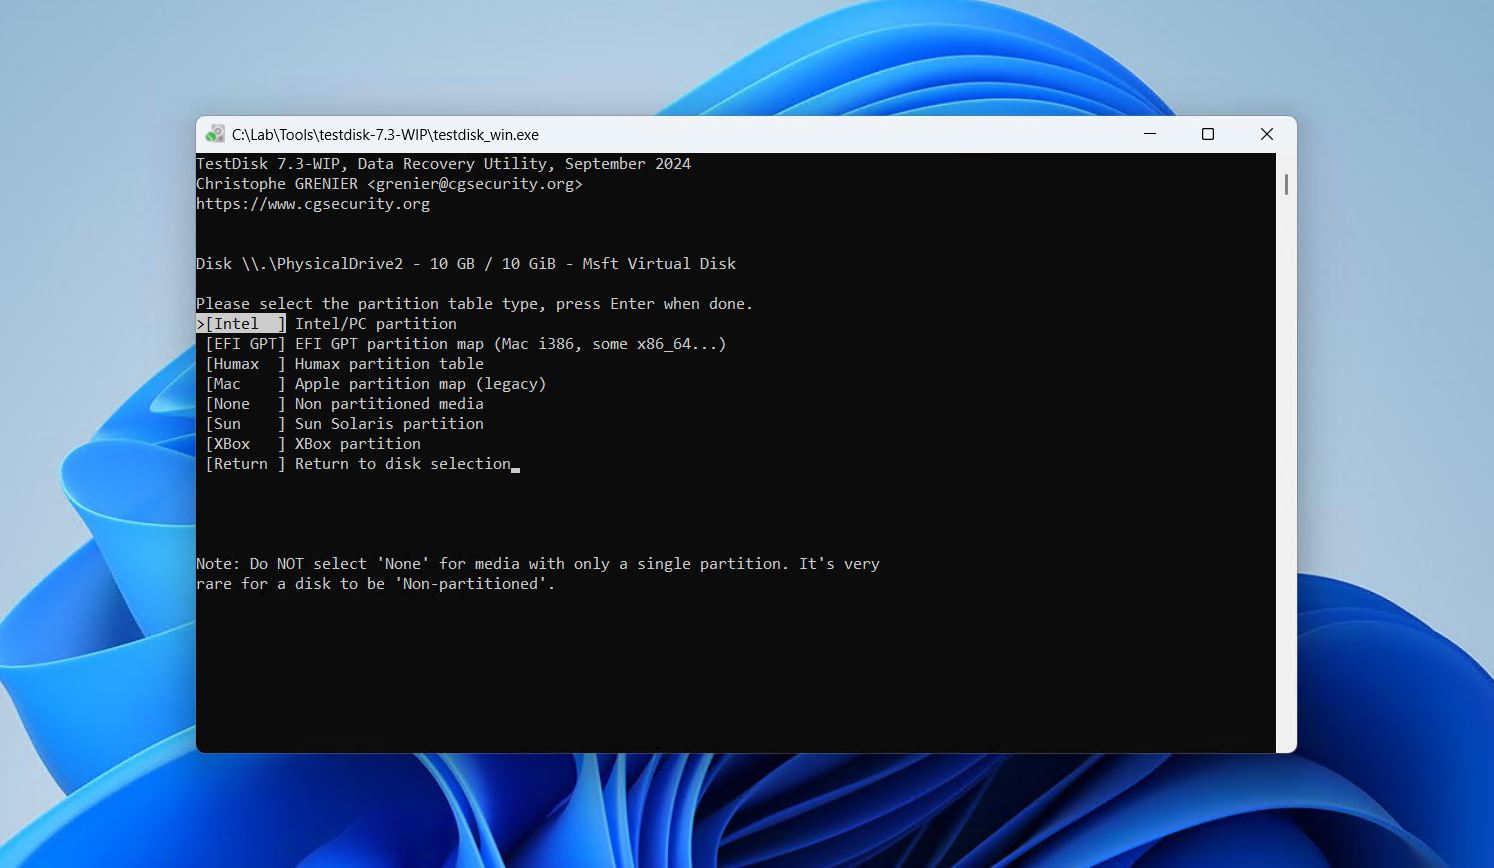
- Choose your partition table type, then press Enter.
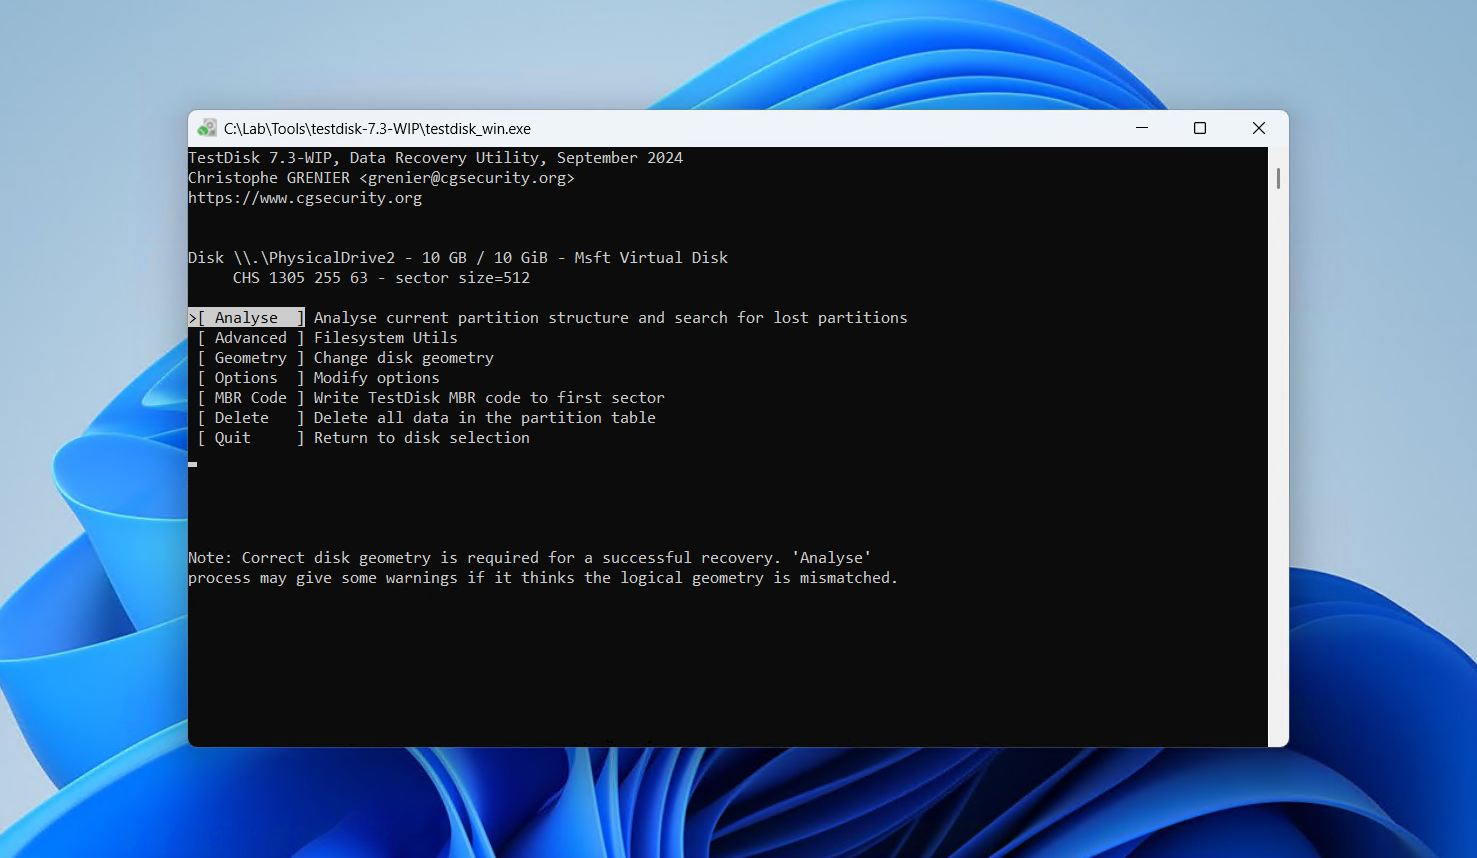
- Press Enter on the Analyse option.
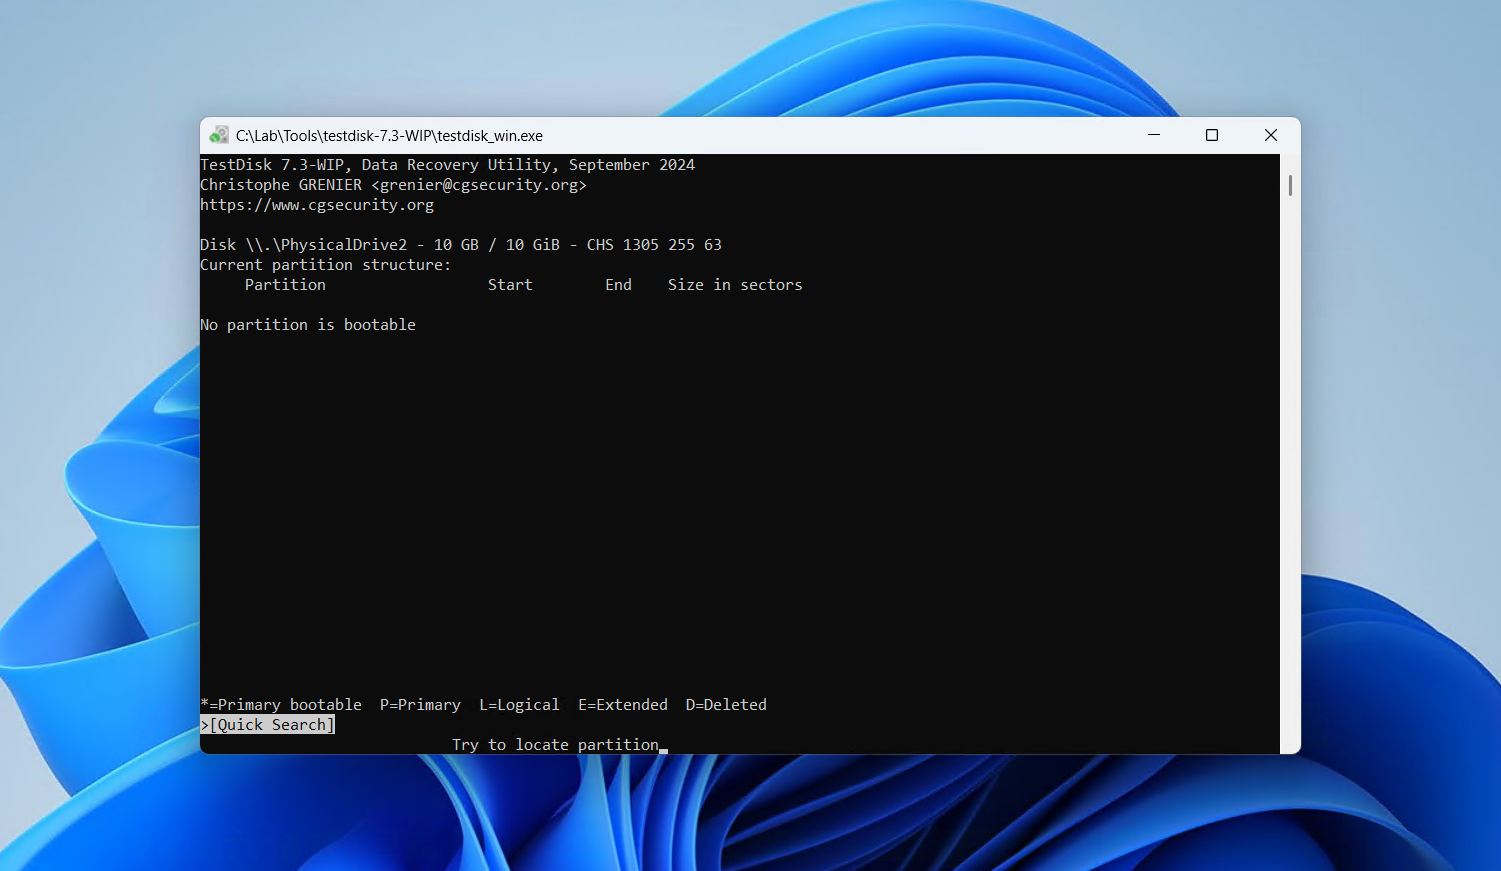
- Press Enter to begin the quick search.
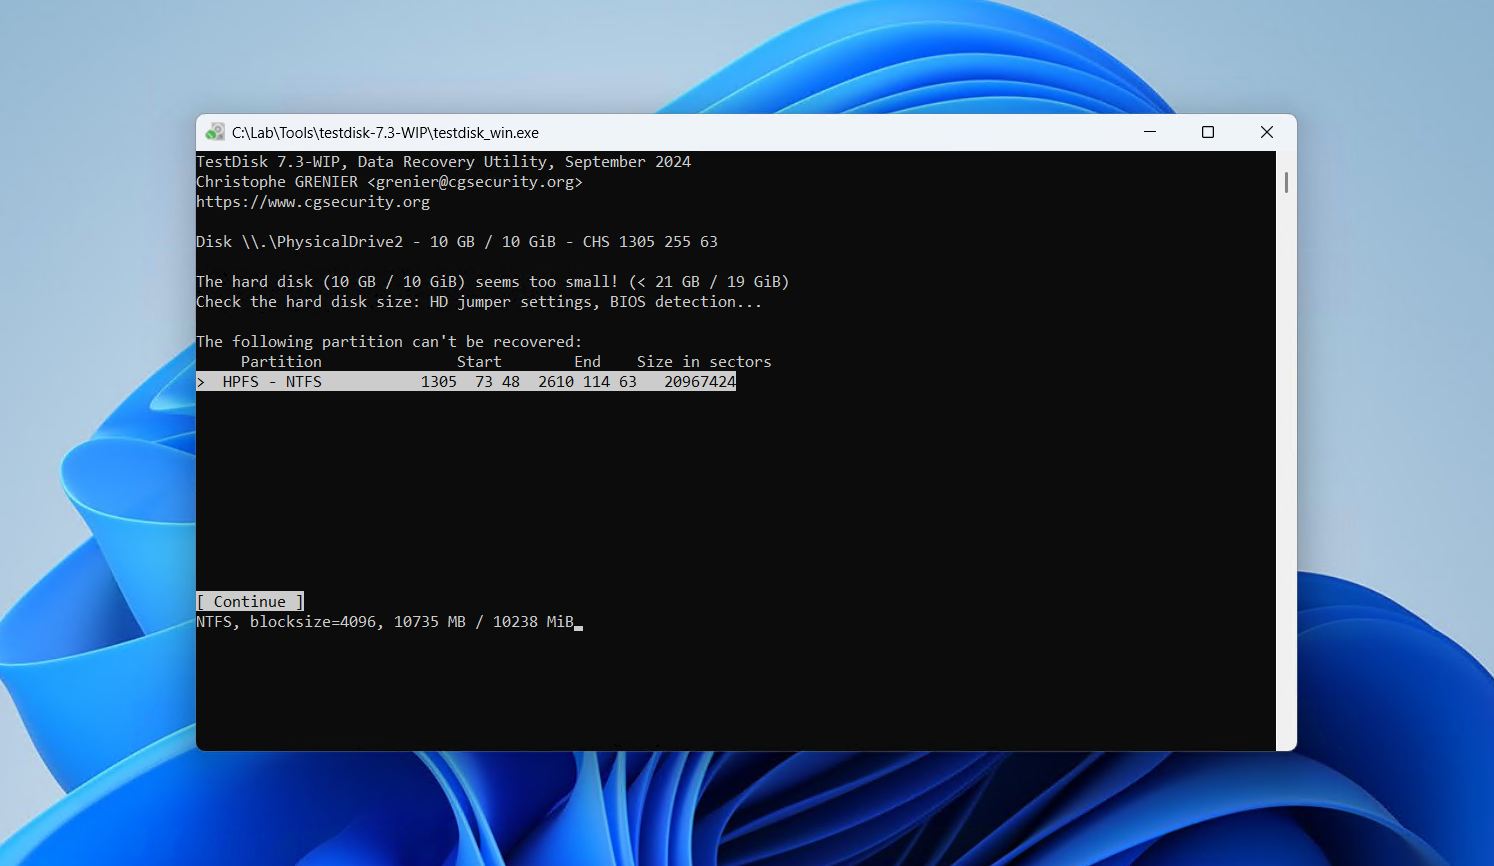
- Press Enter on the screen that shows unrecoverable partitions.
- Highlight the missing partition, then press Enter. You may need to change the partition characteristic to P using the left and right arrow keys, or perform a deeper search.
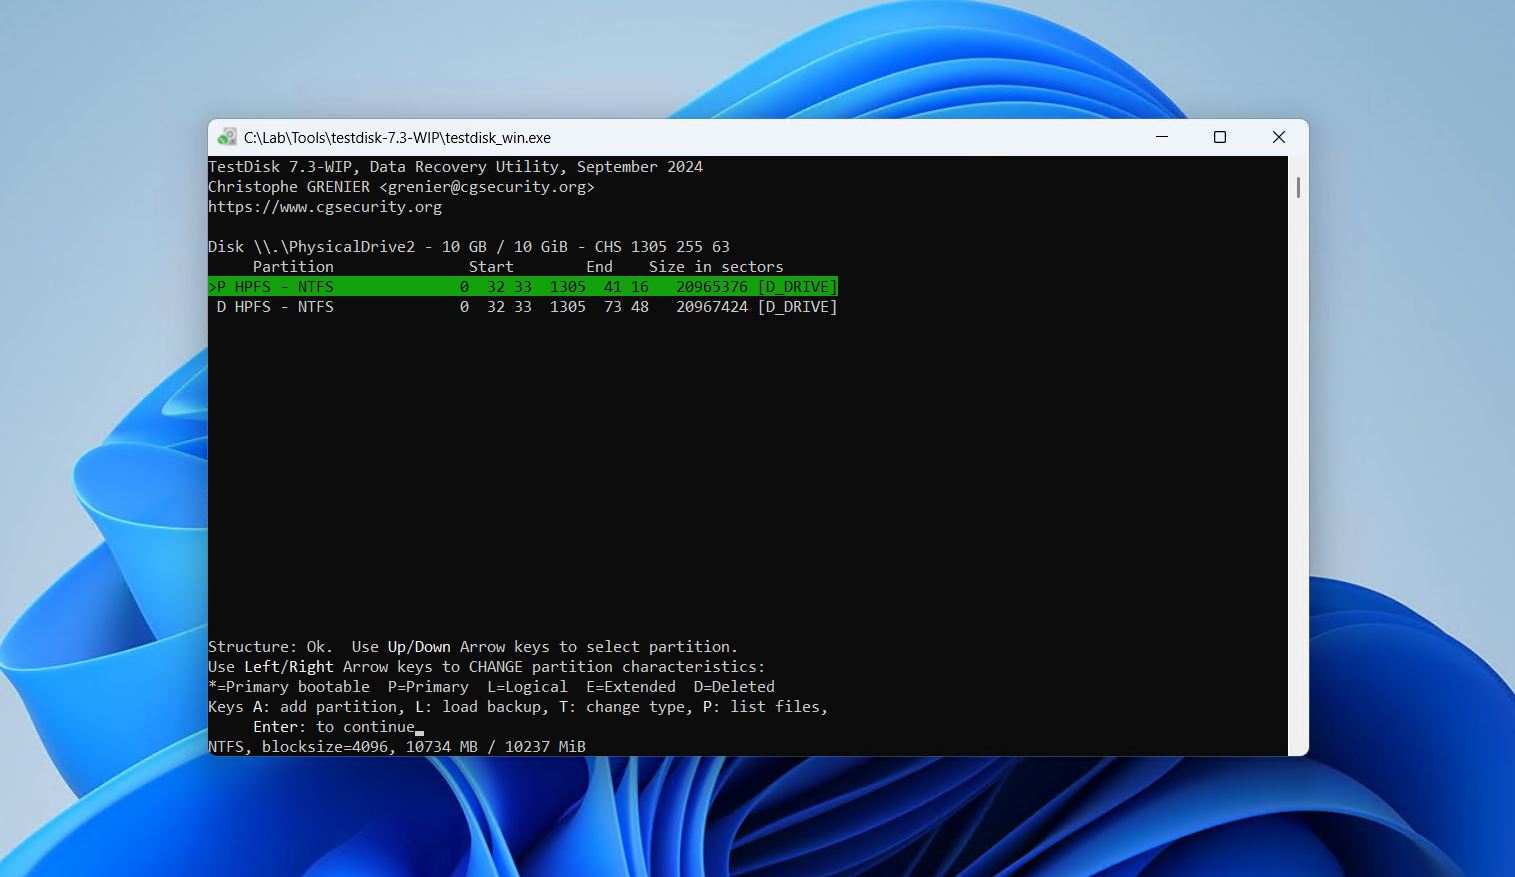
- Hover over the Write option, then press Enter. If your partition wasn’t found, try a Deeper Search instead.
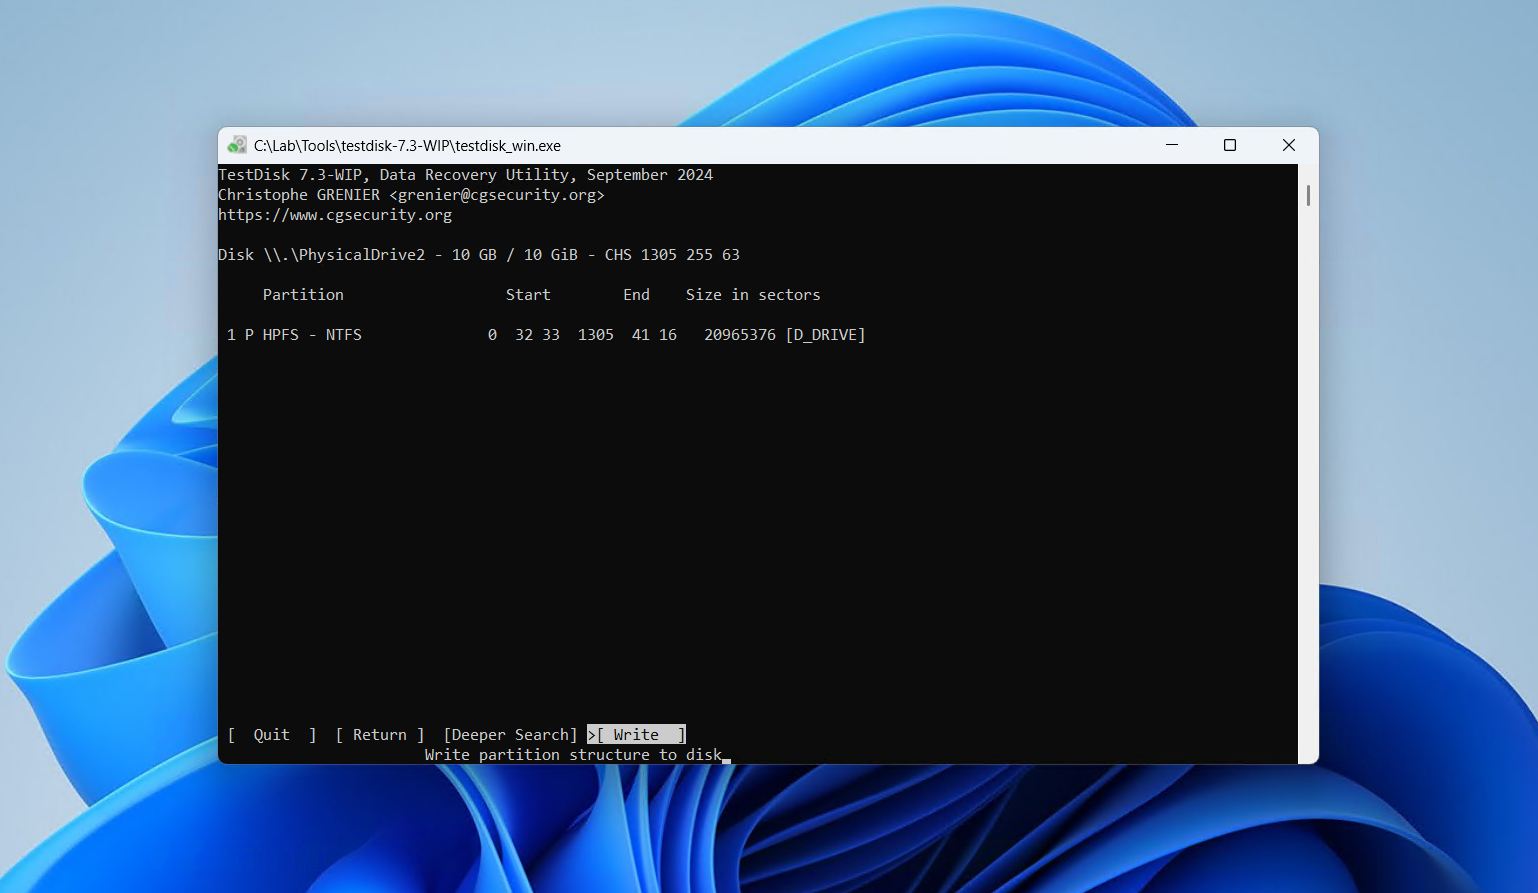
- Press Y to confirm.
Method 5: Recreate and Format the D Drive
Formatting is the final option for restoring a D drive that hasn’t been restorable with the previous methods. This is a last-resort fix that basically clears out the drive and resets everything on it.
The exact steps you take slightly differ depending on the disk’s state:
- If the drive is showing as Unallocated, there is no partition there any more and you will need to create a new volume, format it with a file system, then assign a drive letter.
- If the drive has a RAW partition, then the partition still exists and all you need to do is format the existing volume with a fresh file system and assign a drive letter.
Keep in mind that formatting deletes any data still physically present on the disk being formatted. If you still haven’t recovered your data, it’s imperative that you do so now using the recovery steps outlined earlier. If you’ve already formatted the drive, see our guide on recovering data from a formatted HDD.
Here’s how you format a drive and assign the D drive letter:
- Right-click Start and click Disk Management.
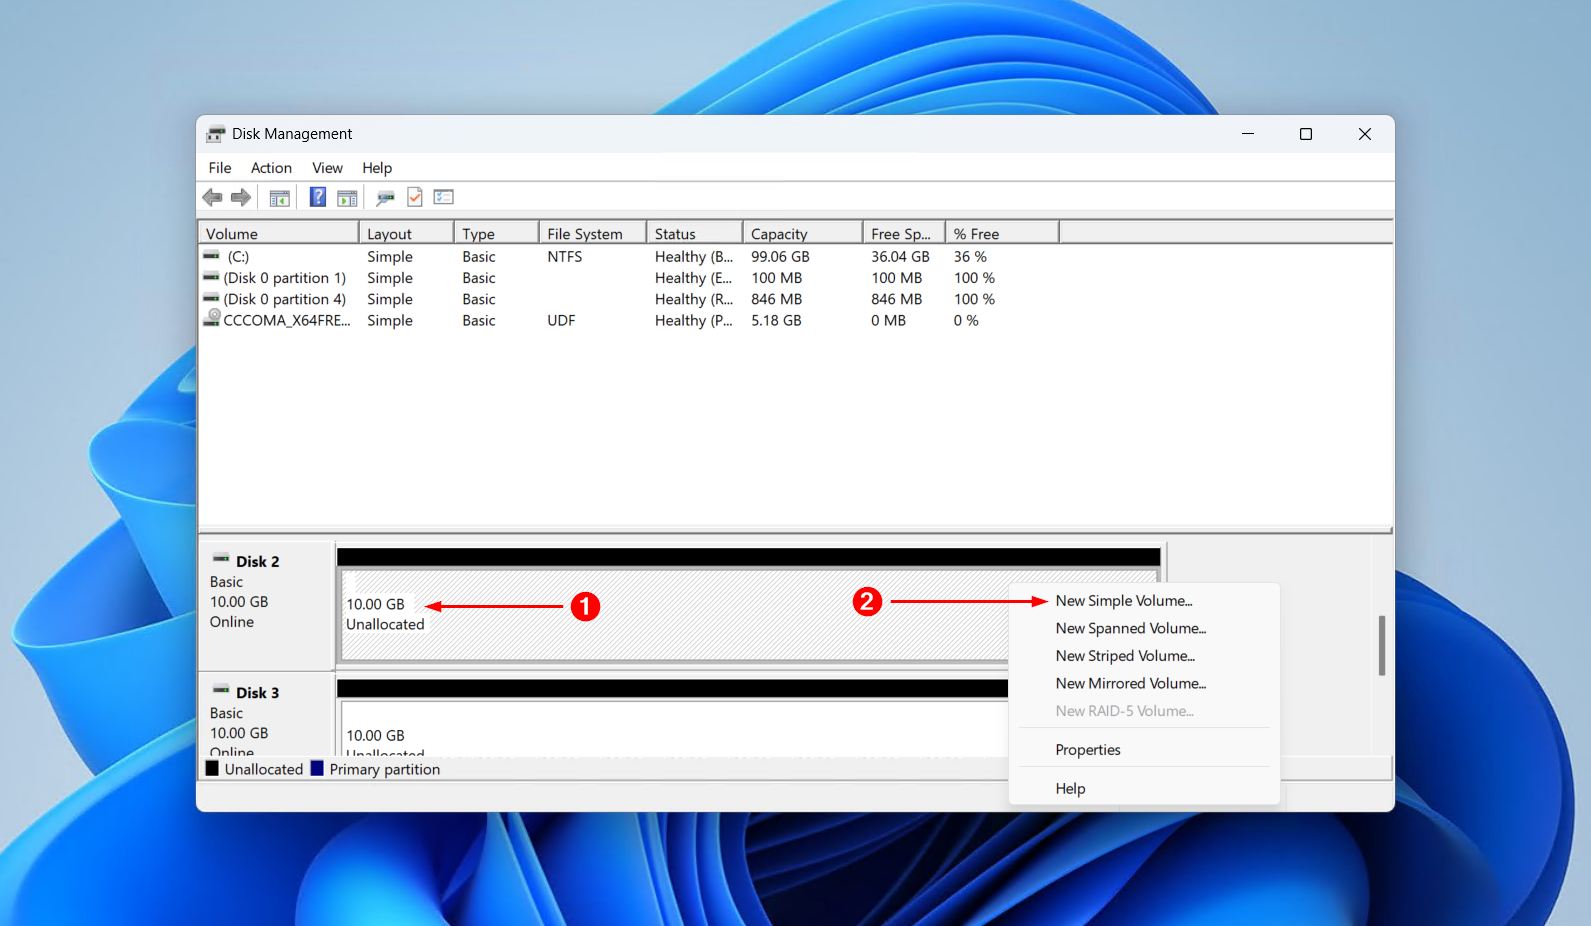
- Right-click the unallocated space and click New Simple Volume. If your drive is showing as RAW, click Format instead and jump to step six.
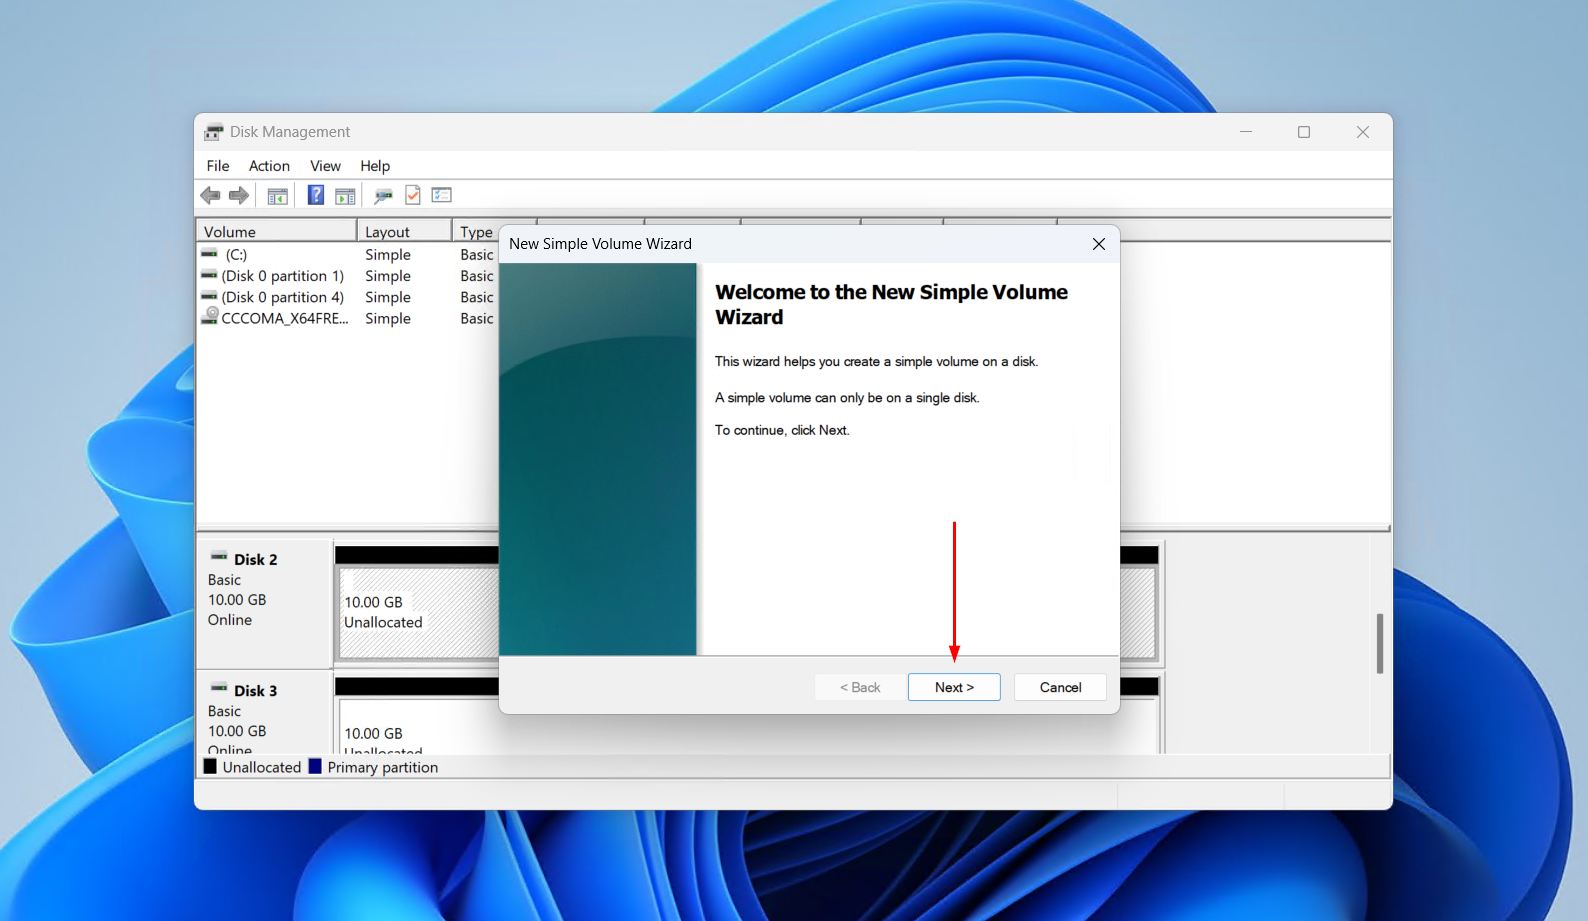
- Click Next to skip the first overview screen.
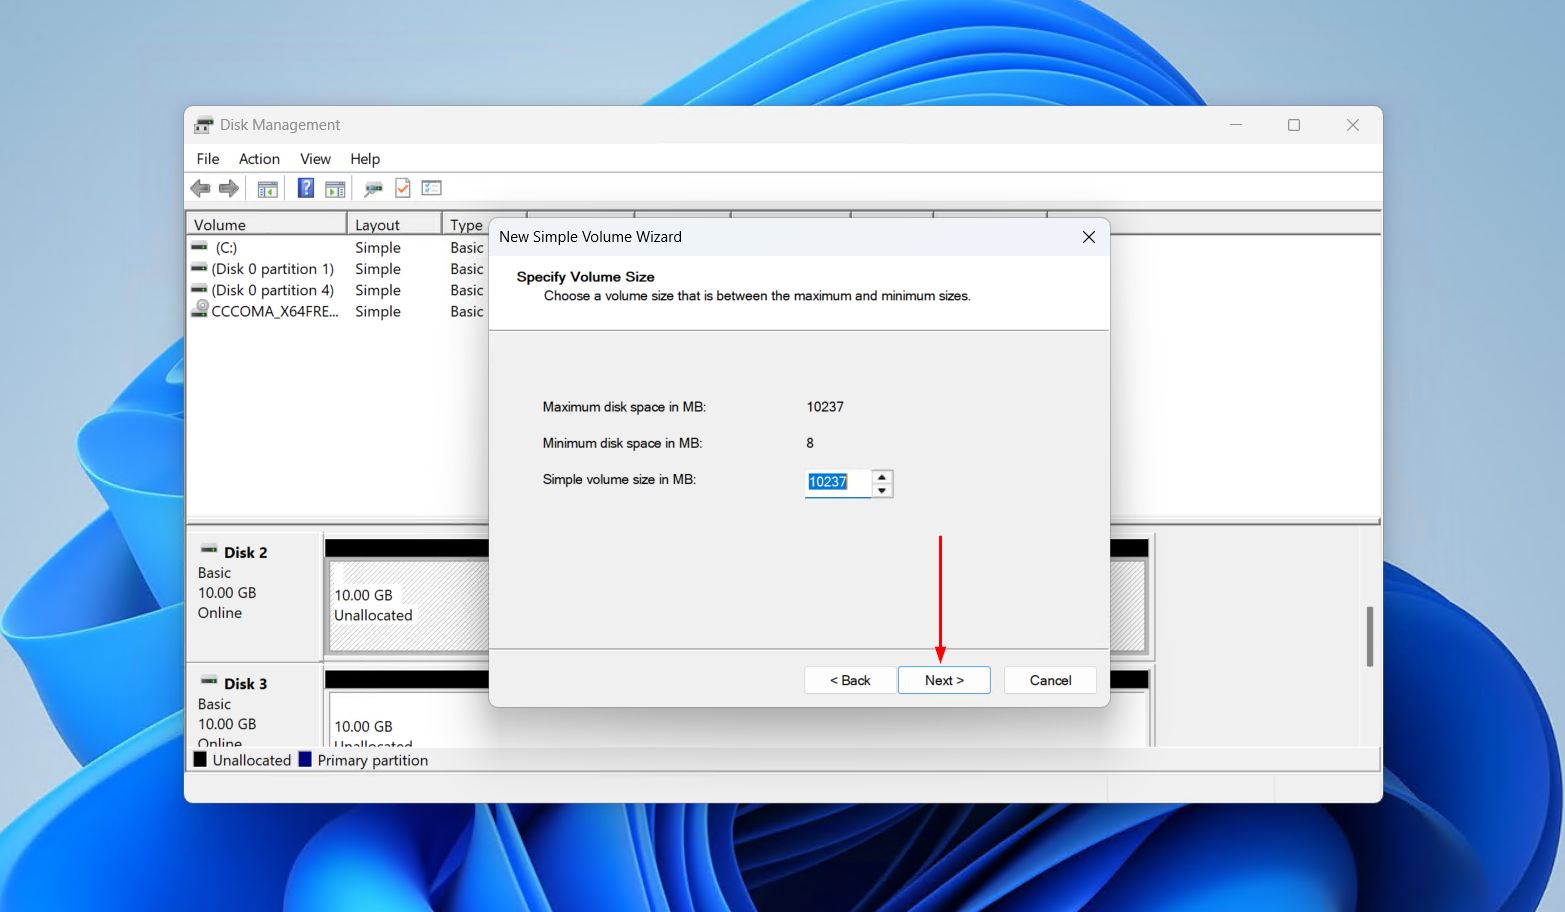
- Specify a volume size, then click Next.
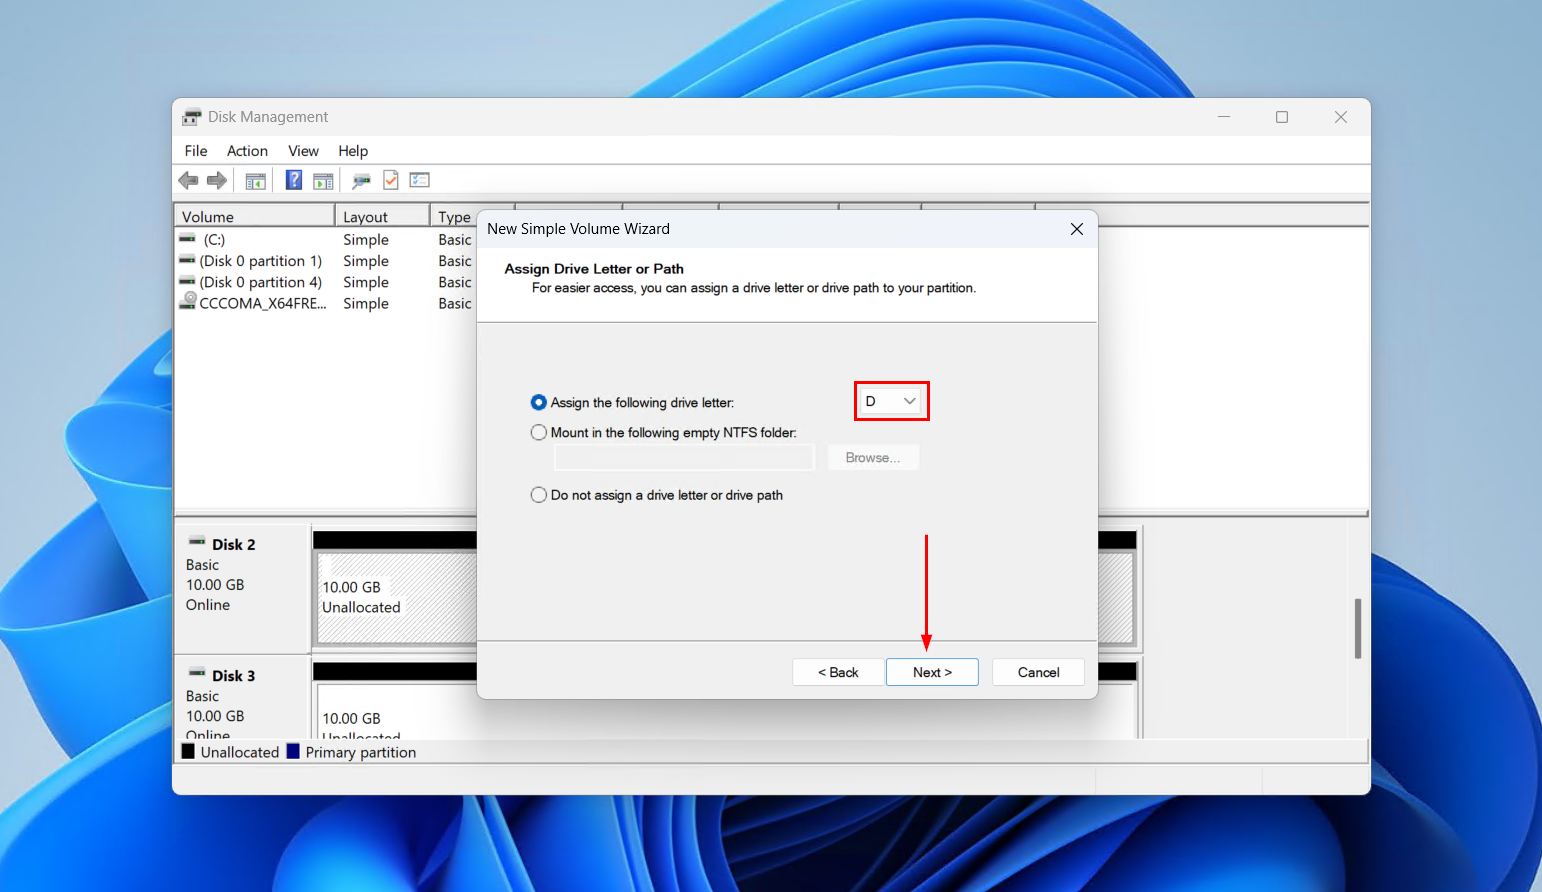
- Choose the D drive letter from the dropdown list. If it’s not appearing, it means it’s already assigned elsewhere. Click Next.
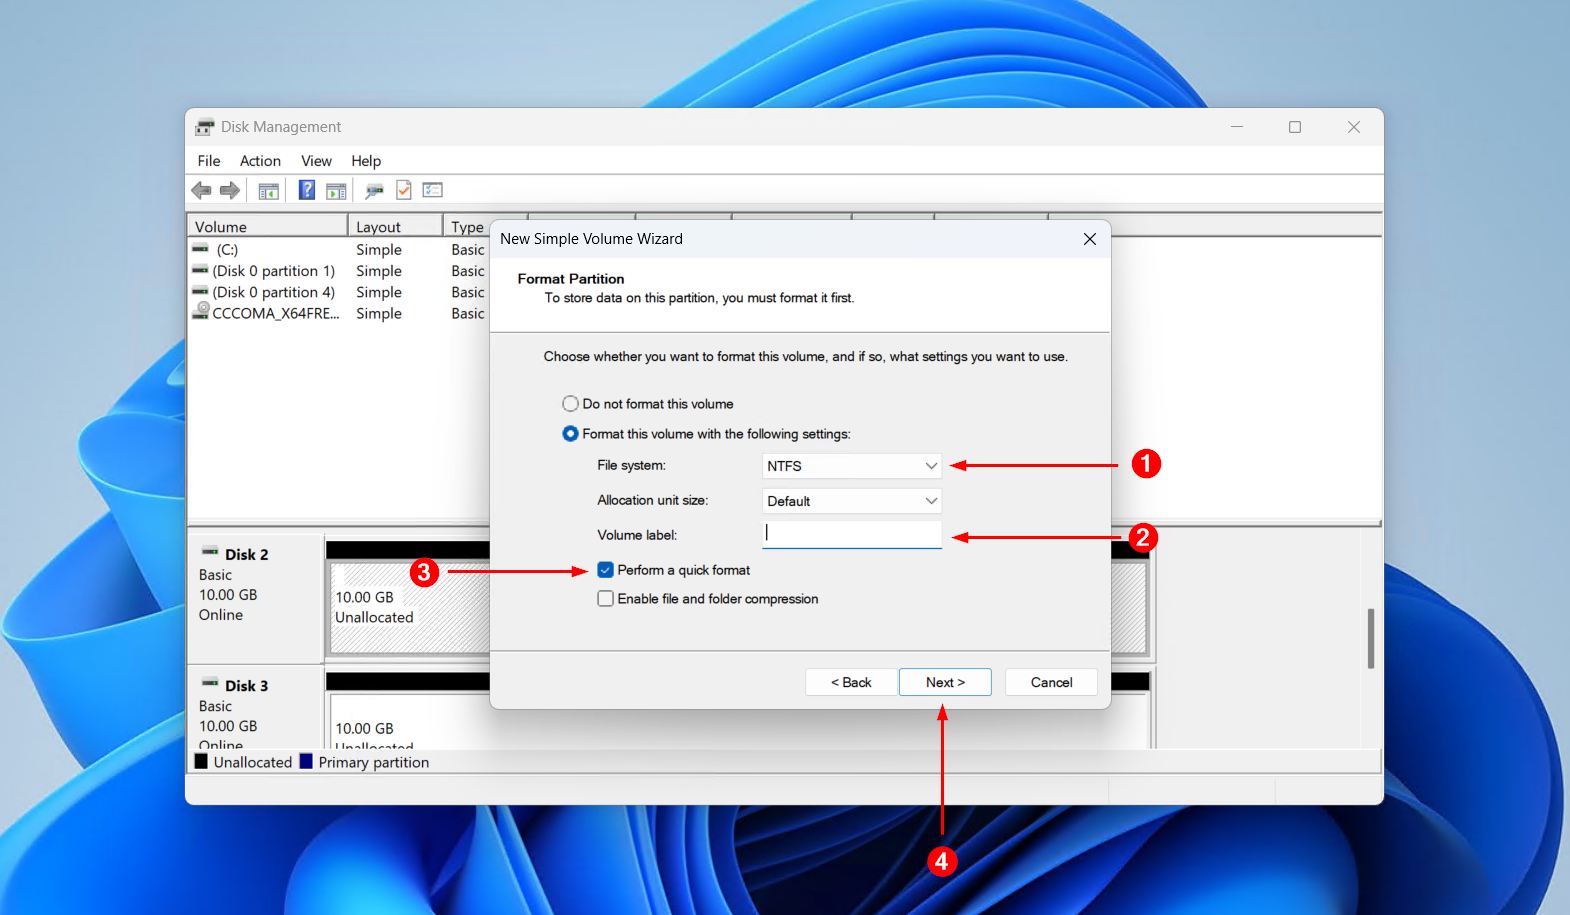
- Choose a file system (NTFS is best used for Windows, exFAT/FAT32 is preferred for cross-platform compatibility), give the drive a volume label, then make sure Perform a quick format is ticked. Click Next.
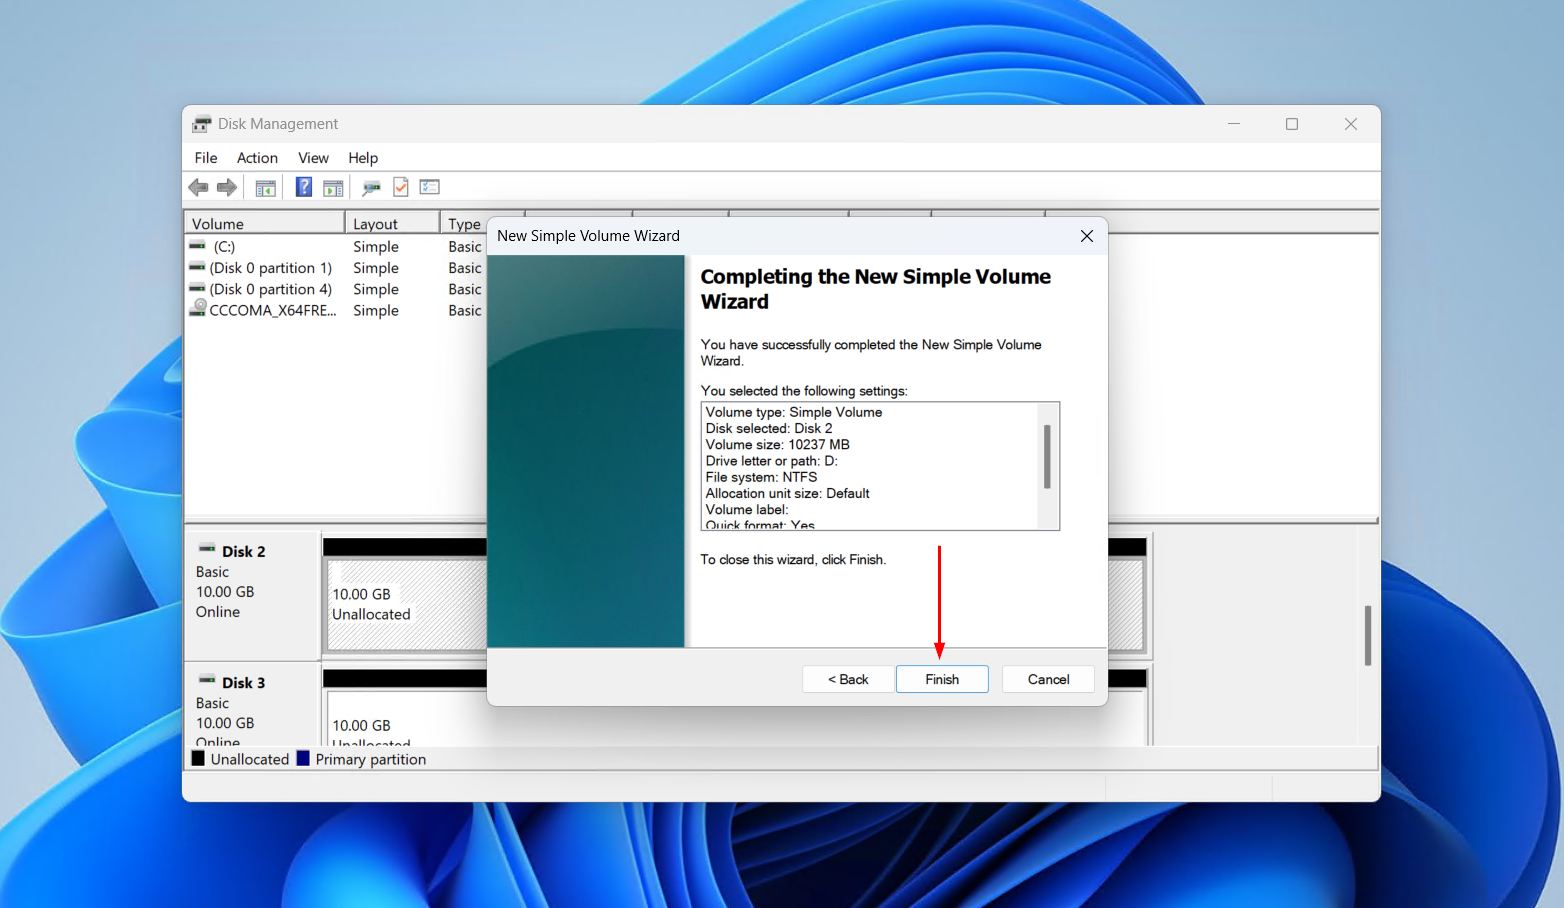
- Click Finish.
Final Tips
If you come across the “My D: drive is missing” error, you’re not without solutions. A missing D drive in Windows is nearly always a mounting problem rather than a lost disk, and is very fixable with built-in or third-party tools. Before doing anything, make sure you recover your data with software like Disk Drill to prevent it from being permanently lost. From there, check the disk in Disk Management to confirm its status, then implement the necessary fix for your case.
The vast majority of cases end in a few clicks. However, for drives that aren’t visible in Disk Management or BIOS (even when connected to a working port, with a working cable), this indicates physical failure. Your only option is to send this to a professional recovery lab if the data is important. This is very much the exception rather than the rule, though, and most cases of a missing D drive are fixable at home.
FAQ
A D drive suddenly missing after an update is almost always a drive letter problem rather than lost data. Because every update re-enumerates the hardware and reloads storage drivers, there’s a chance that a secondary drive could lose its drive letter. Head into Disk Management and assign the drive letter back to restore access.
Yes, especially with external drives, as it forces your computer to re-detect hardware. However, this won’t help if a drive letter (specifically D:) isn’t assigned automatically upon reboot. In that case, you’ll need to assign the drive letter, or change the existing one (if it was assigned a different one). If the disk is offline, you’ll need to bring it online first, and if it’s RAW or unallocated, recover the most important data from it using data recovery software, then try restoring it with TestDisk before opting for a format.
File Explorer only shows volumes that Windows has mounted and assigned a drive letter. You will need to assign the drive letter in Disk Management for it to appear in File Explorer. However, if the disk is reading RAW or unallocated, recover data with recovery software first, then either try to restore the lost partition or create a brand new one.
A drive that’s missing from Disk Management is usually a sign of a deeper, physical issue. Check whether the drive is appearing in BIOS or UEFI, and if it’s not, try swapping out the cable or trying another USB or SATA port, and if possible, try the drive in another PC. If it’s still not visible, see our guide on diagnosing a hard drive that’s not detected for more detailed steps. If nothing can be done, consult a professional recovery service.
No. A drive letter is merely a label Windows uses to reach a volume, so assigning or changing one does not modify any contents on the drive. However, be wary of any prompts to initialize or format the drive, as these do modify the disk and will affect your chances of data recovery.
Yes. Bringing a disk back online in Windows does not touch your partitions or files. If the disk is offline due to a signature clash with another disk, Windows will simply give it a new signature. However, if the disk shows as “Not Initialized” after bringing it back online, recover your data before initializing or formatting.
Intermittent or erratic behavior is a sign of physical problems with the drive. On an external drive, the usual suspects are a worn USB cable, a port that cannot supply enough power, a hub or dock in the way, or Windows suspending the device to save power. Move any and all important data to another drive, and do a S.M.A.R.T. check on the drive with problems to see if it can still be considered reliable for long-term storage.
