


You plugged in your Western Digital drive, but the files you needed are nowhere to be found. Whatever the cause of their disappearance, it’s very likely that the data you’re looking for is still sitting untouched on the disk. So you have a real shot at getting it back, but you need to stop using the drive because lost data is recoverable only until something writes over it. WD drives also add their own complication because many newer external models (like the My Passport) encrypt your data. That rules out some recovery shortcuts that work on other brands.
Nonetheless, this guide walks you through how to recover data from a Western Digital hard drive, and we have a wealth of experience with each method presented here, so you can be sure that they work in practice.
Choose the Right Western Digital Hard Drive Recovery Method
The safest way to recover data from a Western Digital hard drive depends on what went wrong with it. A couple of things specific to WD drives also affect your options.
Most newer WD external models, such as the My Passport and My Book, use hardware encryption tied to the original circuit board, which limits certain DIY fixes. Additionally, older WD desktop drives, for example, WD Green models, were prone to premature head wear from aggressive head parking.
The table below provides an overview of the most common unpleasant WD drive situations you can encounter, paired with the recovery method that fits each one. Find your situation, jump straight to that method, and skip those that don’t apply to you.
| Your WD drive situation | Go to this method | Why is this the right path |
| You deleted files from a WD drive, emptied the Recycle Bin or Trash, or lost files after a simple slip. | Method 1 | Recovery software is the fastest option when the drive still works, and nothing has overwritten your files. |
| Your WD drive is corrupted, has bad sectors, freezes during scans, runs slow, or shows up as RAW. | Method 2 | A byte-to-byte backup lets you scan a copy of the disk instead of stressing the original. |
| You formatted a Western Digital hard drive by mistake. | Method 3 | A quick format usually leaves your data behind, so stop using the drive and scan it first. |
| Your WD external drive does not appear in File Explorer or Finder. | Method 4 | Your next step depends on whether the drive shows up in Disk Management, Disk Utility, Device Manager, or nowhere at all. |
| You set up backups before the files disappeared. | Method 5 | Restoring from a backup is safer than scanning a drive that is already damaged. |
| Your WD drive clicks, beeps, will not spin up, reports the wrong capacity, or has taken physical damage. | Method 6 | DIY repair can make physical damage worse, so a recovery lab is the safer choice. |
Method 1: Recover Files from a Western Digital Hard Drive with Recovery Software
Data recovery software is the first thing to try if your Western Digital drive still shows up on your computer. With it, you can handle deleted files, an emptied Recycle Bin or Trash, an accidental format, and files that vanished from a WD external drive. The process works the same way regardless of whether you have a WD My Passport, a WD Elements, a WD My Book, or an internal Western Digital drive.
Here is how to scan your WD drive with the latest version of Disk Drill.
- Download Disk Drill and follow the prompts to install it. Put it on a drive other than the WD drive you want to recover from, so you don’t write over the files you’re after. A spare flash drive or a separate partition works fine.
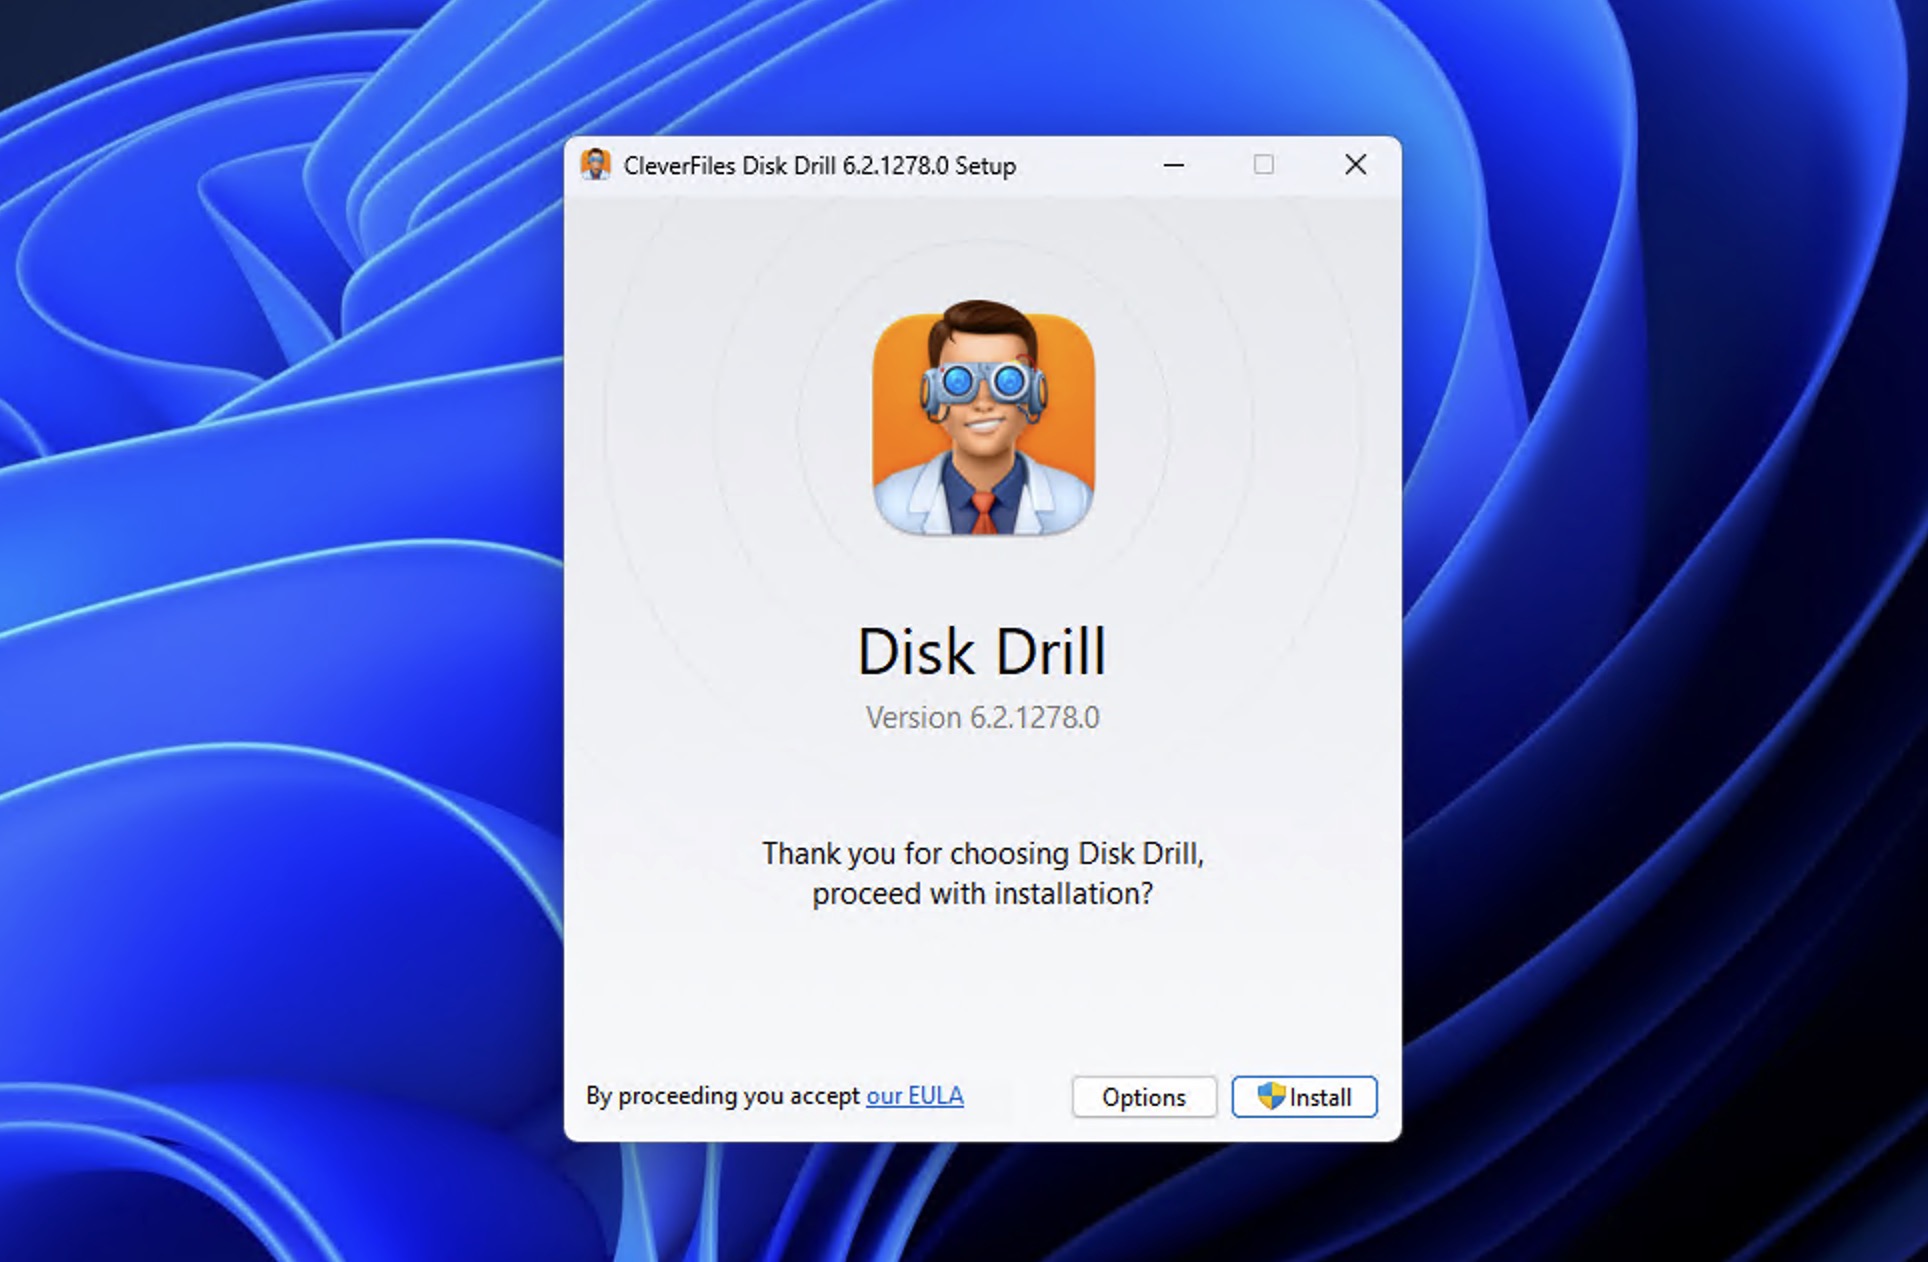
- Launch the app. Your Western Digital drive should show up under Storage devices. Select it. If it’s a WD external drive, you can plug it in before or after you open Disk Drill, since the list updates on its own.
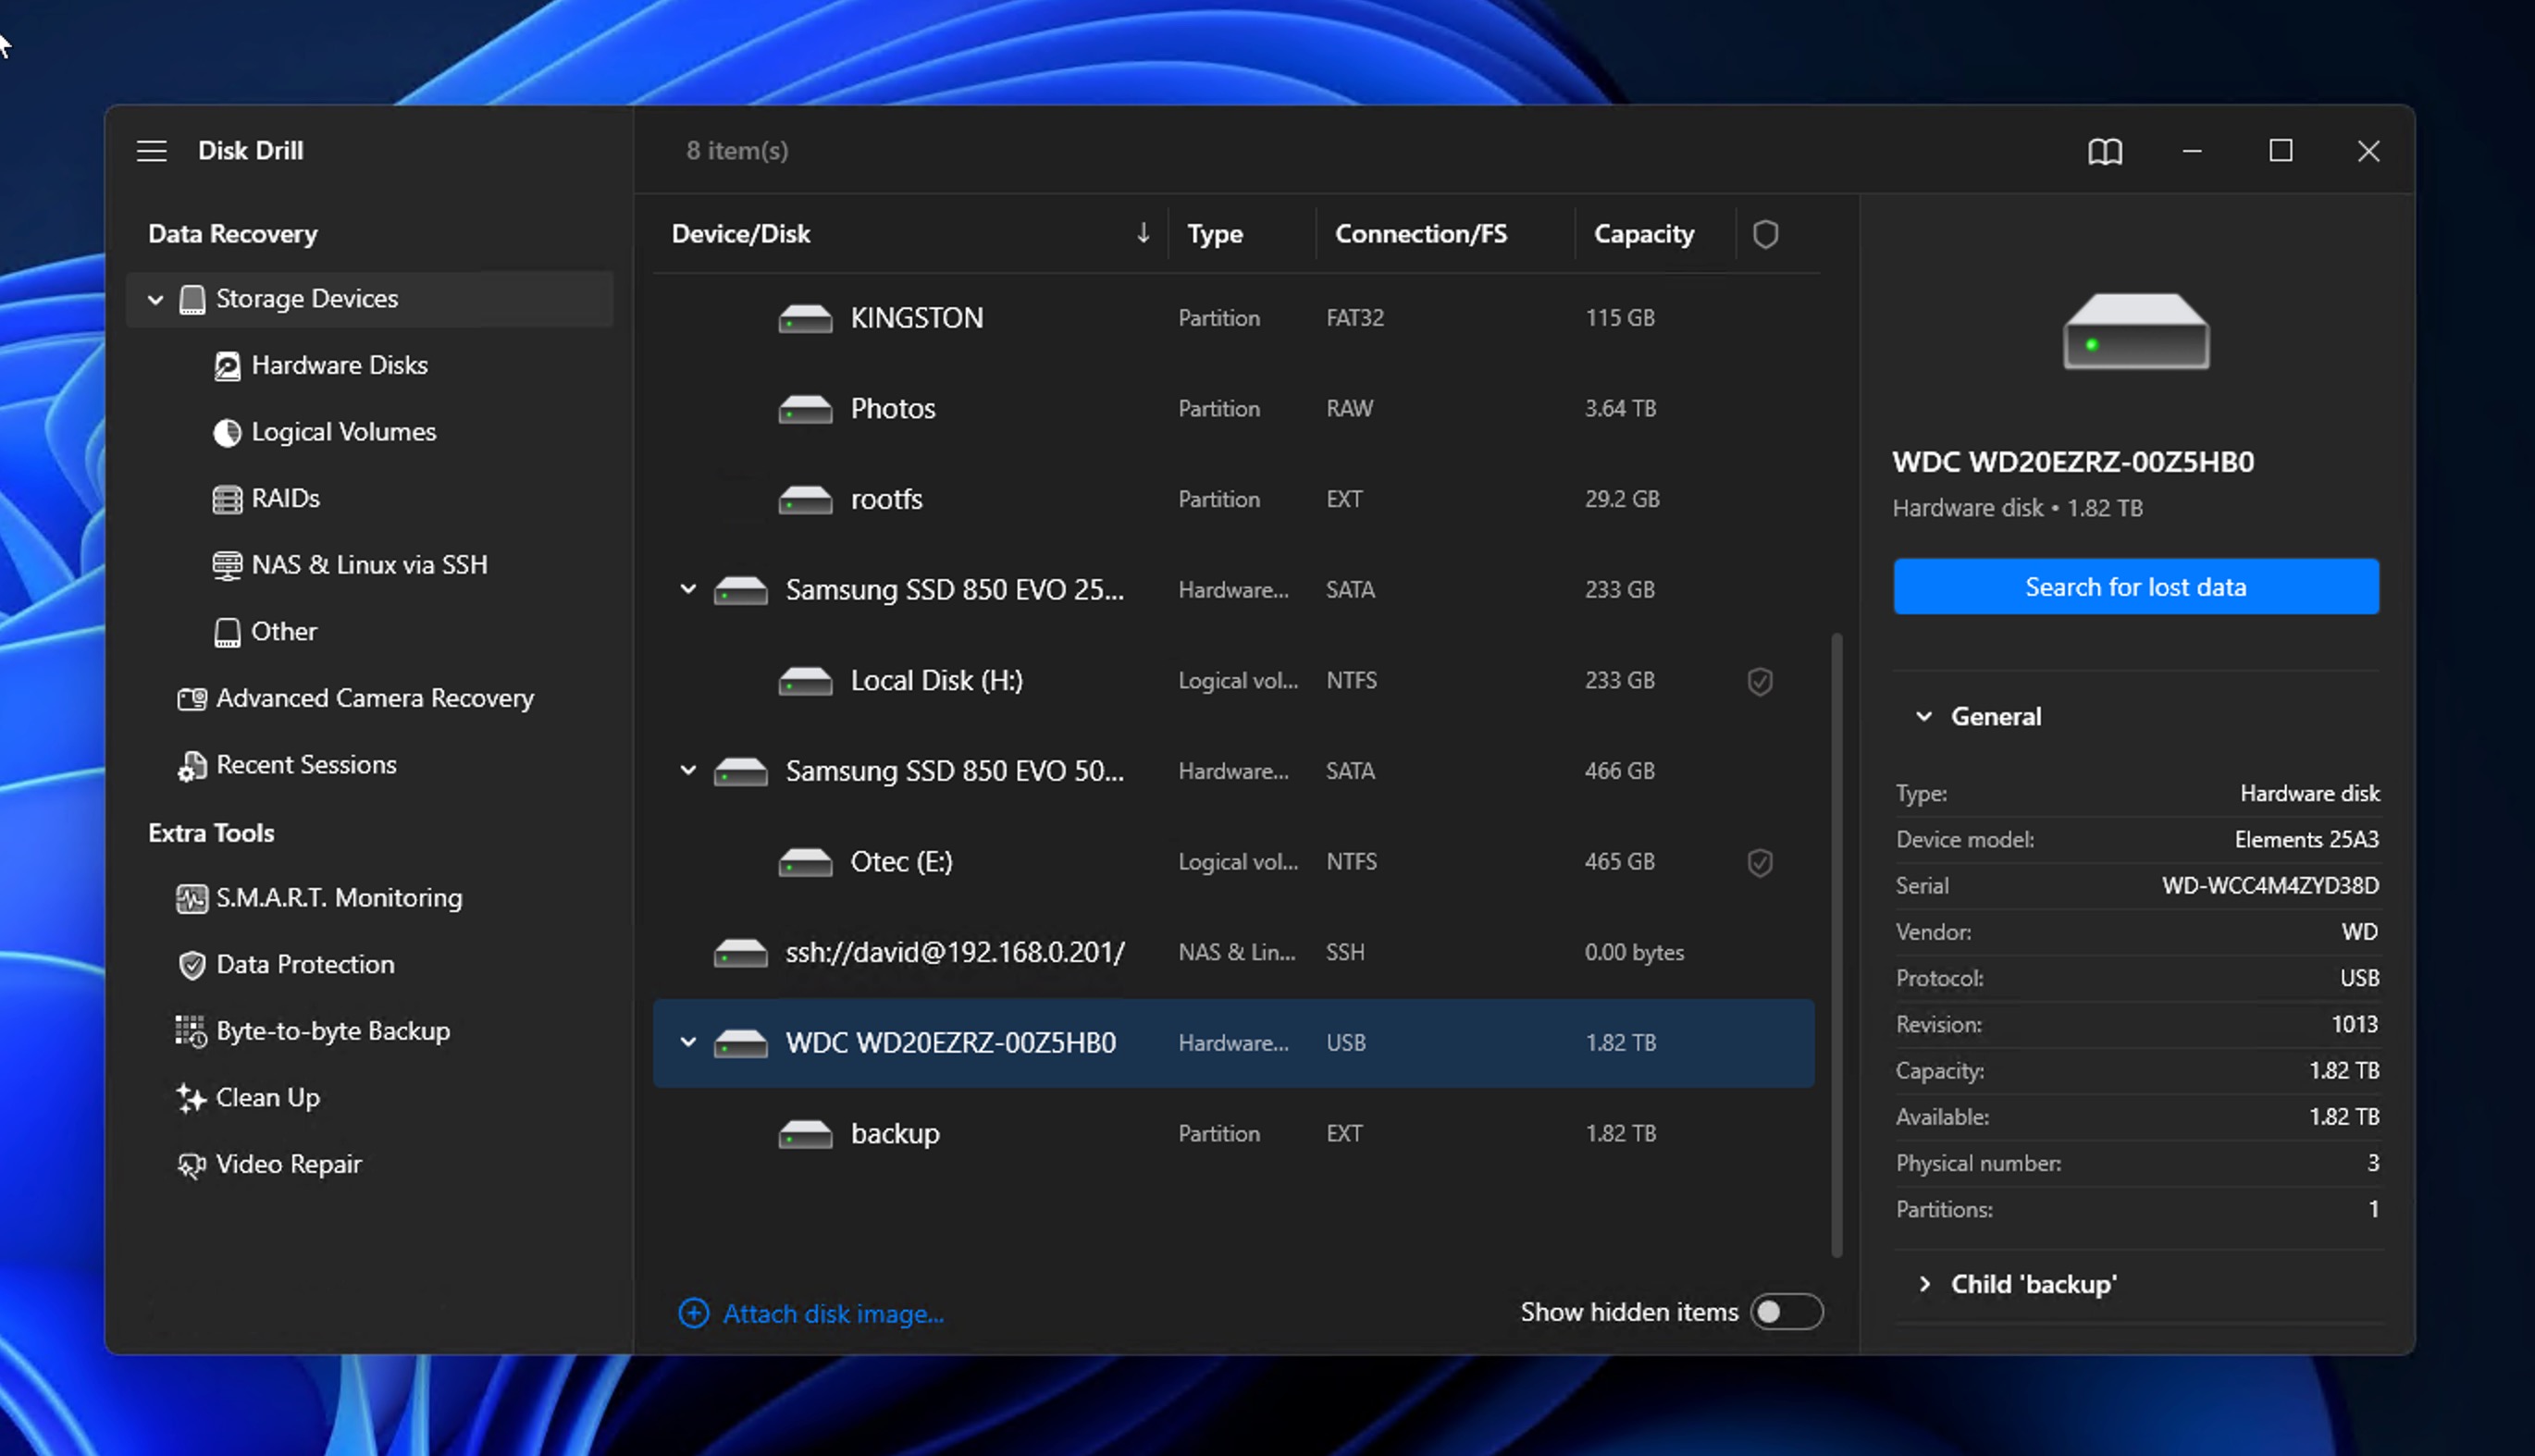
- Click Search for lost data. If Disk Drill offers a choice of scan methods, pick Universal Scan. (The other option, Advanced Camera Recovery, only rebuilds fragmented video from cameras and memory cards, so it isn’t the one for a WD data drive.) The scan then starts, and you can watch its progress.
- We recommend you let the scan run if possible (you can pause/resume it any time), but you don’t have to wait for it to finish. Instead, you can click Review found items to start browsing while the scan keeps going in the background.
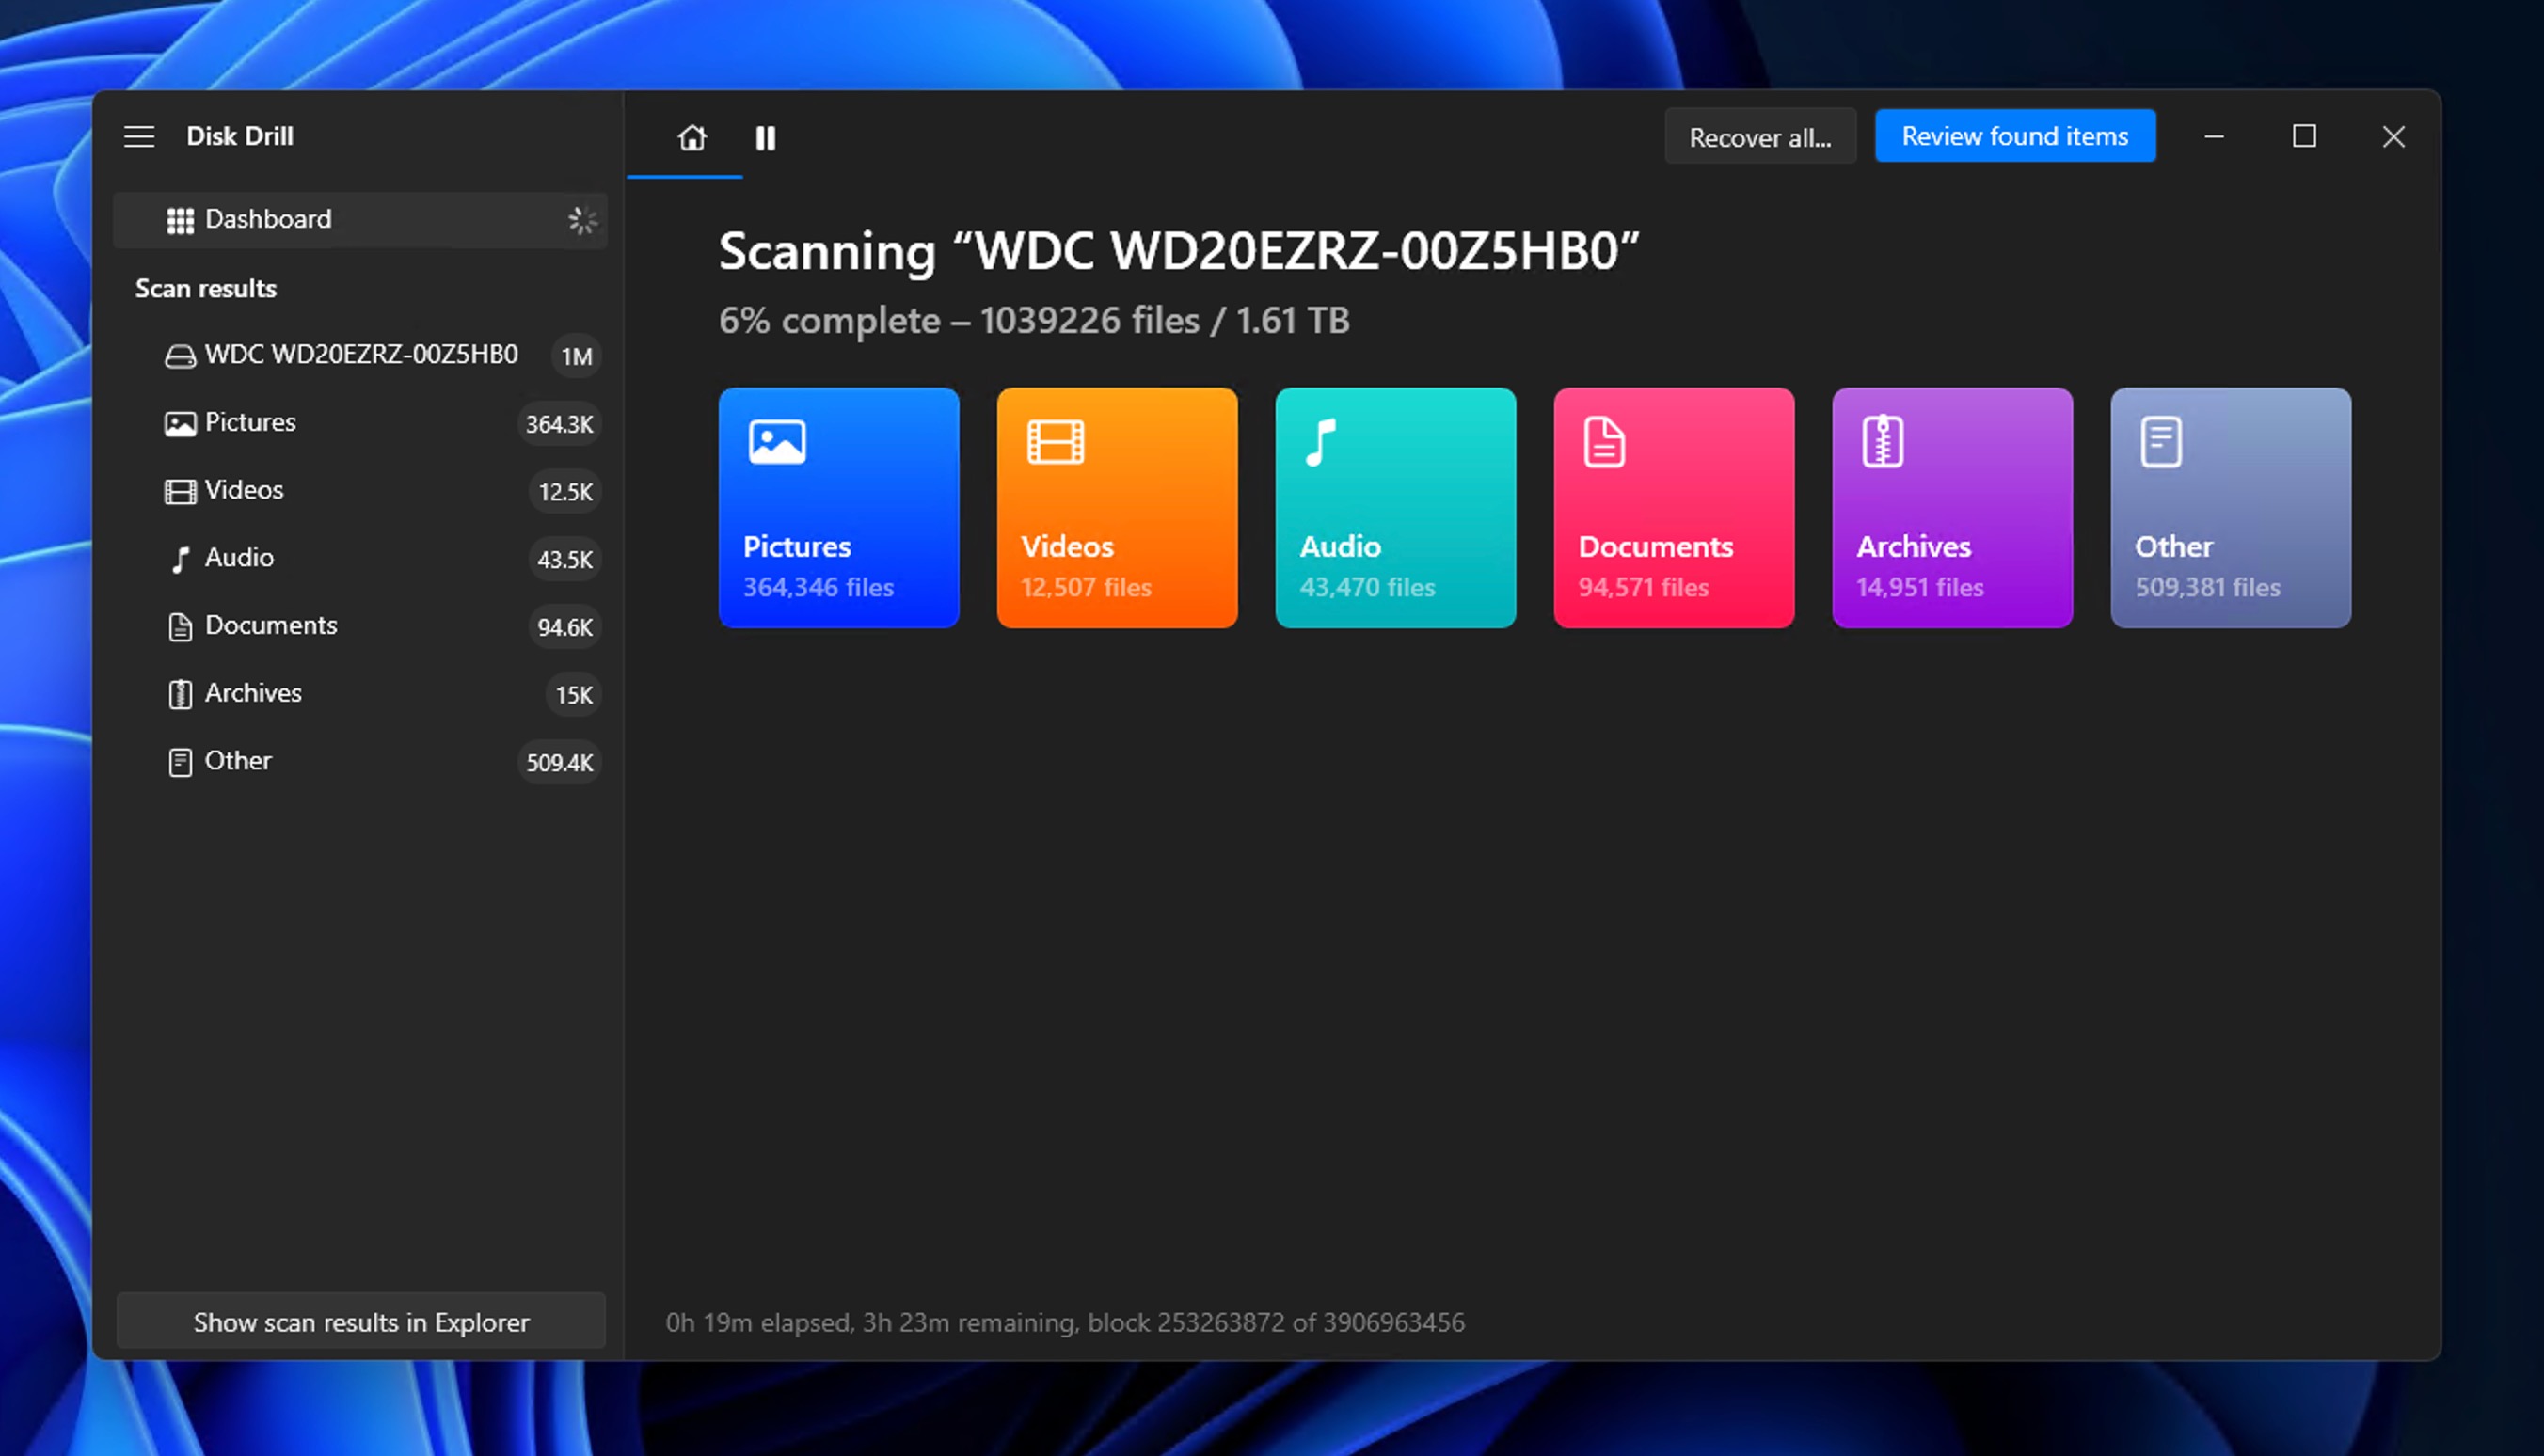
- Find your files using the filters on the left (Pictures, Video, Audio, Documents, Archive, Other) or by typing a name or extension in the search box. Deep-scan files that lost their names land in the Reconstructed section, so check there too.
- Preview before you recover them to verify their content and integrity. You can do just that by simply clicking a file. If it previews correctly, it can be recovered. Disk Drill also shows a recovery chance next to each file, which helps you decide what to grab first.
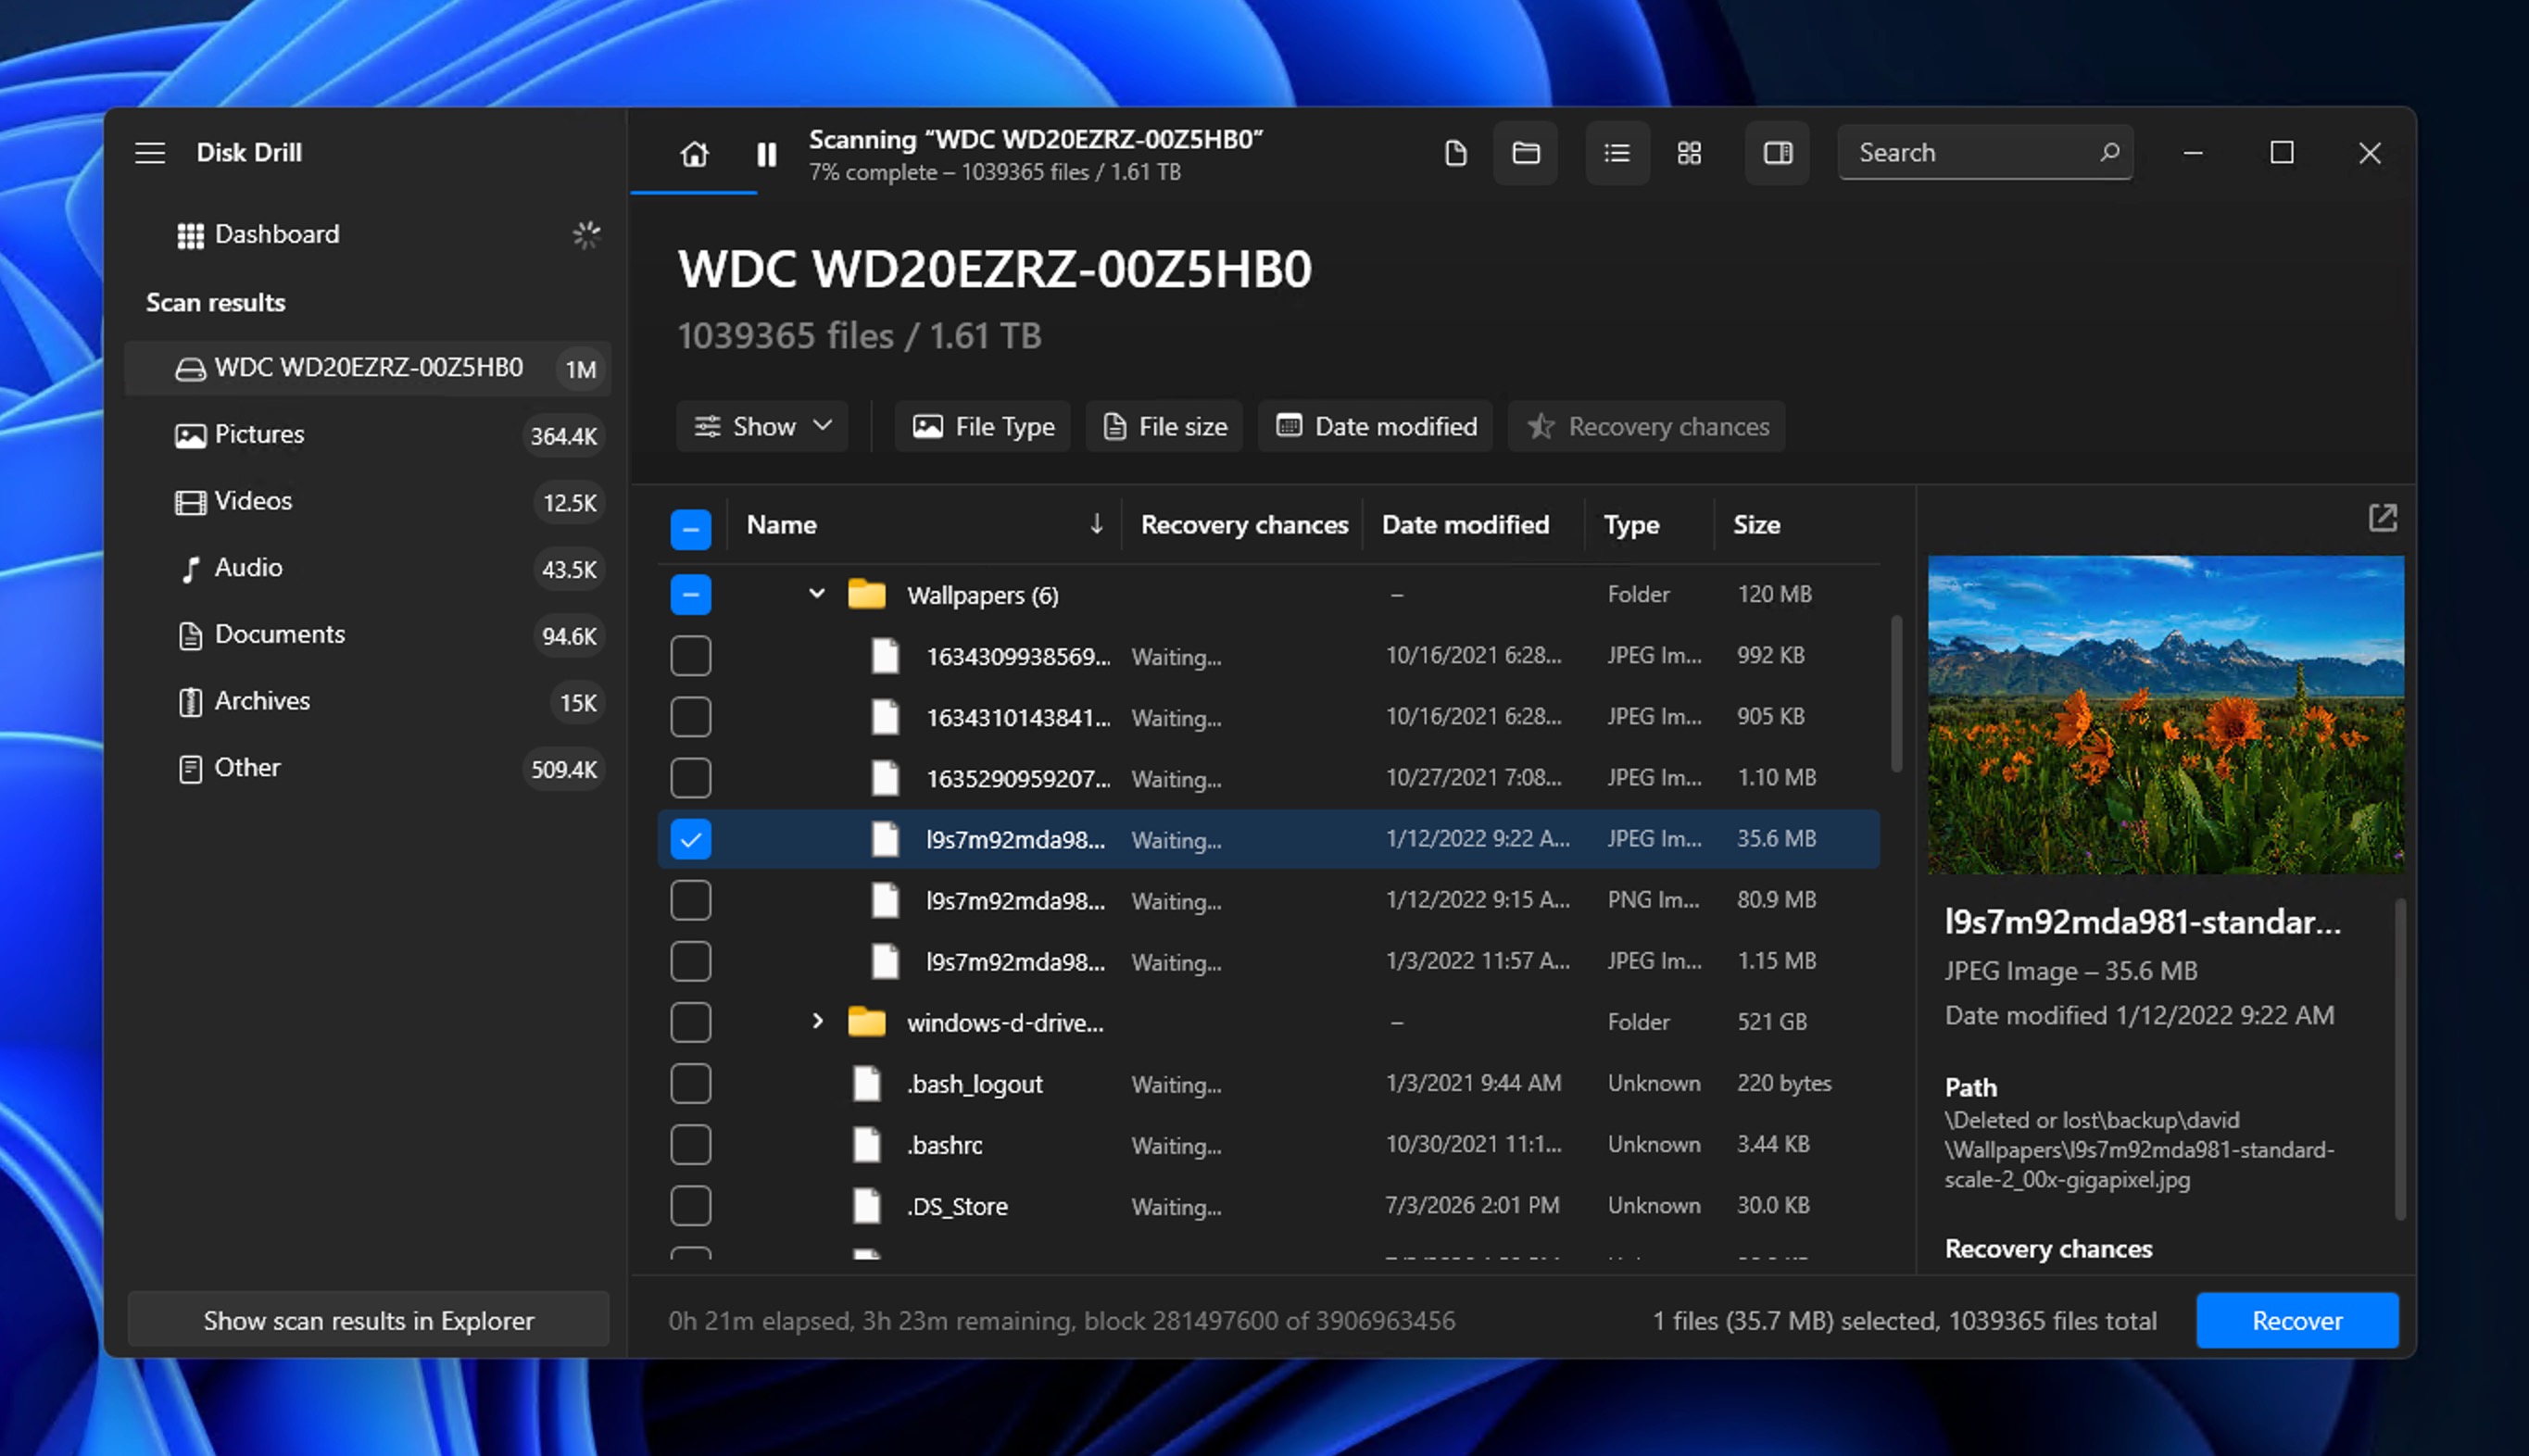
- Check the boxes next to the files you want, or click Recover all to take everything. Then click Recover and choose a save location on a different drive. Saving back to the same WD drive can overwrite other files you haven’t found yet.
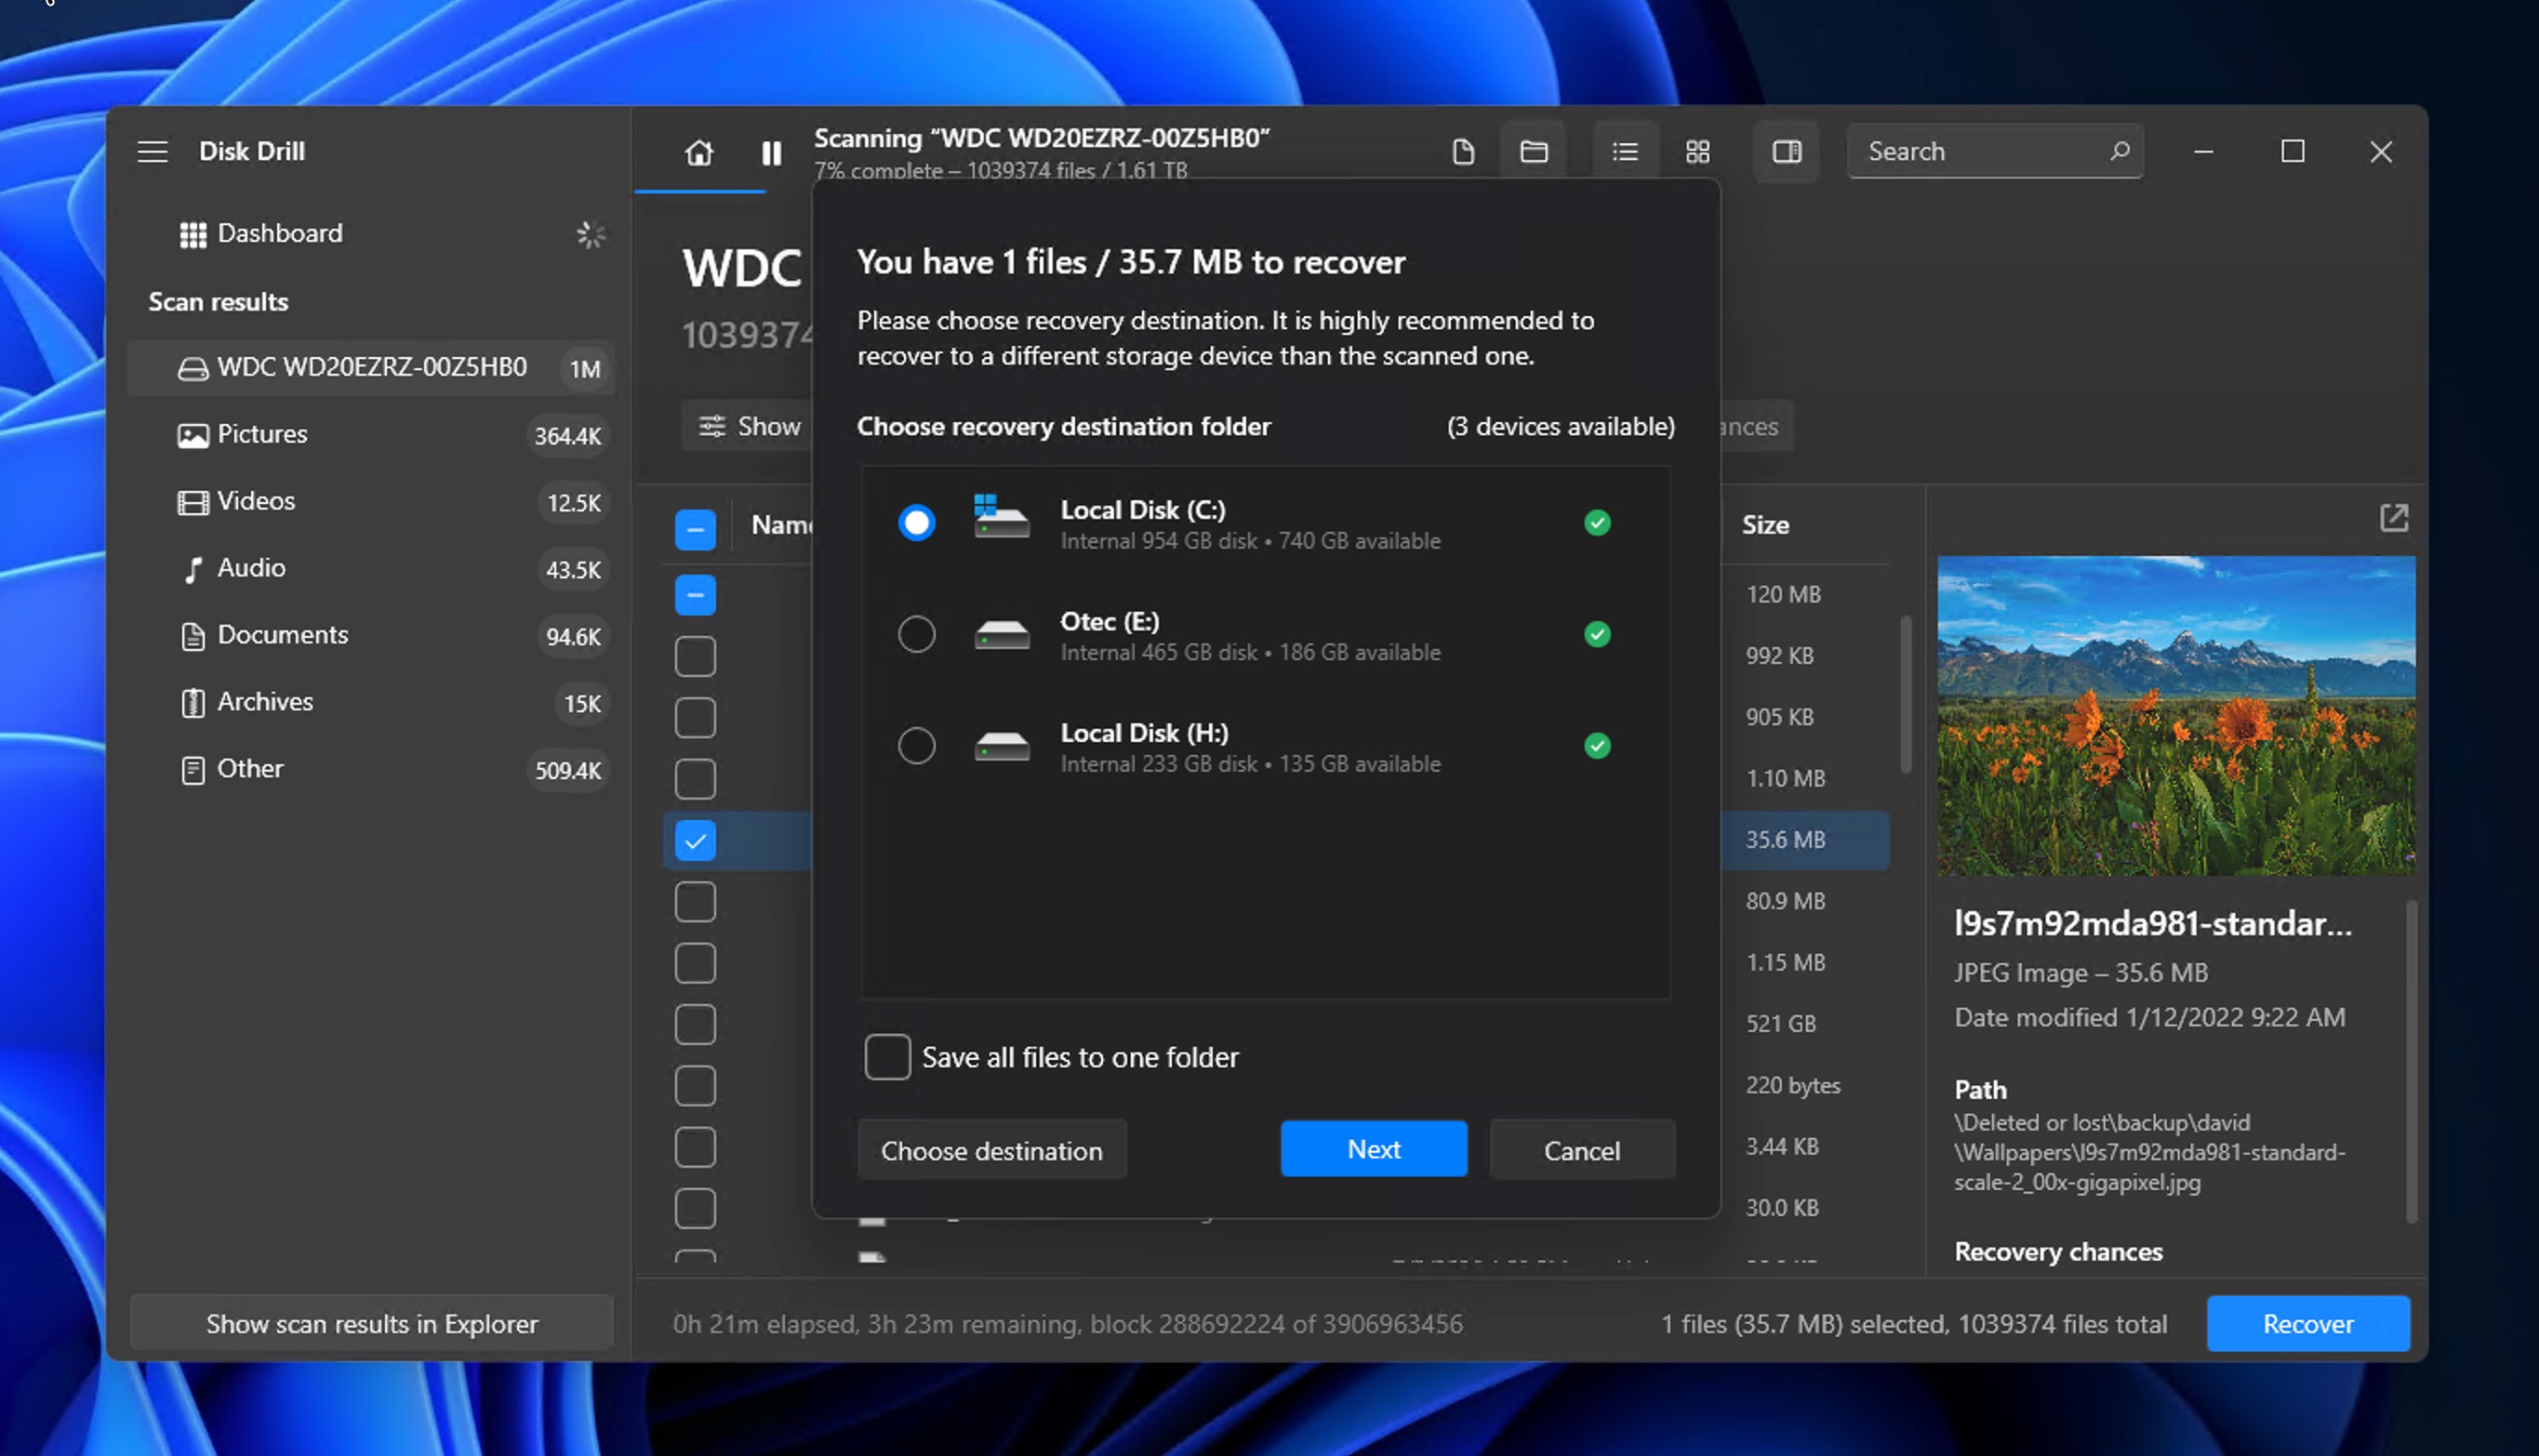
There are several good reasons why we went with Disk Drill as our number one choice for Western Digital file recovery. It reads every file system listed above, and when it has to fall back on signatures, it knows around 400 file types, so you can reap the benefits of both approaches with just one tool. Disk Drill also keeps the recovery process simple with its polished graphical interface and an intuitive step-by-step process that never leaves you wondering what the next step is.
Method 2: Recover Data from a Corrupted or Failing WD Hard Drive
Method 1 works when the WD drive is healthy enough to scan directly. But if the drive itself is acting up, scanning it right away can make things worse. In that case, the recovery process starts with creating a byte-to-byte backup of the drive so you can scan a safe copy instead of the original. If any of these symptoms sound familiar, this is the method you need:
- The WD drive freezes partway through a scan.
- It disconnects on its own, at random.
- It shows up as RAW or Unallocated.
- File Explorer or Finder slows to a crawl whenever the drive is plugged in.
- Recovery software stalls or slows down once it starts reading the disk.
- You suspect the drive is on its way out.
When symptoms like those above are present, scanning the drive right away becomes risky because any more stress you put on a storage device that may already be failing can make the damage worse. The safer move is to make a disk image first, then scan the copy instead of the original. This is what professional labs do. The image also buys you a second chance, since you can rescan the copy as many times as you want, even if the original WD drive gets worse or dies on you.
You can make that image with the same tool from Method 1. Disk Drill has a Byte-to-byte Backup tool that copies the drive sector by sector, bad blocks and all. On a drive with bad sectors, it grabs everything readable on the first pass and skips the trouble spots, then returns to the damaged areas without grinding away at the disk. It also draws a visual map of the bad zones as it works, so you can let it run to the end or stop once the parts you care about are copied.
Here is how to image your WD drive with Disk Drill.
- Download Disk Drill and install it on a healthy drive, not the WD drive you’re trying to save.
- Open the app and select Byte-to-byte Backup from the left sidebar.
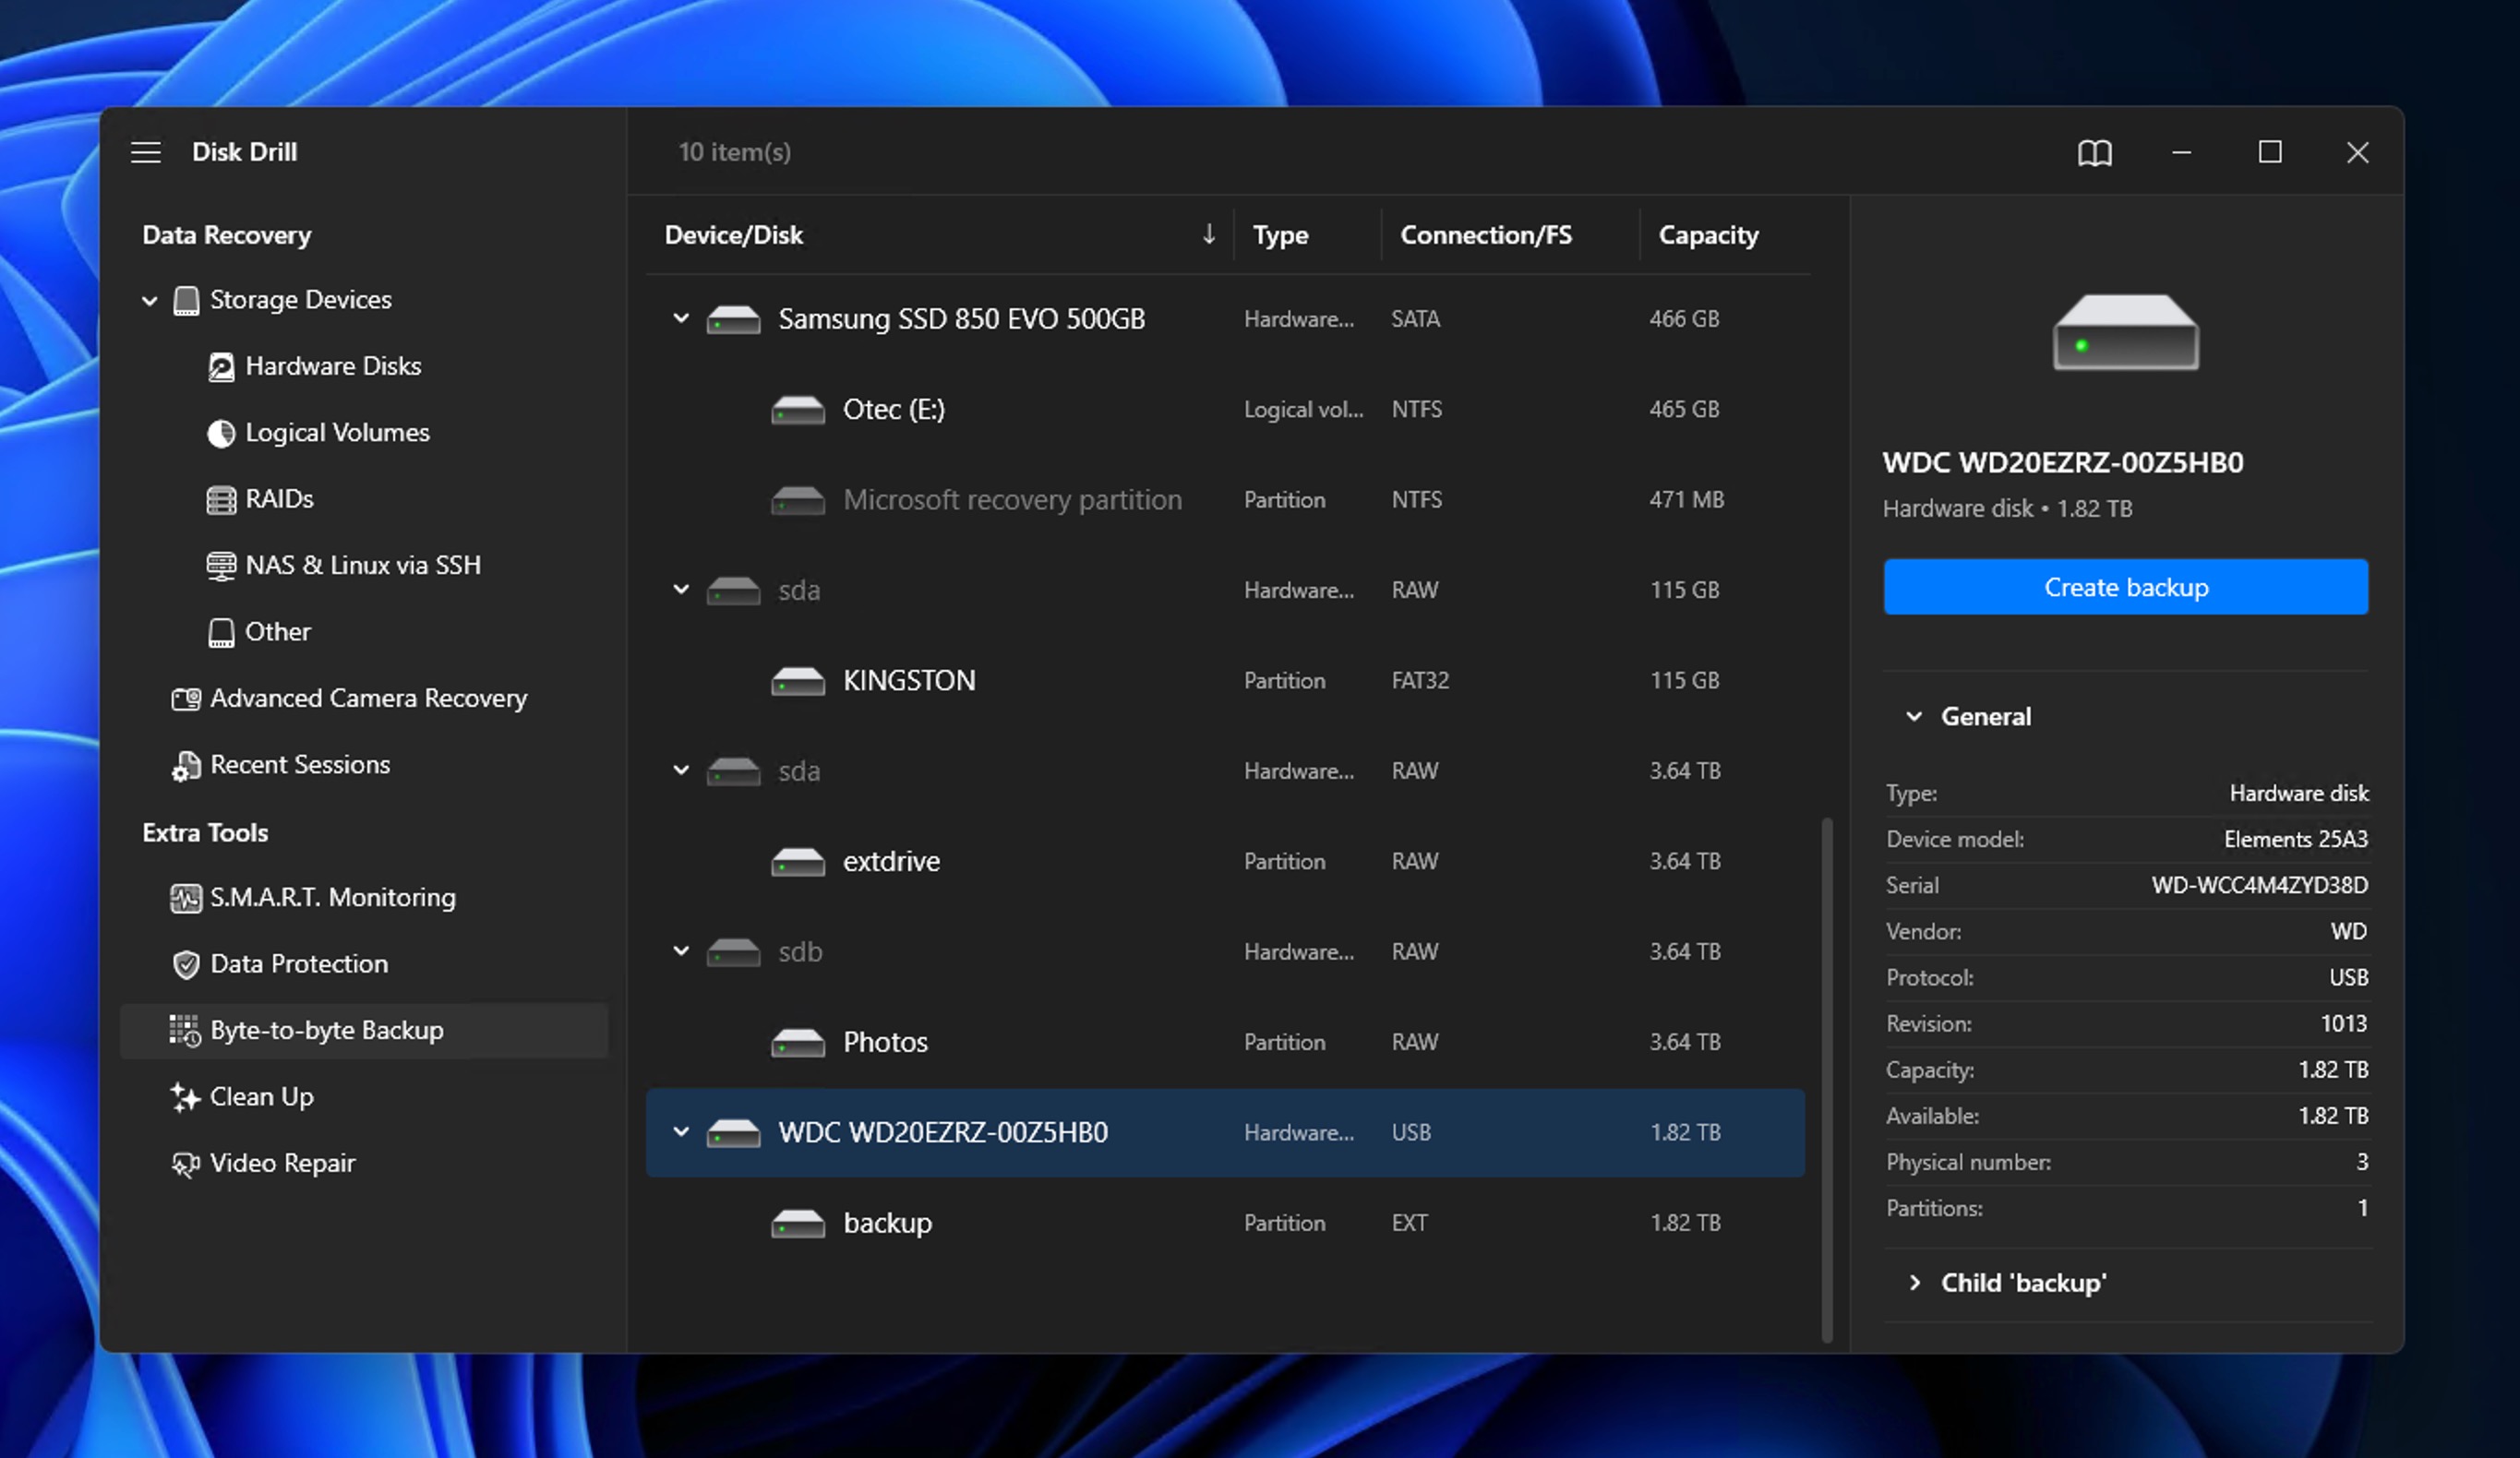
- Pick your Western Digital drive from the list of devices.
- Click Create backup and choose a destination that points to a folder on a different, healthy drive.
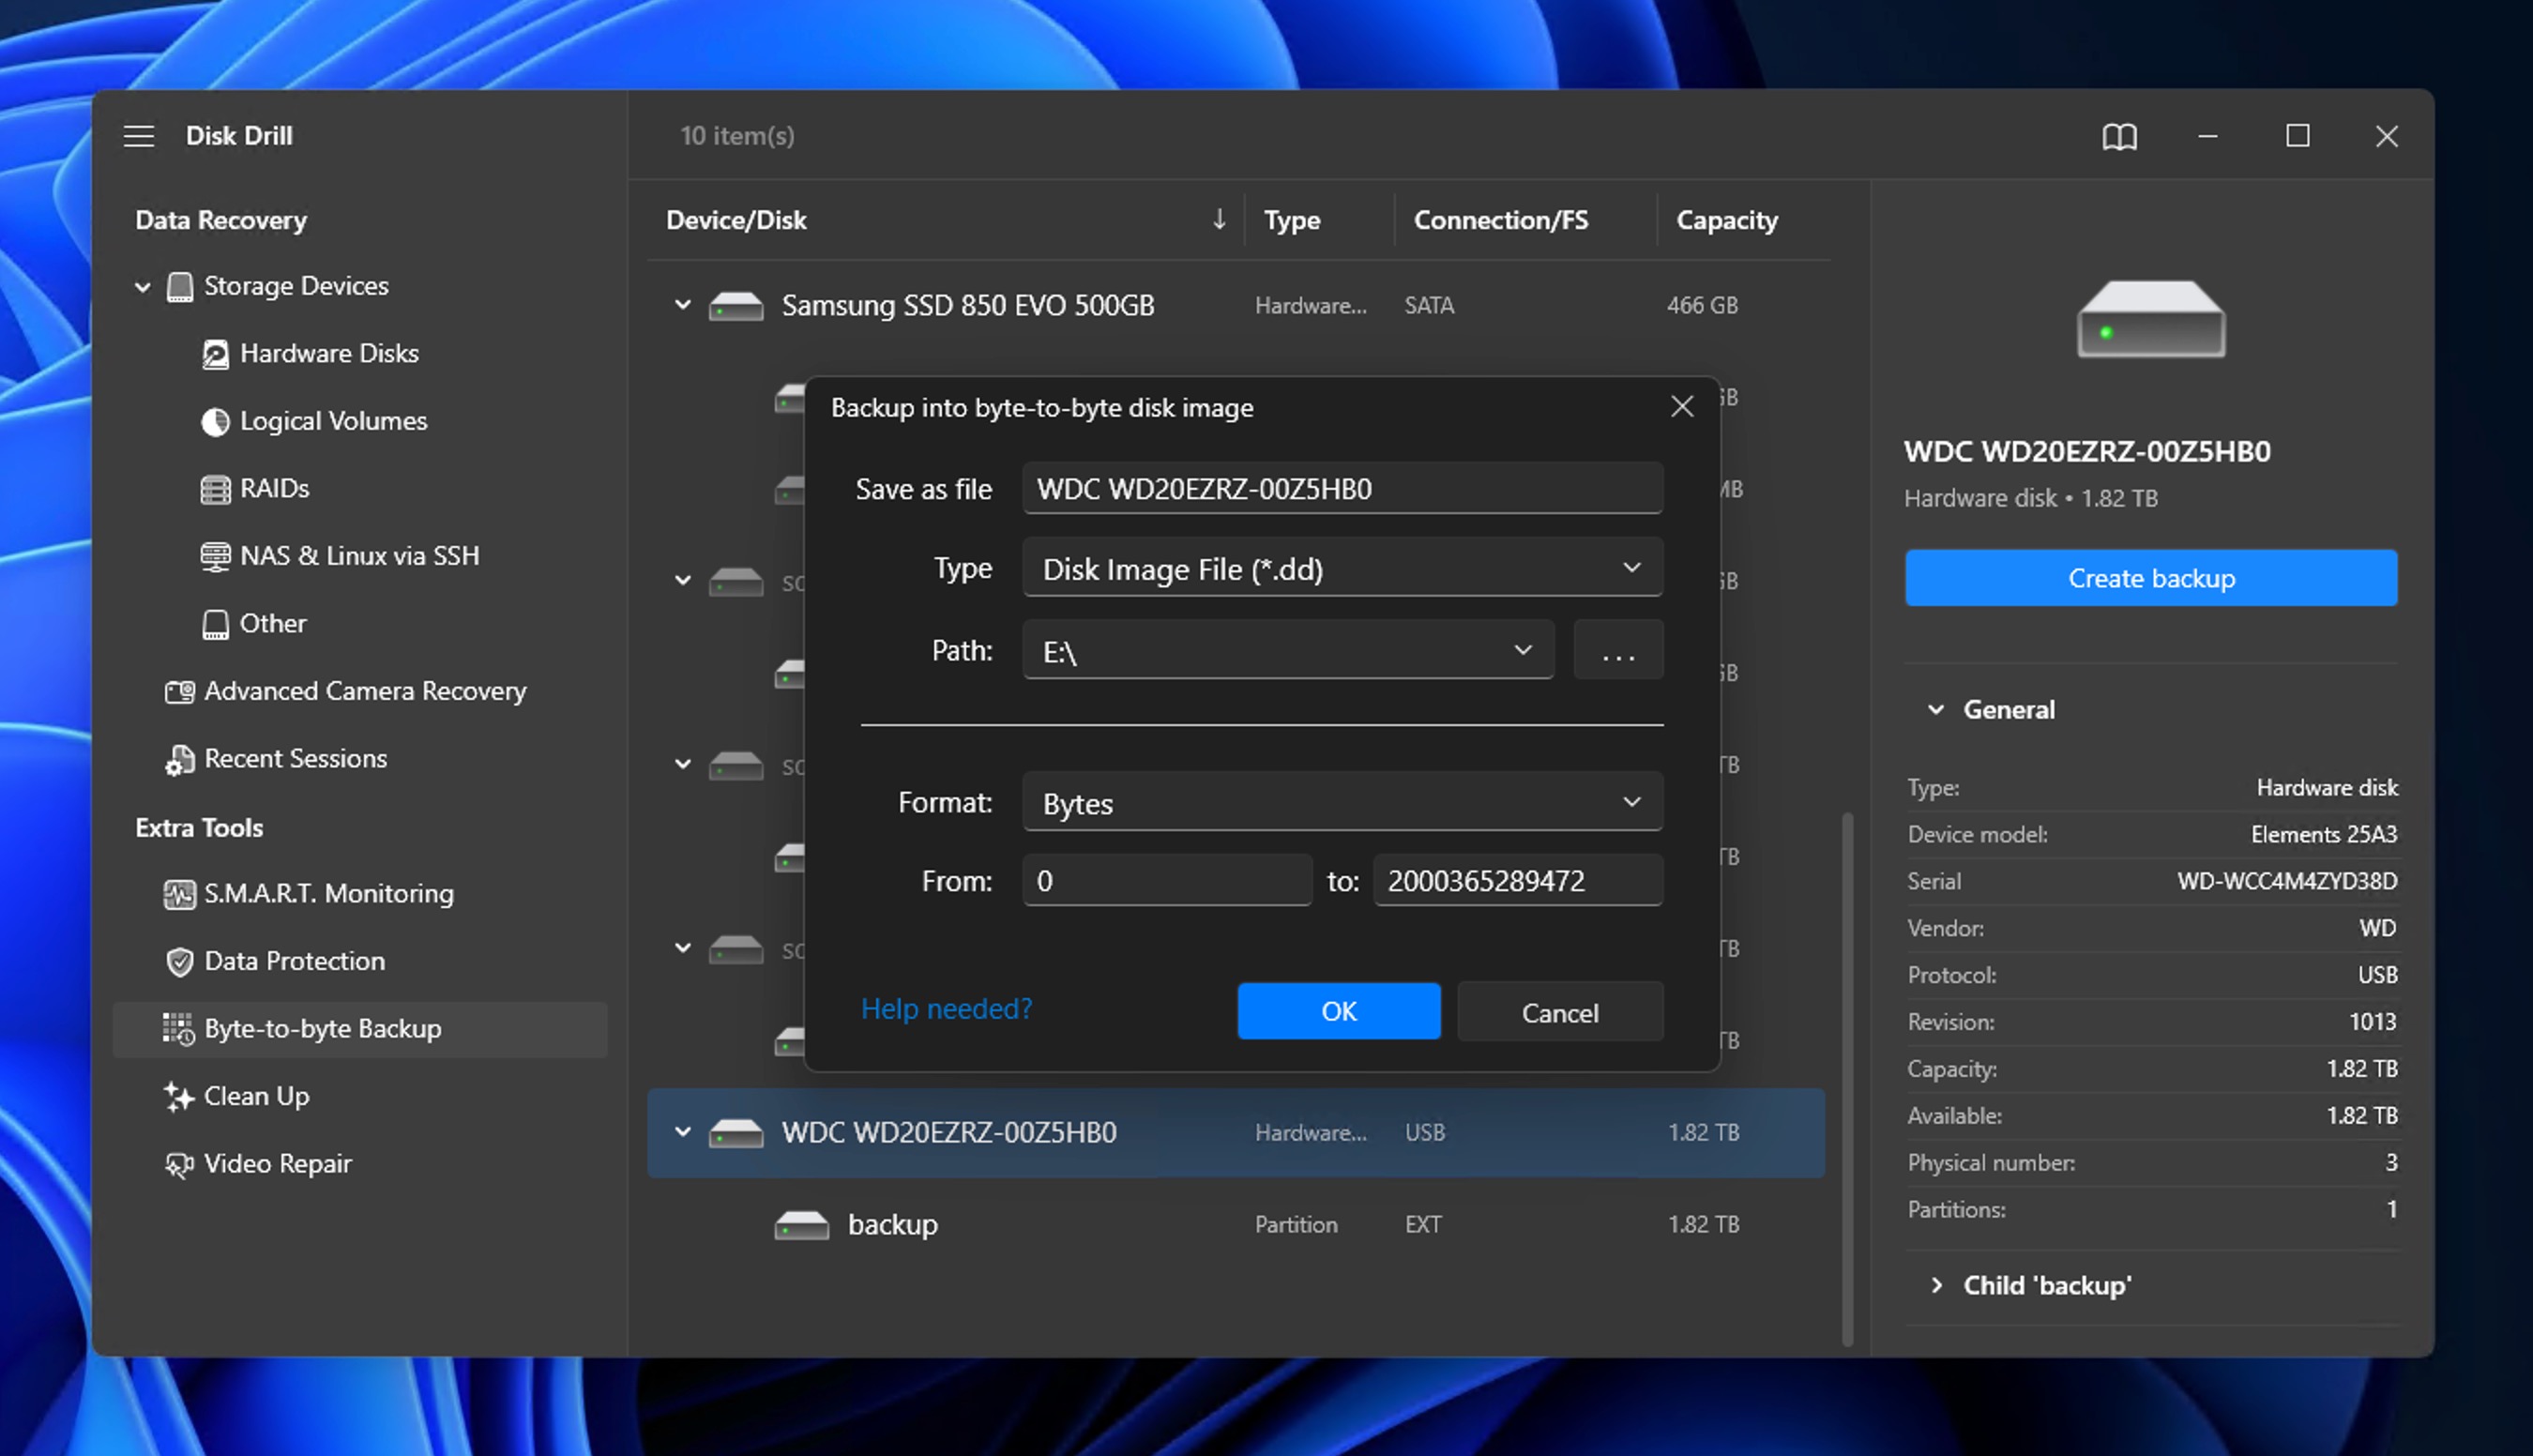
- Start the backup process. If the drive has bad sectors, Disk Drill shows the bad-zone map and makes extra read passes at the damaged spots on its own. The time this takes depends on the drive’s size and condition.
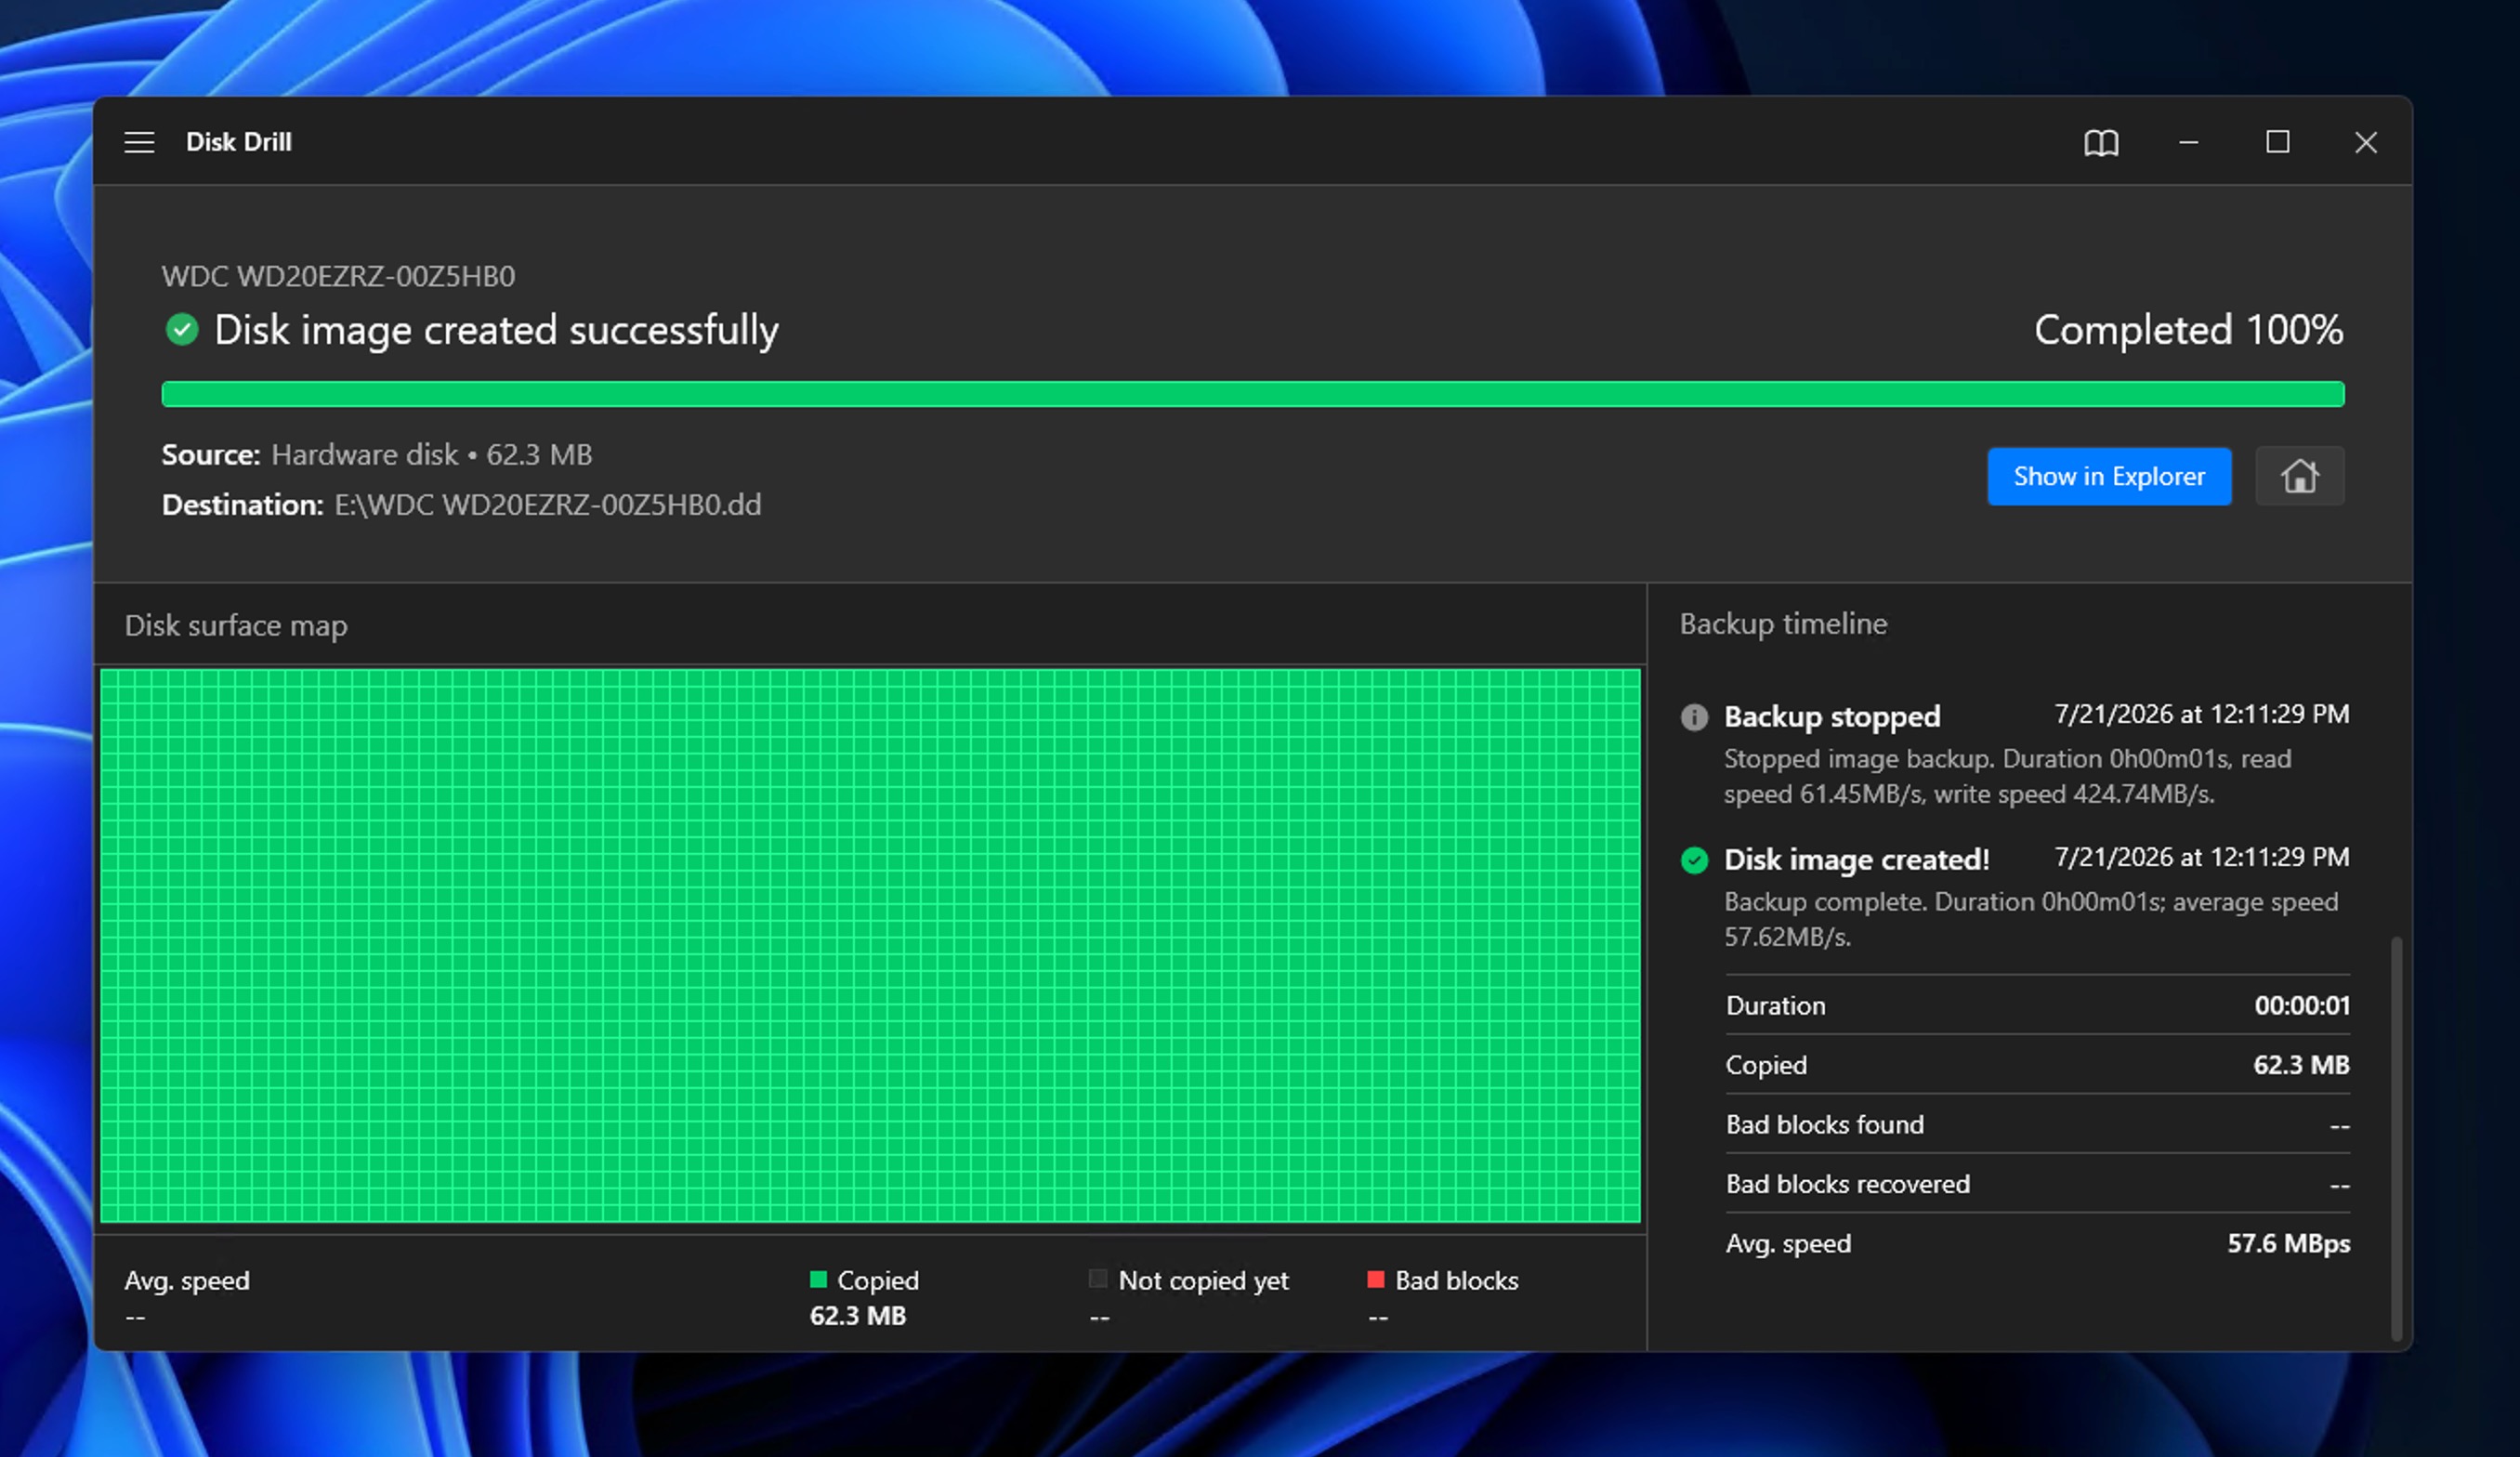
Once the backup is done, you’ll have an image file (a .dd on Windows or a .dmg on Mac). From here, you don’t need to touch the physical drive at all. Instead, you can go to the Storage devices section in Disk Drill, click Attach disk image, and select the file you just made.
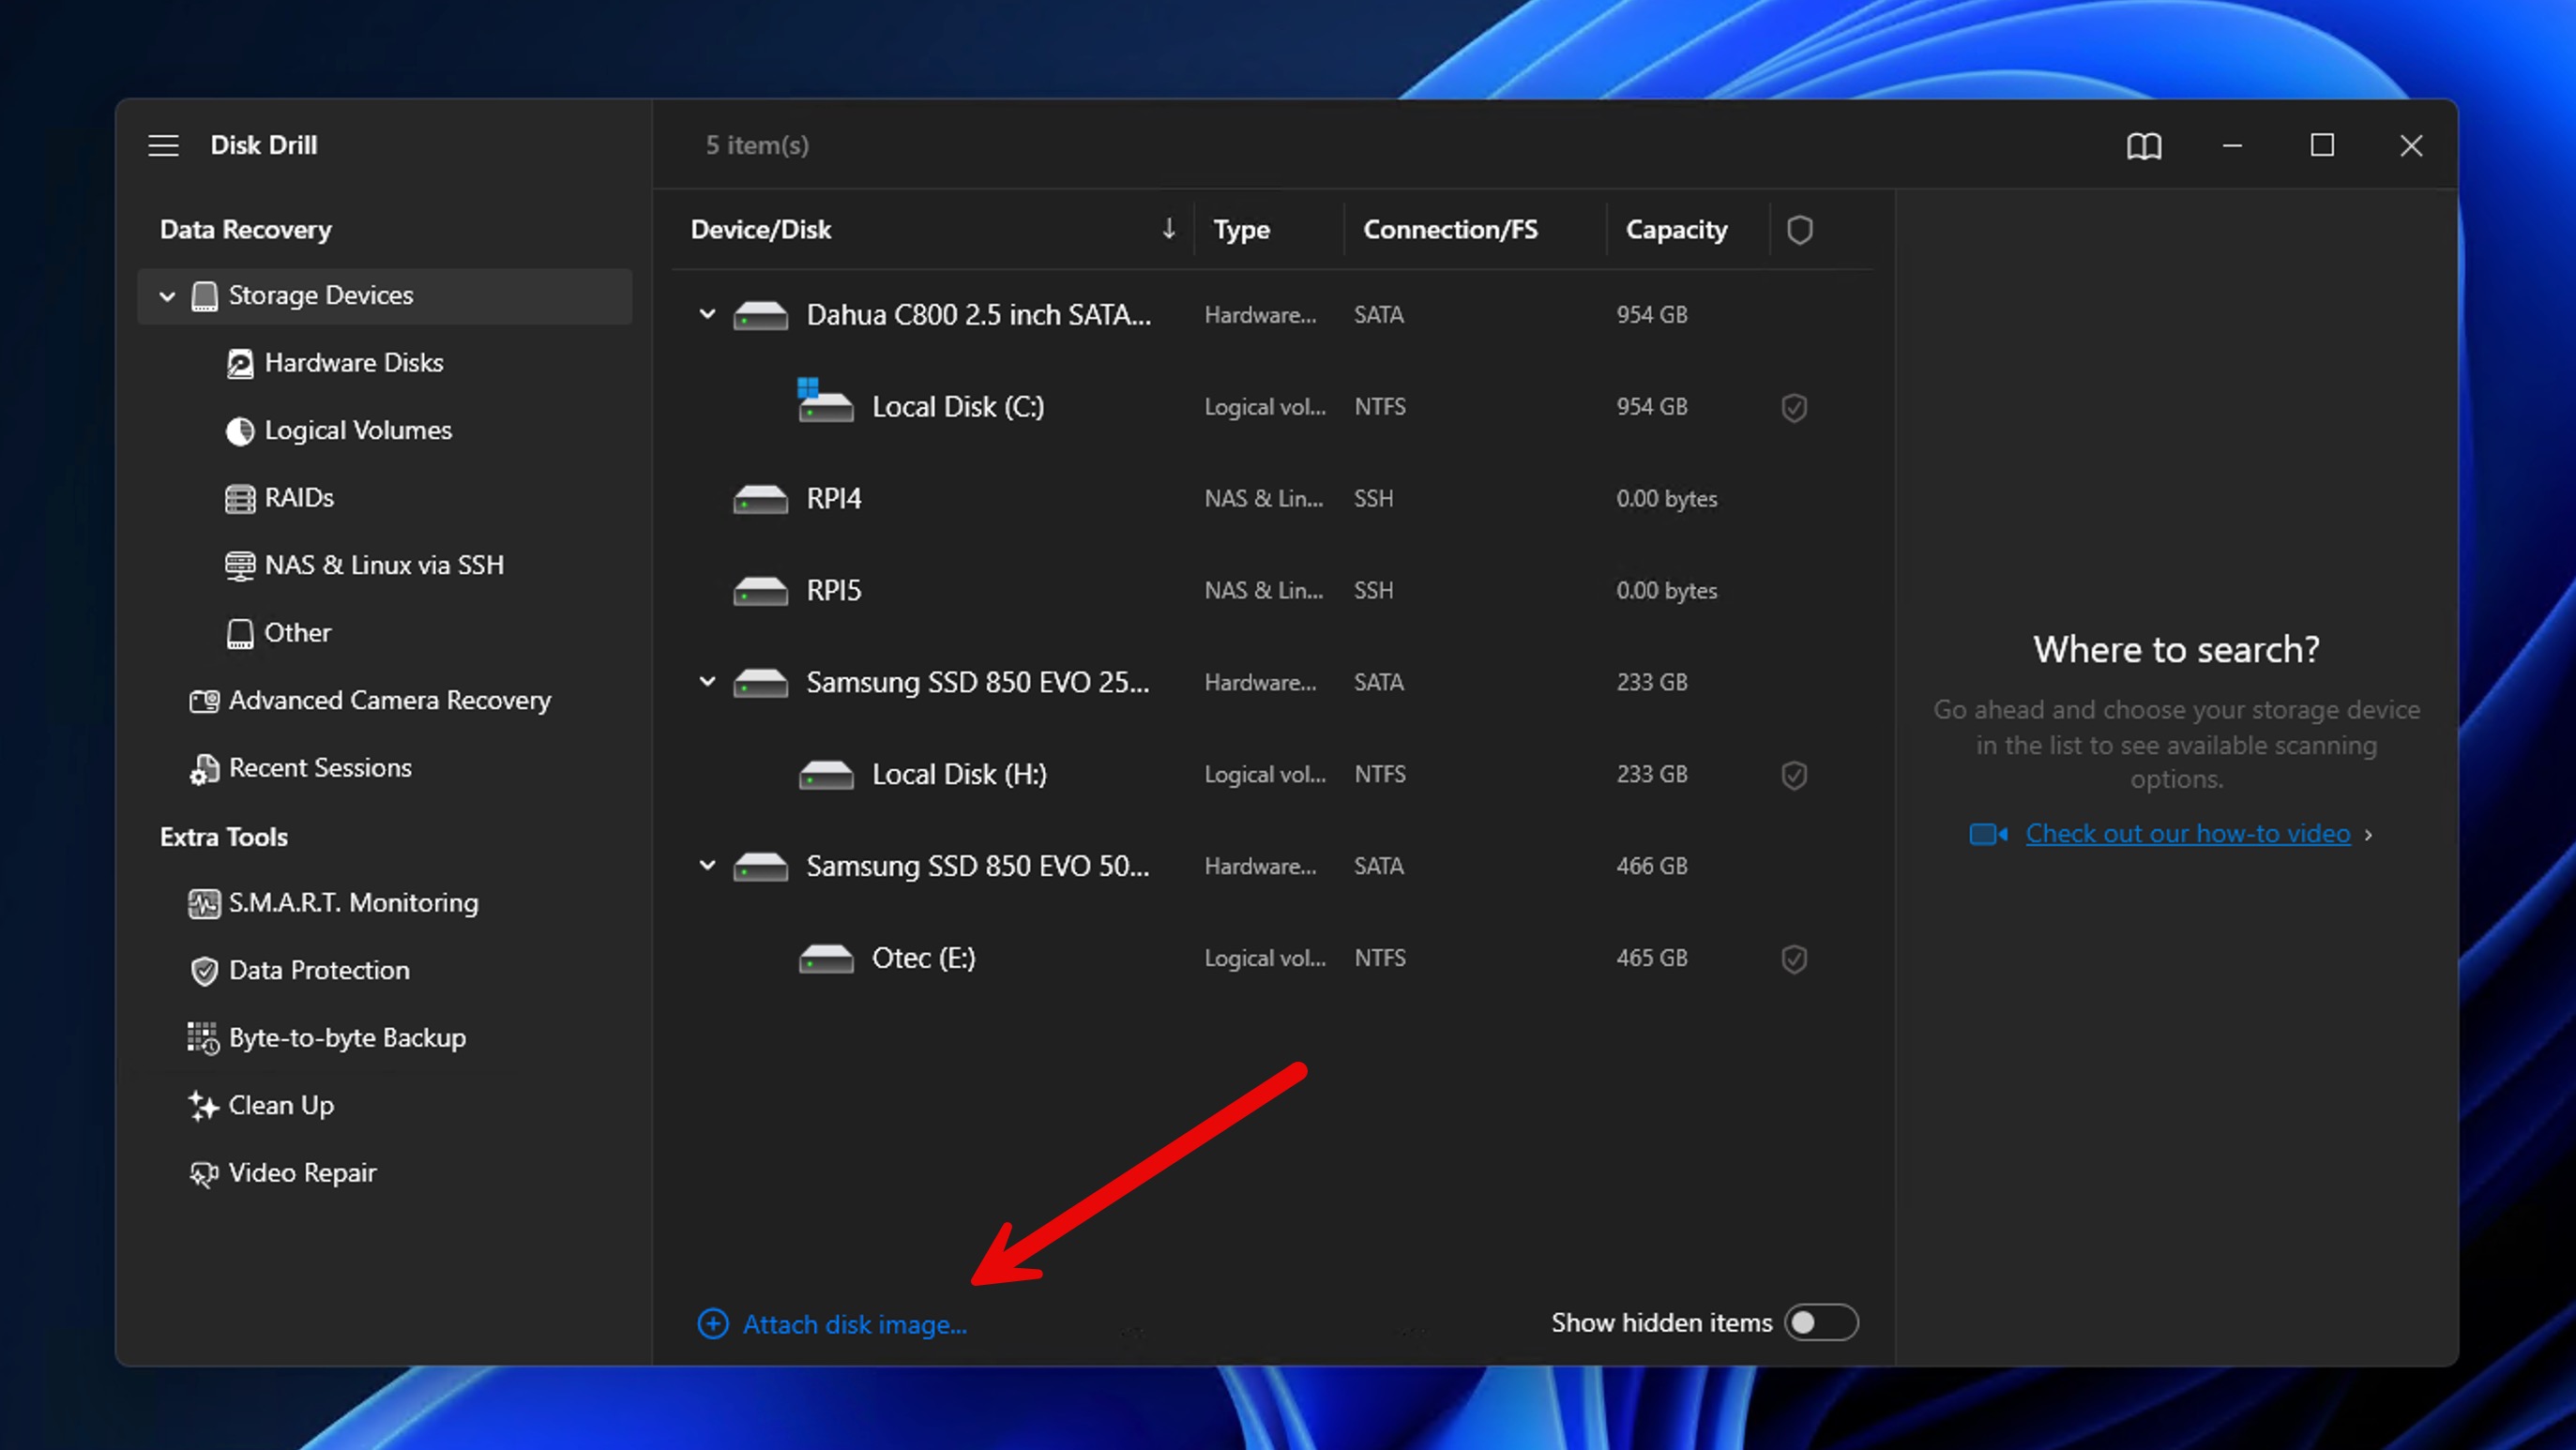
Disk Drill displays mounted disk images alongside regular storage devices. The rest of this careful recovery process is the same as Method 1. You select the attached image, search for lost data, preview your files, and save them to another drive.
Method 3: Recover Data from a Formatted Western Digital Hard Drive
If you format a WD drive by accident, then your files will look gone, but they usually aren’t, at least not right away, which is why formatted drive recovery works in plenty of cases where you’ve run a quick format and haven’t written to the drive afterward.
Quick Format vs Full Format
There are two kinds of format, and the main difference between them is why some formatted Western Digital hard drives can be recovered and some can’t:
- A quick format only clears the drive’s file system records. It marks the whole drive as empty and ready to use, but your old files stay on the disk until something writes over them. That’s the good case. The data is still sitting there, waiting to be found.
- A full format (at least on Windows Vista and later) writes zeros across every sector of the drive. That overwrites your old files for real and leaves little or nothing for recovery software to find.
Fortunately, Windows leaves Quick Format checked by default in the format dialog, so most people format quickly without even realizing it. That’s why Western Digital drive recovery is worth trying after an accidental format, even when things look hopeless.
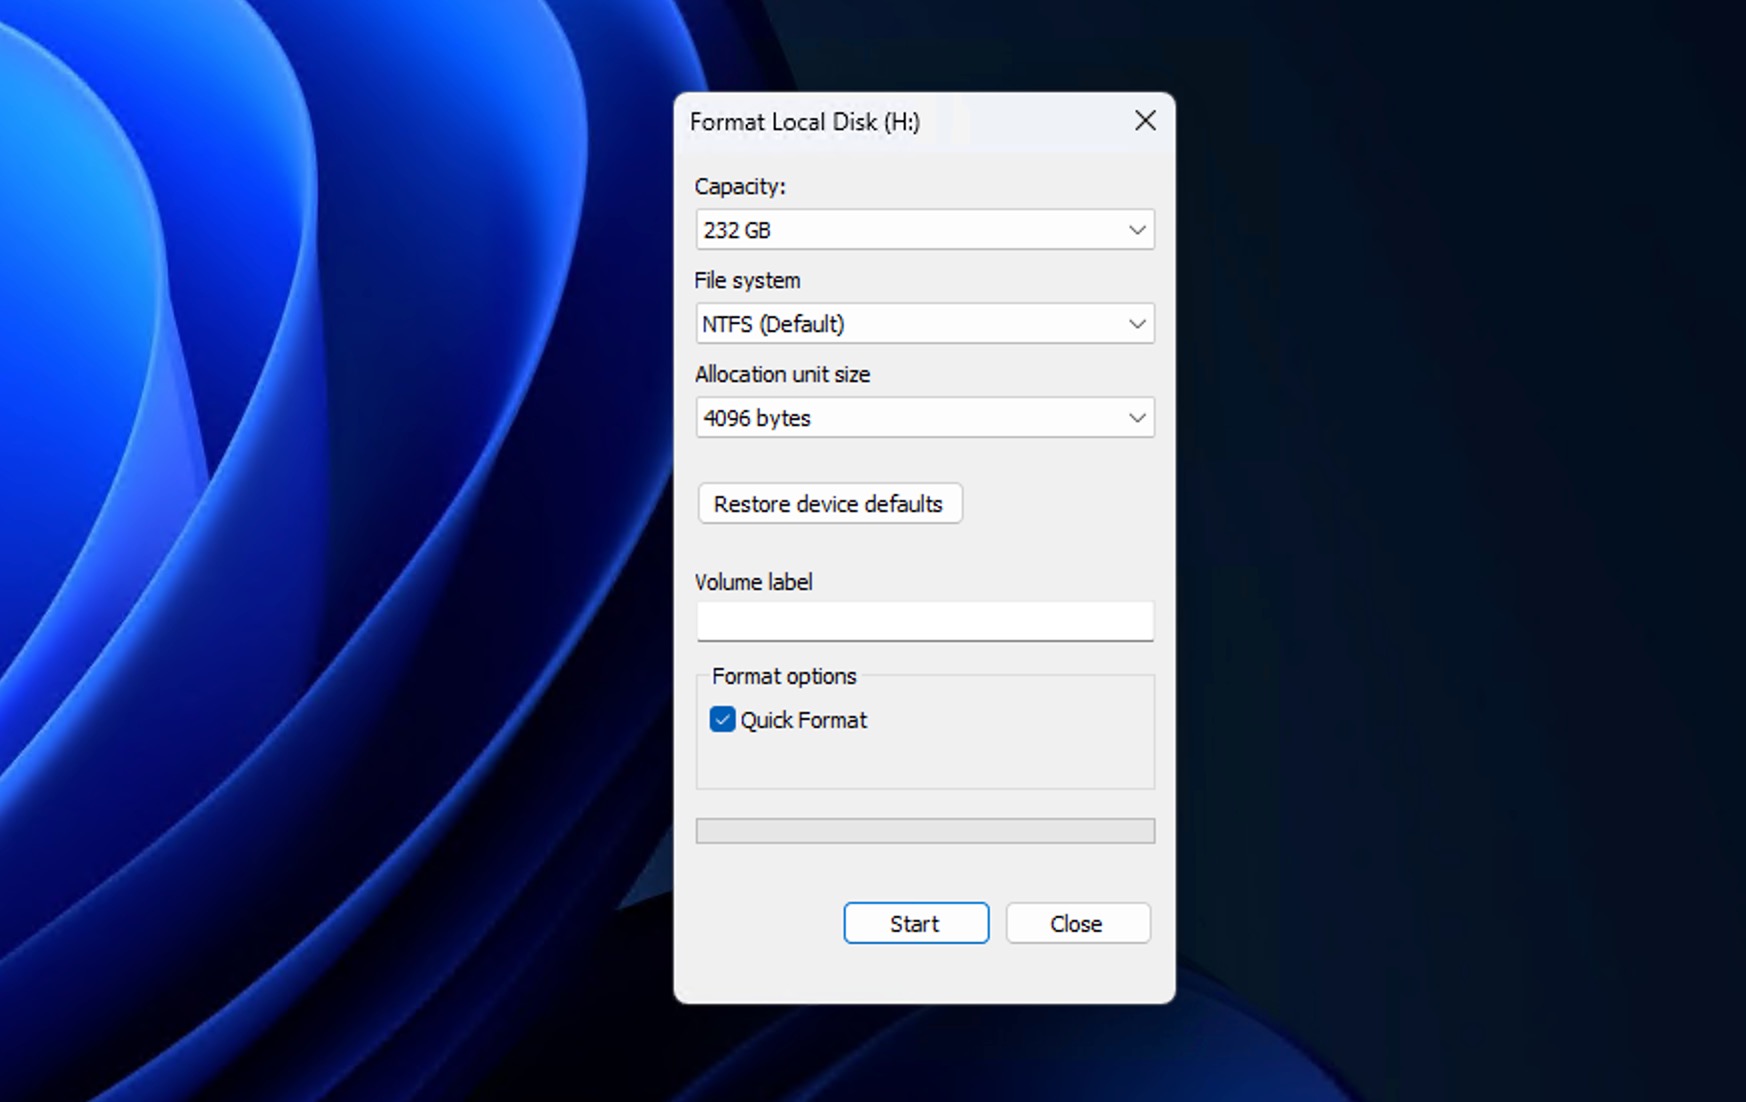
The recovery steps are the same as in Method 1, so just follow that walkthrough with the formatted WD drive selected instead. Scan it, preview what Disk Drill finds, and save the files you want to another drive. No need to repeat the full walkthrough.
Because formatting can wipe out file system records, data recovery software like Disk Drill can’t always return your files with their original names and folders. When that happens, those files end up in the Reconstructed section, which means that Disk Drill found the file content by its signature, but the metadata (the original name, folder path, and creation date) may be missing.
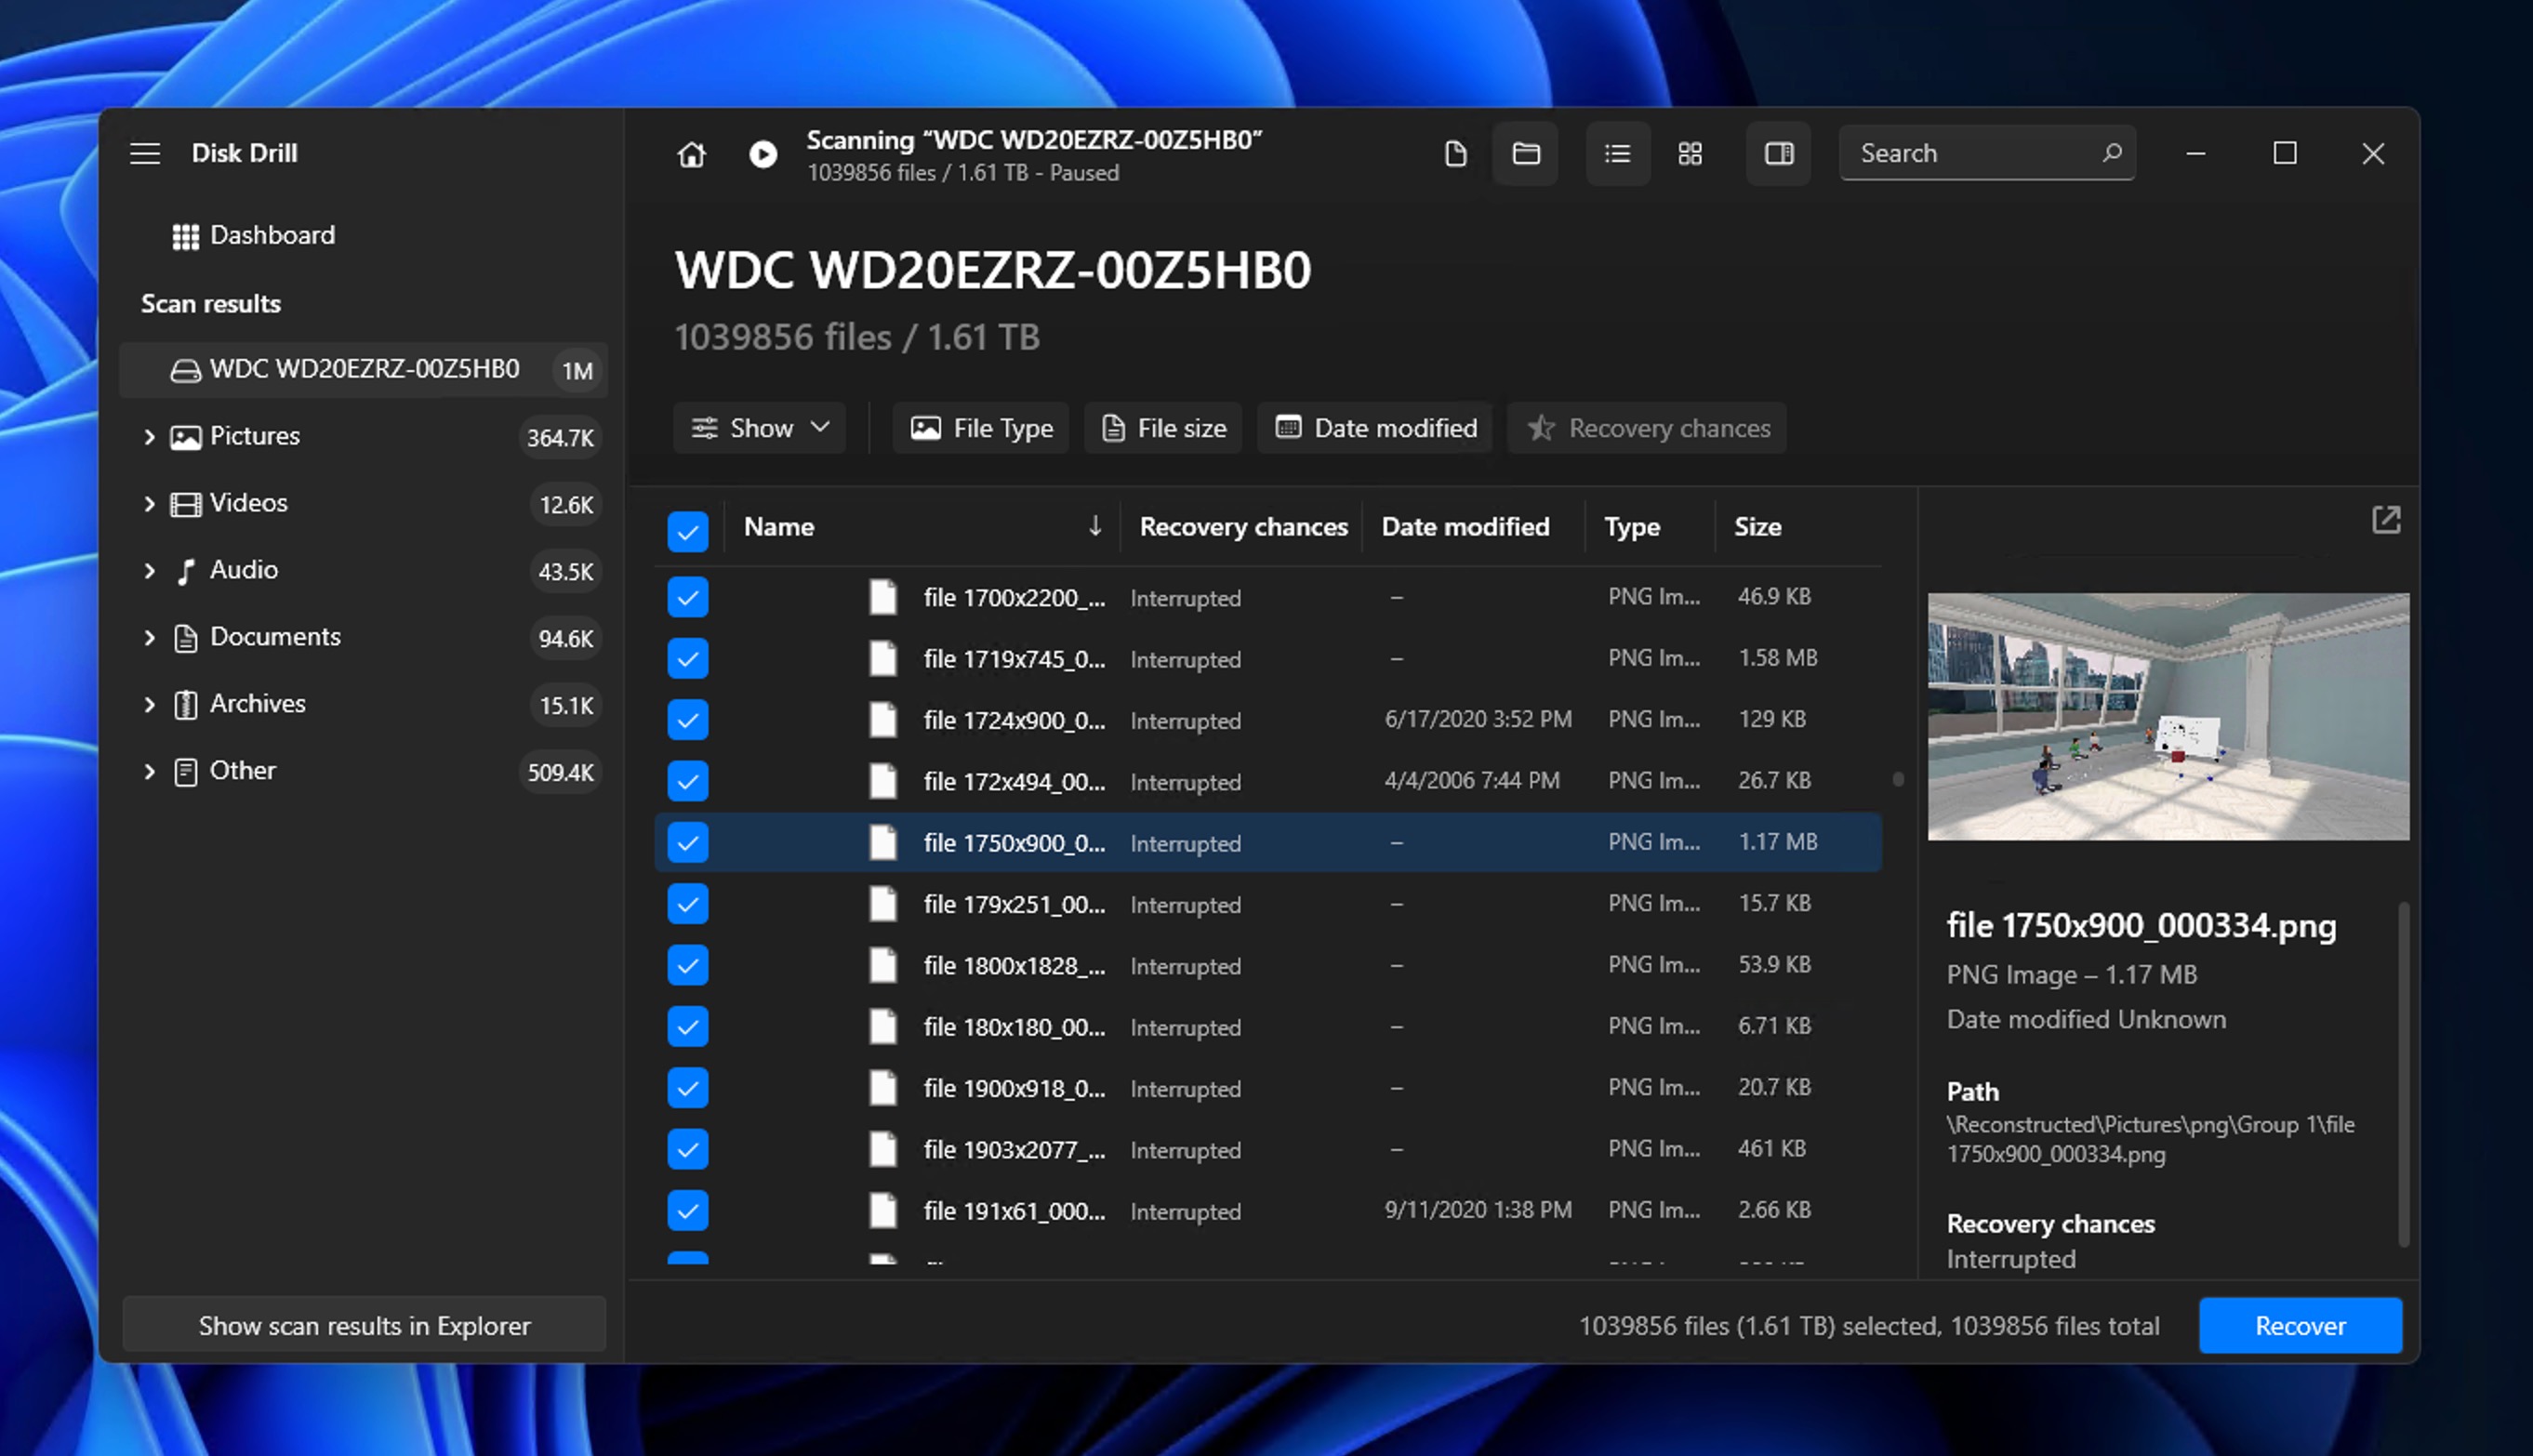
The lack of metadata doesn’t mean the files are useless, but it does mean you need to sort them more carefully. Here are a few ways to make the process faster:
- If you’re looking for photos, documents, videos, archives, or audio files, narrow the results to that category first using category filters instead of browsing everything at once.
- Use the preview feature to confirm whether a reconstructed file is actually the file you need before you recover it.
- Large videos, RAW photos, ZIP archives, and project files are often easier to identify by size, especially when their names are missing.
- If you roughly remember when the lost files were created or modified, date filters can help reduce the number of results or at least put the more likely results closer to the top.
- Recover files to a clean folder on another drive to keep the recovered files organized (it also prevents you from writing new data to the formatted WD drive).
Method 4: WD External Hard Drive Data Recovery When the Drive Is Not Showing Up
A WD external drive that won’t show up is a tougher case than a simple deletion or format. The first thing to figure out is what “not showing up” actually means because it can point to a few different problems. A drive that’s missing from File Explorer might still be alive at the hardware level, with only its partition invisible to you as a user. However, the drive could also be physically damaged and impossible to communicate with using any data recovery software.
On Windows, Disk Management is the place where you can find out what the real status of the WD external hard drive is:
- Right-click Start.
- Select Disk Management.
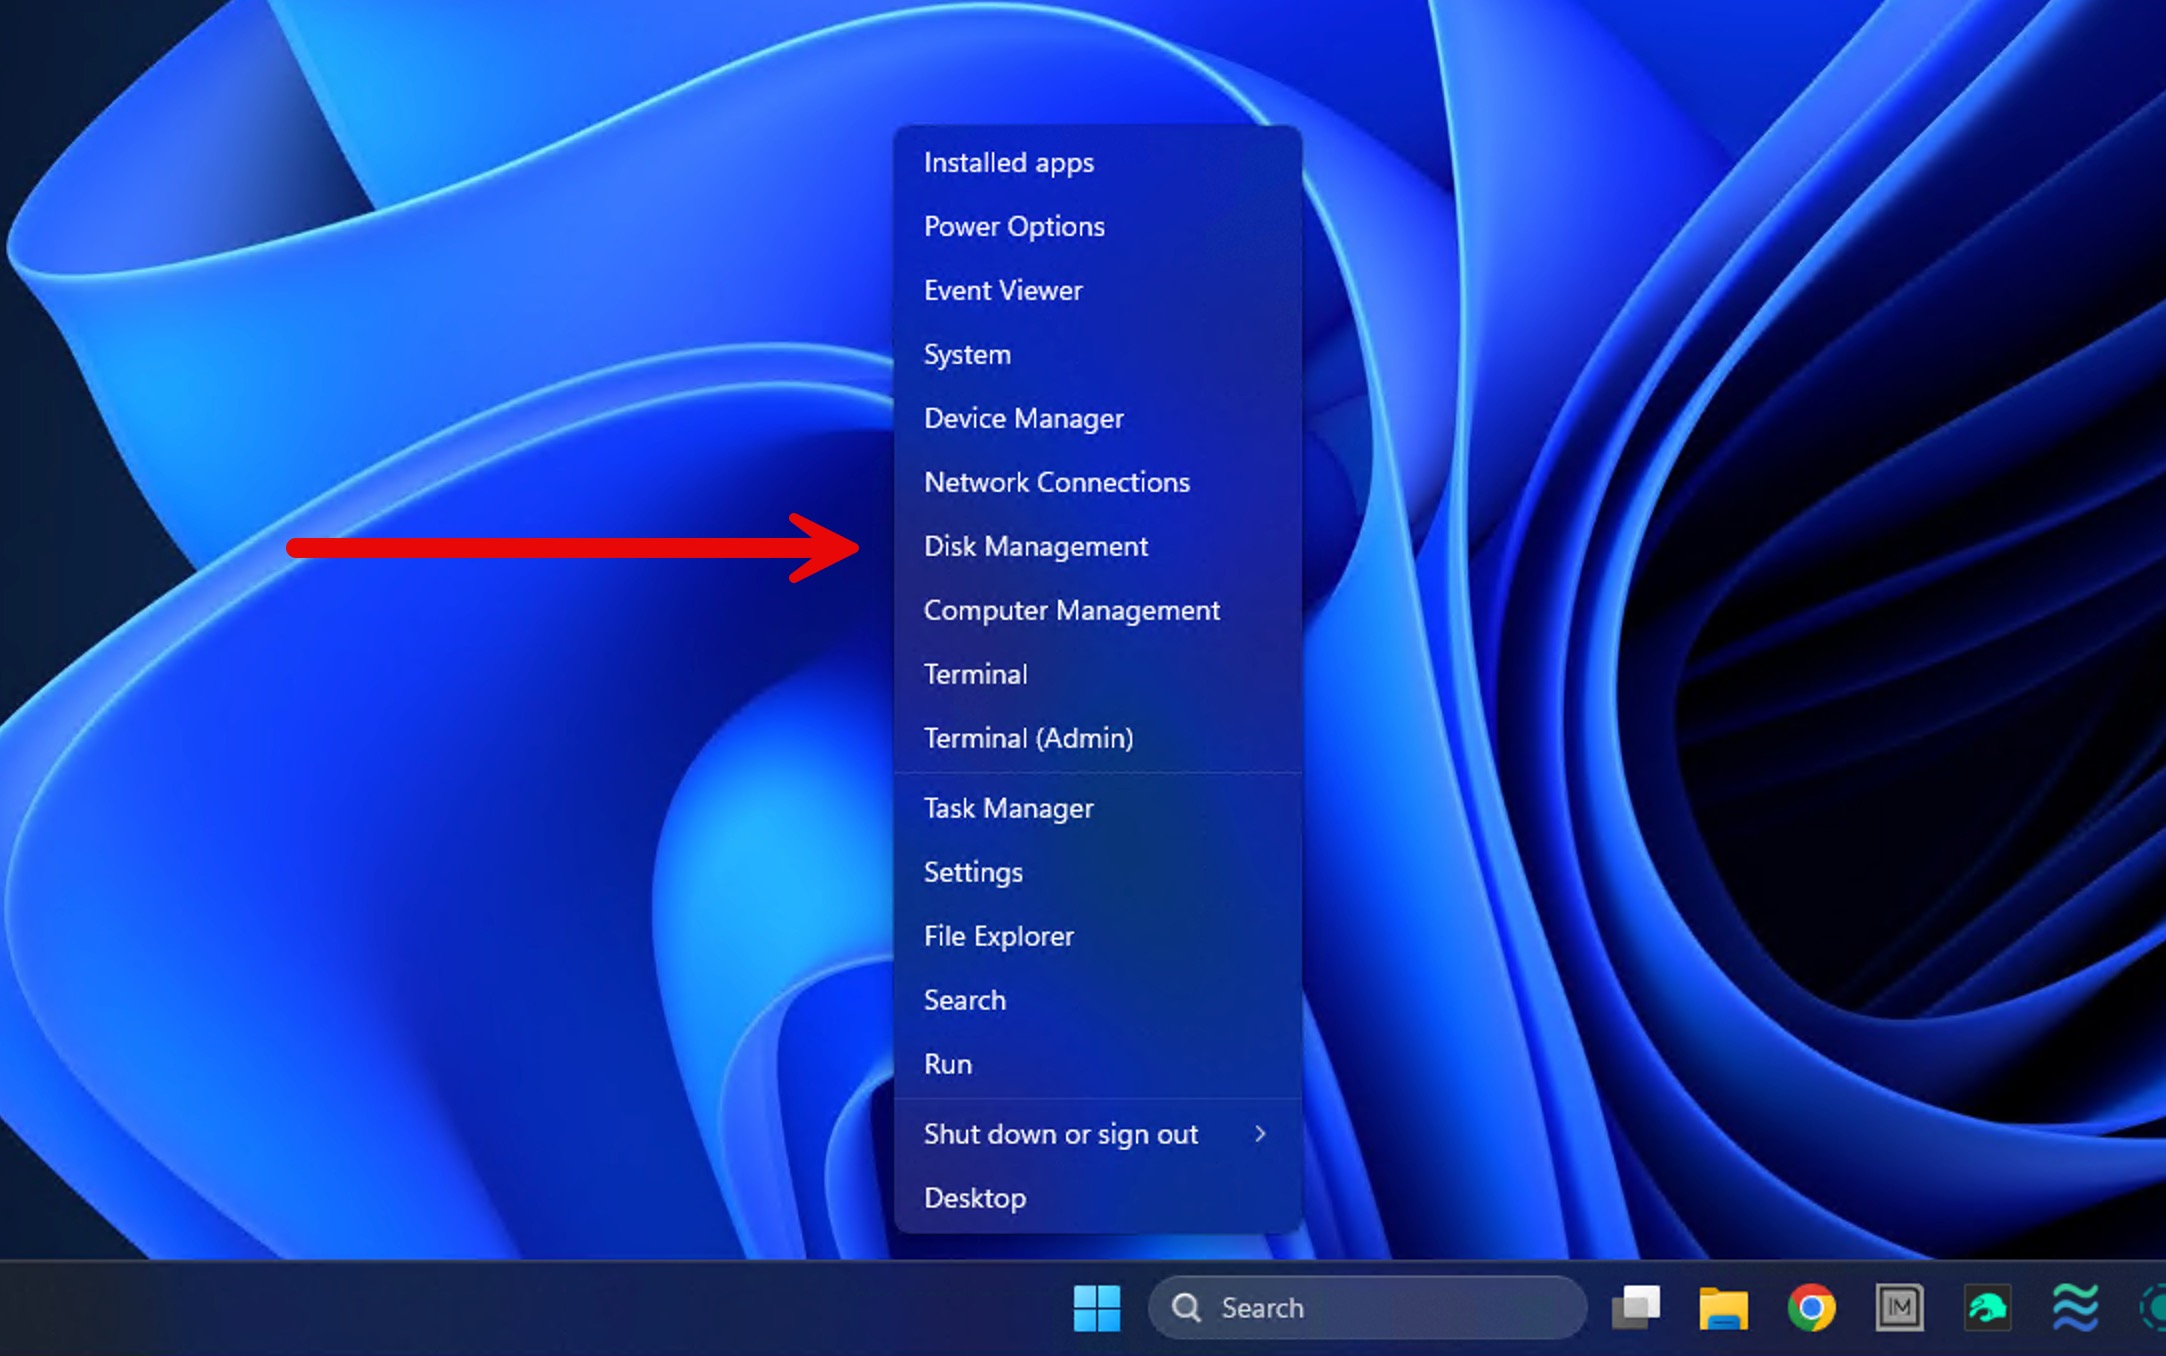
- Look for your WD external drive in the lower part of the window, where the disks are listed.
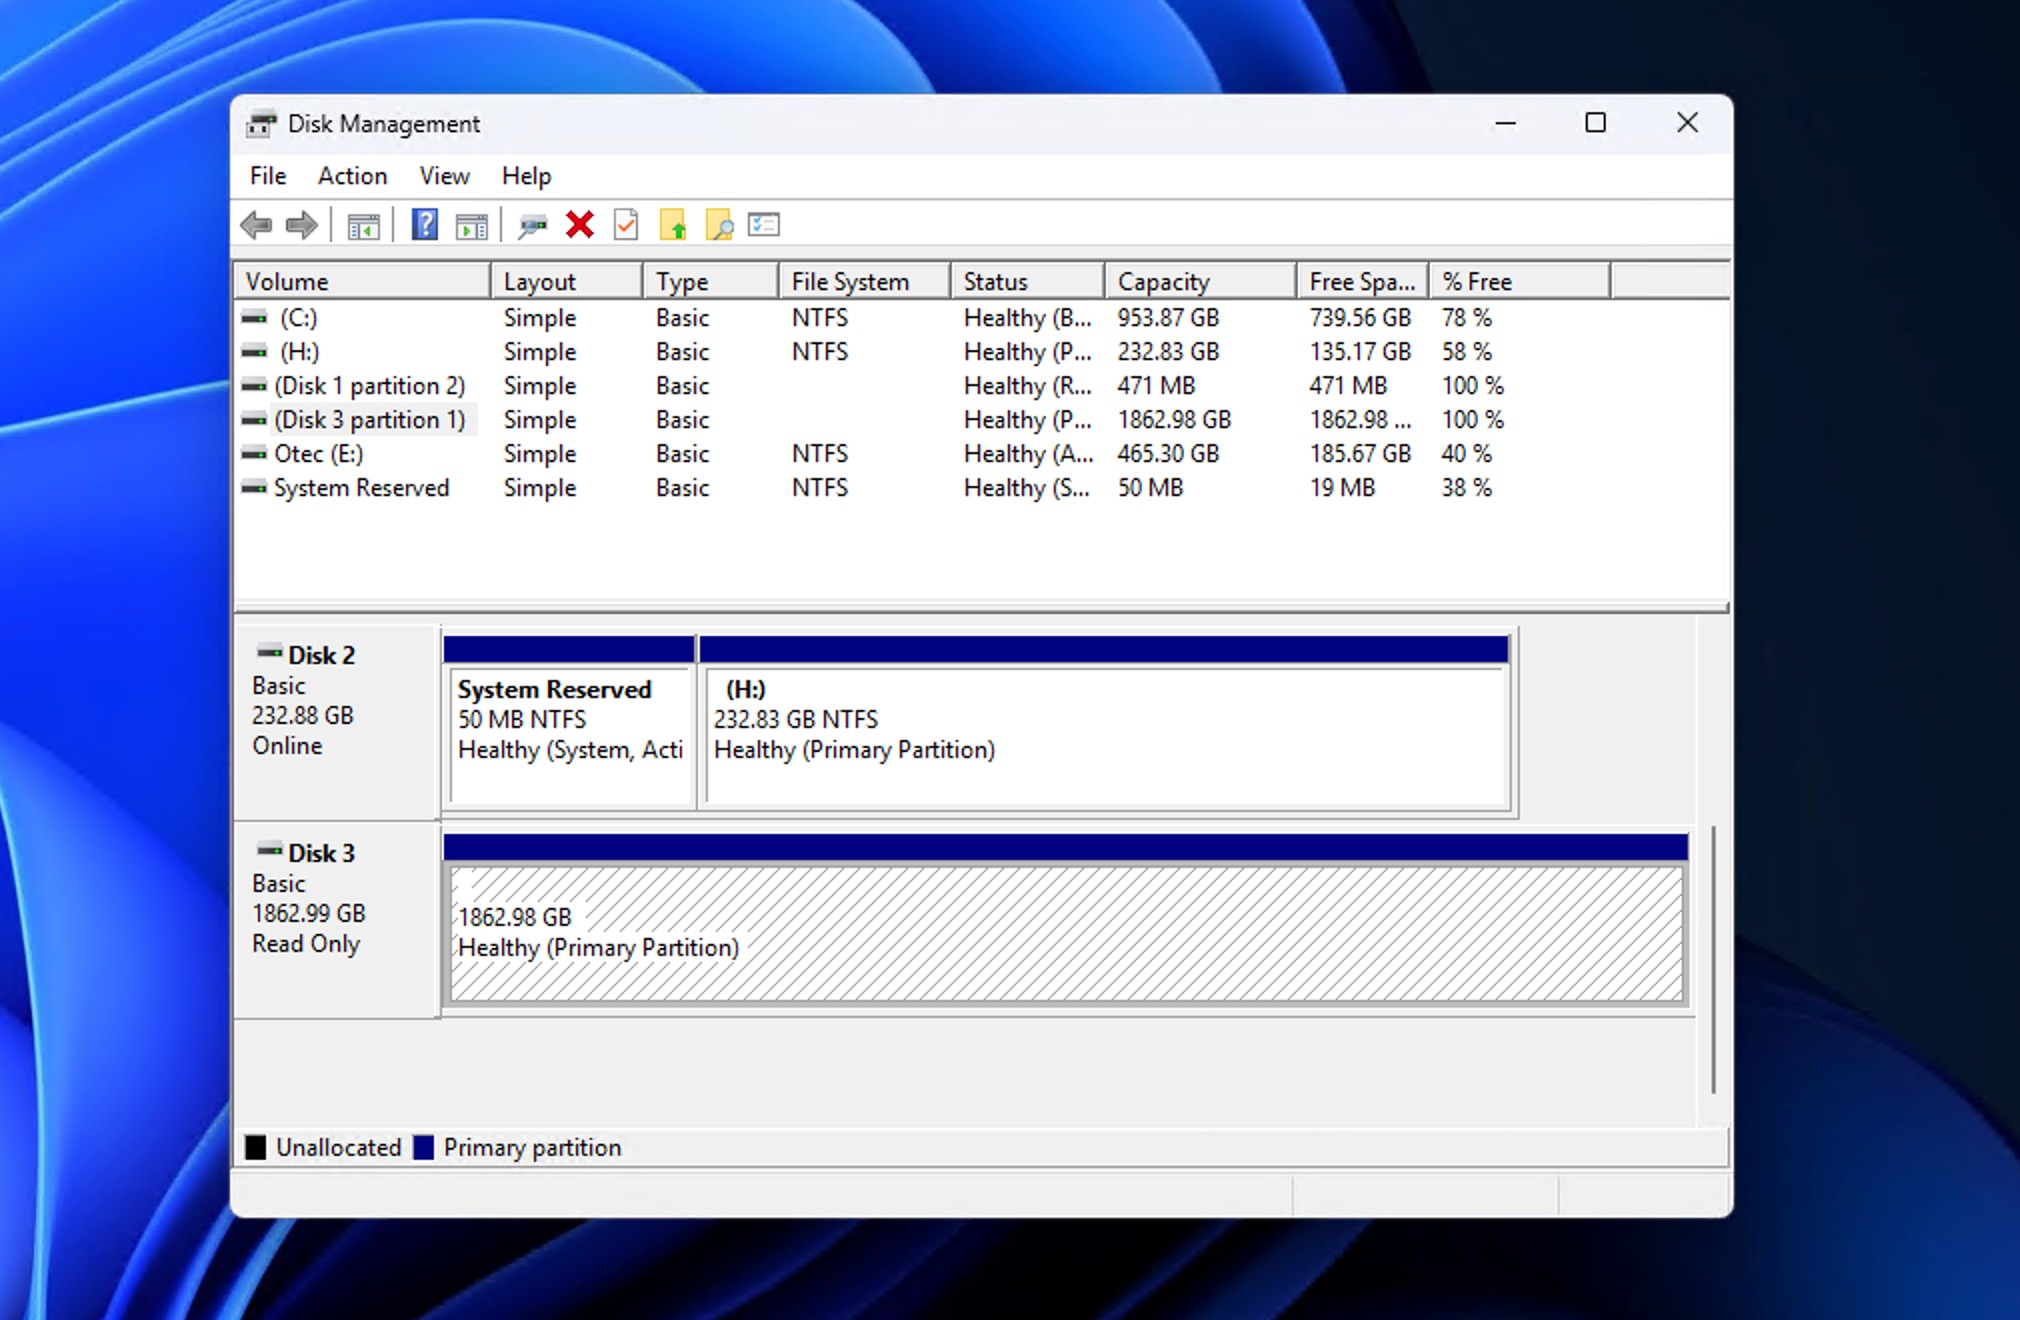
- Check whether it shows up with the correct or close-to-correct capacity.
- Note its status, such as RAW, Unallocated, or Not Initialized.
✅ If your WD external drive appears in Disk Management with roughly the right size, the system still sees it on a physical level. The partition might be corrupted, RAW, unallocated, or invisible in File Explorer, but the drive itself is still recognized, and recovery software can usually still scan it.
Still, a drive that stopped showing up normally often has something wrong underneath. So play it safe. Before you scan, use the imaging approach from Method 2. Once you have the image, go back to Method 1 and run the scan and recovery on it. This prevents any hidden problem from worsening while you work.
❌ If the drive doesn’t appear in Disk Management at all, try the following troubleshooting methods to rule out various simple causes like broken cables and connectors:
- Swap in another USB cable. A bad cable is a common culprit.
- Try a different USB port.
- Skip USB hubs and plug the drive straight into the computer.
- Test the drive on another computer.
If the WD external drive still doesn’t turn up anywhere after all that, recovery software has nothing to work with since it needs the operating system to reach the drive. At that point your options narrow to a backup, if you have one (Method 5), or a professional lab (Method 6).
Method 5: Restore Files from a Western Digital Backup
If you set up backups before the files went missing, then you can skip scanning the WD drive using data recovery software and just retrieve your missing data from the backup. Just to remind you, here are some common places a backup might be waiting:
- File History on Windows
- Backup and Restore on Windows
- Time Machine on Mac
For Windows users, File History is the most common of the three, so let’s walk through that one. If your WD drive was the internal system drive and File History was switched on, Windows has likely been quietly backing up your main user folders: Desktop, Documents, Downloads, Pictures, Videos, and Music. You can then follow these steps to get them back:
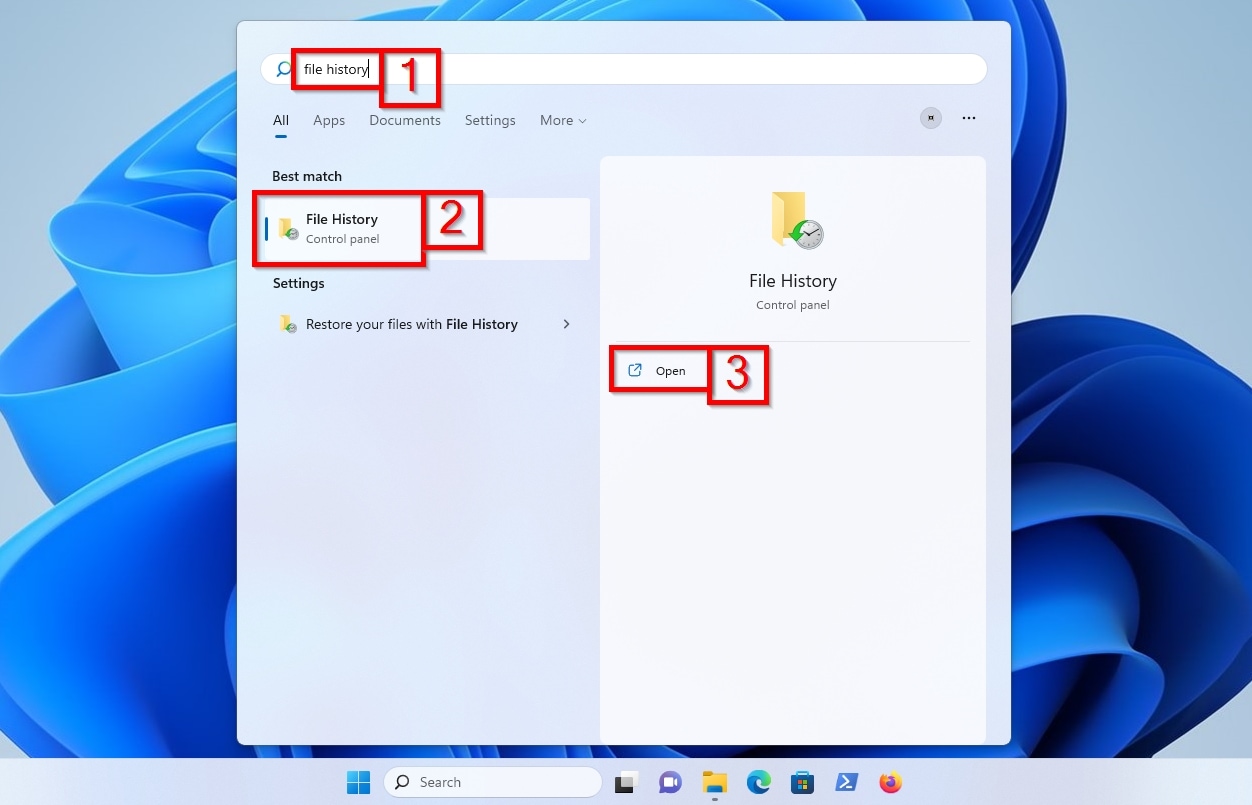
- Open the Start menu, type File History, and open it from the Control Panel.
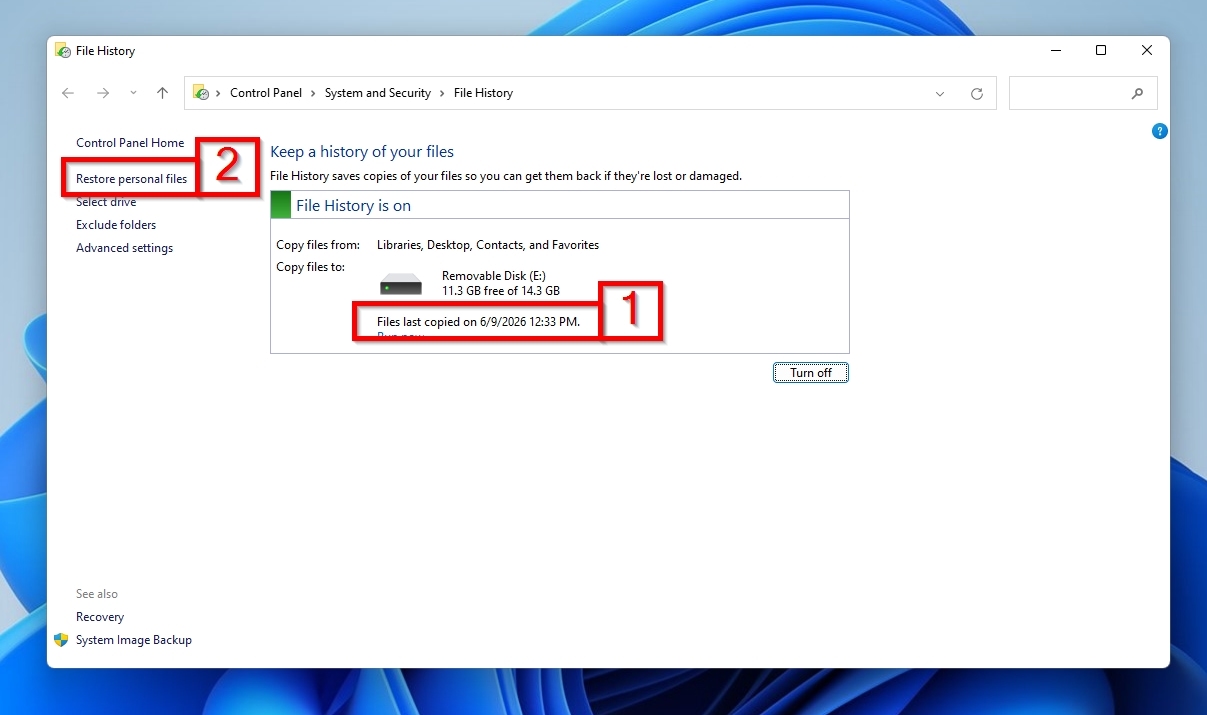
- Click Restore personal files on the left.
- Use the arrows at the bottom to move back through the saved versions until you reach a point before the files disappeared.
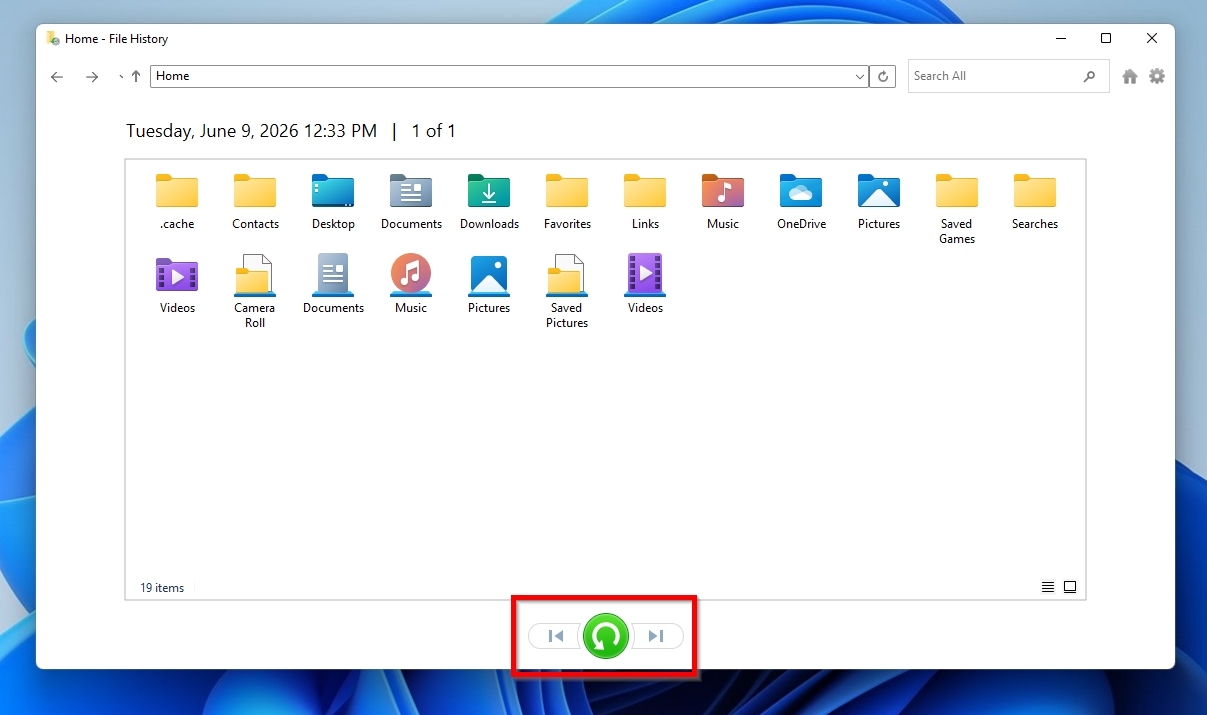
- Select the files or folders you want. You can double-click a file to preview it first.
- Click the green Restore button to send them back to their original spot. To put them somewhere else instead, right-click the button and choose Restore to.
Method 6: Use a Professional Western Digital Data Recovery Service

For most data loss (deleted files, an accidental format, a RAW partition, or any drive that still shows up but with the correct capacity), DIY recovery is the right call.
However, there’s a line you shouldn’t cross. When the drive itself is failing while containing very important data, and you don’t have a backup, then it’s typically better to go with professional recovery. The symptoms of a failing drive include:
- The WD drive isn’t detected anywhere, not even in Disk Management.
- It clicks, beeps, grinds, or keeps spinning up and down.
- It was dropped, got wet, overheated, or suffered any physical damage.
If Windows or macOS can’t detect your WD drive at all, there’s nothing for the software to scan. And even when a badly failing drive does still show up, reading it the normal way only wears it down further, as each spin-up can push it from recoverable to dead.
A professional lab works at a lower level, and its employees can open the drive in a cleanroom, swap in donor parts, and read the platters with equipment you can’t replicate at home.
WD has its own data recovery program, run through its partner Ontrack. It covers one in-lab recovery attempt, two-way shipping, and, in most cases, a replacement device with your recovered files. Access to the program is something you buy together with a qualifying WD drive, as a one-time payment starting at $9.99 for two or three years of coverage, but you should check WD’s latest terms, eligible products, region availability, and coverage details before relying on it. If you already bought that plan when you got your drive, then WD’s data recovery service is likely the best option.
The process of recovering a hard drive through WD’s data recovery program looks like this:
- Confirm your WD drive is eligible for the Data Recovery Plan or a WD/Ontrack option.
- Submit a claim through WD’s process with Ontrack.
- Ship the drive using the prepaid label and instructions you’re given.
- Wait for the evaluation and recovery.
- Get your recovered files back, usually on a replacement device if the recovery succeeds and the plan terms apply.
Final Tips
Data recovery software like Disk Drill is usually the most practical place to start when it comes to Western Digital hard drive recovery because it covers common cases like deleted files, accidental formatting, RAW partitions, lost partitions, and any WD drive that still shows up in Disk Management with the right capacity.
Once you have your files back, you should start keeping an eye on the WD drive’s health so that it doesn’t surprise you with another data loss incident in the future. Disk Drill‘s S.M.A.R.T. monitoring feature is great for this.
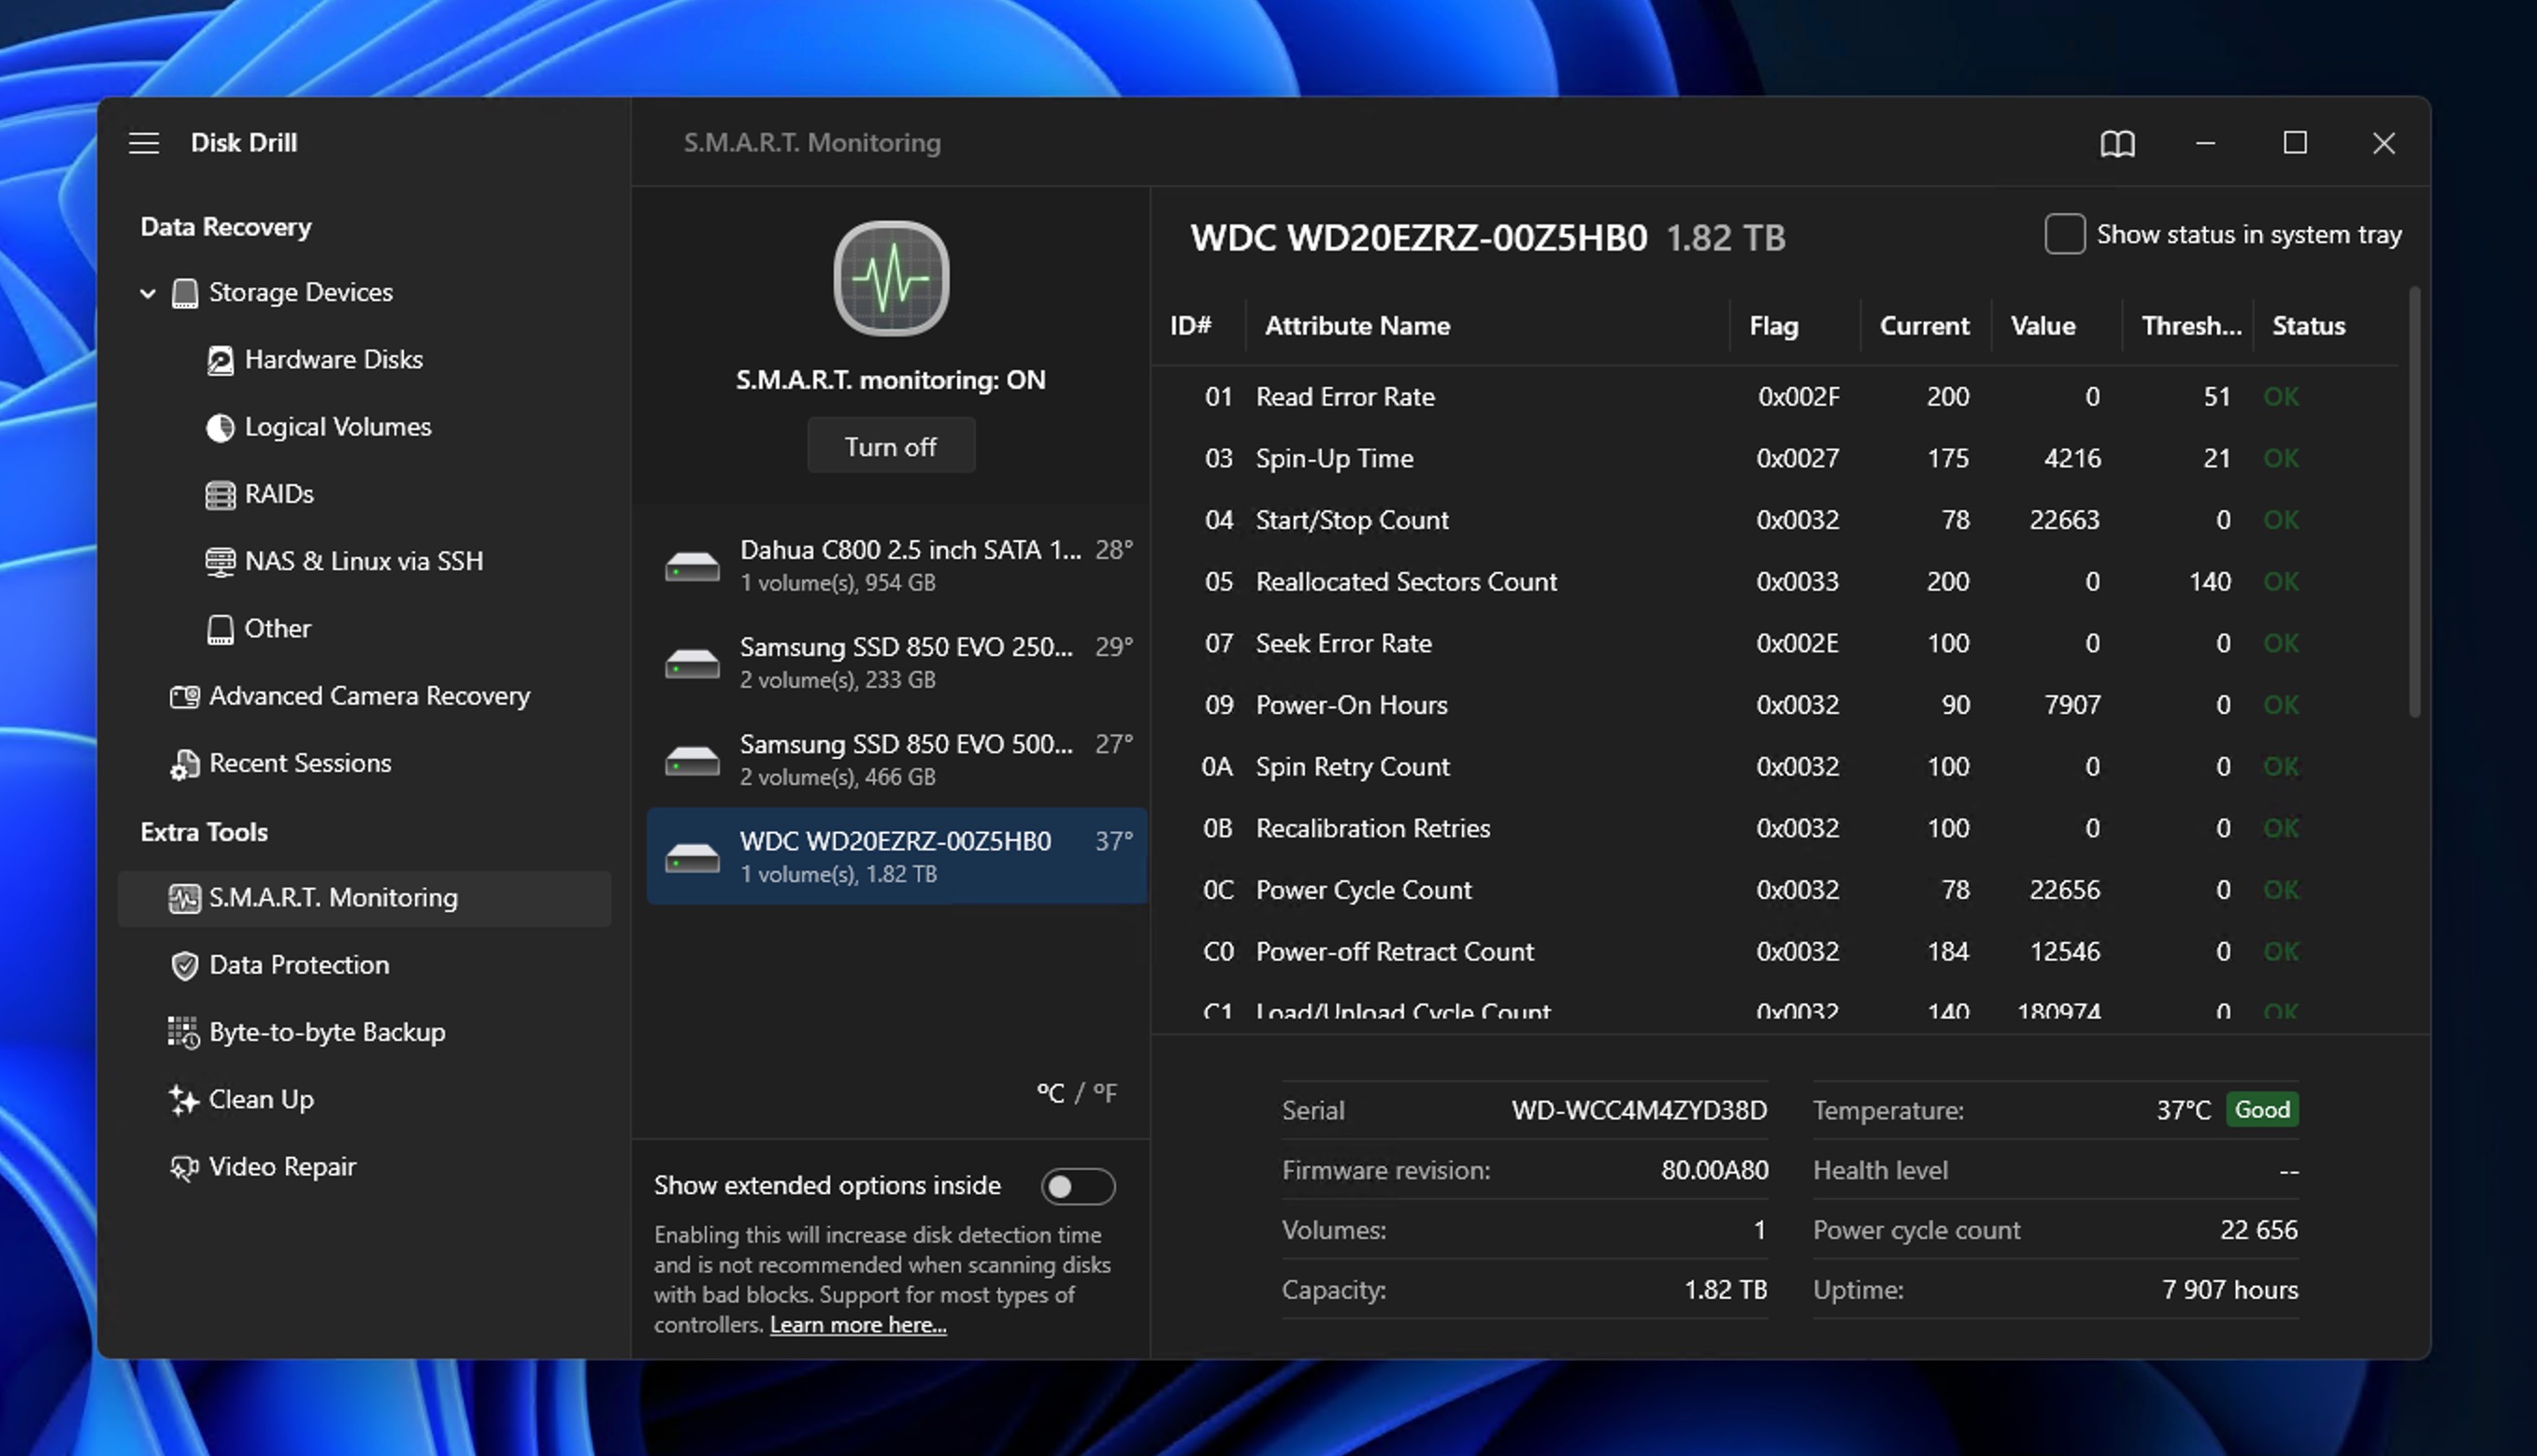
Here is some of the information it can tell you about your WD drive:
- Overall health status, such as good, warning, or bad
- Reallocated sectors
- Pending sectors
- Uncorrectable errors
- Temperature
If reallocated or pending sectors are not zero and keep climbing, or the status flips to warning, back up your data and plan to replace the drive soon.
You should also review your backup habits because they are your best protection against data loss of any kind. The simplest rule to live by is 3-2-1:
- Keep 3 copies of anything important.
- Store them on 2 different types of storage.
- Keep 1 copy off-site or in the cloud.
Disk Drill‘s Recovery Vault is an excellent addition to any 3-2-1 backup strategy because it keeps track of deleted files, so the small slips are easy to undo between backups. Just treat it as a safety net on top of your 3-2-1 setup rather than one of the three copies, since it can’t bring anything back from a drive that has died.
FAQ
Yes. Using recovery software like Disk Drill to recover data from a Western Digital hard drive doesn’t affect your warranty because the software only reads from the drive. The main thing that can void your drive’s warranty is opening its enclosure.
If the drive is in such bad shape that it needs professional data recovery services, then WD itself says that the professional recovery won’t void the warranty as long as the provider gives you written confirmation on company letterhead that they worked on the drive.
No. Western Digital doesn’t make its own data recovery software. For DIY recovery, it points you to third-party tools such as Disk Drill, and for hands-off recovery, it recommends sending your drive to a lab like Ontrack.
Not before recovery because CHKDSK repairs the file system by writing to the drive. On a disk that has already lost data or has bad sectors, the write operations performed by CHKDSK can overwrite your files or make things worse. So, recover first, then run it later if you want to clean up the drive for reuse.
The safest Western Digital data recovery method is to make a byte-to-byte backup with a tool like Disk Drill and scan that copy instead of the original (Method 2 in this guide). If the drive is showing physical symptoms like clicking, beeping, or not being detected at all, then even the creation of a backup can be too risky. In such cases, you should send it to a professional lab, as covered in Method 6.
For Western Digital external hard drive data recovery, the main difference is how you connect the drive. A WD external hard drive can usually be plugged in through a USB port and scanned right away. An internal Western Digital drive that isn’t already connected to the computer you want to use for recovery may need to be placed in a USB enclosure, connected through a SATA-to-USB adapter, or connected directly to the motherboard with SATA data and power cables.
There’s also one SSD-specific difference to keep in mind. TRIM is more likely to be active on internal WD SSDs than on external drives connected over USB, which can make deleted-file recovery harder or impossible if the deleted blocks have already been cleared. Traditional WD HDDs don’t have this issue.
