You unintentionally deleted some photos from your Nikon camera and are now seeking a way to recover them without exacerbating the situation? That’s what you’ll see here in our Nikon photo recovery guide.
Your first step should be to immediately stop using your SD card to eliminate any chance of worsening data loss. Then, go through our Nikon photo recovery guide, which will take you step-by-step from the initial preparation phase up to any necessary post-recovery procedures.
All the information, recommendations, and processes we’ll cover here result from numerous in-house recreations of common real user mistakes and typical memory card “behaviors”. We’ve checked and validated all recovery methods and tools through multiple thorough tests. Our goal? To provide you with the optimal combination of “the three E’s”: the most effortless, efficient, and effective solutions for getting back your seemingly lost photos out of your Nikon’s SD card.
Can You Recover Lost Photos from a Nikon Camera SD Card?
It’s possible to recover deleted photos from a Nikon camera, as their deletion removes them from the list of files available on its storage device but doesn’t actually erase their data. By using the proper tools, you can locate that data and recover deleted photos from an SD card, as long as they’re intact and haven’t been overwritten. However, there’s a catch: since cameras don’t come with a Recycle Bin, or offer other methods of data recovery, you have to enlist a computer’s help.
It’s possible to recover files from corrupted SD cards, as long as their data remains intact. The only ways all files on an SD card may be rendered unrecoverable are:
- 📄 When they’ve been overwritten by newer files.
- 🧹 When the SD card has been full/securely formatted – not to be confused with regular formatting, which is used by default by PCs and many (but not all) cameras, and is recoverable.
- 🗑️ When the camera supports and uses SD_ERASE. This command tells the SD card to erase its storage blocks, which can make photo recovery impossible.
- 🚫 When there is extensive file system corruption that prevents a data recovery app from detecting any files on the SD card.
- 💥 When the SD card has been physically damaged.
How to Get Back Your Lost Photos Using Nikon Photo Recovery Software
Recovering your files from your Nikon camera’s SD card that were deleted or seem lost due to data corruption or a format can be quick and easy with photo recovery software like Disk Drill. All you need to do is download the software, scan your SD card, and select which of the files it located you’d like to recover.
To recover your photos and videos from your Nikon’s SD card using Disk Drill:
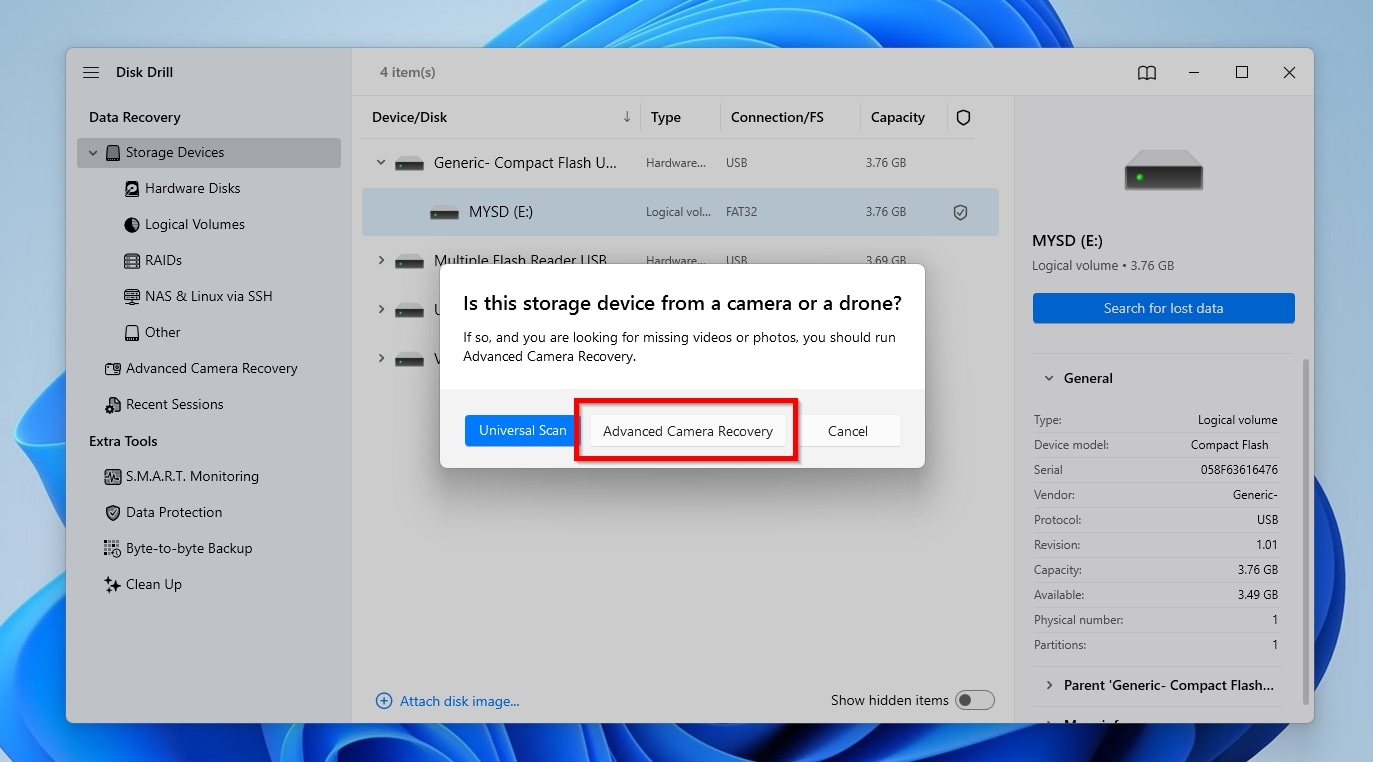
- Connect your Nikon camera’s SD card directly to your computer — if it doesn’t have an SD slot, you can use a standalone SD card reader. Download Disk Drill, install it, and run it. If not already there, move to the Storage Devices page (you can find it under Data Recovery on the left panel of Disk Drill’s window). Select your SD card from the Device/Disk list, and click the blue Search for lost data button.

- Then select Universal Scan. For deleted photos, this is the best option.
- If you only care about recovering the photos and videos you’ve grabbed with your Nikon camera on its SD card, you can choose the Advanced Camera Recovery specialized mode that’s available in the latest versions of Disk Drill. If you would like to recover more types of non-media files from your SD card, select Universal Scan instead.
- Disk Drill will begin scanning your Nikon’s SD card. The process can take a while, depending on the SD card’s size, speed, condition, and the number of files on it.

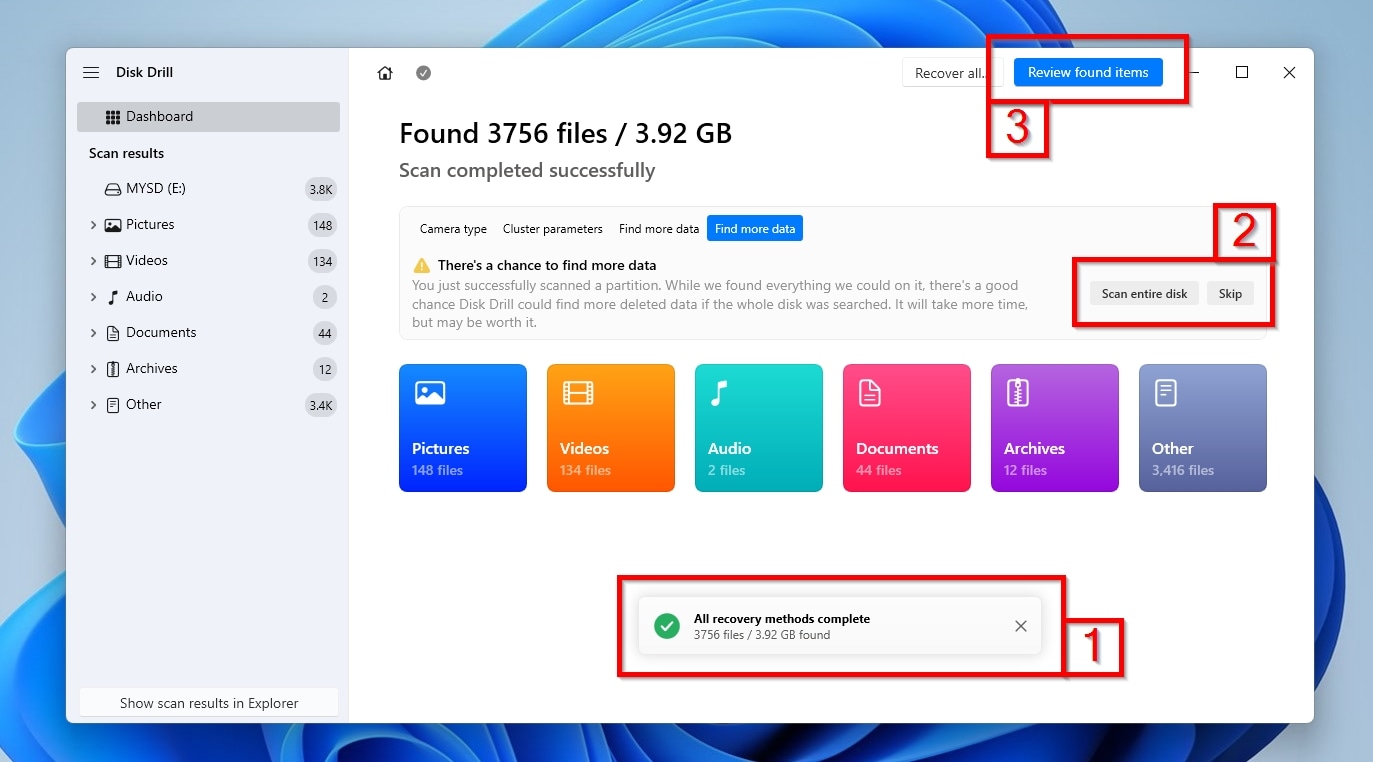
- When the process completes, the app will report “Data carving complete” or “All recovery methods (are) complete“, depending on the scanning mode you selected (1). If you picked the Advanced Camera Recovery mode but Disk Drill detected additional non-media files on the SD card, it will suggest switching to a different mode to find more data and run all recovery methods. Similarly, if you went for a Universal Scan, but only on one out of many partitions on the SD card, Disk Drill may recommend you Scan (the) entire disk to locate even more files (2). When done, click Review found items to see all the files Disk Drill located on your Nikon’s SD card.
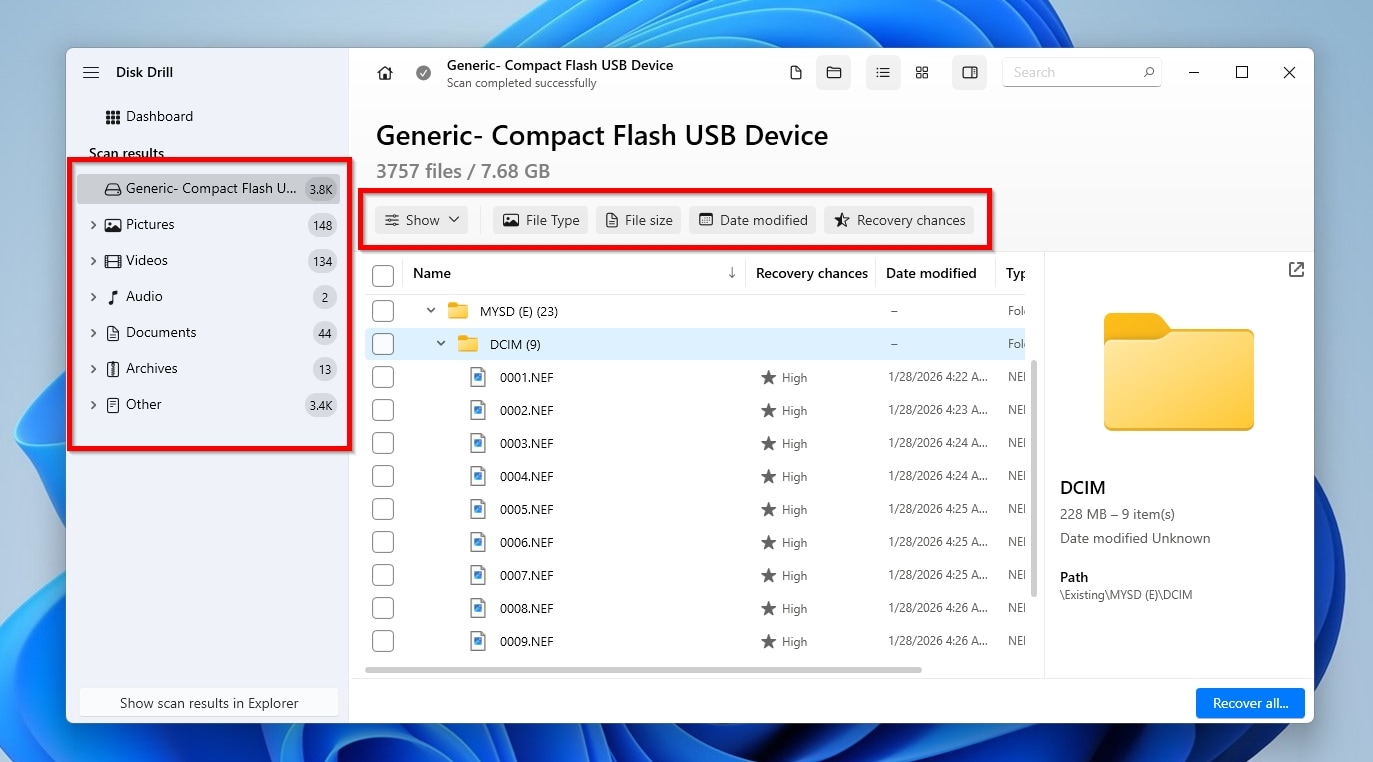
- Disk Drill’s powerful scanning engine can usually find every single file on a storage device, and that can often translate to tens of thousands of files. That proves especially true if you were using a capacious SD card not only with your Nikon camera, but also for storing more types of files from other devices. Thankfully, Disk Drill lets you narrow down its scan results by file type using the Categories on the left, or by characteristics like last modification date using the Filters above the results list.
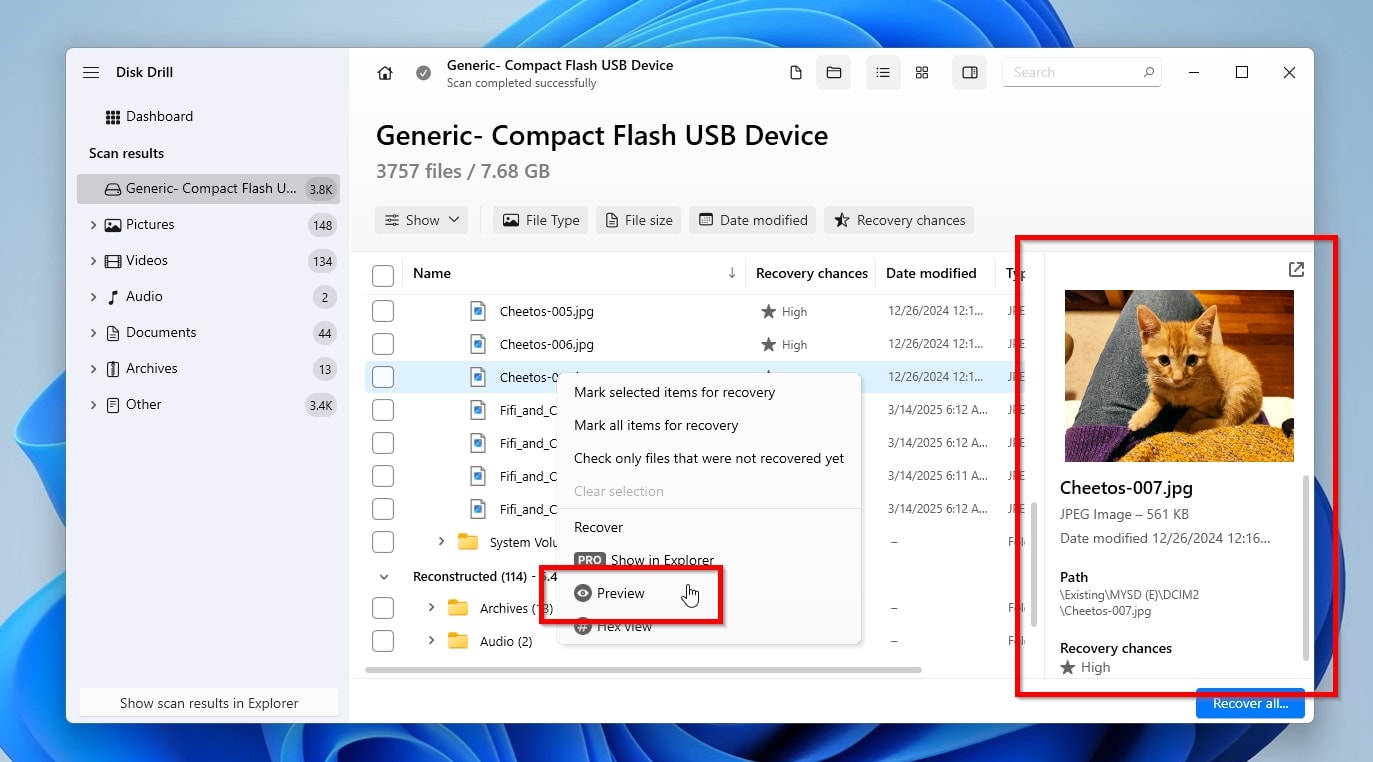
- You can use Disk Drill’s Preview functionality to make sure you’ve found the correct files for recovery, but also as a preliminary test of their “recoverability” (since if you can preview a file’s contents, they’re probably intact, and thus, “recoverable”). Doesn’t the preview pane show up on the right of Disk Drill’s window when you click on a file? Click the little eye icon that appears next to a filename when you point at a file in the results list, or right-click and select Preview to enable it.
- When you find the files you want to recover, mark them for recovery with a check mark on the left of their filename. When you’ve “enabled for recovery” all the files you want to get back, click Recover, on the bottom right of Disk Drill’s window. Disk Drill can recover up to 100 MB without requiring a license, allowing you to recover many deleted photos from a Nikon camera for free.
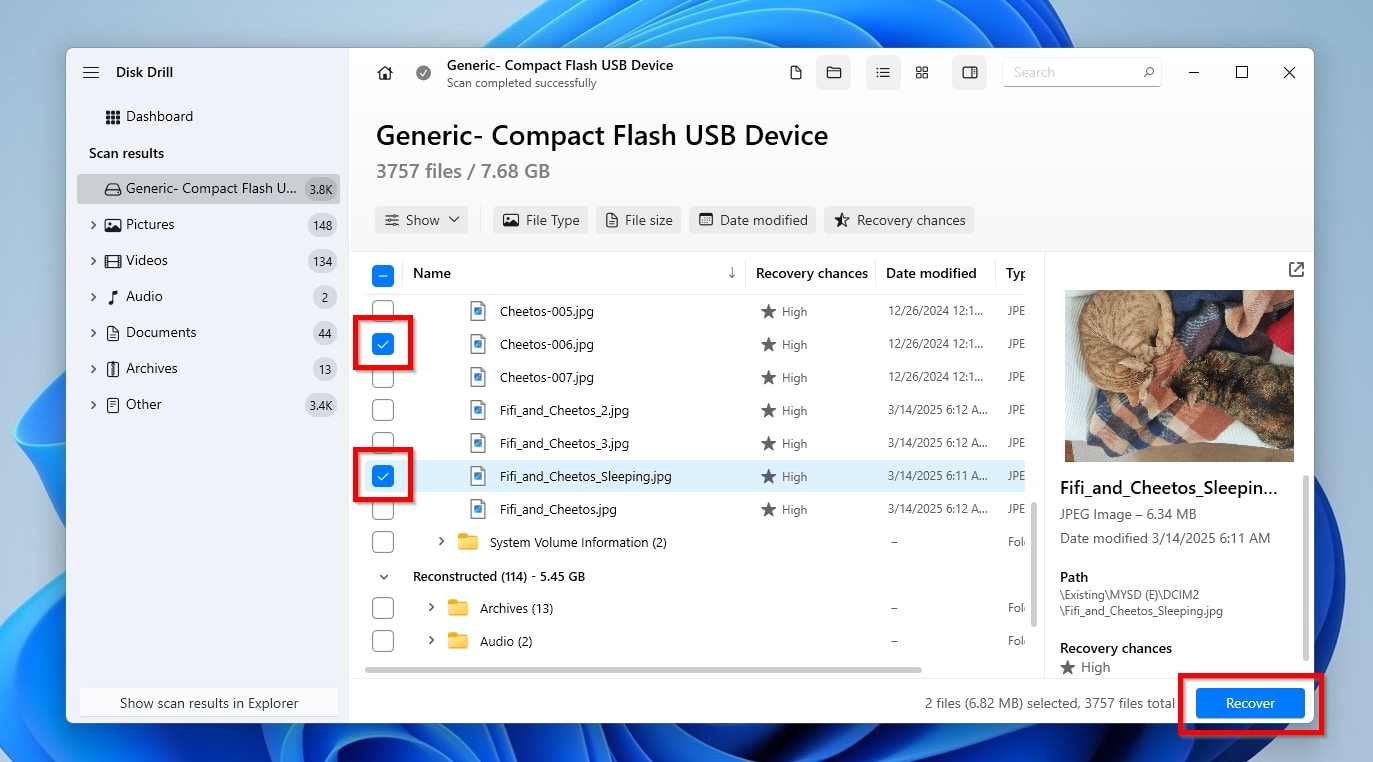
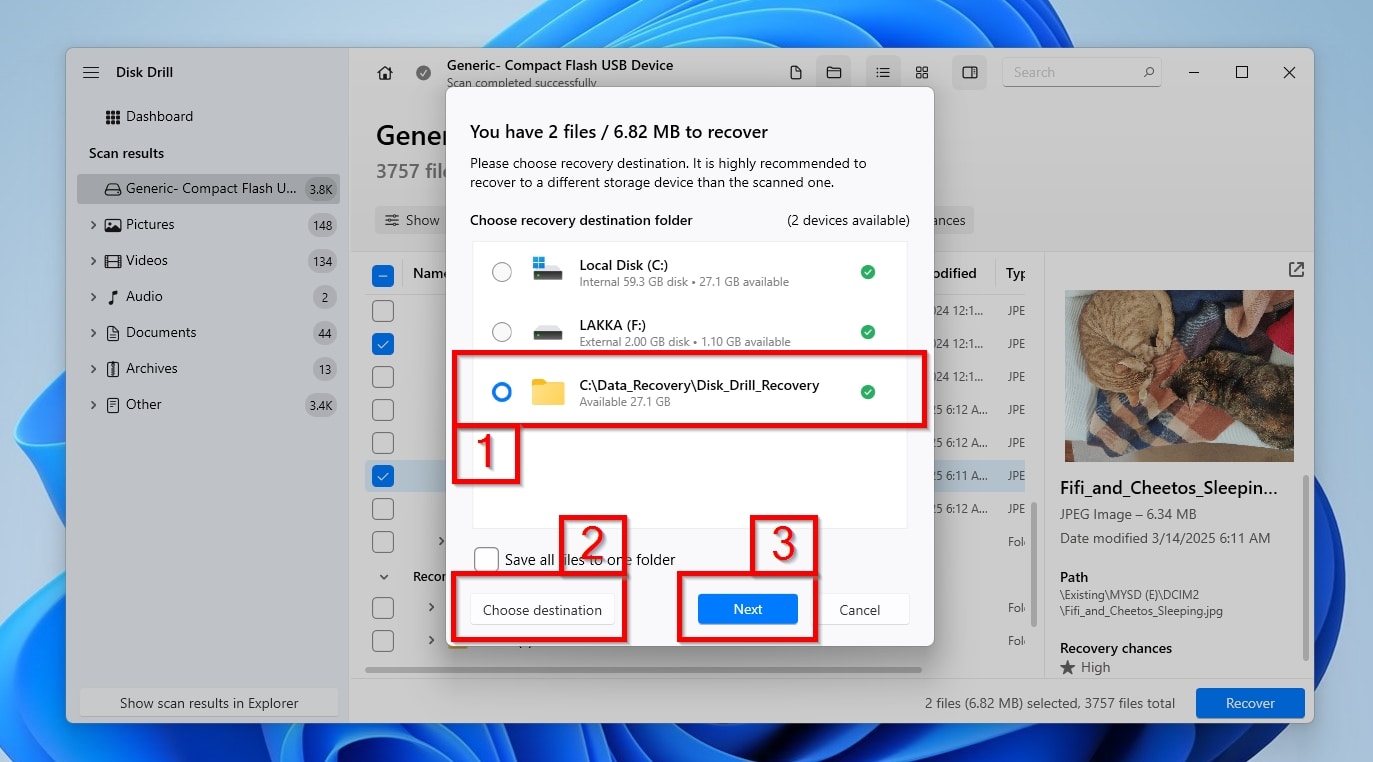
- Disk Drill will present a list of potential “destinations” where it can store the recovered files. If you used Disk Drill before, you’ll see one or more of the folders used as destinations in past “runs” among those suggestions (1). Would you prefer a destination not on this list? Click Choose destination (2), then select a folder from the requester that appears. When done, click Next (3).
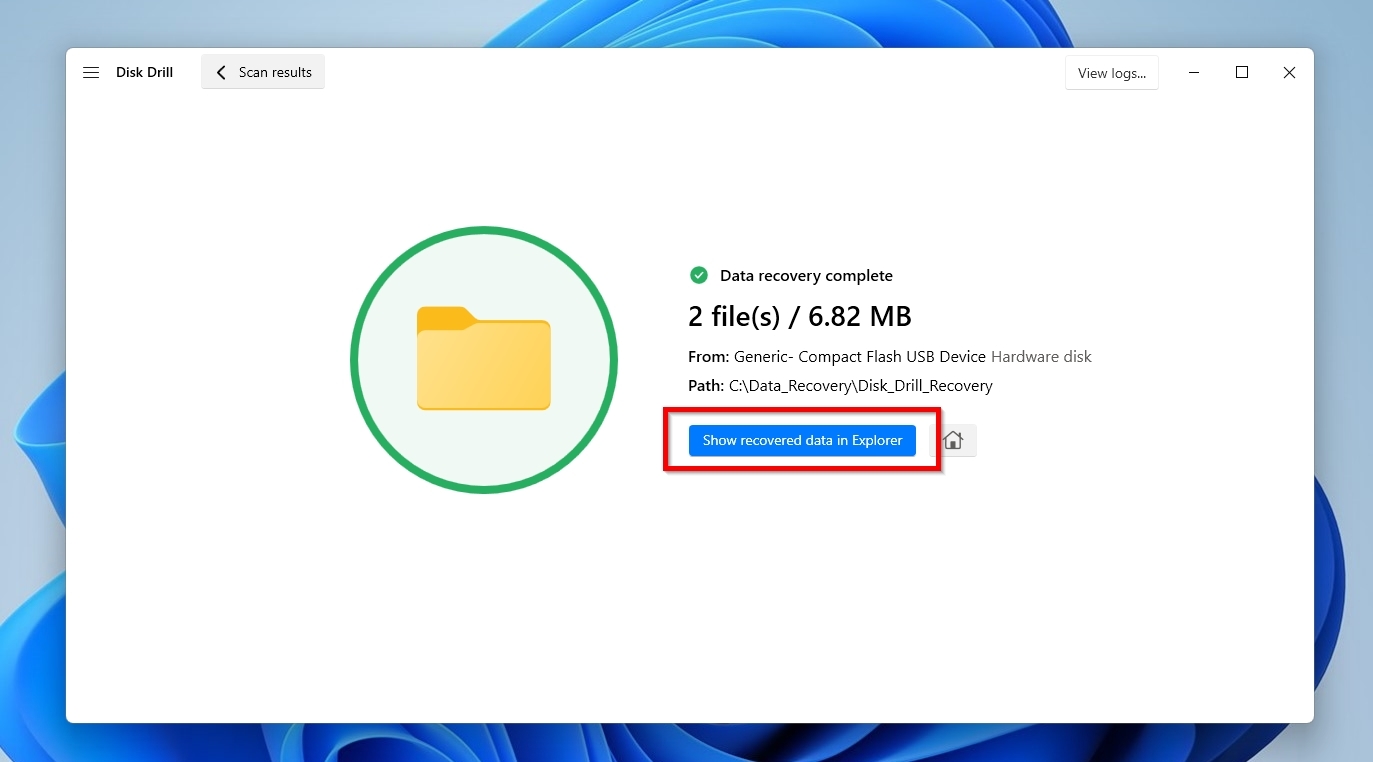
- Soon after, depending on your SD card’s speed, condition, and the number and size of the files you’ve marked for recovery, Disk Drill will report “Data recovery complete” and show some basic information about the outcome of the recovery process. Click on Show recovered data in Explorer to visit the destination folder you selected and check out the recovered files using the OS’s default file manager.

Of course, Disk Drill isn’t the only data recovery solution you can use. In fact, apps like UFS Explorer can be more customizable, and others, like Recuva, trade some flexibility to offer an even more straightforward experience. When looking at the whole picture, though, Disk Drill proves to be one of the top (if not the very best) Nikon camera deleted photo recovery software. How come?
- 👁️ Disk Drill doesn’t “care” about the type or brand or even capabilities of a storage device: as long as your SD card can be detected by your computer and its OS, Disk Drill can work with it.
- 💾 If the SD card’s file system records are still intact, Disk Drill, compatible with all major file systems, can perform a typical scan and recover any type of file from it, no questions asked.
- 🔍 For SD cards with corrupted file systems, or those that show up as empty or RAW, Disk Drill can skip that little no-accessible-file-system problem with its deep scan mode. This mode allows the app to locate and recover deleted photos from a Nikon camera’s SD card based on their “signatures”, the unique “fingerprints” that define their type and contents. The app is intimately familiar with Nikon’s own as well as most other popular image and video format signatures, from classic JPEG to NEF and NRW, and from MOV to MP4.
- 🗃️ Although Disk Drill comes with powerful data analysis and file recovery engines, it hides them behind a modern and user-friendly GUI.
- 🪞 In the case of failing SD cards, more use (and, in some cases, the mere passage of time) brings them closer to the point of no return. Instead of directly trying to recover data from them, Disk Drill comes with an extra tool for taking a pristine byte-to-byte image of all their contents. You can then recover your photos from this image instead, whenever you like, even if that’s years after you’ve replaced the original SD cards.
Best of all, the latest versions of Disk Drill come with a spanking-new Advanced Camera Recovery mode. This feature uses cutting-edge algorithms to locate video fragments scattered across the SD card and reconstructs them into complete, playable files (something a standard scan may struggle to do with fragmented footage).
And that’s why when looking for the best Nikon photo recovery software that’s free, Disk Drill is one of a handful that fit the bill.
Are There Any Nikon Photo Recovery Alternatives?
There are many ways to recover deleted photos on different devices, but data recovery applications remain the most powerful and reliable solution. However, if you’ve been using one of the alternatives we cover in this section, as we’ll see next, they can prove just as useful.
And if you weren’t (using them), we’ll explain how to use them to save your media going forward.
Alternative 1: SnapBridge: The Official Backup Solution
If you were backing up your photos with Nikon’s own SnapBridge app, it can help you get back your deleted files. That is, if it doesn’t behave erratically as described by this DPReview user.
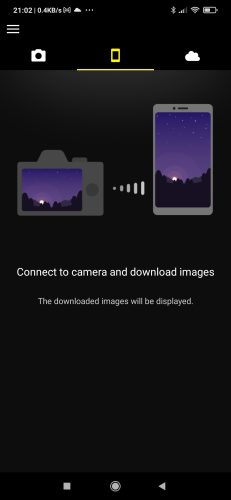
Check your phone’s Photos/Gallery app first. If you use Android, also open SnapBridge and go to App options > Destination to see where downloaded files are stored. (Nikon lists that destination setting as Android-only, so iPhone users should check the app and the main Photos library instead.)
Alternative 2: Dual Slot Cameras: Virtually Zero Chances to Lose Photos
If your Nikon camera has two card slots and the secondary slot was set to Backup, check the second SD card. (In that mode, the camera saves each photo to both cards, so the copy on Card 2 may still be there even if the photo was deleted from Card 1.) Remove the second card, connect it to your computer with an SD card reader, and open the DCIM folder. Easier than digging through the camera’s small screen.
This only helps if Backup mode was already active when the photos were taken. If the camera was set to Overflow, the second card was used only after the first card filled up, so it probably will not contain the missing photos. Do not change slot modes yet if you still need to recover files. First, copy anything valuable from both cards to another drive. Then, for future shoots, set Secondary Slot Function to Backup if you want the second card to act as a real safety net for photos.
Alternative 3: Recovery Pros: For When Nothing Else Worked (or Time Is of the Essence)
If nothing you’ve tried has brought your lost photos and videos back, or you don’t want to waste your time trying to recover your media yourself, it’s time to turn to the pros.
You can also hand the card to a professional data recovery service and let them do the work for you. This makes sense if you do not have time to deal with the recovery process yourself. They have intimate knowledge of everything related to data storage and access to professional equipment, along with many years of experience and countless success stories under their belts. That’s why data recovery specialists like CleverFiles Data Recovery Center offer the highest chances of getting your lost photos and videos back.
Still, this option comes with its own cons: time and cost. It demands some initial back-and-forth to explain your data loss situation, then to send your SD cards over, then to have them analyzed and your files recovered, and then some more time until you receive them. And all this time and effort invested by experts in their field doesn’t come free. However, if you don’t mind the wait for all those “thens” and the associated costs, delegating data recovery to specialists is the best option by far.
What If Some Videos Are Broken After Recovery?
If you’re having problems with video files after recovery, keep in mind that videos are much larger and more complex than photos, increasing the risk of playback-preventing issues. So, although you can use solutions on your own computer to try to “fix” them, it’s much easier to delegate their repair to an online service like Clever Online Video Repair.
To revive your video files using Clever Online Video Repair:
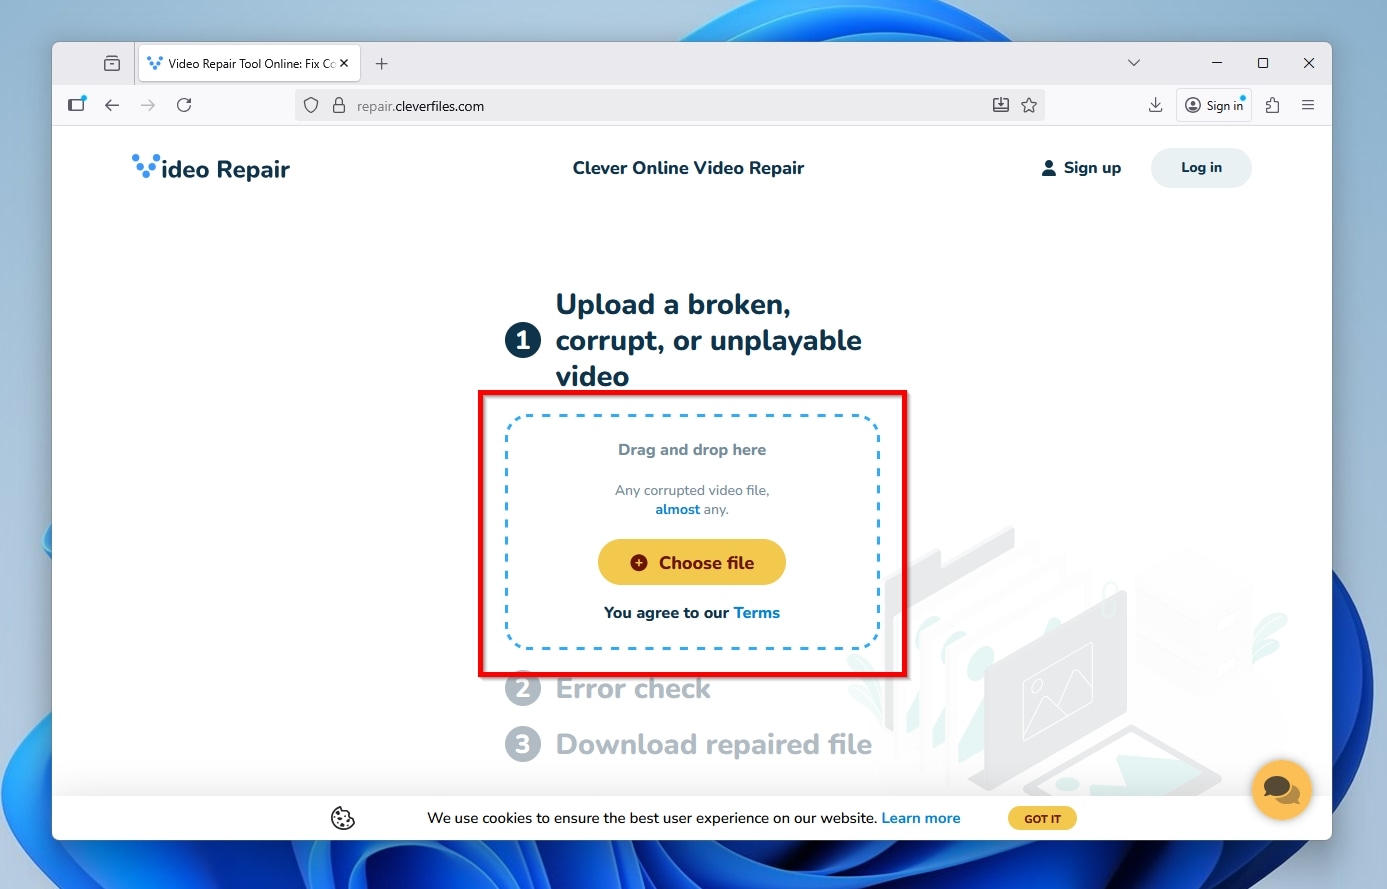
- Visit the Clever Online Video Repair site with your web browser. Click on the friendly Choose File icon and select your corrupted video file from the requester that pops up, or drag and drop the file on that spot from Windows File Explorer, or another file manager.
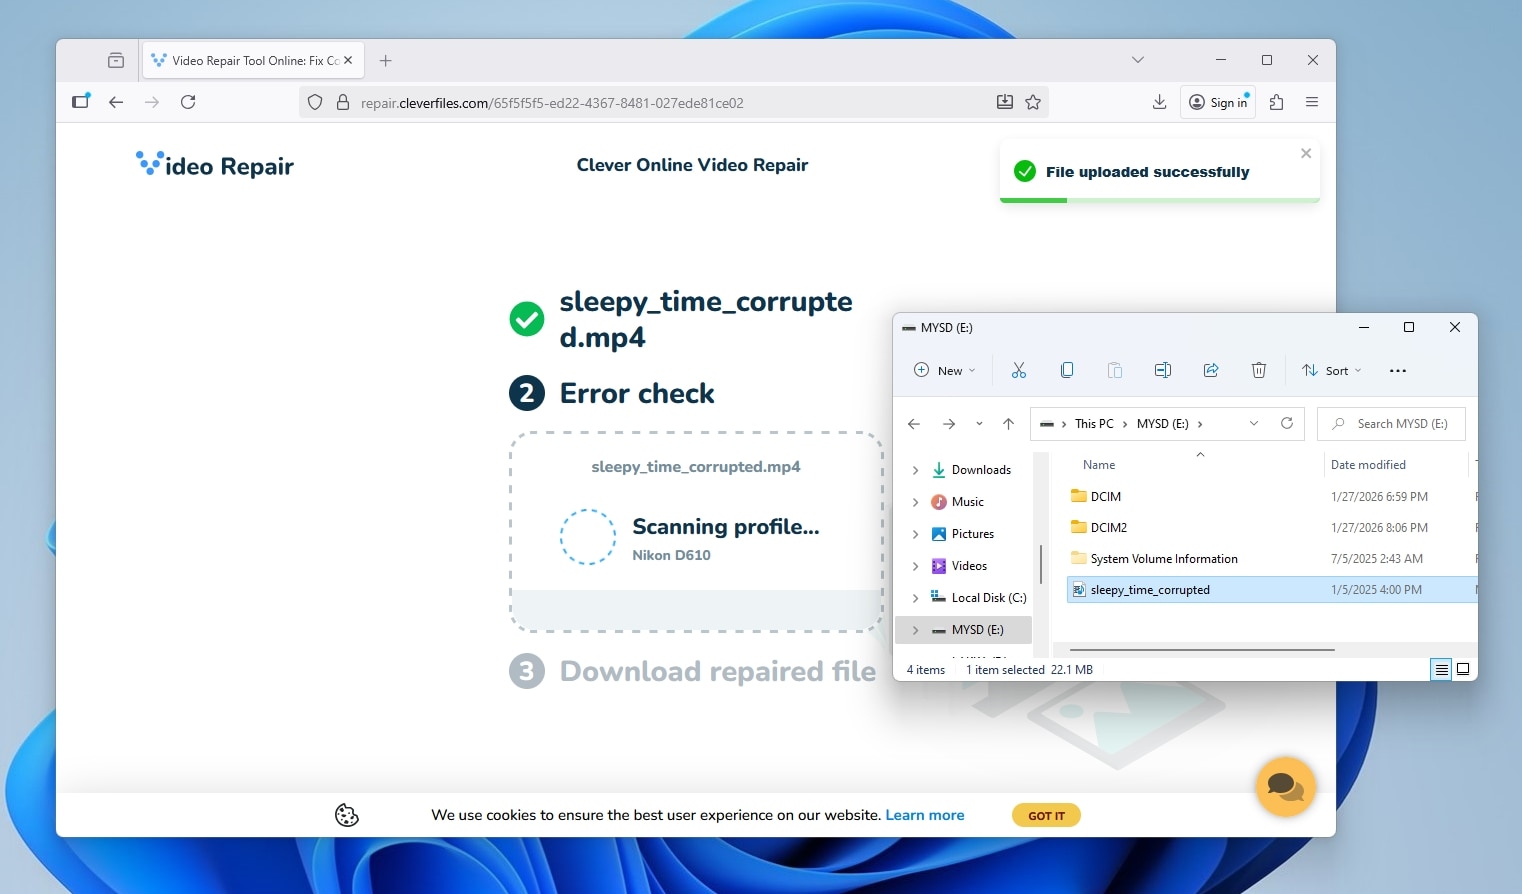
- After your file is uploaded and the Clever Online Video Repair Service analyzes it, it will offer you two paths. The best option, if available, is to also upload the last working file recorded before the corrupted one. This way, CleverFiles Video Repair can compare the two files and use the working one as a guide for reconstructing your corrupted video. Note, though, that a timer will be driving you towards the second option, Auto Repair, which tries to restore your video file without further input.
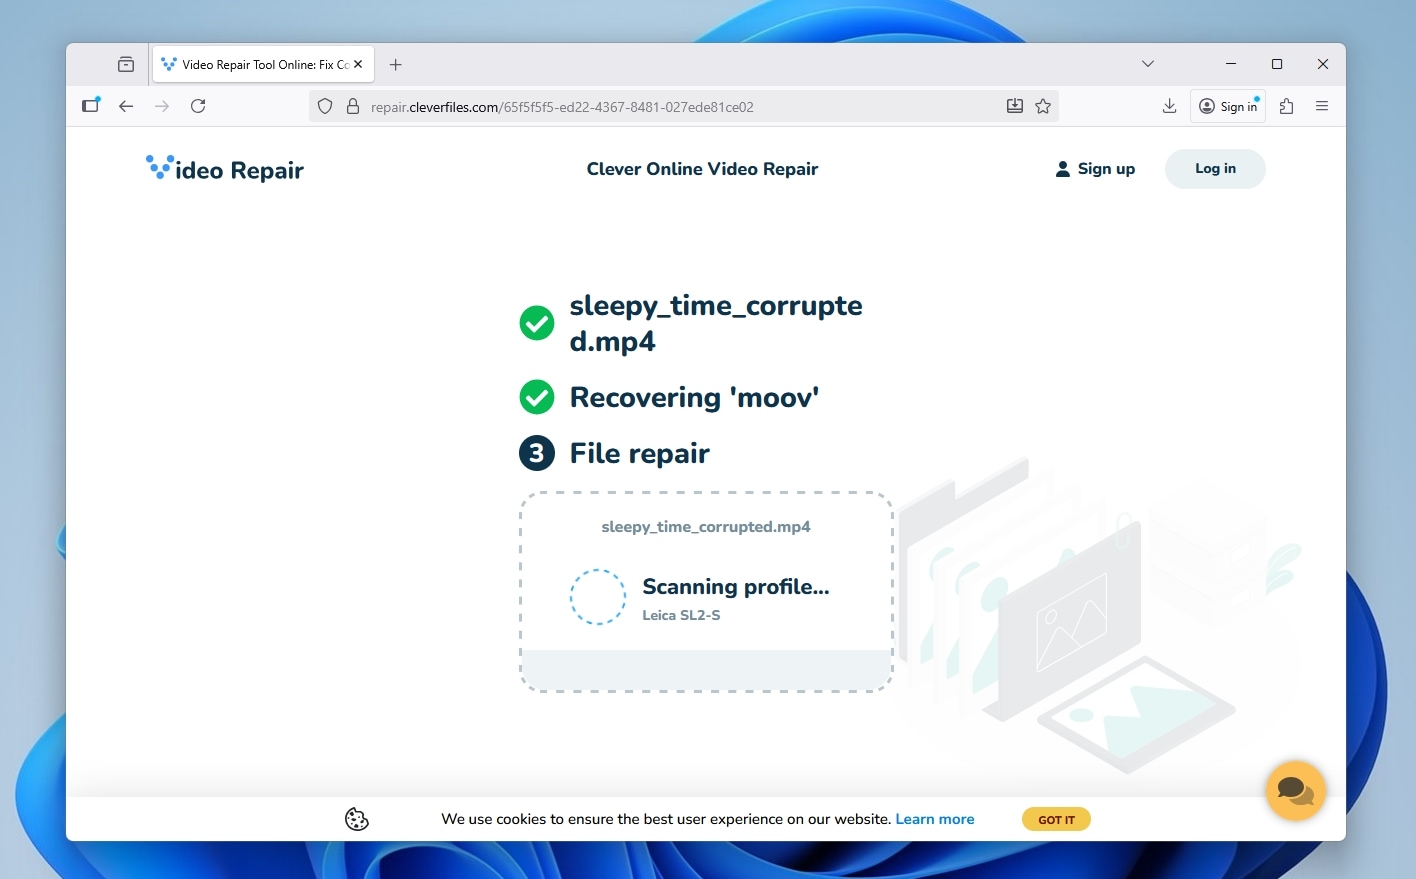
- Clever Online Video Repair will perform more extended scans of your uploaded file to recover its moov index and try to reconstruct other missing bits and pieces. This can take a while, depending on the file’s size and resolution.
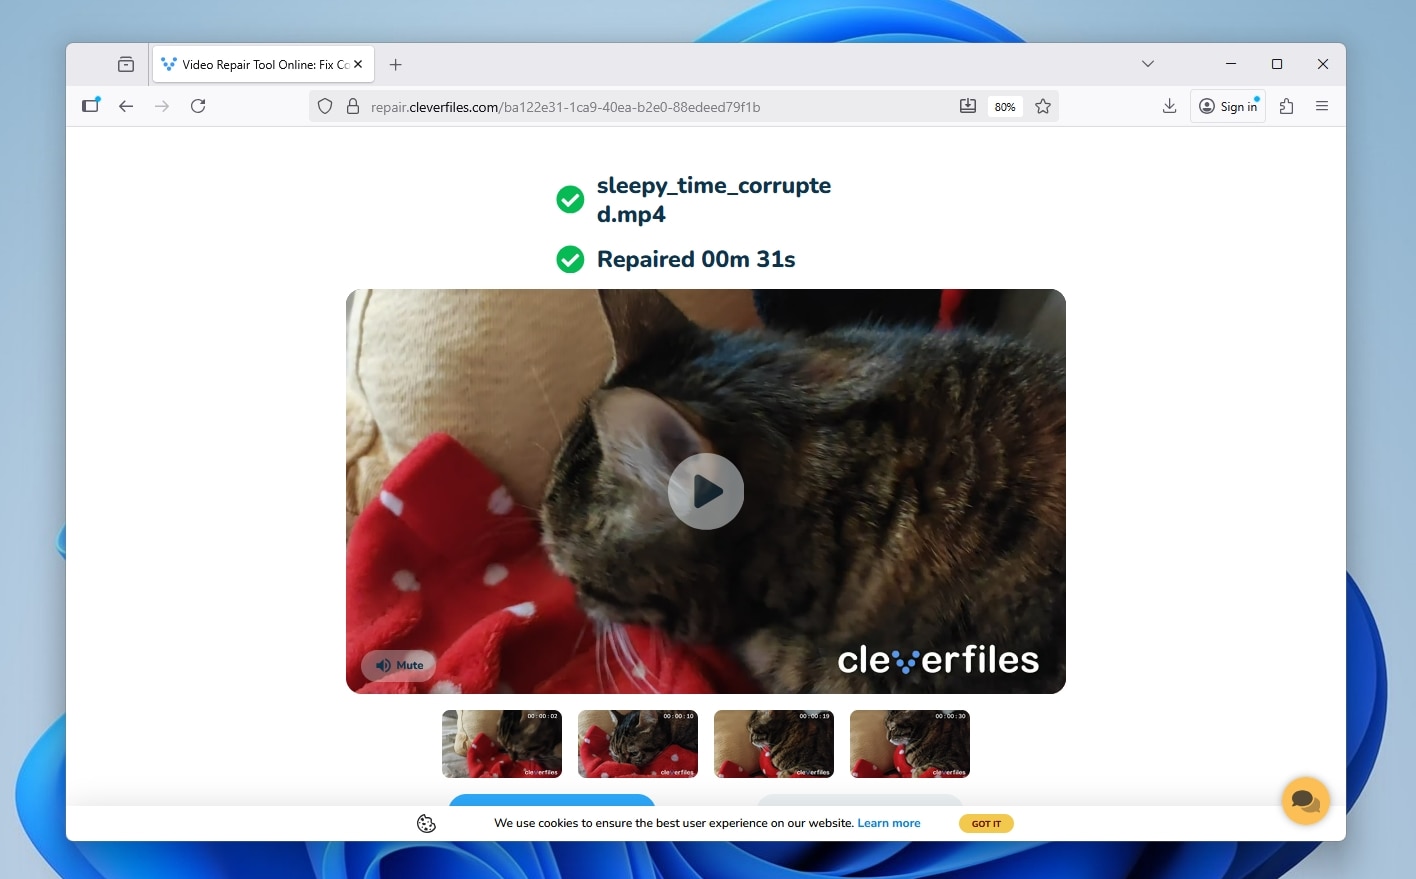
- When the process completes, Clever Online Video Repair will ask for a small payment to provide a link from where you can download the repaired file. Unfortunately, the development and hosting of such a service comes with attached costs, and cannot be provided for free. Thankfully, the required payment should be quite affordable, since Clever Online Video Repair uses dynamic pricing based primarily on the size of the uploaded file.
Final Words
Just to close out our guide: the best way to recover deleted photos from a Nikon camera is usually with a data recovery app like Disk Drill. The effort is minimal, and in most deleted-photo cases, the results speak for themselves. Connect the Nikon SD card to your computer, scan it, select the photos Disk Drill finds, and save them to your computer (or another external drive). That’s it. That is the clean path.
Of course, SD cards do not always cooperate. If your case was not as smooth as the main steps above, check the FAQ section next. We cover those extra hurdles there, along with the situations where full recovery is still possible.
FAQ
First, make sure the files were recovered with a capable recovery tool. NEF/NRW files are Nikon RAW formats, and simpler recovery apps may find something with the right extension but still recover a damaged file. If that happened, scan the SD card again with a stronger tool like Disk Drill.
Also check the viewer before assuming the files are ruined. NEF and NRW are not regular JPGs, so some basic photo viewers may fail to open them even when the files are fine. Try Nikon NX Studio, Adobe Lightroom, RawTherapee, darktable, or another RAW-compatible viewer. If several proper RAW apps still cannot open the recovered files, the photos were likely partially overwritten.
If your recovered Nikon photos open normally but the date, camera model, lens info, or other metadata looks wrong or missing, the image itself may still be usable. Corrupt metadata affects sorting & organization more than the actual photo. Use Phil Harvey’s ExifTool to check what survived inside the file. It can read NEF, NRW, JPG, and many video formats, including Nikon-specific maker notes in many cases. If ExifTool still detects the capture date, camera model, or lens data, you can use that information to rename and sort the recovered files. If it shows little or nothing, that metadata may be gone.
The important part is this: missing metadata does not automatically mean the photo is bad. Open the file in a proper RAW viewer, such as Nikon NX Studio or Lightroom. If the image opens cleanly, keep it and rebuild your organization around the metadata that survived.
Use a card reader. For photo recovery, it is the better option.
When you connect a Nikon camera over USB, the computer may see the camera as a media device, not as a normal removable drive. That can prevent recovery software from accessing the SD card at the level it needs for a proper scan. A card reader gives the software direct access to the card, which is exactly what you want when deleted photos, lost file system records, or RAW card issues are involved.
First, stop trying to use (or “fiddling” with) the memory card, since the more it’s used, the higher the risk of data loss. Then, use a card reader to connect the memory card directly to your computer. If the computer and its OS can detect the memory card, you can likely recover most of its contents with a data recovery app like Disk Drill.