When Windows shows “Disk X Unknown, Not Initialized” on your internal or external HDD/SSD, it really does seem that all files are gone. But the solution isn’t to click the Initialize Disk option (that would only make things worse!). The real solution is to start by recovering data from the uninitialized disk using recovery software capable of locating stored data despite partition table corruption or other issues. Then, you can safely perform the initialization to make the disk usable again.
Pre-Recovery Checklist for an Uninitialized HDD/SSD
Before you start trying to recover data from your uninitialized disk (such as when Disk Management shows “Disk 0 Unknown, Not Initialized” or similar status for Disk 1, 2, etc.), there are three things you need to do:
- 🔴 Don’t click “Initialize Disk” if you haven’t already. Initialization rewrites the partition table and can partially overwrite recoverable data, so it would only make the entire recovery process significantly harder. The good news is that you still have a good chance to recover at least some of your data even if you’ve already performed. Your recovery chances are bad only if you’ve not only initialized the disk but also transferred a large amount of new data to it.
- 🟠 Check your connections first. The “Disk 0 Unknown Not Initialized” error doesn’t always mean your drive is failing. We’ve encountered many cases where it was caused by a connection problem, especially when the disk shows no size information in Disk Management (indicating either a connection issue or physical disk problem). That’s why we recommend you swap USB cables if it’s an external drive and try a different SATA cable if it’s an internal drive. You can also try a different port/slot or even another computer. You’d be surprised how often a drive that won’t detect is just having a connection issue.
- 🟢 Use the right recovery software. To successfully recover data from a disk that’s not initialized, you need software that doesn’t rely on the file system being intact (most basic undelete tools won’t work here because they expect a working partition table). Specifically, the software should have deep scanning algorithms that read corrupted or RAW partitions, file signature detection to identify files without filesystem metadata, and ideally also free scanning capability so you can preview recoverable files before paying.
These three pre-recovery checklist items are what usually separates successful attempts to recover uninitialized disks from those that end up with permanent data loss.
How to Recover Data from an Uninitialized Hard Disk
As we emphasized in the previous section, you need the right hard drive recovery software to recover data from an uninitialized disk. We recommend Disk Drill for Windows because it’s a powerful tool for today’s scenario. It combines multiple recovery algorithms to maximize results, which in many cases helps it find more recoverable data than lower-grade tools. Additionally, Disk Drill enables you to verify that your files are recoverable and provides free restoration of the most important ones.
Disk Drill for Windows also creates byte-to-byte backup copies of your entire hard disk to protect it from further damage. This functionality is highly useful if the cause of the “Unknown Not Initialized” error is the kind of corruption that could be progressively getting worse with continued use of the storage device.
1. Download and Install Disk Drill
Start by downloading Disk Drill for Windows. Save the installer to a healthy storage device, such as your system drive. Launch the installation wizard and go through the usual steps, which include the selection of an installation directory. Once installed, you can start Disk Drill. You’ll need administrator privileges since the software requires low-level disk access to scan uninitialized drives.
2. Create Byte-to-Byte Backup (Advised)
This step isn’t strictly necessary to recover data from a not initialized hard drive, but we strongly recommend you don’t skip it because it creates a safety net for your recovery. By creating a byte-to-byte backup first, you clone every sector of the uninitialized disk to a healthy drive, which means all subsequent scans work from that stable image instead of stressing the original hardware. If the uninitialized disk decides to stop working completely for one reason or another, you’ll still be okay thanks to the backup image.
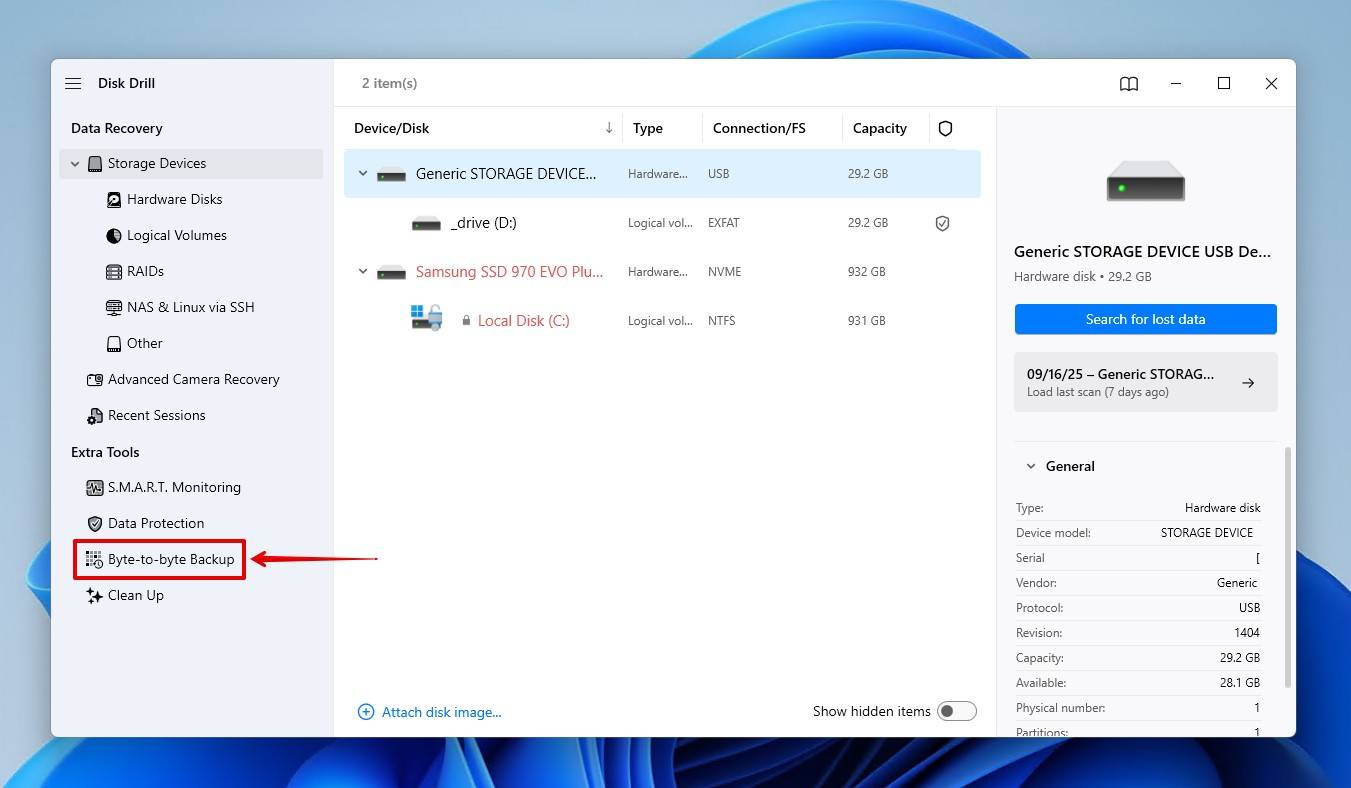
To create a backup, launch Disk Drill and select Byte-to-byte Backup from the left sidebar. Choose your uninitialized disk and click the Create backup button. Select a destination folder on a different healthy drive with enough free space (the backup file will be the same size as your source disk). Give the backup a recognizable name and click OK to start the process. The backup can take a while depending on the drive’s size and condition, but you’ll see a progress bar showing estimated time remaining.
3. Select the Drive or Backup Image from the List
If you’ve created a backup image in step 2, then you need to go to the Storage Devices section and click the Attach disk image… link at the bottom.
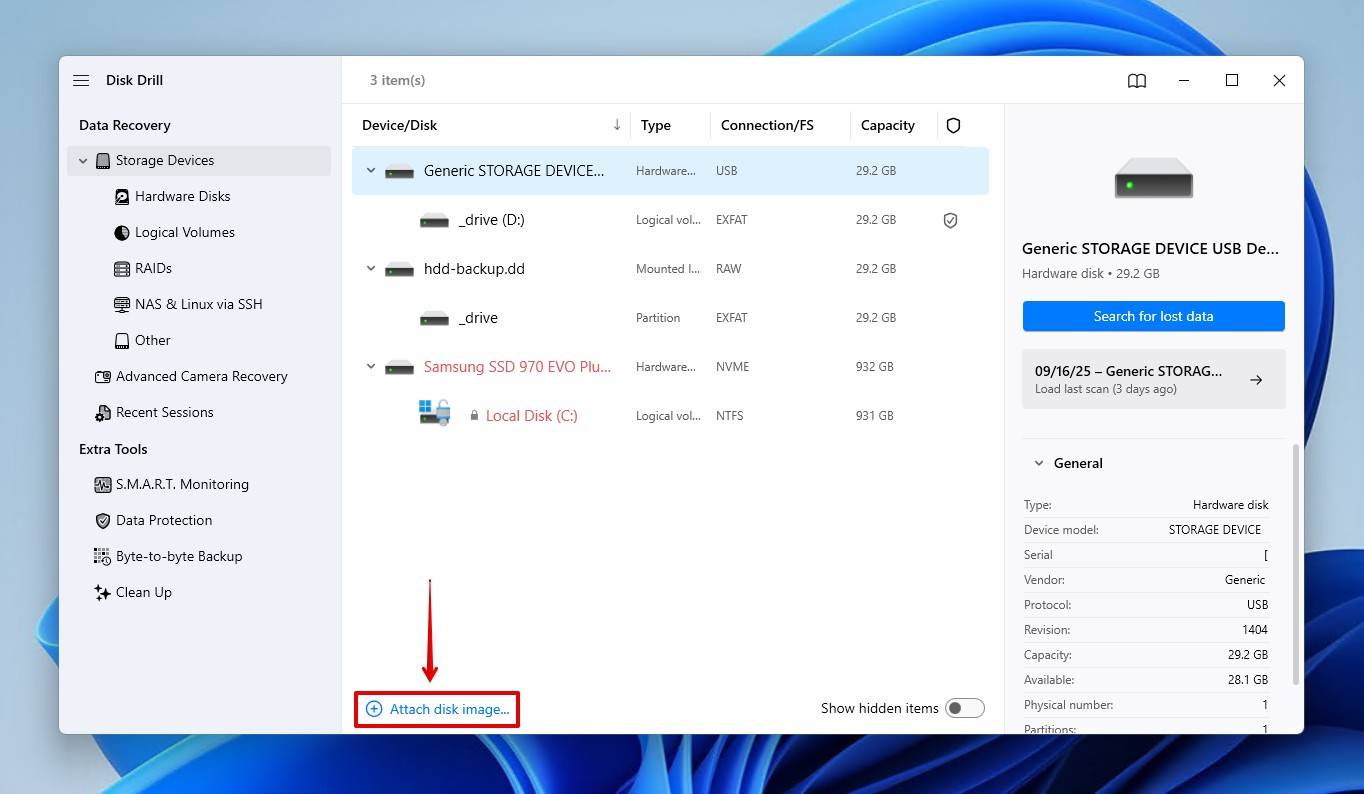
Select your backup image, and it should appear among the available storage devices. If you haven’t created a backup and want to work directly with the uninitialized hard disk, then you can select it in the same Storage Devices section. Don’t be surprised if it has a strange name. That’s a common consequence of a missing file system.
4. Scan for Lost Data
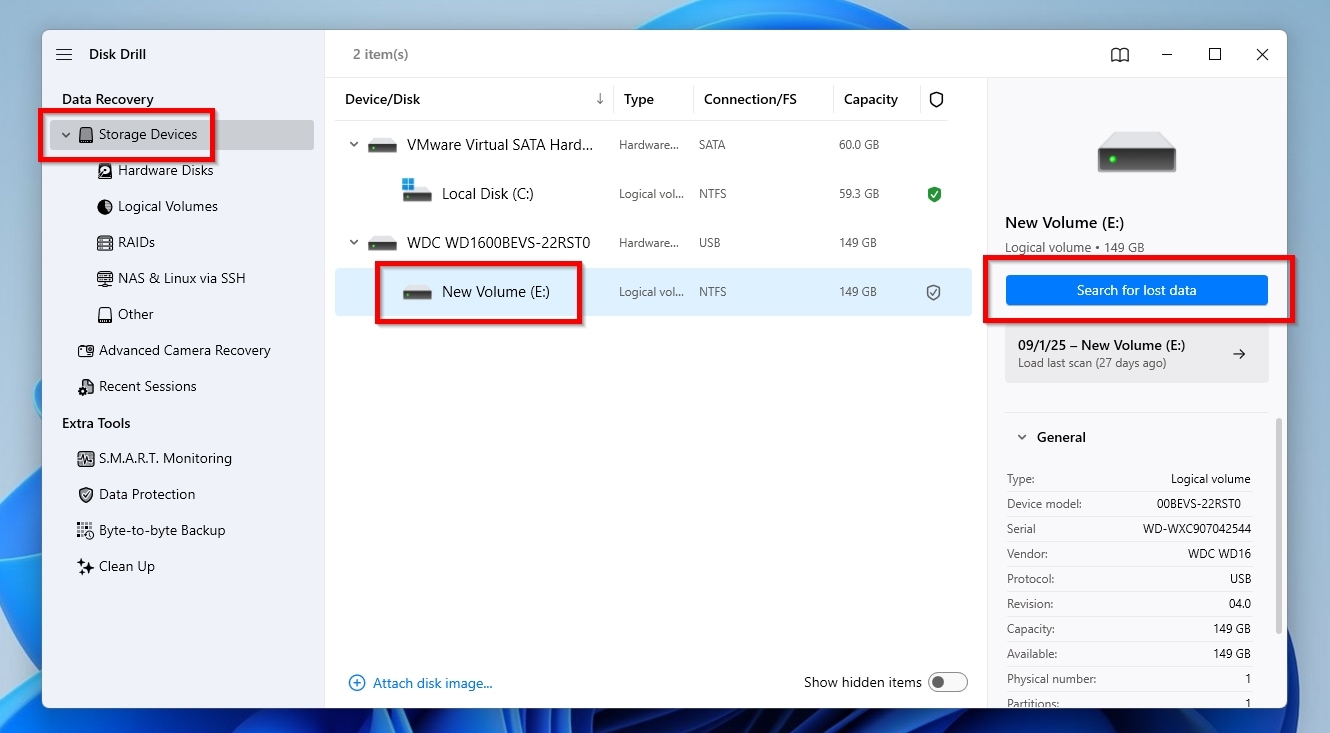
With your storage device or backup image selected, click the Search for lost data button. You will be asked if you want to perform a Universal Scan or Advanced Camera Recovery. In most cases involving uninitialized hard disks, you want to select Universal Scan because the purpose of Advanced Camera Recovery is to look specifically for missing videos and photos.
Disk Drill will run through multiple recovery methods automatically, starting with quick scans that look for recently deleted files and then moving into deep scans that search for file system remnants, analyze raw sectors for file signatures, and recover files based on discovered filesystem metadata. The scan can take anywhere from a few minutes to several hours, depending on drive size and condition. You can pause and resume the scan if needed.
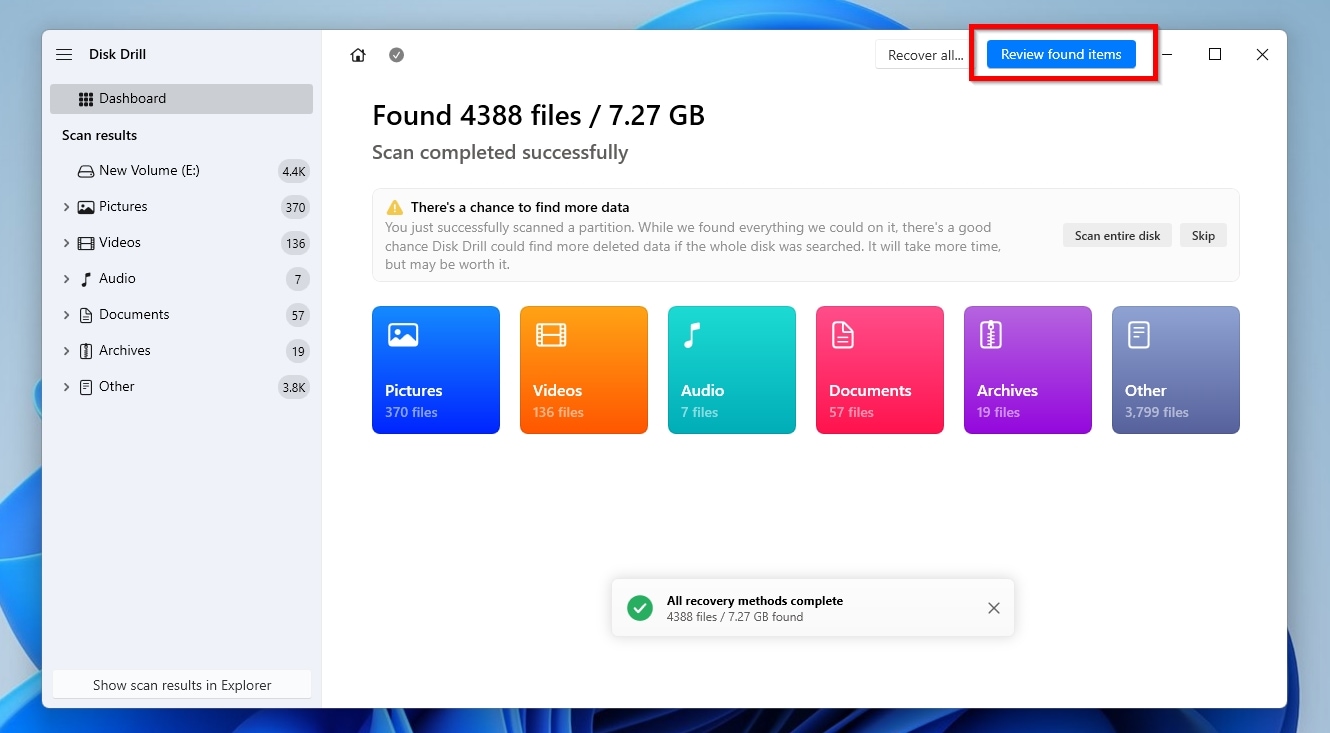
There’s also a Review found items button that lets you see recoverable items right away (scanning will continue in the background).
5. Preview and Recover Data to a Separate Drive
Once the scan completes (or while it’s still running), you can preview recoverable files directly in Disk Drill. Click on any file to see a preview (this works for photos, videos, documents, and most common file types). The preview feature lets you verify file integrity before recovery, which is important because not all found files will be in perfect condition, especially if you’re attempting to recover data after you’ve initialized the disk or if the disk was also formatted accidentally.

You then need to select the files you want to recover by clicking the checkboxes next to them. Alternatively, you can recover all the files found in bulk. Finally, Recover and choose a destination folder. This destination must be on a different drive than the one you’re recovering from, and Disk Drill will let you know if the destination you’ve selected is okay. The only thing that remains is to confirm your choice.
How to Initialize the Disk After Successful Data Recovery
After data recovery, you can finally initialize that disk and make it usable again. The initialization process is straightforward and consists of two main stages: selecting a partition scheme (GPT or MBR) and then formatting the disk.
Here’s how to initialize your disk in Windows:
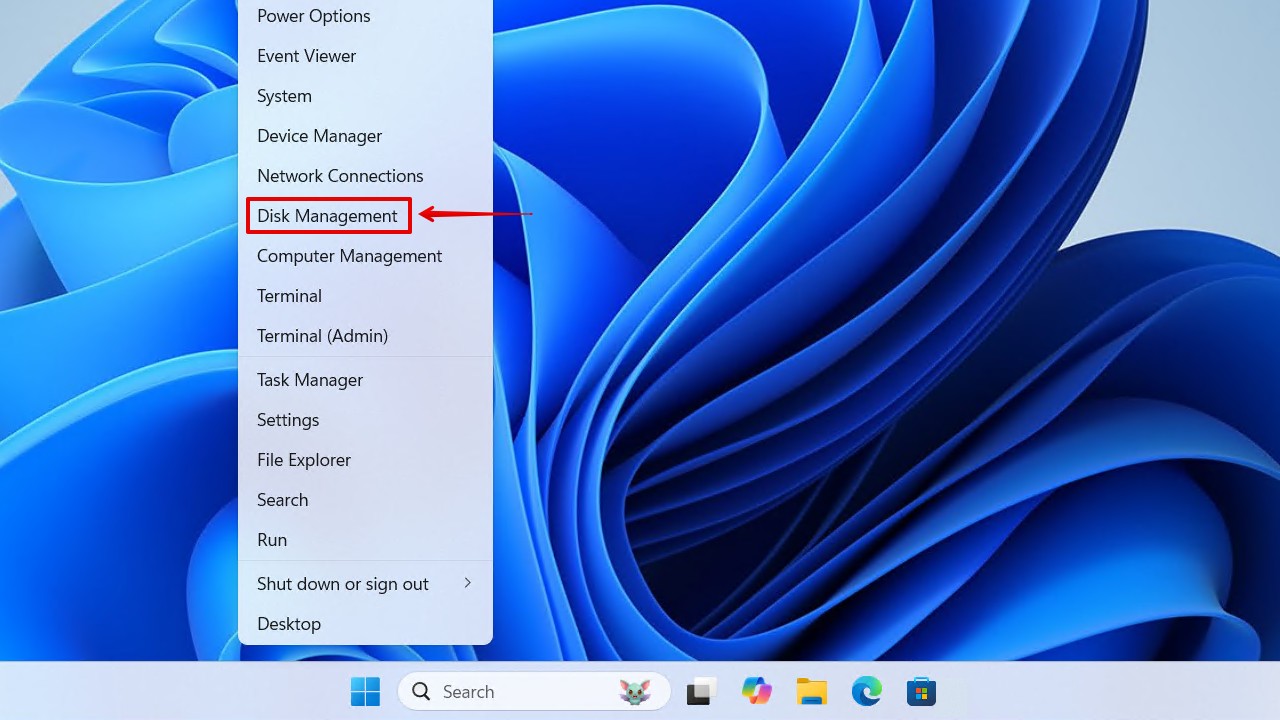
- Open Disk Management by pressing Win + X and selecting Disk Management from the menu. Your uninitialized disk should appear with a black bar labeled “Not Initialized.”
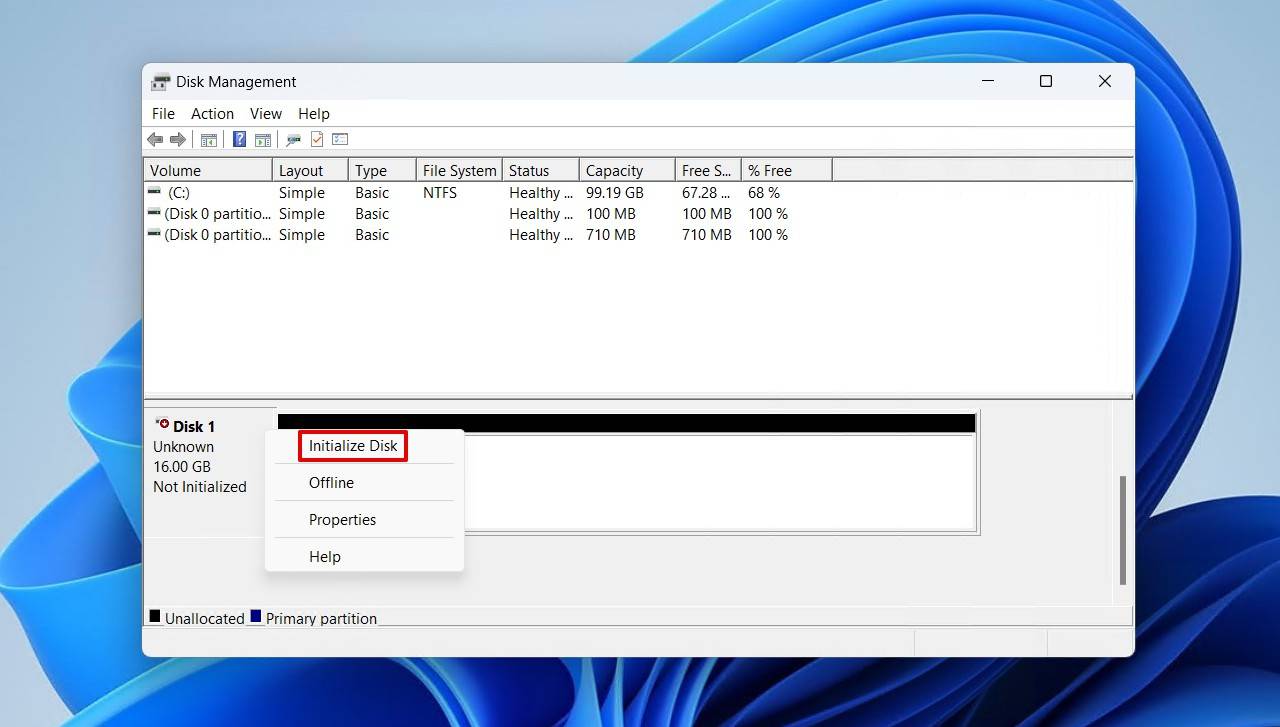
- Right-click on the disk (not on a partition, but on the left side where it says “Disk 0” or “Disk 1”) and select Initialize Disk.
- Choose your partition style. You’ll see two options:
- GPT (GUID Partition Table): This is the modern standard and what you should choose for Windows 10, Windows 11, and recent versions of macOS. GPT supports drives larger than 2 TB, allows for more than four partitions, and includes built-in redundancy to protect partition data.
- MBR (Master Boot Record): This older standard is only necessary if you’re using the drive with very old PCs running Windows XP or Vista, or if you need compatibility with legacy BIOS systems. MBR has a 2 TB size limit and only supports four primary partitions.
- Click OK to initialize the disk with your chosen partition style. The disk will now show as “Online” but with “Unallocated” space.
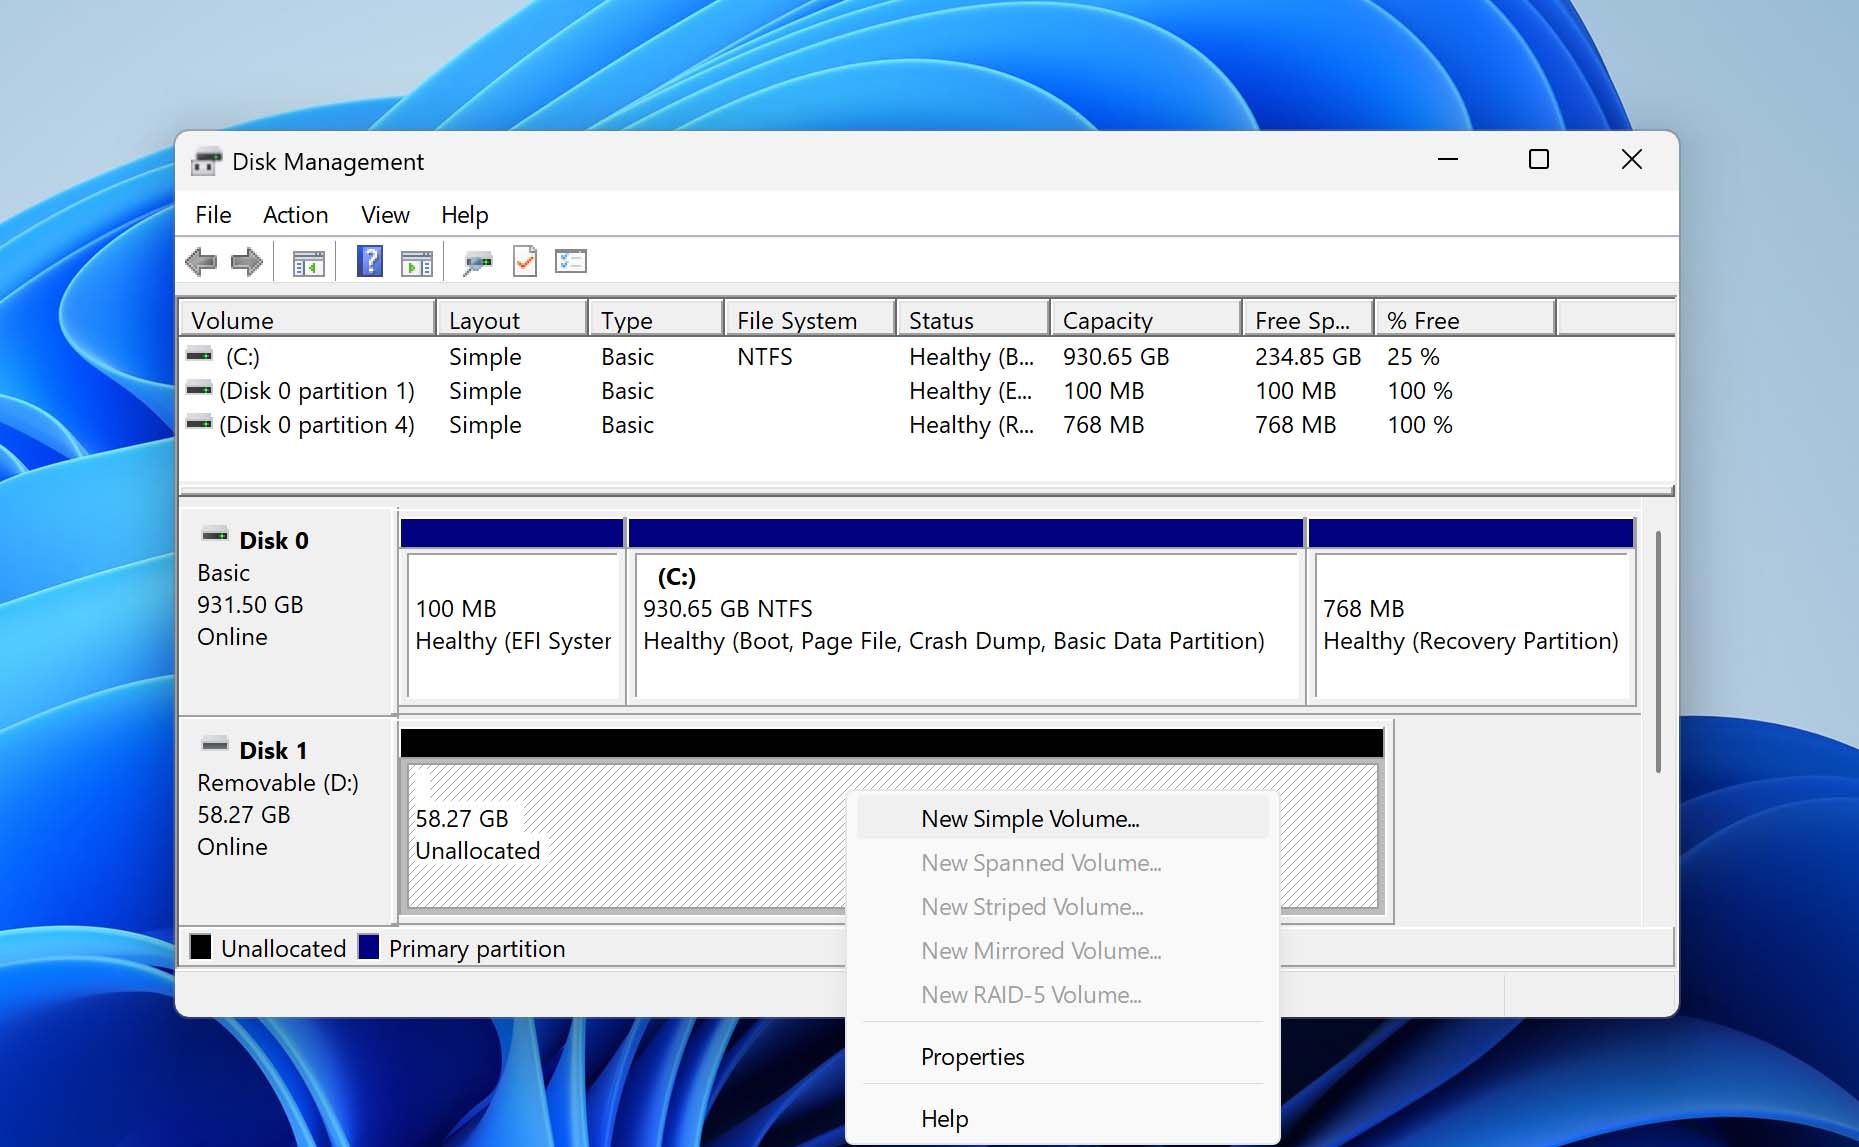
- Right-click on the unallocated space (the black bar on the right side) and select New Simple Volume. The wizard will walk you through creating a partition.
- Assign a drive letter and choose your file system. For most uses, NTFS is the right choice for Windows. If you’re using the drive with both Windows and Mac, exFAT offers better cross-platform compatibility.
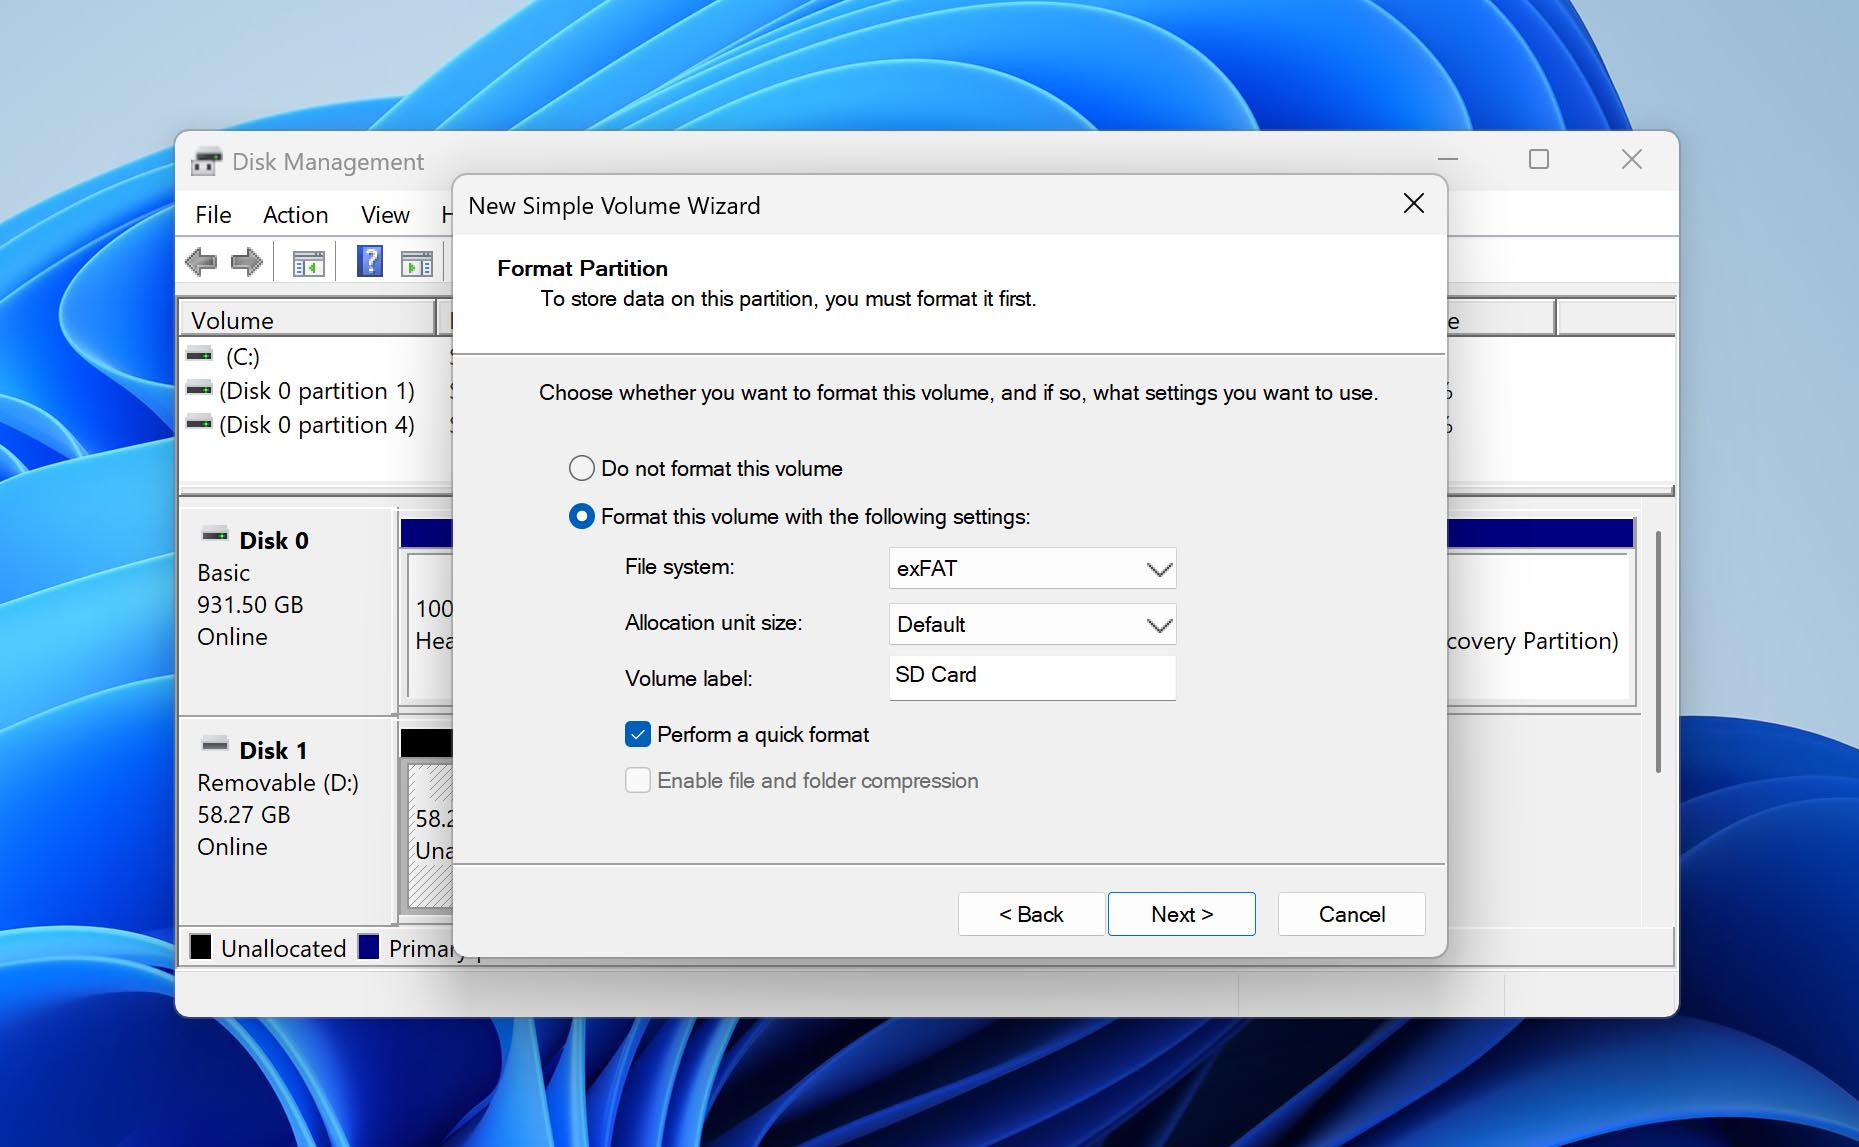
- In the format options, you’ll see a checkbox for Perform a quick format. Leave it checked unless your disk health scan revealed problems. Quick format, which Windows uses by default, just erases the file system metadata and directory information (this is why you could recover data from the disk that was not initialized in the first place). If you found bad sectors or the drive was previously failing or crashing, uncheck the Perform a quick format option to perform a full format.
- Click Finish and Windows will format your disk. Once complete, it’ll appear as a normal drive with a letter assignment, ready to use.
Consider Further Inspections of the Previously Uninitialized Hard Disk
If your disk showed the “Not Initialized” error once, there’s a chance it could happen again. That’s why you should seriously consider whether this drive is safe for continued use after you’ve successfully managed to recover not initialized hard drive data, especially if you’re planning to store important files on it.
The best move right now is to run a S.M.A.R.T. diagnostic using Disk Drill’s built-in disk health monitoring from time to time (it’s available for free in the software). This check will tell you if the drive has any underlying hardware problems like bad sectors, read errors, or signs of imminent failure. If the diagnostic comes back clean, you can keep using the disk. But if the S.M.A.R.T. check shows warnings or errors, you should replace the disk with a new one as soon as possible.
FAQ
The process is nearly identical to Windows. Download Disk Drill for Mac, install it on a healthy drive, and launch the application. Your uninitialized disk should appear in the device list even though macOS won’t mount it normally. Select the drive, run a scan, preview the recoverable files, and save them to a different location.
Yes, but your chances depend on what happened after initialization. When you initialize a disk, Windows creates a new partition table but typically performs a quick format, which only erases the file system metadata and not the actual data. If you stopped immediately after initialization and didn’t write any new files to the drive, most of your data should still be recoverable using Disk Drill’s advanced data recovery algorithms.
A greyed-out Initialize Disk option usually means Windows doesn’t have proper permissions to perform the initialization process. A quick fix is to right-click the Windows Start button and run the Disk Management tool as an administrator. The disk could also be write-protected. In such cases, you can use DiskPart: open an elevated Command Prompt, run diskpart, list disk, select disk <#>, then attributes disk clear readonly and online disk. Then try initializing again.
Yes, a failing USB cable, damaged port, or faulty enclosure can cause intermittent connections that corrupt the partition table information Windows reads during drive detection. In these situations, the disk may show “Not Initialized” without displaying its size in Disk Management. Often, the initialization issue can be resolved with a simple cable replacement or the use of a different port. If that doesn’t help, you might need to perform the initialization as described in this guide.
First, check if the drive is getting power. External hard drives sometimes need a dedicated power supply or at least a powered USB hub. If you’re sure that the hard drive is getting sufficient power, then you should Open Device Manager (press Win + X and select it) to see if Windows detects the storage device. If the drive doesn’t appear anywhere (not in Disk Management, not in Device Manager, and not in BIOS), then you’re probably facing a physical hardware failure that requires professional data recovery services.