Has your Storage Spaces pool suddenly turned RAW? Maybe one of the disks just vanished from Windows, or you accidentally deleted the wrong files. Regardless of the situation, you are not the first. Storage Spaces can be a powerful RAID-like alternative to managing multiple drives, until something goes wrong.
Thankfully, you can repair Storage Spaces and recover the data yourself. There are many software-based approaches you can take, but it’s important you know which order to execute them.
What Are the Specifics of Storage Spaces Recovery?
When one or more disks in a Storage Spaces (MSS) pool fail, there are details you must understand about data recovery, some of which are unique to Storage Spaces recovery:
🟢 Must Know:
Your data’s safety comes first. If your Storage Spaces pool turns RAW or if some drives are missing, stop all activity immediately. Any action that involves writing, moving, or modifying data in any way can overwrite the files you wish to recover. Before attempting fixes, review our troubleshooting section to confirm your system’s condition. Overall, we recommend recovering your data or making a backup of your drives first, before you even consider a “repair,” to protect your data from potential loss during the process.
🟡 Better to know:
The main point of difference between MSS and RAID is that MSS is exclusively software-based, whereas RAID can be hardware or software-based. Meaning that as long as the drives are physically intact, in most cases, the files can be recovered using recovery software, whether they were deleted, formatted, or one of the drives became corrupted.
🔵 Nice to know:
Your Windows 10 Storage Spaces recovery chances, as well as on the more current Windows 11, are impacted by what caused the data loss. Common, and relatively minor issues include deleted or missing virtual disks, accidental reformatting, pool metadata corruption, one or more drives showing as “disconnected”, or even files that have been deleted by mistake. In most cases, the data is fine and can be recovered with data recovery software.
How to Recover Data from Storage Spaces Yourself
Data recovery software is perfect for instances where your Microsoft Storage Spaces pool isn’t accessible, or if you’ve lost some of the data it stored. We’re going to be using Disk Drill, a professional RAID recovery tool that will automatically detect and rebuild the MSS storage pool, whether it uses NTFS or ReFS. As long as the drives are appearing in Windows, Disk Drill gathers them into the correct virtual layout so that even if the data is striped, it’s locatable.
Follow these steps to recover data from Microsoft Storage Spaces on Windows 11/10:
- Download, install, and open Disk Drill.
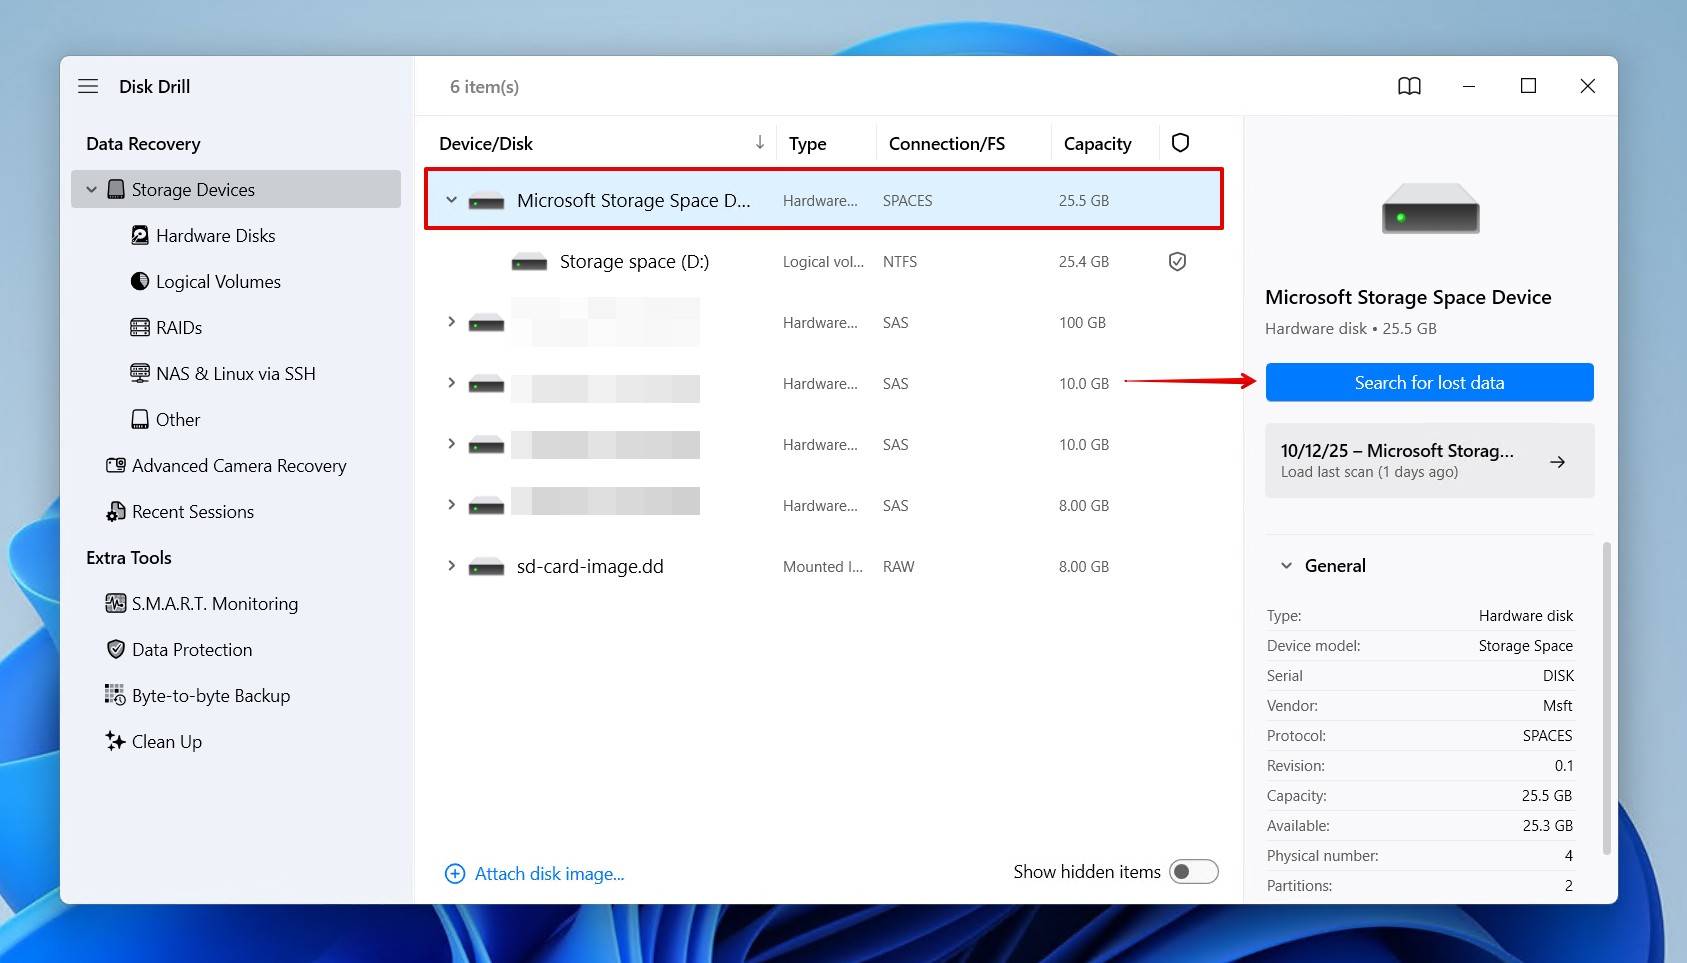
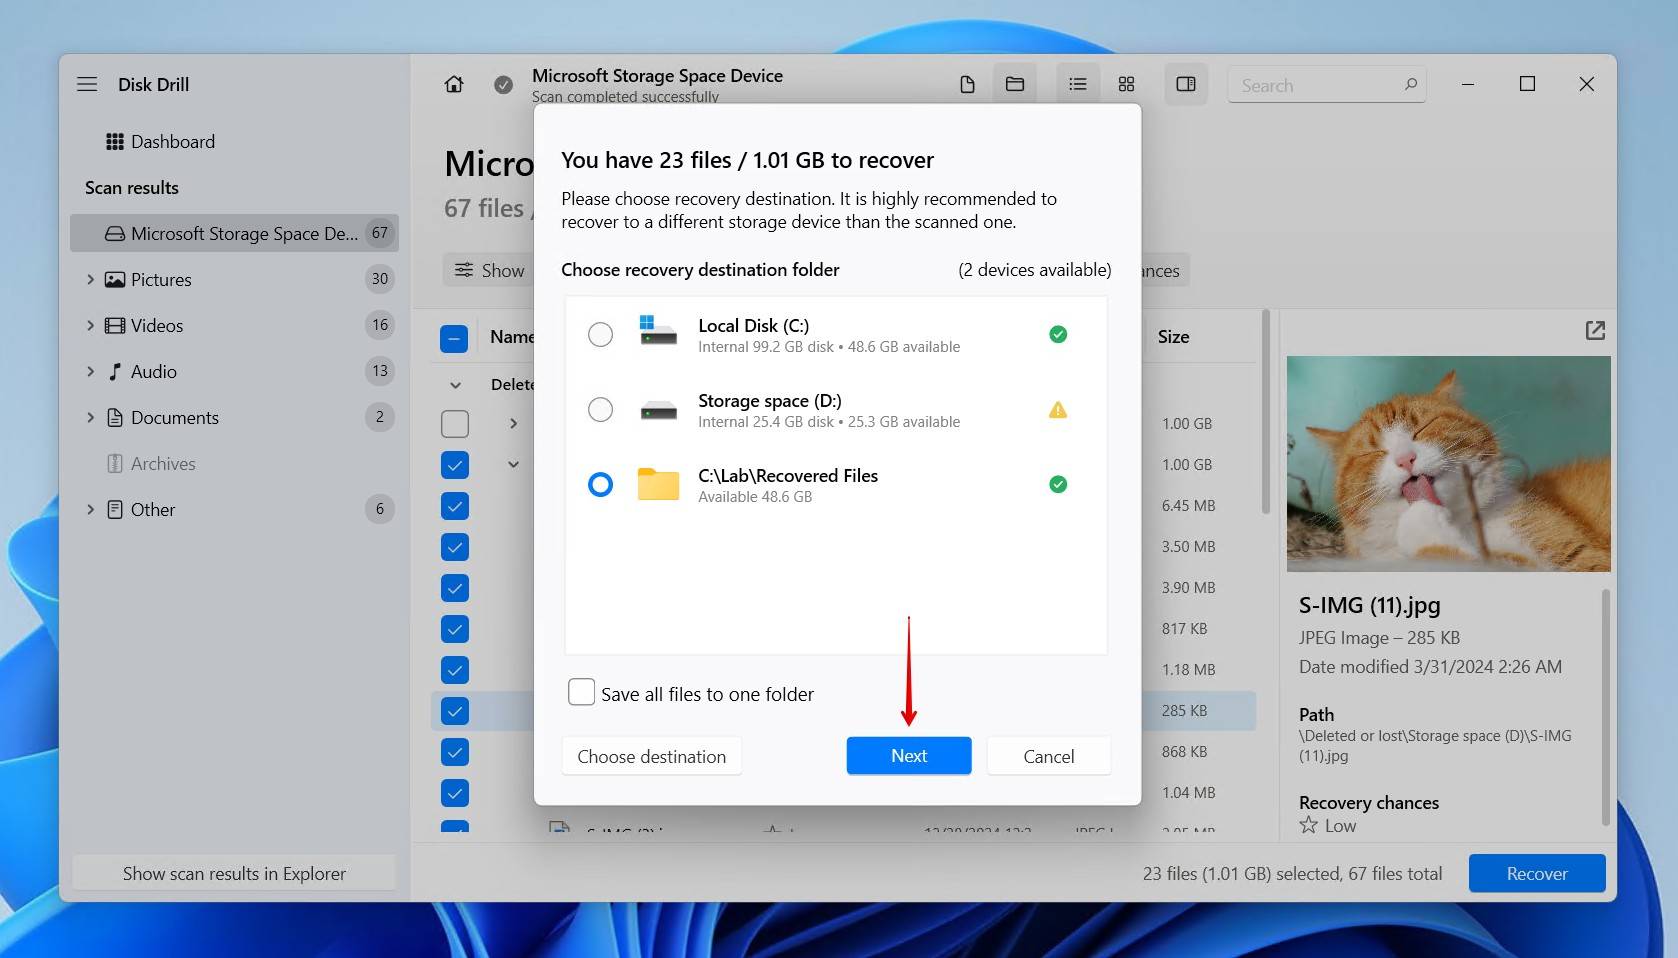
- Select your Storage Space from the list of devices. If one of the disks is unstable, create a byte-to-byte backup in Disk Drill to scan instead. Click Search for lost data.
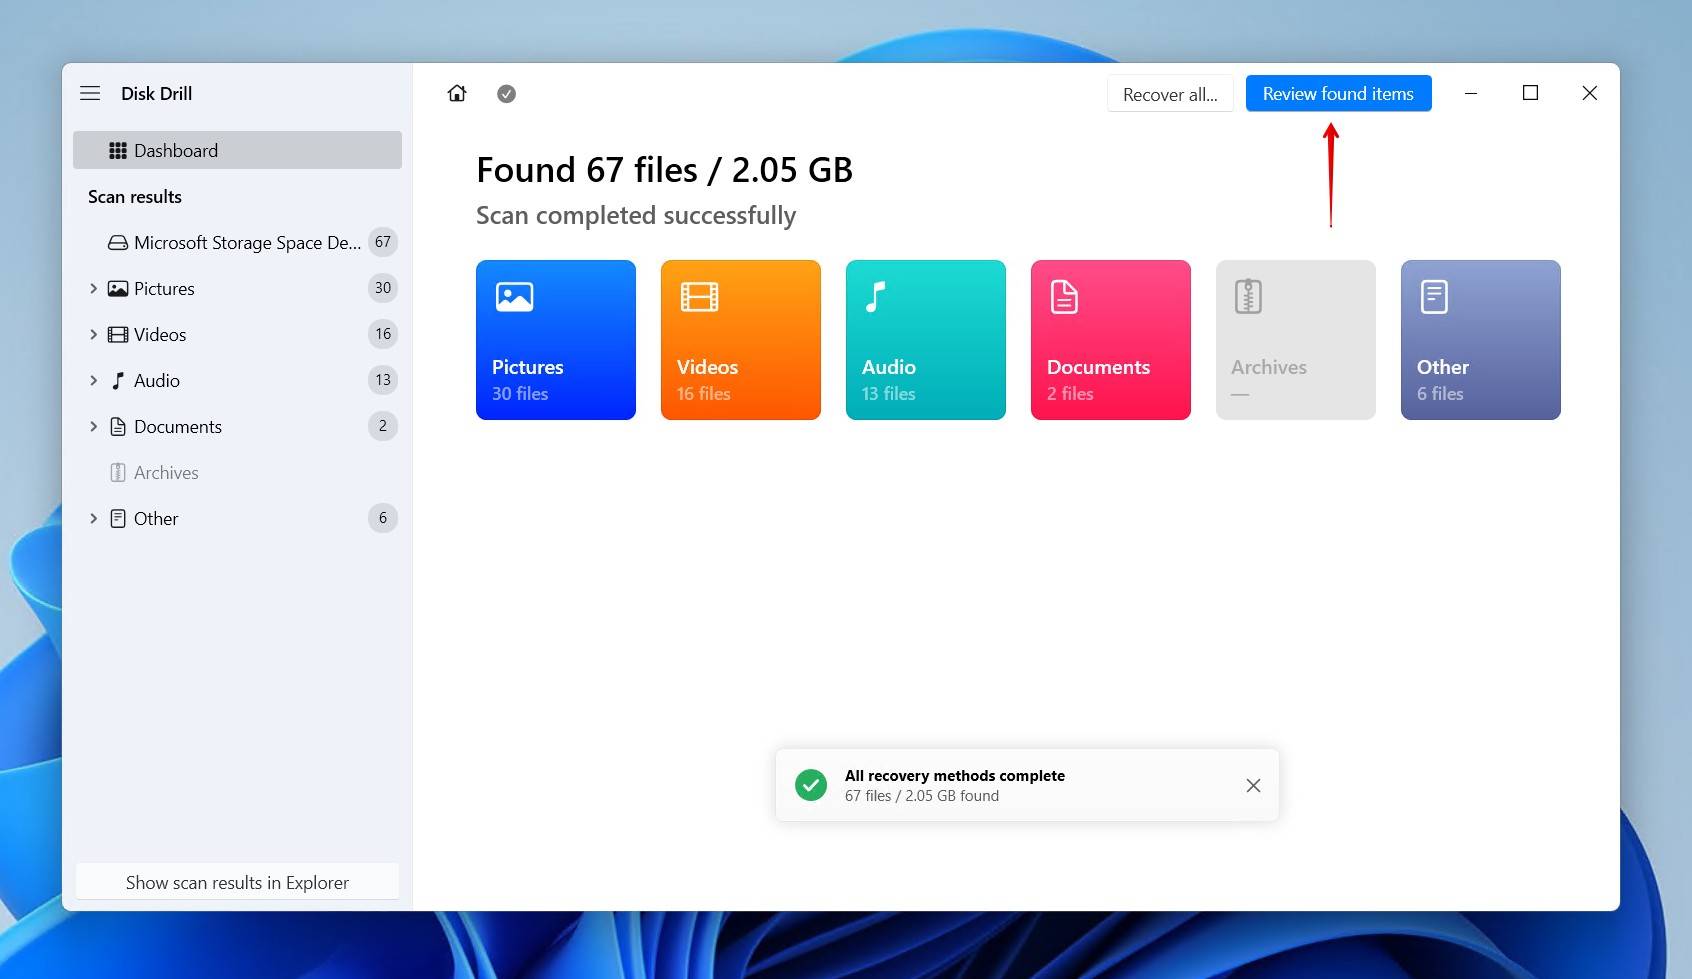
- Click Review found items to see what data Disk Drill found.
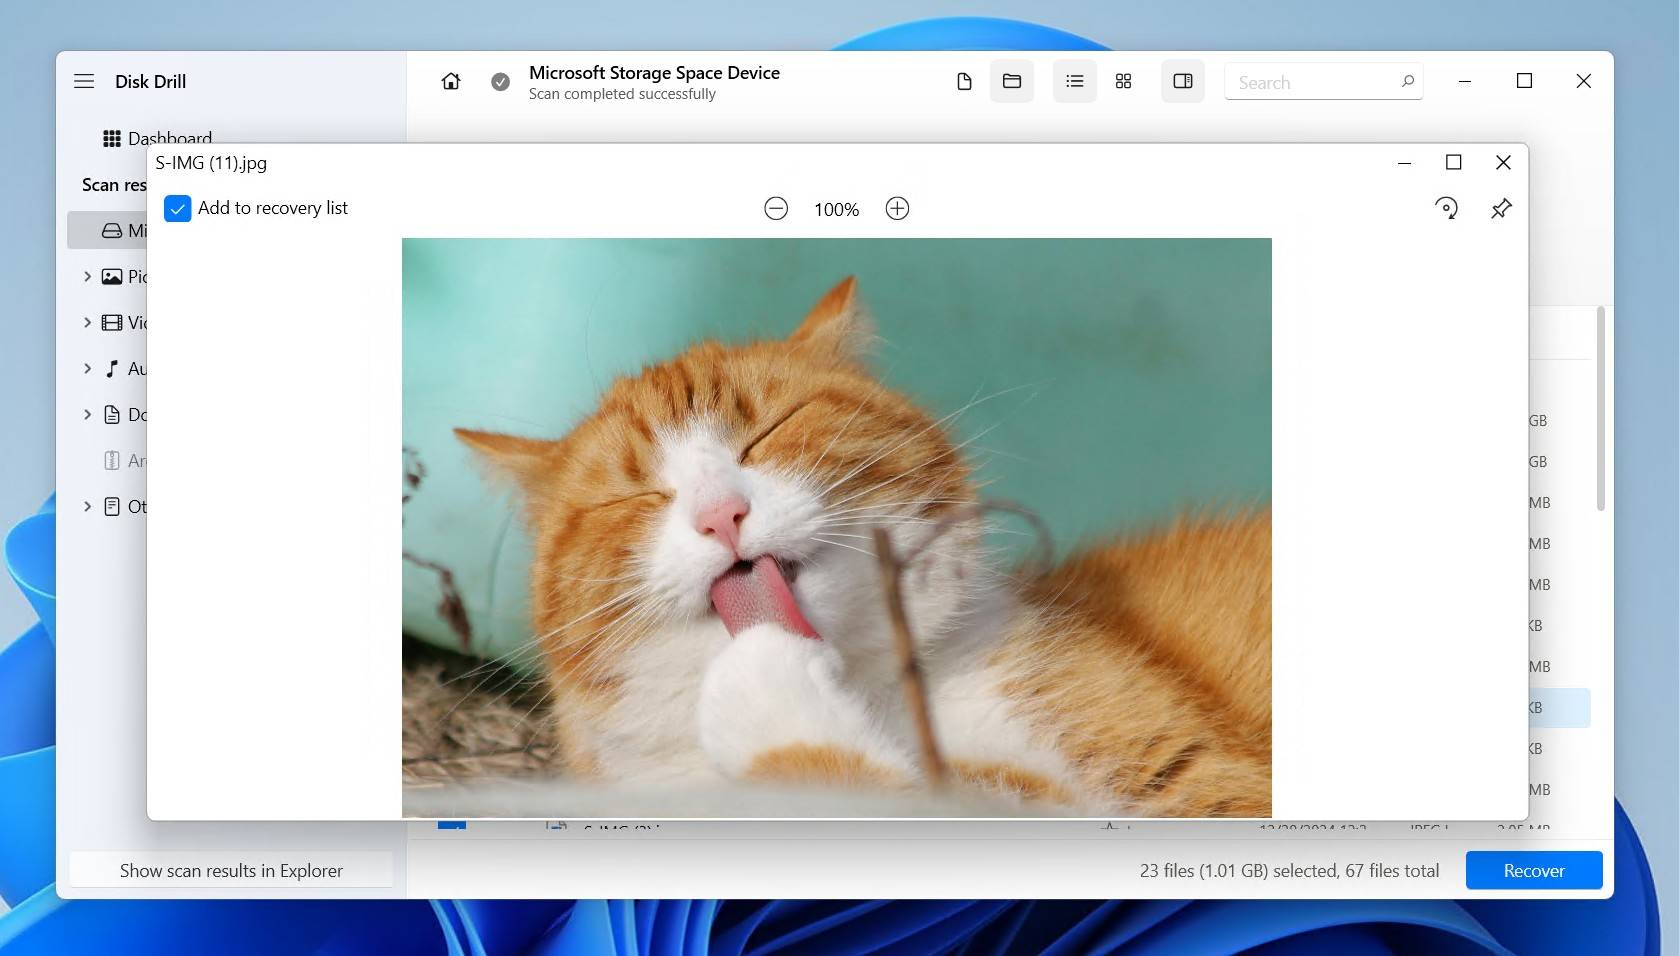
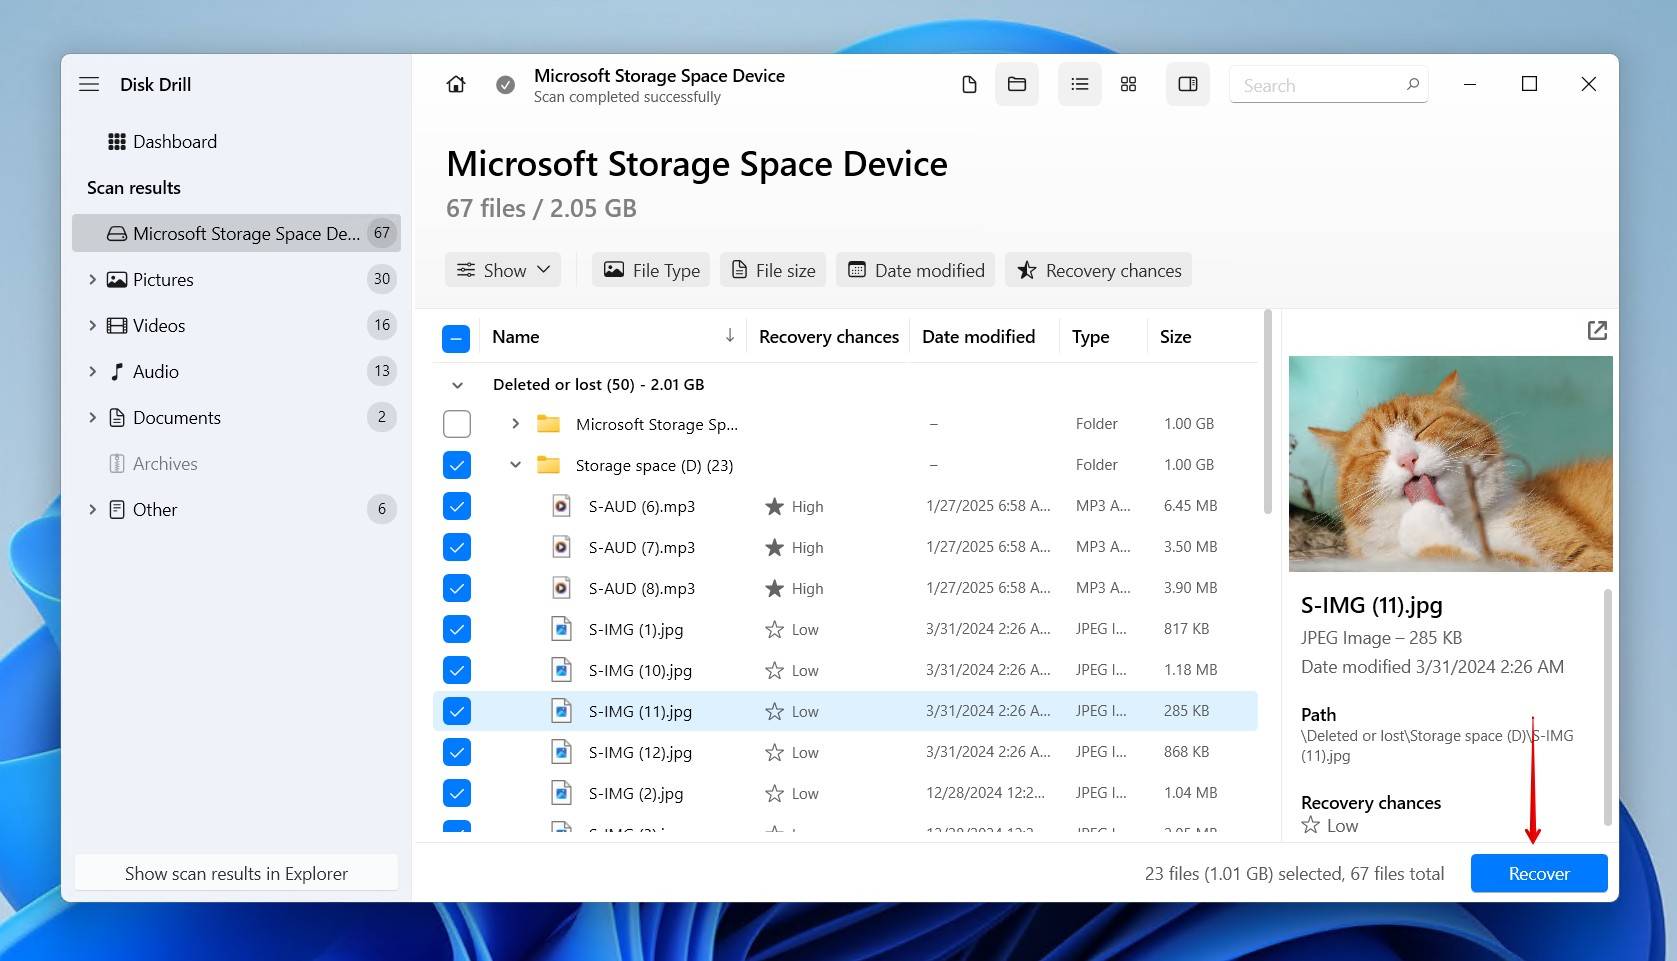
- Preview and select the files you want to recover. Existing data will be categorized under Existing, while deleted and reconstructed data will be under Deleted or lost and Reconstructed, respectively. Use the filter options to refine the results by file type, size, date modified, or recovery chances.
- Click Recover once you’ve selected what you need. Alternatively, if you simply want to recover everything, select nothing and click Recover all.
- Choose where you want to store the recovered data. It must be on a separate physical disk that’s not included in the Storage Space being recovered from. Click Next to finish recovery.
There are plenty of recovery options to recover Storage Spaces, but we chose Disk Drill for a few key reasons, including how it:
- Supports recovery from a wide range of drives, including RAID (RAID 0, 1, 5, 6, 10, 1E, JBOD, WSS), Apple RAID, Fusion Drives, and NAS.
- Works with all common file systems used in these setups, like EXT4, Btrfs, NTFS, and ReFS, offering pretty well-rounded coverage.
- Allows you to attach and recover data from virtual disks and byte-to-byte images in the event that scanning the disk directly is too risky.
How to Repair Storage Spaces and Troubleshoot Common Problems
Now that your data is safe, it’s time to look at how you repair the Storage Space drive(s). Keep in mind that you should have recovered the data by this point, or at least backed it up, as some of these methods could result in the data being lost.
Method 1. Start with Health Checks
Let’s start with a preliminary health check. This is essential for ruling out hardware or connection problems, especially if one of the drives has crashed. Many Storage Space errors can stem from something as simple as a loose cable. Therefore, these basic checks can save you a lot of time.
- Check the physical connections. Is the drive appearing in Disk Management? Is it showing as RAW or unallocated?
- Reconnect the drive. Disconnect the drives, inspect the cables and pins, then reconnect them. Reseat or replace the SATA and power cables as needed.
- Check the S.M.A.R.T. status. Check the S.M.A.R.T. status of each drive to see if there are any signs of impending failure. If you use Storage Spaces, we assume you’re tech-savvy enough to know how to do this, but just in case: you can do it either directly in Disk Drill (which you should have downloaded by now) or with CrystalDiskInfo, for example.
Still having issues? Next, we’ll dig deeper by looking at the logs.
Method 2. Check Event Viewer for Storage Spaces issues
Windows keeps track of system events using Event Viewer. Here, you’ll find warning or error logs related to Storage Spaces, and Event Viewer may report reduced resiliency. However, the logs are huge, and it can be difficult to find what you need.
Follow these steps to find errors relating to Storage Spaces:
- Open Start. Search for and open “Event Viewer”.
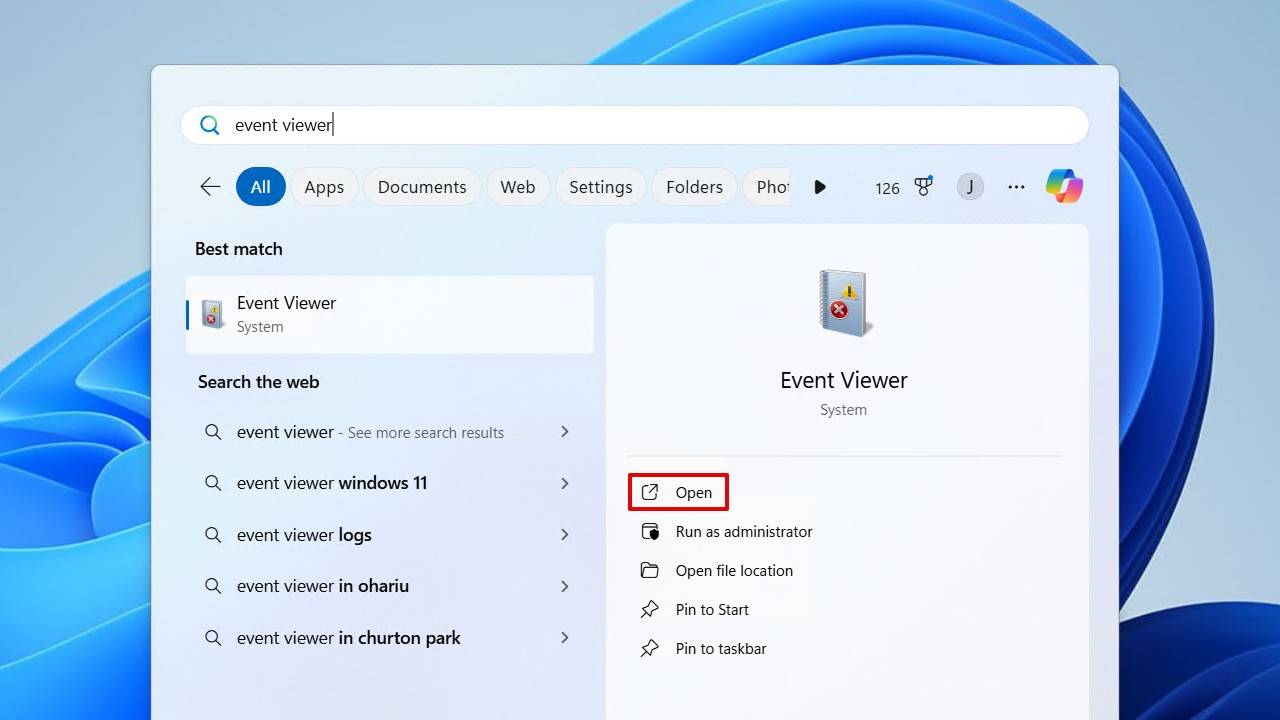
- In the left pane, navigate to:
Windows Logs > System
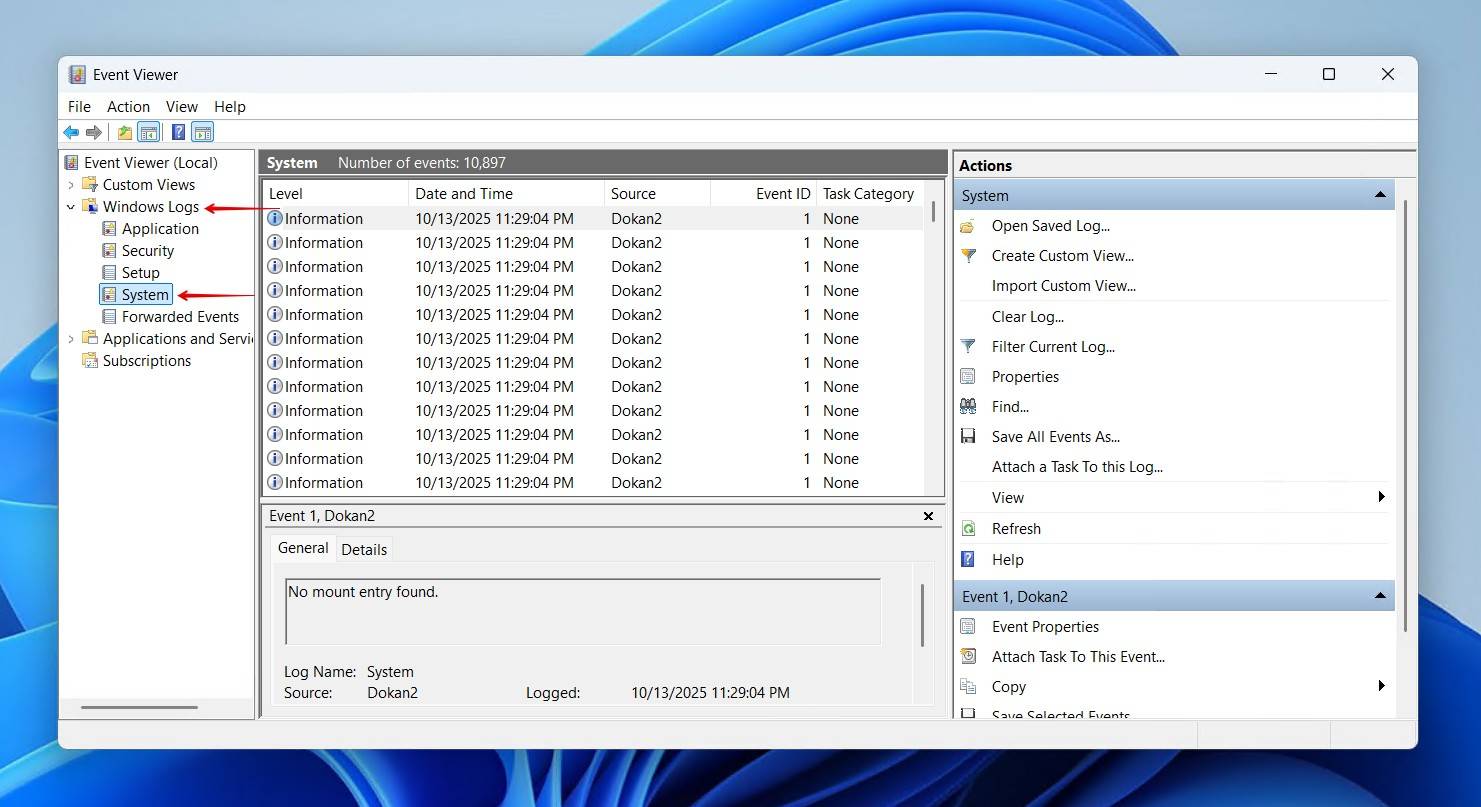
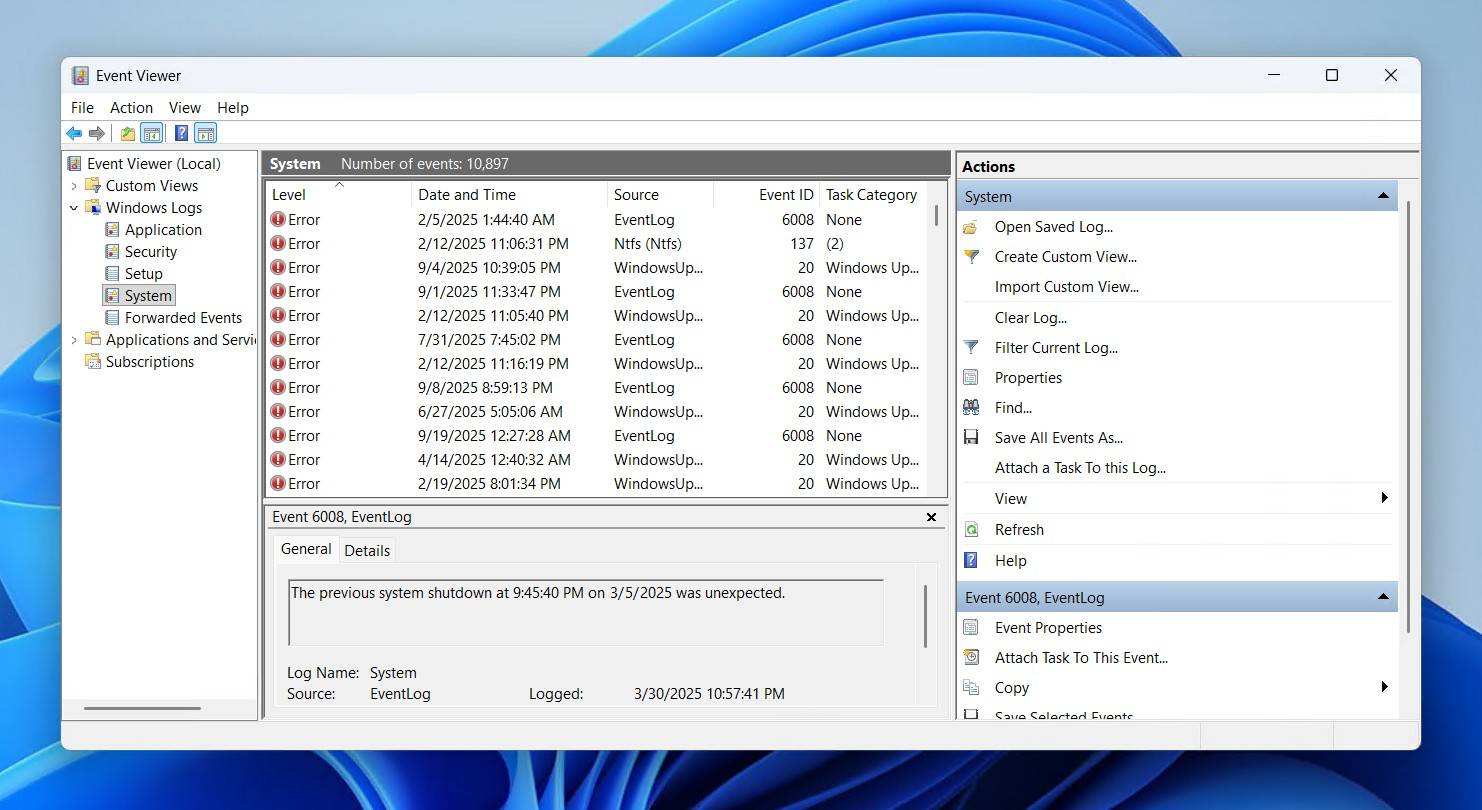
- Look for Critical, Error, or Warning entries around the time the issue started. Click the Level column title to sort by urgency.
- Next, if available, navigate to the logs below and look for Critical, Error, or Warning entries:
Applications > Microsoft > Windows > StorageSpaces-Driver > Operational
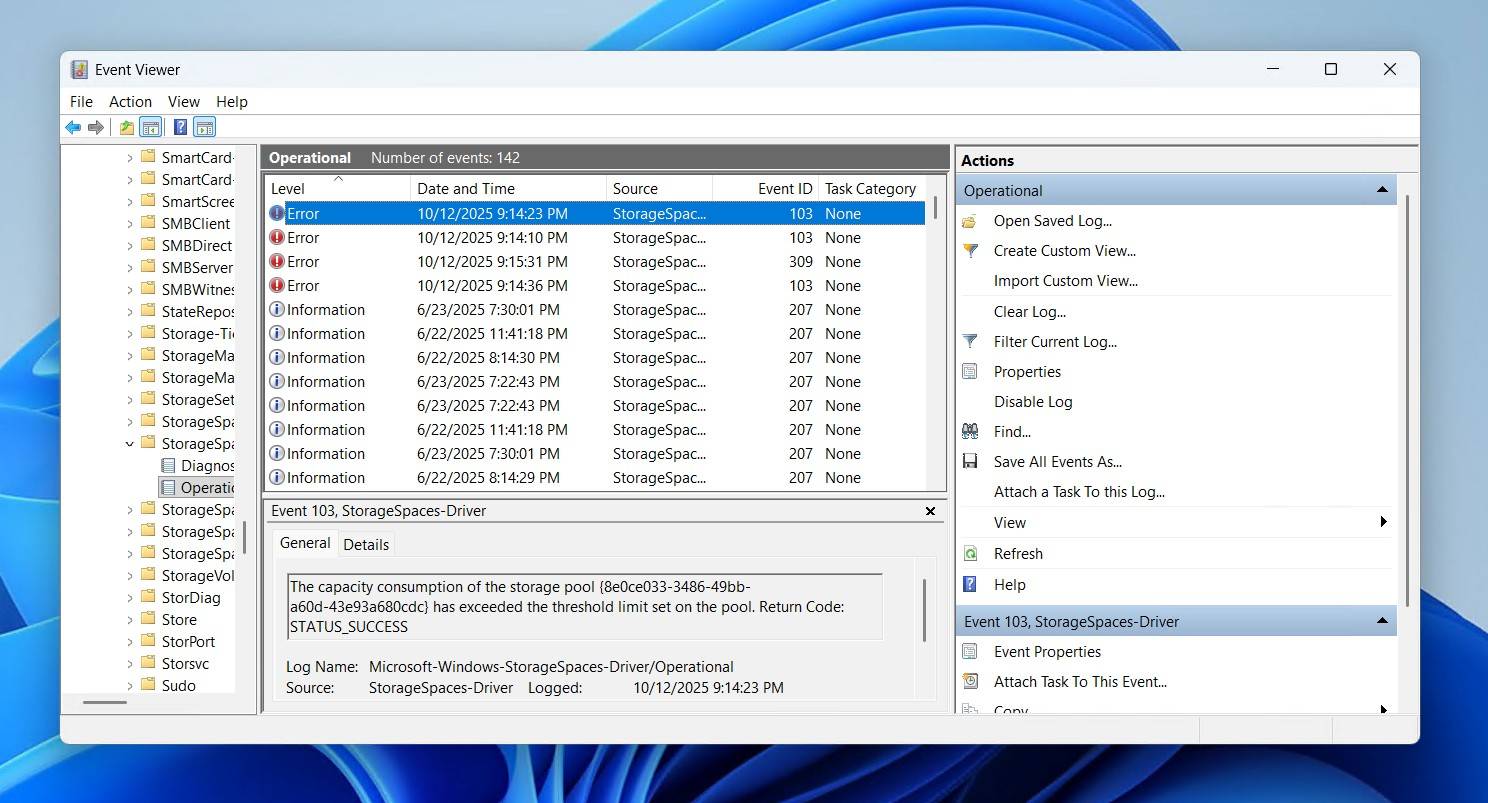
Keep an eye out for messages about physical disk removal, redundancy reduction, virtual disk degradation, or repairs that have started or finished. Here are a few more specific errors that other readers have run into:
| Error | Meaning and Recommendation |
| Disk 7: Bad block detected | Bad sectors have appeared on the drive. Move the data to another, healthy drive, or image the disk immediately. |
| Disk 11: Controller error on the device | Communication breakdown between the drive and its controller. Check the SATA cables, ports, or HBA card. |
| Disk 15: Device not ready | The drive lost connection or power intermittently. Inspect power cables, confirm stable power delivery, and invest in a UPS for critical systems. |
| Disk 51: Paging I/O error | Windows encountered a low-level read/write issue. This could indicate damage to the storage that prevents it from being accessed. |
| storahci/iaStorA 129: “Reset to device, \Device\RaidPortX, was issued.” | The driver or firmware timed out. This is often caused by poor cabling, outdated firmware, or a failing drive. |
Windows comes with a built-in tool that can tackle many of the logical issues that cause this error. We’re going to look at CHKDSK next.
Method 3. Run CHKDSK on the Corrupted Drive
Once you’ve confirmed it’s not a physical issue, it’s time to check for file system corruption. The Windows tool CHKDSK is designed to detect and repair many common drive issues that can stop some of your Storage Spaces disks from mounting correctly. However, because CHKDSK can manipulate your data, it’s best to run it after you’ve recovered your files.
Follow these instructions to run CHKDSK:
- Right-click Start and click Terminal (Admin).
- Type chkdsk *: /scan to look for errors. Replace * with your Storage Spaces drive letter. If some are found, move to the next step.
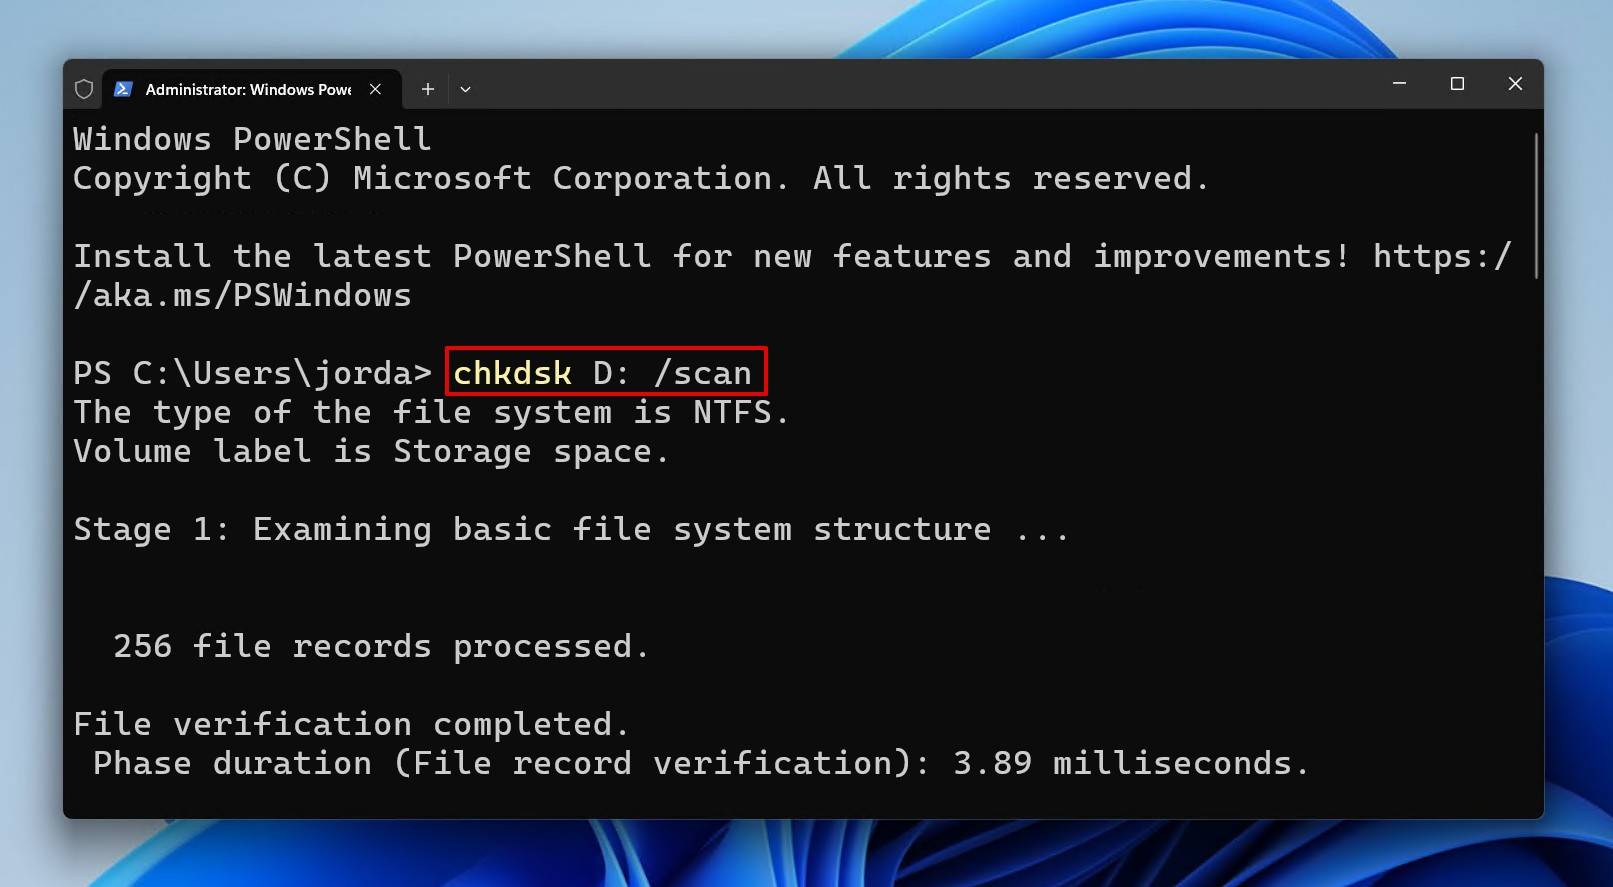
- Type chkdsk *: /f. Replace * with your Storage Spaces drive number. Press Enter.
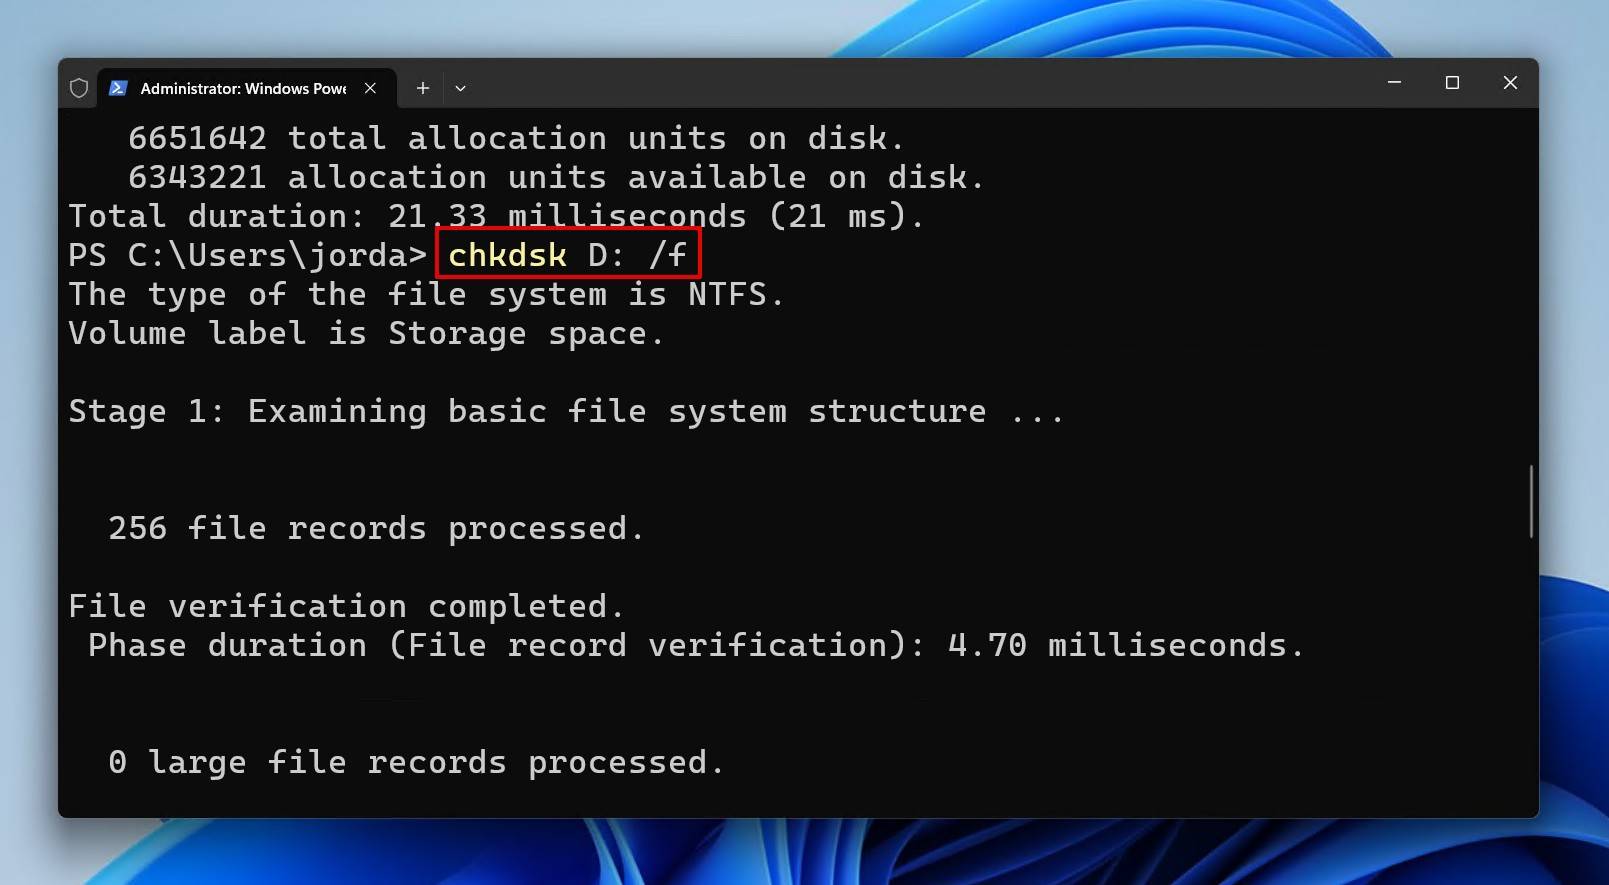
CHKDSK can take some time to run, especially on large drives, but it’s recommended that you let the scan complete.
Method 4. Contact Data Recovery Specialists
In most cases, data recovery software is more than enough to restore files from Microsoft Storage Spaces. It’s the most practical solution in terms of time and money, being able to handle pretty much any software-defined issue, like pools turning RAW, a suspended repair, or thin-provisioning errors. The difficulty lies with physical issues.
Data recovery software cannot do anything with physical errors. If you find the drive is clicking, grinding, spinning up and down, the disk isn’t detected in BIOS/UEFI, or otherwise appears dead, using a data recovery service is the only way to recover critical data. This involves sending your drive to a recovery professional who will recover and return your data. While costly, a data recovery service offers the highest chance of success and is the only means of recovery when physical damage is present.
Bottom Line
Breathe a breath of fresh air knowing your data is back, safe and sound. But don’t relax just yet. There’s just one more step: implementing systems to prevent this in the future. Here are some quick but effective tips for keeping Storage Spaces running efficiently:
- Keep 10-20% free space in the pool. Storage Spaces use background operations to maintain redundancy. Leave some capacity unused so it can manage the space efficiently.
- Use a UPS to prevent sudden power loss. Having your system connected to a UPS lets Windows finish critical write operations and shut down safely.
- Use internal SATA or HBA connections. USB enclosures, especially cheap ones, can suffer from frequent disconnections or controller resets. Direct internal connections are far more stable.
- Back up outside the pool. Always maintain a copy of your Storage Spaces pool on a separate physical drive or in the cloud. Don’t rely on Storage Spaces or RAID alone for backup, as corruption and accidental deletion will be mirrored across all copies.
“If you accidentally delete a file, it will instantly be removed from both mirrored copies. If your disk is corrupted by a software bug or virus, the corruption will be done to both mirrored copies simultaneously.”
– Pete Marovich, petemarovichimages.com - Perform health checks periodically. Regularly check Event Viewer for concerning entries and use a S.M.A.R.T. monitoring tool to be alerted about concerning S.M.A.R.T. data values.
FAQ
If a drive fails in a mirrored or parity Storage Spaces pool, you may need to perform a Windows Storage Spaces RAID rebuild by replacing it with one of equal or greater size. From there, you can access Storage Spaces (in Control Panel), remove the old drive, then add the new one to the pool. It may take some time for the drive to be ready for removal, and if you run into problems, make sure you have enough free space in the pool to temporarily store the data.
Recovery is not possible from a Simple Space, as the data is striped. When striped, the data is divided across all drives with no redundancy. If one disk fails, part of every file is lost. However, if the failed drive is at least visible, you can try recovery with software like Disk Drill.
Aside from general storage requirements, this message can also appear when a disk has failed and Storage Spaces is attempting to restore redundancy by moving data around. Repair or remove the retired disk, or temporarily move some data to a drive outside the pool.
CHKDSK does not work with RAW disks; the only exception is NTFS volumes that have lost their boot sector. Even so, you shouldn’t run CHKDSK before recovering the data from the drive or pool, as CHKDSK can actually render some data unrecoverable with its fixes.
As all of the Storage Spaces pool metadata is stored on the disks themselves, you just need to move the drives across to the new system. Make sure your system drive and operating system is installed first, but once you connect the drives, Windows will recognize the Storage Spaces configuration automatically. Of course, making a backup is always recommended before doing this.
Yes, in any case where BitLocker is present, the key is necessary to decrypt the volume and access the data. If Windows won’t boot, connect the drives to another PC and use the BitLocker recovery key to mount the volumes.