


You connected your trusty old SD card to your PC, hoping to copy some pictures off of it for editing. Except Windows refused to read the SD card. It may show you an error when you try accessing it, or fail to detect the SD card altogether. This issue isn’t uncommon. Sometimes, a simple reinsert fixes the problem. If it doesn’t, and it looks like the SD card has stopped working, this guide will hopefully help you get it working again, or at the very least, help you get back your precious photos and videos from it.
All the methods listed in this guide have been tried and tested by our team of in-house experts that deal with such issues on a daily basis.
Why Did My SD Card Stop Working and What Should I Do First?
There are two broad reasons behind an SD card that suddenly stopped working:
- The SD card is logically damaged: It’s possible that your SD card is physically fine, but there’s a logical (software-related) issue preventing Windows from accessing it. Maybe the SD card’s file system is corrupt, or simply unsupported by Windows, because of which it’s not visible in File Explorer. SD cards approaching the end of their lifespan often run into such issues.
- The SD card has physical issues: Windows won’t read your SD card if the physical connection is faulty: like a problematic USB port, SD card reader, or SD card slot. It’s also possible that the SD card itself is physically damaged. This includes damage due to heat, water, or just plain blunt force. In this case, first inspect your card physically to see if there are any dents, cracks, or missing contact pins.
The table below will guide you towards the right fix(es) for your specific case.
| Possible cause | What it looks like | What to try in this guide |
| Bad card reader, adapter, or USB port | The SD card disconnects frequently, doesn’t show up at all, or shows up once in a while | Basic First Checks |
| Dirty contacts or loose connection | The card only shows up when inserted a certain way, or randomly disconnects | Basic First Checks |
| Missing drive letter | The SD card appears in Disk Management but not in File Explorer | Assign or Change the Drive Letter |
| Driver problem after an update | The SD card stopped working after a Windows update, driver update, or after running a driver updating app | Roll Back the Driver if the SD Card Stopped Working After an Update |
| USB power management issue | The SD card/card reader disconnects when it’s idle, after sleep, or during long transfers | Check USB Power Settings |
| File system corruption | Windows asks you to format the SD card, it appears as RAW, or files/folders appear broken | Recover data first, then Repair File System Errors With CHKDSK or Format the SD Card |
| Lost or damaged partition | The SD card’s space shows as unallocated, has the wrong partition layout, or a volume has disappeared | Recover a Lost or Deleted Partition |
| Read-only or write-protected state | You can open files but can’t copy, move, format, or save anything to the SD card | Fix a Read Only SD Card |
| Incompatible file system or compatibility issue | The card works on Windows but not on a camera, dashcam, or other devices | Format the SD Card after backing up or data recovery |
| Physical damage or failing flash memory | The card is not detected anywhere, shows 0 bytes, heats up, freezes devices, or keeps failing after formatting | Contact a Data Recovery Center or replace the SD card |
| Worn-out, or unreliable SD card | The SD card shows the wrong size, corrupts new files, or stops working again shortly after formatting | Format the SD Card only as a test. Replace it if the problem persists |
Basic First Checks (Before You Try Any Tools)
Attempting more complex fixes on an SD card that’s not working because it’s simply not connected properly is a waste of time. So, first rule out any connection-related issues. There are multiple things that can lead to a bad connection: a malfunctioning USB port, dirty contacts, a malfunctioning SD card reader, or physical damage to the SD card.
Here’s what you should do:
- ⛓️💥 Before anything else, look for any bends, cracks, or warping on the SD card’s casing. Check if the damage seems superficial, i.e., limited to the casing and not the internal circuitry. If yes, you can try and salvage any data from the SD card on your own. If not, contact a professional data recovery service. Avoid re-inserting the SD card directly in an SD card slot or a camera as chipped plastic from the casing may damage the host device.
- 🔎 Look at the gold contacts on your SD card and check for signs of oxidation and dirt. Clean these contacts gently with a dry microfiber cloth and re-insert the SD card into the reader.
- 💻 If the SD card remains undetected, try connecting the SD card reader directly (not via a hub/dock) to another USB port on your computer. On a desktop PC, use a port that’s on the motherboard (at the back of the PC case). If the SD card still doesn’t work, connect it to another PC and re-check.
Regarding detection of the SD card, the File Explorer doesn’t really tell you if your Windows can detect the SD card, it tells you if it can read it properly. A better way to check detection is Disk Management:
- Press Windows Key + R, type diskmgmt.msc and press Enter.
- Look for your SD card in the list of storage drives.
If the SD card appears with its correct storage capacity, it means the card is largely okay and you can proceed with the remaining fixes in this guide.
How to Recover Data from an SD Card that Stopped Working
If your SD card appears in Disk Management with its correct storage capacity, it means that Windows can largely detect it, even if it’s not visible in File Explorer. We suggest recovering your files before attempting to repair an SD card that stopped working because a lot of the fixes are destructive and result in deleted files.
The recovery process itself is quite straightforward:
- Download Disk Drill and install it.
- Connect your SD card to your PC and launch Disk Drill.
- Select the SD card from the list of storage devices, and click Search for lost data.
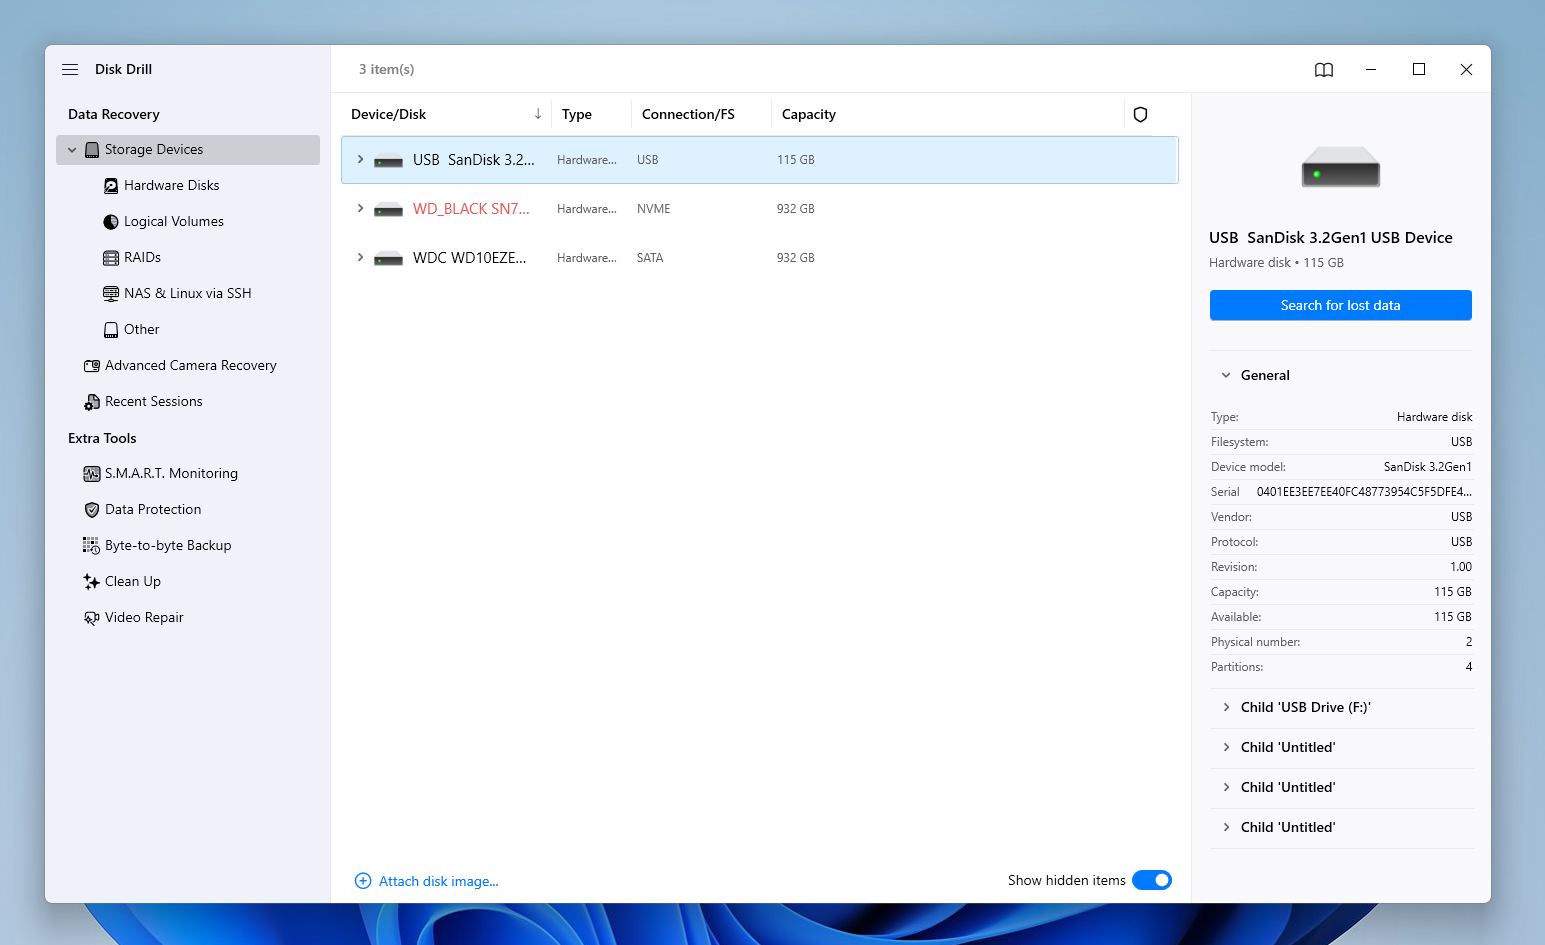
- Disk Drill may prompt you to choose between a Universal Scan and an Advanced Camera Recovery. Stick to a Universal Scan, but if the recovered videos turn out to be corrupt, select Advanced Camera Recovery in a subsequent scan.
- Once the scan completes, click the required file type to filter the results, or click on Review found items to view all recoverable files.
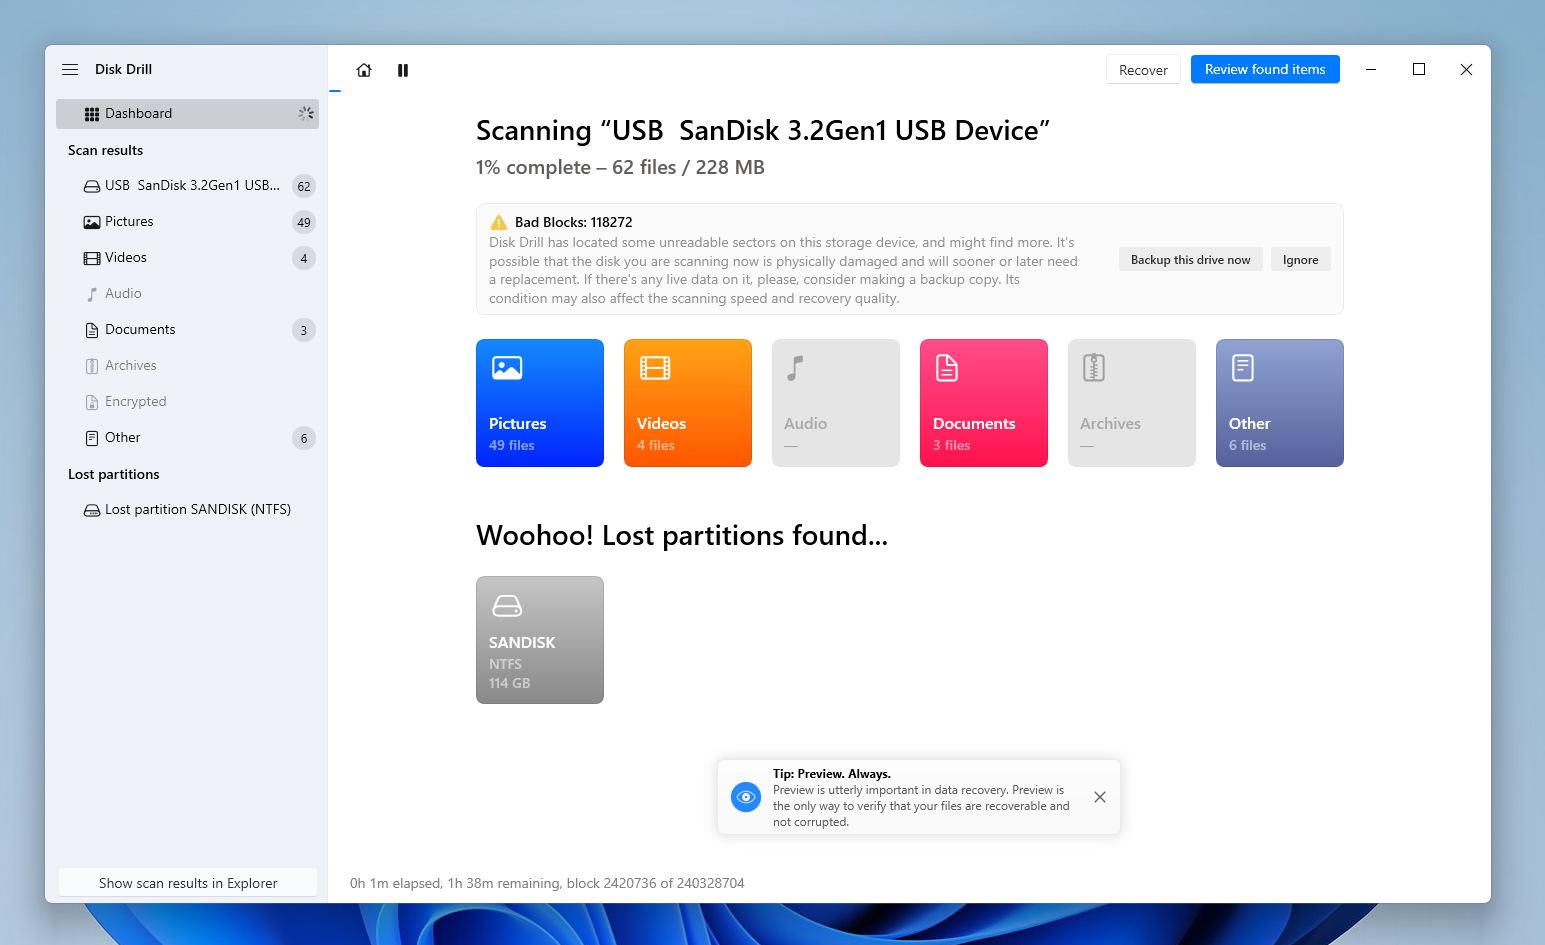
- Expand the Existing section to see currently stored files on the SD card. You can expand the Deleted or lost and Reconstructed sections to view files that were deleted earlier.
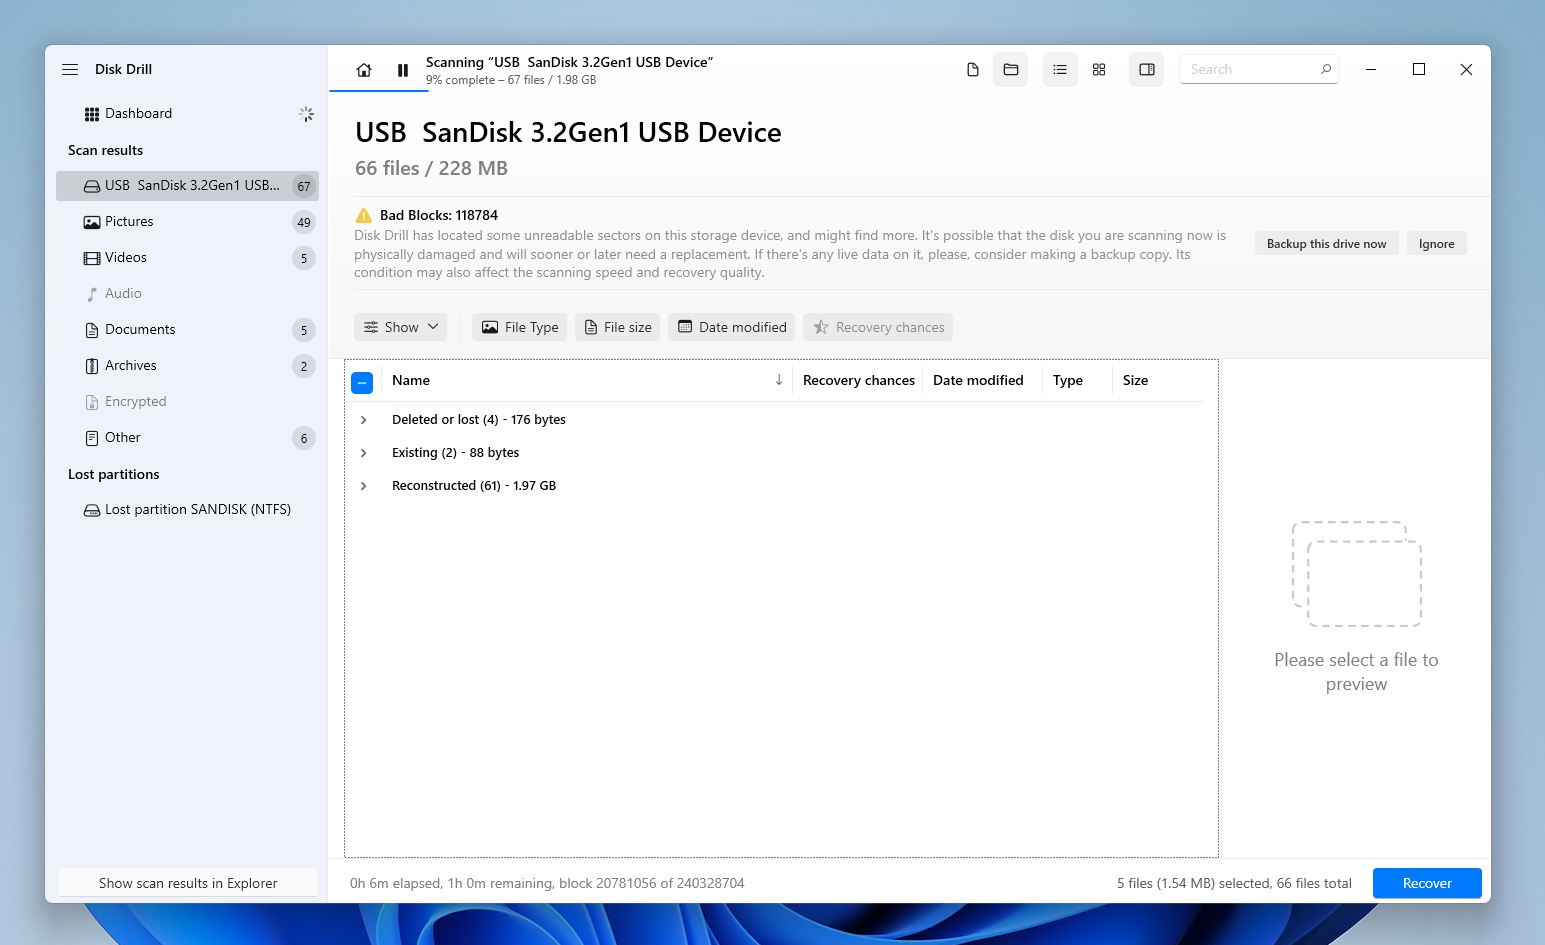
- Select the files you want to recover. You can sort your files by size, date modified, or even search for them by name to find what you want faster. Keep an eye out for the file preview that appears on the right side of the window. A high-quality preview indicates higher chances of data recovery whereas a missing preview usually means the file can’t be recovered.
- Once you’ve finished selecting, click the Recover button.
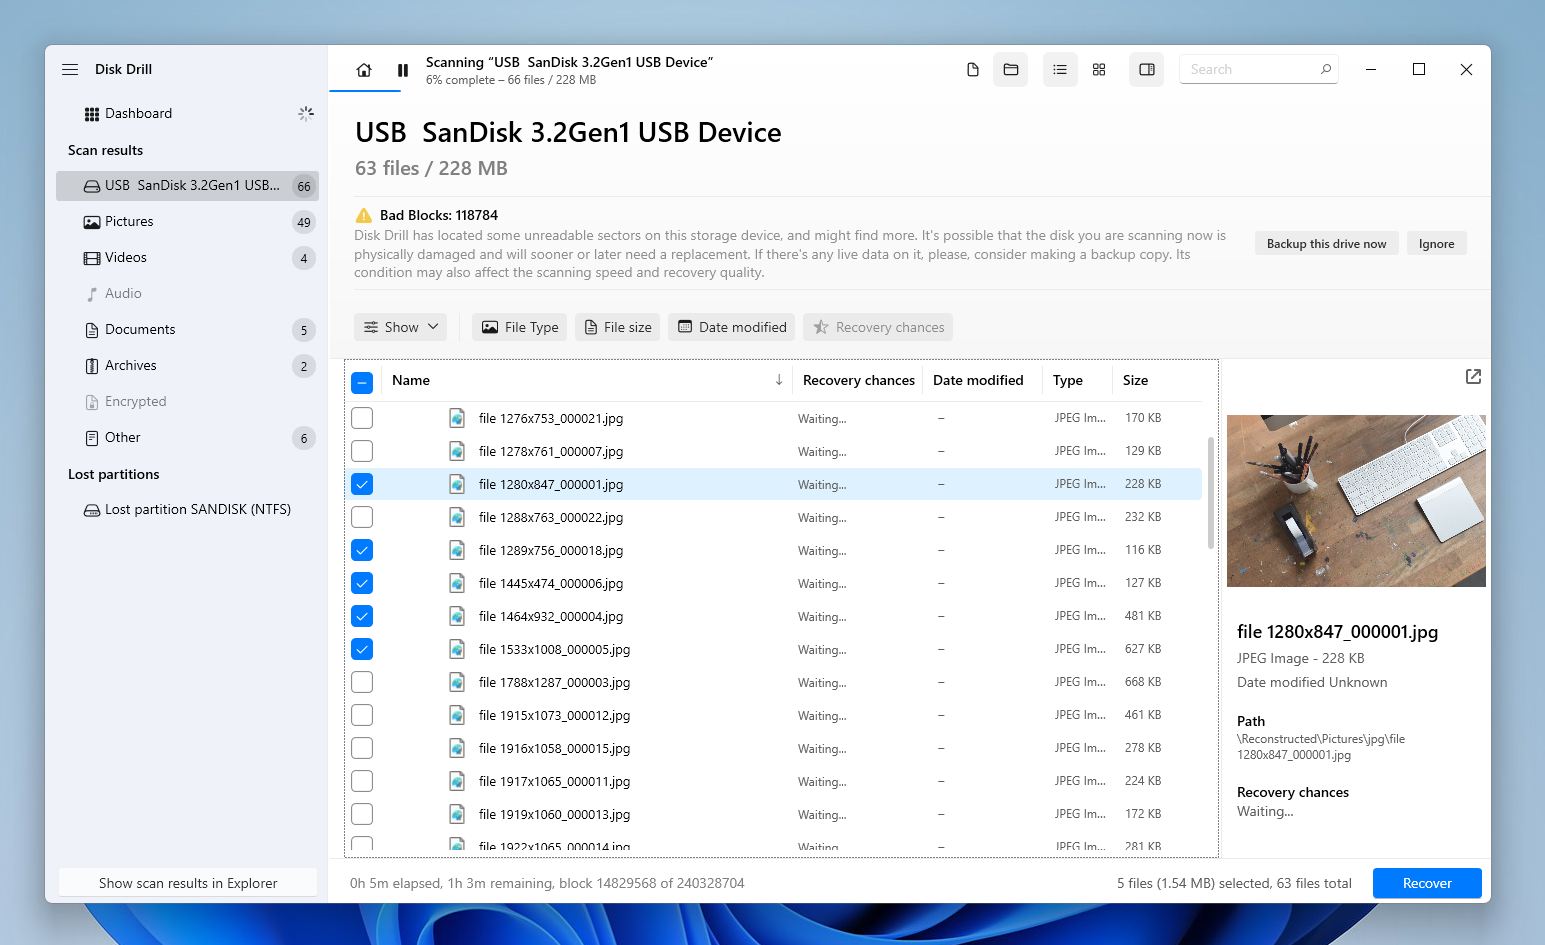
- Choose a recovery destination for the files and click Next.
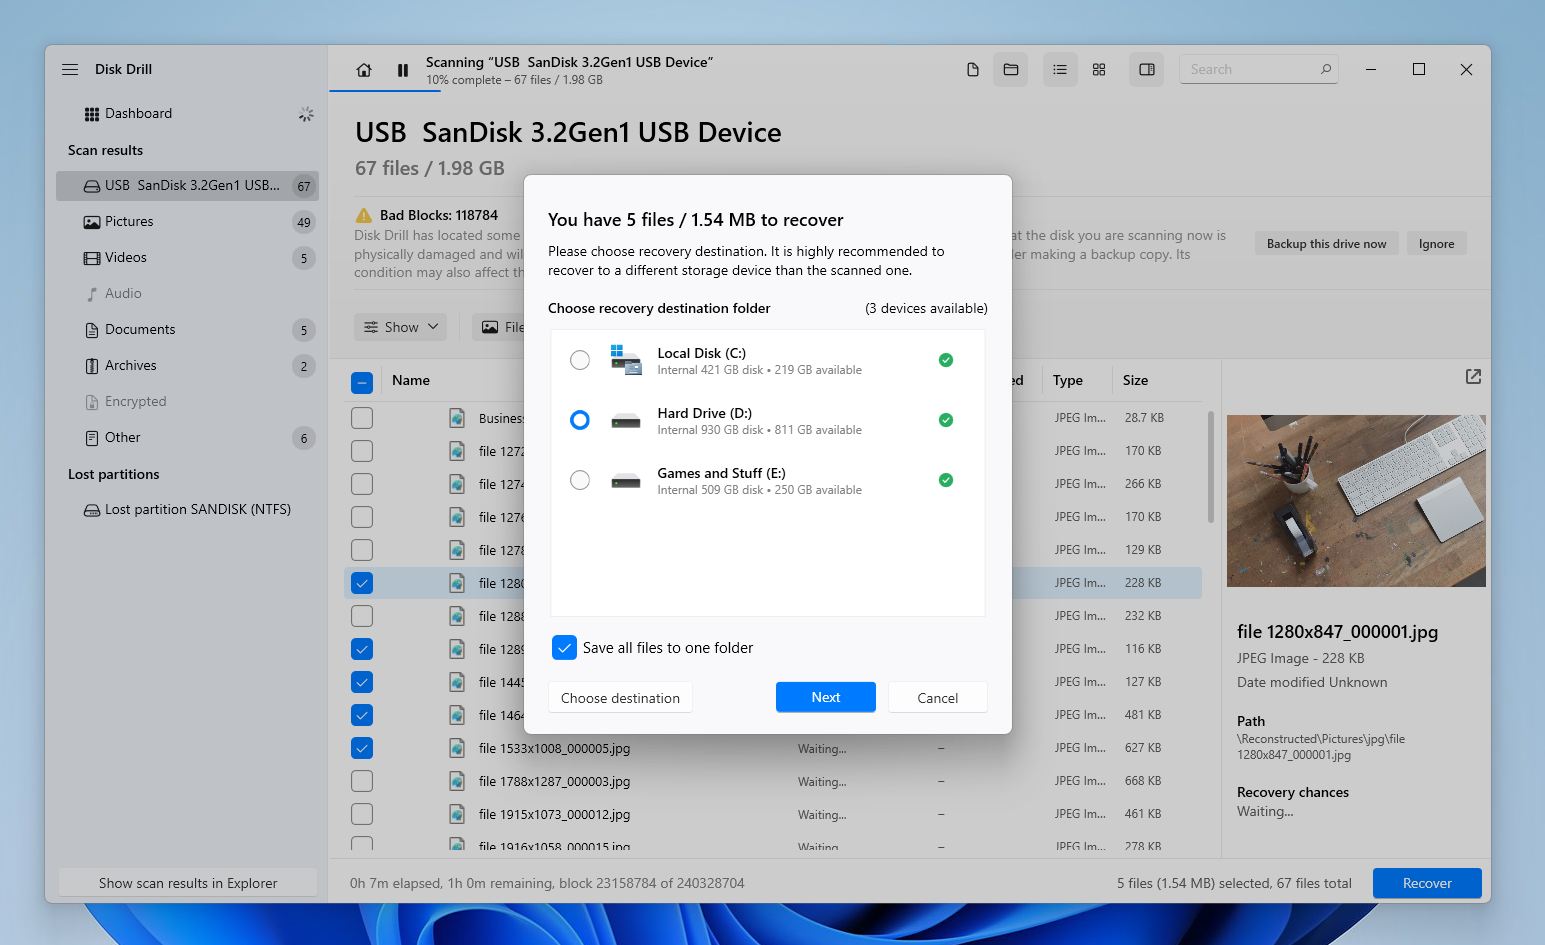
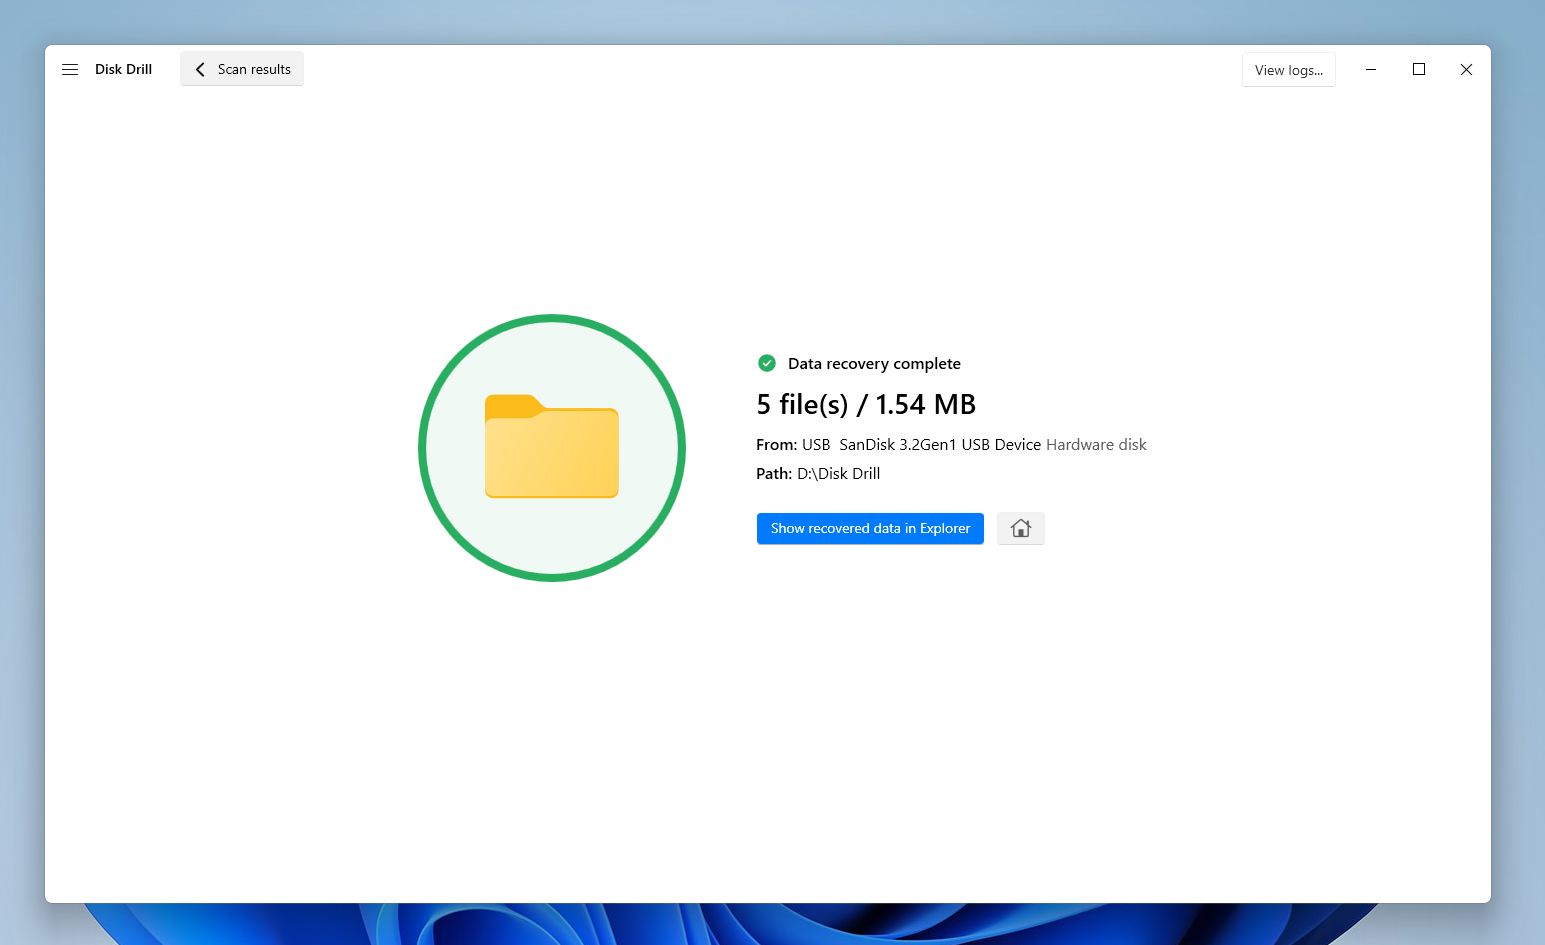
- Disk Drill will recover the selected files. The Windows version of Disk Drill can recover up to 100 MB worth of files for free. Further recovery requires the Pro version of the tool.
While Disk Drill is my tool of choice for SD card recovery, by no means is it the only SD card recovery program on the market. If you’d like to compare options, go through our guide to the best SD card recovery apps tested by our QA team.
How to Fix an SD Card That Suddenly Stopped Working
There are several ways you can fix it. To make your life easier, we’ve listed the fixes in increasing order of complexity and risk, keep in mind that fix that works ultimately depends on why your SD card stopped working and the symptoms its showing.
Method 1: Assign or Change the SD Card Drive Letter
🔍 Best for symptoms: The SD card doesn’t appear in Windows Explorer even though it’s visible in Disk Management.
Each partition/storage drive on Windows has a unique drive letter (C:, D:. E:, etc.). In rare cases, Windows can assign the same drive letter to two of them resulting in a drive letter conflict, or fail to assign a drive letter at all. If this happens, you won’t be able to access the SD card. To restore access, you need to manually change the SD card’s drive letter or assign one to it using Disk Management.
- Search for “disk management” in Windows Search (Windows Key + S) and click on the Create and format hard disk partitions option in the search results.
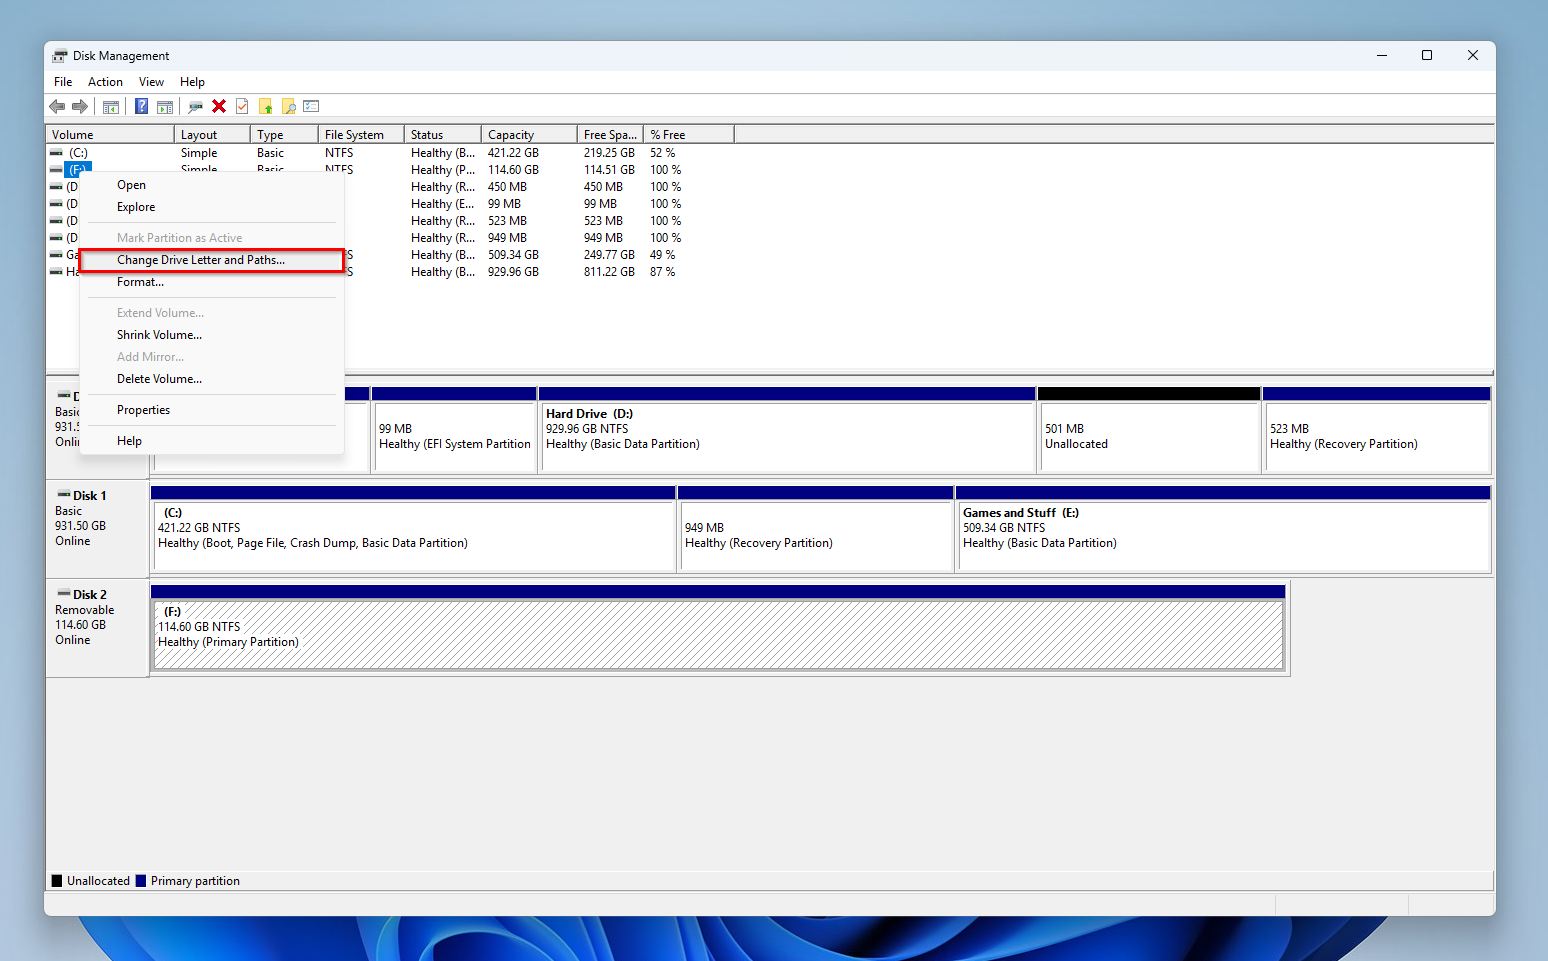
- Right-click on the SD card from the drive list and click on Change Drive Letter and Paths.
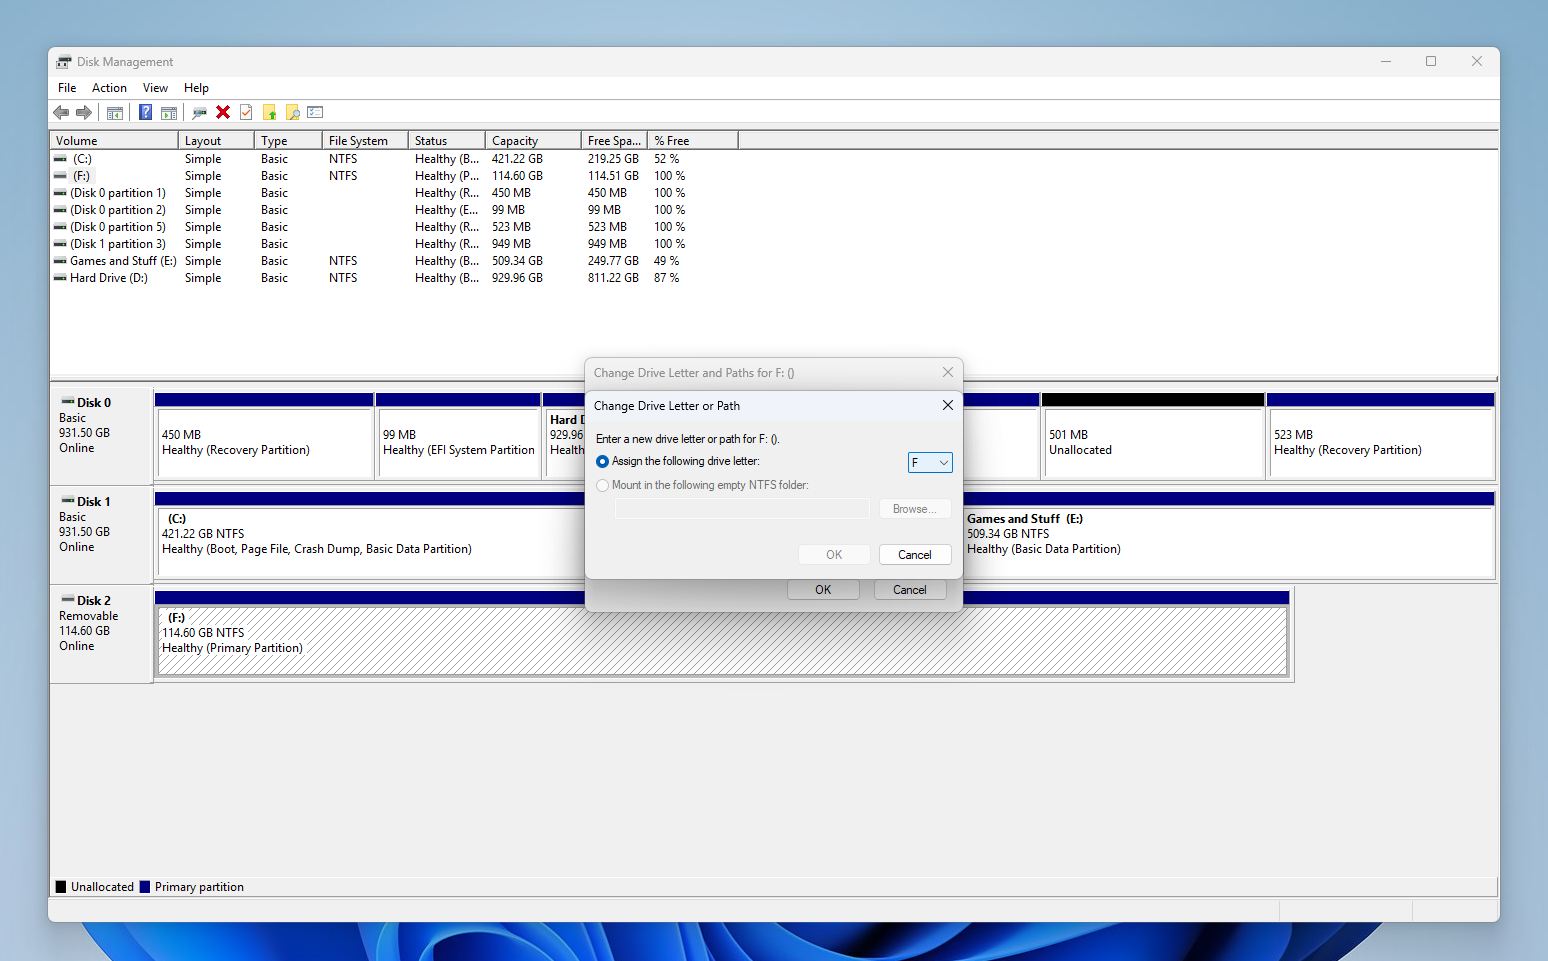
- To assign a new drive letter, click the Add button. Else, click Change to change the existing drive letter to another one.
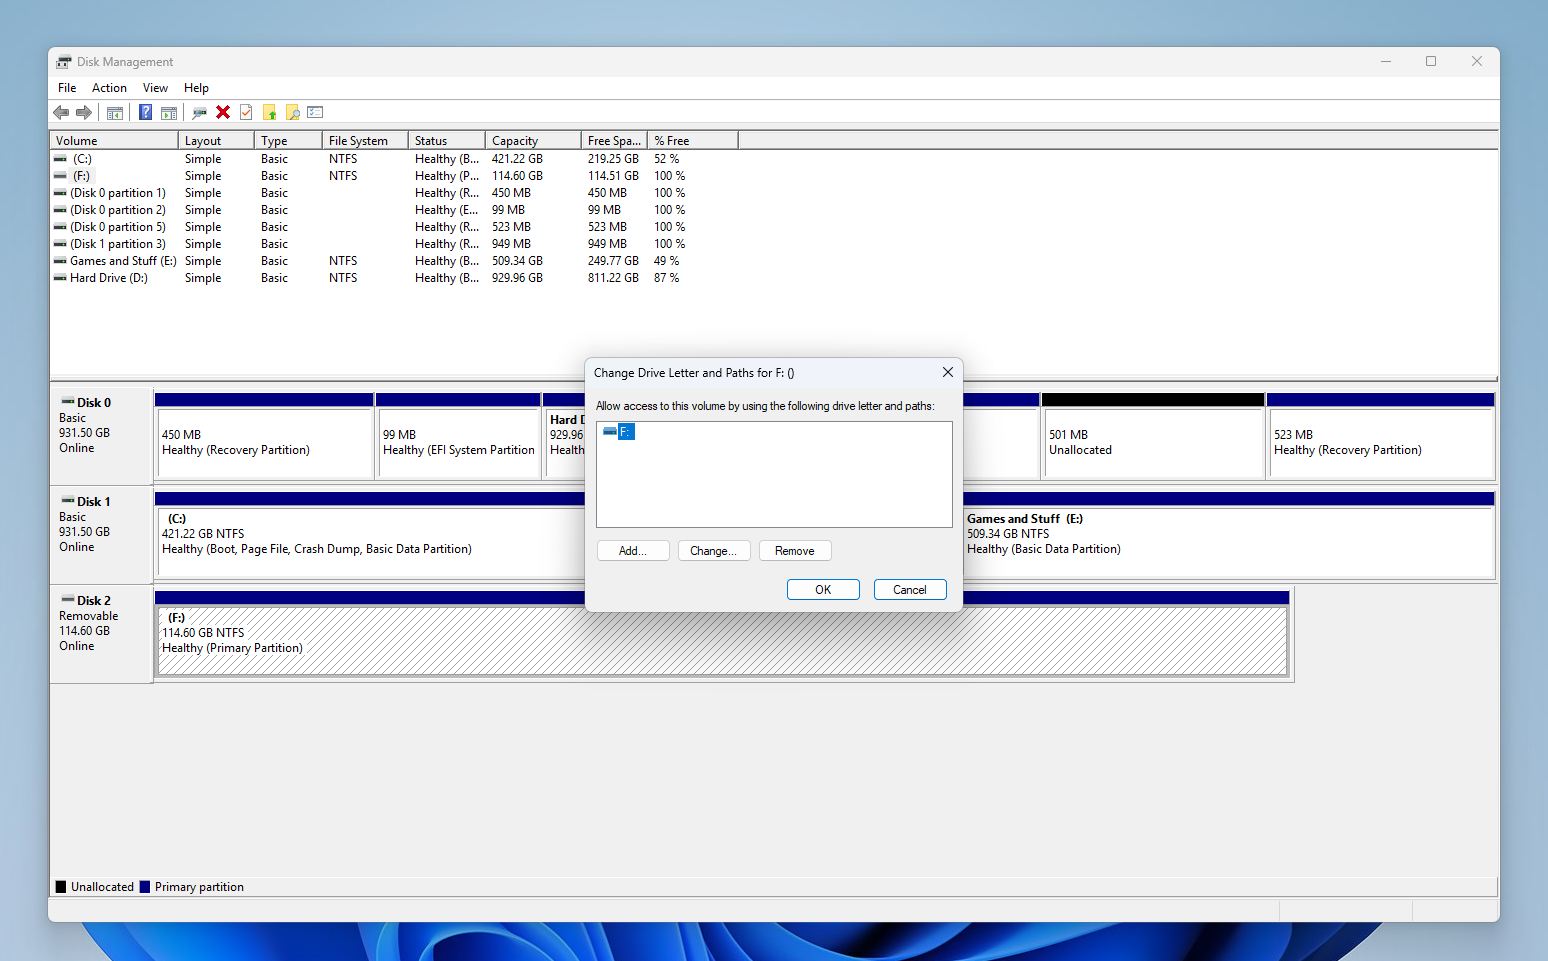
- Select a new drive letter from the drop-down menu and click OK.
- Click Yes on the confirmation prompt.
Method 2: Roll Back the Driver if the SD Card Stopped Working After an Update
🔍 Best for symptoms: You run into errors accessing the SD card after you updated Windows, or ran a driver updating app.
If you’re a long-time Windows user, you’re probably aware that Windows updates can often throw things off-kilter on your system. Programs and features that were working before start throwing up errors. These issues can extend to your SD card too, as happened to one Reddit user whose SD card stopped working on his PC after a Windows update, but worked fine on other non-updated computers. In such cases, the culprit is most likely a problematic driver update for the SD card reader, and not the core Windows update itself. Thankfully, you can roll back problematic driver updates using Device Manager.
- Press Windows Key + R to launch the Run app. Type devmgmt.msc in the text box and press Enter.
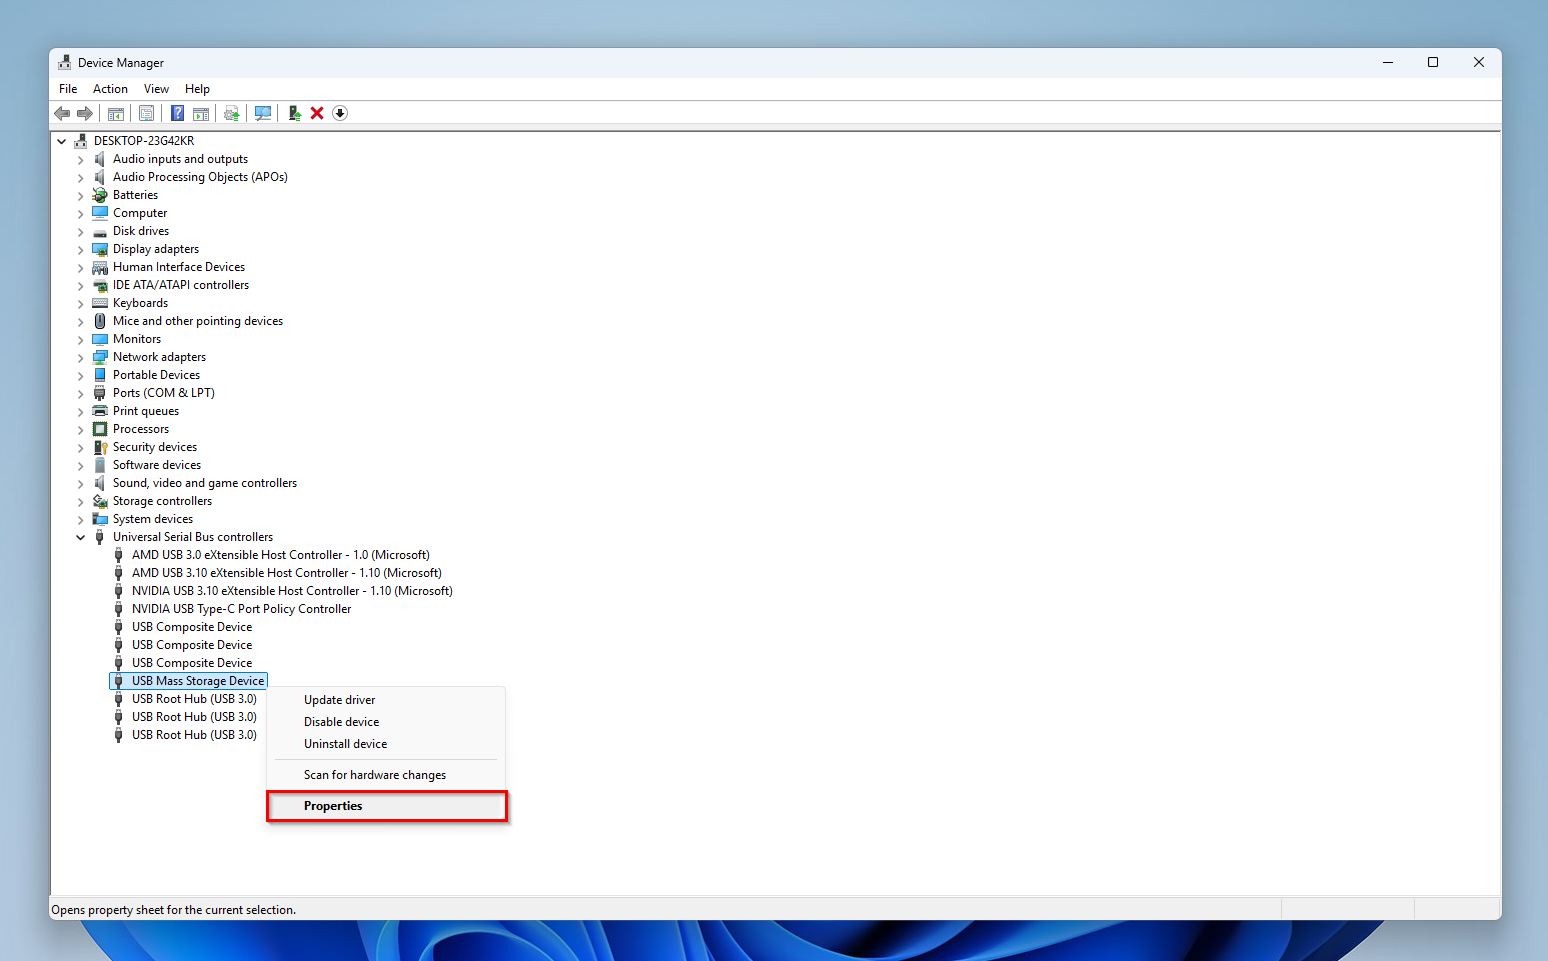
- Expand the Disk Drives, and Universal Serial Bus Controllers sections and look for your SD card reader. It should be in one of them.
- Right-click the SD card reader and choose Properties.
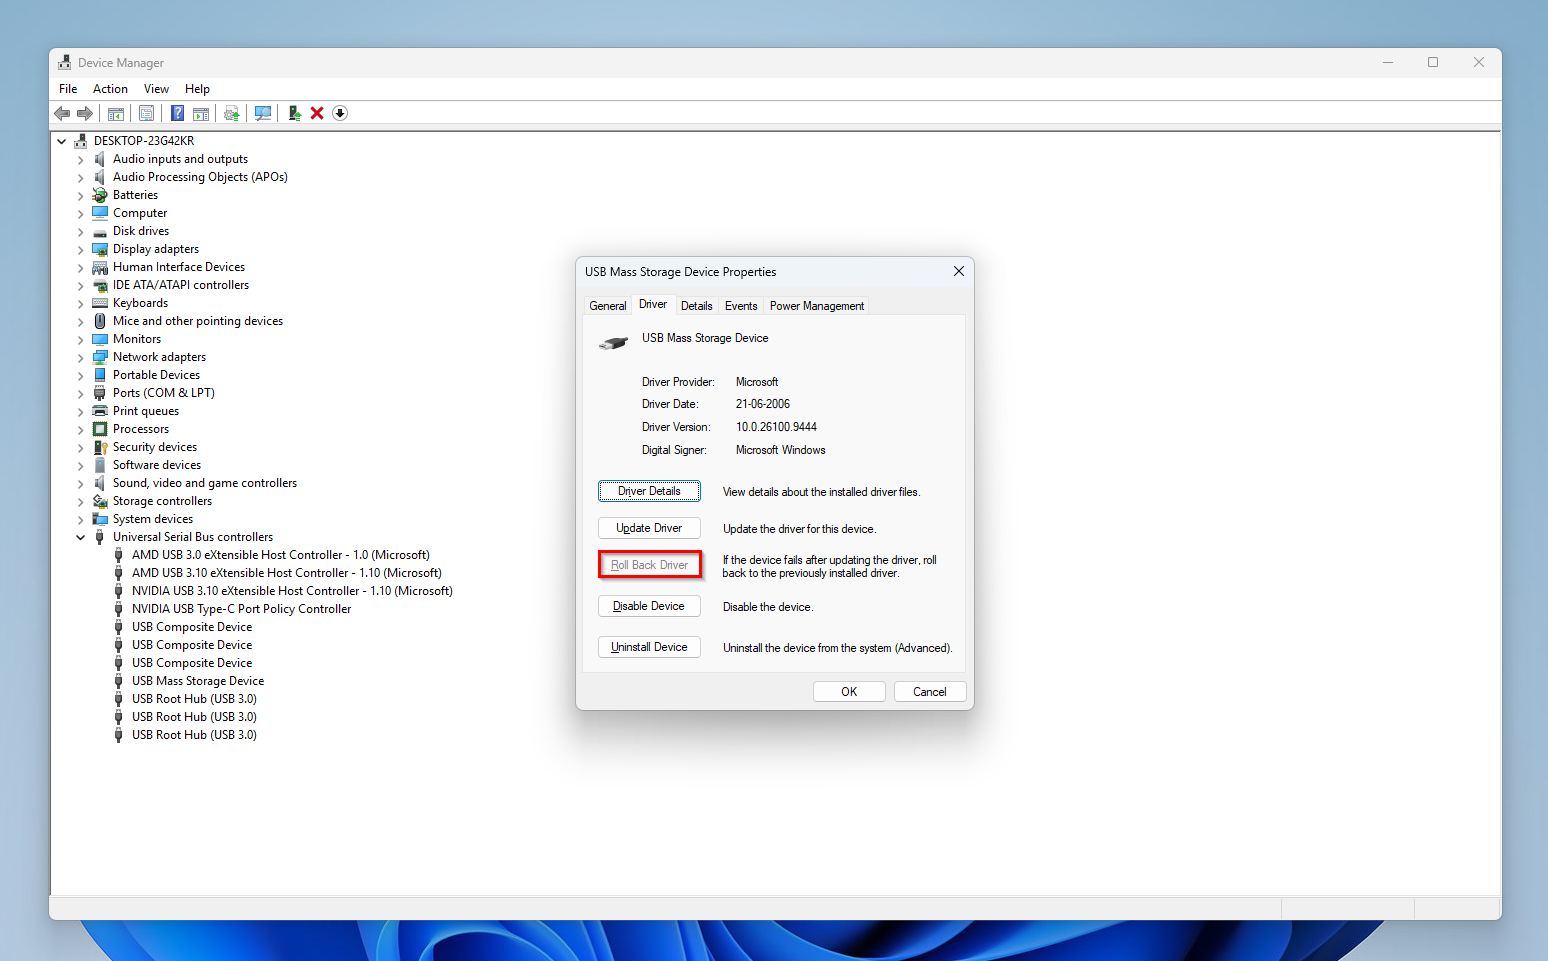
- Click on the Driver tab.
- Click on the Roll Back Driver option and confirm.
Method 3: Check USB Power Settings
🔍 Best for symptoms: The SD card frequently disconnects and freezes, often during long transfers.
Windows has several power-saving features built-in, and one of them is the USB Selective Suspend feature. It is likely enabled on your system, especially if you’re using a laptop. While it doesn’t typically cause any problems, it can interfere with some SD card readers, causing random disconnects and freezes, making the SD card look like it stopped working. Disable this setting and see if the SD card begins working again.
- Type “control panel” in Windows Search (Windows Key + S), and click the Control Panel app from the search results.
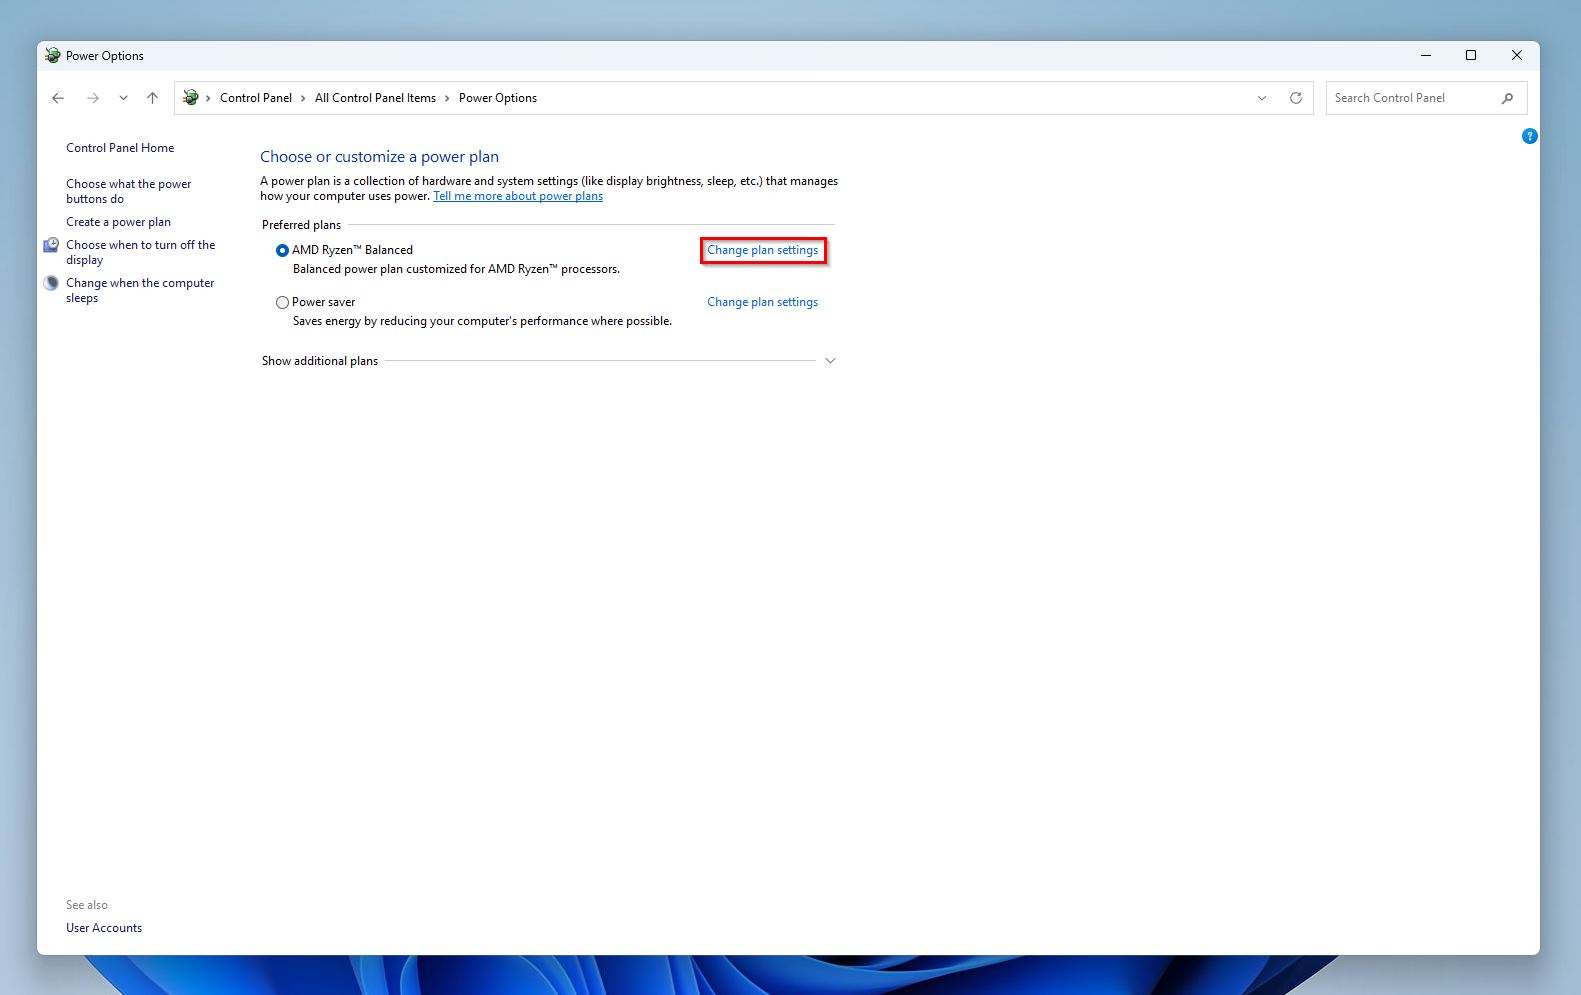
- In Control Panel, go to Hardware and Sound > Power Options.
- Click Change plan settings next to your currently selected power plan.
- Click on Change advanced power settings.
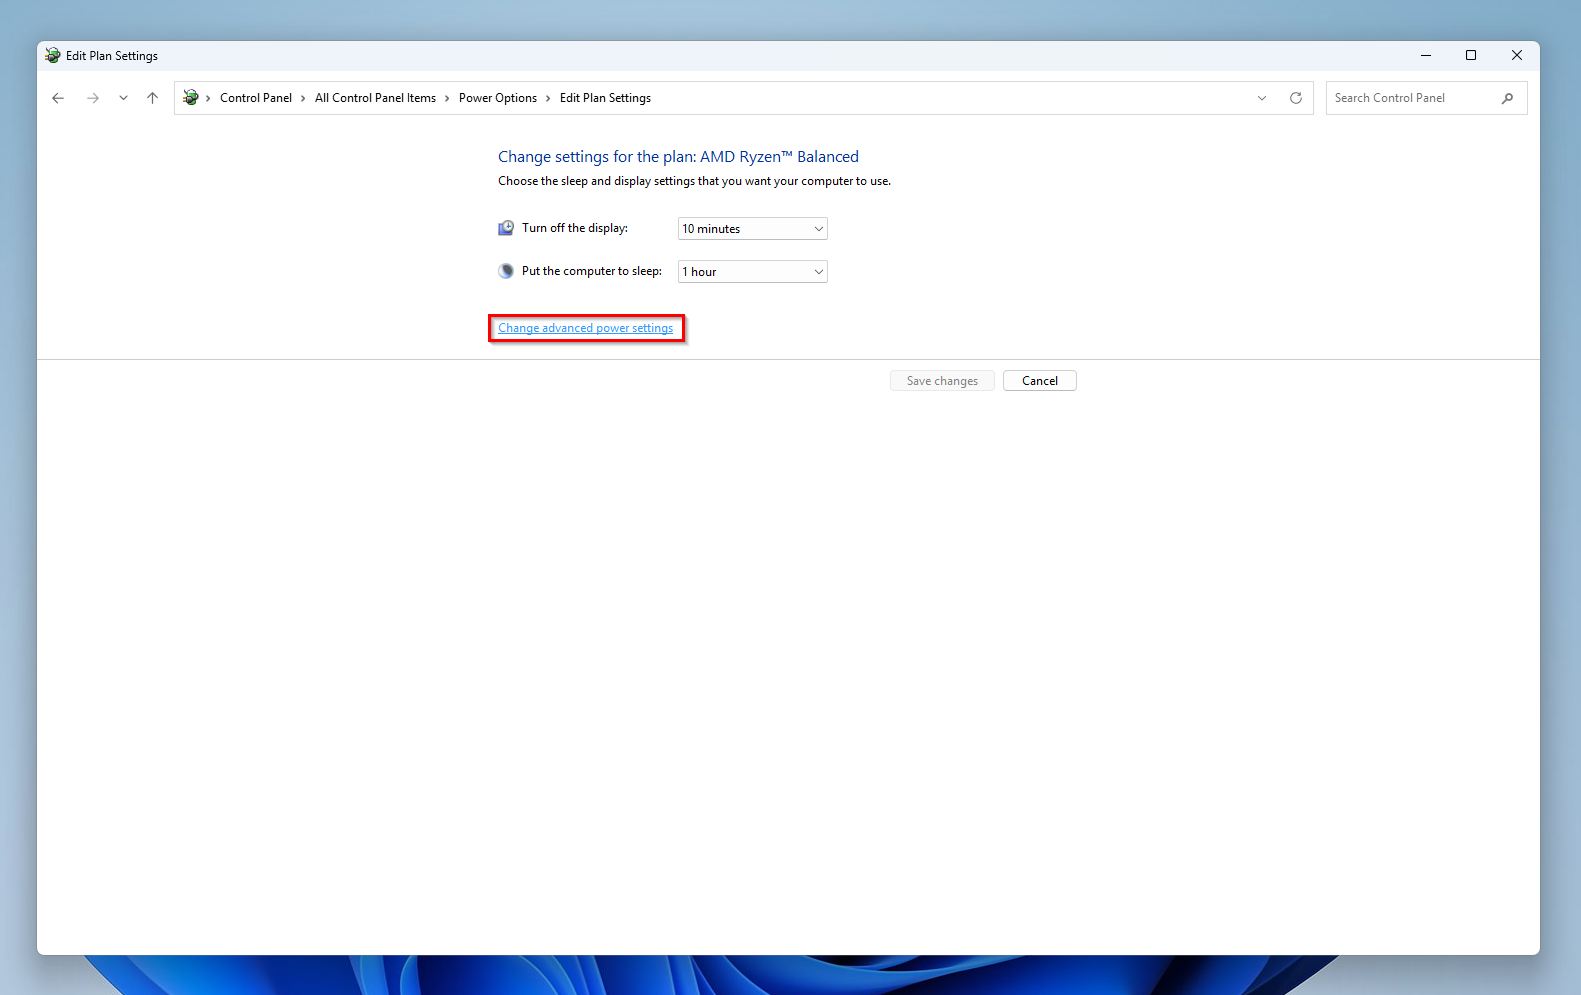
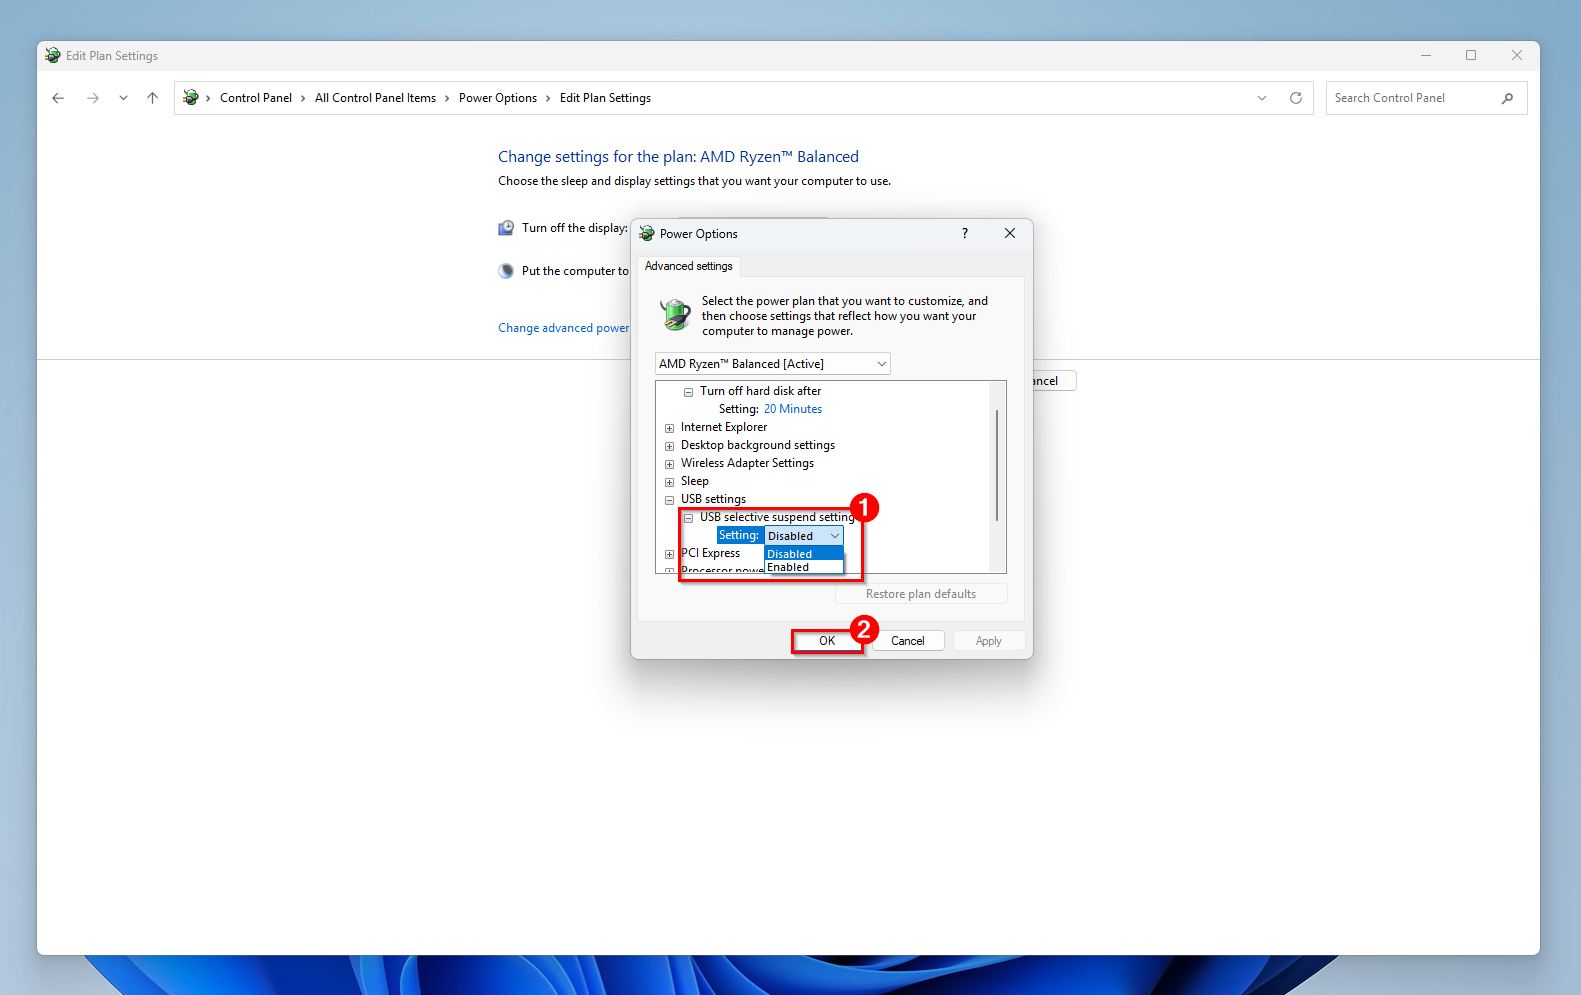
- Expand USB settings, and then expand the USB selective suspend setting.
- Set both Plugged in and On battery options to disabled.
- Click on Apply, then OK.
If you’re on Windows 11, it’s worth going to Settings (Windows Key + I) > Bluetooth & devices > USB and disabling the USB battery saver setting there as well.
Method 4: Repair File System Errors With CHKDSK
🔍 Best for symptoms: The SD card is performing slower than usual, the filenames are garbled, and there are random read/write failures.
CHKDSK is Windows’ in-built utility for finding and repairing filesystem errors on storage devices. It’s a decent utility but it can sometimes cause data loss by deleting or overwriting corrupt index records and the Master File Table ($MFT). It also converts orphaned file fragments into .chk files. While data recovery after CHKDSK is possible in some cases, save yourself the trouble and first recover your data using a data recovery tool, then run CHKDSK.
- Type in “cmd” in Windows Search (Windows Key + S) and right-click on Command Prompt > Run as Administrator.
- Type chkdsk X: /r and press Enter. Replace X with the SD card’s drive letter.
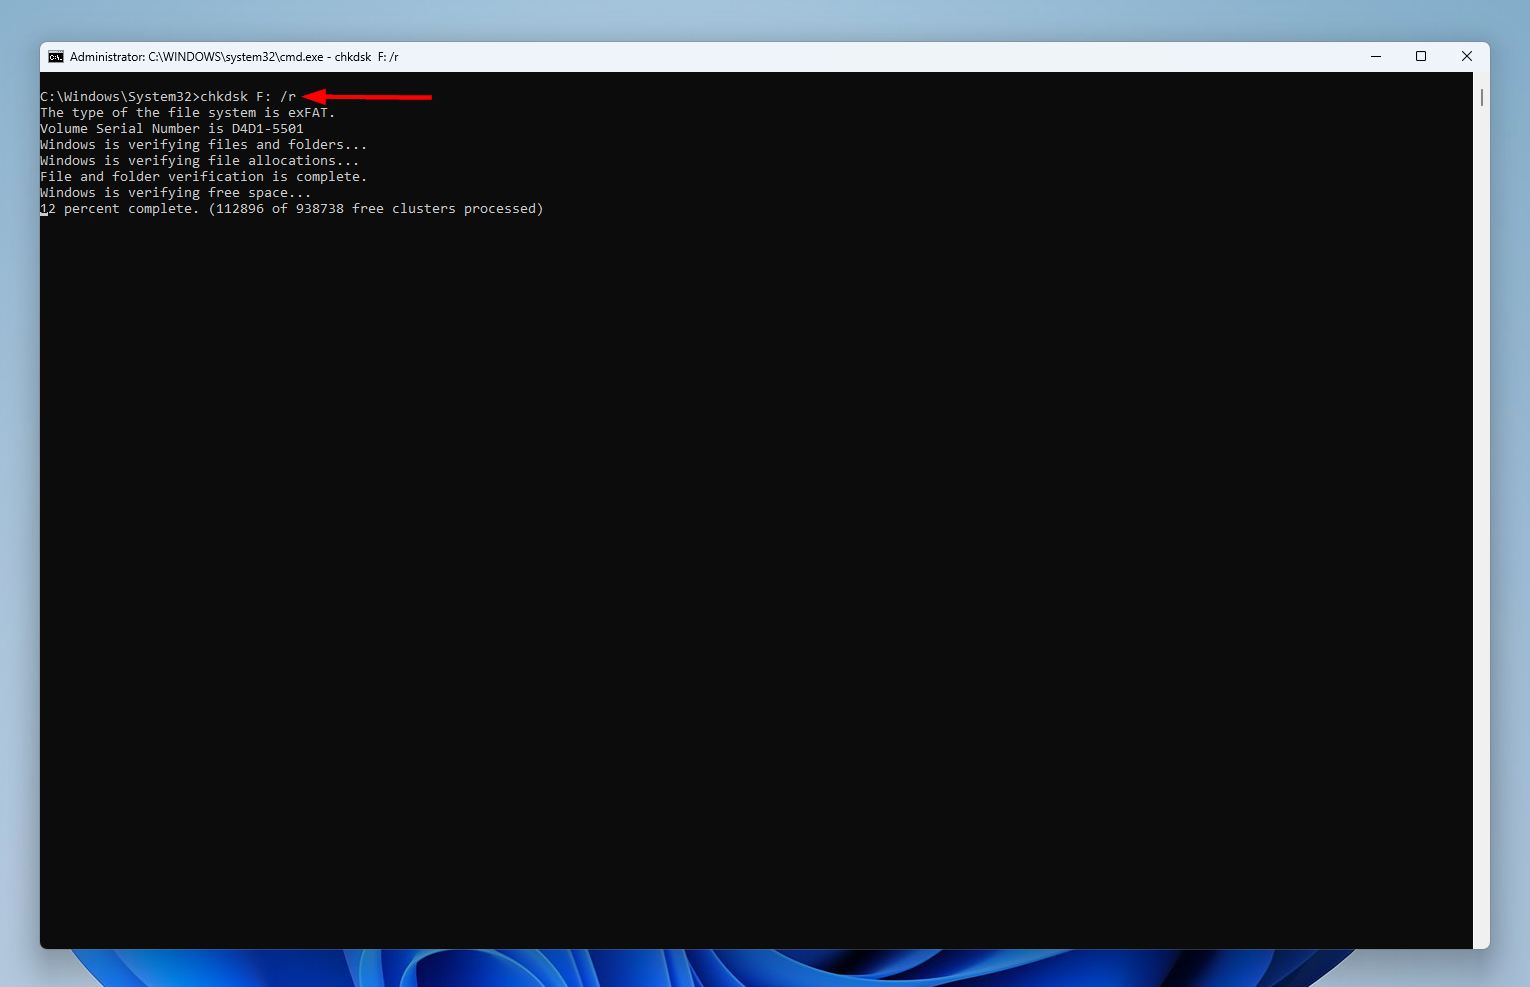
- Wait for CHKDSK to complete, and then reboot your PC.
Method 5: Recover a Lost or Deleted SD Card Partition
🔍 Best for symptoms: The SD card’s showing up as unallocated but with its correct storage capacity, not showing up in your PC’s file explorer, or there’s a missing volume that was there earlier.
A common logical issue on storage drives is a lost or deleted partition. This doesn’t mean that the partition and its data is completely gone. More often than not, it’s the result of a damaged partition table which tells your PC where the partition is, resulting in the space showing up as empty or RAW.
A tool called TestDisk can find and recover lost SD card partitions, then write the recovered structure back to the partition table, making your SD card as well as its contents accessible again.
- Download TestDisk and extract the archive.
- Run the testdisk_win.exe file from the extracted folder. Since TestDisk lacks a GUI, you’ll need to navigate using the keyboard—use the Arrow keys to highlight options, and press Enter to select them.
- Choose whether you want to create a log file or not, and press Enter.
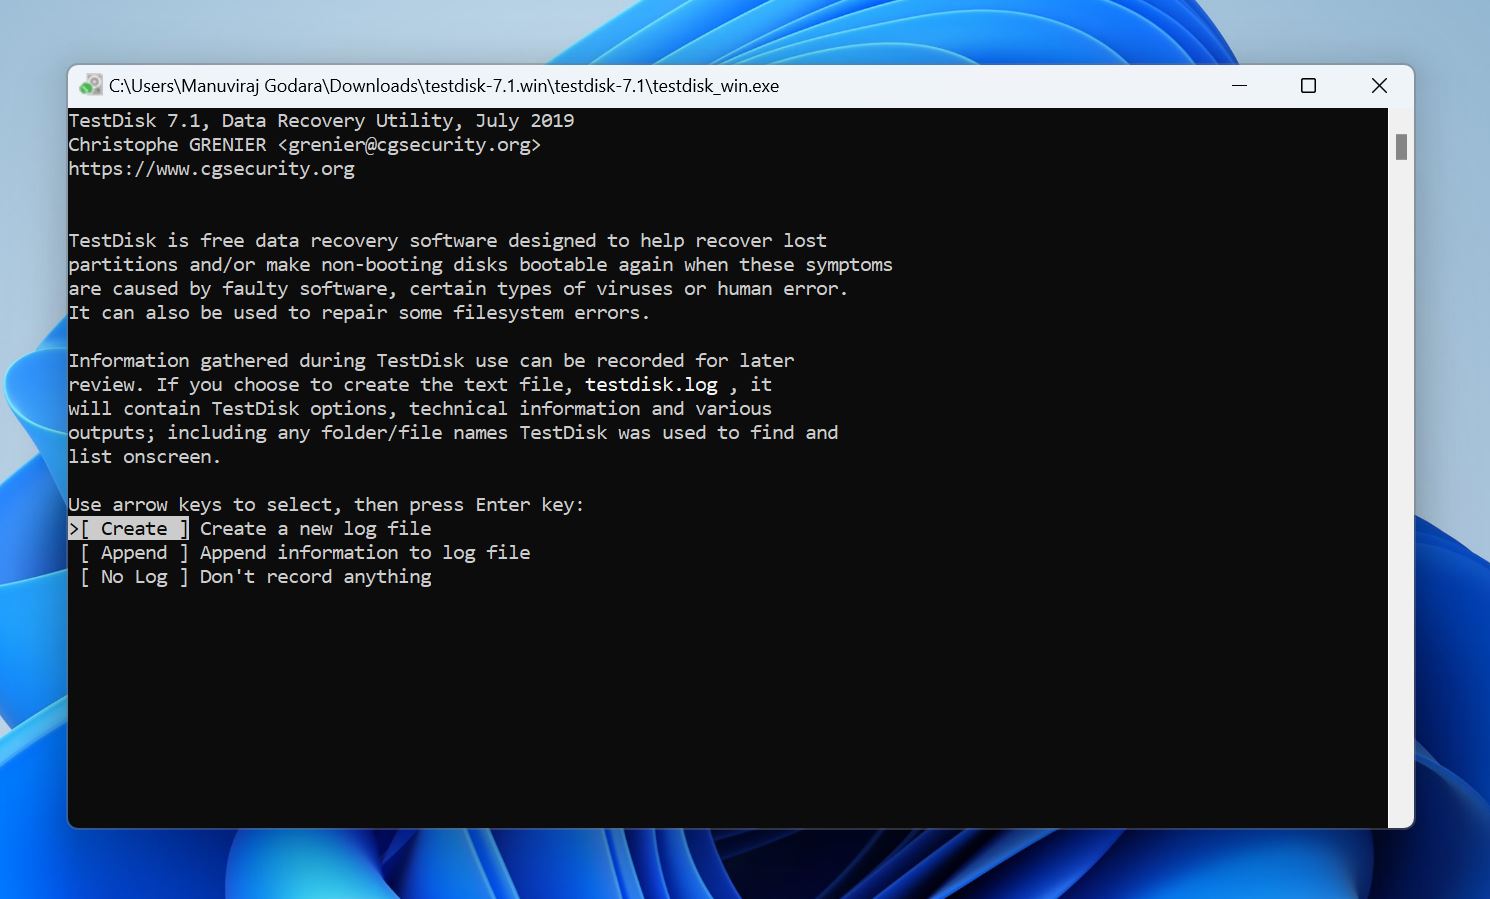
- Select your SD card, and press Enter.
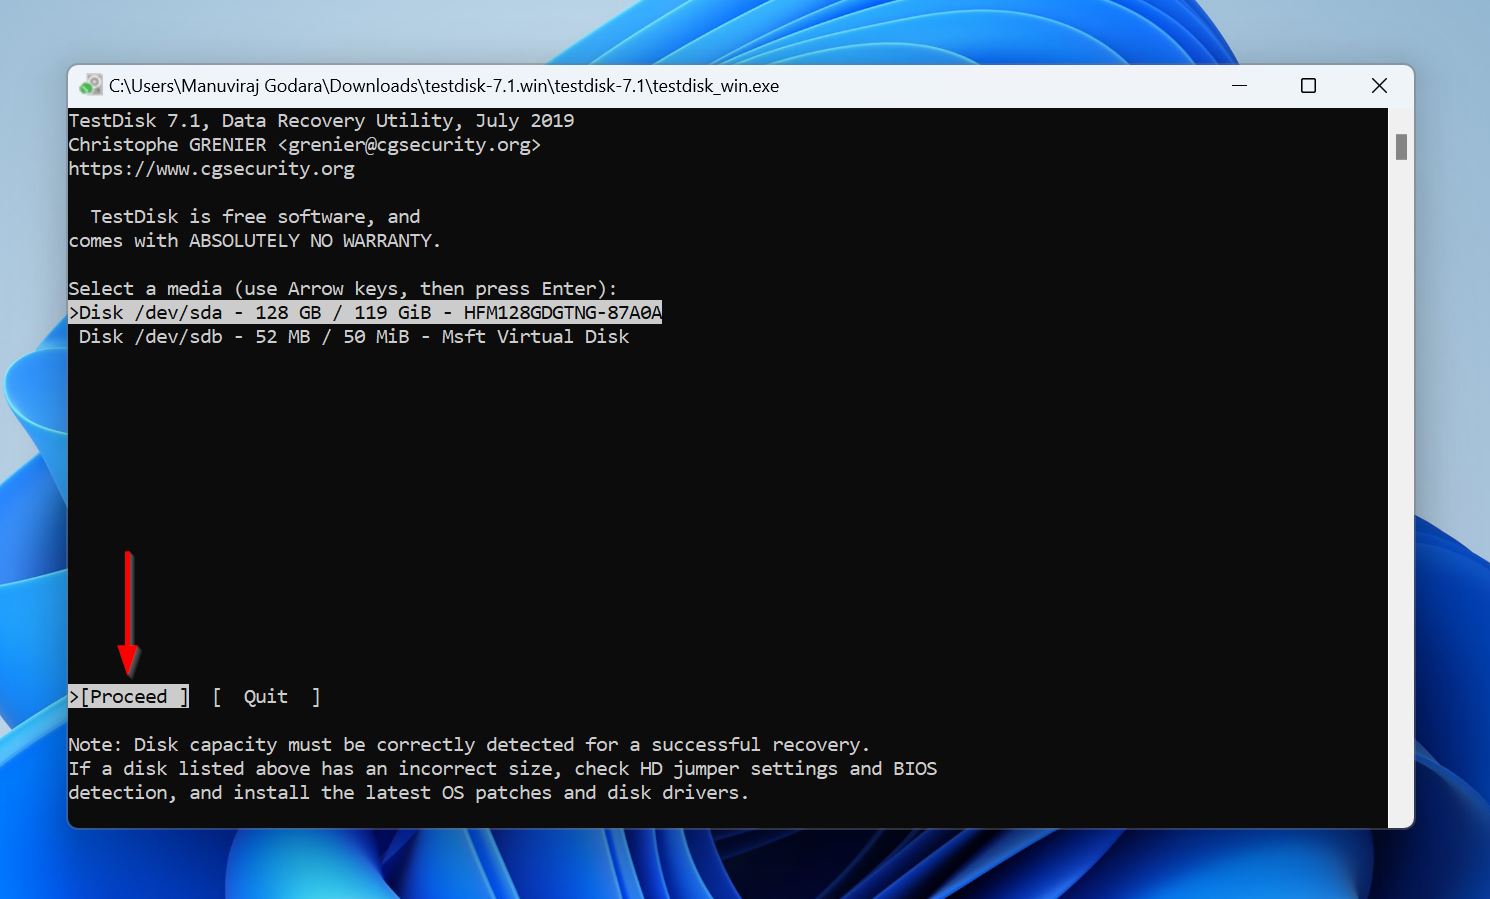
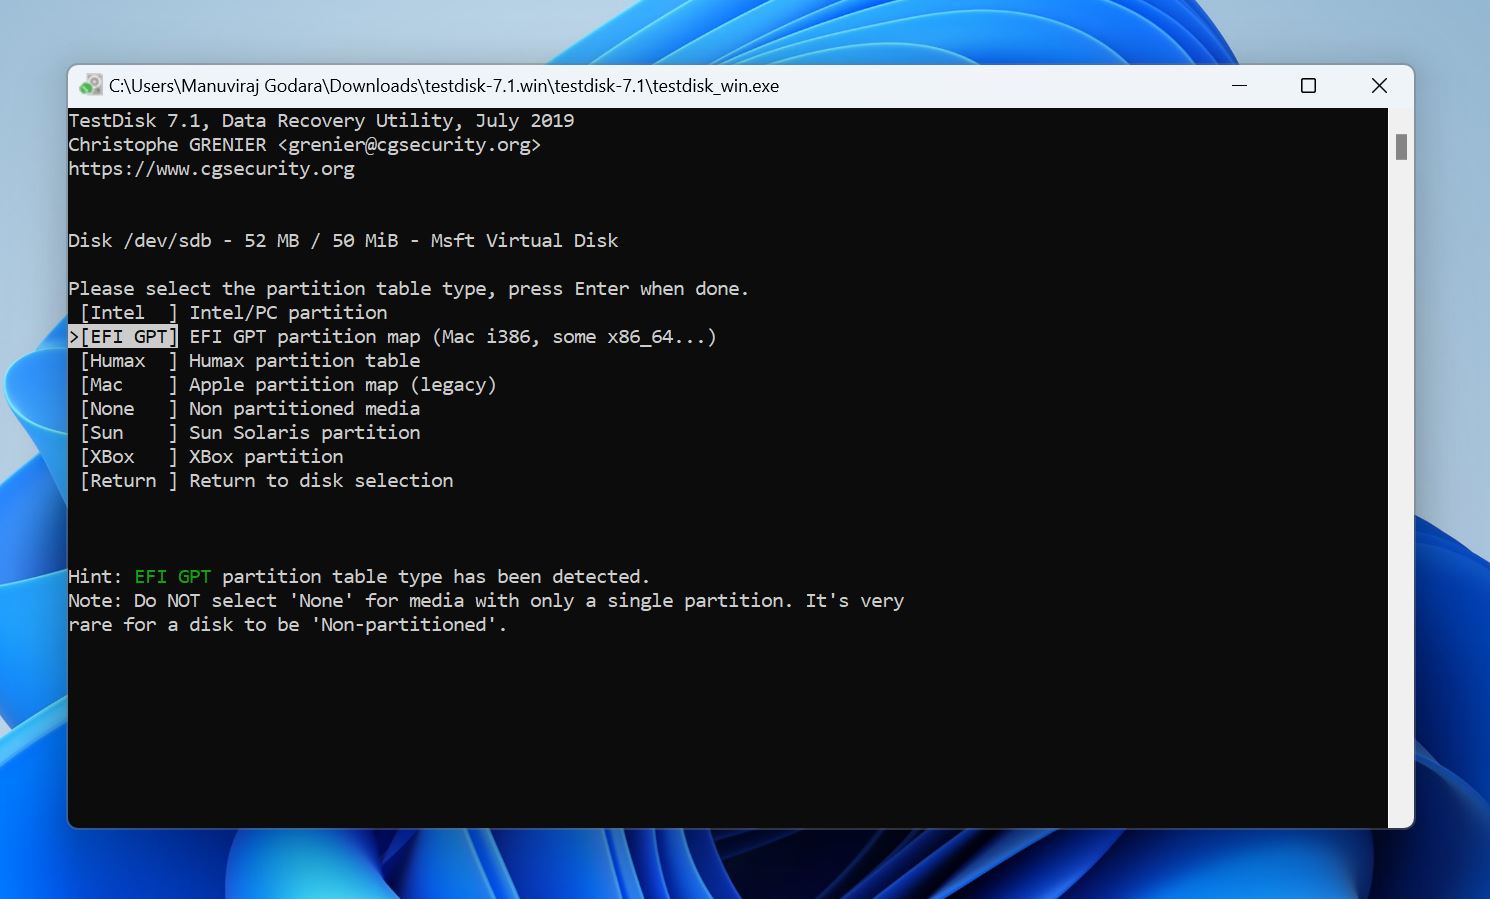
- Choose the partition table and press Enter. TestDisk auto-detects this, so it’s best to just press Enter on this screen, unless you’re sure the disk uses some other partition table than the one highlighted by TestDisk.
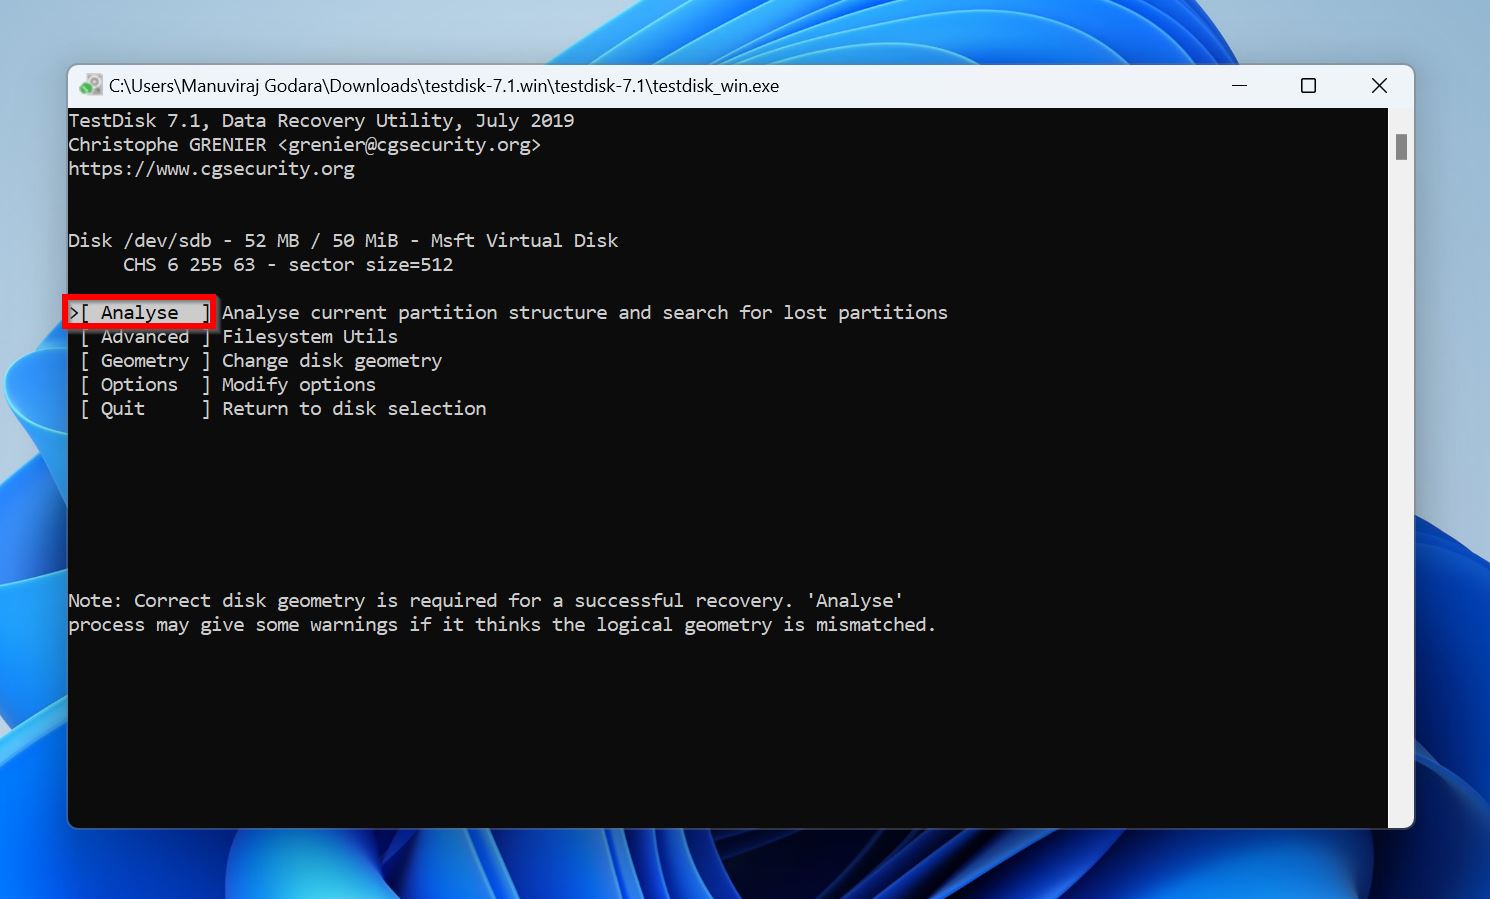
- Select Analyse and press Enter.
- Select Quick Search and press Enter.
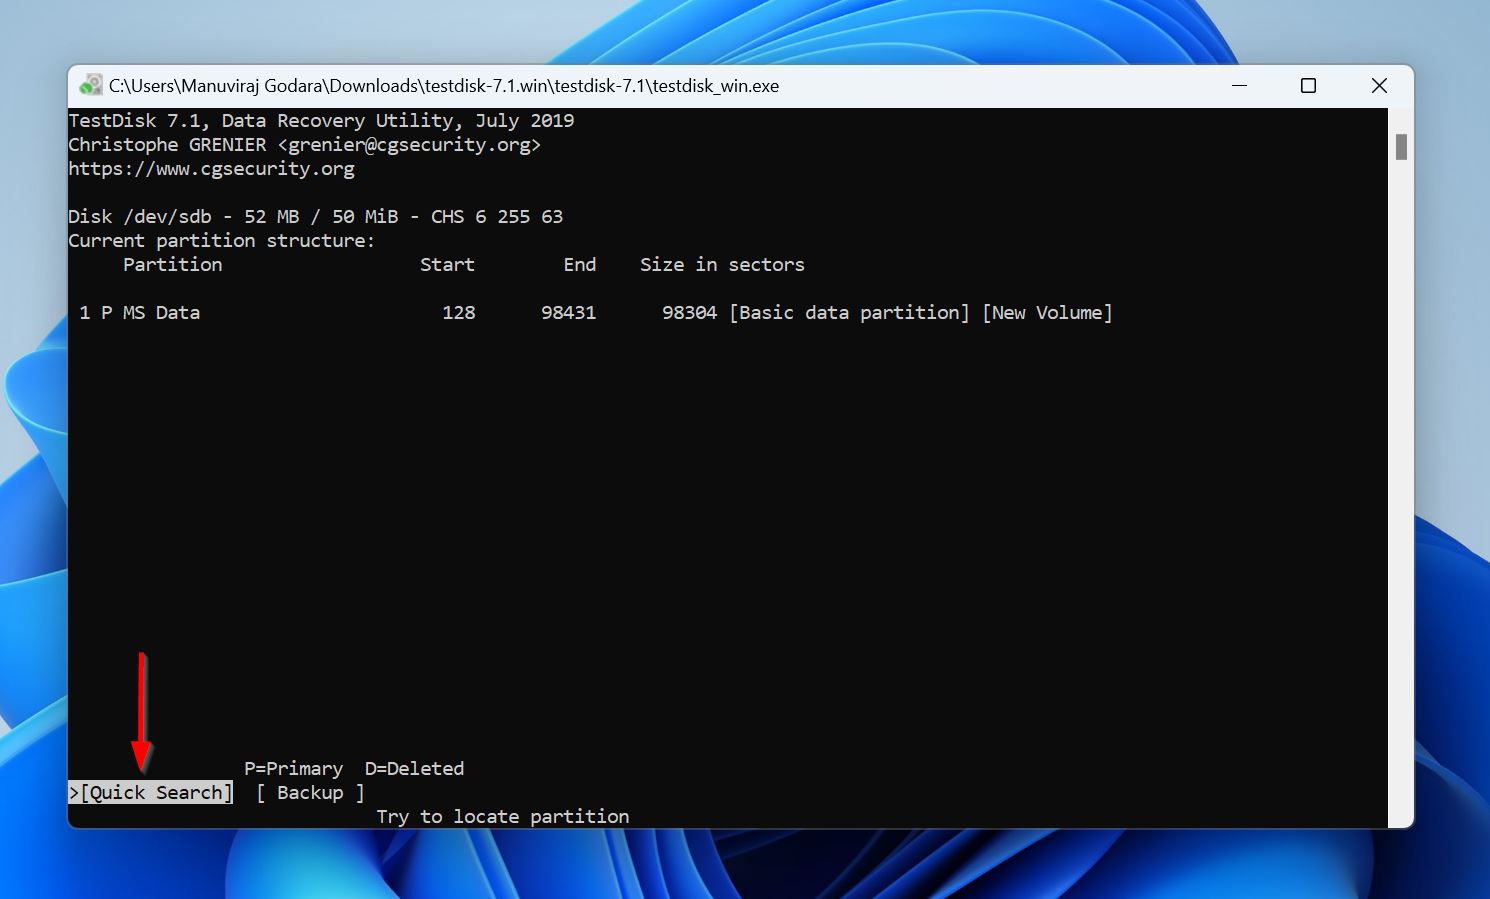
- TestDisk will display a list of partitions. Each partition will have a P (Primary), or D (Deleted) prefix before it. You can cycle through the prefixes using the Left and Right Arrow keys—make sure the partition you want to recover has a P prefix before it. Press Enter.
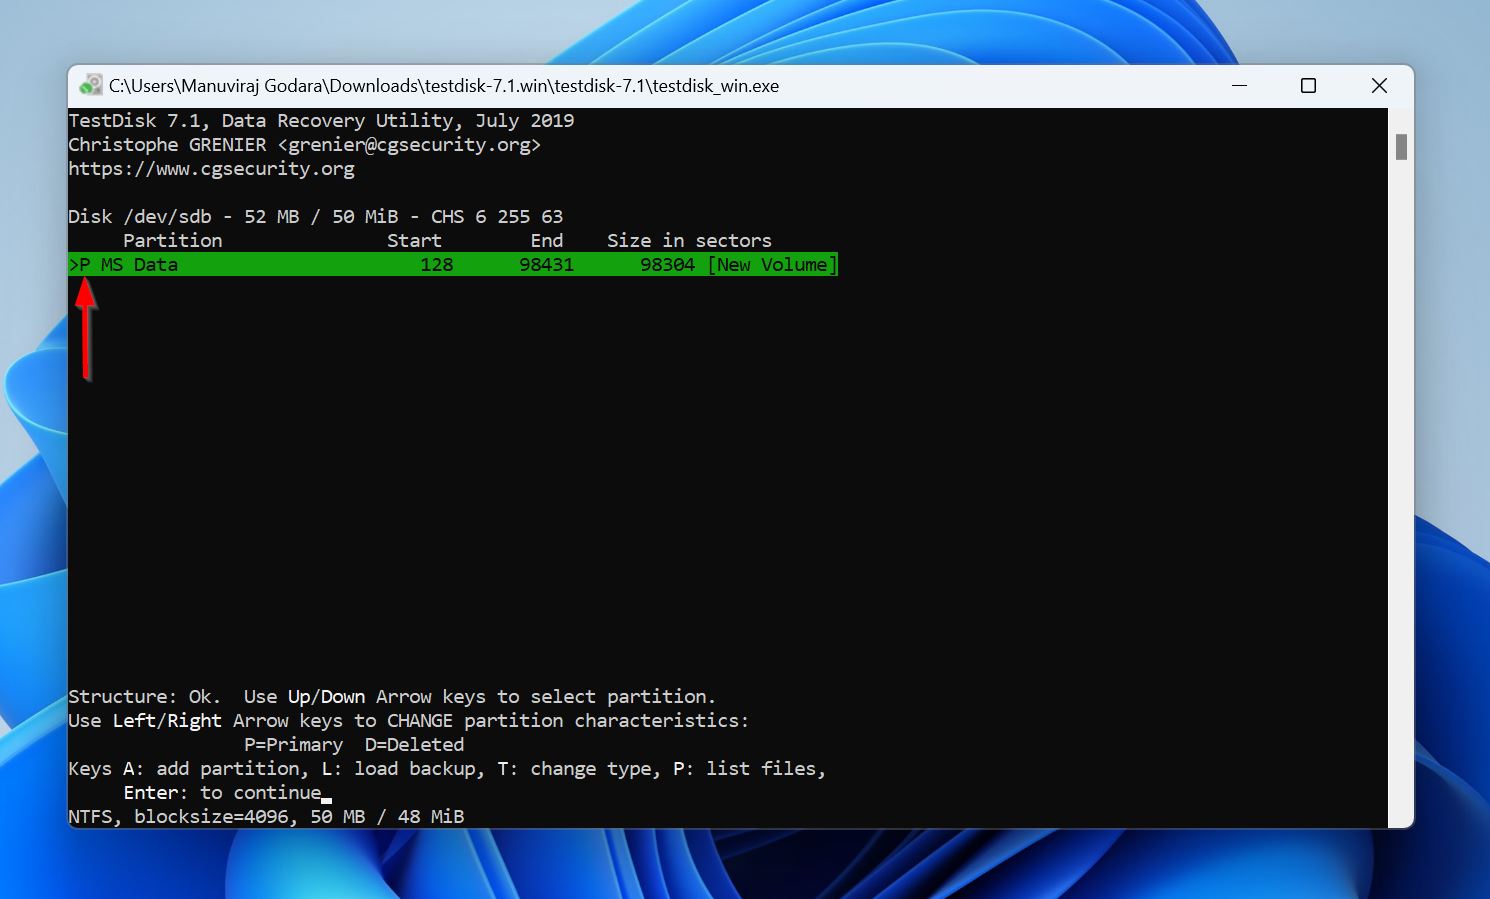
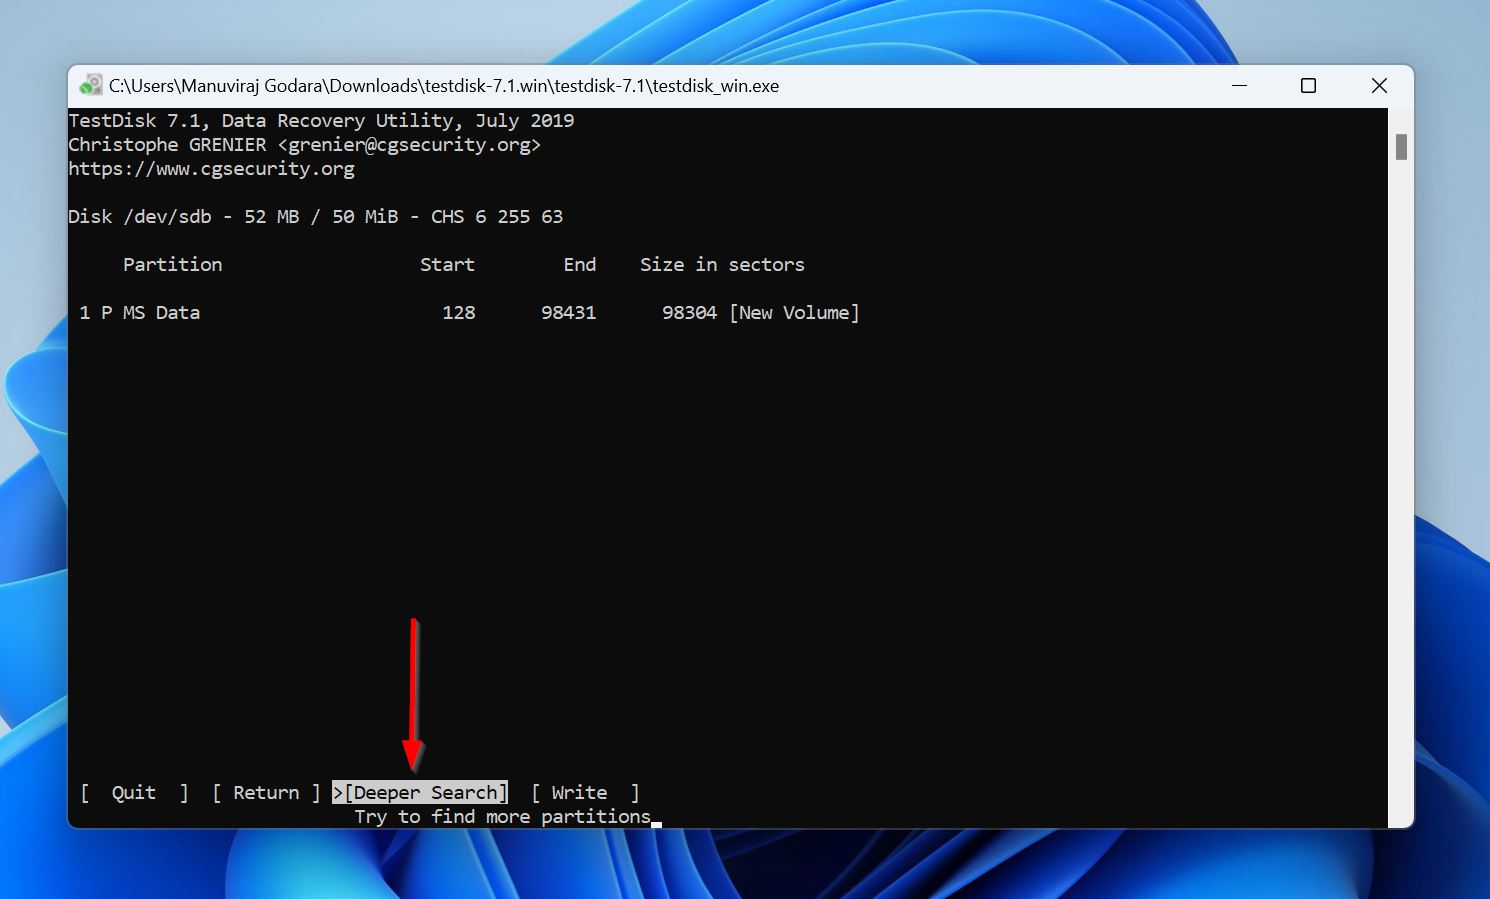
- (OPTIONAL) In case you didn’t find the relevant partition, select Deeper Search and follow Step 8 again.
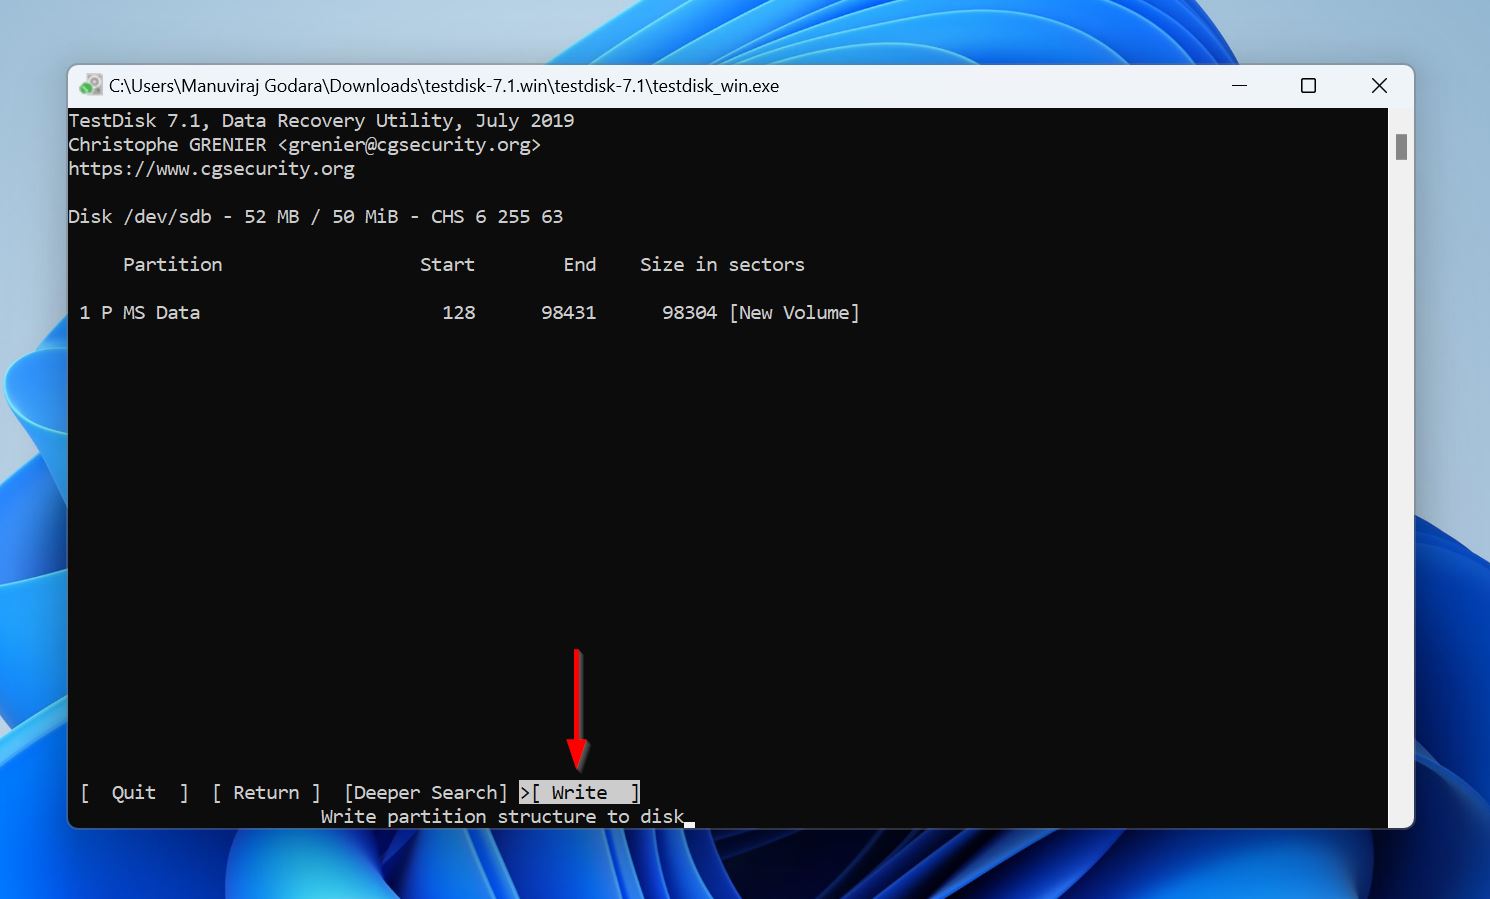
- Select Write and press Enter.
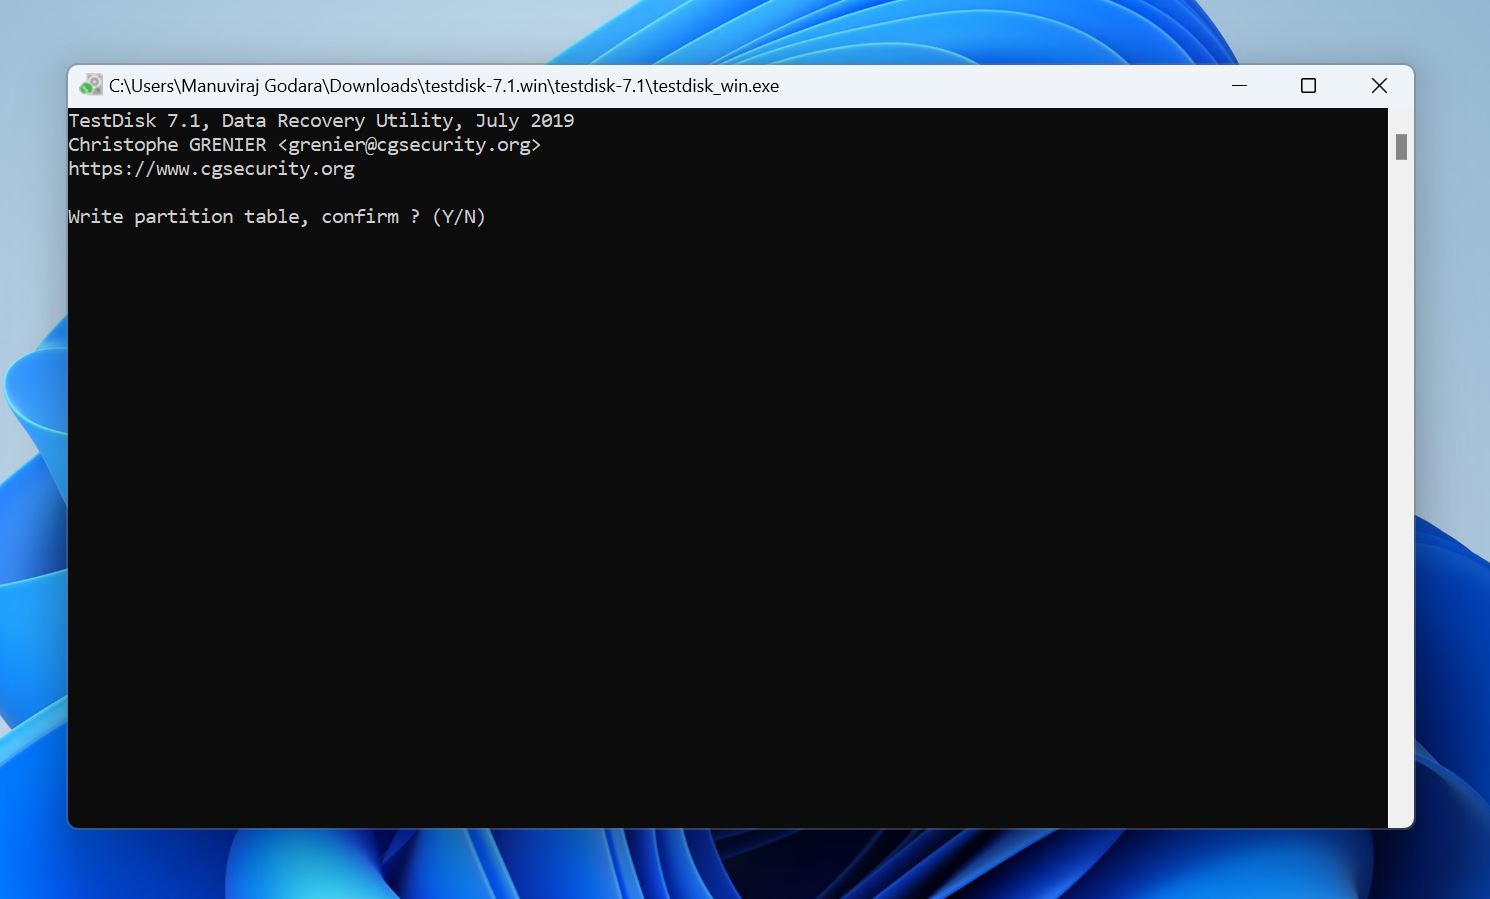
- Press Y to confirm.
- TestDisk will recover the lost partition.
Method 6: Fix a Read-Only SD Card
🔍 Best for symptoms: You can read your SD card’s contents but can’t write to it or modify its files.
You’re probably familiar with the physical lock switch on your SD card which enables read-only mode. But, there can be other reasons why your SD card is in read-only mode and you need to address them before you’re able to modify its contents.
- Search for “cmd” in Windows Search (Windows Key + S), right-click on Command Prompt and click Run as Administrator.
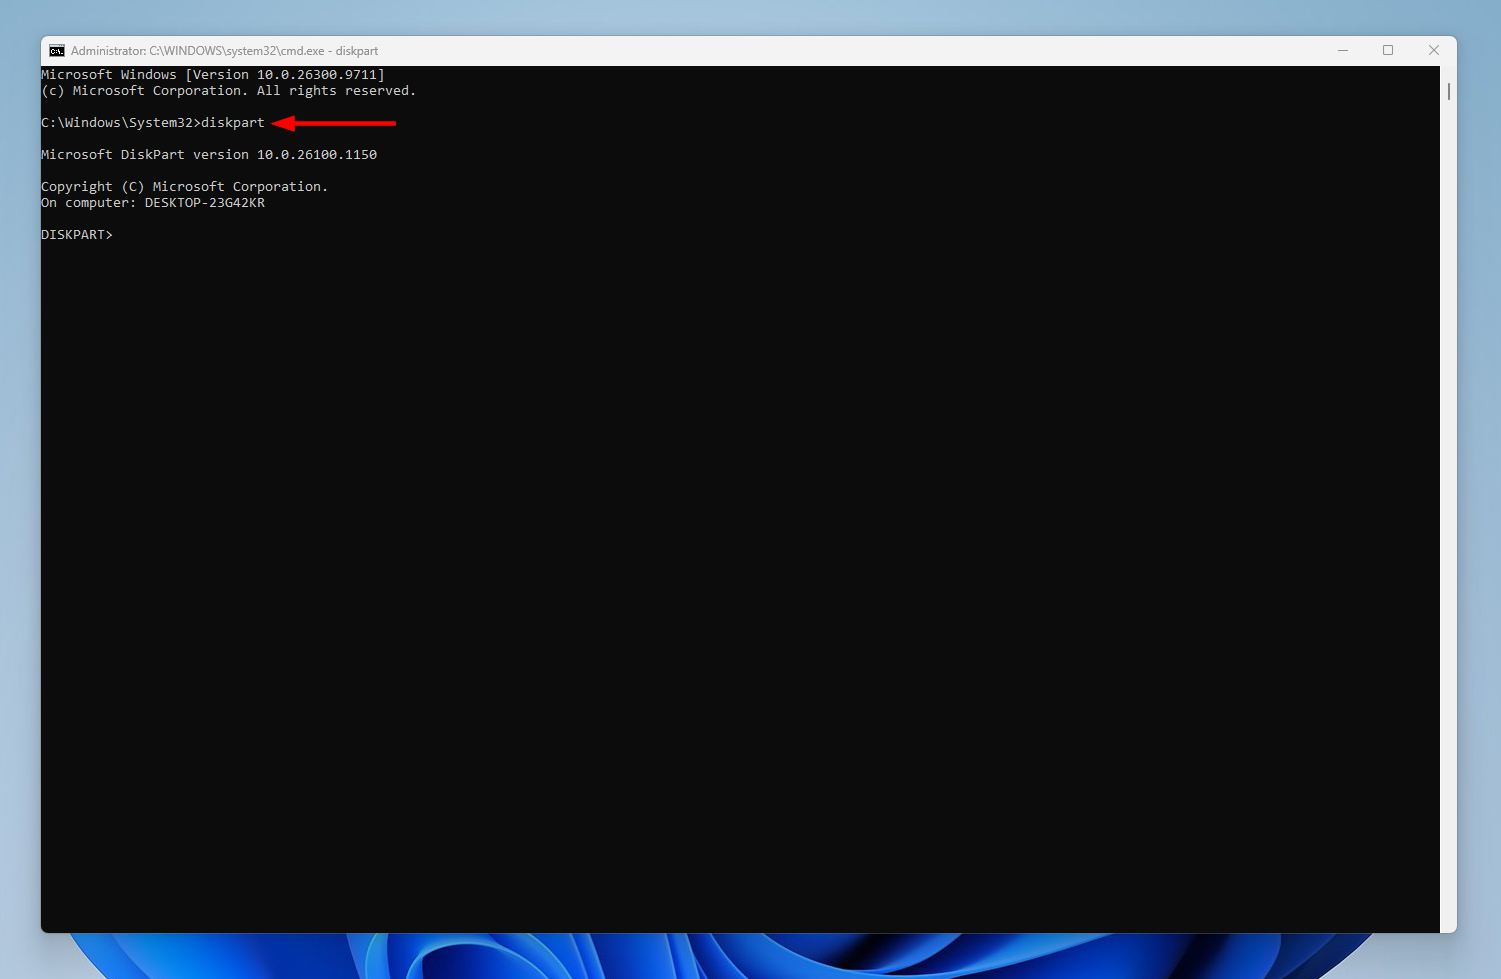
- Type diskpart and press Enter.
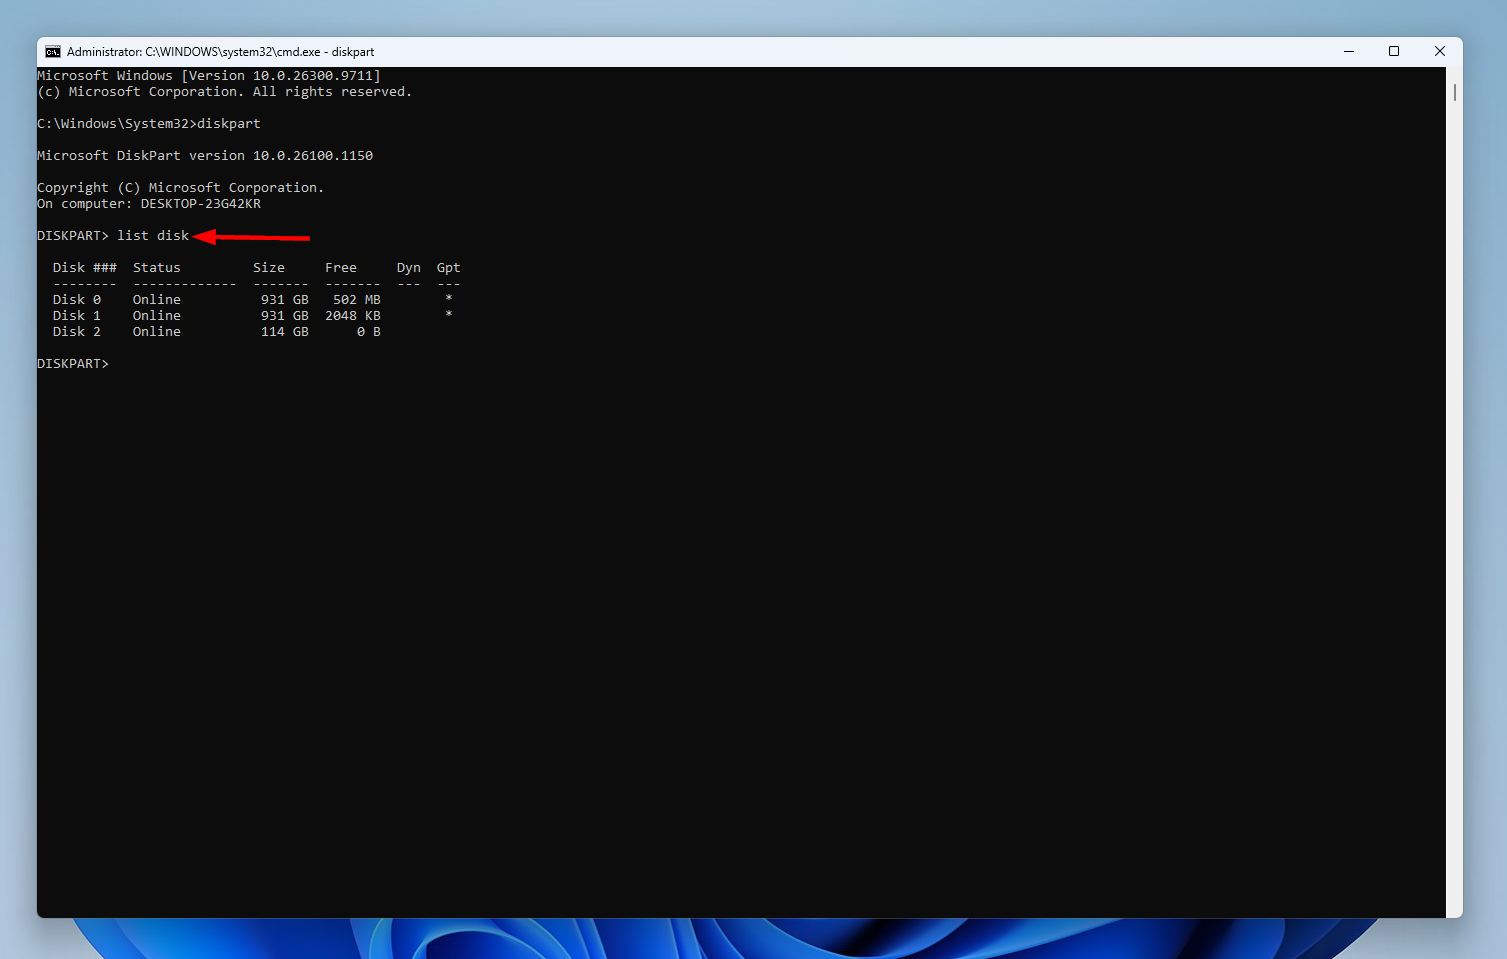
- Type list disk and press Enter to display all the storage drives connected to your PC. Note the disk number of your SD card because you’ll need it in the next step.
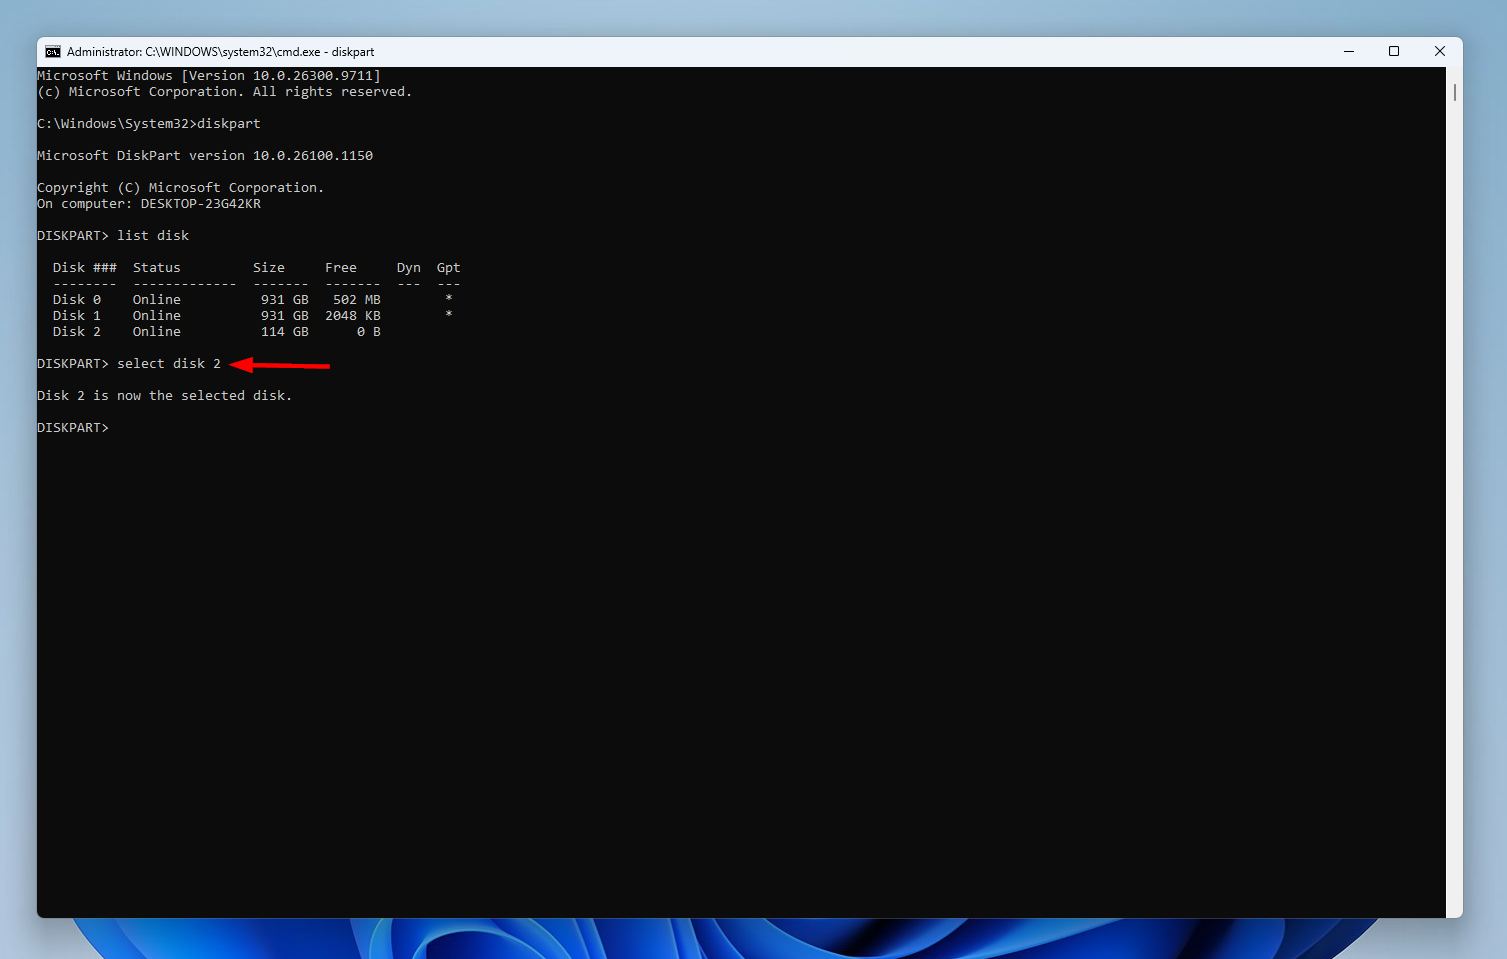
- Type select disk X and press Enter, replacing X with your SD card’s disk number (1, 2, 3, etc.).
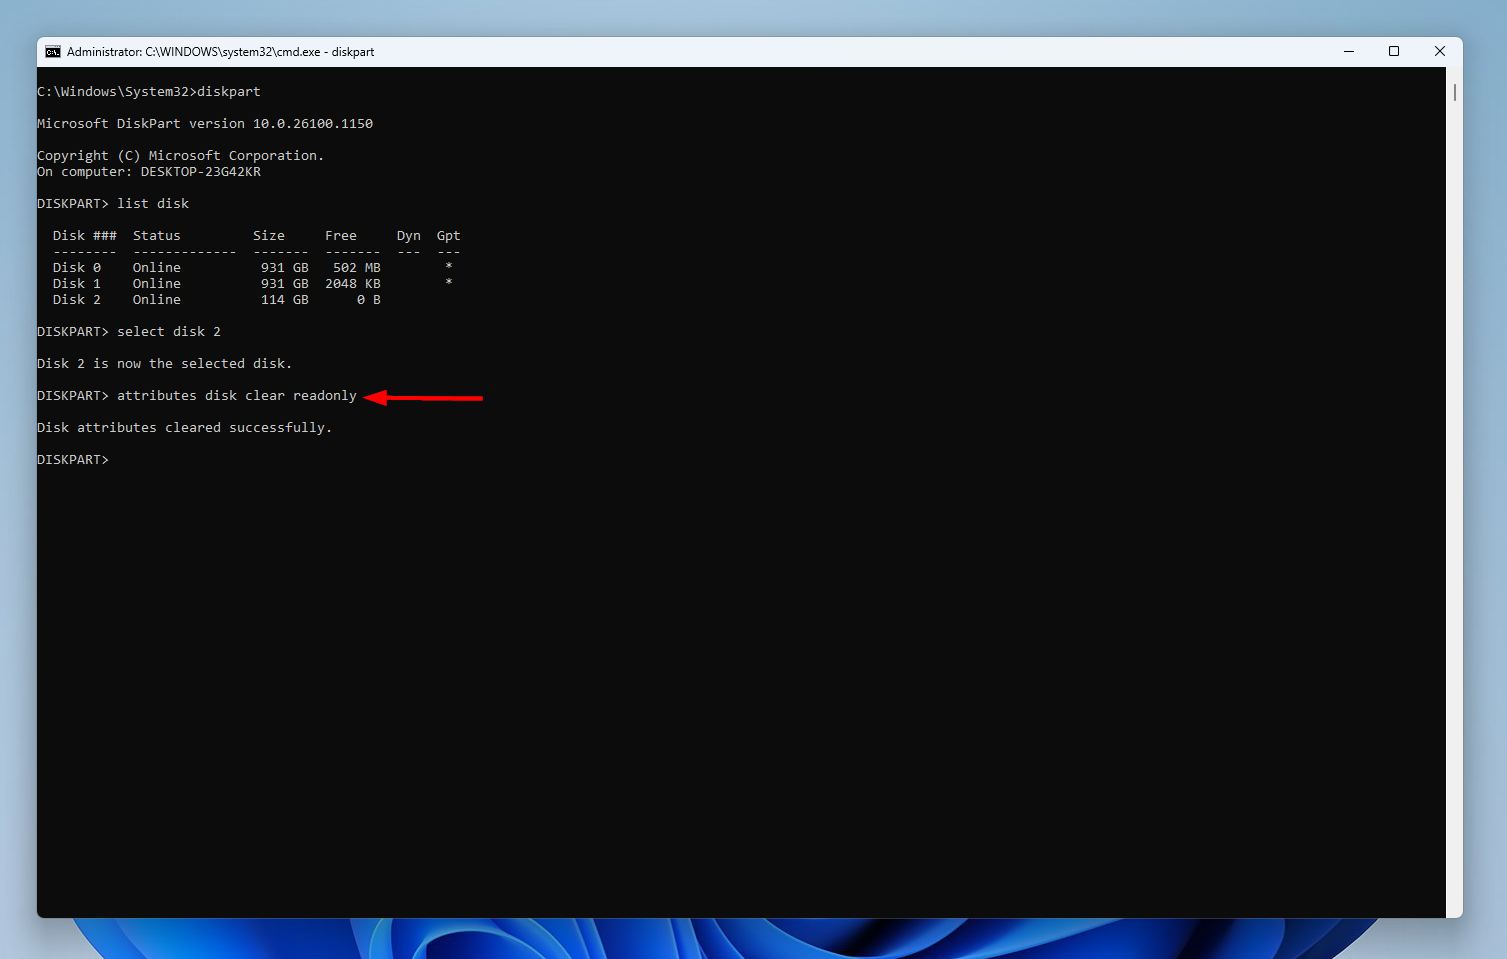
- Type attributes disk clear readonly and press Enter.
- Reboot your PC and see if the SD card becomes writable.
Method 7: Format the SD Card
🔍 Best for symptoms: The SD card works on Windows, but not on other devices like a dashcam, DSLR, or drone which means that it’s formatted to an incorrect file system. It also works in cases where the SD card is showing signs of file system corruption.
Formatting the SD card should be your last resort, after exhausting all the options above. However, it wipes all the data from your SD card. Data recovery may be possible after a quick format, but not after a full-format, so tread carefully: it’s best to recover your data beforehand. Additionally, if you plan on contacting a data recovery service, skip this method altogether.
- Search for “cmd” in Windows Search (Windows Key + S). Right-click on Command Prompt and choose Run as Administrator.
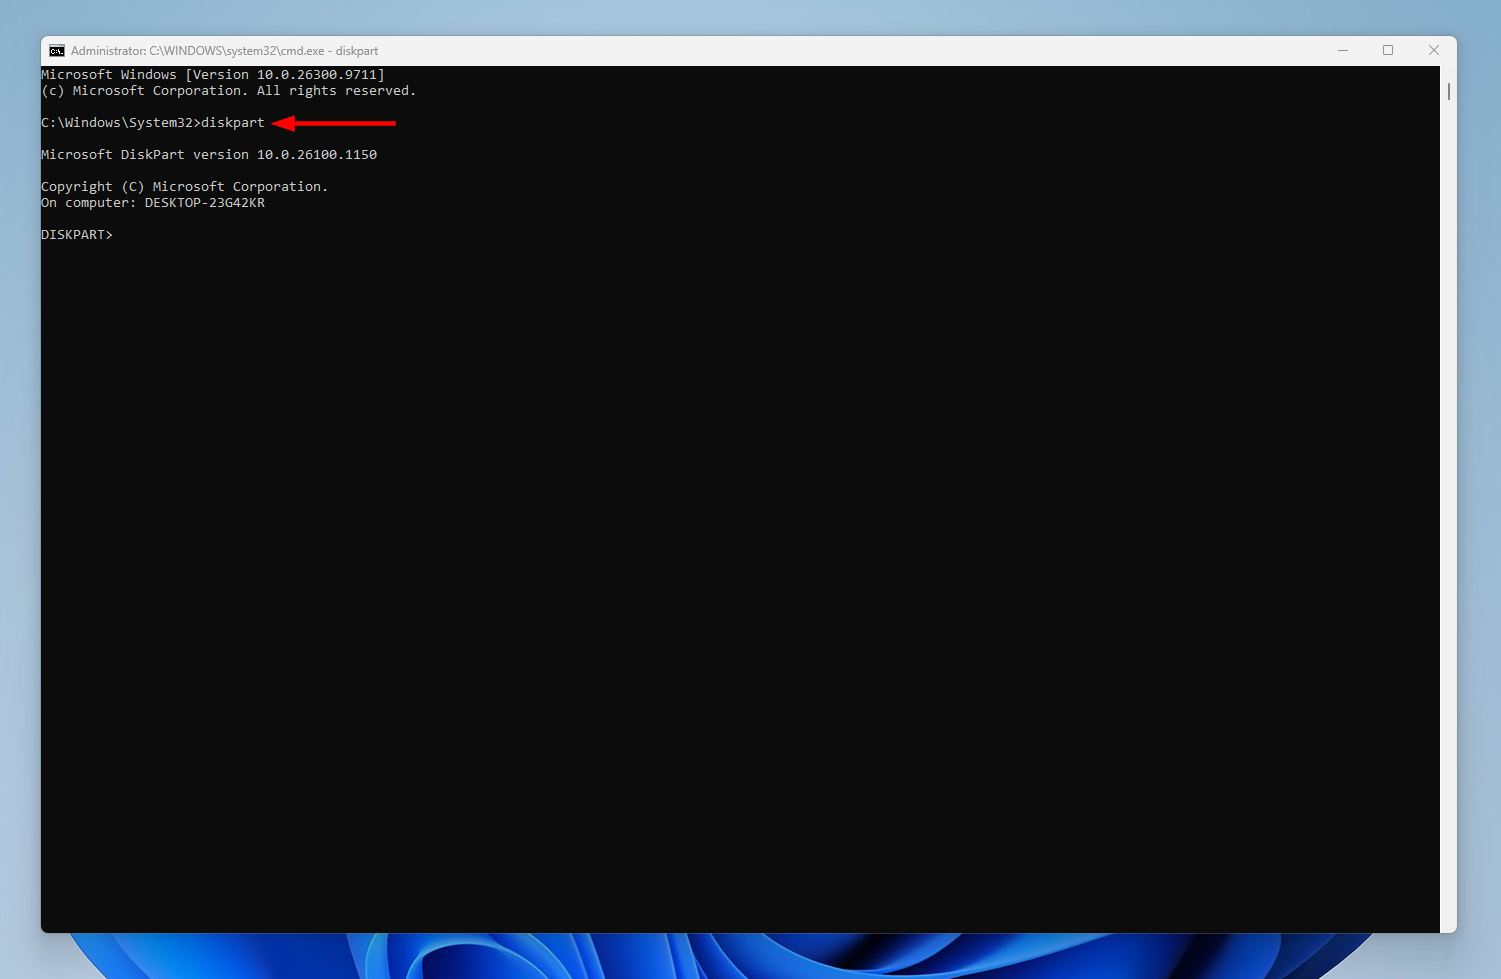
- Type diskpart in CMD and press Enter.
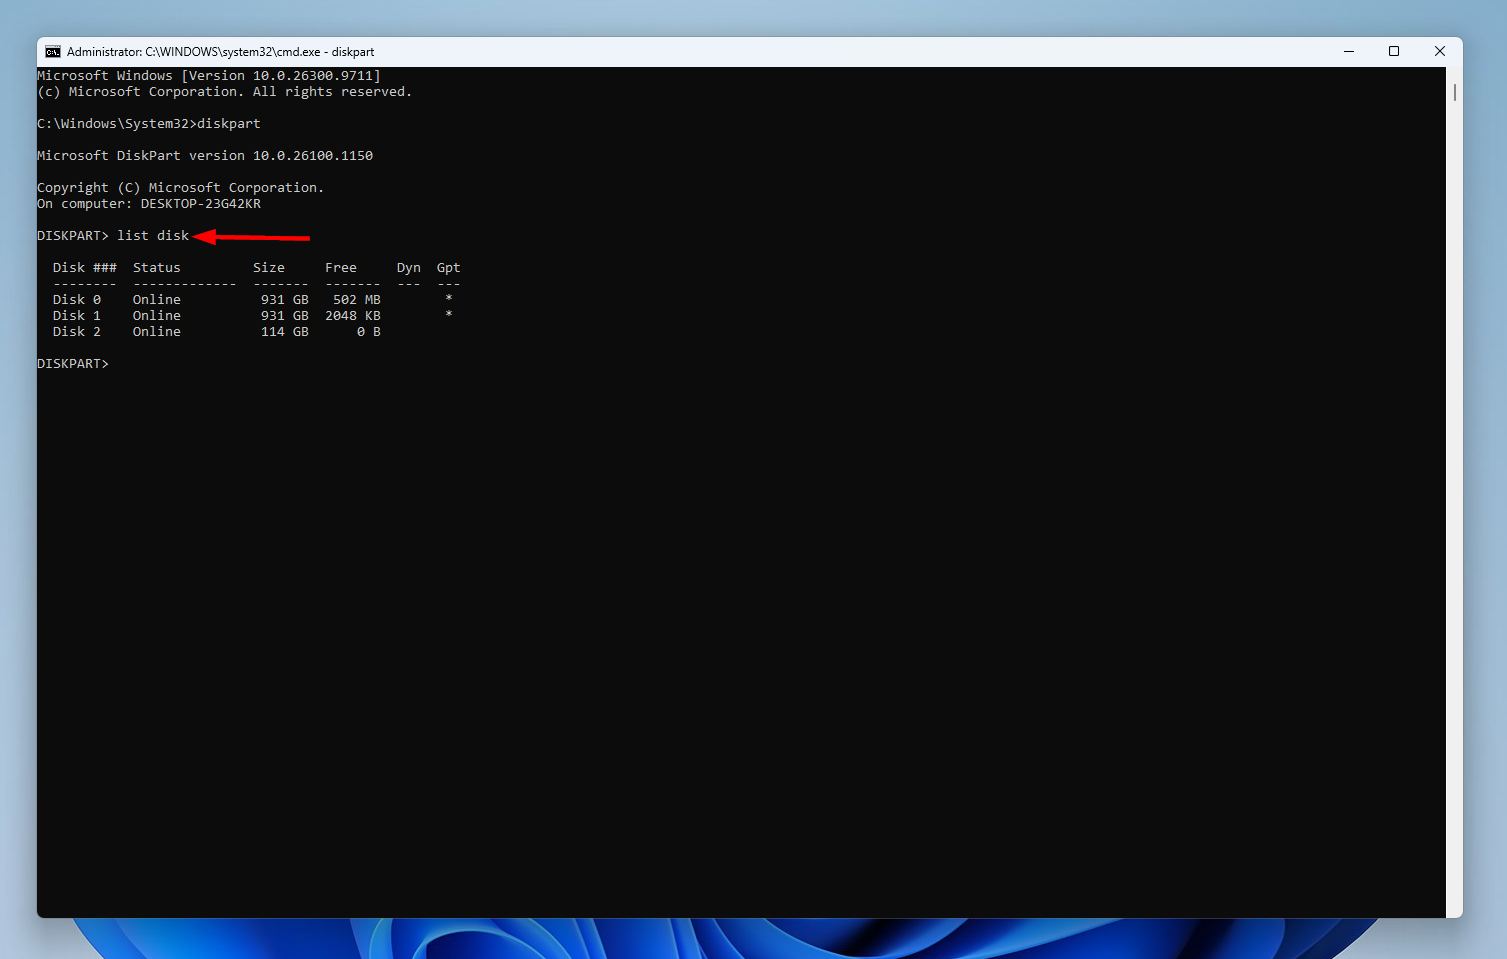
- Type list disk and press Enter. Note the disk number of your SD card.
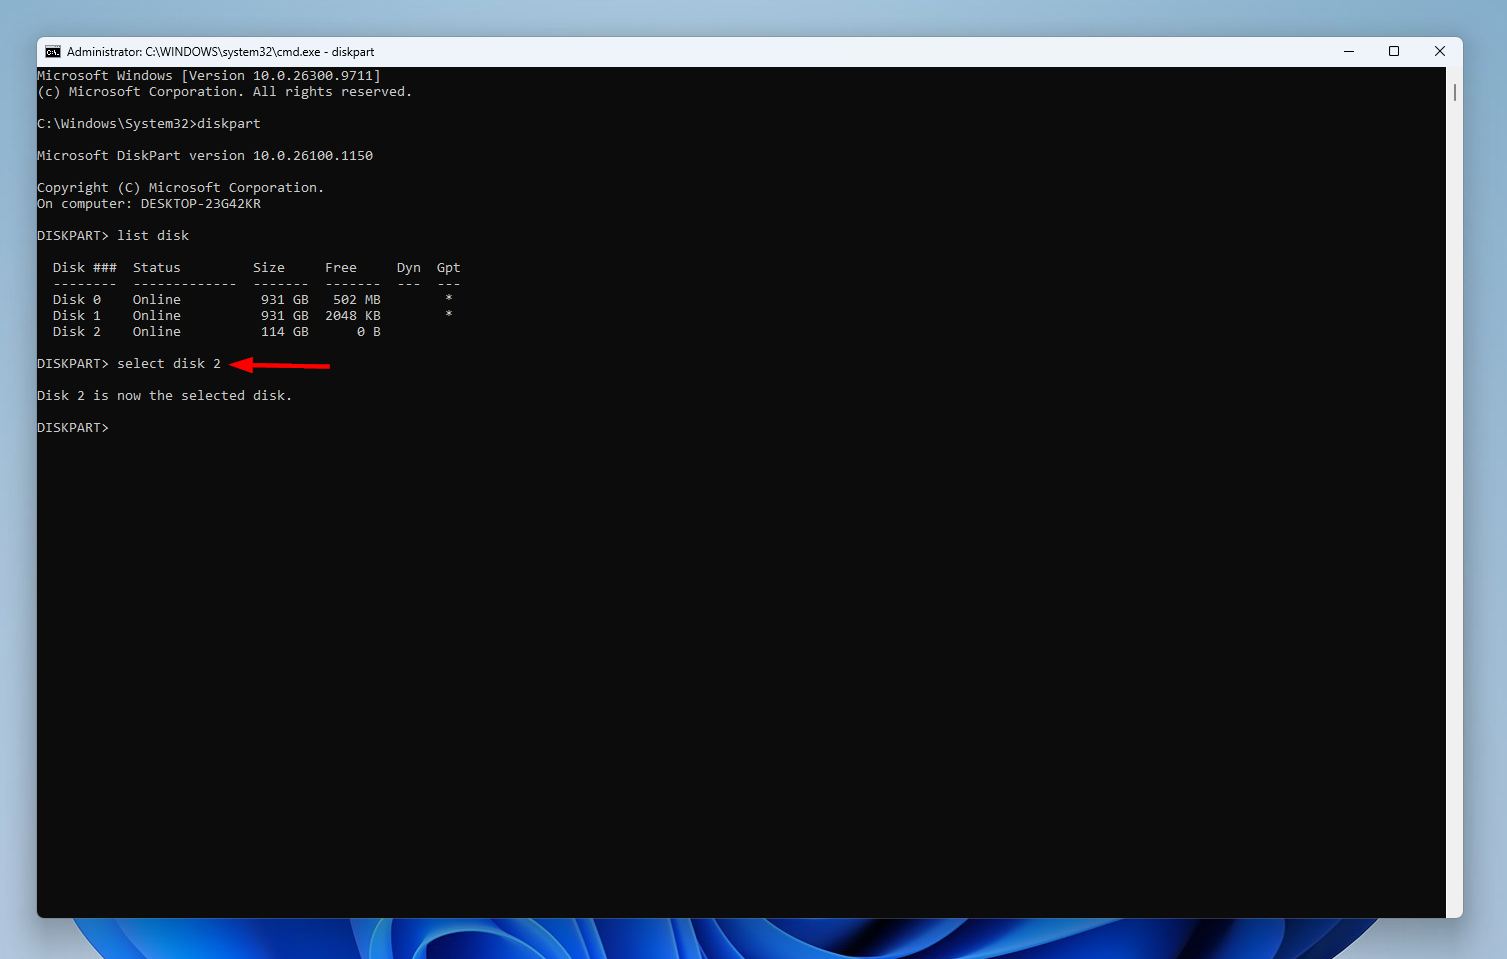
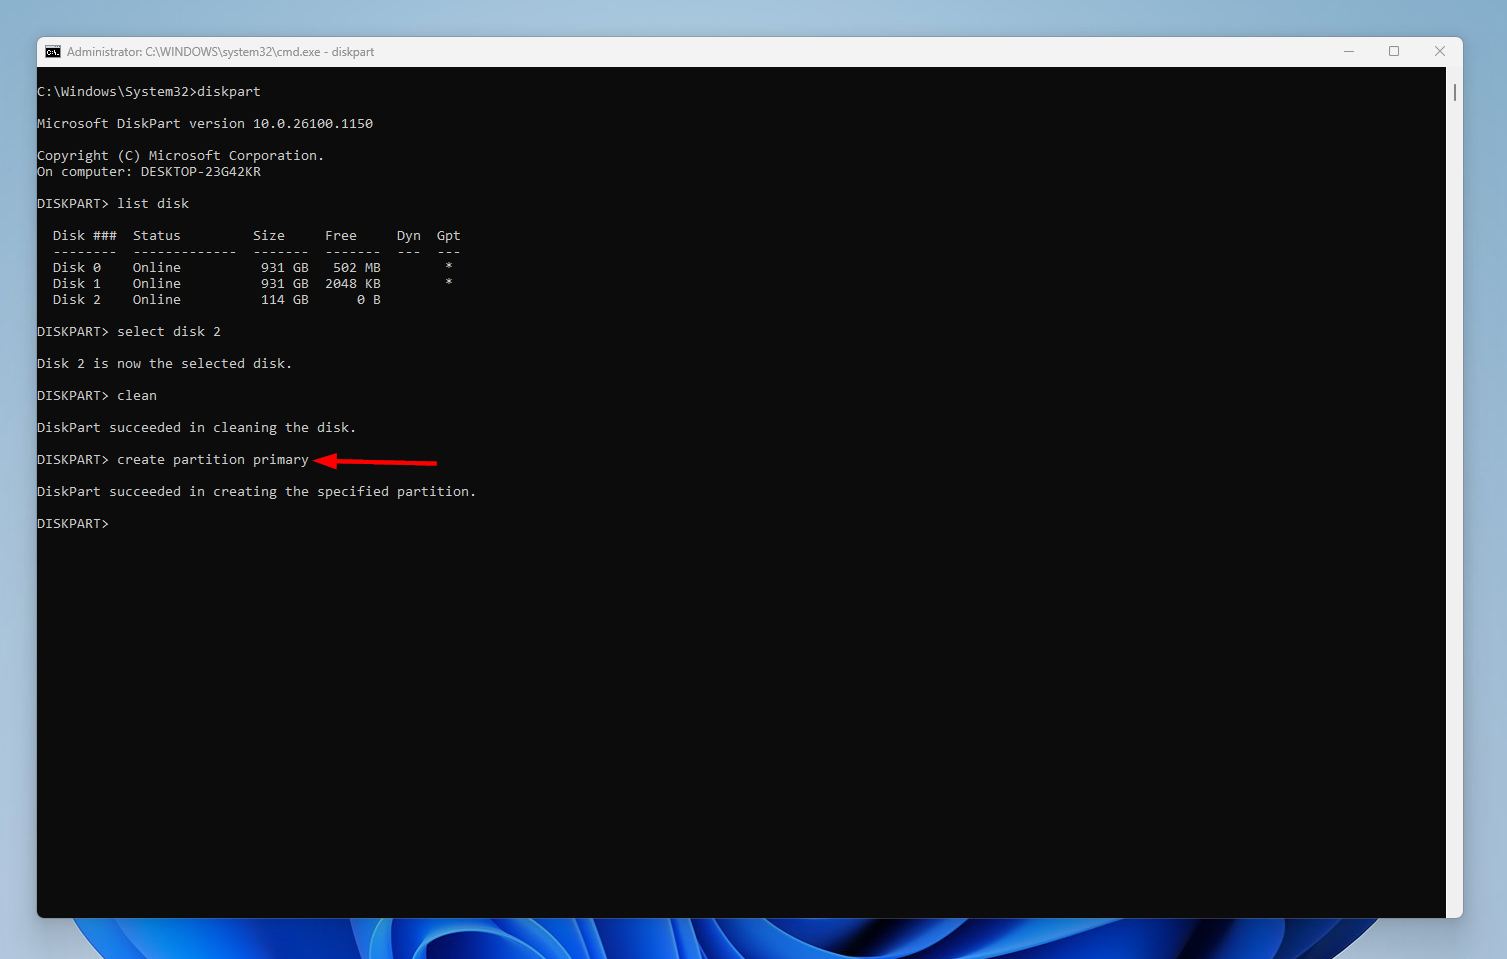
- Type select disk X and press Enter, replacing X with the disk number of the SD card (1, 2, 3, etc.)
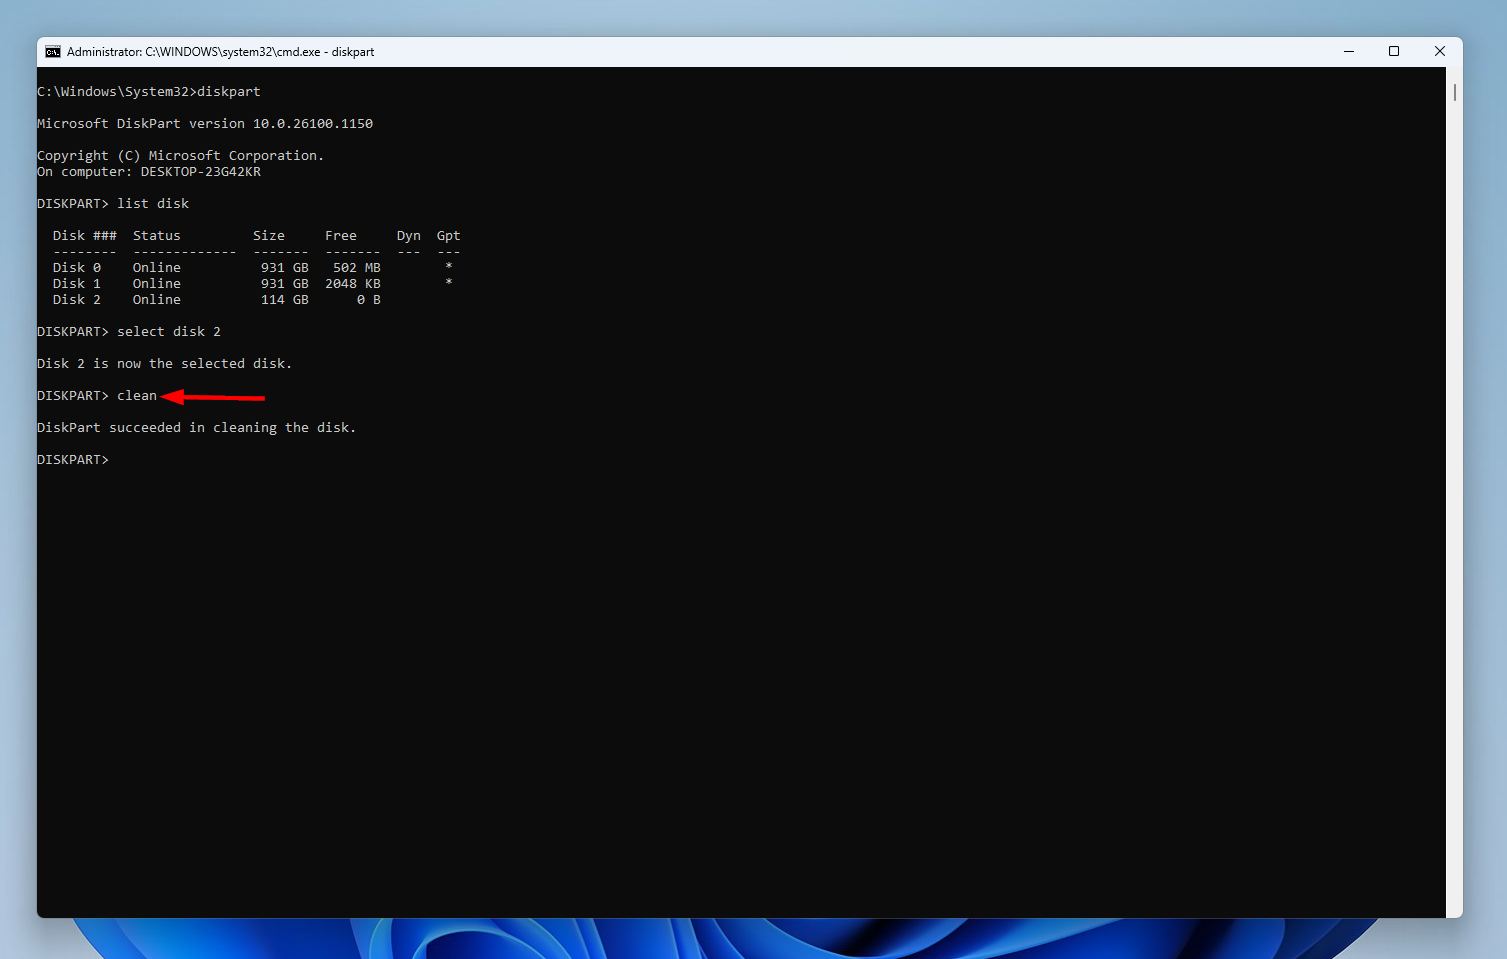
- Type clean and press Enter.
- Type create partition primary and press Enter.
- Type format fs=exFAT quick and press Enter. We recommend the exFAT format because it’s a file system that works across cameras and computers.
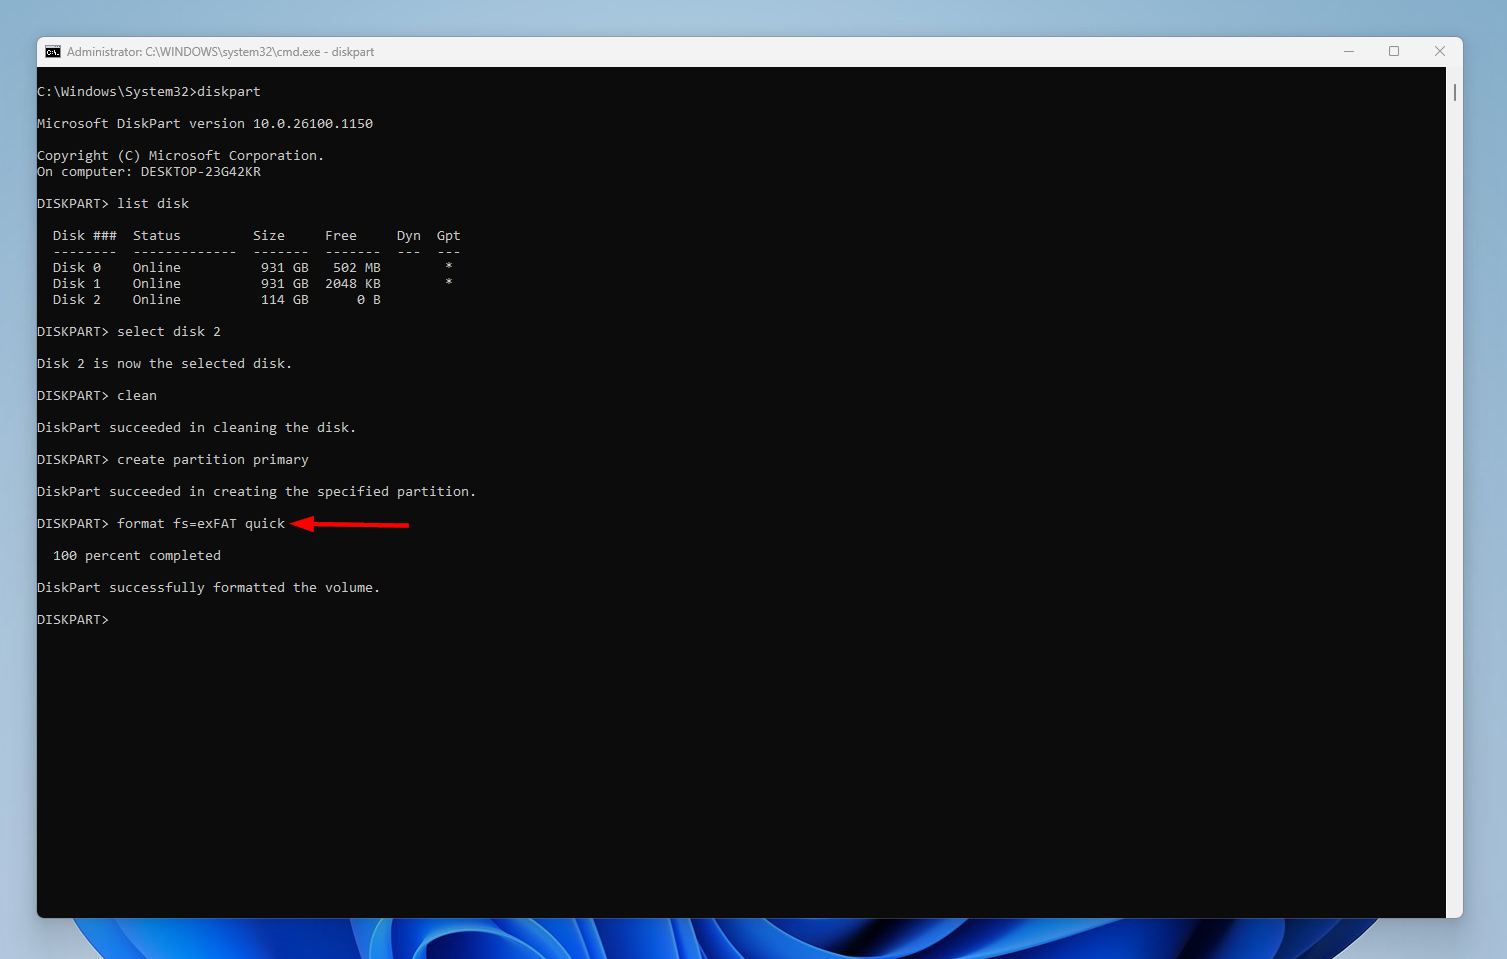
- Close CMD once the format completes.
Method 8: Contact a Data Recovery Service
A professional data recovery service has the highest chances of recovering your data, but it can be prohibitively expensive. But, we do recommend it as a last resort in case none of the methods above worked for you or you have data you want to recover at any cost. It’s also your only plan of action if your SD card isn’t visible in Disk Management (or it’s visible, but with an incorrect storage capacity).
Here’s what to expect when using a data recovery service:
- First, do your research and pick the best data recovery service you can afford. Contact them via phone or email (most services have a 24/7 emergency hotline).
- Describe your SD card’s condition in detail: when it stopped working, how old it is, the physical condition, the make and model, etc.
- The data recovery service will typically ask you to courier the SD card, or drop it off at a drop-off point.
- They will then analyze the SD card and get back to you with how much data can be salvaged and the cost.
- Decide if you wish to proceed further. If you give them the go-ahead, they will recover your data and send it to you on a new storage drive.
Conclusion
To recap:
When dealing with an SD card that stopped working → First perform basic checks like cleaning dirty contacts, switching ports, and checking if the SD card appears in Disk Management with its correct storage capacity.
If it does → Recover your data first and then try to repair it using the fixes described above.
If it’s not visible in Disk Management (or it appears with a wrong storage capacity) → Contact a professional data recovery service. Since these can be expensive, consider replacing the SD card if the data isn’t all that important.
FAQ
There’s no single quickest fix in this situation. You will need to figure out what caused it to stop working, and then attempt the relevant fix. However, if it’s detected in Disk Management with its correct storage size and you don’t care about the data on it, just do a quick format to give it a clean slate.
It’s likely formatted using a file system that your phone doesn’t support (like NTFS). To fix this, format the SD card to a file system like FAT32, or exFAT as they are more widely supported across devices.
There are several things you can do in this case:
- Eject the SD card and clean its contacts and the slot on your phone, then reinsert it.
- Update your Android device to the latest version.
- Inspect the SD card for damage, especially around the contacts.
- Format the SD card on your Android phone. This will delete all data from it.
A brand new micro SD card that randomly stopped working after a few uses is likely defective. There’s nothing you can do except get it exchanged. Additionally, intensive usage of an SD card that’s not meant for such usage will wear it out quickly: buy the correct SD card for your use case.
