


No storage on iPhone but deleted everything? This can occur for several different reasons, and it’s not always because you have too much data.
After researching this error and how other users fixed the problem on their own devices, we plotted out the fastest steps to solve it. In this guide, we’ll tell you why your iPhone storage keeps filling up after deleting, how to fix it, and how to prevent it from happening again.
How to Fix iPhone Storage That Keeps Filling Up After Deleting Files
If you’ve already removed a lot of different data on your iPhone (e.g., photos, videos, apps), but your iPhone keeps saying “storage full” even after deleting, you’re probably experiencing a bug. In this section, we’ll cover how to troubleshoot storage-related system issues.
1. Reboot Your iPhone
iOS needs time and resources to update its storage calculations. If your iPhone storage continues to appear full even after deleting data, it’s possible this process got stalled. There are also cases where users report their photos reappearing after deletion, which likewise prevents them from freeing up storage space.
Restarting your iPhone closes any background tasks using up resources, prompts the system to recalculate storage immediately, and it’s a common fix for the “zombie photos.” It’s also a good general troubleshooter for many other minor iOS issues.
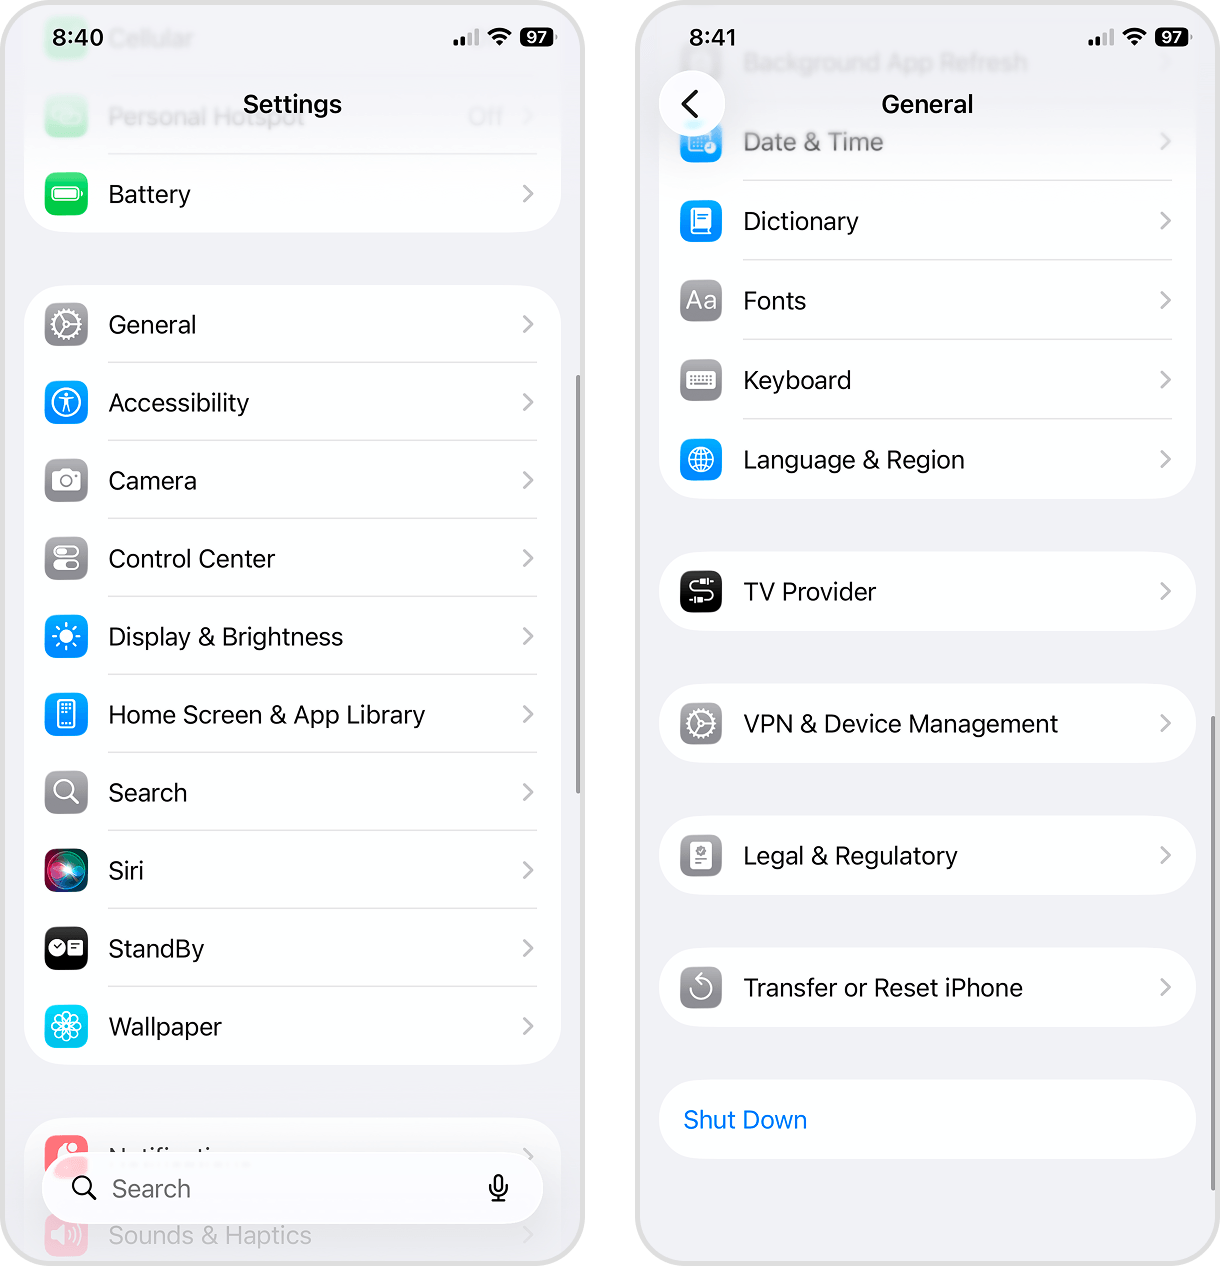
- Open the Settings app.
- Tap General.
- Scroll down to the bottom of the General page and select Shut Down.
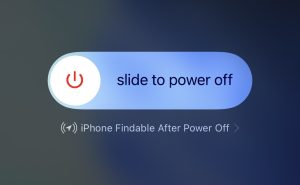
- Use the slider at the top of the screen to turn off your device.
- Once the screen is fully black, press the Lock Button to turn it on again. Then, note any changes in performance.
2. Empty Recently Deleted in Photos and Other Apps
If restarting your iPhone doesn’t work, the next step is to rule out an incomplete deletion. Most built-in iPhone apps have a “Recently Deleted” folder that keeps removed items for up to 30 days by default, allowing you to restore them if you change your mind.
Until the Recently Deleted folder is emptied, or the retention period expires, those files will continue to take up storage space–which is why your iPhone storage is still full after deleting photos. We’ll show you how to empty the Recently Deleted folder in the Photos app, so you know what to look for:
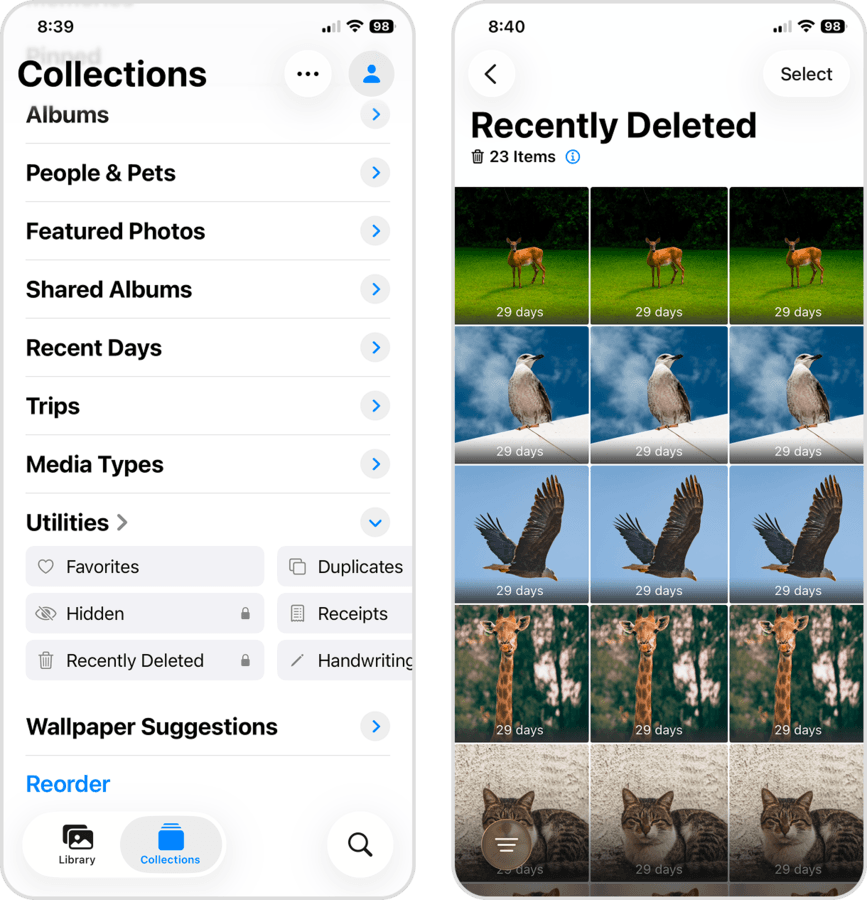
- Open the Photos app.
- Navigate to the Collections page. Then, scroll down to Utilities and tap Recently Deleted.
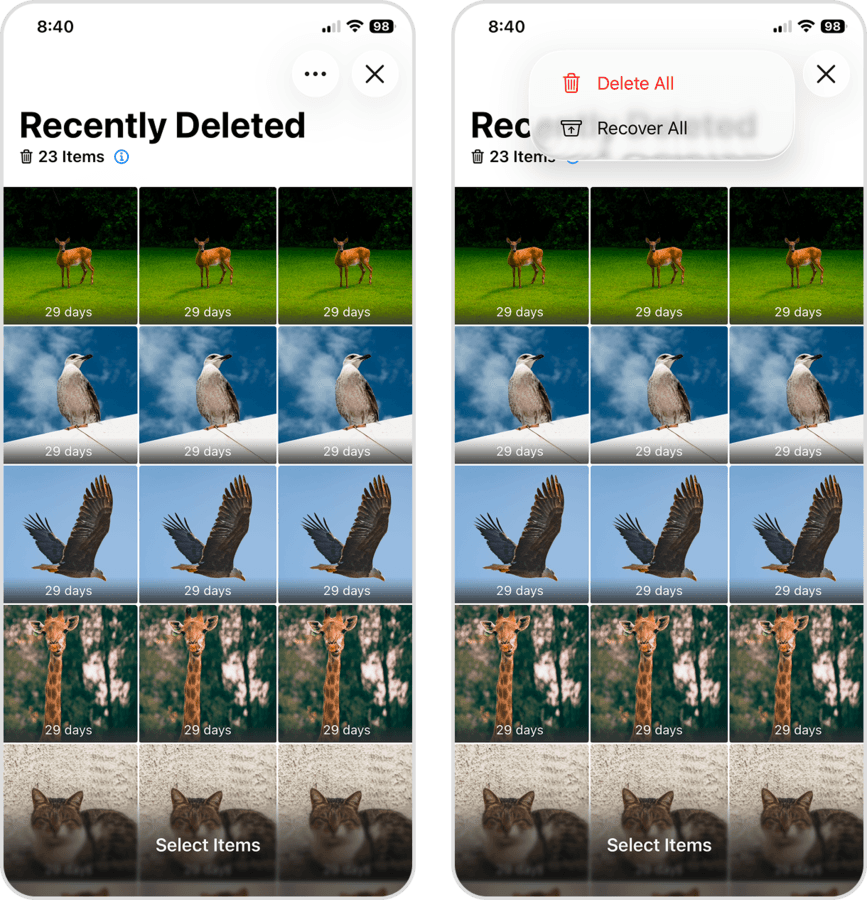
- Tap Select in the top right corner of the screen.
- Tap the menu button ••• and select Delete All.
- Finally, tap Delete From All Devices in the pop-up menu to confirm.
3. Erase Your iPhone and Set It Up Again
If your iPhone’s storage hasn’t updated even after trying the previous methods, there’s one last resort: erasing your iPhone. This completely resets your device to its factory state (but updated to the latest iOS), erasing all of its data and system files–along with the bug. This should also get rid of any conflicts or obsolete files, since you’ll be running a completely fresh version of iOS.
- Open the Settings app.
- Tap General.
- Scroll down to the bottom of the General page and select Transfer or Reset iPhone.
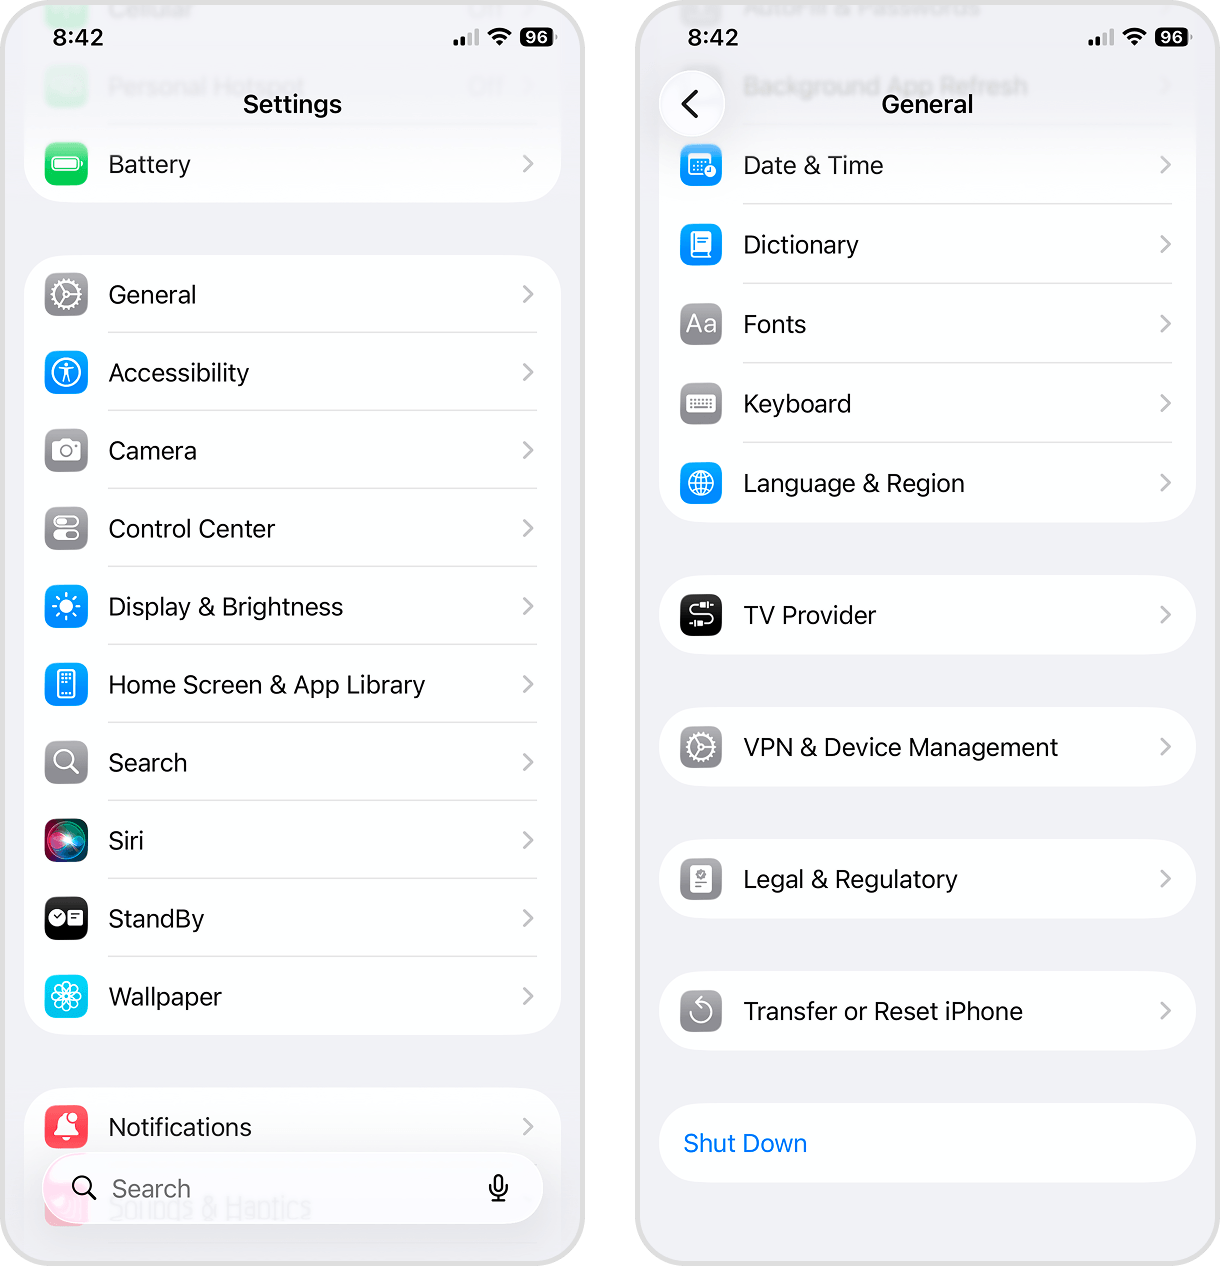
- Tap Erase All Content and Settings.
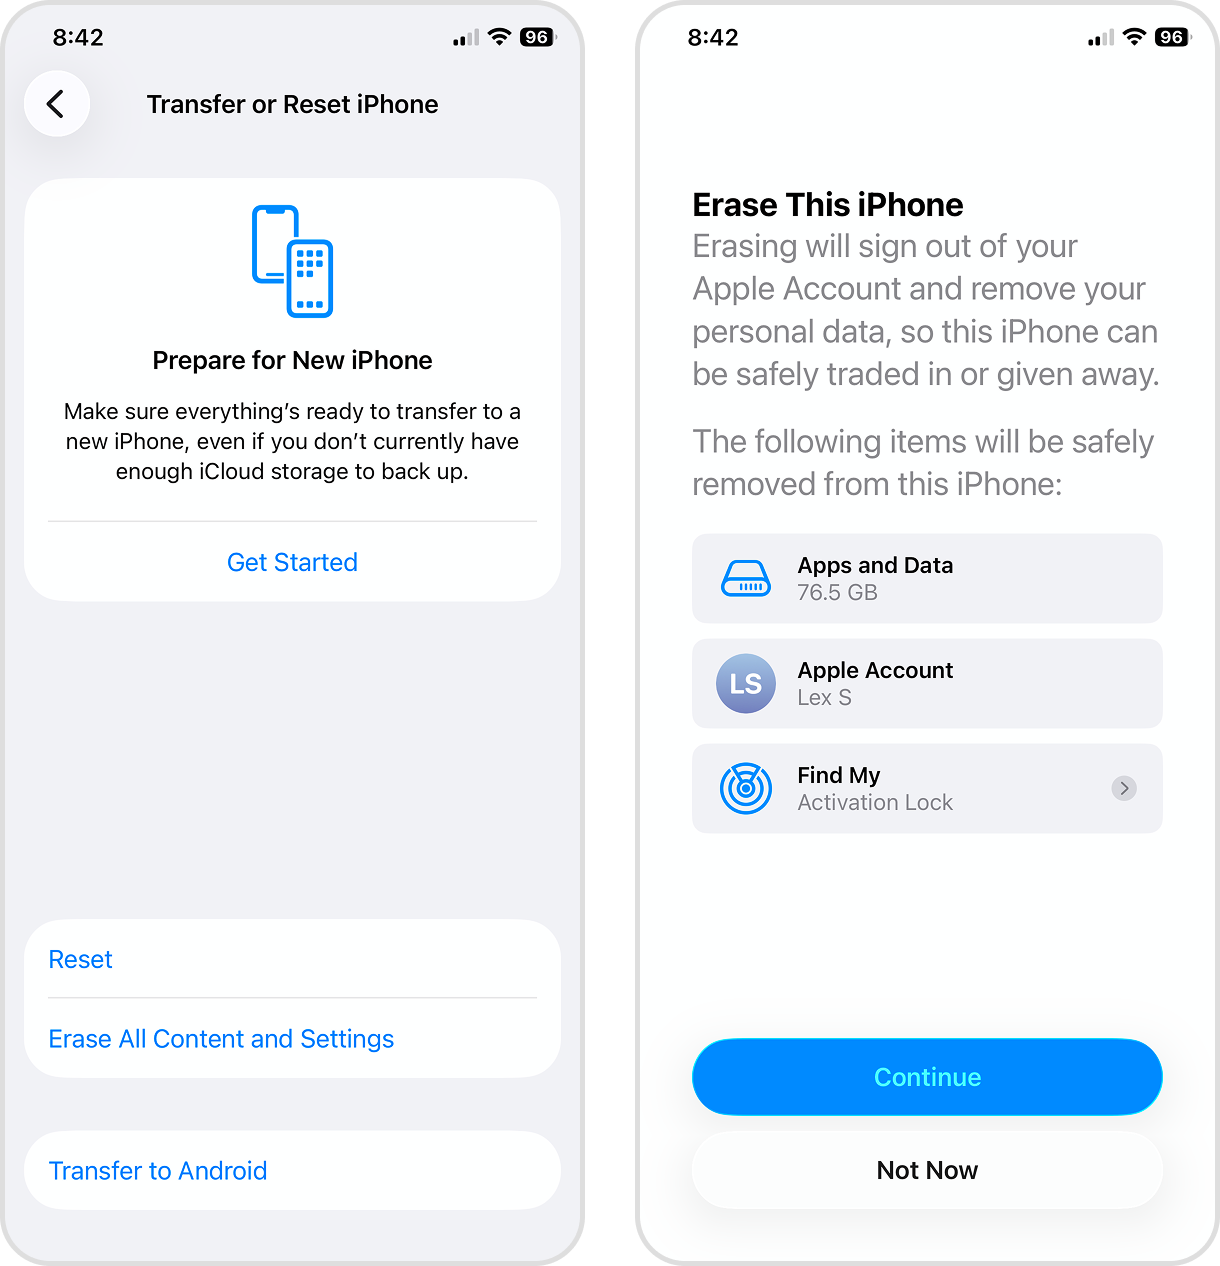
- Finally, review the data about to be deleted, then tap Continue. Follow the rest of the wizard’s instructions to proceed.
Now That Your iPhone Storage Is Fixed, Clean It Properly
Hopefully, one of the methods in the last section fixed the issue of your iPhone storage not going down after deleting data. But once you’ve got the bug under control, your next move should be to free up as much storage space as possible.
In this section, we’ll cover the three most impactful ways to reclaim storage space fast by removing clutter and large files using different tools and settings. If you want a complete walkthrough on cleaning up your entire device, see our in-depth guide on how to free up space on an iPhone.
1. Delete or Compress Unwanted Photos and Videos
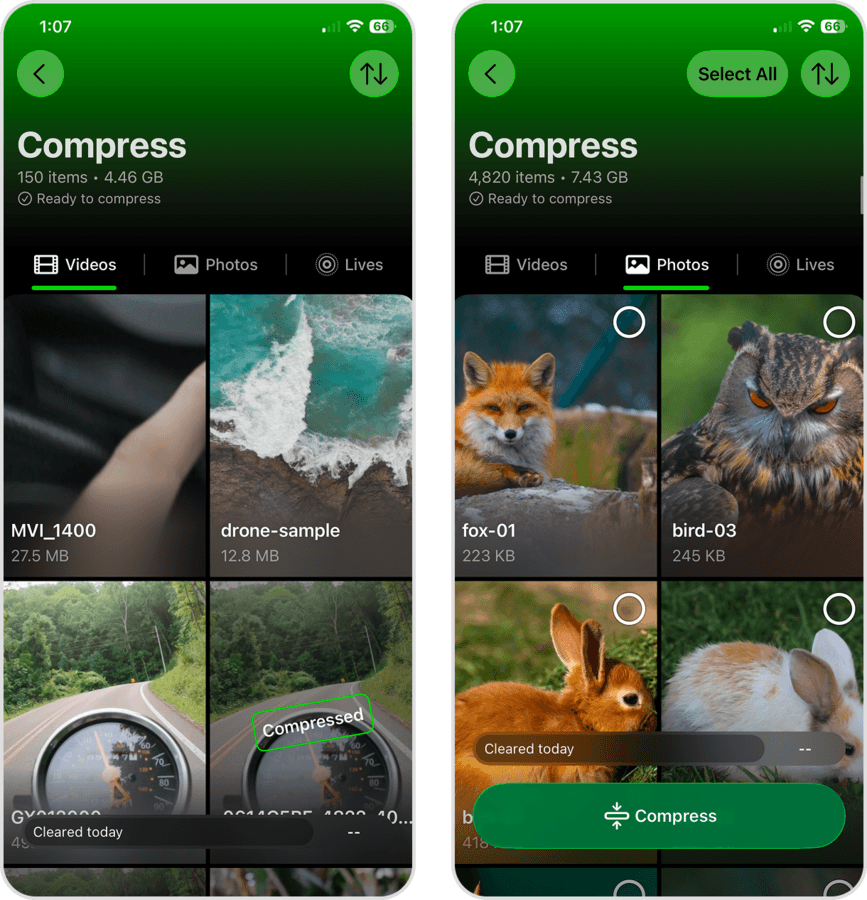
Photos and videos take up a huge amount of storage space, especially if you use high-resolution settings or advanced camera features. While you can clean up your library manually, we found that using a third-party app is significantly more convenient–especially if you have a lot of media on your device.
There are several apps you can choose from the App Store, but we’ll be featuring an app called Clever Cleaner for this guide. It doesn’t take up much storage space (in case you’re running out), and it has several powerful features that can help you delete a lot of large files and unwanted clutter without looking for them manually.
It can clean up similar and duplicate images, compress photos and videos (which reduce their file size), convert Live Photos to still images, and more. It also has a feature called Smart cleanup, which applies all these changes to your entire library at once–so you can instantly reclaim a lot of space with one tap. Its free features are more than enough for most users, and for anyone who wants to follow this guide.
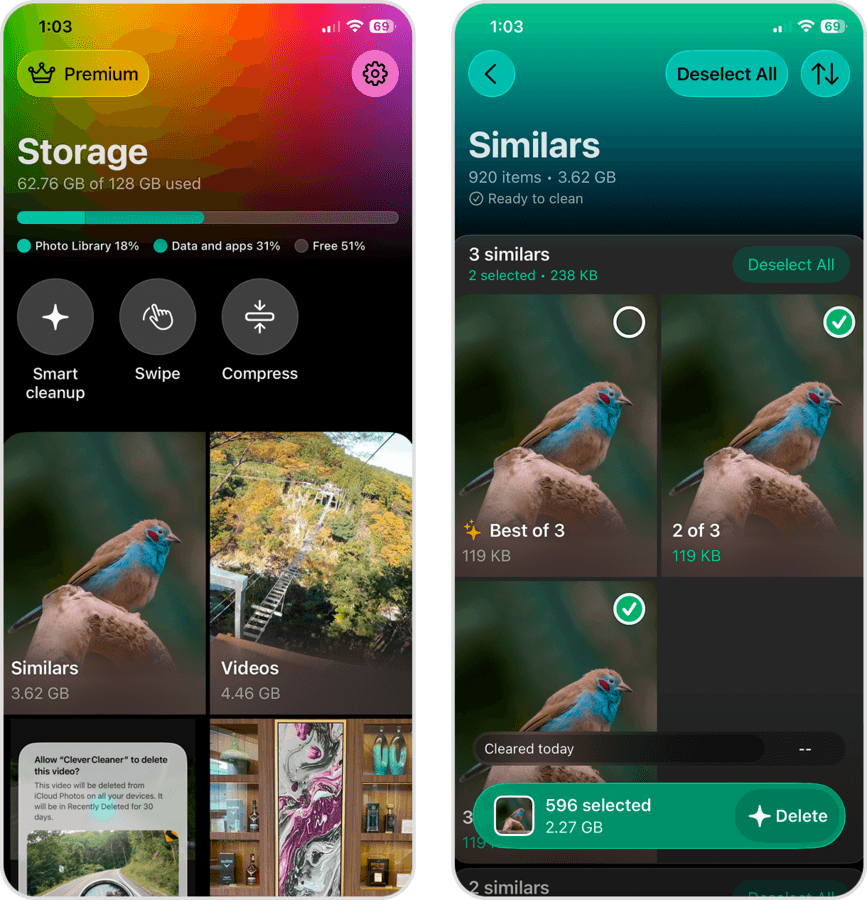
- Similars: Clever Cleaner compiles your similar and duplicate photos, then organizes them into groups. The “Best Shot” of each group is automatically chosen, while the rest are selected for deletion. You can delete them individually or all at once.
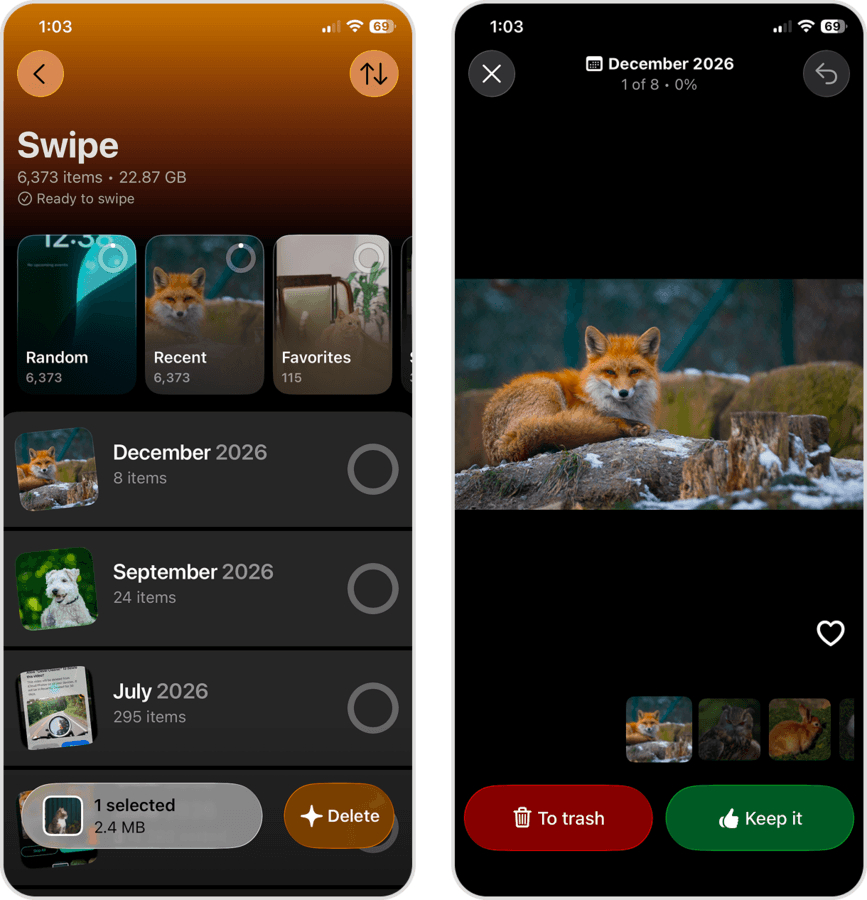
- Swipe: The swipe tool sorts your photos and videos into monthly albums that you can review. When you open a monthly album, you’re shown each photo and video individually, and you can use left and right swipe gestures to keep or delete them. Aside from the standalone Swipe tool, this feature is also available in the other cleaning modes.
- Videos: You can sort videos by size or date (which you can’t in the Photos app), and delete the oldest or largest videos first. The app can also compress videos, which reduces their file size in exchange for a slight loss in quality. Swipe mode is also available.
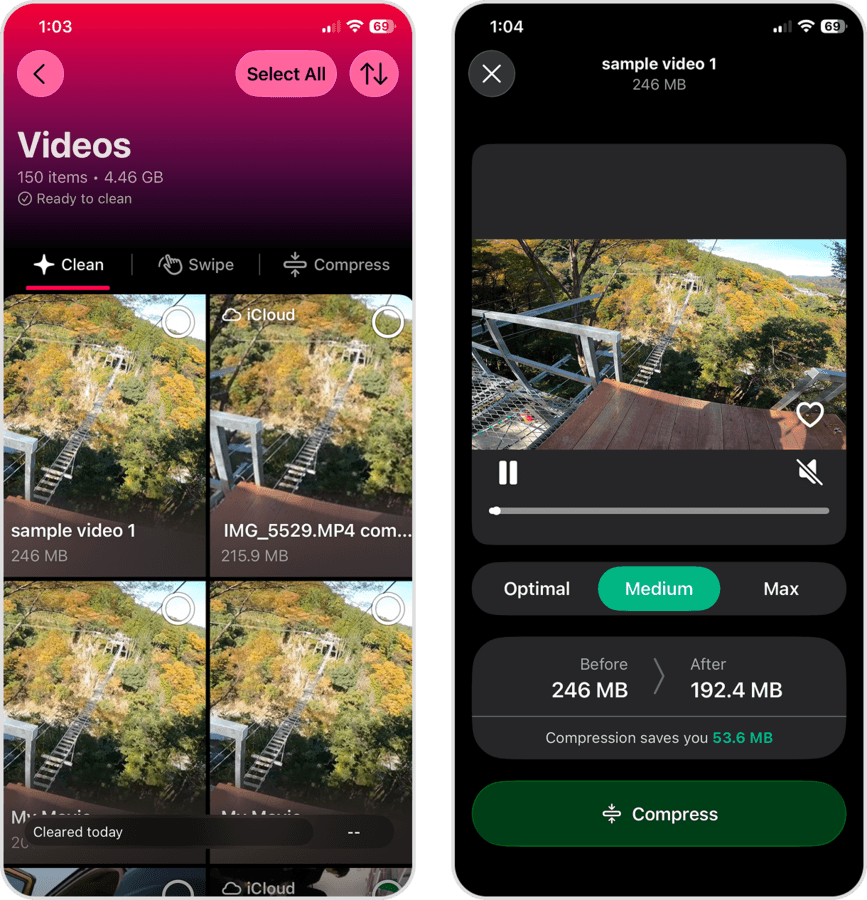
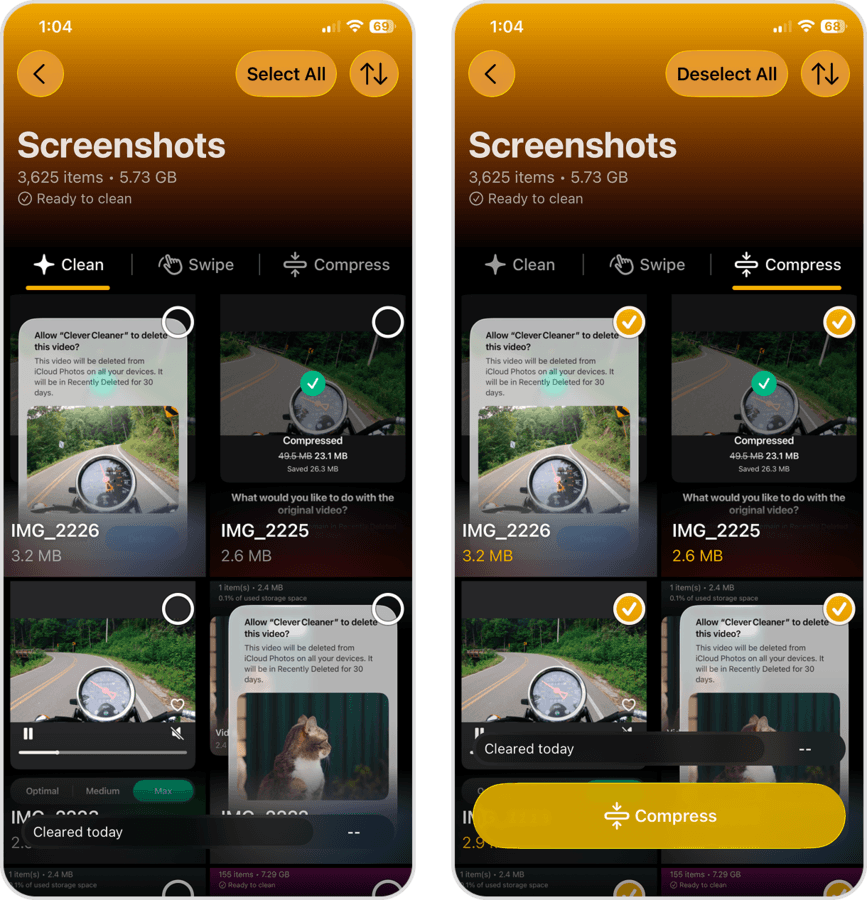
- Screenshots: All of your screenshots are compiled in the app, and you can delete them all at once, use the swipe feature to review them individually, or compress them (like videos, compression reduces a photo’s file size).
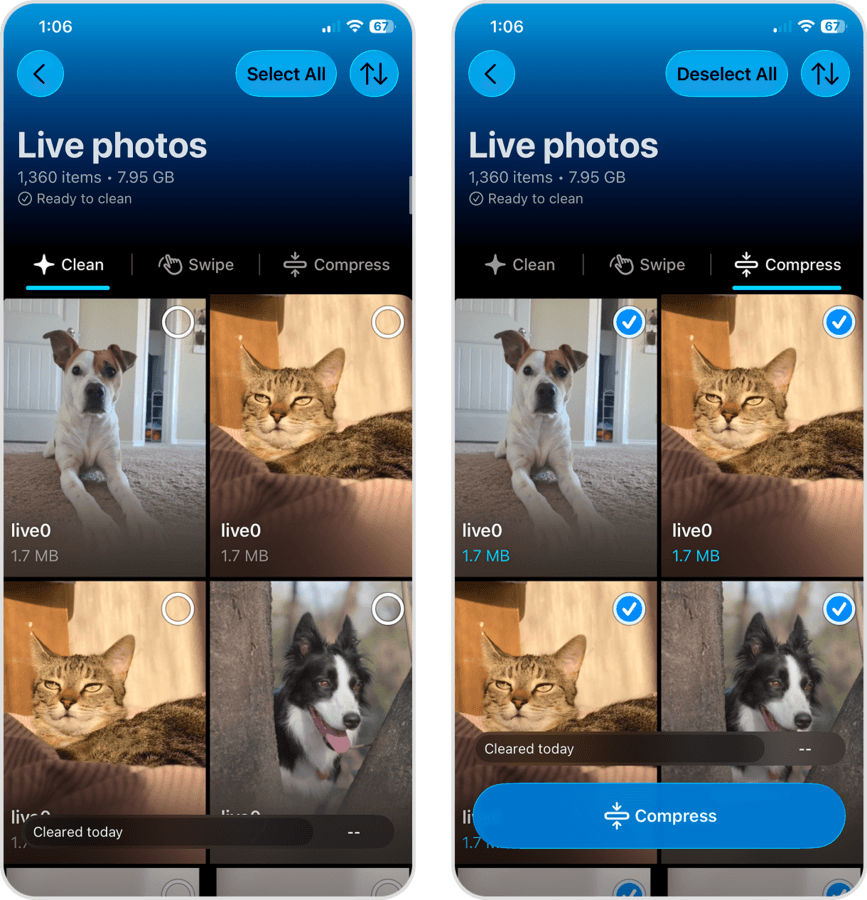
- Live photos: Similar to the screenshots tool, you can delete Live Photos (one by one or all at once), review and clean them with the swipe feature, and through compression (compressing a Live Photo converts it to a still image).
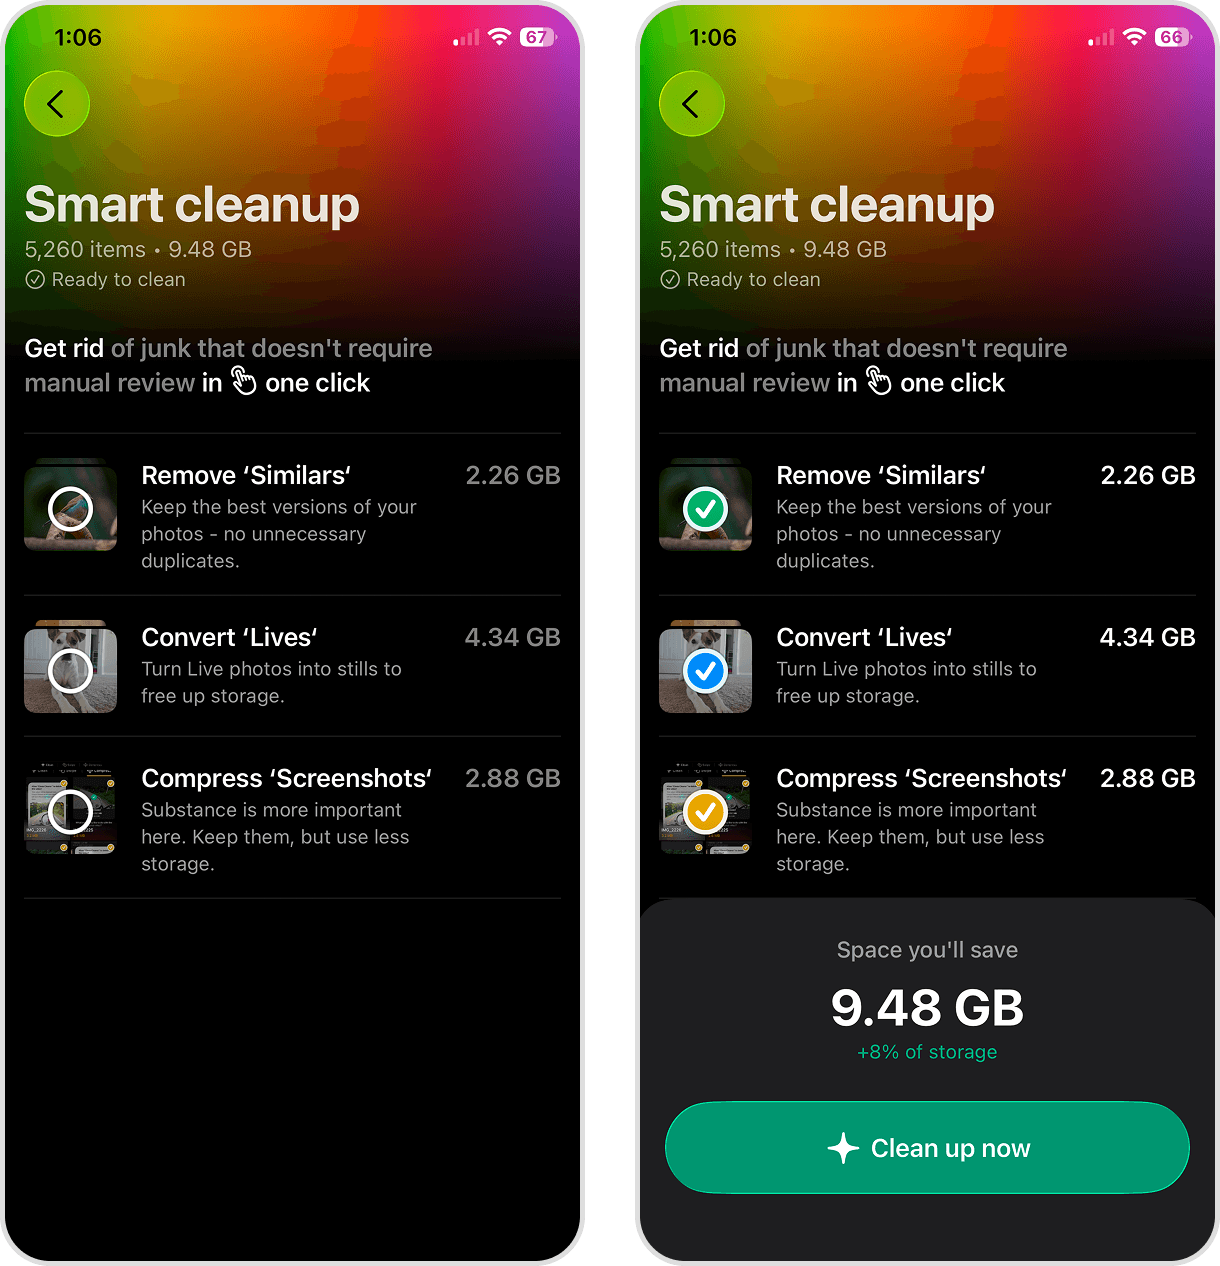
- Smart Cleanup: The Smart Cleanup feature compiles the biggest photo cleanup features in one page–you can use it to remove all similar photos, convert all Live Photos to still images, and compress all of your screenshots.
- Compress: You can compress videos (one by one), all photos, and all Live Photos from one location.
2. Deal With Unused and Large Apps
Apps are already large by themselves. But the real problem with keeping rarely used apps on your iPhone is that they can eventually take up much more storage space than their original download size. Over time, apps accumulate caches, downloaded content, temporary files, and other data–so if you don’t use an app often, we recommend just deleting it.
The easiest way to remove an app is to tap and hold its icon on your home screen and select Remove App (make sure to tap Delete App in the confirmation prompt).
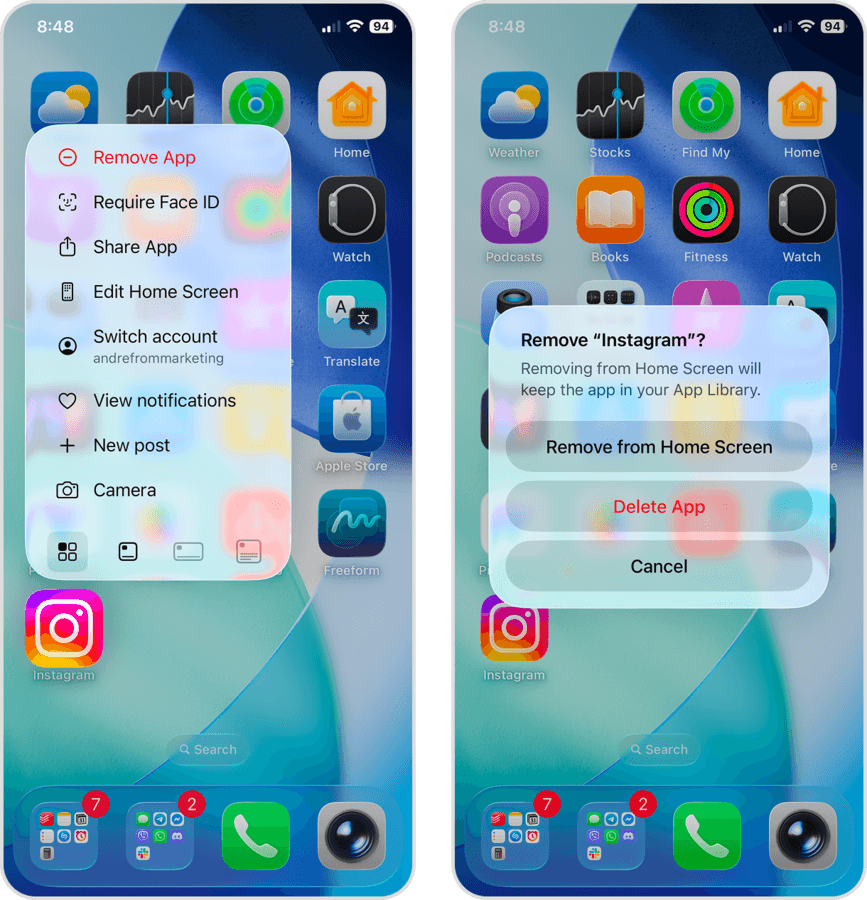
If you want to find out which apps take up the most storage space on your iPhone:
- Open the Settings app.
- Tap General.
- On the General page, select iPhone Storage.
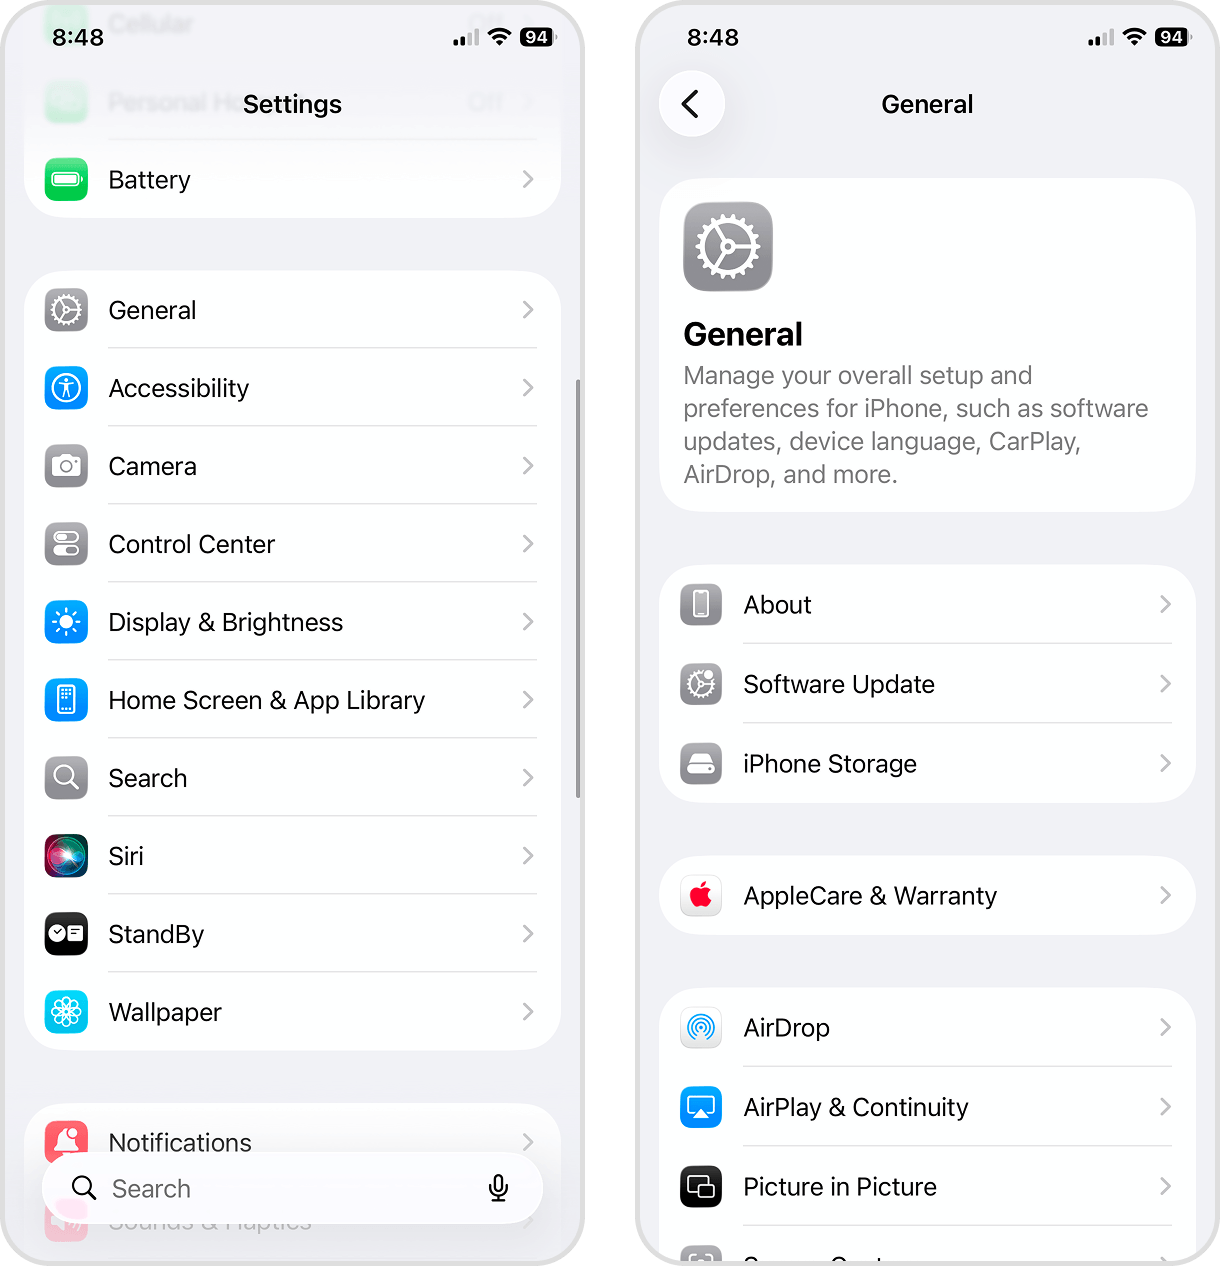
- Scroll down to the list of apps and note which ones take up the most space (you can sort them by size).
- If you select an app from the list, you can also choose to delete it from its Settings page.
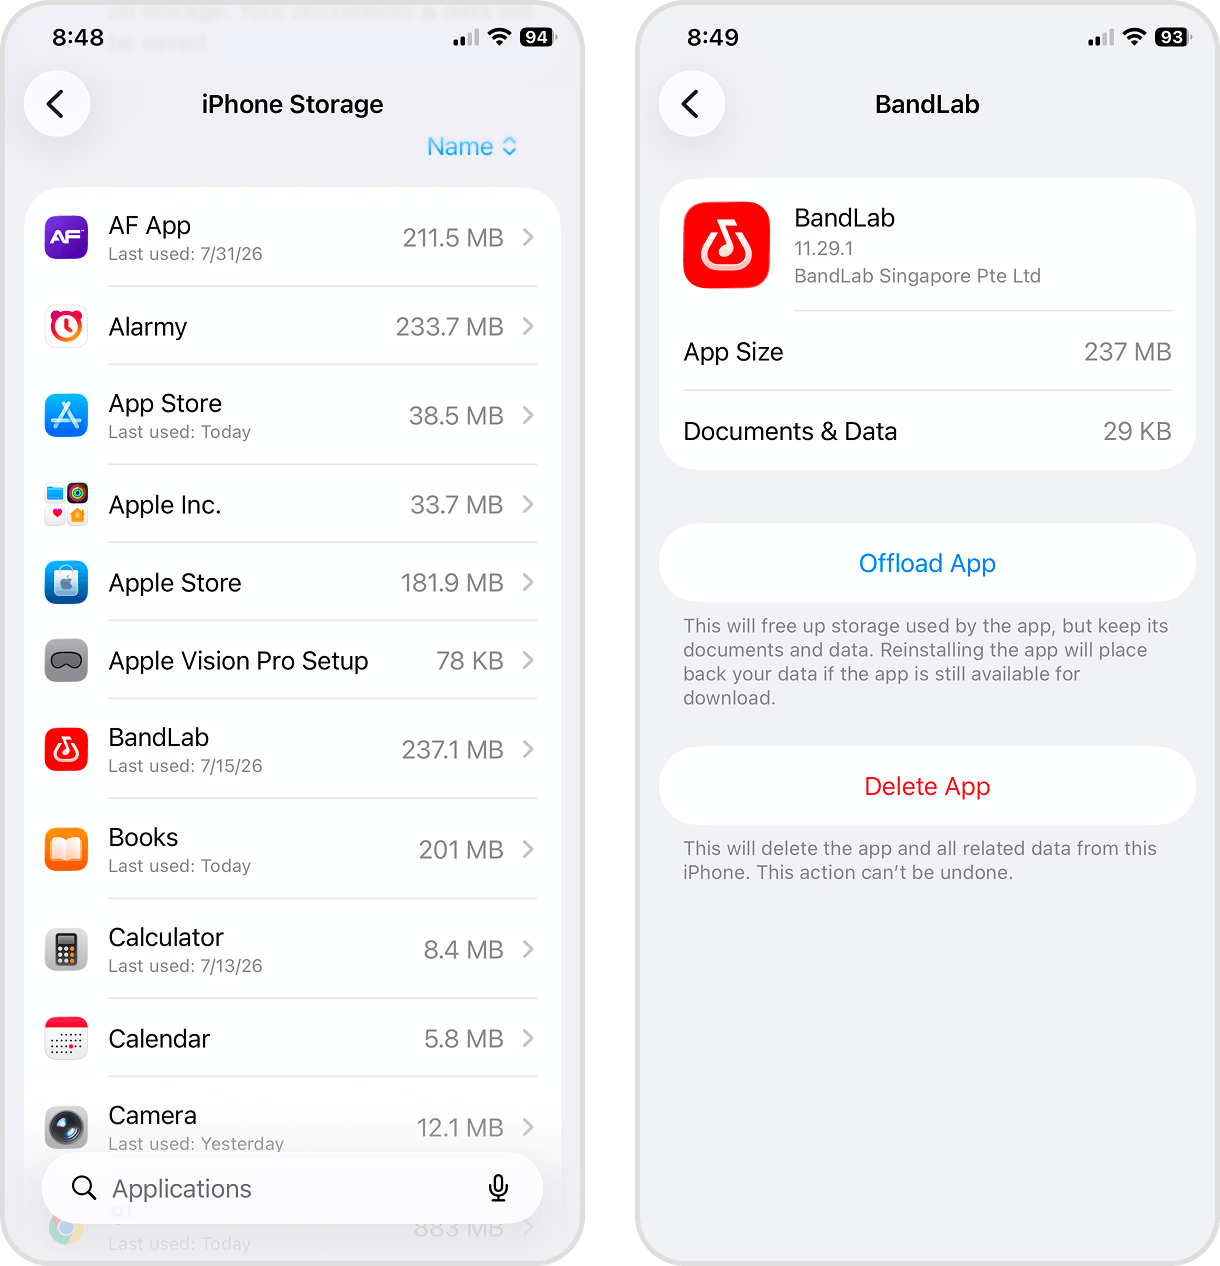
This is just a basic overview of app cleanup–you can still reclaim a lot more space. If you want to learn more about cleaning up your apps, including clearing app caches and removing offline downloads, check out our full guide on cleaning junk files on your iPhone.
3. Delete Old Conversations and Attachments
Photos and videos you receive as attachments in the Messages app are permanently saved in your iPhone’s local storage space by default. Since each attachment has a file size limit of 100 MB, they can add up quickly.
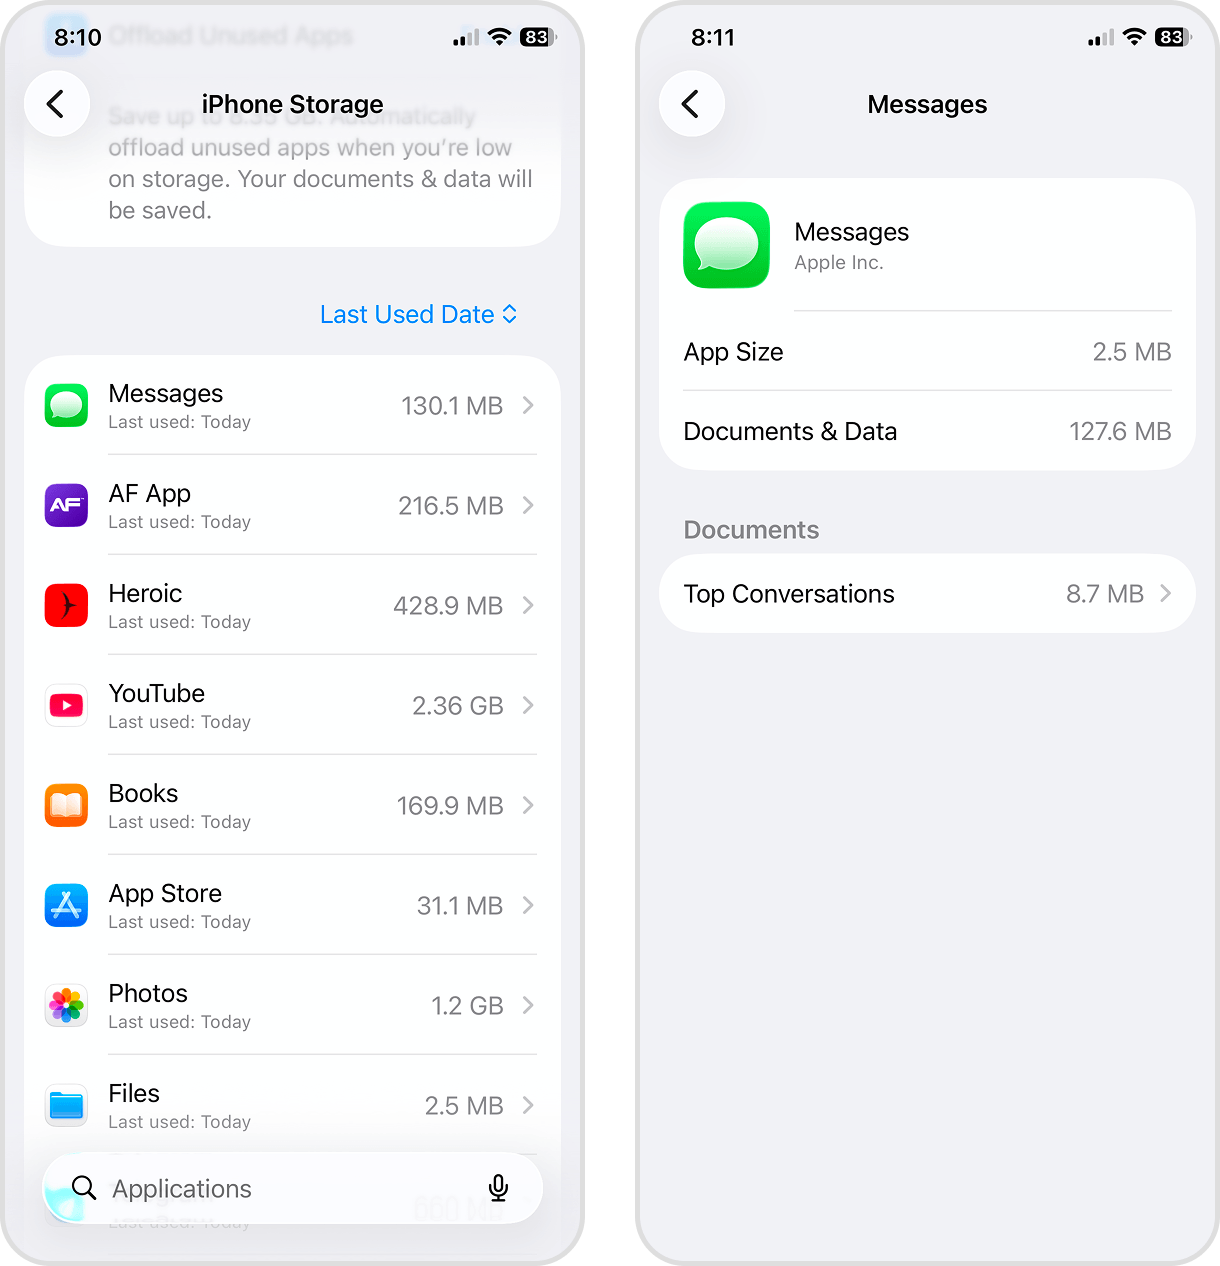
If you want to save your text messages, you can simply delete the attachments by tapping your contact’s icon in the conversation window and selecting Photos. But we’ll show you a faster way to remove the biggest attachments on your iPhone using the Settings app:
- Open the Settings app.
- Tap General.
- On the General page, select iPhone Storage.
- Scroll down to the list of apps and select Messages.
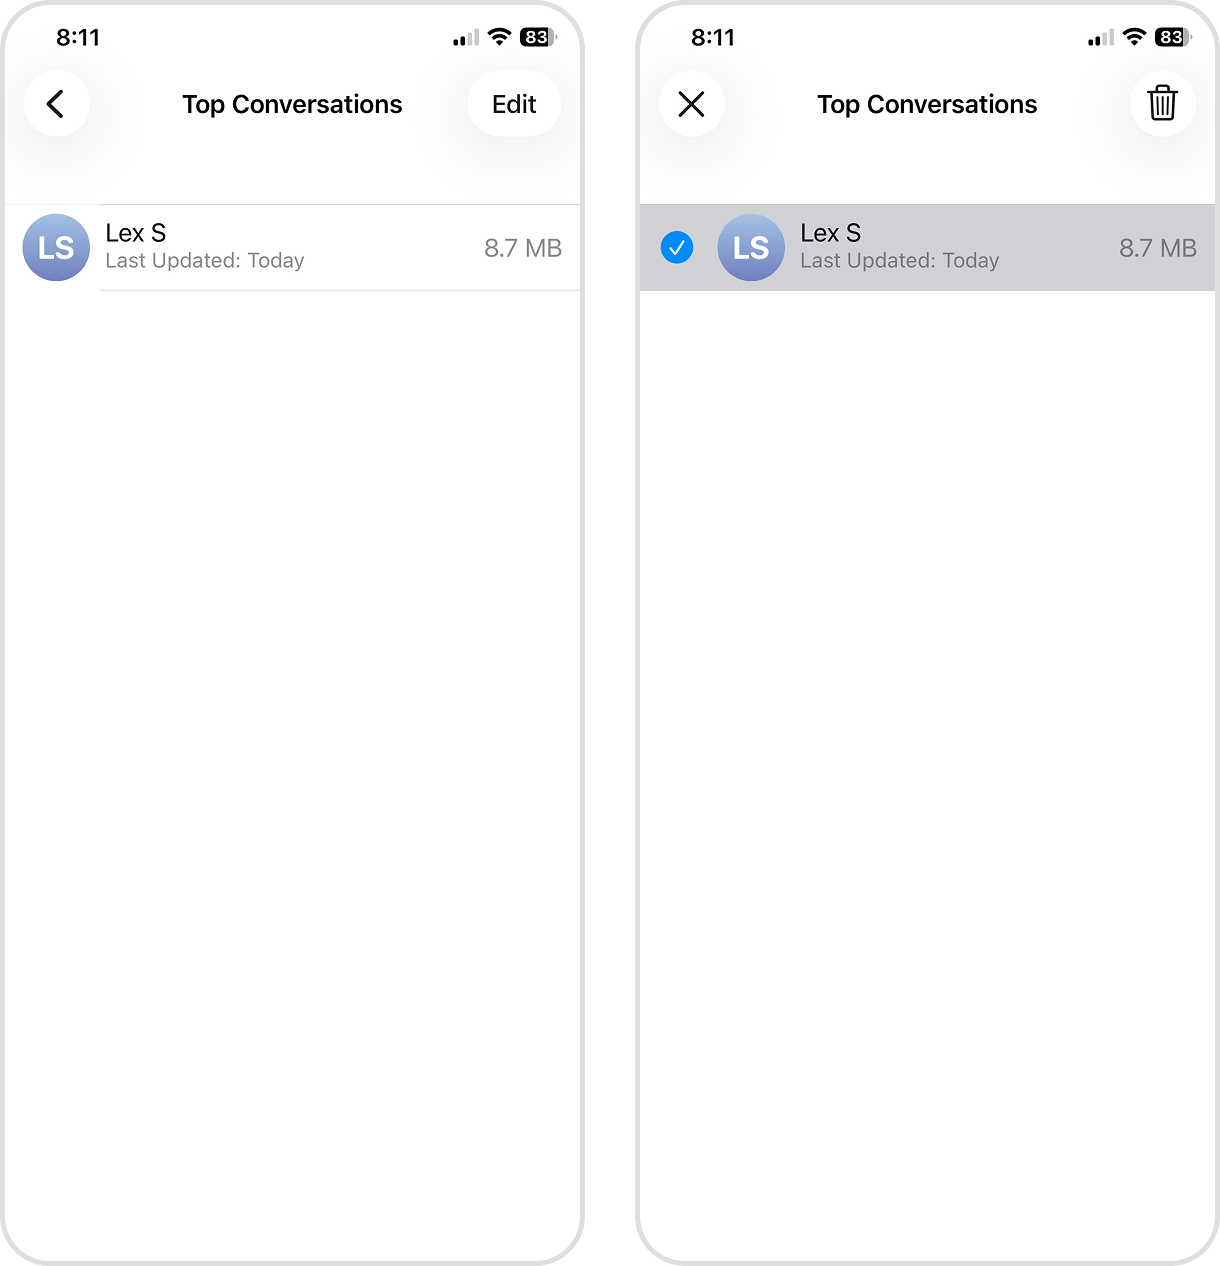
- Select the Top Conversations you want to review.
- Tap Edit in the top right corner of the screen.
- Finally, select the attachments you want to remove and tap the trash icon 🗑️.
Don’t need the actual text messages? You can delete entire conversations instead (which also deletes their attachments). You even have the option to automate this process by changing your iPhone’s message retention settings to 30 days or 1 year (Settings > Apps > Messages > Message History).
4. Try to Reduce System Data
System data is made up of a variety of files that iOS needs to operate. This storage category tends to fluctuate in size, even while you use it normally throughout the week. Most users report a typical range that caps at about 20 GB–if yours is even bigger (30+ GB), it might be worth looking into. Here’s how to check your System Data’s size:
- Open the Settings app.
- Tap General.
- Select iPhone Storage.
- Scroll down to the very bottom of the page, after the list of apps. Below it, you’ll find your device’s System Data.
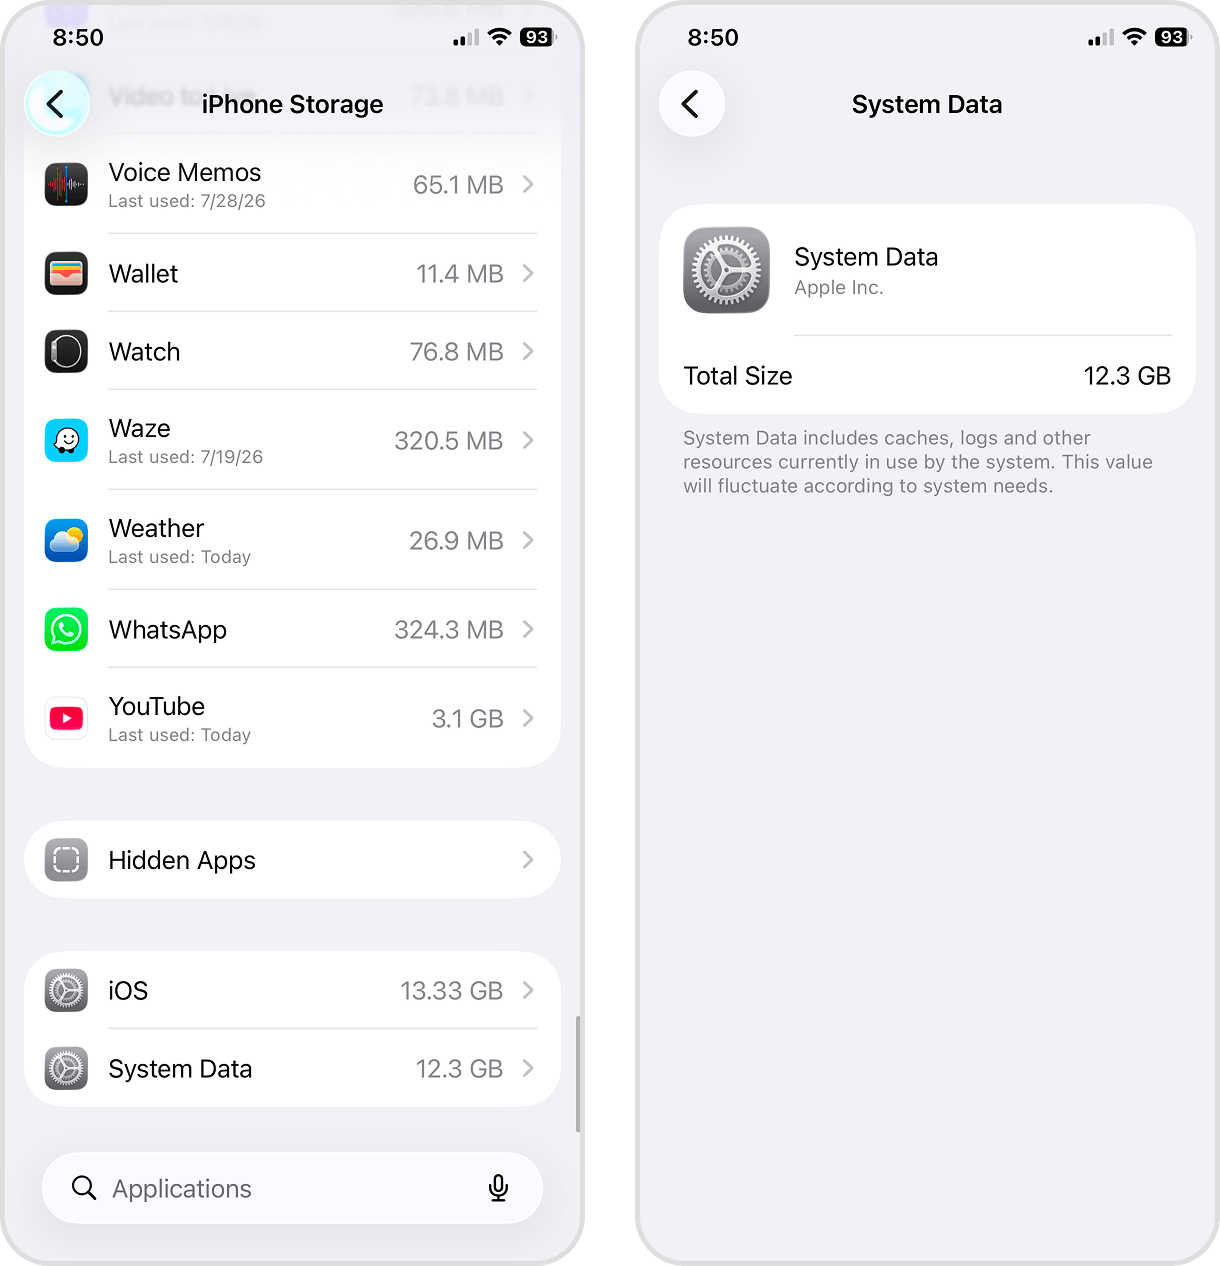
Unfortunately, Apple doesn’t provide users with any direct way to manage System Data, and there’s no indication of what it actually contains. But there are several workarounds that users have tried that reduced the System Data category on their devices–if you’re interested in trying these methods yourself, see our guide on clearing system storage on your iPhone.
Conclusion
Here’s a brief recap of our guide’s key takeaways in case your iPhone storage keeps filling up after deleting:
- Reboot your iPhone, which should prompt the system to recalculate device storage and resolve any potential bugs affecting photo deletion.
- Before anything else, make sure you’ve emptied the Recently Deleted folder. We showed you how it works for the Photos app, but check other apps too (e.g., Voice Memos, Mail, etc.).
- If the previous methods don’t work, erase your iPhone as a last resort.
- After fixing the storage bug, free up space on your device ASAP. Start with deleting unwanted photos and videos, then delete (or reinstall) old apps. If you receive a lot of attachments, cleaning your messages will also help significantly.
But more than troubleshooting and cleanup tips, the best way to maintain your device storage and keep it running optimally is to actively monitor your iPhone and set up a regular cleanup routine. Apps like Clever Cleaner can make this easier, especially if you constantly generate new videos and images. Aside from photos, check other space-consuming categories, like apps, messages, and downloaded files via the iPhone Storage page.
We recommend keeping (roughly) 20 GB of free space when possible, so iOS has enough room for updates, temporary files, and other system processes it needs to operate smoothly.
FAQ
There are several possible reasons why your iPhone storage isn’t decreasing after cleanup:
- You haven’t cleared the Recently Deleted album. See the Photos app > Collections > Utilities > Recently Deleted, and delete its contents.
- iOS hasn’t recalculated your iPhone’s storage space yet. Charge your iPhone, lock the screen, and leave it alone for an hour.
- The system is experiencing a bug. First, restart your iPhone and observe. If an iOS update is available, download it. If nothing works, factory-reset your iPhone.
Yes! iOS updates have often caused storage bugs–the most common issues affect how your iPhone’s system indexes its files and calculates its storage allocation. To resolve a system-related storage issue, try updating iOS again (if available), restarting your iPhone, or performing a factory reset. Just don’t forget to back up your data.
Apple suggests maintaining at least 1 GB of free space to keep it running smoothly, but we recommend freeing up at least 20 GB of storage. This gives you enough elbow room to manage and clean up your device before it starts to lag or throw errors, and it ensures iOS has space for updates, temporary files, caches, and other system data it needs to operate.
Here are the 5 most impactful ways to keep your iPhone storage optimized for the long term:
- Use iCloud’s Optimize iPhone Storage feature for Photos (Settings app > Apple ID > iCloud > Photos).
- Change message retention settings (Settings app > Apps > Messages > Message History). This already removes old attachments.
- Enable automatic app offloading (Settings app > Apps > App Store > Offload Unused Apps).
- Update iOS regularly.
- Routinely clean up your photo library. If you regularly take a lot of photos and videos, we recommend using a third-party cleaning app.
