If you have an external drive that suddenly won’t mount on your Mac, this could happen for a number of reasons. It’s possible that the disk is malfunctioning, or that your computer isn’t recognizing it properly. Sometimes a simple reboot of your machine is enough to fix the issue. When an external hard drive won’t mount on a Mac, there are several approaches you can take to the problem.
Common Situations Where Your External Hard Drive Might Not Mount on a Mac
There are several possible errors that can cause your drive to not mount properly on a Mac (or even show up in Disk Utility). However, before anything else, if your drive at least appears in Disk Utility, push back the diagnosis step and go straight to the data recovery section (if the files on your drive are important). Recovering data from corrupted hard drives is a #1 priority, because even the simplest fixes can cause data loss as a side effect.
Once your files have been recovered and backed up somewhere safe, the next step is to properly diagnose your drive and apply the appropriate solutions. To help you speed up the process (and cut down on confusion), we created a simple troubleshooting matrix that you’ll find below.
In the right-most column, we wrote down the exact steps you should take, based on the information in the other columns. Each step is a link that will take you to one of the sections in this guide.
| Drive Status | Possible Causes | Recommended Solutions |
| Drive is completely missing from Disk Utility | Cable or port failure, lack of power |
|
| Drive is shown in Disk Utility, but won’t mount | File system corruption, partition table damage, lost or missing partitions (due to improper ejection, power surges, and other read/write interruptions) | |
| Drive is missing from Disk Utility and is making mechanical noises (clicking, grinding, etc.) | Physical damage |
|
How to Recover Data from an External Disk That Isn’t Mounting on a Mac
Before attempting any fixes on a drive that won’t mount, you should recover all valuable data because some troubleshooting methods can potentially alter data on your drive and one method in particular (formatting) will completely erase it. Since the disk won’t mount properly, you need to recover your data using specialized software.
Method #1: Use Data Recovery Software
Even though macOS can’t access the external drive that won’t mount normally, your files often remain intact on it—you just need specialized software to reach them by bypassing the standard mounting mechanism and reading data directly from the drive.
Here’s how to recover data from an external that is not mounting on a Mac:
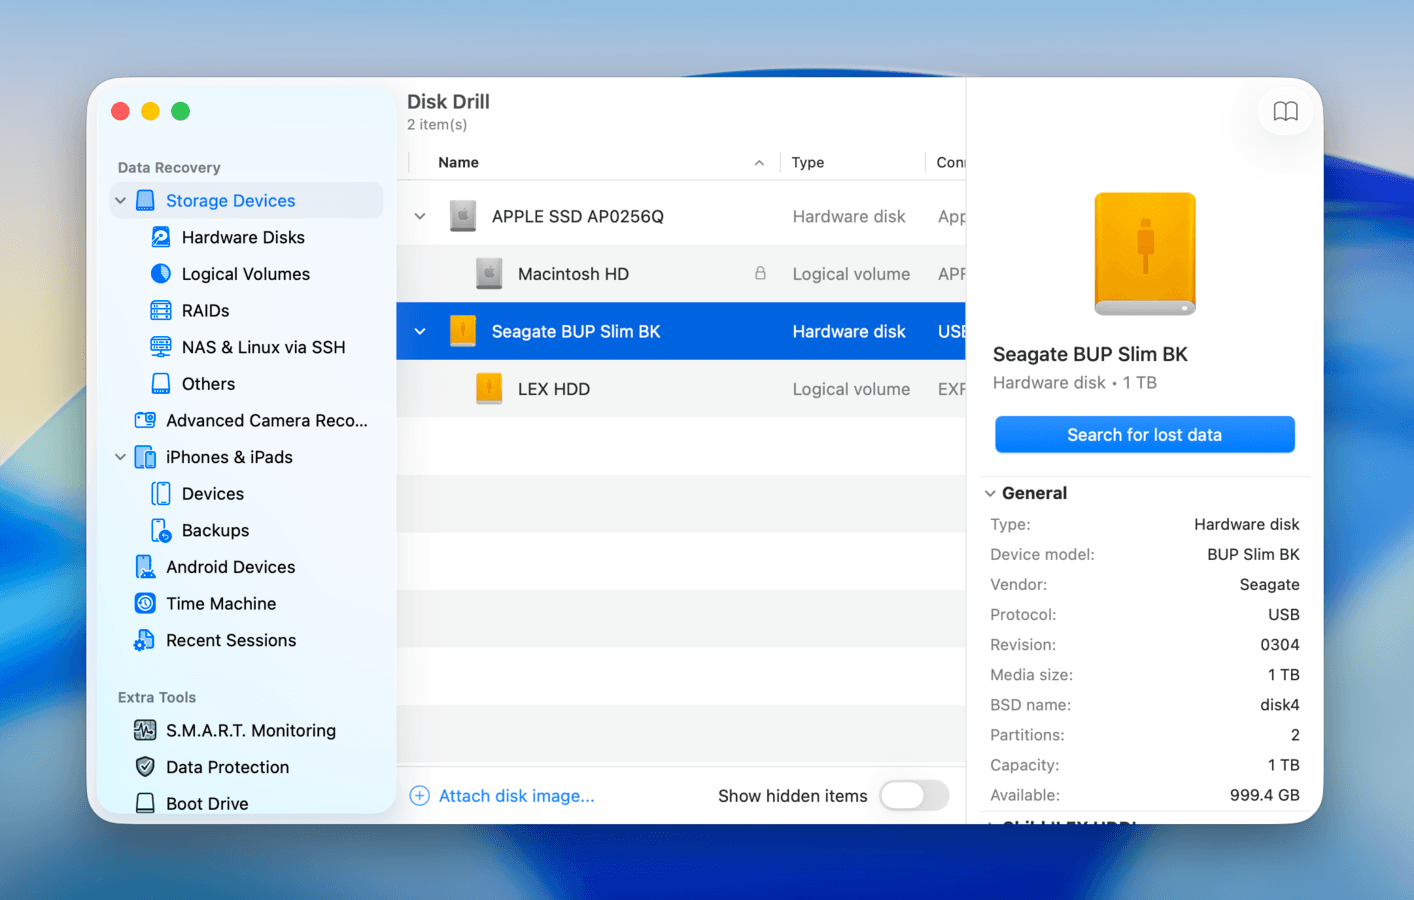
- Download and install Disk Drill from the official website. Make sure you have enough storage on your Mac for the recovered files, since they’ll be saved locally. Alternatively, connect another external drive to your Mac to store the files in case you run out of space.
- Launch Disk Drill and locate your unmounted external drive in the main drive list. If it doesn’t appear, fix it using the methods in the troubleshooting section of this guide (step 1 is checking physical connections, like ports and cables), Then, return to this section once your data is secured.
- Select your drive from the source list. Then, click Search for lost data. A pop-up may appear, prompting you to choose a scan type–select Universal scan for now (if any recovered videos become unplayable, scan it again with Advanced camera recovery after securing the rest of your files).
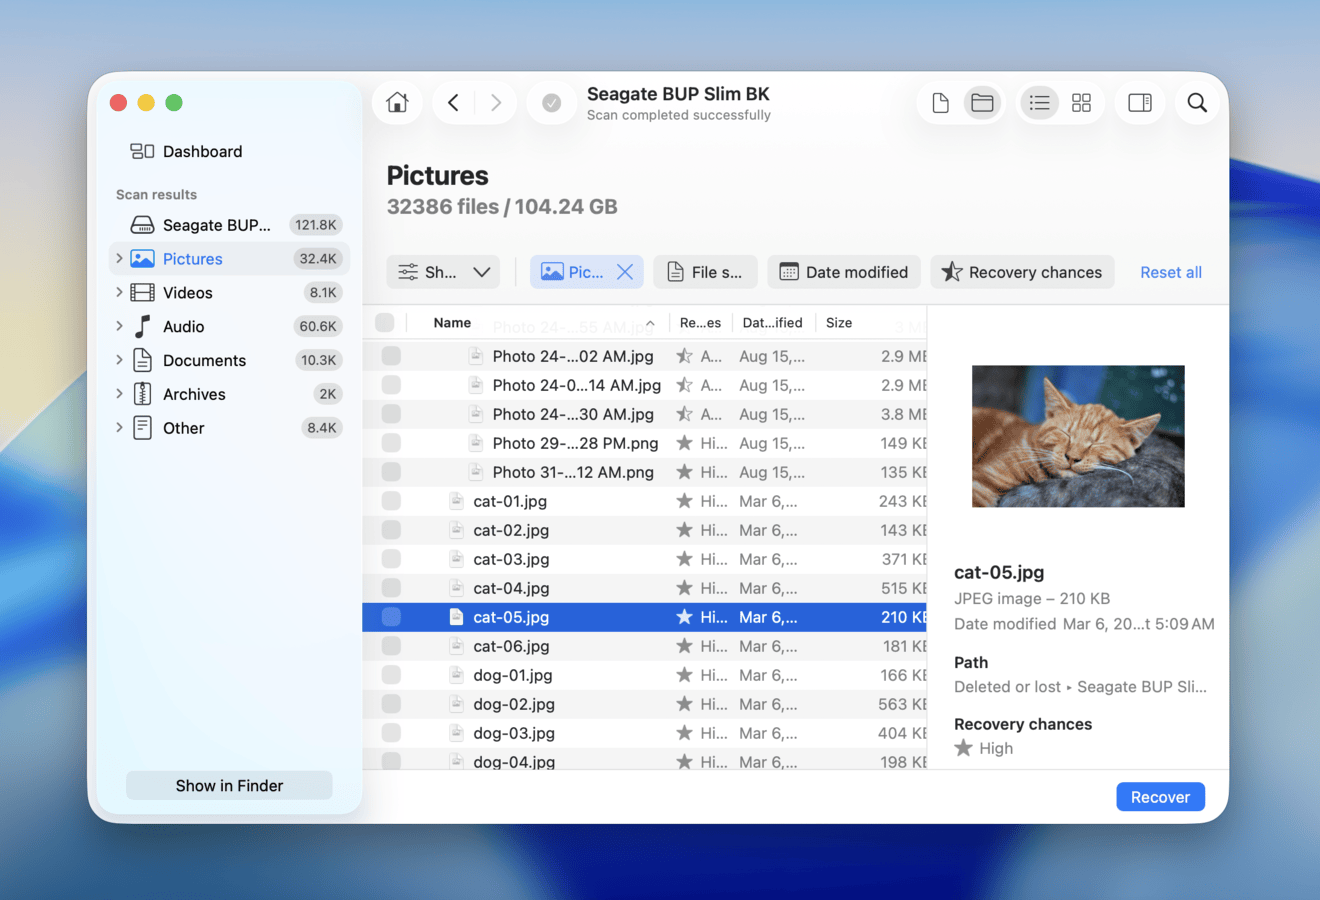
- Either wait for the scan to finish completely and click Review found items and let it continue in the background. Then, go through the scan results and select all files you want to recover from your external drive. Use Disk Drill’s file format filters, search bar, and preview feature to help you select what you’re looking for.
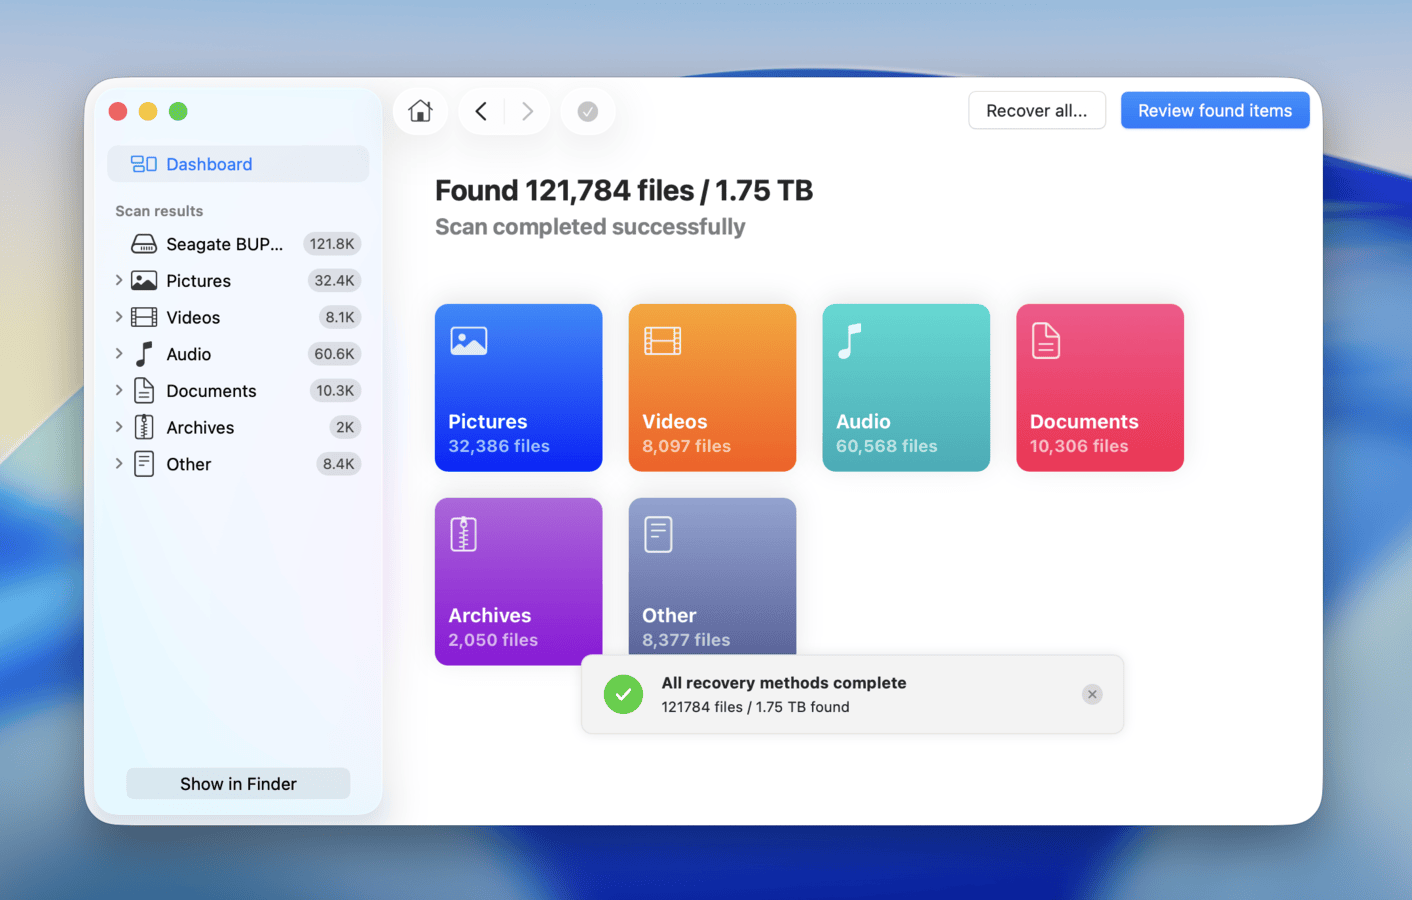
- Once you locate your files, we recommend clicking each of them once to verify if they can be previewed; previewing files lets you verify their recoverability before committing to a Pro license. After previewing your data, select the files you want to restore, then click the Recover button.
After recovering your important files, you can proceed with other repair methods without risking data loss.
Method #2: Contact Data Recovery Service
When data recovery software can’t detect your drive or fails to recover files, it often indicates a more serious problem that requires professional intervention. While software solutions work well for logical issues like deleted files or corrupted file systems, they can’t help with physical drive damage—and attempting to use them on a physically failing drive might actually make things worse.
Common signs of a physically failing external hard drive include:
- Clicking, grinding, or whirring sounds that you haven’t heard before
- The drive repeatedly disconnects and reconnects to your Mac without you touching it
- Your Mac freezes temporarily every time you try to access the drive
- The drive not spin up at all when powered on
- Unusual burning or electronic smells coming from the drive
However, Mac drives can fail and become dead without showing any obvious symptoms, which is why reputable data recovery centers offer free initial evaluations.
For instance, the Cleverfiles Data Recovery Center provides comprehensive drive diagnostics at no cost and operates on a “no data, no fee” basis—you only pay if they successfully recover your files. Their clean room facility and specialized equipment allow them to handle even severely damaged drives that software solutions can’t help with.
How to Fix Your External Hard Drive Not Mounting on a Mac
If you’ve successfully recovered your data, or you were unable to perform recovery because your drive wouldn’t mount, the next step is to repair your drive. In this section, we’ll demonstrate 8 different ways to fix a hard drive that won’t mount on a Mac. Each guide is accompanied by screenshots (where applicable), as well as step-by-step instructions.
Method #1: Check Your Connections
The physical hardware in charge of your drive’s connection to your Mac is critical–if even one component fails, it can prevent your drive from mounting on your Mac or even showing up in the file system. Here’s a simple step-by-step guide that you can follow to systematically rule out any faulty connections.
- Keep your Mac plugged into a power outlet to ensure that it has enough power to route to your external drive.
- Disconnect all other devices from your Mac–they also use up power that could otherwise be routed to your drive.
- Try different USB cables, ports, and hubs. These mechanical components can wear out over time, contributing to the connection’s instability.
- If the above still don’t result in a successful connection, try connecting your drive to another Mac (if available). This can help verify that your drive is the sole failure point and that it makes sense to proceed with the other methods on this list.
Method #2: Confirm the Partition Isn’t Mounted
If you haven’t done so already, then your first step should be to confirm that the problematic partition is really not mounted on your Mac (as opposed to simply not being accessible, for example).
A key thing here to remember is that you can’t mount an entire drive—only its partitions or APFS containers can be mounted by following these steps:
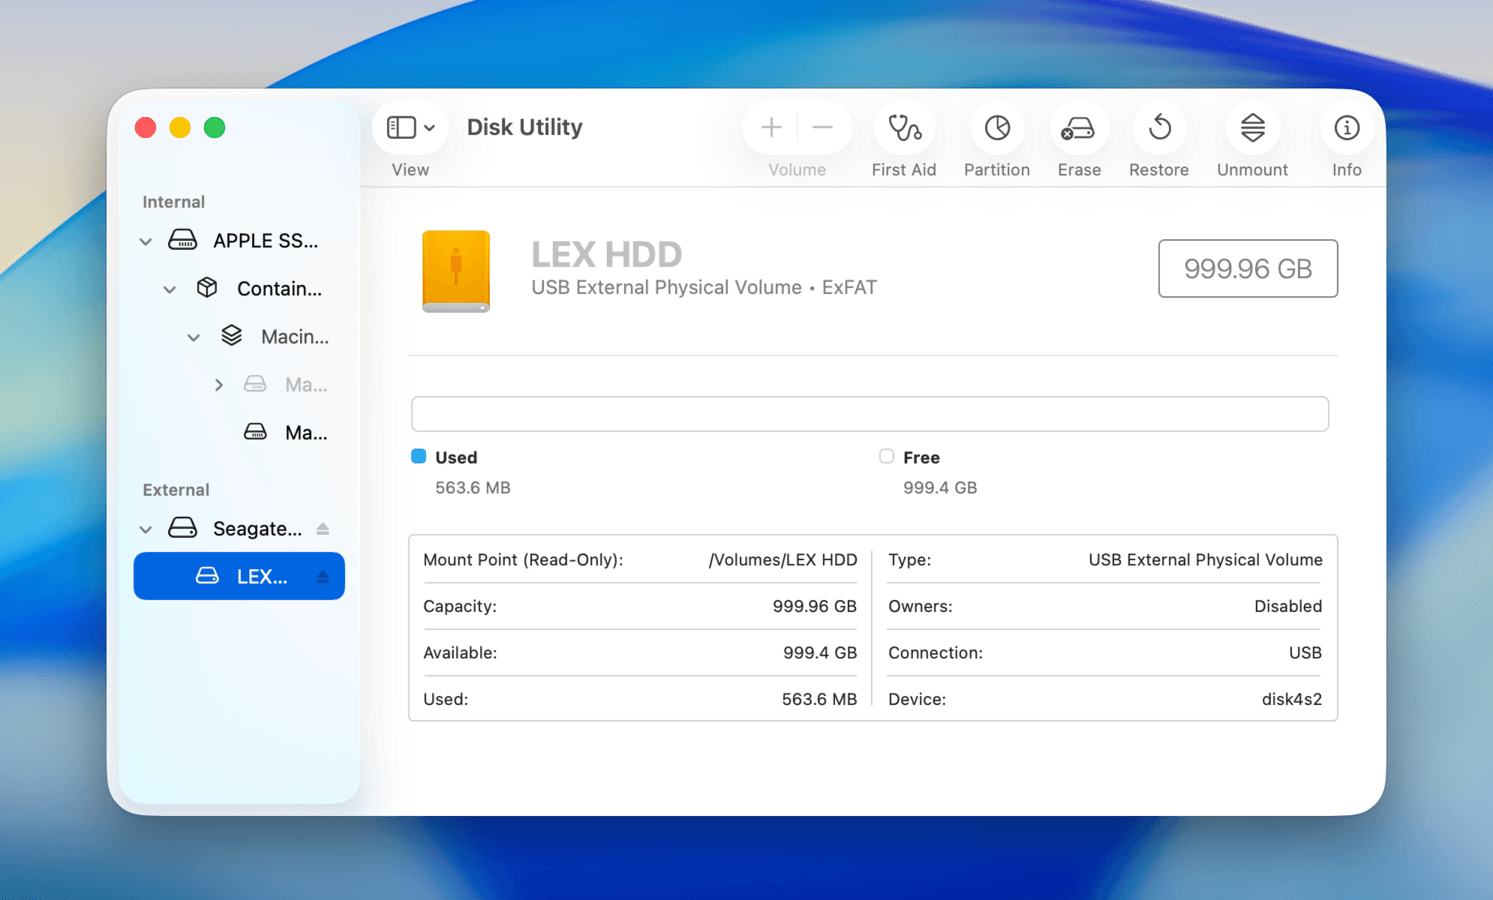
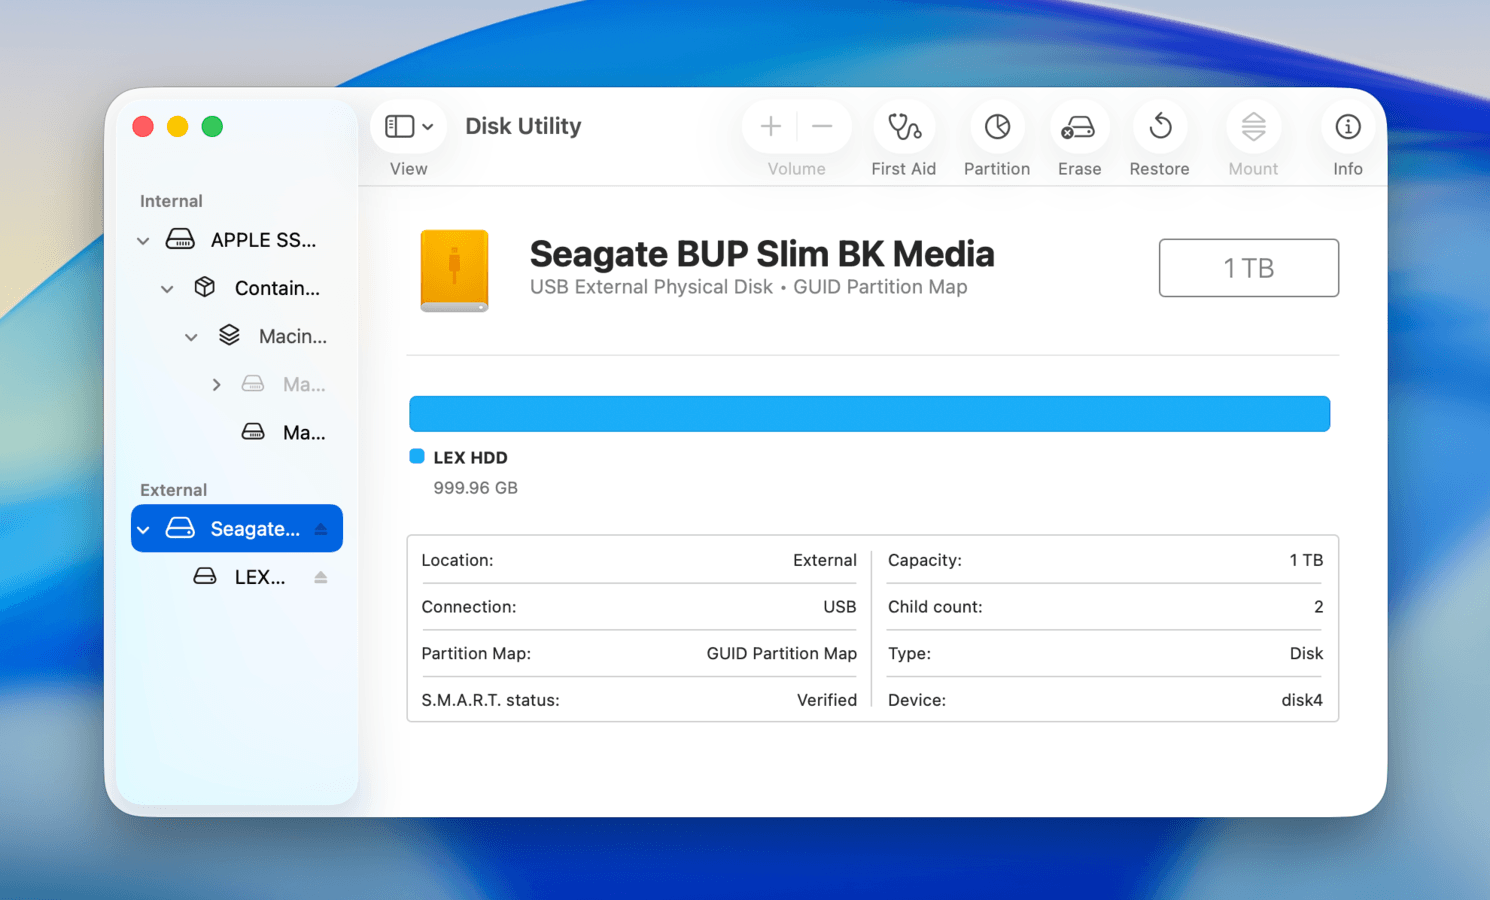
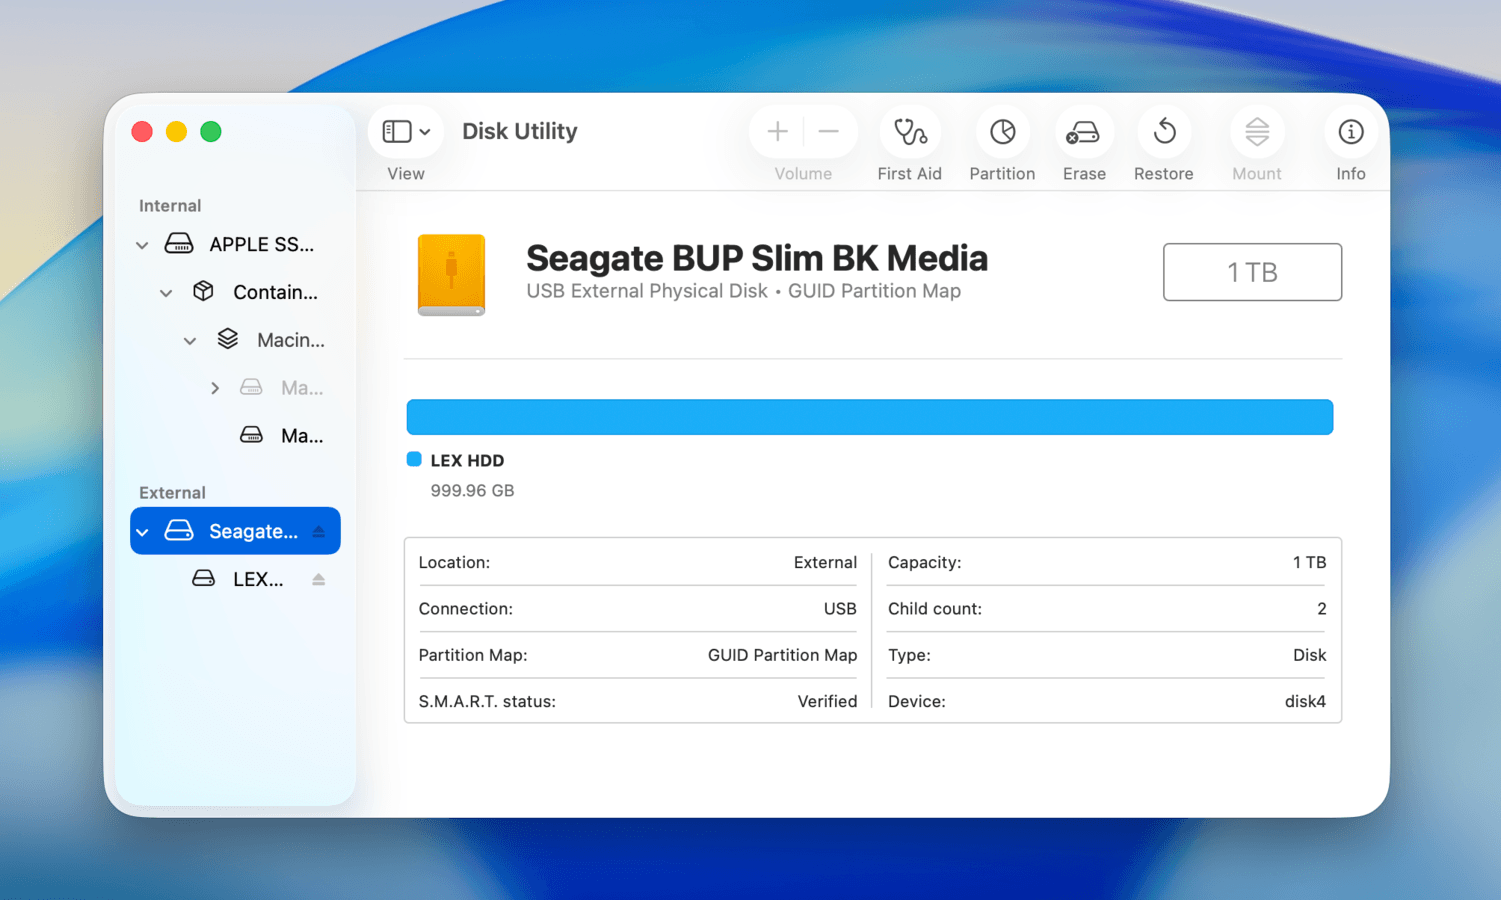
- Open Disk Utility (you can find it in Applications > Utilities) and locate your external drive.
- Click the View button in the toolbar and select Show All Devices.
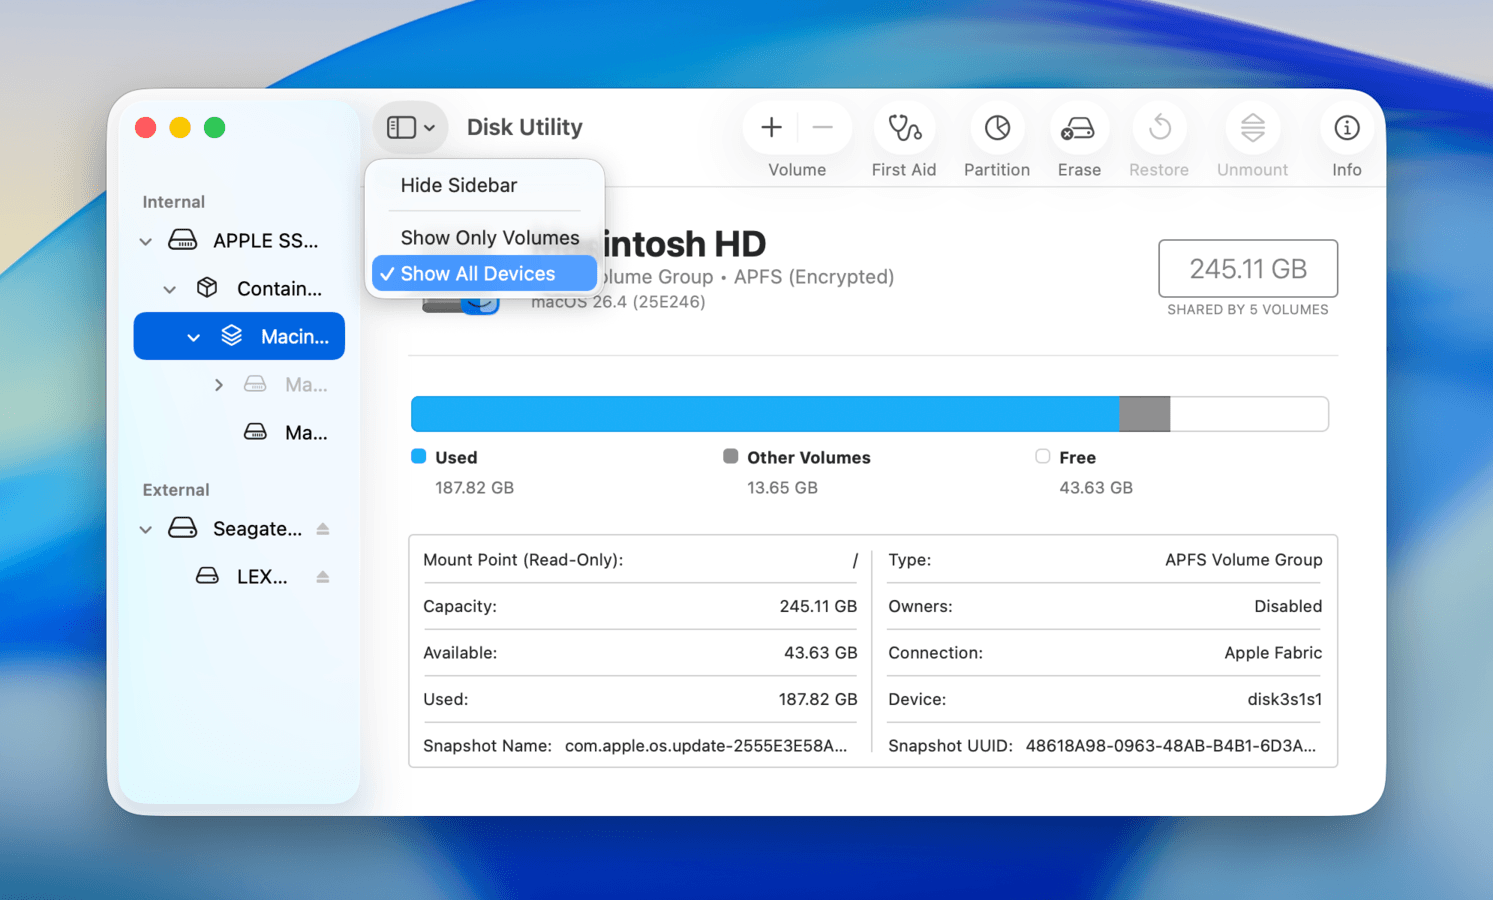
- Expand your drive in the sidebar to see all partitions and APFS containers by clicking the little triangle icon next to it (the disclosure triangle, as per Apple’s terminology).
- Select the partition or APFS container you want to mount—not the parent drive (!). The Mount button will only be active when you select a partition or container.
- If the partition isn’t mounted, then you will see a Mount button in the toolbar and you can click it to verify that it really can’t be mounted manually. If you see an Unmount button, it means the partition is actually mounted already.
If you can’t see any partitions under your drive, then it probably means that the partition doesn’t exist, the drive has no partition table (RAW drive), or the partition table is damaged. In that case, you can skip the next fix because it won’t help you. It could also mean that the drive isn’t connected properly to your Mac, so I strongly recommend you check if both the data and power cables are securely connected and not damaged. Also, don’t forget to try a different port. It could also mean the partition has somehow gone missing, and you need to recover it by following Method 6.
Method #3: Restart Your Mac and Attempt to Mount the Drive Again
Another simple fix that works surprisingly often is to just restart your computer. Sometimes things can get stuck behind the scenes in non-obvious ways, and the only way to fix the problem is to give your Mac a reboot by following these steps:
- Close all open applications and save your work if you have anything important open. If possible, eject all other external drives properly
- Click the Apple menu in the top-left corner and choose the Restart option.
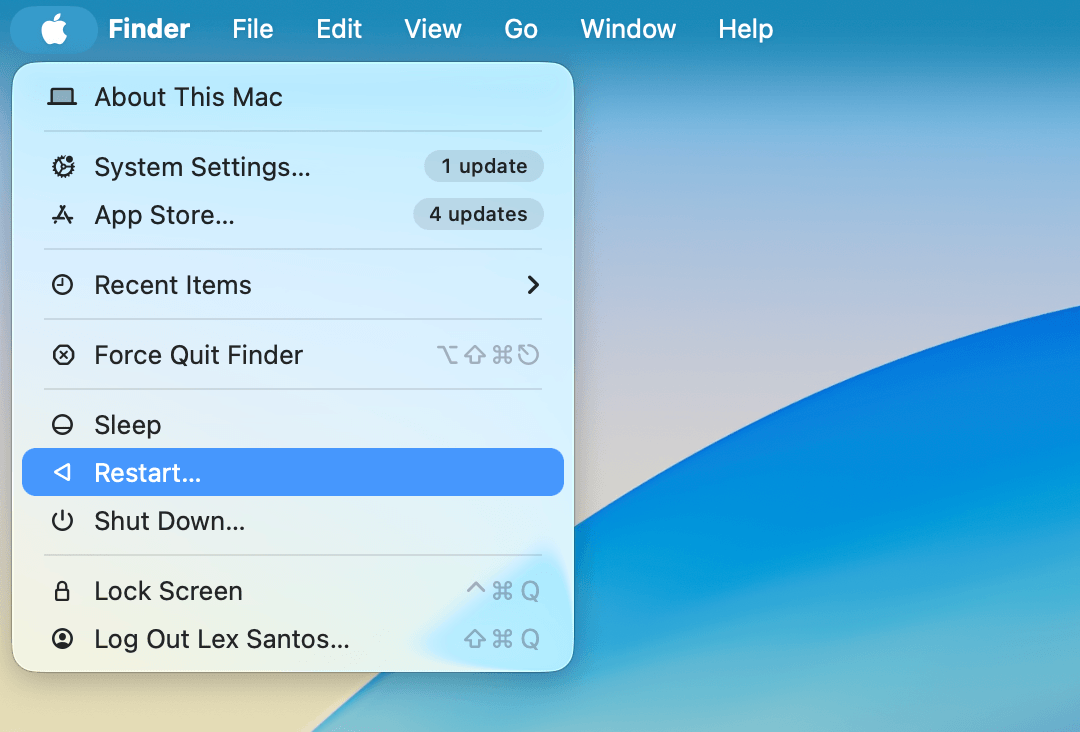
- Uncheck Reopen windows when logging back in for a cleaner restart.
- Click Restart again to confirm.
- Wait for your Mac to restart.
After your Mac restarts, you should wait about 30 seconds for all system processes and background applications to initialize. Then connect your drive again and attempt to mount it by following instructions in Method 2. If the drive still won’t mount after trying these steps, proceed to the next method.
Method #4: Use Disk Utility’s First Aid Tool
Disk Utility has another option for fixing a drive that isn’t mounting on Mac or won’t show up: the First Aid tool. The purpose of this tool is to diagnose and repair common disk errors that might be preventing your drive from mounting properly, and it’s as easy to use as the rest of Disk Utility:
- Open Disk Utility (Applications > Utilities).
- Locate your external drive in the sidebar and select it.
- Click the First Aid button in the toolbar.
- Click Run to begin the verification and repair process when prompted.
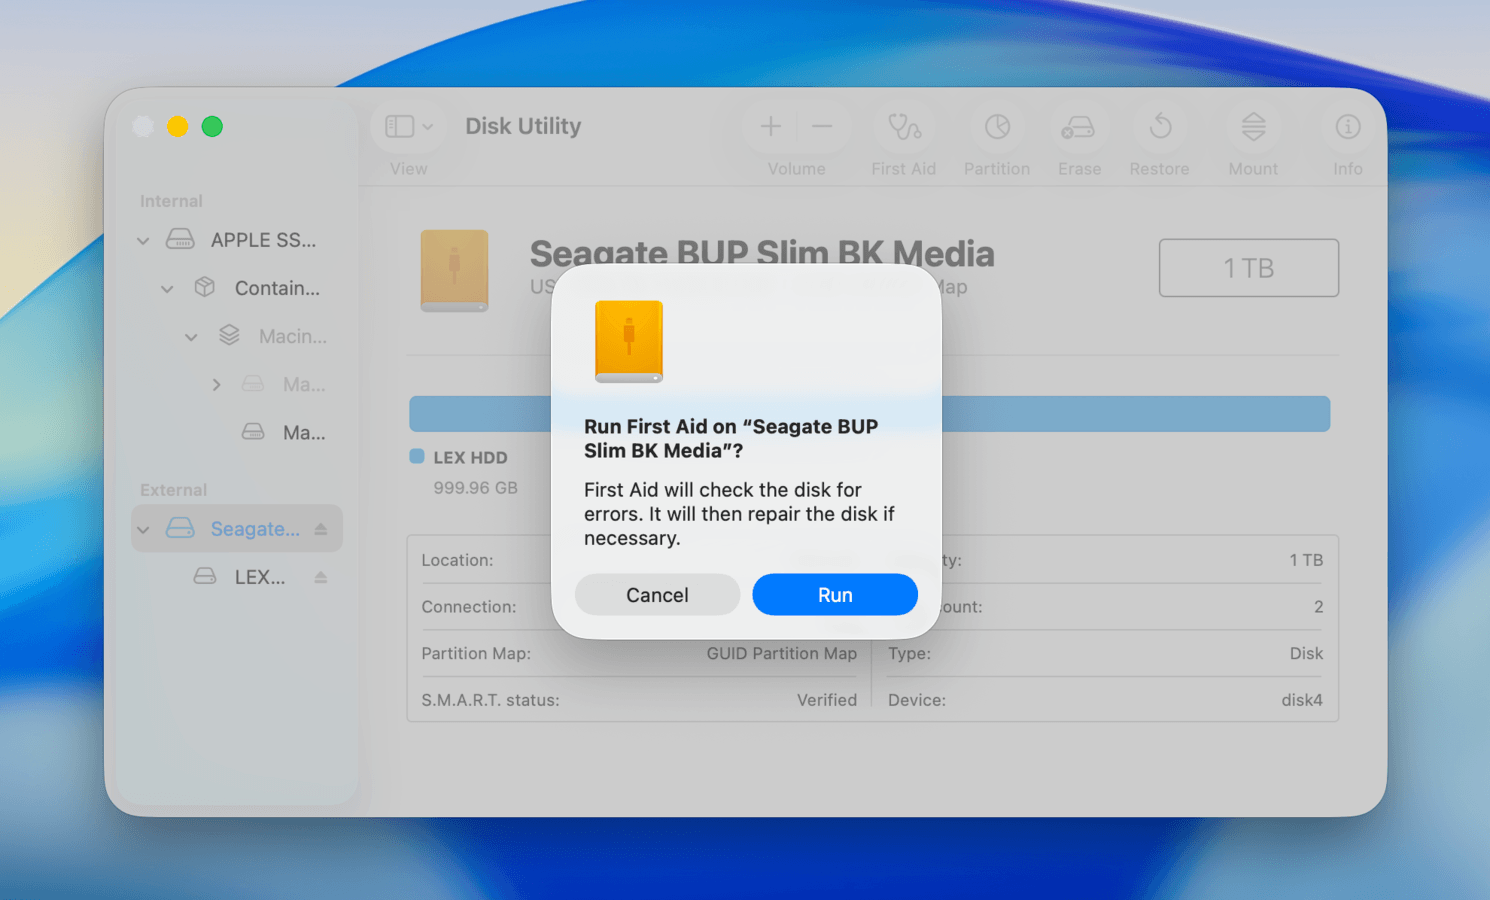
- Wait for the verification process to finish
After successfully running First Aid, we recommend disconnecting your drive (remember to use the eject button in Finder and Disk Utility first) and restarting your Mac. Then, reconnect your drive and see if it works. This ensures that macOS and its system processes re-establish a fresh connection with your drive.
Method #5: Reset your NVRAM, PRAM, SMC
Intel-based Macs include specialized controllers that manage various system functions:
- The NVRAM (Non-Volatile Random Access Memory) or its older variant PRAM (Parameter RAM) stores system settings like sound volume, display resolution, startup disk selection, and time zone.
- The System Management Controller (SMC) handles power management, battery charging, thermal management, and other hardware functions.
When these controllers malfunction, they can cause various issues including external drive mounting problems. Fortunately, there’s an easy way to reset them:
NVRAM/PRAM:
- Shut down your Mac.
- Turn on your Mac and immediately press and hold these four keys together for about 20 seconds (until you hear the startup sound twice or see the Apple logo): Option + Command + P + R
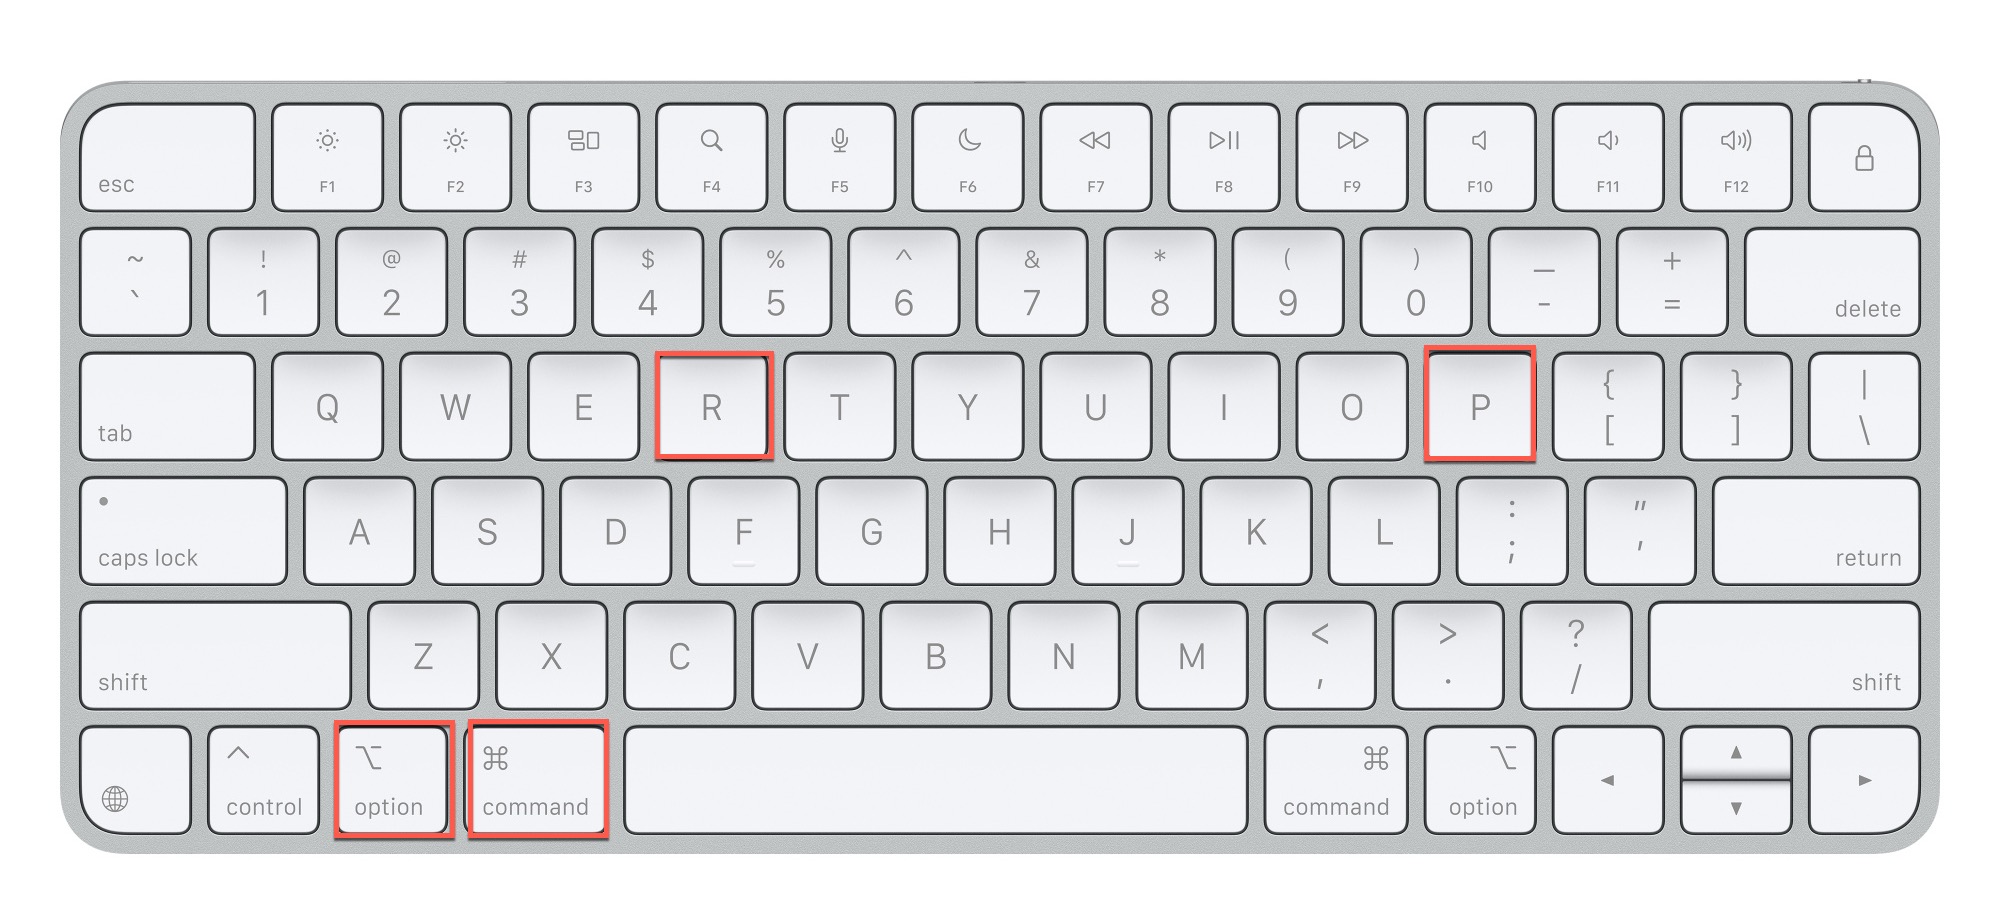
- Release the keys and let your Mac complete the startup process.
SMC:
- Shut down your Mac.
- Press and hold the following keys for about 7 seconds: Left Control + Left Option (Alt) + Right Shift
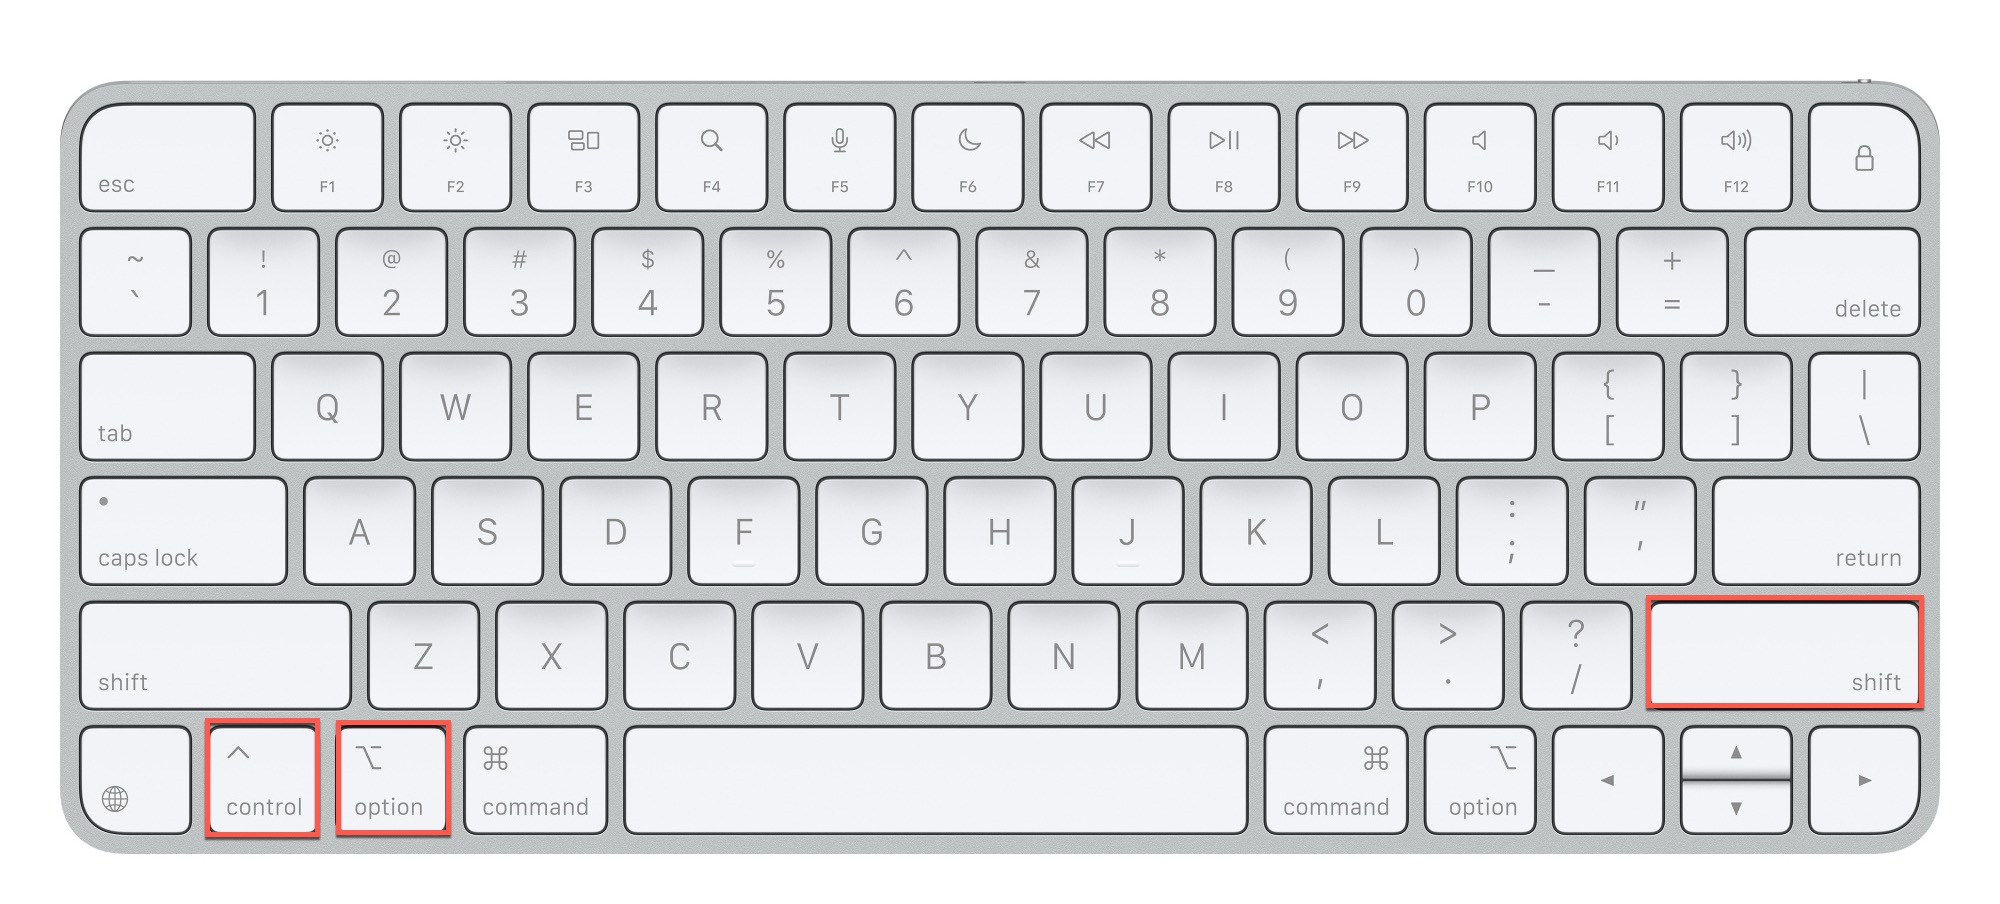
- Then press and hold the Power button as well for another 7 seconds (so you need to be holding four keys at the same time).
- Release all keys, then wait a few seconds.
- Press the Power button to turn on your Mac
The users of Apple silicon Macs (M1, M2, and newer chips) can’t perform these resets as NVRAM functionality is handled automatically during startup, and the traditional SMC functions are now integrated into the Apple silicon architecture.
Method #6: Restore Partition Using TestDisk
When your external drive’s partitions don’t mount in Disk Utility, it often means the partition table has become corrupted or was accidentally deleted. While macOS’s built-in tools might not detect these “lost” partitions, they usually still exist on the drive—the system just can’t see them.
This is where a free and open-source tool called TestDisk comes in. Originally developed by Christophe Grenier as a data recovery utility for the French government, TestDisk specializes in reconstructing damaged partition tables and recovering lost partitions. It works by scanning your drive’s raw data to identify partition signatures and filesystem markers and then rebuilding the map of where your partitions begin and end.
To scan your drive and recover lost partitions using TestDisk:
- Install TestDisk using the Homebrew package manager (this is the easiest way).
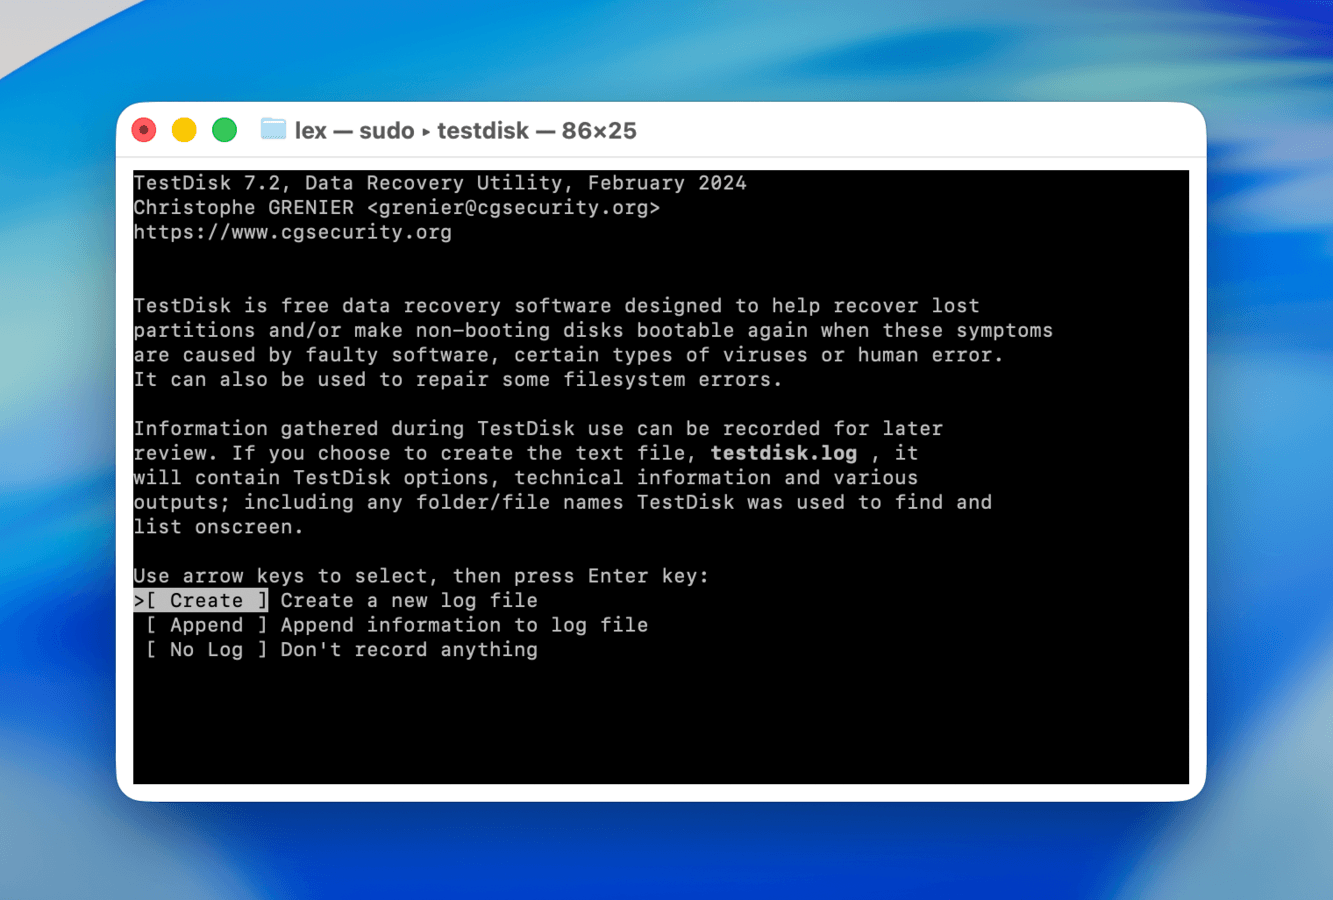
- Launch TestDisk using the following Terminal command: sudo testdisk
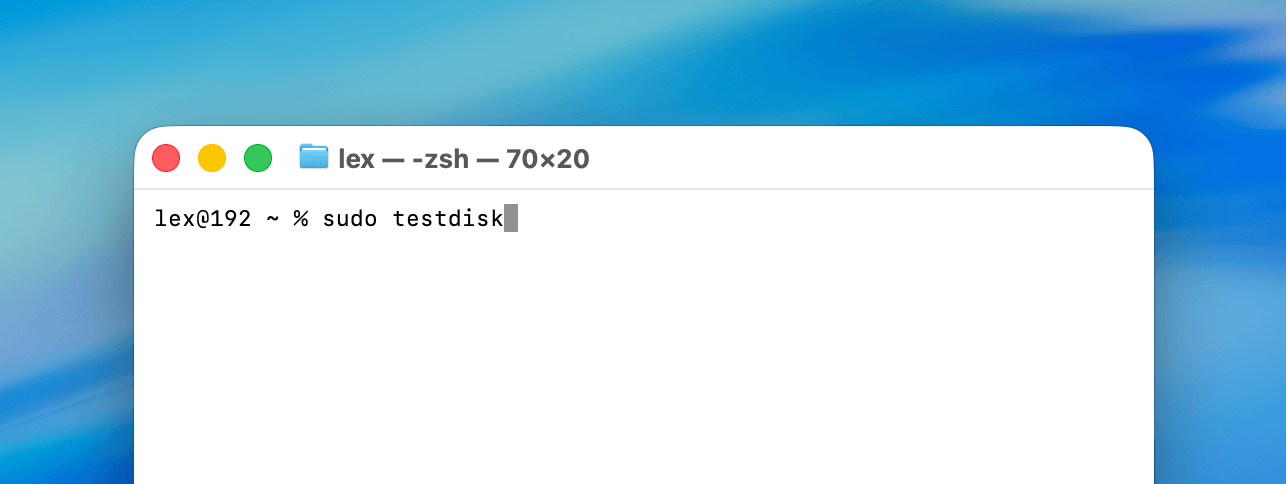
- Choose to create a log file if you want to and select your external drive from the list. TestDisk will automatically detect the partition table type (usually Apple or Intel), which you need to confirm before proceeding (you can pick another one if it doesn’t match, but that hasn’t happened to me yet).
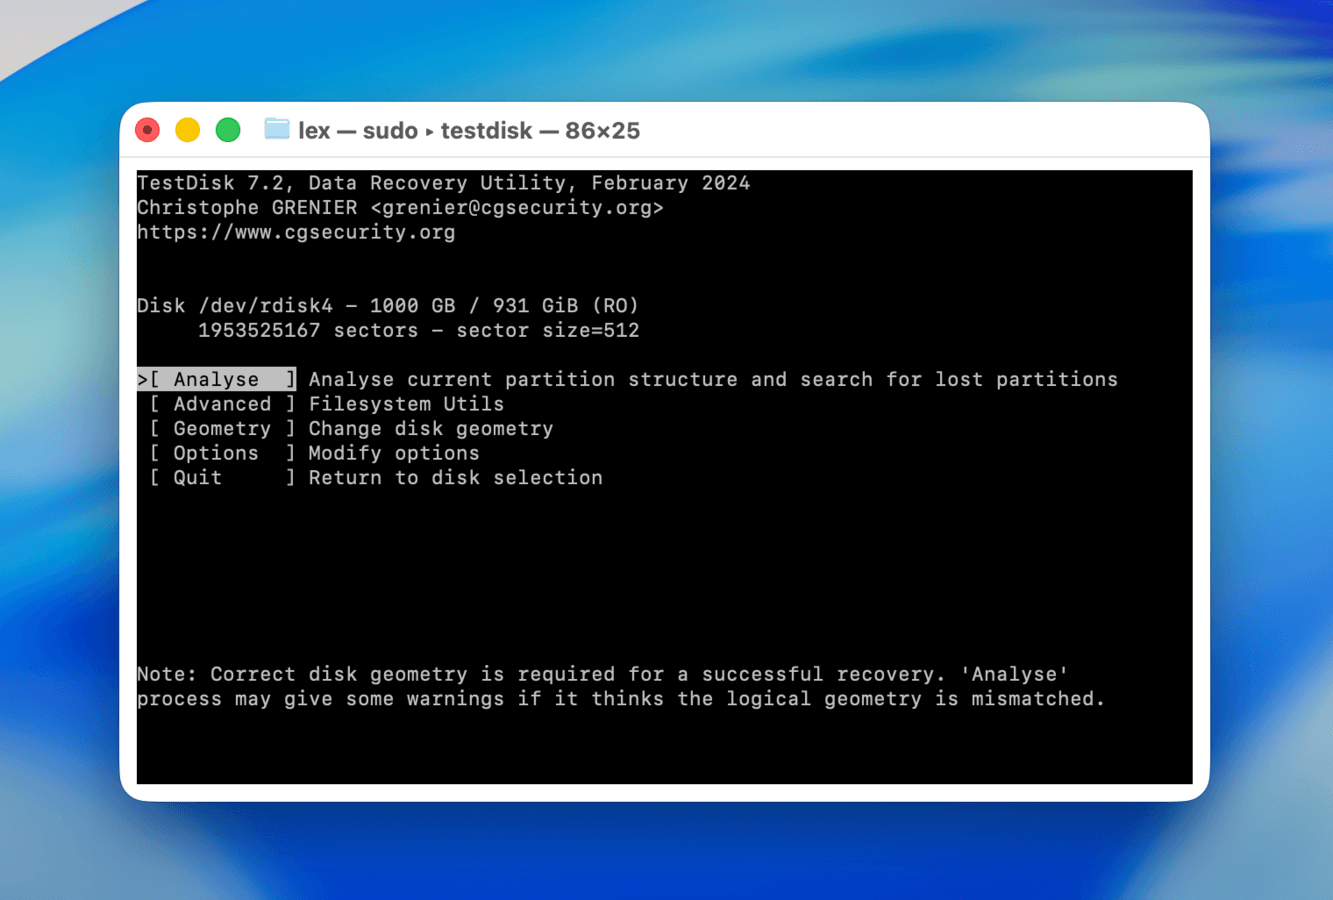
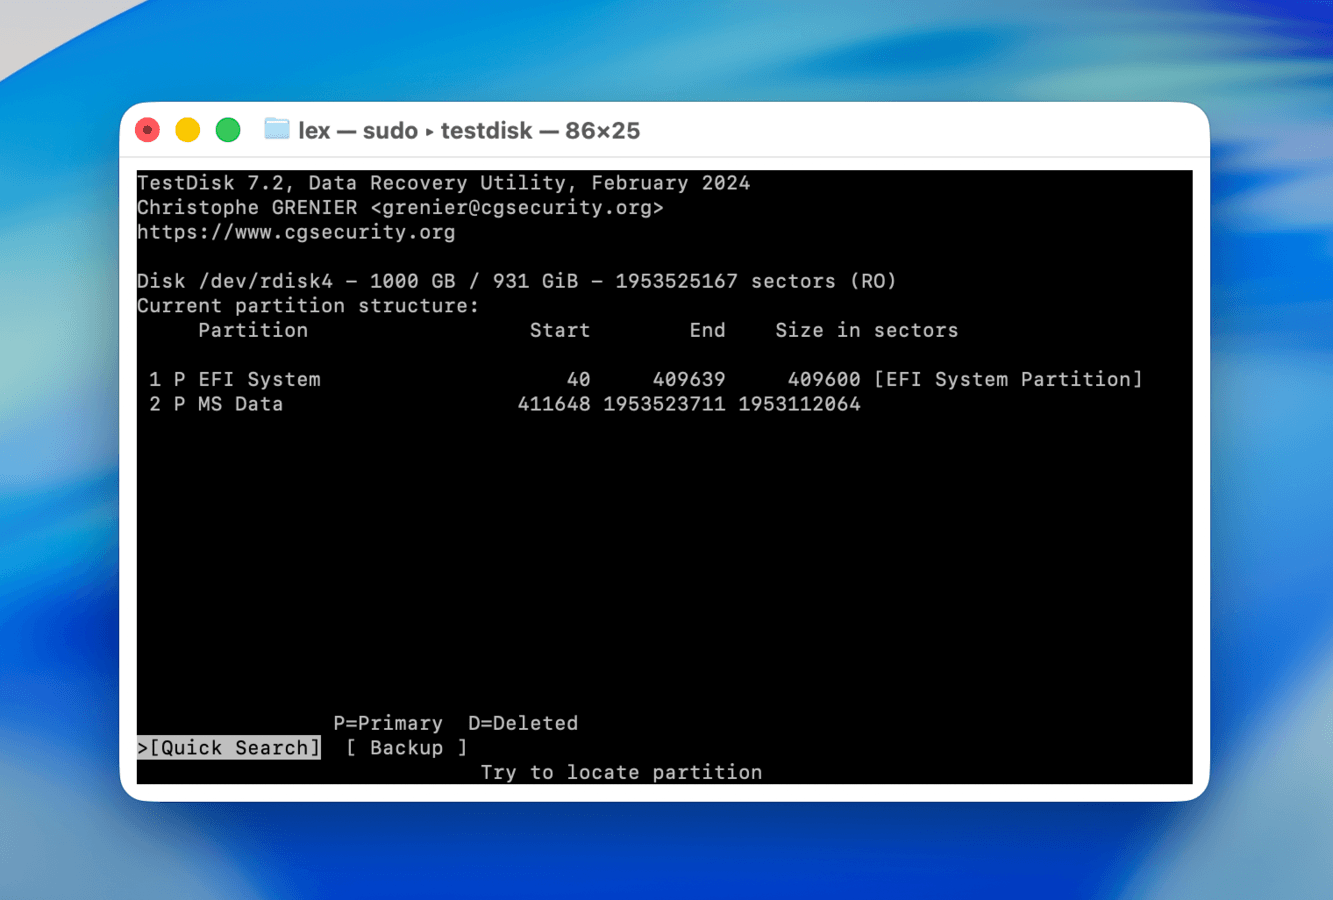
- Choose Analyze from the main menu to initiate a scan of your drive’s partition structure. TestDisk will display current partitions and begin searching for any that have been lost.
- Select Quick Search to begin the initial scan. If Quick Search doesn’t locate your missing partitions, you can run a Deeper Search afterward.
- Use the arrow keys to select the partition you want to recover, then press Right or Left arrows to change its status from Deleted to either Primary or Logical depending on your partition type. If you’re not sure which to select then go with Primary.
- Select Write to save the partition table and confirm with Y when prompted.
After the process completes, restart your Mac for the changes to take effect. You can then look for the partition in Disk Utility and manually mount it if necessary (see Method 2)
Method #7: Reformat Your Drive
Reformatting a drive is the most effective way of fixing logical (non-physical) corruption or damage, because it completely rebuilds the file system from scratch. This purges the old file system, as well as the data and metadata causing the errors.
Here’s how to reformat a drive to fix logical corruption:
- Open Disk Utility (Applications > Utilities).
- Select your external drive from the sidebar.
- Click the Erase button in the toolbar.
- Choose a name for your drive and pick the most appropriate file system format (use APFS if you’ll use the drive exclusively with Macs or ExFAT if you need to use the drive with Windows or Linux computers).
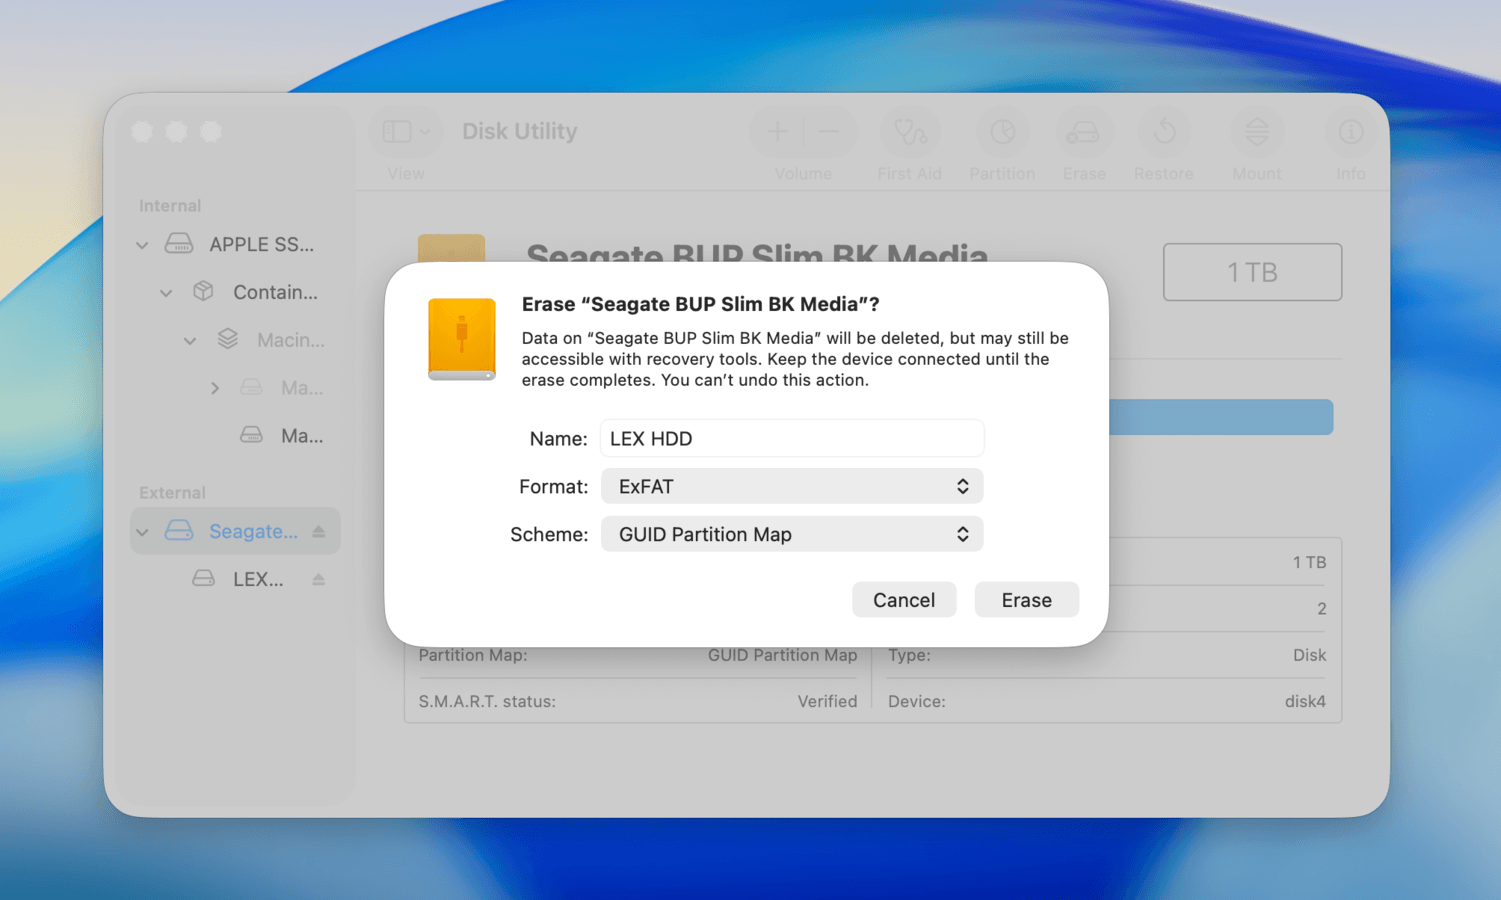
- Click Erase and wait for the process to complete.
After formatting, your drive should mount automatically. If it doesn’t, try disconnecting and reconnecting it to your Mac or mounting it manually as described in Method 2.
How to Protect Your External Drive on a Mac
Unfortunately, even the best external drives eventually fail. As Backblaze reveals, most manufacturer warranties only span 3-5 years for a reason. However, you can significantly extend your drive’s lifespan by following these proven practices:
| Best Practice | Why It Matters | How to Implement |
| Keep multiple backups | According to data recovery experts, one of the most reliable protection strategies against data loss is the 3-2-1 backup strategy: three copies of your data, on two different types of media, with one copy stored off-site. |
|
| Monitor drive health | Early detection of potential issues can prevent catastrophic failure. Signs like unusual sounds or slow performance often precede complete drive failure. |
|
| Handle with care | According to long-term user experiences, physical shock is one of the leading causes of drive failure. Traditional spinning external drives are particularly vulnerable when being transported. |
|
| Maintain optimal environment | Research shows that both very low (below 10°C/50°F) and very high temperatures (above 45°C/113°F) can significantly impact drive longevity. Other major environment dangers include humidity and direct sunlight (which can cause the internals to overheat). |
|
| Use quality cables and connections | Poor quality or loose connections can cause power fluctuations, potentially corrupting data or damaging the drive. |
|
Remember that hardware failure is not a matter of if, but when. The goal is to maximize your drive’s lifespan while keeping your data safe through reliable backup strategies.
Conclusion
To summarize the most important details in this guide: first, if your drive shows up in Disk Utility and your files matter to you, always start with data recovery — before attempting any fixes. Many repair methods can cause permanent data loss even when they successfully restore the drive’s functionality.
Second, if your disk doesn’t appear in Disk Utility at all, start with the simplest solutions first (e.g., checking connections, trying a different port or cable), then work your way up. Once the drive becomes visible, switch to data recovery immediately before going any further.
Third, if the data on the drive isn’t important to you, you can jump straight to the fixing methods — but we’d still recommend creating a byte-for-byte disk image (a raw backup) before you start, just in case. It takes extra time and requires extra space, but it keeps your options open.
Finally, if you’ve already successfully recovered all your important data, don’t bother working through every fix on the list. Simply reformat the drive — it’s the most straightforward and reliable solution at that point. And if you don’t feel confident about your success rate at any stage, consider reaching out to professional data recovery services — most of them offer a free estimate.


FAQ
Improper ejection likely caused the mount error due to the resulting logical damage. Before doing anything else, prioritize recovering your files–repairing a malfunctioning drive almost always results in partial or complete data loss. Then, try the following fixes:
- Mount the drive manually using Disk Utility
- Use the First Aid tool in Disk Utility
- For Intel Macs, reset the SMC and NVRAM/PRAM
To mount an external hard drive using Terminal on Mac, you can use the diskutil command. First, identify your drive using diskutil list to see all available disks and their identifiers. Then use diskutil mountDisk /dev/diskX (replace X with your disk identifier) to mount all mountable partitions on that disk, or diskutil mount /dev/diskXsY to mount a specific partition.
To mount a non-mounting internal hard drive on a Mac:
- Recover and secure your data first (using data recovery software if needed), as repairing your drive may cause data loss.
- Open Disk Utility, click your drive in the left sidebar, then click Mount on the toolbar.
- If you can’t mount your drive manually, run First Aid (also in Disk Utility), then try mounting it again.
- If none of the above steps fix your drive, reset your SMC and NVRAM/PRAM, then try steps 2-3 again (Intel Macs only).
For LaCie hard drives, you can follow the standard troubleshooting steps as you would for other external drive brands including Western Digital (WD), Toshiba, and Seagate:
- Check physical connections and try different ports/cables.
- Open Disk Utility and attempt to mount the drive manually.
- Run First Aid in Disk Utility if manual mounting fails.
- For Intel Macs, try resetting your SMC and NVRAM/PRAM.
Note that repairing your drive may cause partial or complete data loss. If the files on your drive are important to you, secure them with data recovery software first.
This can be caused by a number of factors. It’s possible that the drive is damaged, its filesystem could be corrupted, or you may have an error in your operating system itself.
To fix a drive that won’t mount on a Mac, try these fixes:
- Attempt to remount the disk in Disk Utility
- Reconnect your drive, preferably using a different port and cable
- Restart your Mac to resolve system-level mounting issues
- Use Disk Utility’s First Aid tool to repair file system errors
- Reformat your drive (use this as a last resort since it erases all data)
This means that the drive is physically connected to your Mac, but it’s not set up for access by the operating system.
To mount an unmounted disk on a Mac, follow these steps:
- Start Disk Utility
- Select the disk drive if you see it in the list
- Click Mount