


Apple introduced APFS (Apple File System) as a replacement for HFS+, and it has since become the standard file system on macOS. It offers many advancements over older file systems and improves how data is stored and managed on a Mac.
While all of these advancements are great, they don’t mean that data loss can’t happen. Files can still be deleted, volumes can run into issues, and in some cases you may need to recover your data. APFS also brings some limitations that can affect how recovery works.
In this article we’re going to talk about what Apple File System is, how it works, and how APFS data recovery works should something go wrong.
What Is Apple File System and How Does It Affect Data Recovery?
Apple File System is a proprietary file system that is developed and used by Apple. It is used on multiple devices such as iOS, tvOS, and of course macOS.
In short, Apple’s new file system aims to fix problems of the past. What the new file system gives us is better optimization for solid-state drives, better encryption, snapshots, increased data integrity, among other capabilities.
To know if your Mac is running APFS, you can launch Disk Utility and it will display the data of your hard drive. You can see in my picture below that my Mac is using APFS.
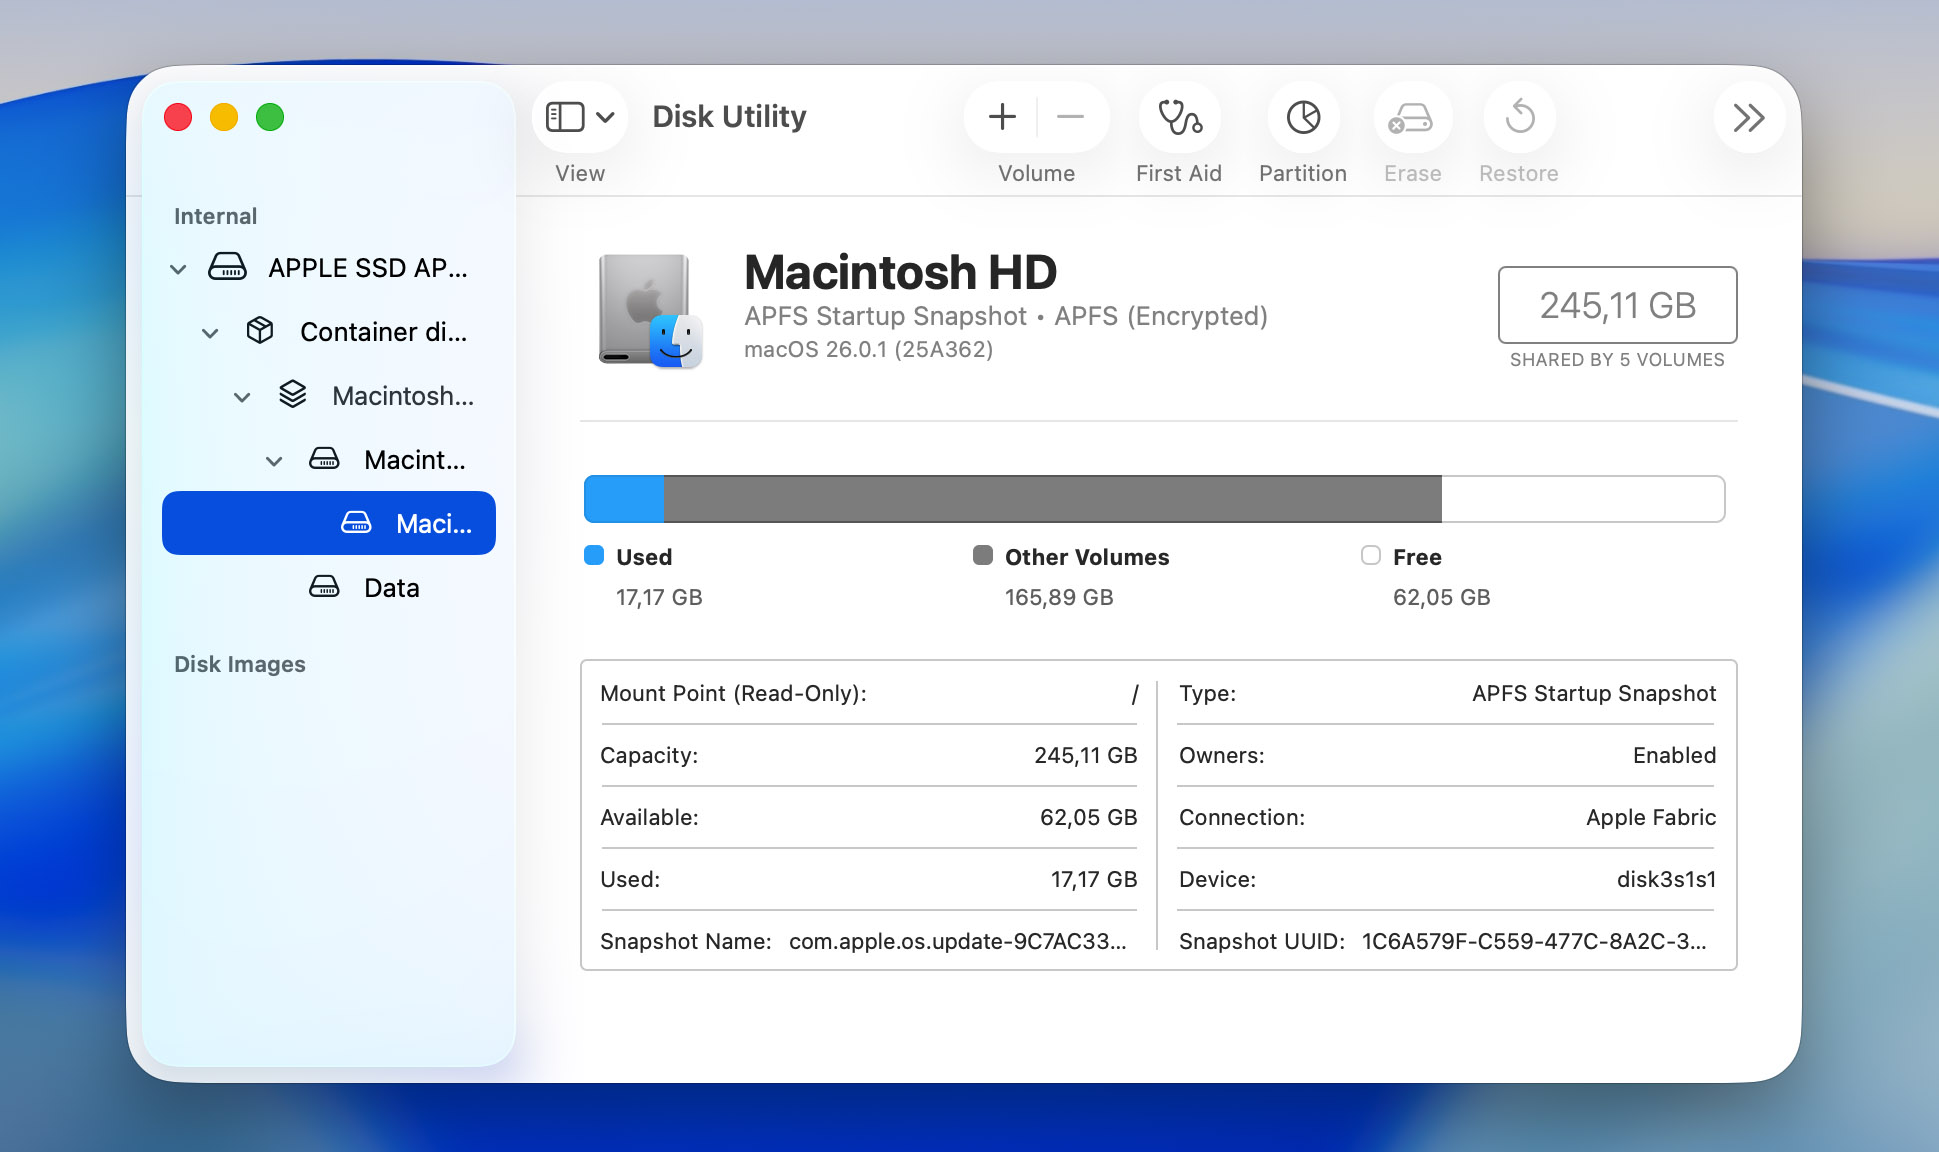
While all of these advancements are great, there is still a chance for data to be lost as nothing is 100% perfect.
If you have a backup, recovering your data is much easier. You can use Time Machine to restore your files and return them to your Mac. Additionally, APFS supports local snapshots, which can allow you to recover recently deleted files even if they weren’t included in a full backup.
If you don’t have a backup, then you will need to use an APFS data recovery tool. Once a file is deleted, the data is still there, but it is marked as free space. This means that it can be recovered until something new takes its place.
Since APFS is optimized for solid-state drives, there are a few more things to keep in mind. Solid-state drives use a feature called TRIM, which allows the system to clear deleted data in the background. This helps with performance, but it can also make data recovery much more difficult or even not possible once the data is removed.
How to Recover Deleted APFS Files on Mac Using Recovery Software
If you don’t have a backup or copies of your deleted files, then your only option is to use Mac data recovery software. These tools scan your drive and look for files that are no longer visible but still exist on the disk. That’s why we mentioned earlier that it’s best not to use the drive too much before starting the recovery process.
In this article, we’re going to use Disk Drill as an example of such software. It’s a well-known tool that many Mac users rely on because it works reliably and is easy to understand even if you haven’t used this type of software before. Unlike many other tools, Disk Drill can scan APFS drives and recover data from them once you allow it full disk access.
Using Disk Drill is super easy and in the steps below I will walk you through how to scan your Mac for lost data.
- Download Disk Drill from the website and install it on your Mac. If possible, install it on a different drive than the one where your files were lost.
- Launch Disk Drill from your Applications folder. If you’re working with an external drive, make sure it’s connected before you continue.
- Before starting the scan, give Disk Drill Full Disk Access in System Settings. This allows the app to see and scan your drives properly.
- You will now see a list of available drives. Select the APFS drive where your data was lost and click on Search for lost data. If prompted, select the Universal scan option.
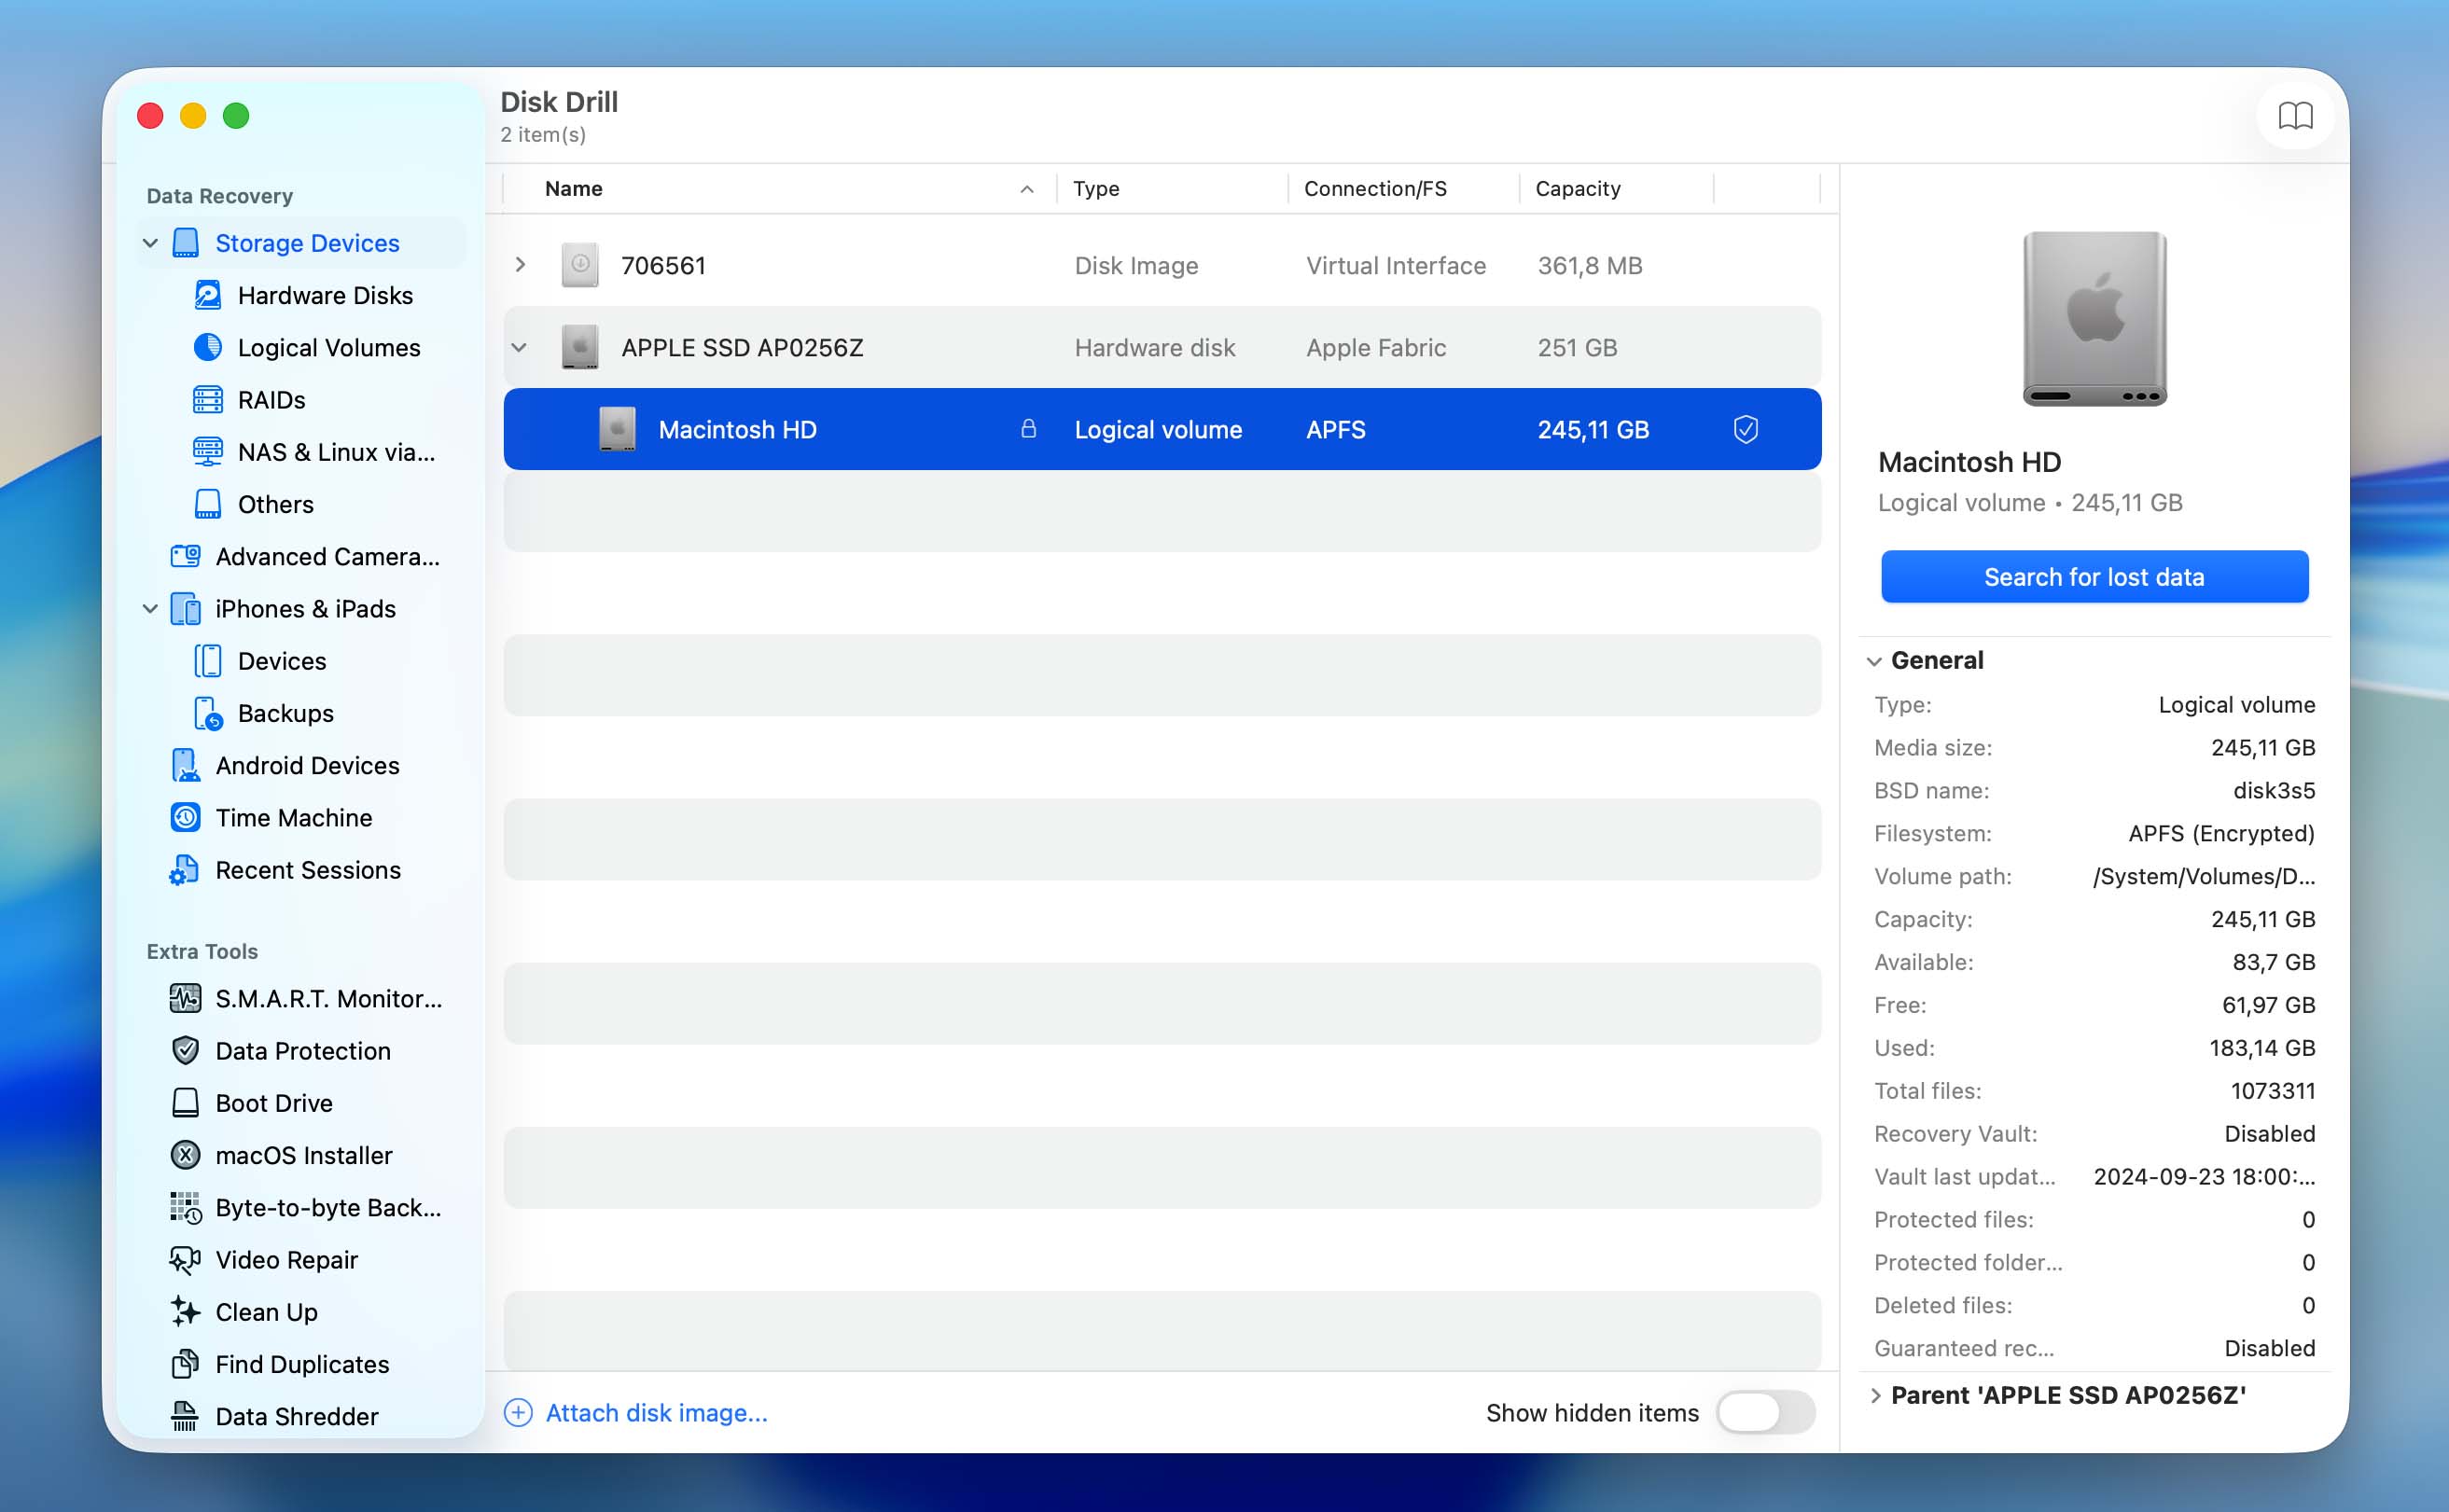
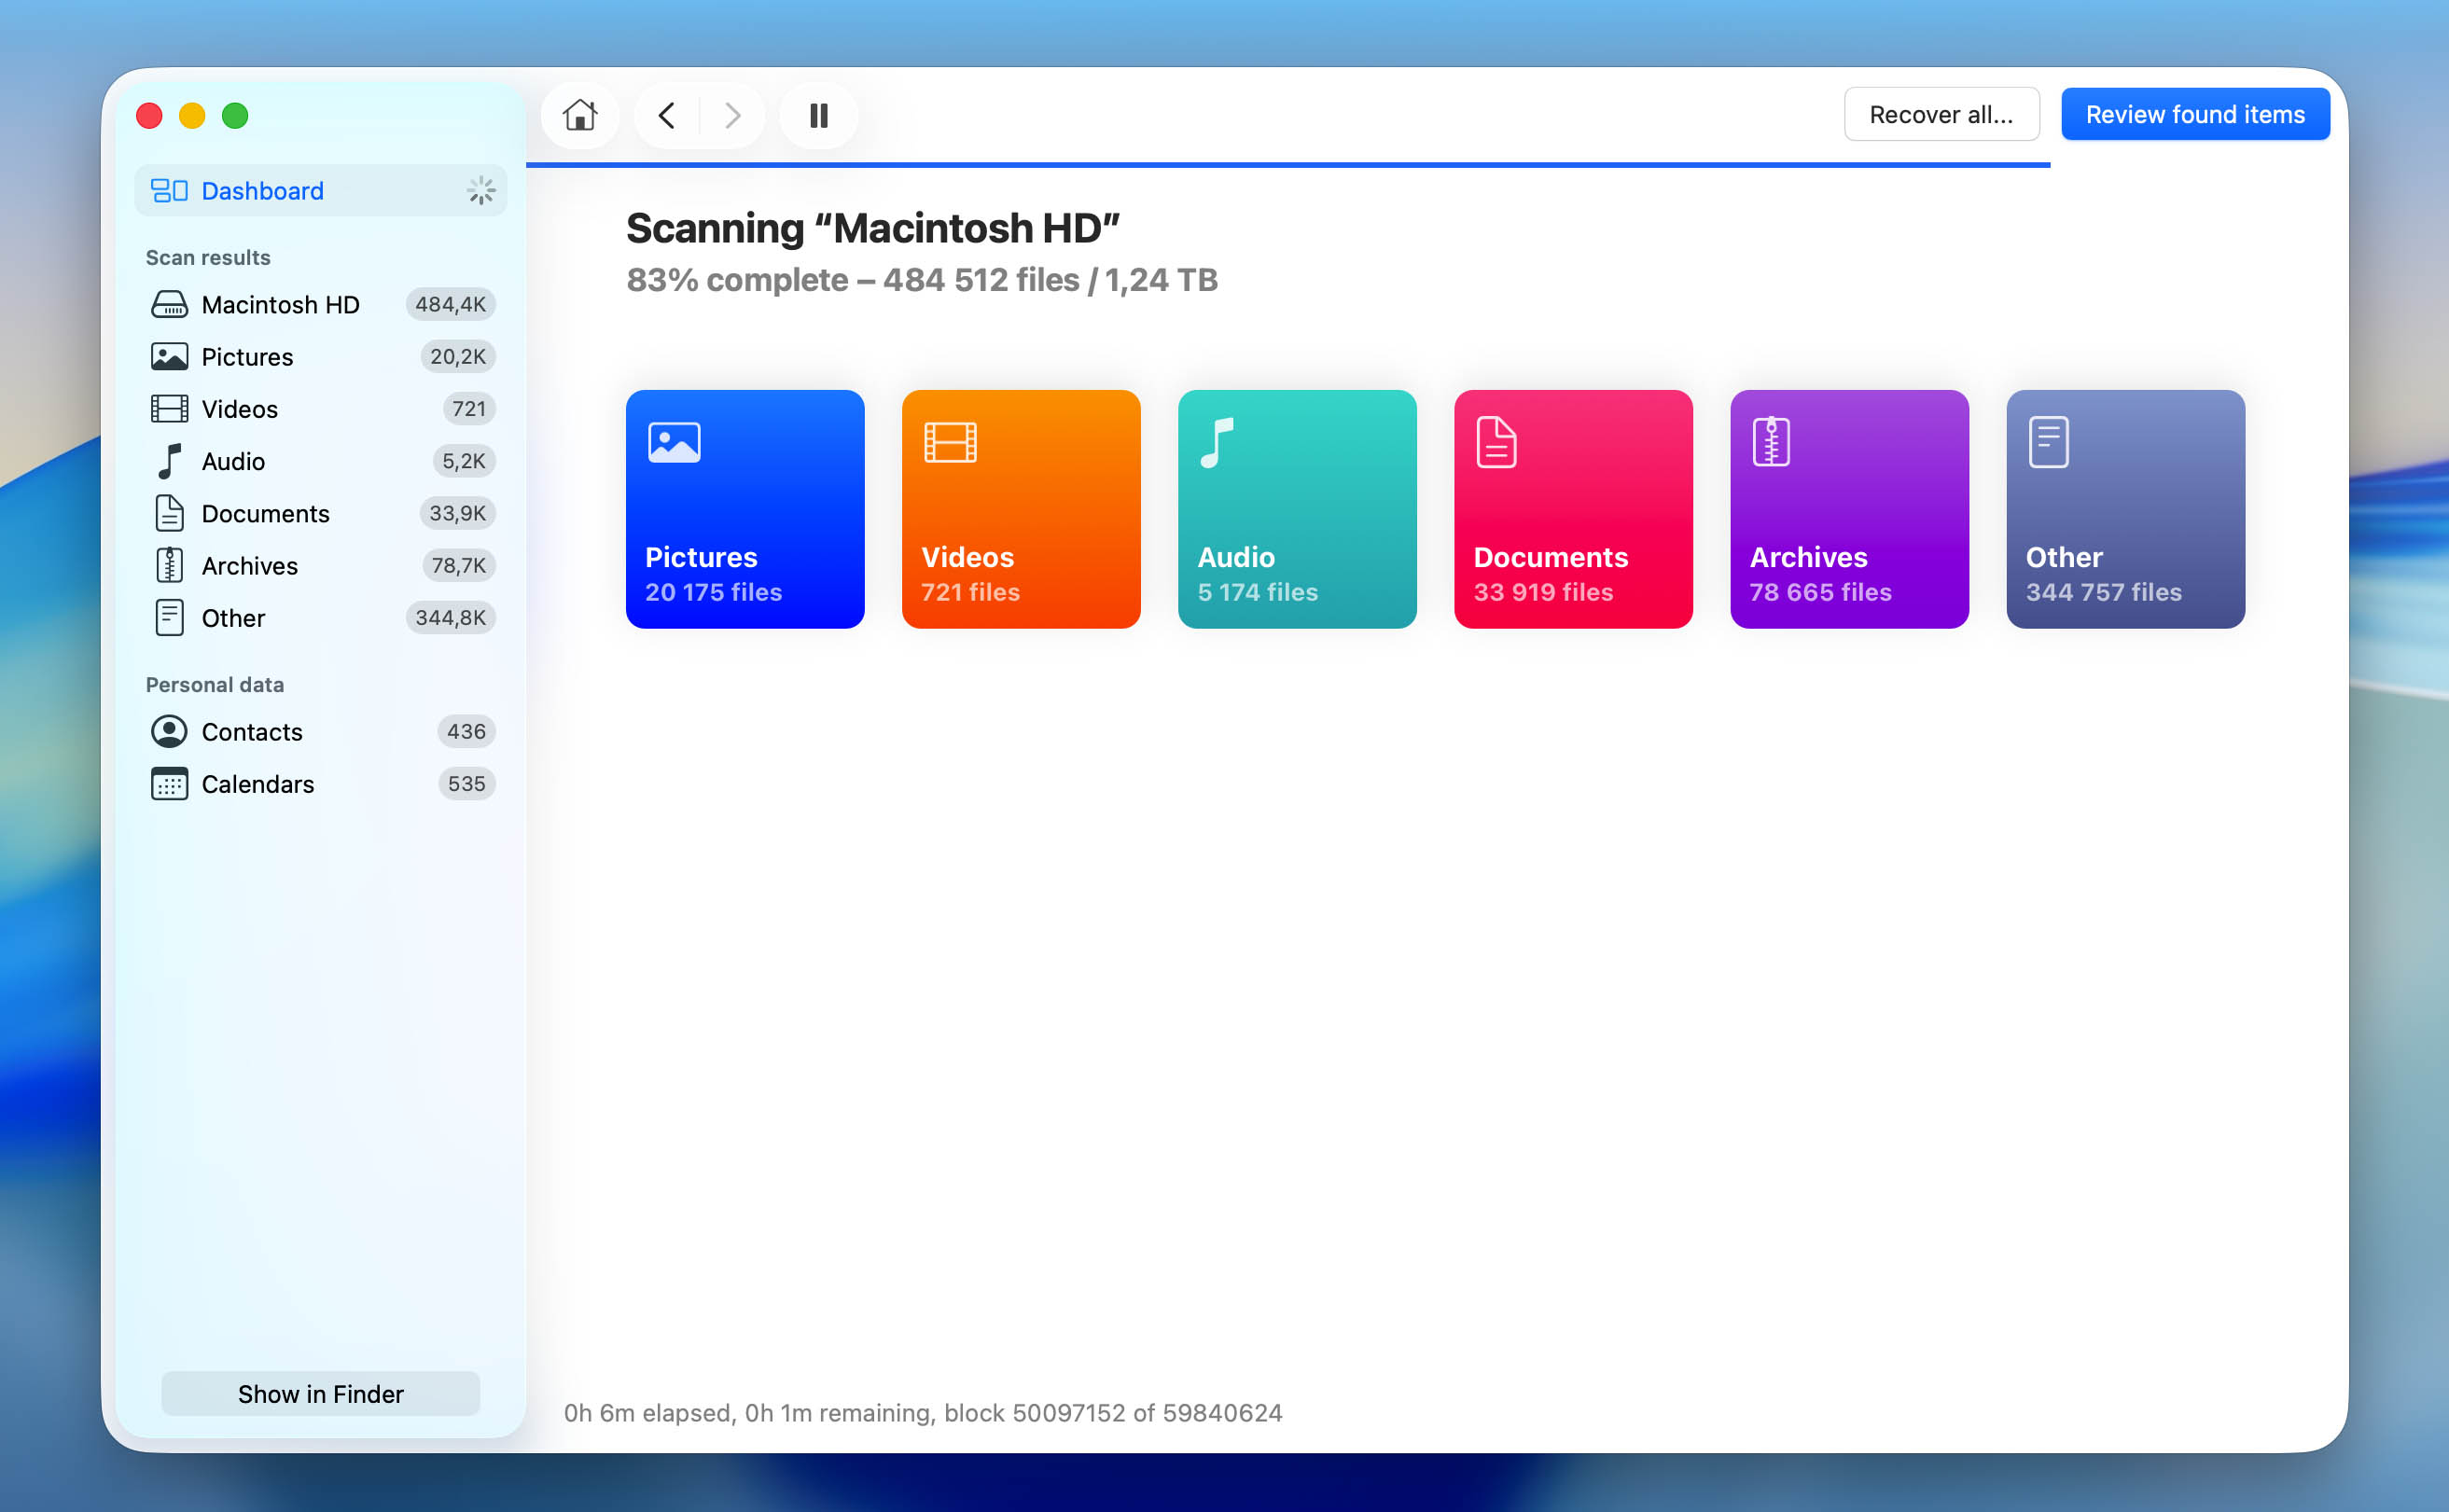
- The scan process will begin. This can take some time depending on how much data is on the drive, so it’s best to wait for it to finish.
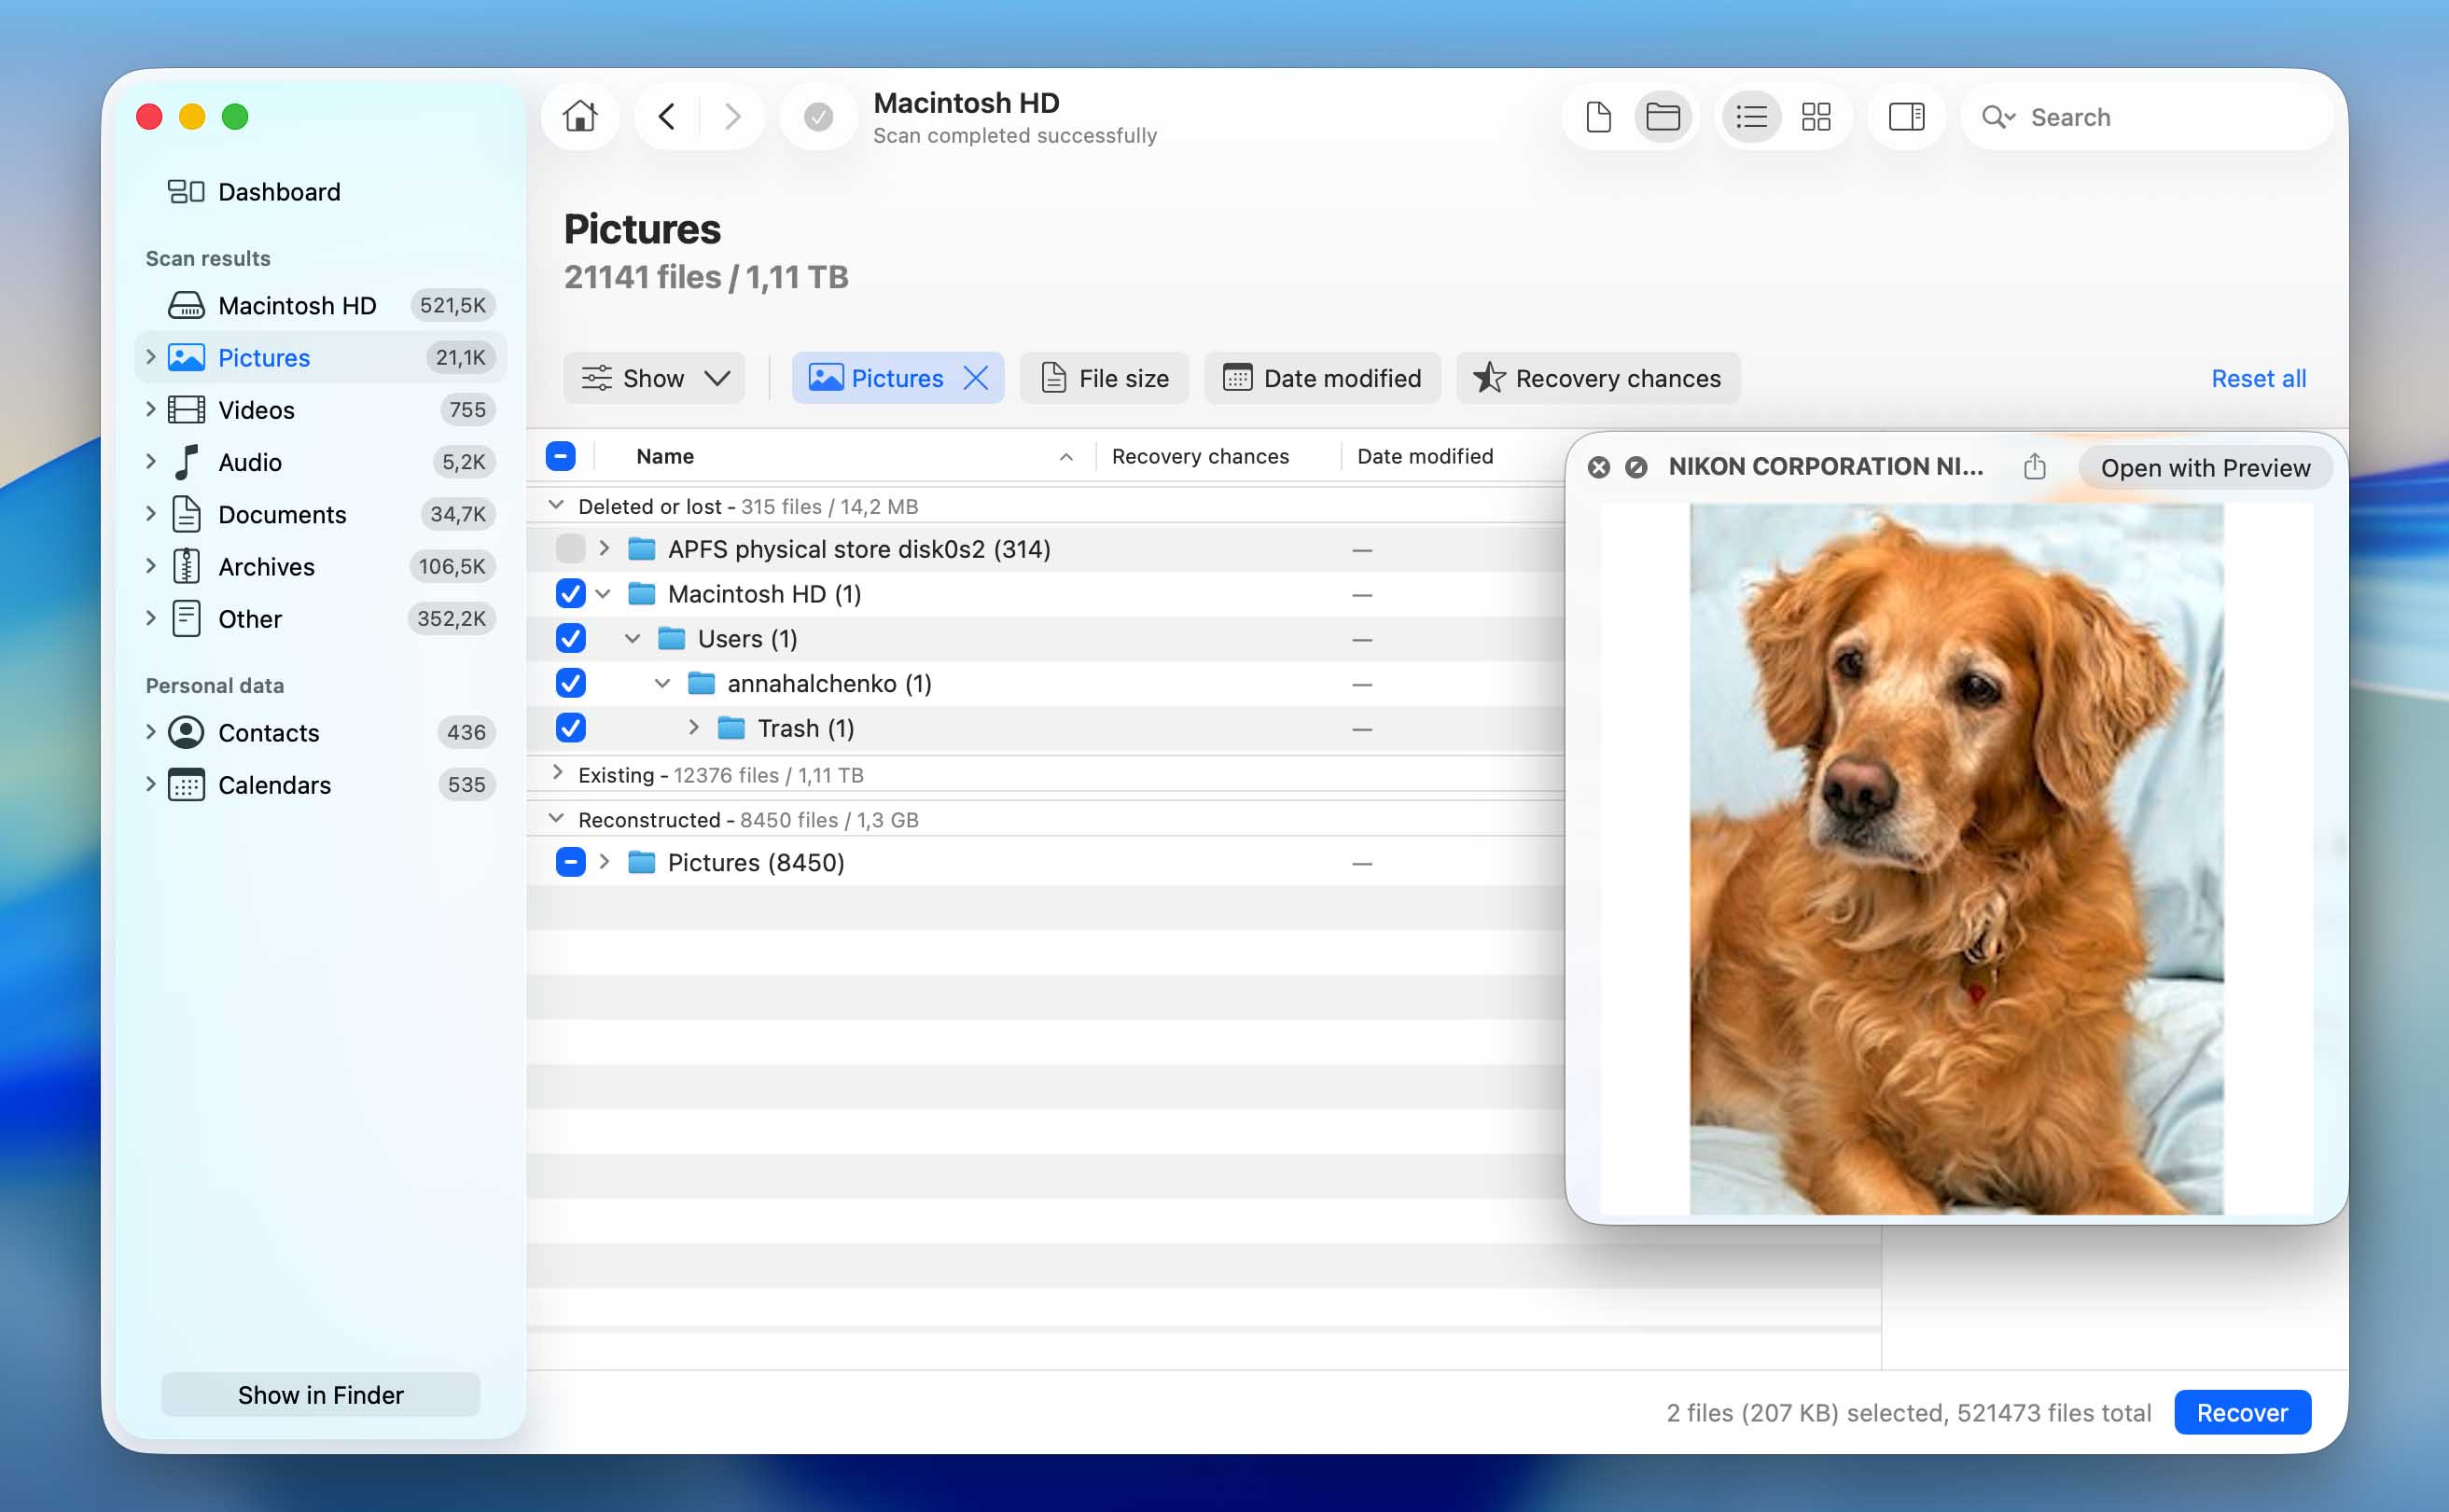
- Once the scan is complete, you can review the files that Disk Drill was able to find. You can also preview them to make sure they are the ones you want to recover.
- Select the files that you want to recover and click on the Recover button.
- Choose a location where you want to save the recovered files and click Next. It’s best to save them to a different drive to avoid any issues during the recovery process.
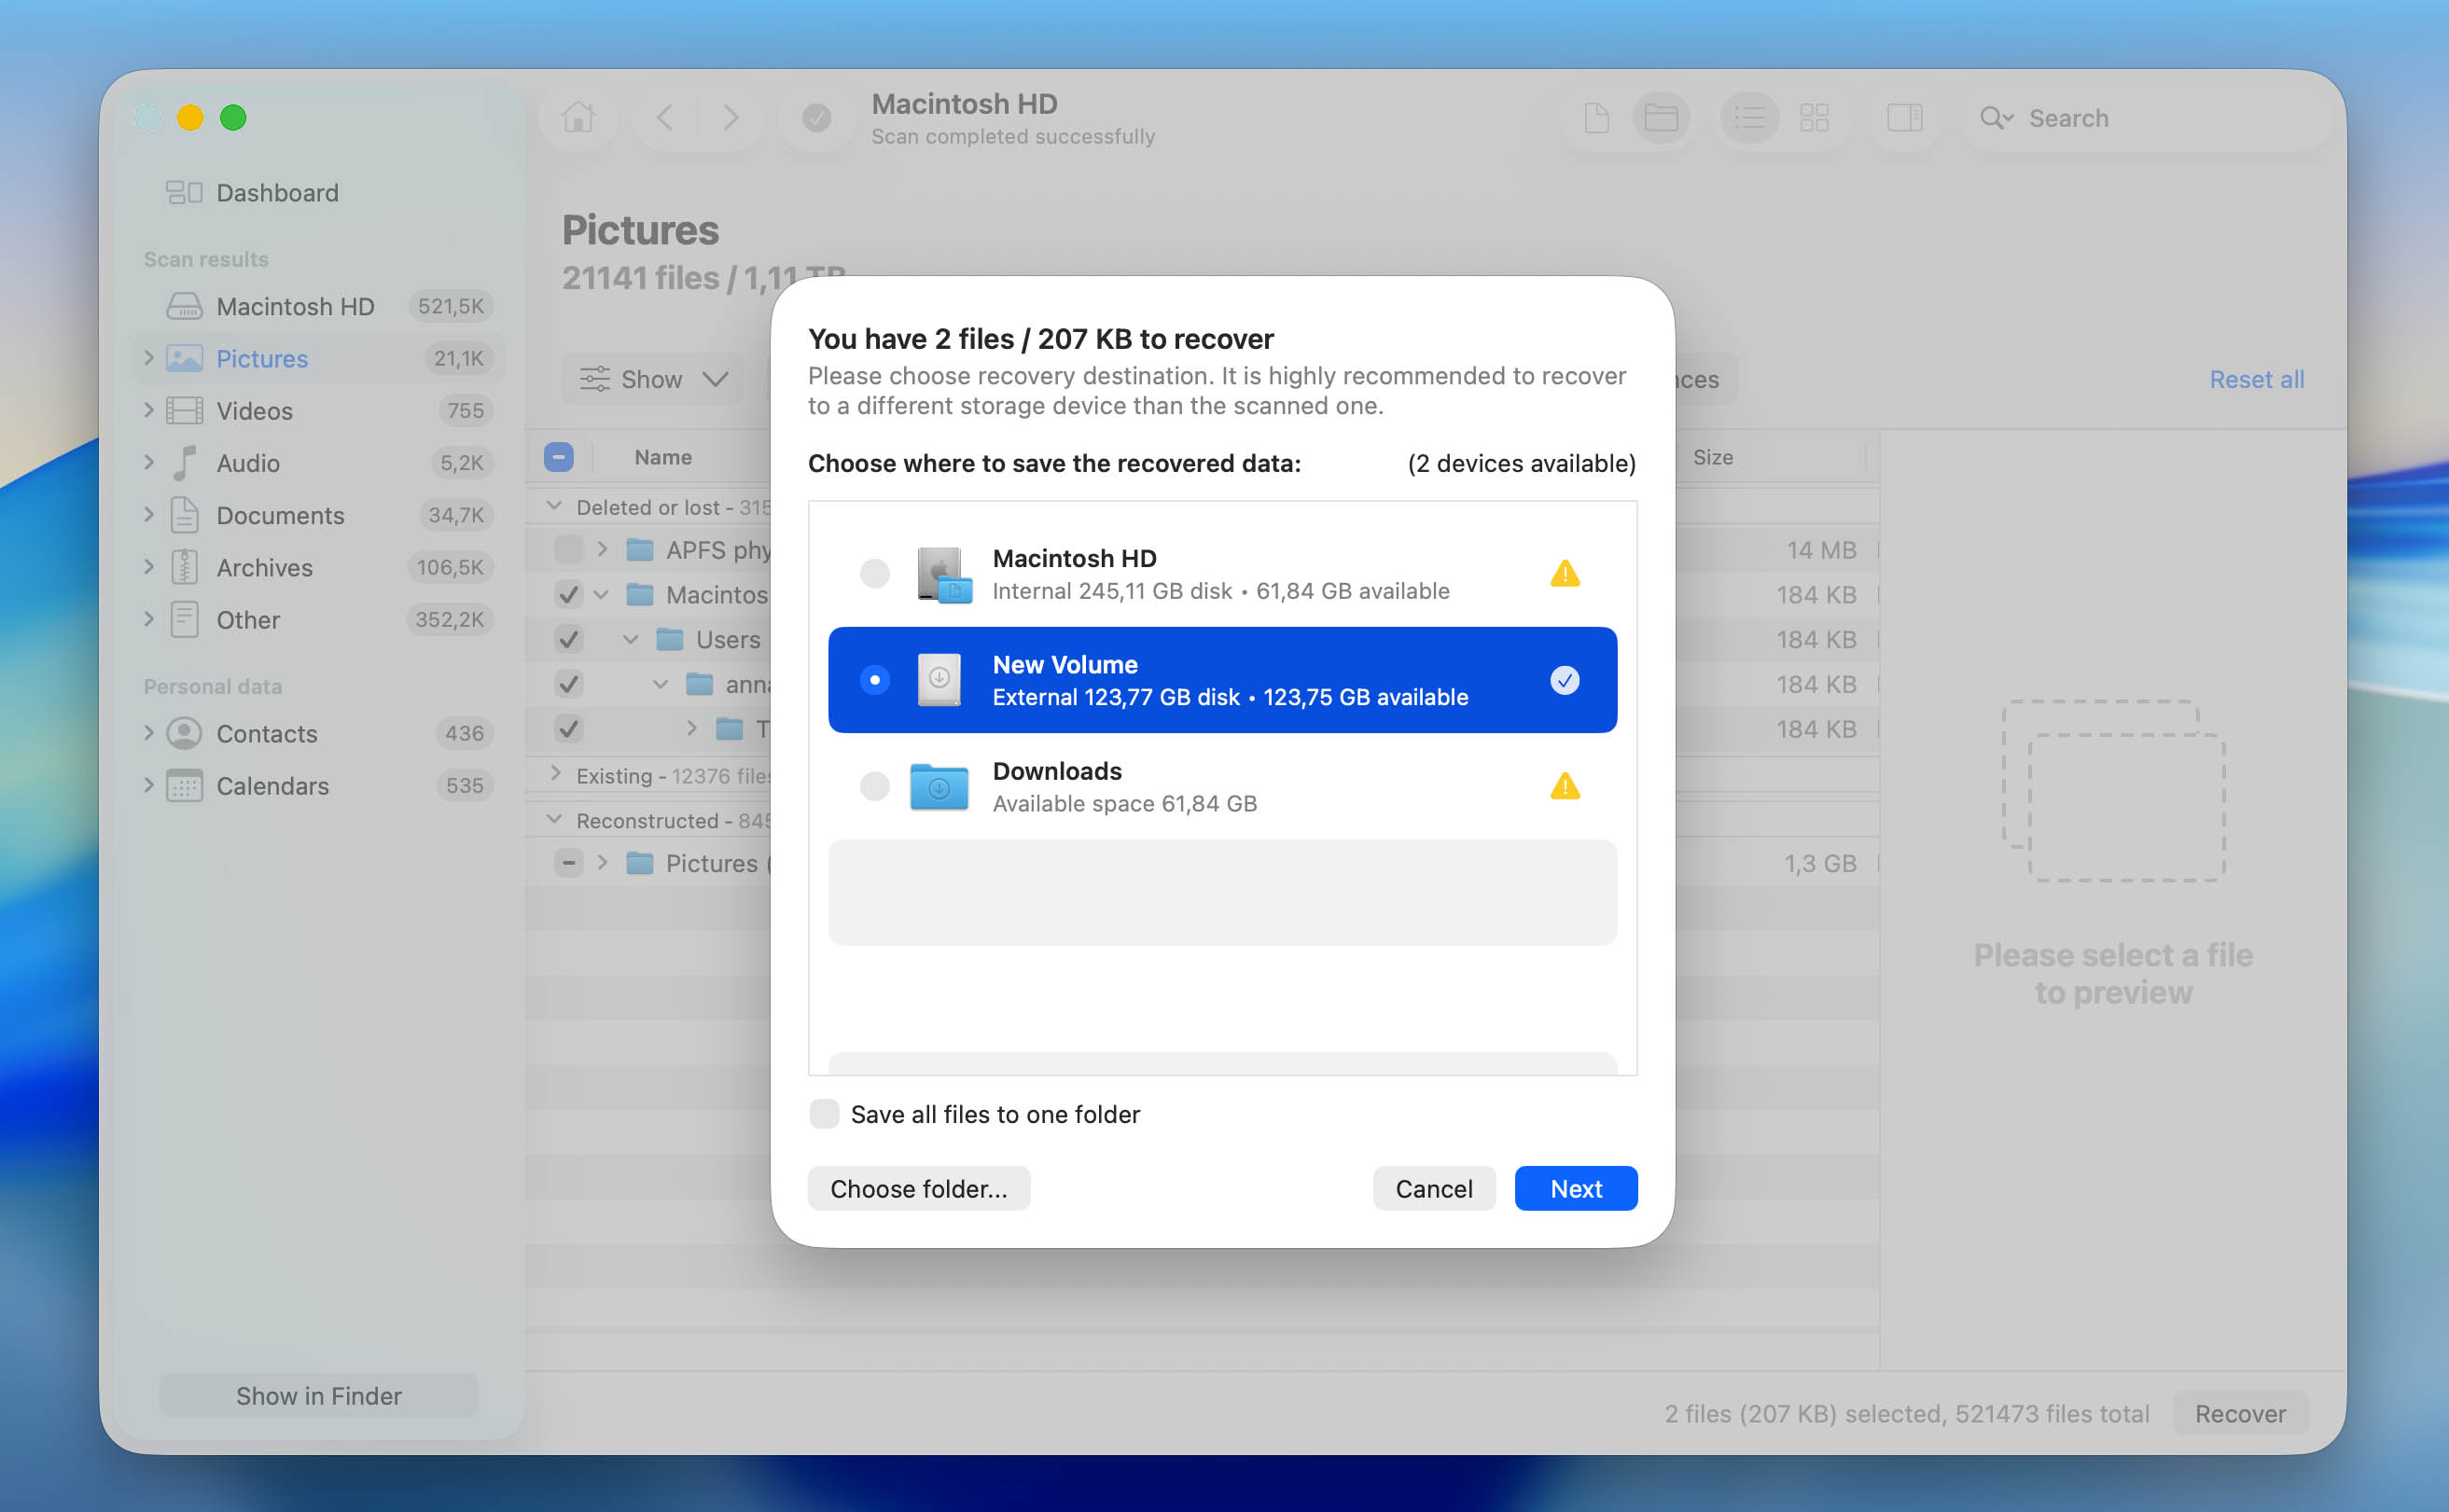

Disk Drill can scan entire APFS partitions and recover files while preserving the original folder structure and file names. In addition, it includes tools designed for working with corrupted drives. For example, you can create a disk image and then carry out recovery from that image rather than directly from the original drive. This is a safer approach when the drive is unstable, as it reduces the risk of further data loss during recovery. It also lets you check SMART data, so you can evaluate the drive’s condition before recovery or monitor its health afterward.
How to Recover Deleted Files from APFS Using Time Machine
If you’re using the features that come with macOS and have Time Machine set up to back up your APFS drive, then this is another way to recover deleted files.
This method works differently than data recovery software and you’re restoring files from a backup instead of scanning the drive. Because of that, things like TRIM on an SSD are not a problem here. The main thing is that the files you want to get back are in the backup.
- Connect the drive that contains your Time Machine backup to your Mac.
- Open the folder where your files were stored before they were deleted.
- Click on the Time Machine icon in the menu bar and choose Browse Time Machine Backups.

- Use the timeline on the right side of the screen to go back to a point in time before the files were deleted.
- Find the files that you want to recover, select them, and click on Restore.
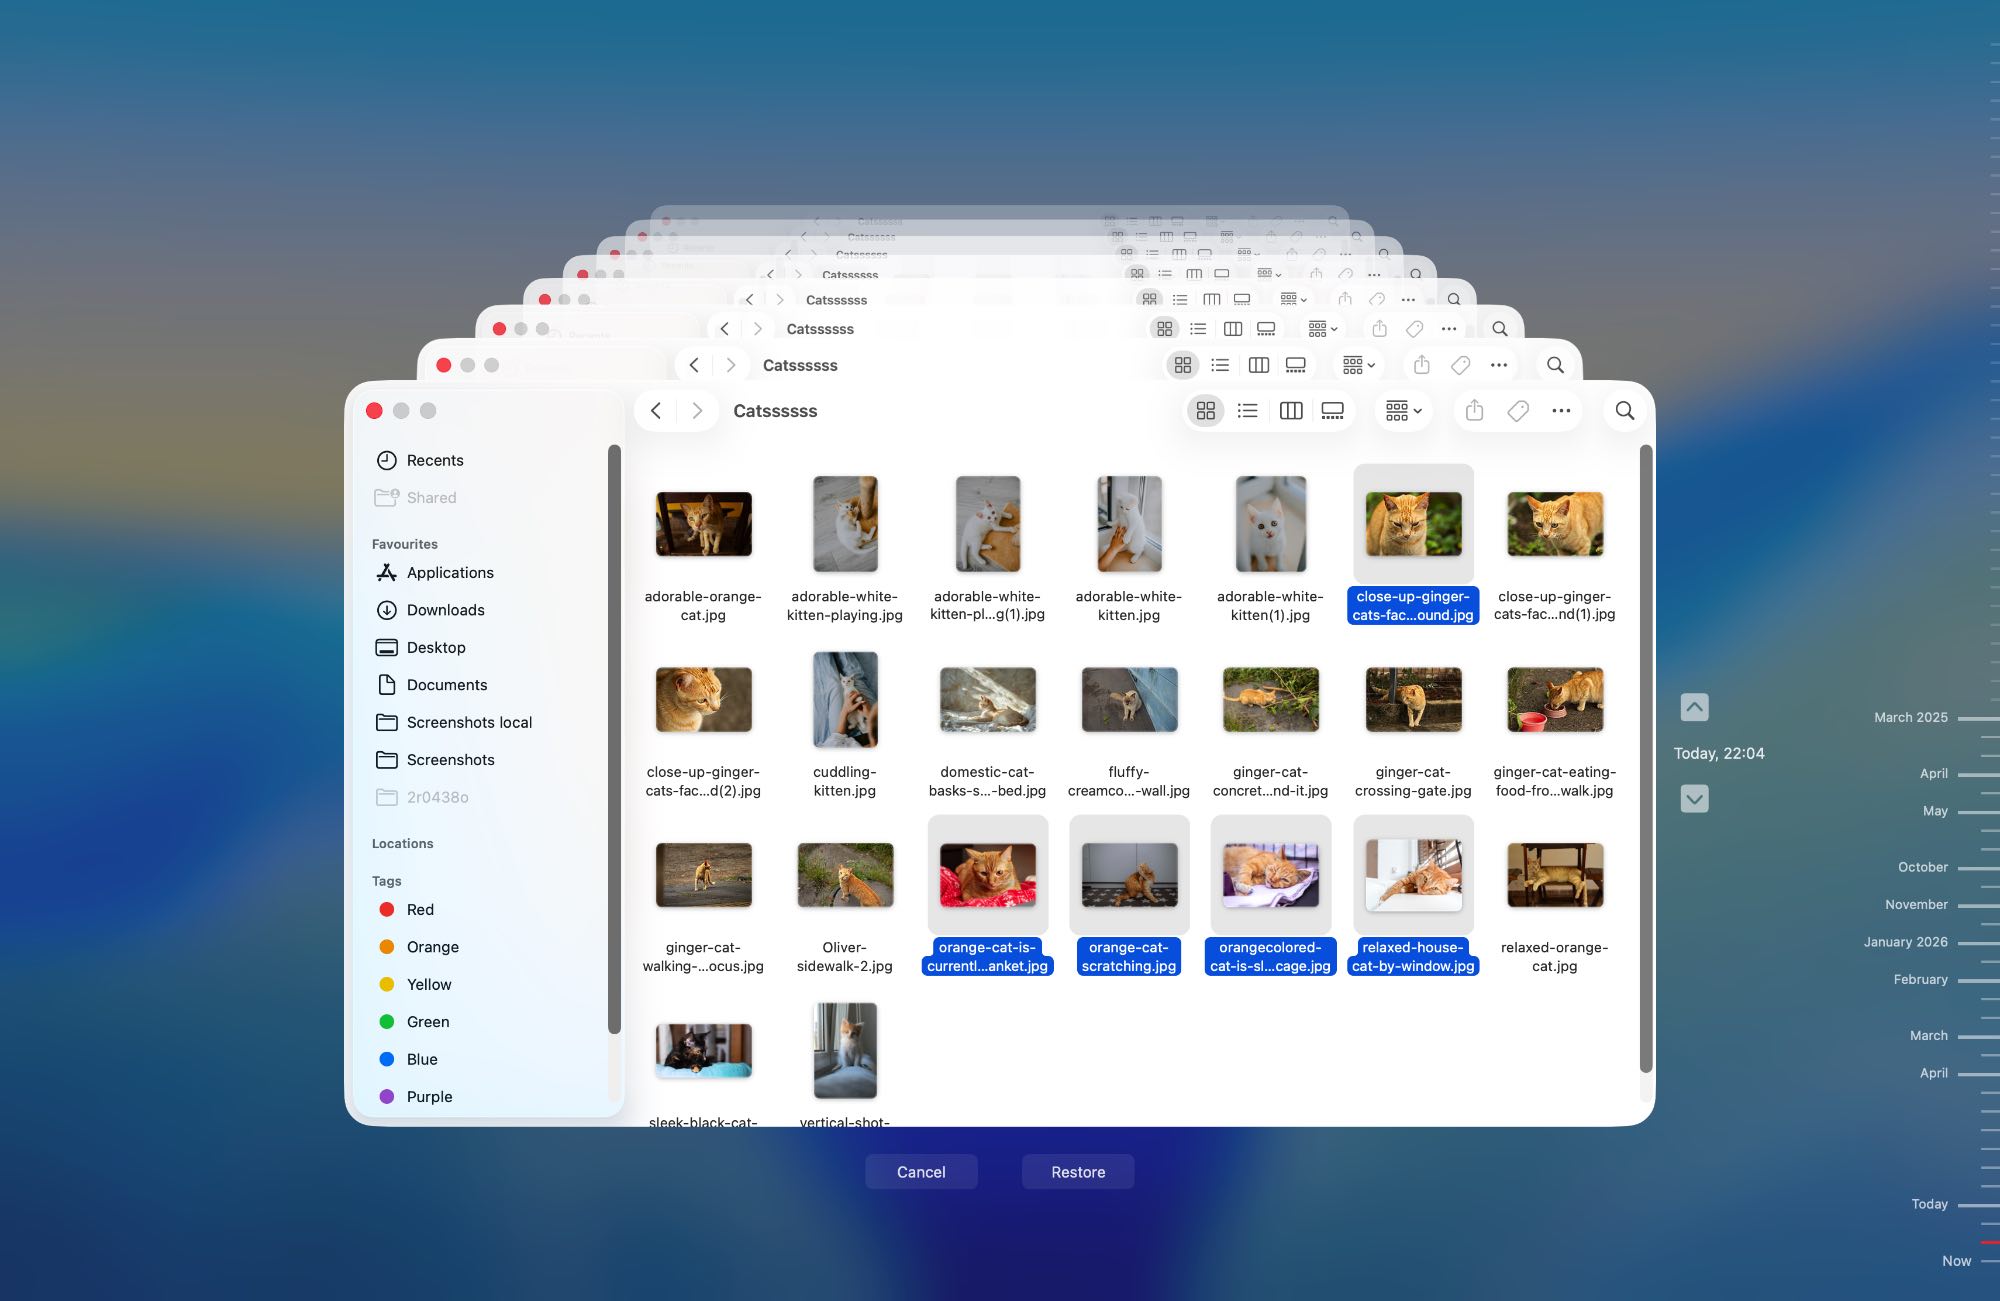
- The files will be returned to their original location on your Mac.
How to Recover a Corrupted APFS Partition on Mac
If your APFS partition is corrupted or no longer mounts properly, you can try to restore the partition itself and regain access to the data using TestDisk.
It’s a free tool designed primarily to repair damaged partition structures and recover lost volumes, which can make the data accessible again without a full file-by-file recovery.
The only thing about TestDisk that some people may not like is that it doesn’t have a graphical user interface, it’s text-based. So the tool requires careful attention. Incorrect actions, such as selecting the wrong partition during recovery, can make the situation worse and complicate any further attempts to restore your data. For that reason, it’s best to recover important files first using Disk Drill, or at least create a full backup before making any changes.
- Open Terminal and install Homebrew by running the command:
/bin/bash -c "$(curl -fsSL https://raw.githubusercontent.com/Homebrew/install/HEAD/install.sh)"
- Once Homebrew is installed, install TestDisk with command:
brew install testdisk
- After it, type
sudo teskdiskand then press the return key. - Select Create a new log file.
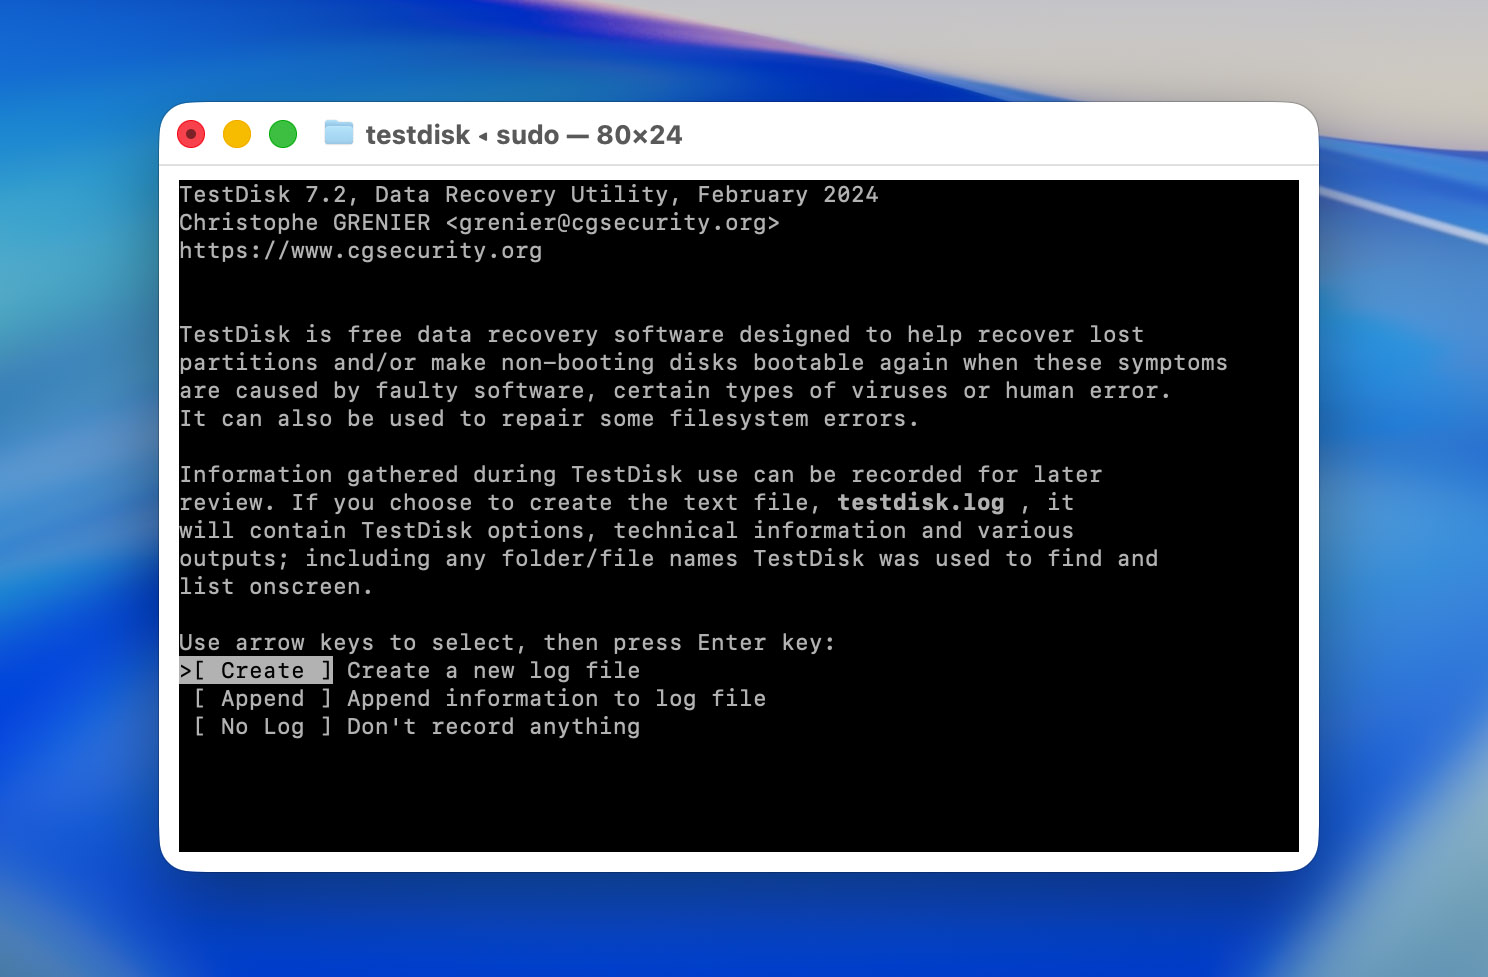
- Select the storage device that you would like to scan for lost data and then choose Proceed.
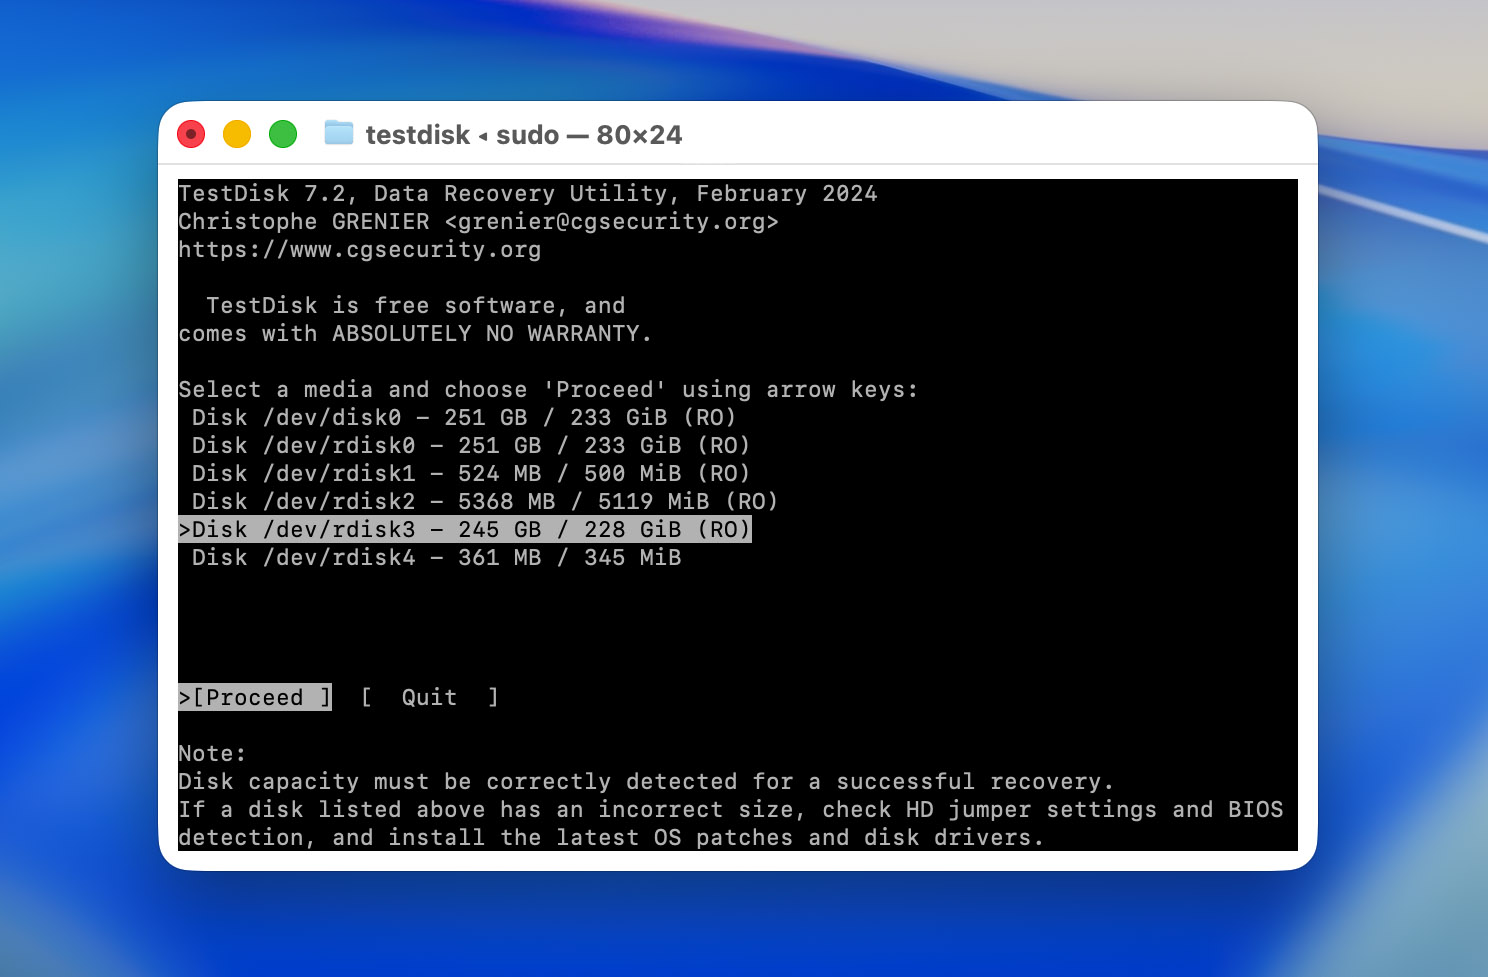
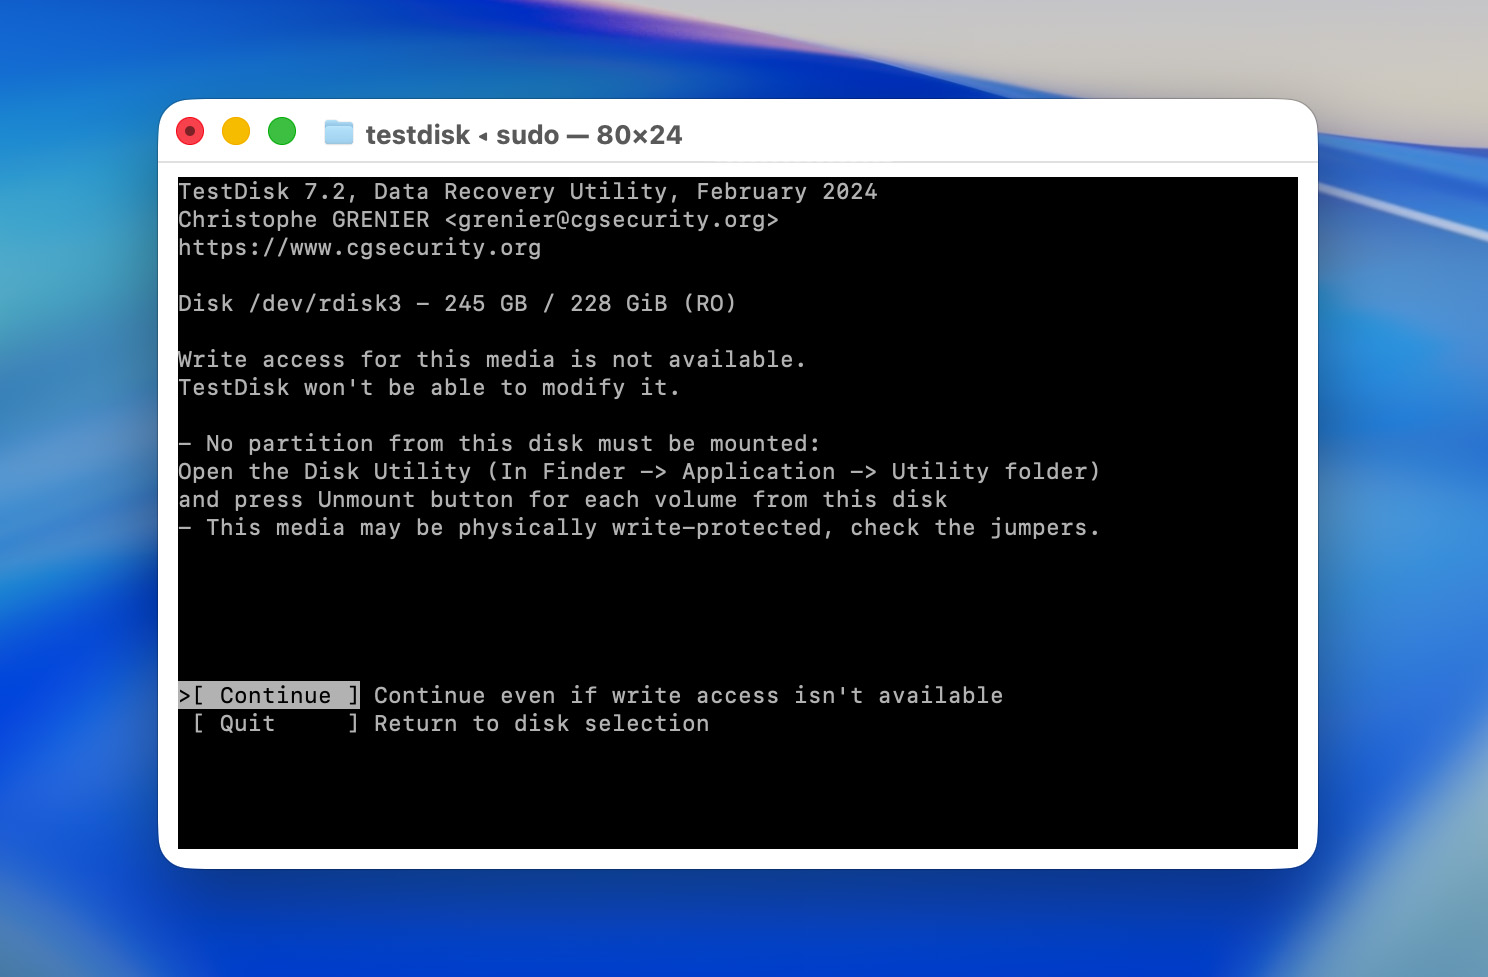
- Click return on your keyboard to select continue.
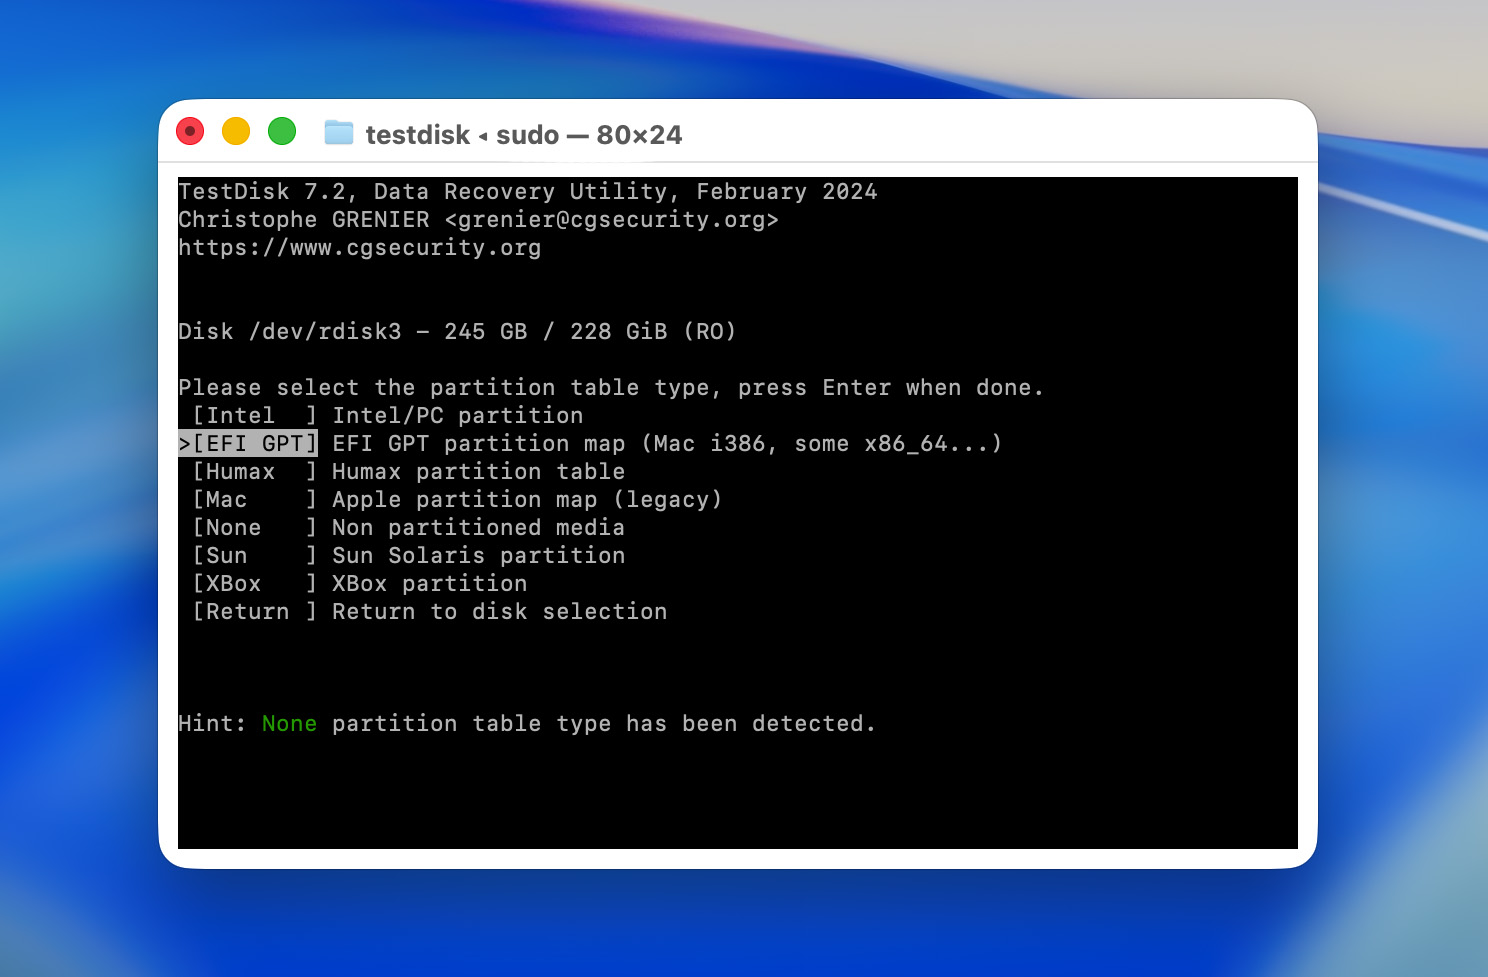
- Choose what data type the disk that you’re scanning is.
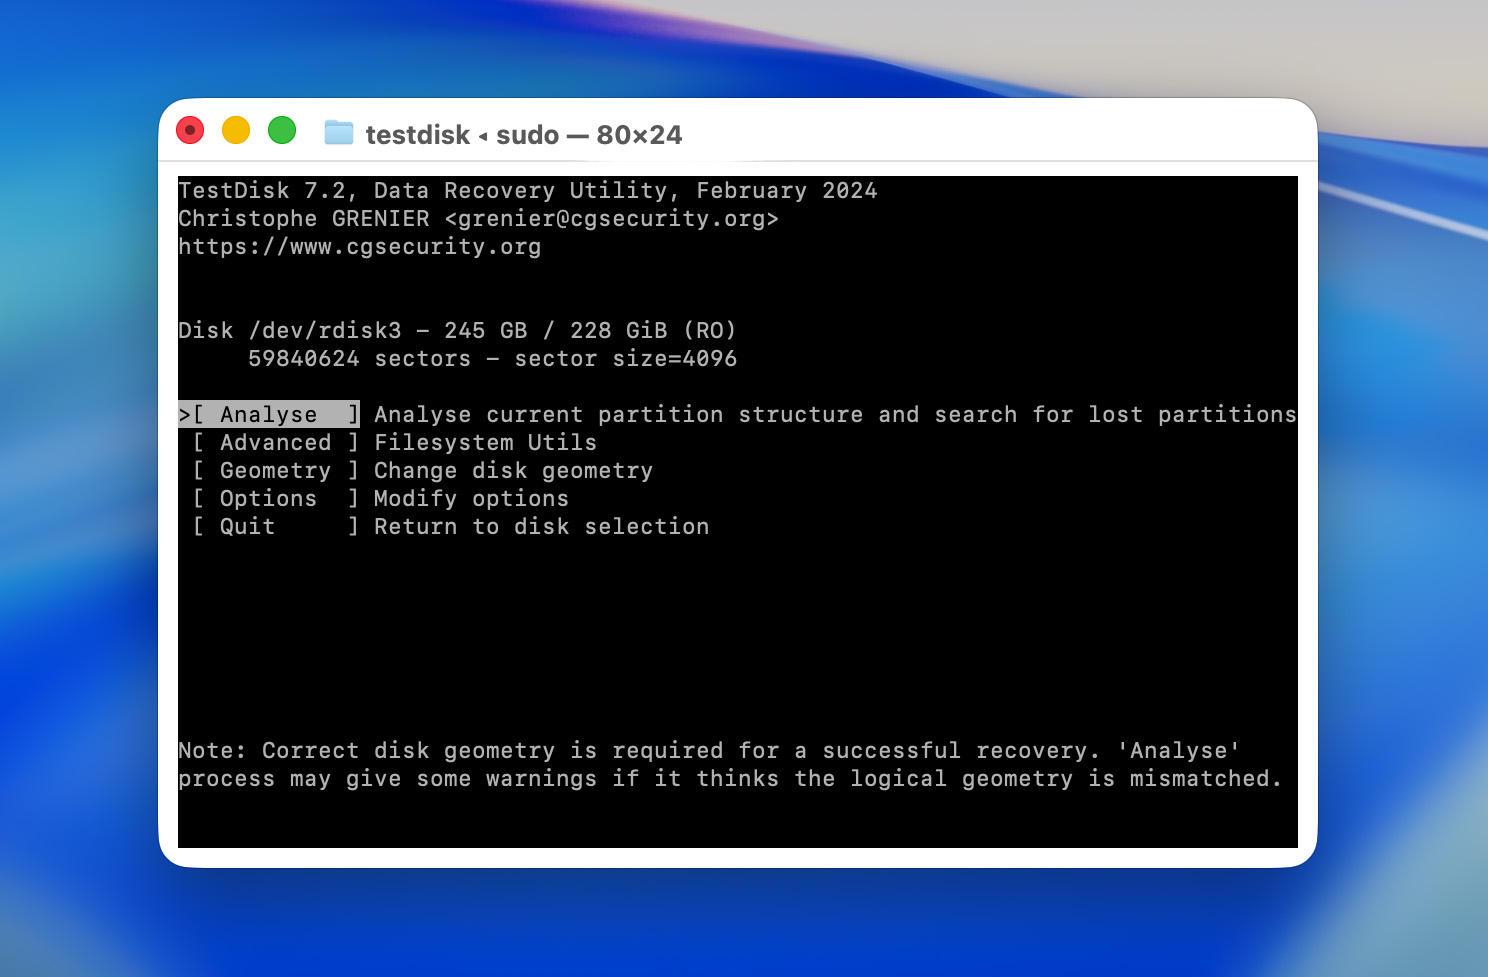
- Select Analyse and then wait for the scan process to complete.
- Wait for the scan to finish and then you can look at the recovered data.
When to Use a Data Recovery Center for APFS Data Recovery

A data recovery center may be a good option if your data is critical and you’re dealing with an unstable or physically damaged drive. In this situation, attempting recovery on your own is not recommended, as it could cause further damage.
It’s best to contact a professional service when your drive shows signs of physical failure—for example, if it won’t turn on, isn’t recognized by your Mac, or has other hardware-related issues. In such cases, using data recovery software may be impossible or could put your data at further risk.
If necessary, you can send your drive or Mac to a service like the one offered by CleverFiles, where specialists will attempt to recover your data. However, these services are not all-powerful—if the data has already been overwritten or permanently removed, the outcome may be no different from what data recovery software can achieve.
Conclusion
It’s quite fascinating just how far computers are coming these days with things such as reliability and speed. Apple’s new APFS is another step forward towards having better technology and when they create better things it pushes competitors to improve their products as well.
However, even with these new advancements in technology, nothing is 100% effective and there still can be issues when it comes to data on your Mac. But now you have a few ways to deal with it, whether that’s restoring files from a Time Machine backup or using a tool like Disk Drill.
If you’ve already gone through recovering deleted APFS files once, it’s probably not something you’d want to deal with again.
So you should know what can actually lead to data loss so you can avoid it in the future:
- For example, if your Mac shuts down unexpectedly, it can cause issues with your file system. This can happen due to battery problems, power outages, overheating, or hardware failure. Some users use a UPS to avoid this, as it gives them time to save their work before the system turns off.
- Encryption is another thing to keep in mind. FileVault helps protect your data and keeps it secure, but it can also make recovery more difficult. If you forget your password or recovery key, you may not be able to get your data back.
- You might also run into a situation where your APFS volume doesn’t mount. When that happens, macOS may not be able to access the drive even though the data is still there. In these cases, data recovery tools can still scan the drive and help you get your files back.
Looking at these cases, it becomes clear that issues can happen in different ways, and not all of them are easy to fix.
Because of that, setting up Time Machine can save you a lot of time and stress if something like this happens again.
FAQ
Apple created its own file system which is a replacement for HFS+. They did this for many reasons. The most notable ones are:
- Optimized solid-state drive storage
- Support for encryption and snapshots
- Increased data integrity
Apple really has been moving the industry forward, not just with things such as this but also with their new M1 Macs. Apple is putting out some of the best computers that you can get these days.
If you’re having issues with your APFS on your Mac, then the best app that you can use to recover your data would be Disk Drill. There are many reasons for this, some of the most notable being:
- Easy to use interface
- Modern design
- Power data recovery features
- Preview function
- Ability to scan
Another nice thing Disk Drill is that you can download it and try it before making a purchasing decision.
No, they’re not the same. APFS has many advantages over NTSF just because it’s much newer and designed from the ground up for more modern computing. When it comes to:
- Disk Duplication – stores identical blocks of data only once to your hard drive.
- Journaled files system keeps track of changes not yet committed to the file system’s main part by recording the goal of such changes in a data structure known as a “journal”.
- Copy On Write – makes for better writing data to your hard drive. It will ensure that data that is being saved has a higher chance of not being corrupted, increases write operation, and reduces disk usage/
SSD Optimized. - Versioning – when you change a file each version is stored on your disk for a period of time in case you want to revert back to the previous version it’s much easier to do so.
- Double the number of total files that can be stored on APFS as compared to the most aggressive NTFS limit.
- Total disk capacity is equal to the largest capacity usable by the most recent NTFS systems.
- Built-in file and disk encryption, similar to NTFS.
Recovering data from an APFS volume/partition can be done using Disk Drill
- Download and install Disk Drill onto your Mac.
- Launch Disk Drill and choose your Mac hard drive to save it for lost data.
- Wait for the scan to complete.
- Once the scan process has been completed, you can then review any data that Disk Drill was able to recover from your APFS volume.
- Choose what you want to recover and click on the blue Recover button.
If you’re having issues with your APFS volume on your Mac, you can try to repair it using built-in tools like Disk Utility. The most common option is to run First Aid, which scans the drive and attempts to fix file system errors.
This works best for smaller issues such as:
- File system inconsistencies
- Problems after an unexpected shutdown
- Volumes that don’t behave as expected
Keep in mind that repairing an APFS volume doesn’t always bring missing files back. If your data is already gone, you may still need to use a data recovery tool.
Data recovery from encrypted APFS drives works a bit differently compared to regular drives. The most important thing is access. You need the correct password or recovery key to unlock the drive. Without it, the data can’t be read or recovered. Once the drive is unlocked, recovery tools can work with it like with a regular APFS volume.
