300+ Million
TOTAL DOWNLOADS
Search the website
It doesn’t take much time to learn how to back up a Mac computer, certainly less than what it takes to recover lost data. In this article, we describe multiple tried-and-tested backup methods so you can choose the one that fits your needs the best. Of course, it’s always a good idea to combine multiple backup methods for extra redundancy.

Data recovery experts understand better than anyone the critical importance of regular backups. A simple mistake, a hardware glitch, or an unexpected Mac failure can lead to permanent data loss, where even the most advanced recovery tools might fall short.
That’s why Disk Drill comes with advanced tools built not just to recover lost files, but to protect your data before anything goes wrong. The latest version of Disk Drill offers a professional-grade byte-to-byte backup tool that lets you create an exact, mountable copy of any drive. It’s the safest way to recover files from a corrupted disk or explore deleted data without putting the original source at further risk.
Data loss knows no mercy, and it has a tendency to come when you expect it the least. By regularly backing up your MacBook Pro, MacBook Air, iMac, Mac mini, or Mac Pro, you can avoid losing important files whose recovery otherwise wouldn’t be possible even with the best data recovery software.

Once emptied, the Trash bin folder, whose purpose is to temporarily store deleted files, can be recovered only using specialized data recovery software, and the results are not guaranteed, especially not when a TRIM-enabled SSD is part of the equation.
It doesn’t take much to make a mistake and accidentally erase or format a wrong partition. But with a complete backup at hand, you should be able to recover the entire content of the partition without any issues.
If only users never made any mistakes, data loss wouldn’t be such a widespread and costly issue. Unfortunately, users do make mistakes, which is why it’s so important to know how to backup data on MacBook Pro, MacBook Air, Mac mini, iMac, and Mac Pro.
Data loss can often be addressed using data recovery software, but not if its cause is physical damage. In such cases, your best option is to recover lost data from a backup.
SSDs delete files fast (often instantly) due to TRIM. Once a file is gone, recovery is rarely possible. That’s why having a backup is even more important; it’s often your only shot at getting lost data back.
Hard drives and SSDs can fail. A sudden hardware issue or external factors like a power loss can corrupt the file system and make your data unreadable. In some cases, the entire drive becomes inaccessible. A backup is often the only way to avoid permanent loss.
Need a safe copy of your drive? Disk Drill’s Byte-to-Byte backup is free and easy to use.
Below is a step-by-step guide on how to create a full backup of your Mac disk. This backup will give you access to everything on the drive: all the existing files and even those you’ve deleted or lost. You can return to it at any time.
First, download the latest version of Disk Drill. The Byte-to-byte Backup feature is a free extra, so you don’t have to purchase a license to use it. To install Disk Drill, open the downloaded installer file and drag the Disk Drill icon to the Applications folder.

Next, connect an external hard drive to your Mac. It should have more space than the disk you're backing up, not just the amount of used data, but the entire disk size. That extra room is needed for metadata and file system structures, especially for a full disk image. Once the drive is connected, open Disk Drill. Keep in mind that Disk Drill will ask for the admin password when launched for the first time.

To create a byte-to-byte backup image, select the Byte-to-byte Backup feature from the left pane and choose the drive you want to back up. Click the Create backup button and specify where you want to store the backup file. When backing up a drive encrypted with the Apple M1-M4/T2 security chip, Disk Drill will warn you that the backup image probably won’t be recoverable. Unfortunately, this is a downside of using full-disk encryption, and there’s nothing that can be done about it.

As Disk Drill creates the backup, you’ll see a visual map of your drive. This lets you monitor the progress and assess the condition of your disk. If any bad sectors are found, they’ll be marked in red. Disk Drill will automatically retry reading those areas several times, using smaller block sizes, to recover as much data as possible and create a byte-accurate image. The total time depends on the size and health of the drive. If needed, you can pause the process and resume it later without starting over.

As soon as the backup completes, you’ll have an exact copy of your drive saved as a disk image file. You don’t need to do anything with it right away (you can keep it stored safely and return to it whenever you’re ready to recover your data). If you want to start recovery right away, you can add the image to Disk Drill. Look for the Attach disk image option at the bottom of the main window. From there, it will appear in the list of devices, and you can scan it just like a physical drive.
You can also mount the image in macOS (it's a .dmg file) and browse its file contents directly in Finder, though keep in mind, deleted files won’t show up this way (you’ll need to scan the image using Disk Drill).

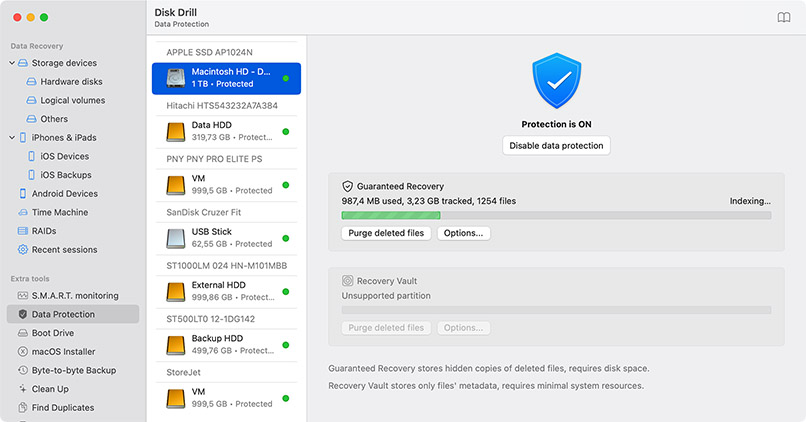
If you want real-time data protection, check out Guaranteed Recovery and Recovery Vault. Recovery Vault stores file names and paths when deletion happens, which makes lost files easier to locate later. Guaranteed Recovery creates full copies of files sent to the Trash or other selected folders. With both tools active, you keep a clear record and a fallback for critical data.
Just like it’s a good idea to wash your car before taking it in for servicing, there are certain steps you should always take before backing up your Mac. If you do, the chances of you experiencing issues during the backup process are guaranteed to drop down significantly.

Regular backups work better when you clean out junk first, like old downloads, duplicates, or app leftovers. They just waste space. Disk Drill includes free tools that help you spot and delete that clutter. It won’t affect byte-to-byte images since those take the full size of the entire disk or partition, but it’s still helpful for scheduled or cloud-based backups.

While the best backup software applications check how much storage space is available before the backup process begins, it’s always a good idea to check available storage space manually. The easiest way to do just that is by launching Disk Utility and choosing your backup storage device from the left pane.

For your backup to contain the latest versions of important files, you need to first save your work. Why? Because many applications store document changes in a temporary storage location that may be excluded from your backup, and some even store changes only in system memory.

It goes without saying that your backup drive must have a functioning partition on it otherwise you wouldn’t be able to copy files to it in the first place, but there’s more to it than that. You also need to use the right file system for the job because not all files systems are supported by all operating systems. We recommend exFAT for the best cross-platform compatibility and APFS for Mac-only backups.

To avoid software conflicts and other issues during the backup process, you should close as many running apps as possible. When we say close, we actually mean that you should terminate them (such as by pressing the CMD + Q shortcut) so that they’re not running at all. You can open Activity Monitor to see all running processes.

Backups sometimes take a long time to create, especially when backing a lot of small files to a slow hard drive. That’s why you should always pick a time when you know your Mac won’t be needed. By starting the backup process at the wrong time, you might be tempted to interrupt it just so you can use your computer as you would normally, and that’s never a good idea.
Byte-to-byte backup images created using Disk Drill make it easy to recover data even from the most complex data loss situations, but they’re not your only option. Let’s go over a couple of other ways you can back up your Mac.
To back up important files so they can be recovered even if your main hard drive stops working, you actually only need a suitable external storage device, such as a USB flash drive:
Sure, there’s nothing convenient about manually backing up files like this, but the method doesn’t require any setup and it just works.

All Mac computers come with a backup application called Time Machine. You can configure this backup application to automatically back up your data to an external storage device:
Need to find a backup on Mac later? Just open Time Machine, click the date on the right, and browse your snapshots.

It takes just a minute to back up files and folders to Apple’s cloud storage service, iCloud. Data in iCloud can be accessed from anywhere and any device, so recovering it is easy. To enable iCloud on your Mac:
Of course, you can use any cloud storage service you want—not just iCloud. Some of the most popular options include Microsoft OneDrive, Google Drive, and Dropbox.

A network-attached storage device, or NAS for short, is basically a file storage server that can be connected to your home network and accessed from any device on the same network. That’s right, NAS devices let you back up your MacBook Air, MacBook Pro, Mac mini, or Mac Pro to a remote location wirelessly using Time Machine or any other backup software.
These days, NAS devices are fairly affordable (at least considering what they can do), so the convenience they provide is well worth the investment. Popular manufacturers of NAS devices include Synology, QNAP, Seagate, WD, and Buffalo.
 Device")
You can also back up your Mac through a dedicated cloud-based service. These tools offer automatic, continuous backups without much input from you. Some services cover only user files. Others back up external drives, maintain version history, or include system-level data. They store your backups offsite in the cloud, so even if your Mac gets lost or damaged, your files stay safe and accessible.
These services often come with features like remote file access, end-to-end encryption, and even unlimited storage. They’re not always cheap, but you’re paying for convenience.

When it comes to choosing a backup drive, you have two basic options: SSDs and HDDs. Let’s take a quick look at each of these two options.
")
SSDs don’t have any moving parts inside because they store data using integrated circuit assemblies. Modern SSDs can offer very fast read/write speeds with minimal latency.
Use when: backing up data in real-time or at a short interval.
Avoid when: backing up large quantities of data that you don’t expect to access all that often.
")
HDDs are electro-mechanical storage devices that store data on rotating platters coated with magnetic material. While more affordable than SSDs, their performance is considerably worse.
Use when: backing up a large amount of data for archival purposes.
Avoid when: you want to create backups as quickly as possible to prevent their creation from interfering with your work.
by Disk Drill Team
You can back up your data on a Mac in several ways. It depends on what you have available and how important your data is.
There’s no one-size-fits-all answer. The best method to back up a MacBook or Mac depends on how much data you need to protect, how often it changes, and what you’re willing to invest (in time, effort, or money). Here are a few strong options:
In general, using two different backup methods (one local, one off-site) is the safest route. If anything goes wrong, you’ll have options.
To back up your Mac to an external drive, you can always simply plug the drive in and copy your important files manually using Finder. It’s quick, doesn’t require any setup, and works on any Mac.
If you want something more automatic, use Time Machine. Just connect the drive, go to System Settings > Time Machine, select the disk, and let it run. It will back up your entire system regularly and let you restore specific files or your whole Mac later.
For a full, low-level backup (including deleted files and free space), you can use Disk Drill. With its Byte-to-byte Backup feature, you can create an exact image of your internal drive and save it to your external one.
Yes, you can back up your Mac without using an external hard drive. There are many backup tools, such as the byte-to-byte feature included for free in Disk Drill, that let you save your backup to any suitably large storage device. Alternatively, you can also use a cloud storage service like iCloud, Microsoft OneDrive, or Google Drive.
Yes, you absolutely can back up your Mac without using Time Machine. There are multiple third-party tools and methods that offer more flexibility or features that Time Machine doesn’t provide.
You can use apps like Disk Drill to create a full byte-to-byte backup of your entire drive, including deleted data and free space. There are also many other third-party options: everything from tools that create bootable backups or run on a schedule, to full cloud-based services that store your data offsite automatically.
If you don’t want to install extra software, you can also backup files on a Mac to an external hard drive manually, just copy-paste them to a suitable drive or upload them to cloud storage like iCloud, Google Drive, or OneDrive.
That depends on a lot of things. There’s no single answer. As you’ve probably guessed, backup speed can vary a lot based on your setup. Here’s what makes the biggest difference:
There are many ways to manually back up a Mac, but it’s never a good idea to rely on just one backup method. Instead, you should combine several methods to achieve redundancy. Here’s an example of how you can do just that:
That depends on how you plan to back it up, but if you’re using Disk Drill’s Byte-to-byte Backup, there’s one simple rule: your external drive should be at least as large as the source drive, plus some extra room to spare. Let’s break it down:
As you may have guessed, more space means more flexibility. If you want to store multiple backups, or keep both a Time Machine backup and a Disk Drill image, consider a 1 TB or 2 TB external drive, even if your Mac has a 256 GB or 512 GB disk.
It’s always better to have more space than you need.
Before we can answer how to back up your entire Mac to an external hard drive, we need to clarify what “entire” really means, because different people mean different things.
Do you want to:
Each of these goals requires a slightly different approach:
No matter which method you choose, make sure your external drive has enough free space, ideally more than the full size of your internal drive. And always eject the drive safely after the backup is complete.
There are two basic ways to back up an external hard drive to an external hard drive on Mac:
The second approach offers several advantages, such as the possibility to automate the backup process to keep the two external hard drives in sync.
Disk Utility isn’t a full-featured backup tool, but you can still use it to create a basic disk image, which can be useful if you want a quick, one-time snapshot of a volume.
Here’s how to backup data on a Mac using Disk Utility:
As you may have guessed, this method works best for static data or when you want to archive a disk at a specific point in time.
If your Mac won’t boot properly or you need to back up data from a failing or unstable drive, you can use Disk Drill directly in Recovery Mode, without booting into macOS. Here’s how to backup data on Mac in Recovery mode:
For Disk Drill 5 (macOS 10.15.7–15.x) use
“sh <(curl http://www.cleverfiles.com/bootmode/boot5.xml)”
For Disk Drill 4 (macOS 10.11.6–12.6) use
“sh <(curl http://www.cleverfiles.com/bootmode/boot4.xml)”
Note: This method is intended for Intel-based Macs without a T2 security chip, as well as older systems that do not use Apple Silicon (M1–M4). Due to system disk encryption and security restrictions on T2, M1-M4 Macs, accessing internal drive data directly in Recovery Mode may not be possible.
REQUIREMENTS
macOS 10.15.8–26.x, 69.7 MB
Use Disk Drill 1.x-5.x for OS X 10.5+
AVERAGE USER RANK
NEWEST RELEASE


TOTAL DOWNLOADS
PRO CLIENTS
in 160+ countries
Just wanted to leave an excellent review!!! I accidentally deleted all of my husband's med school files from his external hard drive and luckily Disk Drill was able to retrieve all of them! SOOOOO SATISFIED!
In my field of study, data is important so protecting it is crucial. I needed a program that could help me recover sentimentally important pictures from an old hard drive that had been corrupted. I have tried many recovery tools but they were either inadequate or very expensive. During a class discussion, I was introduced to Disk Drill by CleverFiles and I decided to give it a try. Not only have I been able to recover most of my lost files, but also clean up my current hard drive. Disk Drill goes beyond just helping you recover files you can also establish a form of backup, clean up your drives by looking for and removing duplicates. I love how intuitive the program is as well as very user-friendly. I am still a novice when it comes to Disk Drill, but that is okay since if you do get stuck they came prepared and have help links just about every where. I look forward to recovering files from other devices such as old Android phones and iPhones. I love that the program can be used across the board with most of your devices. Disk Drill turned out to be more than what I had expected and I look forward to seeing what other things I can do with Disk Drill.

