Microsoft Word documents (DOC and DOCX) created using the native Word app or the Word for the web app that’s available to Microsoft 365 users are the go-to choice for work, school, and personal document creation on Mac.
But despite their popularity, Microsoft Word document formats are not immune to accidental deletion, loss, or failure to save. Understanding that such setbacks can cause significant stress and inconvenience, we set out to create a comprehensive guide to help you recover your missing Word documents by addressing as many scenarios as possible.
| The reason a Word document was lost | Solution |
|---|---|
| I have accidentally deleted an important Word file that is no longer in the Trash. | Recover Word document on Mac using Time Machine or try a data recovery software ✅ |
| The document was recently deleted by the user. | Search your Mac Trash for the lost file. |
| I had to force quit Word and need to recover files. | Use the AutoRecovery feature. |
| Word froze and I did not save the document. | Search in the Mac Temp folder or try AutoRecovery. |
| Word crashed while I was working on a document. | Use AutoRecovery or check your Mac Temp folder. |
| I need to recover an unsaved Word document, but AutoRecovery was not enabled. | Try searching the Mac temp folder or recovering from within the Word app. |
| I want to restore an earlier version of a Word document on my Mac. | You can recover an earlier version of a file with a Time Machine copy or from a backup. |
| My Word document got corrupted, and I can’t open it. | Attempt repairing it or restoring previous versions. |
How to Recover Unsaved Word Document on Mac
Have you closed a Word document before saving it? Or perhaps Word crashes on your unexpectedly, causing you to instantly lose all your progress? Such unfortunate situations do happen, but this section offers multiple methods that can help you recover unsaved Word documents on your Mac.
Method 1: Recover Unsaved Word Docs on Mac with AutoRecovery
Microsoft Word for Mac has an AutoRecovery feature that can help you recover unsaved Word documents. This option is turned on by default when you install the application and automatically saves a copy of open documents every 10 minutes.
You can modify this setting to have the app save at a shorter or longer time interval if you like. If the application or your computer happens to crash while you are working on a Word document, you can recover it to the state it was in when the last automatic save was performed.
Steps to recover an unsaved Word document on Mac:
Step 1. Open a Finder window on your Mac.
Step 2. Select the entire computer as the location.
That will be searched and enter ‘AutoRecovery’ in the Search field. You will be presented with a list of files. It begins with ‘AutoRecovery save of’ followed by the name of the Word document you are trying to recover.
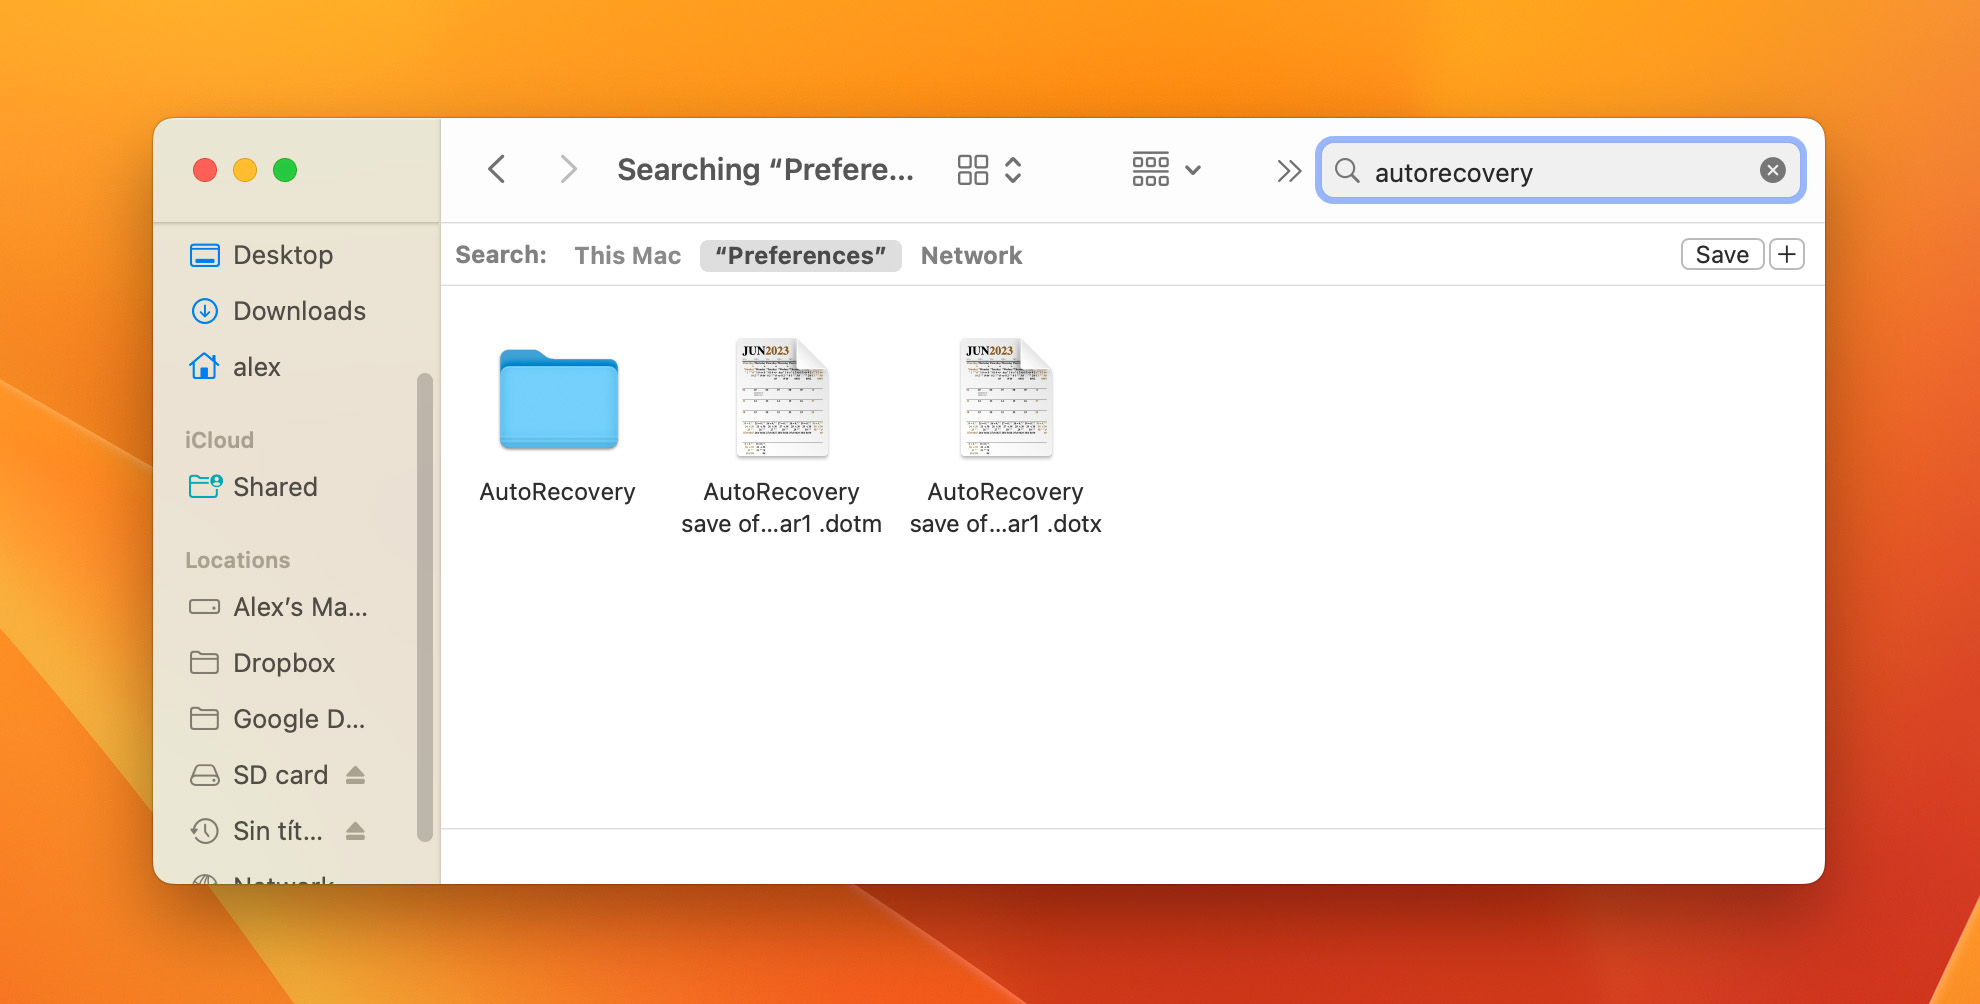
Step 3. Double-click on the file to be recovered. This will open the file in Microsoft Word.
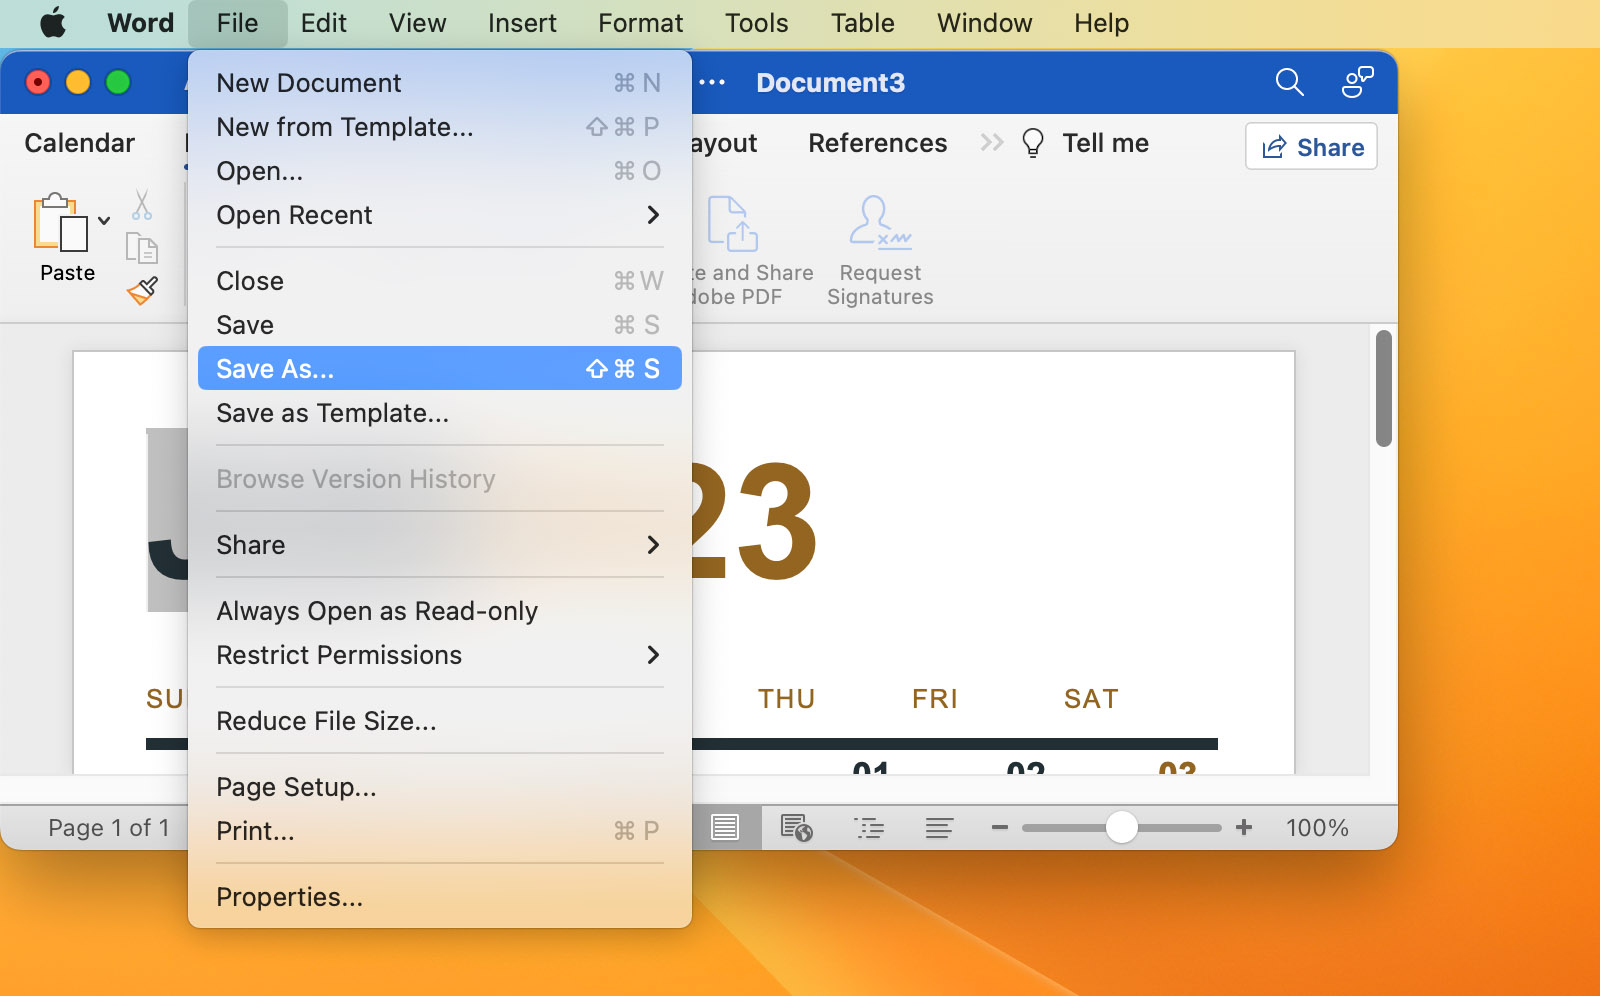
Step 4. Select the File menu and choose Save As. Pick a new name for the document and a folder in which it will be stored and click the Save button.
Method 2: Recover Lost Word docs from the Mac Temporary Folder
Your Mac’s temporary folder may have the lost Word file you need. Try the following procedure to check the contents of the temporary folder:
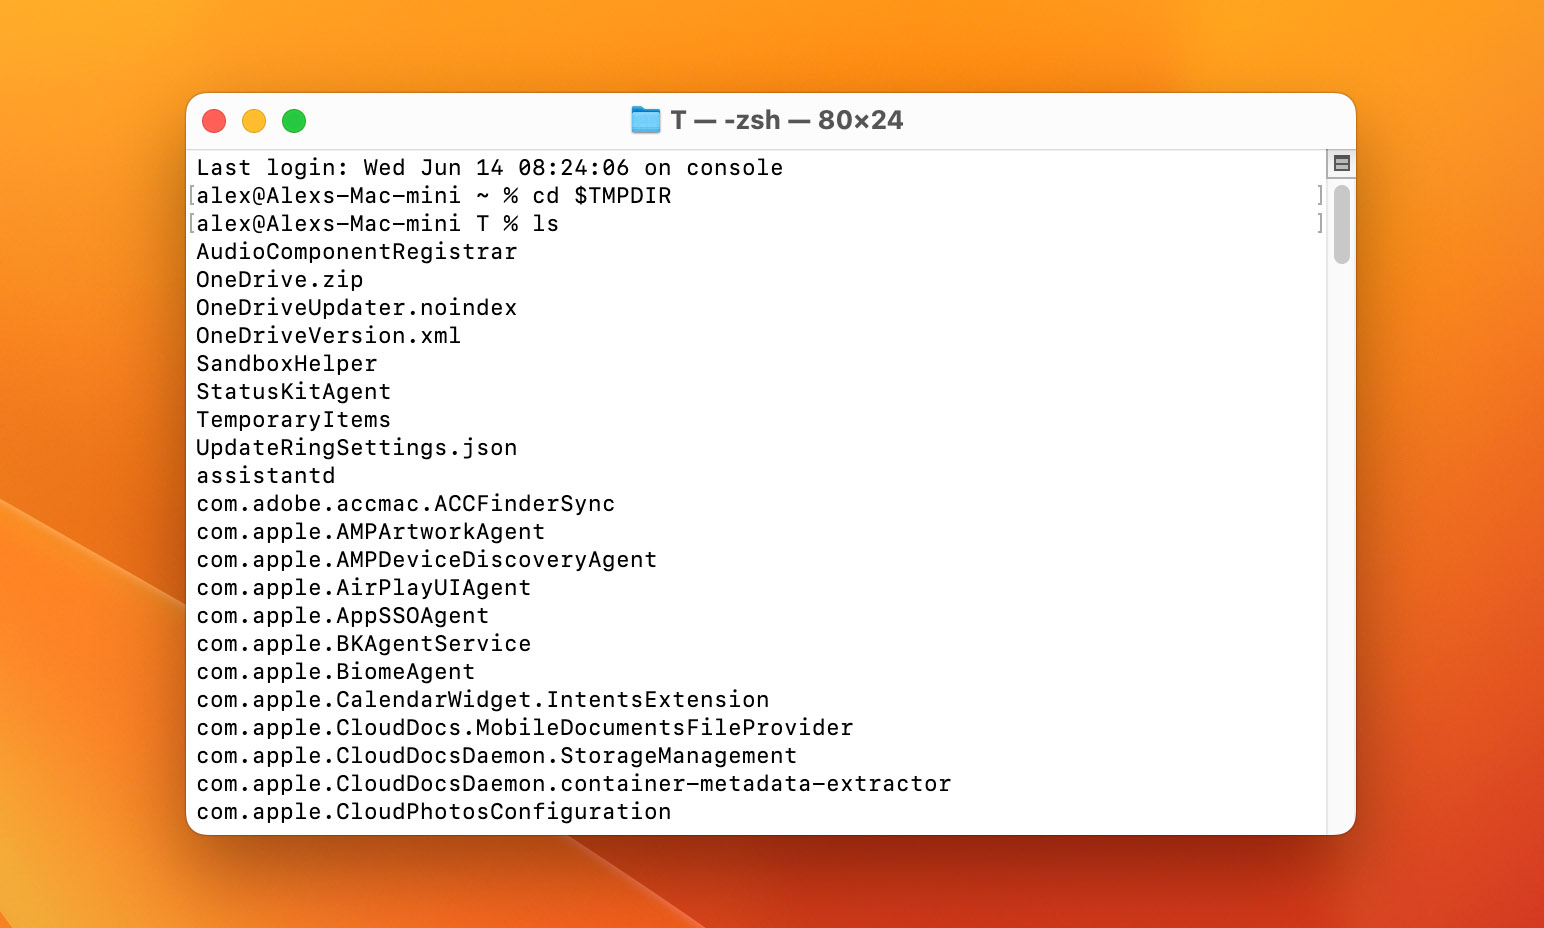
- Open Terminal.
- Type: cd $TMPDIR.
- Type: ls to display the files. Look in the TemporaryItems subfolder for your document.
- Search for the lost file. If you find the Word doc you are looking for, protect it by saving a copy to a new storage location.
Method 3: Restore a Previous Version of a Word File from Within the Word App
Steps to perform the recovery:
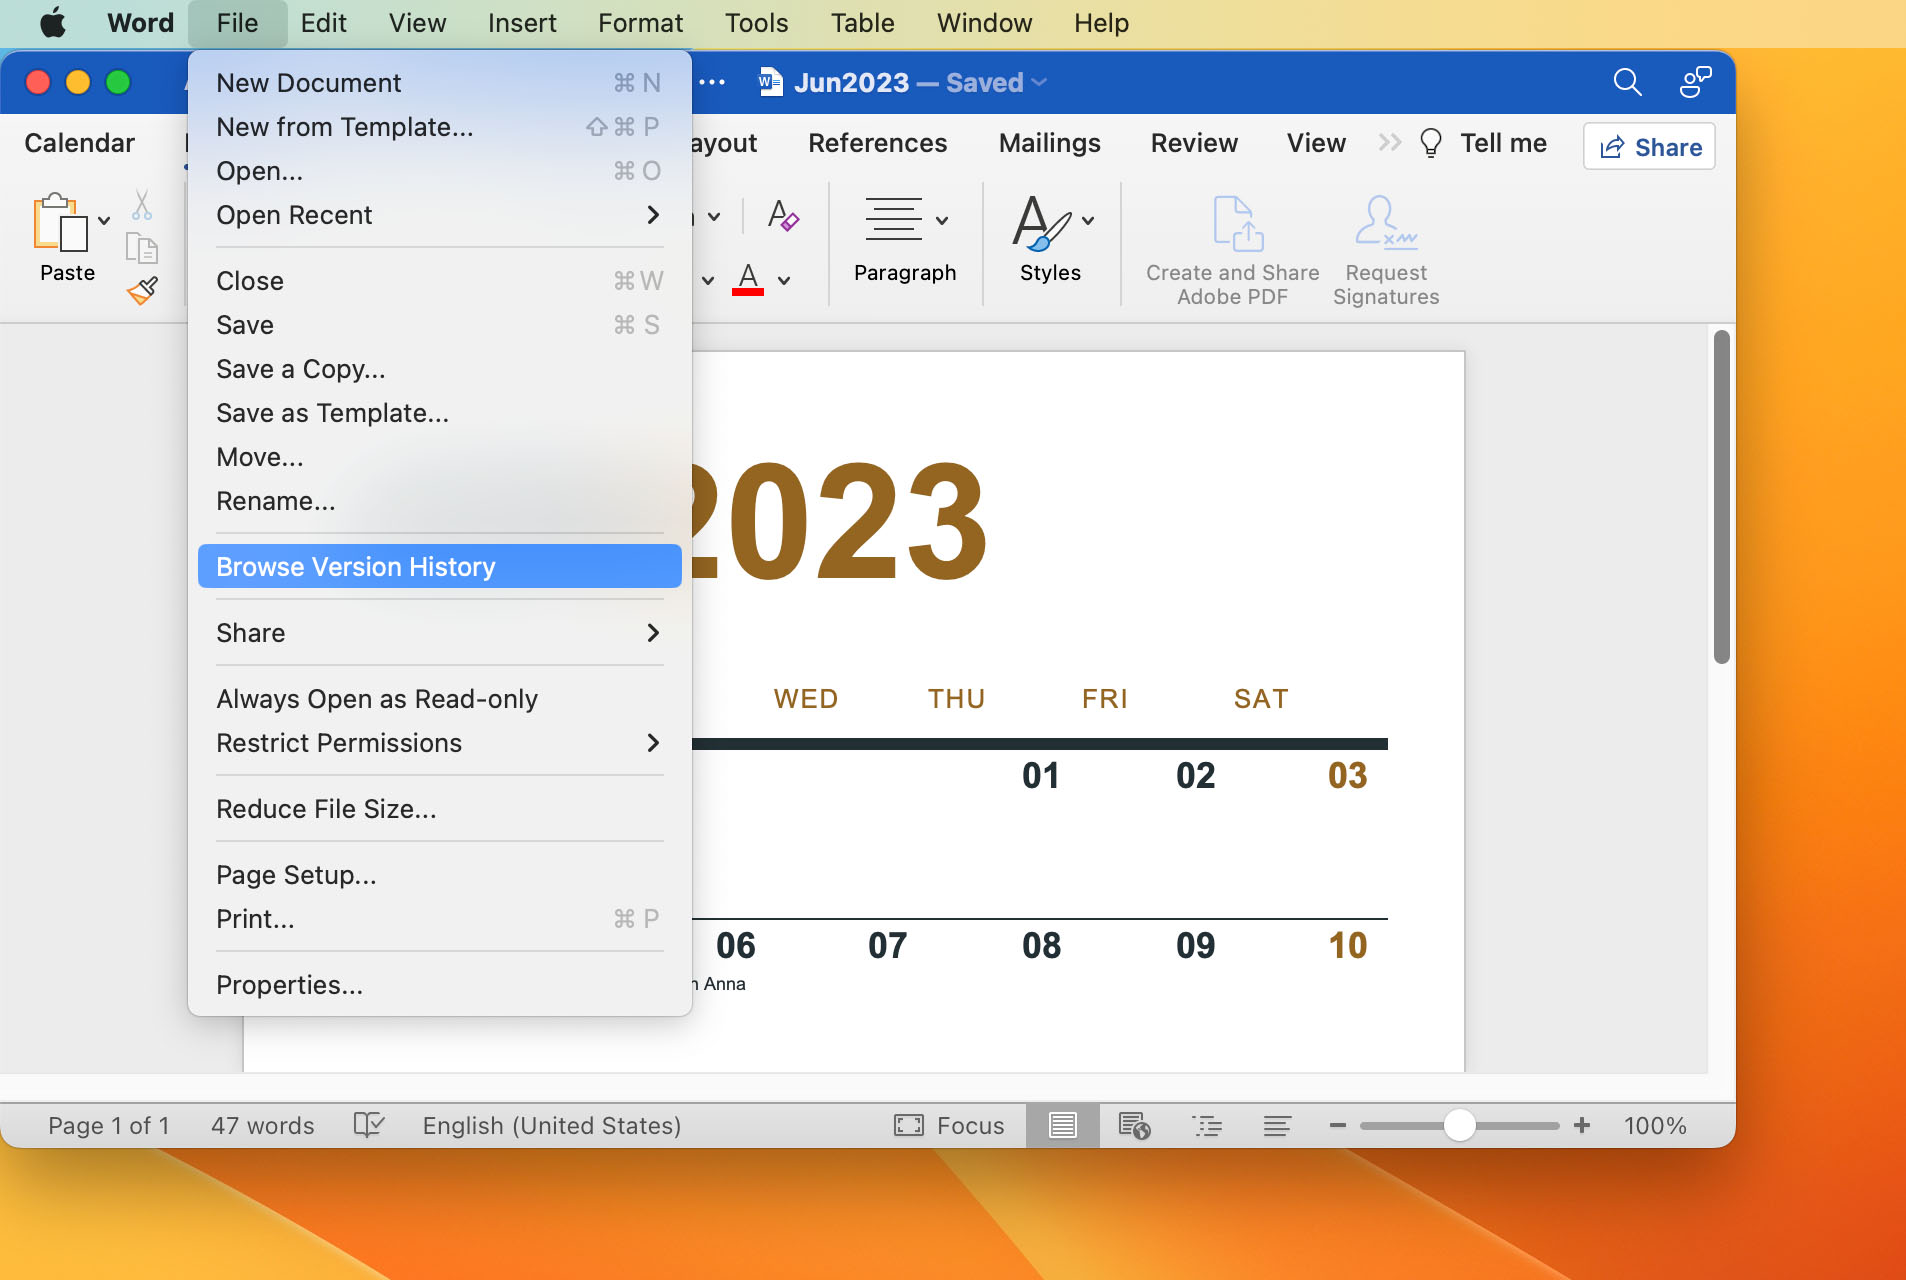
- Open the most recent version of the Word file you want to recover.
- In Word go to File > Browse Version History.
- You will see a panel displayed that shows all previously saved versions of the file.
- Select the previous version you wish to recover and choose Restore to complete the process.

How to Recover Deleted Word Documents on Mac
It would be impossible to find a seasoned Mac user who hasn’t accidentally deleted the wrong file at least once, so don’t feel too bad if it happened to you too. Instead of crying over spilled milk, follow our step-by-step guide on how to recover deleted Word documents on your Mac to retrieve your valuable document quickly and efficiently.
Method 1: Recover Deleted Word Documents from a Trash Bin
Files that have been deleted from the folder will no longer be visible in that location. They are, however, not totally removed from your Mac until you empty the Trash.
- Open the Trash folder by clicking its icon in the lower-right corner of your Mac’s screen.

- Right-click on the file name and select “Put Back”. This will return the file to its original location.

Method 2: Recover Deleted Word Documents Using Disk Drill
Word document recovery software like Disk Drill can prove to be instrumental in recovering those important Word files that have mysteriously vanished from your computer. It employs deep scanning technology to find deleted files and file fragments that are still physically on your computer’s storage but are no longer visible to the operating system.
Follow these steps to recover a Word document on Mac:
- Download and install the free version of Disk Drill.
 💡 If your Word files are stored on the system drive, then we suggest you install Disk Drill on a USB stick to minimize the chances that the installation will overwrite your files.
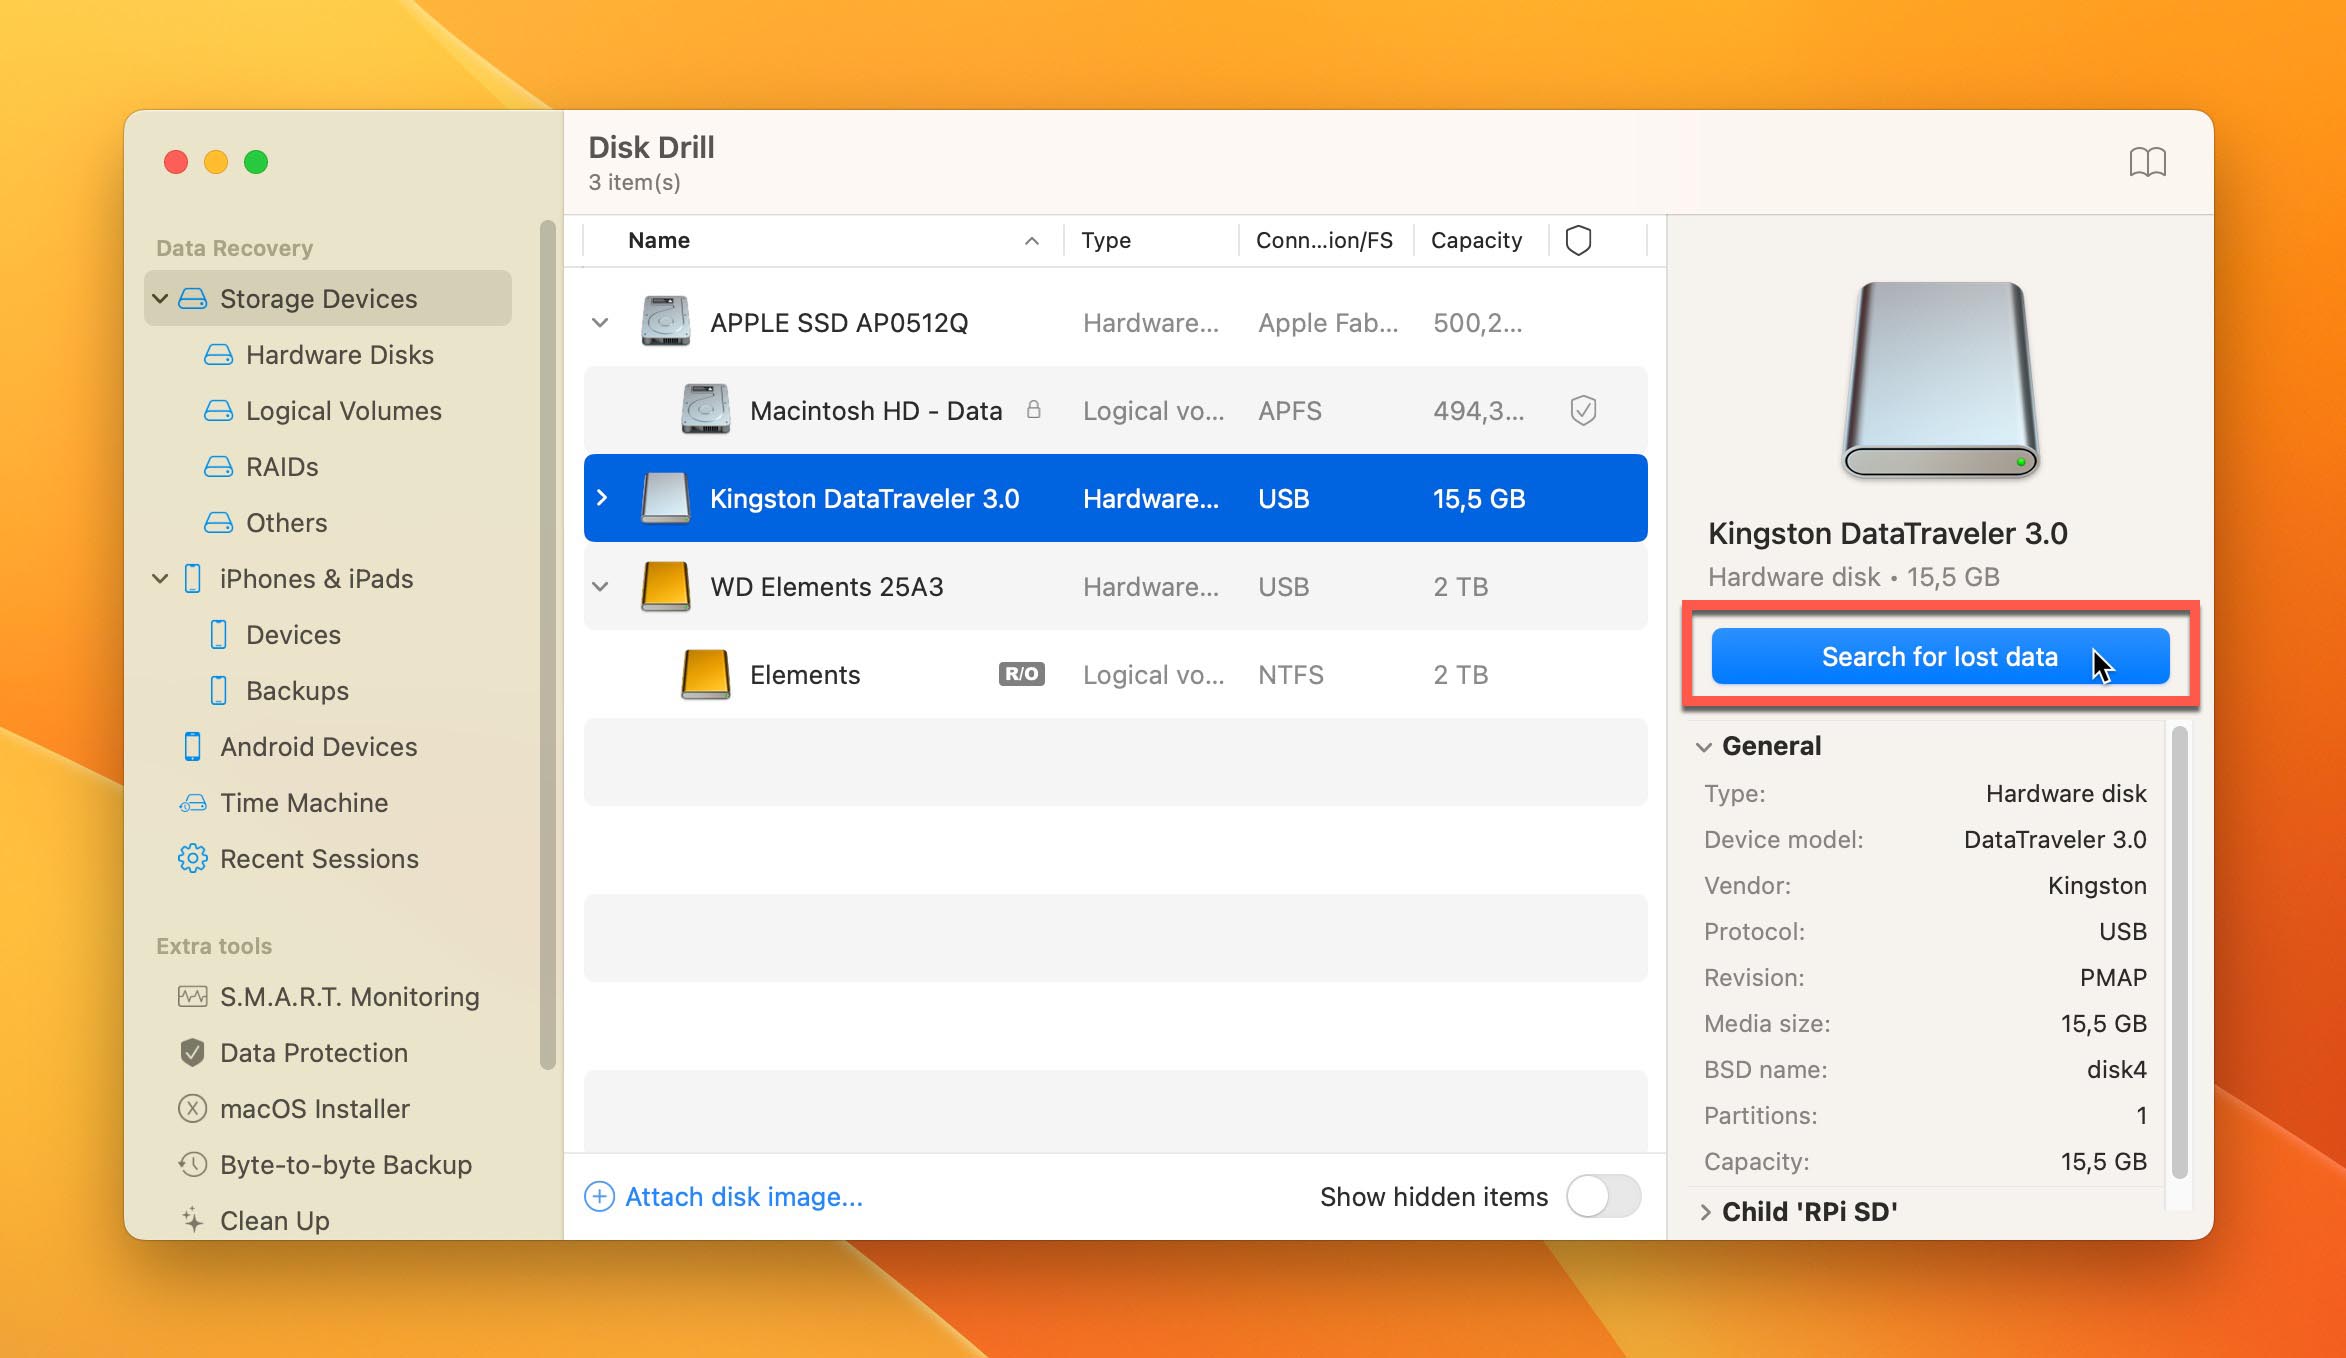
 - Launch the application and select the disk on which your lost documents were last seen.
- Click the ‘Search for lost data’ button to start a scan of your storage device.
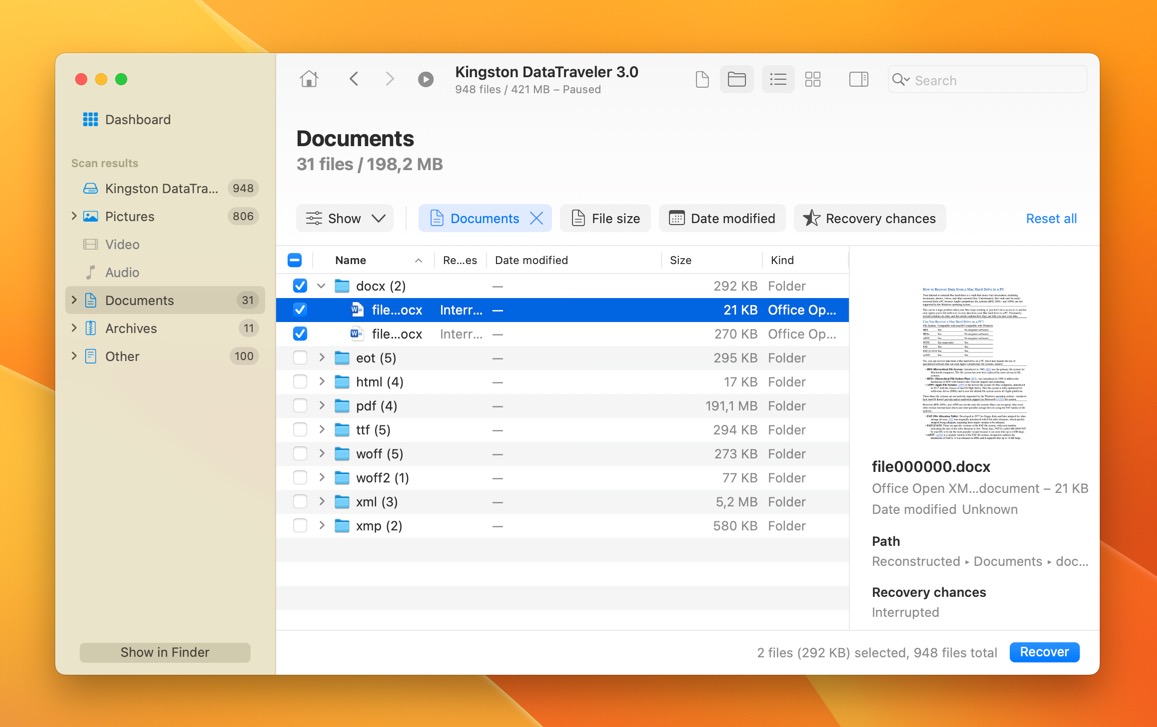
- Use filters to display specific types of files to speed up the search. If a preview of a selected file can be displayed, then the file can be recovered, but you need to upgrade to the Pro version of Disk Drill to perform the recovery.
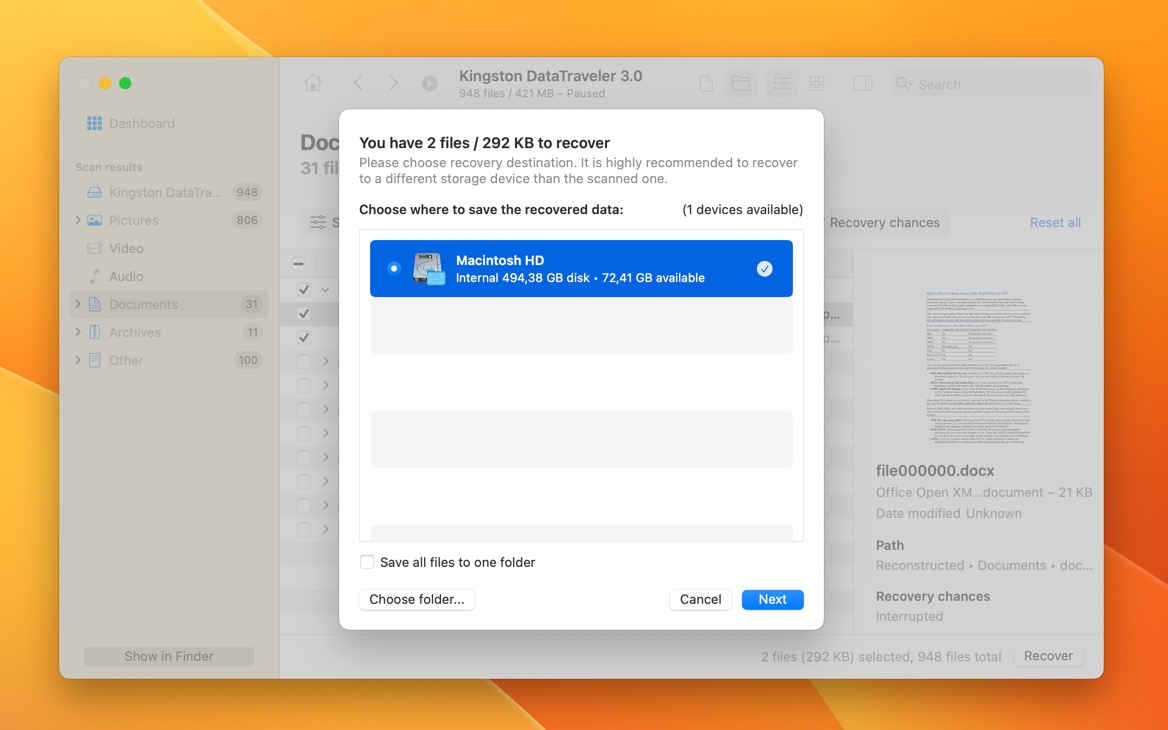
- Click ‘Recover’ and choose where you want to restore your lost Word files.
Method 3: Recover Lost Word Document Using Time Machine
If you’re using Time Machine to back up your Mac, you may be able the recover your lost Word doc from the backup media.
Steps to recover a lost Word file from a Time Machine backup.
- Connect the storage device that contains the backup files created by Time Machine to your computer.
- Open a Finder window in the folder that previously stored the lost Word file.
- Launch Time Machine by clicking the Time Machine icon on the menu bar.

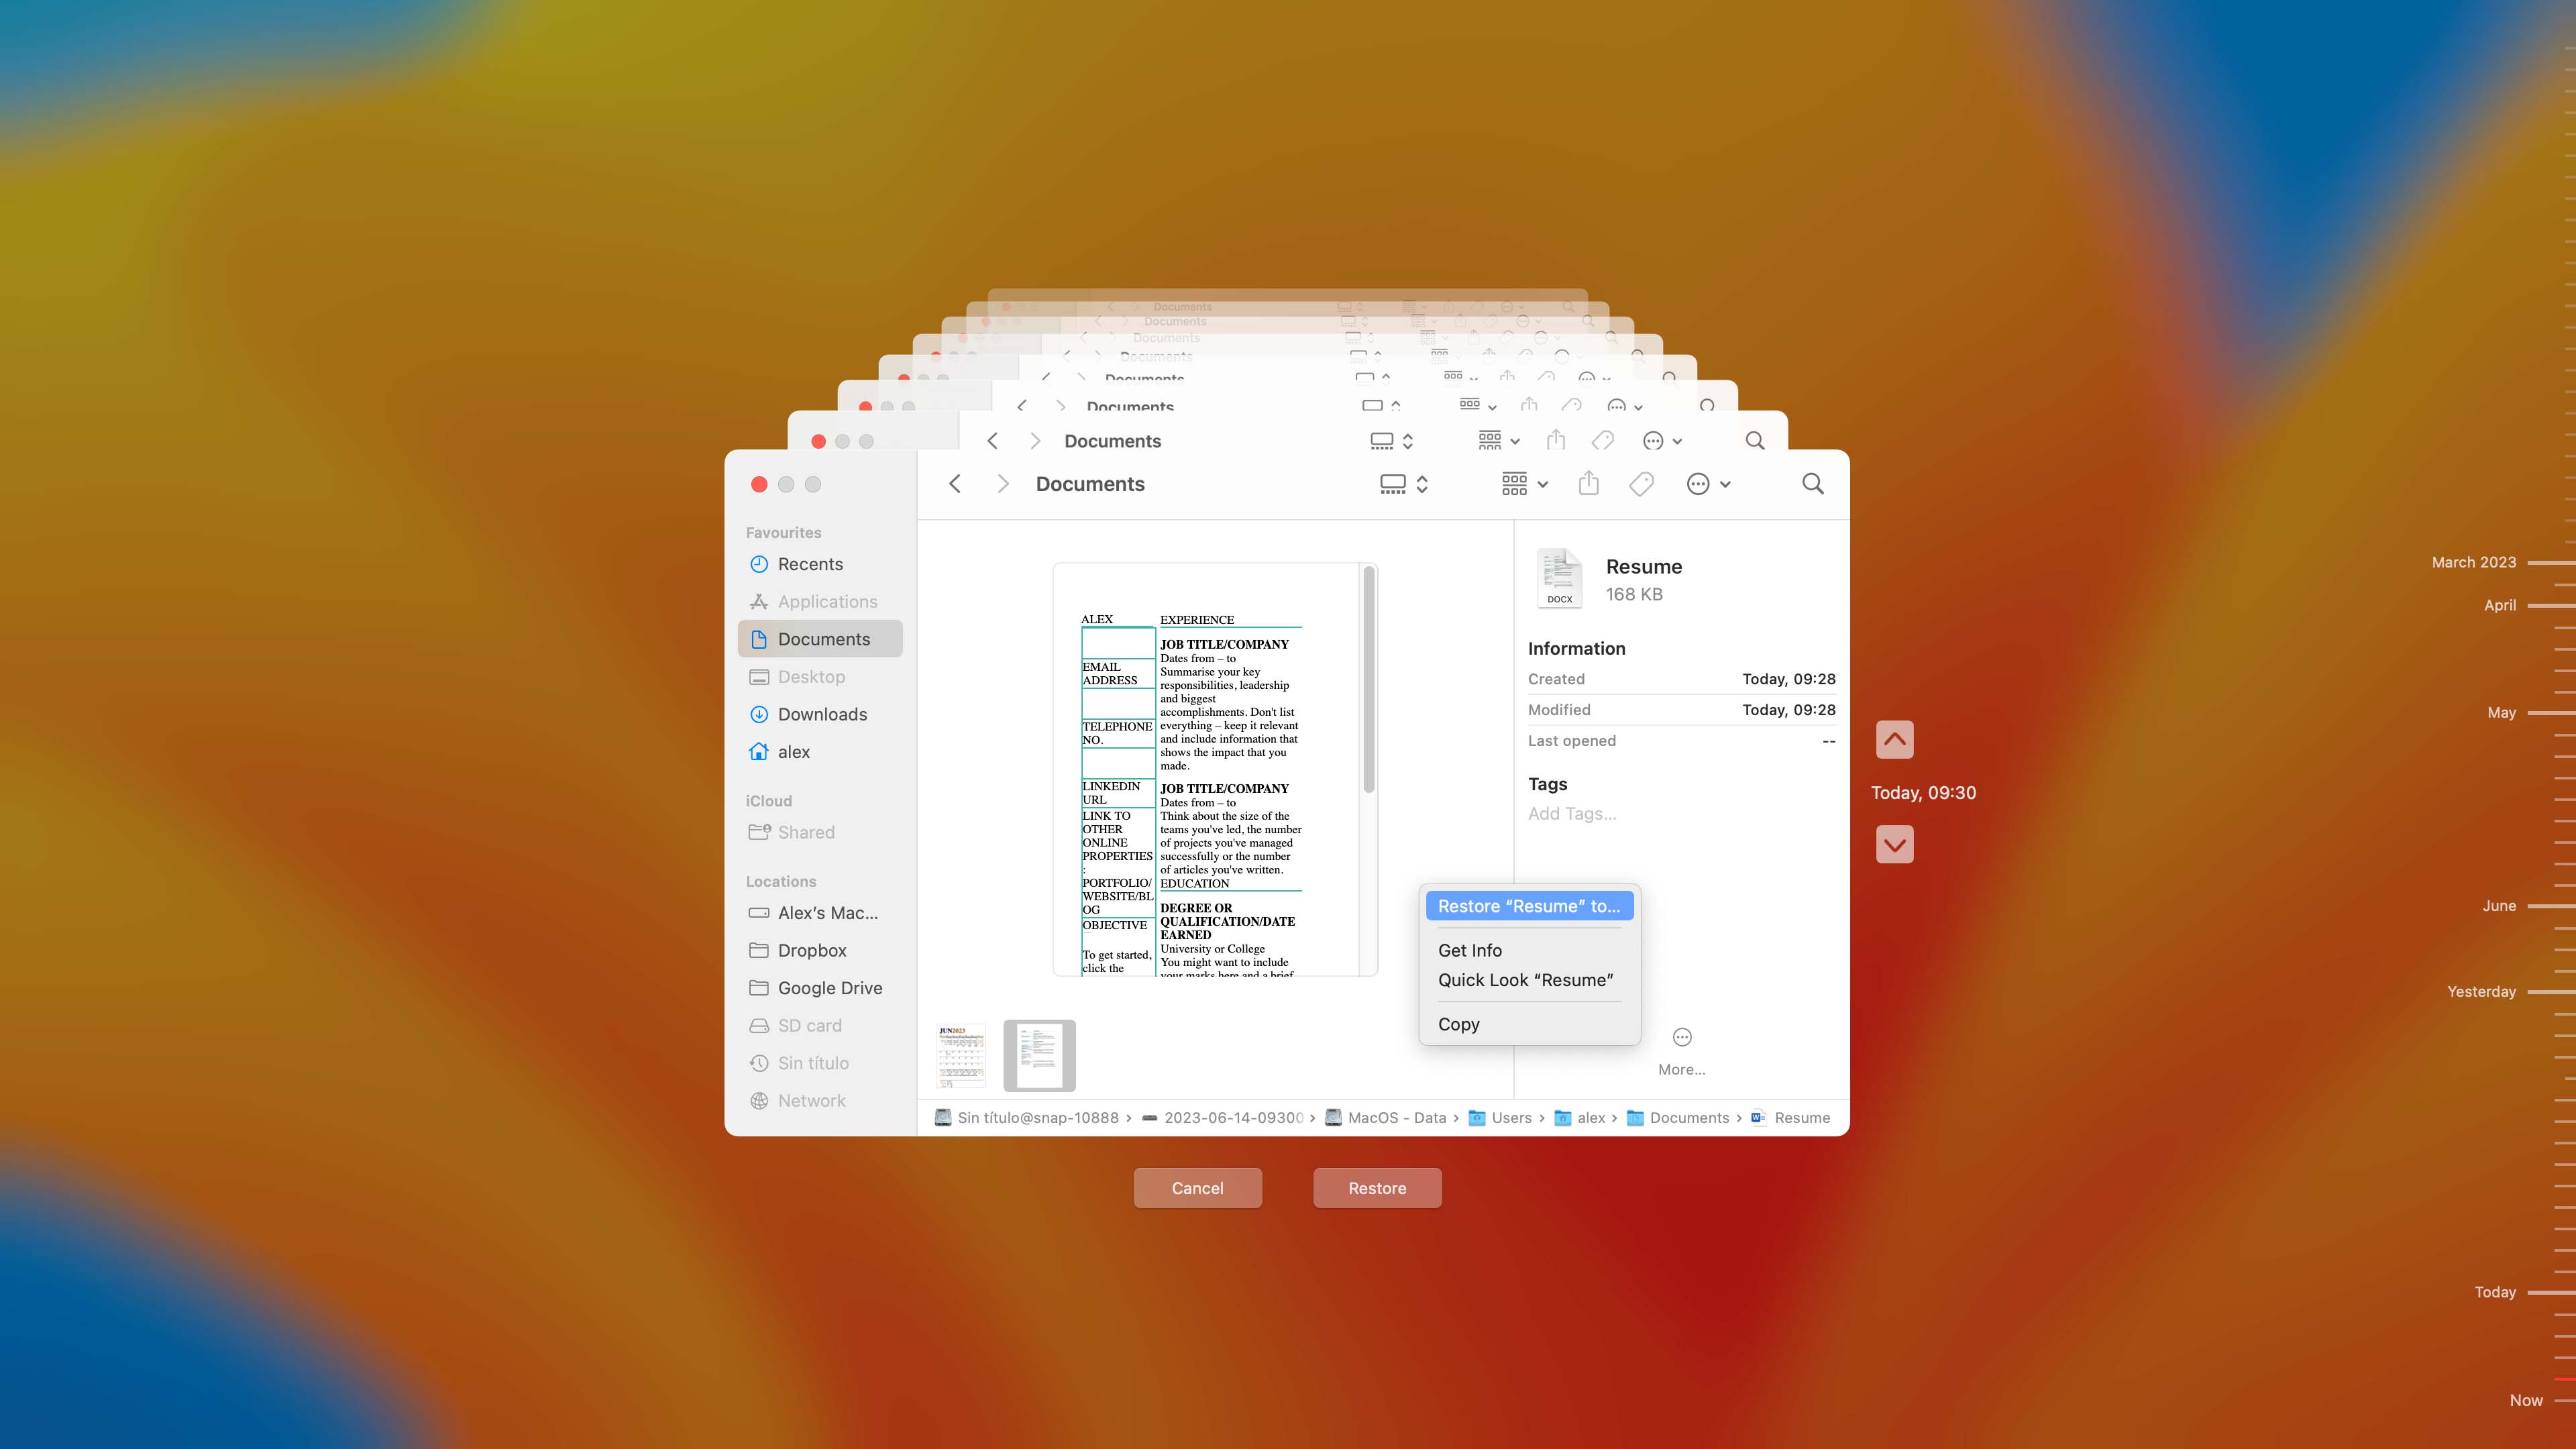
- Search through the snapshots and backups with the timeline and arrows to find the Word doc you want to restore.
- Highlight the file you want to recover and click the Restore button. The doc will be restored to its original location.
Method 4: Try Different Backup Solutions to Recover a Lost Word Document on Mac
There are many backup solutions that can be used to retrieve copies of lost Word documents on your Mac:
- ☁️ Use iCloud: If you’ve enabled iCloud backups on your Mac, then you might be able to find a copy of your Word document in iCloud Drive. We recommend you check the contents of this backup location from the web because you can then conveniently see all Recently Deleted files even if they’re no longer present on your computer.
- 💿 Examine your external devices: Do you sometimes back up your files on external devices like USB drives or external hard drives? If so, you should examine them because there’s a chance that a copy of your lost Word document could reside there.
- 🗂️ Check the downloads folder: Word documents downloaded from the web, instant messengers, and various team collaboration apps end up in the downloads folders, so it’s always a good idea to look there. You might just find an old copy of your missing Word document sitting there intact.
- 💬 Check your messages: If someone shared the Word document with you through iMessage, Telegram, WhatsApp, Viber, or just a good old email, then checking your chat history might just be the solution.
- 🔎 Manually search for the missing file: Using Finder’s search feature, you can perform a thorough manual search in all the potential backup folders. We recommend you look for the document by name or extension (.doc or .docx) to narrow down the number of results.
Method 5: Contact Data Recovery Service

If the strategies outlined above for recovering Word document files on your Mac are unsuccessful, it might be time to consider enlisting the help of a professional data recovery service.
These firms utilize advanced tools and methodologies specifically designed to retrieve documents from damaged, corrupted, or otherwise inaccessible storage devices. However, it’s important to set your expectations regarding the potential costs and the time frame for recovering your Word files. This option should be considered when your documents are critical, and all other recovery attempts have failed, indicating the situation may require specialized expertise.
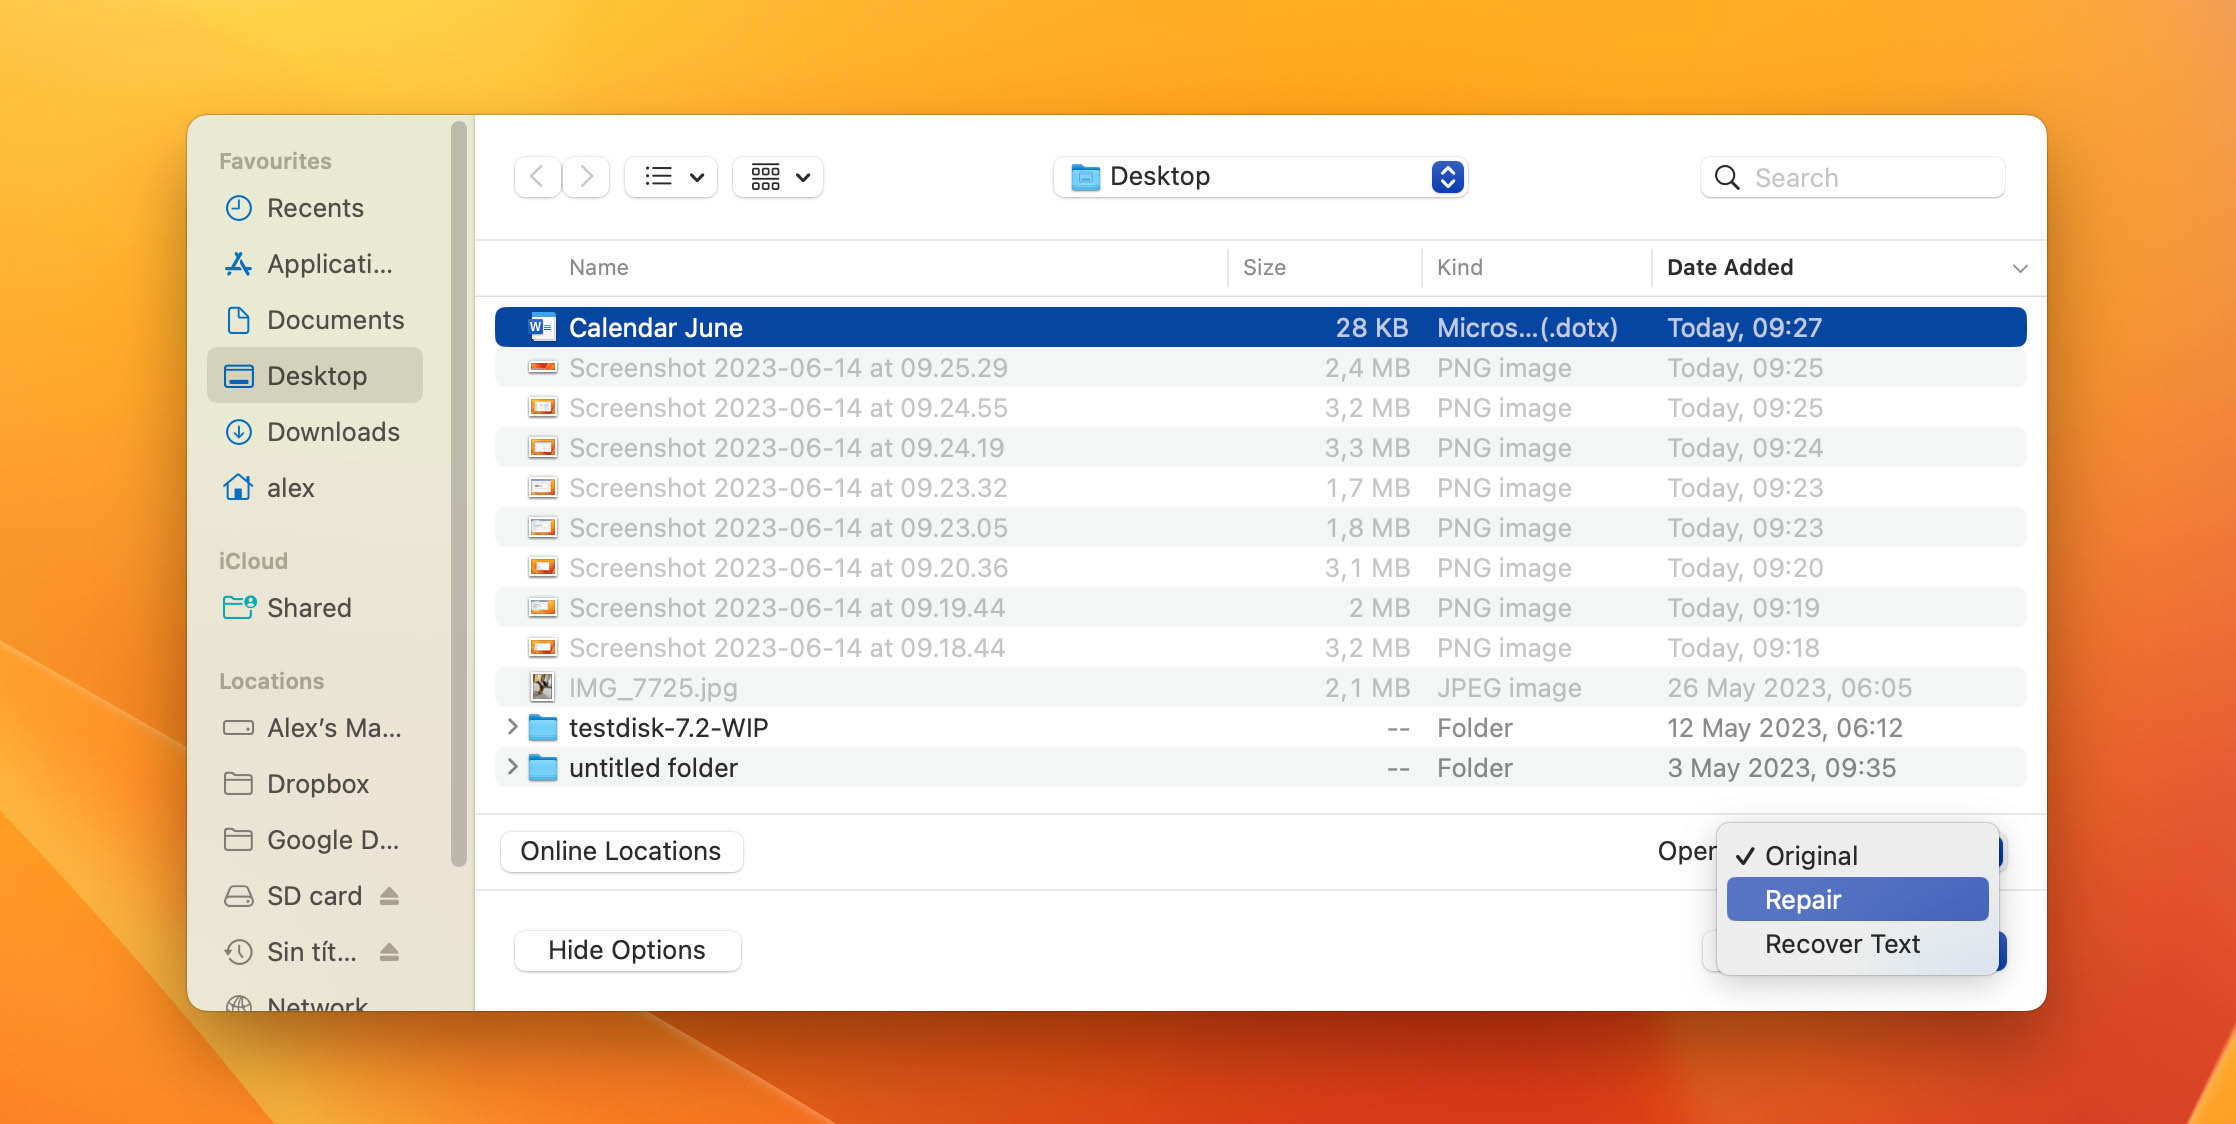
How to Recover Text from a Damaged Word File
Microsoft Word has a built-in feature to repair corrupted files. Use the following steps to try this recovery method:
- In Word, click File > Open.
- Select the damaged file from the dialog box.
- Click the arrow on the Open button to display the submenu.
- Click Repair or Recover Text option.
Check out this Microsoft support page for more information on handling damaged Word documents.
Tips to Help Avoid Losing Important Word Files
Here are a few tips that might help you avoid losing Word files. If the files contain important data and hold value for you, we suggest you take the necessary steps to protect them against accidental loss.
- ⏸️ Pause before manually emptying the Trash – Take a minute to see what items you are about to delete. It’s very possible that you can rescue a mistakenly deleted file easily from the Trash at this point, rather than with data recovery software after it has been emptied.
- 🛡️ Run Antivirus software – Malware and virus infections can lead to data loss. Run a reputable antivirus tool and make sure it’s always kept updated.
- 🔋 Consider a surge protector – Power spikes and surges can lead to unexpected system crashes that cause you to lose data. Using a reliable surge protector can help eliminate that source of lost Word documents.
- 💾 Turn on AutoRecovery – This Microsoft document explains everything you need to know about this feature. You should turn it on and use it to automatically protect your Word files.
- 💎 Configure Guaranteed Recovery – Guaranteed Recovery is a free data protection tool available with the trial version of Disk Drill. It allows you to configure specific files and folders for additional protection from accidental deletion and provides a one-click data recovery method.


FAQ
To recover a previous version of a Word document on a Mac:
- Connect your Time Machine backup disk if it’s not already connected to your Mac.
- Open the folder that contained the deleted Word document.
- Click the Time Machine icon located in the Menu Bar and choose Enter Time Machine.
- Locate the Word document you want to recover using the timeline on the right edge of the screen.
- Click Restore to restore the selected Word document.
Yes, there are multiple ways to recover an overwritten Word document on Mac:
- Use Time Machine to recover an older version of the overwritten document.
- Open the current version of the overwritten document in Word and recover an earlier version using Version History.
- Recover the document from a cloud backup.
- Go through your backup devices to see if you have a backup of the original Word document.
Word on Mac has a special feature called AutoRecovery that is turned on by default and periodically creates a copy of the document you’re working on. So if suddenly your Mac shuts down or Word crashes, you’ll be able to use this tool to recover your unsaved document.
Usually, the unsaved document should open when you launch Word on your Mac after the shutdown. But if it didn’t, follow these steps to recover an unsaved Word document on Mac via AutoRecovery:
- Open Finder.
- From the top menu, head to Go > Go to Folder.
- Copy and paste this folder path in the window (replace username with your own username):
/Users/username/Library/Containers/com.Microsoft/Data/Library/Preferences/AutoRecovery
- Click Go.
- Once you’ve found the needed file, double-click it to open.
- Click File > Save As. Type in the name for your file and choose a location for it. When ready, click Save.
If you’ve been backing up your Mac with Time Machine frequently, you can use the backups to recover the Word document. Follow these steps to do it:
- Connect the drive containing your Time Machine backup to your Mac.
- From the menu on the top of the screen, click the Time Machine icon and choose Enter Time Machine.
- Open the folder where the file should be located. Use the arrows on the right side to choose the needed backup version and search for the lost file.
- Click the needed Word document and click Restore.
The AutoRecovery files go to a hidden folder on your Mac, which is why it will be almost impossible to find such files by simply navigating through Finder. To find the unsaved Word documents on your Mac, head to Go > Go to Folder and enter this folder path (replace username with your own username):
/Users/username/Library/Containers/com.Microsoft/Data/Library/Preferences/AutoRecovery
It’s possible you can’t find a Word file on your Mac because of one of these reasons:
- You forgot the location where you saved the document;
- You deleted the document by mistake;
- Word or your Mac unexpectedly crashed, and you didn’t save the document before that;
- Your Mac got infected with a virus that caused data loss;
Whatever the reason is, the easiest and quickest way to find the lost Word document on your Mac is to use data recovery software.