![]() One of the characteristics of the macOS that makes it attractive to all kinds of users is the inclusion of many apps and applets designed to facilitate the use of your Mac or MacBook. One of these apps which can be used to make your life easier is Notes. It’s a great way to jot down some ideas or information without going through the exercise of opening Pages or another word processor.
One of the characteristics of the macOS that makes it attractive to all kinds of users is the inclusion of many apps and applets designed to facilitate the use of your Mac or MacBook. One of these apps which can be used to make your life easier is Notes. It’s a great way to jot down some ideas or information without going through the exercise of opening Pages or another word processor.
During the course of a busy day, you might create any number of notes for various reasons. You probably delete some of them from time to time as well. Everything is fine until you look for the notes you made regarding an important project and realize they have been deleted. You are not sure when these notes disappeared from your Mac but you definitely need to get them back if at all possible.
We are going to show you several ways to restore notes that have been deleted from your Mac running Yosemite or any other iteration of the macOS.


1 How to Recover Deleted Notes on macOS With Disk Drill
Disk Drill data recovery software is a comprehensive application that is designed to protect your data from incidents such as the disappearance of your Notes from your MacBook Pro. You can download the tool for free to take advantage of its data protection capabilities.
The free version also can be used to scan your storage devices for deleted files that can be recovered by the tool. It runs on macOS Mojave, macOS High Sierra, and all other versions of the macOS. Only after being satisfied that you can restore the files you need are you required to make an economic investment in the application.
Steps to recover your lost Notes on Mac
- Stop using the disk that contained the deleted Notes to prevent the files from being overwritten by the operating system during normal operation.
- Download and install Disk Drill. You should refrain from using the disk that contains the deleted Notes for this purpose to avoid accidentally overwriting the files.
- Launch Disk Drill by opening Finder > Applications > Disk Drill and double-clicking its icon.
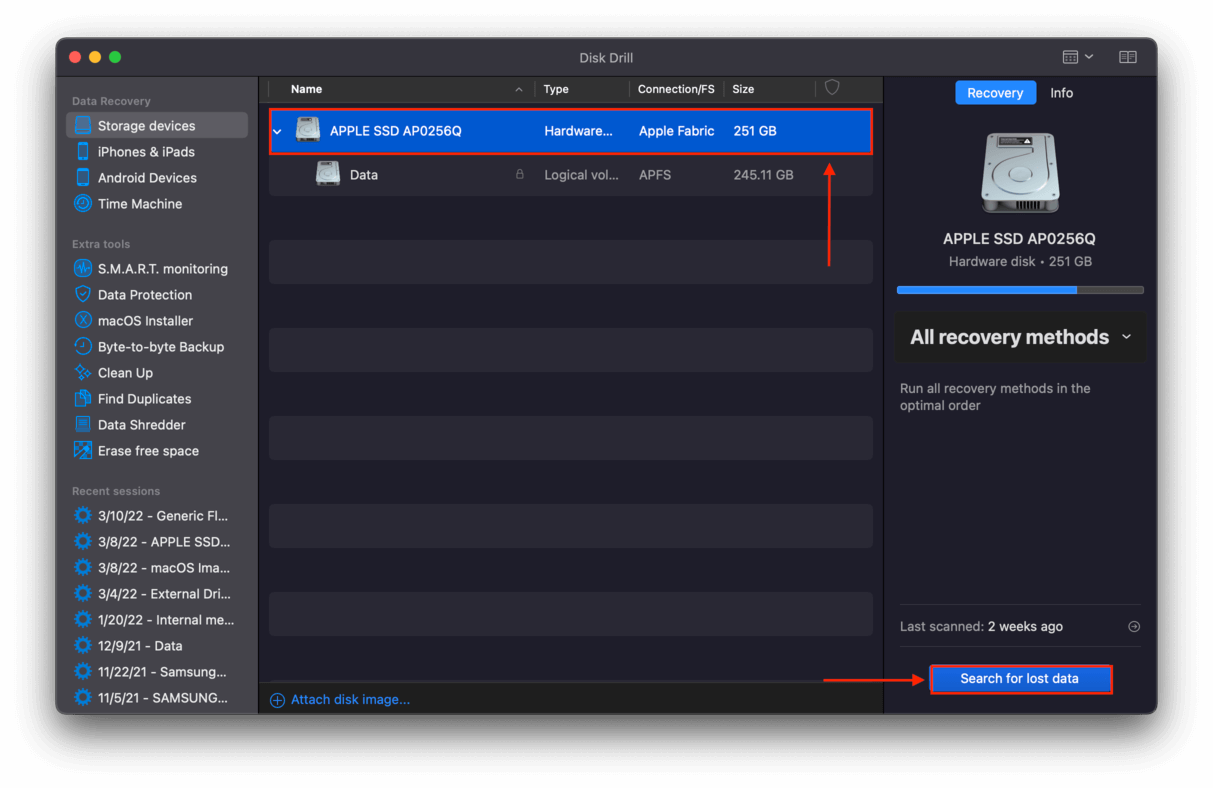
- Select your system drive (or whichever drive holds your Notes files), then click “Search for lost data.”
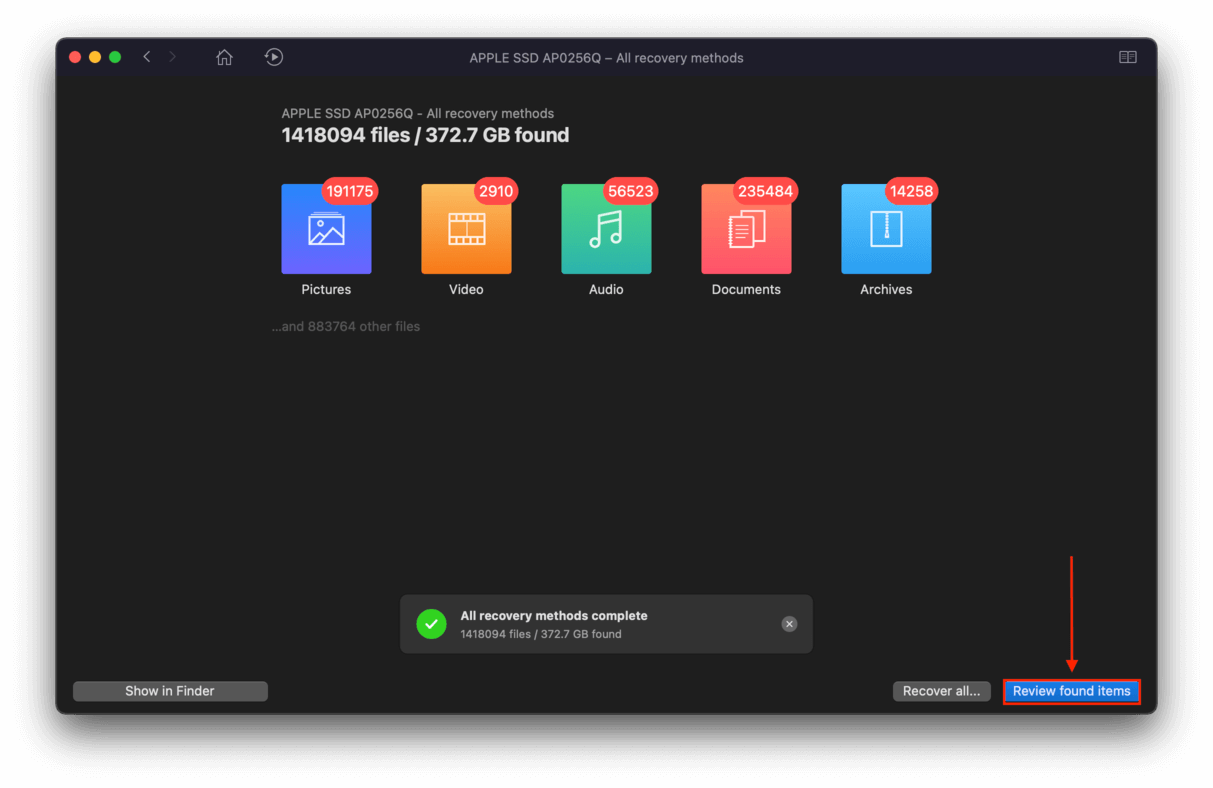
- Wait for Disk Drill to complete the scanning process, then click “Review found items.”
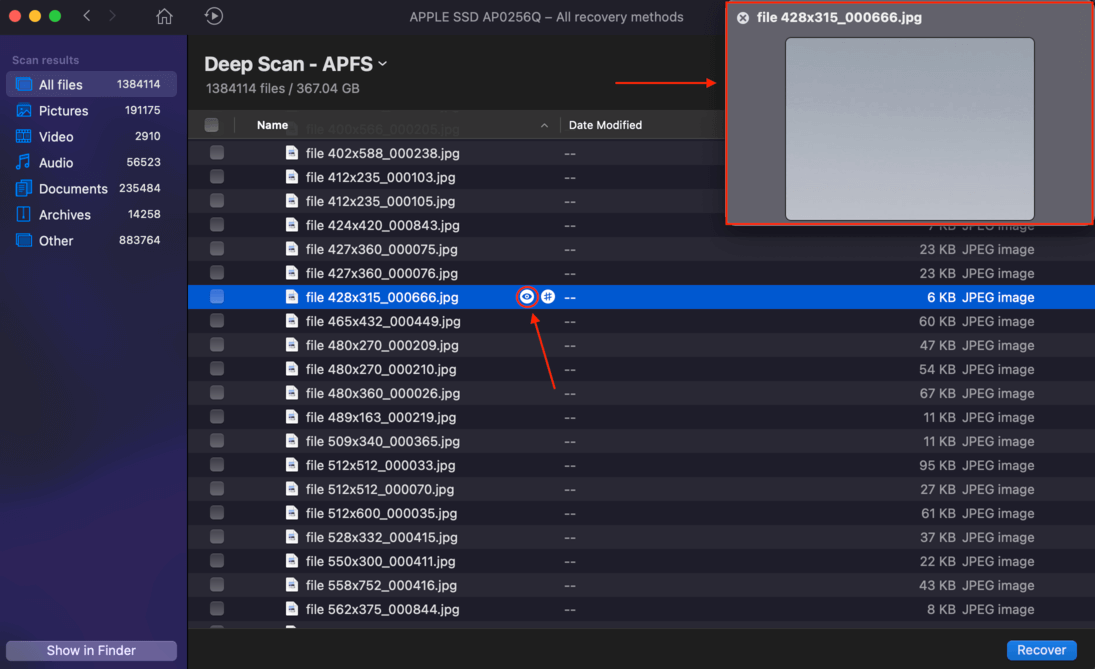
- Hold your pointer to the right of any filename and click the eye button to preview that file’s contents.
- Select the files you want to recover by ticking the boxes in the selection column on the left. Once you’re satisfied with your selection, click “Recover.”
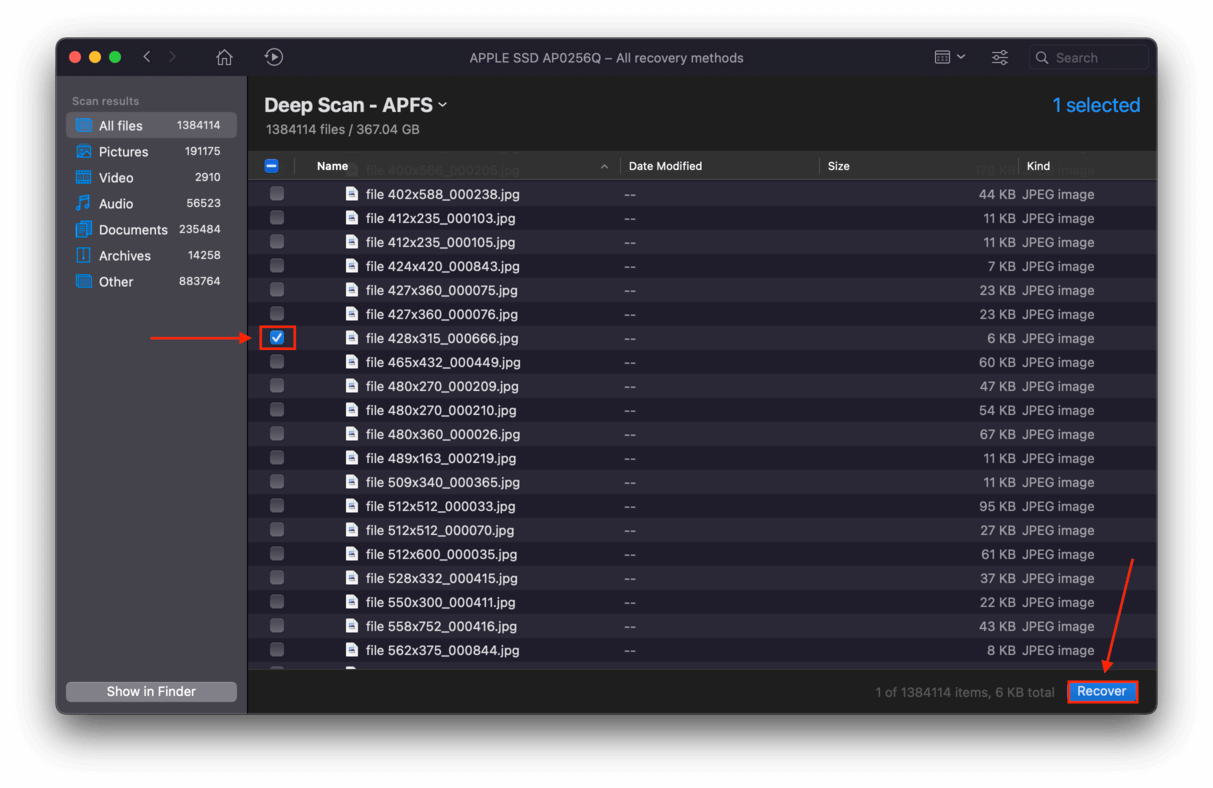
- On the dialogue box that appears, select a location off your computer (such as a USB flash drive) where Disk Drill will save your data. Saving your files on the same drive that you’re restoring may end up overwriting existing data.


The powerful and advanced scanning algorithms employed by Disk Drill interrogate your disk sector by sector to find any files that can be salvaged. It can reconstruct files that were deleted long ago, even files that were removed from the Trash Bin.
2 How to Recover Deleted Notes on a MacBook or Mac Using iCloud
Making use of iCloud to sync your various Apple devices may enable you to recover notes that are disappearing from your machine due to a problem with an upgrade or any other unforeseen event.
Steps to Recover Deleted Notes using iCloud
- Open System Preferences > Internet Accounts.
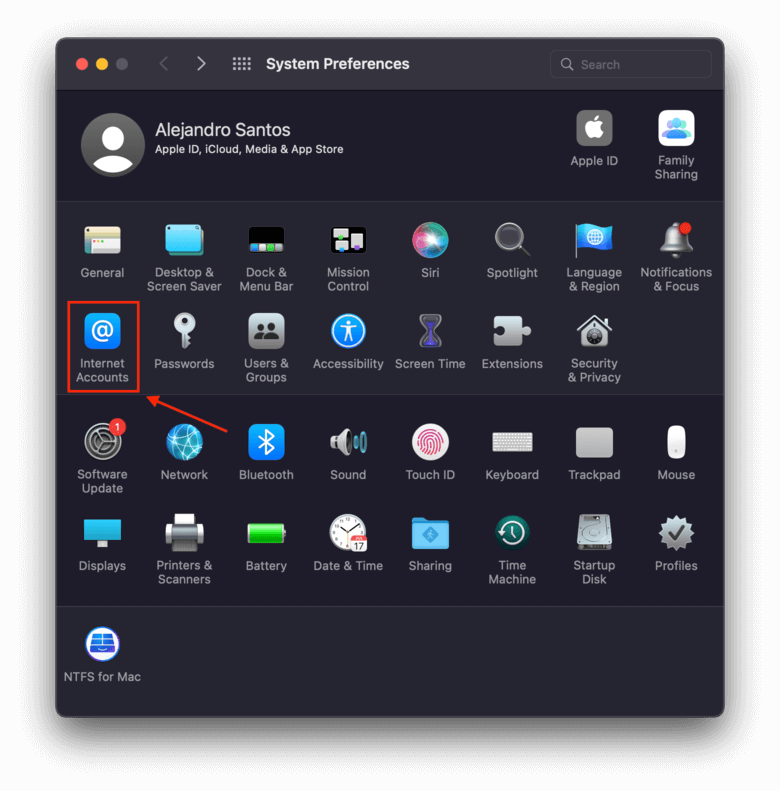
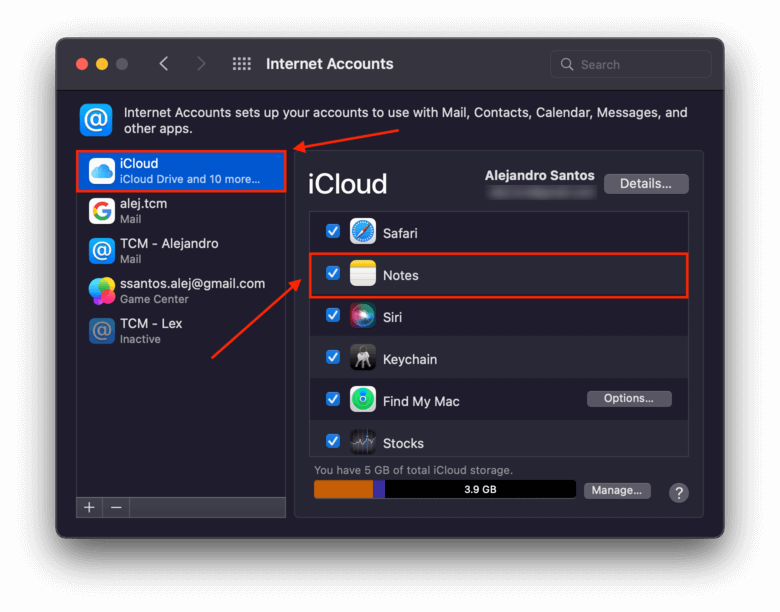
- Click “iCloud” on the left sidebar and untick the checkbox beside the “Notes” app. This will prevent your computer from syncing with iCloud and deleting the files.
- Open your browser and log into iCloud.com with your Apple ID and password (or using your fingerprint). Then, click the Notes app.
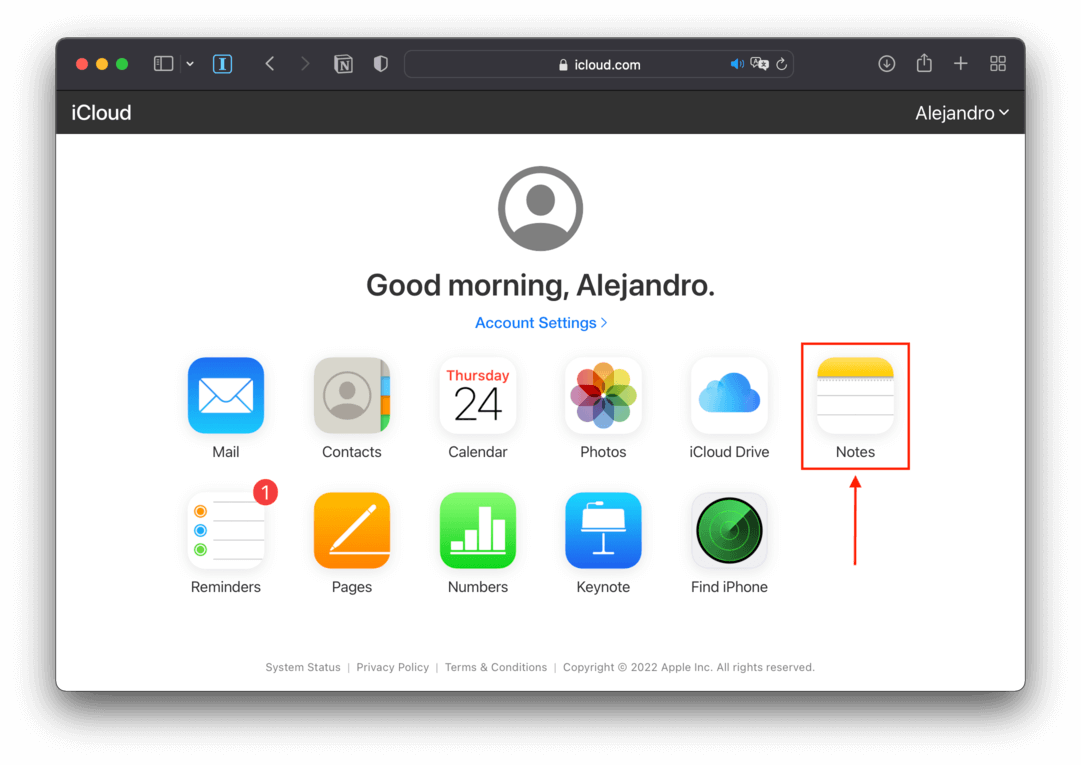
- Copy-paste your notes to another text editor on a location on your computer.
❗ Remember to enable the function in iCloud that syncs your Notes after you are finished with your recovery.
3 Recovering Deleted Notes from a Time Machine Backup
All computer users should be aware of the importance of backing up your computer on a regular basis. It is one of the most fundamental methods of protecting your valuable data from the dangers of a catastrophic loss. Apple understands this and has built a powerful backup tool into its operating system. It’s called Time Machine and you should be using it or some alternate means to backup and protect your data.
When faced with a data loss scenario such as deleted Notes, you can use Time Machine to recover files if they have been captured in a previous backup of your system. If you are concerned that some recently created files may be overwritten by the restore, simply select the notes and export them to PDFs. You can import them after the restore is complete.
Using this method you will overwrite your existing Notes database which is stored at ~/Library/Containers/com.apple.notes/Data/Library/Notes/. This is where Notes are stored on your Mac. You may also find your Notes files at ~/Library/Group Containers in the group.com.apple.notes folder. For safety’s sake, copy the files in both folders to a new location.
Steps to Restore Notes from Time Machine
- Ensure that you have copied the current Notes database referenced above.
- Attach the storage device that contains the Time Machine backups to your computer.
- Quit Notes and disable iCloud syncing for the Notes application.
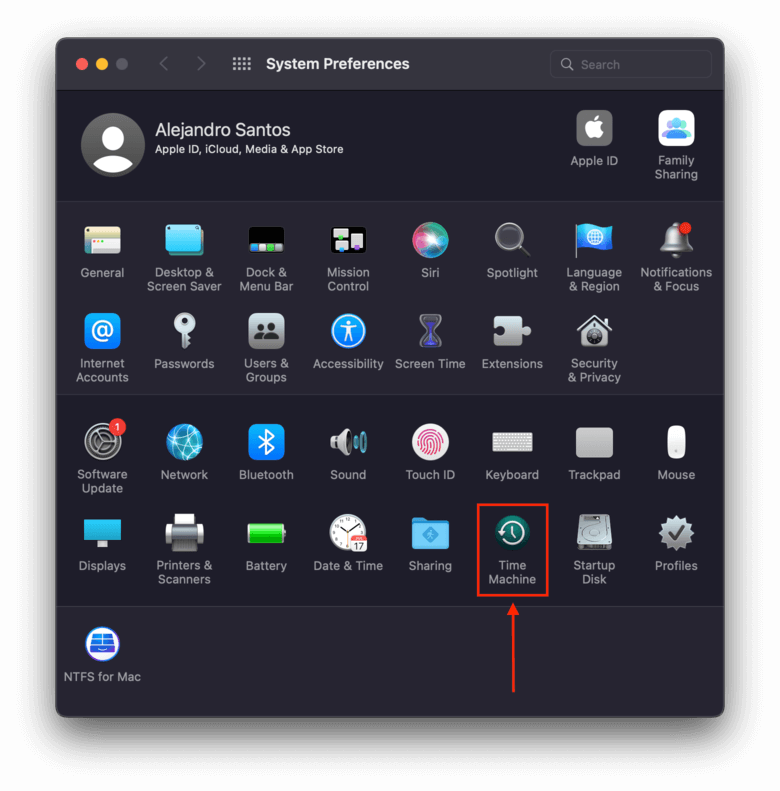
- Open System Preferences > Time Machine.
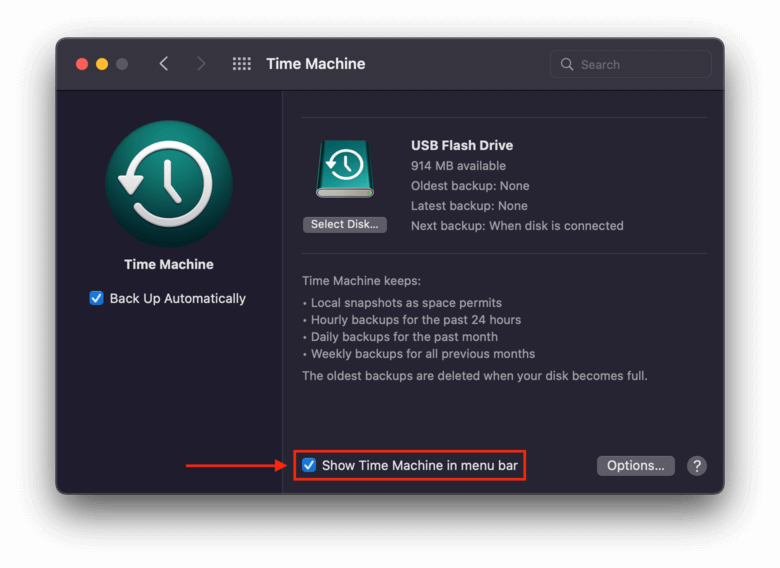
- Near the bottom of the window, tick the box beside “Show Time Machine in menu bar.”
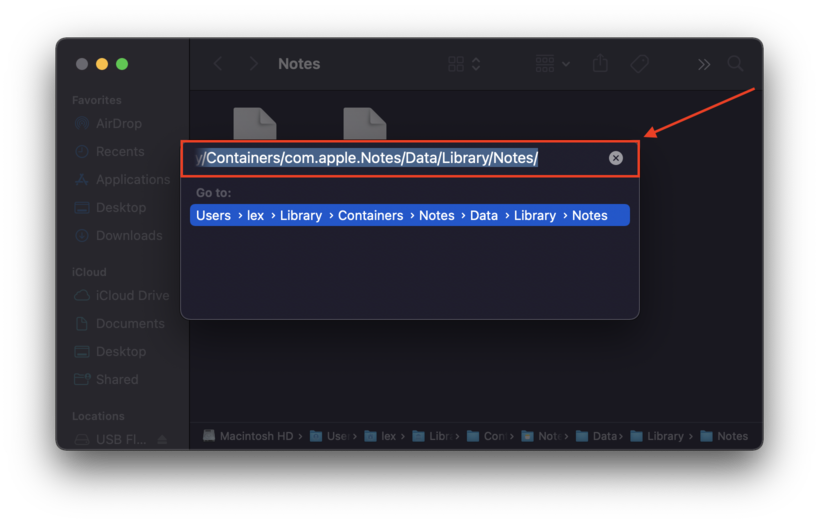
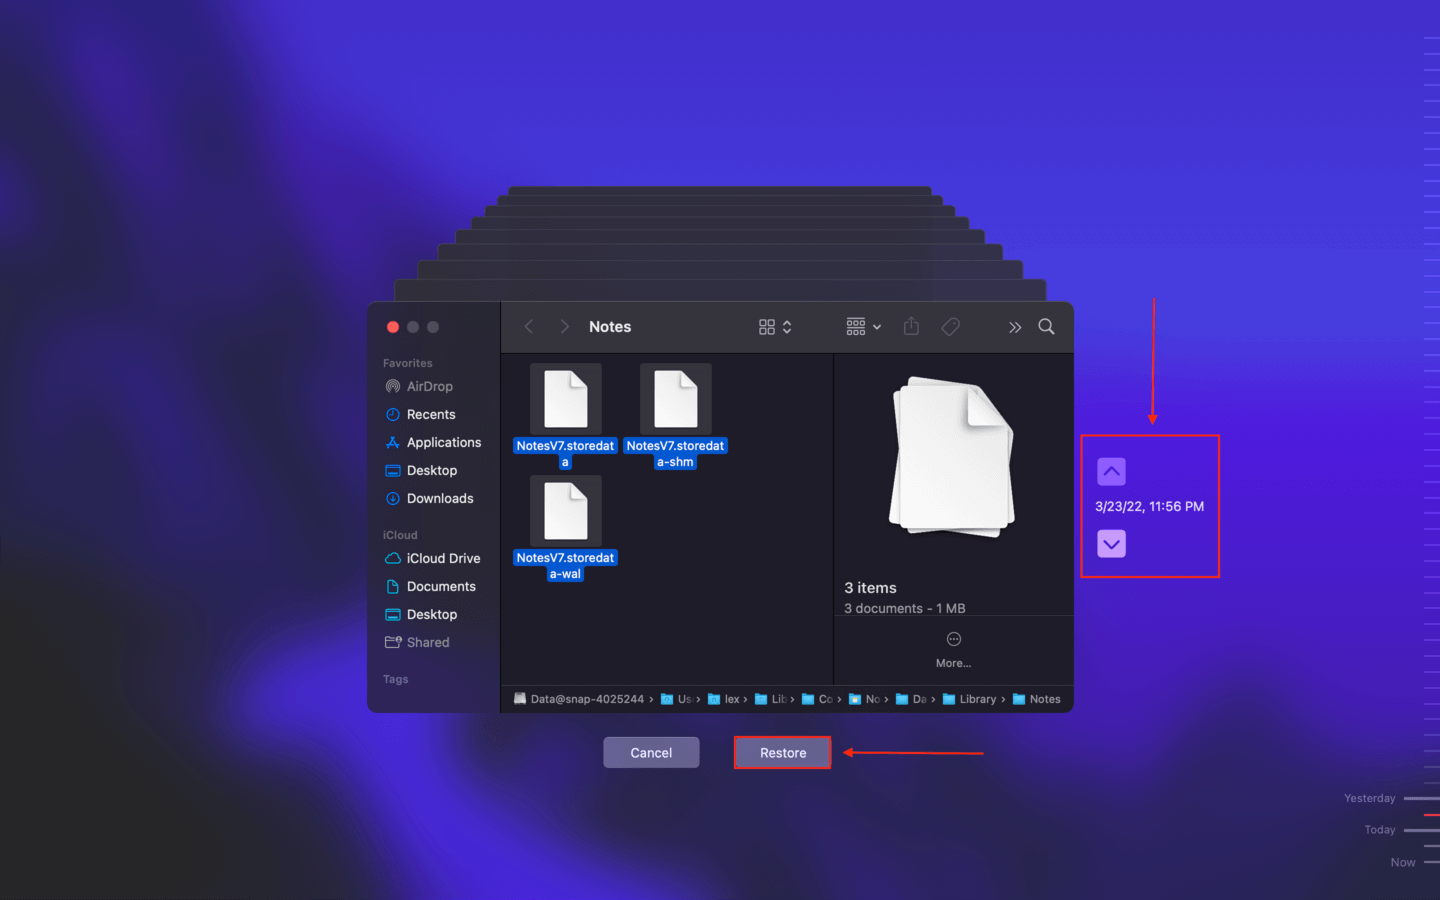
- Navigate to the following location using Finder > Go (on the Apple menu bar) > Go to Folder…
~/Library/Containers/com.apple.Notes/Data/Library/Notes/
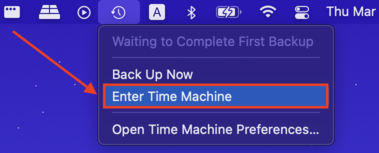
- On the Apple menu bar, click the Time Machine icon > Enter Time Machine.
- Use the arrow buttons on the right side of the window to select a snapshot along the timeline of each folder (remember: restoring old versions of .storedata files overwrites existing .storedata files – so backup the existing ones first!). Select all .storedata files, then click “Restore.”
4 Recovering Deleted Notes from the Recently Deleted folder
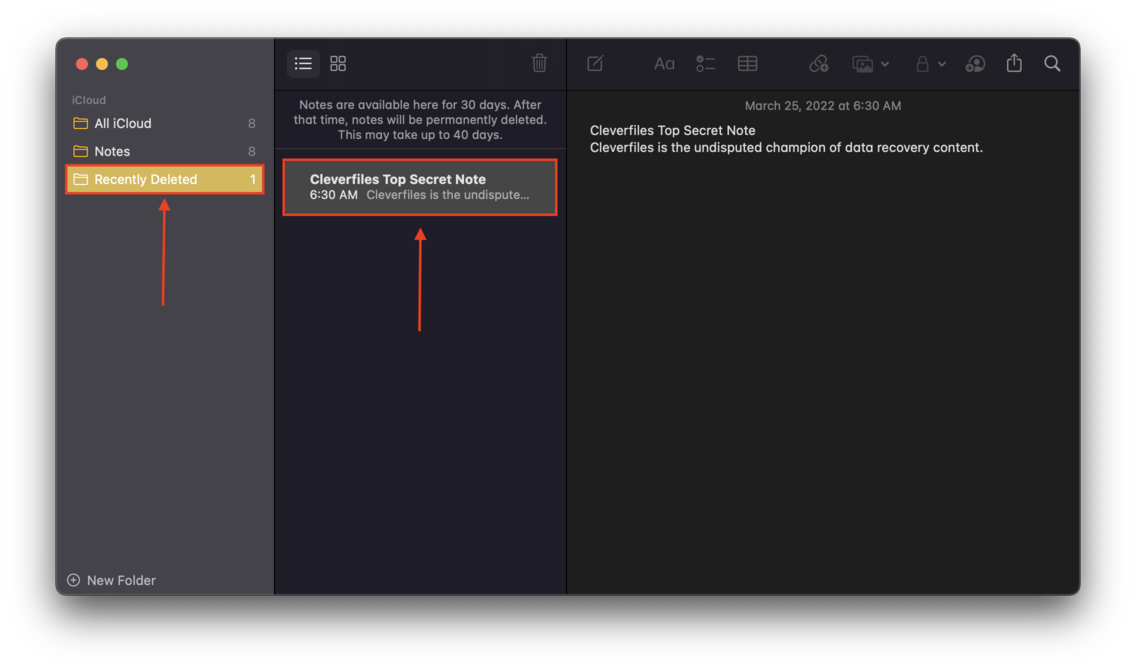
If the Notes files that you want to recover have been deleted in the last month or so you may be able to recover them from within the Notes app itself. You may have noticed that when you delete a Note it does not show up in the Trash Bin. Instead, the app keeps a copy in its own version of the Trash Bin called the Recently Deleted Folder. Files are kept for at least 30 days at this location before being permanently deleted.
Steps to Recover Note files on Mac
- Open the Notes application.

- Click on the Recently Deleted Folder in the left menu panel and select the Note to be recovered from the list in the right panel.
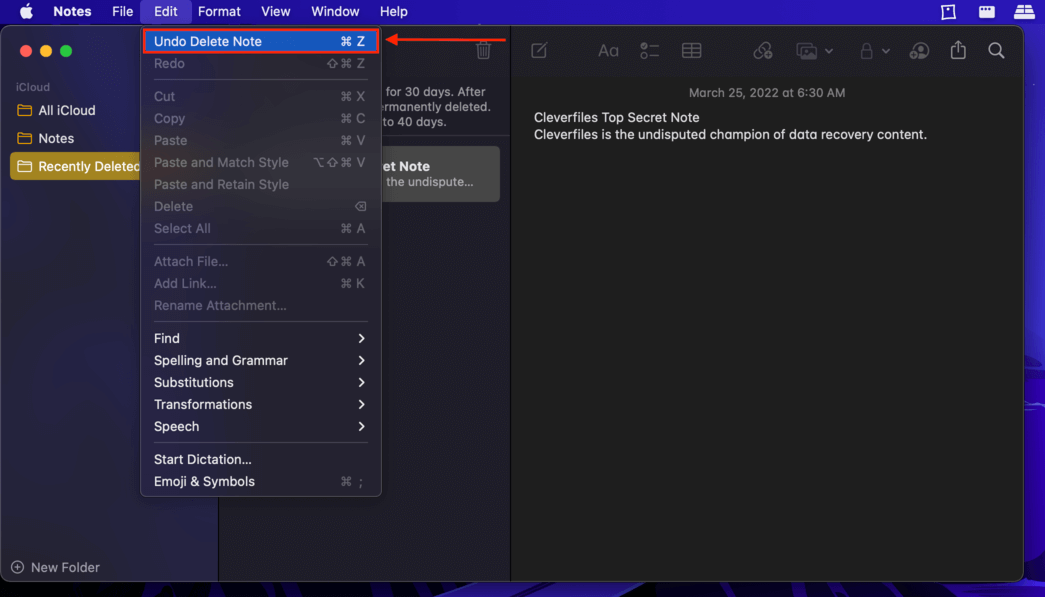
- Choose “Edit” from the menu bar at the top of the screen and click on “Undo Delete Note”. Alternately you can right-click on the Note and then select a folder in which to store the document.
 • Alternative option: right click on the note → Move to → Choose folder.

It’s a pretty simple procedure that can be helpful if you need to recover Notes that were deleted not too long ago.
5 How to Recover Deleted Notes from .storedata
The notes app stores temporary data in .storedata files located in the Library folder on your Mac. It does this automatically as you use the app, so it’s likely that you’ll find some of your missing text here. To access those files and retrieve your notes, do the following:
- Open Finder.
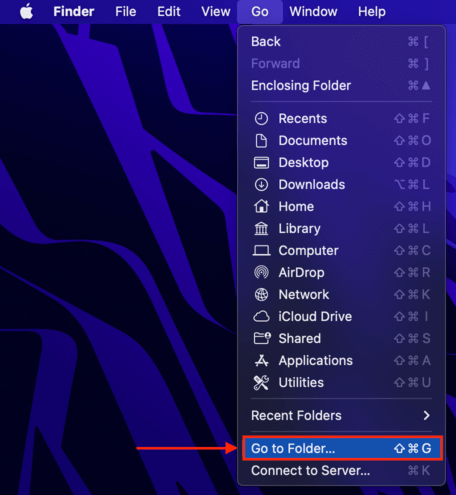
- On the Apple menu bar, click Go > Go to folder…
- Type the following text in the field, and hit “return.” ~/Library/Containers/com.apple.Notes/Data/Library/Notes/

- Make a copy of NotesV7.storedata and NotesV7.storedata-wal and save them to another location.
- Change their extensions to .html and double-click the .html files to open them.
.storedata files are displayed as walls of “gibberish” text on the document, as they contain codes that speak directly to the Notes app. You should find clumps of your notes that you can copy-paste into TextEdit or similar.
How to Prevent Notes on Mac From Being Deleted
macOS does its best to keep your files safe, but computers can still be unpredictable. Virus attacks, drive corruption, physical damage – many factors can put your data at risk at any given time. Take the following precautions so you never lose your notes again:
- Make PDF copies.
Make non-sync PDF copies of your notes that you can then save to another location (or upload them to iCloud). On the Apple menu bar in the Notes app, click File > Export as PDF…
- Backup your notes.
Enable both Time Machine and iCloud for your Notes app so your notes automatically get saved in the background, and so you always have access to their past versions.
- Don’t update immediately.
Updating macOS (especially as an early adopter) can put your files at risk of disappearing or rearrangement if you don’t back them up first. This is especially true when first updating to High Sierra and later macOS releases, which makes the jump from HFS/HFS+ file system to APFS.
All you need to know is that HFS/HFS+ Time Machine backups aren’t recognized by computers running APFS. So before deciding to update, make sure you backup your notes via iCloud and/or make PDF copies and save them to a separate location. - Monitor your hard drive’s S.M.A.R.T.
S.M.A.R.T. (Self Monitoring Analysis and Reporting Technology) is a built-in feature in hard drives that tries to predict potential drive failure. Some data recovery and management tools offer a feature where you can look at your S.M.A.R.T. status. This allows you to backup and repair your drive before anything bad happens. Disk Drill offers this feature for free on their app, so this is something you can do right now.
- Only download software from trusted sources.
Viruses are one of the worst culprits when it comes to data loss. They can corrupt your drives (or individual files), rearrange your data, or straight up delete the contents of your computer. Some viruses can even hold your data hostage until you pay up. Avoid sketchy sites and downloads, and stick to reputable sources.
Conclusion
The Notes app is one of our favorite note-taking apps thanks to its powerful sync features and the ability to quickly pick up where you left off on any device. If you’re like us and you have a huge chunk of your life in your notes, make sure to always keep them backed up. A combination of Time Machine, iCloud, and external backup once a month will ensure you will never lose your notes again.
As you can see there are a number of ways to recover deleted or missing Notes on your Mac or MacBook. We hope that we have pointed you in the right direction to get these important Notes back on your computer.
FAQ
Mac stores notes in the following location: ~/Library/Containers/com.apple.Notes/Data/Library/Notes/
Notes are stored as an SQLite 3.x database, and you can open this database with any plaintext editor.
If your notes have disappeared after a recent macOS update, you should be able to recover them from iCloud:
- Open System Preferences.
- Click iCloud and uncheck the box next to Notes.
- Log into iCloud.com with your Apple ID and password.
- Select Notes and save them to your computer.
Alternative, you can restore your Mac to an earlier state using Time Machine.