Data encryption is among the most effective techniques for protecting confidential files, but it can become a double-edged sword when recovering lost data. Why? Because files stored on an encrypted (password-protected) USB drive can’t be accessed by anyone unless the USB drive is decrypted and unlocked first.
If you’ve found yourself in a situation where you need to recover lost files from an encrypted/password-locked USB drive, the instructions provided in this article are just what you need to get them back regardless of if you’re using Windows or macOS.
What Is an Encrypted File?
When a file has been encrypted, an encoding algorithm has been applied to it which modifies the data until a decryption key has been used. While encrypted, the file is no longer readable through normal means. File encryption is a method used to digitally protect your data from unwanted access.
How to Open an Encrypted File
In order to view an encrypted file, you must first decrypt it using a decryption key. In most cases, this is in the form of a password, but it could also be a physical access card or biometric data. In any case, once the file is decrypted using the decryption key, you can open and view the contents of the file like normal until it is encrypted again.
How to Unlock Encrypted USB Drive
It’s not possible to recover files from an encrypted USB drive unless the drive is decrypted/unlocked first.
Let’s go over three ways to unlock an encrypted USB drive—one for Windows, one for macOS, and one that works regardless of which operating system you use.
Method 1: How to Unlock a Flash Drive in Windows
Unlocking a password-locked USB drive in Windows is easy, assuming the drive has been encrypted using BitLocker, Microsoft’s encryption tool included with Microsoft Windows versions starting with Windows Vista.
How to unlock a flash drive encrypted using BitLocker:
- Insert the flash drive into a USB port on your PC.
- Open the Start menu and type “control panel.”
- Launch the classic Control Panel and navigate to System and Security → BitLocker Drive Encryption.
- Select the encrypted flash drive and click the Unlock drive option.
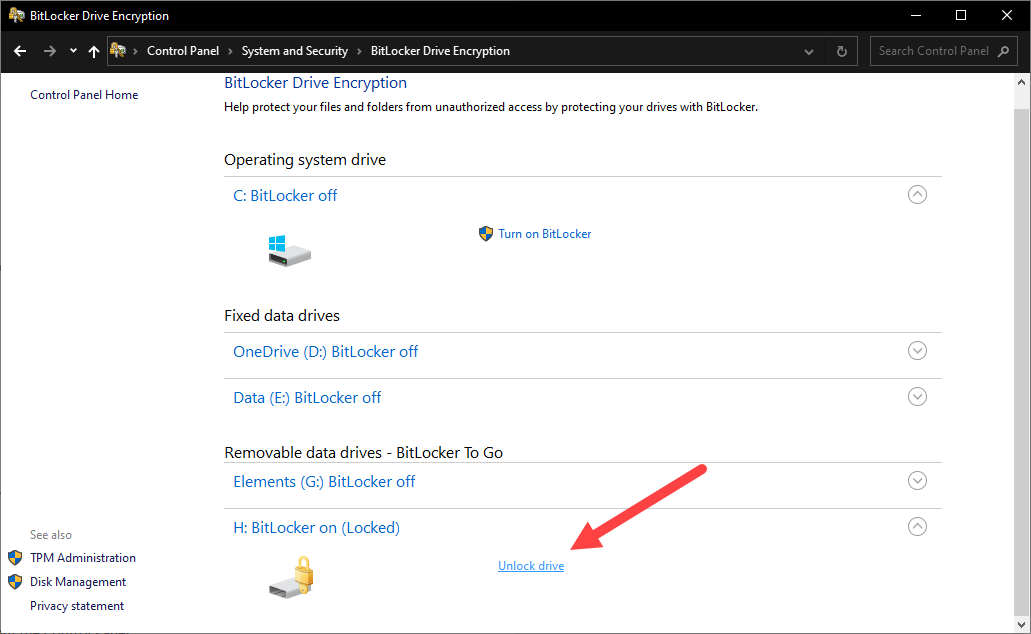
- Enter your password and confirm.
If you don’t remember your password anymore, you can click More options and use your 48-digit recovery key instead. If you would like to learn how to remove a password from a USB flash drive encrypted with BitLocker, you can read this official tutorial.
Method 2: How to Decrypt a USB Flash Drive in macOS
macOS comes with a native disk encryption program called FileVault. If you need to recover files from a USB drive that has been encrypted with it, then you need to enter your password first to unlock it. The good news is that it won’t take you more than a minute to do so.
How to unlock a password-protected USB drive using FileVault:
- Insert the flash drive into a USB port on your Mac.
- Launch Finder and right-click your USB drive.
- Select the Decrypt option.
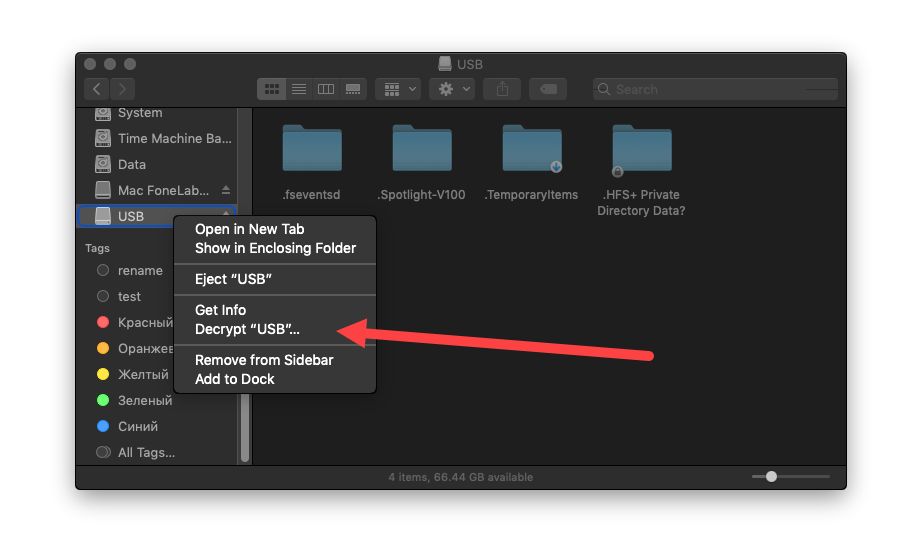
- Enter your password and confirm.
Tip: As a Mac user, you can also decrypt BitLocker-protected USB drives, but you need to use a third-party software application like UUByte BitLocker Geeker.
Method 3: How to Unlock a Physically Locked USB Flash Drive
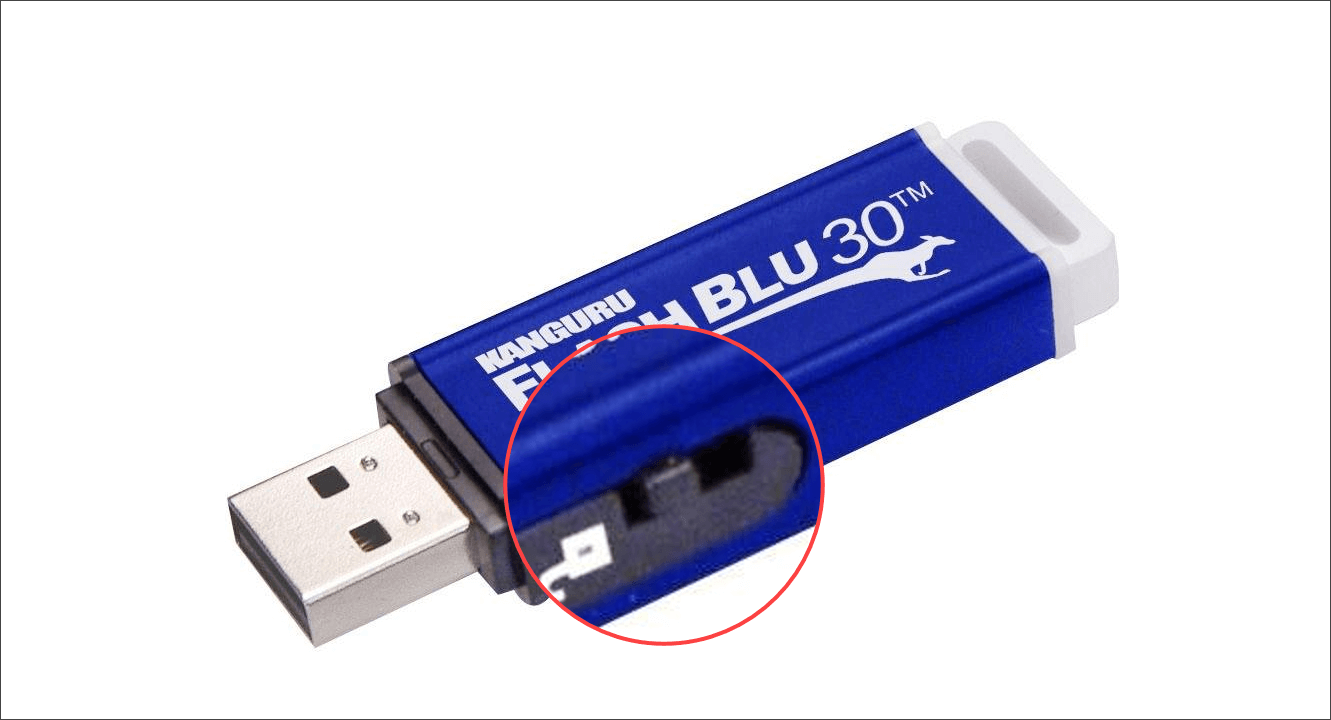
Just like SD cards, some USB flash drives feature a physical lock switch that makes it impossible to write new data on the device when engaged.
Such a switch can protect the USB drive from malware infections, accidental erasure and overwriting, and other user errors. However, it can also complicate recovery attempts by making it impossible to copy backups of lost files to the USB flash drive.
To disable read-only protection on your USB flash drive, all you need to do is move the lock switch to the off position.
How to Restore Files from Password-Protected USB Drive
Now that you know how to unlock a USB memory stick and make it fully accessible, we can finally explain what you need to do in order to recover lost files from it. Once again, we’re describing multiple methods so you can choose the one that best fits your specific data loss scenario.
Option 1: Recover Your Files from a Backup
![]() If you’ve been diligently backing up your data using File History in Windows or Time Machine in macOS, then you should be able to quickly and painlessly recover all lost files by following the step-by-step instructions below.
If you’ve been diligently backing up your data using File History in Windows or Time Machine in macOS, then you should be able to quickly and painlessly recover all lost files by following the step-by-step instructions below.
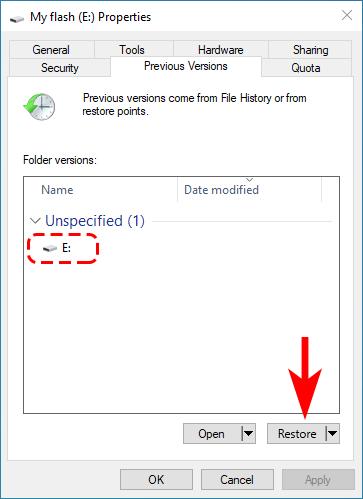
File History (Windows)
- Launch File Explorer.
- Right-click your USB drive and select the Restore previous versions option.
- Select a previous version and click Restore.
Time Machine (macOS)
- Launch Finder and open your USB flash drive.
- Click the Time Machine icon in the Menu bar and select Enter Time Machine.
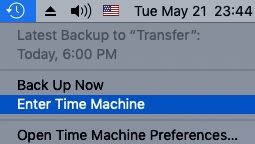
- Use the navigational arrows to find a backup with the files you want to recover.
- Select your files and click Restore.
Of course, there are countless third-party backup software applications for Windows and macOS, but it would be beyond the scope of this article to describe them all. That said, you should be able to find detailed instructions for just about any backup application with a simple Google search.
Option 2: Use Data Recovery Software
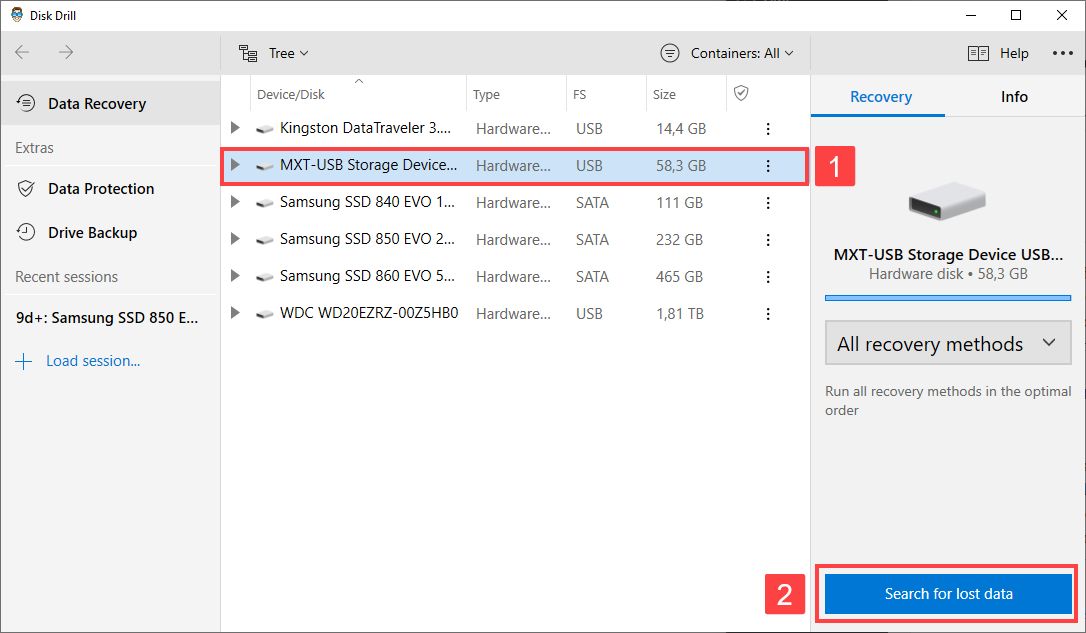
![]() Don’t have a backup from which you could recover your files? Don’t despair just yet! You can download data recovery software like Disk Drill and attempt to recover files that are no longer accessible from Windows or macOS.
Don’t have a backup from which you could recover your files? Don’t despair just yet! You can download data recovery software like Disk Drill and attempt to recover files that are no longer accessible from Windows or macOS.
Disk Drill and other similar applications scan the actual physical storage space, looking for traces of deleted files that haven’t been overwritten yet. If you act quickly enough and are at least a little bit lucky, you should recover some and maybe even all lost files.
We recommend Disk Drill because it runs on both Windows and macOS, is exceptionally easy to use, and delivers fantastic recovery results. What’s more, Disk Drill comes with handy extra tools that you can use to avoid data loss emergencies in the future.
To recover encrypted files from a USB drive on a Windows PC:
- Download and install Disk Drill for Windows.
- Connect the USB drive to your PC and unlock it.
- Launch Disk Drill and scan the USB drive.
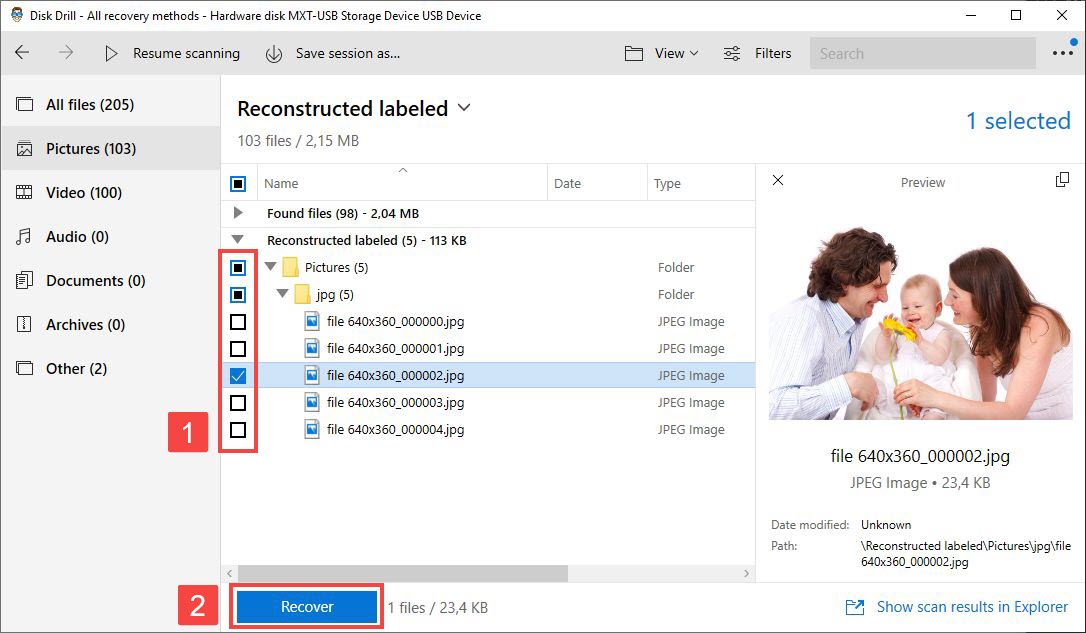
- Preview & select the files you want to recover.
- Click Recover and pick a suitable recovery location.
To recover encrypted files from a USB drive on a Mac:
- Download and install Disk Drill for Mac.
- Connect the USB drive to your Mac and unlock it.
- Launch Disk Drill and scan the USB drive.
- Preview & select the files you want to recover.
- Click Recover and pick a suitable recovery location.
Option 3: Pay for Professional Data Recovery
 Have your data recovery attempts failed to yield the desired results? If so, then you should consider sending your USB flash drive to a professional data recovery center.
Professional data recovery centers are equipped with state-of-the-art data recovery software and hardware tools, allowing them to recover data even from physically damaged or heavily corrupted storage devices.
Just don’t expect data recovery professionals to circumvent modern encryption standards, such as AES-256. Without the correct password, even experienced professionals won’t get too far.
How to Fix a Broken USB Flash Stick in Any Situation→
How to Recover Encrypted Files
Encrypted files can be recovered like any other file, though the fact remains that once the file is recovered, you will still need the decryption key in order to open and view it.
How to Recover Encrypted Files From Windows 11/10
Windows offers a few methods for recovering encrypted files. Here are a few.
Restore from a Backup
The File History backup solution is included with your copy of Windows. If it was configured prior to the loss of your encrypted files, you can restore a working copy of the files you lost. To restore a copy of lost or deleted encrypted files from a File History backup, follow these steps:
- Navigate to the folder that contained your lost file.
- Click Home, then History.
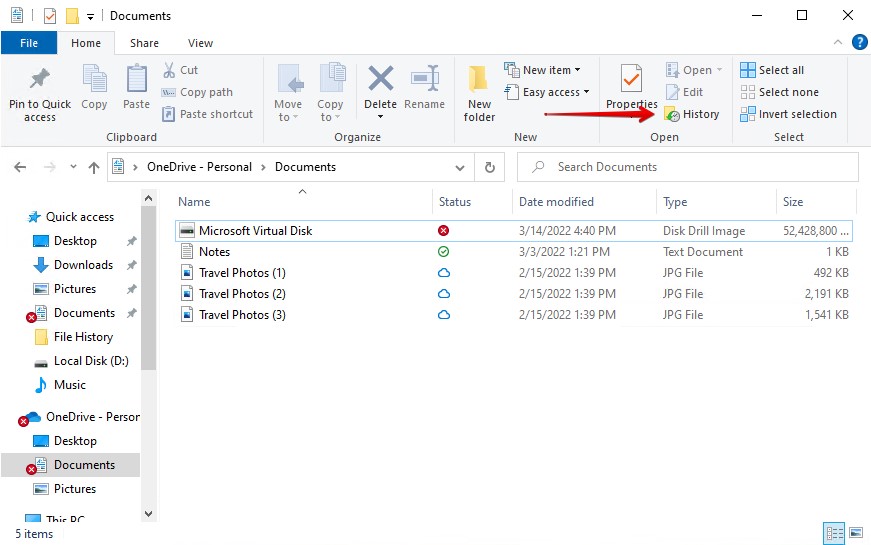
- Select the encrypted file, then click the green restore button.
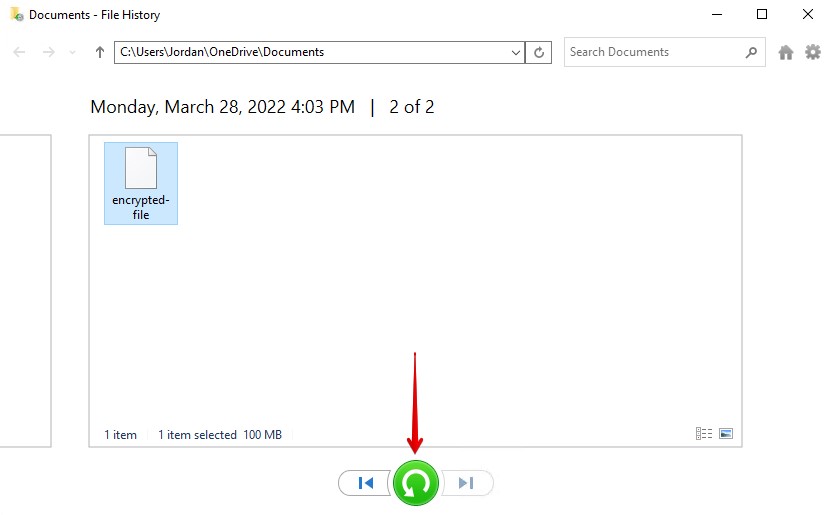
Once restored, the file will return to its original location.
Recover Using Data Recovery Software
Data recovery software, like Disk Drill, can be used to recover encrypted files. This is a great option for those who don’t have access to a backed-up copy of their files. To retrieve a lost or deleted encrypted file using Disk Drill, follow these instructions:
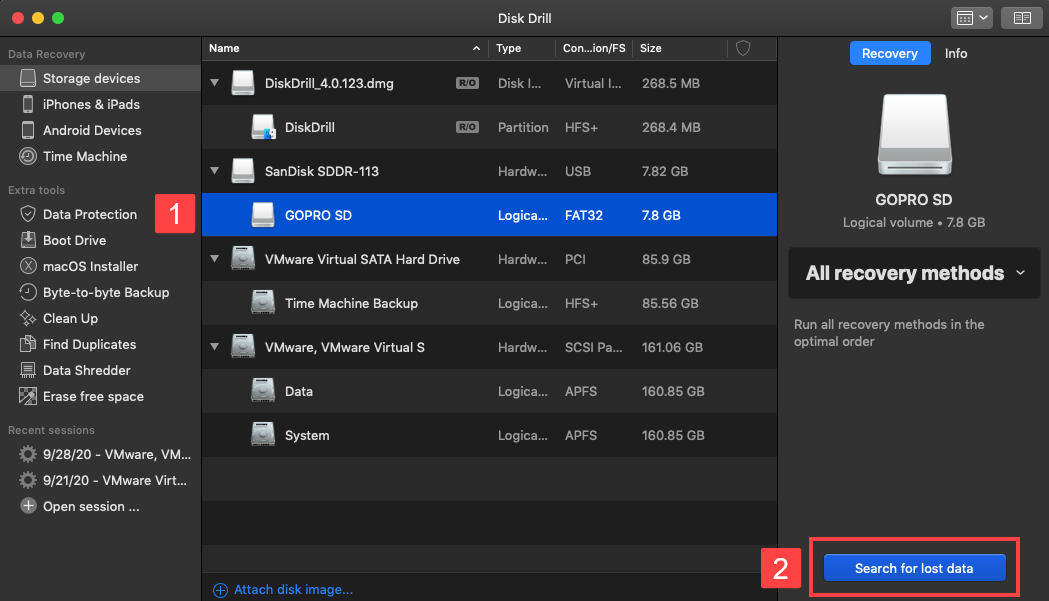
- Download and install Disk Drill to a separate physical partition than the one where your file resides.
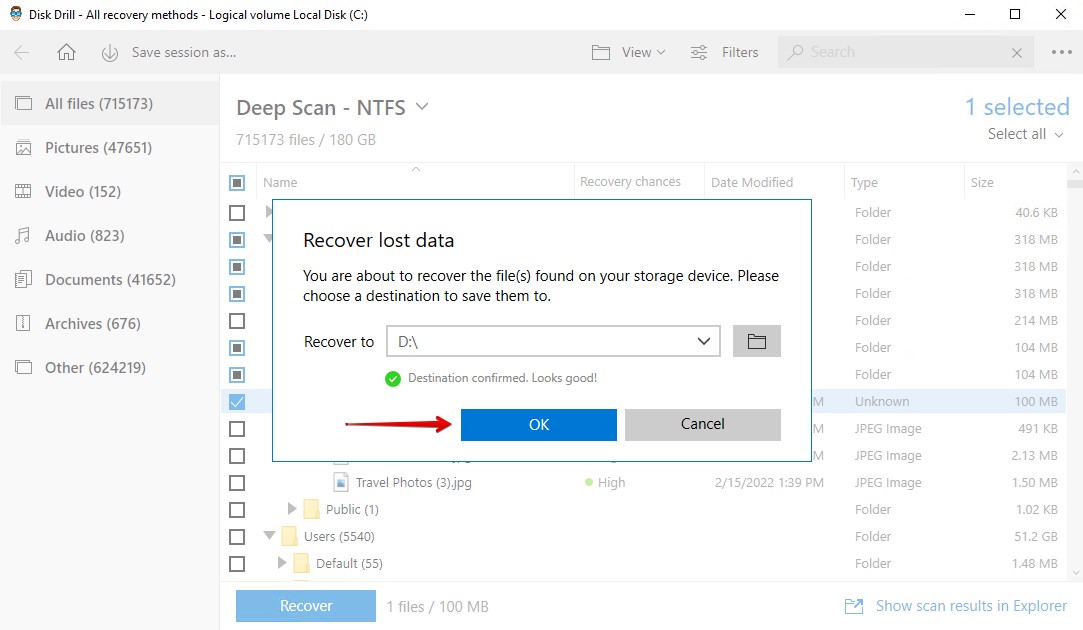
- Select the drive that contains the encrypted file from the list, then click Search for lost data.
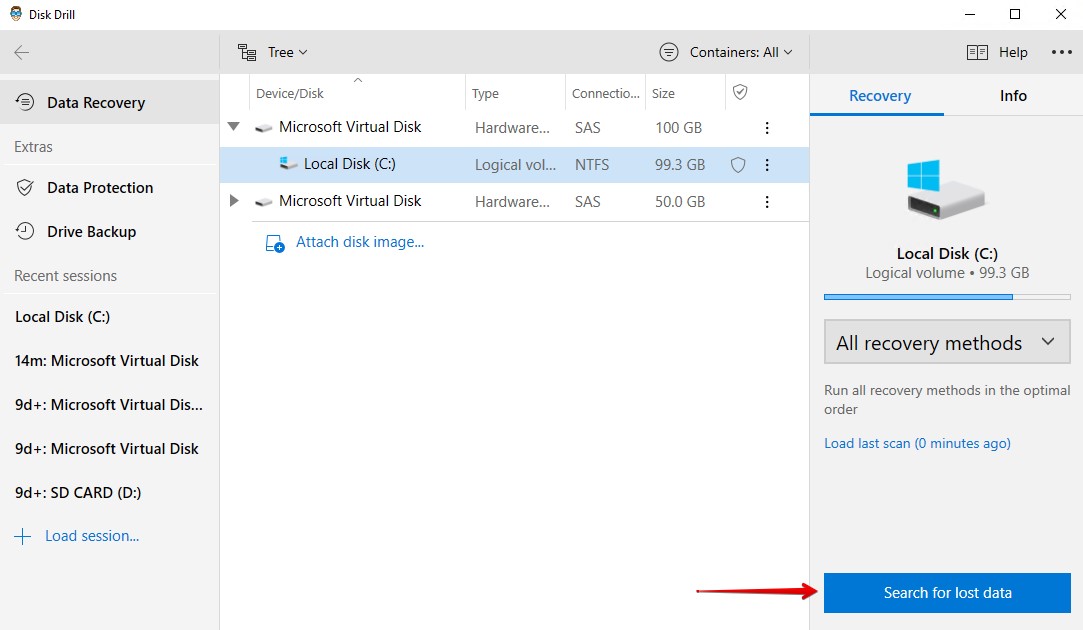
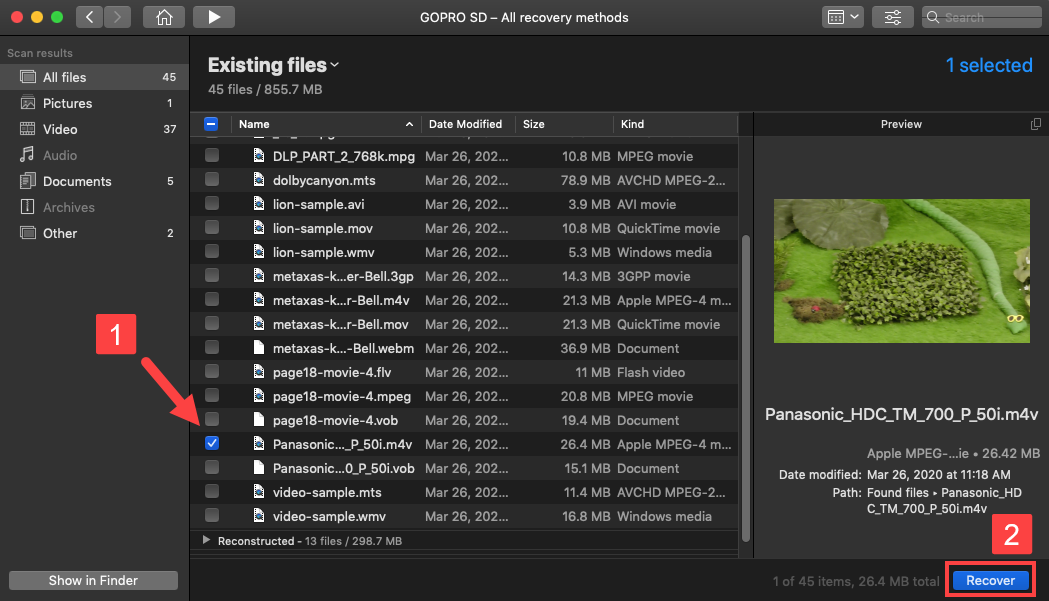
- Click Review found items and mark the file you want to recover from the list. When ready, click Recover.

- Select an output location that resides on a separate physical partition than where you’re recovering from, then click OK.
Using a Third-party Decryption Tool
If you’re trying to decrypt files that were encrypted by ransomware, there are some options available. Ransomware is a type of malware that encrypts all of your data, rendering it unusable. The attacker will typically request payment from you via cryptocurrency in exchange for the decryption key. This should always be treated as a lie, as once the payment is made, there is no guarantee that the decryption key will be provided.
Instead, you can check out No More Ransom. It includes a directory of known ransomware, as well as their corresponding decryption tools so you can unlock your data. If you’re unable to find a decryption key for your files, it’s best to create a shadow copy of your data for safekeeping until one becomes available.
It should be noted that files encrypted with powerful file encryption, like Encrypting File System (EFS), are virtually impossible to decrypt without the correct certificates. This method typically only works on files encrypted by ransomware.
How to Recover Encrypted Files on Mac
It’s also possible to recover encrypted files on Mac. Here’s how.
Restore from a Backup
Time Machine is the backup solution for Mac, just like File History is for Windows. It makes incremental backups of your data that you can restore copies from should the need arise. Here’s how you restore an encrypted file from a Time Machine backup:
- Connect the media that holds your backup, then navigate to where the original file was stored on your computer.
- Click the Time Machine menu, then click Enter Time Machine.
- Locate the file you want to restore using the navigational arrows on the right. Select it, then click Restore.
Decrypt the File on Mac
If the file was encrypted on your Mac, you have the option of decrypting it using the Terminal. This will allow the file to be viewed like any other. Follow these steps to do so:
- Launch the Terminal window.
- Type openssl enc -aes-256-cbc -d -in <encryptedfile> -out <decryptedfile>. Replace <encryptedfile> with the filepath of your encrypted file and replace <decryptedfile> with output name and location of the file. Press Return.
- Enter the decryption password and press Return again.
How to Recover Encrypted Files on Android
Some Android devices come with built-in encryption capabilities, others rely on third-party applications. Here are two ways you can recover encrypted files on Android.
Recover Using Data Recovery Software on Android
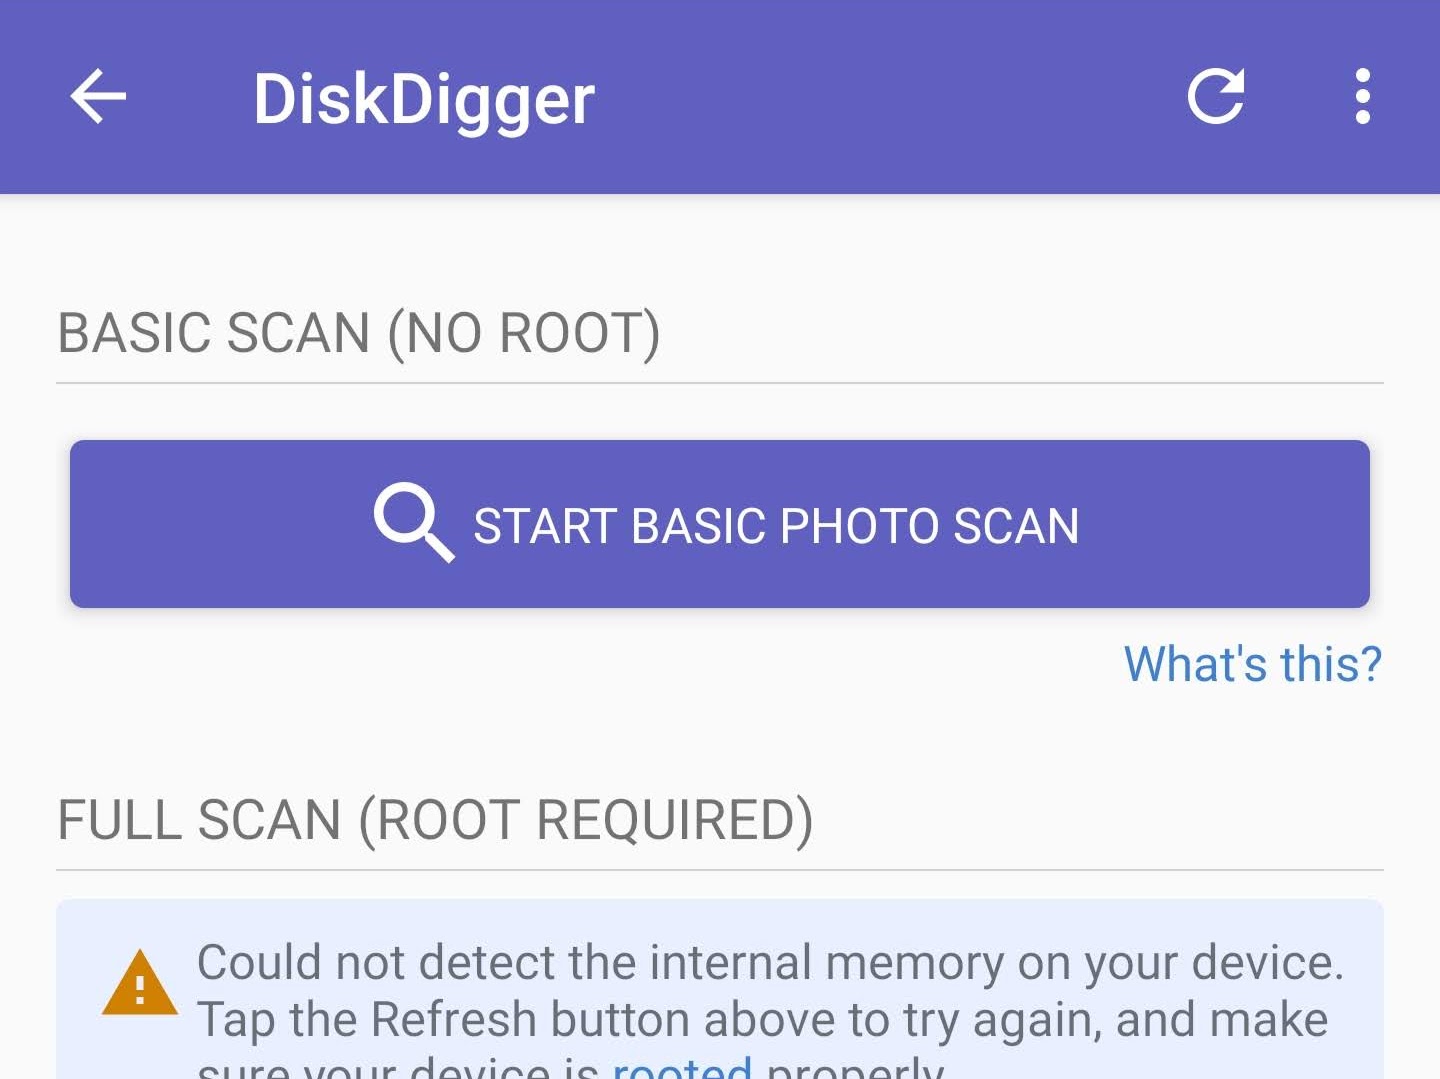
DiskDigger is an Android app that can be installed on your device and used to recover lost encrypted files. Bear in mind that DiskDigger Pro must be bought and used as the free version only allows the recovery of photos. Your device must also be rooted before the application can work. Here’s how you recover encrypted files using DiskDigger Pro (the below instructions use the free DiskDigger version, but the steps will be almost identical):
- Download and open DiskDigger Pro.
- Tap Start Basic Photo Scan.
- Mark the files you want to recover, then tap Recover.

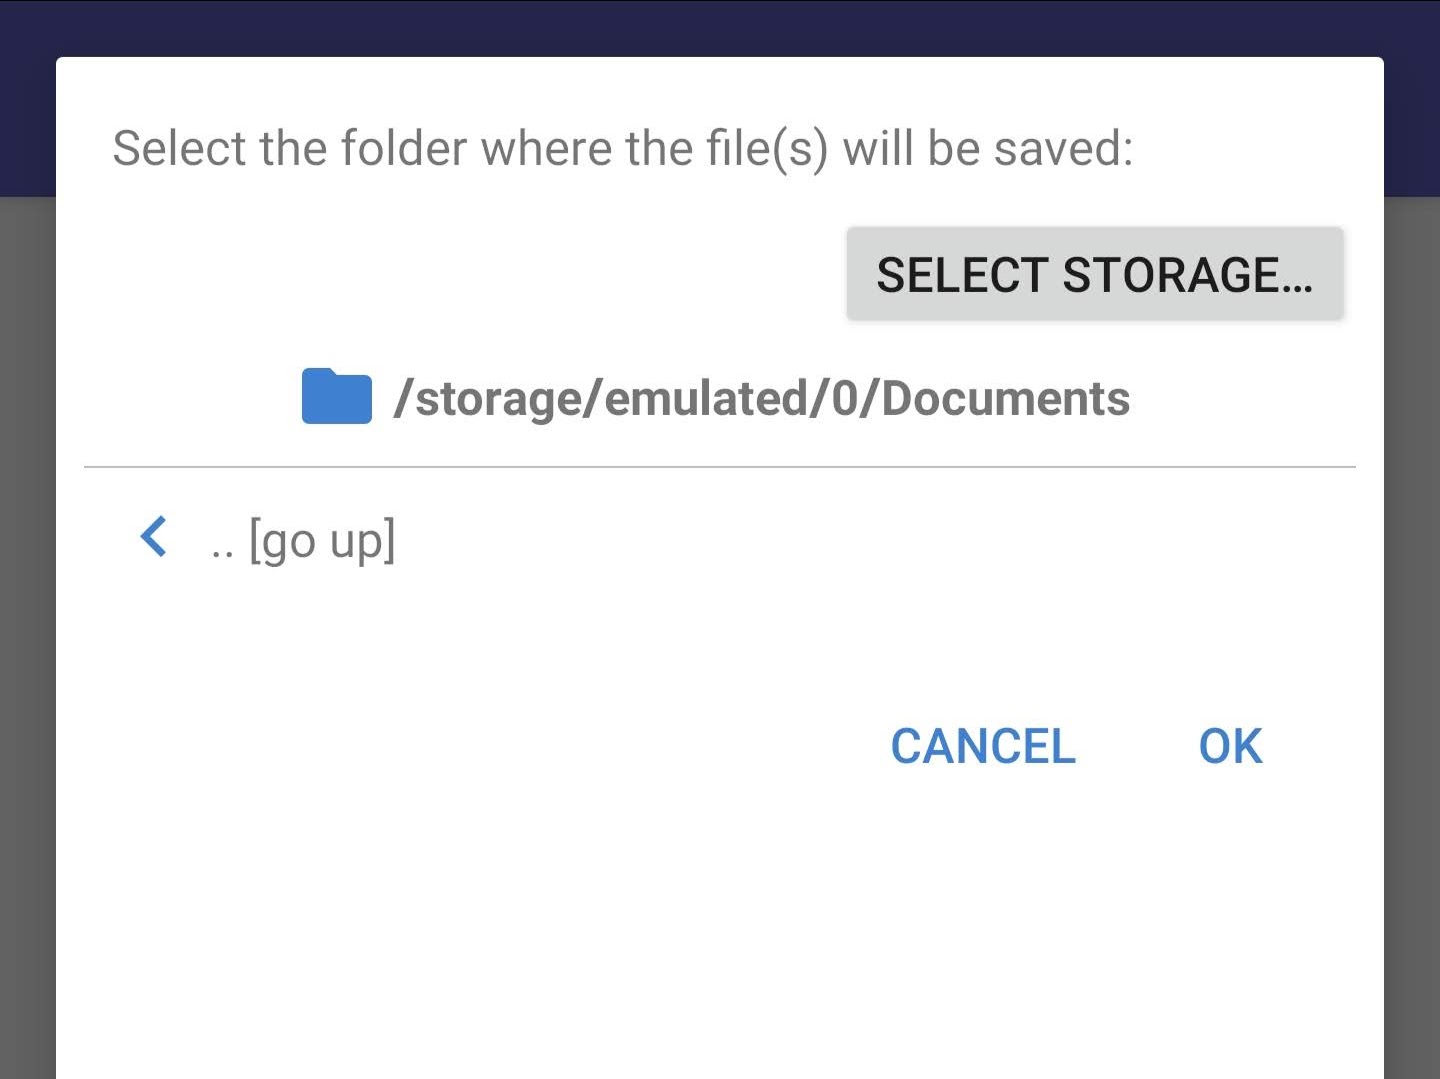
- Select how you want to recover the files. For this demonstration, we chose Save the files to a custom location on your device.
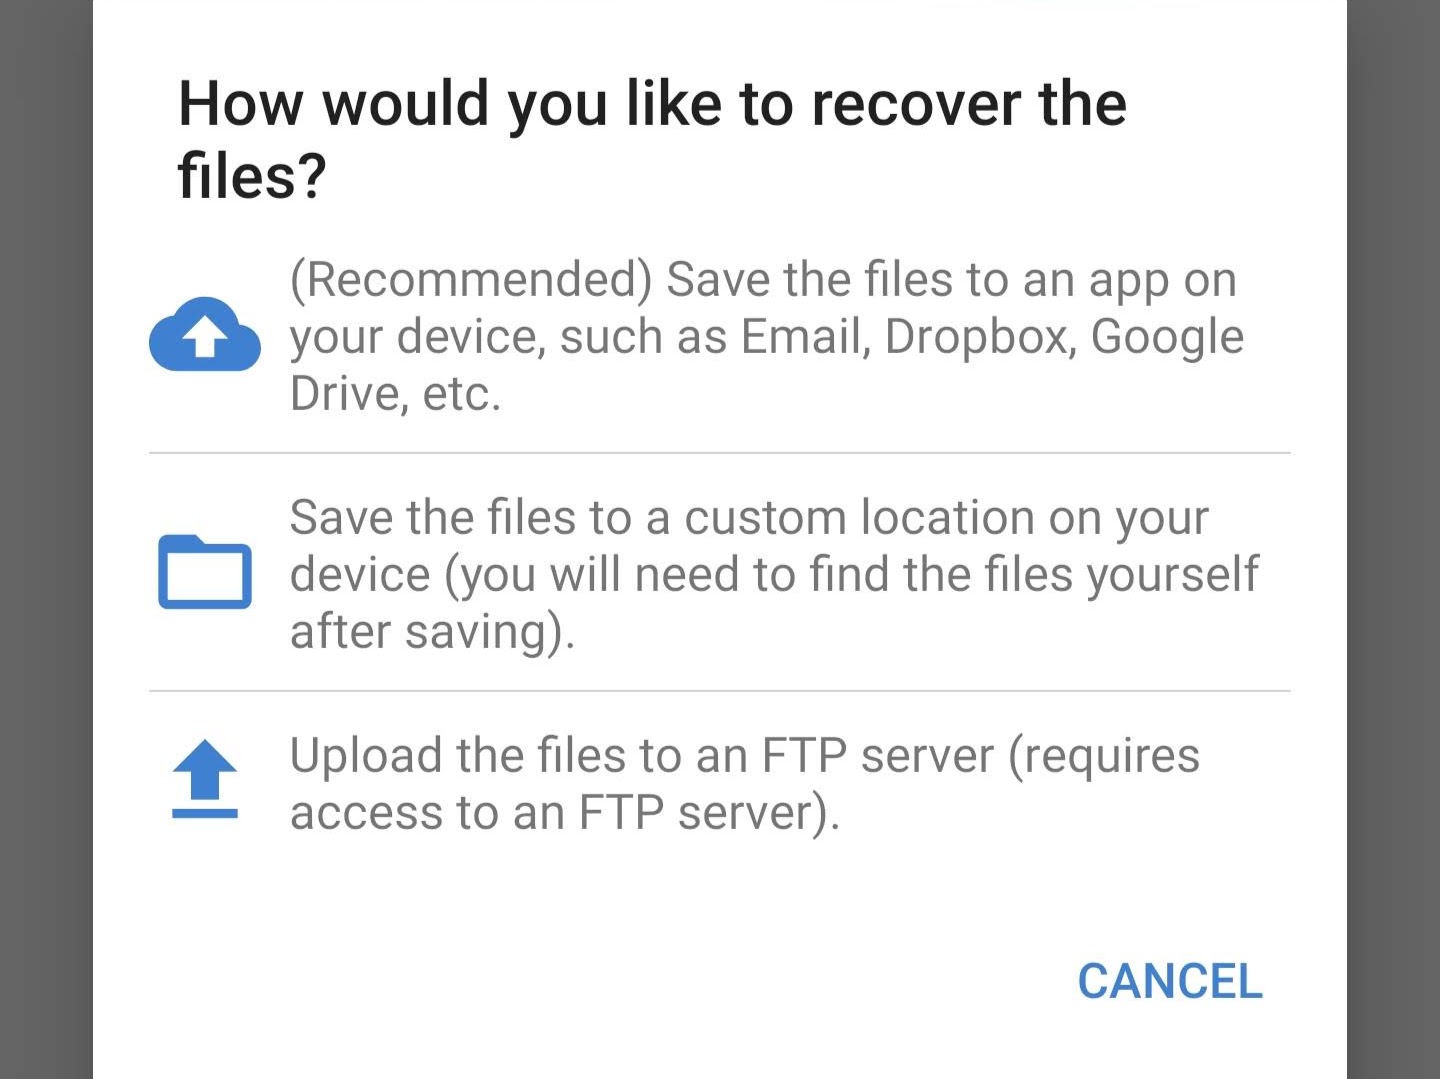
- Tap OK to finalize recovery.
Recover Using Data Recovery Software on Mac
Disk Drill for Mac has the ability to recover files directly from your connected Android device. Again, like DiskDigger, your Android device must be rooted in order for this to work. Follow these instructions to recover encrypted files from your Android devices using Mac:
- Download and install Disk Drill for Mac.
- Connect your rooted Android device and enable USB debugging.
- Accept Disk Drill’s request for permission to scan your device.
- Select the Android Devices section. Choose your device, then scan it.
- Mark the files you want to recover. Click Recover, then choose where you want to store the files.
How to Recover Encrypted Files on iPhone
It’s generally harder to recover encrypted files from an iPhone, but there are still a few methods available to you.
Restore from a Backup
If your iOS device was backed up to iCloud, there’s a chance that your recently deleted encrypted files can be recovered from there. Of course, this is only possible if the file was saved to iCloud first.
- Go to iCloud.com, then click Recently Deleted.
- Select the file you want to recover, then click Recover. Alternatively, click Recover All to recover all files in here.
Recover Using Data Recovery Software
Although you’d assume that recovery would be unlikely given Apple’s inclination for doing things differently, it is very much possible to recover encrypted files from your iOS device. Again, this is only possible using Disk Drill for Mac.
- Download and install Disk Drill for Mac.
- Select your iOS device in the list, then scan it.
- Mark all the files you want to retrieve, then recover them.
Conclusion
Learning how to recover encrypted files from a USB drive isn’t nearly as difficult as it may initially seem. As long as you manage to successfully unlock the drive, the actual recovery is a piece of cake—at least if you use a straightforward data recovery tool.


FAQ
To open an encrypted USB drive on a Mac, you need to:
- Right-click the USB drive in Finder
- Select the Decrypt option
- Enter your password.
If the USB drive has been encrypted using BitLocker in Windows, then you’ll need to download a third-party tool capable of decrypting BitLocker volumes.
To restore files from a password-protected USB drive on a Mac:
- Unlock it with your password.
- Scan it using a data recovery tool like Disk Drill.
- Select and recover all files that are still physically present on the drive.
The only way to access encrypted files on a USB drive is by unlocking the drive first. Here’s how you can do that:
- Connect it to your Windows computer.
- Click the Unlock drive message prompt.
- Enter your password and click Unlock.
If you’re using Mac, then the process is largely similar, but you need to select your USB in Finder.
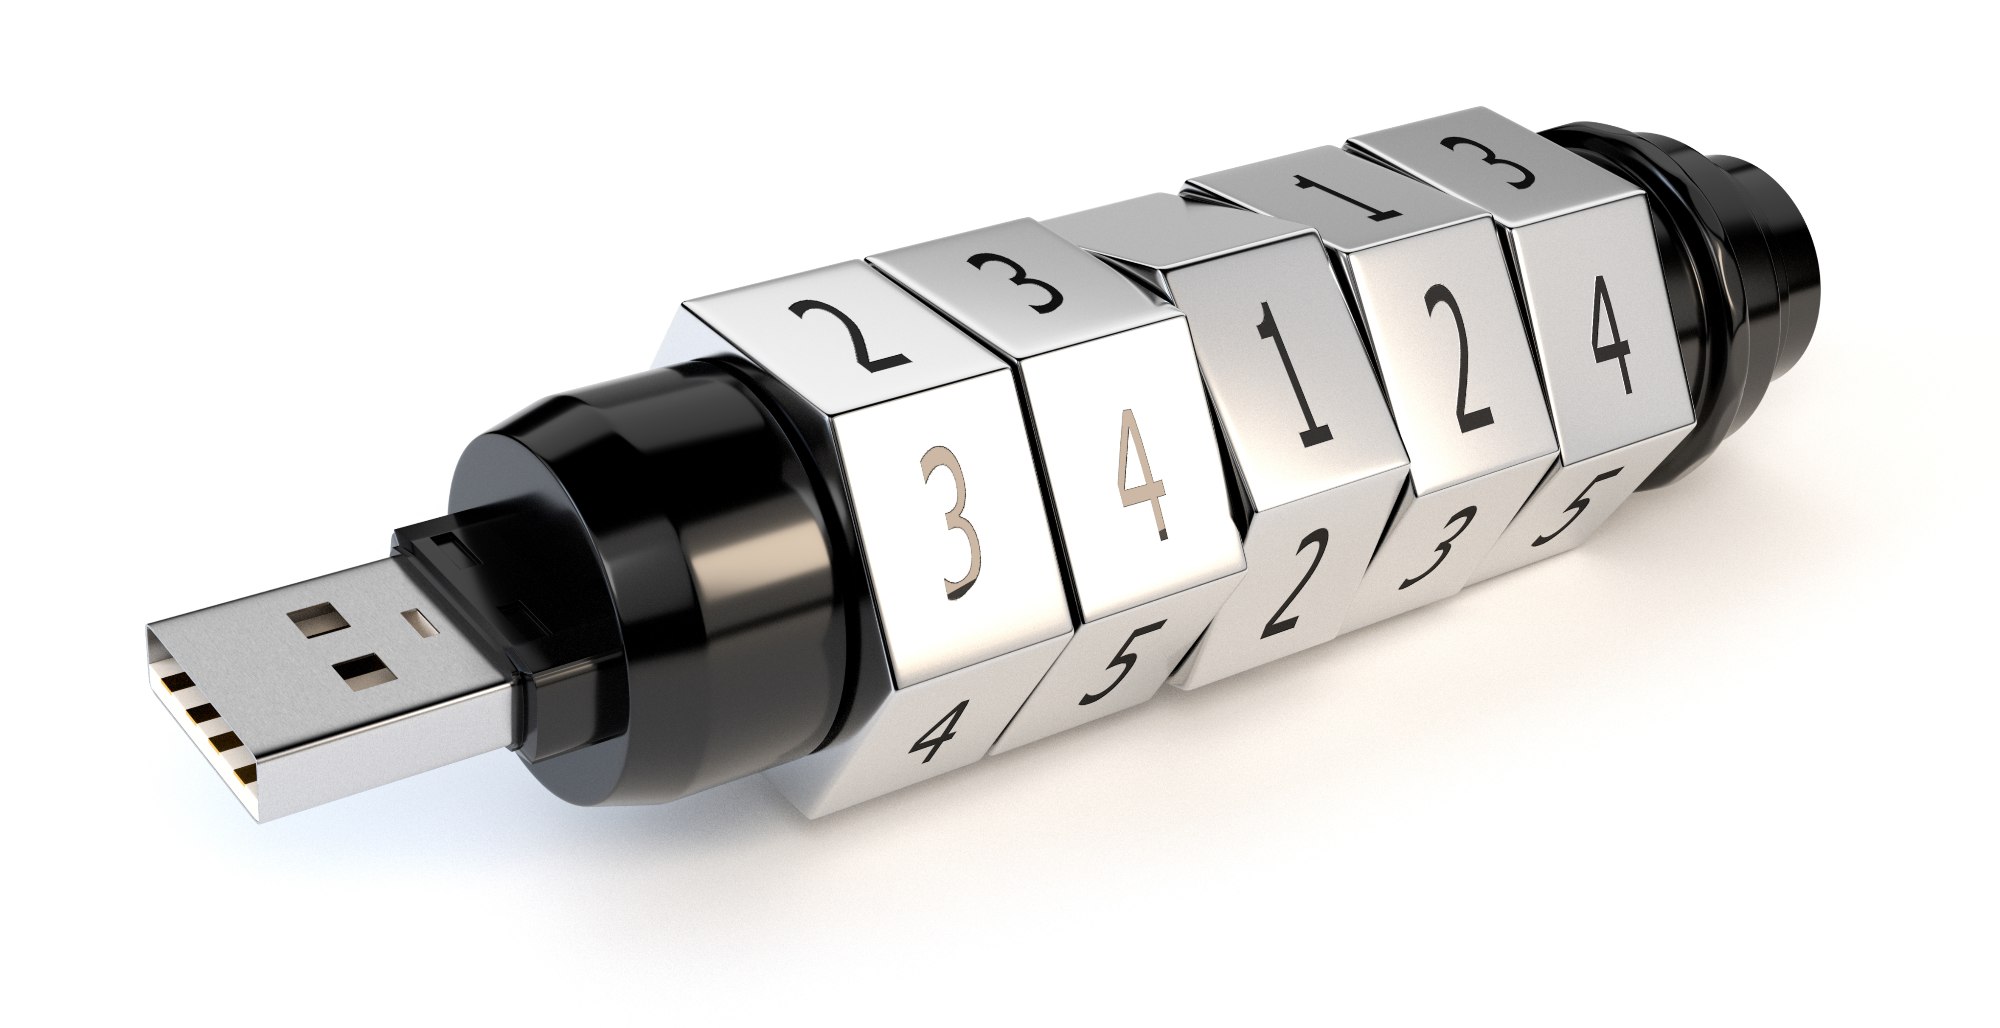
There are some flash drives with built-in encryption capabilities. Such flash drives typically feature a physical keypad, allowing you to encrypt and decrypt your files without software. Here’s how they work:
- You set your password to encrypt the entire flash drive.
- Use the flash drive just like you would normally.
- The flash drive will lock automatically when you disconnect it from your computer.