You sit down, log into your computer, and after booting up, you find that one of your GPT partitions is missing. Oh no. All of those important photos, videos, and documents have disappeared without a trace.
Before going into full-blown panic mode, you search Google for some suggestions on what to do next. And, you’ve landed yourself here. Luckily, this is the perfect place to be. Today, we’re going to take a look at what GPT partitions are and how to recover them.
What Is a GPT Partition?
Before you can use a disk drive to store data, you first need to partition it. GUID Partition Table (GPT) is a partition style that was developed by Intel in the late 1990s. It stores and structures information pertaining to partitions, like where they begin and end. This allows your operating system to locate and access the data stored on your drive.
What Is the Difference Between GPT and MBR Partitions?
Master Boot Record (MBR) is another type of partition style that was introduced with DOS 2.0 in 1983. While for a long time it was sufficient in satisfying the needs of both end-users and enthusiasts alike, with the rapid rate at which technology is developing, MBR is quickly becoming legacy in comparison to GPT.
MBR
MBR only works with disk drives up to 2TB in size, and can only support four primary partitions. In order to add more partitions, you need to replace one of your primary partition slots with an extended partition, which you can then use to make extended partitions within it.
GPT
GPT supersedes MBR in almost every way. Size limits and the number of partitions you’re allowed on a single drive are only limited by the operating system. It also replaces the old-school-looking BIOS with Unified Extensible Firmware Interface (UEFI) for easier navigation of your computer’s boot screen. And, probably the biggest advantage over MBR in terms of recovery, it stores multiple copies of the partitioning and boot data across the disk for redundancy.
Reasons Behind GPT Partition Loss
GPT partition loss can happen for a multitude of reasons. In most instances, it’s unavoidable and is the result of something out of your control. In others, it could simply be the result of user error.
Here are some common reasons why your GPT partition was lost:
- ⛔ Unexpected system shutdown – If your computer is in the middle of performing an action to the GPT partition like formatting, writing, or resizing – there’s a chance that the partition can be lost due to the unexpected power failure. This can also cause data on the partition to become corrupted.
- 😐 Accidental deletion or format – Accidents happen to everyone. In some instances, you may have accidentally deleted or formatted a partition that you weren’t supposed to. This is especially easy if the wrong command is entered through a terminal based solution like Command Prompt, and can quickly erase or format the partition in the blink of an eye.
- ❓ Failed partition type conversion – If you’re converting your drive’s partition from MBR to GPT, your partition is left in a vulnerable state during this process. If anything were to go wrong, like an unexpected power failure, it can cause catastrophic damage to your partition.
- 🐜 Malware – The bane of any computer user’s existence. Malware can be created to specifically target the partitions on your drive, either to delete them or encrypt them and force you to pay a sum to regain access to them.
- 🔨 Corrupted partition table – If your partition table becomes corrupted, your operating system might not be able to view your partition. In some cases, this doesn’t mean that the partition is lost, but instead that the operating system can’t find it.
No matter the cause, there are ways you can go about recovering the data from the lost partition.
How to Recover Data from a GPT Disk/Partition
If you don’t need to recover the entire partition, you can instead recover the data that you need. There are various solutions available for recovering the lost data, with many so easy that you can do them yourself without much effort.
Restore from a backup
If you’ve prepared for this type of situation, you can restore the data directly from a backup. This is going to be your fastest and most efficient ways of recovering any lost data, as you can almost guarantee that the data is readily available.
The problem here is that if you haven’t backed up your data, this won’t be a viable solution for you. Instead, move onto the next method of recovery.
Use data recovery software
Luckily, if you find yourself in a position where your GPT partition has disappeared, there are ways you can recover the data that was on it using data recovery software.
In order to recover the data, we’re going to make use of Disk Drill, a data recovery tool that specializes in all types of data recovery, including partitions. Disk Drill is proven to be reliable and easy to use, making it a popular go-to choice for all types of end-users.
Windows
- Download and install Disk Drill.
- Once installed, open it. On the main Data Recovery screen, you’ll see a list of the drives in your computer. Left-click on the drive that the partition was on.
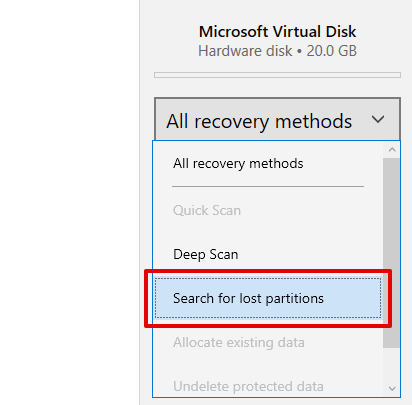
- In the All recovery methods drop-down menu, click on Search for lost partitions.
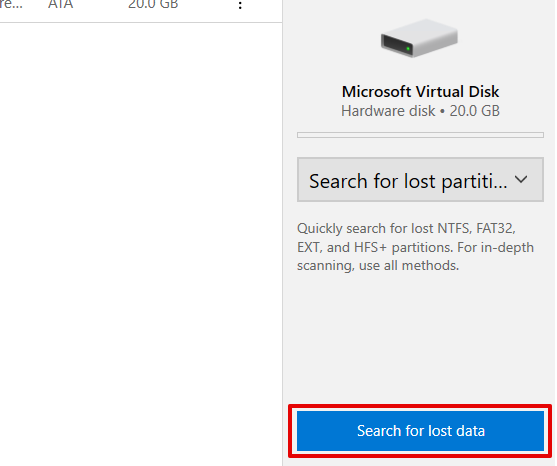
- Click on Search for lost data to begin the scan.
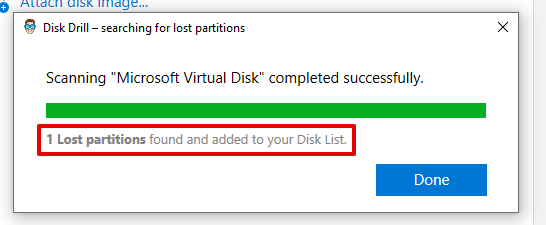
- When Disk Drill is finished scanning the drive, it will display any lost partitions that were recovered. Click Done.
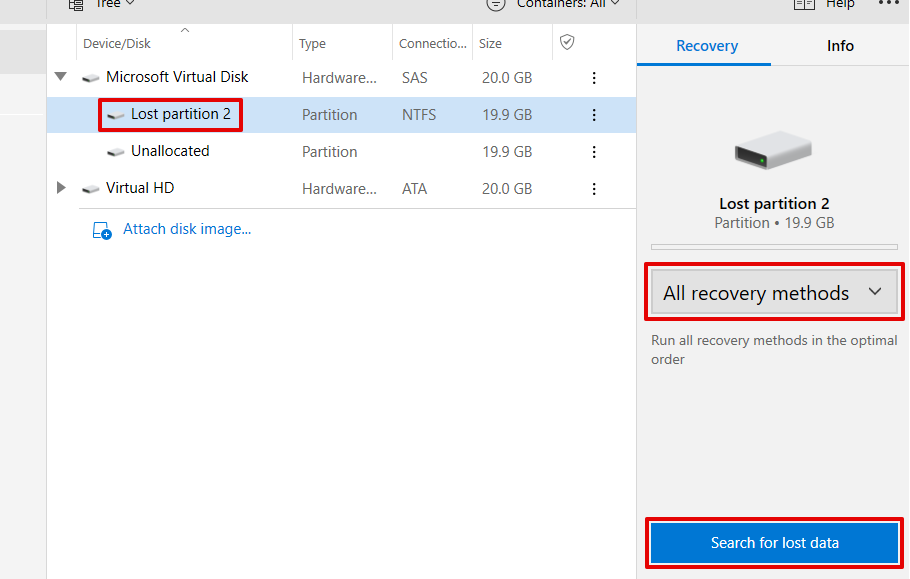
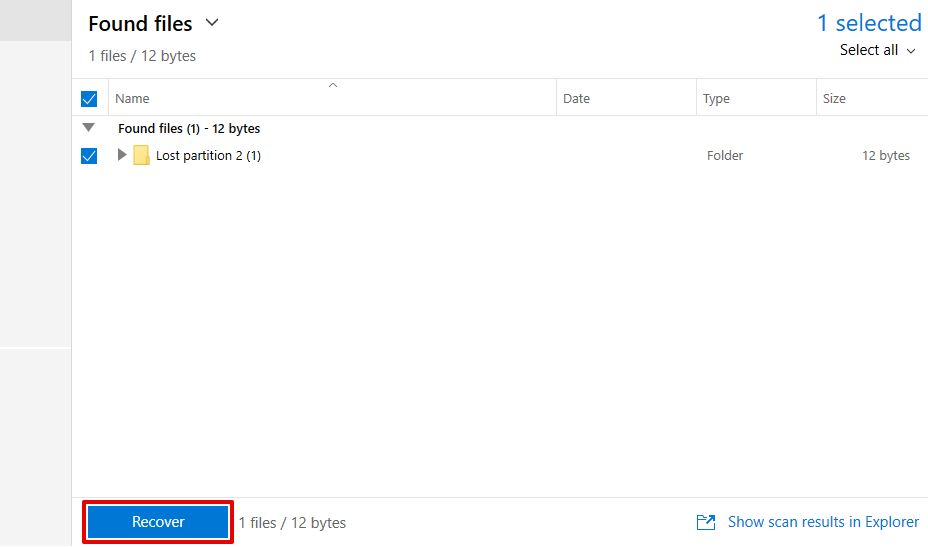
- Click on the lost partition that was recovered. Make sure that All recovery methods is selected from the drop-down on the right, and click Search for lost data. Disk Drill will begin to scan the drive for any recoverable data.
- When the scan has finished, click Review found items. From here, you can select the files you’d like to recover. When ready, you can click Recover.
- Specify a location for recovery. Press OK.
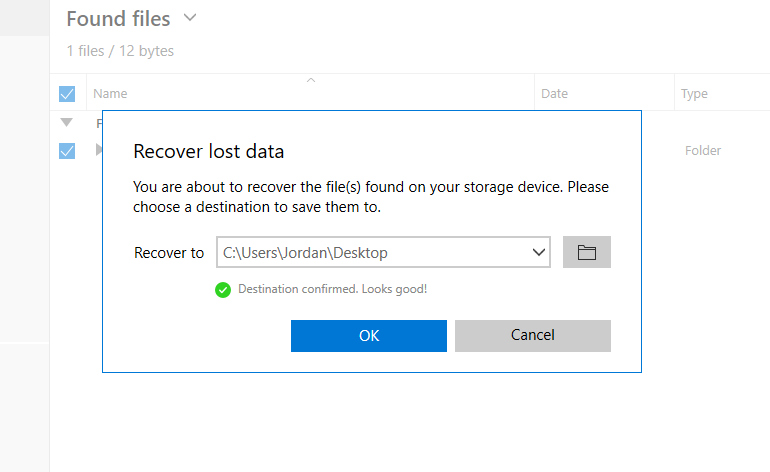 ⚠️ Note: To avoid losing the files again, it’s recommended that you recover to a storage location that’s not located on the same disk where the partition vanished.
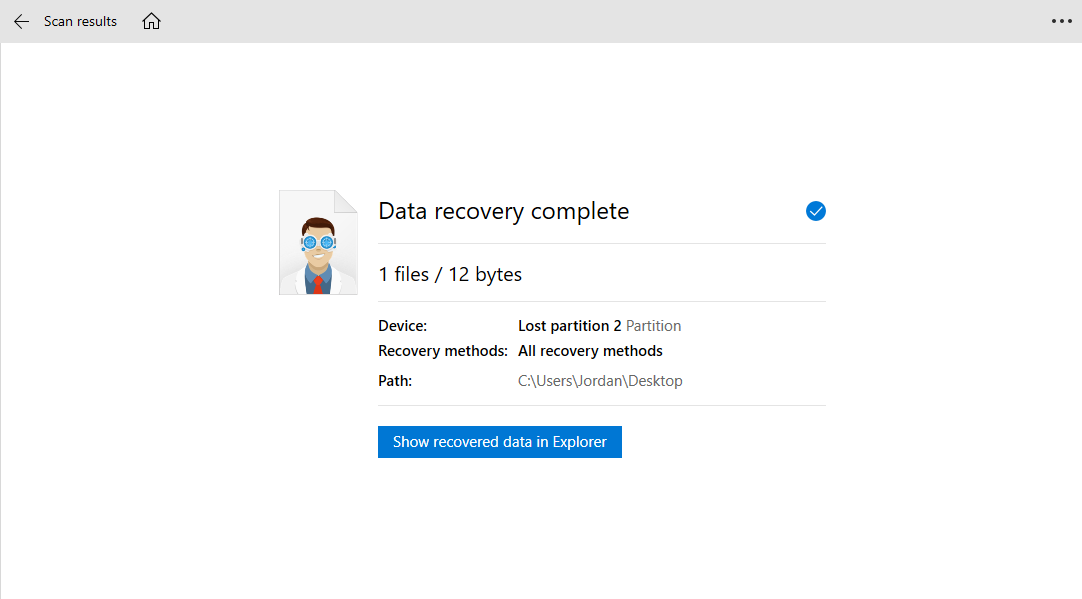
 - When recovery is finished, you’ll be met with a brief overview of what has been done.
Once you’ve recovered the data that was on the lost partition, you can now recreate that partition and load the data back on.
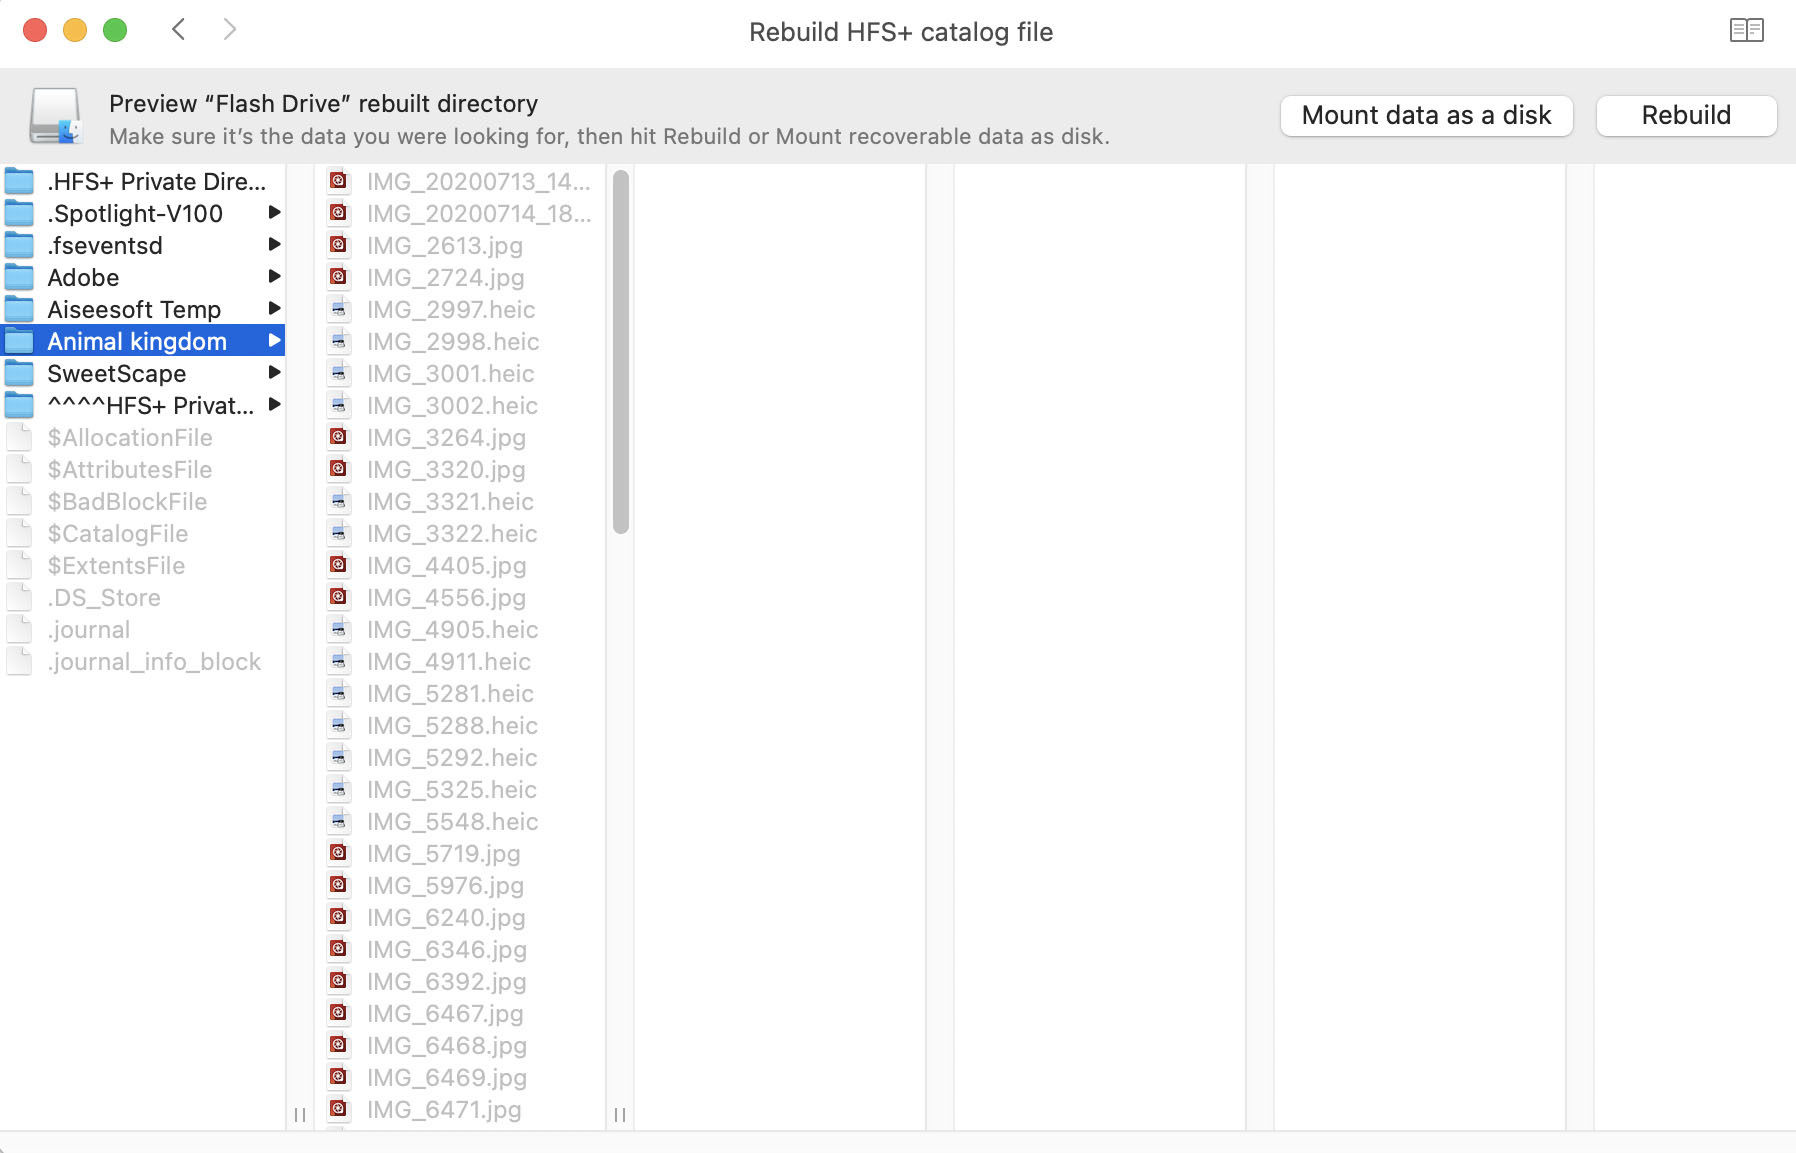
Mac
Mac users have the benefit of being able to recover the entire partition instead of recovering the data and creating a new partition to store the data like on Windows. Let’s take a look at how you can do this:
- Download and install Disk Drill.
- Open Disk Drill and select the drive that had the GPT partition before it was lost.
- From the All recovery methods drop-down menu, select HFS+ Rebuild catalog. Click Rebuild HFS+ catalog.
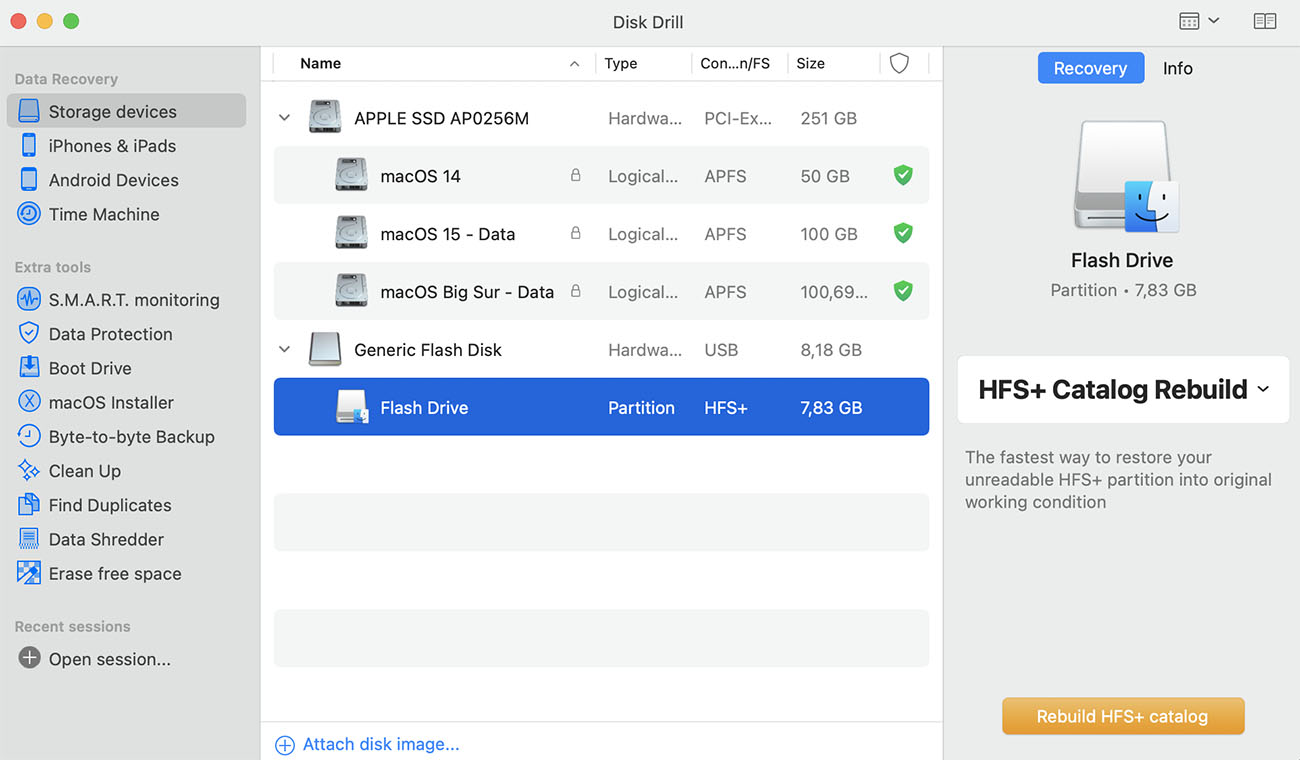
- When the scan is complete, your GPT partition (and the data on it) will be back to the way it was before it was lost.
Use a recovery service
If you’ve done everything you can, or the above solutions are too technical for your liking, then you can enlist the services of a professional. Recovery services exist to recover all types of lost data using commercial-grade tools and equipment.
Clever Files has a team of experts ready to help you. Using a professional recovery service gives you the best chance at recovering lost or deleted data from a GPT partition, and is usually the final option you choose if you’re unable to get it done yourself.
How to Prevent Data Loss Going Forward
Although data loss can occur at any time, you can take preemptive measures to prepare yourself for when it happens.
- 💽 Make backups of your data – Of course, the best way to keep your data safe is by creating copies of it. There are so many different ways you can backup your data, from cloud solutions like Google Drive to entire clones of your hard drive to an external drive that you keep in a safe place.
Note: For Mac users, check out our complete guide on backing up your Mac. - 🛡️ Use Antivirus – Viruses and malware can target your computer and either erase your data or hold it for ransom. Using an Antivirus solution like Malwarebytes is a great way to add an extra layer of security to protect your machine against those with malicious intent.
- ✅ Remove your drives safely – Before removing any external storage media from your computer, be sure to safely eject it before doing so. If you remove your storage device while it’s in the middle of an operation, it could corrupt the data and even the partition itself.
- 💂 Look for signs of a failing drive – If you hear your drive making clicking noises, files disappearing, or applications crashing at random, it could be that your drive is on its final legs. At this point, you should move your data from that drive and replace it before it fails entirely.
Conclusion
Data loss never occurs at a convenient time. Because of that, you need to take proactive steps in preparing for the worst so you can bounce back in no time. Luckily, when disaster strikes, the solutions in this article can help you get your data back.

FAQ
You can recover GPT partitions using Disk Drill, a data recovery solution available for Windows and Mac.
For Windows:
- Download and install Disk Drill.
- Select the drive that held the GPT partition, change the drop-down to Search for lost partitions. Click Search for lost data.
- When the lost partition is found, select it. Then, make sure the All recovery methods option is selected from the down-down and click Search for lost data.
- Review the recoverable data, select the data you want, then click Recover.
- Choose a location to recover the data to.
For Mac:
- Download and install Disk Drill.
- Select the drive that has the GPT partition, change the drop-down to HFS+ Rebuild catalog, then click Rebuild HFS+ catalog. This will rebuild the partition back to how it was before it was lost.
Yes, you can boot from a GPT partition, but only with 64-bit operating systems and hardware. In addition to this, your computer needs to support UEFI.
GPT partitions generally include a protective MBR. For operating systems that don’t support GPT, the entire drive will display as one large partition, even if there are multiple partitions. This ensures that older tools will not mistakenly display the partition as empty and attempt to overwrite any existing data with new data.
This depends entirely on your situation. Computers that are running old hardware without support for UEFI will likely need to use MBR. GPT can only be used on systems that are UEFI-compatible. However, if your system can support UEFI, you’re probably better off using GPT instead since it outclasses MBR in almost all aspects.
There are many different recovery solutions available on the market, and it can be hard to determine which is the best as it all comes down to what you need. On our YouTube channel, we’ve taken a look at our Top 5 Best Data Recovery Software in 2022.
If you want to convert a GPT partition to MBR, the first thing that you should do is back up all data to avoid data loss. Then follow these steps:
- Hit Start, type command prompt, and right-click Command Prompt.
- Choose Run as administrator.
- Type in diskpart.
- Type in list disk to see the number assigned to the needed disk.
- Type in select disk 1 (or the number that’s assigned to the needed disk).
- Type in clean.
- Type in convert mbr.
- Quit Command Prompt.
Keep in mind that this will delete all the data from the partition. So it is best to create a backup of the data stored there before moving forward.
Here’s how to fix a GPT protective partition:
- Click the Start menu and type in cmd.
- Right-click Command Prompt and choose Run as administrator.
- Type in diskpart and hit Enter.
- Type in list disk and hit Enter.
- Type in select disk 1 (or the number that’s assigned to the needed disk) and hit Enter.
- Type in clean and hit Enter.
- Once the process is finished, quit Command Prompt.
Follow these steps to recover data after converting GPT to MBR:
- Download and install Disk Drill on your computer.
- Launch the tool and choose the drive containing the GPT partition.
- Click All recovery methods for a drop-down menu to appear. Choose Search for lost partitions.
- Click the Search for lost data button to start the scan.
- When the app is finished with the scan, click Done.
- Choose the recovered partition from the list of devices, select All recovery methods from the drop-down menu on the right, and click Search for lost data.
- Click Review found items, choose the folders (files) that you wish to recover, and click Recover.
- Select a location for the recovered files and click OK.