If you’re asking, “How do I back up my Mac?” then the answer is simple: regularly, and in more than one place. That’s because every Mac (whether it’s a MacBook Air, MacBook Pro, or iMac) stores a mix of personal and professional data that’s often difficult or impossible to replace. Documents, photos, project files, and app data can all be lost in an instant due to hardware failure, accidental damage, theft, or a failed software update.
Things get a bit more complicated when you start looking at the different ways to actually back up your Mac. Do you use Time Machine with an external drive? Upload your files to iCloud? Create a full disk image with third-party software? Each method works differently and has its pros and trade-offs. The good news is that we’ll walk you through them all step by step.
Why You Might Need to Back Up Your Mac
Even if you acknowledge the importance of data backups, you might not be fully aware of all the main reasons to create them. Let’s break it down into three big reasons you’ll want to know how to back up your Mac:
- 🛡️ Protecting your data from loss, corruption, or damage: By far the most important reason to back up data is that users make mistakes and Macs are not 100% reliable. Files get deleted accidentally. Drives wear out and become damaged. Power outages, failed software updates, and even the occasional coffee spill can make your MacBook useless in an instant.
- 💽 Creating a full, restorable copy of your Mac: Sometimes the goal isn’t just to save your files but to preserve your entire system as-is. That includes apps, settings, and user preferences. Personally, I tinker with my system a lot, always testing new tools, adjusting settings, trying out different data recovery methods, and so on. Every now and then, I break something I didn’t mean to. Having a complete backup means I can rewind to a clean, working version of my setup instead of spending hours (or days) trying to piece it all back together.
- 🗄️ Archiving older data for long-term reference: Not everything on your Mac needs to be at your fingertips all the time. Those gigabytes of vacation photos from 2018? That folder of tax documents from three years ago? Your completed work projects that you rarely reference? They’re important to keep, but not necessarily on your main system drive. By backing up such files to an external storage location, you can enjoy more free space where you need it the most (and perhaps even better performance since SSDs need around 20% of storage space to be free to work optimally) without sacrificing access to your data.
With these three backup goals in mind (prevention, recovery, and archiving), it’s time to explore your options. Below, we’ll break down the most effective backup methods available to help choose the solution that best fits your workflow and priorities.
What Backup Options Are Available to You
Mac users typically choose from the following main backup methods, each with distinct strengths and trade-offs:
| Backup Method | What It Does | Pros | Cons |
| Time Machine | Creates incremental backups that let you restore files from different points in time | • Built into macOS • Automatic backups • Restore individual files or entire system • No internet required |
• Requires external drive • Not bootable by default • Drive must stay connected for auto backups |
| Third-Party Backup Tools | Third-party tools like ChronoSync offer advanced synchronization and backup options. | • Highly customizable • Supports bootable backups • Many other advanced features |
• Requires purchase • May be complex for casual users |
| General-Purpose Cloud Storage | Stores your files online (iCloud, Google Drive, Dropbox, OneDrive) | • Access from any device • Protection from physical damage/theft • Easy file sharing • No extra hardware needed |
• Requires internet • Monthly costs for extra storage • Slower for large files • Limited app/system backup |
| Dedicated Backup Services | Cloud services specifically designed for computer backups (Backblaze, Carbonite) | • Unlimited storage options • Automatic background backups • Optimized for computer backup |
• Monthly subscription • Requires internet • Initial backup can take days |
| Disk Imaging | Creates an exact clone of your entire drive | • Complete, bootable backup • Fastest recovery option • Perfect for system migration • Works offline |
• Requires third-party software • Takes more time and space • Needs manual updates |
| NAS & RAID Systems | Network-attached storage with redundant drives for enhanced protection | • Central backup for multiple devices • Automatic redundancy • Expandable storage • Works on local network |
• Higher upfront cost • Requires technical setup • Needs network configuration |
Based on the table above, we can say that:
- Time Machine is perfect for everyday Mac users who want hassle-free protection against accidental file deletion or corruption.
- General-purpose cloud storage solutions like iCloud shine when you need to access your files across multiple devices.
- Dedicated backup services like Backblaze offer the best of both worlds – comprehensive backup options with offsite storage.
- Disk imaging tools like Disk Drill, SuperDuper!, or Carbon Copy Cloner become essential when you’re preparing for a major system update, transferring to a new Mac, or tinkering with something that could break your system.
- NAS and RAID setups provide the ultimate in local backup redundancy for power users and small businesses who need rock-solid data protection.
For most Mac users, it’s actually best to combine multiple methods for maximum protection. Specifically, most professionals recommend that users keep at least three copies of your data (your original plus two backups), store them on at least two different types of media (like your Mac’s internal drive, an external hard drive, and cloud storage), and keep at least one copy offsite (such as in cloud storage or at another physical location).
In the following sections, we’ll walk through the most popular backup methods in detail so that you can effortlessly implement your own effective Mac data backup strategy in no time.
Method 1: How to Back Up your Mac with Time Machine
Time Machine is Apple’s built-in backup solution for macOS. When enabled, it automatically and incrementally backs up your entire system to an external storage device by following this schedule:
- hourly snapshots for the past 24 hours
- daily backups for the past month
- weekly backups for all previous months.
The biggest advantage of Time Machine’s incremental approach is that it lets you restore your Mac to a previous state or recover specific files as needed. For example, if you accidentally overwrite a file and notice it a few hours later, you can easily retrieve the previous version from the most recent hourly snapshot. Similarly, if you delete a file and realize it a week later, you can recover it from the weekly backup. When your backup drive starts getting full, Time Machine automatically deletes the oldest backups to make room for new ones.
Preparing a Time Machine Backup Drive
Before you can turn on Time Machine, you need to prepare an external drive to store all those backups. Here’s what to look for:
- Get a drive with at least twice the storage capacity of your Mac. If your MacBook Air has a 512 GB drive, aim for at least 1 TB of backup space so that you can store multiple incremental copies of your data.

- Buy the fastest drive you can so that your backups are done quickly (you don’t want to lose valuable data because the backup process is taking forever). For the fastest backups, get a drive that takes full advantage of your Mac’s USB-C/Thunderbolt ports.
- While HDDs traditionally offered more storage for less money, modern SSDs are quite reliable for backup purposes. According to Backblaze’s data, SSDs actually maintain lower failure rates than HDDs over time, with SSDs showing approximately 1% annualized failure rates through their first four years.
Once you have a suitable external drive ready, you need to format it in Disk Utility:
- Connect your drive to your Mac using the appropriate cable.
- Launch Disk Utility (you can find it in Finder > Applications > Utilities).
- Select your external drive from the sidebar.
- Click the Erase button at the top.
- Name your drive something memorable like Time Machine Backup and choose APFS if you’re using macOS Big Sur or later, or Mac OS Extended (Journaled) for older systems.
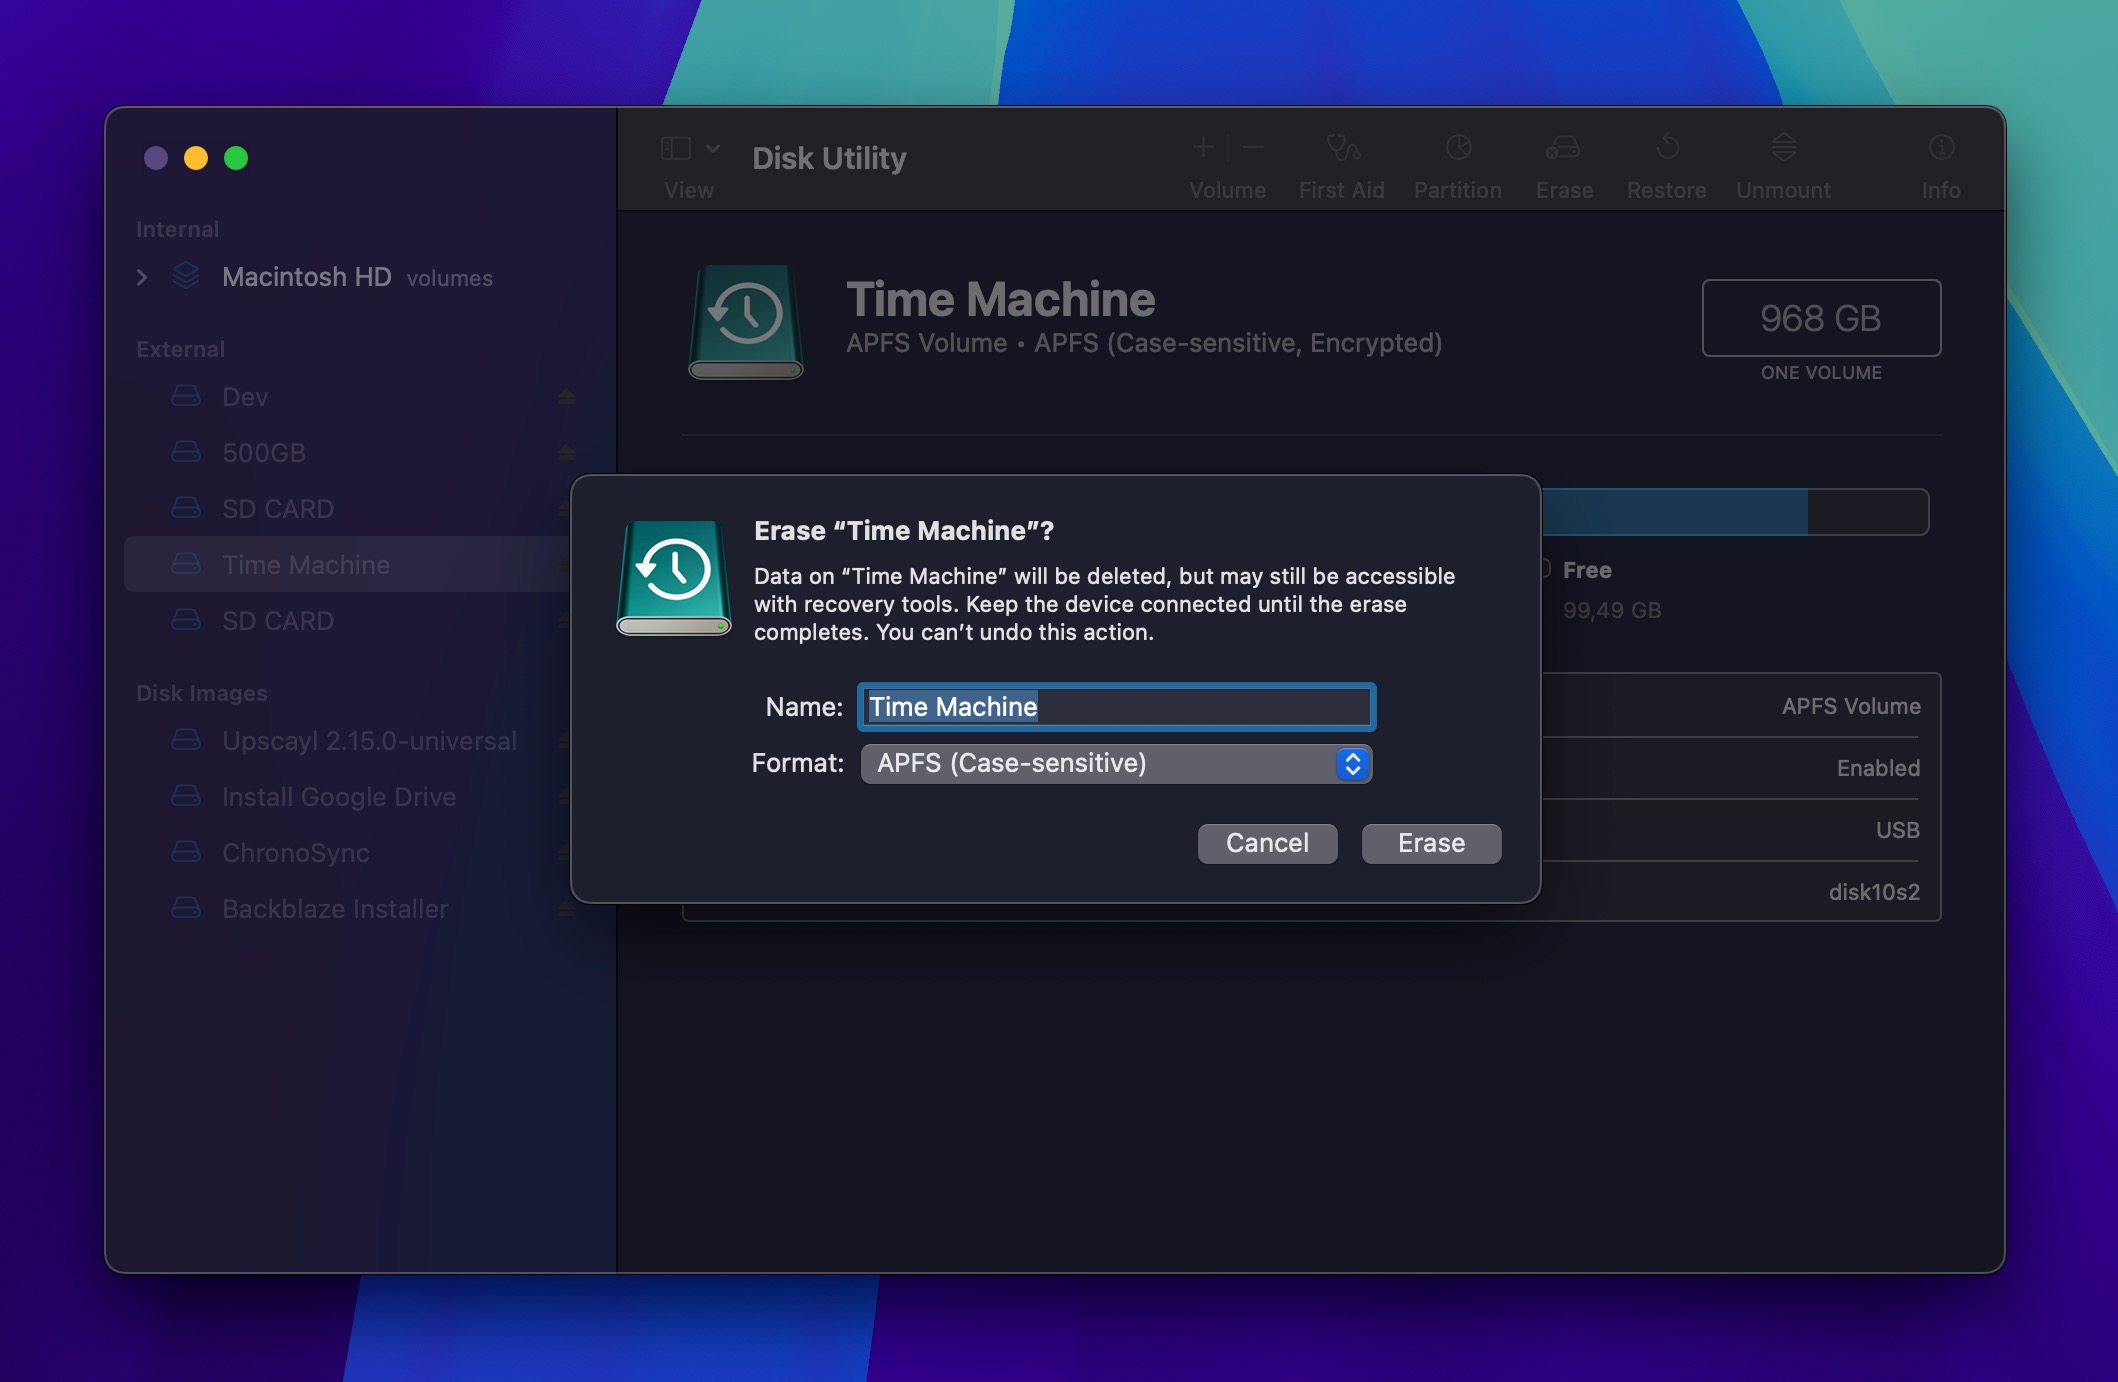
- Confirm and wait until the drive is formatted.
Now you can set up Time Machine itself so that it automatically backs up your Mac:
- Launch System Settings (or System Preferences in older versions).
- Navigate to General > Time Machine.
- Click Add Backup Disk and select your external drive.
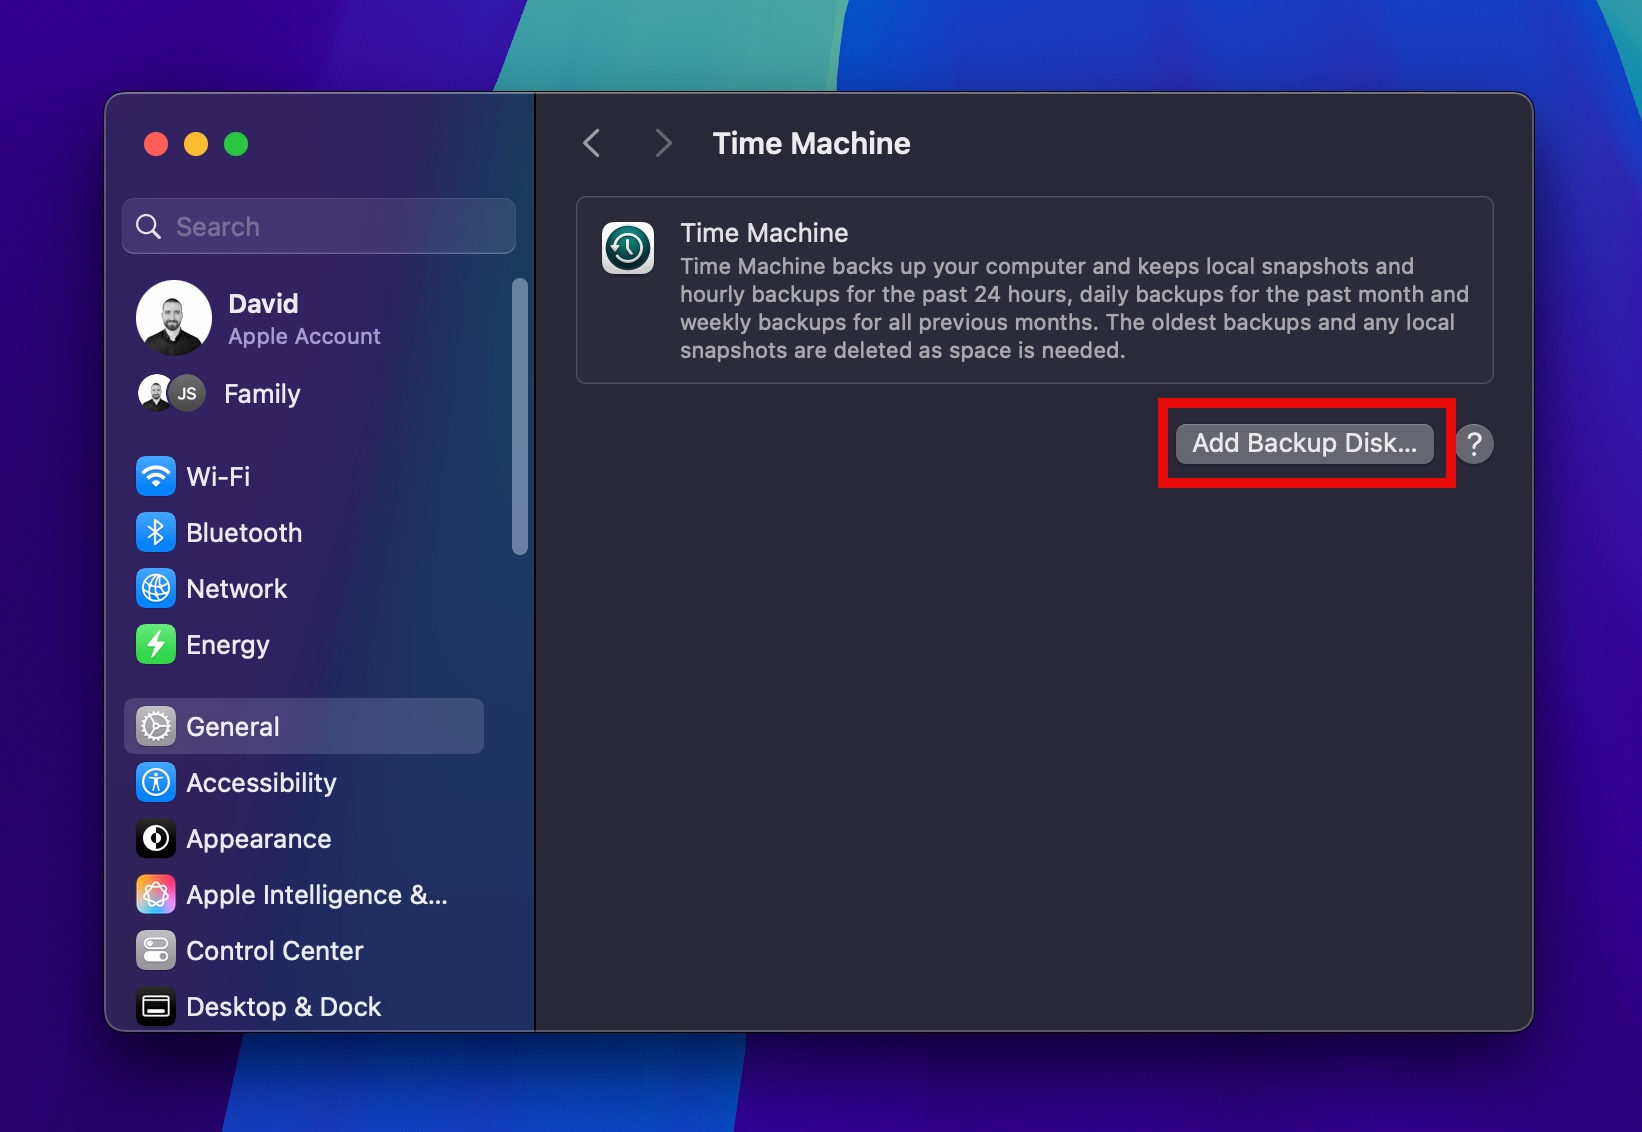
- Choose whether to encrypt backups. Encryption makes it impossible for others to go through the content of your backup drive but requires you to remember the password. Forgetting the password means you won’t be able to access your backups.
- Click Back Up Now to start your first backup, or just wait and Time Machine will begin automatically within 2 minutes of being set up.
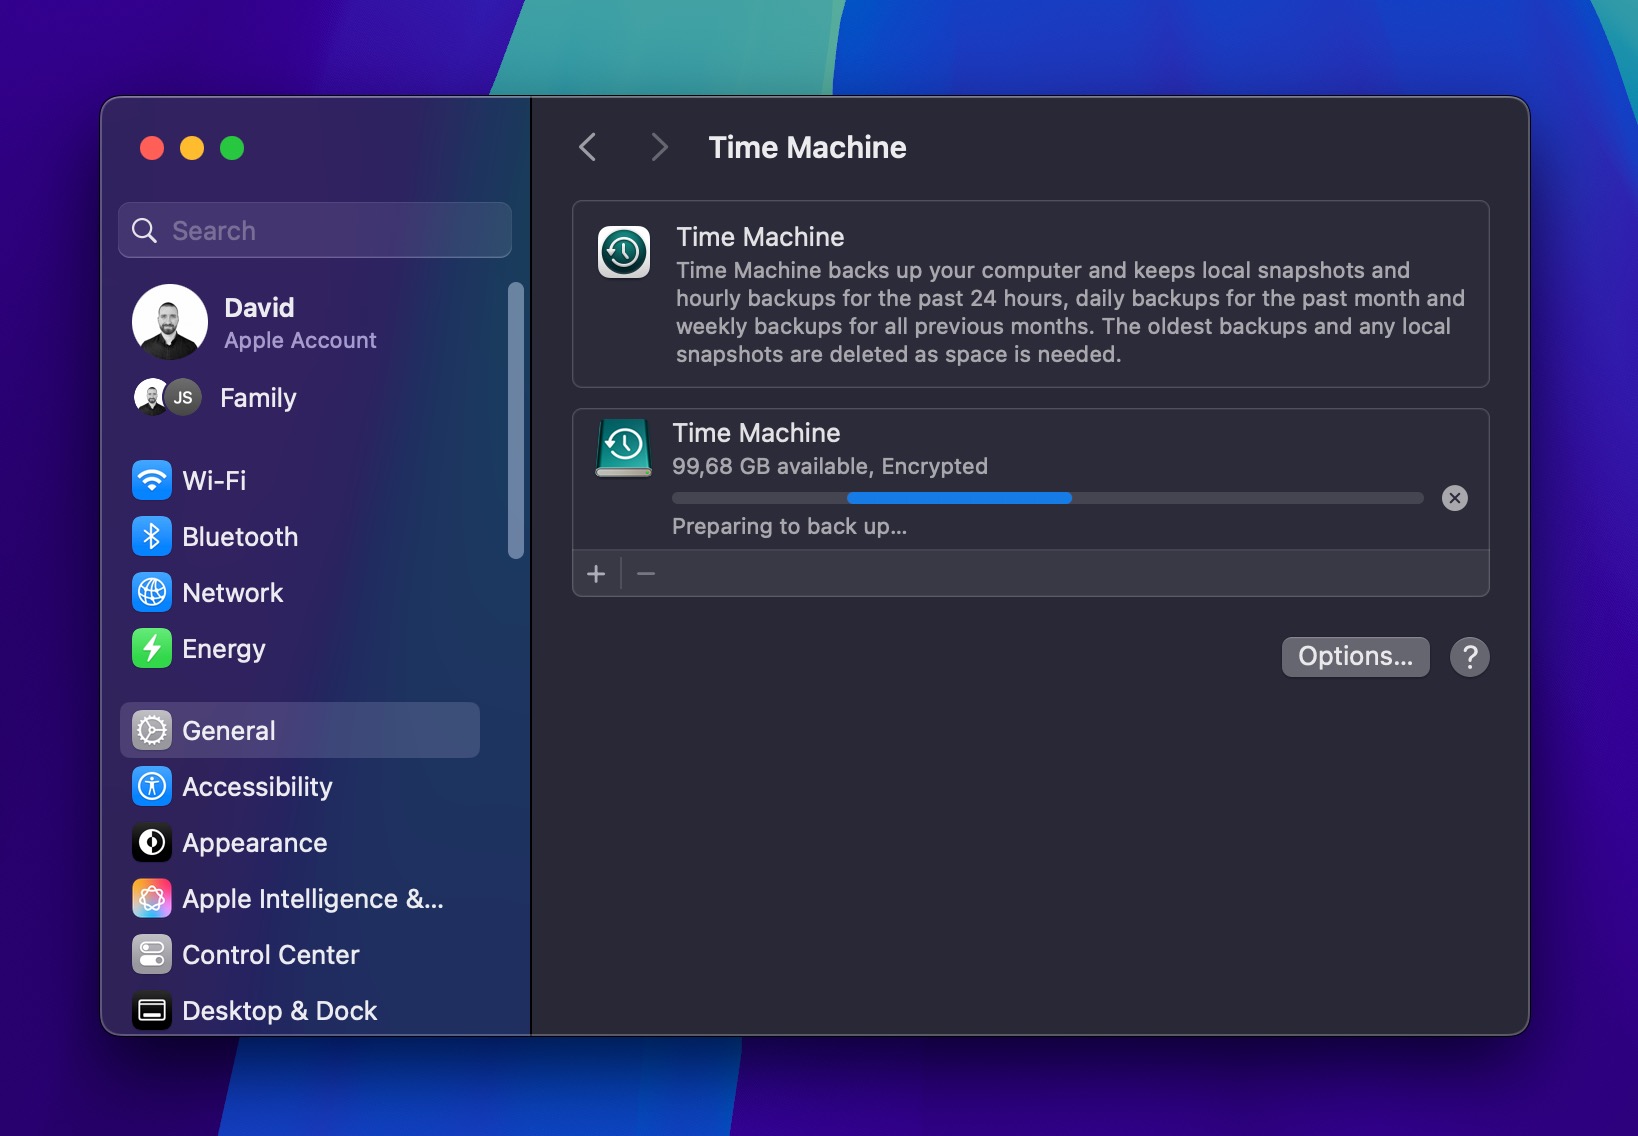
The first backup will take quite a while (possibly hours) if you have a lot of data. You’ll see a progress bar in the Time Machine menu (the little clock icon with an arrow in your menu bar). Don’t worry if it seems to slow down or pause occasionally. As long as you keep the external hard drive plugged in, the backup will almost certainly finish.
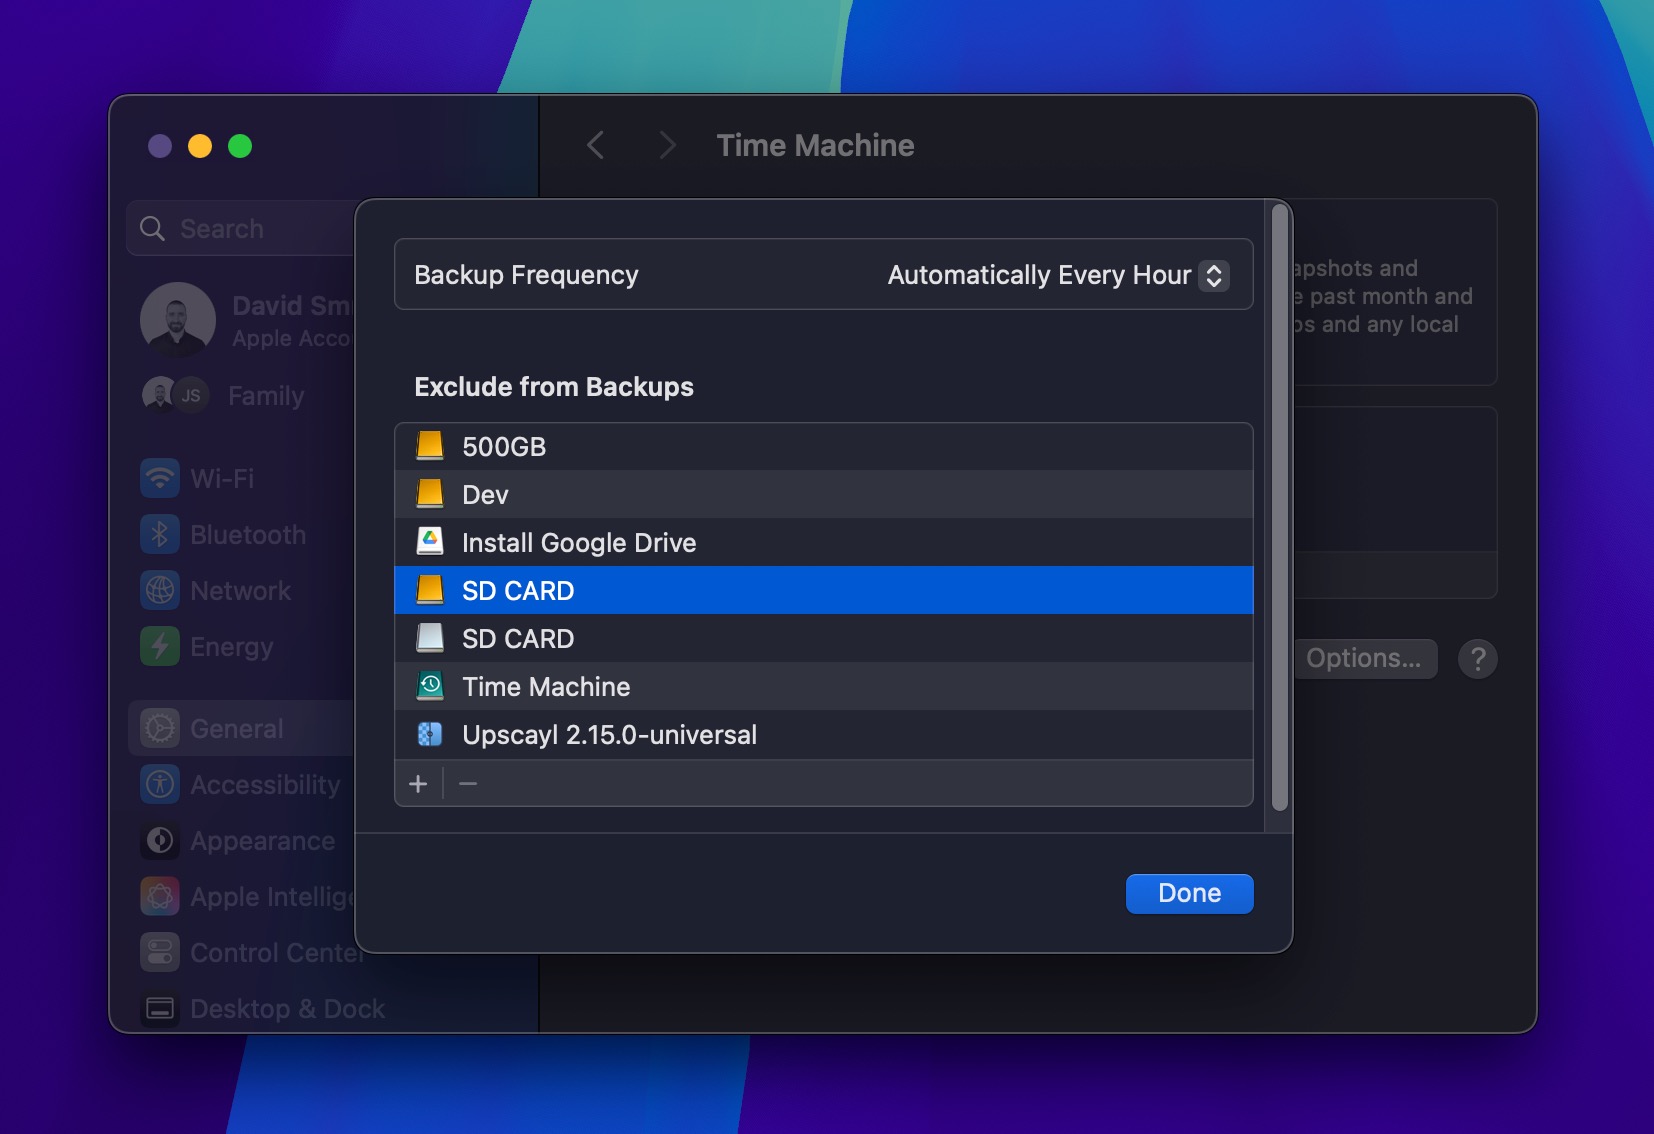
Once your initial backup is complete, you may want to optimize subsequent backups by excluding unnecessary files from them. For example, you probably don’t need to back up your entire Downloads folder or those massive video files you can easily download again. To exclude items, go to Time Machine preferences, click Options, and add folders or files you want to skip.
To recover deleted or overwritten files with Time Machine, you can simply open the folder where the file used to be, click the Time Machine icon in the menu bar, and select Browse Time Machine Backups.
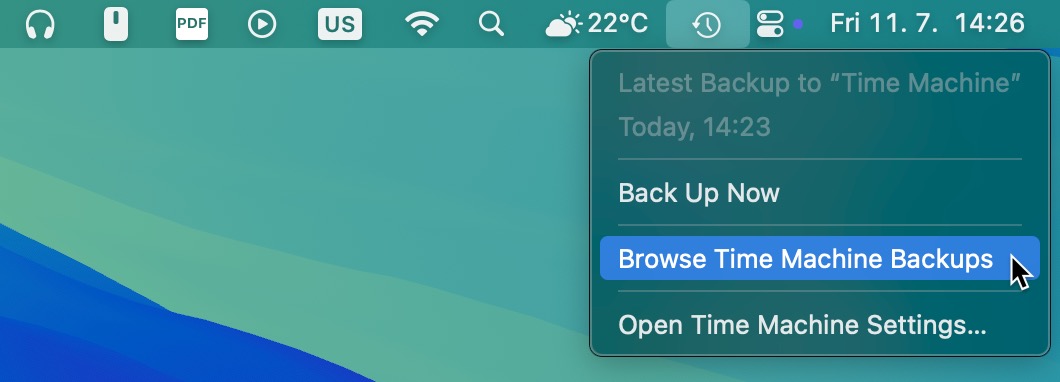
Then, use the timeline on the right edge of the screen to “travel back” to when your file still existed, select the file(s) you want to restore, and click the Restore button. Your file returns to its original location – that’s the beauty of Apple’s native incremental backup solution.
Method 2: Using Third-Party Backup Tools for Your Mac
Time Machine is fantastic for simple backups, but some Mac users need more control over their backup process. That’s where third-party backup applications come in to offer features and flexibility that Apple’s built-in solution simply doesn’t match.
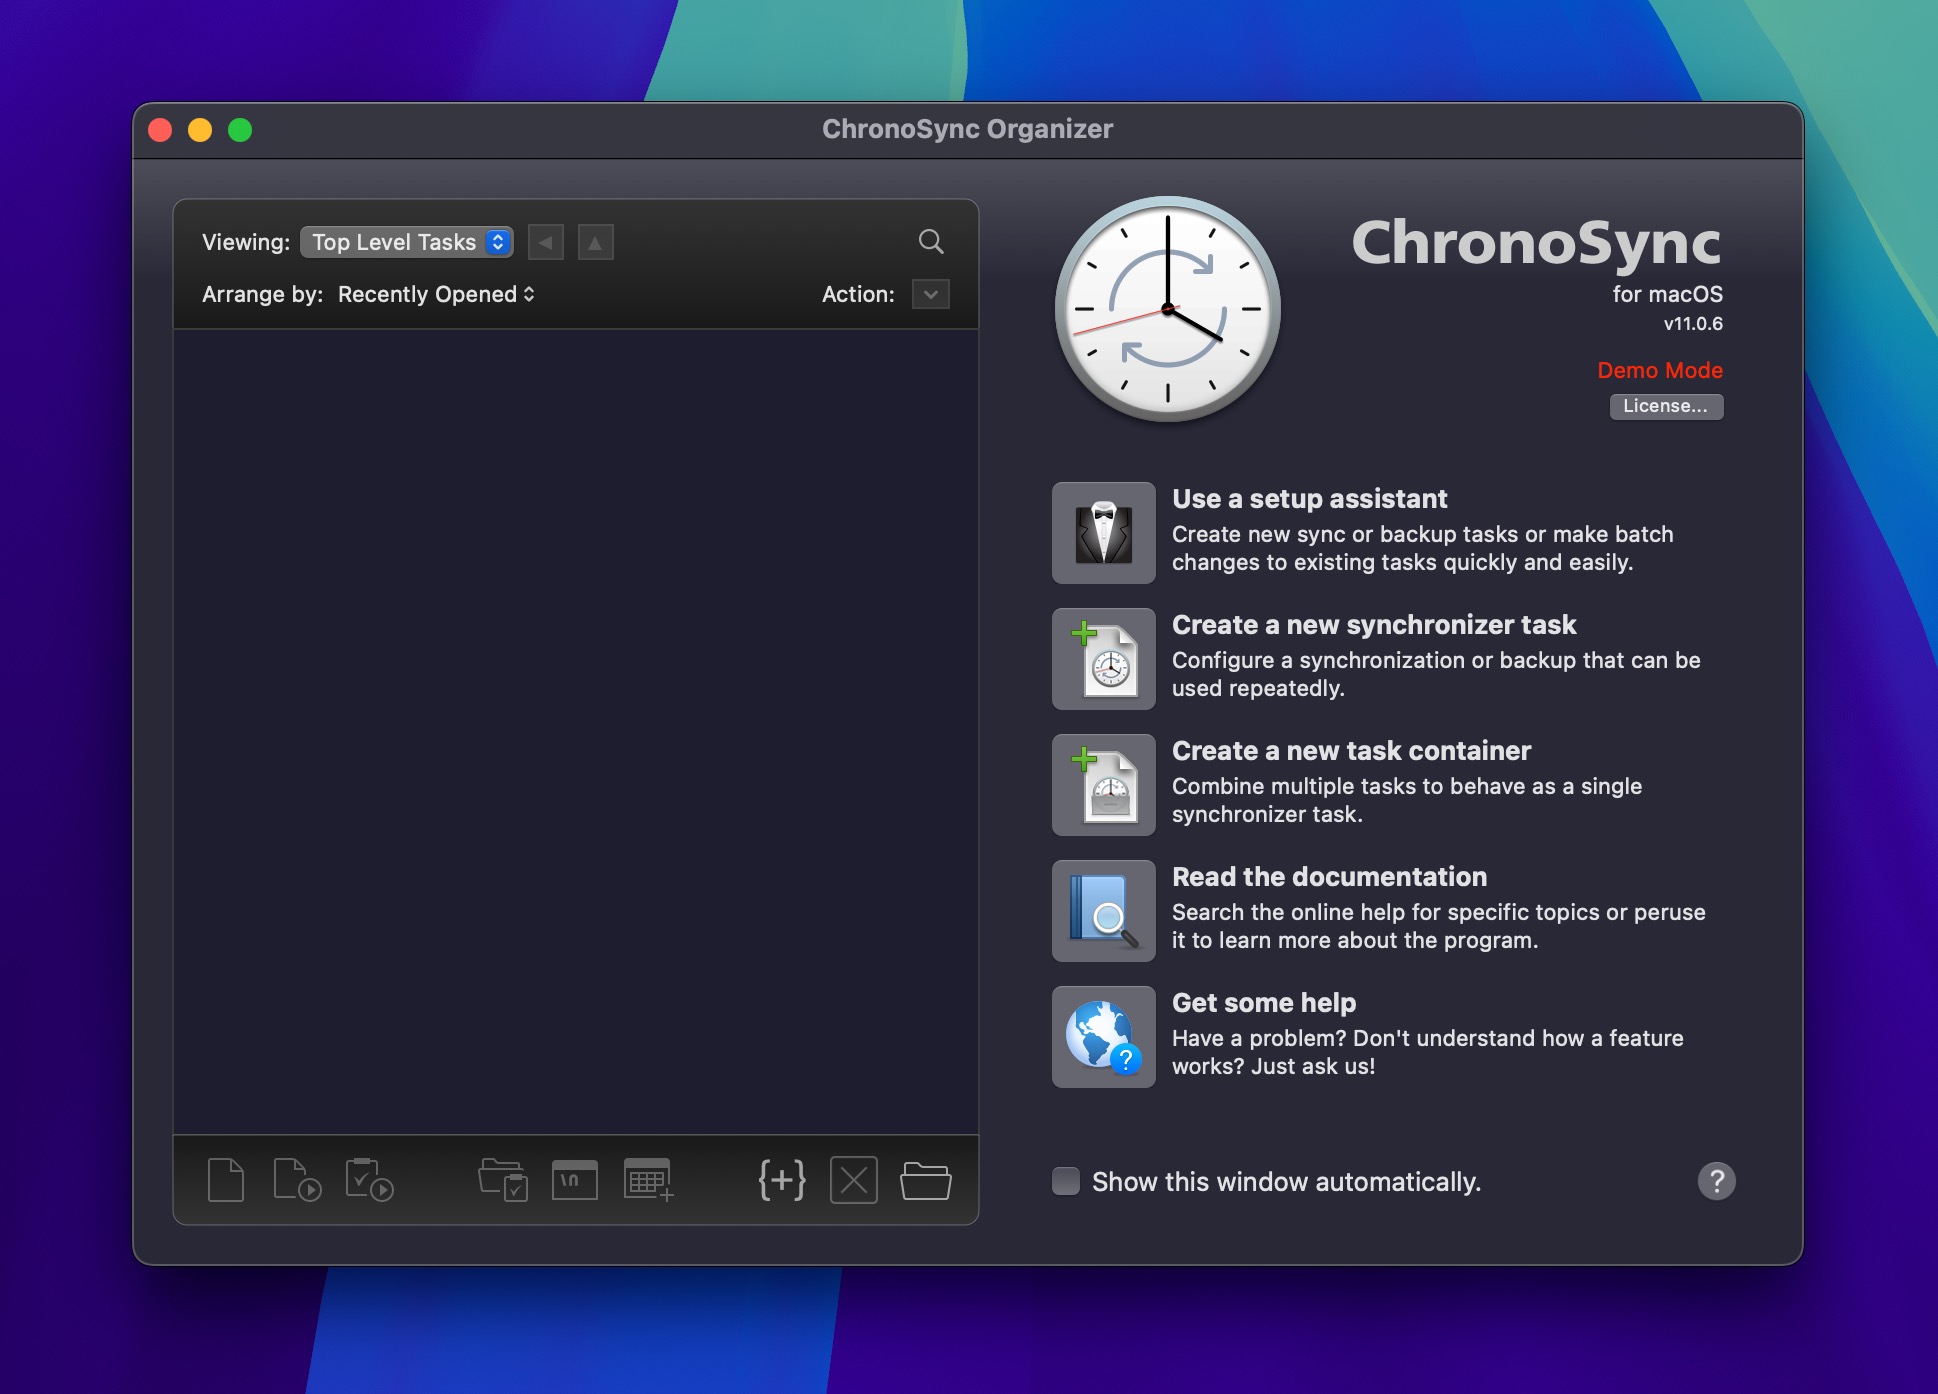
One of the most popular third-party backup tools available to Mac users is ChronoSync. There are many features that make it worth considering, including:
- The ability to do bidirectional syncs, so files updated on either your Mac or your backup drive get copied to the other location (Time Machine is strictly one-way).
- Can create backups that you can actually boot your Mac from in an emergency. When your main drive fails, you can start up directly from your backup without reinstallation.
- Plays nicely with cloud services, network-attached storage (NAS) in RAID configurations, and even remote servers – all of which can be used as backup destinations.
- Lets you create complex backup schedules that match your workflow, not just hourly/daily/weekly options.
The tradeoff? ChronoSync costs $49.99 (one-time purchase), while Time Machine is free with macOS. Also, the learning curve is steeper, as the following instructions on how to set up your first backup with it make obvious:
- Start by downloading ChronoSync from the developer’s website. They offer a free 15-day trial, so you can test it out before purchasing.
- Launch and click Create a new synchronizer task to begin.
- Give your backup task a descriptive name and choose your desired backup mode:
- Backup: Similar to Time Machine, copies new and changed files to the destination.
- Mirror: Makes the destination identical to the source (including deletions).
- Synchronize: Updates files in both directions between source and destination.
- Now you need to select what you want to back up. This could be your entire home folder, just your Documents folder, or any other location. Then, select where the backup should go (typically an external hard drive).
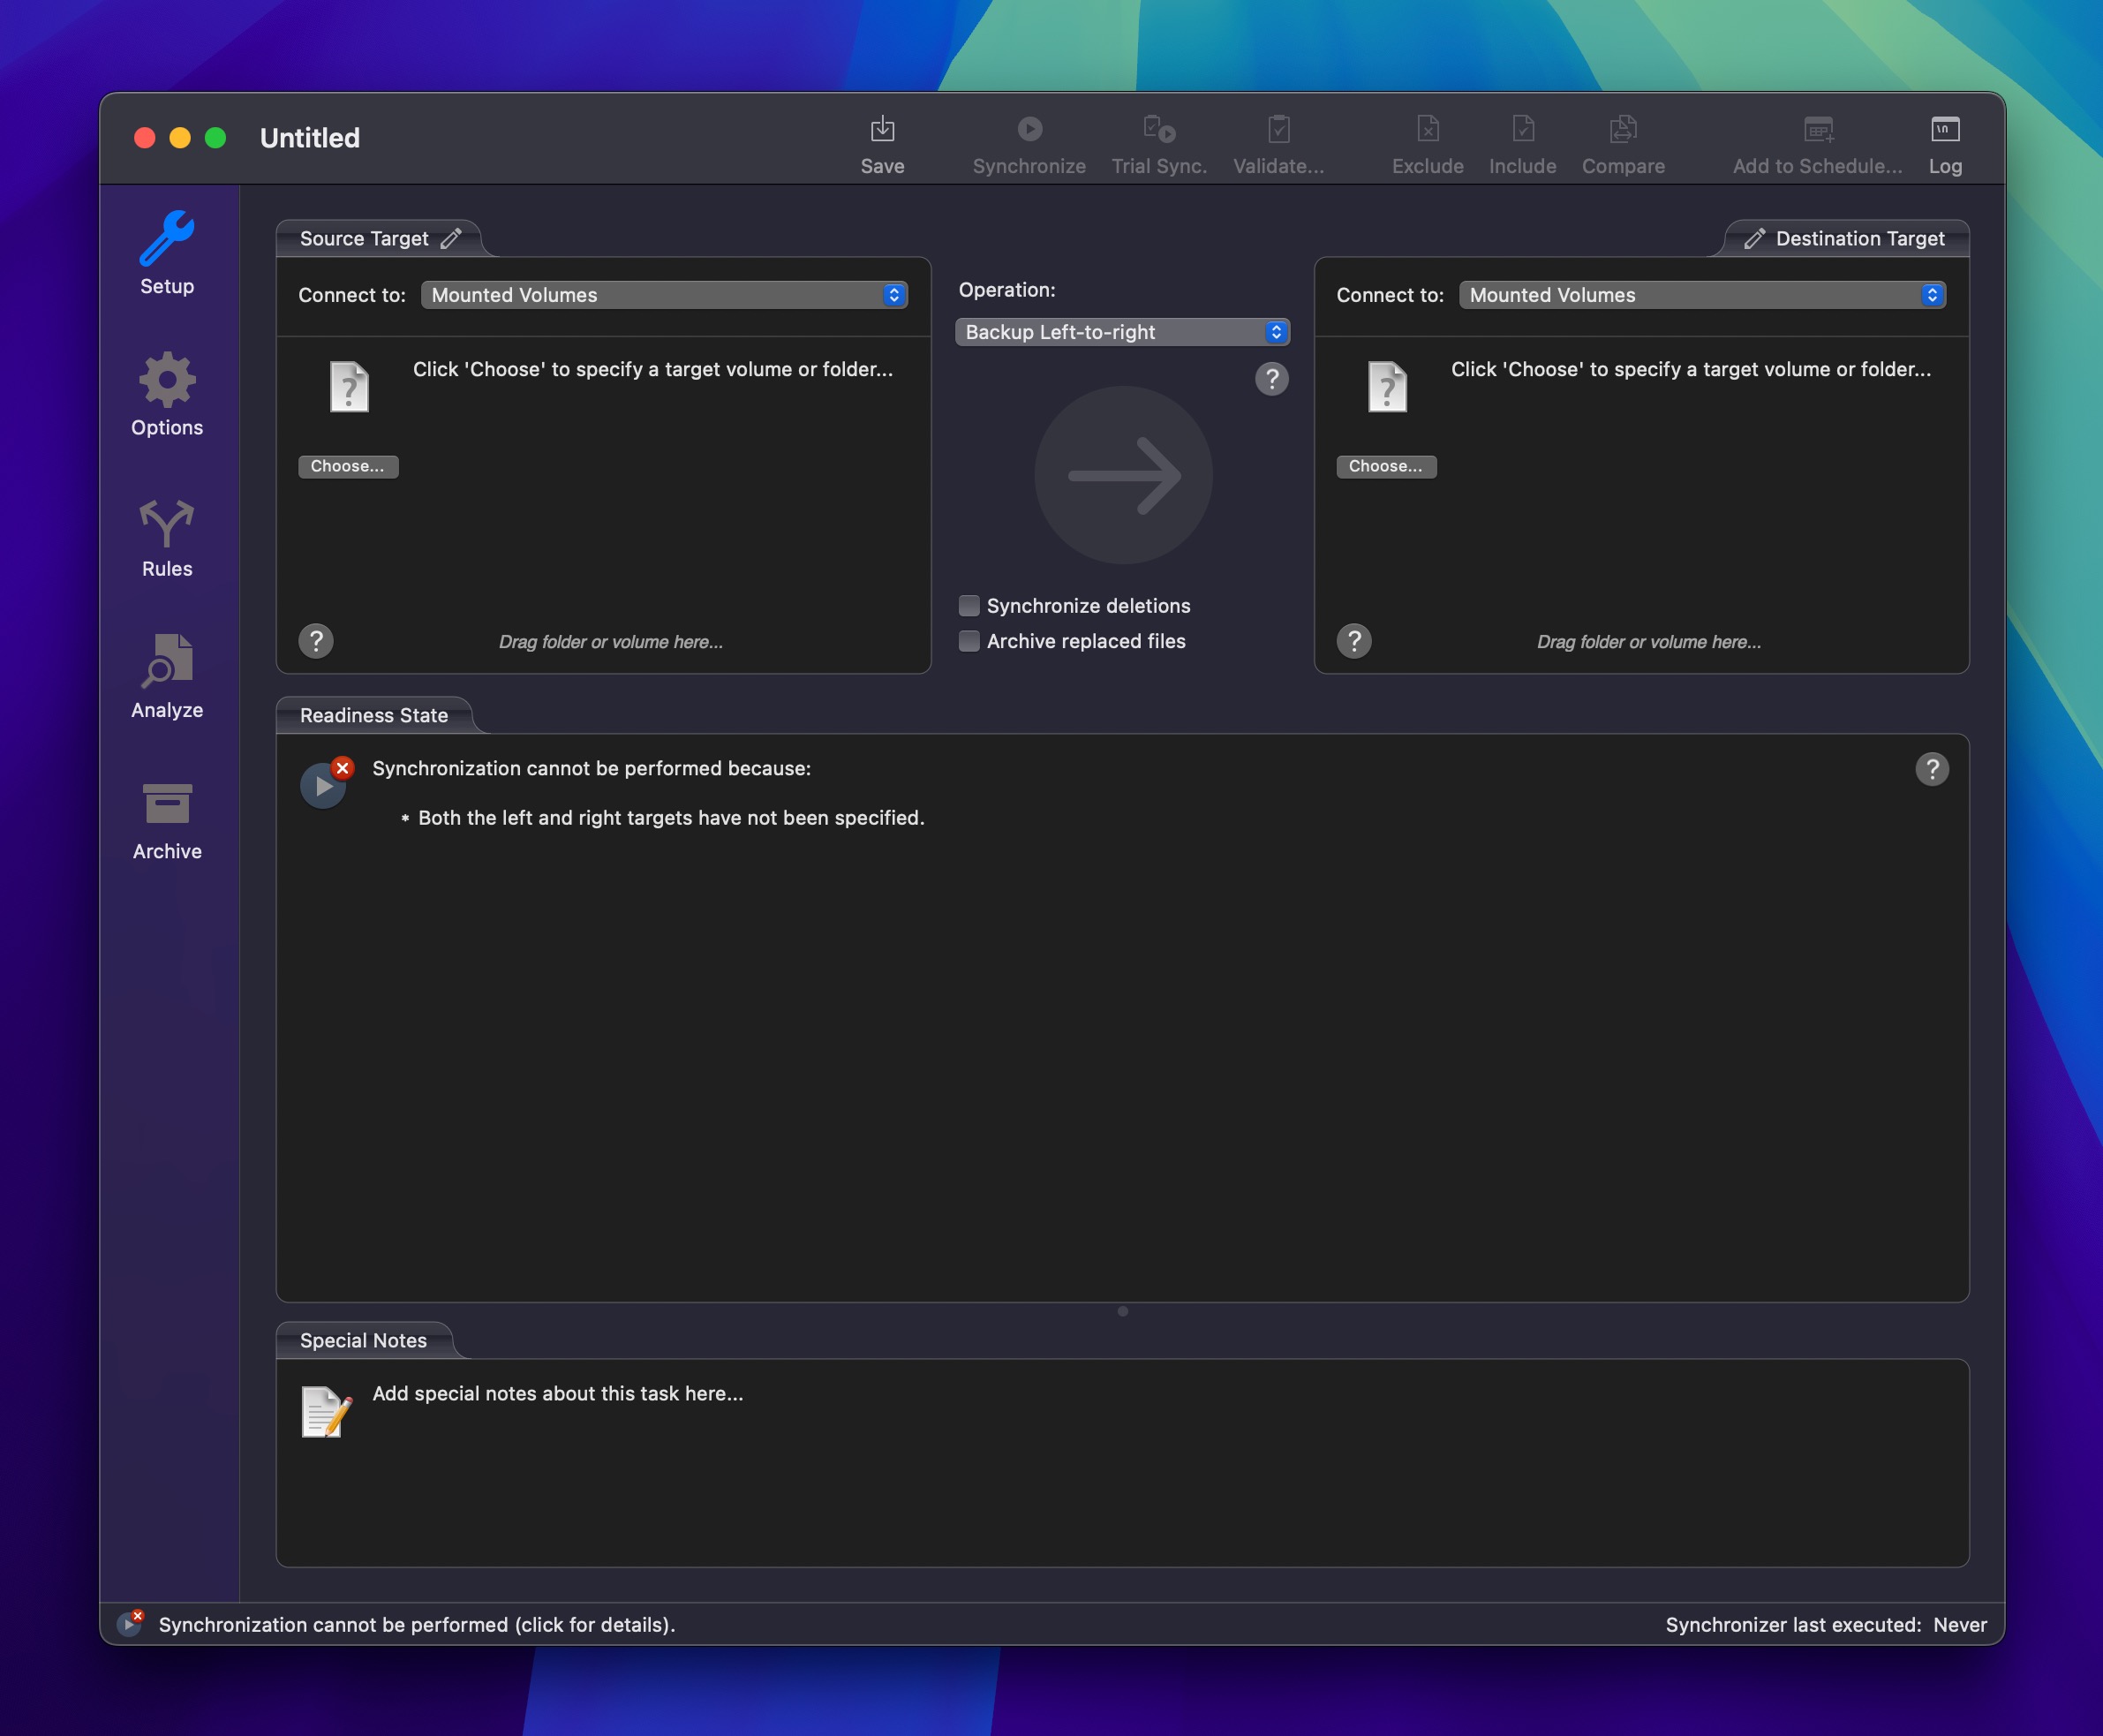
- (Optional) Enable Synchronize Deletions if you want files deleted from the source to also be removed from the backup.
- (Optional) Check Archive Replaced Files to keep older versions of files when they’re updated.
- (Optional) Click the Analyze button in the sidebar, then CMD+click on items you want to exclude from your backup (like system files or large media that’s backed up elsewhere).
- Once you’re done with the configuration of your first backup, you can save your task and click the Synchronize button in the toolbar to start backing up. The first backup will take longer because everything needs to be copied. If you’re not ready to commit to a full backup right away, click Trial Sync instead. This shows you exactly what will happen without actually copying any files.
Method 3: Use Backup Software to Clone Your Hard Drive
In addition to backing up individual files and folders that are stored on your Mac, you can also create backups at a deeper level by cloning your entire hard drive.
When you create a clone of a storage device, you create block-level duplicates that preserve permissions, metadata, and hidden system files. What’s more, hard drive clones also contain deleted files that haven’t been physically overwritten yet but aren’t accessible via Finder anymore (nor present in Trash). Because all this information is included in the backup, the clone can even be used to boot into a working version of your operating system (useful when your internal drive fails).
The tradeoff? Clones typically capture your system at a single point in time (unlike Time Machine’s versioned history), and they require dedicated external storage since they’re complete duplicates of your entire system, which means the backup is as large as the storage device you’re protecting from data loss.
To create a clone of your hard drive, you need backup software with byte-to-byte cloning capabilities, and there’s no shortage of good options available, ranging from free to paid.
1. dd (Free)
dd (short for “Disk Duplicate” or “Data Definition”) is a command-line utility that comes pre-installed on every Mac. It’s the original disk cloning tool that many graphical apps use behind the scenes. The biggest advantages of dd are that it’s completely free and surprisingly capable.
Only use dd if you’re comfortable with command-line tools and understand exactly what each parameter does. Here’s an example of how to back up your Mac’s internal drive to an external drive using dd:
- First, identify your drives:
diskutil list - Then use dd to clone:
sudo dd if=/dev/disk0 of=/dev/disk1 bs=1m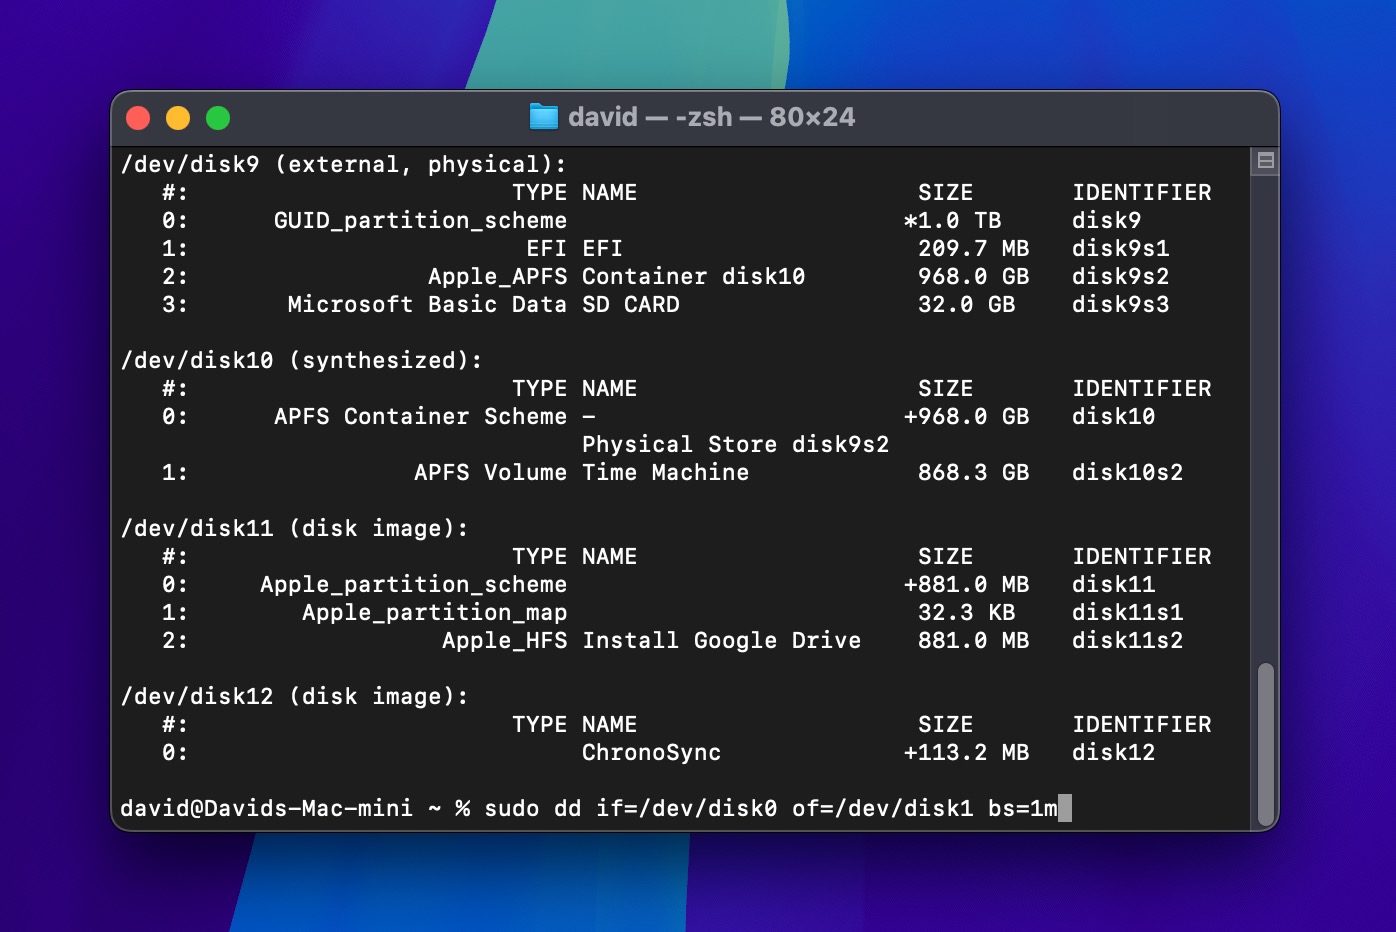
- Wait for the cloning process to finish.
If this seems doable to you, then you can learn more about dd and its various parameters (in practice, you’d want to be more precise about partitions and might add parameters for performance and progress reporting) in its manual.
2. Disk Drill (Freemium)
Disk Drill is a complete data protection and recovery solution with an excellent byte-to-byte backup feature that creates perfect disk images that capture absolutely everything on your drive
When you create a byte-to-byte backup with Disk Drill, you’re protecting your current files and preserving deleted ones that still physically exist on your drive but are no longer accessible through macOS. However, this capability to preserve deleted files is only available on Macs without T2, M1, M2, M3, or M4 chips, as these newer models have fully encrypted system disks.
The software then gives you powerful recovery tools to extract any file from that backup image, complete with preview capabilities, smart file organization, and advanced filtering options so you can find exactly what you need.
This is how you can clone your drive with Disk Drill:
- Visit CleverFiles.com and download the latest version. Launch the downloaded installer and copy Disk Drill to your Applications folder. For backing up the system disk on newer Macs, you’ll need to start in Recovery Mode.
- Launch Disk Drill and give it any required permissions (necessary for low-level access to your hard drive and the creation of its complete clone).
- Look for and click on Byte-to-byte Backup in the left sidebar. It’s usually the fourth option down, with a clock icon next to it.
- Select your source drive. For a complete Mac backup, select your internal drive (typically named Macintosh HD or Apple SSD). Pay attention to the size shown, as you’ll need at least this much free space on your destination drive.
- Connect an external drive (ideally with at least 20% more space than your source drive’s total capacity) and click the blue Create backup button.

- Choose a meaningful name for your backup (like MacBook Pro Backup May 2025), select your external drive as the backup destination, and click Save to begin.
- The backup process will start immediately, and you just need to wait for it to finish.
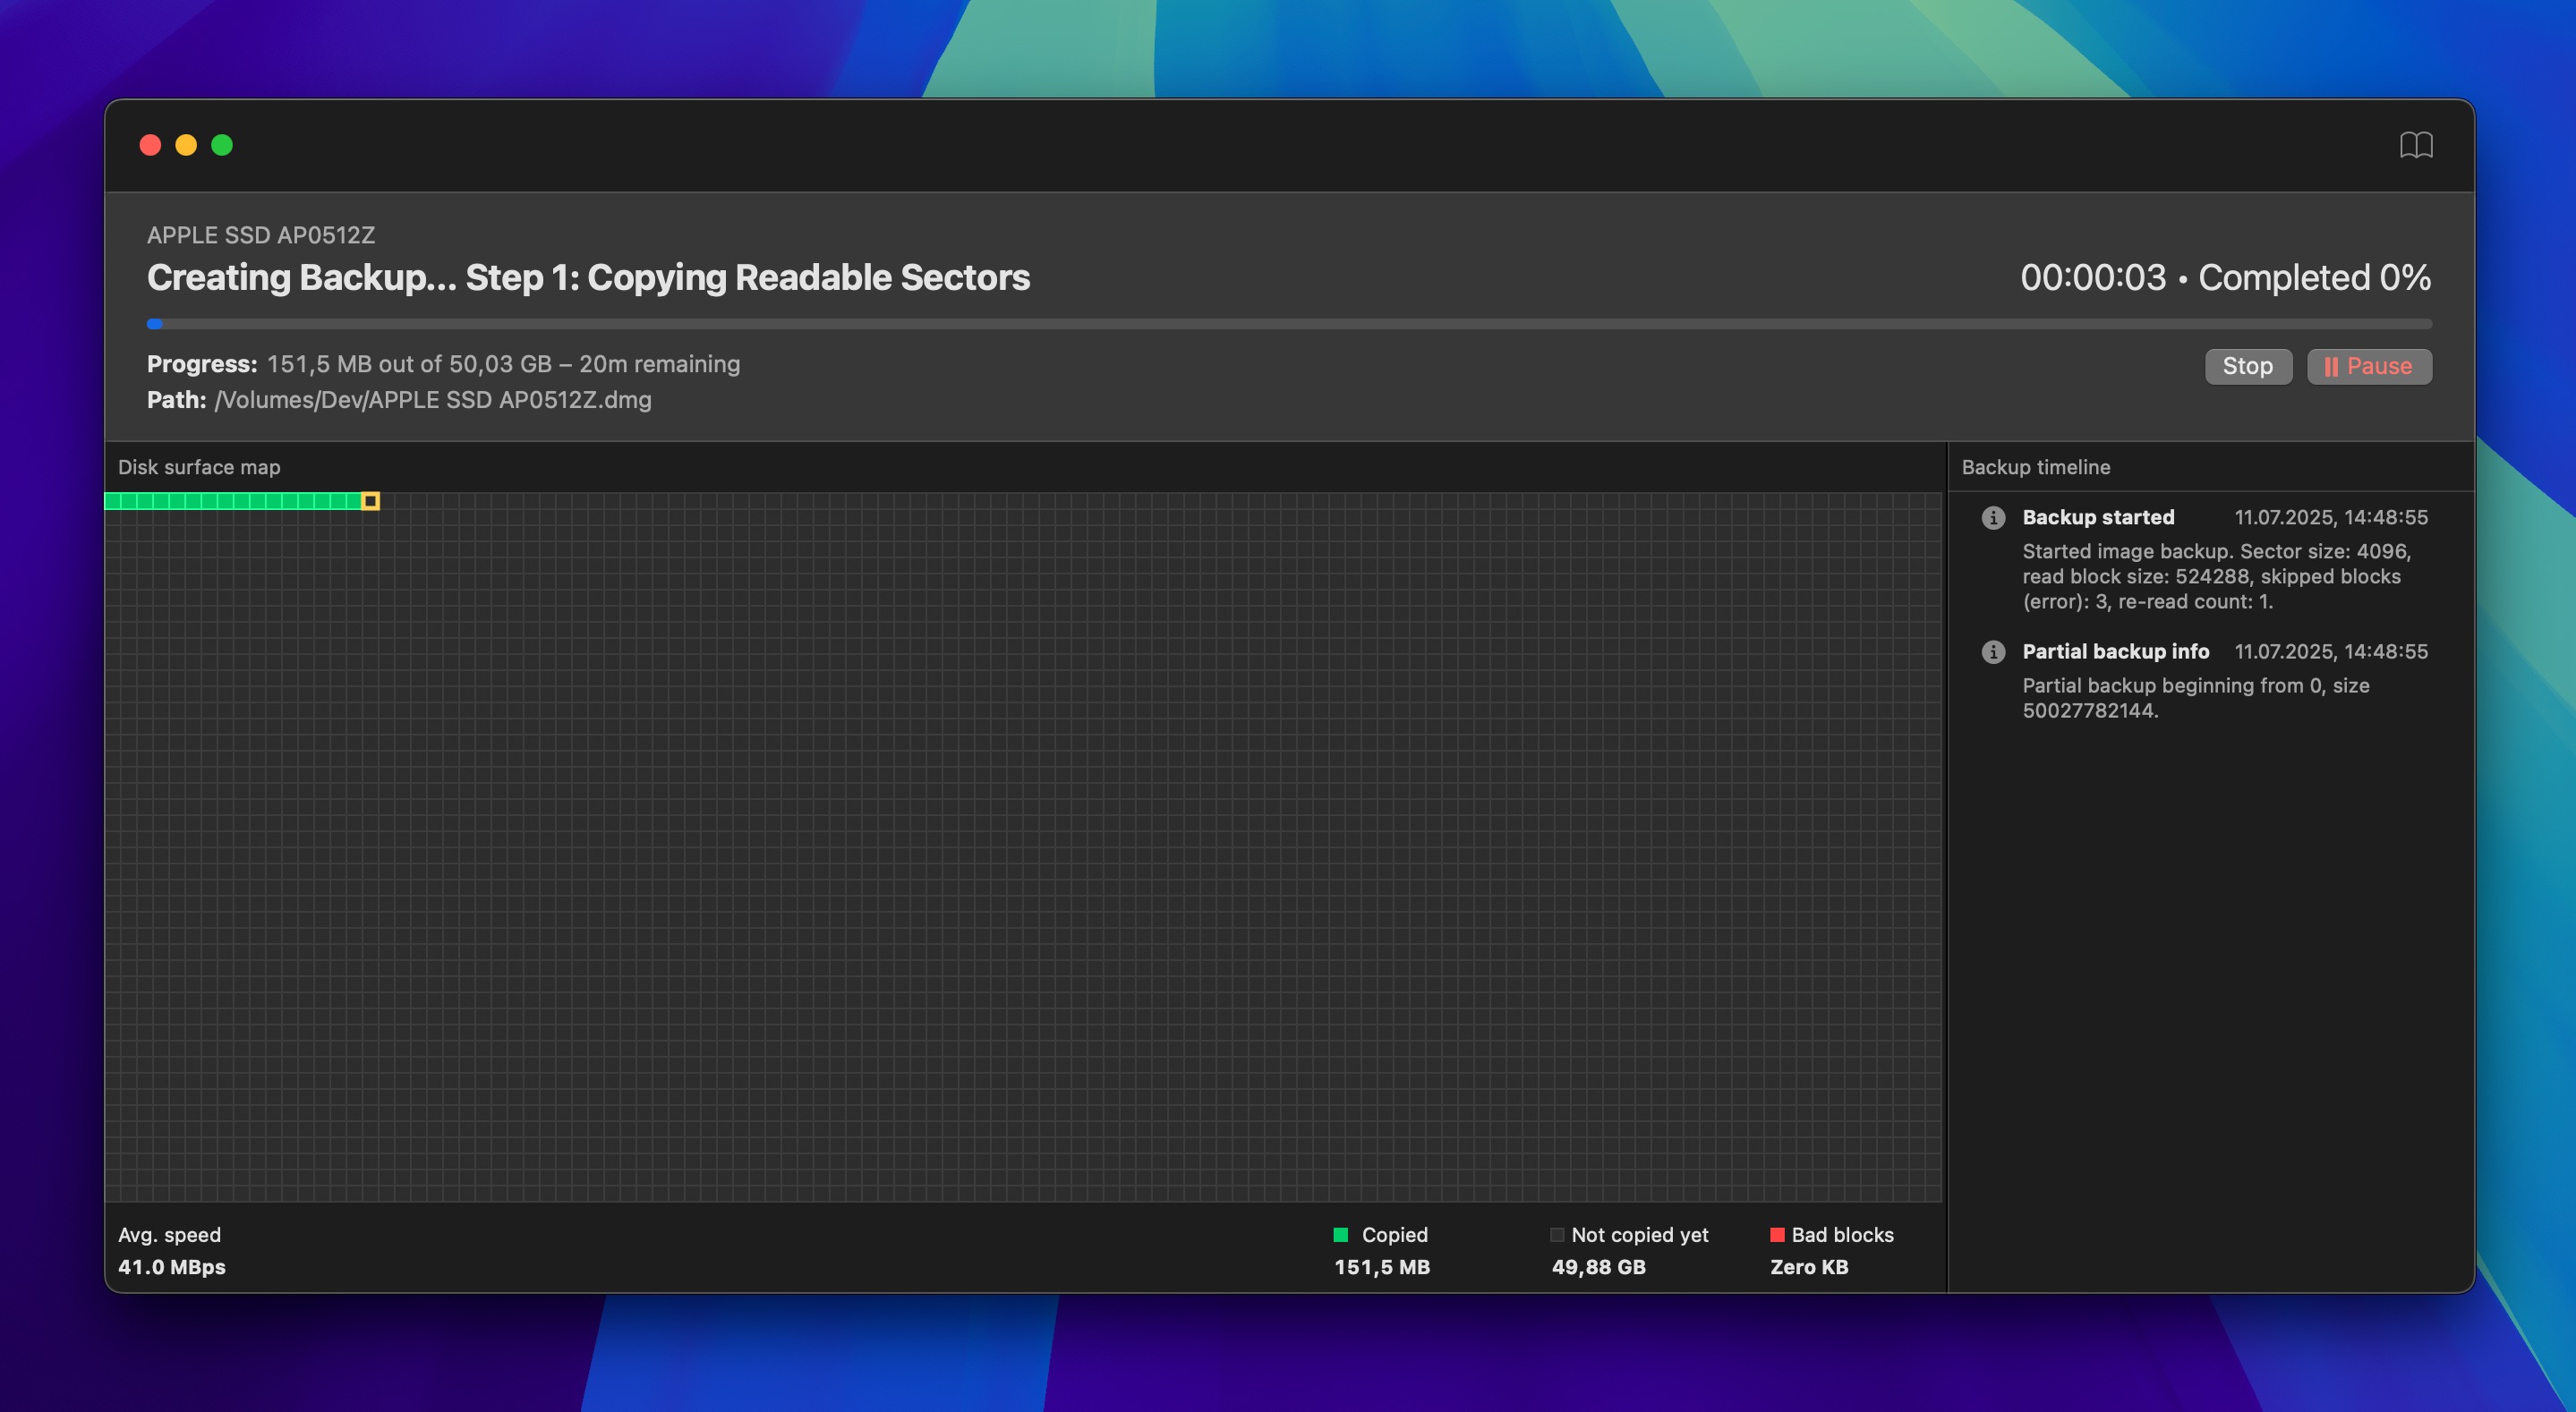

When the process completes, you’ll have a DMG file that contains a perfect copy of your drive. You can verify the backup worked by double-clicking the DMG to mount it.
It’s worth noting that Disk Drill additionally offers two proactive protection features, called Recovery Vault and Guaranteed Recovery. These features work alongside your backups to prevent data loss. Recovery Vault keeps track of deleted files’ metadata to make future recovery much easier), while Guaranteed Recovery automatically saves copies of files sent to Trash. Both features are free to use and can significantly improve your chances of recovering accidentally deleted files.
Method 4: Backup Your Mac to a Personal Cloud
Backing up your Mac to cloud services gives you something physical backups can’t, and that something is protection from disasters that might affect both your computer and your backup drives. Modern cloud backup services protect your valuable files automatically in the background while you use your Mac, and you can recover from them using virtually any device with an internet connection.
Let’s take a closer look at the best cloud backup options for Mac users and help you figure out which one fits your needs best.
iCloud Drive
💸 Free storage: 5 GB (shared across all Apple devices using your Apple ID)
💰 Paid plans (iCloud+): Starts at $0.99/month for 50 GB
If you’re already deep in the Apple ecosystem, backing up your Mac to iCloud is a natural choice because it’s integrated right into macOS, so it requires minimal setup and offers seamless integration with all your Apple devices.
Setting up iCloud Drive takes just a few steps:
- Click the Apple menu in the top-left corner of your screen, then select System Settings (or System Preferences on older macOS versions).
- Click your name at the top of the sidebar, then select iCloud.
- Sign in with your Apple ID if prompted, and then scroll down and make sure iCloud Drive is toggled on.
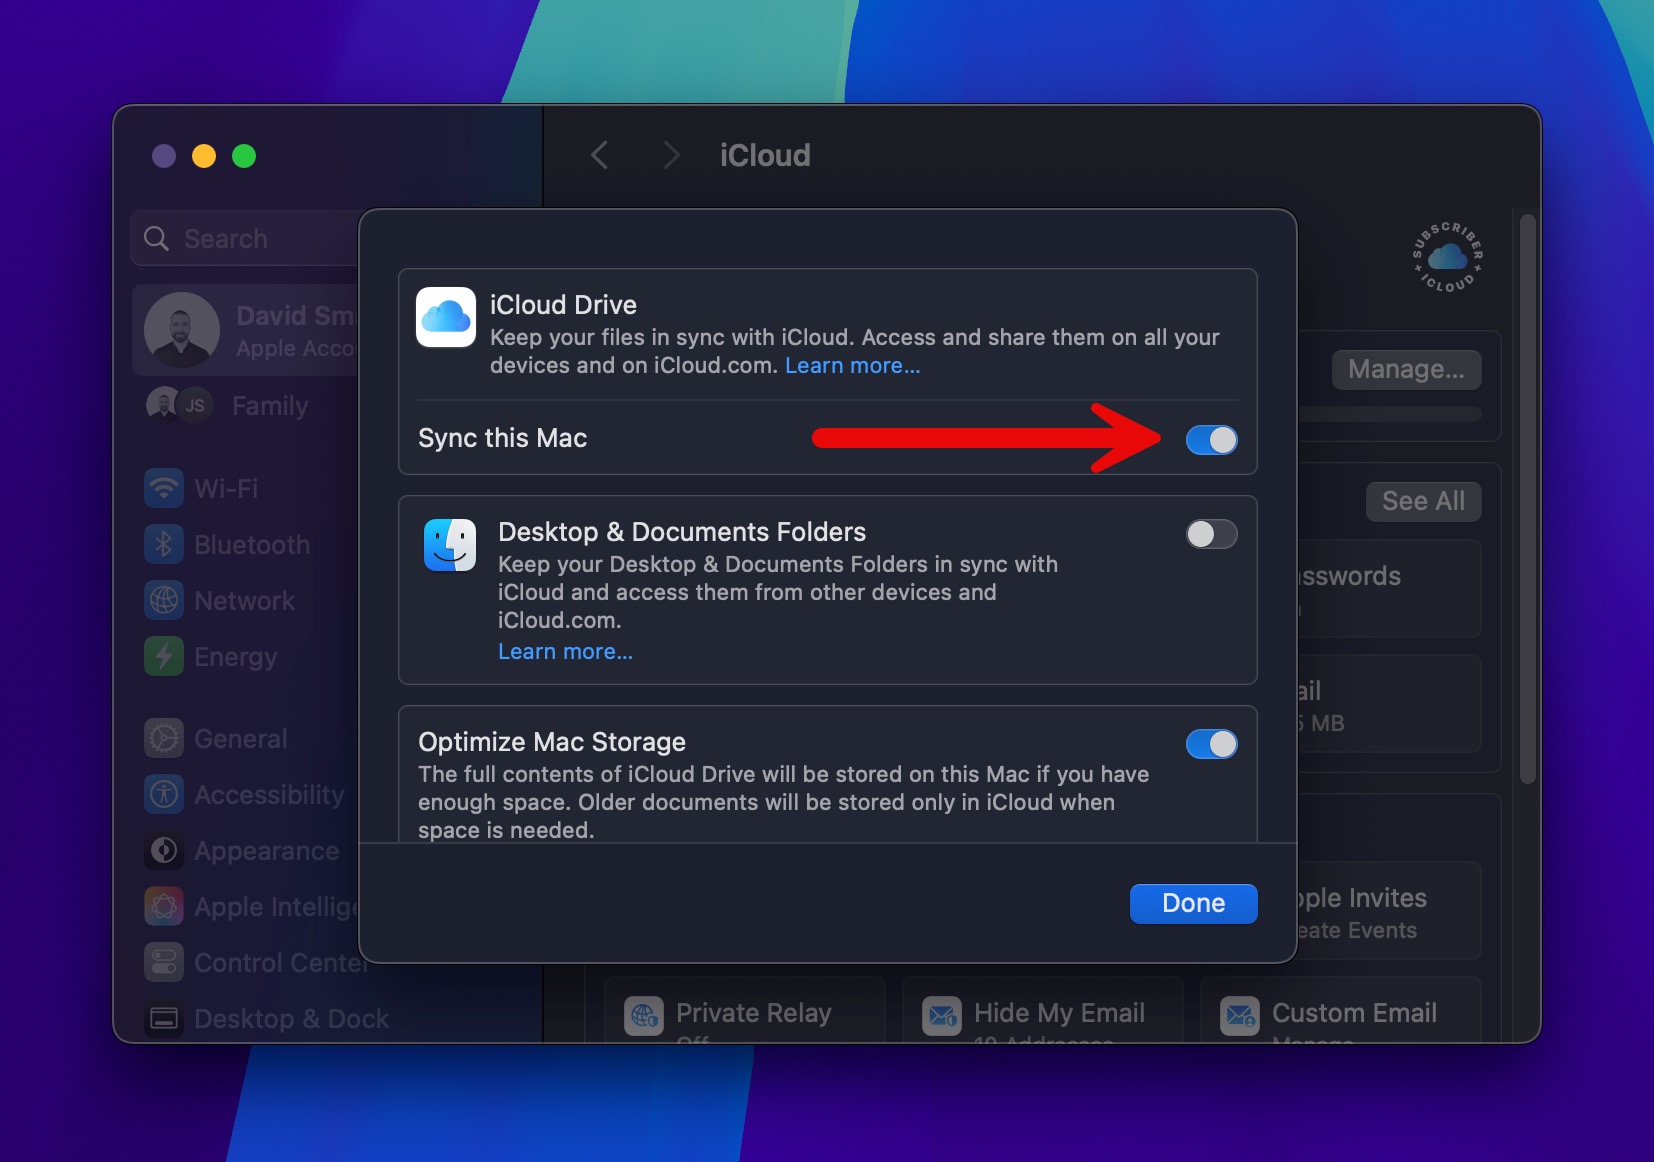
- (Optional) Click the toggle next to Desktop & Document Folders to automatically back up everything in those two folders to your iCloud Drive.
With iCloud Drive enabled, you can navigate to it using Finder and copy or move any files you want to back up to the cloud to it, just like you would to a regular folder. You can then access the files on icloud.com or from any other iOS device that’s logged in to the same iCloud account.
Google Drive
💸 Free storage: 15 GB (shared with Gmail and Google Photos)
💰 Paid plans (Google One): Starts at $1.99/month for 100 GB
Google Drive offers generous free storage and works beautifully across platforms, which makes it a solid choice for Mac users who also work with Windows or Android devices, or regularly collaborate with others who use different operating systems.
To get started with Google Drive on your Mac:
- Download the Google Drive for Desktop app from Google’s website.
- Open the downloaded file and follow the installation instructions.
- Sign in with your Google account credentials.
- After installation, you’ll see a Google Drive icon in your menu bar. Click the icon and select Preferences to configure your sync options.
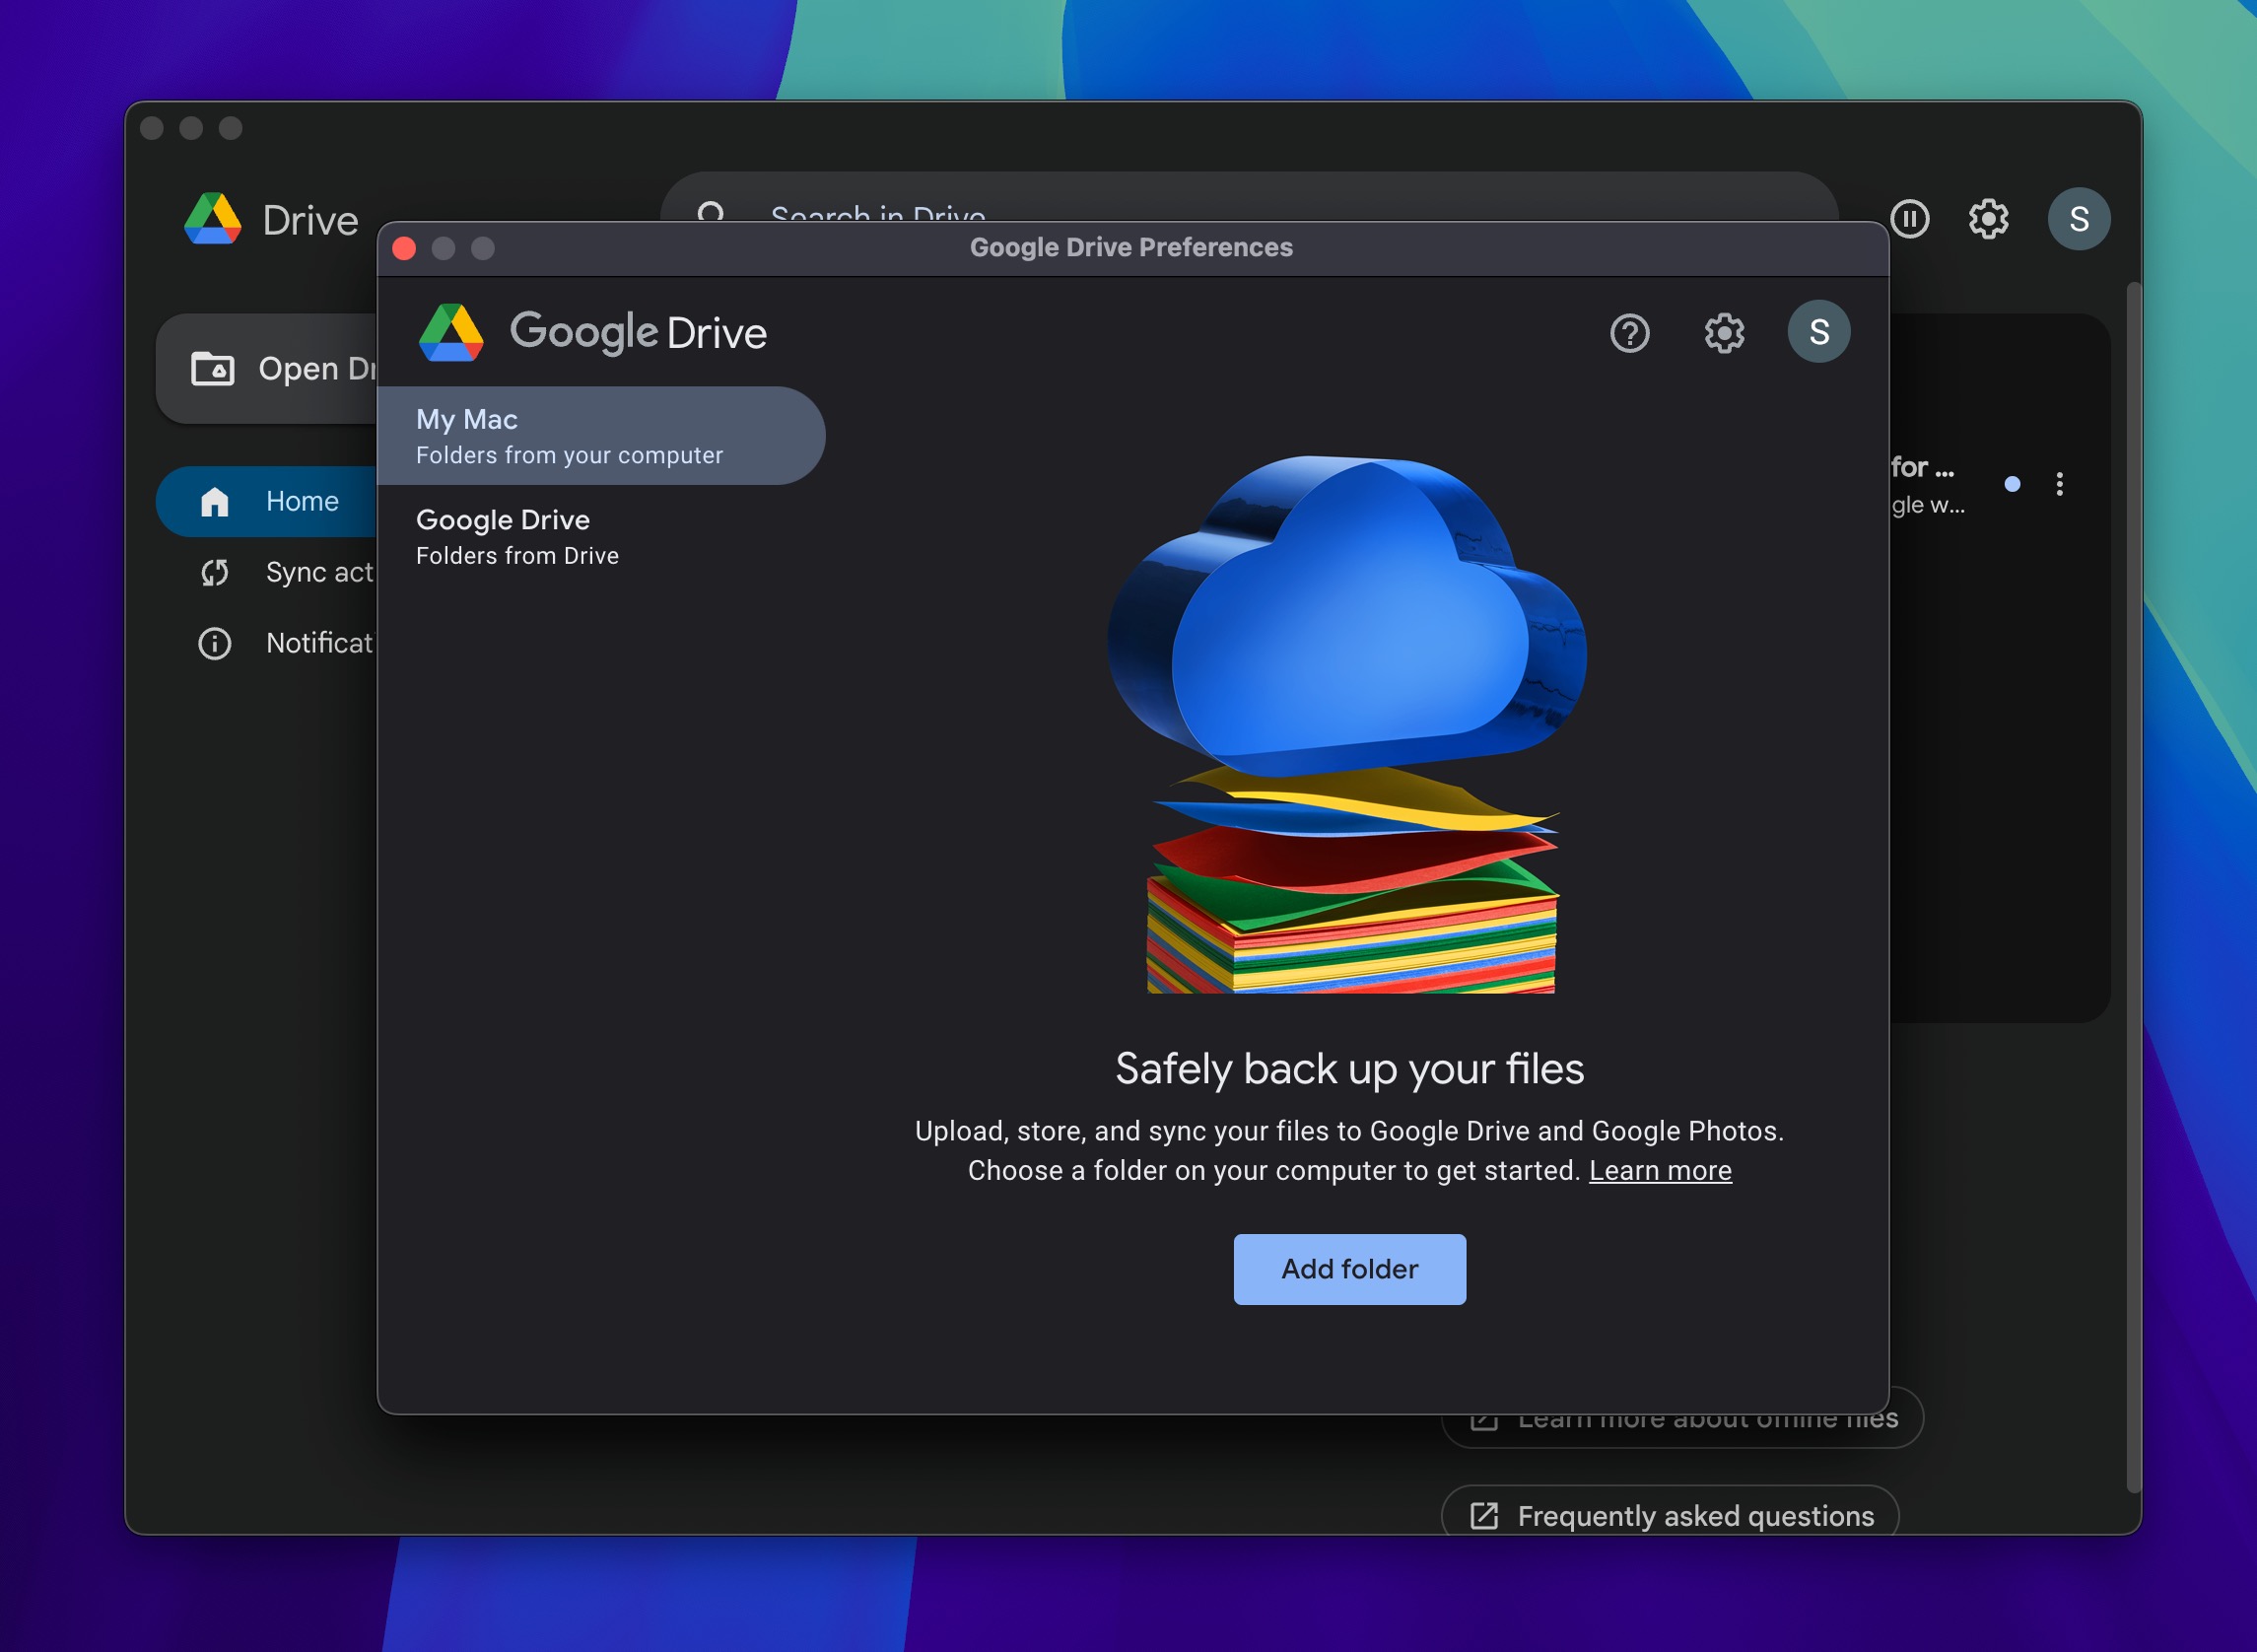
- For example, you can choose whether to stream files from the cloud (saving disk space) or mirror them locally (for offline access).
Once set up, Google Drive creates a folder on your Mac that syncs automatically with the cloud. Simply drag files into this folder to back them up. You can also configure Google Drive to automatically back up specific folders like Documents or Pictures.
Dropbox
💸 Free storage: 2 GB
💰 Paid plans: Starts at $11.99/month for 2 TB
Dropbox was one of the first cloud storage services, and it still offers one of the most reliable sync engines available. Its interface is clean and simple – great for Mac users who aren’t particularly tech-savvy.
Follow these steps to start using Dropbox on your Mac:
- Download the Dropbox desktop app from dropbox.com.
- Run the installer and follow the prompts to complete the installation.
- Sign in with your Dropbox account (or create one if you’re new to Dropbox).
- After installation, Dropbox creates a folder on your Mac that automatically syncs to the cloud.
- (Optional) Open Dropbox preferences from the menu bar icon to set up automatic camera uploads or select which folders sync to your Mac.
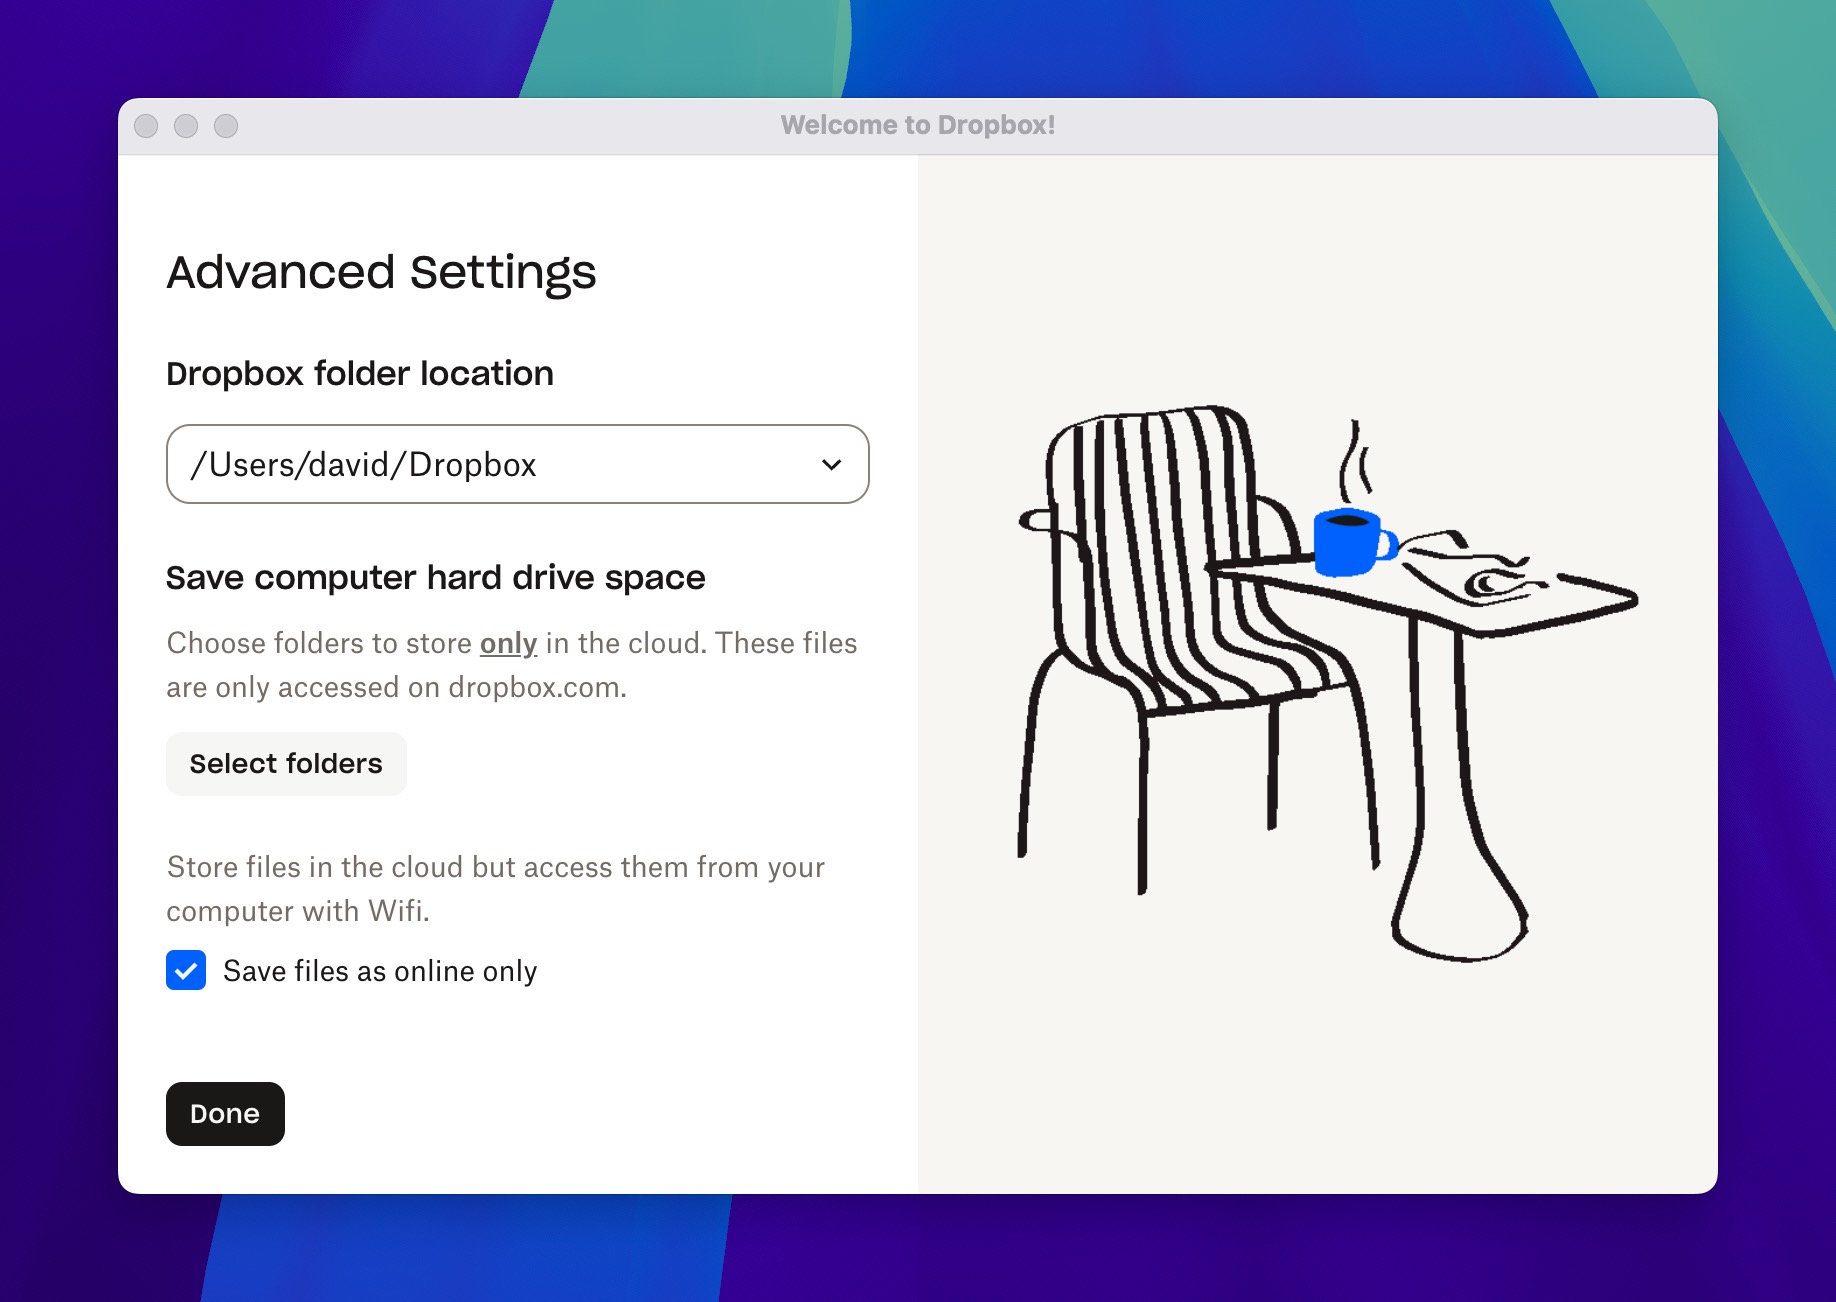
Just like with Google Drive, using Dropbox is as simple as saving files to the Dropbox folder that appears in your Finder. Everything placed there automatically syncs to the cloud and becomes available on any device where you’ve installed the Dropbox app or via the web interface at dropbox.com.
Microsoft OneDrive
💸 Free storage: 5 GB
💰 Paid plans: Starts at $1.99/month for 100 GB, or get 1 TB with Microsoft 365 Personal for $9.99/month
OneDrive is Microsoft’s cloud storage solution that can be a real boon to those who regularly use Microsoft Office apps on Mac or need to collaborate with people who do because of how well-integrated with the Office suite. In fact, OneDrive. For example, OneDrive allows you to save Word, Excel, and PowerPoint files directly to the cloud in real time, which makes it virtually impossible to lose more than a few seconds of progress.
How to back up a Mac to OneDrive:
- Download the OneDrive app from the Mac App Store or Microsoft’s website.
- Launch OneDrive and sign in with your Microsoft account credentials.
- During setup, OneDrive will create a folder on your Mac that syncs to the cloud.
- To configure backup settings, click the OneDrive cloud icon in your menu bar and select Help & Settings > Preferences.
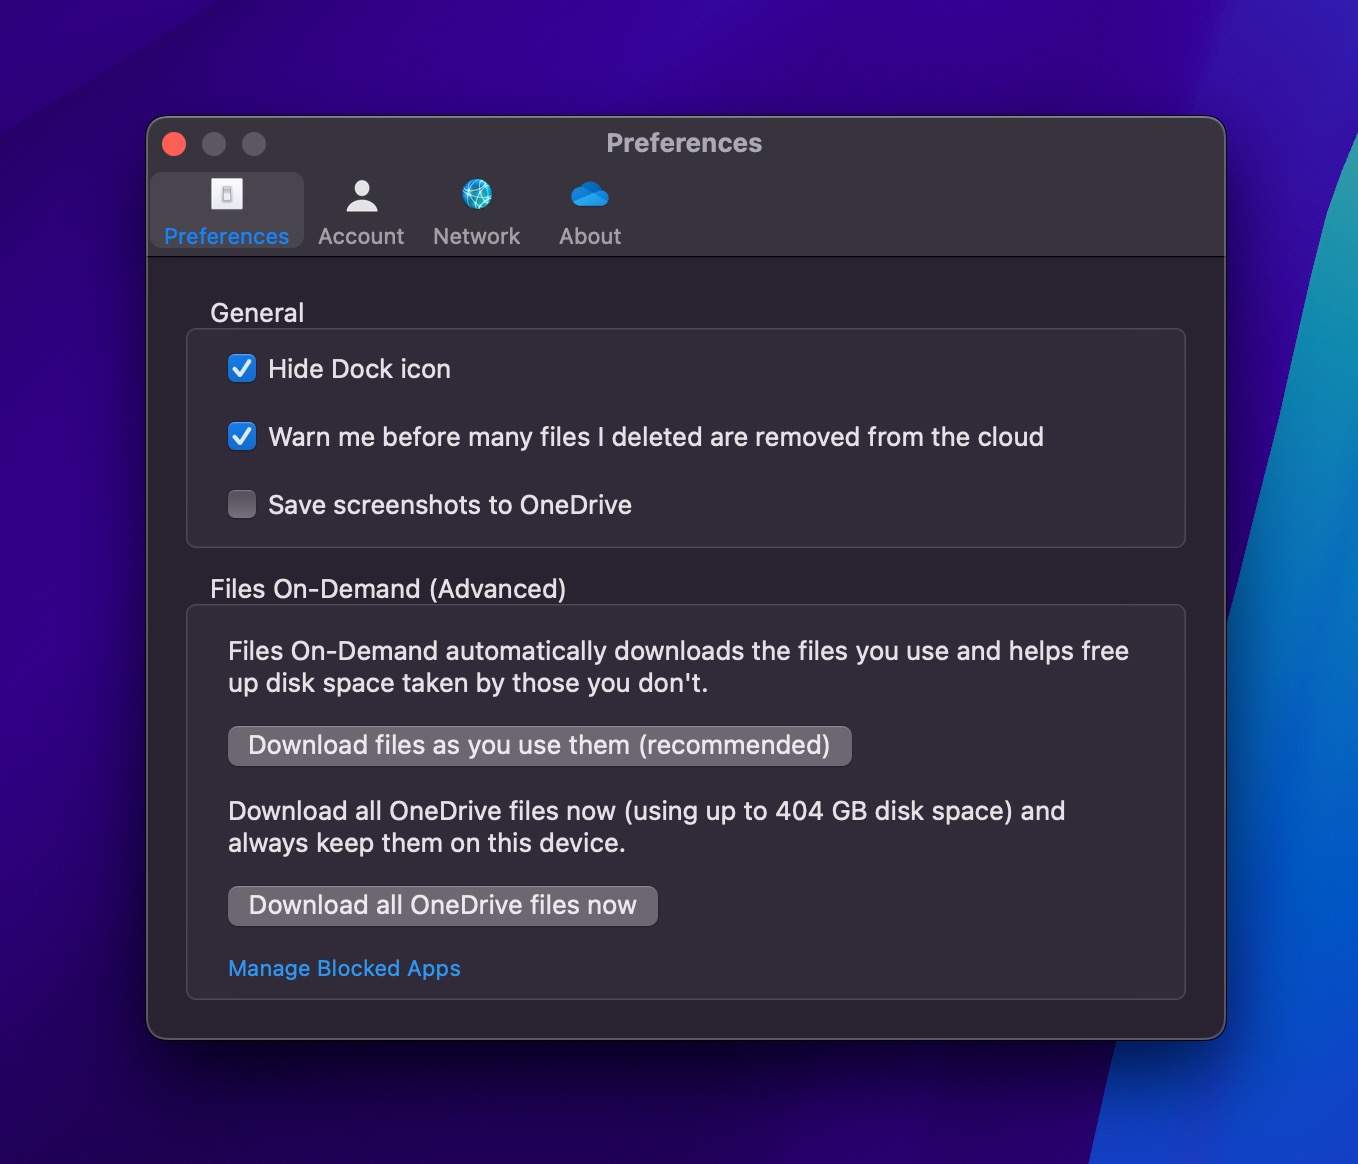
- In the Backup tab, you can select to automatically back up your Desktop, Documents, and Pictures folders.
Files sync automatically once copied or moved to the OneDrive folder, and they can be accessed from any device with OneDrive installed or through the web interface at onedrive.live.com.
Method 5: Purchase a Dedicated Cloud Backup Service
If you’re serious about protecting your Mac data, then you should also consider dedicated online backup services. While iCloud, Google Drive, and similar personal clouds are great for syncing working files across devices, dedicated cloud backup services can do a lot more than that:
- Because they’re built specifically for disaster recovery and not file sharing, they can help you recover everything after a total system failure.
- Most leading dedicated cloud backup services offer unlimited storage for a fixed price, regardless of how much data you have.
- They keep version history based on time, not space. Instead of counting old file versions against your storage quota, they typically keep 30 days (or more) of versions by default.
- They provide whole-machine restore options, including the ability to have your entire backup shipped to you on a physical drive.
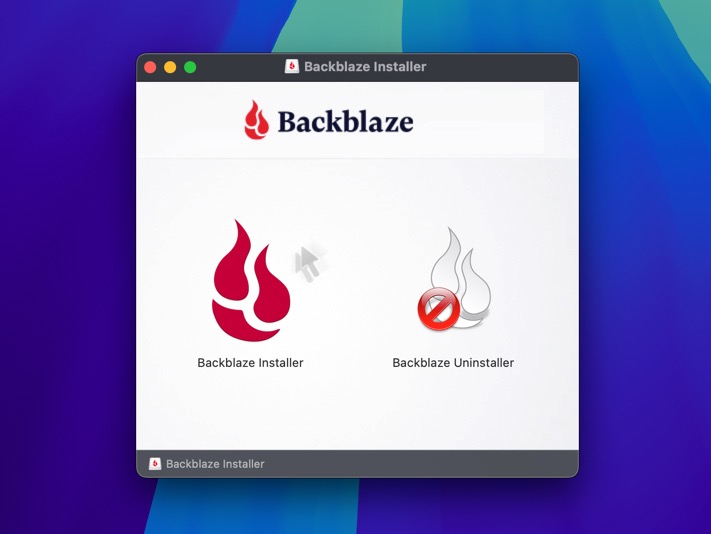
Backblaze Personal Backup is free to try for the first 14 days, and it then costs $9 per month or $99 per year for truly unlimited backup of one Mac, including all your connected external drives. For most users with substantial data, this works out dramatically cheaper than expanding cloud storage with services like iCloud or Dropbox.
Best of all, getting started with Backblaze takes just a few minutes:
- Sign up for an account at Backblaze.com using your email address.
- Download and install the Backblaze app for Mac.
- Grant necessary permissions when prompted. On newer macOS versions (Ventura and later), you’ll need to:
- Navigate to System Settings > Privacy & Security > Full Disk Access.
- Toggle on permissions for both Backblaze and bzbmenu.
- Backblaze immediately starts working in the background, first scanning your Mac to identify what needs to be backed up, then beginning the actual backup process.
As you can see, the initial backup is easy to create, but you can go far beyond the default configuration and customize everything from backup frequency to excluded folders to network performance.
When disaster strikes – whether it’s an accidentally deleted file or a completely failed MacBook – Backblaze lets you recover selected files or everything at once from any web browser, or you can request your data on a USB flash drive (up to 256 GB) or an external hard drive (up to 8 TB).
Method 6: Advanced NAS and RAID Solutions
For power users, small businesses, or anyone managing multiple Macs, Network Attached Storage (NAS) devices with RAID configurations offer enterprise-level backup protection that’s worth considering.
A NAS is essentially a specialized computer that connects to your network and serves as a centralized backup hub. When combined with RAID (Redundant Array of Independent Disks), you get automatic data redundancy (if one drive fails, your data remains safe on the other drives) and the ability to access your backups from any device connected to the same network as the NAS (and even from the internet using a VPN service like Tailscale).
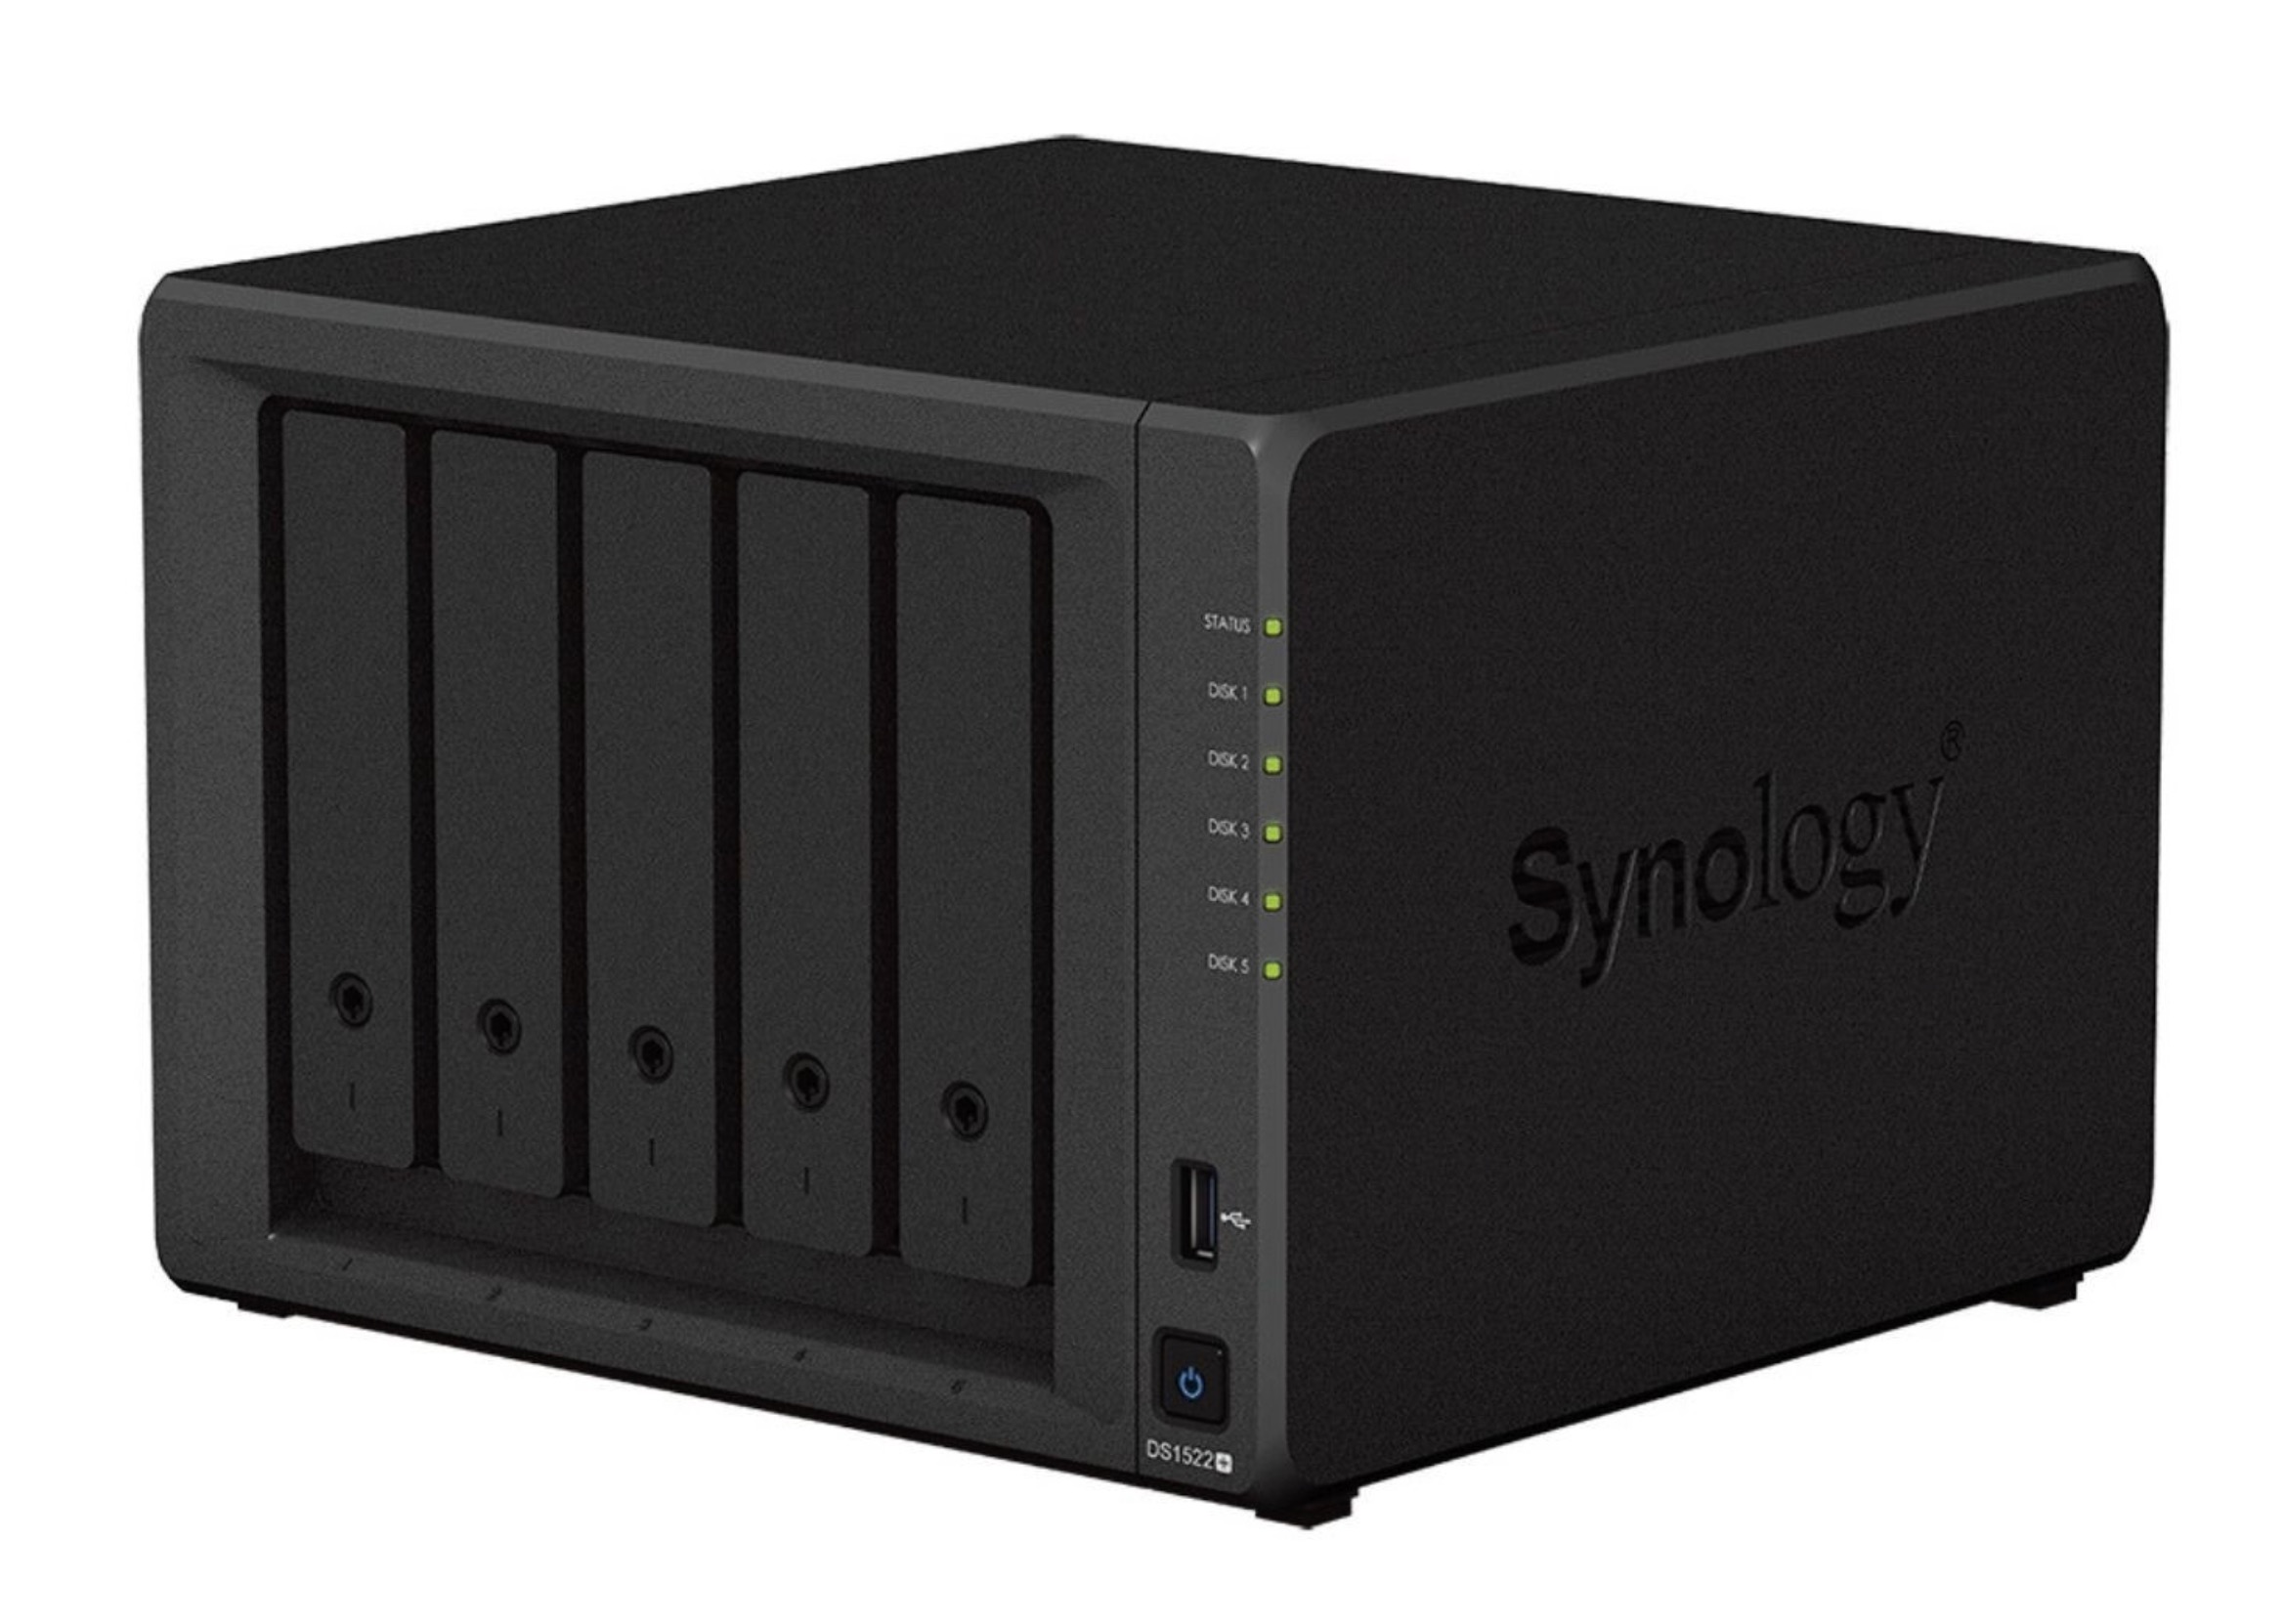
You can create a NAS with RAID backup drives on a budget with just a Raspberry Pi combined with a SATA HAT, but there are also popular NAS manufacturers like Synology, QNAP, and Western Digital, all of which offer Mac-friendly solutions that work seamlessly with Time Machine over your network.
Regardless of whether you go with a DIY NAS or some ready-made solution, some technical knowledge will always be required for the initial setup and ongoing maintenance since you’ll need to configure network settings, set up user permissions, and choose the appropriate RAID level for your needs.
Conclusion
As you can see, there are a multitude of techniques you can employ to backup your Mac. Failure to backup your machine leaves you exposed to data loss and all the problems that can result from such an event. If you are not currently backing up your Mac, choose one of the options above and start doing it today. You never know when a backup may be required to recover your precious files.

FAQ
Time Machine is the fastest no-fuss way to back up your Mac computer without installing additional software. To take advantage of it, you just need to connect an external hard drive, format it using the APFS file system, and select it as your Time Machine backup drive.
You can technically rely solely on cloud backups using a service like iCloud, but physical external drives offer faster backups and restores, work without internet, and are a one-time purchase. As such, it’s best to combine cloud and physical backups so that you can get the best of both worlds.
Yes! Time Machine backs up your entire Mac by default, including your macOS installation, applications, settings, and all your personal files. Thanks to its comprehensive nature, it allows you to restore not just individual documents but your entire system to exactly how it was at a specific point in time.
Each available backup solution has its strengths and weaknesses:
- Traditional HDDs offer the most storage for your money, but they are slower and require external power.
- SSDs are faster, can be powered from a USB port, and are more reliable, but they also cost more money.
- A NAS (Network Attached Storage) can serve as a central backup hub for multiple devices, but setting it up requires some technical knowledge.
- Cloud services give you anywhere-access and protection from physical disasters, but not without a monthly subscription.
You can definitely back up your Mac over Wi-Fi to a network drive or Time Capsule, but direct connections will always be faster and more reliable. The first full backup, which often involves hundreds of gigabytes, can be especially painfully time-consuming over Wi-Fi.
Absolutely! Using a Time Machine backup is one of the easiest ways to transfer everything from an old Mac to a new one. During the setup of your new Mac, you’ll be prompted to restore from a backup, and you need to simply connect your Time Machine drive and select it. Alternatively, you can use Migration Assistant (found in the Utilities folder) after setup.
Follow these steps to back up your Mac with Time Machine:
- Connect the storage device that will be used for the backup to your Mac.
- Open Time Machine by clicking on the clock icon on the Mac menu bar.
- If it’s the first time you are using the storage device, you may need to select it in Time Machine. Subsequent backups will automatically go to the device if it is connected when you start Time Machine.
- Select Back Up Now to perform a backup immediately.
- Open Time Machine Preferences to change the backup disk, choose folders to exclude from backups, or set Time Machine to backup automatically when the storage device is attached to your Mac.
Disk Drill enables you to create a byte-level backup of your Mac using the following procedure.
- Launch Disk Drill on your Mac.
- Select Byte-to-byte Backup from the left panel.
- Choose the drive or partition you want to back up.
- Click the Create backup button and select a target location where the data will be stored.
- Allow the process to complete.
Backing up a Mac takes a variable amount of time based on a few factors.
- If it’s the first time you back up the machine, the elapsed time will be directly influenced by the amount of data. More data equals a longer backup.
- Once the initial backup has been taken, the time necessary to back up a Mac will depend on the amount of data added to the machine as well as modifications made to existing files. The more changes you make, the longer a backup will take.
- The third factor in backup time is the location of the target storage device. A local backup taken with Time Machine to a USB attached external drive will usually be faster than an online backup that needs to send data over the Internet.
The best backup tools for Mac are:
- Time Machine – included with macOS, creates full backups of your Mac
- iCloud – accessible with an Apple ID, saves user data to the cloud
- Disk Drill – data recovery software with extra tools, creates byte-level backups
- Carbonite – an offsite backup service
- Google Drive – Save files and folders to the cloud
- DropBox – Save files and folders to the cloud
- OneDrive – Save files and folders to the cloud
Use these steps to backup data on your computer to iCloud.
- Go to Apple menu > System Preferences, then click Apple ID. If you’re using macOS Mojave or earlier, you don’t need to click Apple ID.
- Choose iCloud.
- Sign in with your Apple ID if prompted.
- Select iCloud Drive.
- Choose the items you want to be backed up to iCloud and select their checkboxes.
Yes, there are ways to back up the data from your Mac without an external hard drive. For example, you can use an online backup service such as iCloud to backup your computer. Or you can use a third-party app to create a bootable disk image of the hard drive and upload it to an online data storage service. Since iCloud is available on all Macs, here’s how to back up your computer using this service:
- From the top menu on your Mac, click the Apple logo > About this Mac.
- Click the Storage tab.
- Click the Manage button.
- Click Store in iCloud.
- Choose whether you want to store on iCloud your desktop files, photos, or both. Click Store in iCloud to confirm.
Alternatively, you can simply drag and drop the files or folder that you wish to backup to iCloud Drive through Finder.
Yes, actually, that’s what iCloud was made for. You can safely back up all of the data from your Mac (photos, videos, documents, contacts, etc.) using this cloud storage service. And it is incredibly easy to set it up since iCloud is a native app on all Apple devices.
If you don’t want to use Time Machine to back up your Mac, you can use a specialized third-party app to clone your computer’s hard drive and upload it to an external storage device. For example, apps such as Disk Drill, SuperDuper!, or Carbon Copy Cloner can quickly get such a job done.
It depends on how much data there is to backup. For example, if this is your first time backing up your Mac and you’ve been using it for a while, it can take up even a few hours to complete the backup process. But if your Mac is relatively new and there are just a few files located on it, then the process should take only a few minutes.