So you’ve deleted a file on your Mac, and somewhere in your Googling, you stumbled upon mentions that it’s possible to recover permanently deleted files on Mac using Terminal. It’s true that Terminal can help restore deleted files, but only in some situations.
We’ve tested every Terminal recovery method out there to find out what really works. In this guide, we’ll show you exactly what Terminal can and can’t do for file recovery, plus provide alternatives when Terminal isn’t enough.
What Is Mac Terminal and How Does It Work?
Mac Terminal is a command-line interface that provides direct access to macOS’s Unix-based system. It’s typically used by administrators, software developers, and power users to execute text-based commands that change system settings, compile software, manage files, and much more.

✅ What Mac Terminal CAN do for data recovery:
- You can recover deleted files on Mac using Terminal if they’re still in the .Trash directory.
- Recover deleted folders on Mac by performing Terminal operations when the folders exist in Trash.
- Display hidden files and folders that might contain recoverable data.
- Access and restore files from local Time Machine backups.
⛔️ What Terminal CANNOT do for data recovery:
- It’s impossible to recover emptied trash on Mac using Terminal commands.
- Restore files that bypassed the Trash.
- Get back data that has been securely deleted or overwritten.
- Unformat a storage device after it has been formatted.
In summary, Terminal is most useful for simple file recovery when items are still in the Trash. It’s not useful if the Trash has been emptied. Terminal in the context of recovery simply replaces (or rather duplicates) what you can do using the macOS UI.
How to Recover Deleted Files Using Mac Terminal
So if your files are still in the Trash, you can actually just open it and drag them out.
But if you’re determined to use Terminal to recover deleted files on Mac (maybe there are some issues with Finder that make it impossible for you to access Trash the easy way), or you just want to learn how the command line works, here are the steps you can follow to recover emptied trash on Mac:
- Open Terminal through your Utilities folder (Applications > Utilities > Terminal), and then type the following command and hit Return to navigate to the Trash folder: cd .Trash
- Type this command to see everything in your Trash: ls -al ~/.Trash
- To recover a specific file, type: mv filename ../ (replace “filename” with the exact name of your file (including the extension like .docx or .jpg, such as “my document.pdf”)
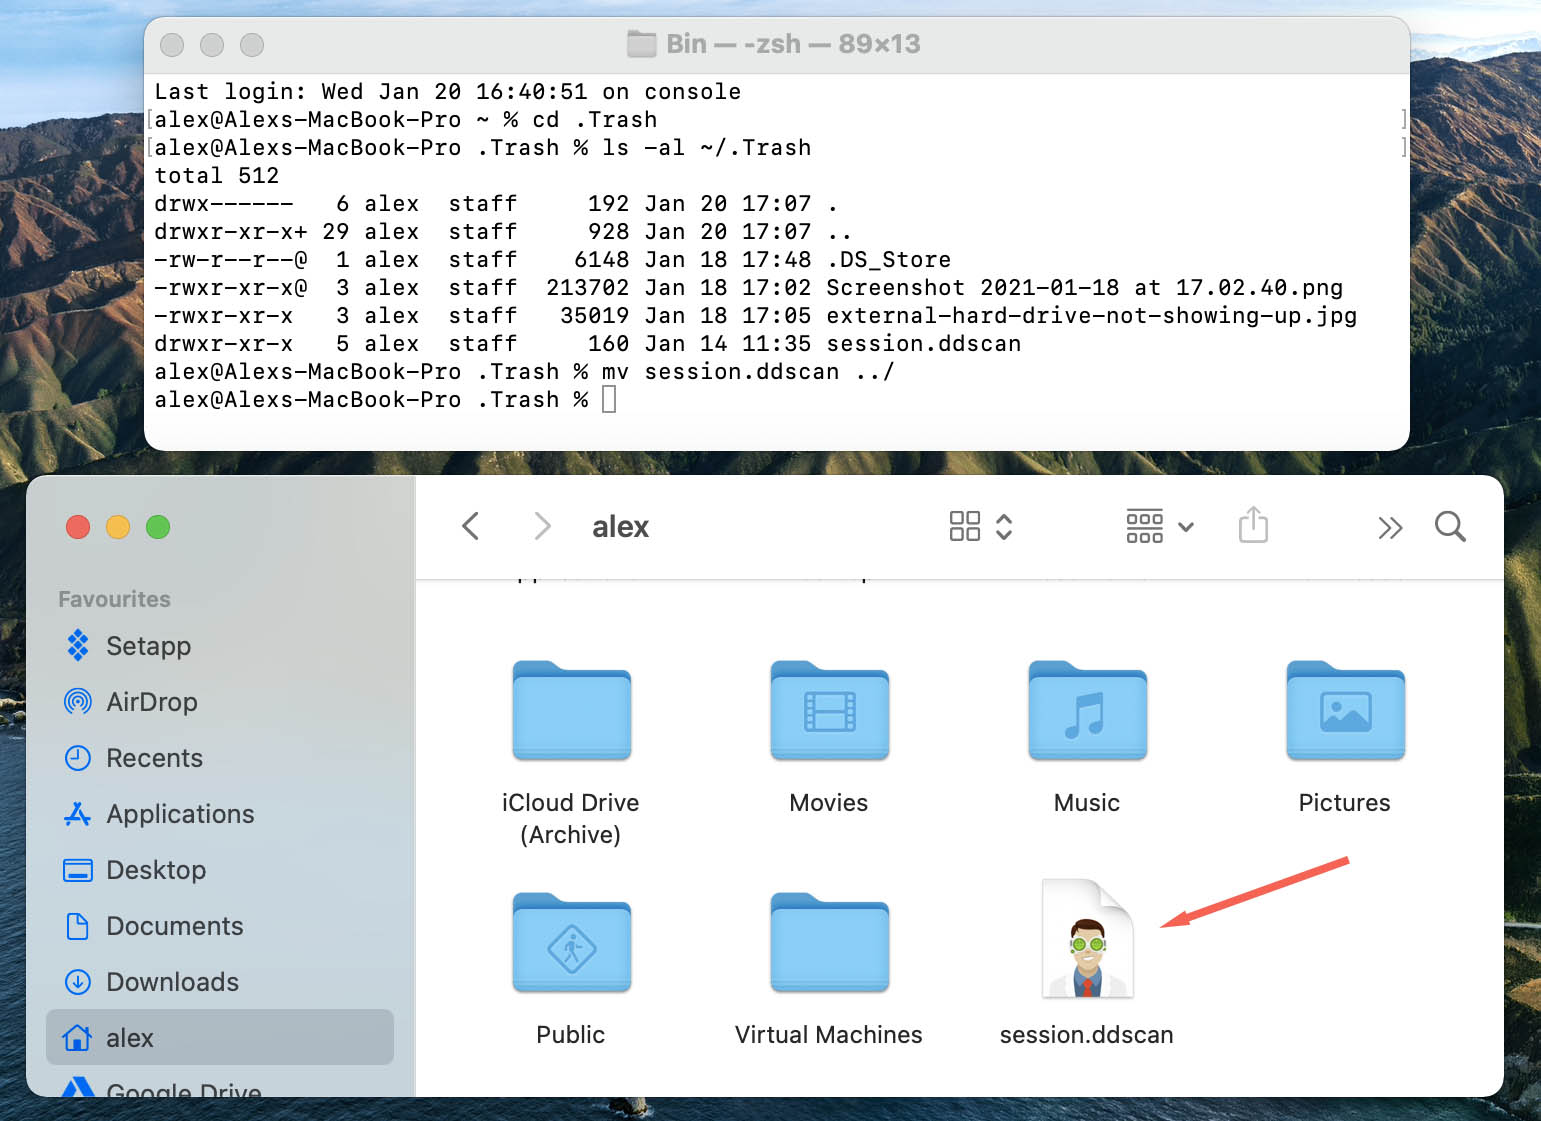
- Close the Terminal window.
Your recovered file should now appear in your home folder. It’s also possible to recover them to a different location. To do that, simply replace ../ in step 3 with your desired path, such as ~/Desktop/ for the Desktop or ~/Documents/ for the Documents folder.
What to Do When Mac Terminal Proves Ineffective?
When Terminal commands fail to recover your deleted files (happens whenever you’ve emptied the Trash or files bypassed it entirely), you need Mac data recovery software that can dig deeper into your storage device.
Data recovery software examines your disk at a much lower level than Terminal ever could by scanning for file signatures and analyzing available file system information. Disk Drill, ranked first among the best data recovery software for Mac, offers free scanning that shows you precisely which files can be restored, complete with previews, so you know whether recovery is worth pursuing.
Here’s how to recover deleted files on Mac with Disk Drill:
- Download and install the latest version of Disk Drill. The installation process is straightforward as you just need to drag the app to your Applications folder.

- Launch Disk Drill and grant it Full Disk Access when prompted. This permission allows the software to scan your entire drive, including system-protected areas where deleted files might be hiding.
- Select the drive or partition where your deleted files were stored. If you’re trying to recover deleted folder contents from your Mac’s internal drive, select your Macintosh HD.
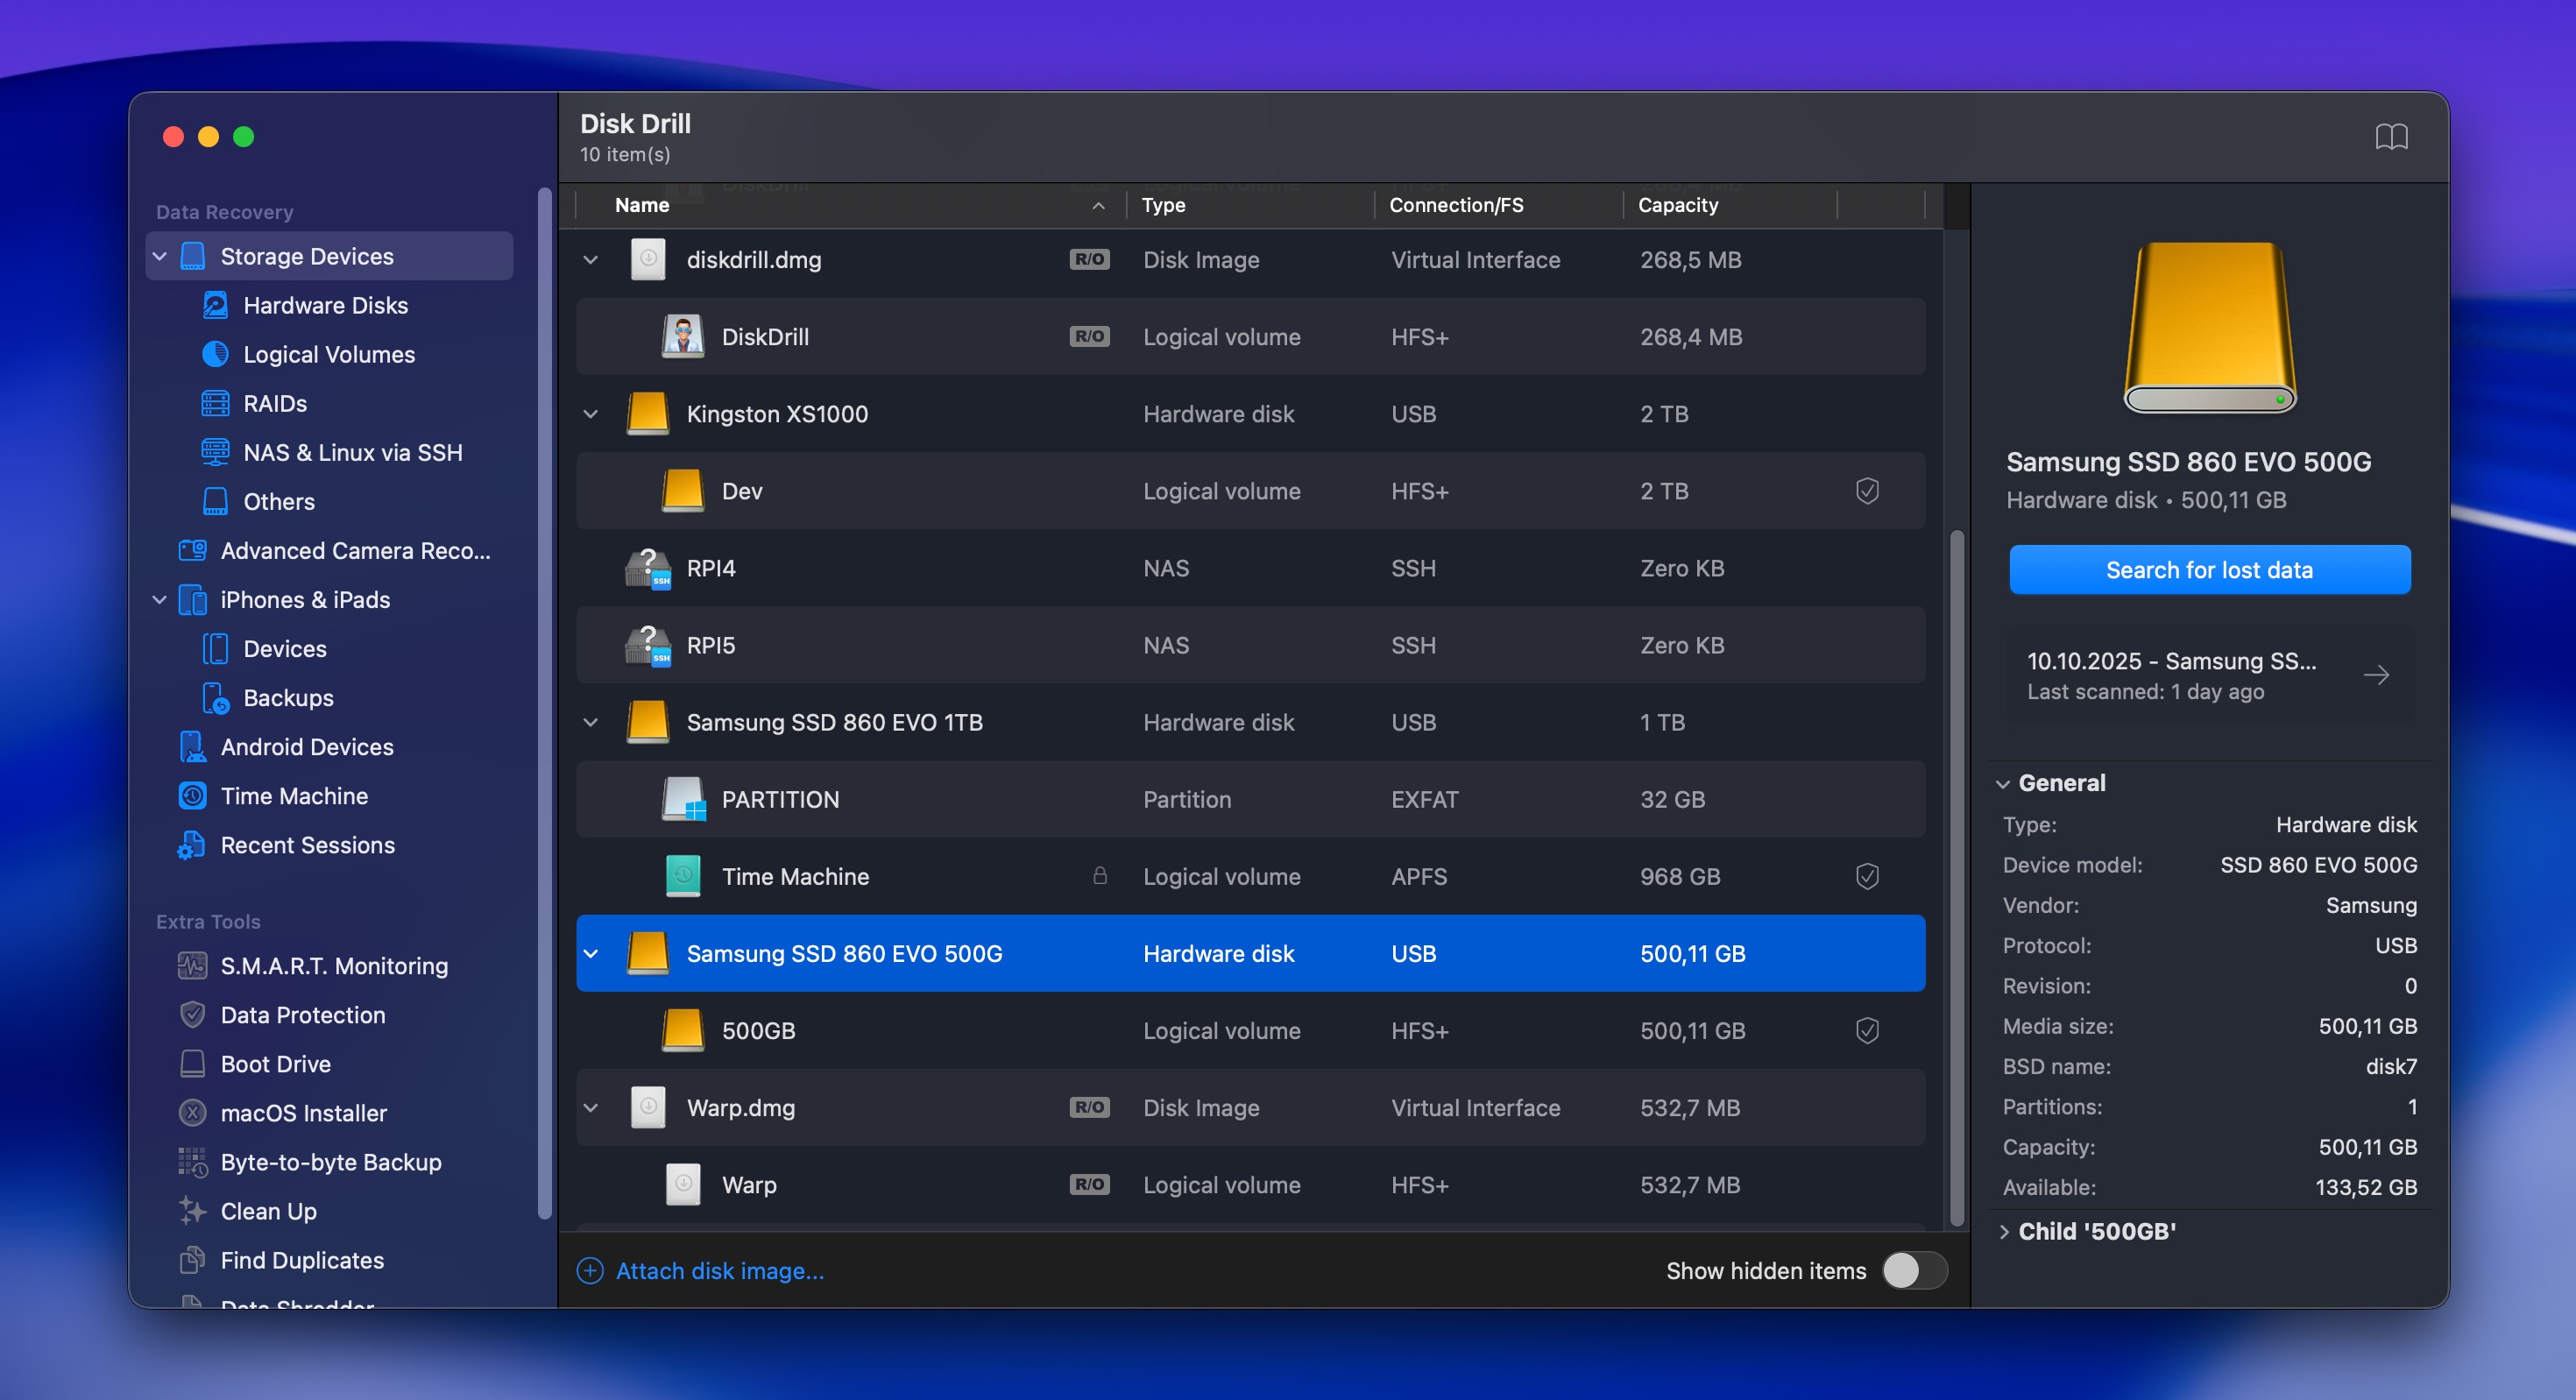
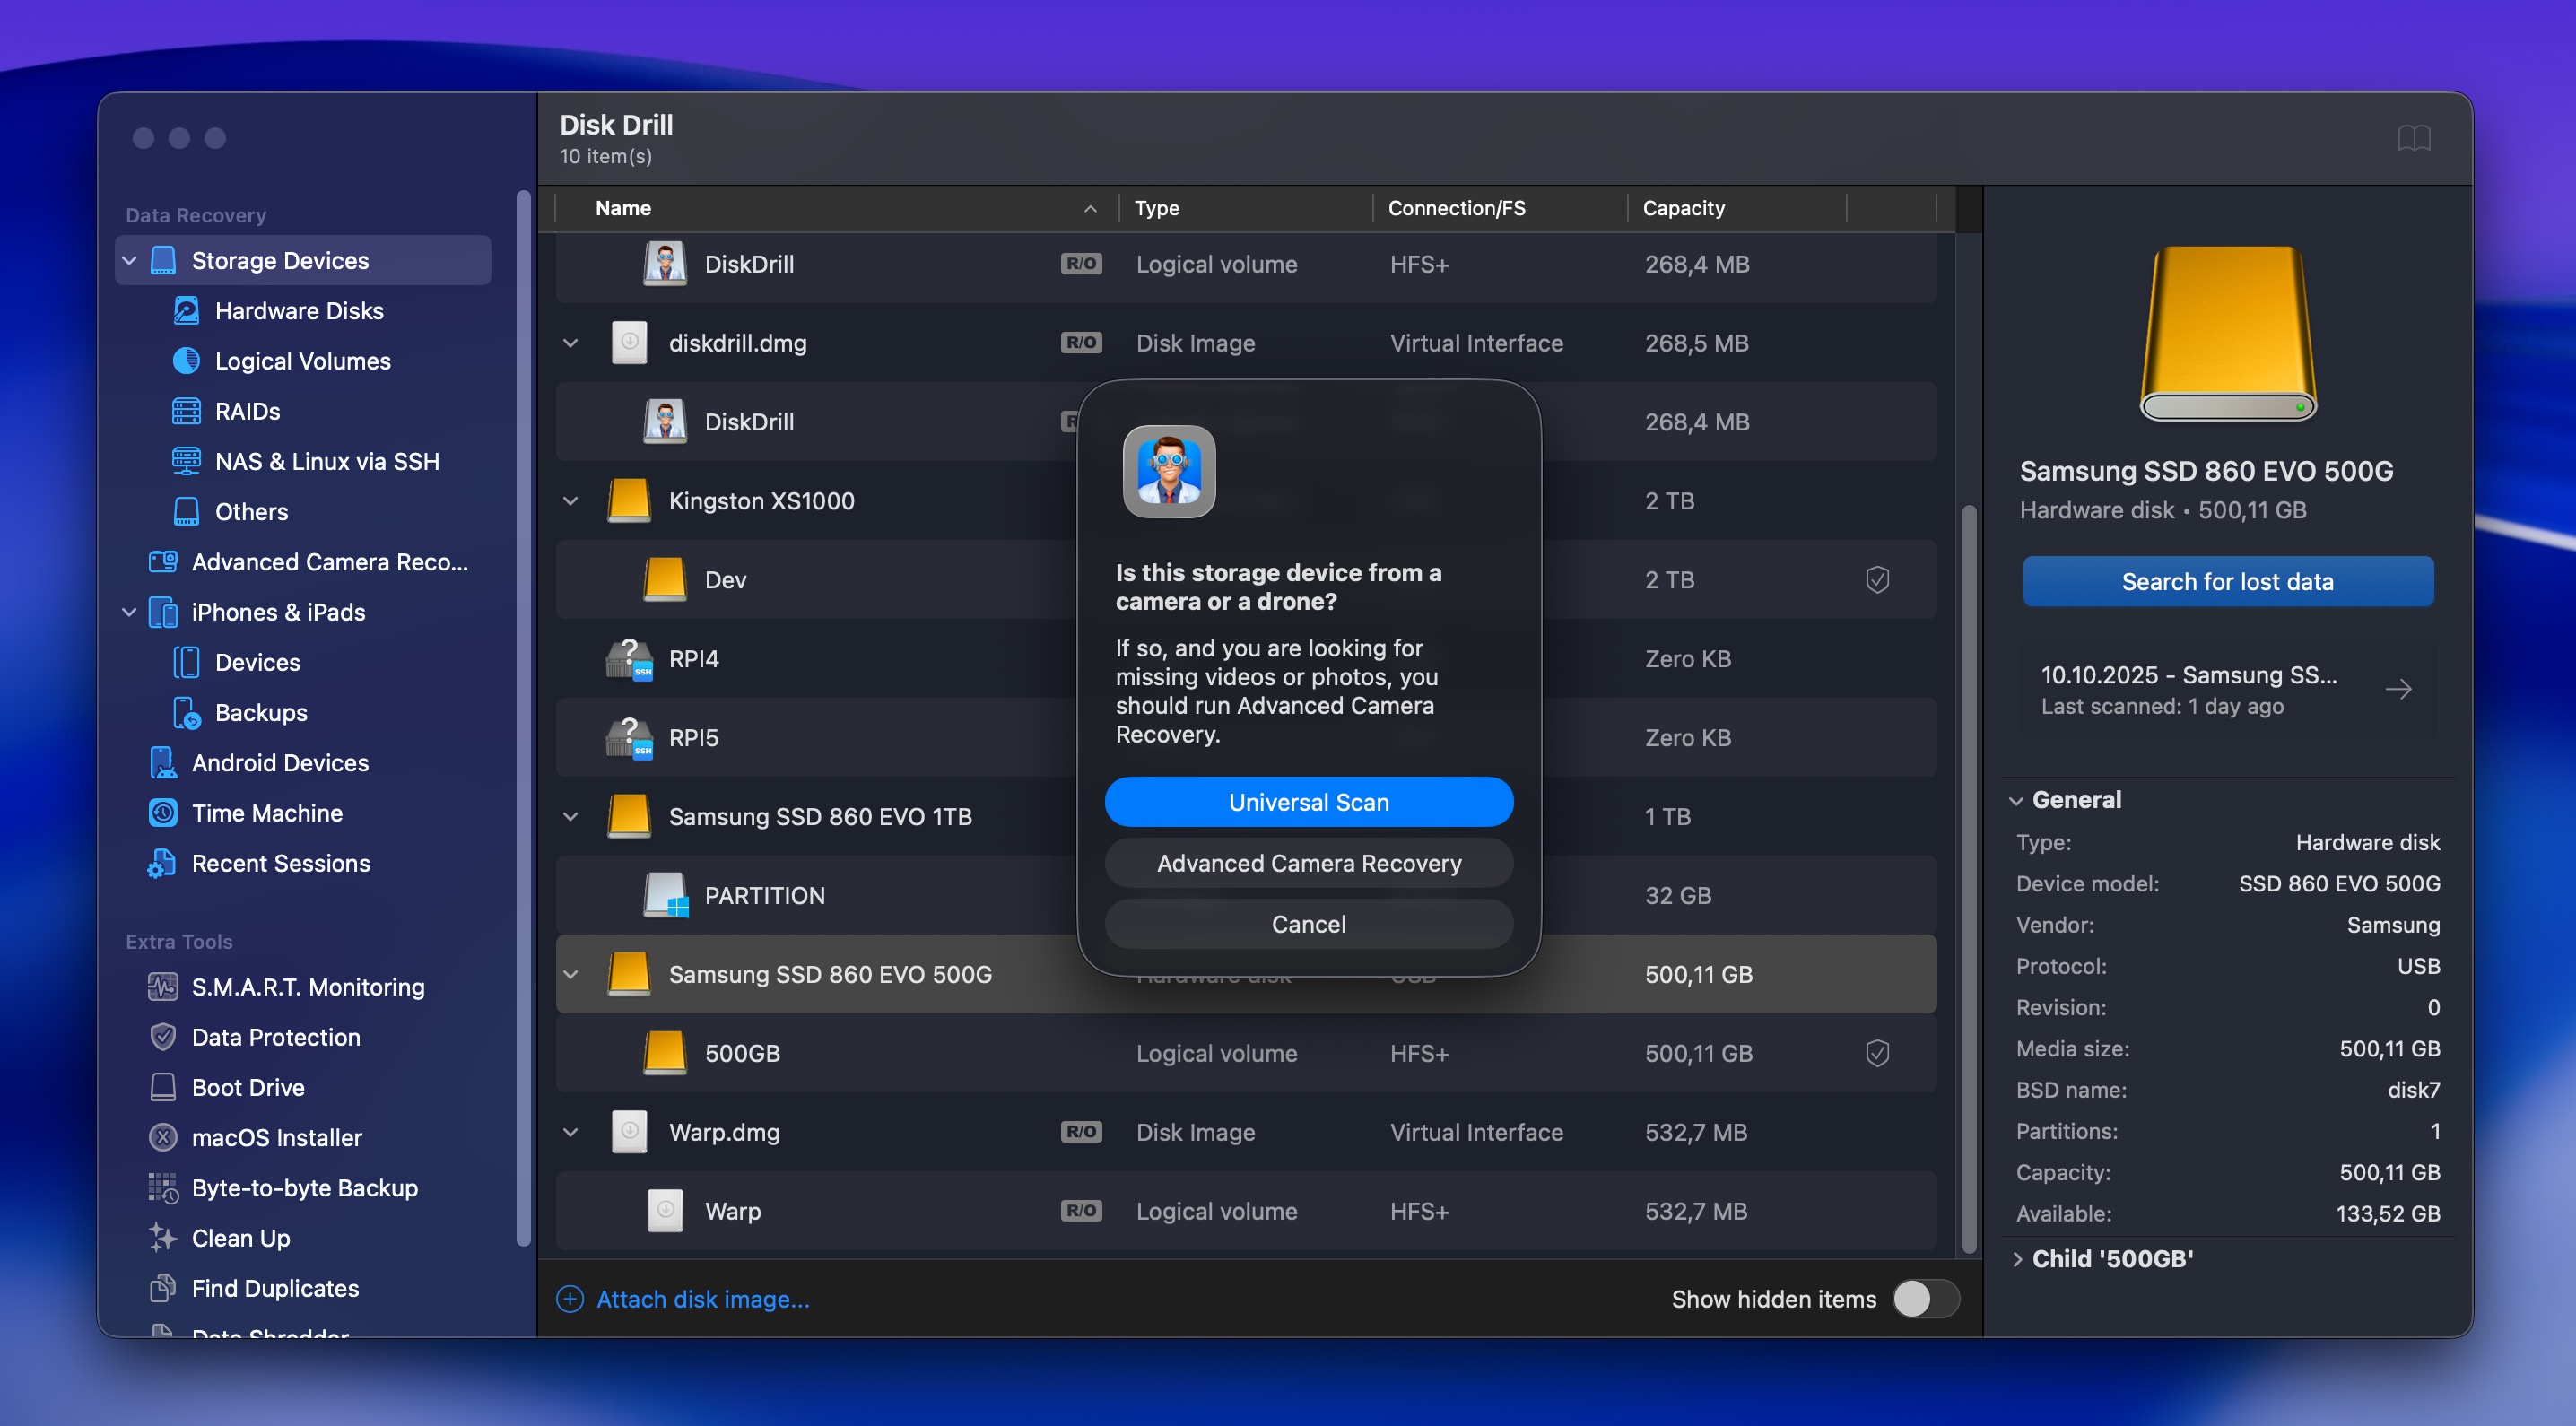
- Click Search for lost data to begin scanning. For external media a pop-up will appear. Choose to perform Universal Scan (Advanced Camera Recovery mode is intended for the recovery of fragmented videos from memory cards).
- Browse through the scan results using the file type filters on the left sidebar. You can search for specific files by name, filter by date, or preview files directly within Disk Drill to verify they’re intact.
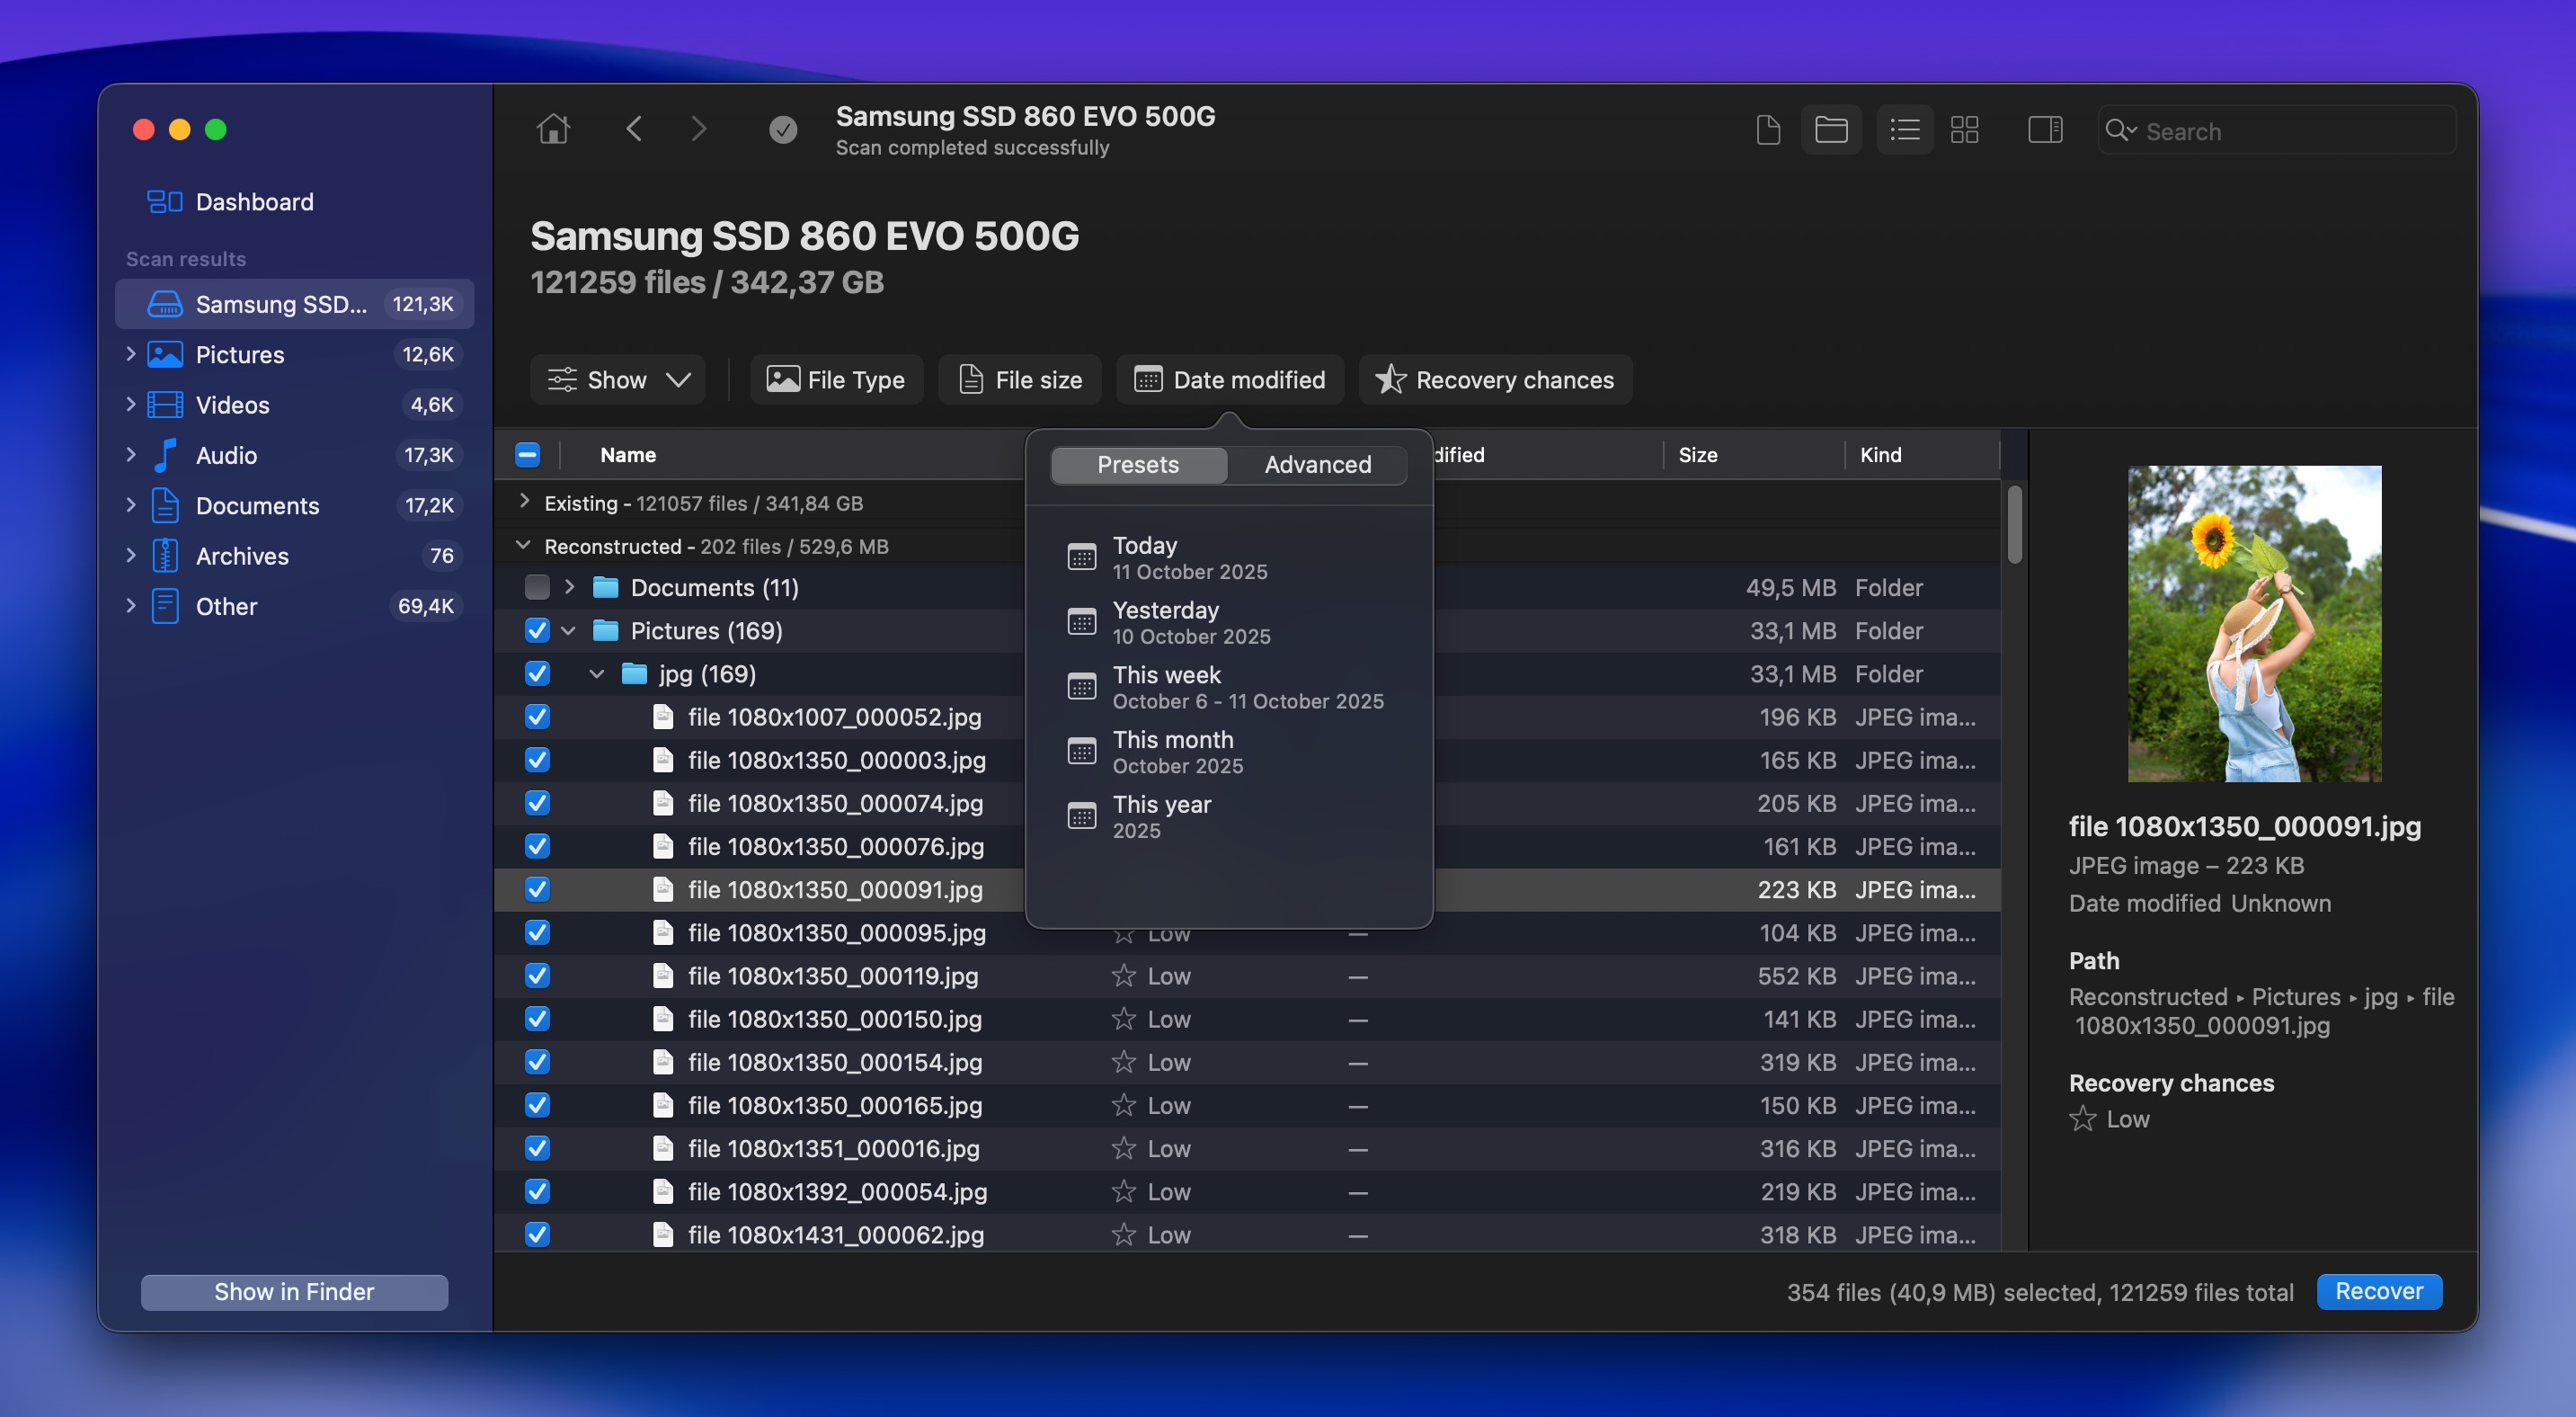
- Select the files you want to recover by checking the boxes next to them. You can select individual files or entire folders or even all recoverable files.
- Click the Recover button and choose a safe recovery location. Never save recovered files back to the same drive they were deleted from as this could overwrite other recoverable data.

As you can see, the recovery process with Disk Drill is straightforward, but the results can vary greatly depending on your Mac.
If your Mac uses an SSD (all modern Macs do), recovery becomes significantly more difficult due to TRIM technology, which immediately erases storage blocks after file deletion to prepare them for use. That’s why it’s important to begin the recovery process as soon as you can. For detailed information about these challenges and specialized techniques, check out our guide on Mac SSD data recovery.
Are There Other Methods Besides Terminal for Data Recovery?
We dug around and found a couple more methods you can use to recover deleted files on Mac besides Terminal commands. While the helpfulness of these approaches depends on various factors, this article wouldn’t be complete without covering them, especially since attempts to recover emptied trash on Mac using Terminal deliver good results only in a limited number of situations.
Option 1: Run Alternative Command Line Tools
If you prefer CLI tools or are looking for free solutions, PhotoRec and TestDisk form an excellent open-source bundle that can solve a number of your data recovery problems.
PhotoRec (File Recovery Tool)
PhotoRec specializes in recovering deleted files directly from your storage device by detecting their signatures. Despite its name, it supports hundreds of file formats, so it can handle everything from documents to videos on accessible drives.
The main limitations are that it can’t recover original file names and folder structures, which means you’ll need to sort through recovered files manually. Additionally, PhotoRec is unable to access system partitions on Macs with Apple Silicon (M1-M4) or T2 security chips due to their hardware encryption and security features (it can only work with external drives or secondary partitions on these systems).
To install and use PhotoRec:
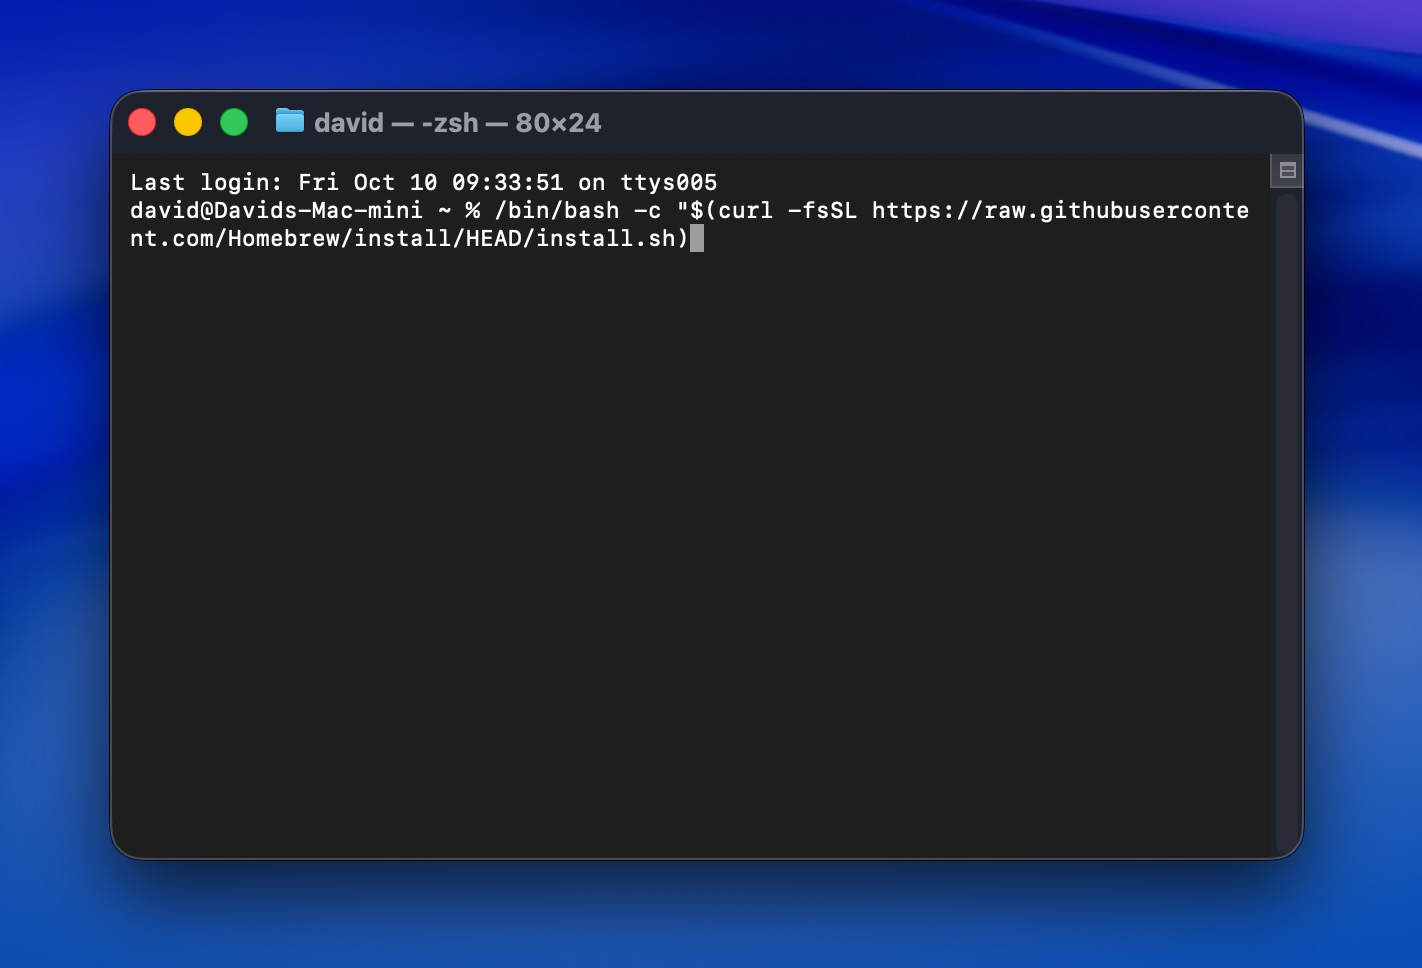
- Install Homebrew from Terminal if you haven’t already: /bin/bash -c "$(curl -fsSL https://raw.githubusercontent.com/Homebrew/install/HEAD/install.sh)"
- Install TestDisk (which includes PhotoRec): brew install testdisk
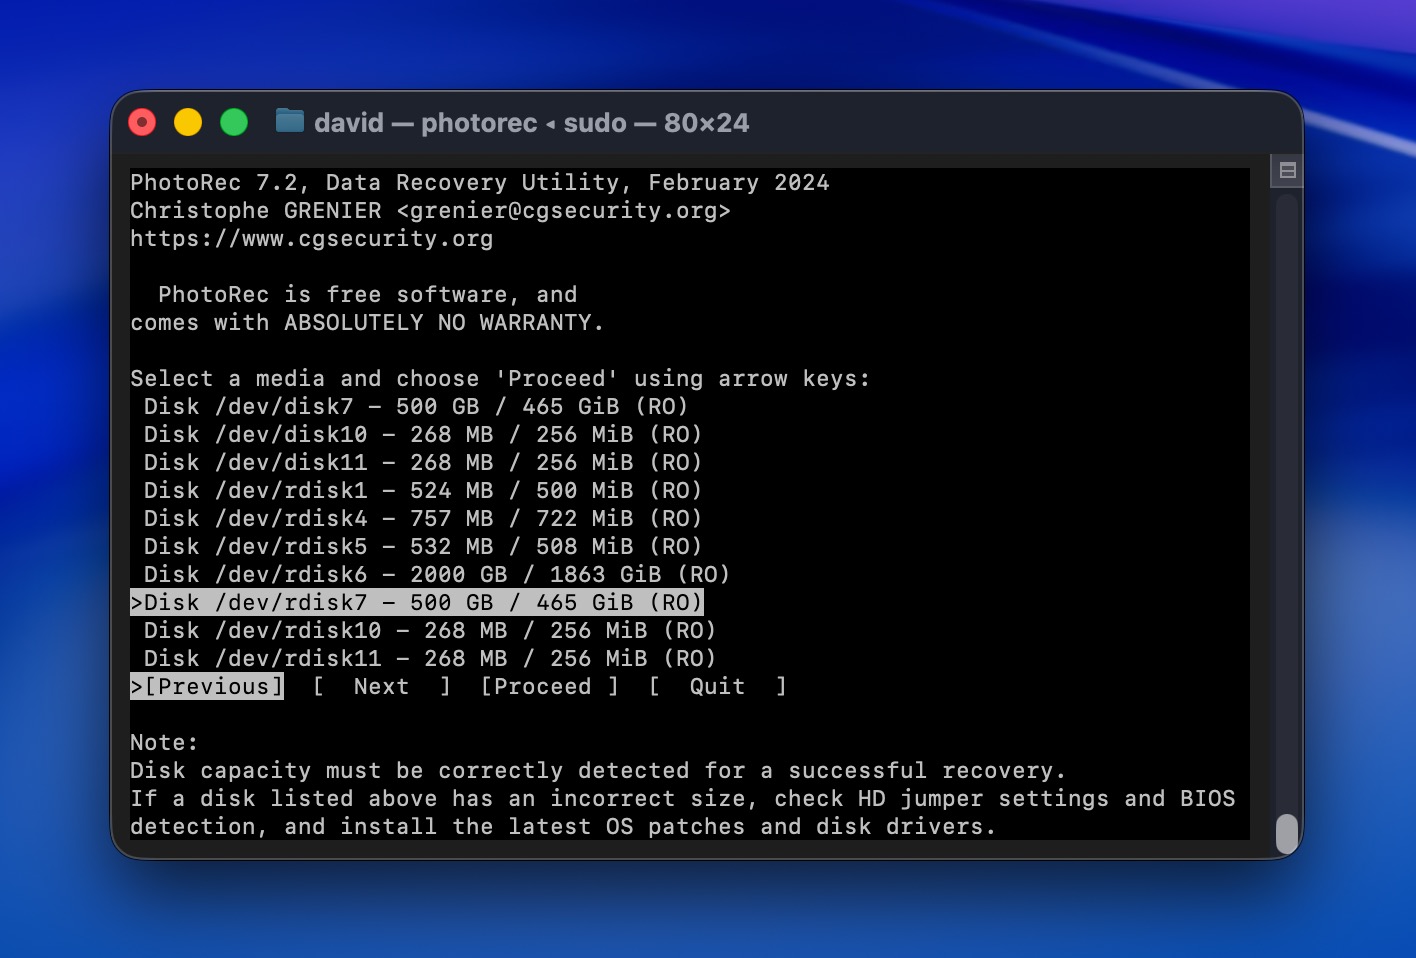
- Launch PhotoRec: sudo photorec
- Select your disk from the list using the arrow keys and press Enter.
- Choose the partition where your files were deleted.
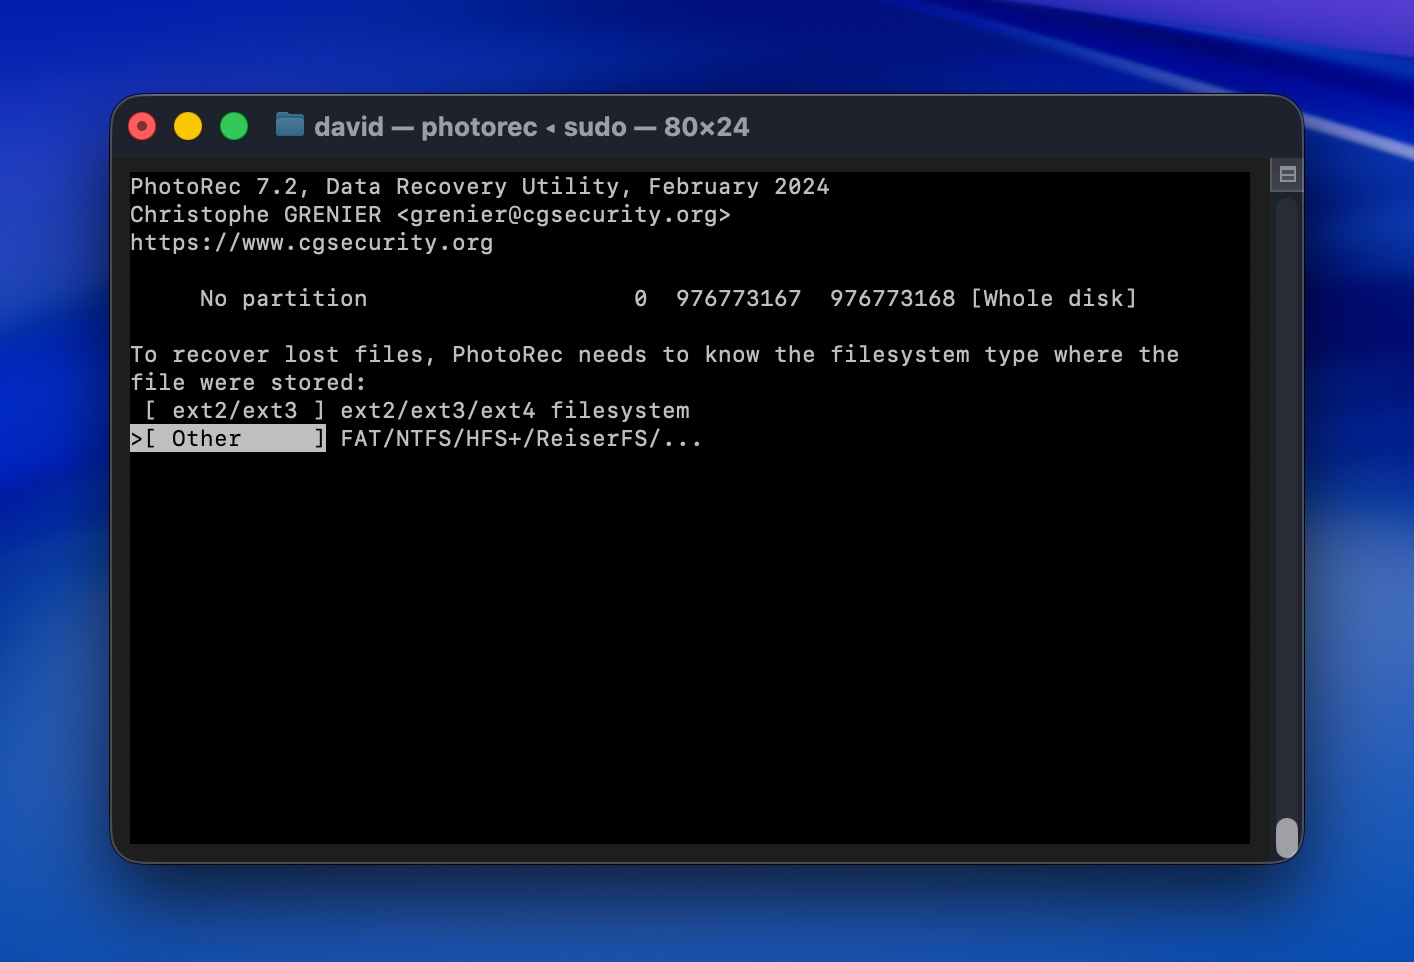
- Select the file system type.
- Choose whether to scan only free space or the whole partition.
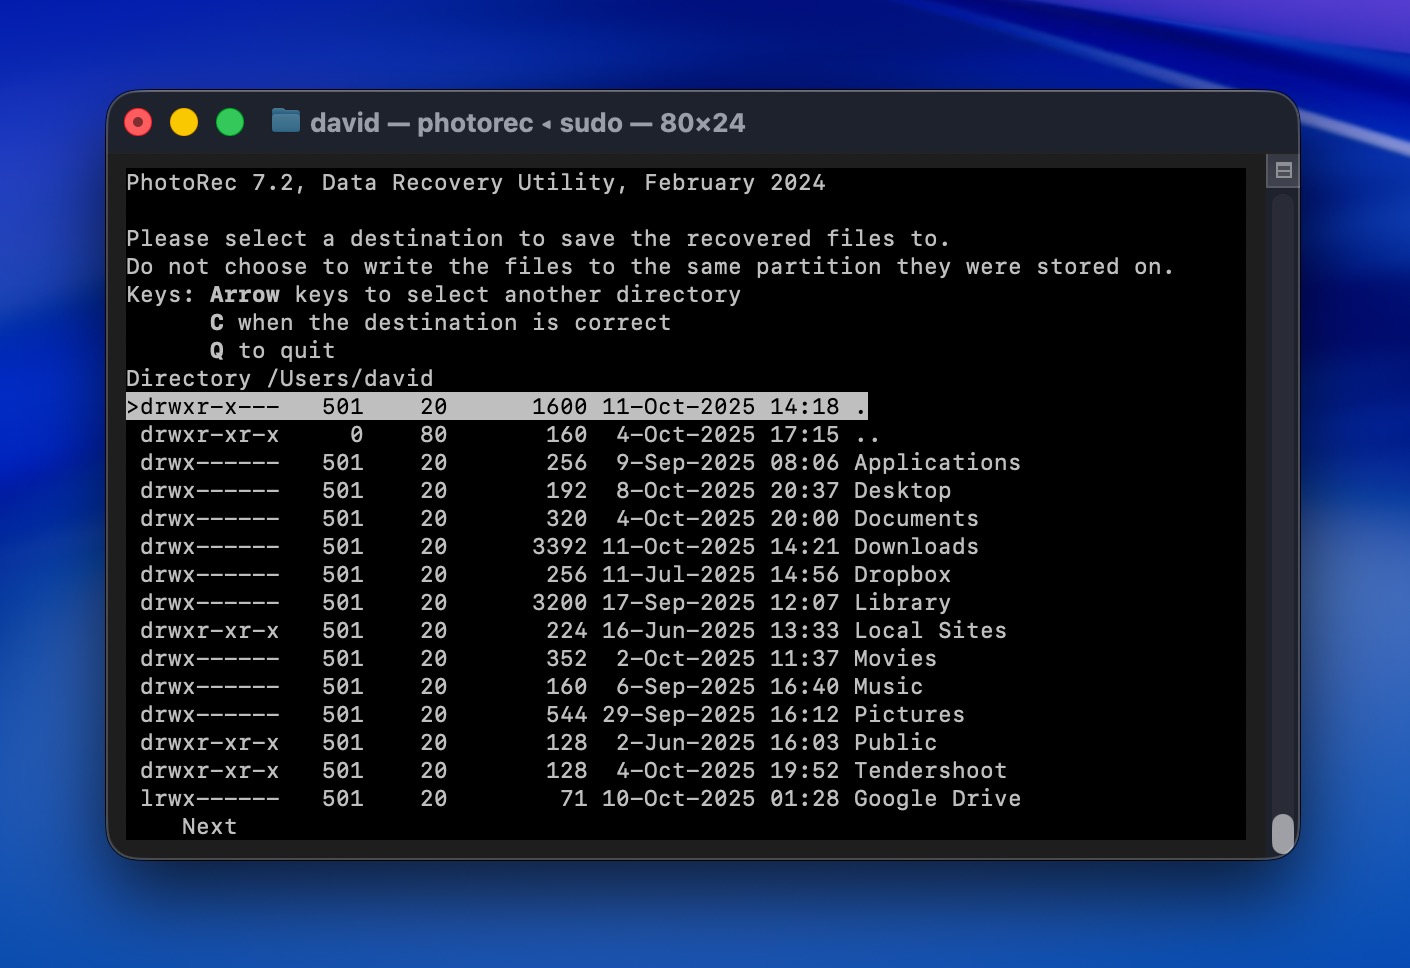
- Select a destination folder for recovered files (must be on a different drive).
- Wait for the scan to complete. PhotoRec will organize recovered files by type in the recovery destination folder.
TestDisk (Partition Recovery Tool)
While PhotoRec handles individual files, TestDisk is best suited for scenarios where you’ve accidentally deleted an entire partition or need to repair a damaged file system because it recovers file system information rather than individual files.
How to use TestDisk for partition recovery:
- If you haven’t already installed it, follow steps 1-2 from PhotoRec above.
- Launch TestDisk from Terminal: sudo testdisk
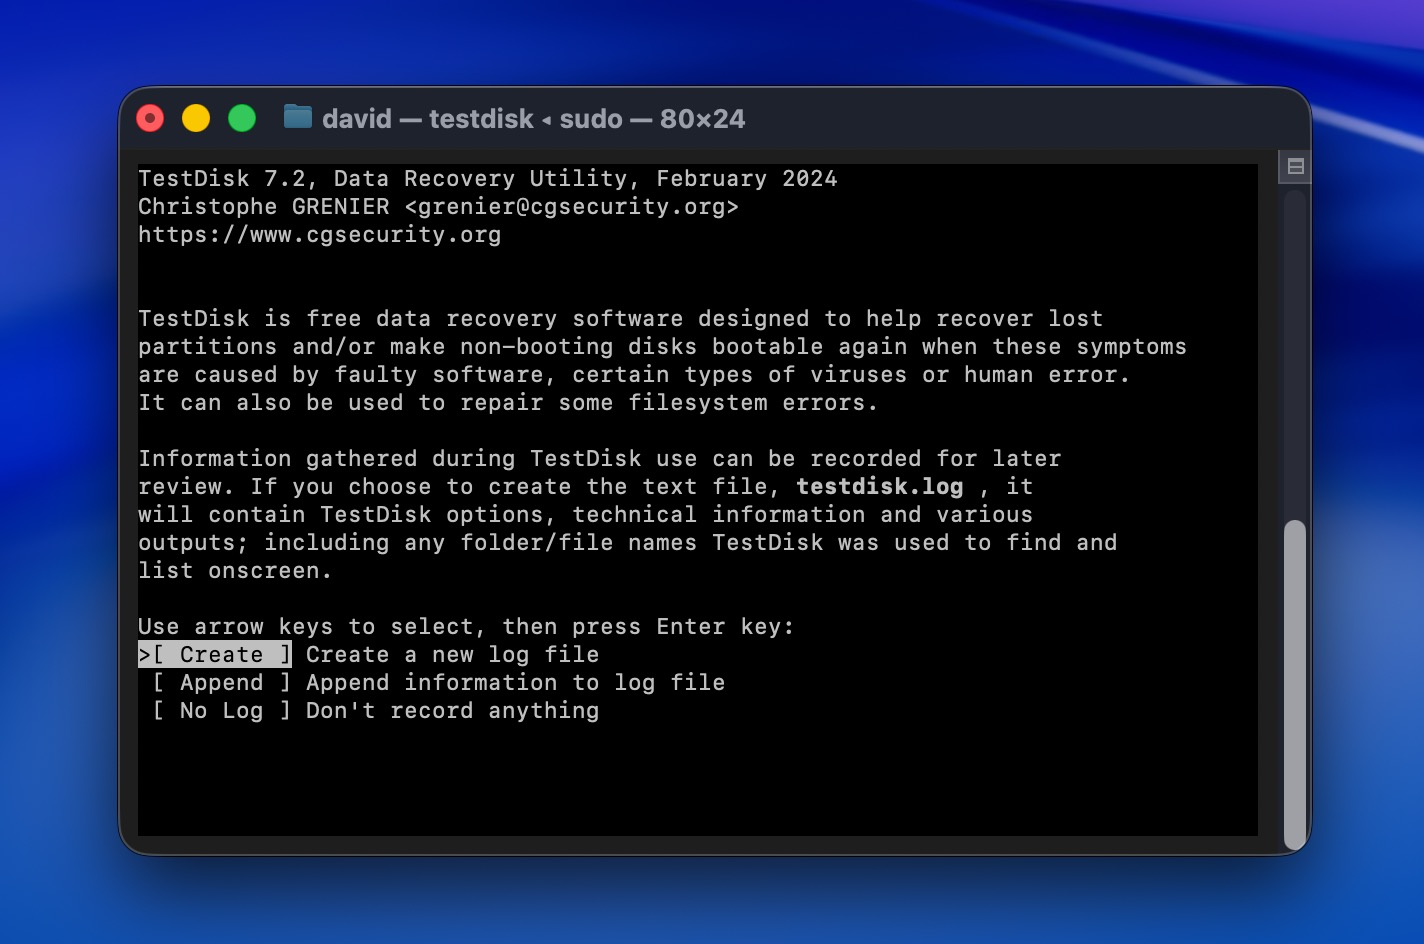
- Select Create to generate a new log file.
- Choose your affected drive from the list.
- Select the partition table type (usually EFI GPT for modern Macs).
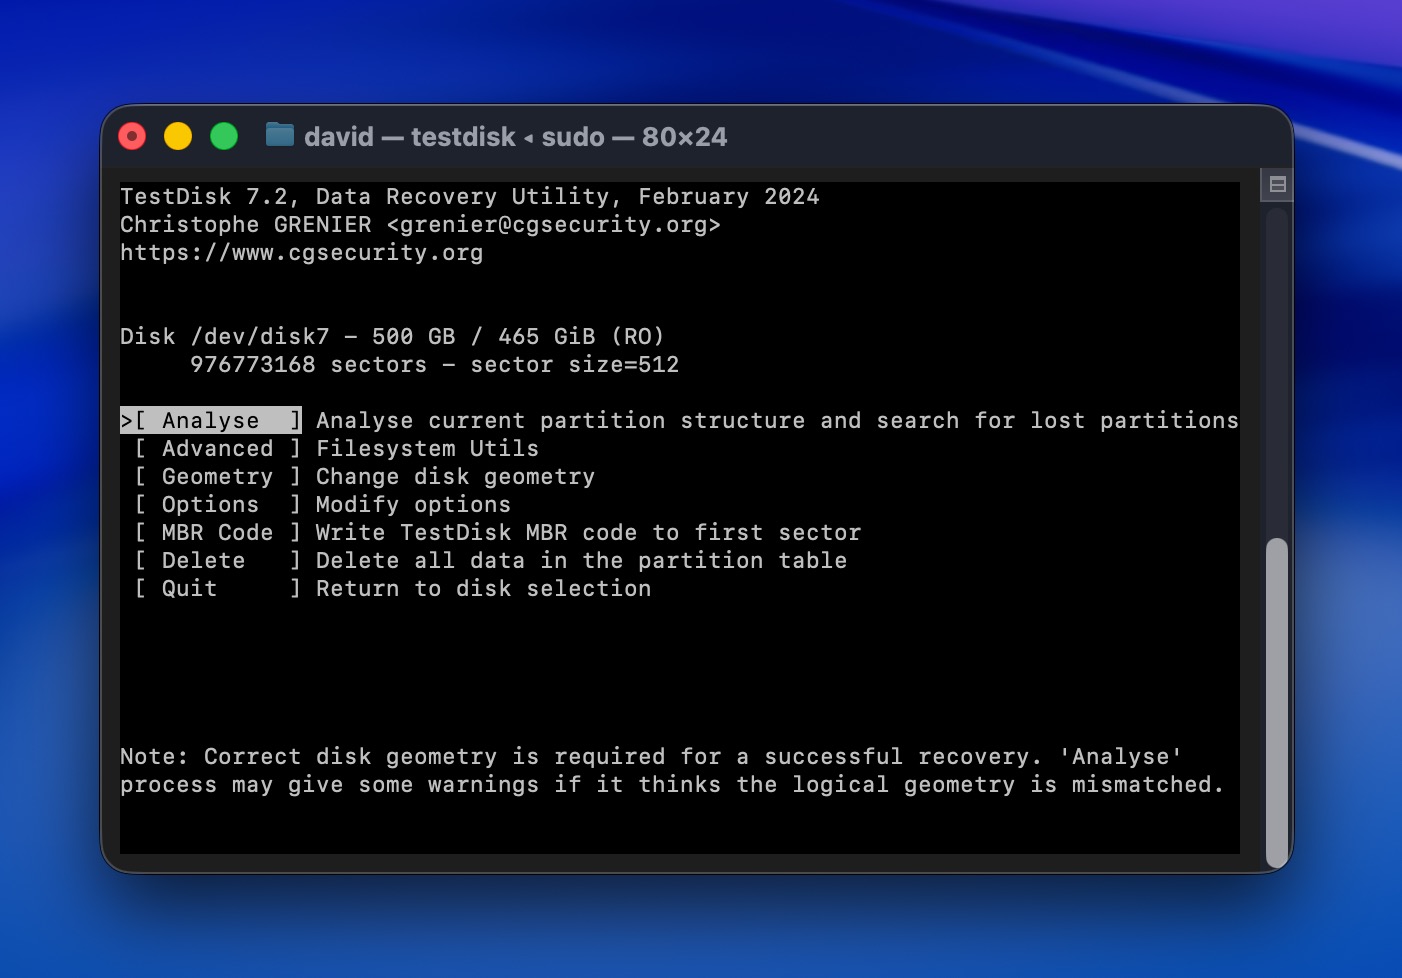
- Select Analyse to search for lost partitions.
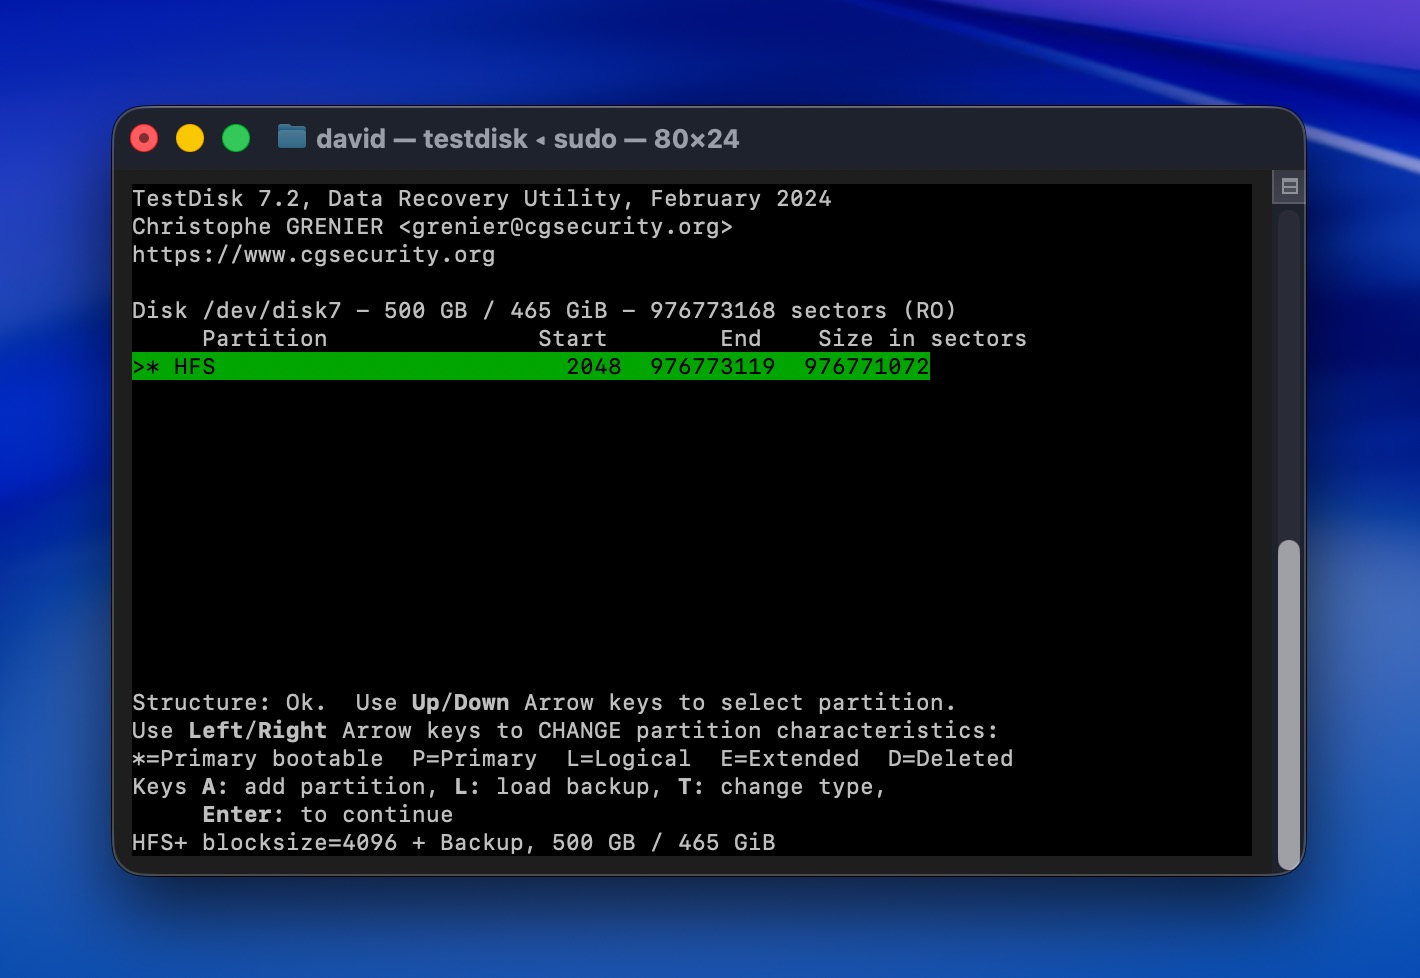
- Choose Quick Search to scan for deleted partitions.
- If Quick Search doesn’t find your partition, try Deeper Search.
- Once found, select your partition and choose Write to restore it.
Option 2: Utilize Time Machine Backups
Time Machine remains one of the most reliable ways to recover deleted files on Mac, and it’s especially effective for recovering overwritten files on Mac (something that neither Terminal commands nor recovery tools can accomplish). However, it can only help if it was already enabled before you lost your files.
Follow these steps to restore from Time Machine:
- Connect your Time Machine backup drive to your Mac if you have access to it. If not, continue regardless because recovery may still be possible from local snapshots (more about them below).
- Open the folder where your deleted files were originally stored.
- Click the Time Machine icon in your menu bar and select Enter Time Machine.
- Use the timeline on the right side to navigate to a date before the files were deleted.
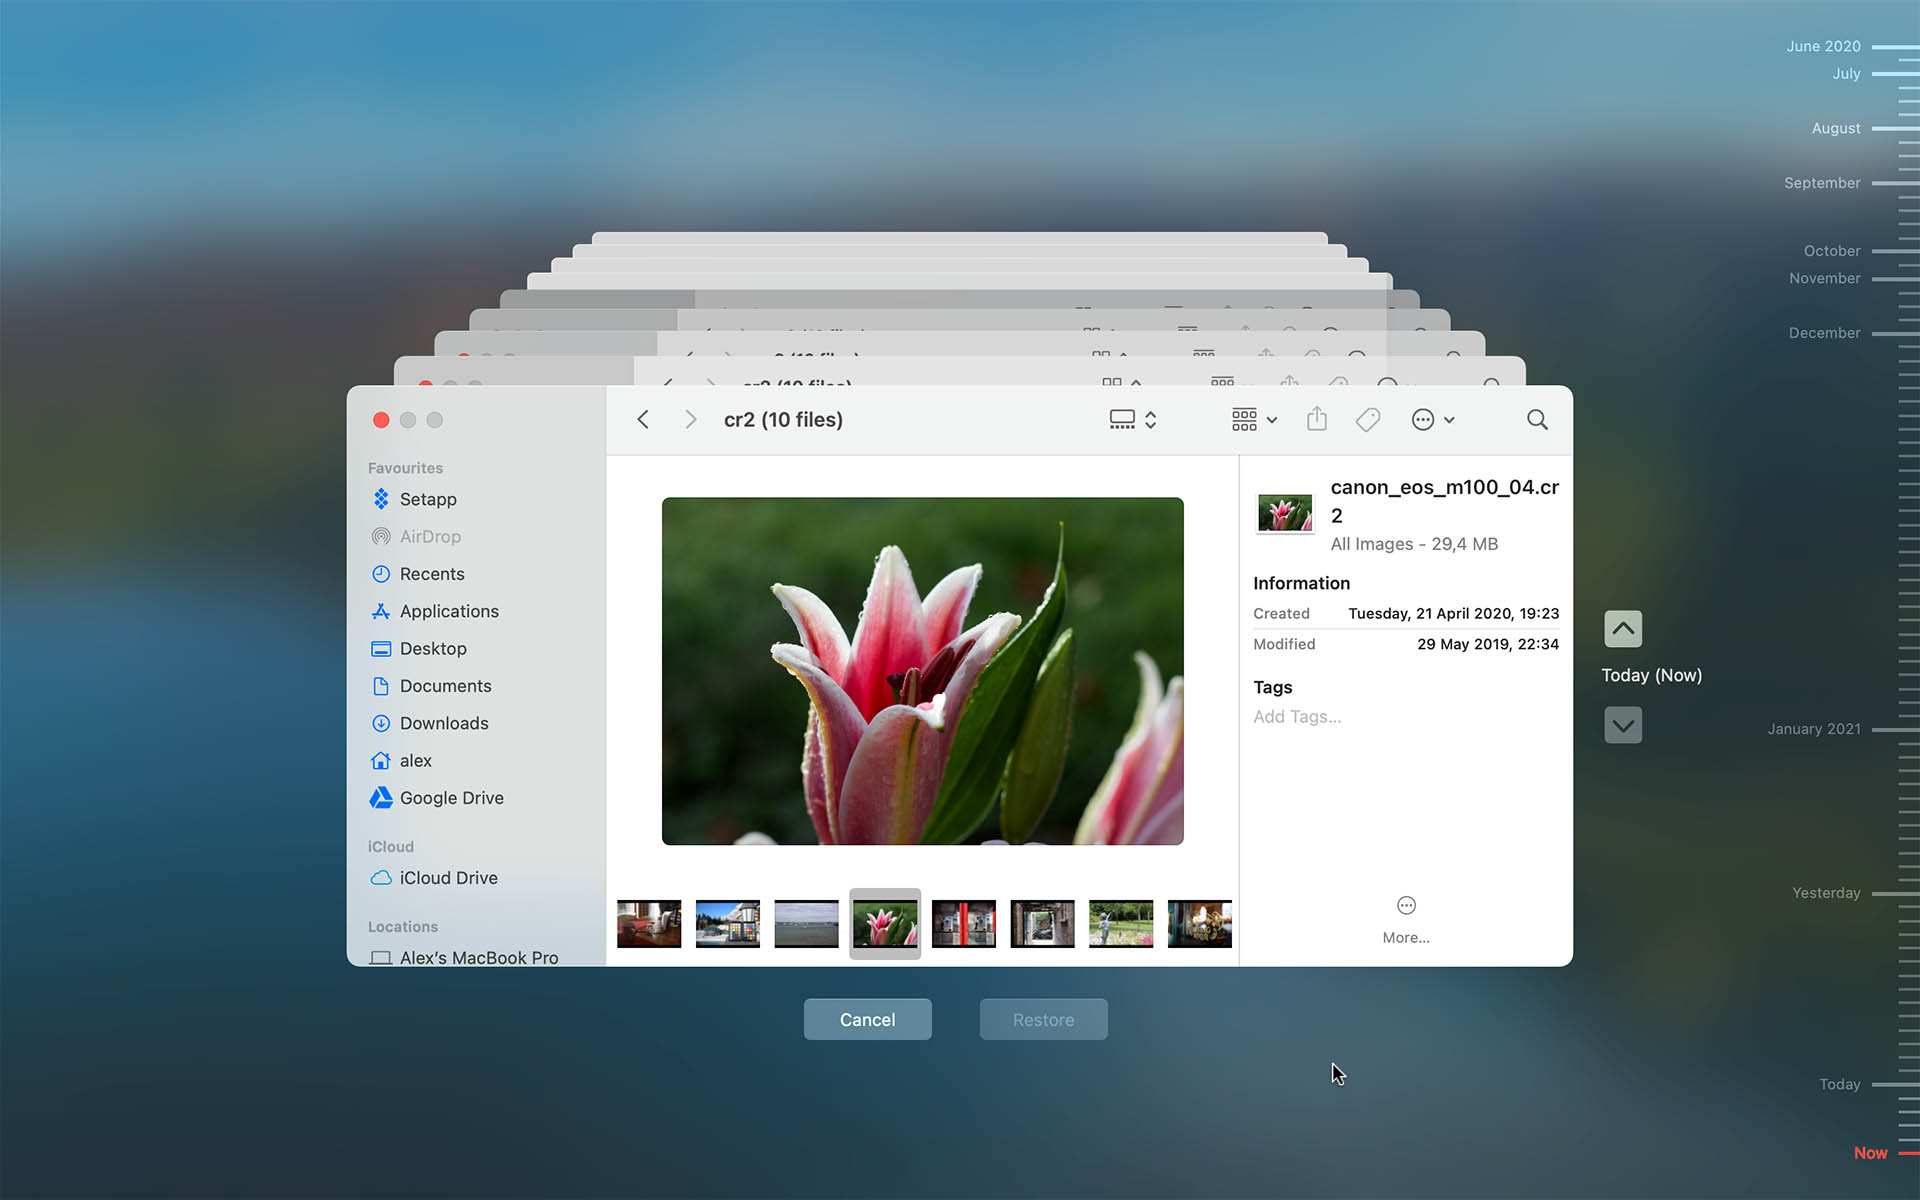
- Select the files you want to restore and click Restore.
Common Mistakes When Using Mac Terminal for Recovery
The text-based nature of Terminal makes it easy for users to make seemingly small mistakes that have significant consequences (so large that they can be the difference between successful and failed recovery).
Incorrect Paths
The most frequent mistake is entering incorrect paths or commands. Terminal is unforgiving when it comes to typos, and even a single misplaced character will cause your command to fail. Here are some common path errors to avoid:
- Typing cd.trash instead of cd .Trash (missing the space)
- Using cd trash instead of cd .Trash (missing the period)
Wrong Case
While macOS typically uses a case-insensitive file system (APFS formatted as case-insensitive by default), Terminal commands themselves are case-sensitive. This creates a confusing situation where your file system might treat “Downloads” and “downloads” as the same folder, but Terminal commands require exact capitalization.
For example, if you type cd ~/downloads when the actual folder is named “Downloads” with a capital D, Terminal will still navigate to the folder because macOS’s file system is forgiving. But try typing CD ~/Downloads (with uppercase CD), and Terminal will throw an error saying “command not found” – because the command itself must be lowercase.
A Reddit user switching from Linux to macOS discovered this quirk when extracting a tar file – their “downloads” directory seemed to vanish because macOS merged it with the existing “Downloads” folder. “I didn’t even know that there was such a thing as a case-insensitive file system,” they admitted.
Incorrect File References
Terminal treats spaces as separators between different arguments, so a file named “My Important Document.pdf” looks like four separate items to Terminal unless you handle it properly.
Wrong: Users often type mv My Important Document.pdf ../ expecting it to work, but Terminal interprets this as trying to move four different files: “My”, “Important”, “Document.pdf”, and “../”.
Right: The correct approach requires either wrapping the filename in quotes (mv "My Important Document.pdf" ../) or escaping each space with a backslash (mv My\ Important\ Document.pdf ../).
Unrealistic Expectations
Sure, Terminal can move files out of your Trash folder, but that’s really about it. Once you’ve emptied the Trash, used the rm command, or experienced any real data loss, Terminal becomes useless.
For serious data loss situations, you need proper data recovery software. Tools like Disk Drill exist because Terminal’s recovery abilities end where real data loss begins.

Conclusion
We hope you’re now convinced that learning how to recover deleted files using Mac Terminal isn’t actually difficult. You just need to familiarize yourself with the basics and avoid common mistakes like incorrect paths or wrong case sensitivity. Unfortunately, there’s only so much Terminal can do.
As explained throughout this article, once you’ve emptied the Trash or files bypassed it entirely, you’ll need specialized tools. Because there’s no shortage of options to choose from, you need to pick one that can meet your needs the best. For most Mac users, Disk Drill is an excellent choice thanks to its advanced data recovery capabilities combined with a user-friendly interface.
If you would like to discover more recovery options beyond macOS recover deleted files Terminal methods, then you should check out this video showing 5 different ways to recover deleted files on Mac.
FAQ
No, Terminal isn’t capable of recovering files deleted with the rm command. When you use rm, the file bypasses the Trash folder entirely and is immediately marked as deleted by the file system. Your only options are to use data recovery software like Disk Drill or PhotoRec, which can scan your disk for remnants of the deleted file, or restore from a Time Machine backup if you have one.
If a file isn’t visible in Trash through Finder but you suspect it’s still there, Terminal might help. Use the command ls -al ~/.Trash to list all files in Trash, including hidden ones that Finder might not display. Sometimes files with special characters or system files don’t appear in the graphical Trash view. If Terminal shows the file, you can recover it using mv ~/.Trash/filename ~/Desktop/ to move it to your Desktop. However, if Terminal also doesn’t show the file, it means the Trash has been emptied or the file bypassed it, and you’ll need data recovery software to proceed.
Yes and no. If you follow the commands exactly as shown in this article, Terminal is perfectly safe for recovering files from the Trash. However, Terminal’s text-based nature makes it easy to make a mistake (a single typo can delete the wrong file, for example). For peace of mind, especially if you’re not comfortable with command-line interfaces, it might be better to use graphical data recovery software like Disk Drill.