


Does your iPhone storage keep getting full? Modern iPhones generate so much data just with normal usage that even if you’re conservative with how you use your space, the storage bar quietly fills up without you noticing.
So to come up with this guide, we analyzed our own team’s devices and read dozens of user stories online–and we found out exactly why your iPhone storage keeps filling up, where all that data is coming from, and how to fix it.
Why Your iPhone Storage Keeps Filling Up
It’s not really true that your iPhone storage is going up “for no reason.” Aside from obvious sources (like taking photos or downloading apps), iOS generates many different types of data while you use your device.
If you haven’t cleaned up your iPhone for some time, keeping track of them all just off the top of your head is impossible. So we prepared a complete list of the different types of files you’ll find on your iPhone and where they come from, which should give you a better idea of how to approach cleaning your device.
- Photo library: iPhone photos and videos are huge storage consumers; a single 4K video can easily “cost” a few gigabytes. Your photos can also add up to hundreds of megabytes over a short period, especially with advanced camera features and high-resolution settings.
- Downloads & attachments: Files that you download from the internet or receive as attachments through messages and AirDrop transfers (including photos and videos) get saved in the Files app and stored locally on your device until you manually delete them.
- Temporary files & caches: Your iPhone’s operating system, as well as any apps you use, generate temporary data for some of their processes. This data can include large files, and it doesn’t always get cleared automatically (or it takes too long for iOS to clear it).
- App data: Aside from temporary files, apps themselves cost a lot of storage space. Aside from installation files, some apps let you download content to your local storage. System files: The operating system itself tends to increase in size with every update; it’s made up of files that your iPhone requires to run.
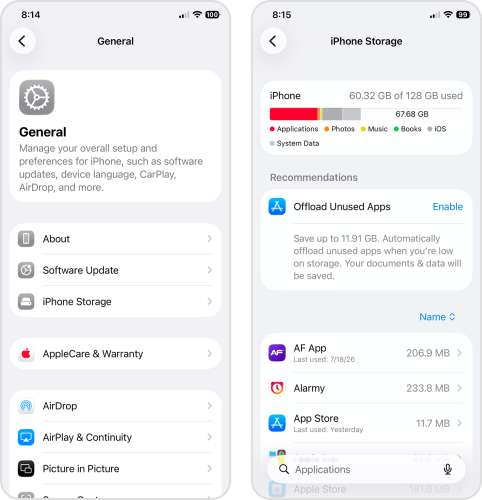
You can find out what type of data takes up the most storage space on your iPhone by checking the iPhone Storage page (Settings app > General > iPhone Storage). The colorful bar at the top shows you whether you need to clean up your photos, messages, apps, downloads, or System Data.
How to Deal With iPhone Storage That Keeps Filling Up
In this section, we’ll cover 10 different ways to free up space on your iPhone and prevent it from getting full (where you’ll start encountering bugs). We start with the methods that are both convenient and make the most impact on storage, so we recommend moving your way down until you’re satisfied with the results.
Method 1: Empty Recently Deleted in Photos
Before trying any cleanup methods, make sure you’ve emptied the Recently Deleted album in the native Photos app. This is where iOS keeps all deleted photos and videos for 30 days before permanently deleting them, which is why it can feel like your iPhone keeps filling up storage even after cleaning your library.
- Open the Photos app.
- Navigate to the Collections page, then scroll down to Utilities and tap Recently Deleted.
- In the top right corner of the screen, tap Select.
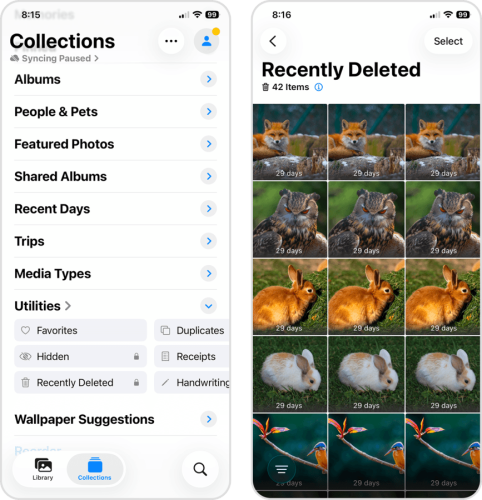
- Tap the photos you want to permanently delete. Then, tap the menu button.
- In the pop-up that appears, select Delete. Make sure to confirm when prompted.

Method 2: Remove Large Videos and Similar Photos
iPhone photos and videos consume massive amounts of storage (e.g., a single 4K video can instantly cost you a few gigabytes)–so cleaning up your library is step 1. We recommend starting with duplicate photos and old, large videos, so you can free up a lot of storage space without losing anything important.
The native Photos app has several tools that can help, like the Duplicates album, but we found that using a third-party app is faster and more effective. For example, we’re featuring an app called Clever Cleaner, which has a feature called Similars; it can detect duplicate and similar images in your library, while the native app only recognizes exact duplicates.
The app also has a powerful cleaning feature for Video; it can sort them by size and lets you compress your videos instead of deleting them (both features that iOS Photos lacks). But if you really need to free up a LOT of space fast, you can also use the Smart cleanup tool, which instantly eliminates different types of clutter at once–we’ll show you a quick demo.
- Download Clever Cleaner: AI CleanUp App from the App Store.
- Run Clever Cleaner. At the very top of the app’s main page, tap Smart cleanup.
- Select Remove ‘Similars’, Convert ‘Lives’, and Compress ‘Screenshots’. Then, tap Clean up now.
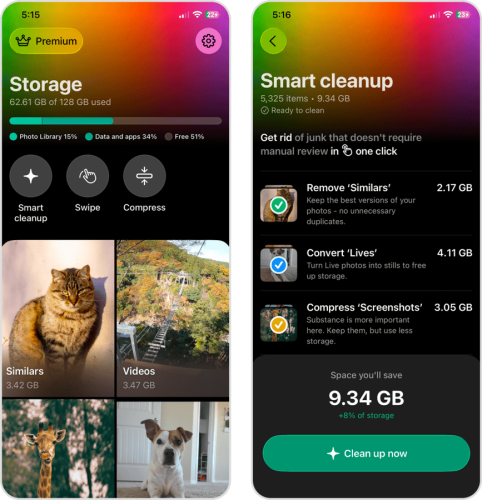
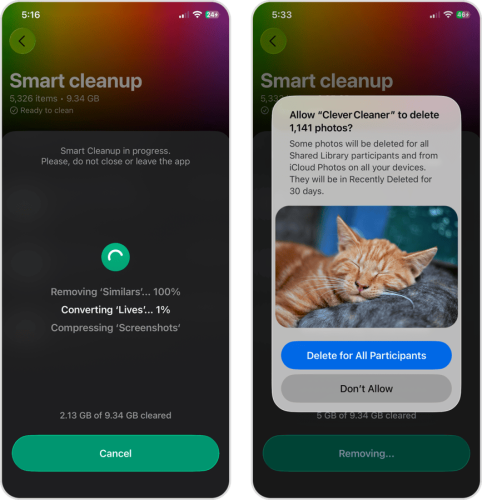
- Wait for Clever Cleaner to finish processing your photos.
- Finally, tap Delete or Delete For All Participants in the pop-up dialog box to confirm the action.
Once you’re done cleaning up your similar/duplicate photos and large videos, keep going! If you have a huge library, Clever Cleaner can make a huge dent in your storage. It can help you delete and even compress screenshots, as well as convert Live Photos.
The app also has other useful features to help keep your library organized (which can also improve storage management), like the ability to Favorite your photos and skip photos and videos you don’t want to include in the cleanup, which you can view in the Settings page.
And thanks to the app’s generous limits, most users will never need a subscription. The Swipe feature–which lets you use swipe gestures to clean your library–is completely free for everyone. You only need to close the Pro banner once while using it (there are no other ads or pop-ups, even in the free version).
Method 3: Review and Delete Large Message Attachments
Messages are one of the biggest “silent killers” of storage space on iPhones. With a 100 MB file size limit and enough talkative contacts, you can accumulate gigabytes’ worth of photos, videos, GIFs, and voice notes in just a few weeks. Here’s the fastest way to clean them up:
- Open the Settings app.
- Tap General.
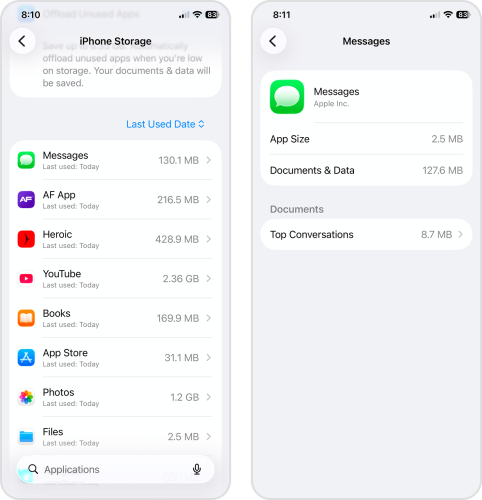
- Tap iPhone Storage. Then, scroll down to the list of apps and select Messages (you can use the search bar at the bottom to locate it faster).
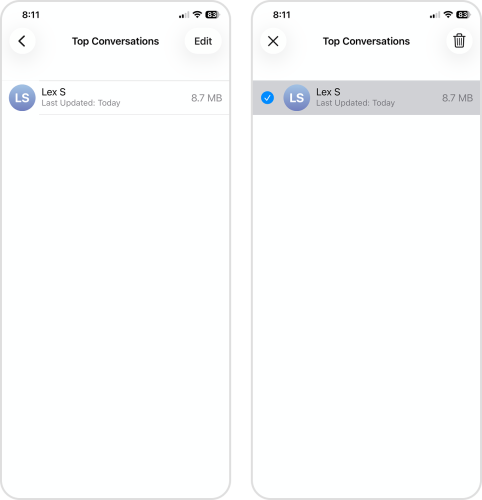
- Select the Top Conversations you want to review.
- Tap Edit.
- Select the attachments you want to delete. Then, tap the trash button 🗑️.
Method 4: Clear App Caches Where Possible
Certain apps can store a surprising amount of temporary data in their cache. The best examples are messenger and social apps, which can save hundreds of thumbnails, gifts, and other small files that add up over time.
Unfortunately, even though many users have tried to look for one, a universal “clear all app cache data” doesn’t exist in iOS. However, some apps have this feature built in. We’ll show you what Telegram’s cache management tool looks like, so you can try looking for it in other apps.
- Open the Telegram app or any app you want to clean up.
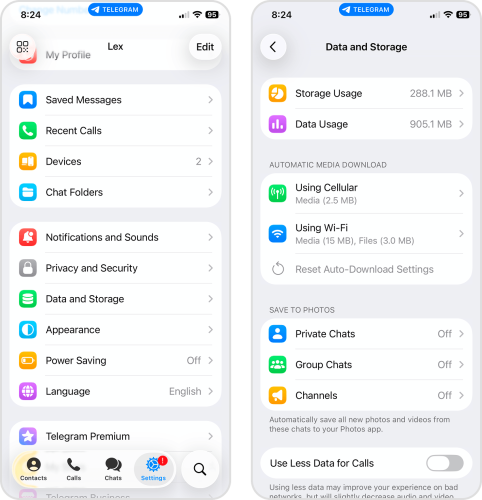
- From the bottom menu, tap Settings. Then, scroll down the menu and select Data and Storage.
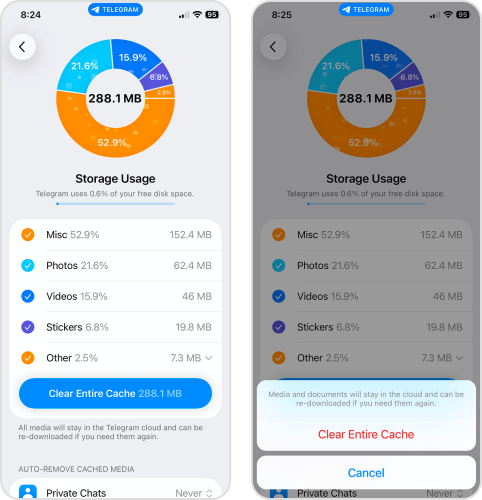
- Select Storage Usage.
- Tap the Clear Entire Cache button.
- Finally, tap Clear Entire Cache again in the pop-up dialog to confirm the action.
Method 5: Reinstall Apps With Bloated Data
While Telegram has a handy clear cache button, many apps unfortunately don’t. In this case, the most practical solution is to reinstall the bloated app, which instantly clears cache files, temporary downloads, previews, old media, and other “Documents & Data” that iOS may not remove on its own.
- Locate the app you want to delete on your home screen or App Library.
- Tap and hold the app’s icon until a menu appears. Then, tap Remove App.
- In the pop-up that appears, tap Delete App to confirm the action.
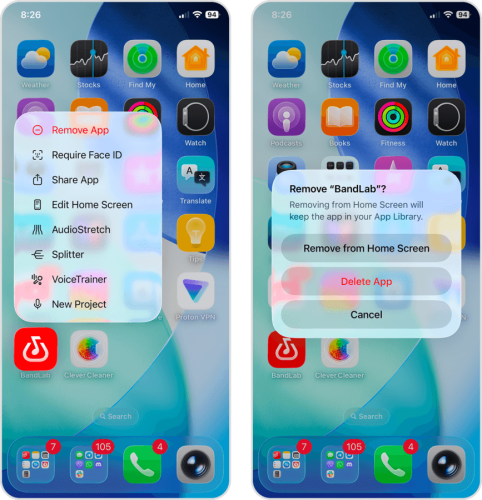
- Once your app is uninstalled, reinstall it from the App Store. You can search for it by name or via Apps & Purchases. To review the latter, tap your Apple Account icon in the top right corner of the screen.
- In your Apple Account page, tap Apps & Purchase History.
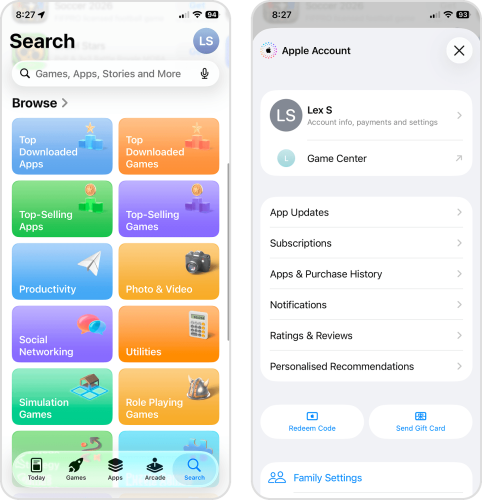
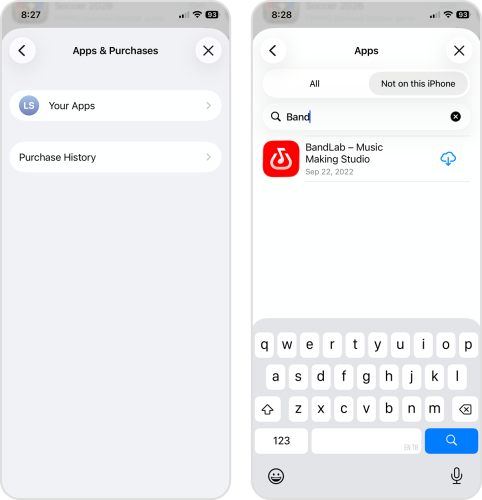
- Tap Your Apps.
- Finally, open the Not on this iPhone page and tap the download button ☁️ beside the app you want to redownload.
Method 6: Remove Offline Downloads From Streaming Apps
Media streaming apps, like Netflix, Apple Music, and Disney+, often have a feature called “offline downloads.” It lets you store media locally on your device (which you still access through the app), so you can view them even without an internet connection. Some apps even do this automatically (e.g., Netflix’s Smart Downloads).
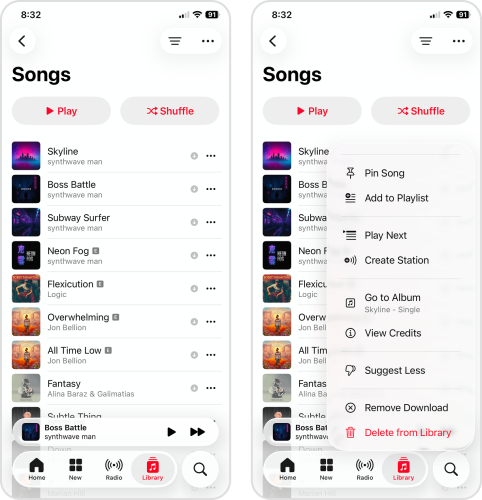
One downloaded HD movie can “cost” gigabytes of storage space–even downloaded songs can quietly add up. If you don’t need offline access to your media, this feature is a huge waste of storage. We’ll show you how to delete downloads in the Music app, but the steps should look the same in most media streaming platforms.
- Open the Music app or any app you want to clean up.
- From the bottom menu, select Library. Then, tap Downloaded.
- Tap Songs.
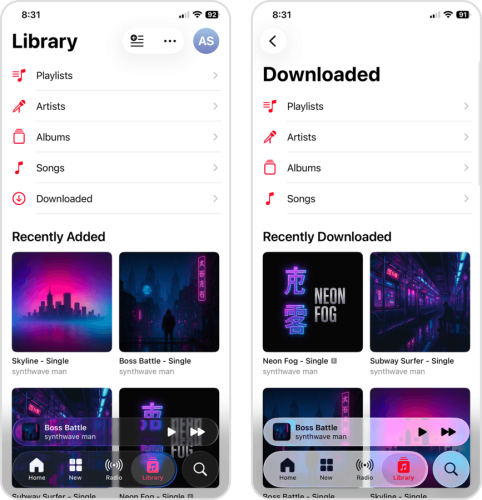
- Tap the menu button beside the song you want to remove from your downloads.
- In the menu that appears, tap Remove Download.
Method 7: Clear Safari Website Data
Website data is another quiet storage killer; you can’t control how it gets generated, and it relies on system intervention to clean it automatically. This data can include resource-heavy assets, like large images or even video clips from recently visited websites.
iOS can typically keep website data in check, but garbage cleaning can sometimes be delayed, and you may want to reclaim the storage manually. We’ll show you how to do it for Safari.
- Open the Settings app.
- Scroll down to the bottom of the page and select Apps.
- Locate and select Safari.
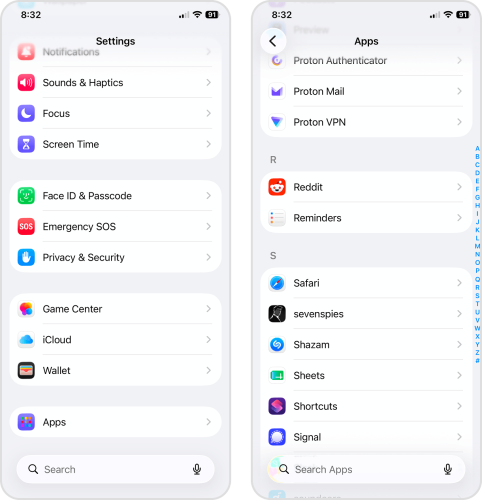
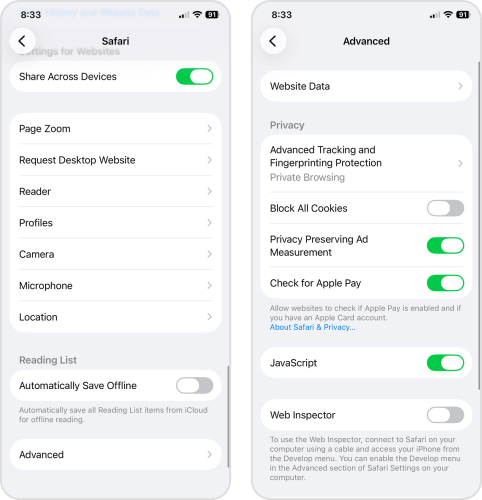
- Scroll down to the bottom of the page and tap Advanced.
- Tap Website Data.
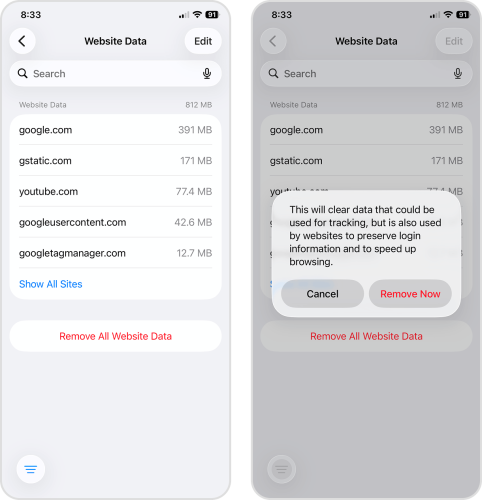
- Scroll to the bottom of the page and tap Remove All Website Data. Alternatively, you can tap Edit and choose the website data you want to delete.
- Finally, tap Remove Now in the pop-up window to confirm the action.
Method 8: Clean Up the Files App
Whenever you download files through Safari, Mail, Messages, and even AirDrop, they remain on your device after you view them (and continue to take up storage space). Fortunately, you can find most of your downloads in the Files app, where you can conveniently review and delete them:
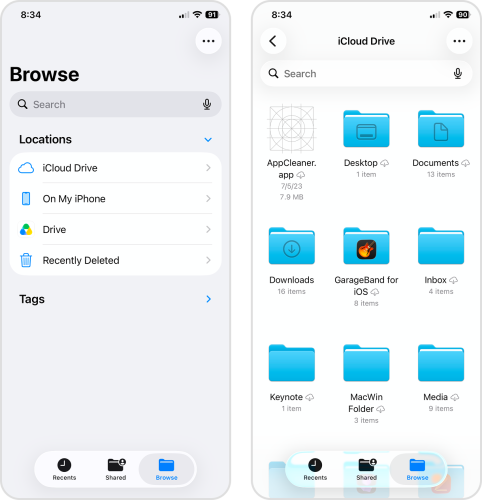
- Open the Files app.
- Navigate to the main Browse menu. Then, if you have iCloud enabled for Files, tap iCloud Drive. If you don’t, tap On My iPhone.
- Open the Downloads folder (or whatever folder you want to review).
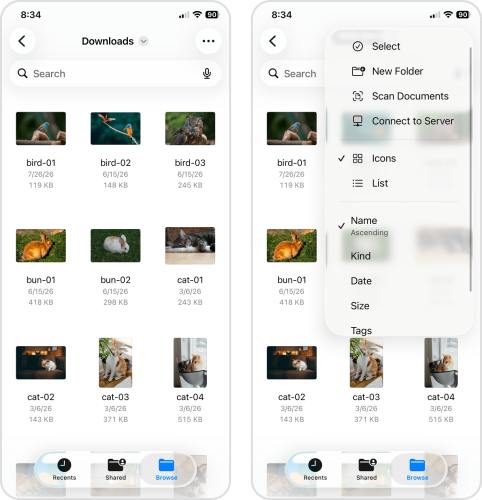
- Tap the menu button in the top right corner of the screen.
- Tap Select.
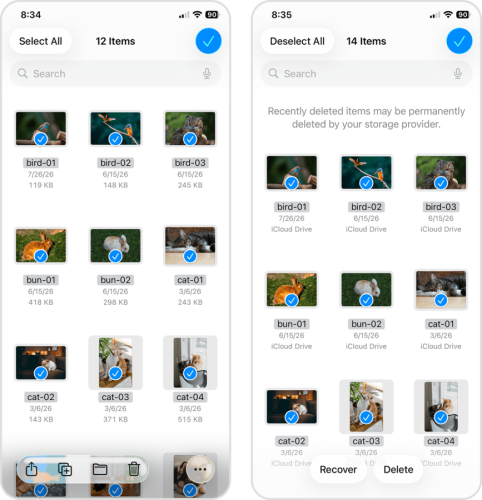
- Select the files you want to delete. Then, tap the trash button.
- Finally, return to the main Browse menu (step 2) and select Recently Deleted. Delete your files again from this folder to permanently remove them from your iPhone.
Method 9: Delete Old Voice Memos and Podcasts
Even though voice memos and podcasts “cost” less storage than videos (because they’re only audio files), they can quietly take up more and more space on your iPhone–especially files with long durations. Here’s how to clean them up:
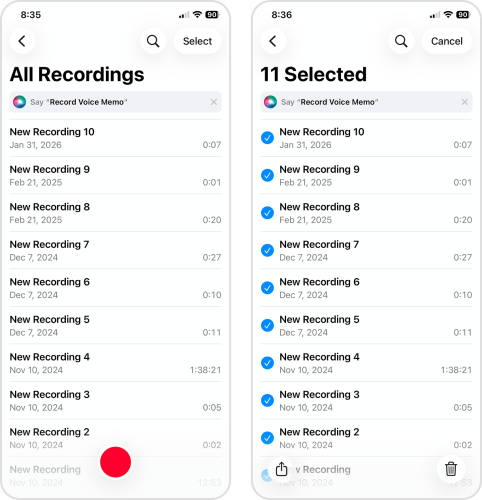
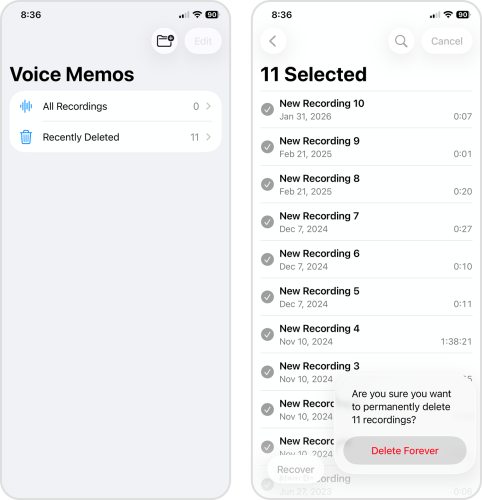
- Open the Voice Memos app, which should open the All Recordings page. If it opens the main Voice Memos page, tap All Recordings.
- In the top right corner of the screen, tap Select.
- Select the recordings you want to delete and tap the trash button 🗑️. Then, tap the back button < to navigate to the main menu.
- Select Recently Deleted.
- Tap Select in the top right corner of the screen. Then, tap the recordings you want to remove and tap Delete.
Method 10: Factory Reset Your Phone
If you’ve tried every other method in this guide, and your iPhone storage still appears full or doesn’t match how much data is actually stored on the device, you might be experiencing a bug. Based on experimenting on our own devices, as well as researching other user stories, we found that the most effective solution in this scenario is performing a factory reset.
Resetting your iPhone wipes everything on your device and installs a fresh instance of iOS, which completely eliminates the bug.
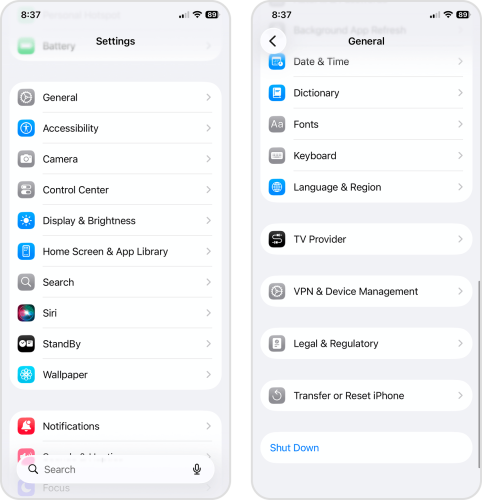
- Open the Settings app.
- Tap General.
- Scroll down to the bottom of the General page, and tap Transfer or Reset iPhone.
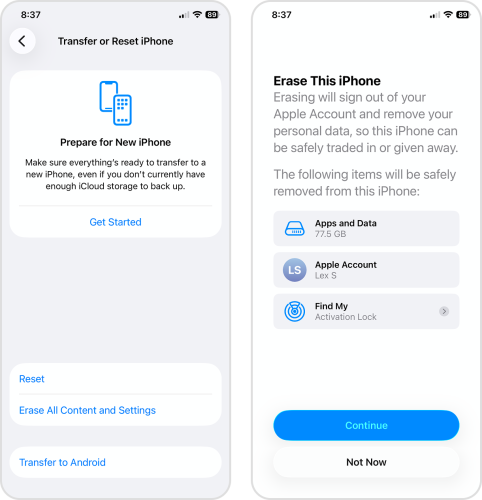
- Tap Erase All Content and Settings.
- Review the data to be deleted, then tap Continue. Proceed with the wizard’s instructions.
How to Stop iPhone Storage From Filling Up Again
After cleaning up your iPhone with the methods we just covered, we strongly recommend going one step further into maintenance and prevention–otherwise, it won’t take long before you’re back here again.
In this section, we’ll cover a few optimization tweaks to your device settings, as well as a simple way to keep your storage space in check as you use it.
Turn On Optimize iPhone Storage for Photos
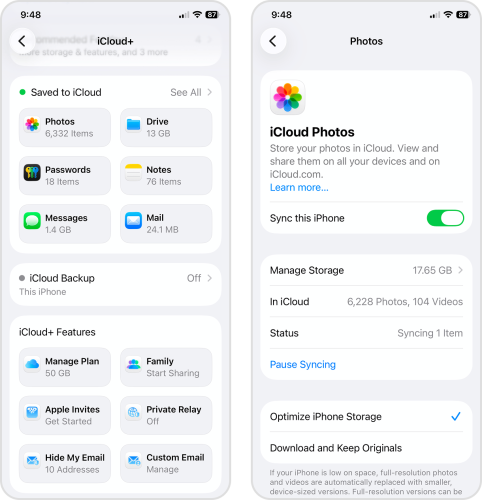
If you have a big photo library, using iCloud’s storage optimization feature can help you instantly reclaim gigabytes of local storage space. Once activated, iOS automatically starts uploading the high-resolution copies of your photos and videos to Apple’s servers. Then, only lower-resolution copies–which are much smaller in file size–are stored locally on your iPhone.
This method’s biggest limitation is that the free version of iCloud only provides 5 GB; if your library is bigger than that, you may need to upgrade to an iCloud+ subscription. And if you often have to work with your media offline (e.g., editing raw videos), this method will probably just disrupt your workflow.
- Open the Settings app.
- Tap your Apple ID.
- Tap iCloud.
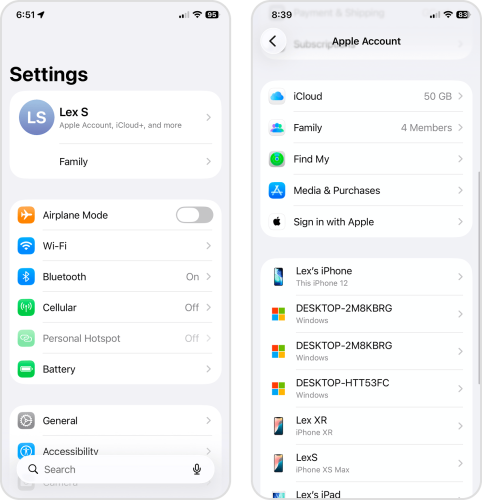
- In the Saved to iCloud section, select Photos.
- Finally, activate the toggle switch beside Sync this iPhone (it should turn green) and make sure Optimize iPhone Storage is selected (it should have a check mark ✔️ beside it).
Set Messages to Delete Old Conversations Automatically
If you tend to receive a lot of attachments in the Messages app, constantly deleting conversations can become tedious. Instead, you can change your device’s settings to only store conversations for a certain duration, then automatically delete them.
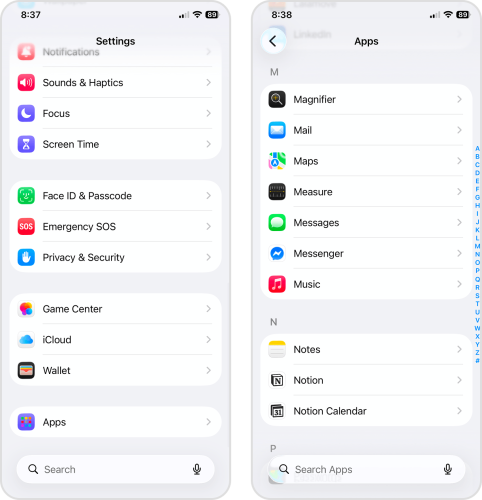
- Open the Settings app.
- Scroll down to the bottom of the page and tap Apps.
- Find and select the Messages app.
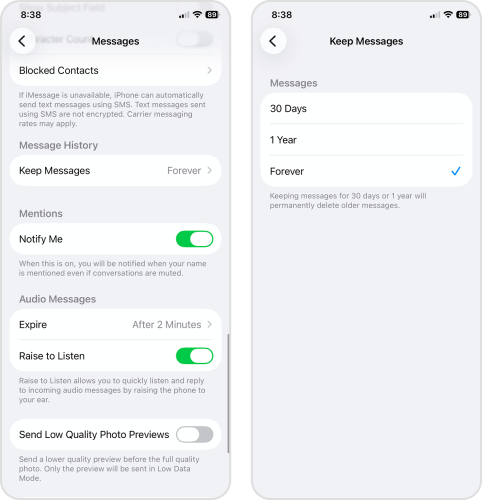
- Scroll down to Message History. Then, tap the Keep Messages option.
- Finally, choose either 30 Days or 1 Year, depending on your preference. Note that selecting either option will instantly delete all messages past their “expiration date.”
Turn On Automatic App Offloading
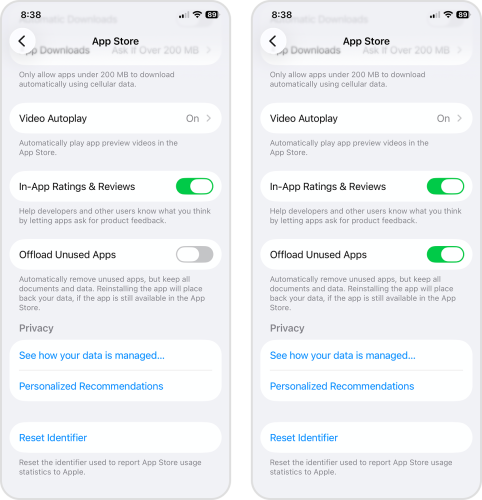
Do you have apps that are important but rarely get opened? For example, maybe you only open the Steam app whenever a game you wishlisted is on sale. You can free up more spare storage with no effort by letting iOS automatically offload apps.
If iOS detects you haven’t used an app in a while, it automatically deletes the app itself from your device, but keeps your documents and data. Reinstalling is easier, since the icon stays on your home screen (but grayed out), and you can immediately pick up where you left off.
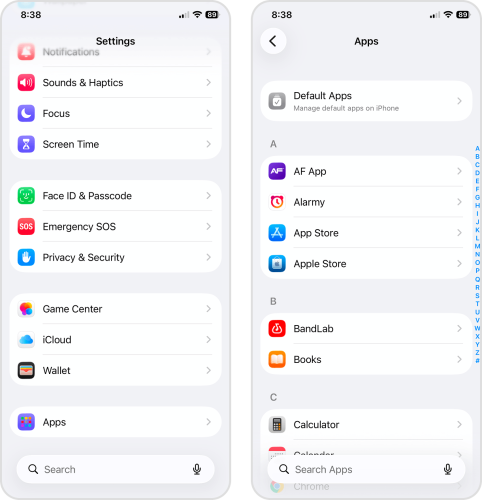
- Open the Settings app.
- Scroll down to the bottom and select Apps.
- Near the top of the list, select App Store.
- Scroll down until you find the Offload Unused Apps option. Then, activate the toggle switch beside it (it should turn green).
Review Storage Once a Month
iPhone storage-related problems are much easier to prevent if you regularly maintain your library. It consumes the most storage space on your device (aside from apps), and it constantly generates clutter that you always forget about. To turn this into a habit, we recommend using an intuitive third-party iPhone cleaning app, since the native Photos app has limited cleanup abilities.
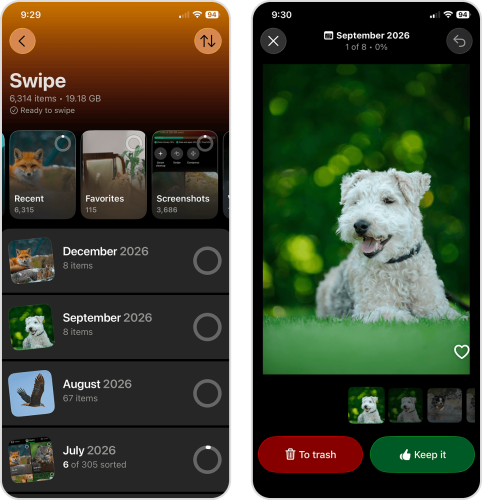
For example–Clever Cleaner, which we used in Method 2 of the cleanup section, has a feature called Swipe. It automatically organizes your photos into intuitive categories that you can review in your own time, and you can simply use left and right swipe gestures to save or delete a photo (instead of tapping multiple buttons per action). Here’s a quick demo of how it works:
- Open the Clever Cleaner app (here’s the App Store link again in case you haven’t installed it).
- Tap Swipe from the main menu. Then, select a category you want to review.
- Photos should appear on your screen one by one. Tap the Keep it button to save the photo or the To trash button to delete it (you can also tap the Undo button in the top right corner to reverse any mistakes). Don’t forget to confirm the deletion (see Method 2 for reference).
The Short Version
We covered a lot! You’ll probably need to come back to this article a few times to completely clean your device if your iPhone storage keeps filling up. To make it easier for future you, here’s a TLDR (too long; didn’t read) of the entire guide for reference:
- First, delete large videos, similar photos, and other clutter from your library. Don’t forget to empty the Recently Deleted album afterward.
- Next, clear unwanted attachments you received in the Messages app.
- Then, clean up your apps. Clear your app caches, delete any downloaded content, and reinstall bloated apps that don’t have a built-in storage management tool. For browser apps, you can remove their website data.
- Clean up the Files app, which is where old downloads and AirDropped files pile up over time.
- Don’t forget to remove obsolete voice memos and downloaded podcasts, which can quietly add up.
- If you’ve used all the cleanup tips in this guide and your iPhone storage still appears full, factory reset your device.
- Once you’ve got your iPhone storage under control, prevent it from filling up again using a combination of optimization settings and simple habits.
If you want to learn more ways to save space on your device, check out our guide on reclaiming, maximizing, and adding storage on iPhones using free and paid methods.
FAQ
It may seem like your iPhone storage is going up for no reason, but that’s usually not the case. Aside from data you generate (like taking a photo or installing an app), your device generates other files it needs to operate–like temporary data, system files, auto-downloaded content, and more. So even if you actively avoid creating or saving new files, you’ll still need to monitor your storage.
There are 3 possible reasons why your iPhone storage is still full after deleting everything:
- Reason 1: If you primarily deleted photos and videos, you may have forgotten to empty the Recently Deleted album (Photos app > Collections > Utilities > Recently Deleted).
- Reason 2: iOS hasn’t reindexed your data and recalculated your storage space. Charge your iPhone, lock the screen, and leave it alone for a few minutes before trying again.
- Reason 3: Your device encountered a bug. Back up any important files, then perform a factory reset.
No, iCloud Photos doesn’t directly make your storage full. In fact, using its “Optimize This iPhone” setting frees up local storage space by saving the high-resolution copies of your media to Apple’s servers. But if you disable iCloud and choose to save your media locally, the sudden influx of downloads can make your iPhone storage suddenly full.
