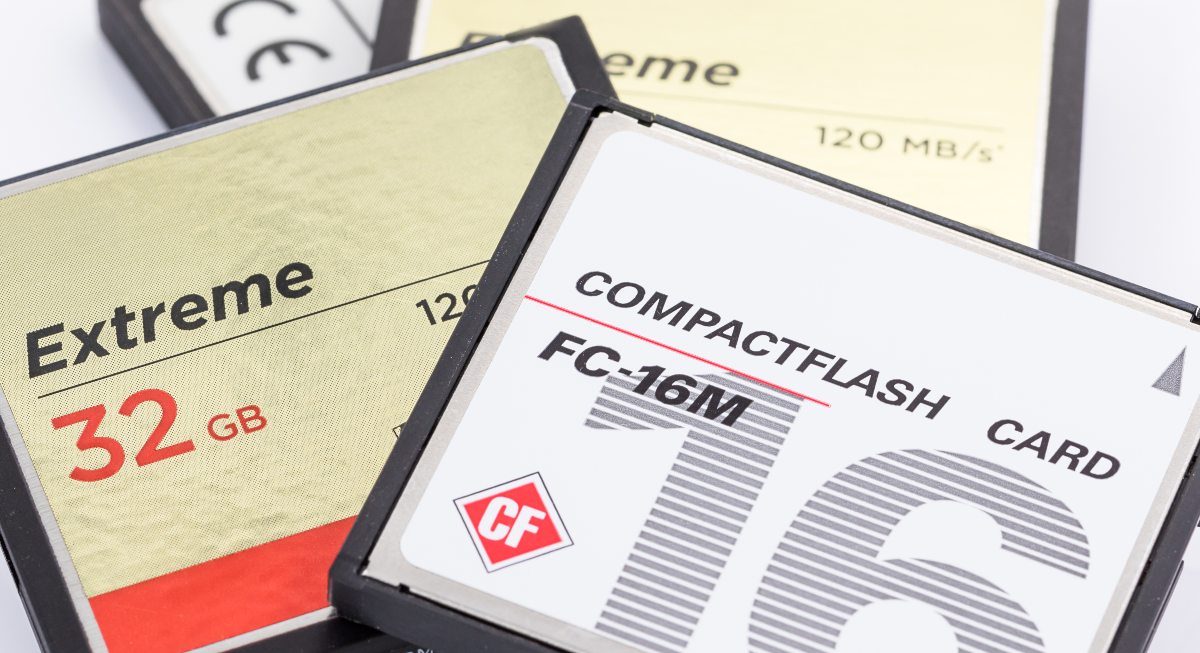
You’ve just plugged your Compact Flash card into your card reader, fired up your favorite file manager, and… nothing. The photos you wanted to transfer to your computer are nowhere to be found.
We’ve all been there. You initially brush it off – it’s just a glitch. Then, a feeling of dread, followed by panic, then trying to pinpoint the cause of the mishap through a series of rational questions.
- How could something like this happen?
- Is there a chance of getting the lost files back?
- If everything goes well, can you also keep using the CF card?
- How can you avoid such “adventures” in the future?
How Can a CF Card Become Corrupted?
There are many reasons your files might disappear from a CF card, and, thankfully, there’s at least an equal number of solutions for dealing with such problems.
A Write Process Was Interrupted
One of the most common causes for lost data on CF cards is an incomplete writing process.
- 💾 Did you rush to pull out your CF card without choosing to “detach” it from a menu or powering your camera off?
- 🔋 Did your battery run out of juice while actively using your camera?
The “lite” result could be a single corrupted, semi-saved file. The worst-case scenario would be a thoroughly corrupted CF card.
Strangely, it’s easier to deal with the worst-case scenario, where there’s hope of getting your files back, than the “lite” one, since there’s no way to recreate a partially saved file. Only to salvage what’s left of it.
Your CF Card Is Using an Unsupported File System
Does your CF card seem to work normally on your computer, but your camera “complains” about it and asks you to format it? That’s quite probably because it’s formatted with an unsupported file system.
Such a prompt might appear when we absent-mindedly format a CF card using a computer-centric file system, like NTFS or EXT2. Most cameras expect to find media formatted with the FAT32 or ExFAT file systems.
The solution to this problem is easy:
- Move the CF card back to your computer.
- Copy its contents to a temporary folder.
- Format it to one of the supported file systems, OR…
- Move it back to your camera and format it there, since that usually gives you the best compatibility with the camera’s preferred file system, allocation unit size, and overall card layout.
Your CF Card’s Contents Got Corrupted
It might be a misbehaving app, which didn’t finish a write process to your CF card properly, inadvertently corrupting it. It could be a virus or a piece of malicious software that did it purposefully. Or your operating system decided to “hang” while you were moving files around.
In all cases, the result is a corrupted file system, and the way to deal with it is the same:
- ⚙️ Use a data recovery solution to “fish out” your files from the corrupted CF card.
- 🔬 Check your CF card for errors with a tool like CHKDSK.
- 🗑️ Perform a full format while checking – again – for errors to be extra sure you’re not dealing with a hardware failure.
- 📄 If all went well, move your files back to your CF card.
Your CF Card was Accidentally Formatted
A corrupted CF card isn’t the same as a formatted one. Some solutions are common in both cases. However, they’re also distinct enough to warrant a different approach.
Your CF Card is Physically Damaged
Its metal connectors might have bent, worn out. It fell in a glass of orange juice, and you didn’t notice for a week. An elephant stepped on it.
There are many ways – and creative stories we could come up with – for how a CF card can get physically damaged. However, the gist is that this is the only kind of problem where there’s no easy way out.
Even better, though, or if it isn’t (detected), is turning to the experts. A service like CleverFiles Data Recovery Center has the tools and, more importantly, know-how to salvage as much data as possible in such scenarios.
How Can You Recover Data From a Corrupted CF Card on Windows?
Even if it feels as if a cinematic villain snapped your files out of existence, just like most movies have happy endings, you shouldn’t consider their loss a given. There’s always hope, for there are many ways you can try to get your data back. Where should you begin, though?
We believe Disk Drill is always a good starting point when dealing with data loss. It’s one of the most popular, performant, feature-rich, and trustworthy data recovery solutions. Here’s what makes it especially useful:
- Works well with corrupted, RAW, unreadable, and unmountable CF cards (as long as the card still appears in Disk Management with the correct size);
- Can scan the whole card instead of only a visible partition;
- Offers Universal Scan for damaged file systems and lost partitions;
- Offers Advanced Camera Recovery for deleted, fragmented, or unfinished camera video files;
- Can recover photos and videos (including many camera-specific formats: JPG, TIFF, PNG, CR2, CR3, NEF, ARW, DNG, MOV, MP4, AVI, MXF, MTS);
- Lets you preview files before recovery;
- Can create a byte-to-byte image backup of an unstable CF card and scan it;
- Has a relatively simple interface;
- Plus, if the free version isn’t enough for your particular needs, it comes with pretty affordable plans.
That said, if you want to compare your options, you can also check our review of the 5 best free SD card recovery tools, choose the best one for you, and you may soon have your lost files back.
Corrupted CF Card Data Recovery with Disk Drill
To get your data back with Disk Drill, you must first have the application locally installed. So, download Disk Drill from our site and install it on your PC. Then, run it, and…

- Choose your CF card from Disk Drill’s Storage Devices list. (Make sure you select the whole card itself, not one of its individual partitions, so Disk Drill can scan the entire card.)
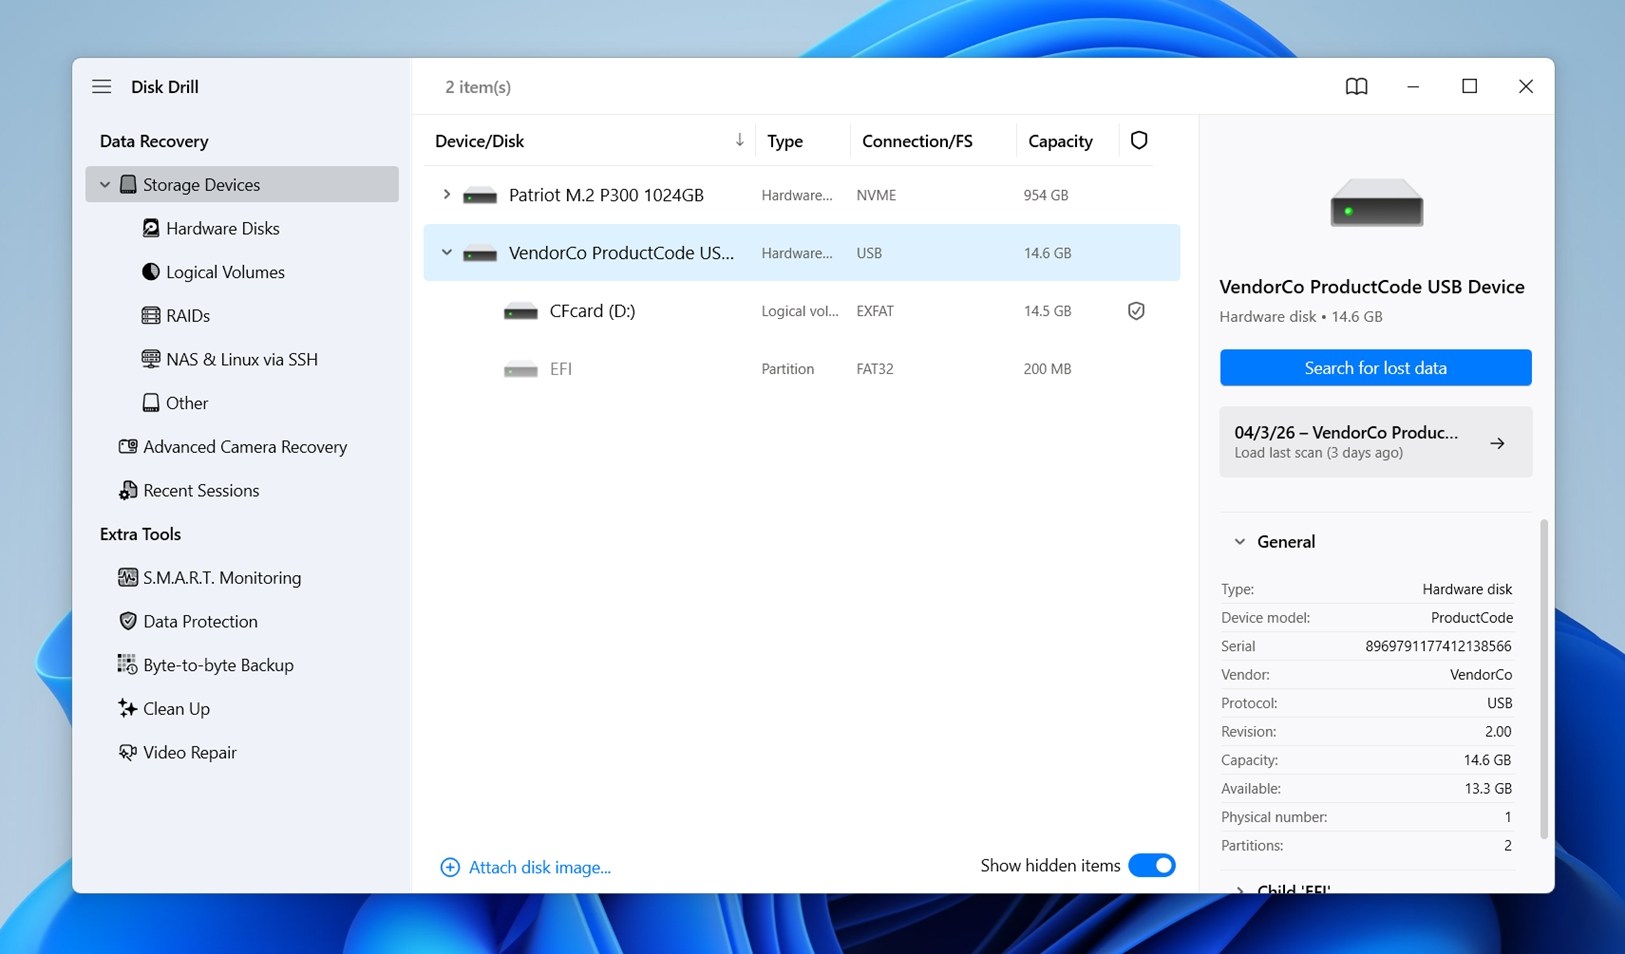
- Then, click on Search for lost data at the bottom-right and choose either Universal Scan or Advanced Camera Recovery.
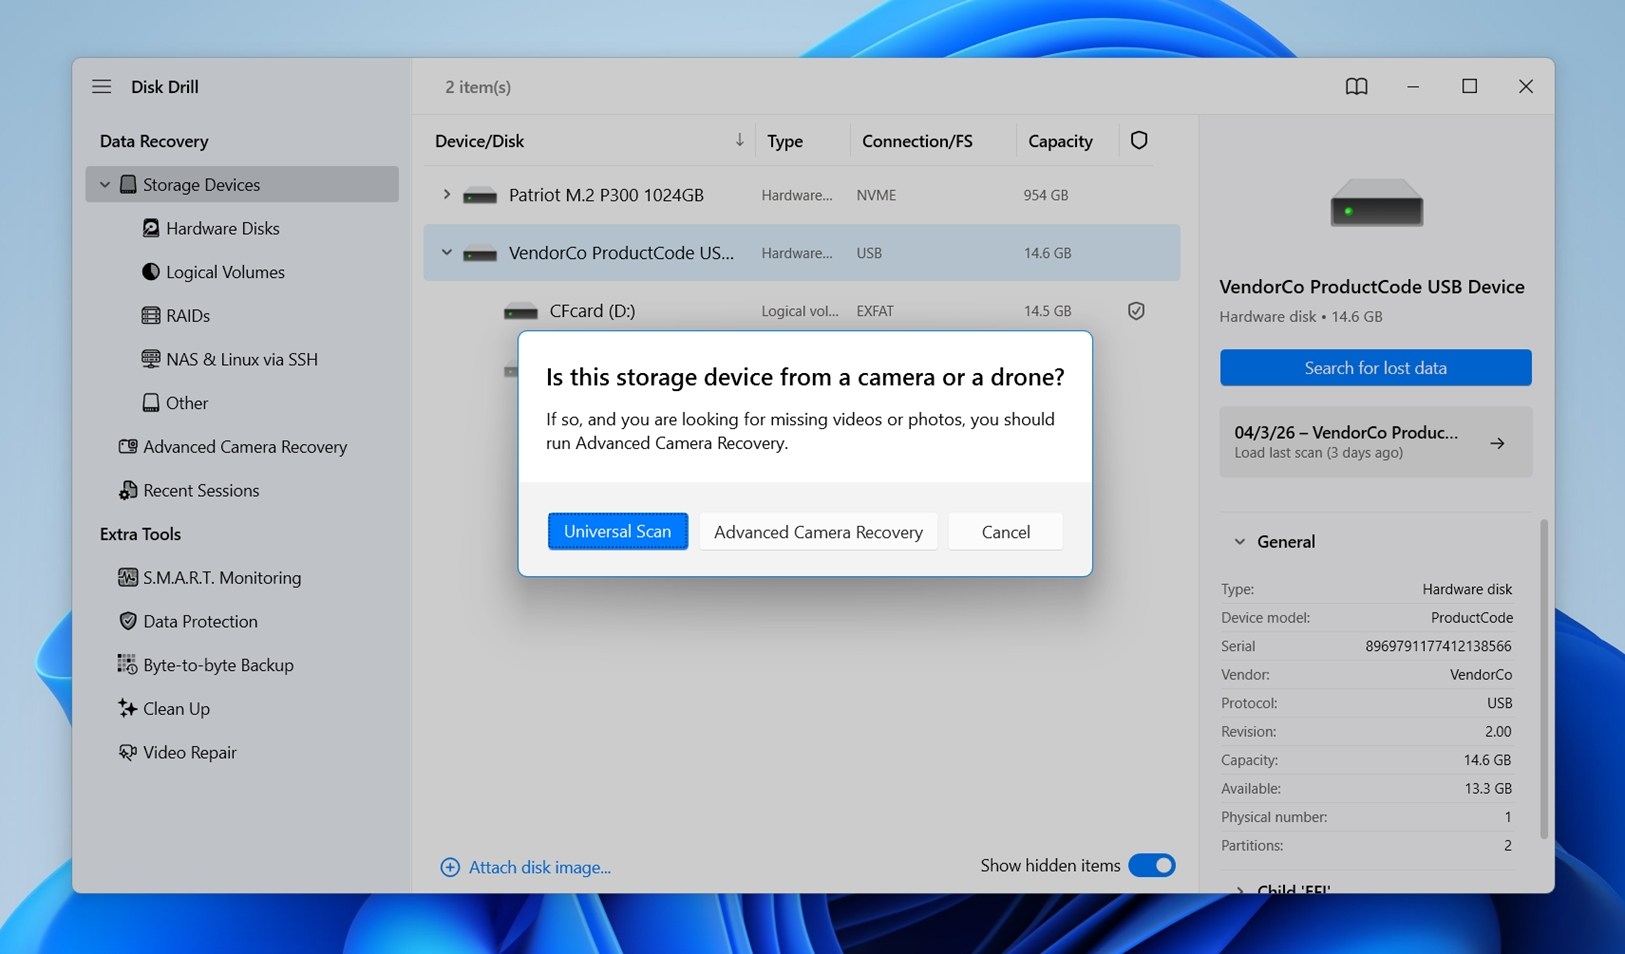 ✍️ Note: The better starting point depends on what went wrong. If the CF card’s file system got corrupted, the partition disappeared, or the card no longer opens properly in File Explorer, start with Universal Scan. If your main problem is clips that failed to finish recording or disappeared after a camera error, do the opposite: start with Advanced Camera Recovery first. It’s better suited to fragmented video files and unfinished camera recordings.
 - Allow Disk Drill enough time to initially scan for lost partitions and then for your lost files.
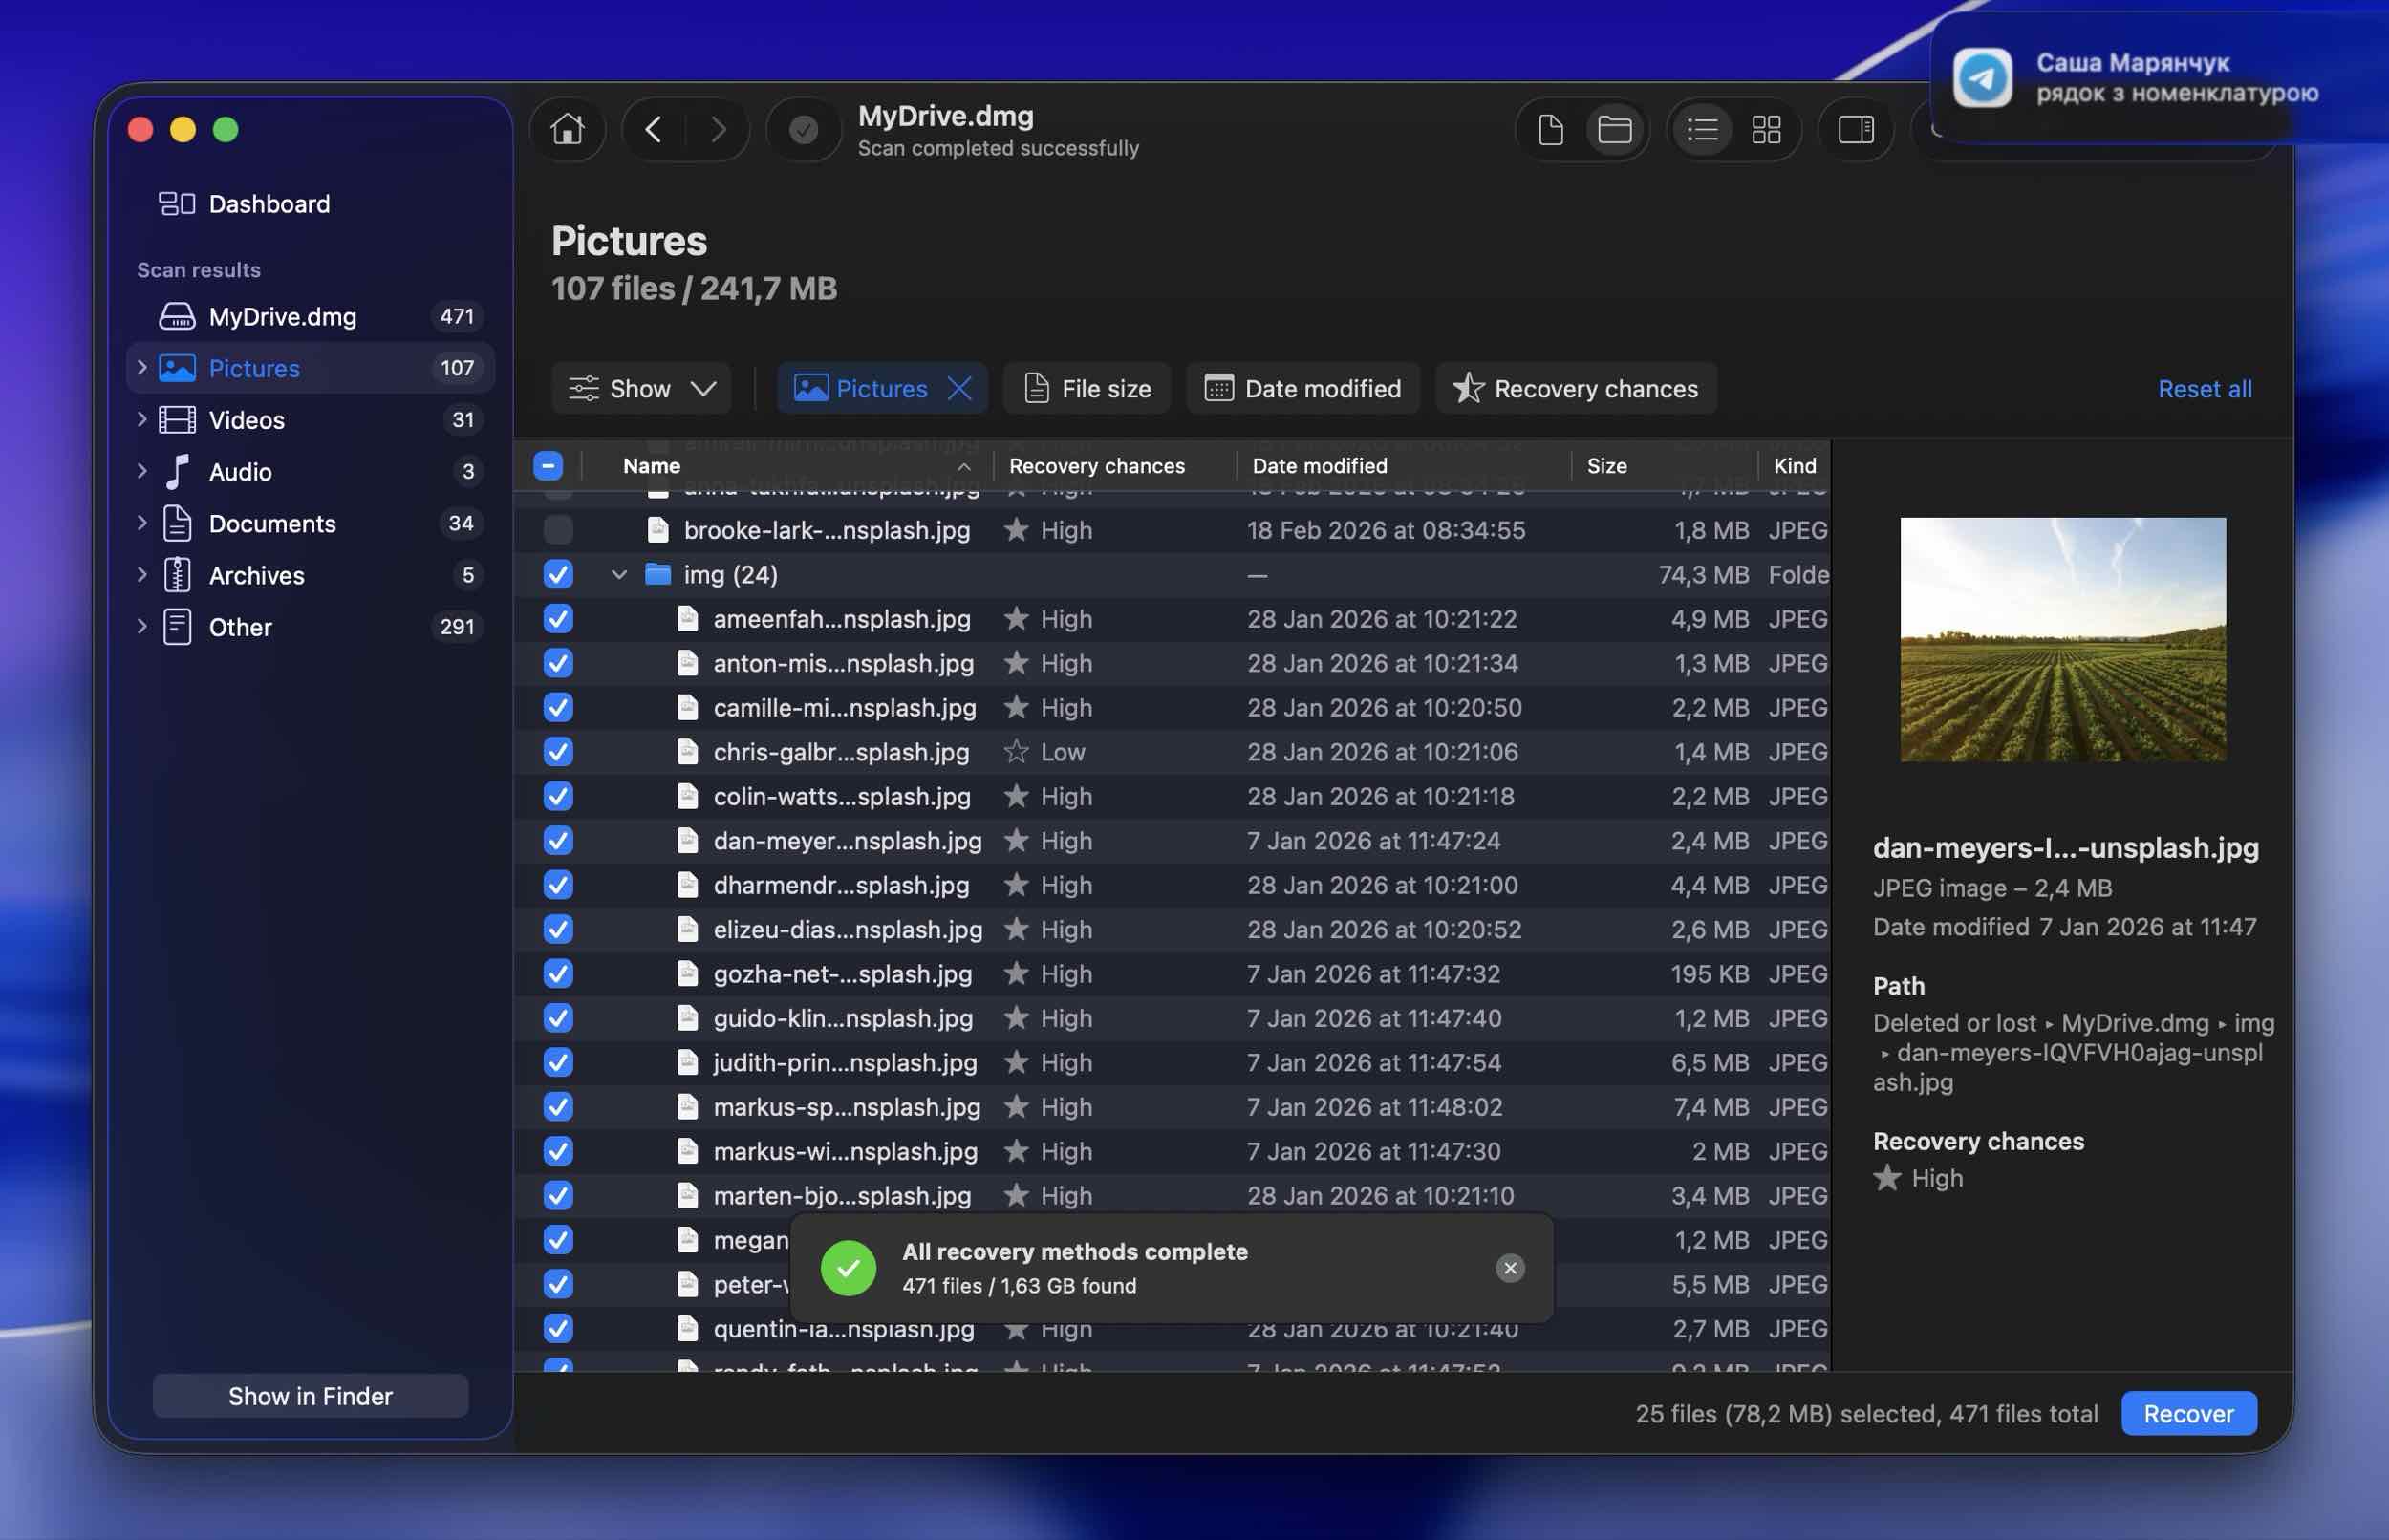
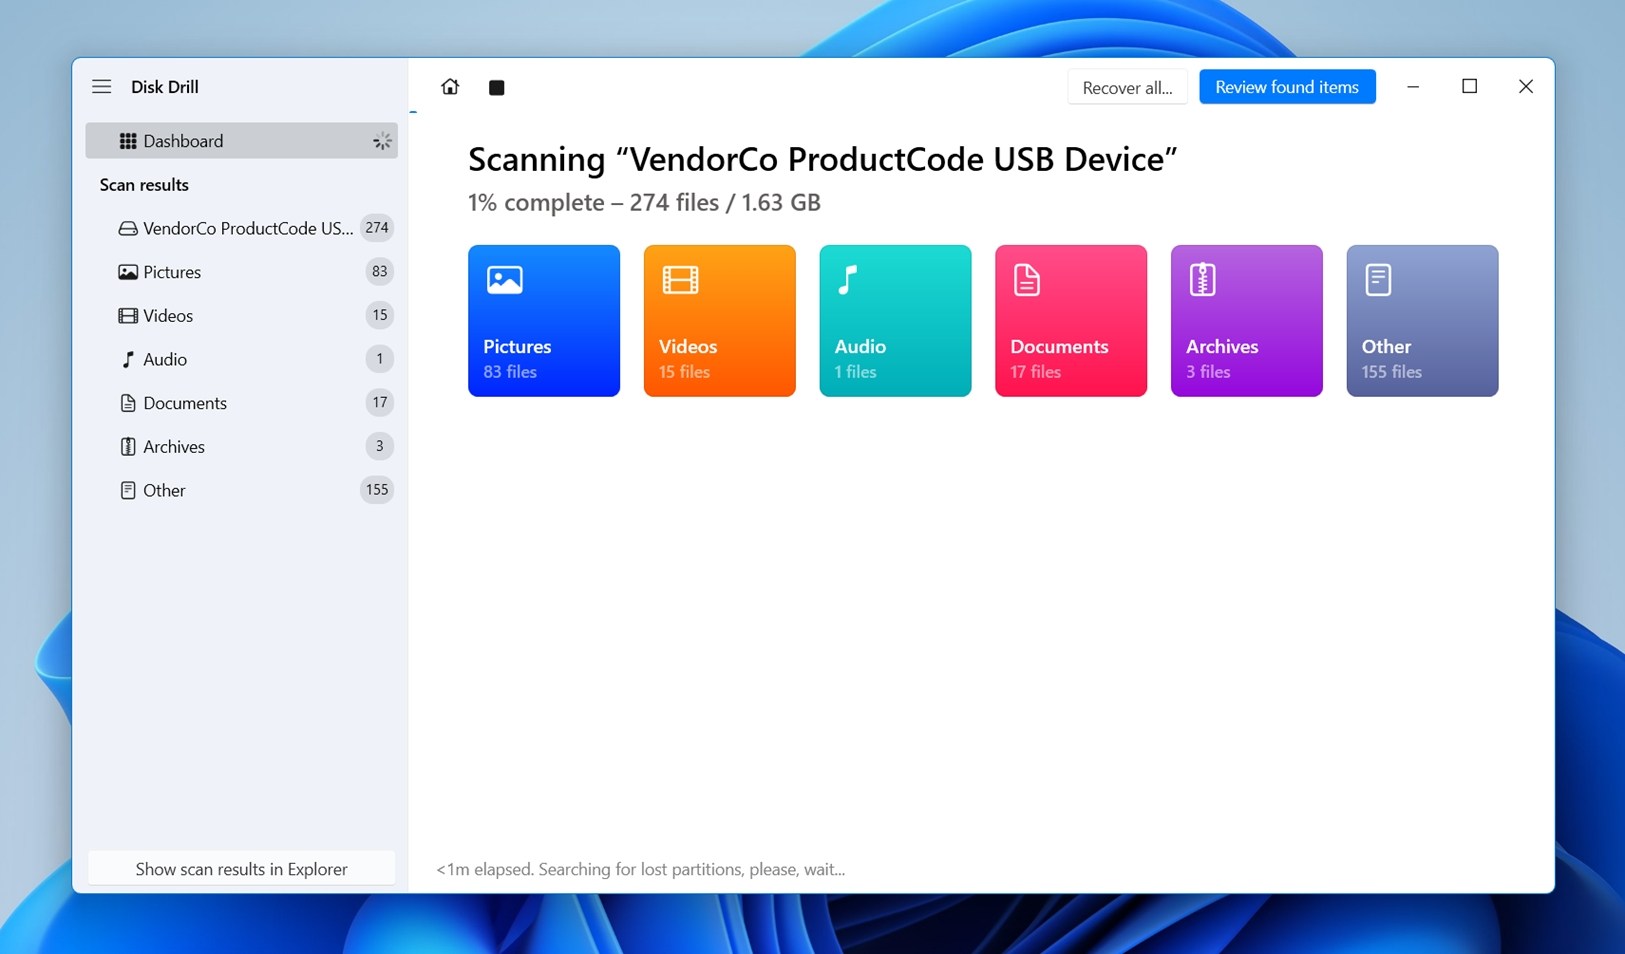 You can click Review found items whenever you wish to check the files Disk Drill located up to that moment. Still, it’s better to let it complete its scan to find as many recoverable files as possible.
 - When Disk Drill completes its scan, as we mentioned earlier, click on Review found items, at the top-right of its window, to see everything it managed to find.
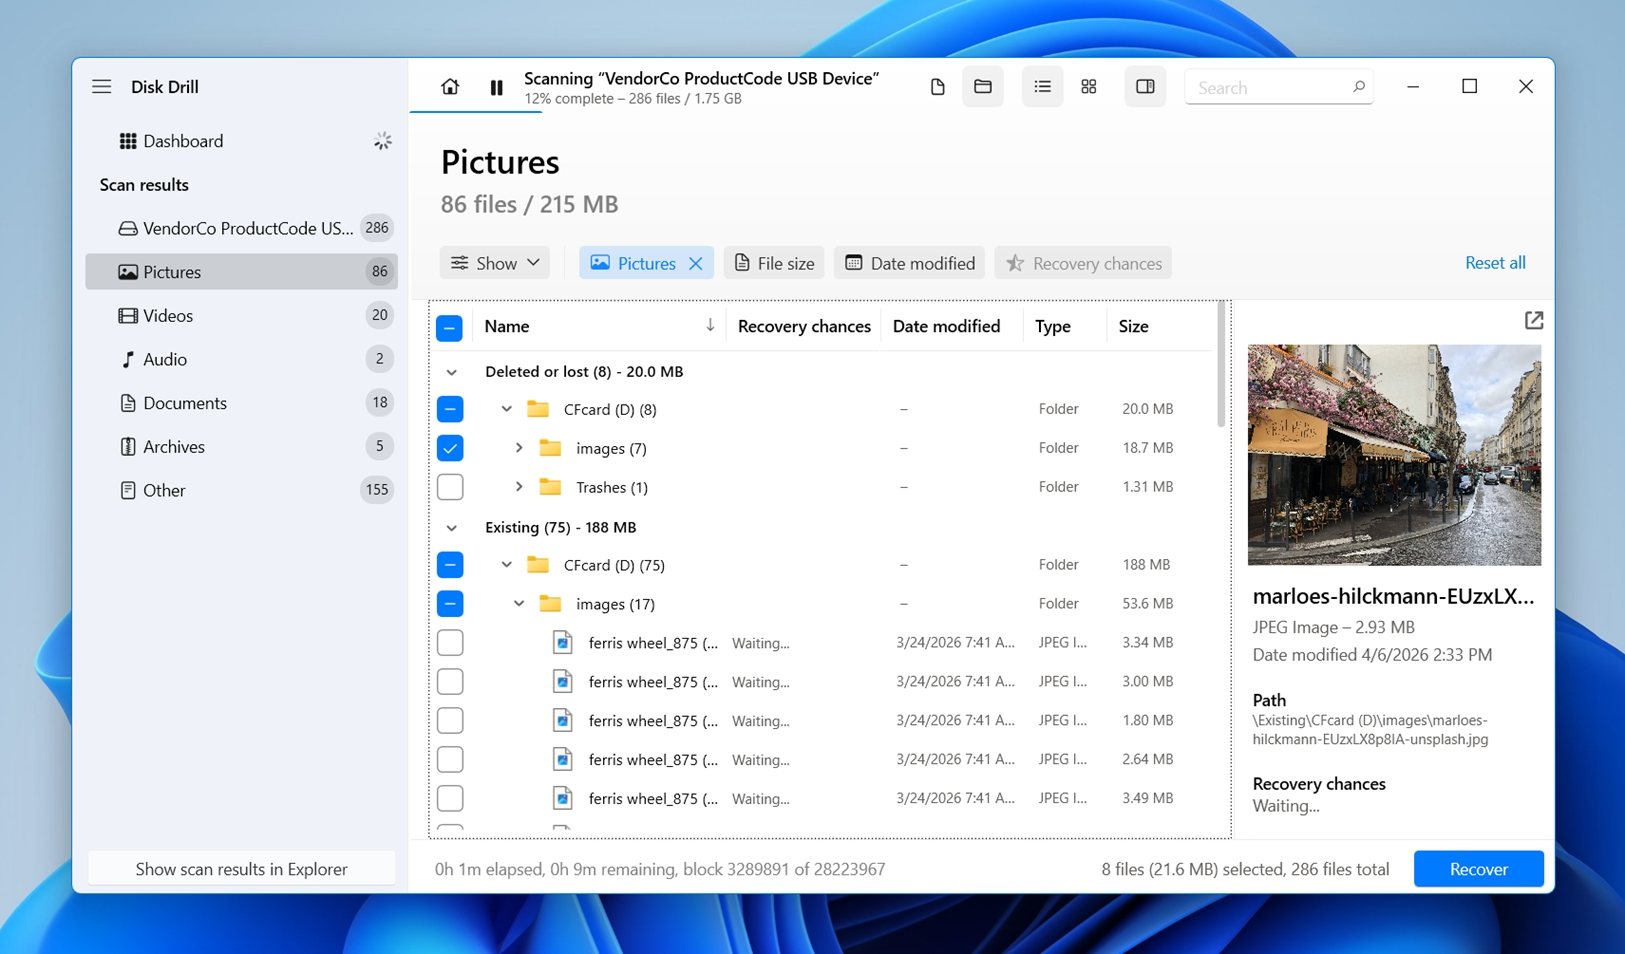 Check the list (also make sure to look inside folders) to locate the files you want to get back. If you can’t tell which you should prioritize by their name, just click on any file to open its preview on the right. (Disk Drill can preview anything Windows can open natively, as well as formats supported by compatible software installed on your machine.)
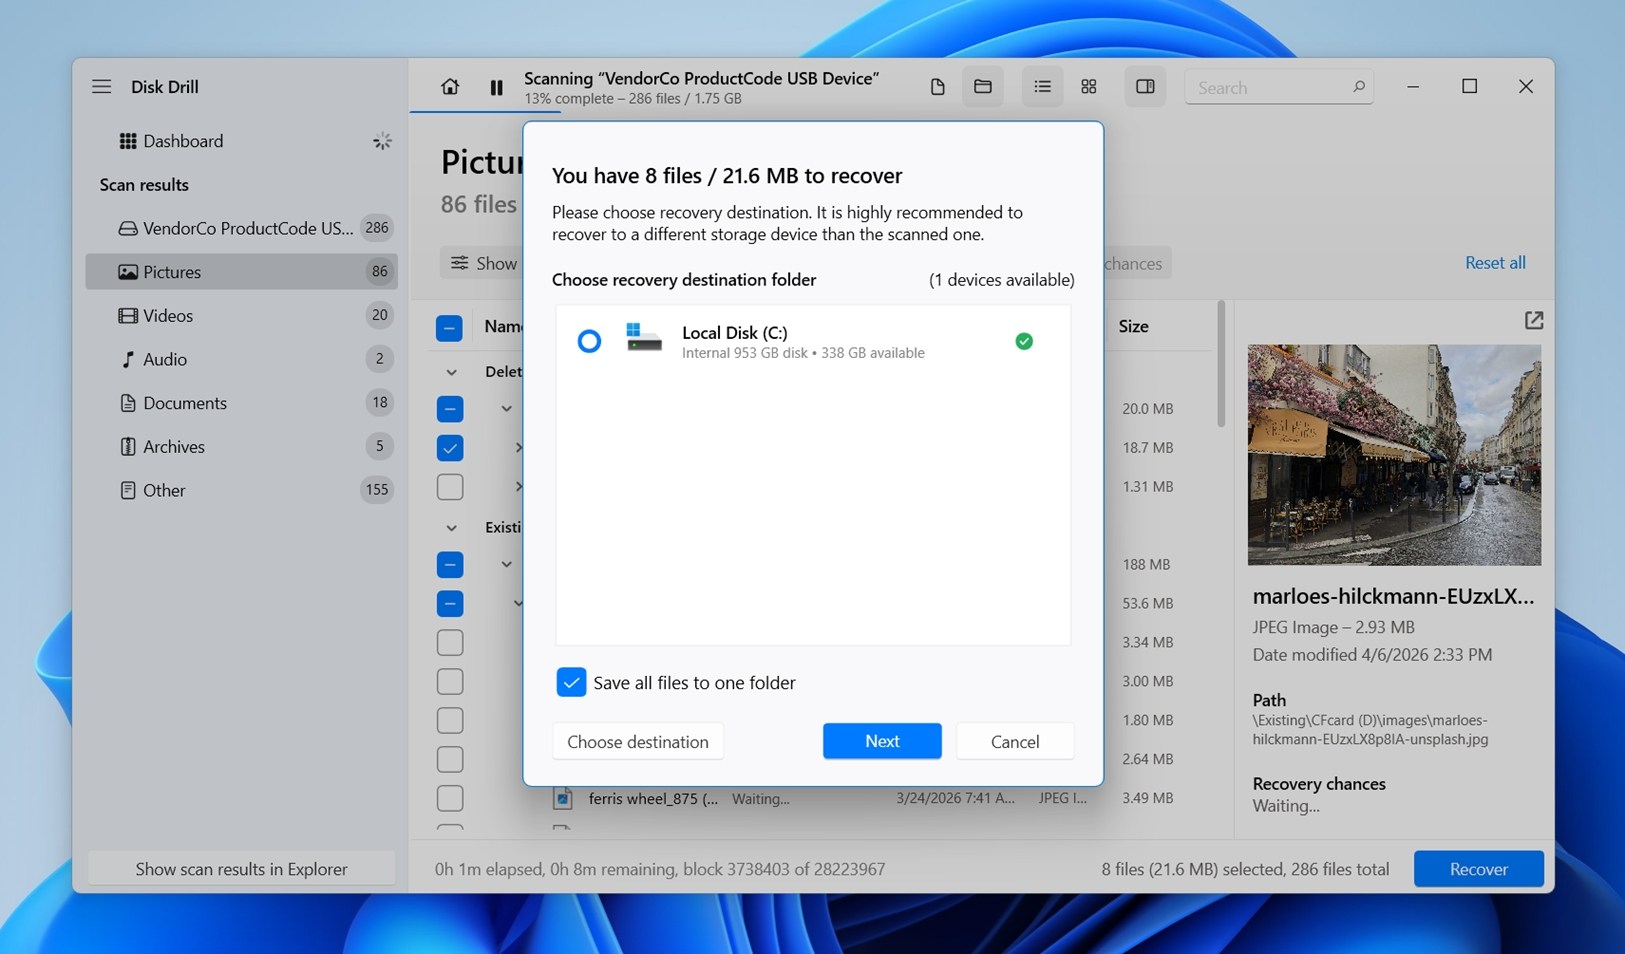
 - Place a checkmark on the left of the ones you’d like to add to Disk Drill’s recovery pool. When you’re happy with your selection, click on Recover at the bottom-right of Disk Drill’s window.
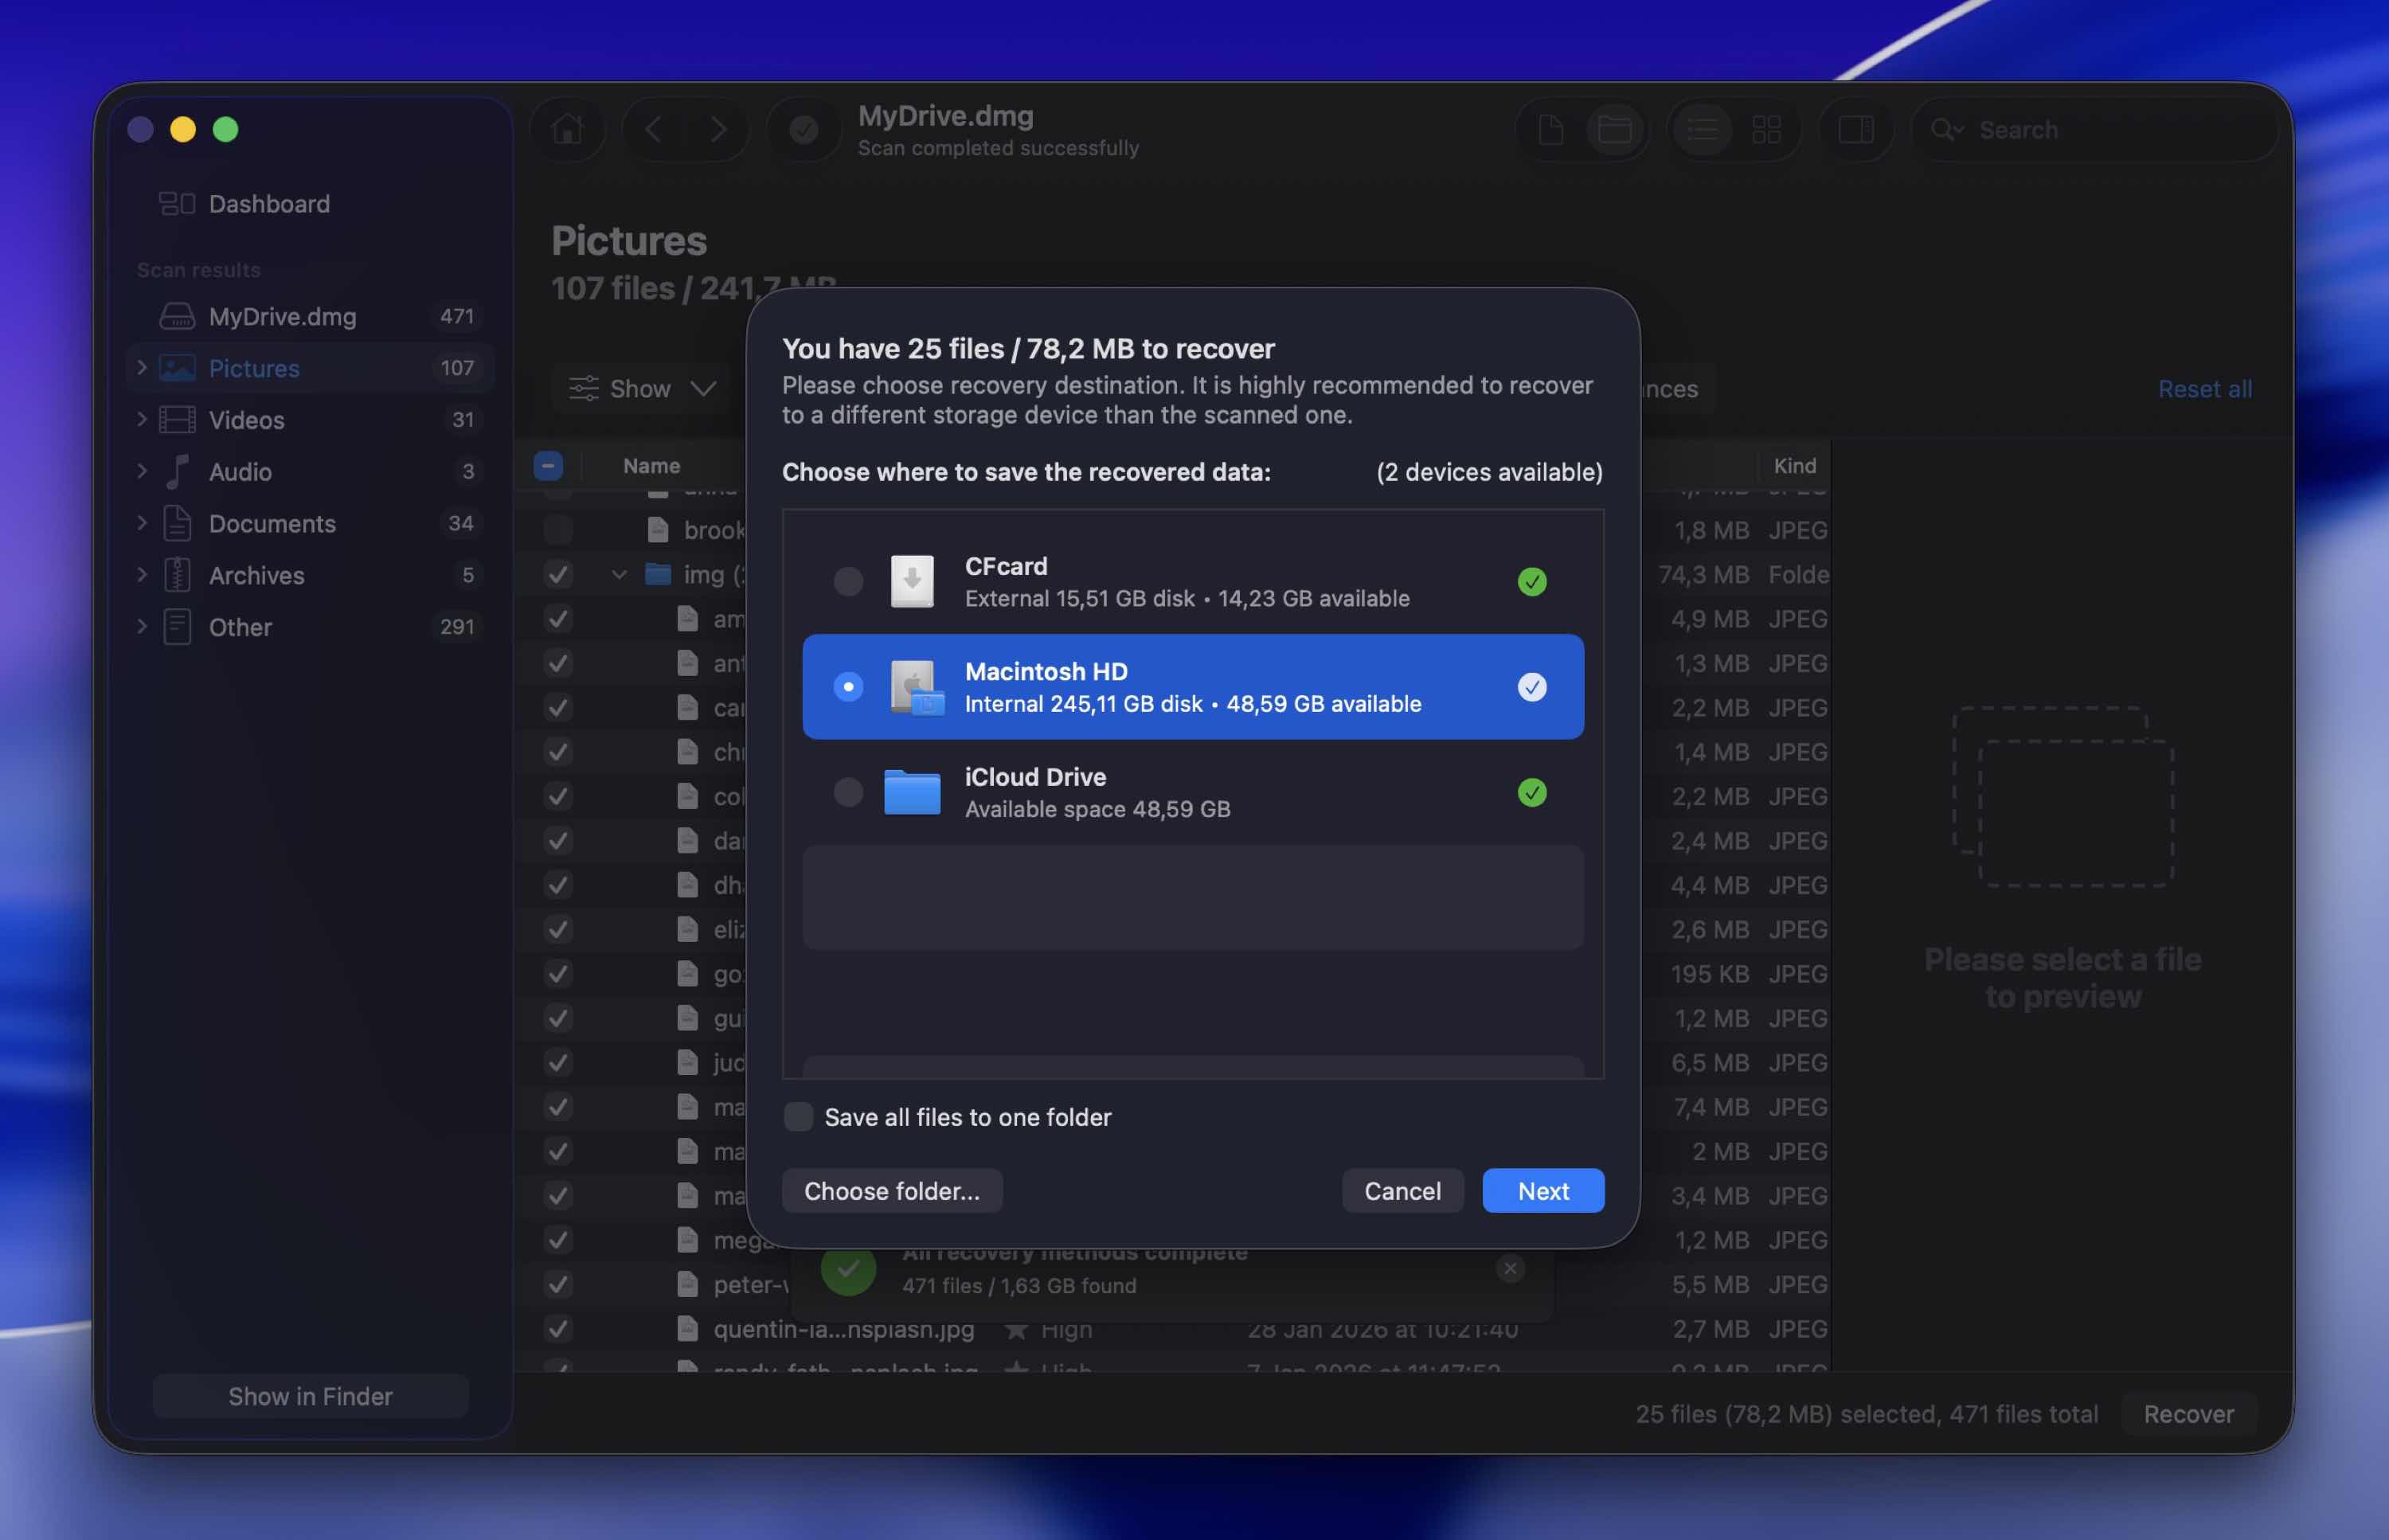
- When prompted, “tell” Disk Drill where you’d like it to store your recovered files. Make sure to choose a different device from the one you’re trying to recover data from, and then click Next.
- When done, Disk Drill will inform you it has completed the recovery process, and you’re free to check the results. Disk Drill will offer a quick and easy shortcut, Show recovered data in Explorer, that can take you there.
Fixing a Corrupted CF Card with CHKDSK
Before you try fixing your CF card with CHKDSK, we should stress once more that it isn’t a tool for recovering lost data. CHKDSK can help when the CF card’s file system has minor logical errors, for example when files won’t open, folders behave strangely, or Windows throws file access errors.
However, it can make some files inaccessible and unrecoverable in the process or shorten the time until a total hardware failure. Use it only after you’ve recovered your files.
CHKDSK is a command-line tool, so you’ll have to use it through either Windows’ command prompt or PowerShell. Use Windows’ search function, or press the Windows key (or click on the Start button) and start typing either cmd for the command prompt or PowerShell for PowerShell. Then, Then, right-click the result and choose Run as administrator.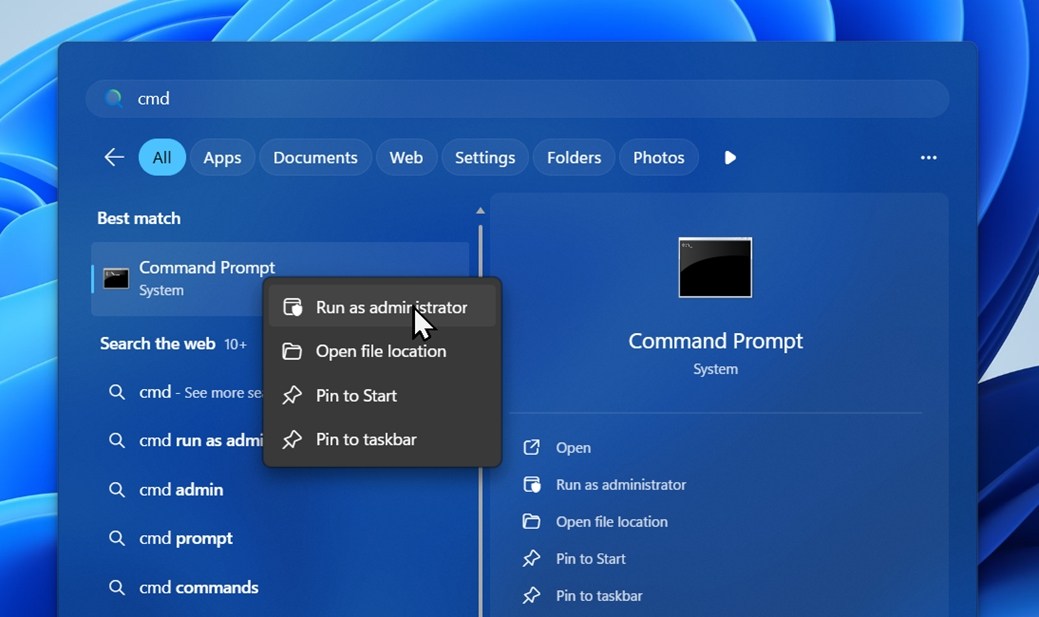
To keep typing at a minimum, and avoid the scary-looking terminal as much as possible, take note of your CF Card’s letter from a friendlier Windows Explorer window. Then, in either the Command Prompt or PowerShell, type:
chkdsk /f Z: or chkdsk /r Z:
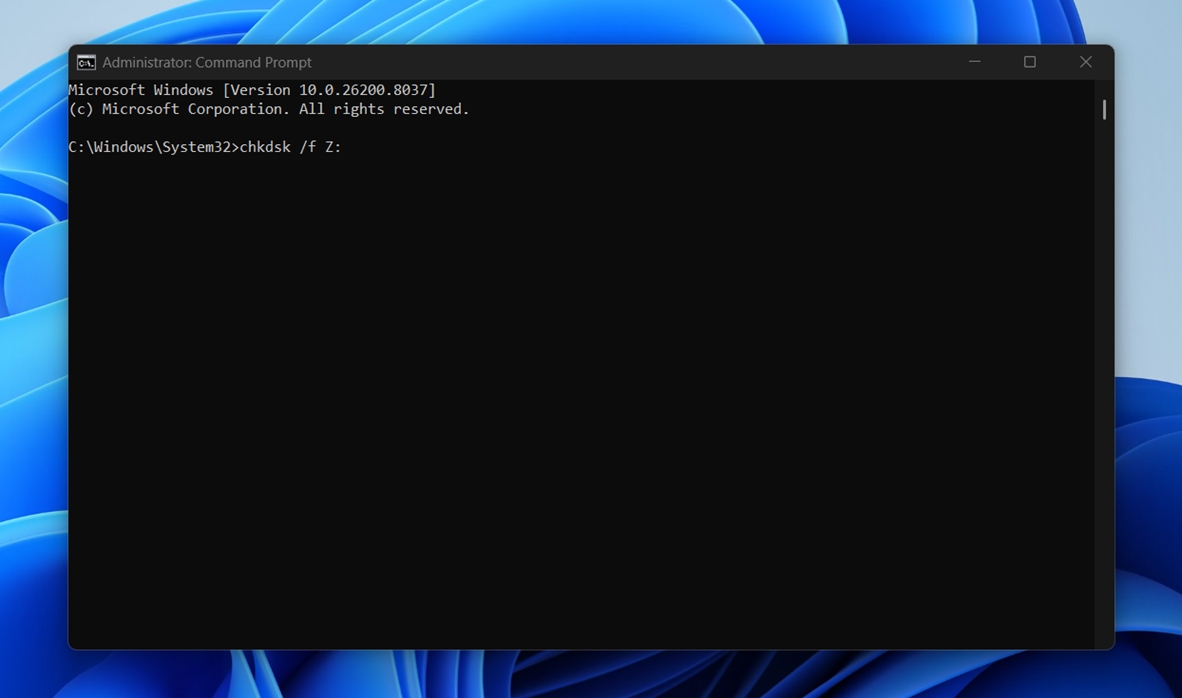
Replace “Z” with the letter of your CF card. You don’t have to use both commands.
The first one will check your CF card’s file system for problems and repair them if possible.
The second command is similar, but more thorough. In addition to checking the file system, it also scans the card for bad sectors and tries to mark them so the current file system no longer uses them. That can help reduce future read/write errors. Just keep in mind that this happens at the file system level – if you later reformat the CF card, those areas may become available for use again; this is not a hardware-level fix.
If you’re dealing with a failing CF card, it’s better to start with the quicker first option, which will stress it less, minimizing the chances of further data loss.
Other Recovery Solutions for Corrupted CF Cards
Do you hate the idea of typing commands to try to repair your CF card? Windows offers a “lite” but more straightforward option. It’s basically the same file system repair process as CHKDSK, just with a graphical interface instead of a command line.
- Right-click on your CF card.
- Choose Properties.
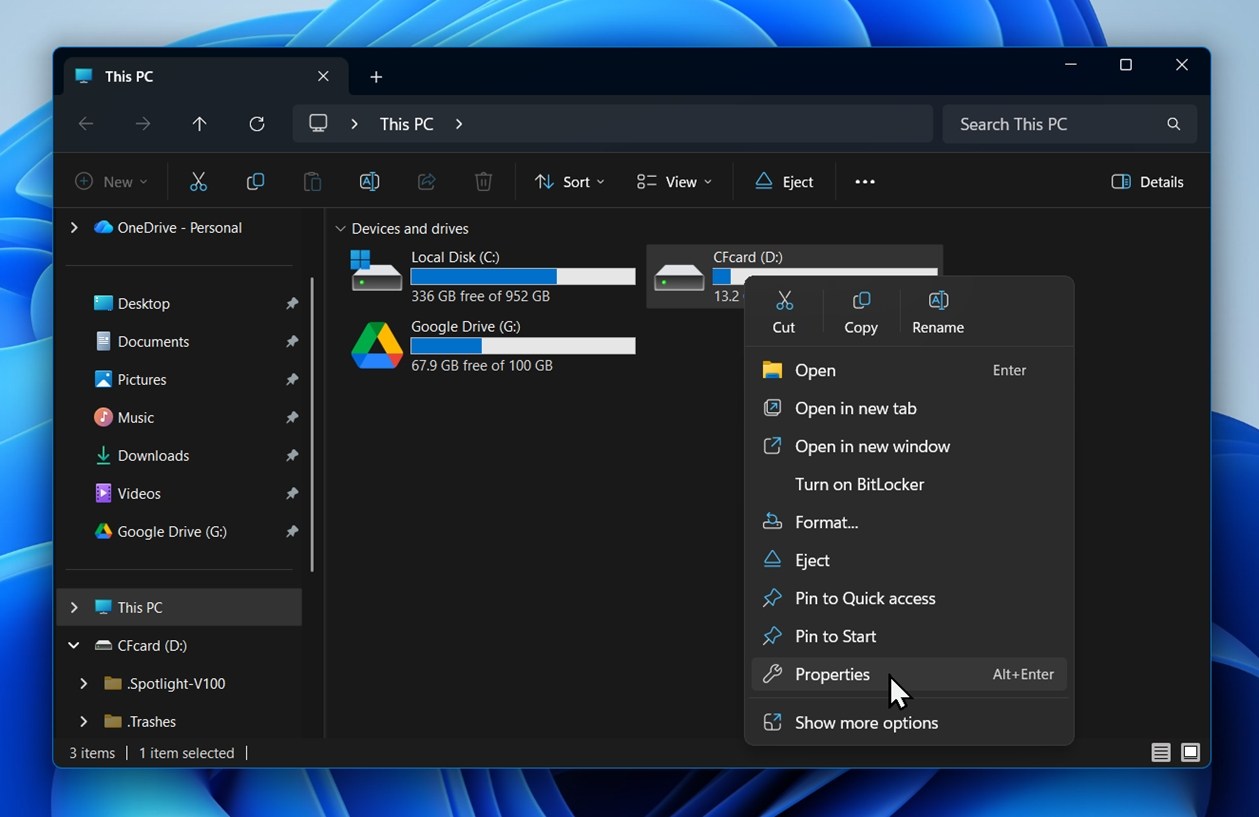
- Move to the Tools tab.
- Click on the Check button.
- Select Scan drive.
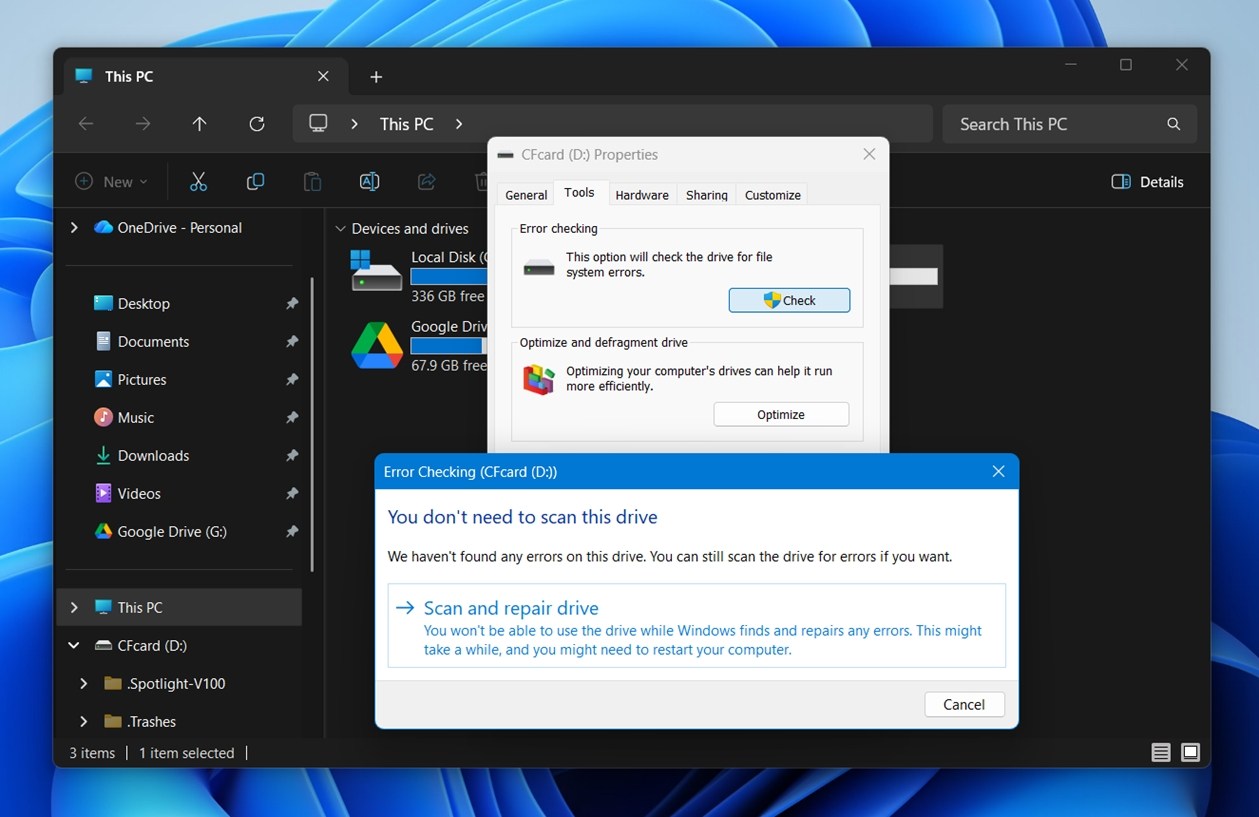
- Follow the steps of the guide to try to fix your CF card.
This built-in check is the same as running CHKDSK /f through Command Prompt. If you want the more thorough /r scan (which also checks for bad sectors), you’ll need to use the command-line version.
And of course, there’s always formatting as an option too. If your data is already safe (or you don’t care about the files left on the card), you can simply reformat it. This is much easier than any repair scan.
What it does is wipe the existing file system structure and create a fresh one, which can often make the CF card usable again if the issue was logical corruption rather than physical damage. Just keep in mind that formatting is not a recovery step, so only do it after your files are safe.
- Open Disk Management. Press Win + X and choose Disk Management.
- Find your CF card in the list of drives. Double-check the size so you don’t pick the wrong device.
- Right-click the partition on the CF card and choose Format.
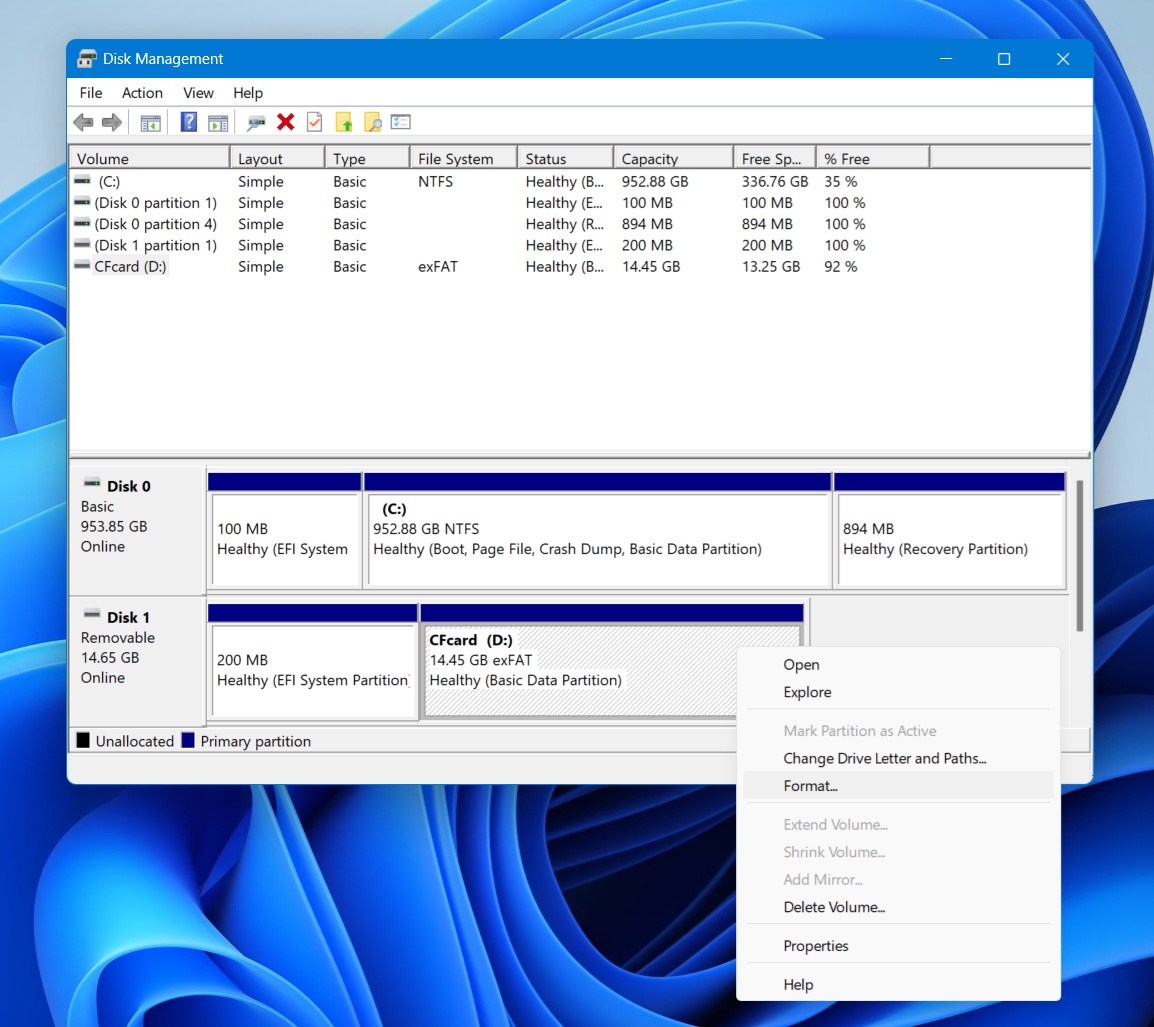
- Choose a file system.
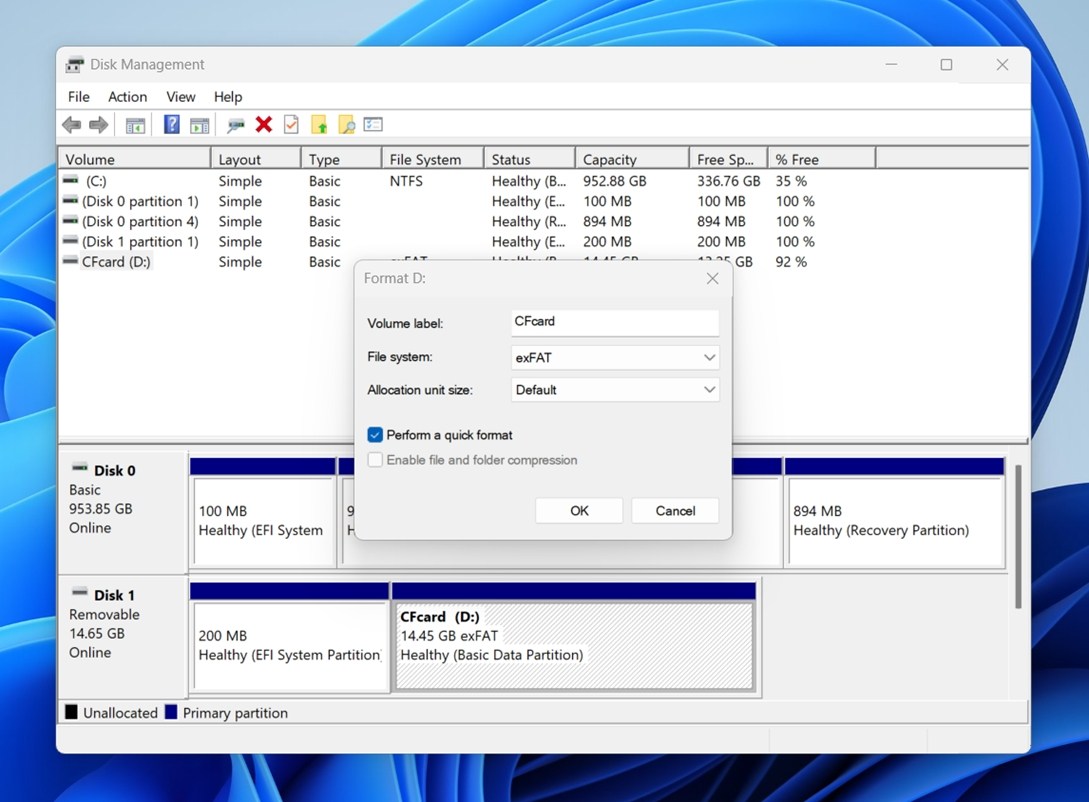 In most cases, FAT32 or exFAT is the right choice for a CF card, depending on the card size and the device you plan to use it with.
 - Set a volume label if you want, and leave Perform a quick format enabled (unless you specifically want a full format).
- Click OK and confirm the warning to start formatting.
- Wait for the process to finish, then safely eject the card and test it again.
That was the quick and easy way to describe the process, but we can’t expand on it, for each step can be a separate article on its own.
How Can You Save Your Lost Files From a Corrupted CF Card on Mac?
The best way to deal with corrupted CF cards on both Macs and Windows is the same: start by recovering your files, and then try to fix the storage device itself.
That’s not where the similarities end, since you can also use the same tool on both platforms for the first – and most important – part of the process, getting back your files with Disk Drill.
Save Your Lost Data From Corrupted CF Cards with Disk Drill
To get back your files from your CF card with Disk Drill…
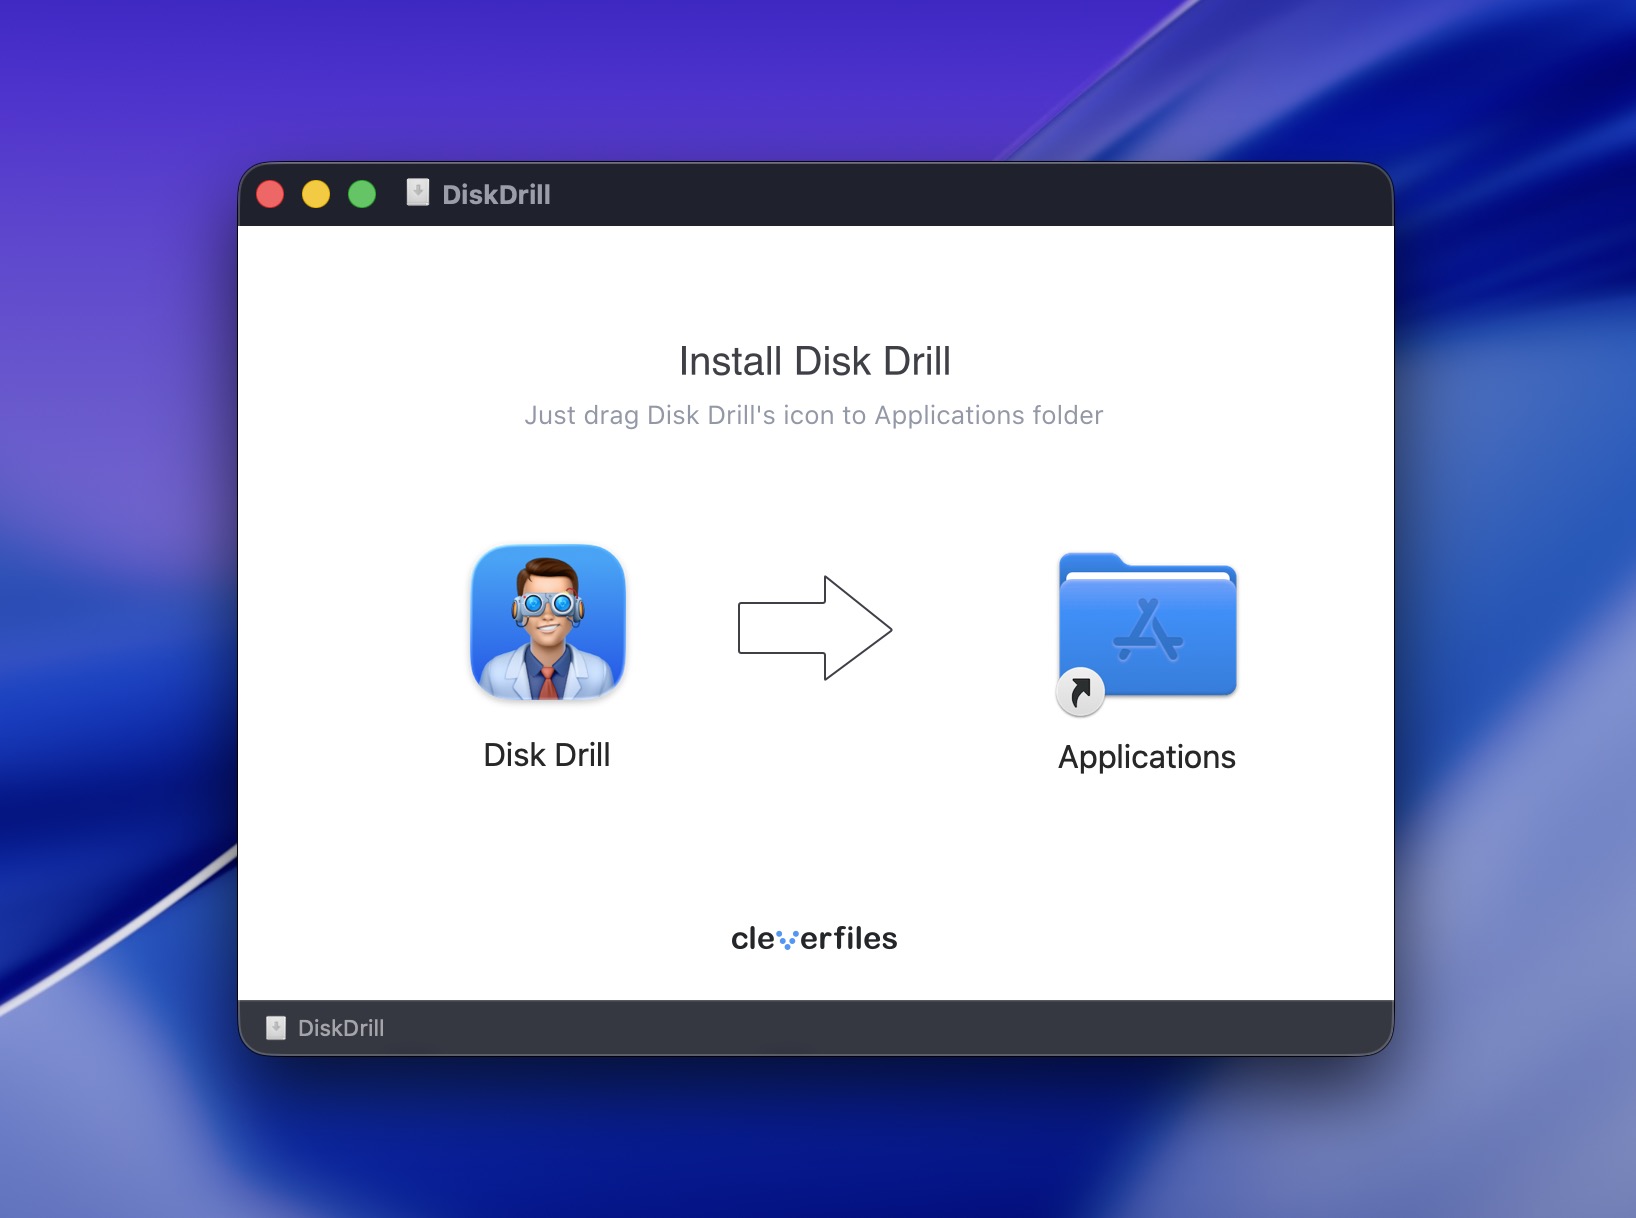
- Download Disk Drill. Install it like any other app by dragging its icon to your Applications folder.
 Disk Drill needs full access to your devices to recover files from them. Thus, you’ll also have to pay a visit to the Security & Privacy settings.
 - If the CF card is behaving oddly or you just want the safest approach, open Byte-to-byte Backup from the left-hand sidebar.
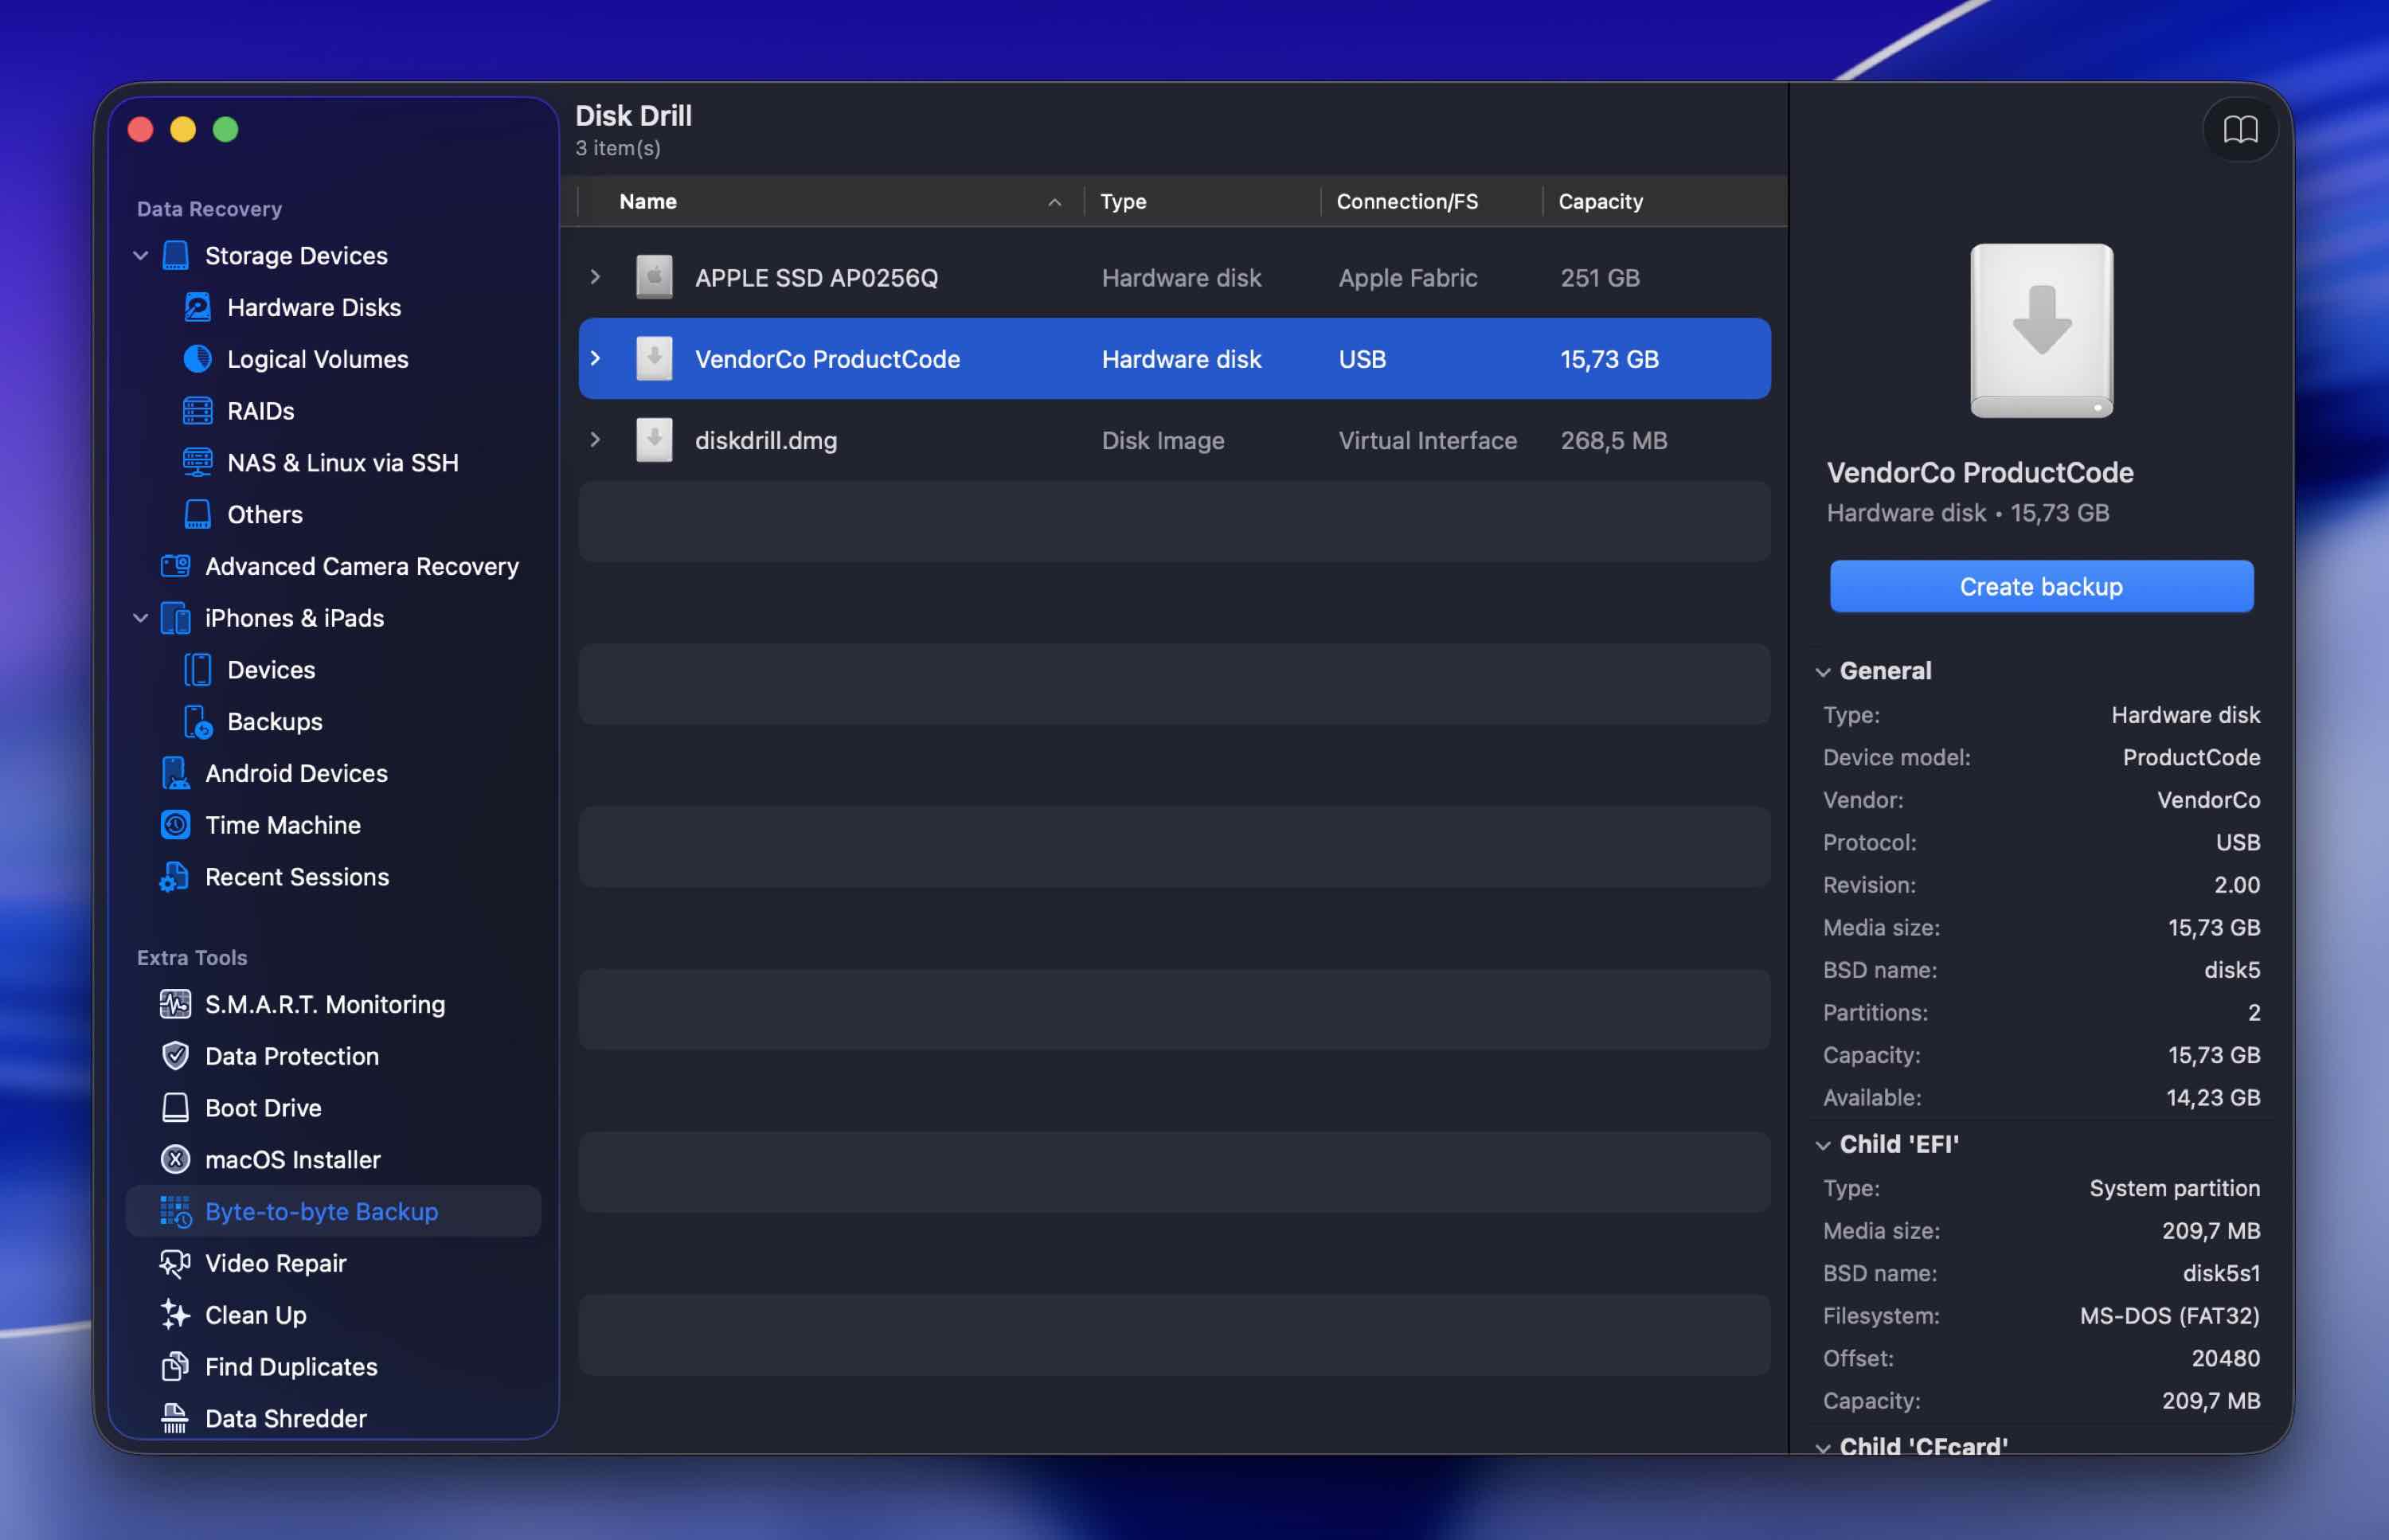
- Select the CF card, and click Create backup.
- Save the image to a location with enough free space to store the card’s full capacity. Wait for it to finish. (You can pause it and resume later if needed.)
- Then, return to Disk Drill’s main device list and click Attach disk image at the bottom.
Select the backup file you just created.
- Click Search for lost data.
Select either Universal Scan or Advanced Camera Recovery, depending on what happened to the card. (In most corrupted CF card cases, Universal Scan is the better choice.)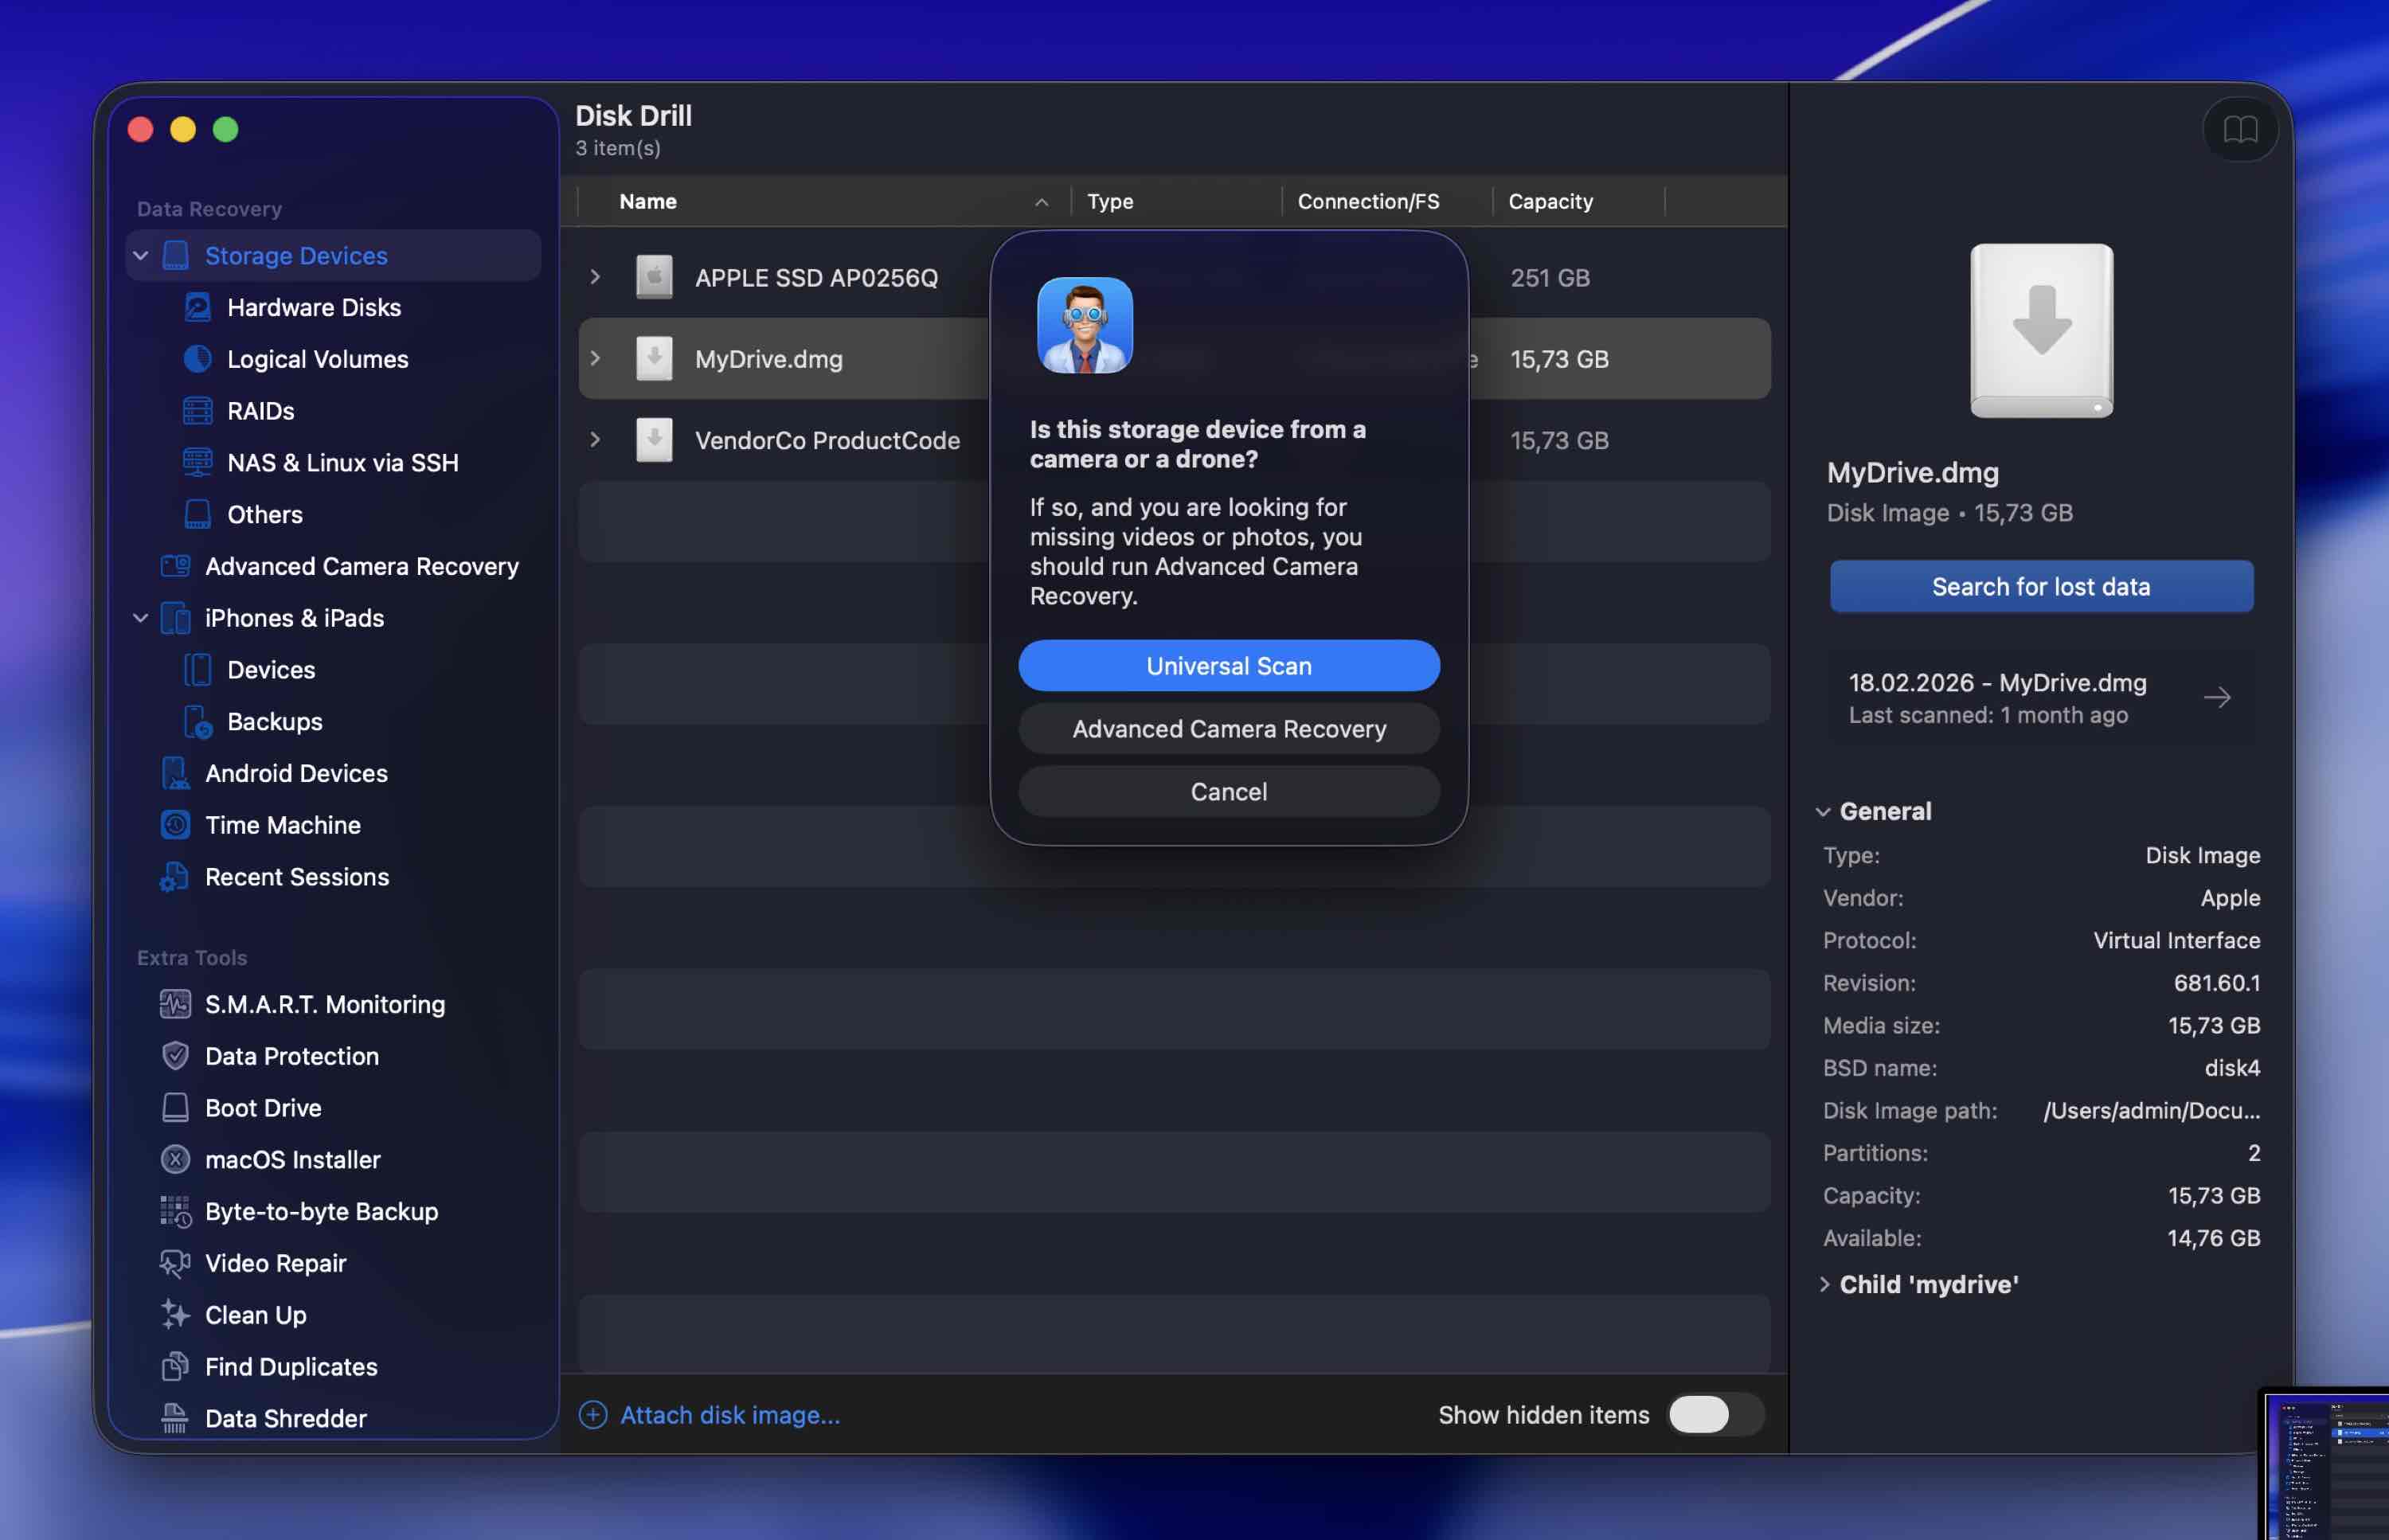
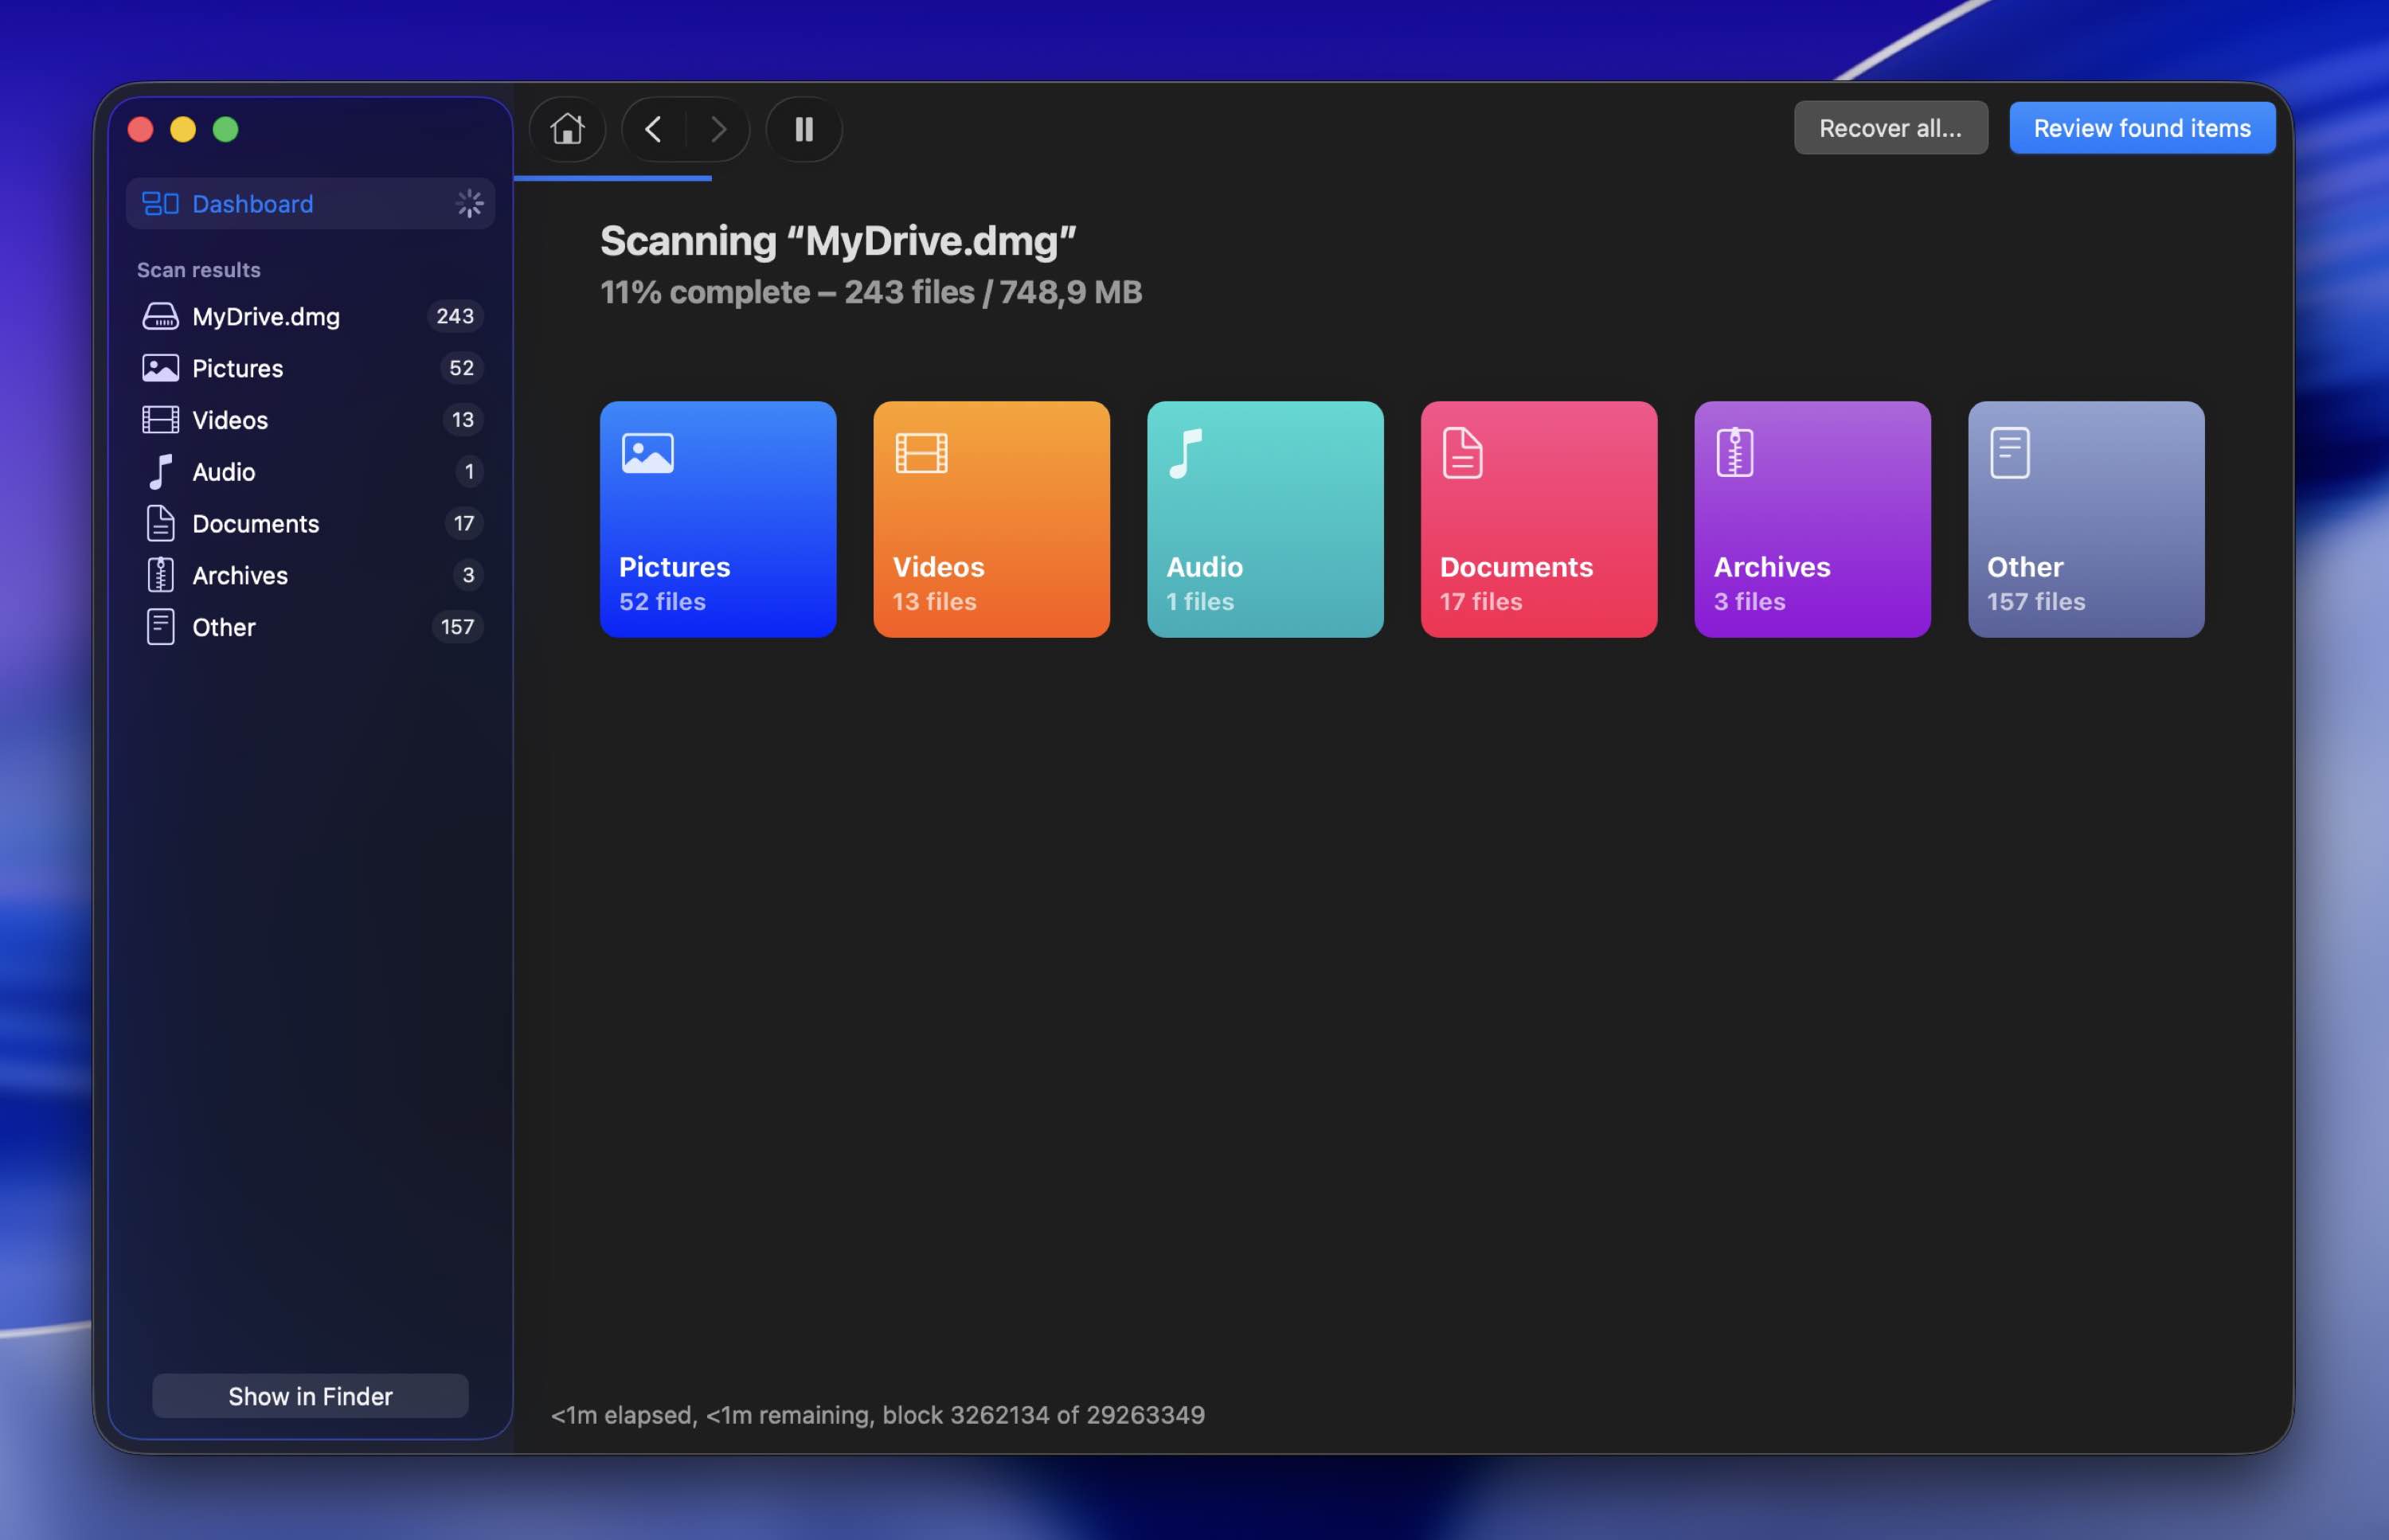
- Disk Drill will start scanning your CF card for lost files. It’s best to allow the scan process to finish to locate as many files as possible. However, you can check out what Disk Drill has already found by clicking on Review found items at the bottom-right of its window.
- Click on Review found items (if you resisted the urge to do so before the scan finished) to see the files Disk Drill located on your CF card.
- Select any of them to see a preview of its contents on the right of Disk Drill’s window.
- Place a checkmark on the left of every file you want to get back. Finally, click on Recover, on the bottom-right of its window, to begin the recovery process.
- Choose where you’d like Disk Drill to store the recovered files. Choose a different device than the one you’re trying to recover from to minimize the chances of further data loss.
- Then, click Next.
When the recovery process completes, you’ll find your files in the target folder you selected.
Check and Repair a Corrupted CF Card Using Disk Utility
The Disk Utility built-in Mac OS can also help with a corrupted CF card file system. However, it feels as if the option for doing that is somewhat hidden. The steps to do it are:
- Fire up Launchpad and search for “disk” to filter down to entries that contain this word, like Disk Utility – which is precisely the tool we’re seeking. So, when you locate it, run it.
- Choose your CF card from the list of devices on the left of Disk Utility’s window.
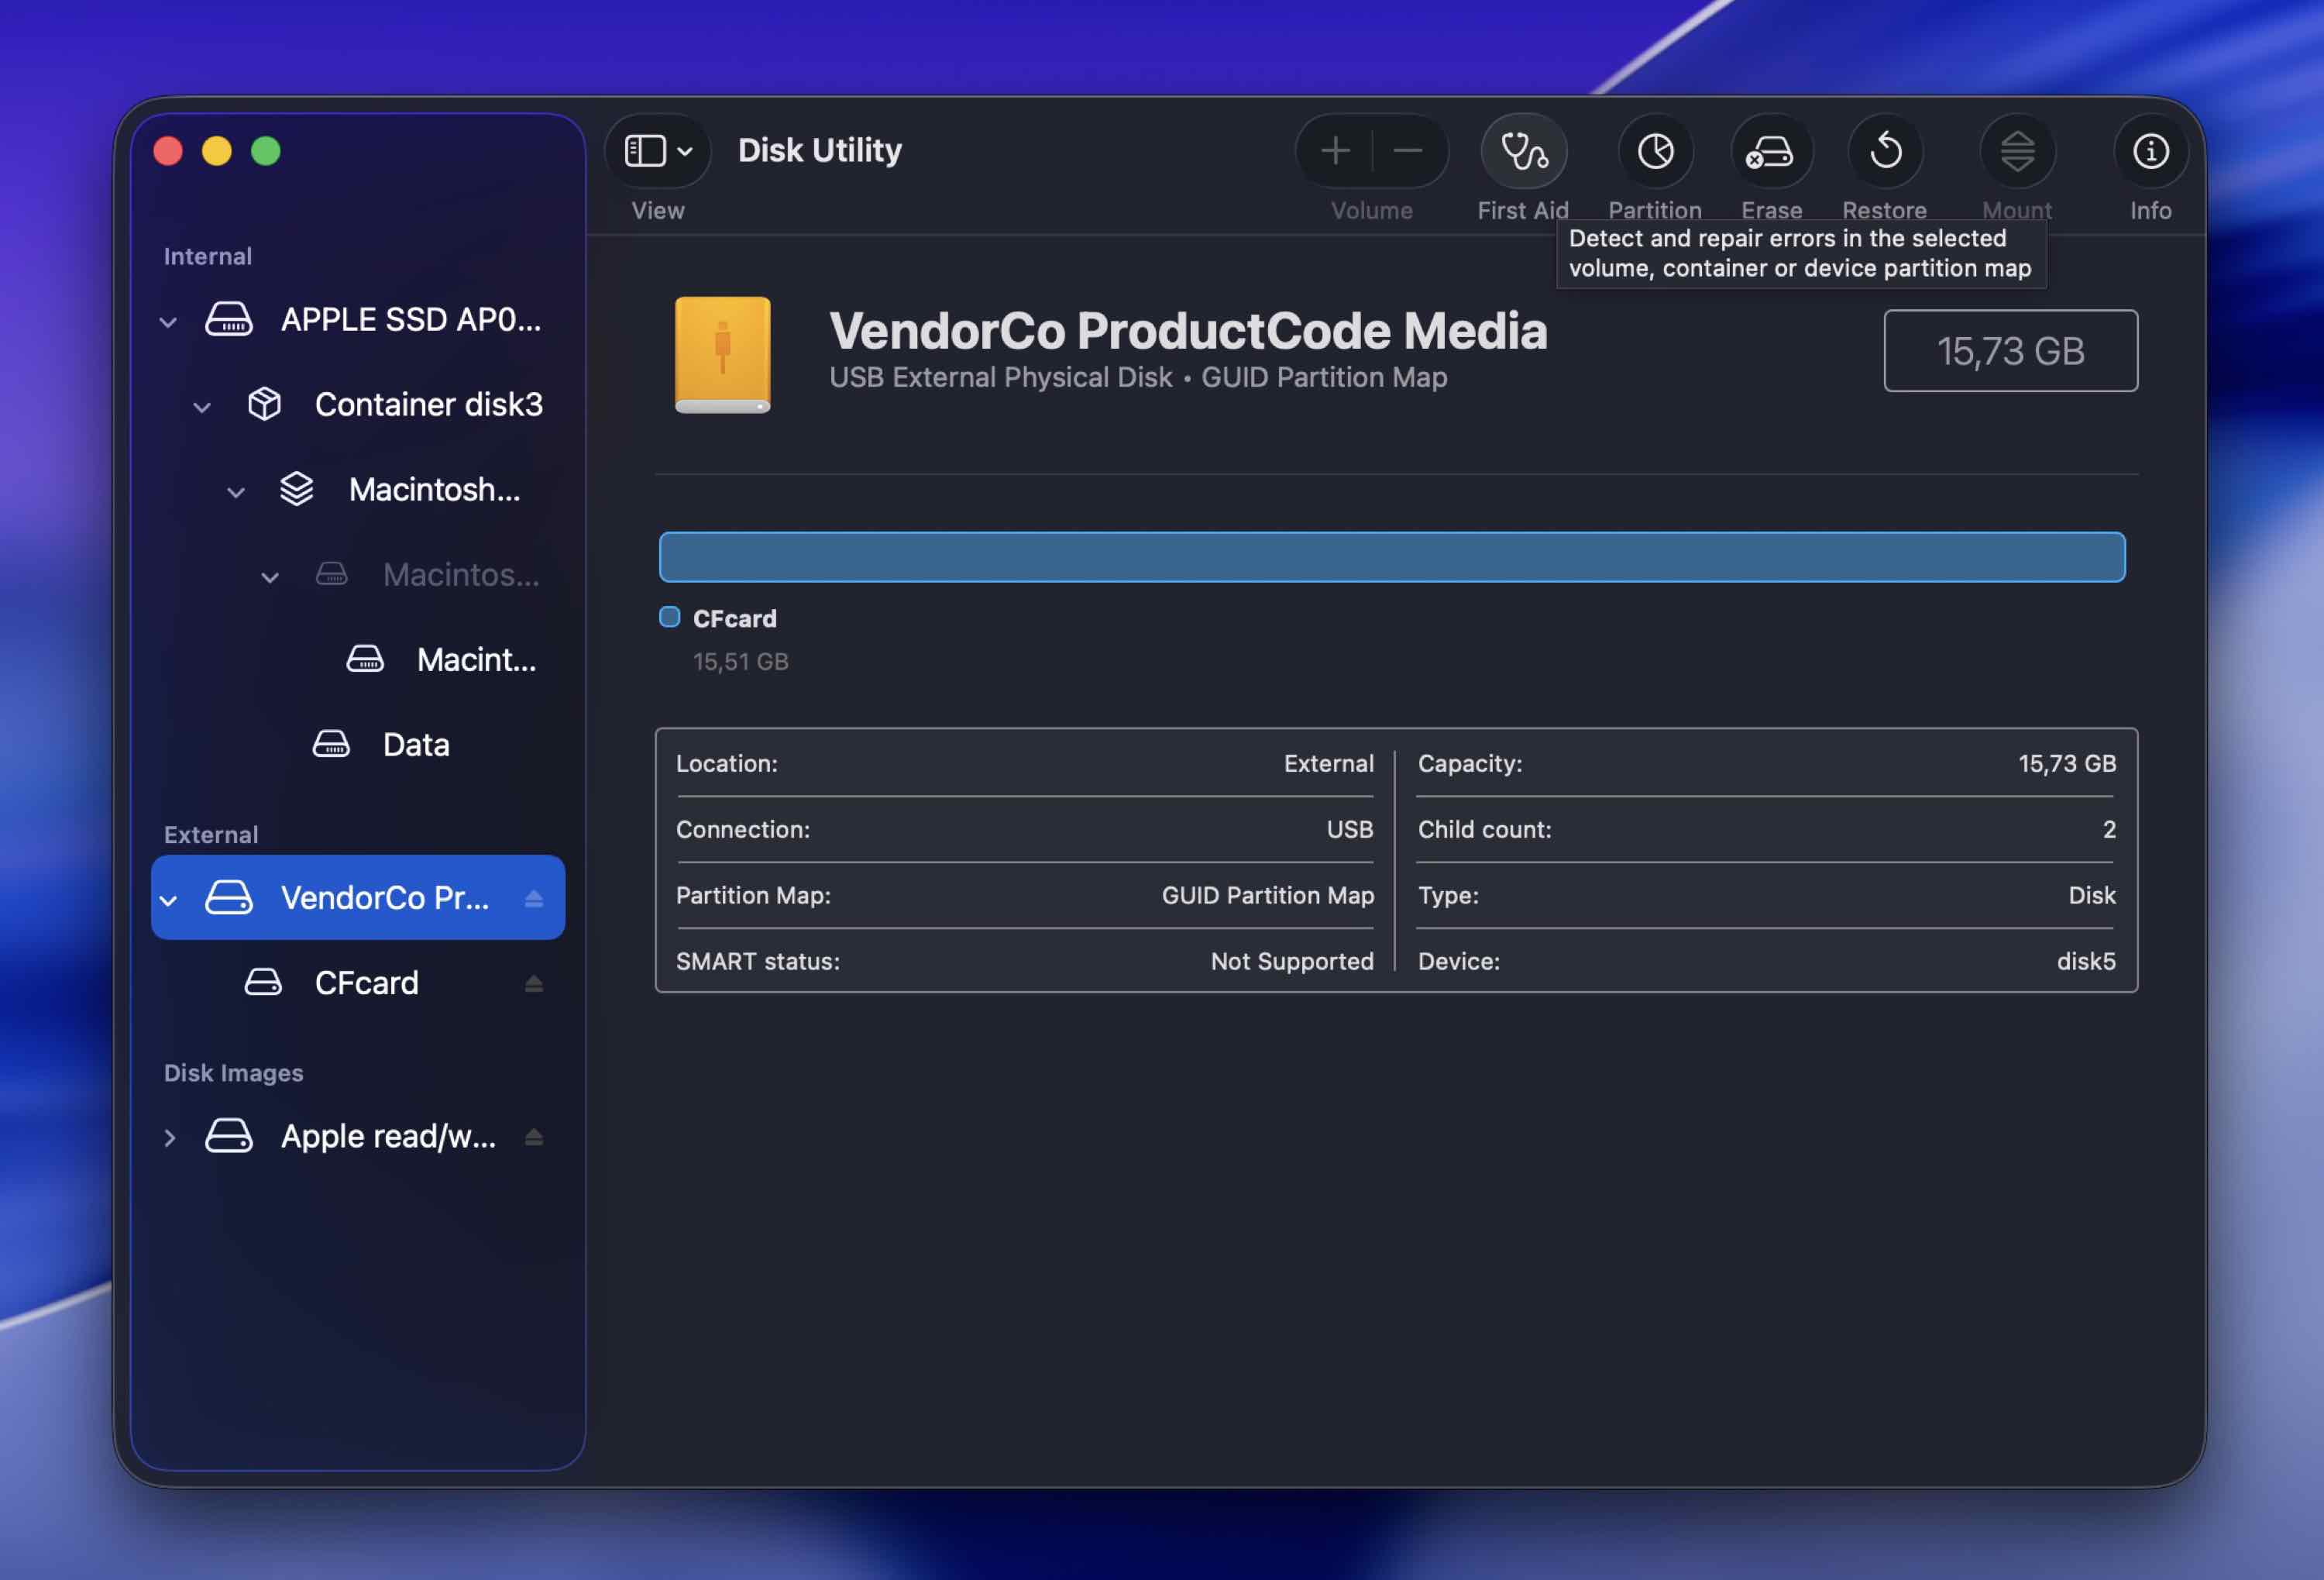
- “First Aid” will be enabled at the top-right of the window. Click on it.

- Follow the presented steps to run first aid on your CF card and have it automatically fix any errors it finds.
Hopefully, your CF card will be as good as new afterward. If it still isn’t, you can try erasing it. This often helps when the problem is a badly damaged file system that First Aid can’t fully repair. This removes that broken structure and creates a fresh new file system, which can make the card usable again (if the issue is logical corruption).
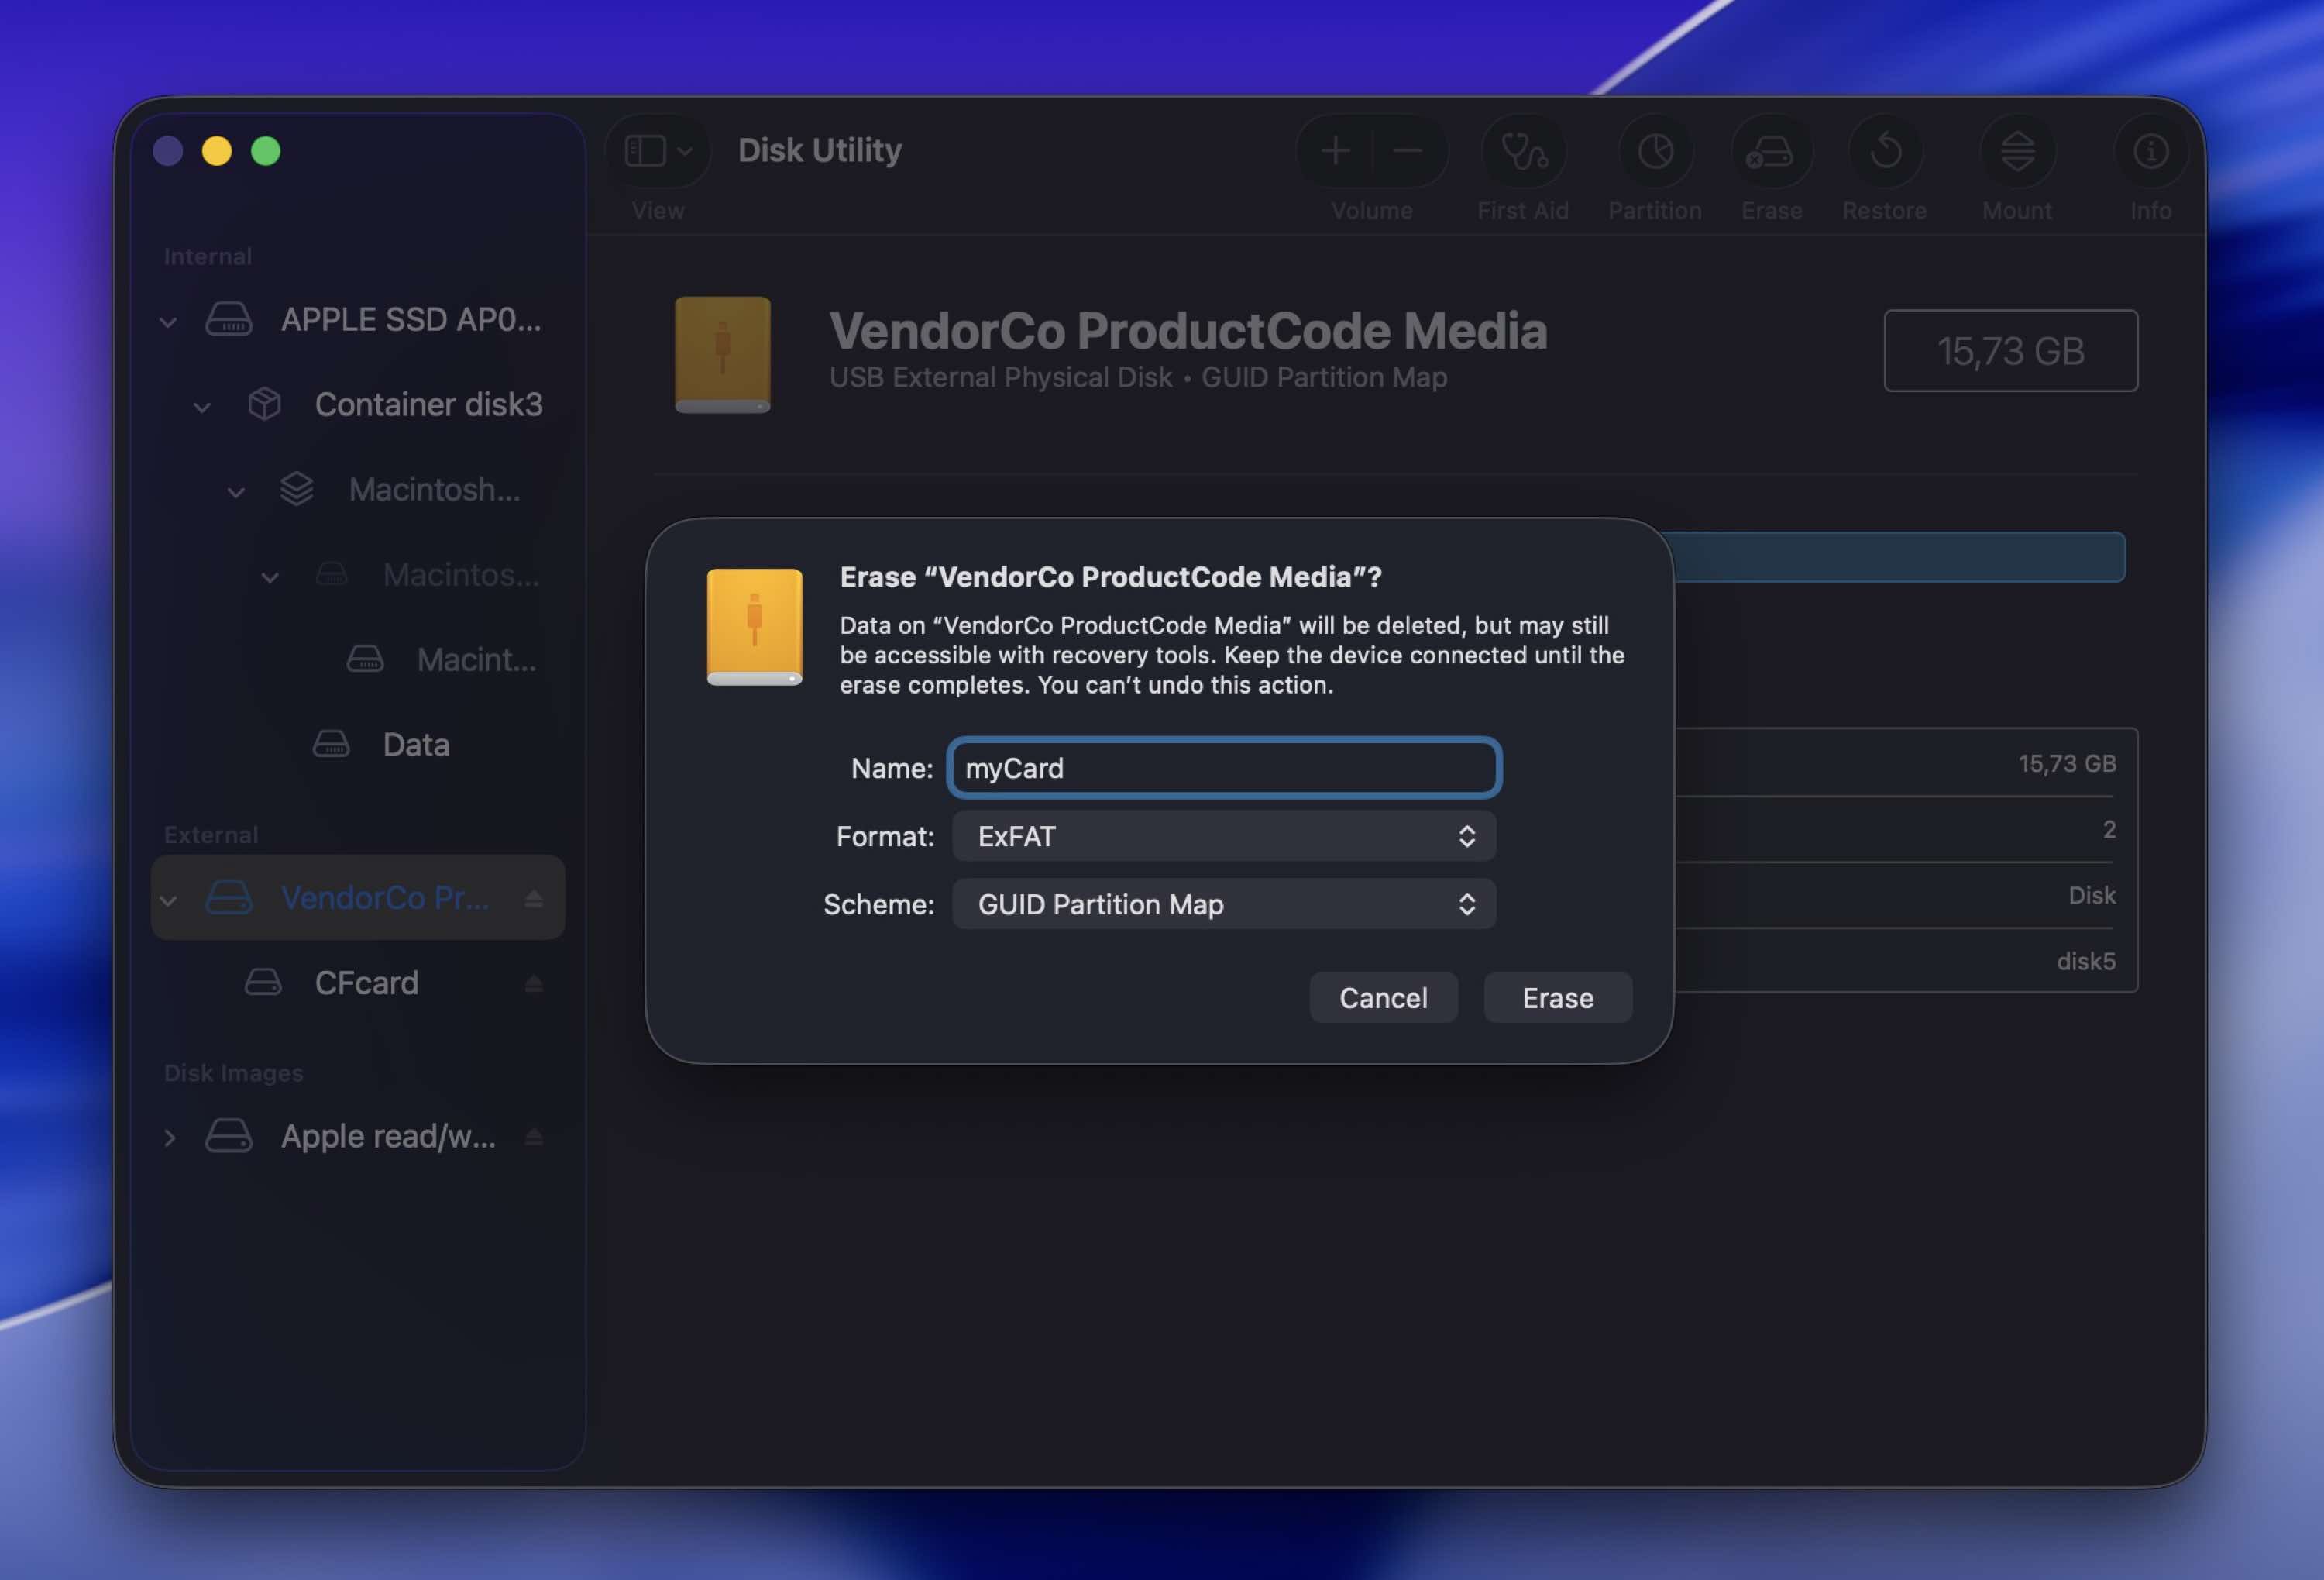
To do that in the same Disk Utility app, select the CF card, click Erase at the top, choose a suitable file system such as ExFAT or MS-DOS (FAT), give it a name if you want, and confirm the action.
Other Ways to Save Your Files from Corrupted CF Cards
PhotoRec is another tool with which you can try to recover your files from a corrupted CF card. However, it’s a shell app with no graphic user interface geared more towards “advanced” users. We won’t expand on its use, but a simplified step-by-step version would be:
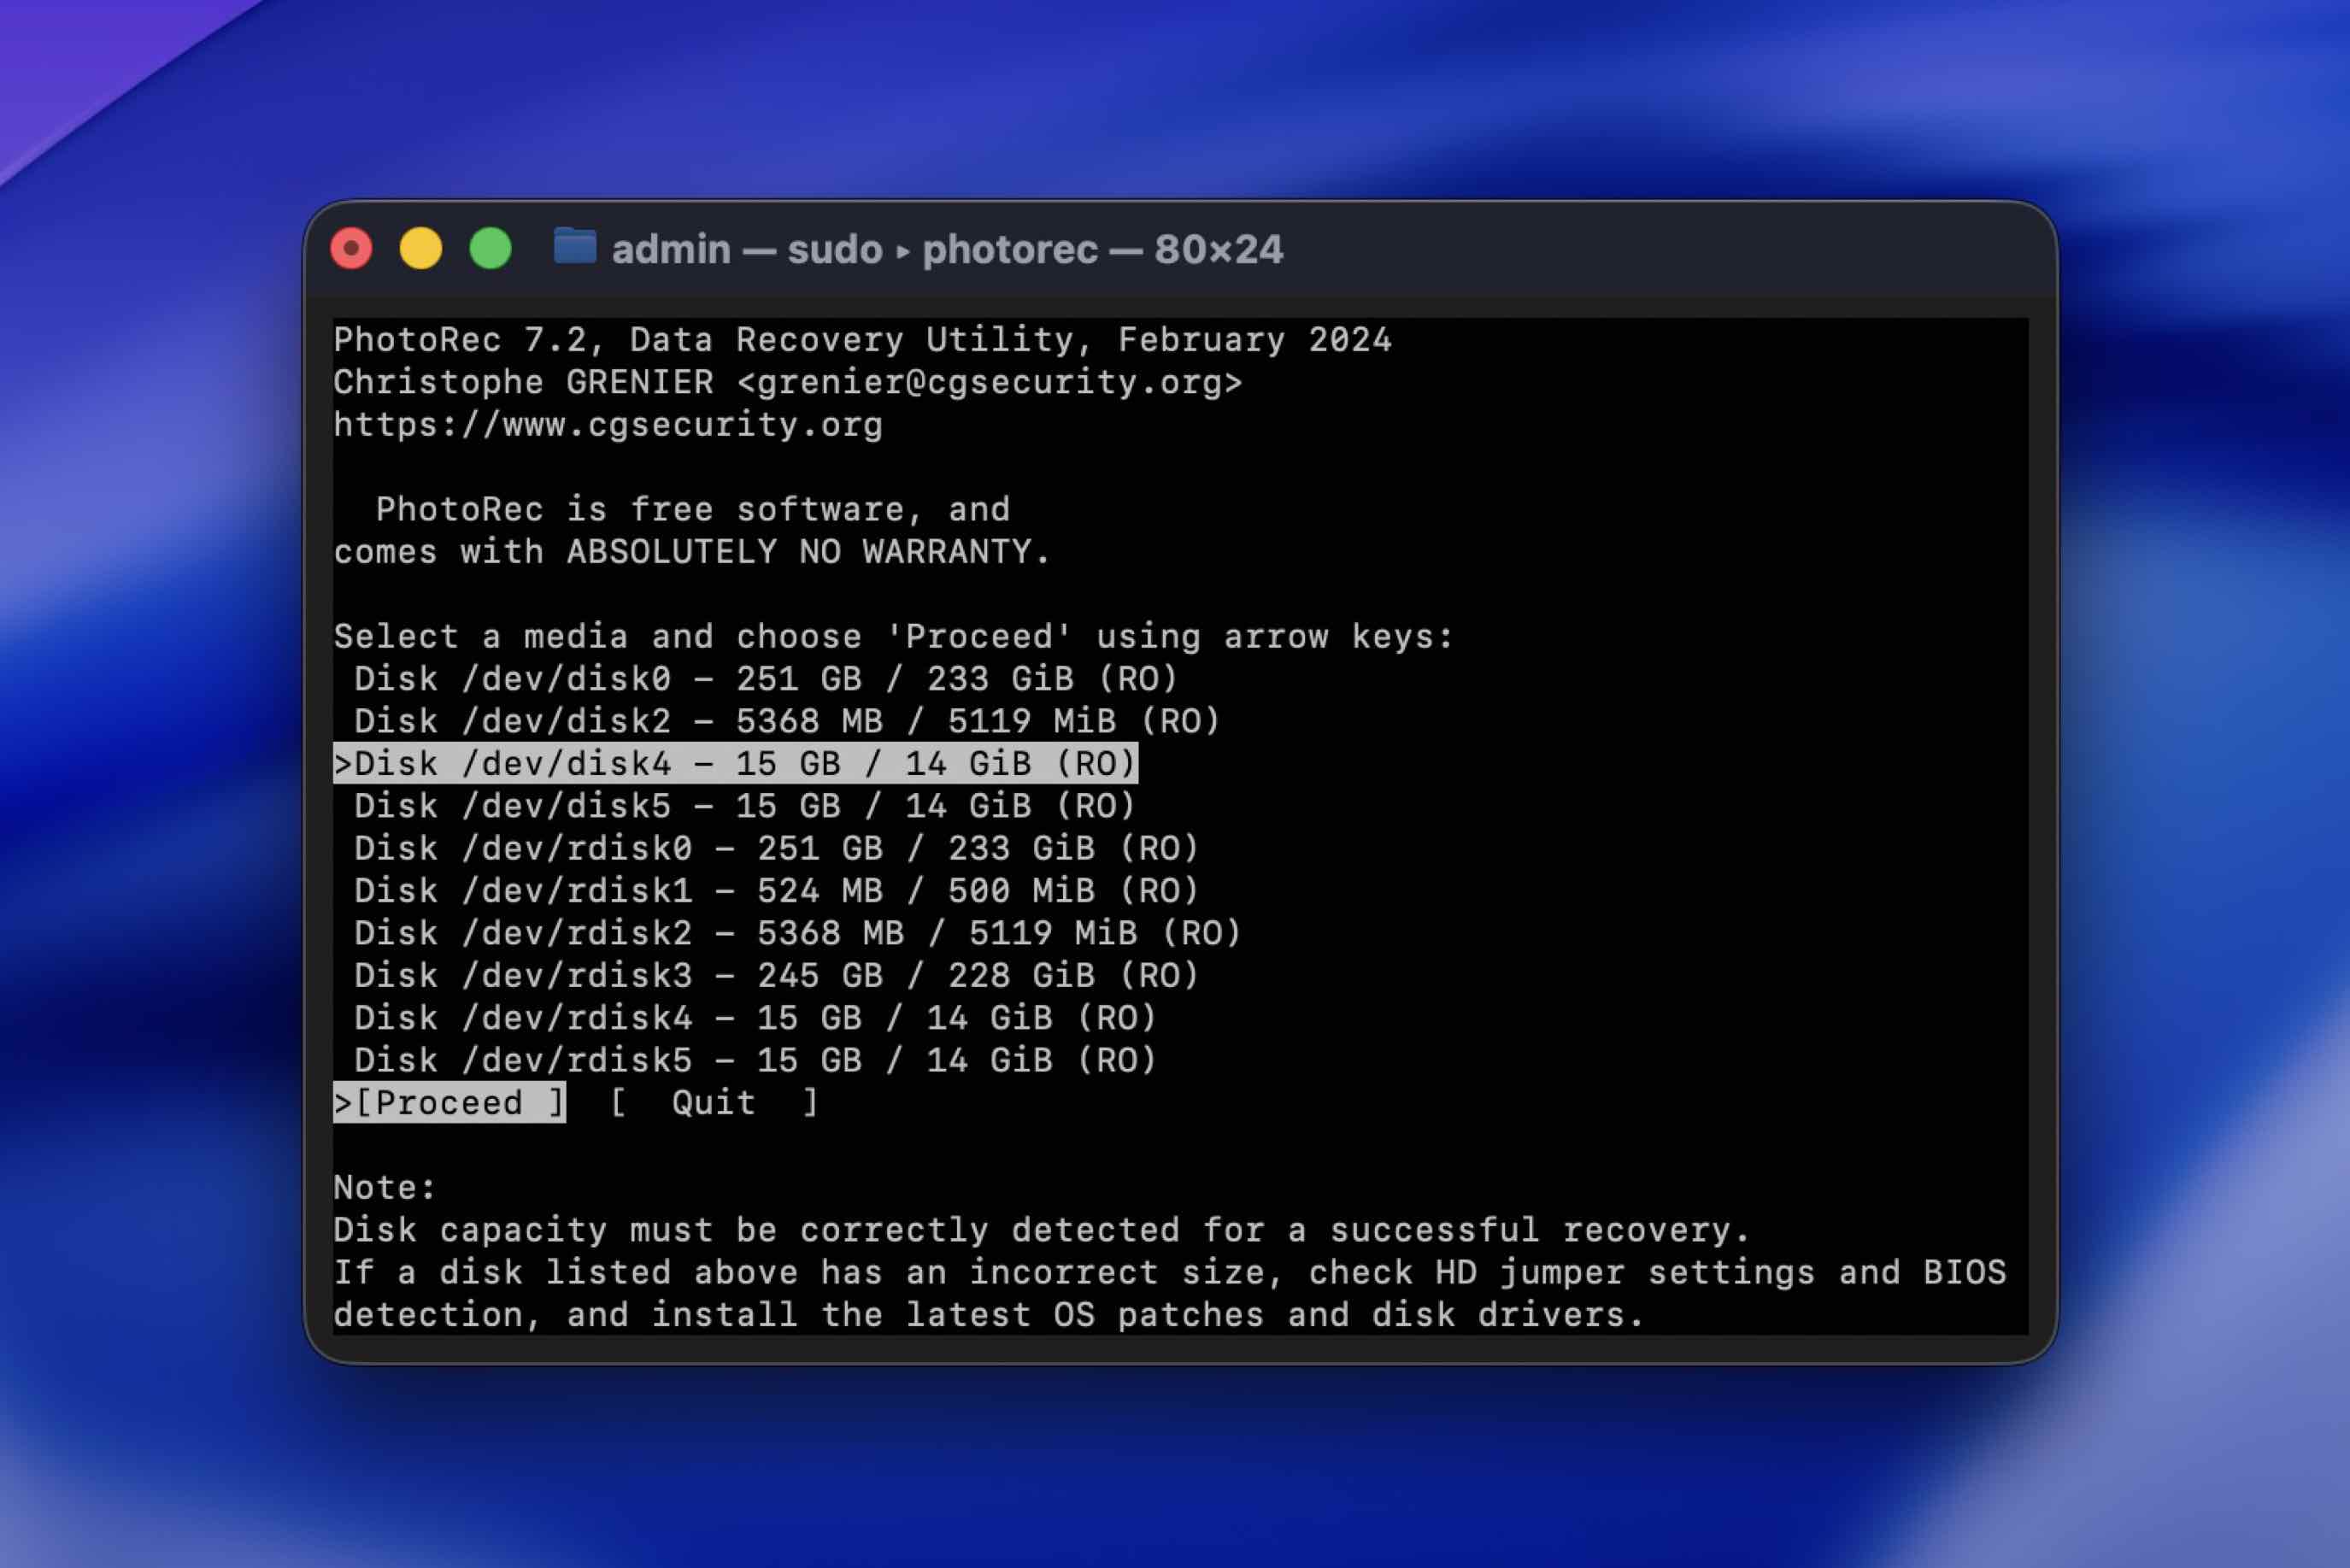
- Download PhotoRec from its official site and install it on your Mac. Then, run it.
- Choose your CF card from its device list.
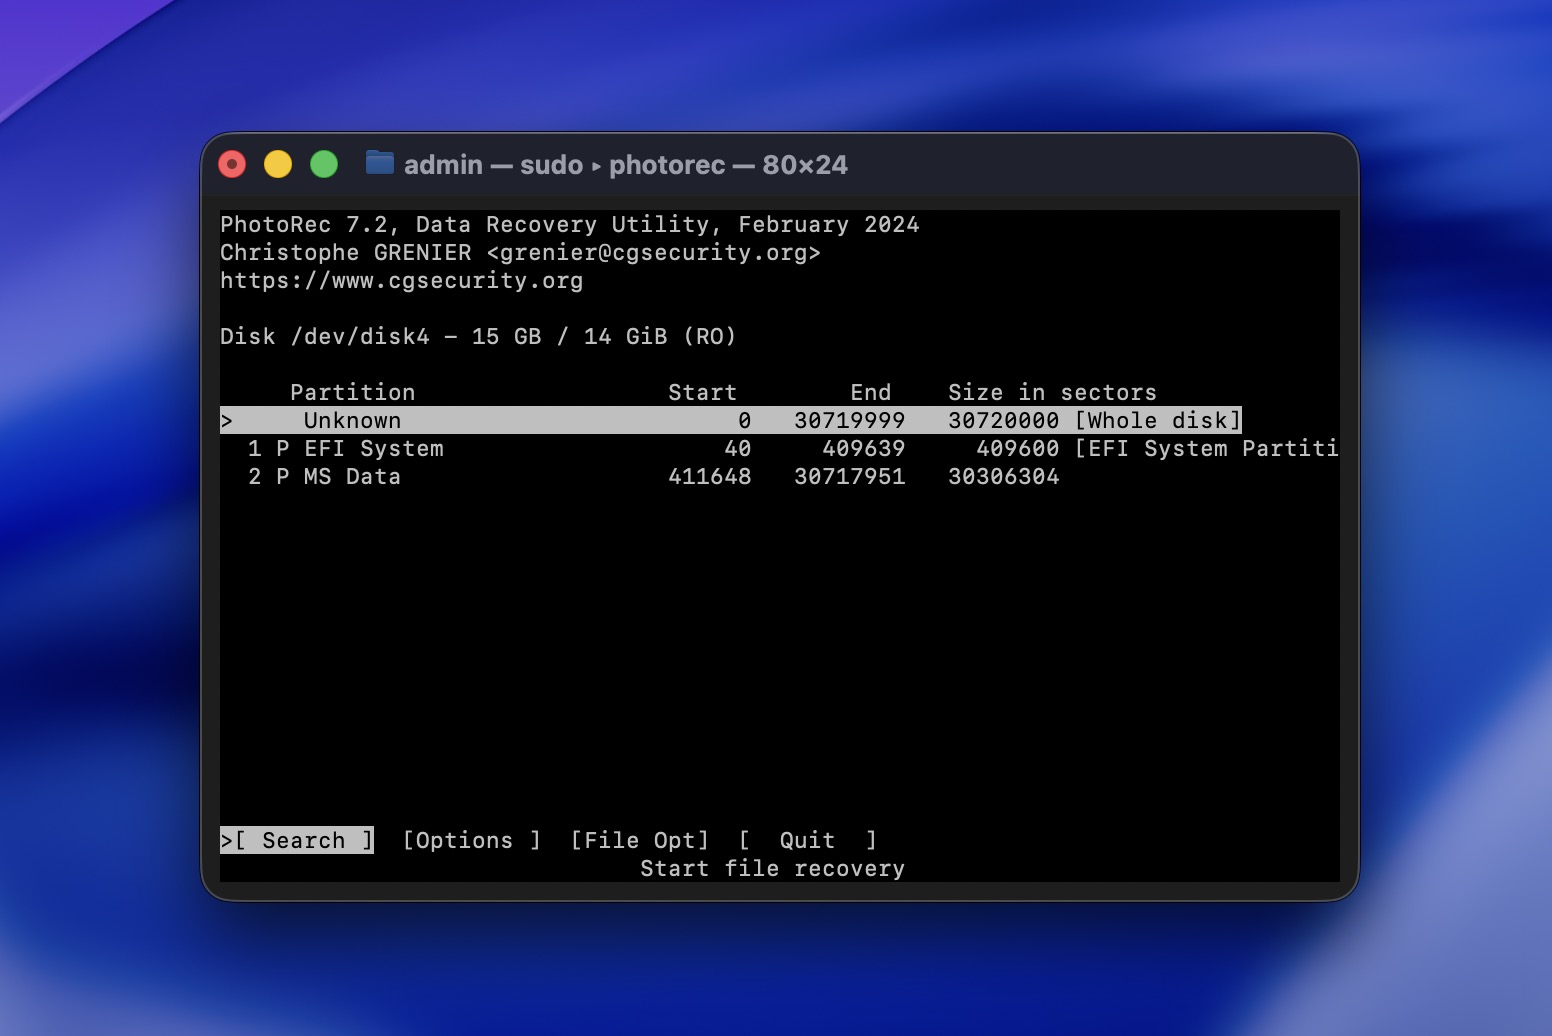
- Select Unknown if you want to scan the whole device. It’s slower but may reap better results.
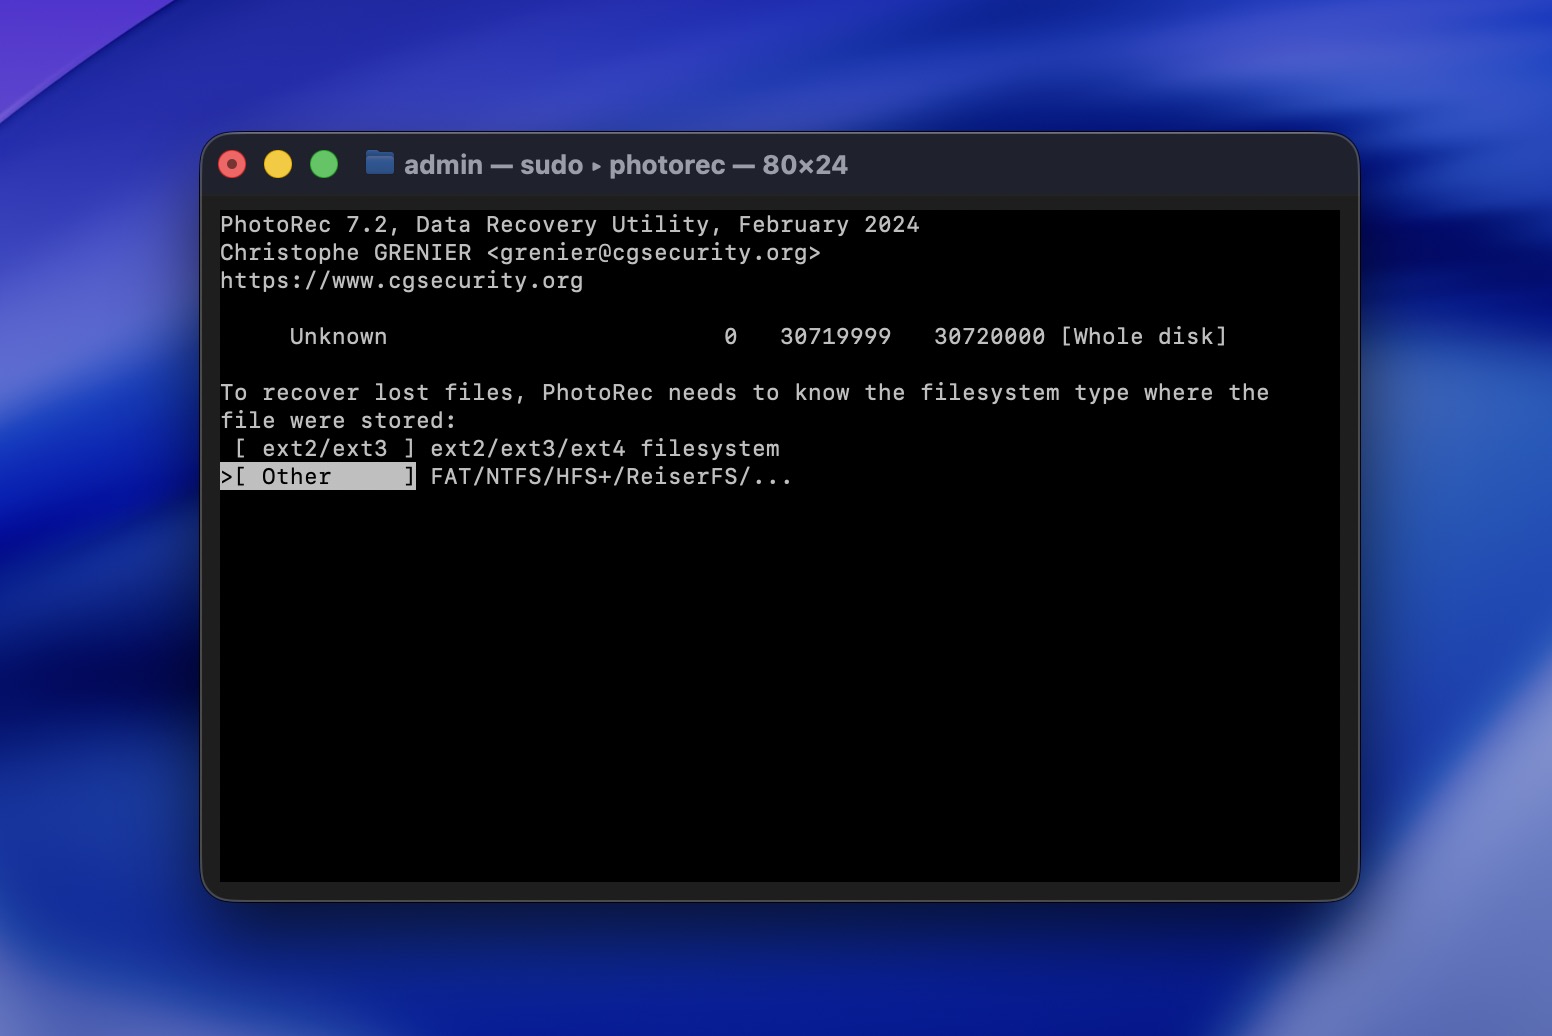
- Pick your card’s file system – usually Other is the best choice.
- Choose the destination folder where you’d like Photorec to save your recovered files.
- Let PhotoRec fully scan your card for best results. When the scanning process completes, PhotoRec will inform you about the files it found. Quit the app, and find your recovered files in the folder you selected in the previous step.
Just keep your expectations realistic. PhotoRec is a free and open-source tool (and that’s a big part of its appeal), but it also means it lacks many of the conveniences and recovery features you get in more sophisticated tools like Disk Drill.
It doesn’t offer the same kind of guided flow, preview experience (none), or scan flexibility; all recovered files come back without their original names or folder structure (it relies only on file signature recognition). On top of that, PhotoRec can’t create and scan a disk image of your CF card first. So while PhotoRec can still recover some data, it’s usually not as convenient as a paid recovery app.
For when it doesn’t, and your CF card is all but invisible, check our guide on how to repair an SD card that’s not reading or recognized on your Mac.
Is CF Card Corruption Preventable?
Even if you manage to get back all your data from a corrupted CF card, how can you make sure this won’t happen in the future?
- ❌ The most common cause of data loss is human error. Double-check you don’t need the files you’re trying to delete and that you’ve moved everything out of a CF card before formatting it.
- 💾 Keep backups of all your precious files, especially those it’s not easy or outright impossible to recreate.
- 📍 Avoid running apps from untrusted sources or that you don’t need. Always use antivirus software, especially if you’re on Windows, which malicious users target more because of its expanded user base.
- 🎎 Don’t use the same CF card on multiple devices. When you can’t avoid it, don’t accept any prompt from one of your devices to format or somehow “tweak” the CF card. If you can’t use it otherwise, first make sure you’ve backed up its contents to different storage media.
- 📌 Always carry your CF cards in their protective cases. Don’t let them exposed to intense sunlight, excessive heat, or moisture, and try to avoid getting them wet.
Even if you take the utmost care of your CF cards, always remember they’re meant to be replaceable and won’t last forever. At the first hint of a hardware failure, or if you notice their contents getting corrupted repeatedly, backup your failing CF cards and replace them as soon as possible.
Conclusion
It’s impossible to eliminate the possibility of data loss because of CF card corruption or any other non-file-friendly cause. Still, there’s no reason to live in constant fear you’ll lose your precious data.
As we saw, it’s possible to recover files that seemed forever lost. Even better, by following the simple rules we saw in the last section, you can drastically minimize the chances of data loss. Or, at least, be prepared for it.
It might need some time and effort, but it’s minimal, and as the saying goes, it’s better safe than sorry.

FAQ
Usually yes, unless you’re dealing with catastrophic hardware failure that renders your CF card inaccessible on all of your devices.
Even then, there’s hope: contact the knowledgeable folks at a trusted file recovery service. They might be able to get your precious data back from a damaged CF card using specialized equipment.
First, make sure the card is actually unreadable and not just missing from your file manager. A corrupted CF card often won’t open in File Explorer (on Windows) or Finder (on Mac), but that does not mean the system can’t still see it.
On Windows, check Disk Management. On Mac, check Disk Utility. If the card appears there with the correct size, even if it shows up as RAW, unmounted, or without a usable volume, that’s actually a good sign from a recovery standpoint. It means the file system is damaged, but the card is still detectable at the hardware level.
Once you confirm that, the next step is data recovery, not repair. Try to recover the files first with a tool like Disk Drill. If the card seems unstable, it’s even better to create a full image backup of the CF card first and scan that image instead. Only after your files are safe should you move on to repair tools or formatting.
On both Windows and Mac computers, you should begin with data recovery – either scan the CF card directly, or, if possible, create a backup image of the card first and recover your CF files from that backup using specialized software like Disk Drill (available on both platforms). Note that Disk Drill can help in both those steps since it also comes with support for cloning the contents of your CF cards into image backups.
Finally, check and fix any errors on the CF card with the tools that come with your OS for the purpose (CHKDSK on Windows and Disk Utility on Mac OS). As an extra final step, reformat your CF card while checking its whole storage area for errors.