Is your external hard drive not showing up on your Mac? This usually points to (a) a connection issue that keeps your drive from being recognized or (b) some form of corruption, resulting in your Mac not recognizing the external hard drive.
In this guide, we’ll walk you through every common fix–from troubleshooting your connections to handling serious corruption (safely)–while protecting your data throughout the process. We only included solutions that actually worked, as vetted by our in-house data recovery team on real external hard drives.
How to Properly Troubleshoot a Mac that Is Not Recognizing an External Hard Drive
Fixing and securing files from an unrecognized external hard drive takes several steps—and it can get confusing, fast. To help you hit the ground running, we prepared a troubleshooting menu; you can follow each step to systematically diagnose your drive, or you can identify which scenario resonates with your experience and jump straight to the solution via links in the rightmost column.
Warning: If your drive doesn’t appear in Finder but appears in Disk Utility, and you suspect hardware damage, do these 2 things first. (1) Mount your drive as Read-Only using the diskutil mountDisk readOnly /dev/diskX command. (2) Create a byte-to-byte backup of your disk (see instructions in the data protection part of this guide).
| Troubleshooting steps | Reasoning | Guide Links |
| Step 1: Check if macOS can actually see the external hard drive. | First, check if your Mac “sees” your drive on either a software or even just a hardware level. If your hard drive is not showing up on your Mac at all, you may have a connection issue, or your drive is physically damaged. |
|
| Step 2: Do the easiest solutions first. | If your drive appears in System Information (at least), the issue may be a simple bug, a faulty connection, or the “wrong” settings. | |
| Step 3: Check if your drive appears in Disk Utility. | Even if it doesn’t appear in Finder, as long as your drive shows up in Disk Utility (and is mounted), you might only be facing a minor system or disk error. Alternatively, you may need to adjust Finder’s settings. | |
| Step 4: Fix any mount errors. | If your drive appears in Disk Utility but won’t mount, the problem can range from connection issues to hard drive corruption. Follow the steps in the right column in order, prioritizing data recovery/protection. |
How to Protect Data on the External Drive that Is Not Showing up on a Mac
If your drive shows up in Disk Utility, but you can’t access your data, the very first thing you should do is secure your files (if they matter to you). Data loss is a real possibility during or even after the repair process.
For this guide, we’ll be using Mac hard drive recovery software because it can do 2 important things: (1) create a byte-to-byte image backup, and (2) recover lost data from an external hard drive–even if it’s corrupted. Notably, it can perform a data recovery scan on the image backup file instead of the drive itself–which can prevent your drive from enduring further wear during the process.
- While your drive is disconnected from your Mac, download and install Disk Drill from the CleverFiles website.
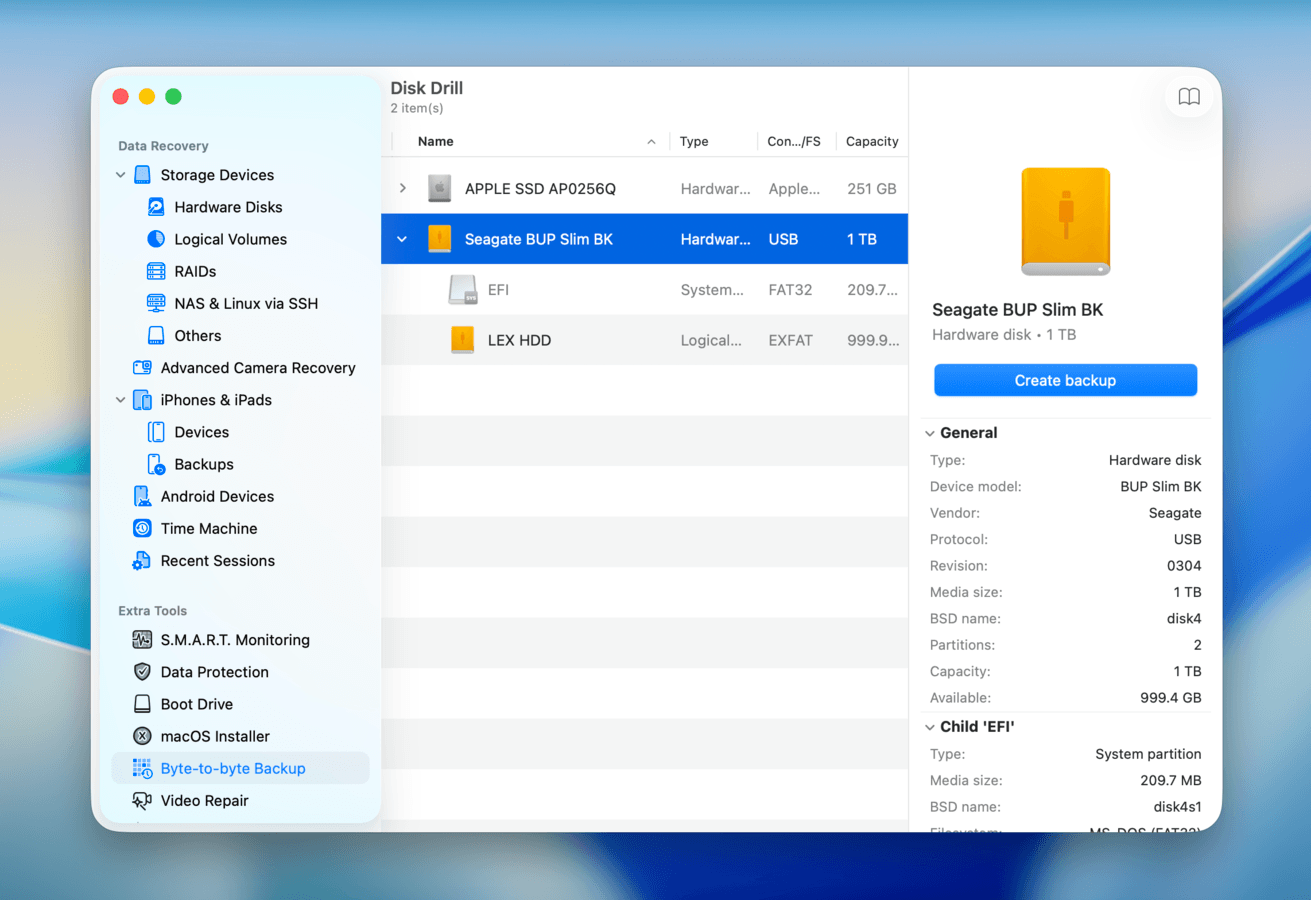
- Open Disk Drill. If you don’t want to create a backup, jump to step 6. If you want to create a Byte-to-byte backup (recommended), click Byte-to-byte Backup in the left sidebar. Then, select your drive from the list and click Create backup.
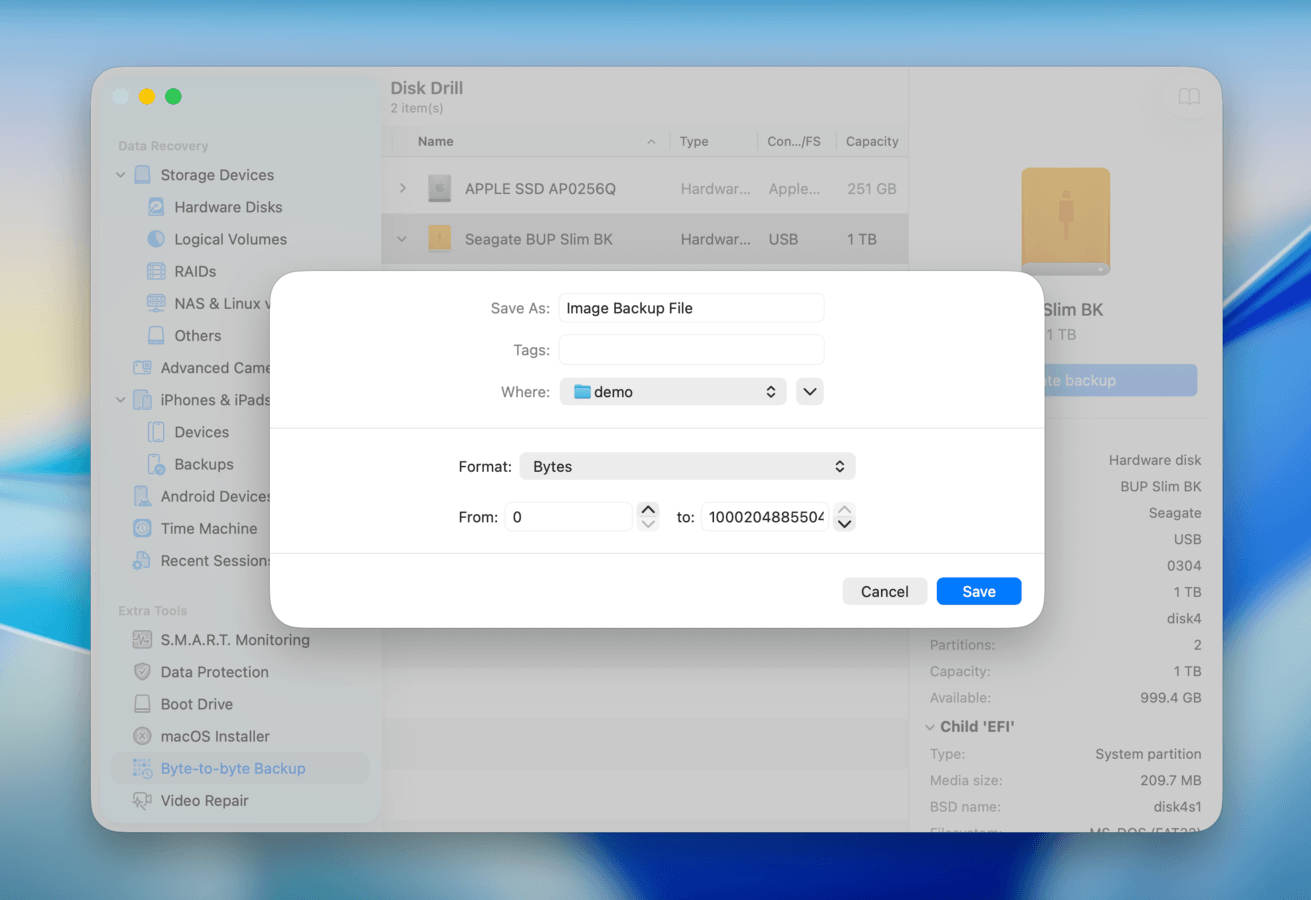
- Choose a name and location for the image backup file–make sure to select a folder on your Mac, not on your external hard drive. Then, click Save.
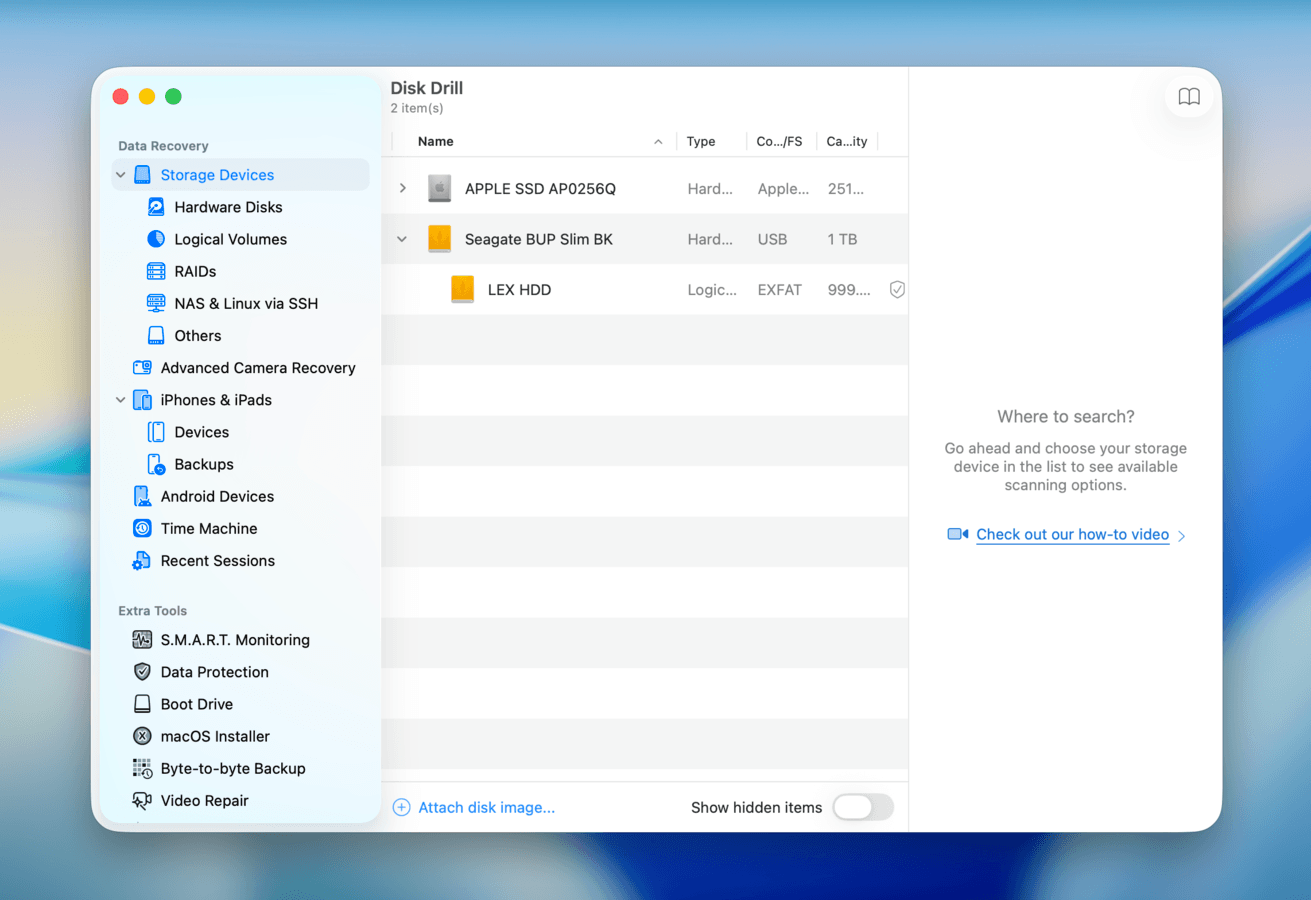
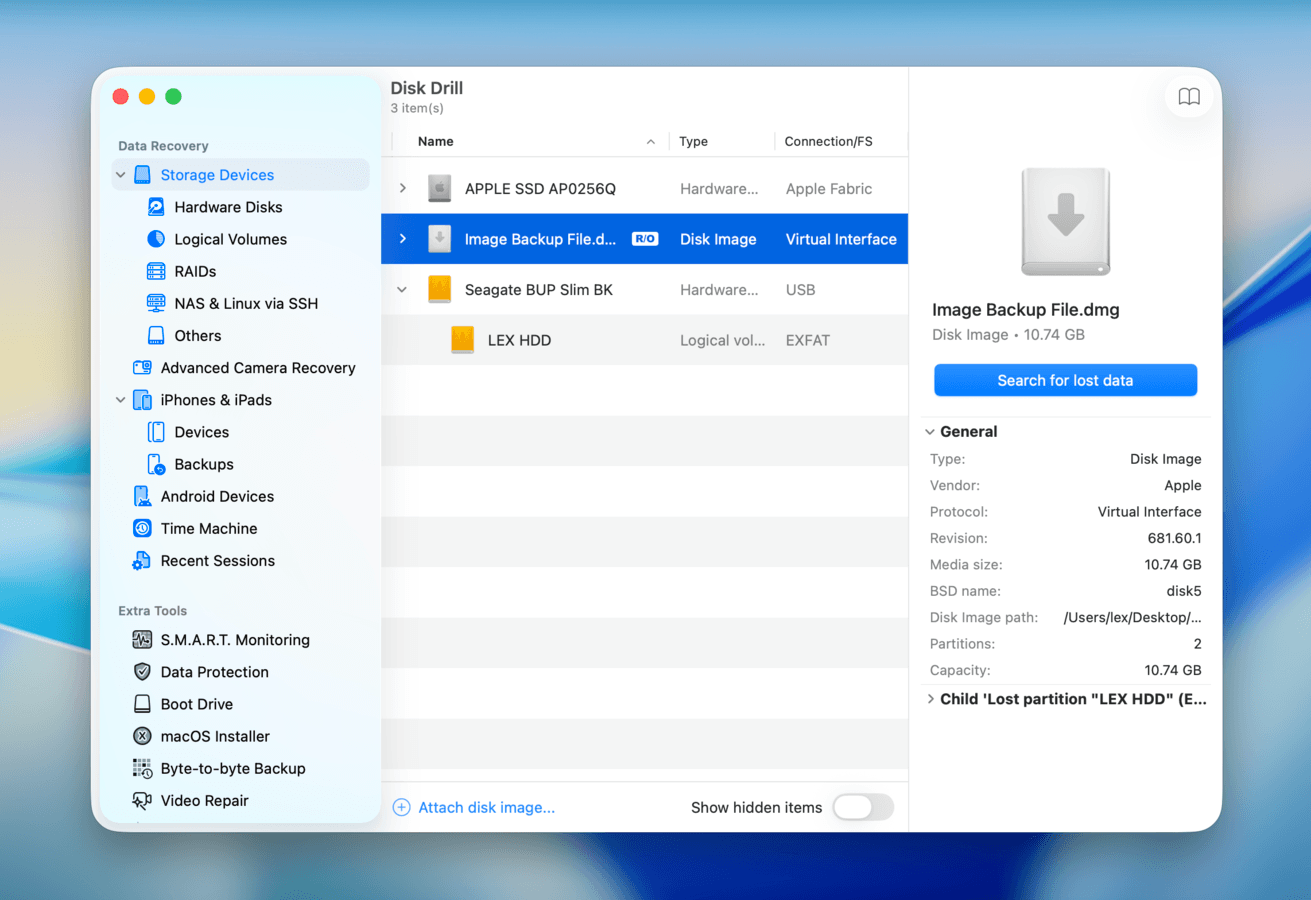
- After creating the backup file, return to Disk Drill’s main menu. Then, on the left sidebar, select Storage Devices. Click the Attach disk image button at the bottom of the window.
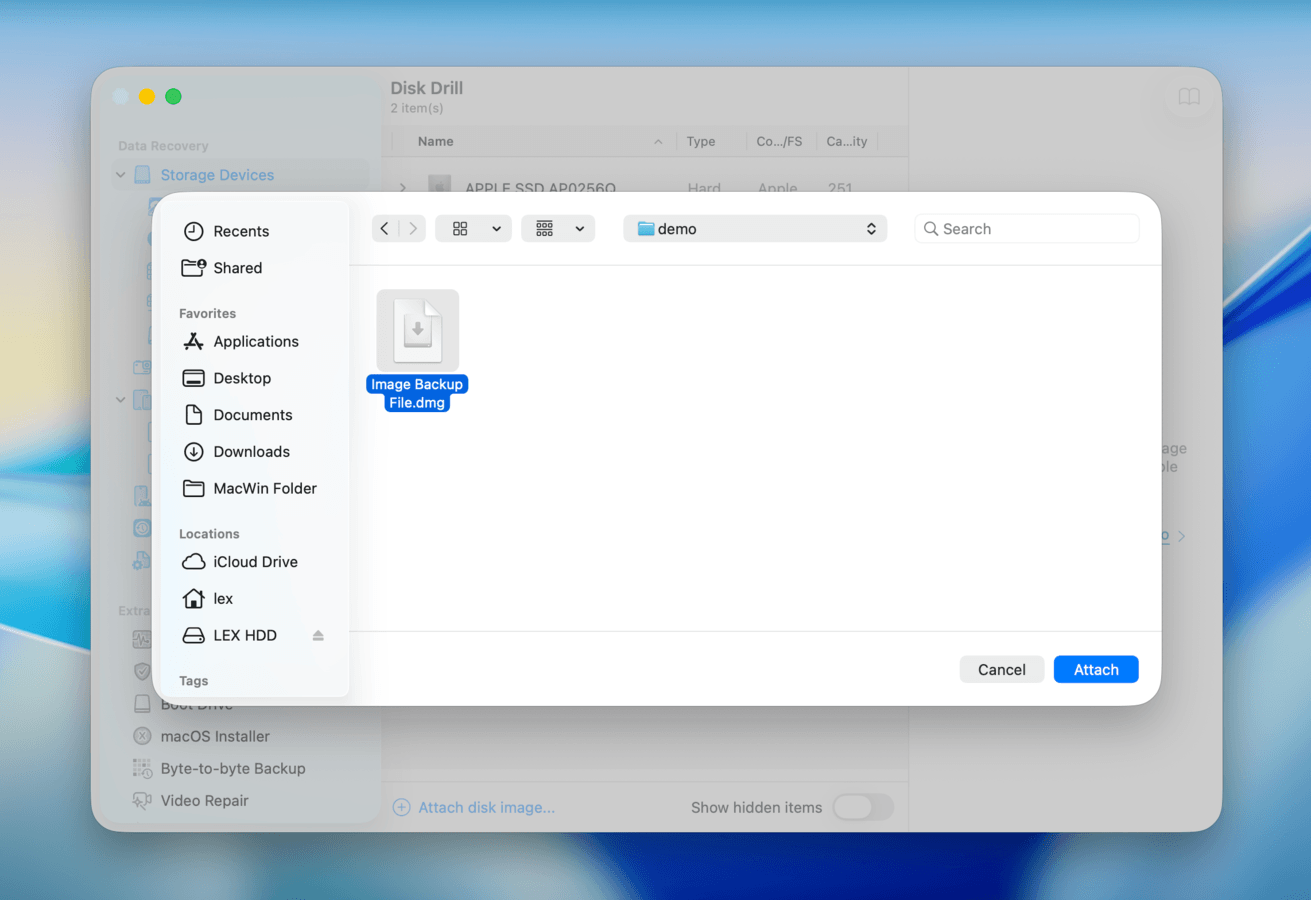
- Locate and select the backup file you created in step 3. Then, click the Attach button.
- If you didn’t create a backup in step 2, select your drive. If you did create a backup, select the newly attached disk image. Then click Search for lost data.
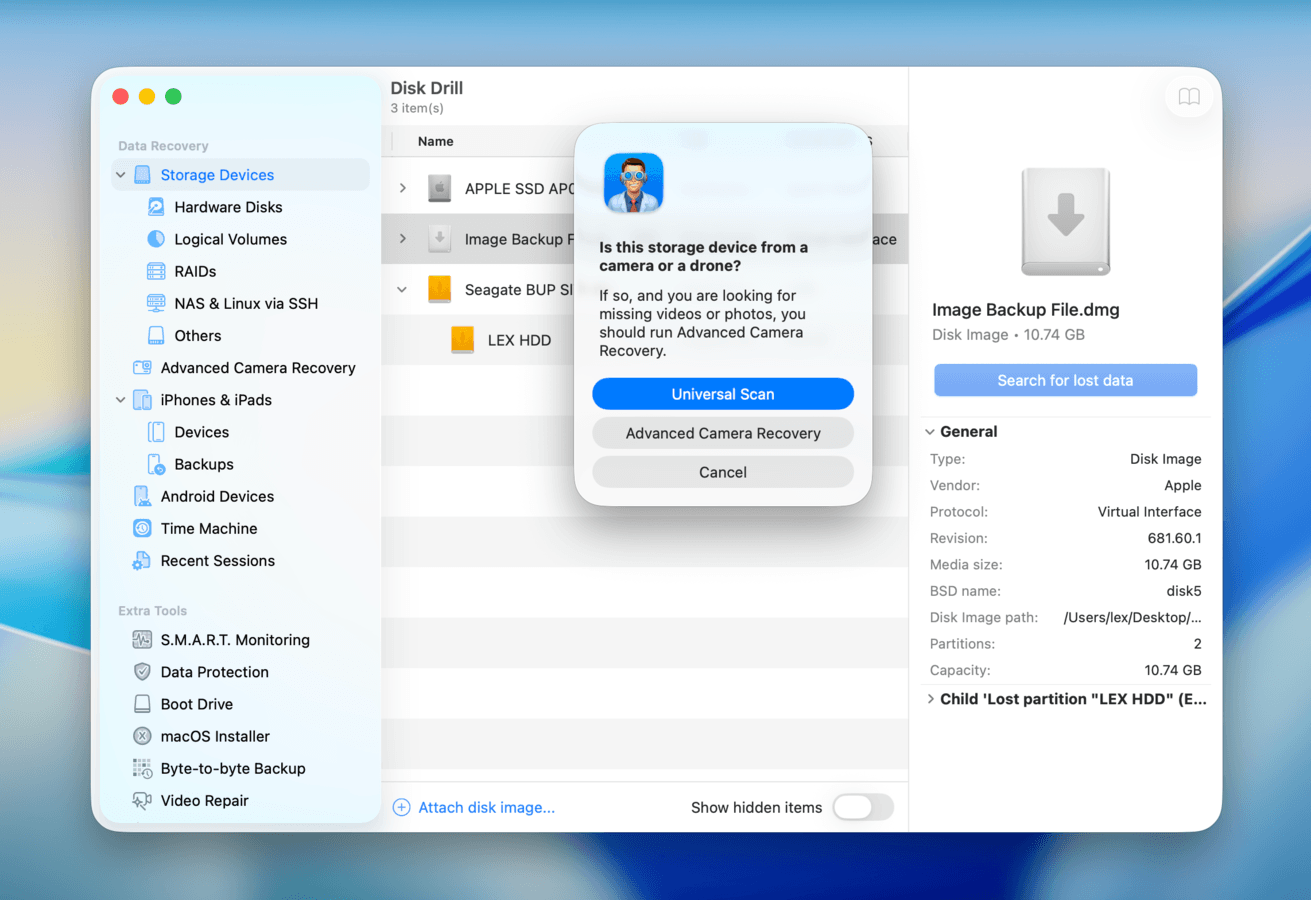
- A pop-up may appear, asking you to choose which scan type Disk Dril should use for your drive. We recommend starting with the Universal scan. If any unedited videos you recovered end up unplayable, scan your drive again with Advanced camera recovery.
- Once Disk Drill is done scanning your drive, click Review found items.
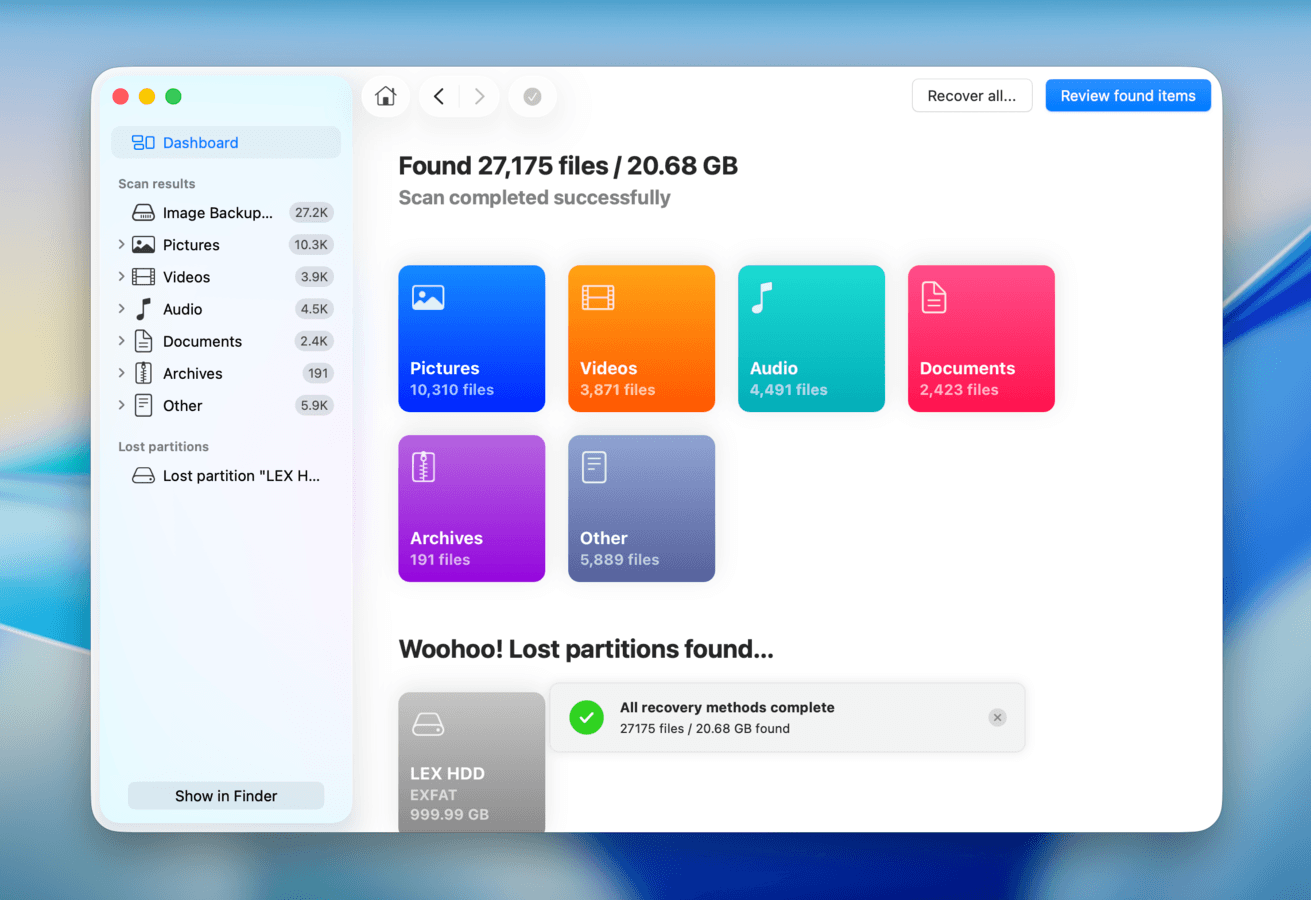
- If you simply lost access to your drive data, focus on the Existing section. If your files aren’t there, try the Deleted or lost and Reconstructed sections. You can also use the search tool in the top right corner, as well as the filters in the left sidebar, to narrow down Disk Drill’s scan results and locate your files faster.
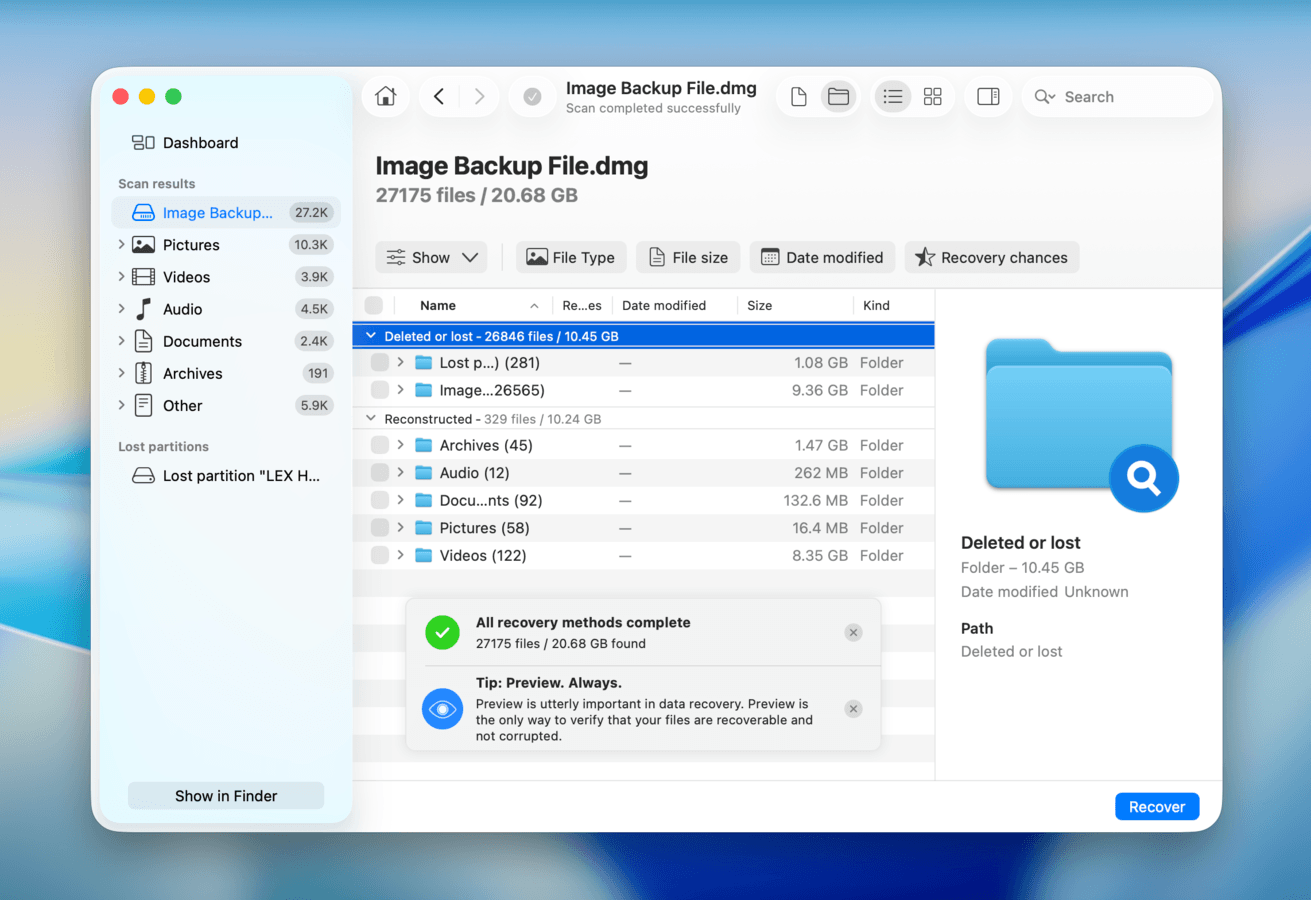
- When you find your files, make sure to click each file once to preview it–this allows you to verify what data is actually recoverable. Then, select the files you want to restore and click Recover.
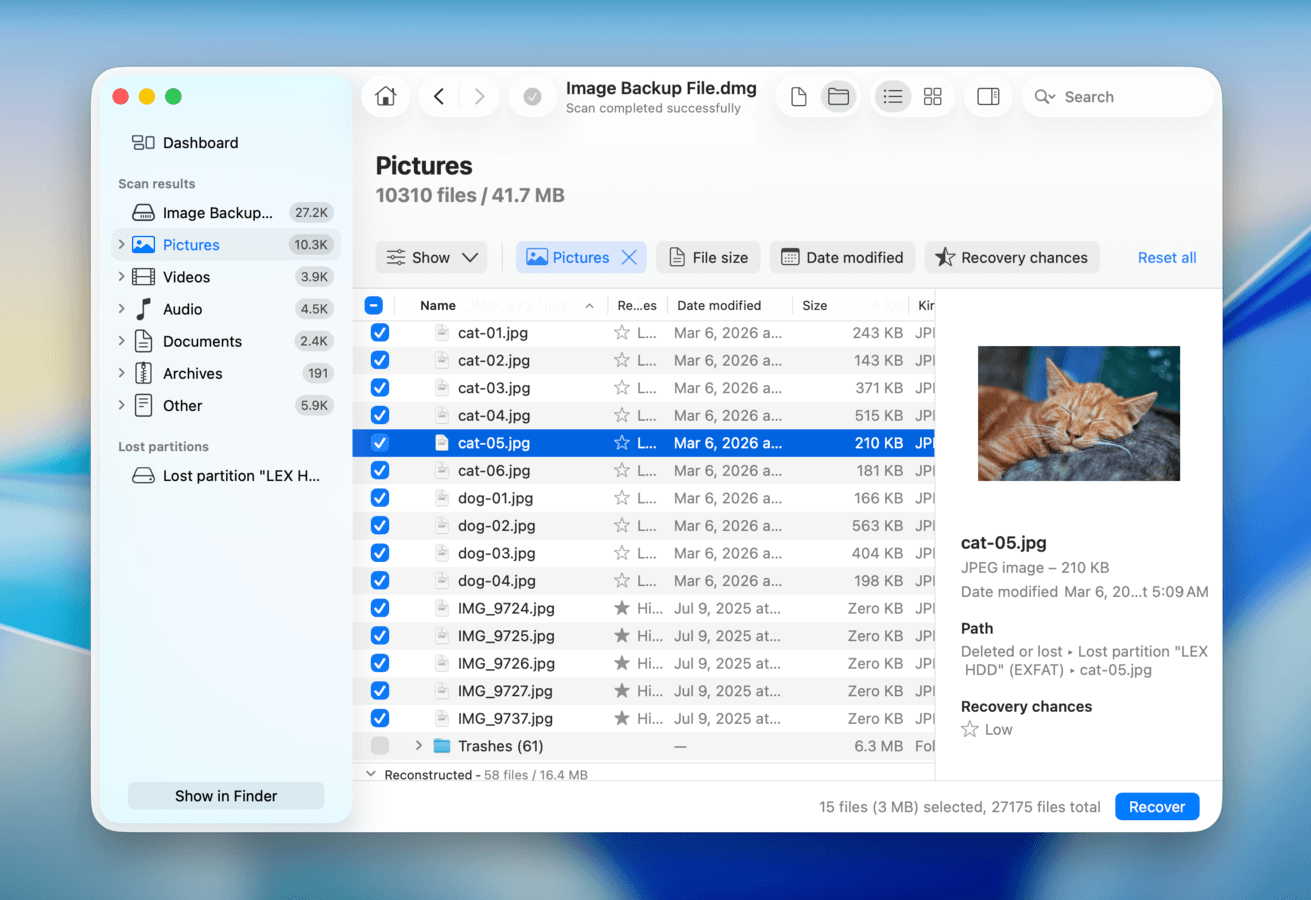
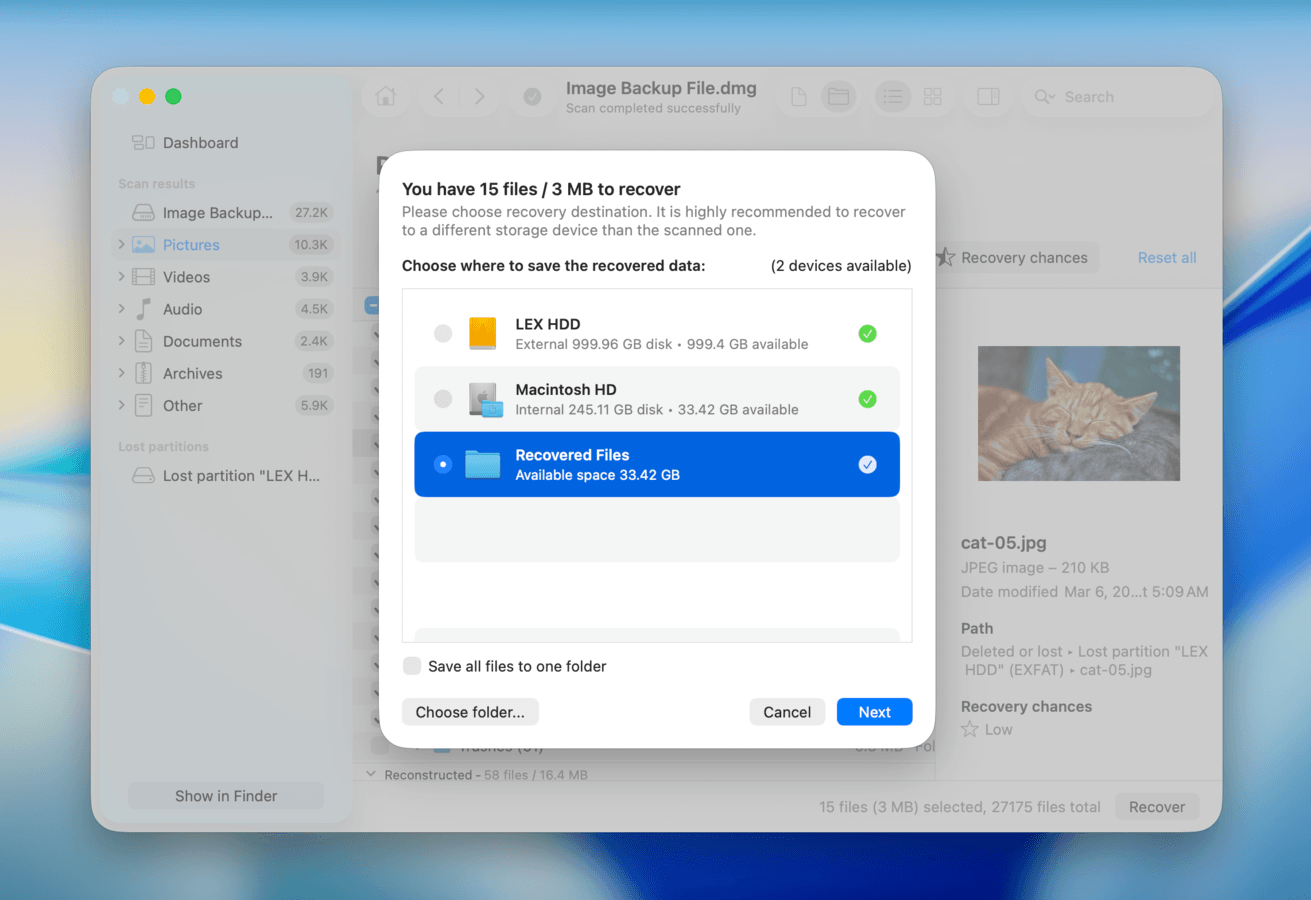
- Choose a folder where you want Disk Drill to save your recovered files. Make sure to select a folder on your Mac–not on your external hard drive; you might overwrite the data you’re actively trying to restore. Finally, click Next.
Here are some other key advantages of Disk Drill that can help you restore files, specifically during cases where your Mac won’t recognize your external hard drive:
- Scanning algorithms: Disk Drill has a powerful signature scanner (that recognizes about 400 file signatures), which is the most reliable way to restore data from corrupted drives that don’t appear.
- Partition recovery: In case of lost partitions (common in malfunctioning drives), you can restore entire disk partitions while preserving the original folder structure and file names.
- Reliable preview: Disk Drill has a very reliable and completely free preview feature that works with almost any file type–including videos and RAW photos. Use it to check if your files are still recoverable.
- Advanced camera recovery: Many videos end up unplayable post-recovery due to fragmentation, which commonly happens with drives with visibility problems. Disk Drill’s ACR module automatically “stitches” videos together whenever it finds data fragments during the recovery process.
- Diagnostic tools: The S.M.A.R.T. (Self-Monitoring, Analysis, and Reporting Tool) feature can scan your external hard drive for damage, and you can have it monitor disk health in real-time by adding it to your Mac’s menu bar.
- Session management: Disk Drill is very good at detecting disconnections and picking up where the scan or backup last stopped. This is a huge advantage in case your drive glitches out mid-recovery.
How to Fix a Hard Drive Not Showing Up on a Mac
In this section, we’ll cover 8 methods to repair an external hard drive that won’t appear on your Mac. We strongly recommend starting at the top, then working your way down–each fix builds on the previous one, and skipping ahead makes it harder to identify and eliminate the root cause of the problem.
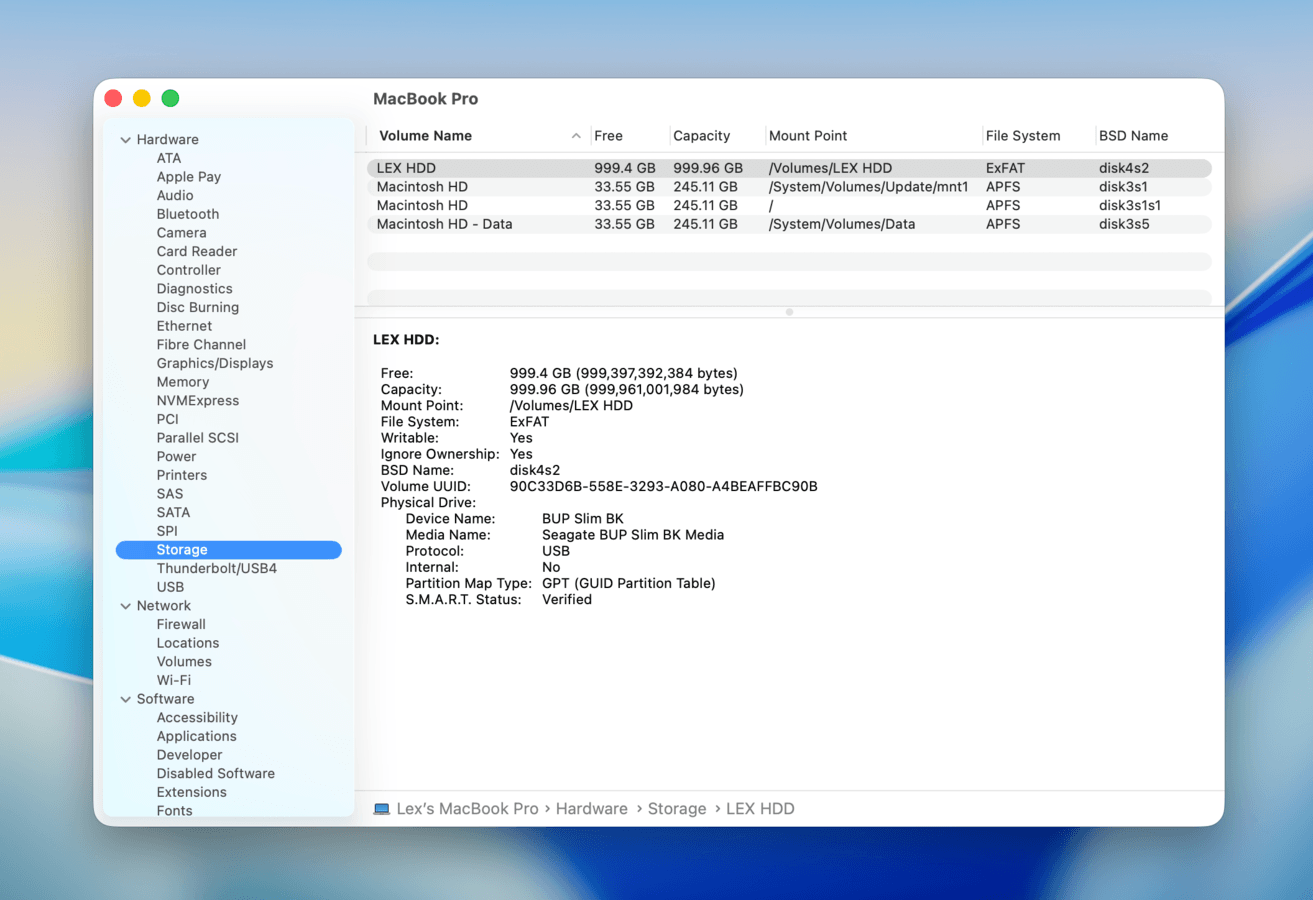
1. Check System Information
System Information shows you the hardware-level connections of any external devices to your Mac. If your drive appears in System Information, but not in Disk Utility or in Finder, then it points to a software or system error rather than corruption or damage on your drive.
In other words, macOS can “see” your drive, but can’t mount it. This simple diagnosis step can help you narrow down what fixes to try next as you proceed with your repair attempt.
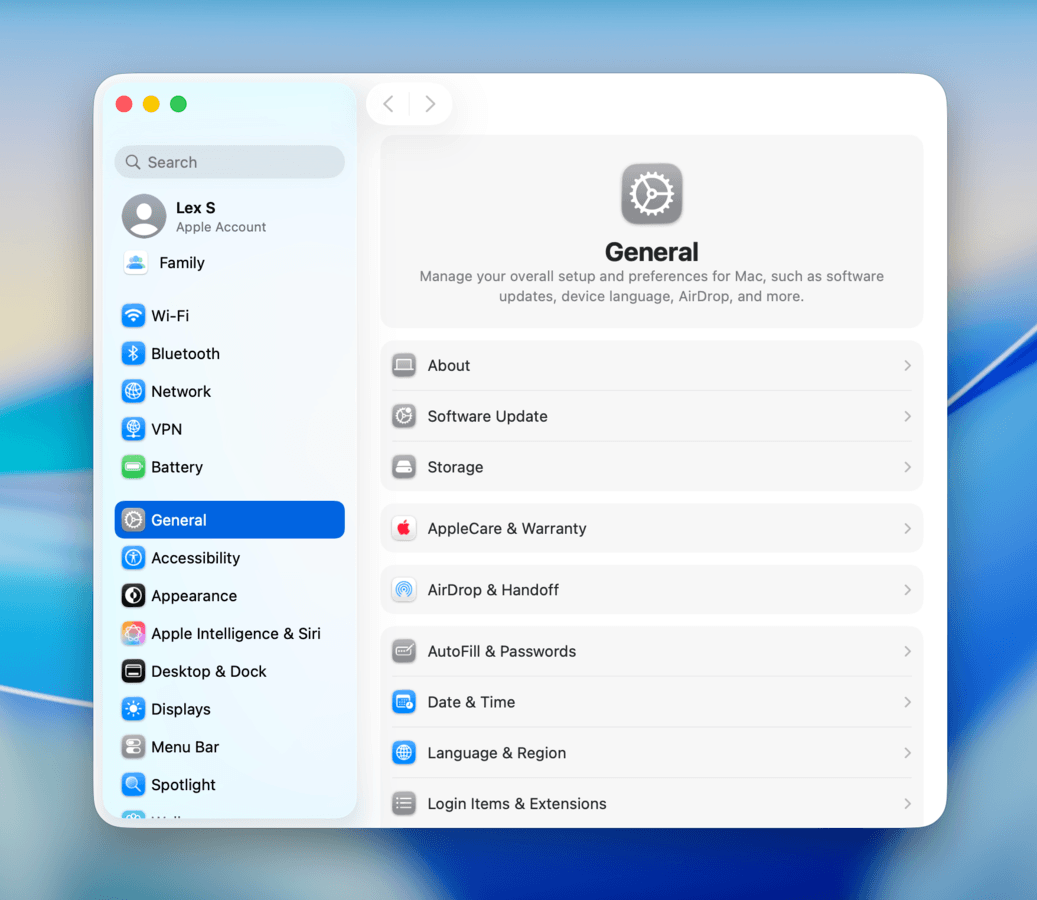
- Open the System Settings app.
- On the left sidebar, select General. Then, click About at the top of the General page.
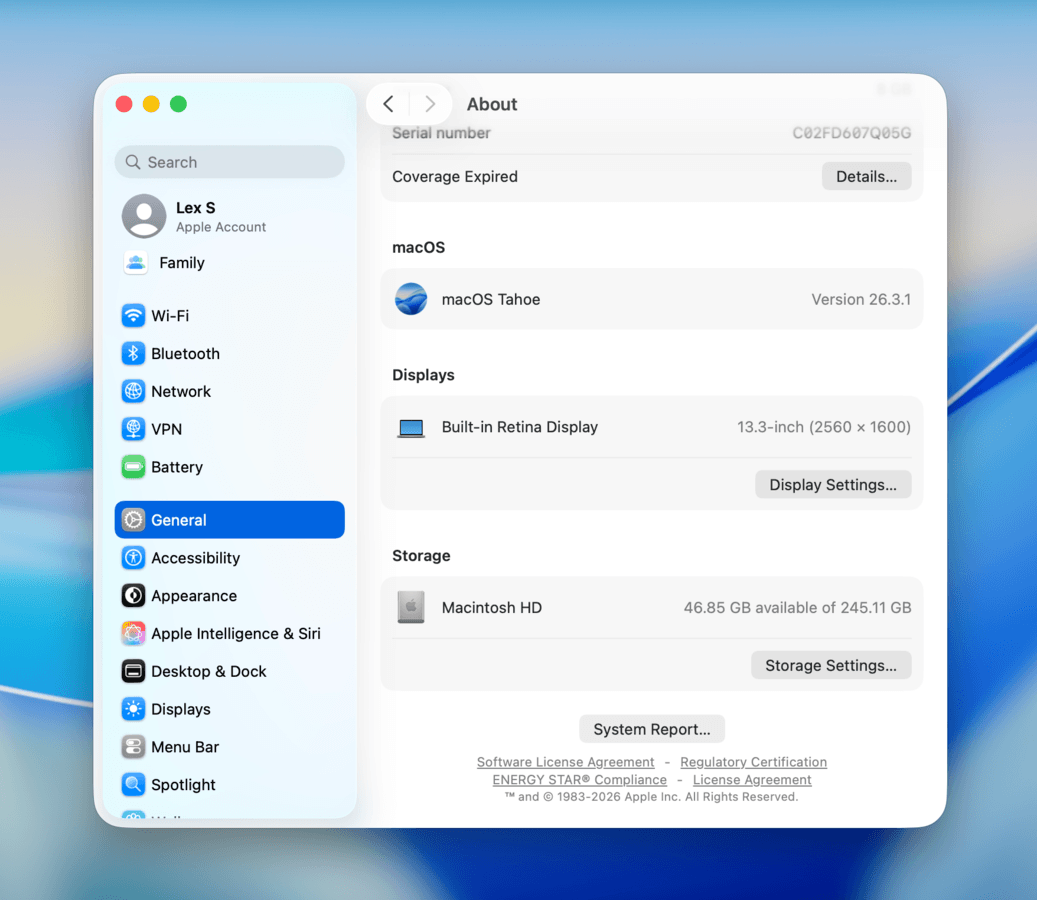
- Scroll down to the bottom of the About page and click the System Report button.
- In the new window that appears, select the Storage option under the Hardware category in the left sidebar. At the very top of the page, you’ll see a list of volumes that your Mac can detect. Select your external hard drive, then check if its storage information is correct.
If your Mac is not detecting your external hard drive at all, you’ll need to check your cable or port for connection issues (Method 3) before proceeding with the rest of the solutions.
2. Try a Simple Restart
A common reason for Mac not reading your external hard drive is mounting failure (which prevents it from appearing in Disk Utility and Finder). System processes required for this task can sometimes get stuck–restarting your Mac safely “closes” these processes and begins a fresh session.
- With your drive still connected to your computer, click the Apple button on your Mac’s menu bar. Then, select Shut Down from the context menu.
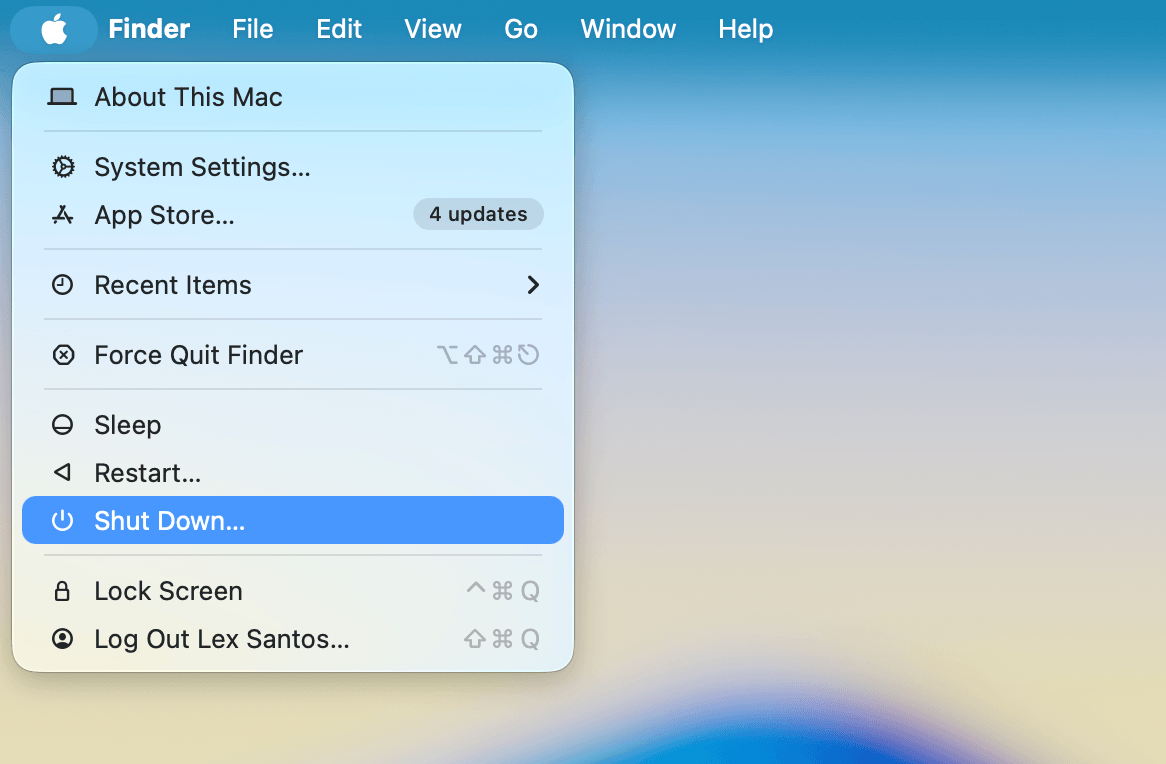
- In the pop-up menu that appears, click Shut Down to confirm the action.
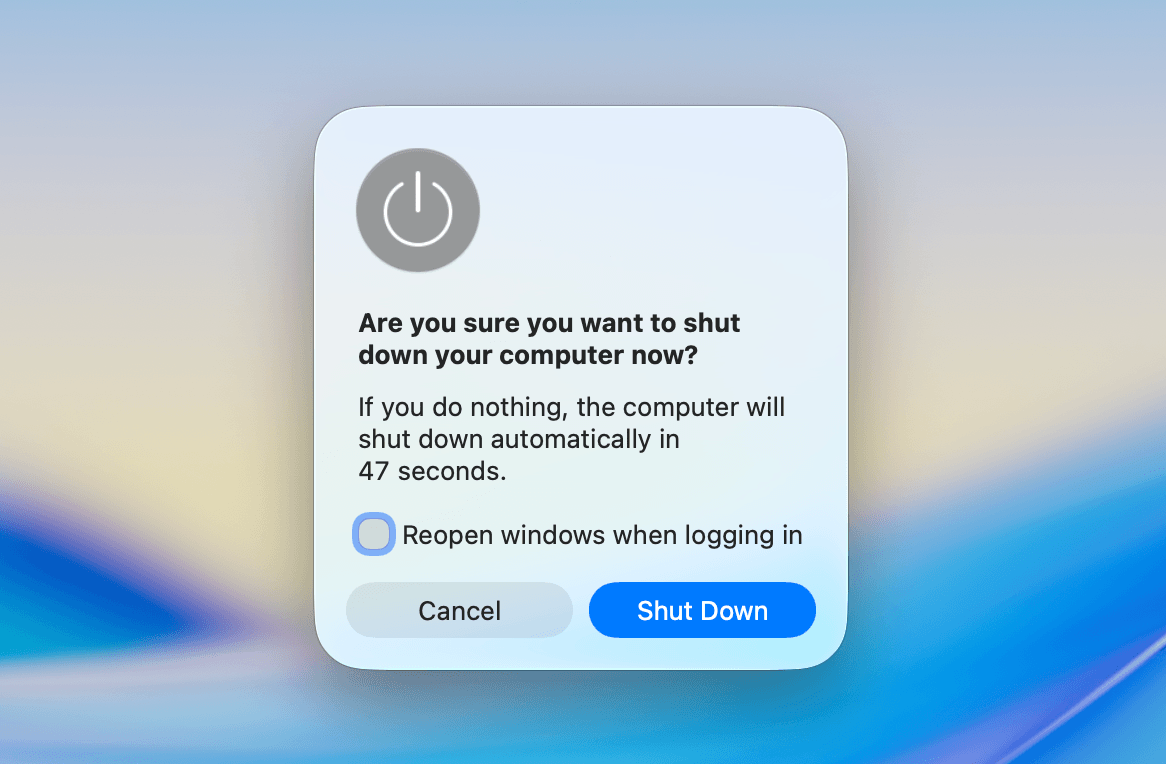
- Wait until your Mac goes completely black, you don’t see or hear any micromovements from the machine, and your external hard drive’s disk has completely stopped spinning. Then, disconnect your drive.
- Start your Mac up again. After your Mac’s UI interface elements appear, reconnect your external hard drive to your computer and check if it appears in Disk Utility.
3. Eliminate Connection & Power Issues
External devices need a reliable connection to work; not only does it ensure that your data gets transferred safely, but it also routes power from the Mac to your drive to keep the disk spinning. A faulty hardware connection is a very common root cause for storage device issues, and you should systematically rule them out early in your repair process.
Here’s a simple checklist that you can follow:
Info: We also recommend turning off your Mac, disconnecting ALL peripherals, then turning it back on again. Do this at least once before proceeding to allow your computer to redistribute power to its ports.
- Damaged cable: If your cable is damaged, it’s possible that the wires that actually carry your data to and from your drive are broken. Even if your drive lights up, your Mac won’t detect the storage device on its board. Replace your cable ASAP, and make sure the new one has fast enough speeds to support your drive.
- Damaged ports: Ports house the microscopic pins or “teeth” that, when connected, produce the electrical circuit required for your Mac to read your drive. If any of the pins are bent or corroded, or the port is damaged or blocked by debris, macOS can’t establish a reliable connection (if at all). Test different ports on your Mac or try connecting your drive to a completely different computer.
- Inappropriate cable: If you use a cable only suitable for standard charging, it may lack the USB speeds required by modern external drives. Try upgrading your cable.
- Power issues: Many modern external drives require a lot of power to work; if you have several devices connected to your Mac, they may use up power that your drive needs to operate. Keep your Mac connected to a power source and disconnect all external devices, other than your hard drive.
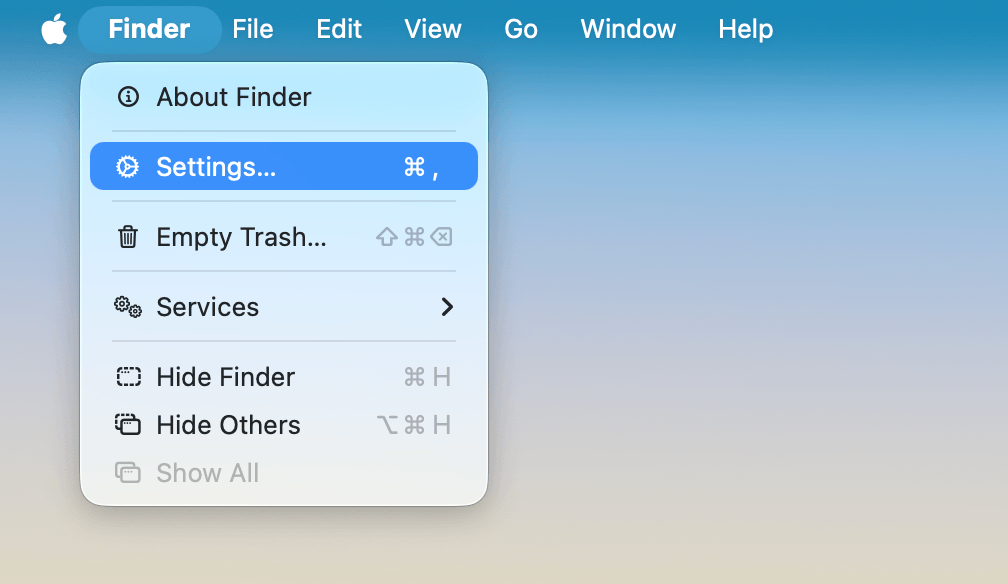
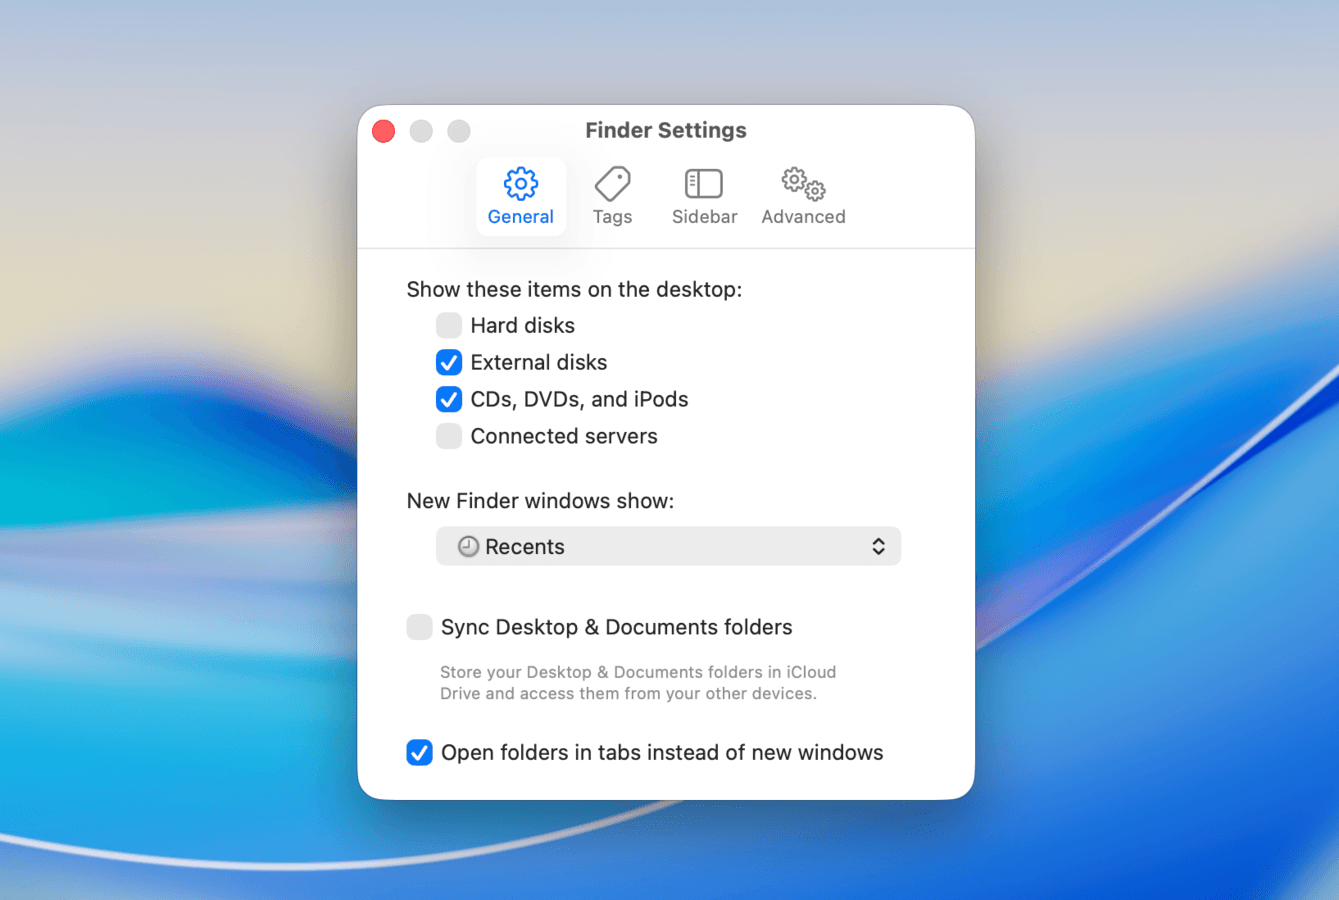
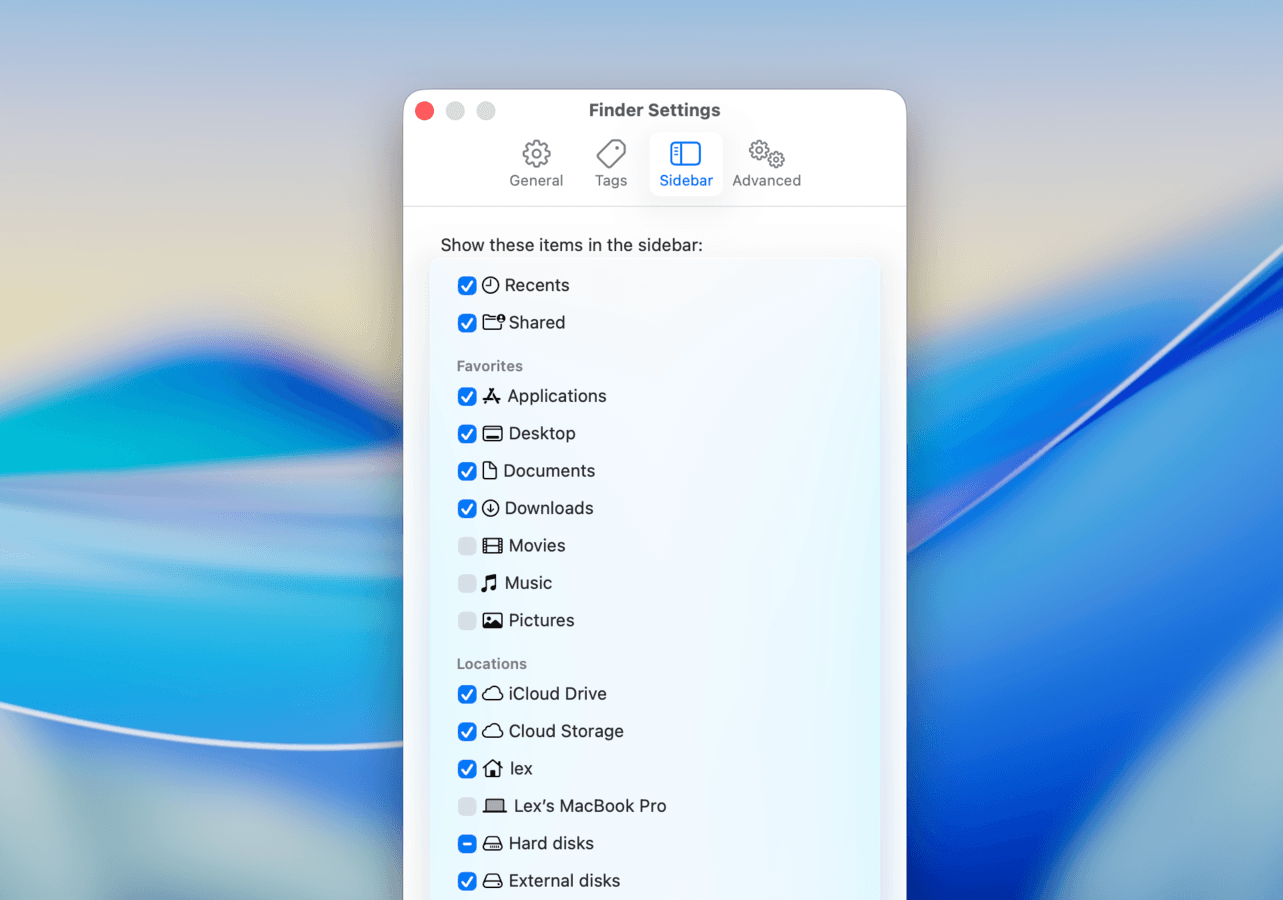
4. Change Finder Settings
Another surprisingly common and easy-to-fix scenario that makes your external hard drive “disappear” from your Mac is incorrect Finder settings. Finder allows you to choose which folders and external devices show up in the sidebar (under Locations) and on your Desktop. We’ll show you how to set Finder to display external devices on your Mac.
- Open Finder.
- On your Mac’s menu bar, click Finder. Choose Settings.
- Navigate to the General page, then make sure that the box beside External disks is checked.
- Finally, navigate to the Sidebar page. Under the Locations section, ensure again that the box beside External disks is checked.
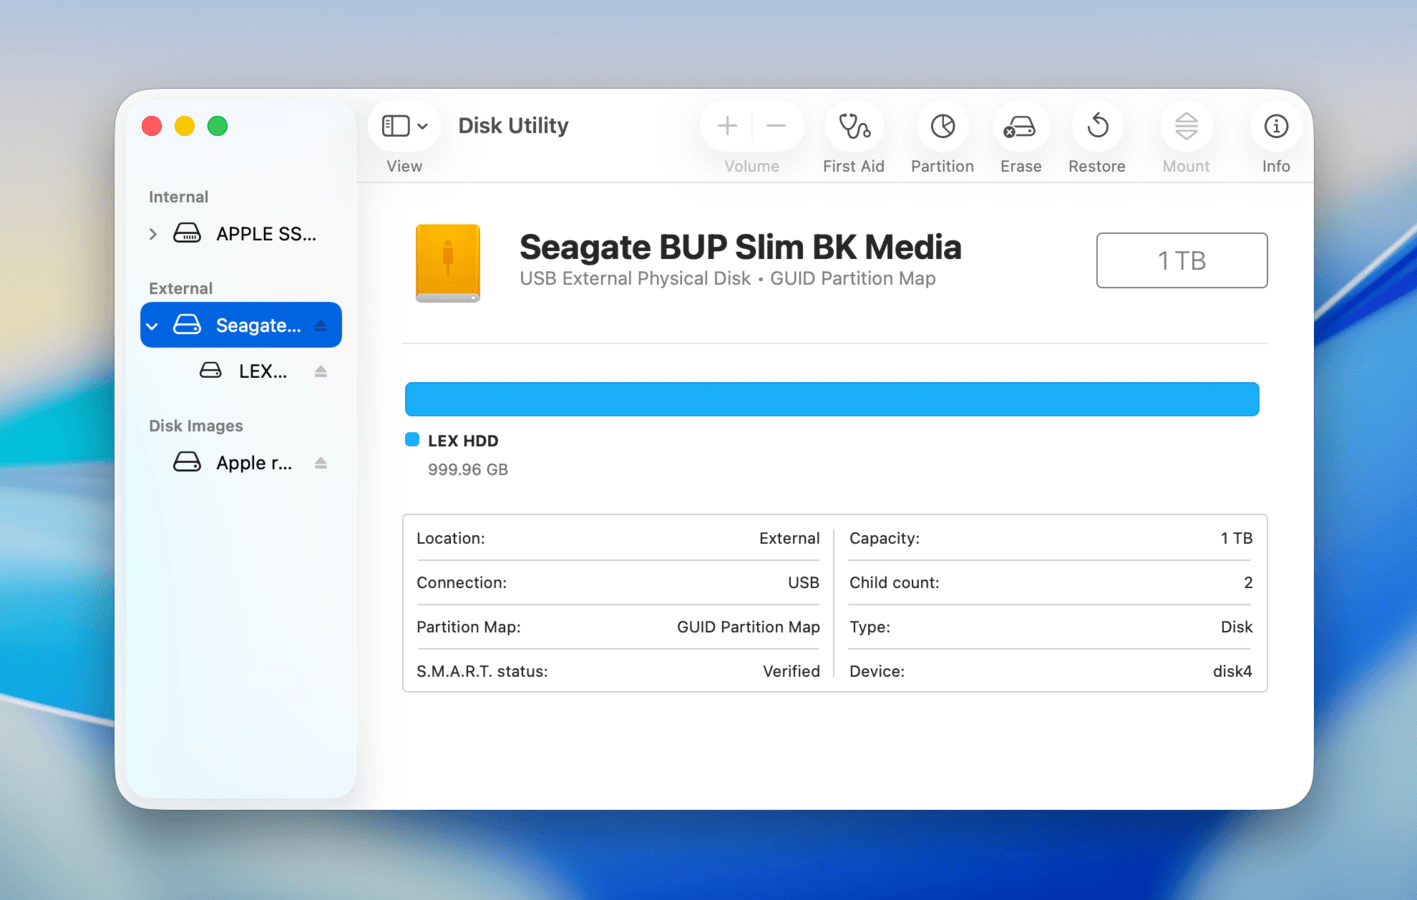
5. Mount the Drive Manually
MacOS usually mounts drives automatically, but there are cases when that process encounters an error. In these situations, you can manually initialize the mount process yourself. There are two ways to do it: (a) using Disk Utility’s Mount tool or (b) running the mountDisk command in the Terminal app.
We recommend trying Disk Utility first, since you literally only need to click one button to mount your drive (with a bit of setup). However, in case the Mount button is greyed out for your drive in Disk Utility, or your drive doesn’t appear in the app at all (but it shows up in System Information–Step 1), Terminal commands can bypass these issues and “force” your drive to mount.
Mount your drive in Disk Utility:
- Open the Disk Utility app (Finder > Applications > Utilities).
- Click the View button and select Show All Devices.
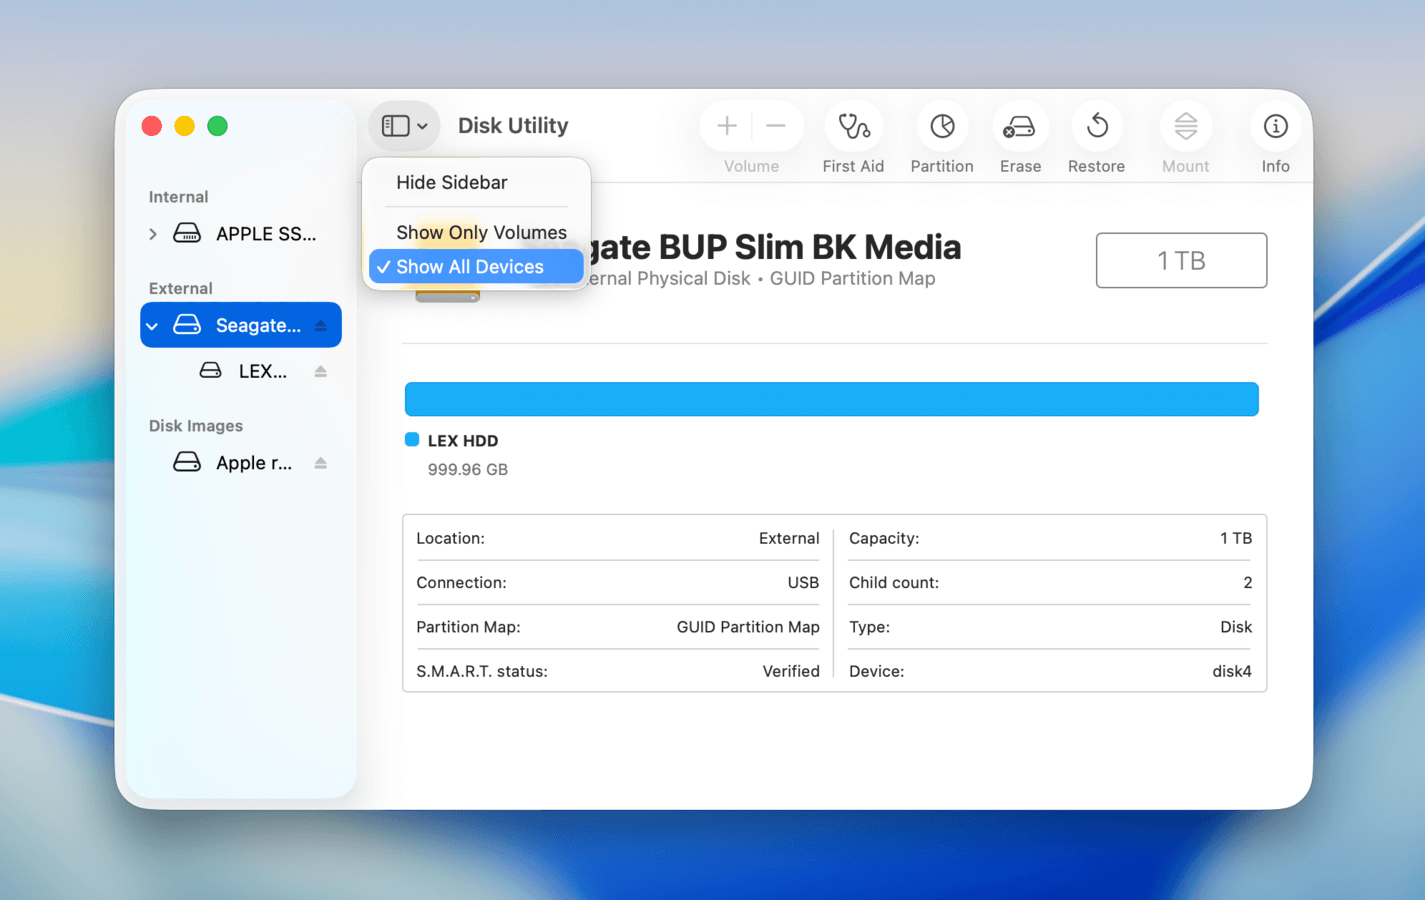
- On the left sidebar, select your external hard drive. Then, on Disk Utility’s toolbar, click Mount. Make sure to select Mount when the confirmation pop-up appears.
Mount your drive using Terminal Commands:
- Open the Terminal app (Finder > Applications > Utilities).
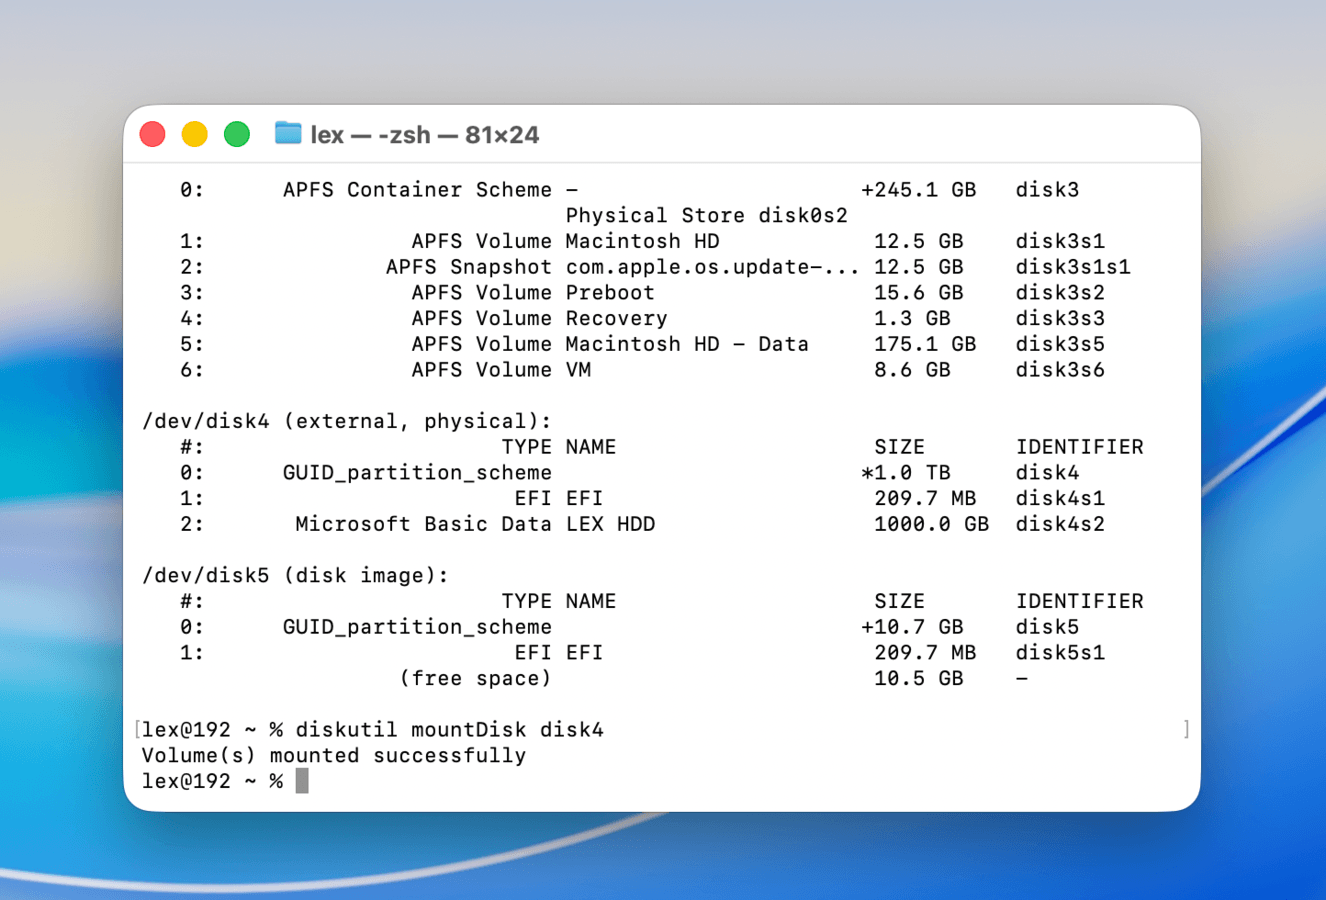
- Use the following command to list all the disks macOS can “see” and find out your drive’s identifier (ours is disk4):
diskutil list
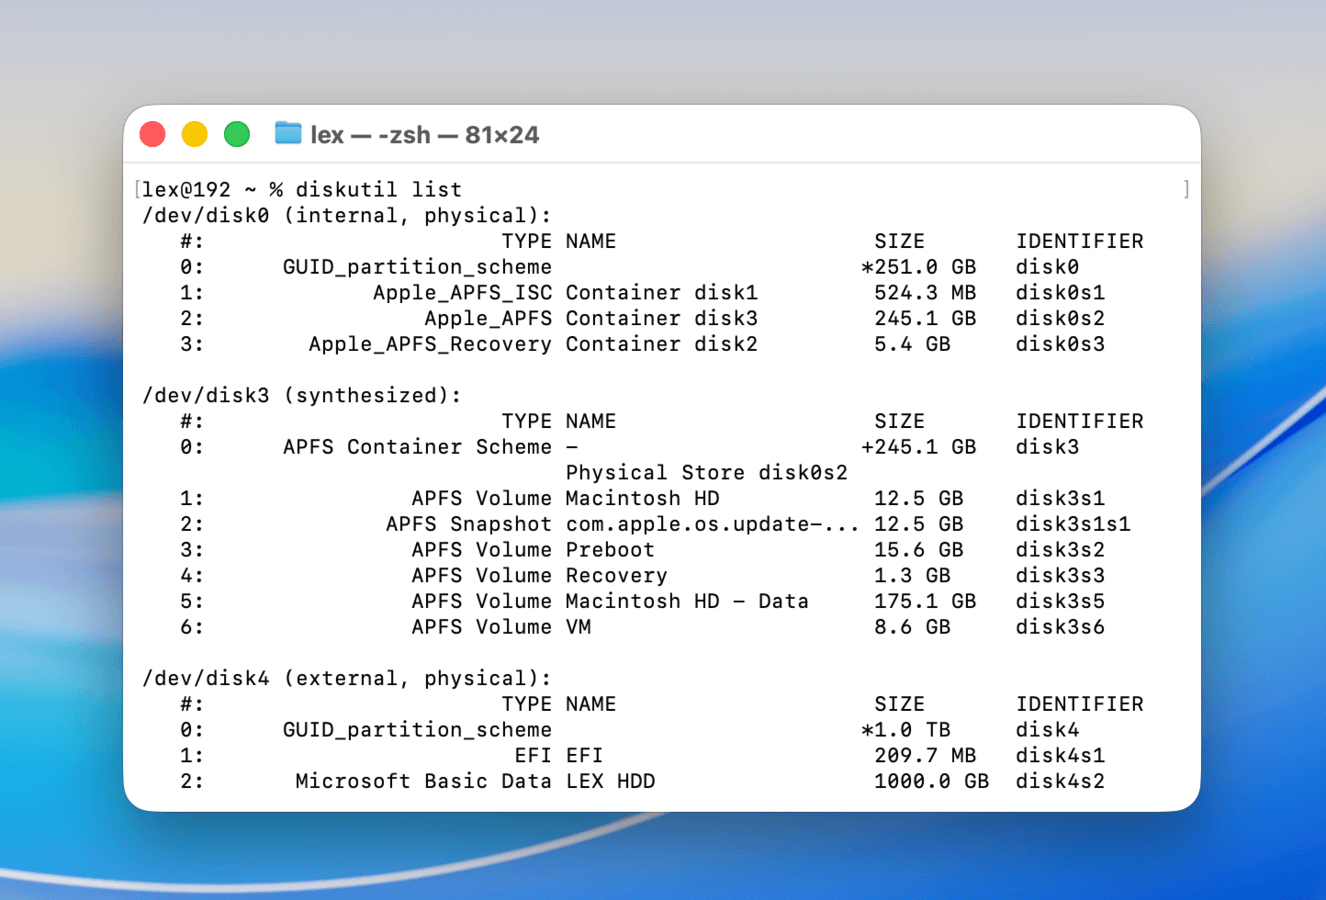
- Finally, mount your drive using the following command (replace /dev/disk4 with your own drive’s identifier):
diskutil mountDisk disk4
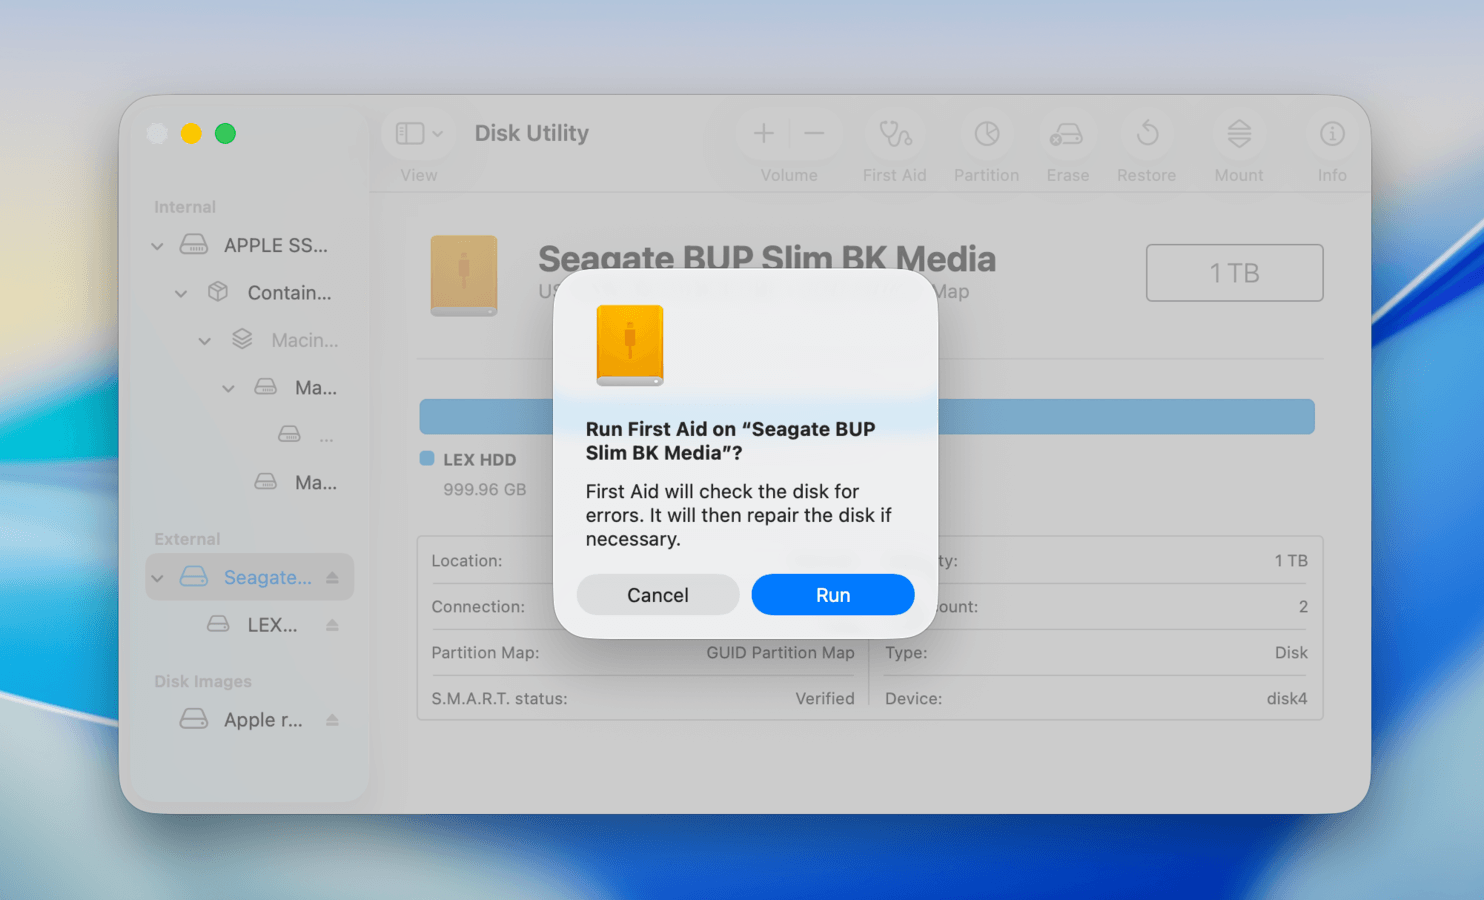
6. Run First Aid
First Aid is a Disk Utility tool that can fix corrupted hard drives by repairing minor file system errors and soft corruption. While it can’t fix severe corruption or physical damage, it’s a simple and low-risk step worth trying before attempting harder repair methods.
- Open Disk Utility (Finder > Applications > Utilities).
- Click the View button and select Show All Devices.
- On the left sidebar, select your external hard drive. Then, click First Aid on Disk Utility’s toolbar.
- In the pop-up dialog that appears, select Run to confirm the action.
7. Reset NVRAM/PRAM and SMC (for Intel Macs)
Your Mac’s NVRAM/PRAM (Non-Volatile RAM) and SMC (System Management Controller) are in charge of storing device settings and routing power to your drive. Resetting these components can trigger a re-initialization of your drive’s connection to your Mac, clearing any previous errors and potentially resulting in a successful “handshake.”
To reset your Mac’s NVRAM/PRAM:
- Shut down your Mac.
- Turn on your Mac, then immediately press the following keys at the same time: Command + Option + P + R.
- Once you hear the second startup sound, release the keys. If your Mac has a T2 Security Chip, wait for the Apple logo to appear and disappear a second time before releasing the keys.
To reset your Mac’s SMC:
- Shut down your Mac.
- If your Mac has a T2 chip, press and hold the power button for 10 seconds, then release it. If it doesn’t have a T2 chip, press and hold the following keys: Left Shift, Left Control, Left Option. Then, add the power button and hold all keys for 10 seconds before releasing.
- Press the power button again to turn your Mac on.
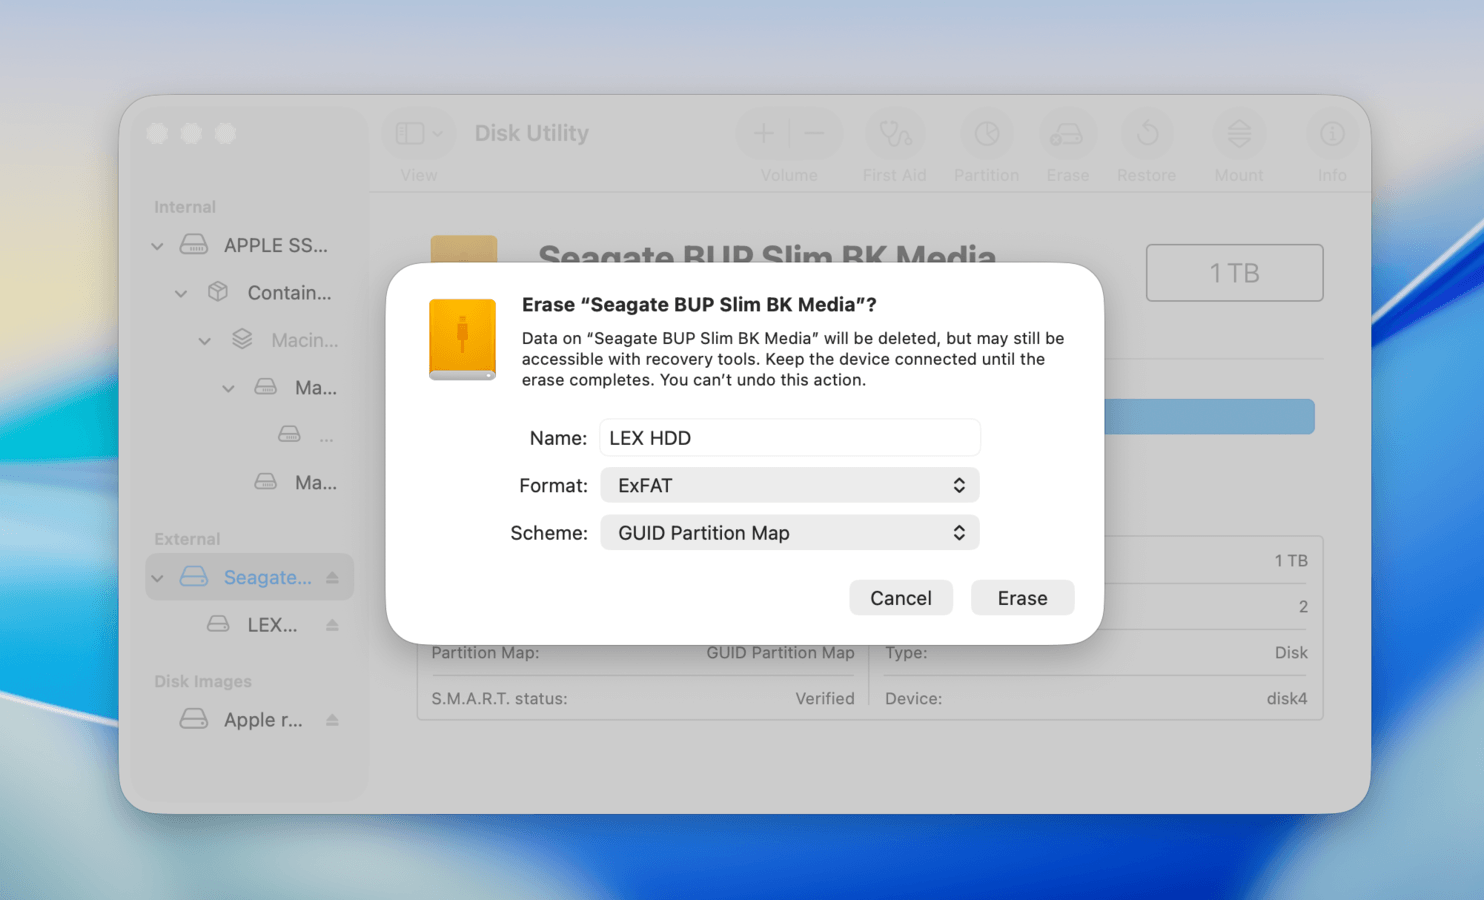
8. Format External Drive
Formatting your external hard drive rebuilds its file system from scratch, which removes any corruption and ensures its compatibility with your Mac. However, it also completely wipes out your data, which means that this method should be your last resort.
Note that this method won’t work if your drive doesn’t show up at all (which is why it comes last in this guide). If you can’t see your external drive anywhere on your Mac, start from Step 1.
- Open Disk Utility (Finder > Applications Utilities).
- Click the View button and select Show All Devices.
- On the left sidebar, select your external hard drive. Then, click Erase on the toolbar.
- In the pop-up dialog that appears, choose a Name for your drive. Then, select a Format and Scheme (we recommend ExFAT and GUID Partition Map, respectively). Finally, click the Erase button.
When It’s Time to Consider Data Recovery Services
Professional data recovery services are companies that restore lost files for a fee. Because of their advanced tools and expertise, they can recover data from severely (physically) damaged drives, and even dead drives, safely.
If the data on your drive is important, you may want to consider using data recovery services if you fit into the following scenarios:
- Scenario 1: Your drive was dropped or exposed to fluid, or you noticed any physical damage on your external hard drive or its components. For example, damaged or bent connector pins, unusual clicking or grinding sounds, or a total loss of power.
- Scenario 2: None of the steps in this guide worked for you, connection and power issues are ruled out, and you were unable to secure your files using data recovery software.
- Scenario 3: You don’t have the time or confidence to attempt data recovery and/or disk repair yourself.
Note that data recovery services are more expensive than using data recovery software yourself. But some companies, like CleverFiles (which actually developed Disk Drill, the tool we used in this guide), offer a No Data – No Charge guarantee. This means you only have to pay for the service if the files you specifically requested were restored.
Conclusion
In summary, the key to successfully fixing a disappearing drive is correctly diagnosing the root cause and following the appropriate steps to eliminate it. The best starting point is finding where the drive is visible. If your drive only shows up in System Information, check your drive connection, restart your Mac, and make sure external devices are enabled in Finder’s settings.
If it shows up in Disk Utility, run First Aid or mount your drive manually (if it appears unmounted). As a last resort, consider formatting your drive. If it doesn’t show up at all, try using other ports on your computer or connecting your drive to another Mac to isolate the problem.
FAQ
If your drive appears only in System Information but not in Finder or Disk Utility, then its physical connection to your Mac works; it’s the software layer that is failing to mount it. Do these steps in order to troubleshoot your drive:
- Try mounting the disk manually using Terminal commands (diskutil mountDisk /dev/diskX), which can bypass potential UI errors with Disk Utility.
- Restart your Mac while your drive is connected. This still refreshes any stuck processes without having to non-safely eject the drive.
- Reset your SMC and NVRAM (Intel Macs only).
- Once your drive appears (at least in Disk Utility), use data recovery software ASAP to secure your files, in case the device fails again.
Mounting errors in Disk Utility can either mean file system errors or system lag. Follow these troubleshooting steps in order (until your drive works):
- If the files on your drive are important, use data recovery software (or reach out to a professional data recovery service) before attempting repair. Data loss can occur during the process.
- Restart your Mac while your drive is connected to it.
- Repair your drive using First Aid in Disk Utility or a third-party tool like DiskWarrior.
- Format your drive (causes 100% data loss).
If all of your external devices have gone missing after updating macOS, it’s usually a sign of a security permission mismatch, driver conflicts, or system errors. Here are several fixes you can try:
- Open System Settings > Privacy & Security. Then, scroll down to the Security section and click Accessories to change permission settings for external devices.
- Completely shut down your Mac. After 30 seconds, turn it back on.
- For Intel Macs, reset your SMC and NVRAM.
When only the volumes of your drive appear in Disk Utility, issues can range from simple UI settings to a lack of power being routed to the drive, or even minor or severe partition map corruption. Do the following steps in strict order to troubleshoot your drive:
- Use data recovery software or contact a professional data recovery service before proceeding with any fix.
- Ensure Show All Devices is enabled in Disk Utility (Disk Utility > click View > select Show All Devices).
- Connect your Mac to a power source and disconnect all other external devices except for your drive. If using a USB hub, connect your drive directly to your Mac’s port instead.
- Use the First Aid tool in Disk Utility on your drive, which can repair minor partition errors.
- If none of the above fixes work, format your drive.