Have you accidentally erased a hard drive using Disk Utility on Mac and are wondering if you can recover it? You’re not the only one! Every day, thousands of users around the world search for solutions that would let them recover an erased hard drive on Mac, but only a few find what they’re looking for.
Why? Because there’s a lot of misinformation online when it comes to data recovery solutions for Mac. The goal of this article is to help Mac users recover erased data in the quickest and most cost-effective manner possible, which is why we describe two different solutions, each suitable for a slightly different data loss scenario.
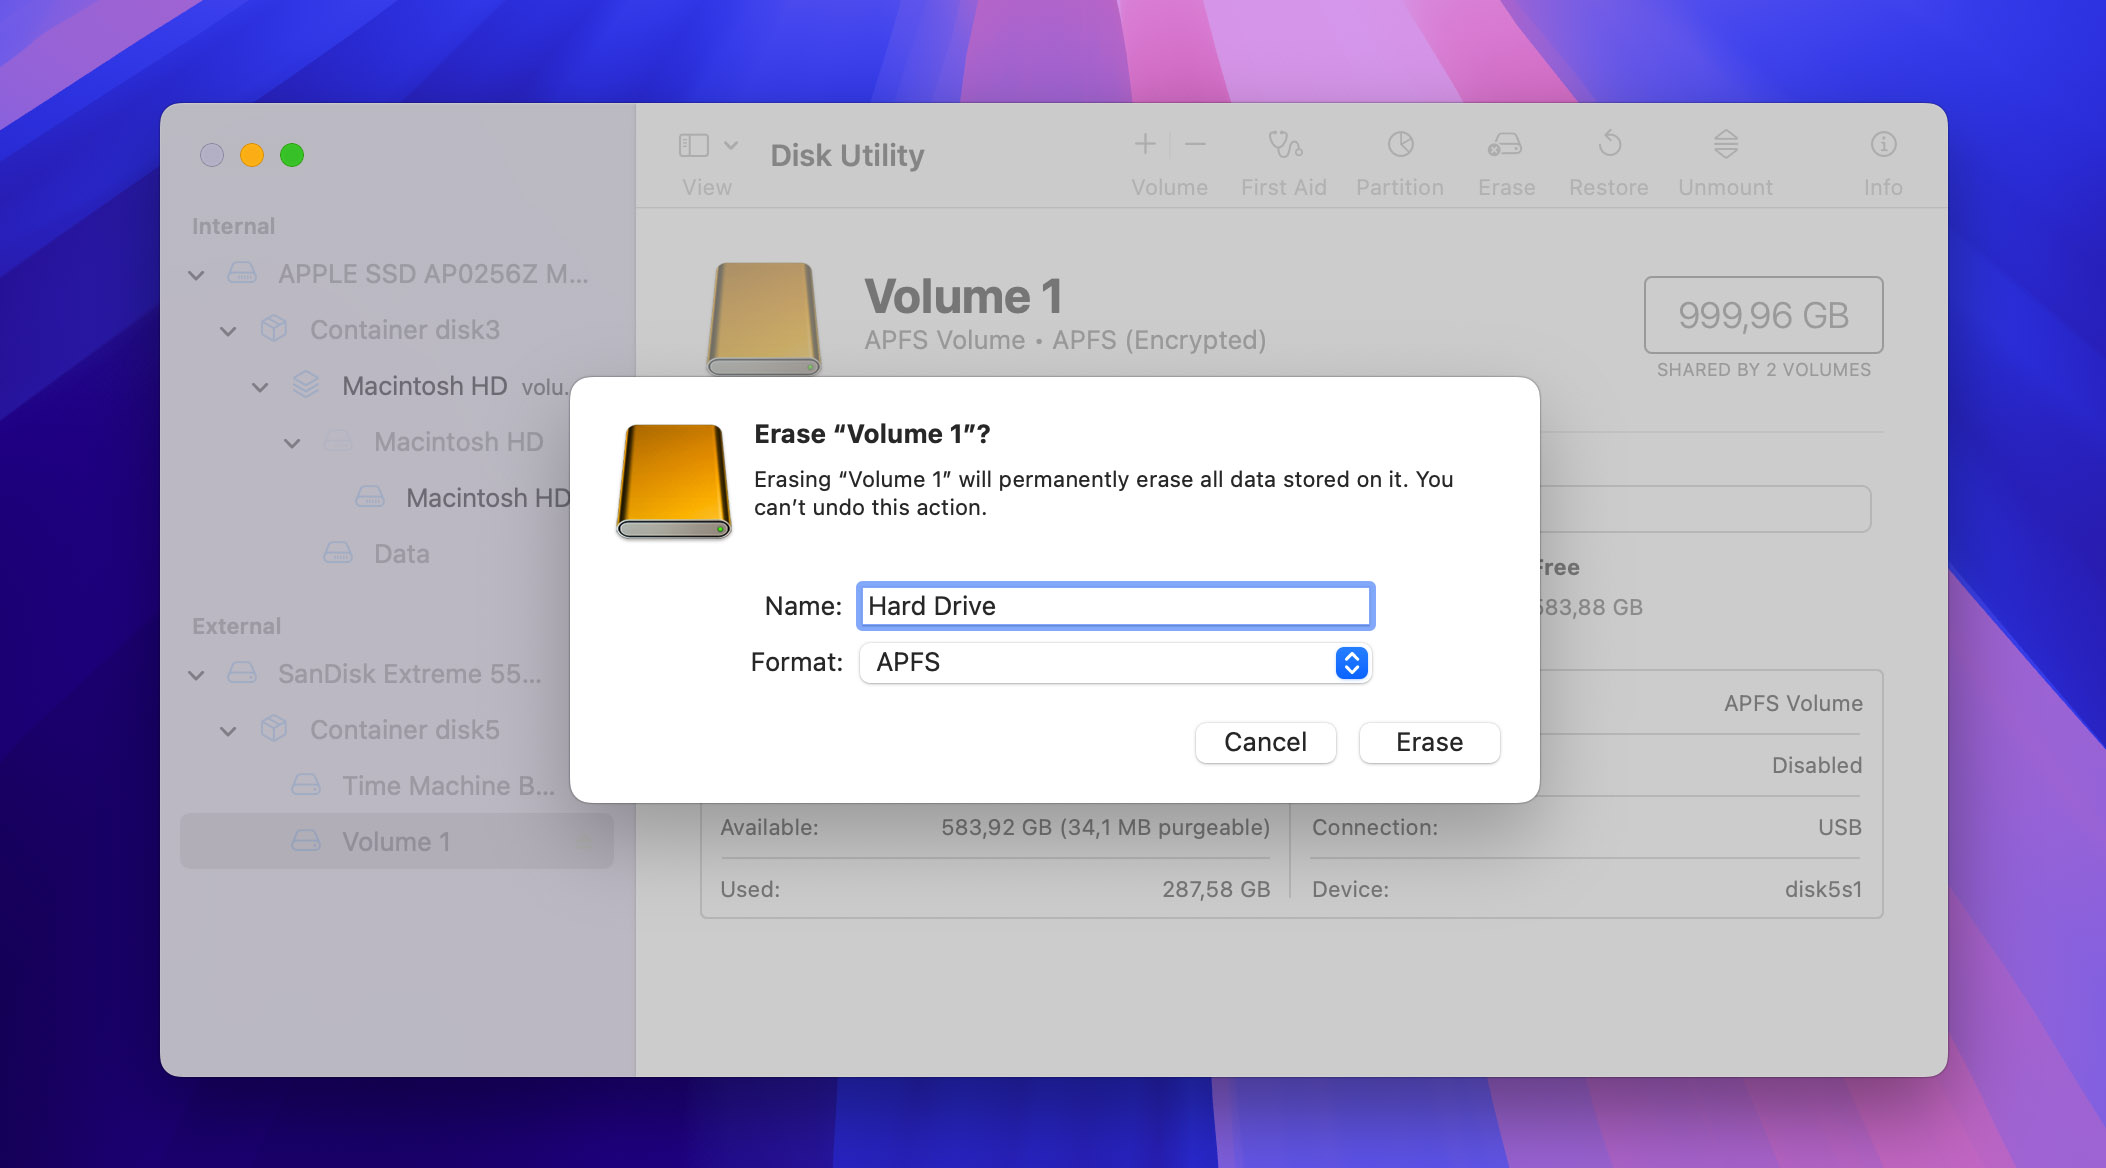
Does Disk Utility Erase Everything on the Hard Drive?
“I tried factory resetting my MacBook and I accidentally erased all startup disks including Macintosh HD […] I opened disk utility and I two disks pop up one says 121.33 GB Apple ssd sd0128f media under that it says disk1 and the other one is a little bit lower it says disk 1 and under that it says OS X base system,” writes a user on Reddit’s r/macbookrepair.
Sadly, posts like this one are far from rare. In fact, you’re guaranteed to come across at least one or two almost every day if you frequent popular Mac forums. But even though erasing the wrong internal or external hard drive seems like a pretty clear-cut problem to tackle, the truth is that some erased hard drives can be recovered using hard drive recovery software, while others can only be restored from a backup.
Even though Disk Utility always erases everything on the hard drive, it doesn’t always overwrite the erased data, making their recovery impossible. It all depends on the security options. These options specify how to erase the selected drive to prevent hard drive recovery software from recovering it.
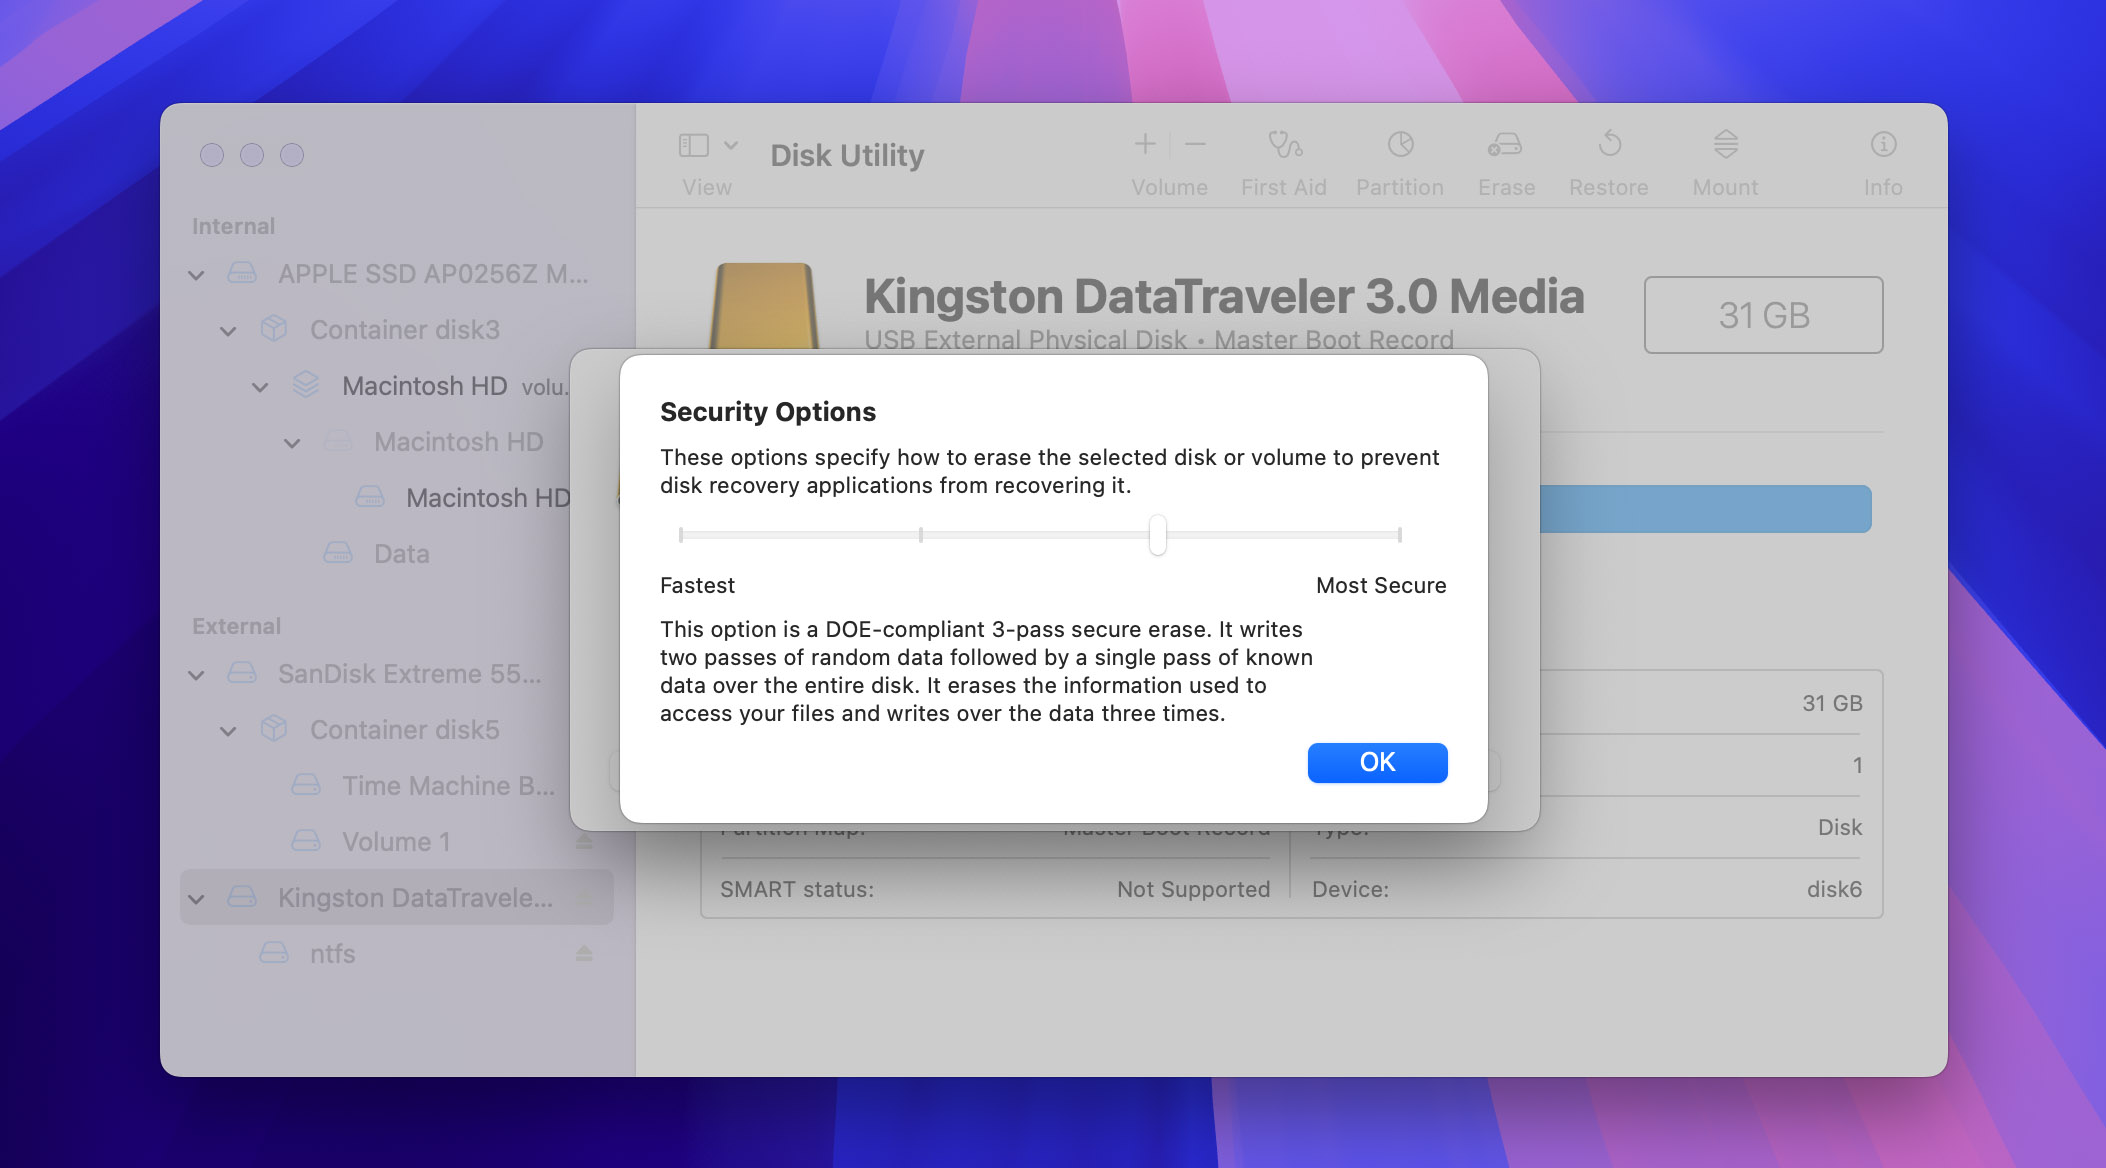
As a Mac user, you can choose between the following security options:
- Fastest: This option does not securely erase the files on the drive. A hard drive recovery software may be able to recover the files.
- Fast: This option writes a pass of random data and then a single pass of zeros over the entire drive.
- Secure: This option is a DOE-compliant 3-pass secure erase, and it writes two passes of random data followed by a single pass of known data over the entire drive.
- Most Secure: This option meets the US Department of Defense 5220-22 M standard for security erasing magnetic media because it writes over the data 7 times.
The good news is that the fastest security option is selected by default. So, if you haven’t changed the security options before erasing your HDD or SSD, you should be able to recover data from it using data recovery software for Mac.
What If You Can’t Boot the Mac After Deleting the Startup Disk
Despite the safeguards built into macOS, accidentally erasing your Mac’s startup disk (Macintosh HD) is a surprisingly common issue. This often happens when users try to:
- Factory reset their Mac to sell it
- Free up space on their drive
- Partition their system drive
The most typical symptom indicating your Mac can’t find a valid operating system because the startup disk has been erased is a question mark when trying to boot your Mac.
The good news is that recovery is possible, but it’s a two-step process. First, boot your Mac in Recovery Mode and reinstall macOS on the startup disk. Then, use Migration Assistant to restore your data from a Time Machine backup.
How to Recover Erased Hard Drive / Startup Disk on Mac
It takes only one click to mistakenly erase a drive. Luckily, there are data recovery methods that can help.
That said, the tools described in this section require access to a working macOS operating system, so they can be used in the following scenarios:
- When recovering data from an erased external drive or secondary internal drive.
- When recovering data from a system drive after you’ve already restored macOS.
Method 1: Recover an Erased Mac Hard Drive with Data Recovery Software
Data recovery software can help you recover files from an erased hard drive, but there are important limitations to consider. This method works best with traditional hard disk drives (HDDs) and only when the drive was erased using the “fastest” (non-secure) option, you haven’t written new data to the drive since erasure, and the drive isn’t an internal SSD with Apple T2 security chip or Apple Silicon (M1-M4) encryption.
If you meet these criteria, then you can attempt to recover lost data using data recovery software like Disk Drill, which stands out with its ease of use, powerful recovery algorithms (around 400 file formats and all commonly used file systems are supported), and completely free file preview capabilities that you can use to verify the recoverability of your lost data.

To recover an accidentally deleted Mac hard drive follow these steps:
- Download Disk Drill for Mac and install it on a different drive than the one you’re trying to recover. For example, if you’re recovering an external drive, install Disk Drill on your Mac’s internal drive. If you’re recovering your internal drive, install Disk Drill on an external drive.
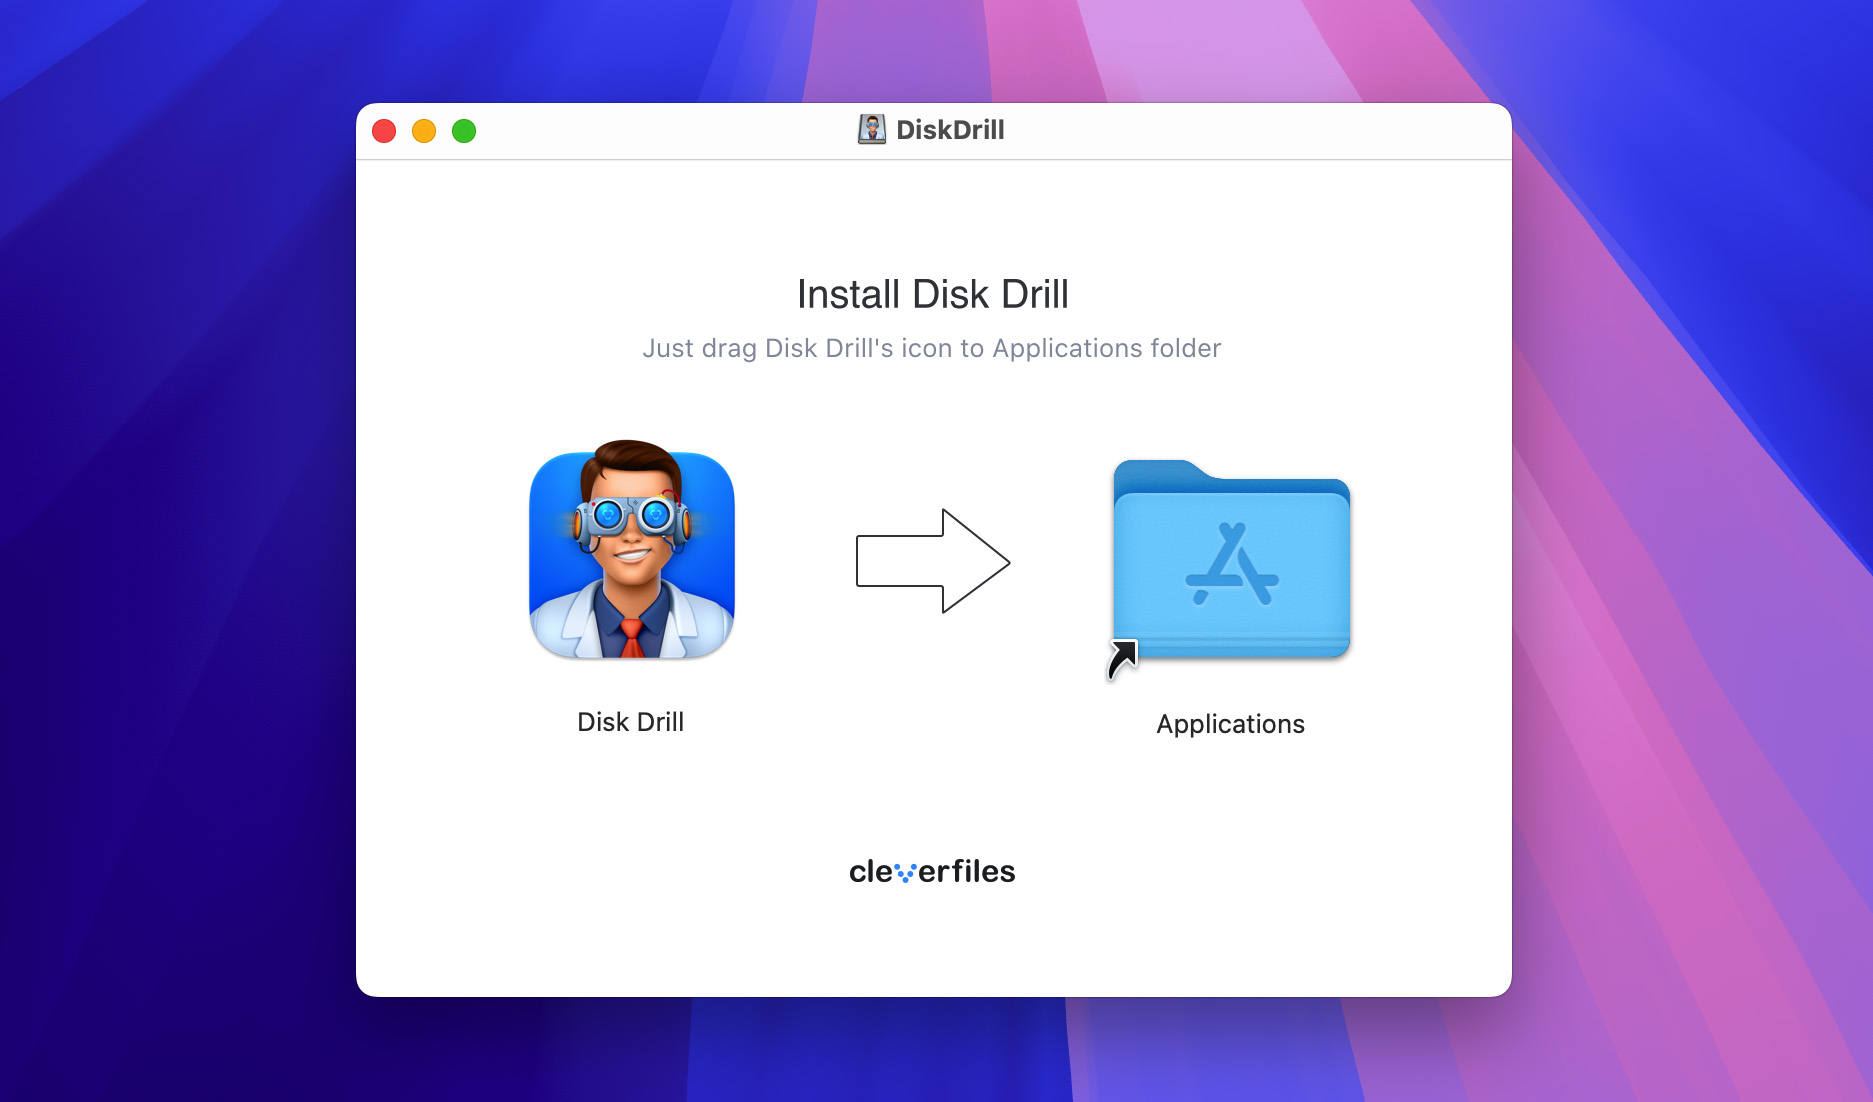
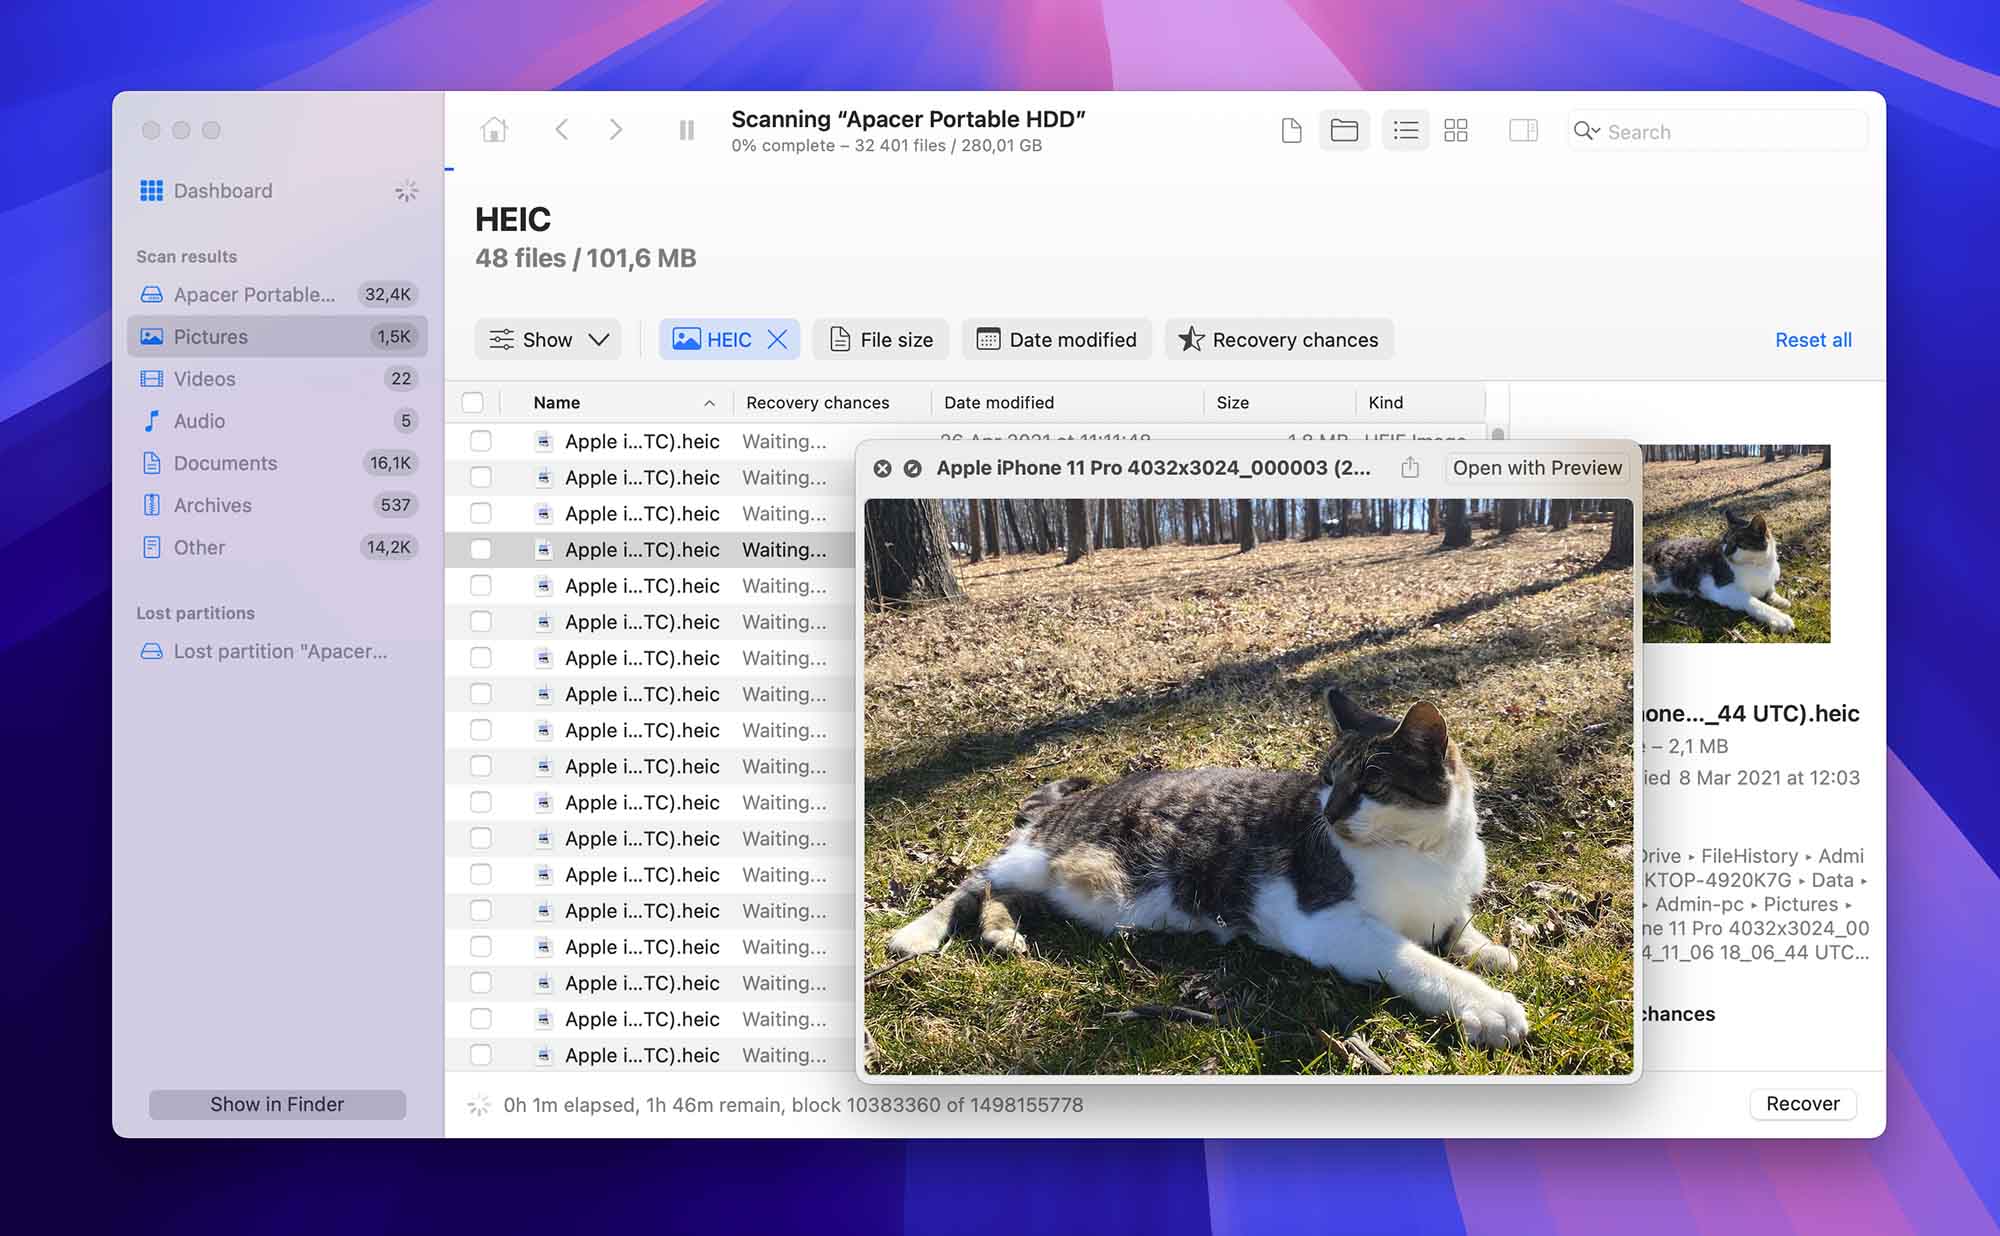
- Launch Disk Drill from your Applications folder. You’ll see a list of available devices (those that are recognized by your Mac and listed in the Disk Utility tool). Select the erased drive you want to recover. Click the Search for lost data button to begin the scanning process.
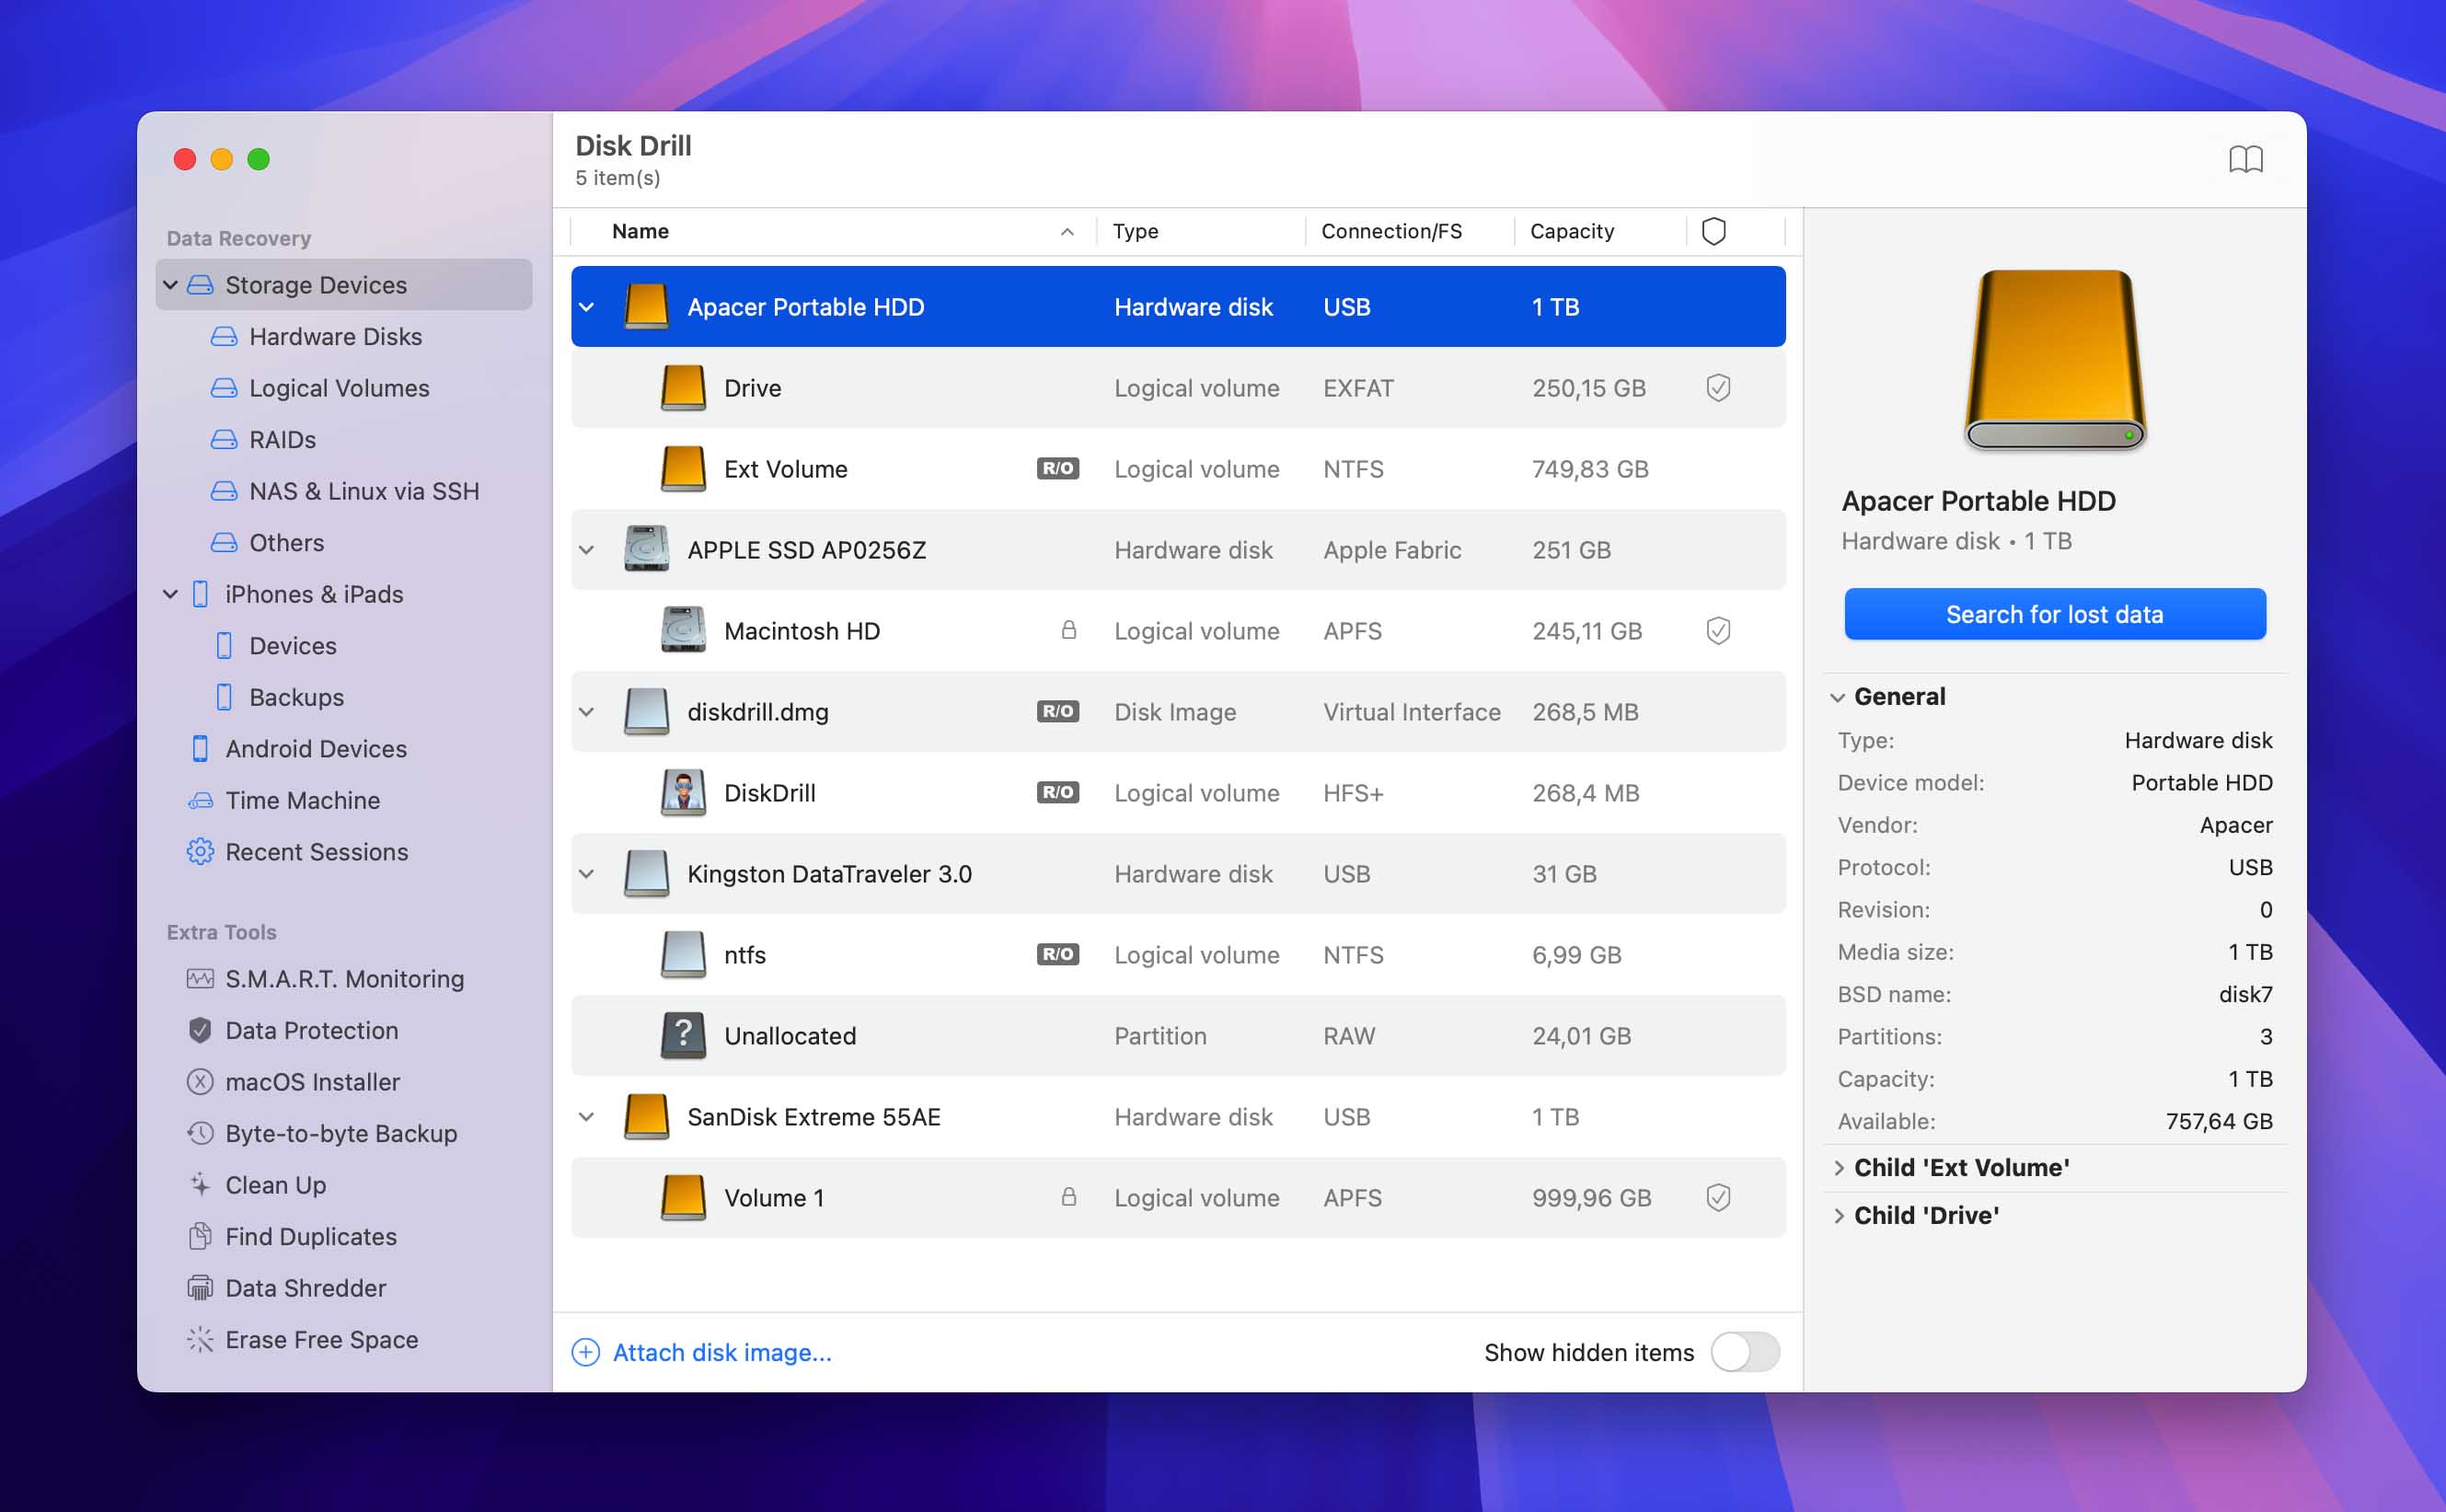
- Use the search tool and filters to find specific files, and take advantage of the preview feature when recovering multimedia files or documents. Generally, any file that can be successfully previewed inside Disk Drill can also be successfully recovered since previewing basically serves as a quick verification of its integrity.
- Click on the checkbox next to each file you want to recover. You can also select all found files in one go by clicking the checkbox at the top, but keep in mind that you’ll need enough free storage space on your destination drive to save all the recovered files.
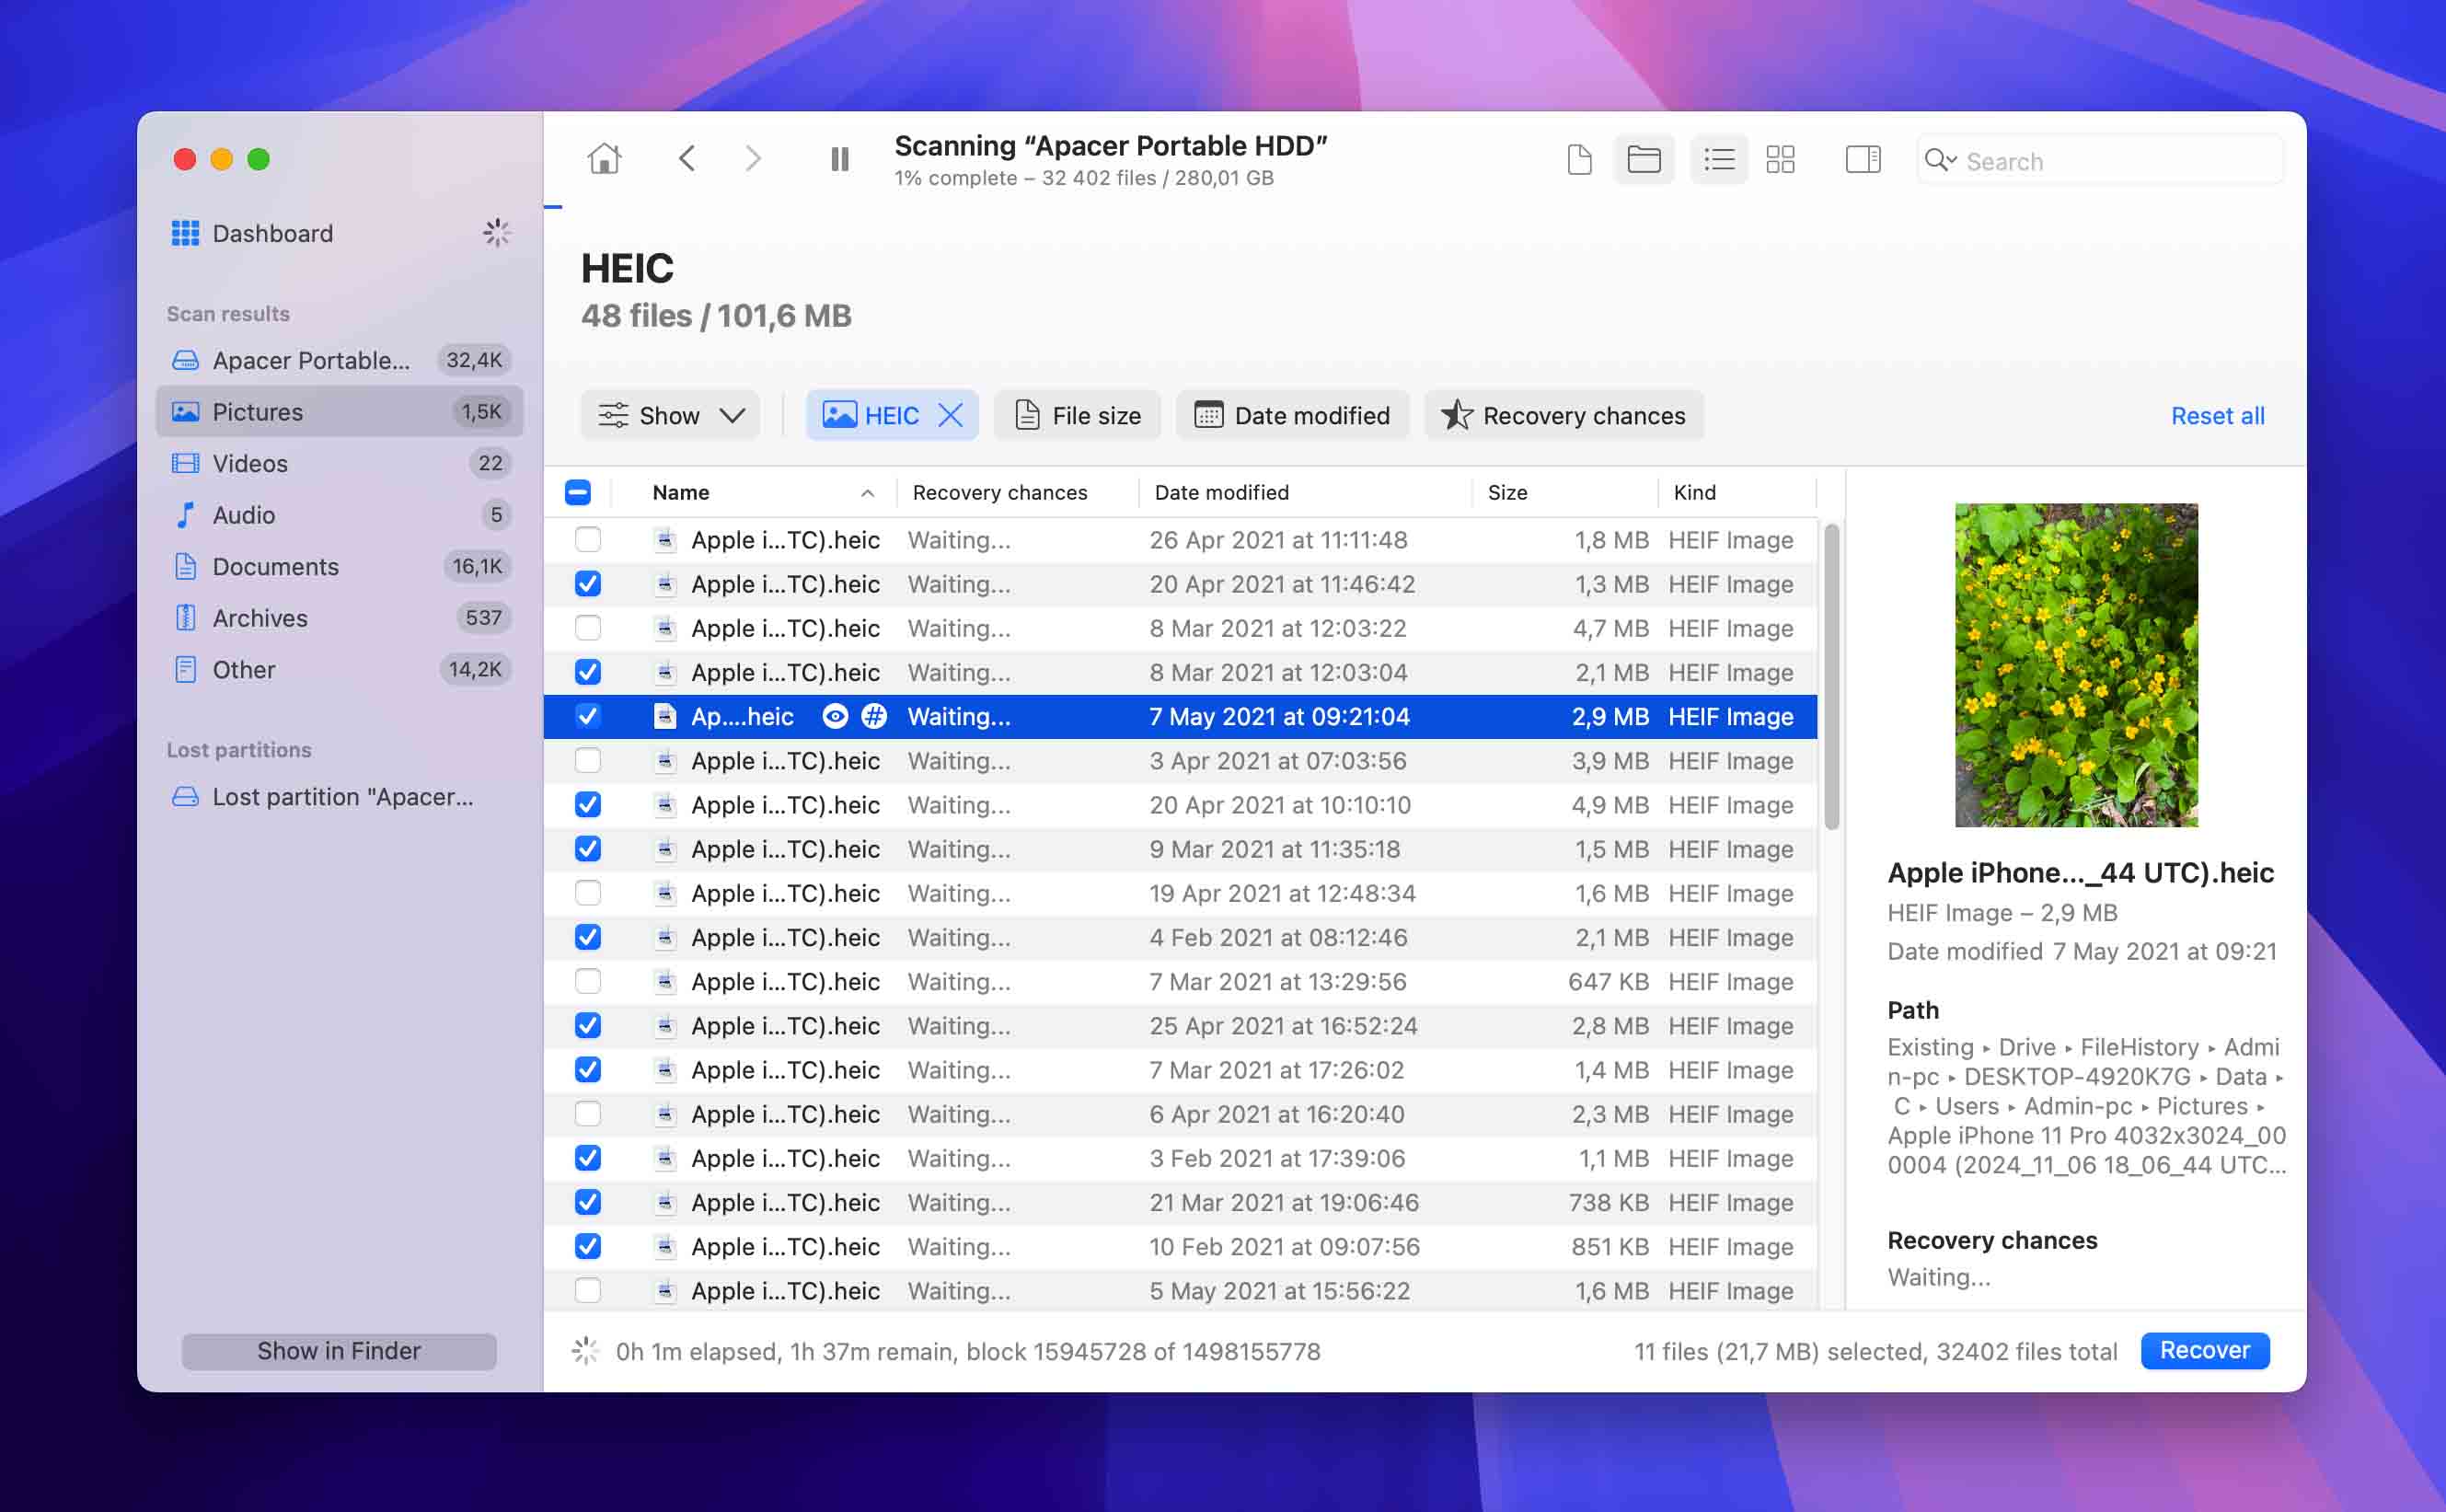
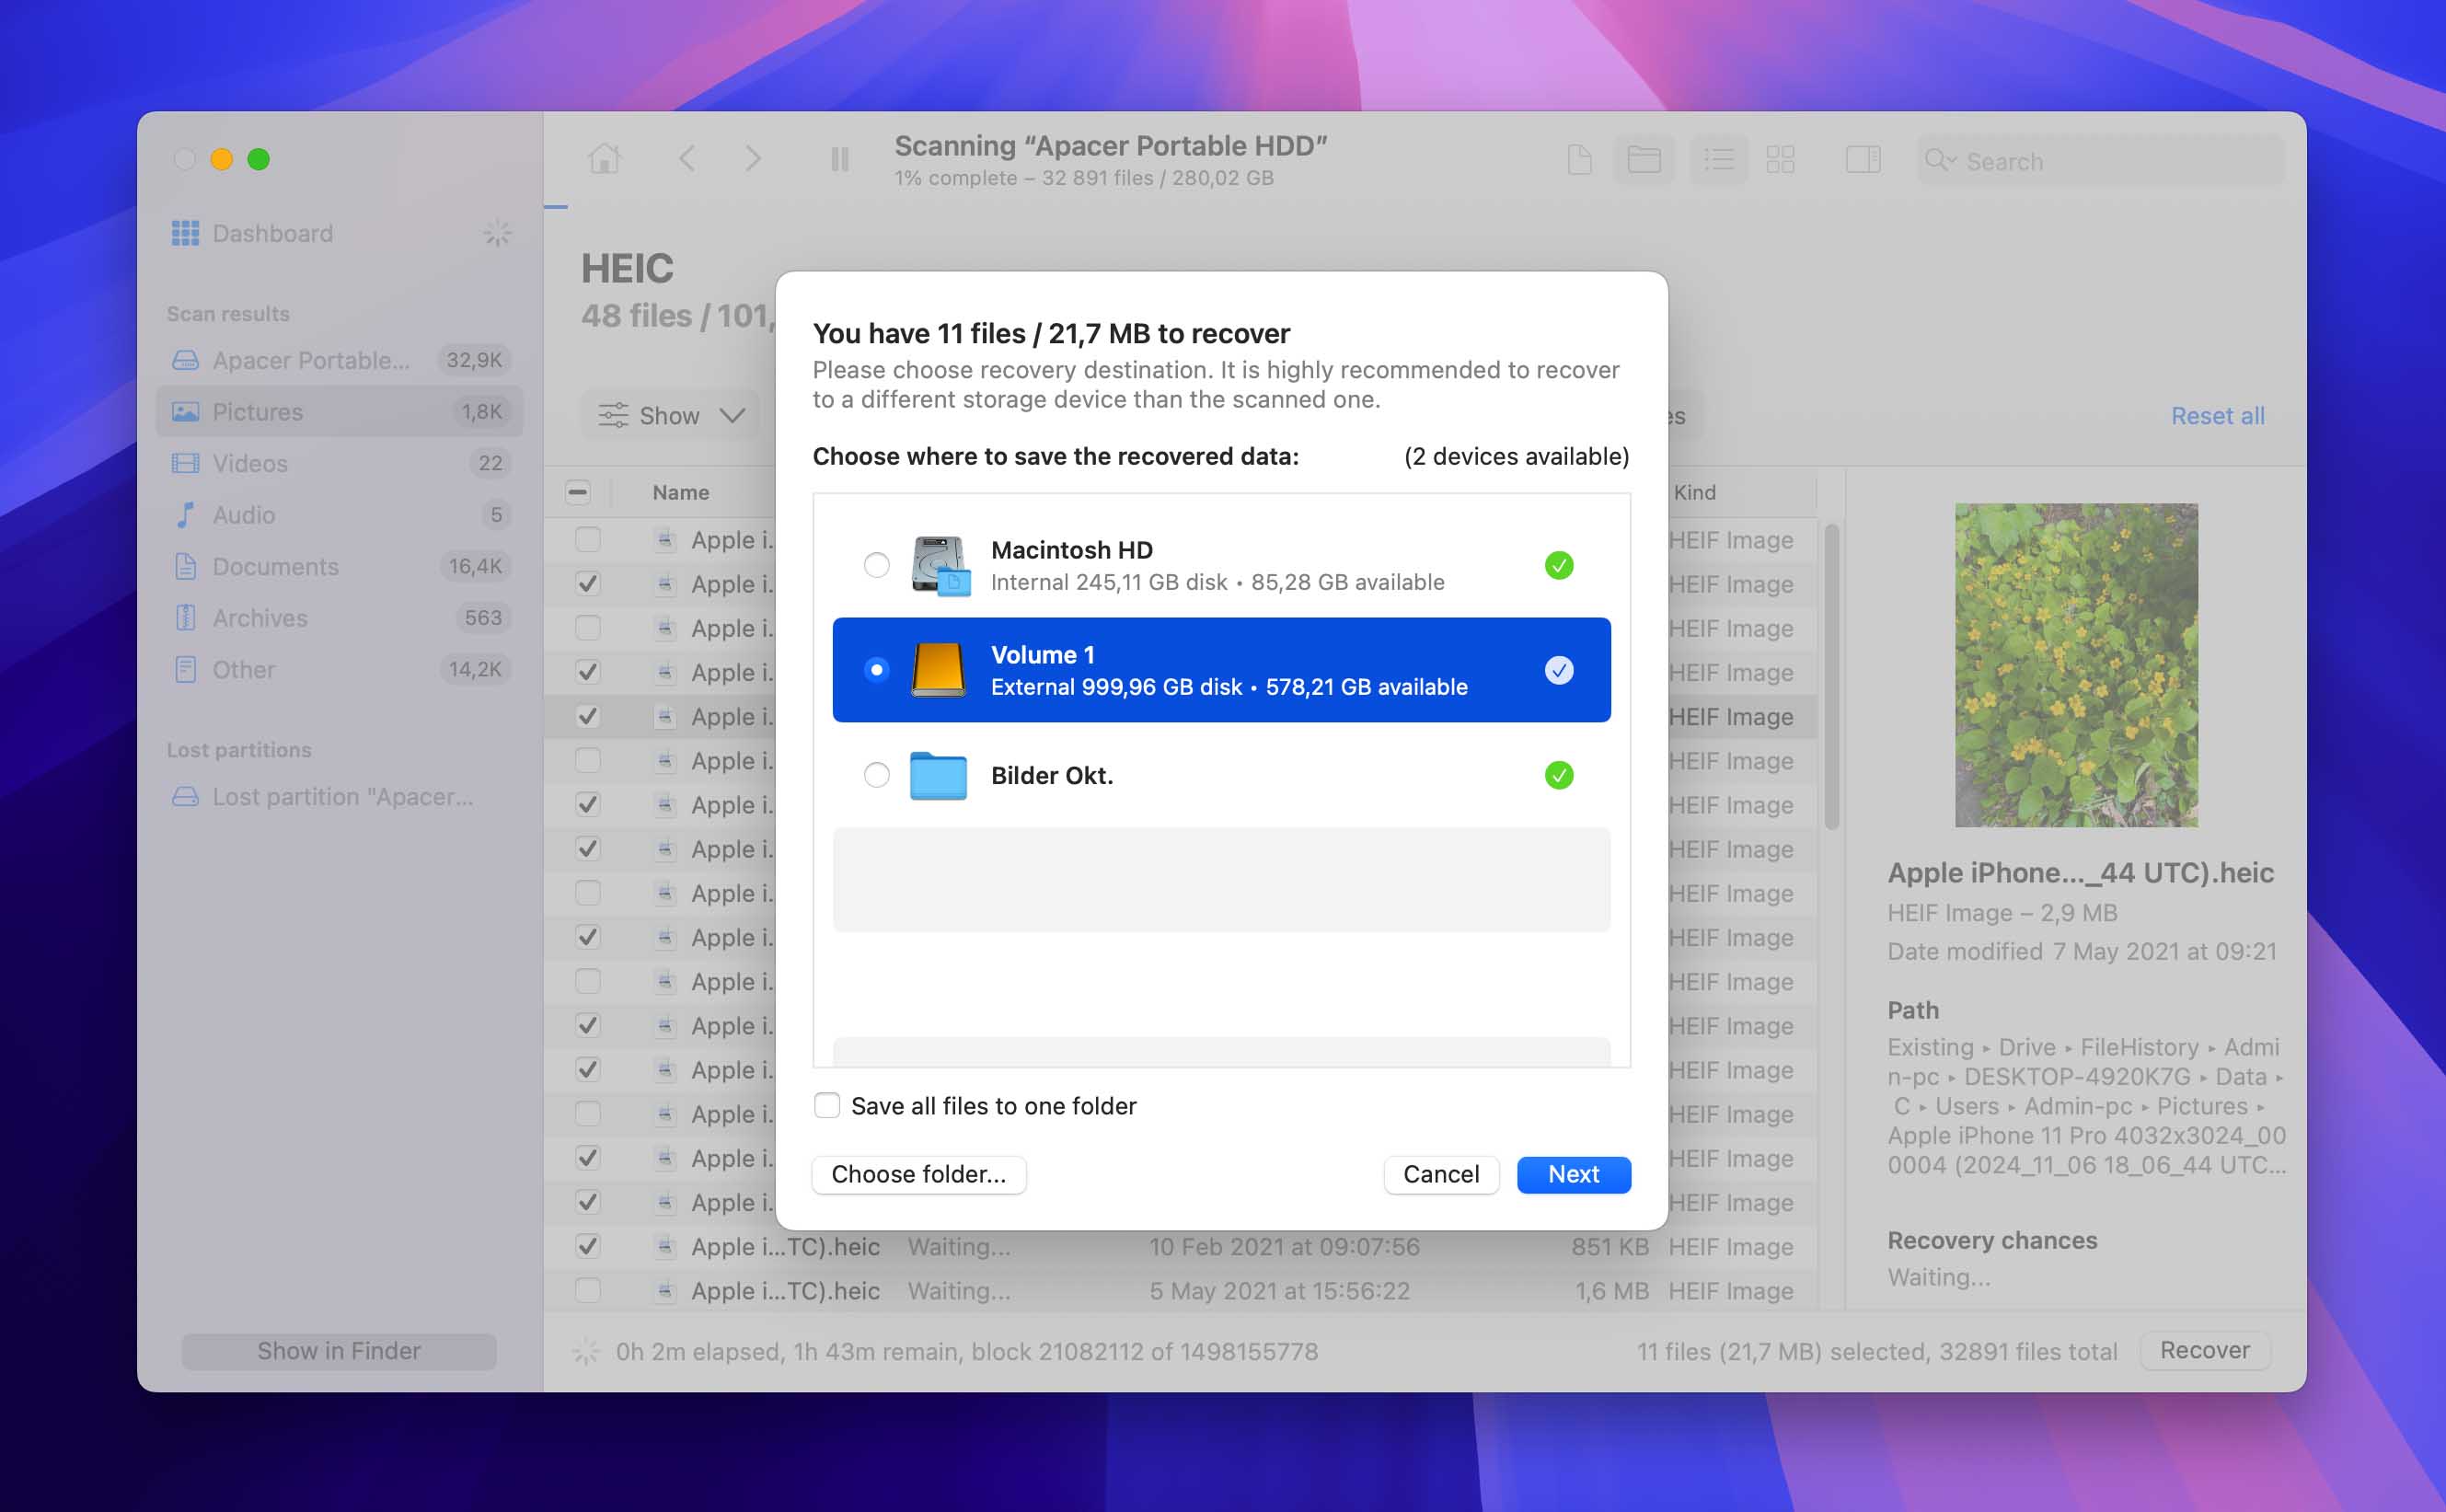
- Finally, click the Recover button and select a destination folder on a different drive where you want to save the recovered files. Click Next to begin the recovery process. Once complete, you can access your recovered files in the selected destination folder.
Method 2: Restore an Erased Hard Drive Using Disk Utility
If you have previously created a disk image (DMG file) of your drive before it was erased, then you can restore the erased drive from it using Disk Utility.
Here are the steps to recover the erased Mac Hard Drive:
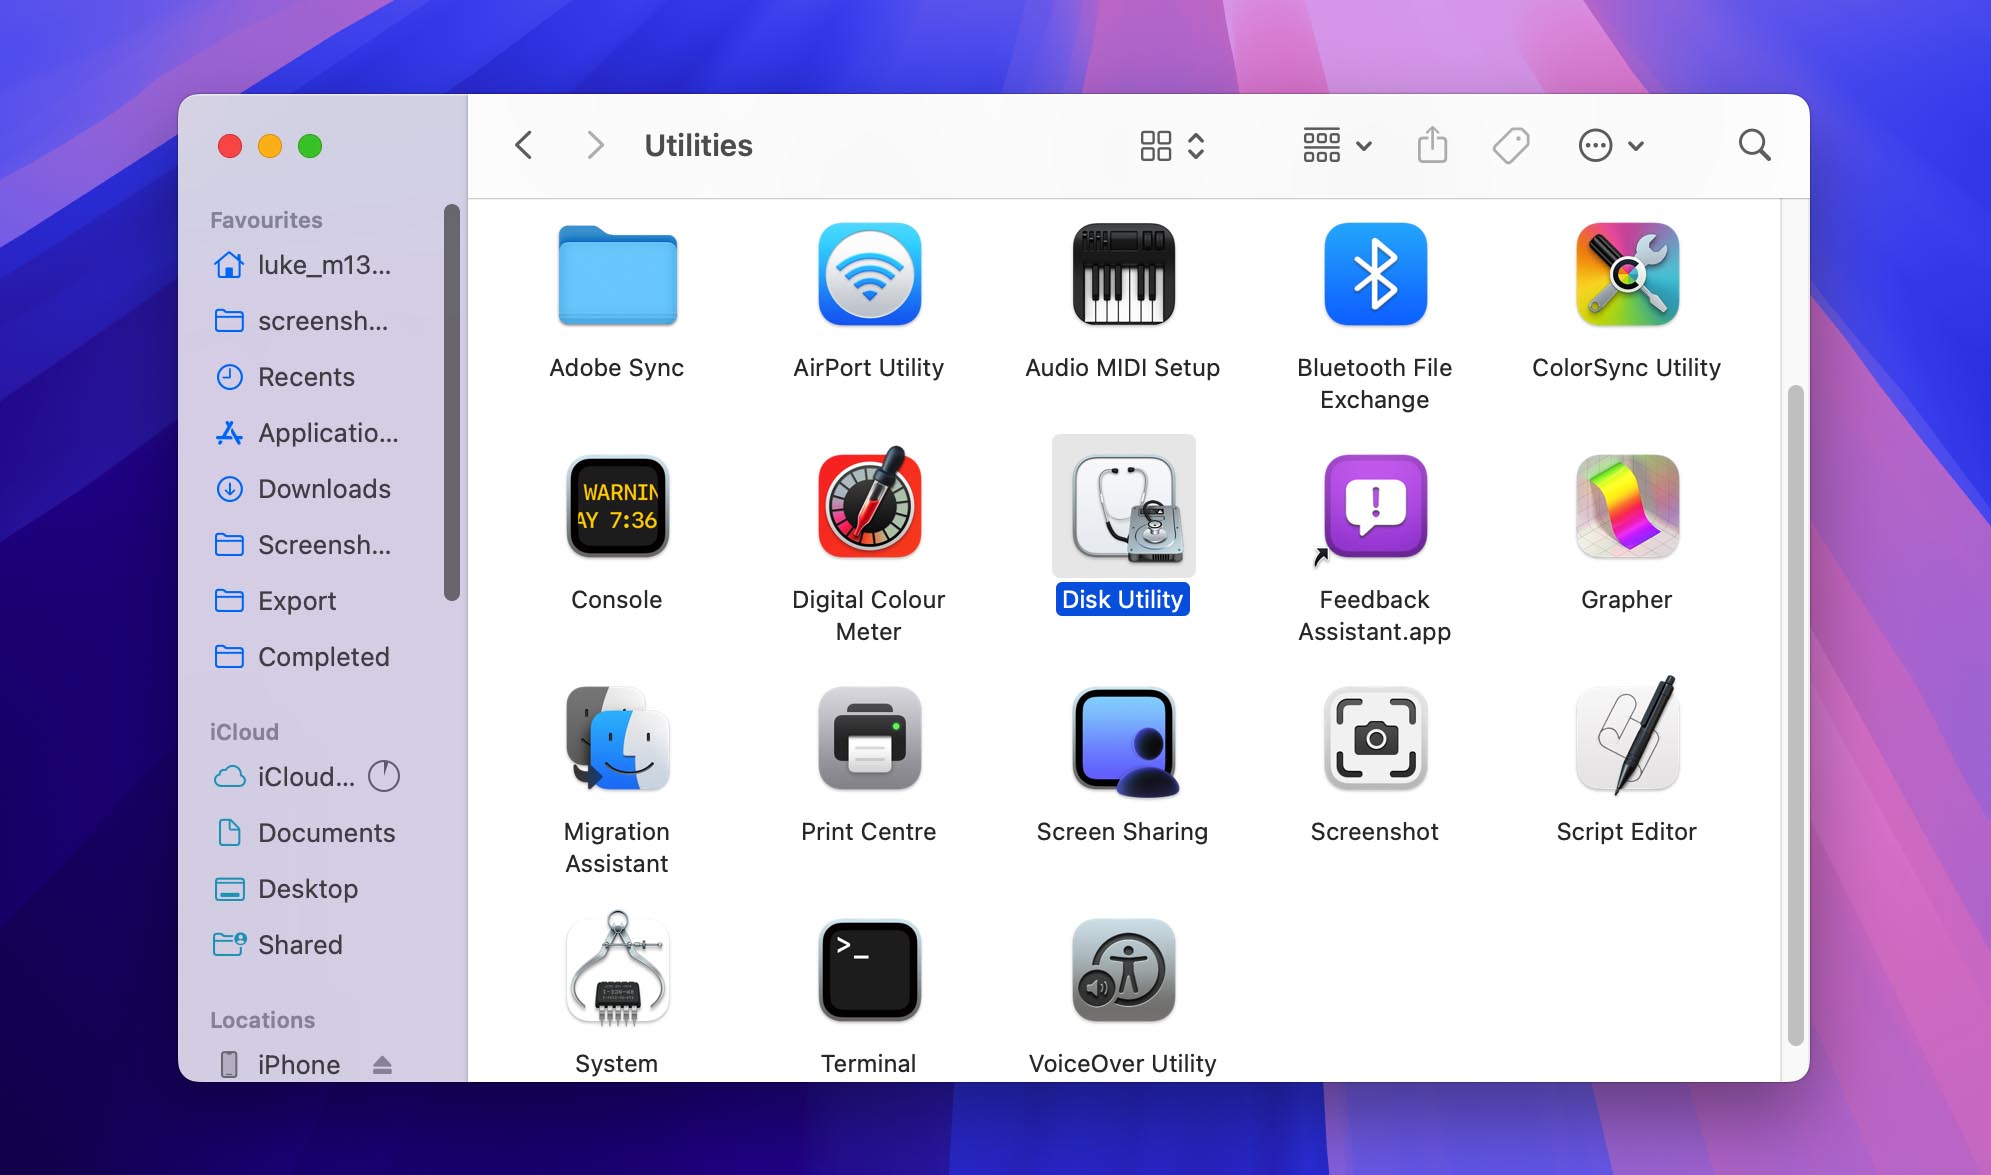
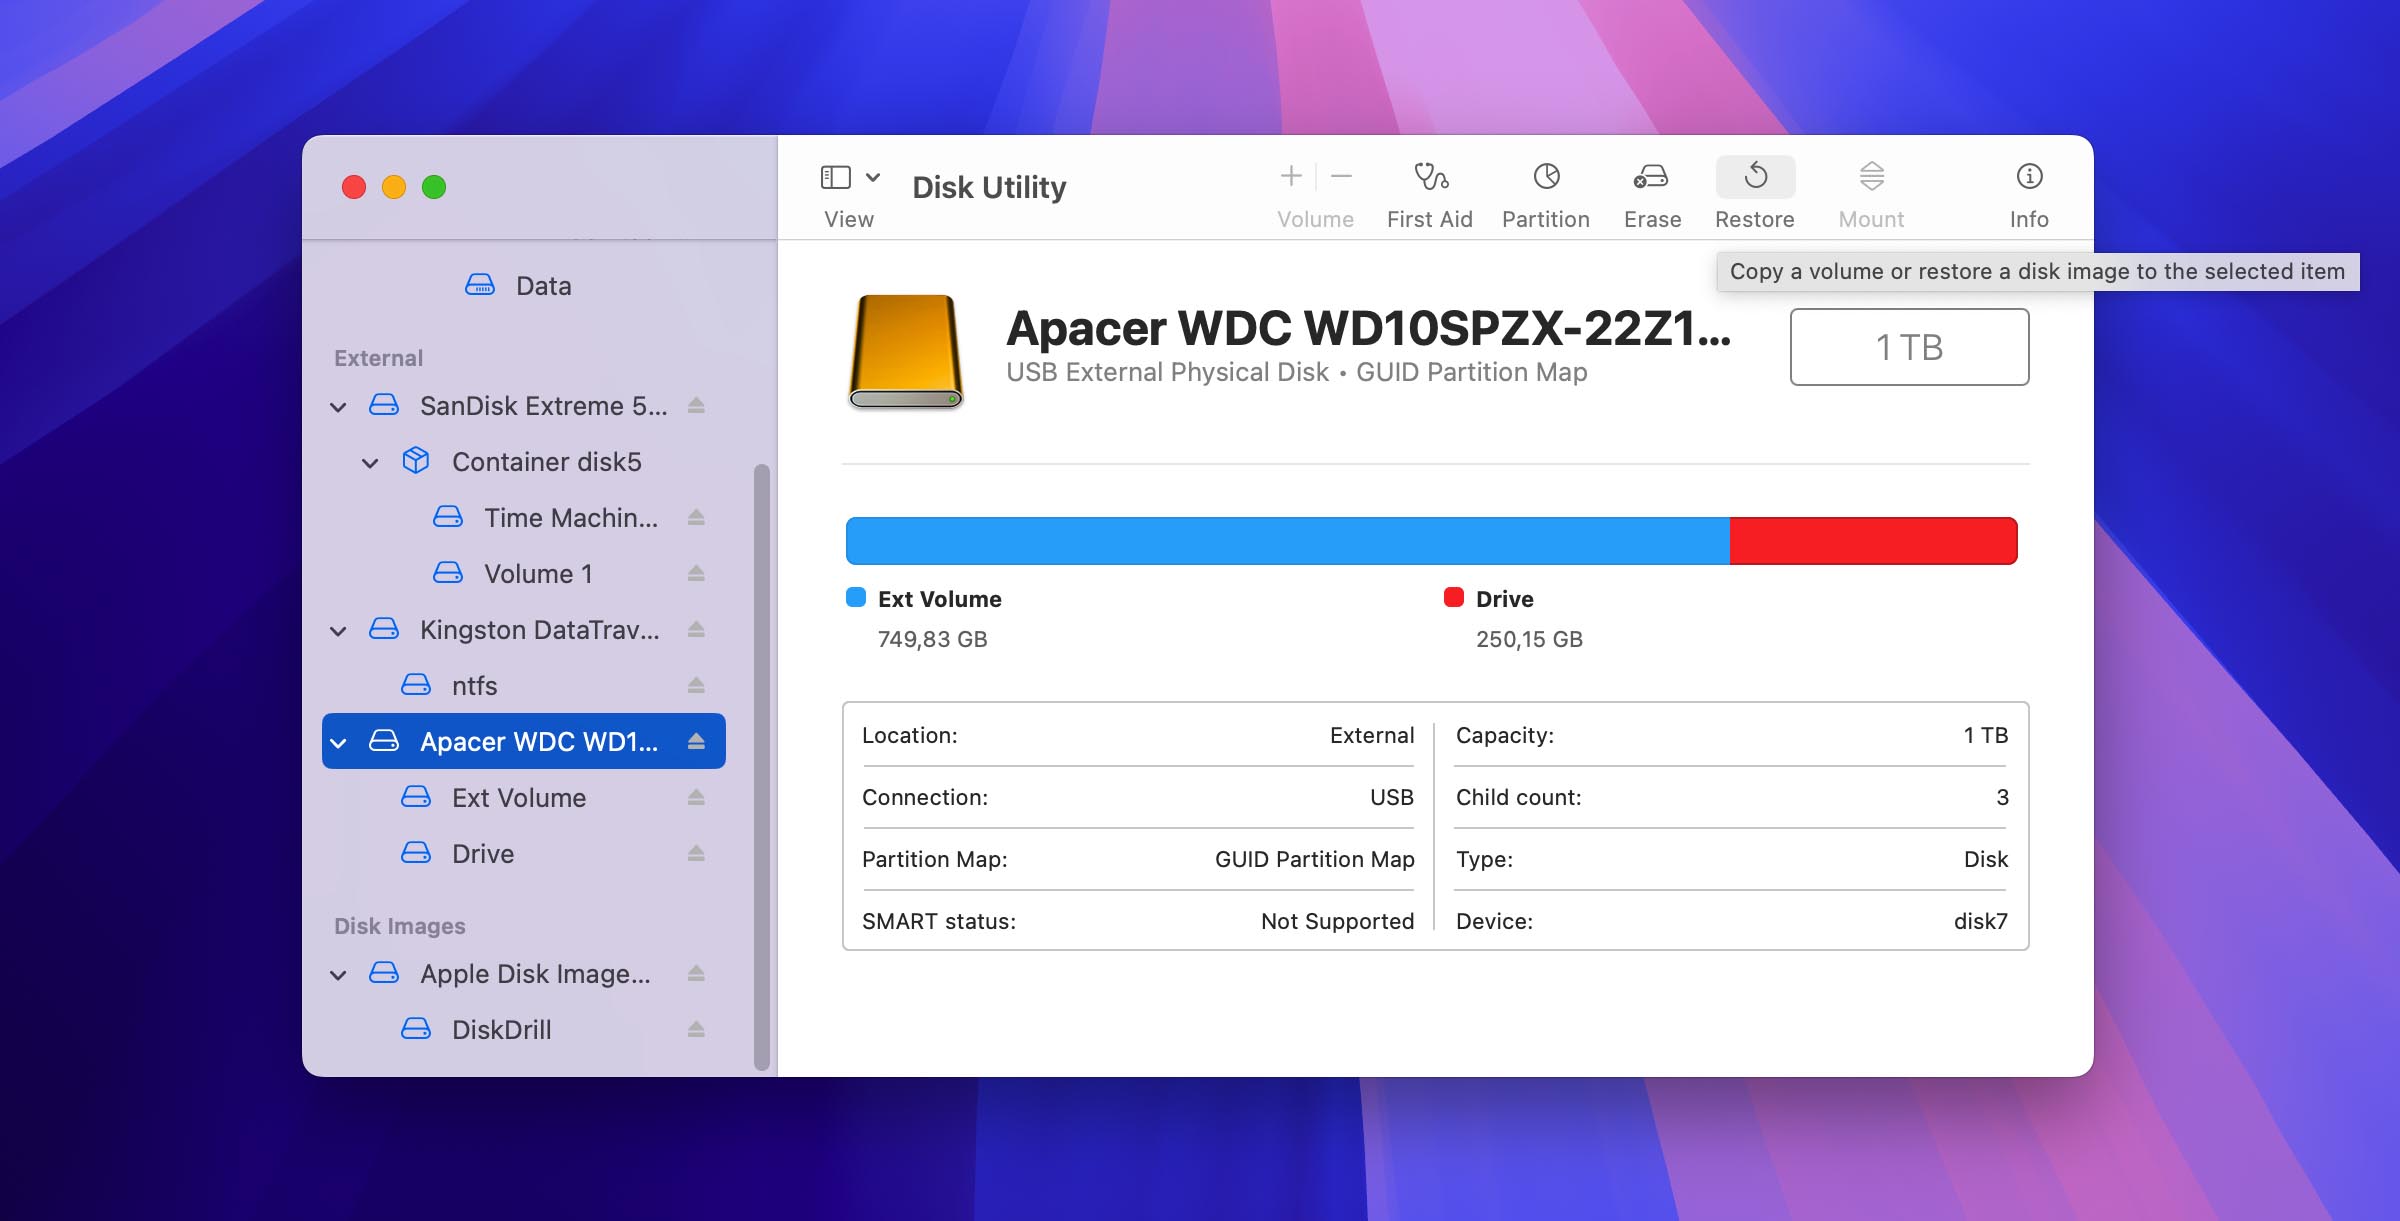
- Open Disk Utility from Applications > Utilities.
- Select the erased drive in the sidebar that you want to restore to.
- Click the Restore button in the top toolbar.
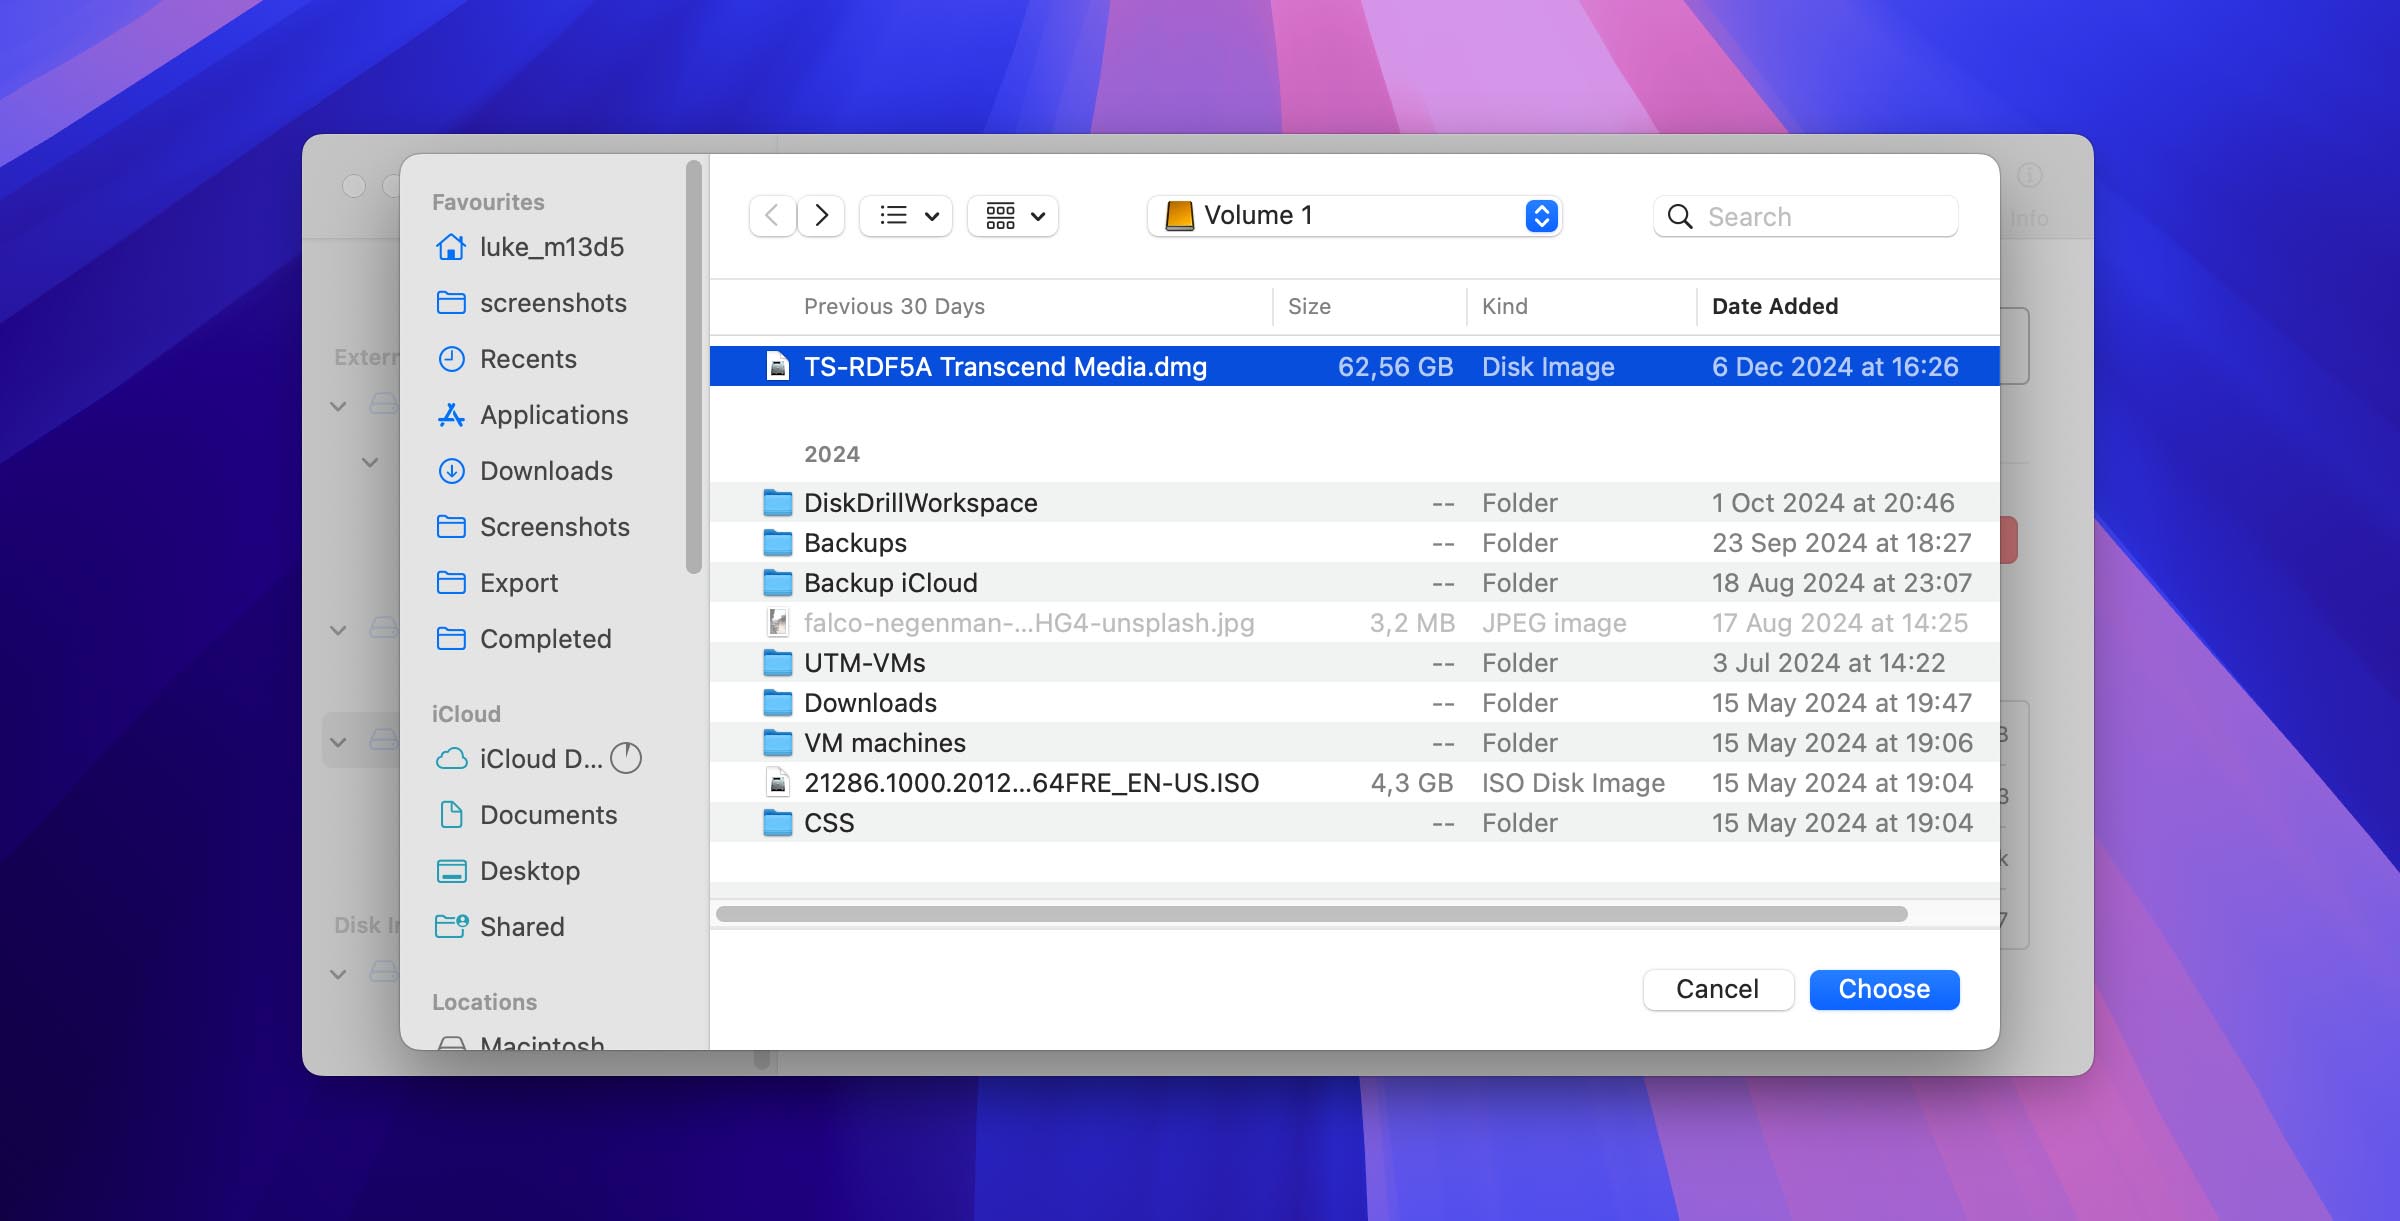
- Click the Image button.
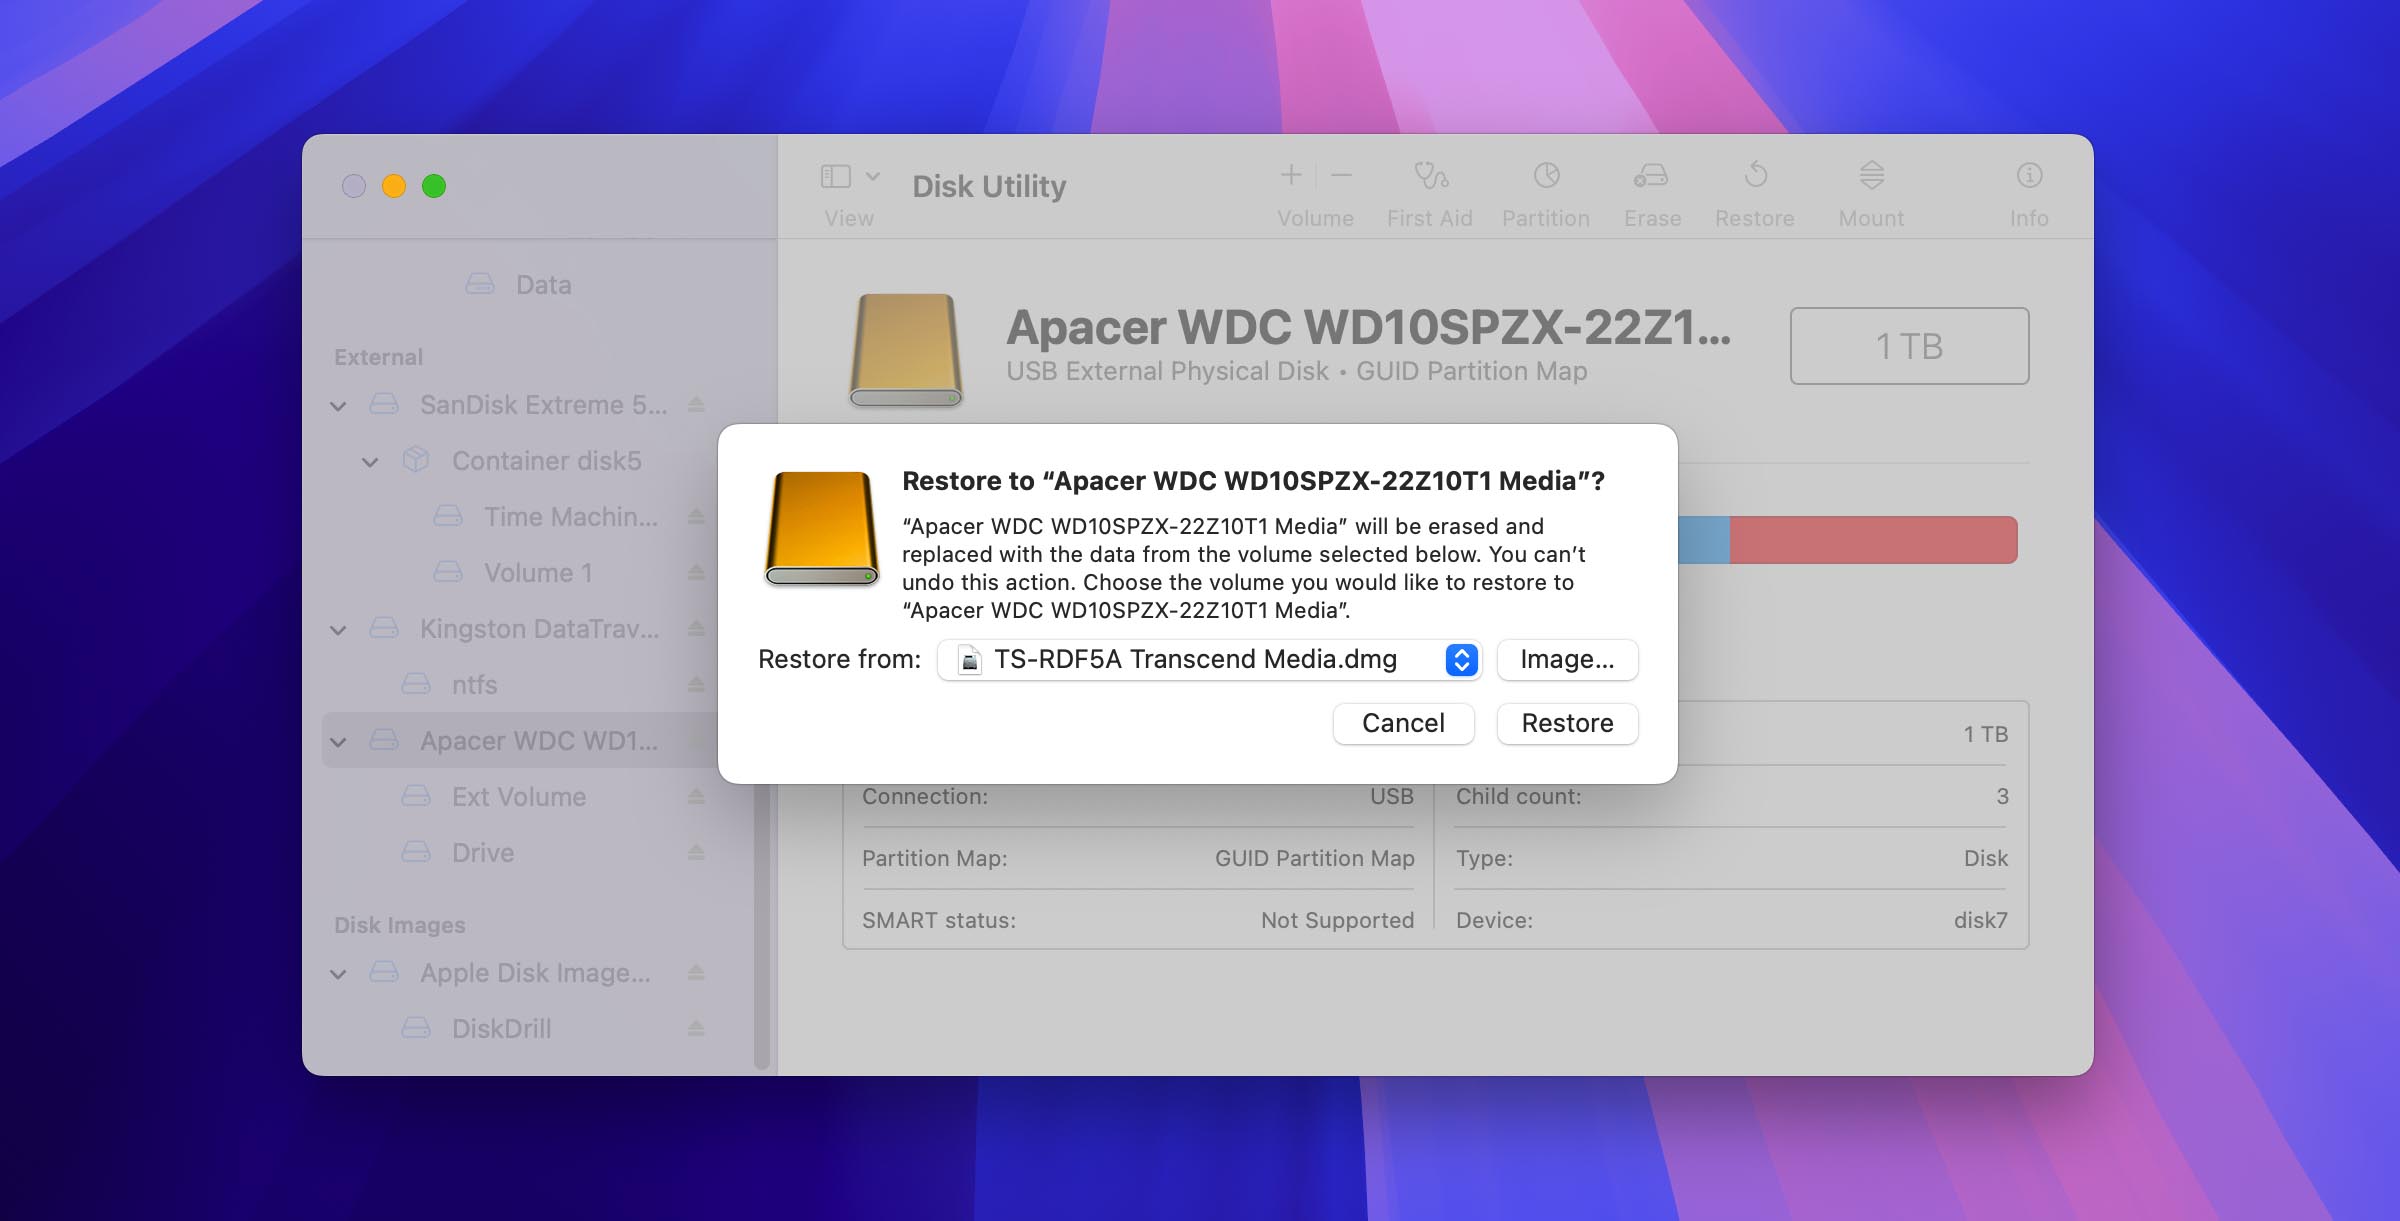
- Navigate to and select your disk image file (.dmg).
- Click Restore and then click Done.
Method 3: Recover Erased Macintosh HD from Time Machine Backup
If you’ve erased your Mac’s startup disk but have been using Time Machine for backups, you can restore both your system and data. The process involves two main steps: first reinstalling macOS to get a working system, then recovering your files from Time Machine.
Reinstall macOS
First, you’ll need to reinstall the operating system:
- Start your Mac in Recovery mode:
- On Apple silicon Macs: Shut down your Mac, then press and hold the power button until you see “Loading startup options.” Click Options > Continue.
- On Intel Macs: Restart your Mac while holding Command + R until you see the Apple logo.
- When prompted, select your user account and enter your password.
- In the macOS Recovery window, select Reinstall macOS and click Continue.
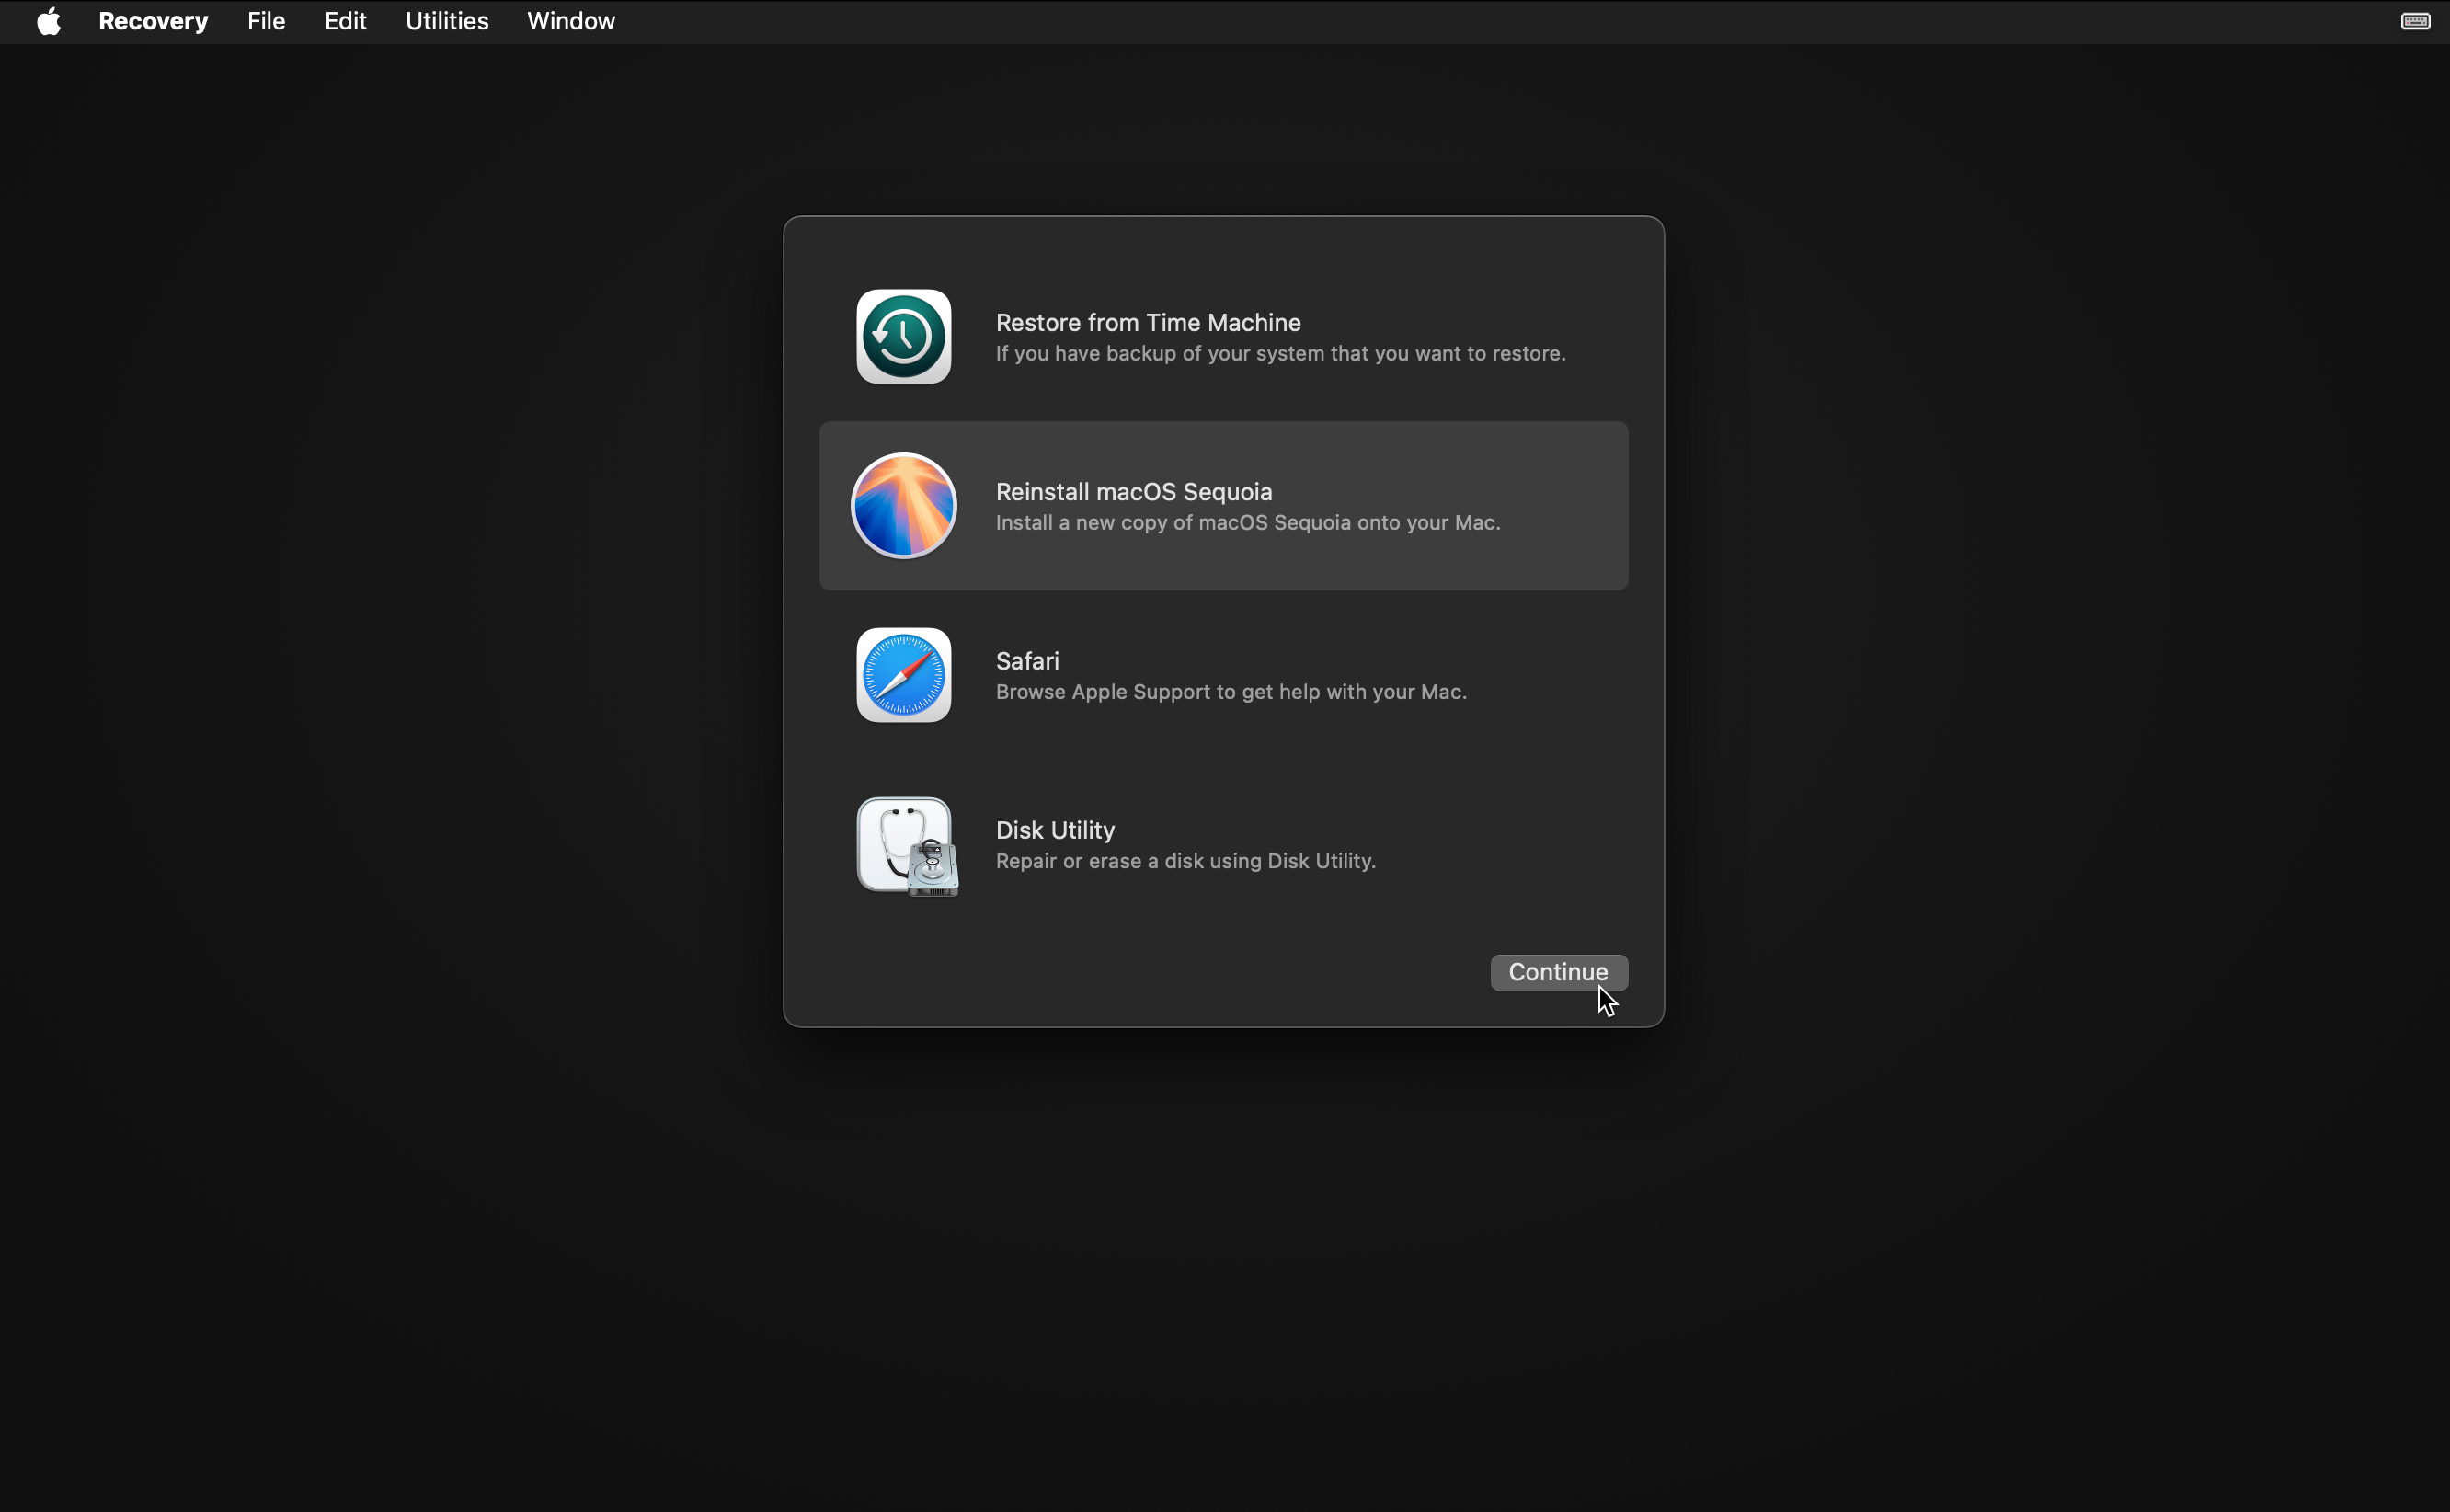
- Follow the installation prompts. If asked to select a disk, choose “Macintosh HD” (not “Macintosh HD – Data”).
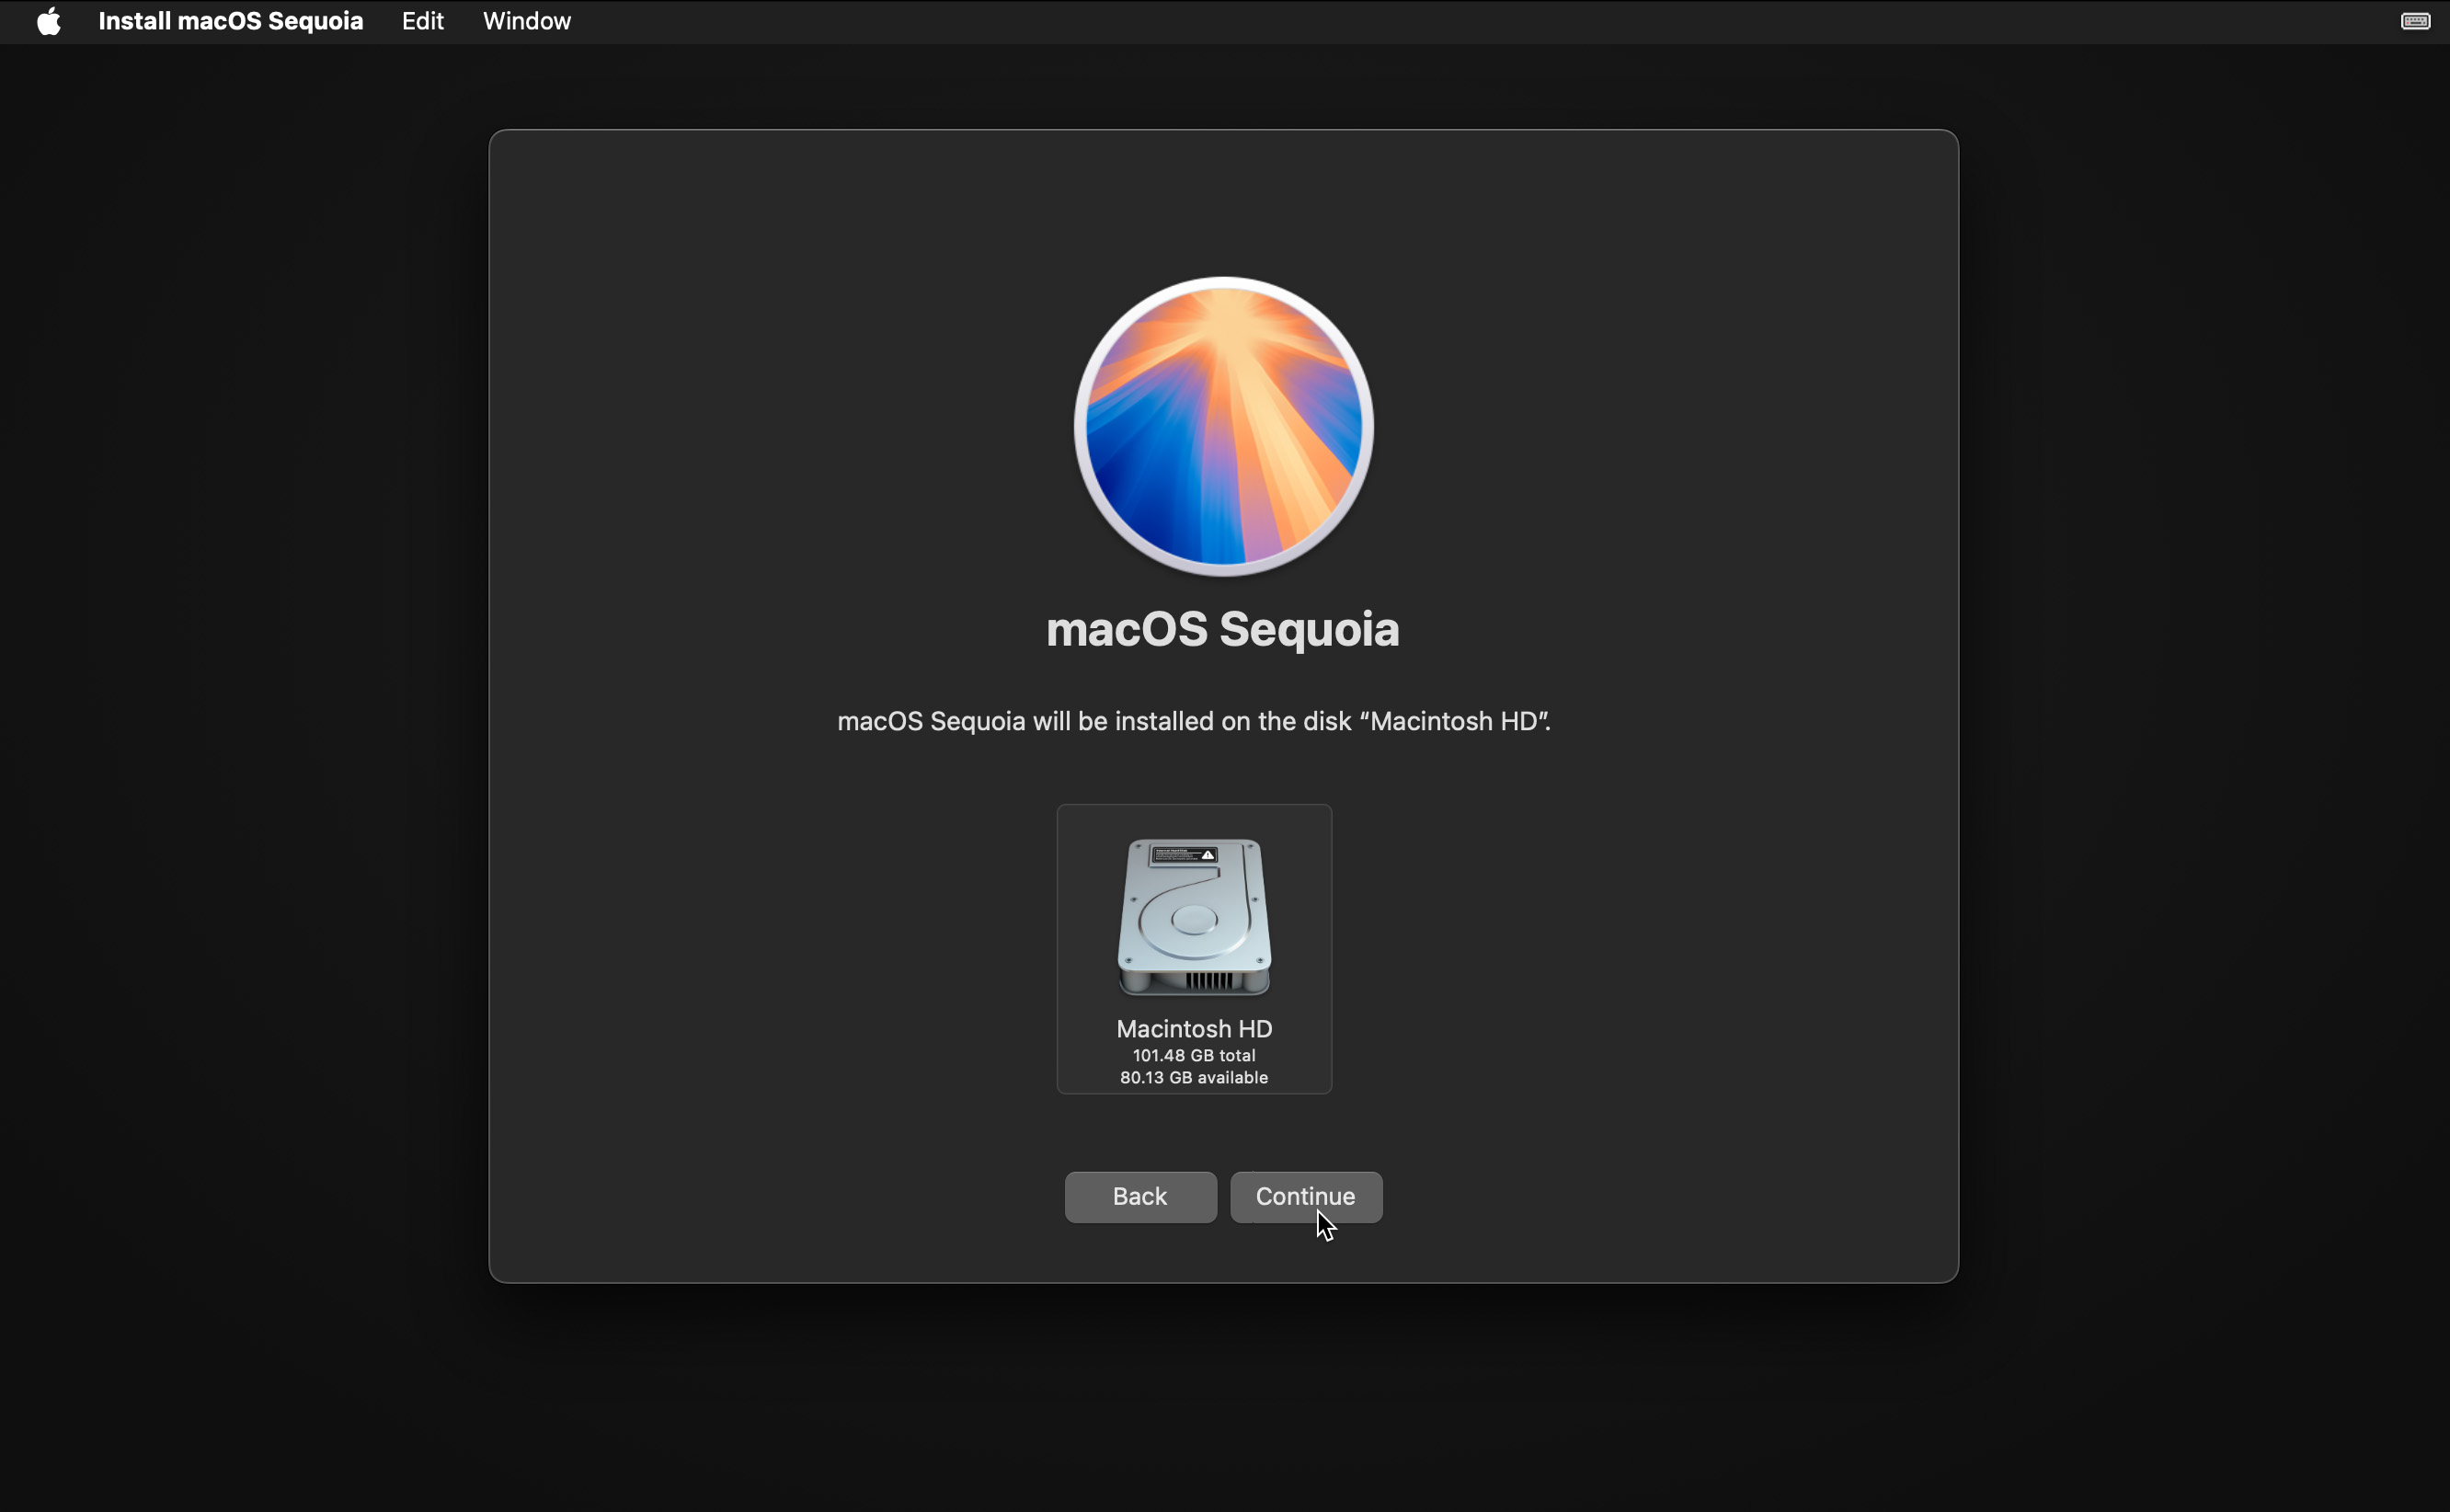
- Wait for the installation to complete.
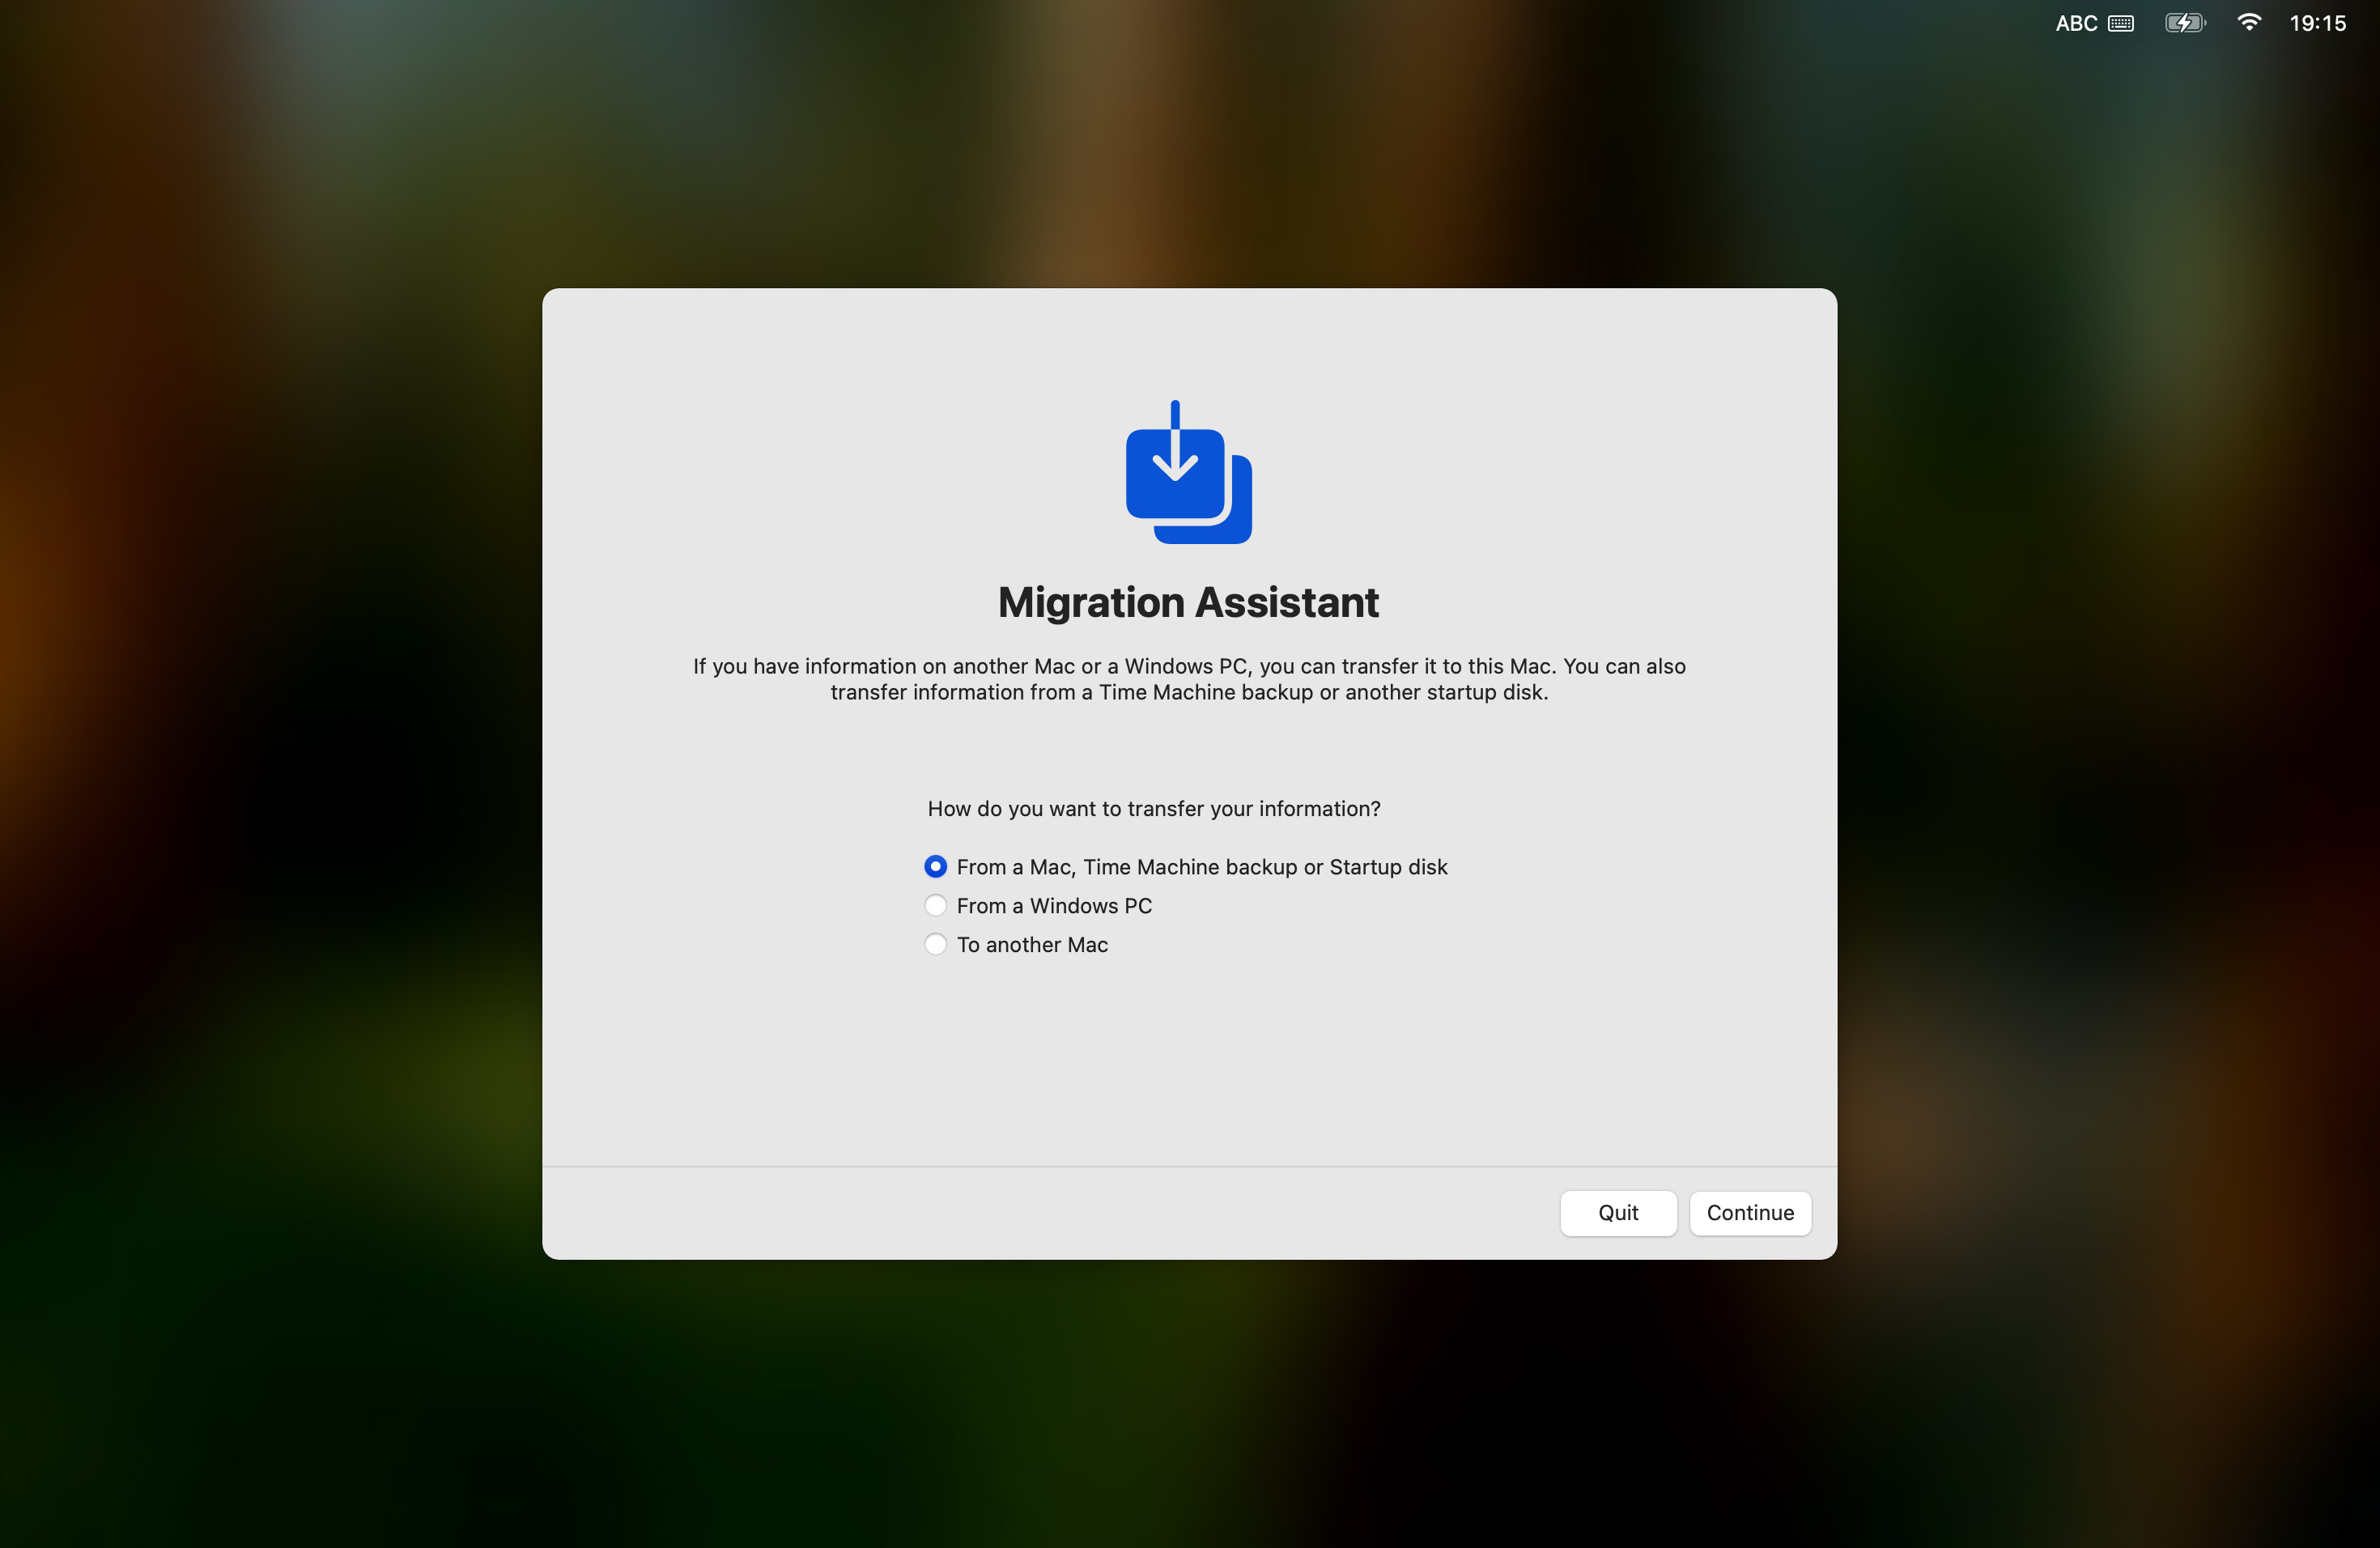
Recover Files from Time Machine
Once macOS is reinstalled, you can restore your files from Time Machine:
- Connect your Time Machine backup drive to your Mac.
- During the initial setup after reinstalling macOS, you’ll see Migration Assistant asking if you want to transfer information. Select Transfer from a Time Machine Backup.
- Choose your backup drive and select the most recent backup (or the specific backup point you want to restore from).
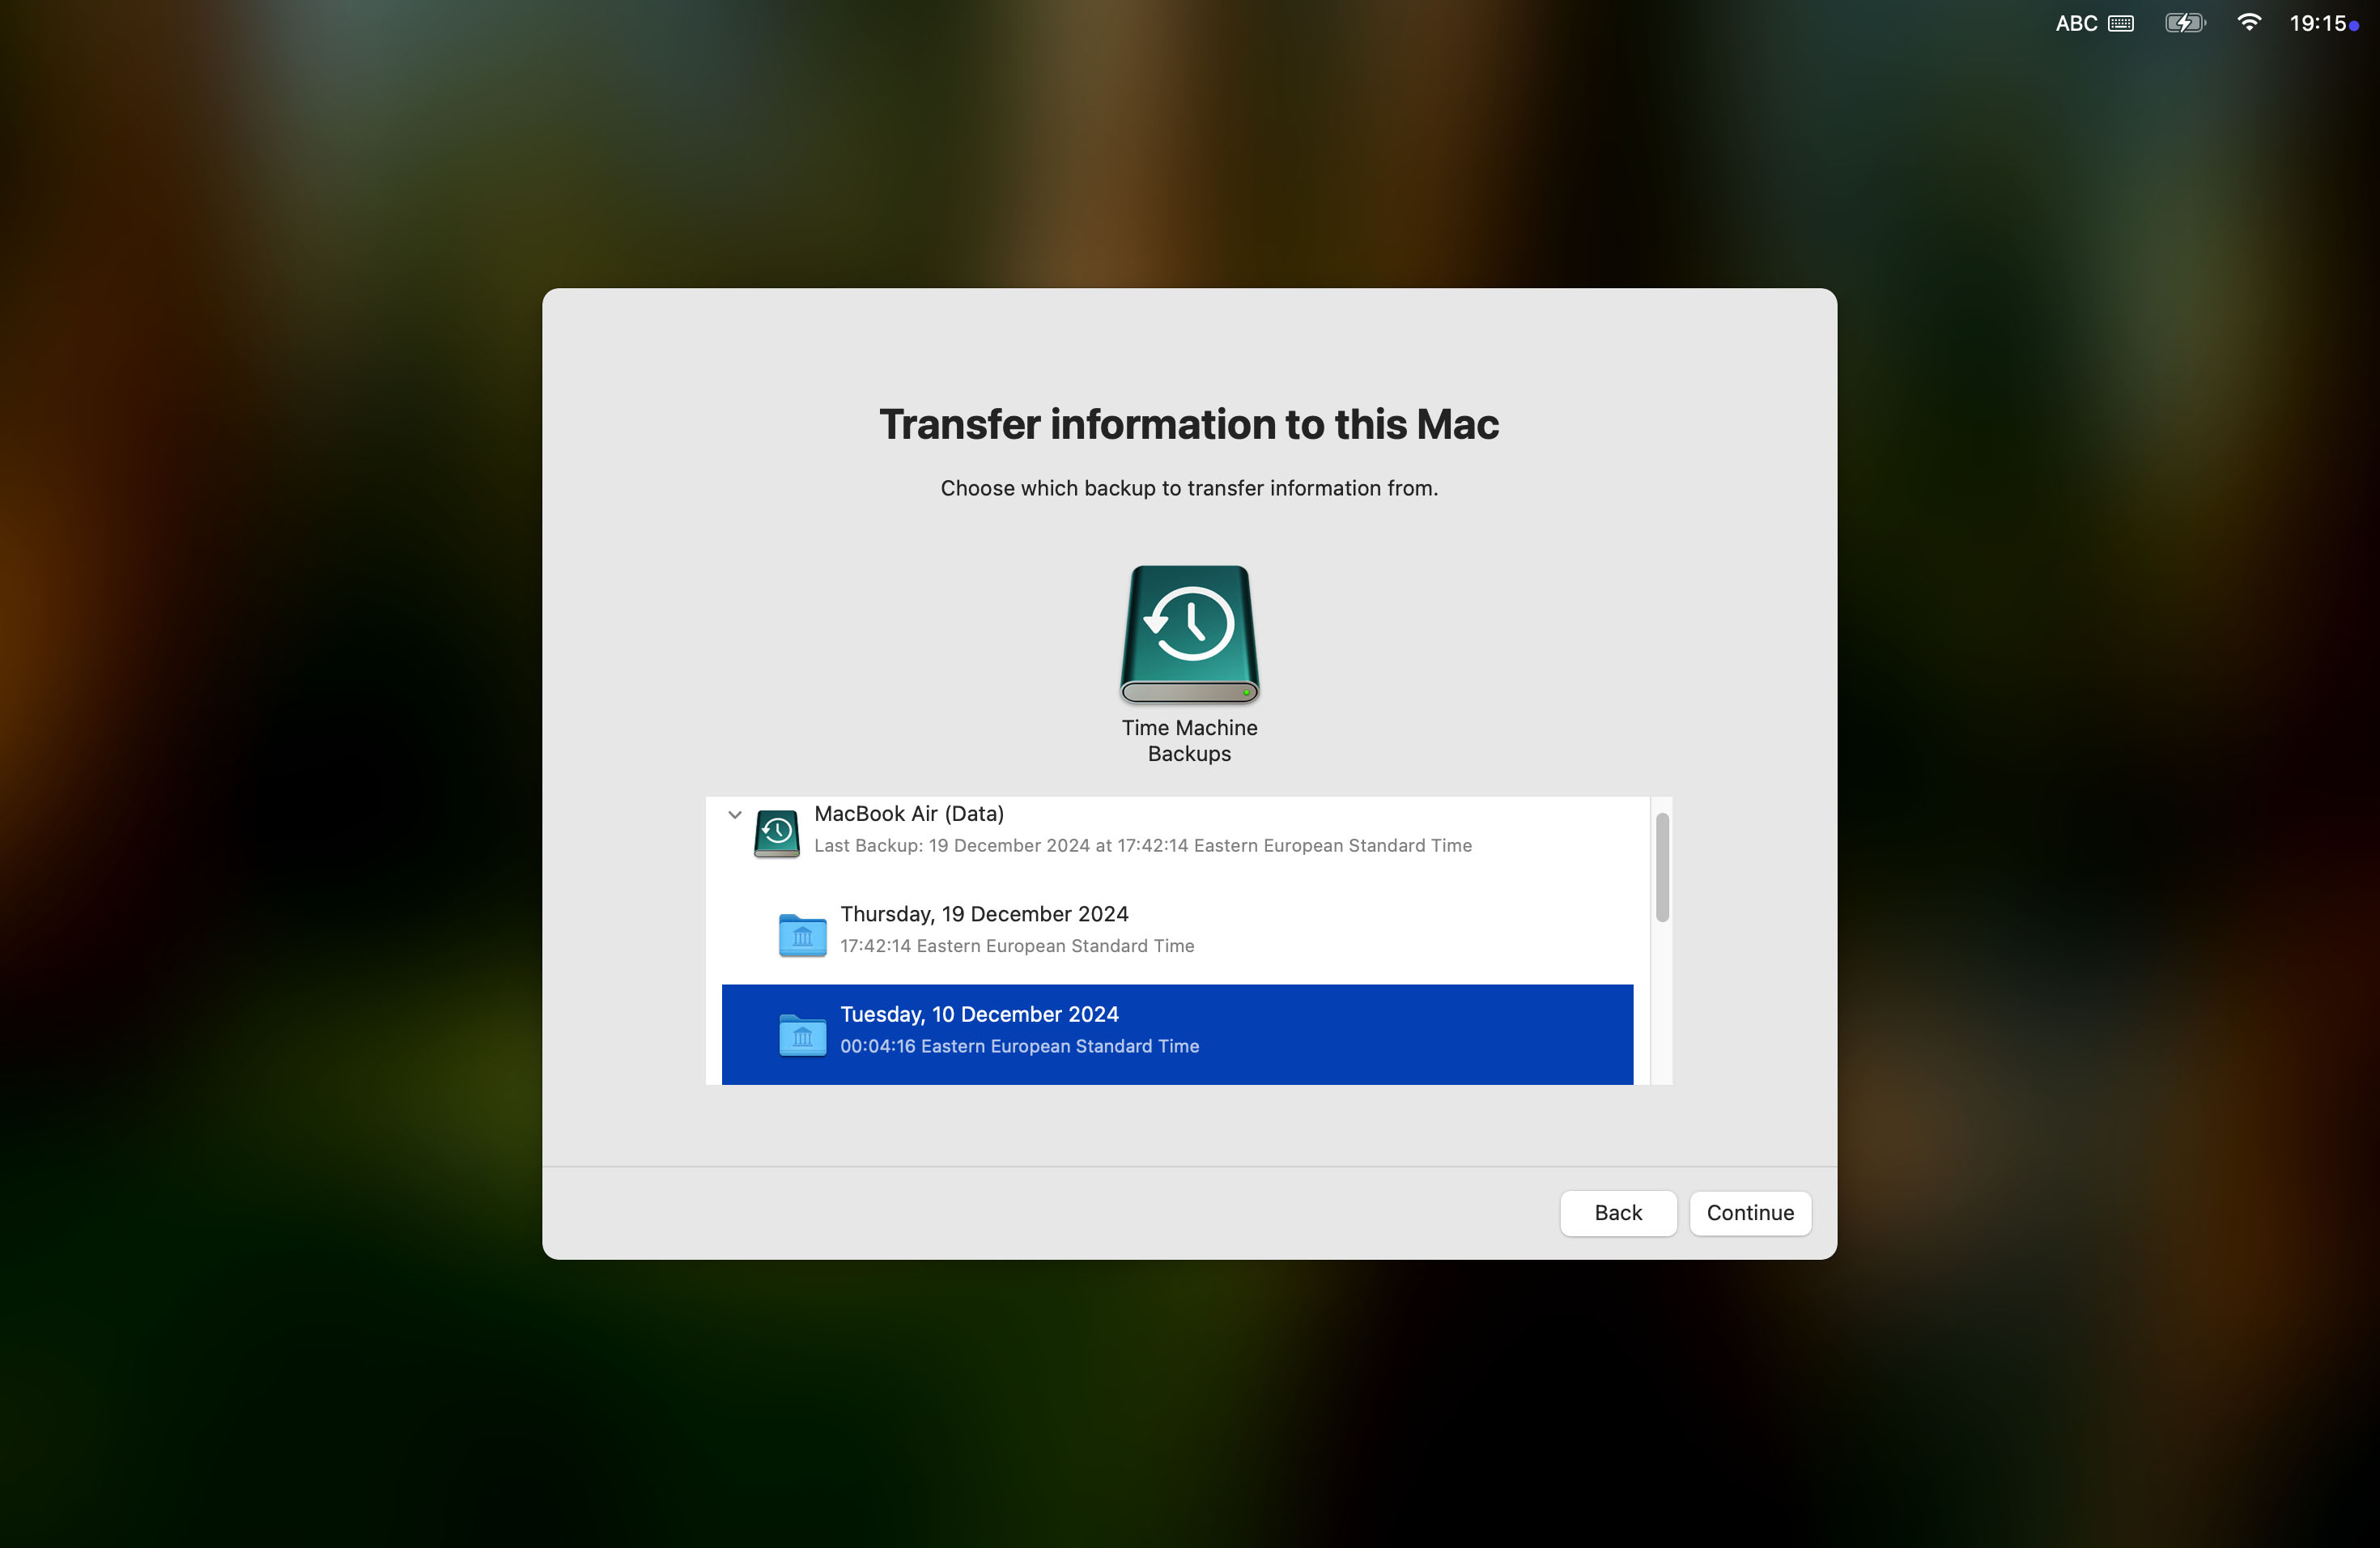
- Select the types of data you want to restore (applications, documents, system settings, etc.).
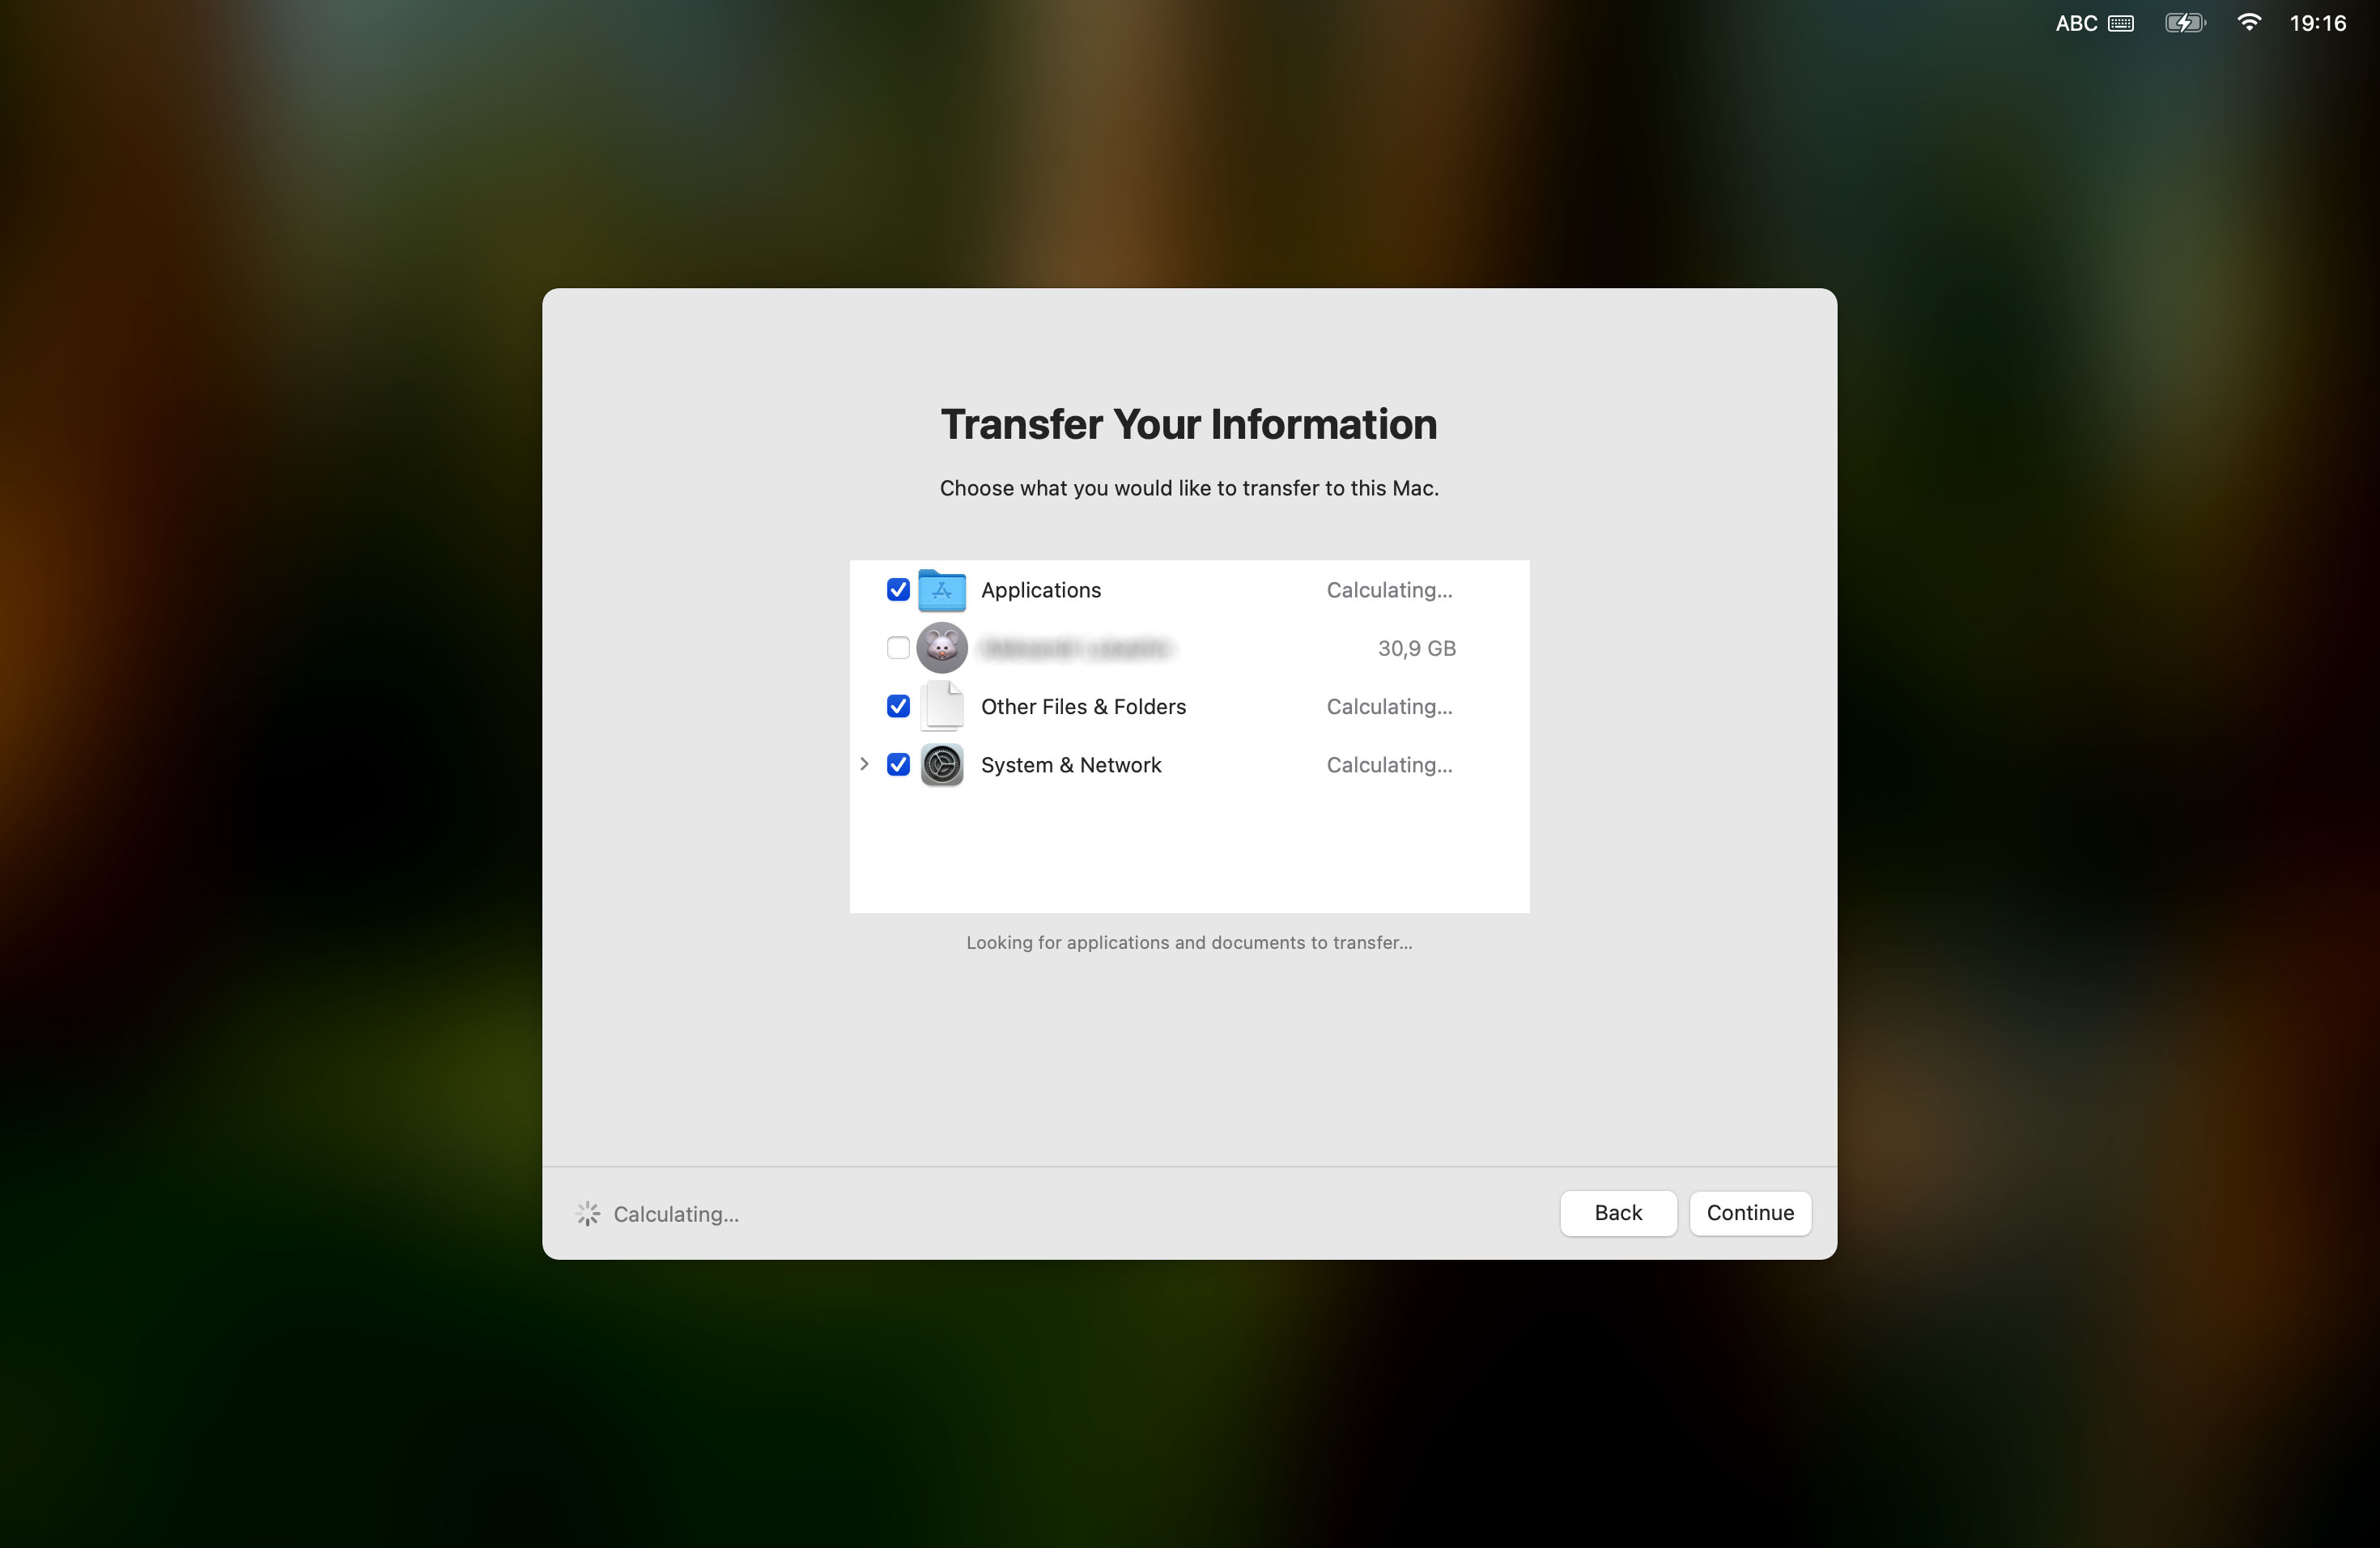
- Click Continue and wait for the recovery to complete.
Conclusion
A crisis can be averted even if you’ve mistakenly deleted your Mac’s startup disk. Luckily, there are a few ways out of this unfortunate event. Even in the worst-case scenarios, if you act quickly, it will be possible to successfully recover data from a deleted startup disk on your Mac.
FAQ
If you have a disk image backup of your Macintosh HD, you can restore it using Disk Utility in Recovery Mode. Simply boot into Recovery, open Disk Utility, and use the Restore feature to recover your system from the backup image. All existing data on your drive will be replaced with the contents of the backup image.
If you can’t boot into macOS because your startup volume has been erased, then you might need to reinstall your operating system from Recovery:
- Turn on your Mac and immediately press and hold Command (⌘)-R.
- Enter a password, such as a firmware or admin password, if prompted.
- Choose Reinstall macOS from the Utilities window.
- Click Continue and follow the onscreen instructions.
- Select the deleted disk when the installer asks you to choose a disk on which to install.
- Choose Macintosh HD if the installer offers you the choice between installing on Macintosh HD or Macintosh HD – Data.
To recover after deleting a Macintosh HD with Disk Utility, you need to restore both the operating system and your files from your Time Machine backup disk:
- Connect your Time Machine backup disk.
- Turn on your Mac and immediately press and hold Command (⌘)-R.
- Choose the option to restore from a Time Machine Backup.
- Click Continue and select your Time Machine backup disk.
- Click Continue again and enter your password if asked to do so.
- Select the Time Machine backup you want to restore and click Continue.
- Select your Macintosh HD and click Restore.
- Restart your Mac when done.
When you delete the startup disk on a Mac, you instantly erase the files, videos, documents, images, and all other data from the hard drive. Also, your computer will get reset to factory settings.
The quickest and easiest way of recovering a deleted startup disk on a Mac is with the help of data recovery software. Simply download Disk Drill and install it. Then follow these steps:
- Launch Disk Drill.
- Choose the erased hard drive from the list of storage devices and click Search for lost data.
- Wait for the scan to finish.
- Select the folders that you wish to recover. If you want to restore all data, press Command + A on your keyboard.
- Click Recover.
- Choose a location for the files and click OK.
Once you delete Macintosh HD on your computer, you instantly wipe your Mac. This means that all of the data (documents, images, videos, and other files) will get erased from your Mac.
You can restore your Mac using macOS Recovery, which is built into every Mac. On Intel-based Macs, restart and hold Command-R until the startup screen appears. On Apple Silicon Macs, shut down completely, then press and hold the power button until you see the startup options. From there, you can use Disk Utility to repair your disk, restore from a Time Machine backup, or reinstall macOS. For detailed instructions, see Apple’s guides for Intel-based Macs and Apple Silicon Macs.