300+ Million
TOTAL DOWNLOADS
Search the website

Disk Drill 3 is now capable of creating your own bootable Mac OS X USB drives for data recovery. Chances are, the Mac with the disk, where the data was lost, will be able to start from the boot drive created. We officially recommend running data recovery on your startup disk ONLY when your Mac is booted from a different drive, using external docking stations, or Disk Drill's own bootable data recovery freeware. OS X 10.9.x-15 required as a source of system files.


The initial recommendation given to anyone who lost important data and would like to proceed with the data recovery is always to stop using the drive where the data was stored as soon as possible. You can turn your computer off, remove the drive in question from the docking station, do whatever may be required to prevent any further utilization of that drive. Set it aside, calm down and download a bootable data recovery app using any other computer. Disk Drill is by far the most convenient and up-to-date macOS bootable file rescue solution. It'll make your Mac boot from USB in just a few clicks.
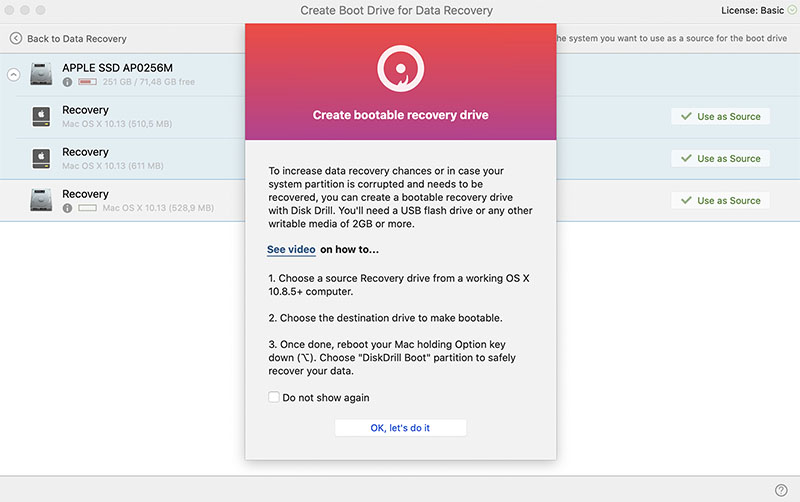
Starting with Disk Drill 3, anyone can create a bootable Mac OS X drive in a matter of minutes. Make sure you have an extra storage device, which is at least 2GB in size. Connect it to any Mac, run Disk Drill and use the "Create Boot Drive" option on the main toolbar.
Disk Drill let's you run all its data recovery algorithms via a bootable Mac USB drive. This ensures the maximum amount of data stays intact during the recovery process, and other background processes or the operating system itself do not overwrite any recoverable pieces of information. Please note: Disk Drill does not provide any option to create bootable CD/DVD drives due to them becoming less popular and accessible in modern computers.
Data recovery cannot always be done on a running system. It's always a smart move to reboot using Disk Drill's Data Recovery Boot Drive and proceed from the minimal OS X boot from USB. Make sure the drive with lost data is completely disconnected. Get to any Mac, and download free Disk Drill. Install and launch it. Choose "Create Boot Drive" from the main list of available tools and follow the instructions.
Download Disk Drill
Drag to Applications Folder

Launch Disk Drill
So, you are ready to increase your data recovery chances and would like to make sure you restore every file and folder. You are on the right track! Get any extra USB drive or external disk, connect it to your Mac, and get ready to convert it into a bootable data recovery kit.

To create a bootable Mac drive you need any disk with Mac OS X 10.11.0 El Capitan or newer (10.12 Sierra, 10.13 High Sierra, 10.14 Mojave, 10.15 Catalina) either running as your main system, or just being installed on a drive that's connected to your Mac at the moment. Go to "Create Boot Drive" feature, and choose the drive you would like to copy the OS X system files from to the new drive that we are building. Once the source disk is selected, proceed with choosing the destination to make a USB bootable drive.

Thanks to the bootable USB drive you just made with Disk Drill, you can now safely recover Mac data from any startup disk that is already unmounted to prevent any further data loss.
Disk Drill's data recovery boot disk is also an ideal solution when systems with deleted data that needs to be recovered fail to boot from the internal drive. Once your Mac USB bootable drive is created, you are ready for data recovery at any time.

Insert the newly created bootable drive into the Mac where the lost data still resides. Reboot it holding down the Option (⌥) key. The list of available drives to boot from will be displayed. The one you created at previous steps that provides you with data recovery capabilities is called "Disk Drill Recovery". Go ahead, select it and boot your Mac up. Disk Drill software is already preloaded into the system that loads. Just run it as you regularly would to recover the lost data.
Make sure you try all available data recovery methods to get your deleted data back. Also note: Disk Drill does provide a separate feature to install a new instance of Mac OS X using the bootable drive that can be created with it. However, this article explains the steps required to create the Mac OS X USB boot disk for lost data retrieval and running Disk Drill in a ready-to-use standalone recovery environment.
Now anyone can make Mac USB bootable disk for everyday use.
If you are looking for the solution for macOS 11.0 (Big Sur), please check out this article. The post will guide you through the process and will help you to recover your data safely and successfully.
Under ordinary circumstances, your Mac starts up normally every time you use it. When you perform a restart, the operating system usually boots from the desktop or laptop’s main internal disk. You may run into a situation where your Mac will not start using the main disk. In these cases, you will need to make use of the Mac boot options.
Accessing the Mac boot options allows you to decide which storage device will be used to load your operating system. These options enable you to boot a Mac from a USB drive or optical disk. The advantage of using a USB drive is that it is a more flexible solution that lets you use the device on laptops and machines that do not have an optical drive installed. A bootable USB drive is a great thing to have around to resolve the problem of a Mac that won’t start or to perform a fresh install of the opening system.
Here are several methods for creating a bootable installer for macOS.
The createinstallmedia command can be used to create a bootable installer. You need to use the Mac Terminal app and enter the correct command based on the OS version running on your computer. Use the following steps:

Big Sur - sudo /Applications/Install macOS Big Sur.app/Contents/Resources/createinstallmedia --volume /Volumes/MyVolume
Catalina - sudo /Applications/Install macOS Catalina.app/Contents/Resources/createinstallmedia --volume /Volumes/MyVolume
Mojave - sudo /Applications/Install macOS Mojave.app/Contents/Resources/createinstallmedia --volume /Volumes/MyVolume
High Sierra - sudo /Applications/Install macOS High Sierra.app/Contents/Resources/createinstallmedia --volume /Volumes/MyVolume
El Capitan - sudo /Applications/Install OS X El Capitan.app/Contents/Resources/createinstallmedia --volume /Volumes/MyVolume --applicationpath /Applications/Install OS X El Capitan.app
💡 Note: For OS versions prior to El Capitan, use the command for El Capitan with the applicationpath parameter.
You can use Disk Utility to create a bootable USB with the following procedure.

Disk Drill offers the ability to create a bootable drive with a simple process that is available as a free feature available in all versions of the software.

Once you have created the bootable installer, here’s how to boot your Mac from the USB drive.

Booting a Windows computer from a USB drive requires you to follow these steps:
Use the following procedure to boot a Linux machine from a USB drive.
Here are some other methods you can use to start your Mac. They may be necessary if your main disk is experiencing problems or your Mac won't boot from a USB drive.
If your Mac is equipped with a CD/DVD drive, you can use a bootable optical disk to start your computer.
You can choose to use an external volume to start your Mac by selecting the device from the boot option screen upon startup.
Holding down the Shift key while rebooting will start your Mac in Safe mode which may be helpful for diagnosing problems.
Starting your Mac in Verbose mode by using the Command V key combination after hearing the chime gives you detailed information regarding system startup.
With Target Disk Mode you can connect two Macs and use the second machine’s operating system to boot the other computer.
Access Recovery Mode with the Command R keystroke combination which allows you to reinstall the operating system and perform other functions.
Updated on by Disk Drill Team
Use the following steps to install your Mac operating system from a USB.
You can get your Mac to boot from a USB drive with these steps:
To get to the boot menu on a MacBook Pro, use these steps:
Use this procedure to make a USB stick bootable with Disk Drill:
Use these steps to see if a USB drive is bootable:
There are multiple reasons that a USB drive may not be bootable including:
UEFI is the advanced replacement for BIOS that is used on Macs with Intel-based CPUs. Accessing UEFI mode on a Mac requires you to execute this command as your machine starts up.
From within the EFI, you can select the USB bootable disk as the volume to start your computer.
You can easily make a bootable USB drive with the help of the following software applications:

REQUIREMENTS
macOS 10.15.8–26.x, 69.7 MB
Use Disk Drill 1.x-5.x for OS X 10.5+
AVERAGE USER RANK
NEWEST RELEASE


TOTAL DOWNLOADS
PRO CLIENTS
in 160+ countries
I recommend Disk Drill from @cleverfiles to every Mac User who is serious of keeping his files by all means! Big Thank You to the developers!
Remember Hugo’s Mac computer? His external hard drive crashed. He bought a piece of software called Disk Drill. The software worked perfectly. It recovered everything on his busted external hard drive. If you have a Mac, you need this software. Harry Newton
