Need to retrieve footage from dashcam storage in your Tesla or any other dashcam? Our short walkthrough covers the main situations drivers run into, including accidental deletion, missing clips, overwriting, formatting, and storage corruption on SD cards or Tesla USB drives. We’ll explain when recovery is possible, which tools make sense to use, and how to recover the footage safely without lowering your chances. Every method covered here has been tested by our team to verify it actually works.
Can You Recover Lost Videos from a Dash Cam
Fortunately, recovering deleted dash cam videos, including Tesla dashcam footage, is often possible. Let’s explore the recovery options based on the storage types used by dash cams:
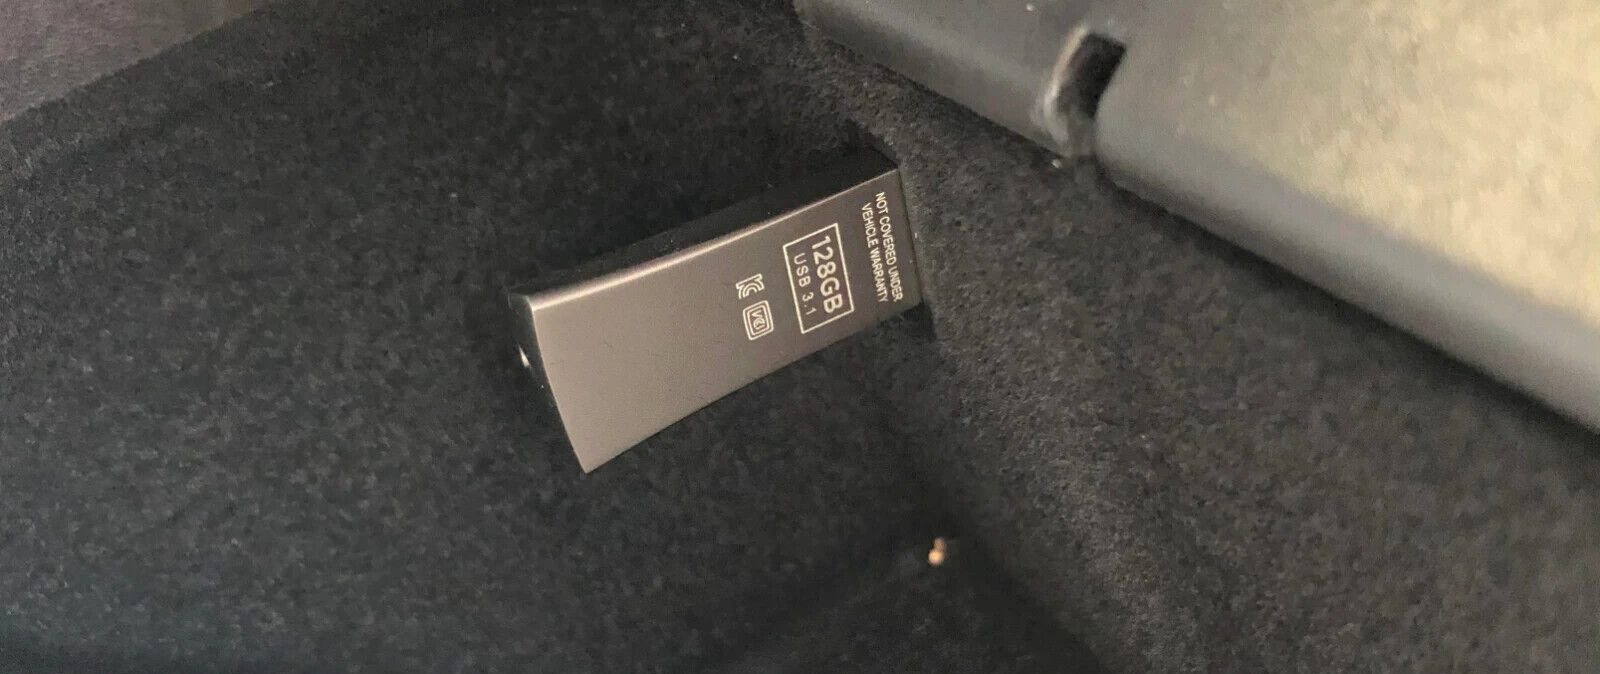
- Tesla USB drive. Teslas record dashcam footage on a USB flash drive, but regardless of how large the drive is, only 1 hour of footage is kept in a continuous loop unless the driver presses the button to manually save a clip. But because of how USB flash drives work, even old footage that’s no longer visible can often be recovered using data recovery software. In fact, the best data recovery tools can recover even formatted, corrupted, or manually deleted Tesla USB drives.
- SD card dash cam. SD cards are widely used in dash cams for their convenience and capacity. However, users may encounter problems like corrupted files, accidental deletion, or formatting issues that result in lost footage. These problems can be caused by different factors, including improper ejection, card failure, or file system errors. Thankfully, solutions exist to recover deleted dash cam videos from SD cards.
- Internal memory. Dash cams with internal memory are convenient self-contained units that can usually be simply turned on—no initial setup needed. Unfortunately, their internal memory can also be difficult to recover using popular data recovery software solutions. If you find yourself unable to access lost videos from a dash cam’s internal memory, it’s not the end of the road. We recommend contacting a professional data recovery service that specializes in retrieving data from such devices.
- Cloud storage. The process for recovering lost or deleted footage differs significantly for dash cams that rely on cloud-based storage solutions. Since the data is stored remotely, recovery typically involves contacting the cloud service provider. Many cloud services offer ways to restore deleted files or access earlier versions of your data.
- HDD or SSD DVR systems. Some dashcam setups – in trucks, commercial fleets, buses, and larger surveillance-style vehicle systems – store footage on a dedicated DVR unit with an internal hard drive or SSD instead of a memory card. These systems can hold far more video, but they still face similar problems, including deletion, formatting, file system damage, or drive failure. If the drive itself is healthy, data recovery software may help retrieve footage from dashcam DVR storage.
How to Recover Lost Tesla Dashcam Footage
Despite Tesla dashcams recording in a 1-hour loop, this footage is distributed across the entire storage space due to wear-leveling, which protects the drive. When footage is deleted or formatted, it’s not immediately erased but marked as free space, which leaves the data recoverable until new data takes its place.
To recover lost Tesla dashcam footage, you’ll need data recovery software. Tools like Disk Drill are built for this job. They can scan USB drives, recognize MP4 video files (Tesla dashcam and Sentry Mode clips are saved as video files in that format), work with exFAT (the file system commonly used on Tesla USB drives), and include features like file preview and a simple UI that make Tesla dashcam footage recovery easier for non-professionals. And if we’re talking specifically about Tesla footage, Disk Drill also includes an Advanced Camera Recovery mode that can help recover fragmented Tesla video clips.
Here’s how you can recover deleted Tesla dashcam footage using Disk Drill:
- Download Disk Drill, then launch the installer and follow the prompts to install the app.
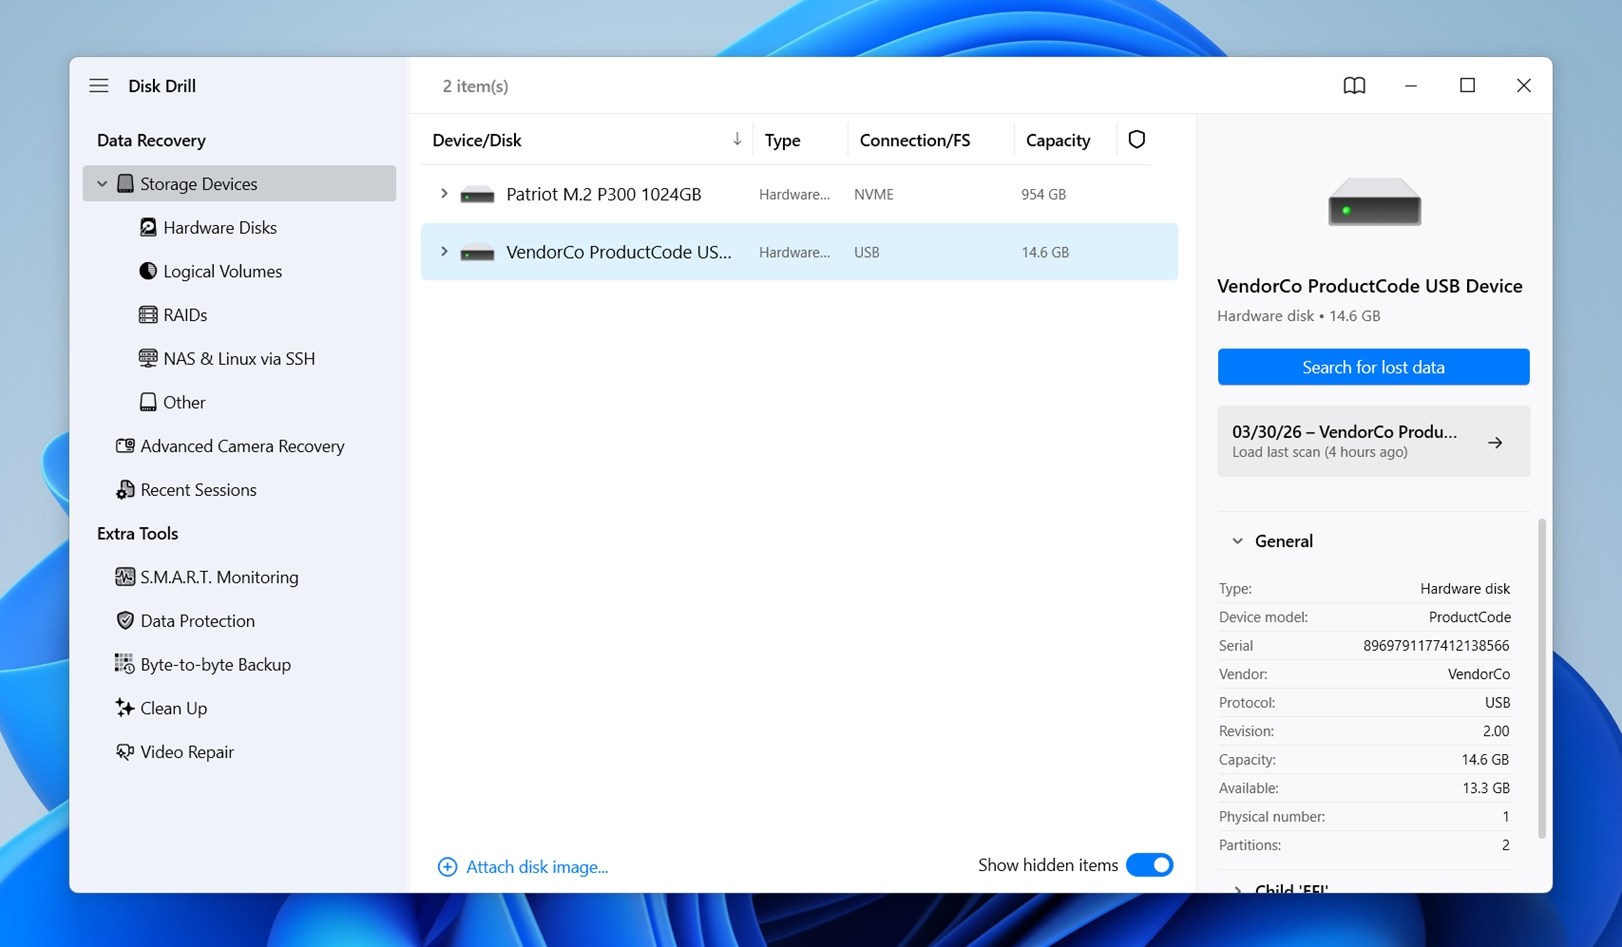
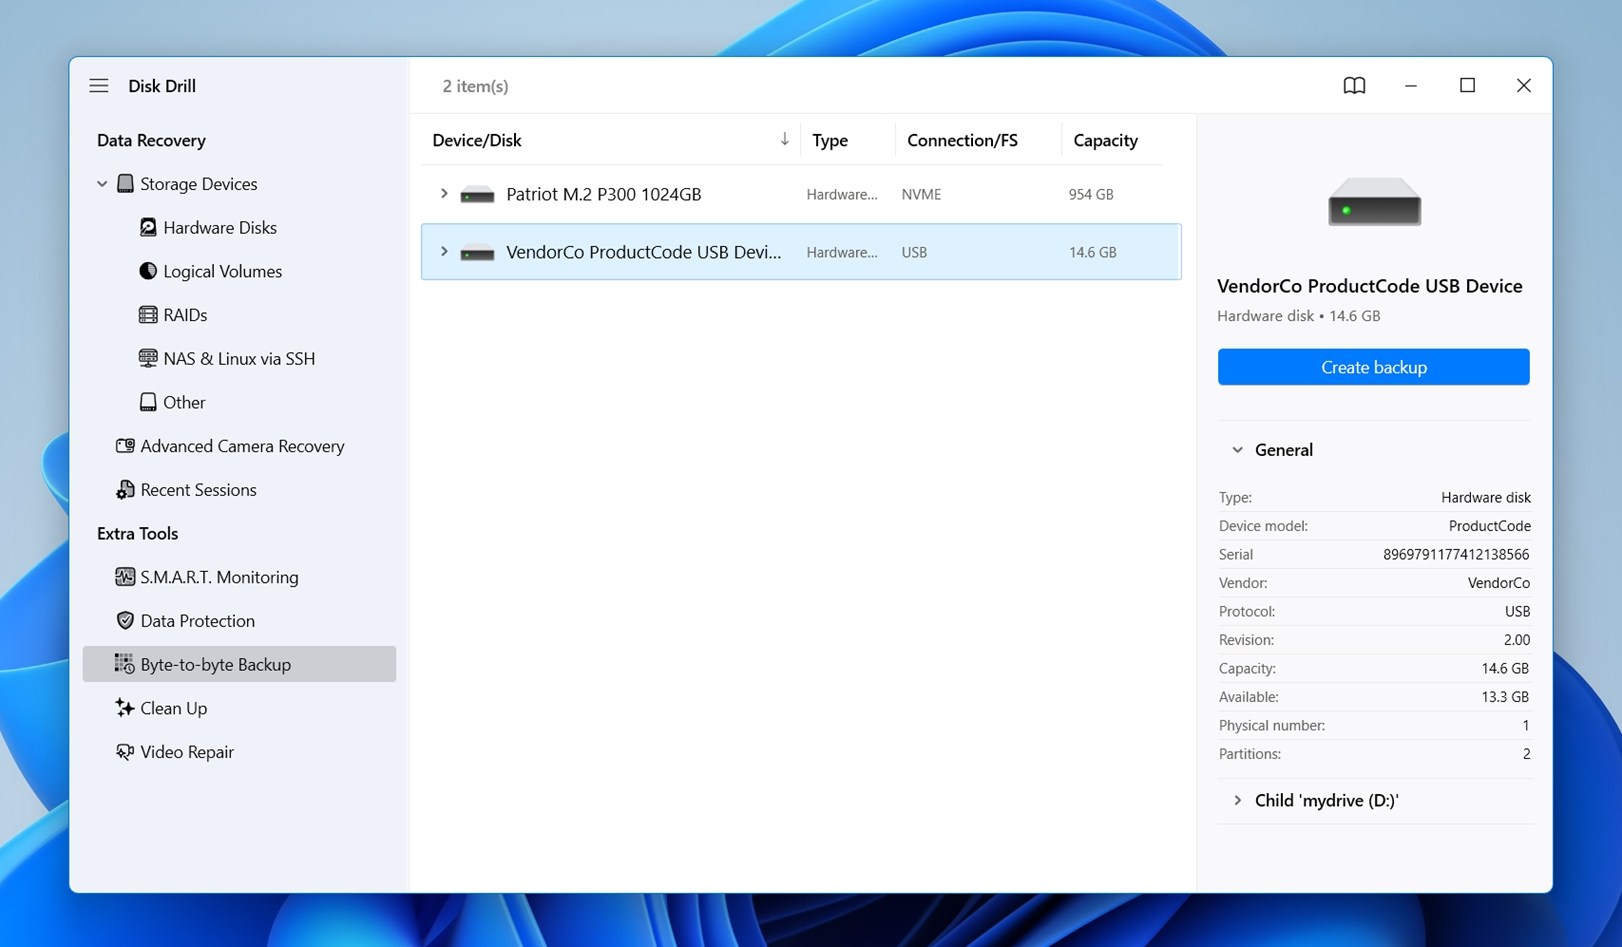
- Remove the Tesla USB drive from your vehicle and connect it to a PC or Mac where Disk Drill is installed.
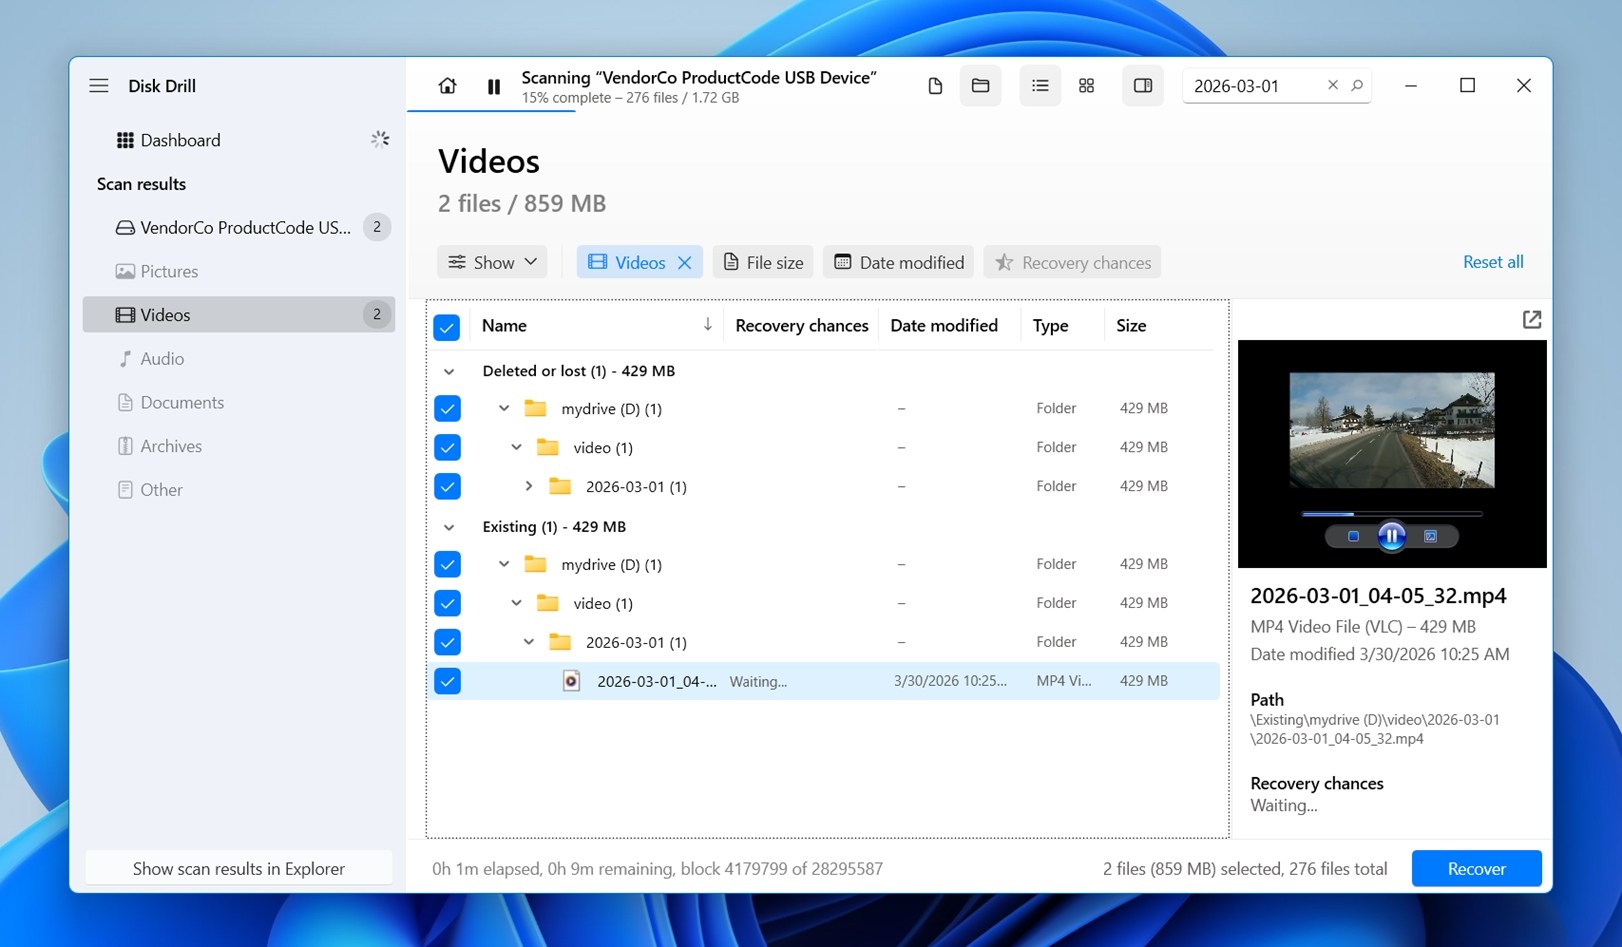
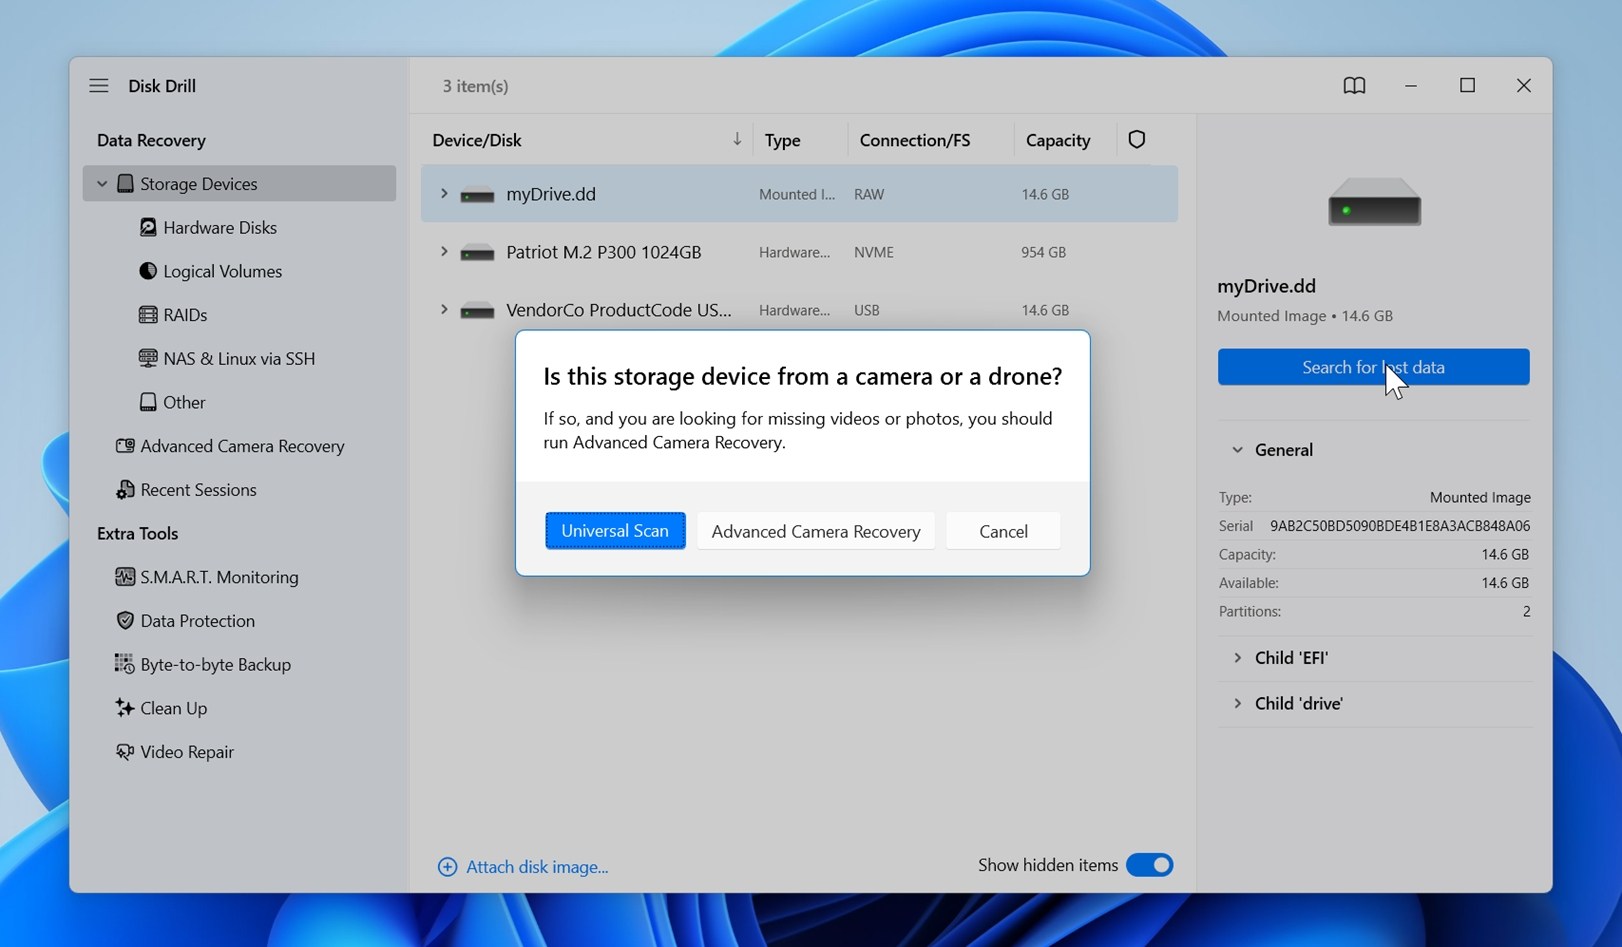
- Launch Disk Drill and select the Tesla USB drive from the list and click the Search for lost data button to scan it.
- Choose the scan mode based on what happened to the device. In most cases, Universal Scan is the go-to option. But when you’re dealing with a Tesla USB drive with dashcam footage or a formatted device, we’d recommend trying Advanced Camera Recovery first, since this mode is better suited to fragmented video footage.
 (You can always run another scan later with a different mode if you want to compare the results.) Be patient as this process may take some time, depending on the size of the drive and the amount of data being recovered.
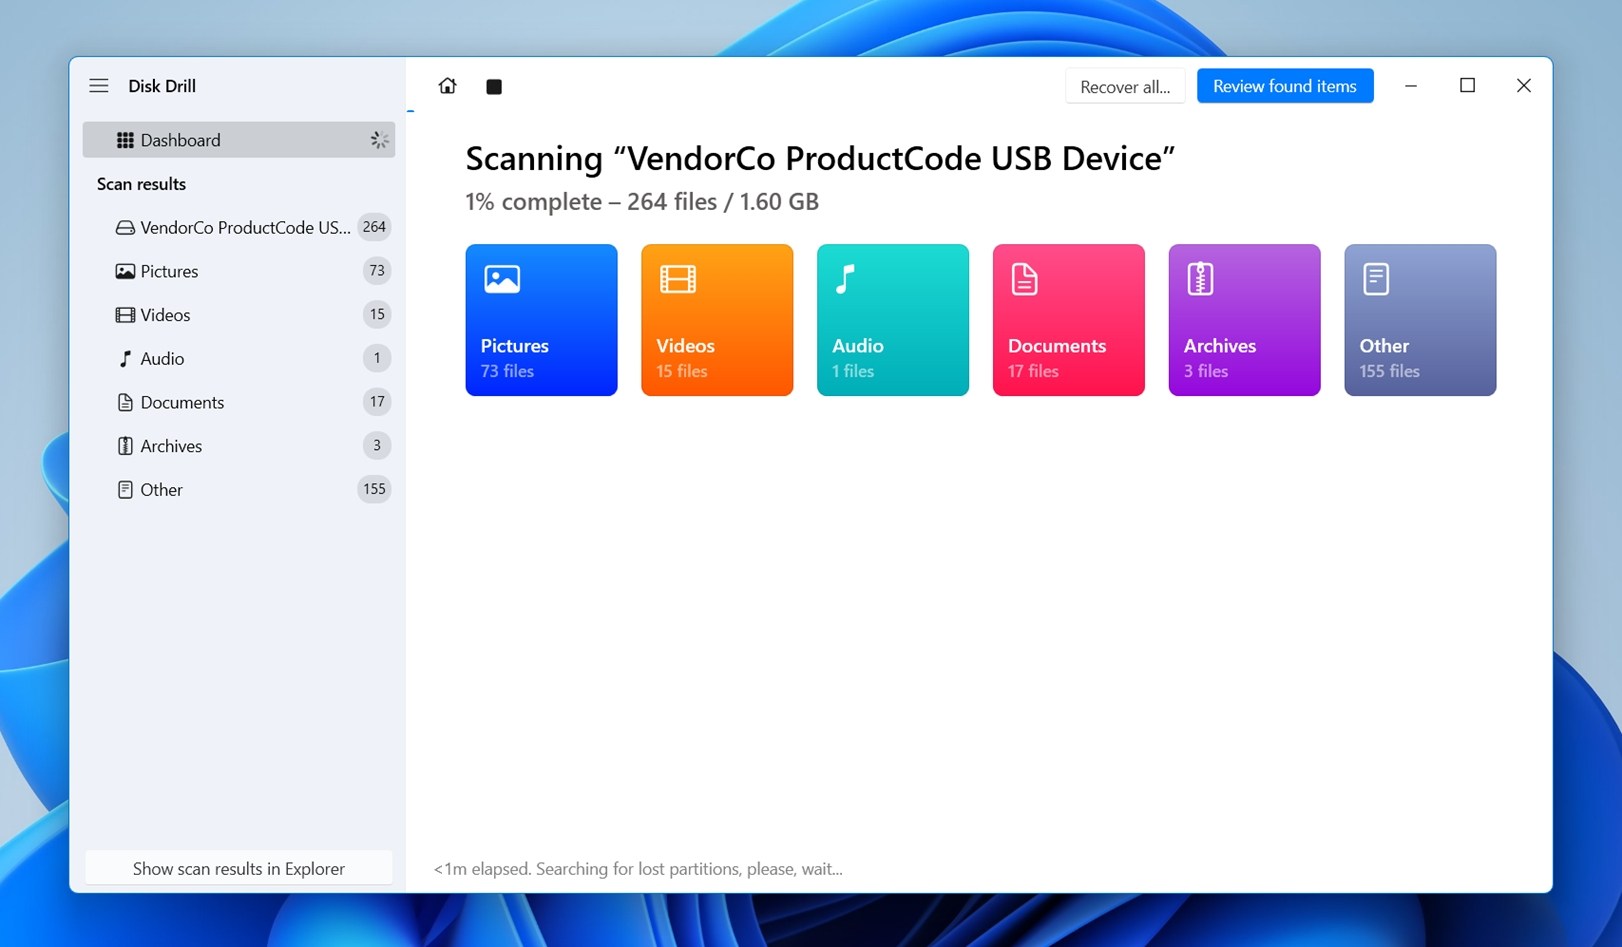
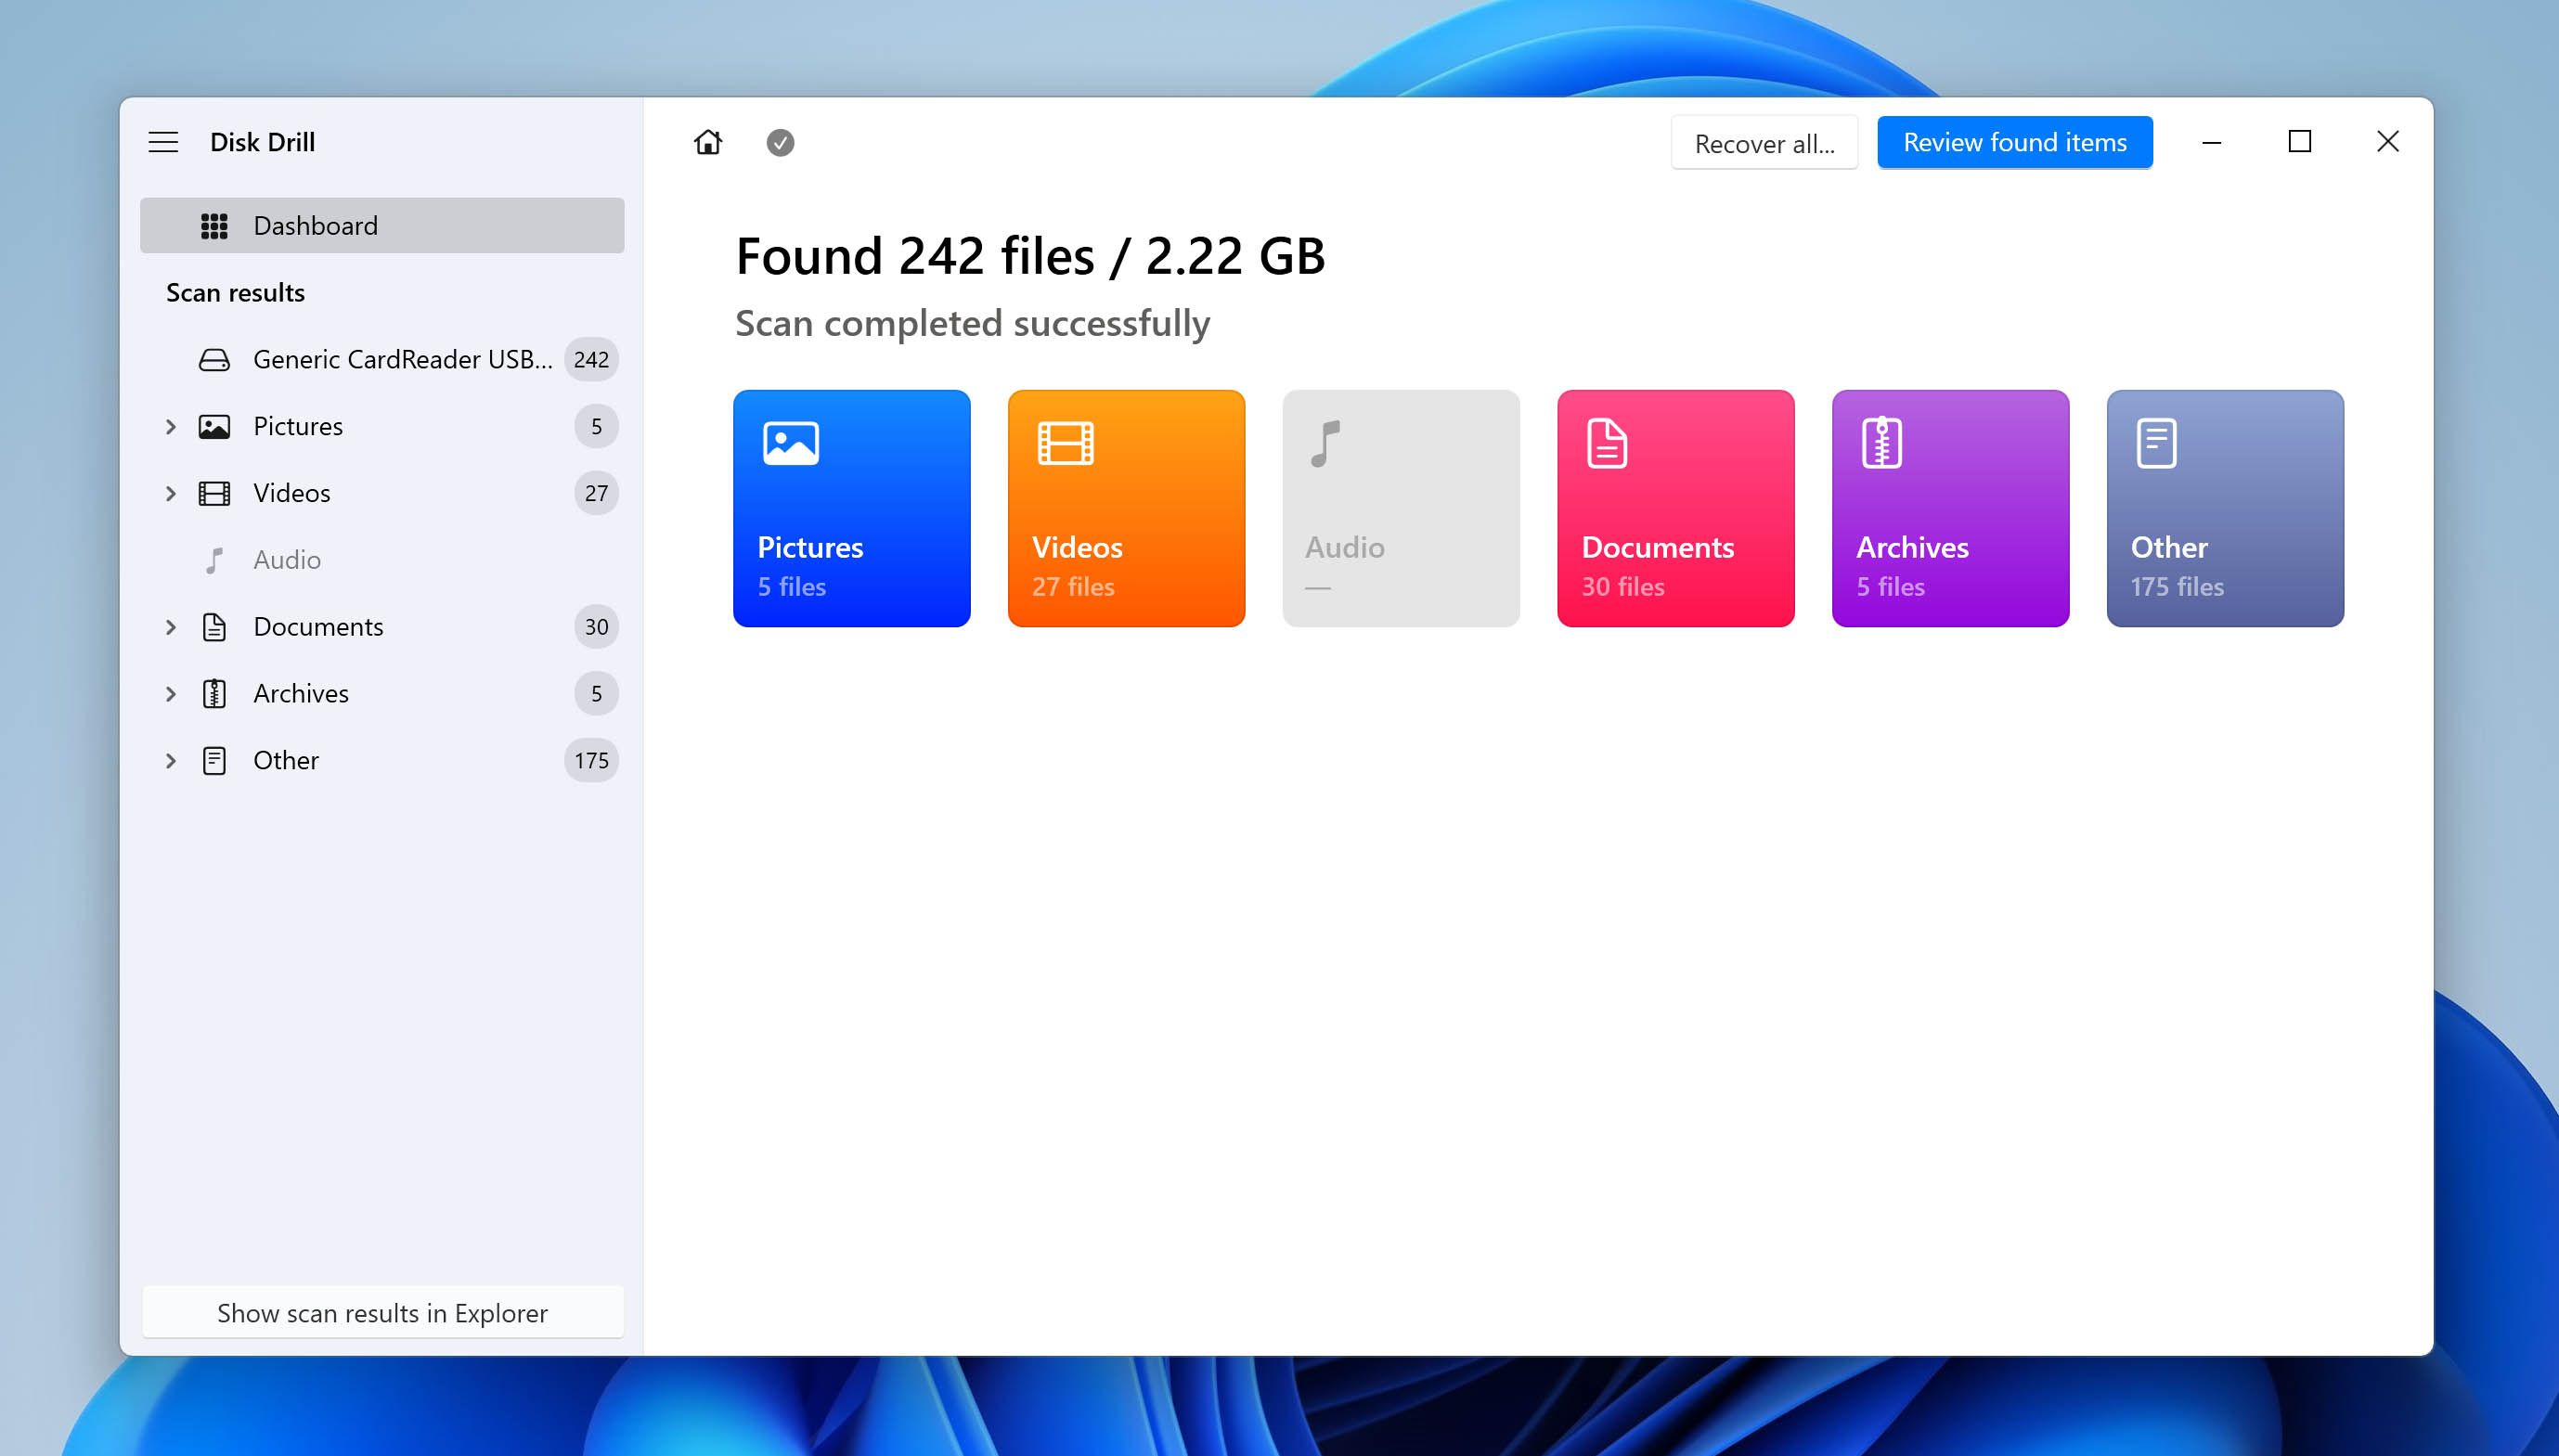
 - As the scan moves along, Disk Drill automatically sorts recoverable files into categories like Pictures, Video, Audio, Documents, Archives, and Other Files.
 Since you’re trying to retrieve video from dash cam storage, the Video category is the natural place to start.
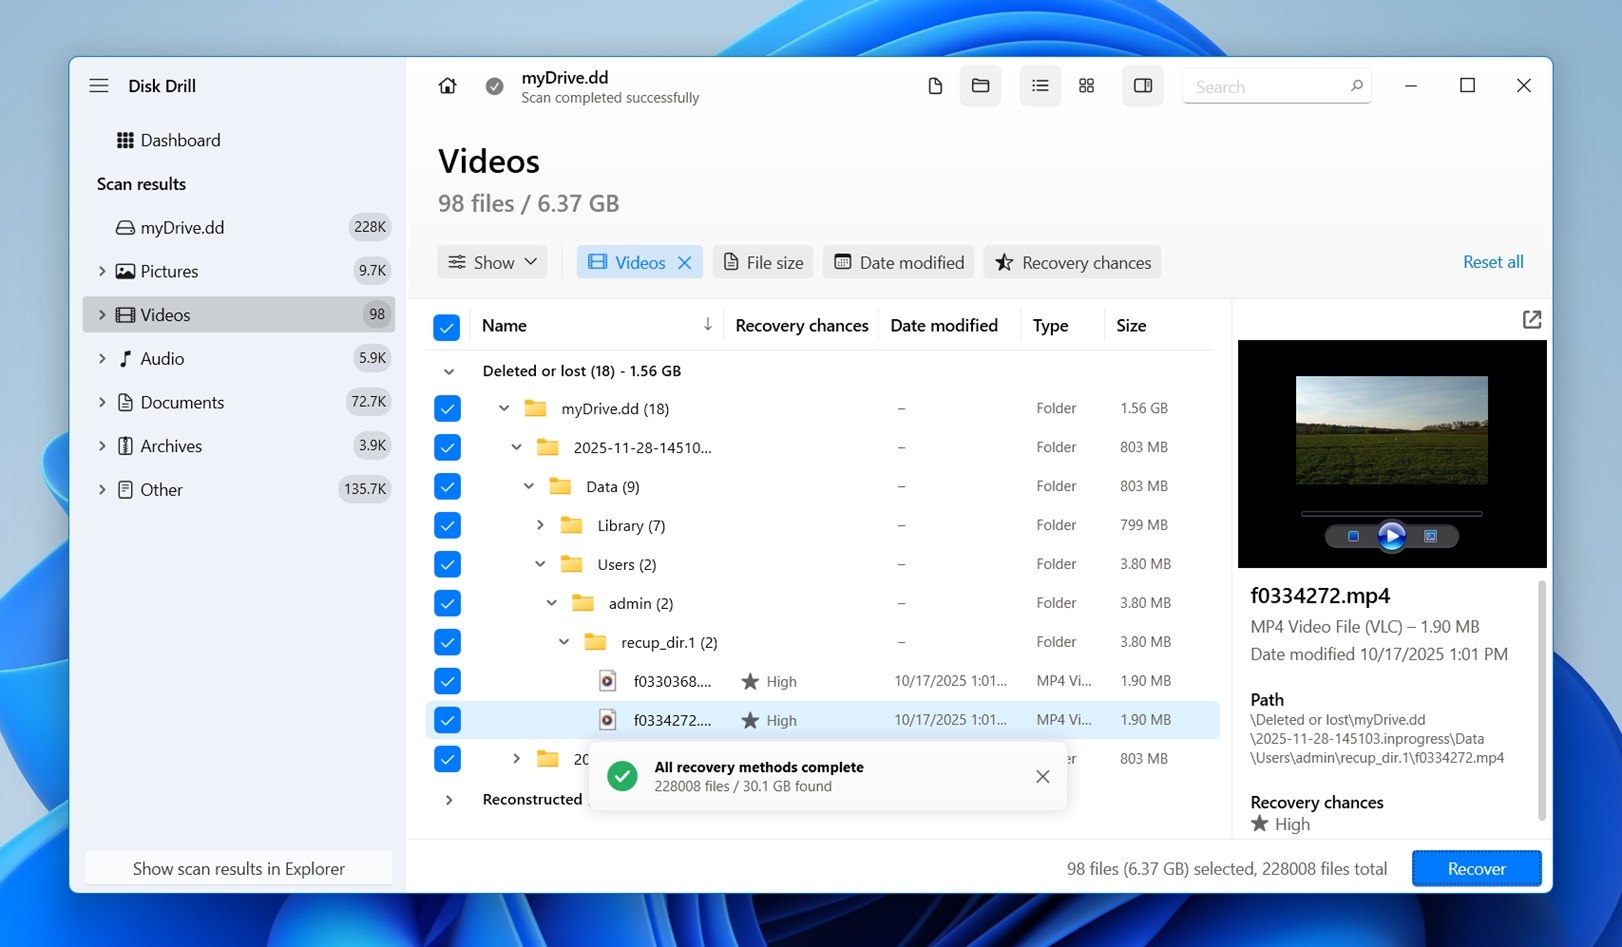
 - Use the search bar to look for files by name or parts of a date, like 2026-02-02, if that’s what your footage uses and the original filenames were preserved.
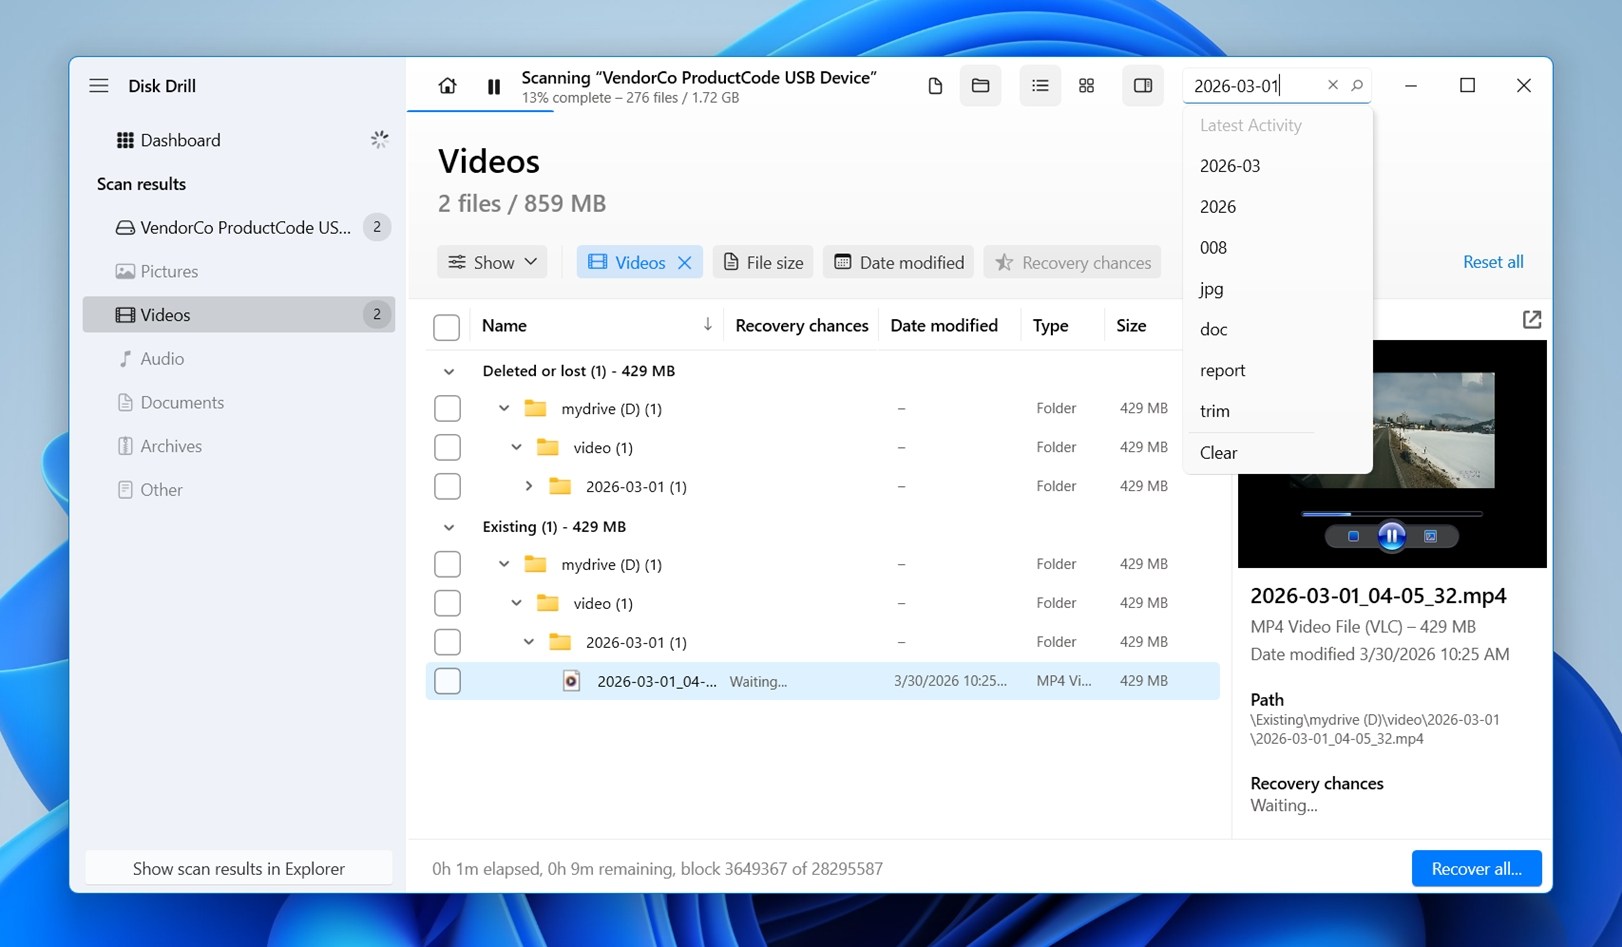
Click a file to preview it before recovery. That helps in two ways: it makes it easier to confirm that you’ve found the clip you want, and it gives you a quick check on file condition. (If the video plays correctly in preview, that’s a 100% sign the file is intact and should recover properly.) - Click the checkbox next to each file you want to recover.
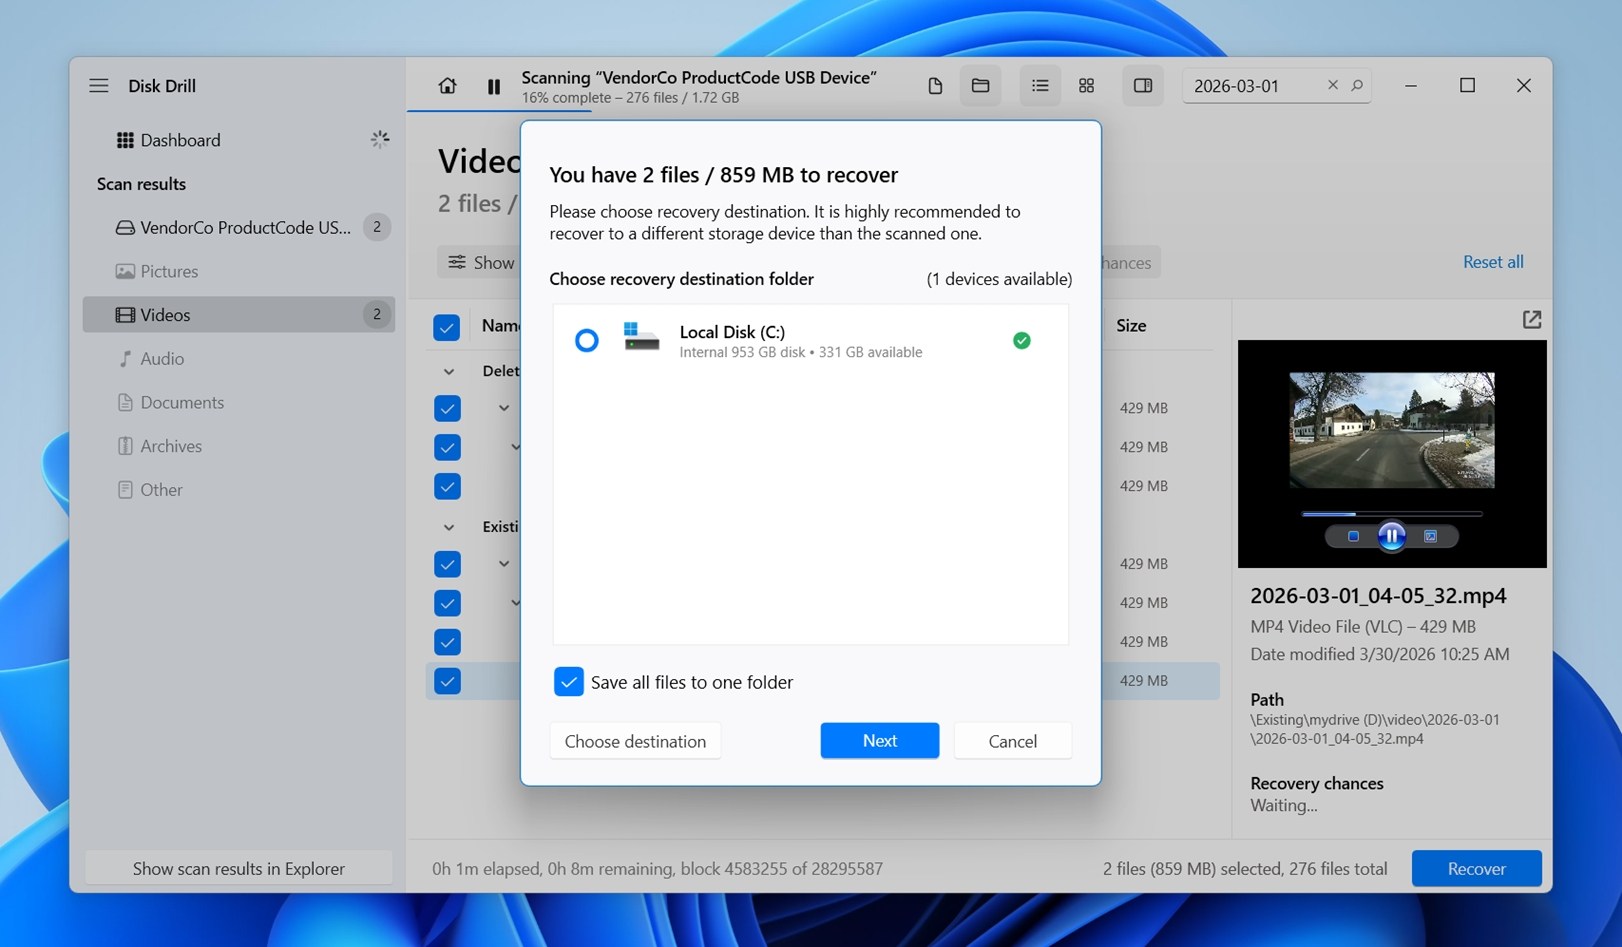
- Click on the Recover button and choose a save location on your computer that is different from the Tesla USB drive.
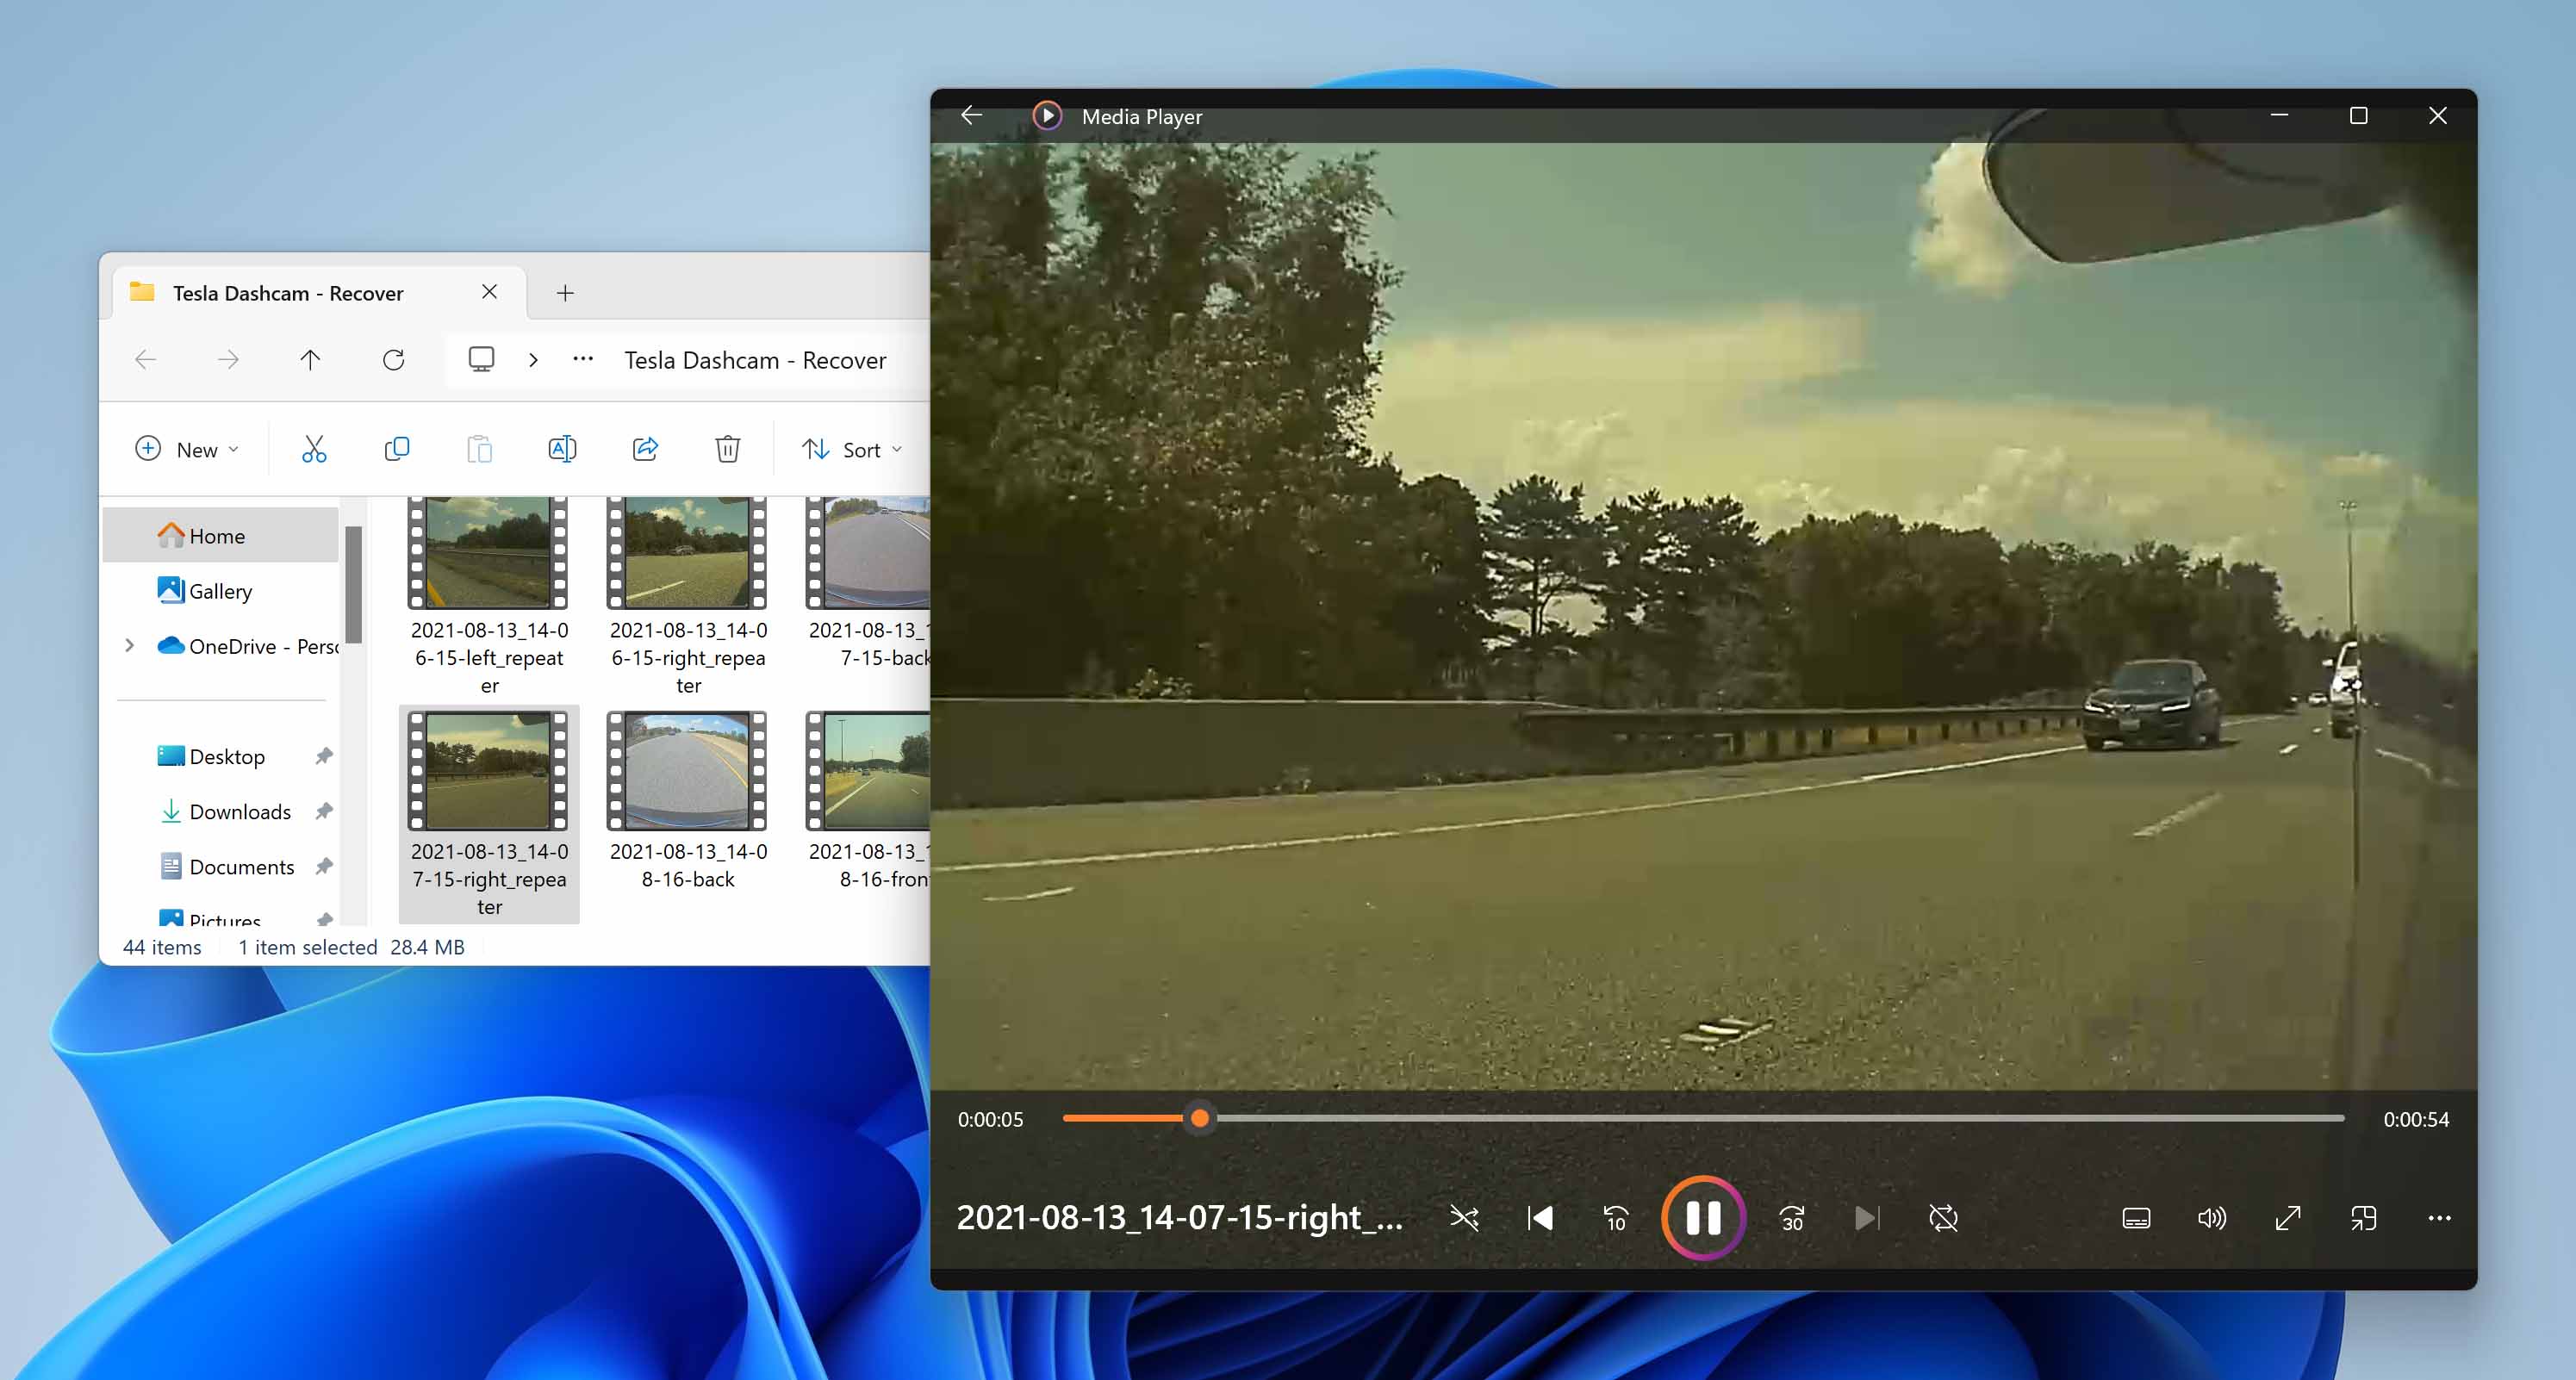
- Once the recovery process is complete, navigate to the save location and open the recovered videos to check if they have been restored properly and are playable.
How to Restore Dashcam Footage from SD Card
There are several ways to recover deleted video files from a dashcam. Due to the time-sensitive nature of dashcam recovery (or any data recovery for that matter), we recommend you start with the most likely-to-work method (the first one), and progress to other methods if the initial attempt doesn’t yield the desired results.
Method 1: Use Data Recovery Software
The best way to recover videos that have been deleted from a dashcam is to use data recovery software, such as our own solution, Disk Drill. Disk Drill can scan all storage devices used by dashcams, and it recognizes and recovers virtually every video file format that’s in use today, including MP4, MOV, and AVI.
Because one of Disk Drill’s main goals is to make data recovery accessible to everyone, the software is designed with a straightforward, intuitive interface that enables users of all skill levels to perform dashcam video recovery with ease.
On top of that, it includes extra tools that can help in tougher cases. One good example is Byte-to-Byte Backup, which we will demonstrate below – it can be a big help if the memory card is corrupted or starts acting unstable (this gives you a safer way to retrieve footage from dashcam storage because Disk Drill scans the image file, not the memory card itself, which reduces that extra stress on a card).
Here’s a step-by-step guide on how to use Disk Drill to recover lost dashcam video footage:
- Download Disk Drill from our website. Install the application on your computer, following the provided instructions. Disk Drill is available for both Windows and Mac operating systems. You can then connect the storage device where your dashcam footage was saved to your computer.
- Open Disk Drill on your computer.
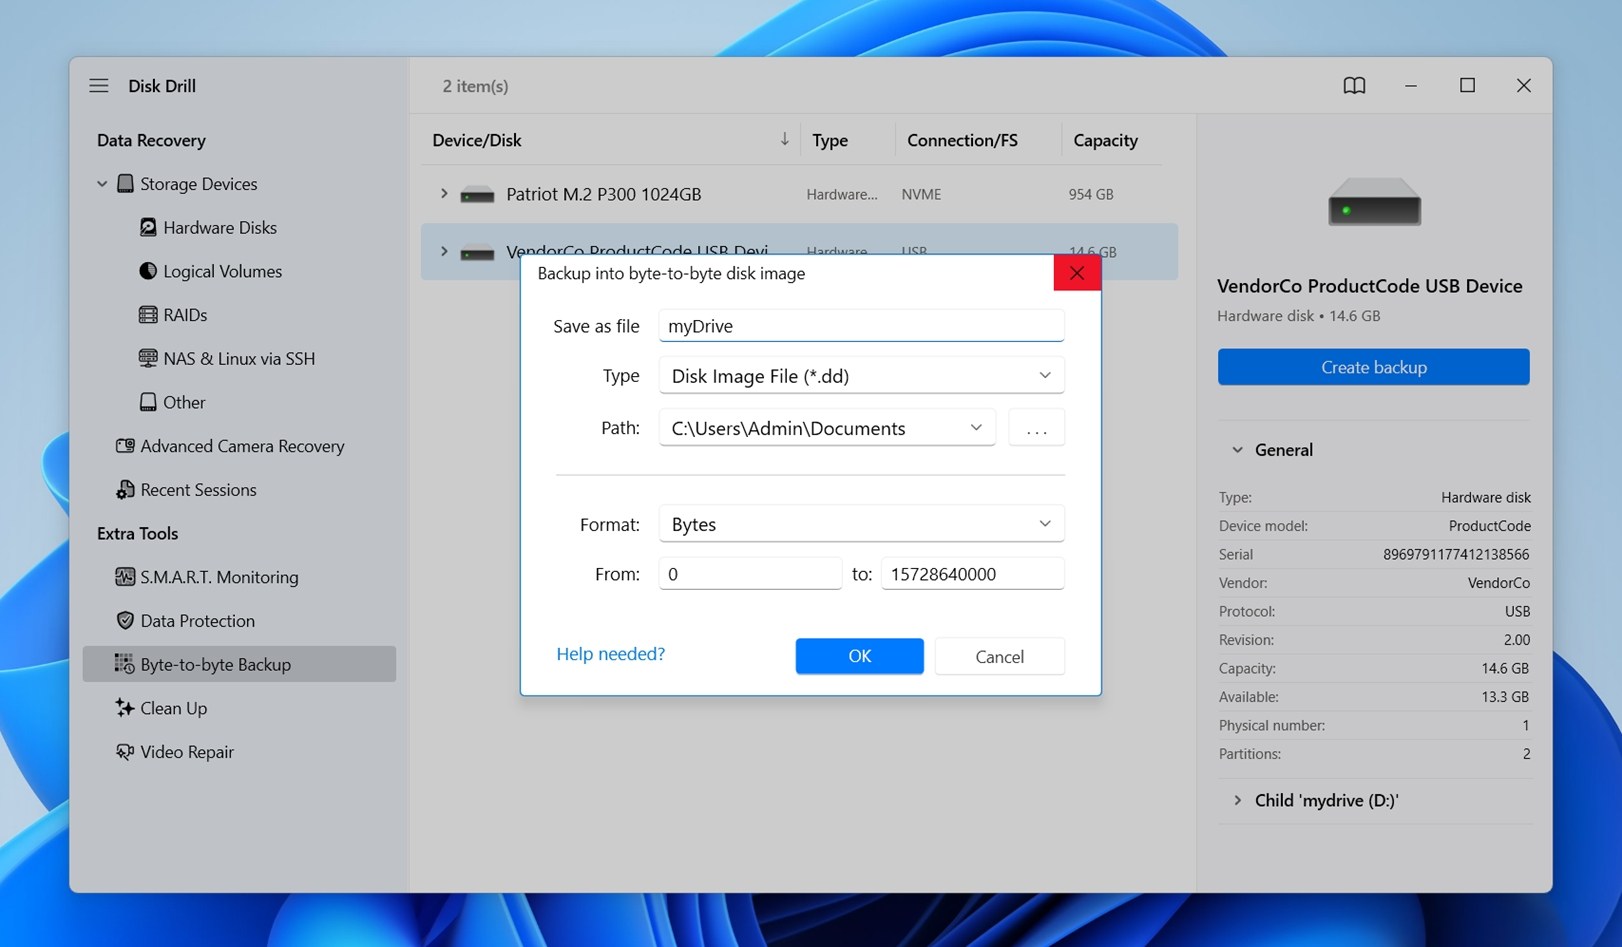
- If the card is acting strangely or you simply want a safer recovery workflow, open Byte-to-Byte Backup from the left-side menu first.
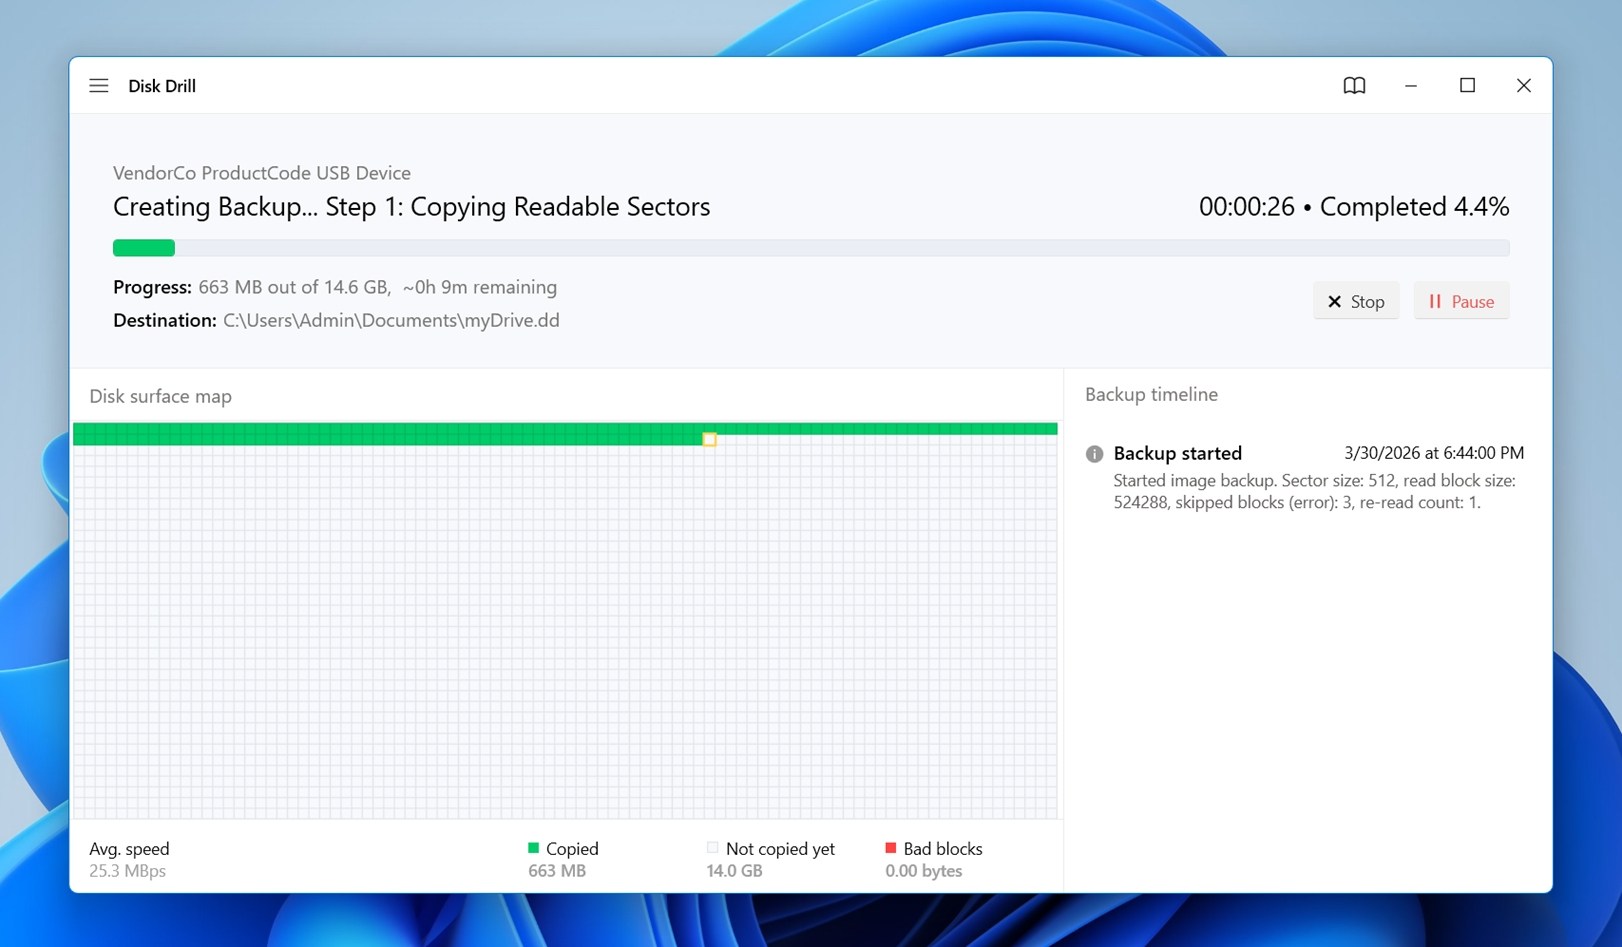
- Select the card, click Create backup, and save the image to a location with enough free space to hold the full capacity of the card.
- Wait for the backup to finish. You can pause it and resume later if needed.
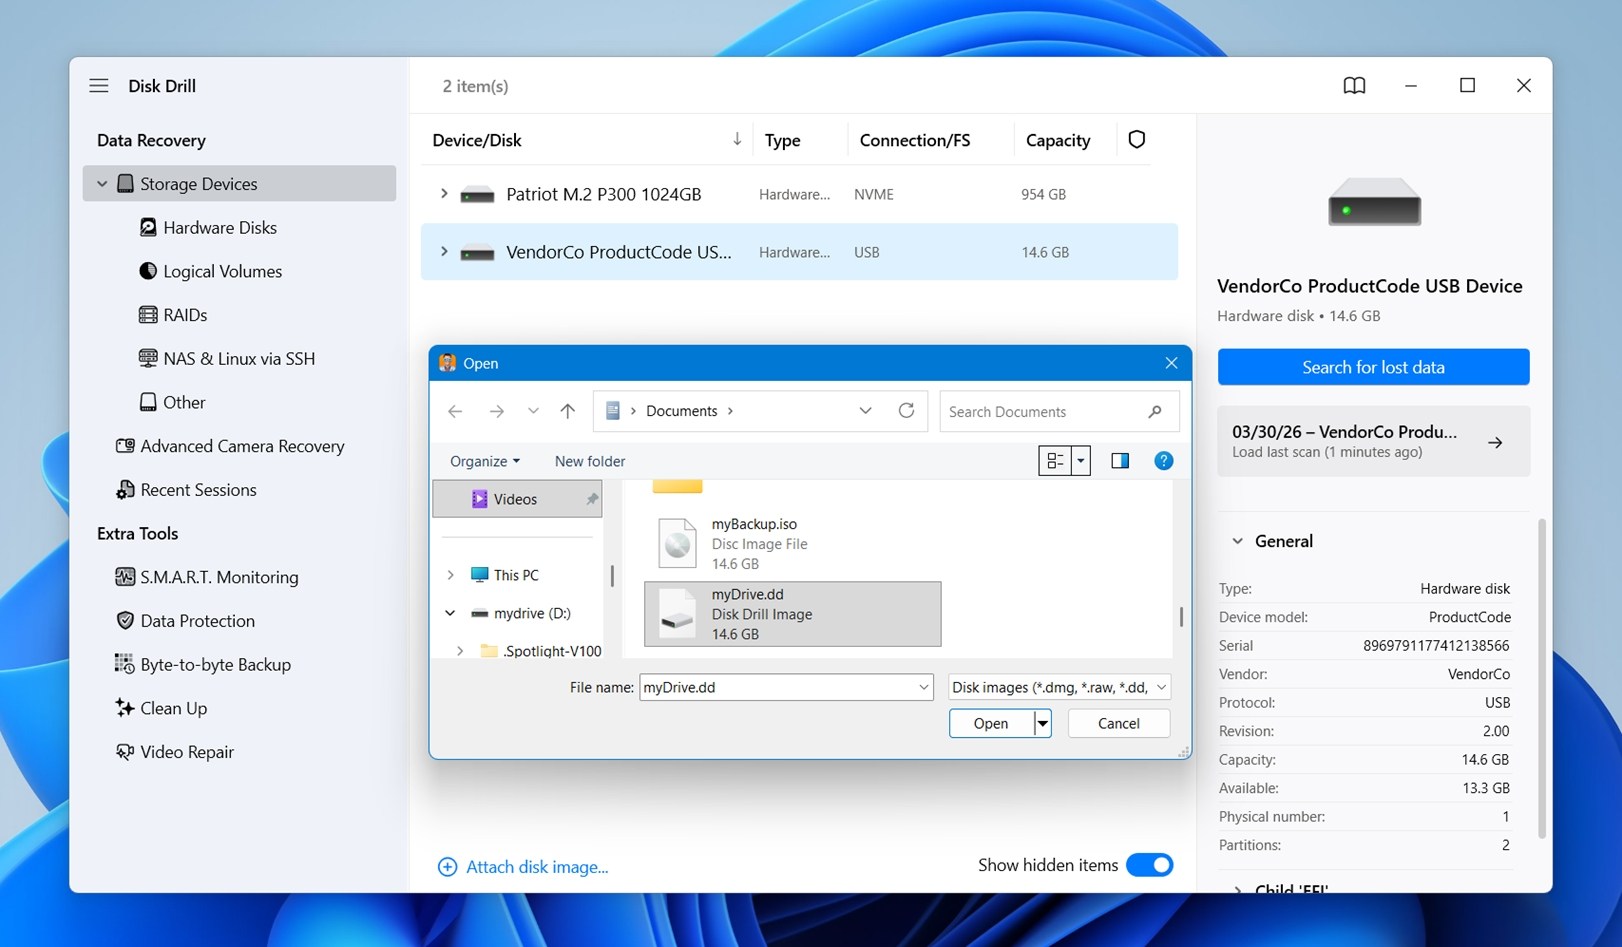
- Then, once the backup is finished, go back to the main device list and click Attach disk image at the bottom.
- Select the backup file you just created.
- Click on the Search for lost data button to start the process. When Disk Drill asks which scan mode to use, you can begin with either Universal Scan or Advanced Camera Recovery.
 Both can work, but Universal Scan is usually the better first choice in most dashcam recovery cases.
If the recovered files come back with artifacts, won’t play properly, or look incomplete, run an additional scan with Advanced Camera Recovery. This one can help with fragmented video files and may recover clips cleanly. - Wait as Disk Drill performs a thorough scan of the device to find recoverable video files. If you’re in a hurry, then you can click the Review found files button while Disk Drill is still scanning.
- Apply the Video file filter to make it easier to find and retrieve dash cam footage. Locate the missing files and click the checkboxes next to them. You can click the view icon next to a file to preview it.
- Click the Recover button when you’re done selecting your files. Disk Drill will prompt you to choose a destination for the recovered files. It’s important to save the recovered videos to a different location than the original storage device to avoid any potential overwriting of data.


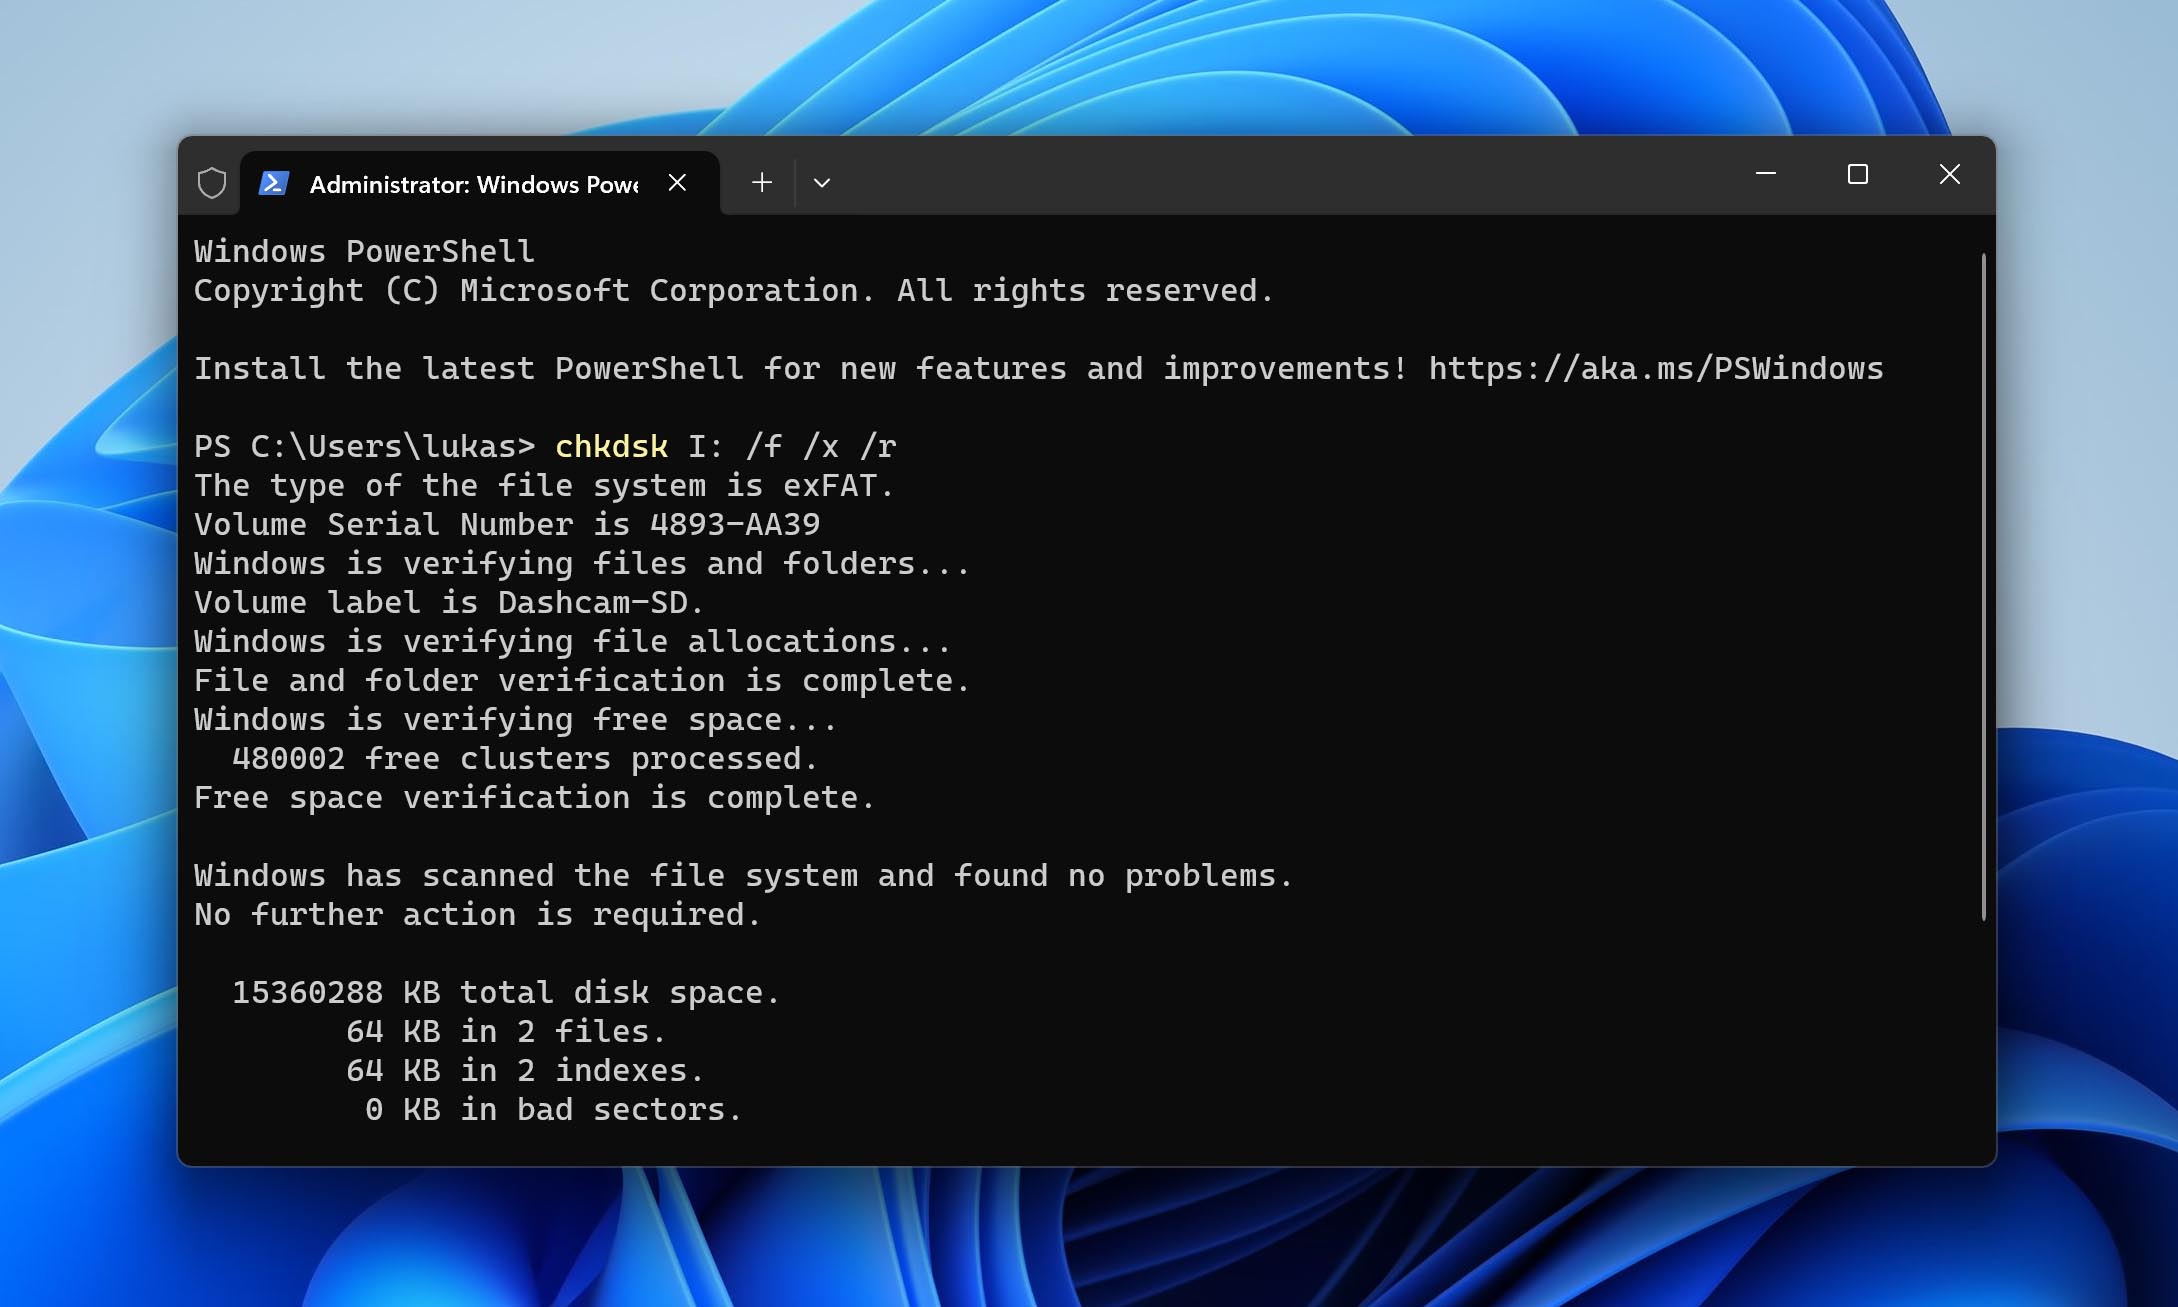
Method 2: Run CHKDSK
When dealing with the loss of dashcam footage due to file system issues, the CHKDSK (Check Disk) utility can make the contents of the storage device where your footage is stored accessible again by fixing logical errors.
This utility is included in Windows, and you can use it from the Command Prompt (Terminal):
- Connect the storage device containing your footage to your computer.
- Open Terminal.
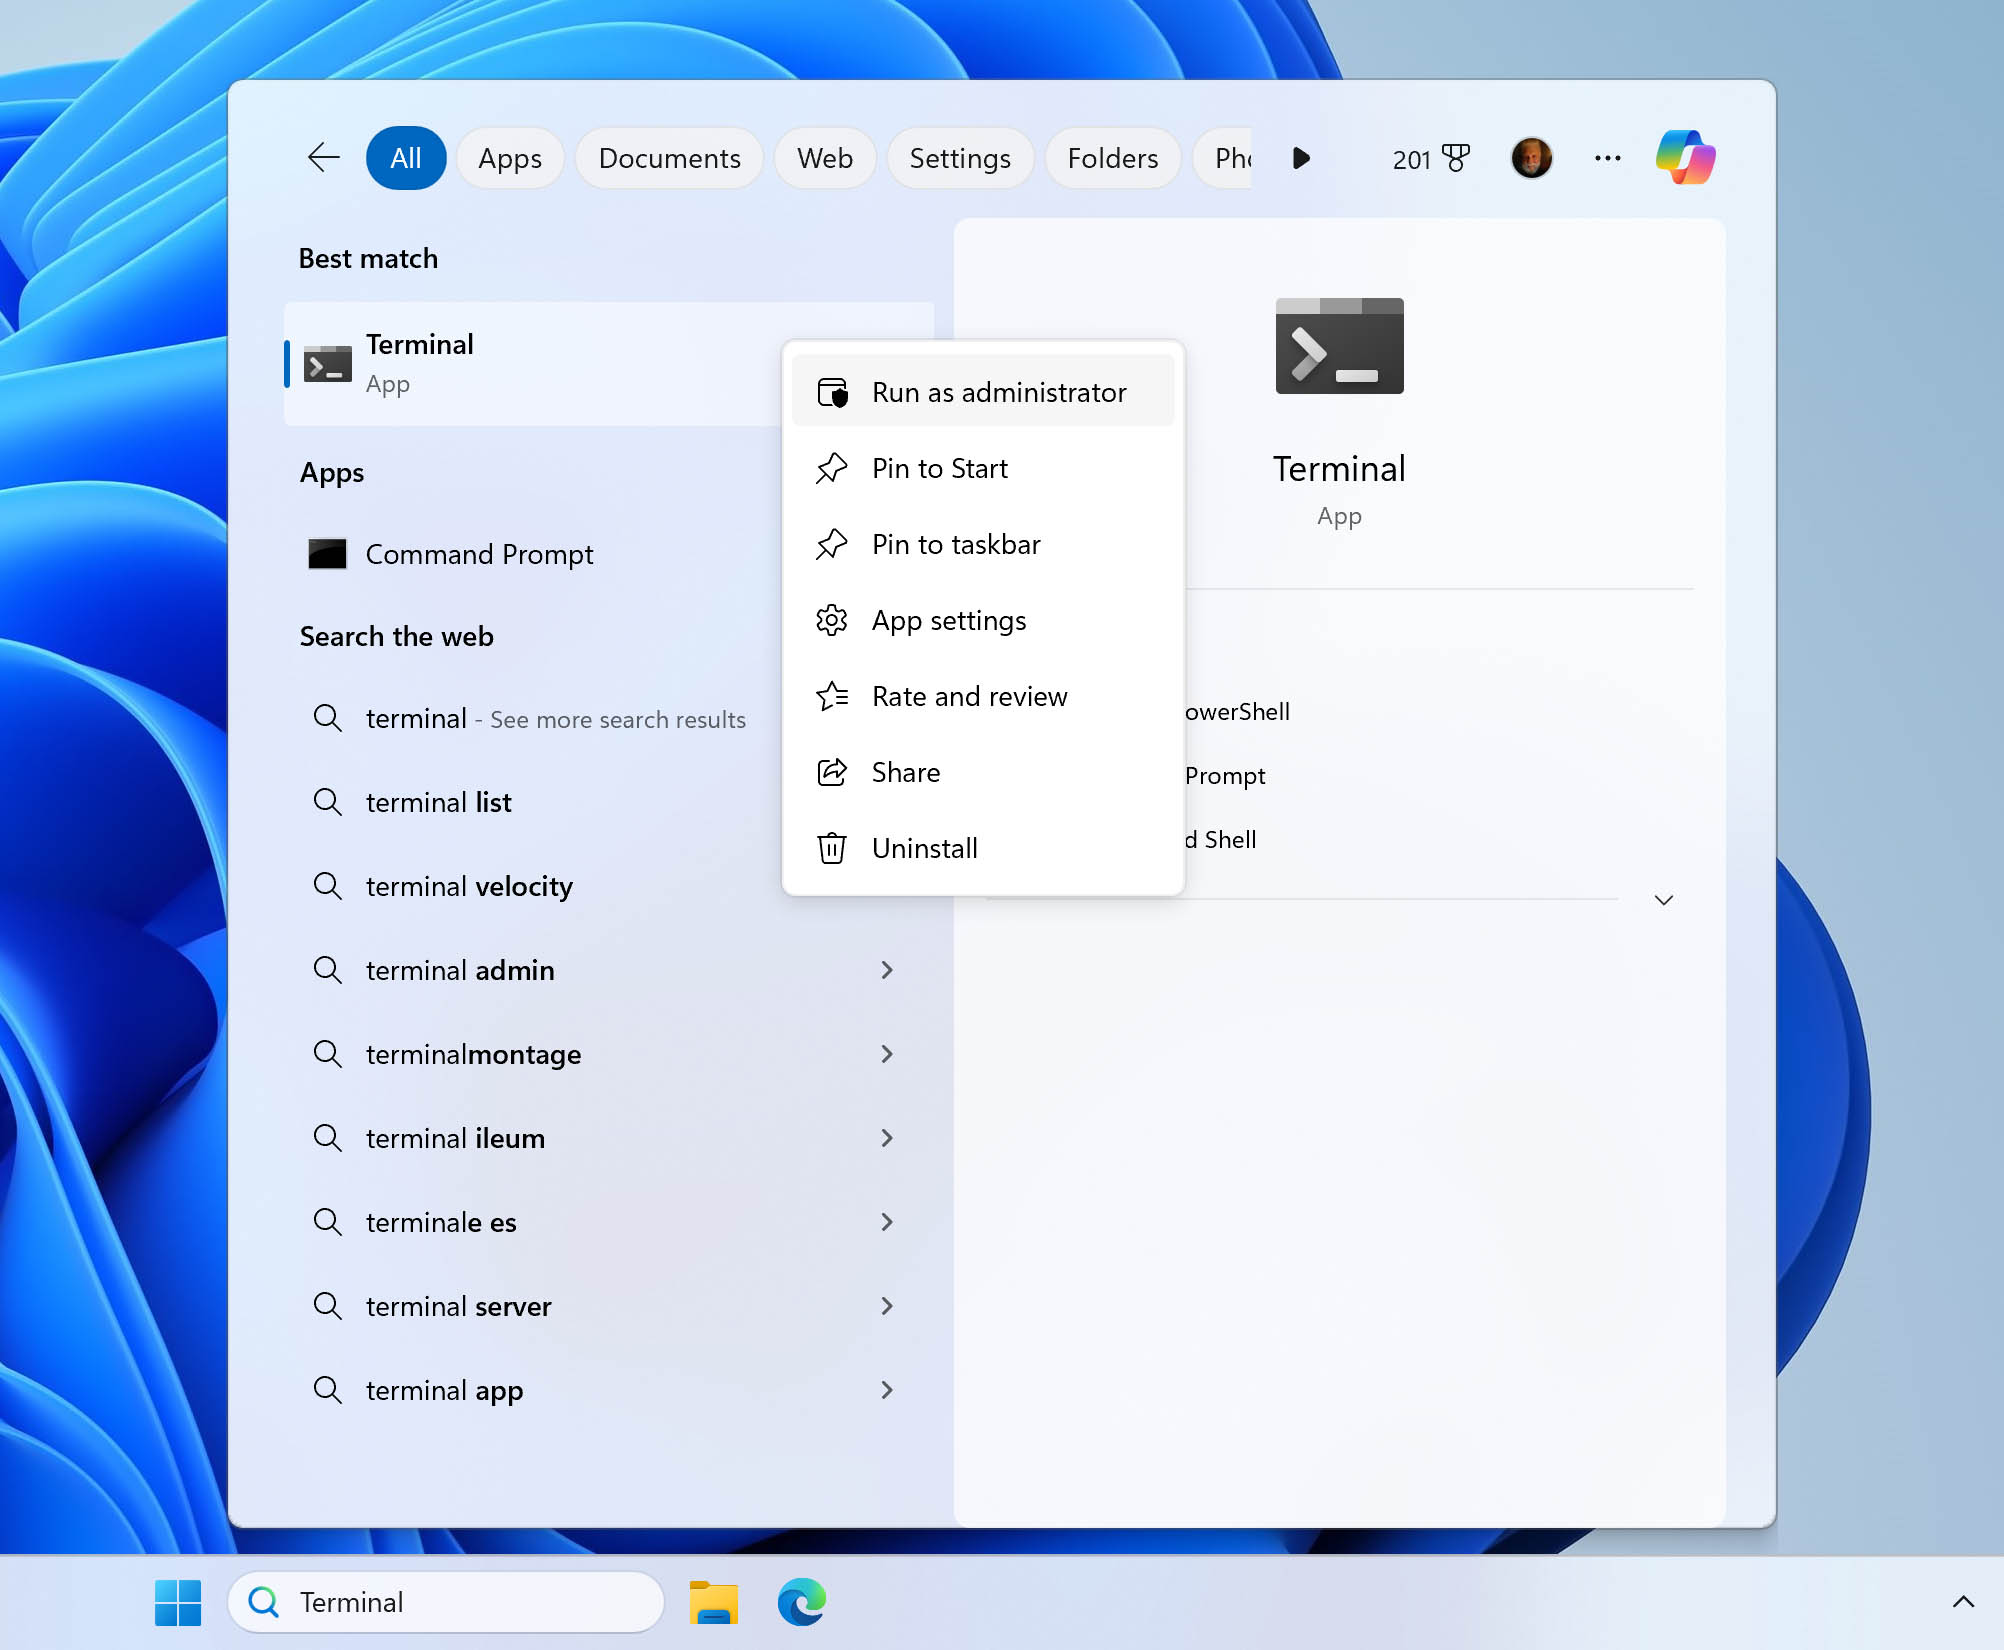
- Type in the following:
chkdsk X: /F /X /R. Replace the first X with the actual drive letter of your USB stick (you can open File Explorer and navigate to the This PC section to find out what it is).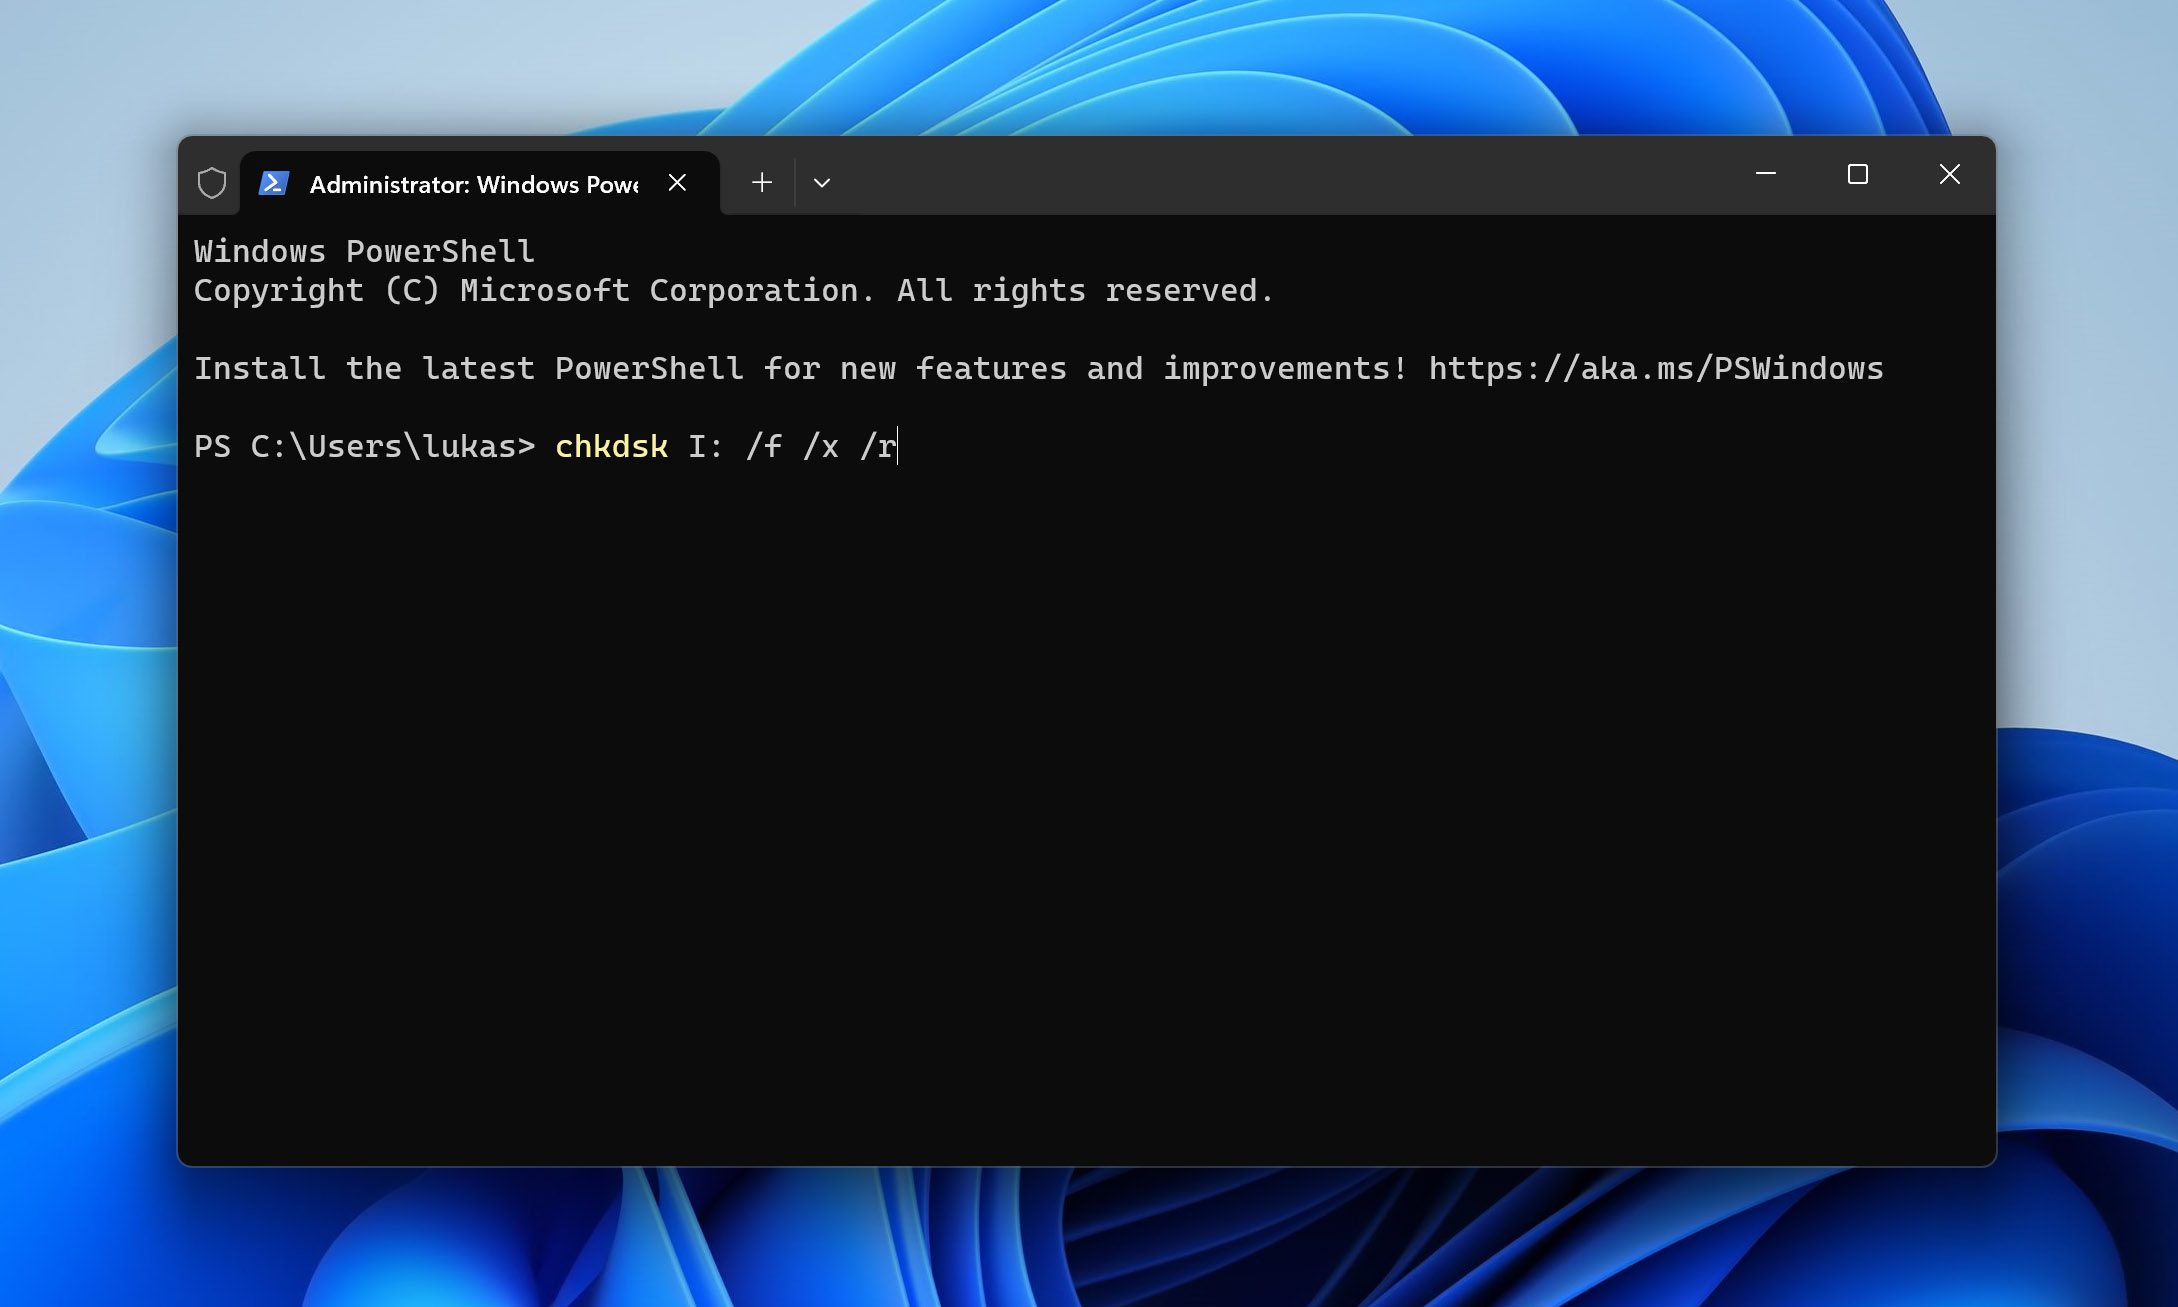
- After a while, you’ll get a report of all errors that have been identified and fixed.
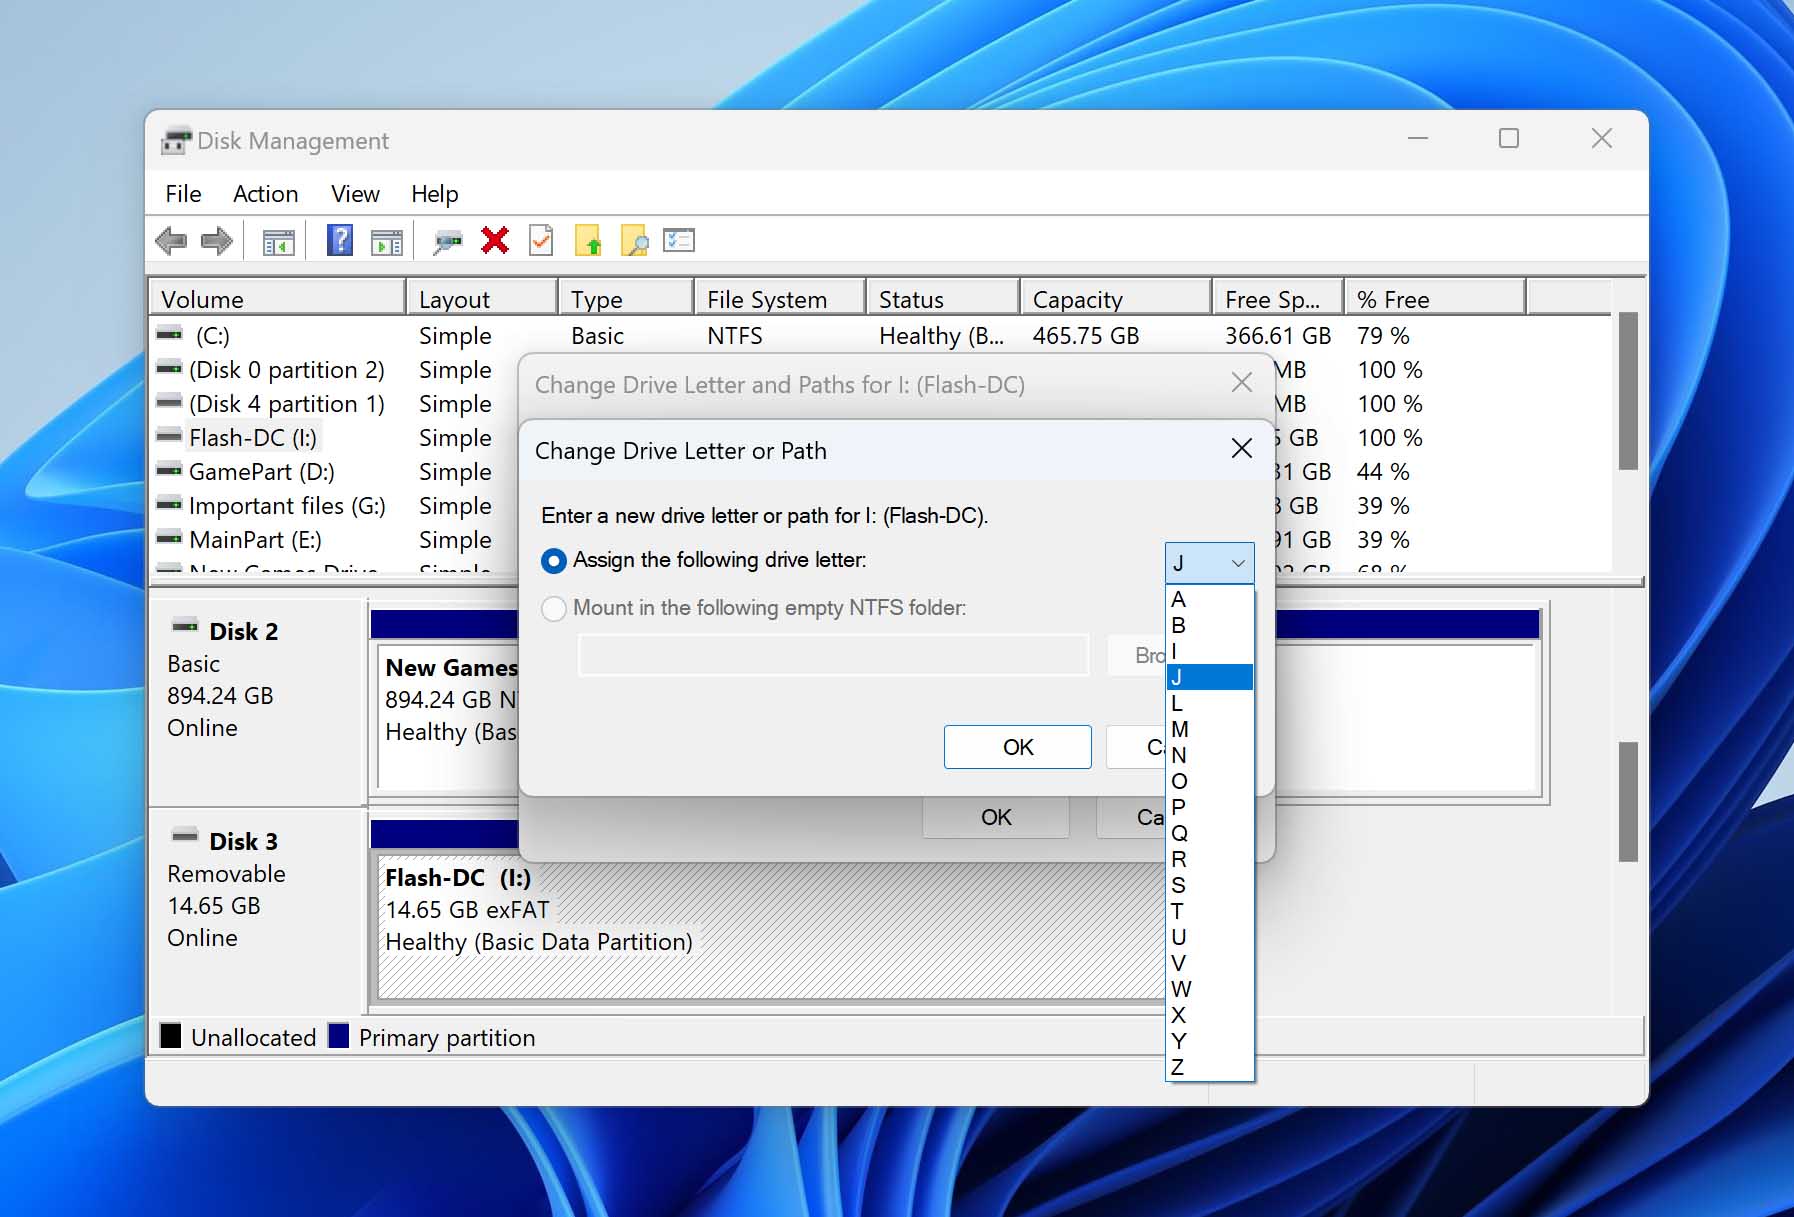
Method 3: Assign a New Drive Letter
Another simple fix you can try is to reassign the drive letter of the storage device connected to your computer.
Here’s how to do it:
- Connect the USB stick containing your footage to a computer.
- Open Disk Management.
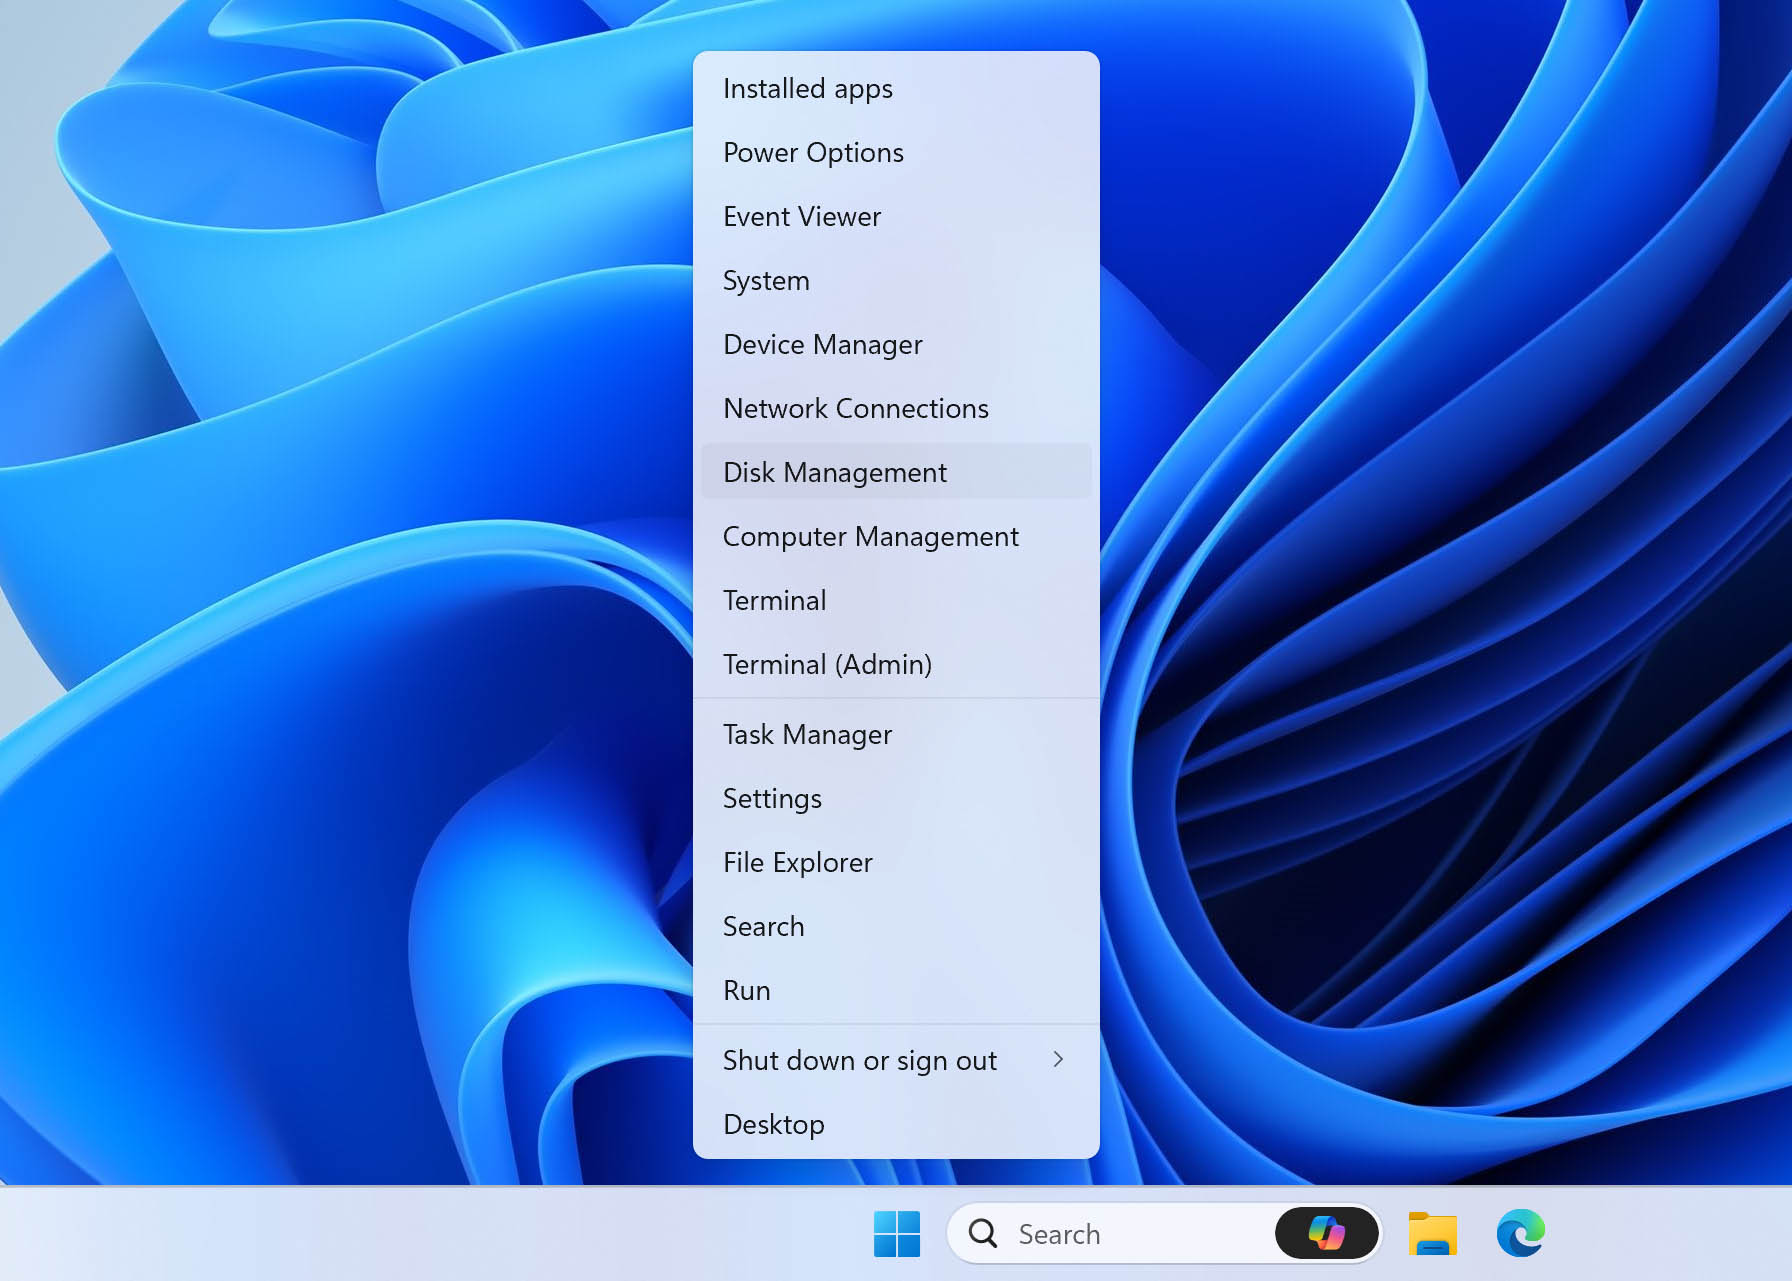
- Right-click on the USB stick in the list of drives and select Change Drive Letter and Paths…

- Click Change… in the window that pops up.
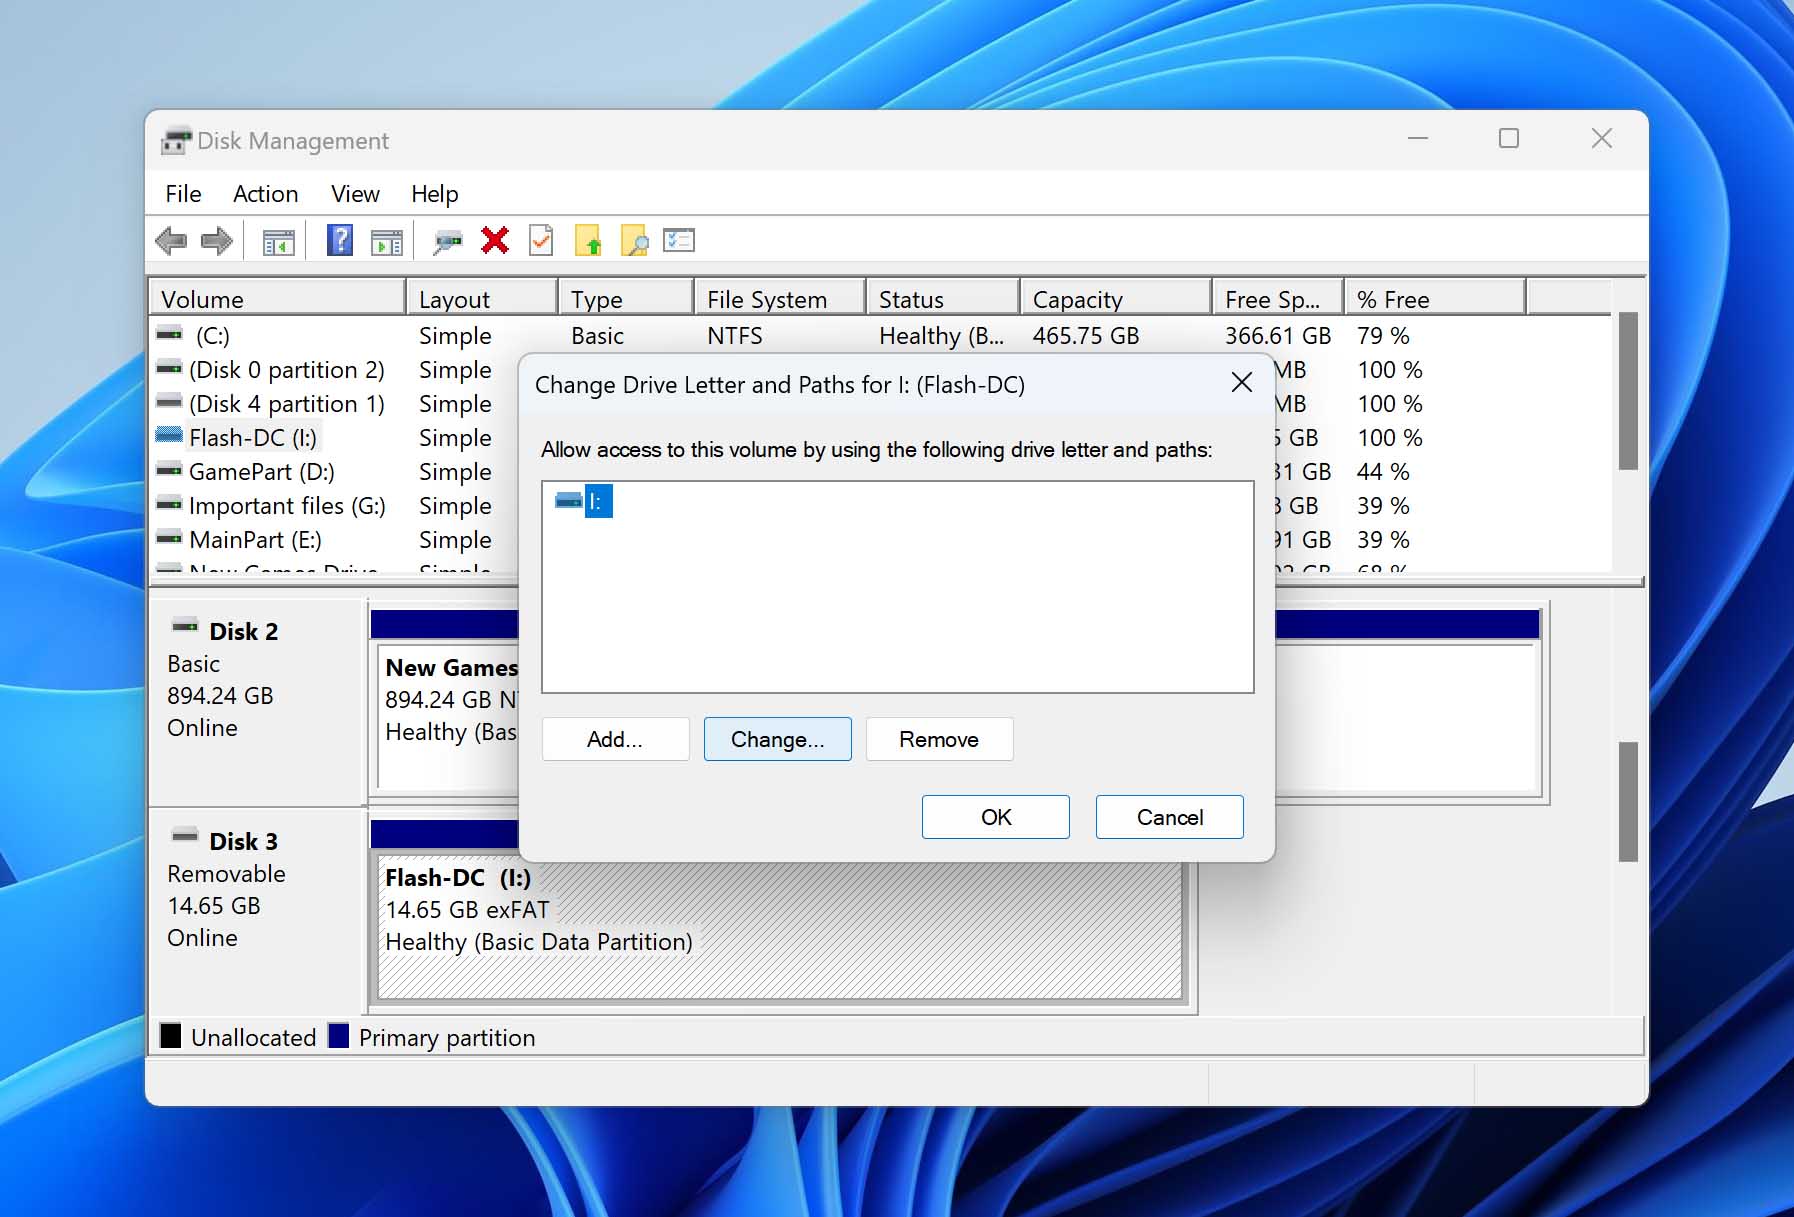
- Select a new letter on the next screen and click OK.
Method 4: Use a Data Recovery Service
If the idea of using data recovery software to retrieve your deleted dashcam videos at home seems a bit too daunting to you, or if you’re dealing with a storage device that’s physically damaged, turning to a professional data recovery service becomes a smart choice.
Professional data recovery services employ technicians with specialized expertise and access to state-of-the-art tools that allow them to perform recoveries that would be impossible with standard software solutions. That said, when the storage device has no physical damage, DIY recovery is usually the better route to start with.
In many cases, software can handle the problem, and you have a solid chance of recovering the dashcam footage yourself at home. It’s also faster, far less expensive, and sometimes free, depending on the tool and the amount of data you need to recover.
The general process of working with a professional data recovery service is straightforward, and it starts with sending your damaged or corrupted storage device to experts who then assess the damage and provide a quote. Upon approval, they proceed with the recovery process, which may vary in duration based on the complexity of the recovery. Once complete, the recovered data is returned to you on a new storage device or via a secure online download.
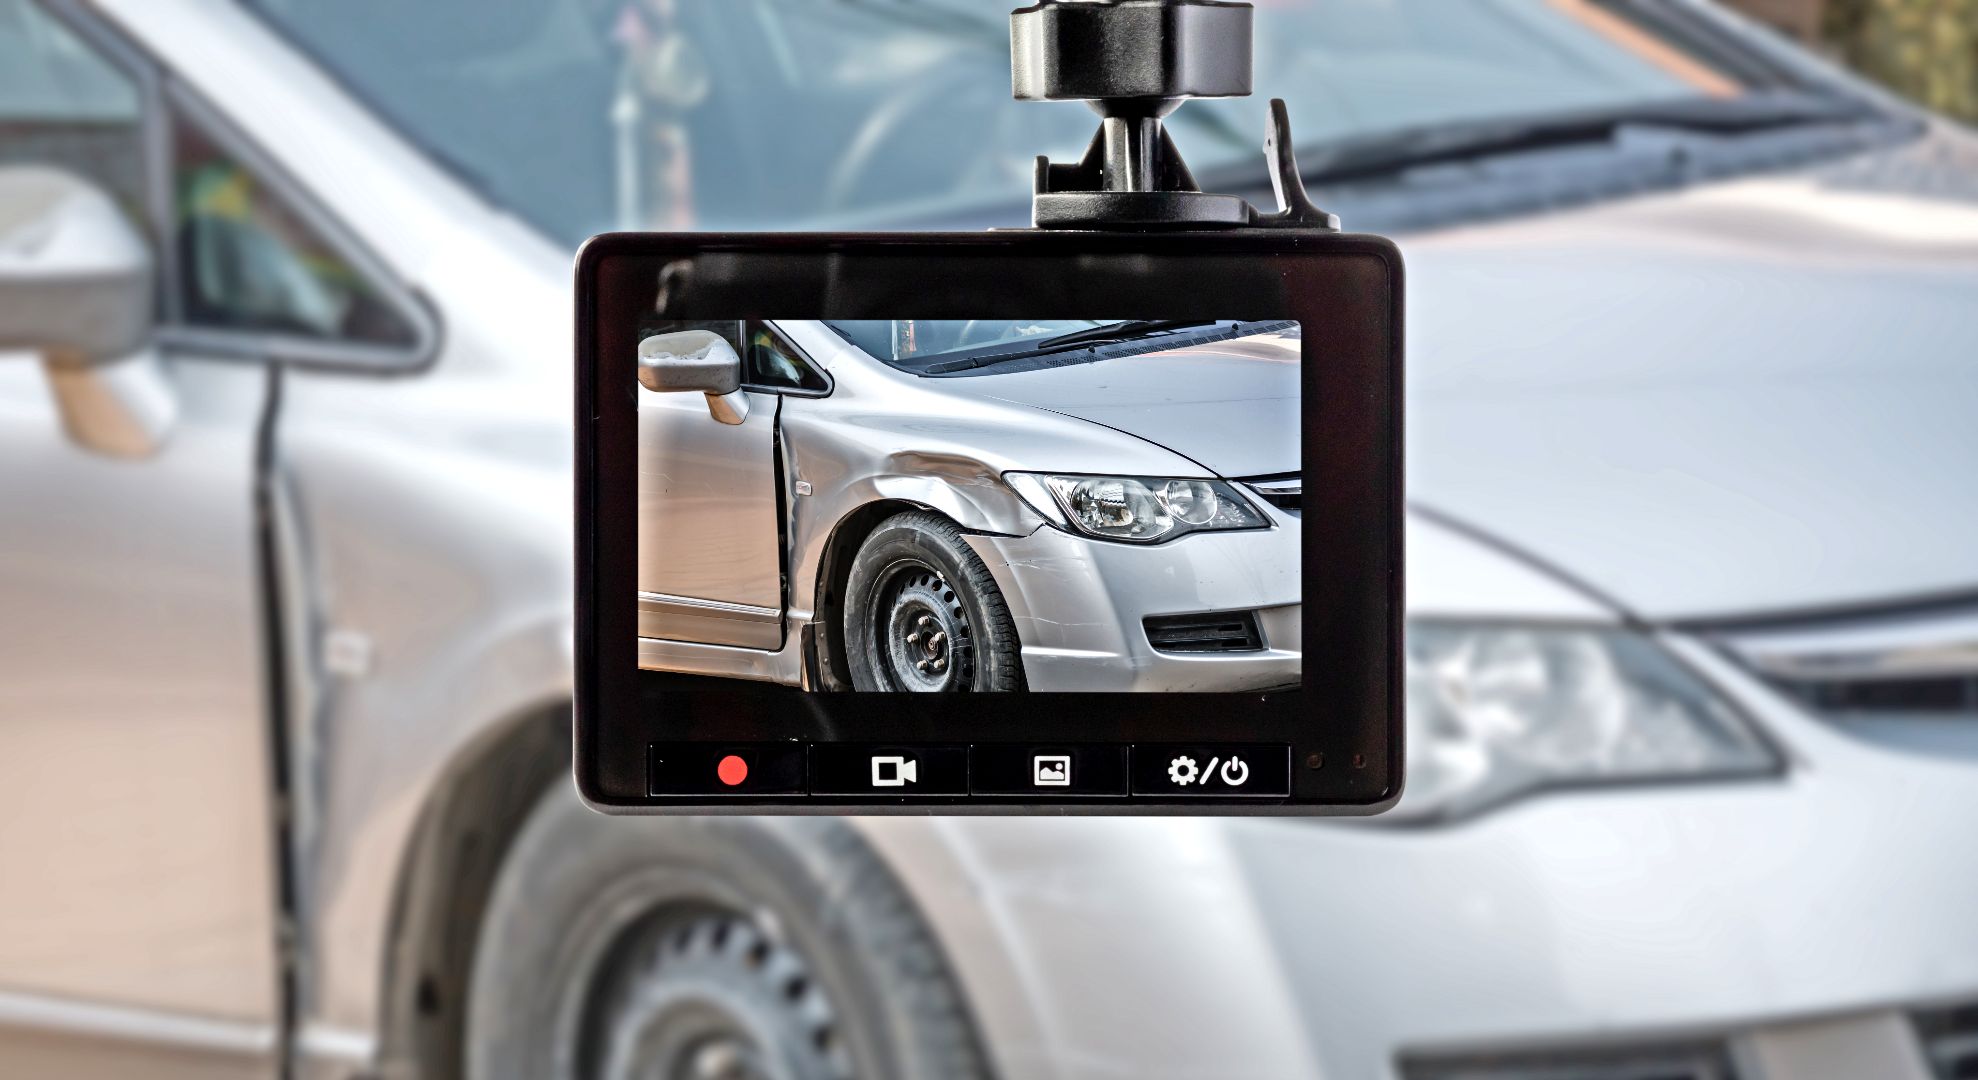
How to Protect Dashcam Video Recordings After a Car Accident
Every car accident is a highly unpleasant event, but dashcam footage can make it much less so by providing clear evidence of what occurred. To preserve this evidence, you should always take the following steps:
- Manually save the recent footage from your dashcam to protect it from being overwritten by new recordings. If you drive a Tesla, then you can visit this support page for more information.
- Remove the storage device—whether it’s a USB stick, SD card, or another form—used by your dashcam to store footage. If possible, turn off the dashcam first before physically removing it.
- Store the device in a secure, stable environment. Avoid exposing it to extreme temperatures, moisture, or magnetic fields, as these can damage the device and the data it contains.
Advanced dashcams, such as those integrated into Teslas or offered by premium brands like BlackVue, feature cloud connectivity that automatically backs up footage via Wi-Fi or mobile data. If your device includes this feature, then you should do whatever it takes to let the upload finish because the cloud is a highly safe place for your footage.
Conclusion
Accidentally deleted footage recorded by a Tesla or some other dashcam can be recovered with the right method, provided you act quickly enough. This also applies to situations where data has been lost due to corruption, a software error, or some other logical issue. We’ve demonstrated how to perform the recovery of lost dashcam footage using our own data recovery software, Disk Drill, hopefully making it easy for you to follow our footsteps and successfully retrieve your videos.


FAQ
There’s no fixed time limit. What matters most is whether the lost footage gets overwritten. Most dash cams record in a loop, so the more you keep using the camera after the clip disappears, the higher the chance that new recordings will replace the old data.
You may still be able to recover deleted dash cam footage even days or weeks later (if the dash cam wasn’t active). In other cases, it can be gone within hours if the card keeps recording nonstop. That’s why the best move is to stop using the dash cam right away, remove the SD card or USB drive, and scan it as soon as possible from a computer.
It’s not uncommon, unfortunately. Start with the obvious checks first:
- Open the Recent Clips, Saved Clips, and Sentry Clips folders on the Tesla USB drive and look for footage around the time of the accident. Sometimes the clip exists, but it wasn’t saved where you expected, or the timestamp makes it easy to miss.
- If you still can’t find it, remove the USB drive and connect it to a computer as soon as possible. Don’t keep driving with it plugged into the car, because new recordings may overwrite older data. From there, you can scan the drive with data recovery software to try to recover Tesla dashcam footage – including cases where the file was deleted, the Tesla Sentry recording was deleted, or the footage no longer appears in the drive folders.
- That said, recovery is not guaranteed. If Tesla dashcam missing footage was never written to the drive in the first place because of a USB error, unsupported drive, full or corrupted storage, or a recording failure, no software can recover a file that was never created. Still, it’s worth checking the drive and scanning it before you give up.
Once dash cam footage has been truly overwritten by new recordings, the original data is gone, and even a professional recovery service can’t bring it back. Overwriting means the old data was replaced at the storage level, so there’s nothing left to recover.
That said, people often assume footage was overwritten when the real problem was something else. The file may have been deleted, the card may be corrupted, the dashcam may have failed to save the clip properly, or the footage may still exist in fragments. In cases like that, you can even try the DIY route first with data recovery software and scan the card to see whether any recoverable footage is still there. If recovery software finds nothing because the data was already overwritten, then it makes little sense to send the card to a recovery service for that specific reason. As we said earlier, they can’t recover truly overwritten files either.
Tesla does not offer a normal official dashcam recovery service for owners. Tesla states that Dashcam and Sentry Mode recordings are not eligible to be provided through a Tesla account data request, and it also says those recordings are generally not shared with Tesla in the first place.
That means if your clip is missing, Tesla usually cannot send you a copy later from its servers. In practice, your recovery options are local ones: check the TeslaCam folders on the USB drive, stop using the drive right away, and scan it with recovery software.
There is one important exception, though: Tesla says camera recordings may be available to them in the case of a safety critical event, such as a collision or airbag deployment. But that is not the same thing as a public owner-facing dashcam recovery service, so you should not count on Tesla to restore missing footage on request.