Losing video files can be a devastating experience, especially after investing hours in recording, editing, and finalizing them. In the blink of an eye, a single accidental click or a brief lapse in attention can cause your precious memories or important work to vanish. However, the good news is that it’s often possible to recover deleted videos, regardless of the device you use. Whether you’re operating on Windows, macOS, Android, or iOS, this guide will walk you through various methods to bring back your lost video files.
Choose the guide specific to your device:
- ➡️ Recover video on Windows PC
- ➡️ Restore lost videos on Mac
- ➡️ Recover videos deleted on Android phone
- ➡️ Retrieve deleted videos on iPhone
Can Deleted Files be Recovered?

Yes, it’s often possible to recover deleted videos. Scared by the word “often?” Don’t be! As long as you follow these data recovery best practices, your chances of successfully recovering all lost video files are high:
- 🛑 Stop writing new data to the storage device on which the deleted videos were stored to avoid overwriting the physical storage space where the files are still likely located.
- 🚀 Begin the data recovery process as soon as possible because experience tells us that data recovery chances decrease over time.
- ✋ Avoid third-party data recovery products that have only a few online reviews, especially if the reviews seem to be fake.
These three simple data recovery best practices can really make a huge difference when recovering data from external storage devices and internal hard drives alike.
How to Recover Deleted Videos on Windows
![]() Let’s go over the most effective ways how to recover deleted videos on Windows. We recommend you try the methods described below in the order they’re listed, but you can, of course, start with the method that seems the most promising to you.
Let’s go over the most effective ways how to recover deleted videos on Windows. We recommend you try the methods described below in the order they’re listed, but you can, of course, start with the method that seems the most promising to you.
Method 1: Check Recycle Bin for Lost Videos
The Recycle Bin in Windows is a special folder where deleted files are temporarily stored to allow for their easy recovery.
To restore a video from the Windows Recycle Bin, follow these steps:
- Double-click the Recycle Bin icon on the desktop.
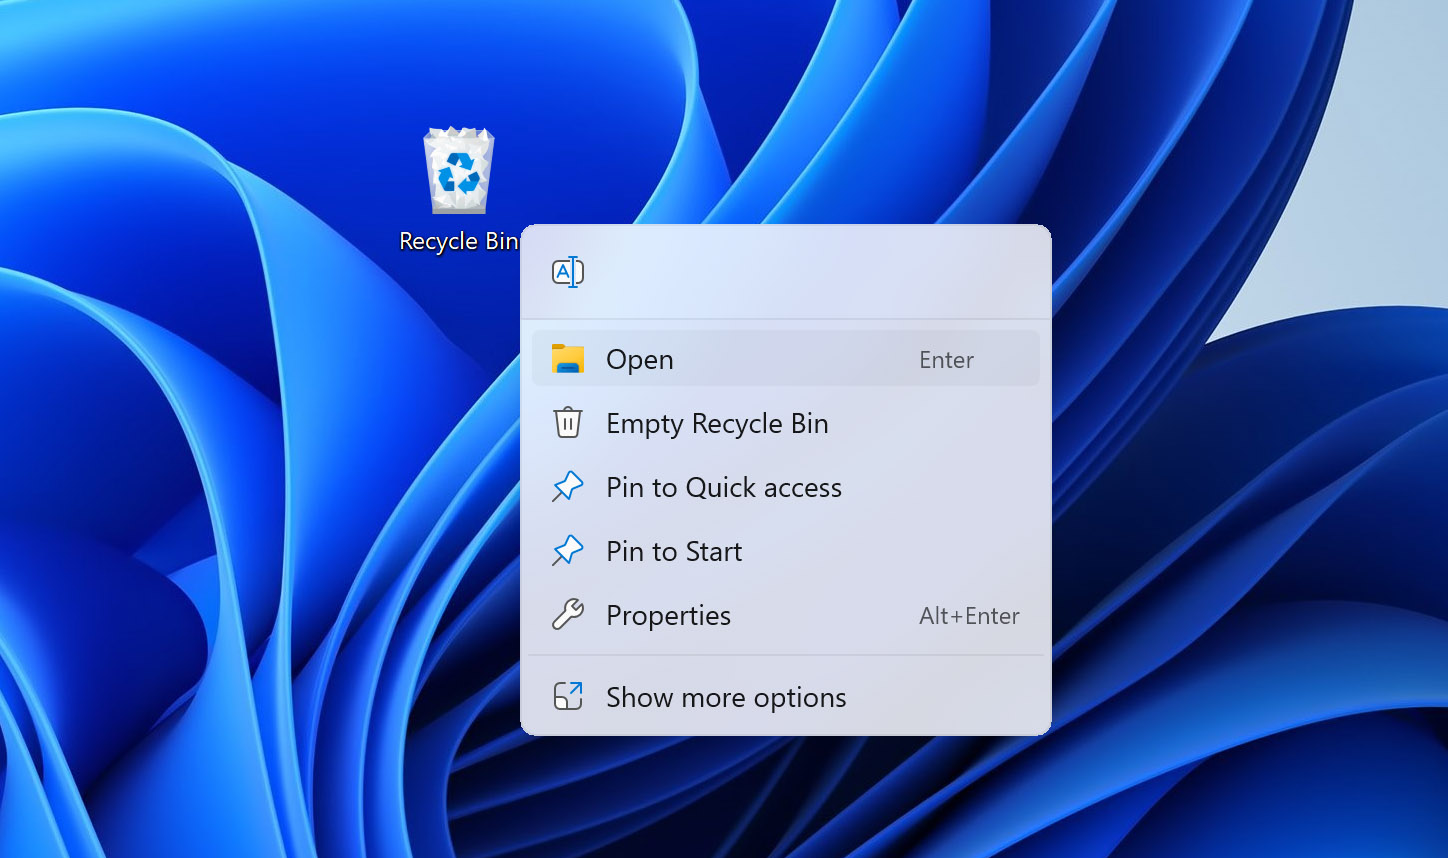
- Locate the video file you want to restore.
- Right-click the file and select Restore.
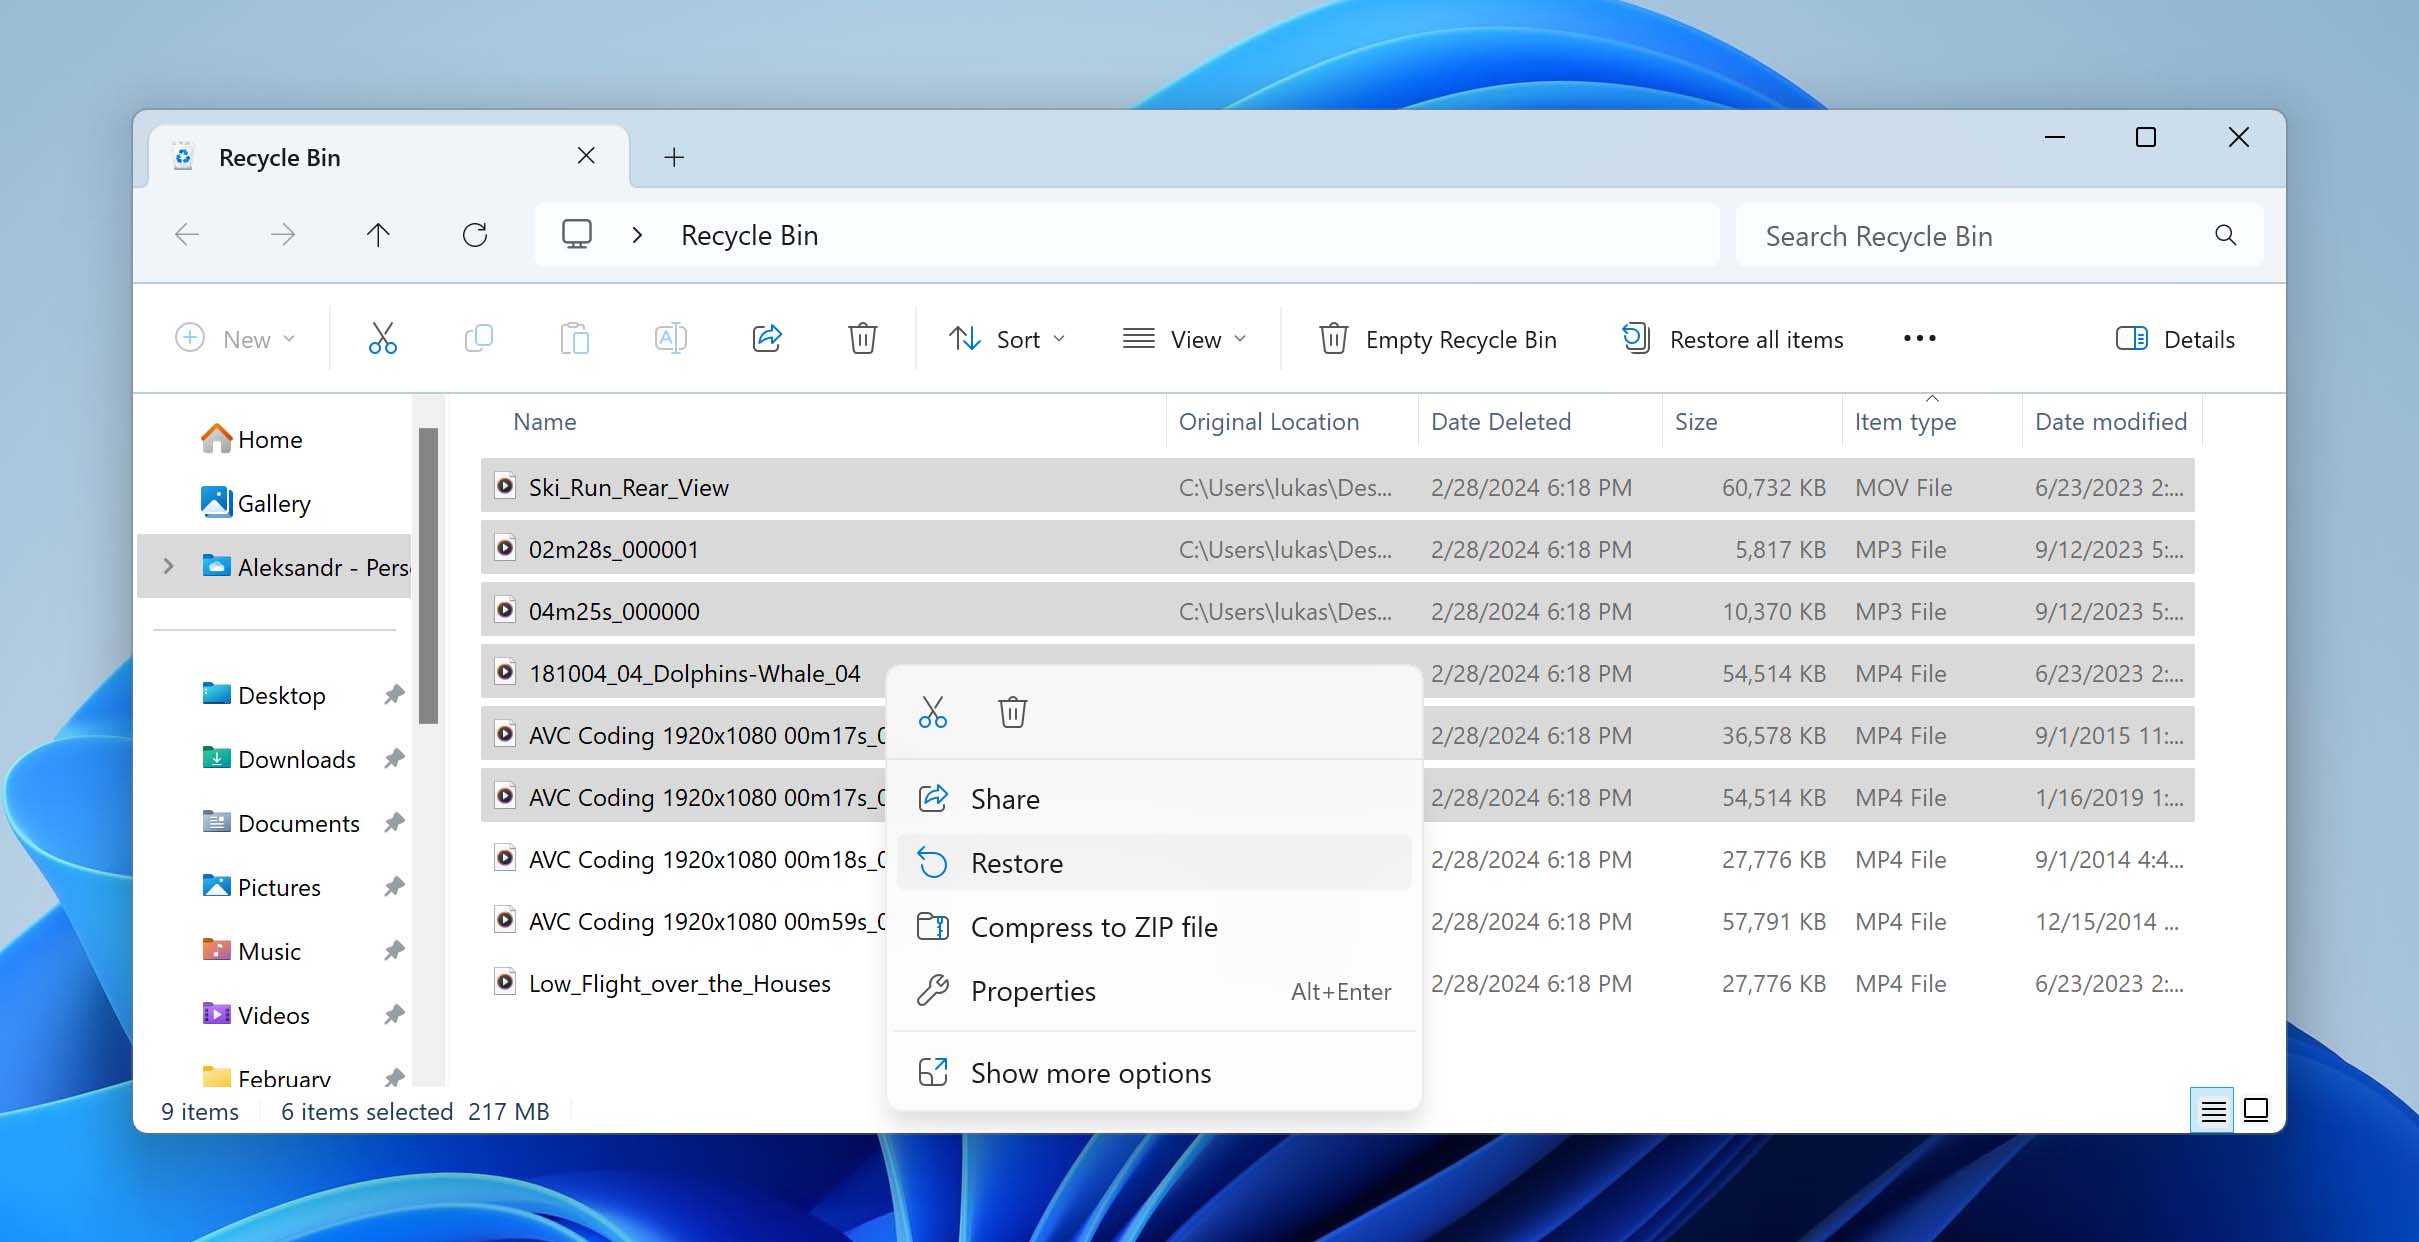
The file will be restored back to its original location. You can also drag-and-drop selected files to any location you want, including those located on external storage devices. To do that, open File Explorer, navigate to the preferred recovery location, and move your videos from the Recycle Bin window to the File Explorer window.
That said, there are other video recovery methods that can recover even files that are not present in the Recycle Bin (permanently deleted videos), and we describe them in detail in the following sections of this article.
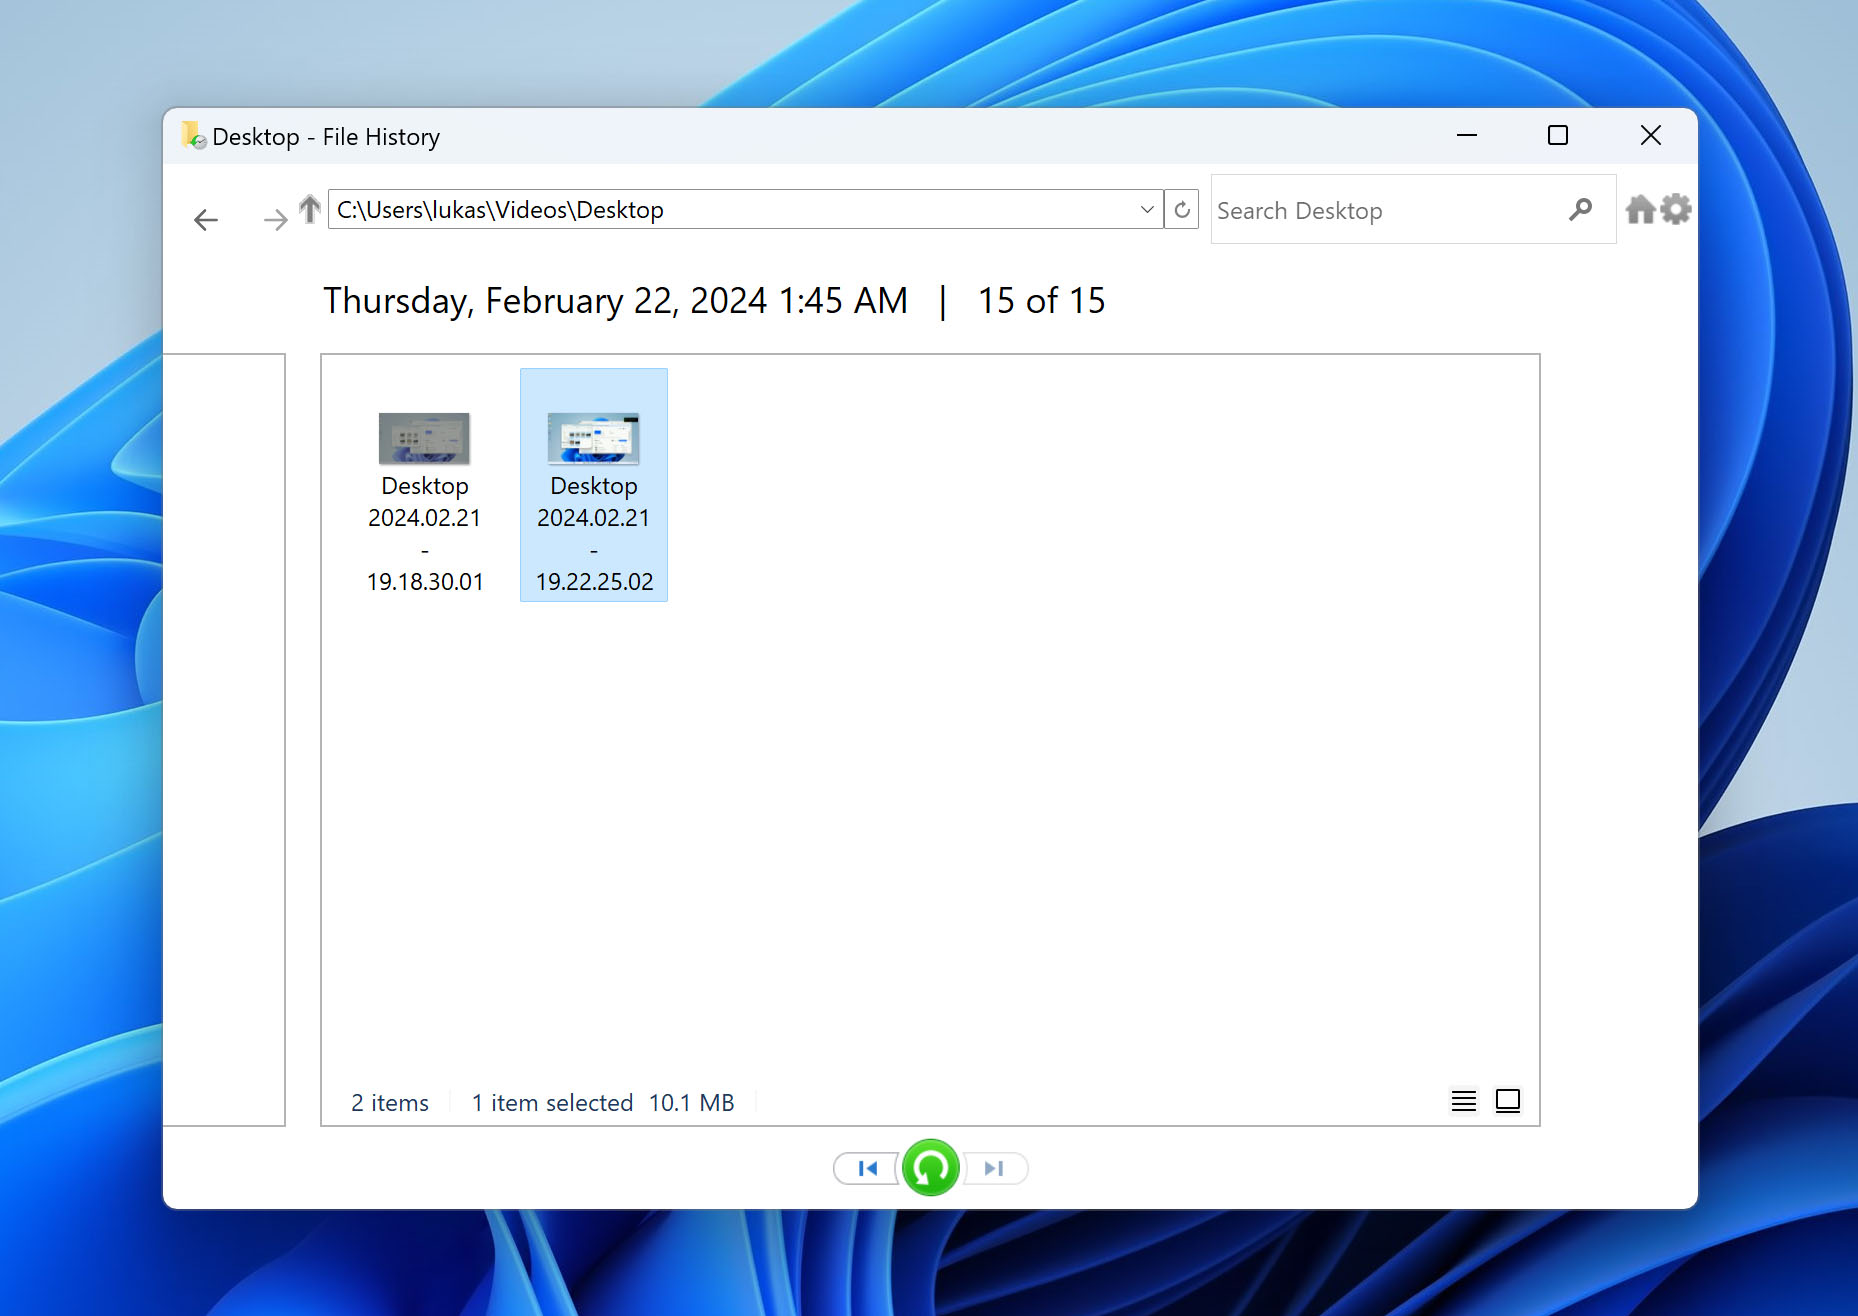
Method 2: Recover from a File History Backup
After checking the Recycle Bin, the next place where you should look for deleted videos files is your backup folder or application. Many Windows users rely on the File History feature, whose purpose is to continuously back up files located in your Libraries, on your desktop, in your Contacts folders, and in your Favorites folders.
To recover permanently deleted videos from a File History backup:
- Open the classic Control Panel.
- Go to System and Security > File History > Restore personal files.
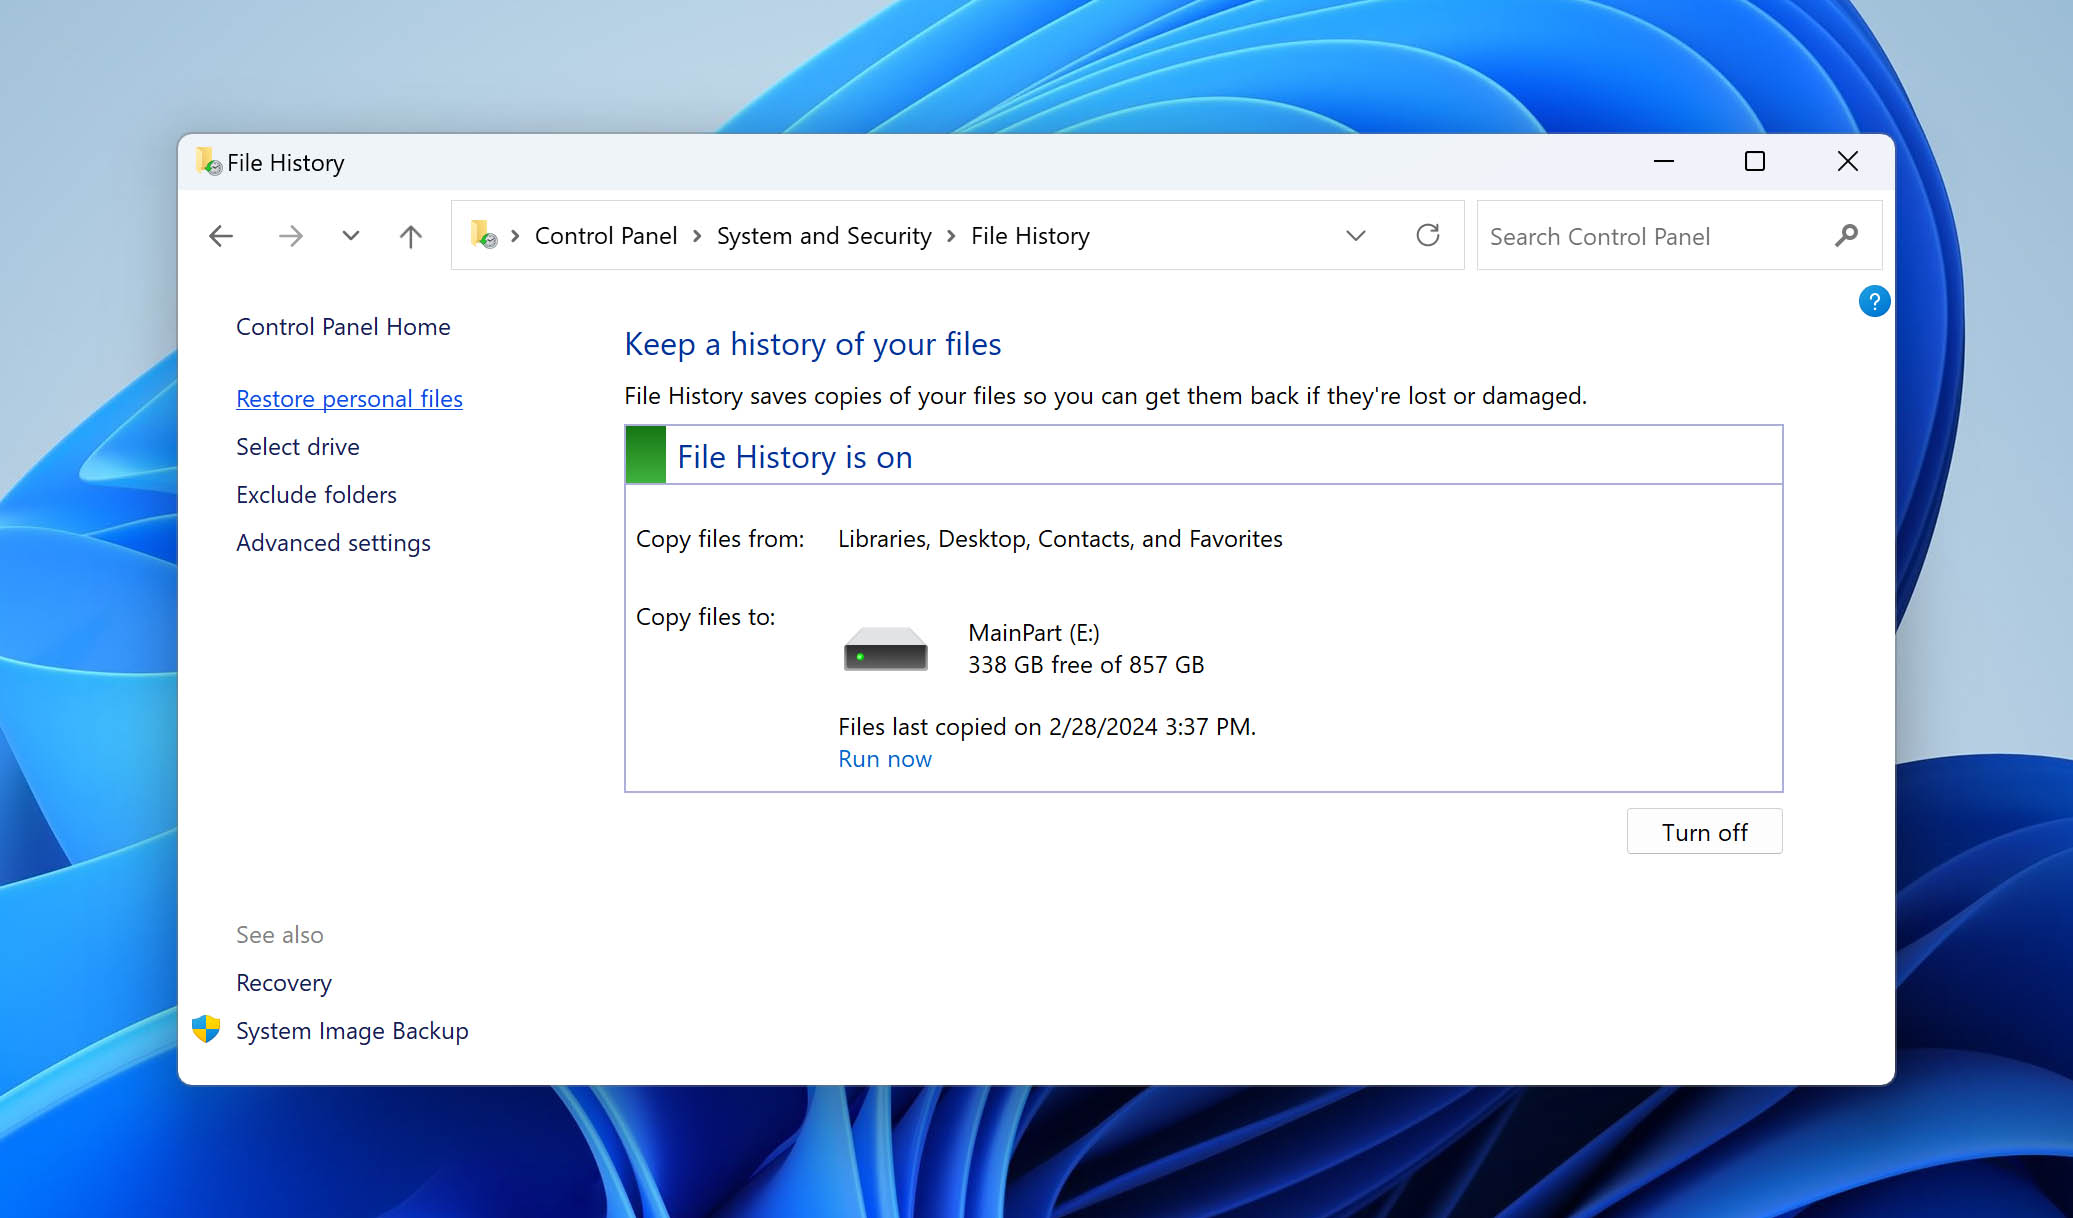
- Navigate to the location where your video files were stored and go through available backups to see if one of them contains them.
- Select the files you want to restore.
- Click the green Restore button.
As you may be aware, File History is just one of many backup solutions for Windows, but it would be beyond the scope of this article to describe all solutions commonly used by Windows users because there are simply too many of them. Just know that different backup incremental applications have different retention policies, so you better hurry up before your backup becomes overwritten with a new one, especially if your backup drive is relatively small.
Method 3: Use Data Recovery Software to Restore Permanently Deleted Videos
If you don’t have a backup to recover from, not all hope is lost just yet! Permanently deleted files often remain physically located on the storage device long after the logical links that make it possible to open them have been removed.
Using specialized data recovery software, you can locate where the files are and restore the logical links that lead to them. Such software is available from a number of different developers, including Microsoft.
The data recovery software application we recommend the most is called Disk Drill, and it stands out with its performance, simplicity, and reliability. On Windows, you get 100 MB of free data recovery, which is equal to short clips, screen recordings, or a handful of compressed MP4s. Upgrade only if you need more.
Follow these steps to recover video files with data recovery software on Windows:
- Download, install, and open Disk Drill for Windows.
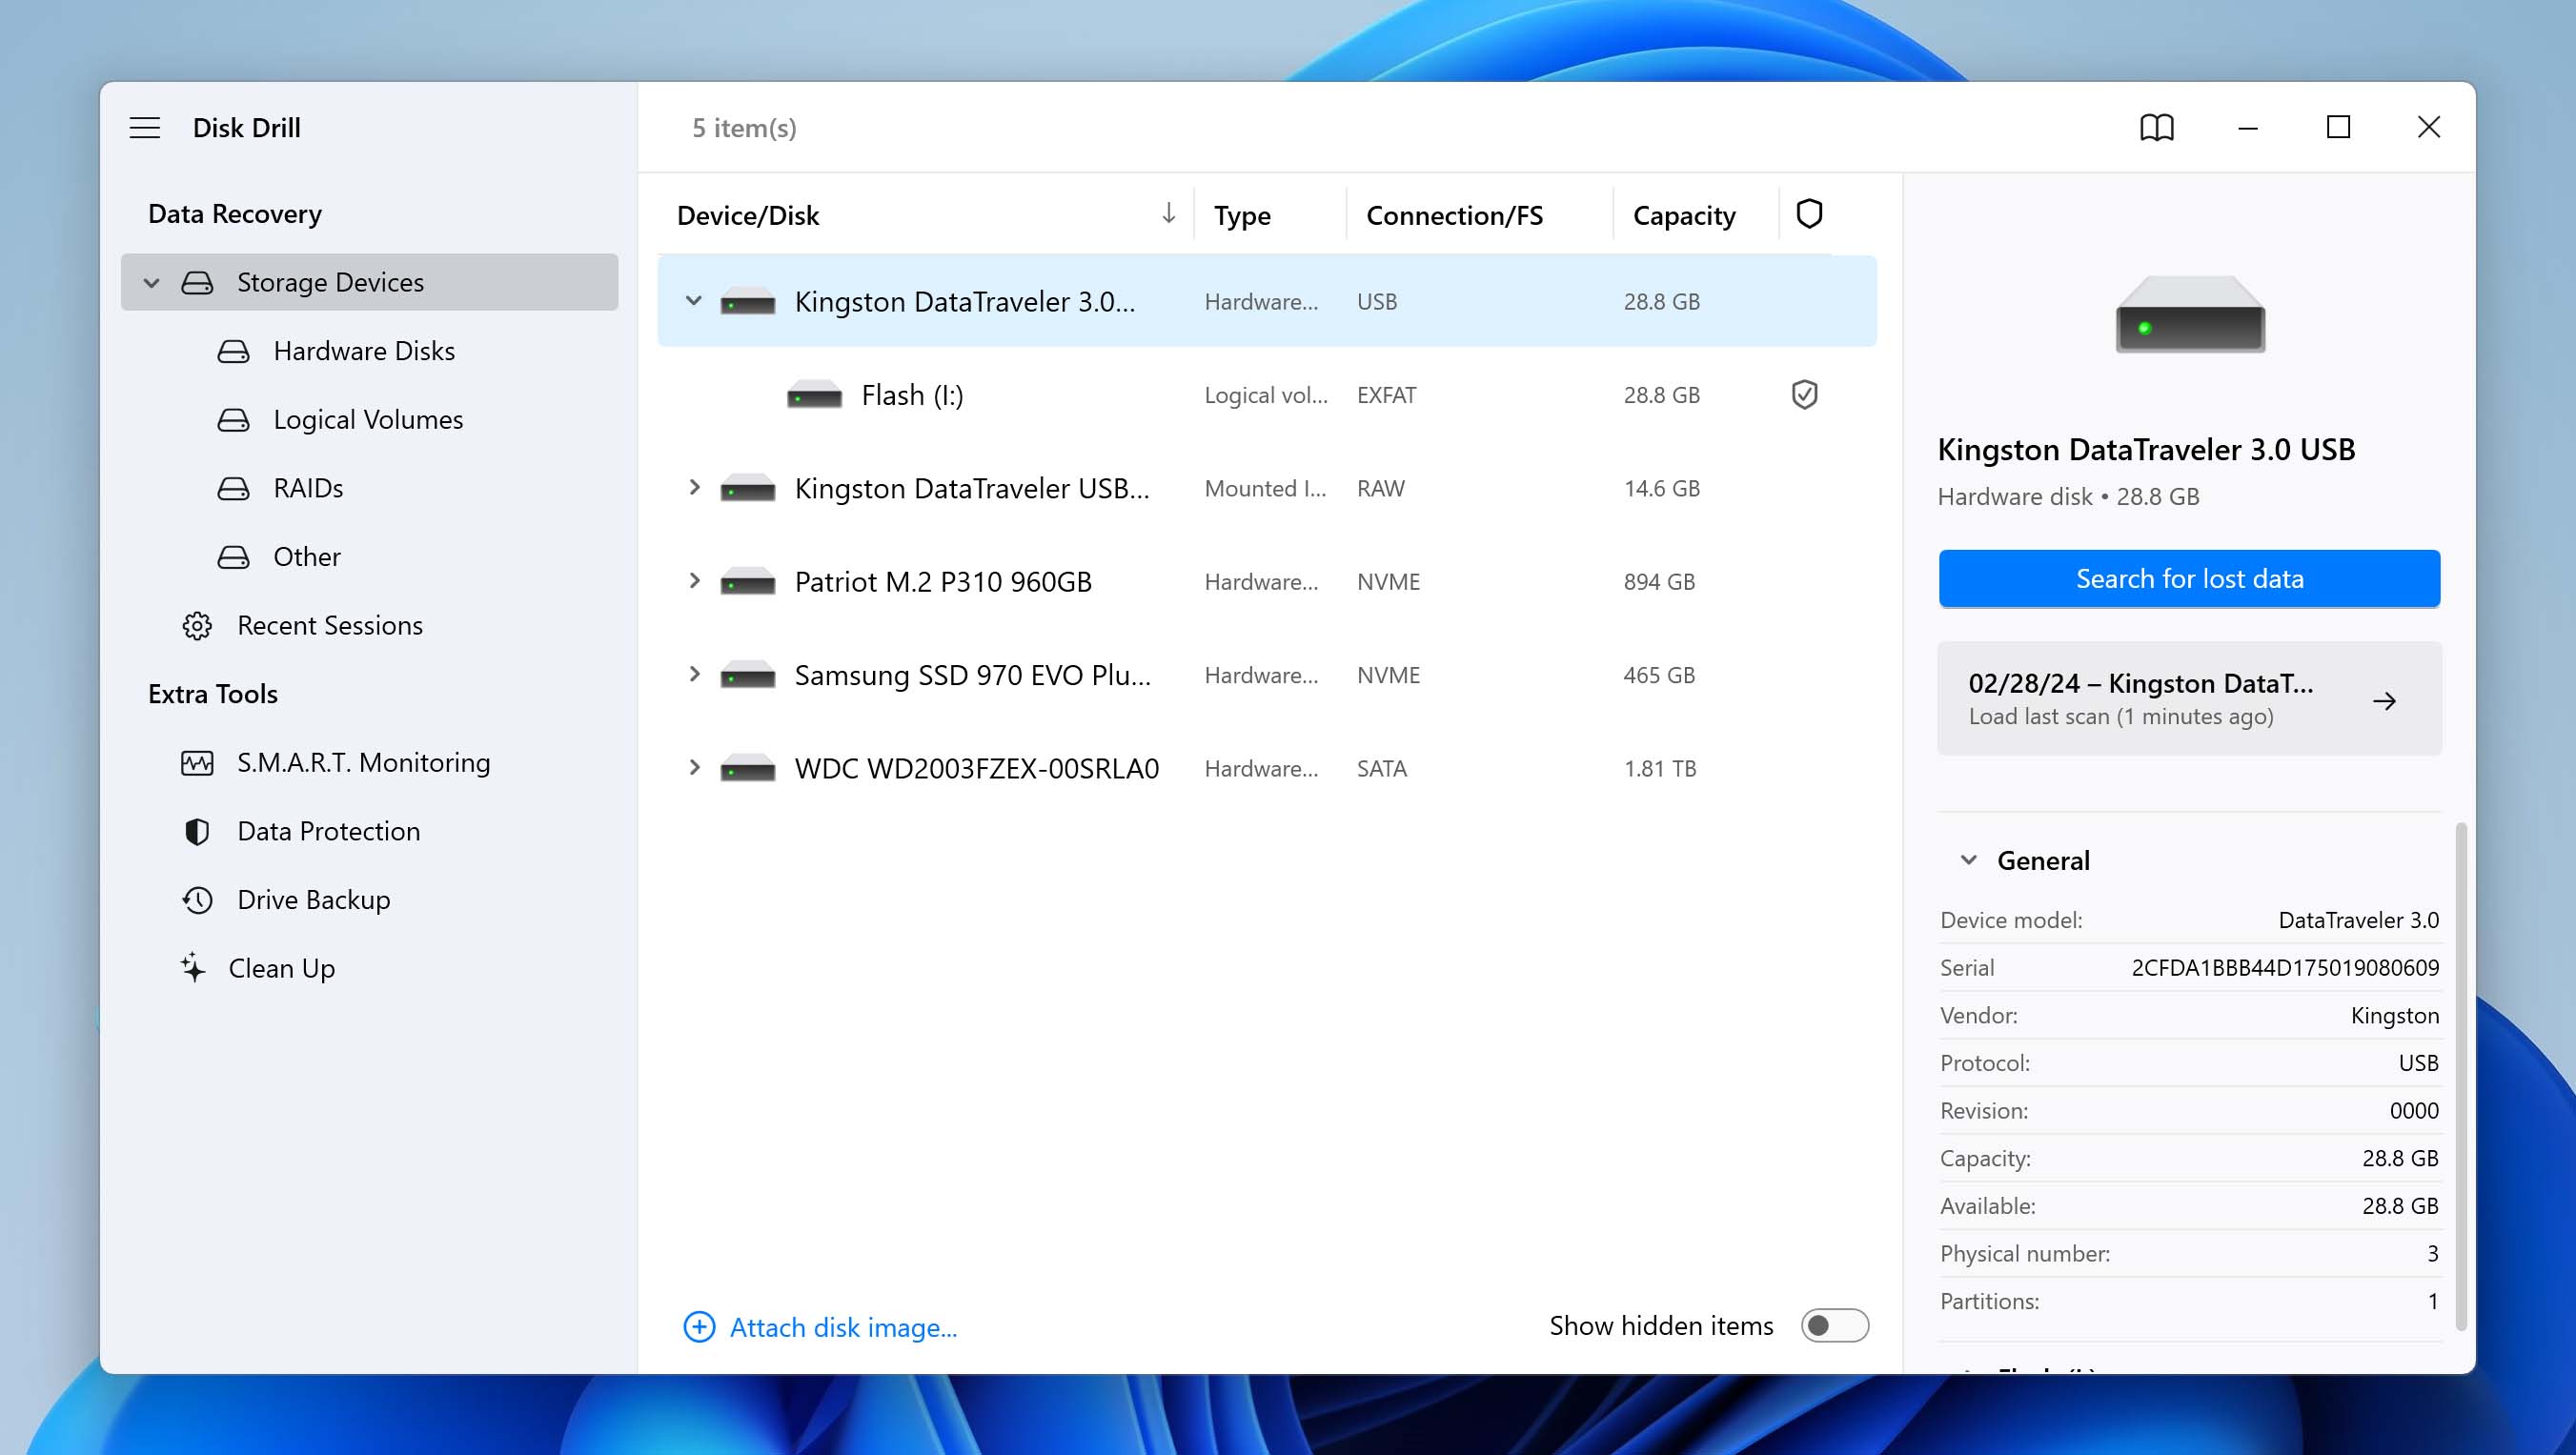
- Select your drive from the list of available storage devices and click Seach for lost data.
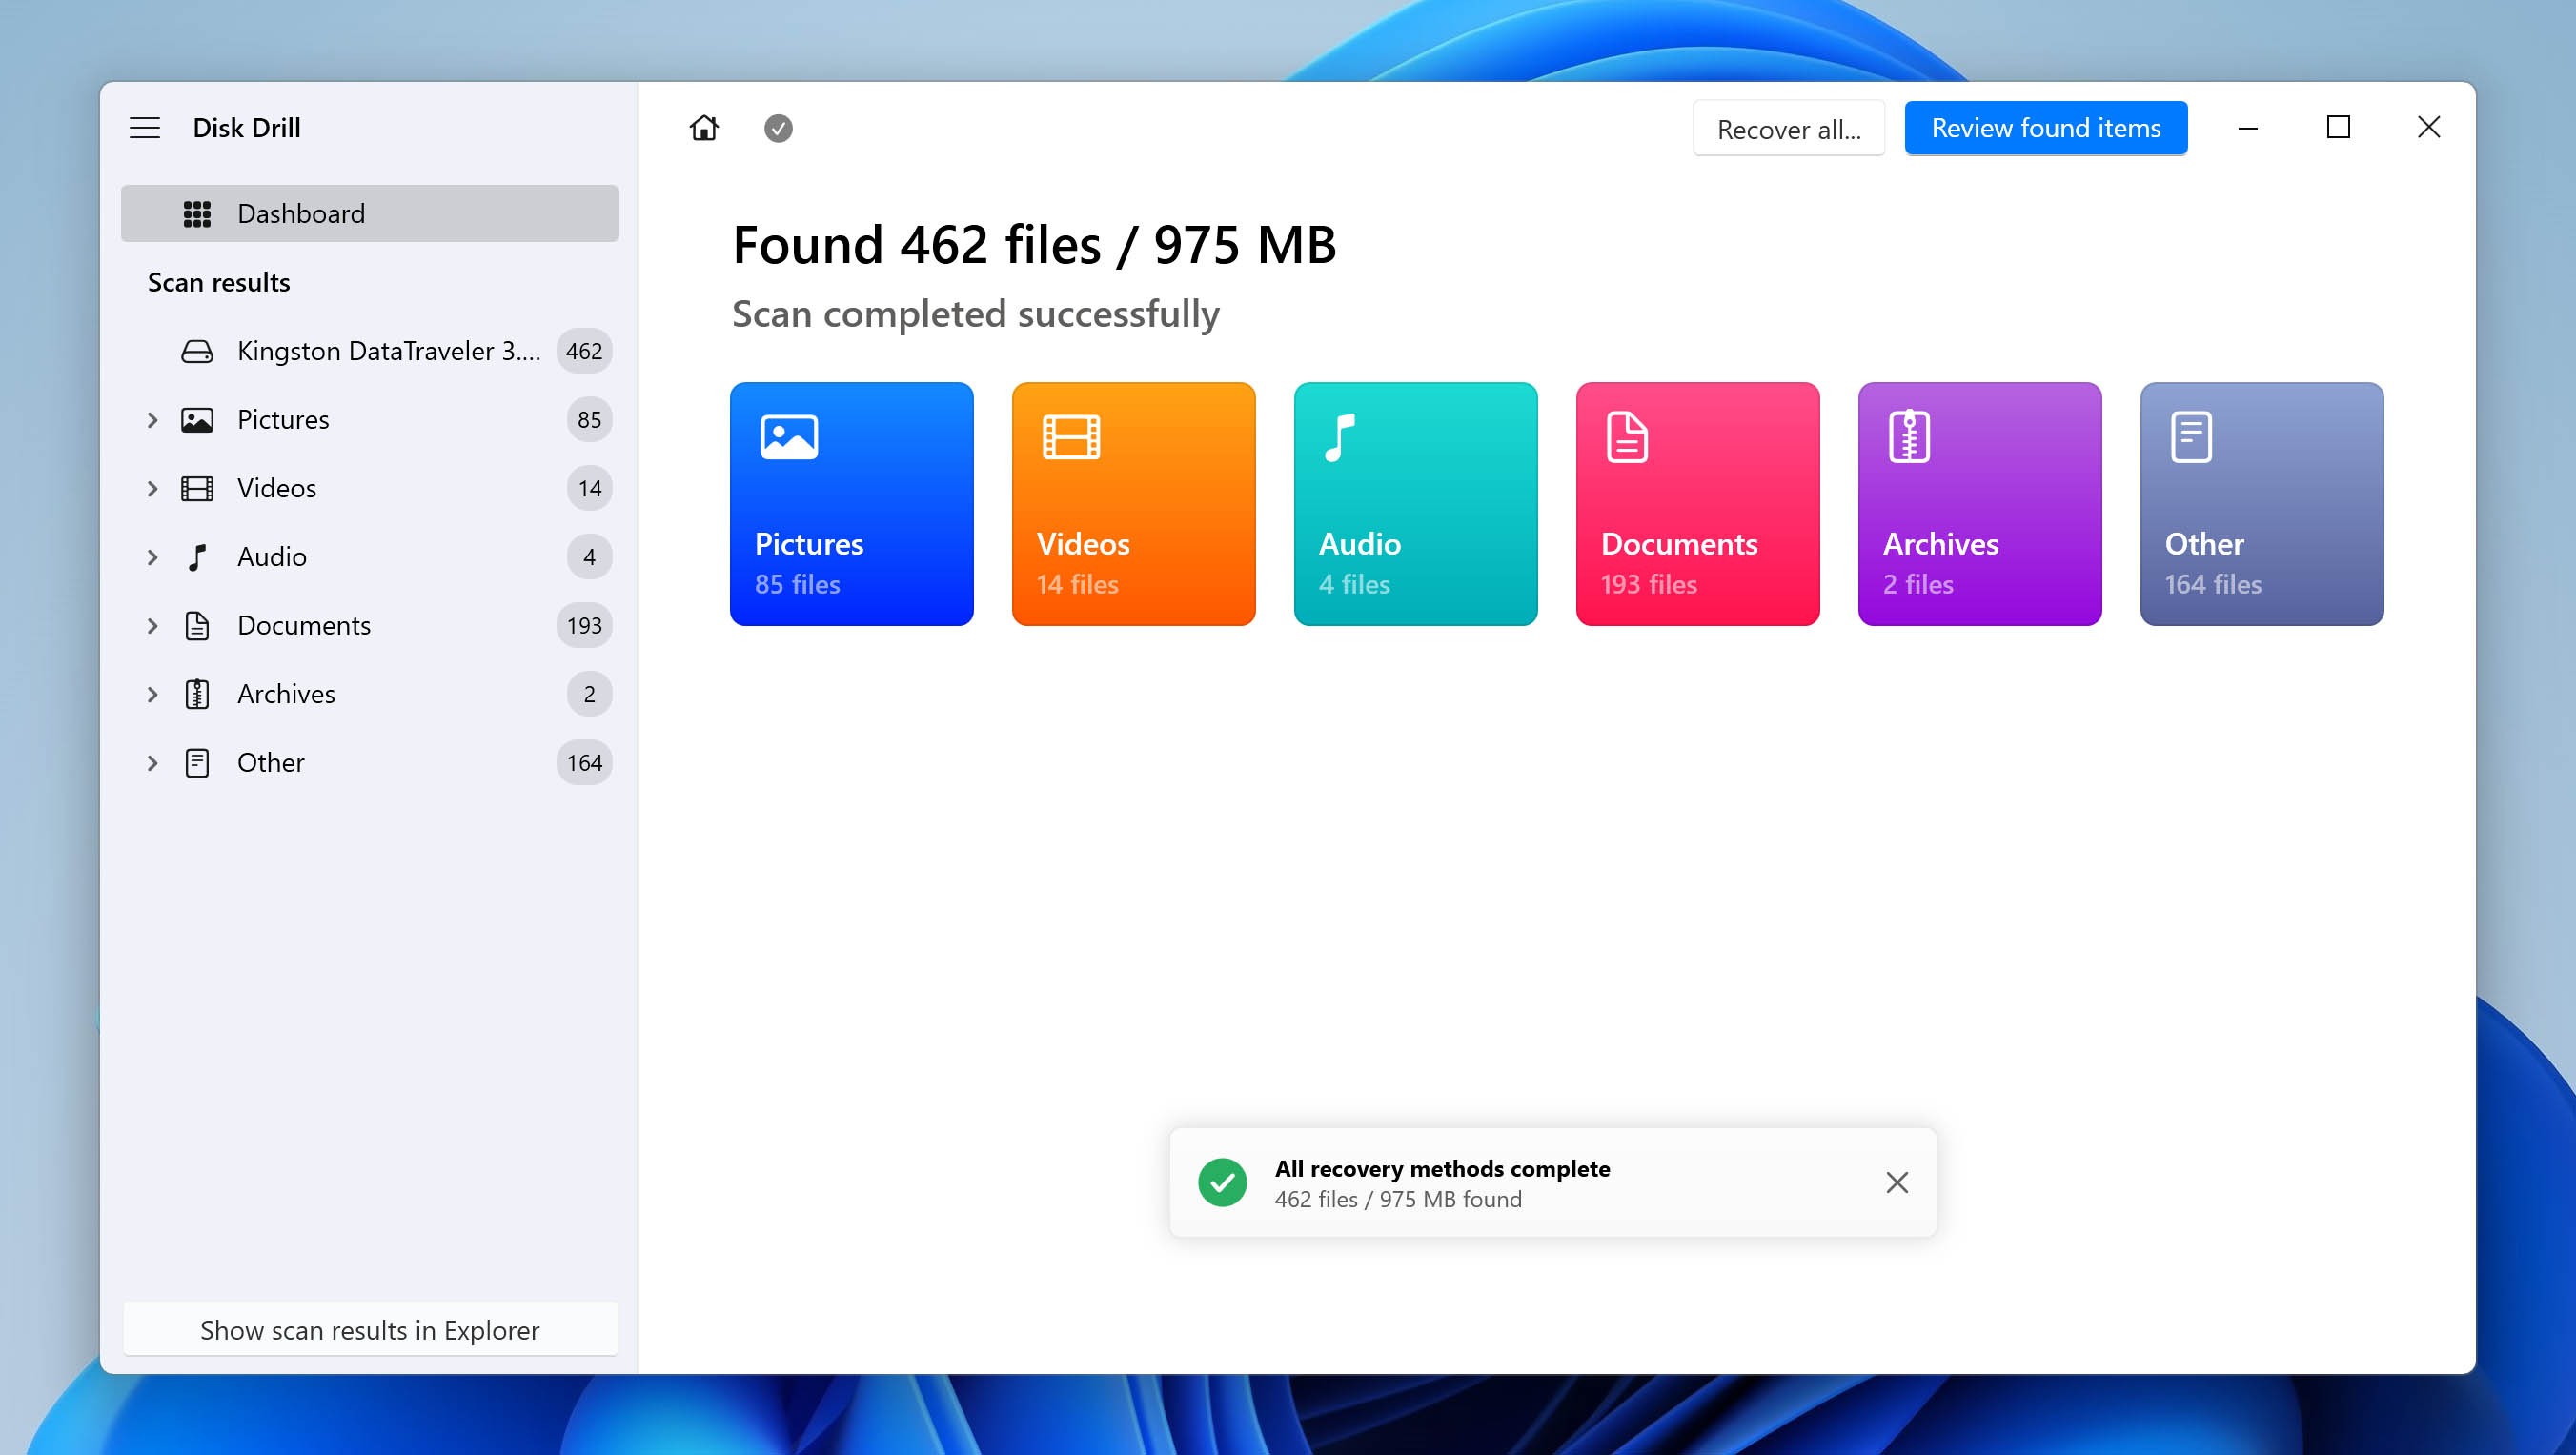
- Disk Drill will begin the scan process. As it locates lost/deleted files, it will display a count for each file type. Depending on how large your storage device is and how much data it contains, this can take some time.
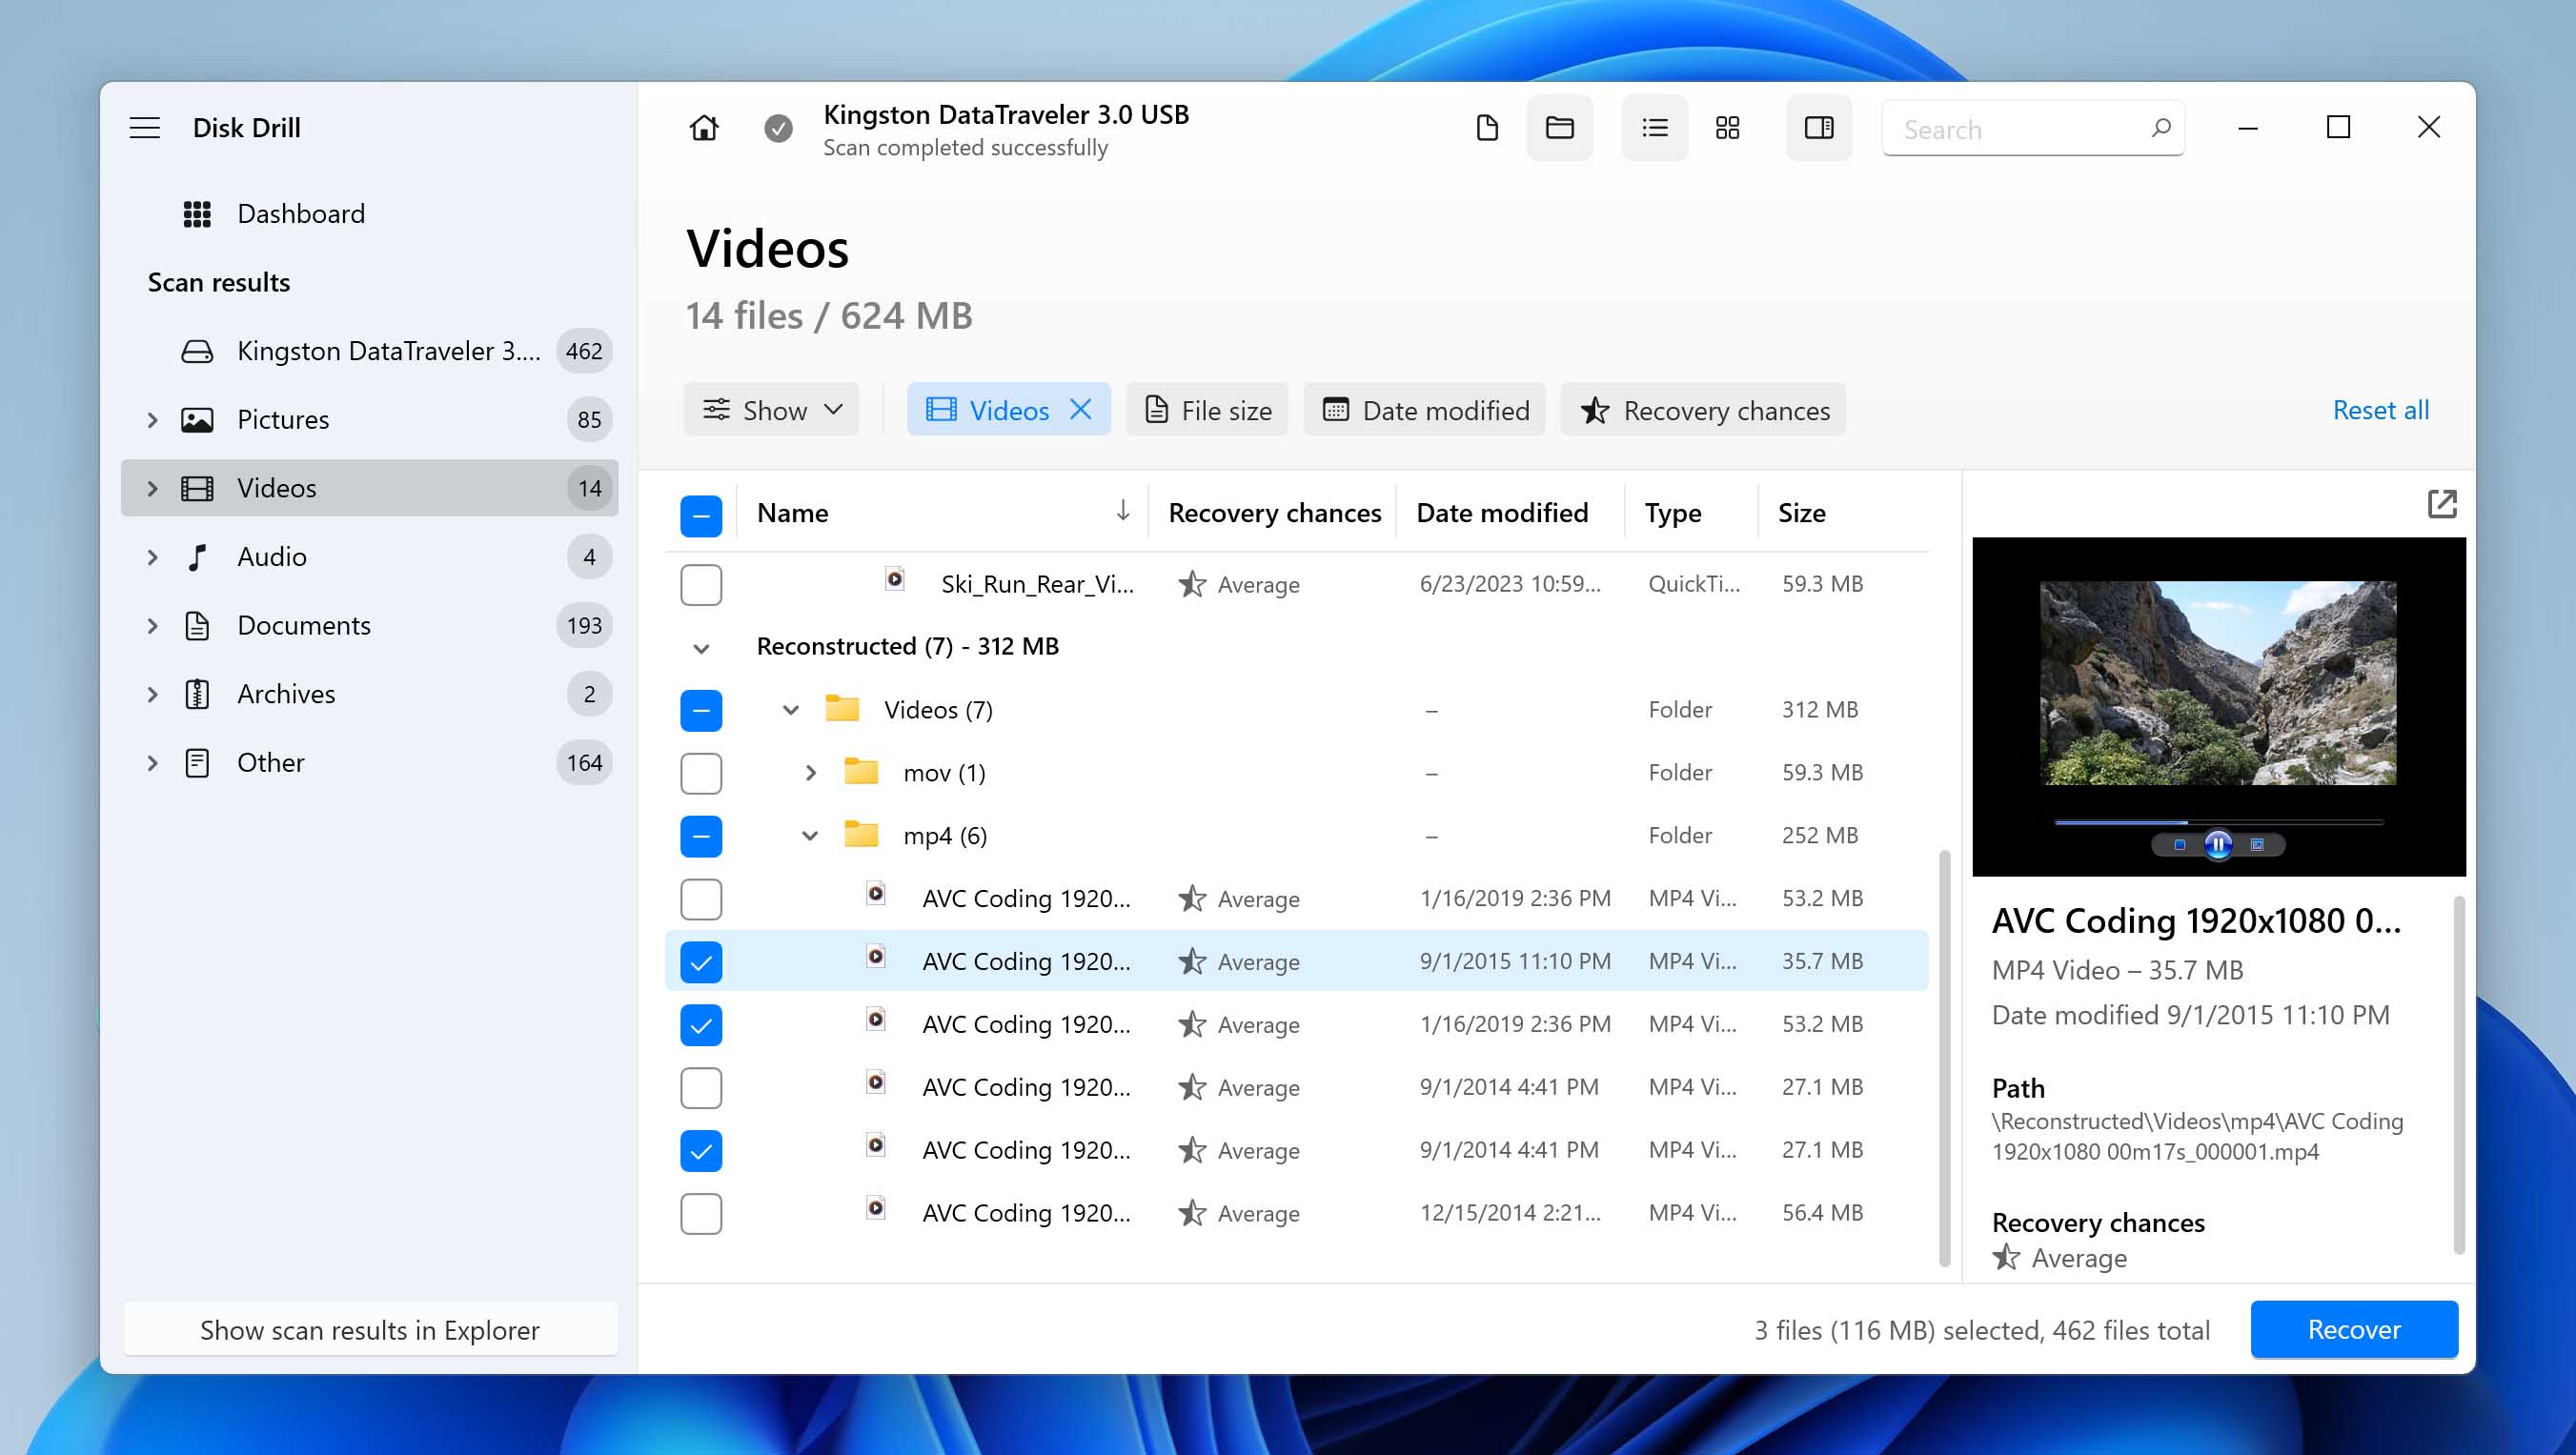
- When the scan completes, click Review found items. Filter the list of recoverable files to display only videos by clicking the corresponding option in the left pane.
- Go through the list and select each video file you want to recover.
- Click the Recover button and specify the recovery destination for the selected files.
How to Recover Deleted Videos on Mac
![]() The most useful methods how to recover deleted videos on Mac mirror those available to Windows users, but the individual steps you need to follow are different.
The most useful methods how to recover deleted videos on Mac mirror those available to Windows users, but the individual steps you need to follow are different.
Method 1: Check Trash Bin
When you delete a video file on macOS, the file is moved to the Trash folder, where it stays until the folder is emptied. Until that happens, you can follow these steps to recover it:
- Click the Trash icon on the Dock to open it.

- Locate the video file to be restored.
- Two-finger tap (or right-click) the file and then click Put Back. The file will be restored back to the location it was prior to its deletion.
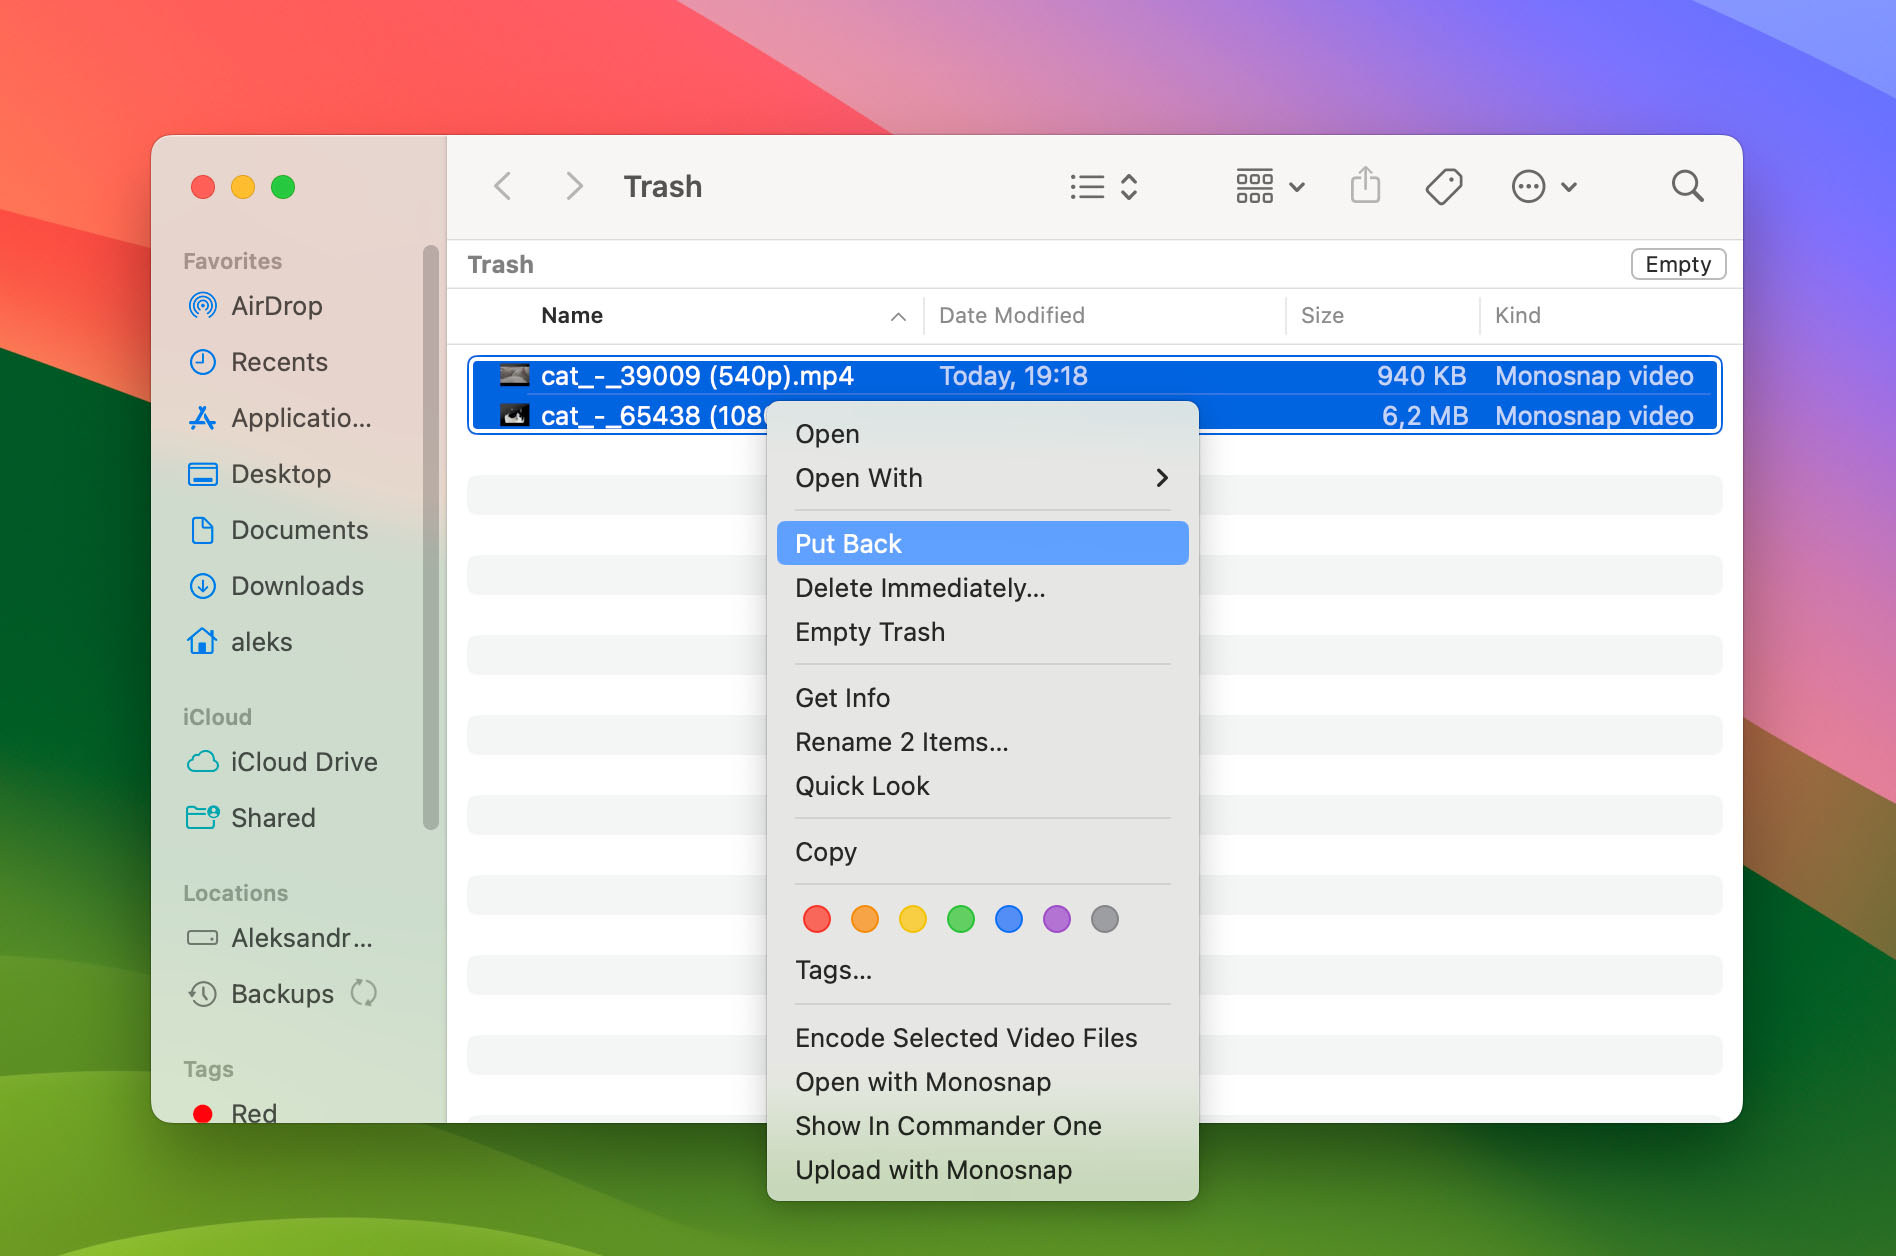
The Trash folder doesn’t include the content of formatted storage devices, and it also may not include files deleted by third-party applications.
Method 2: Recover from the Photos App
It may surprise you that the Trash folder isn’t the only location on macOS where deleted videos files are temporarily moved to make their recovery easily possible. The Photos app, which many Mac users use to manage their videos, has its own Trash equivalent, the Recently Deleted folder. To recover your videos from it:
- Launch the Photos app.
- Go to the Recently Deleted folder.
- Select all videos you want to recover.
- Click the Recover button to move the selected videos back to your library.
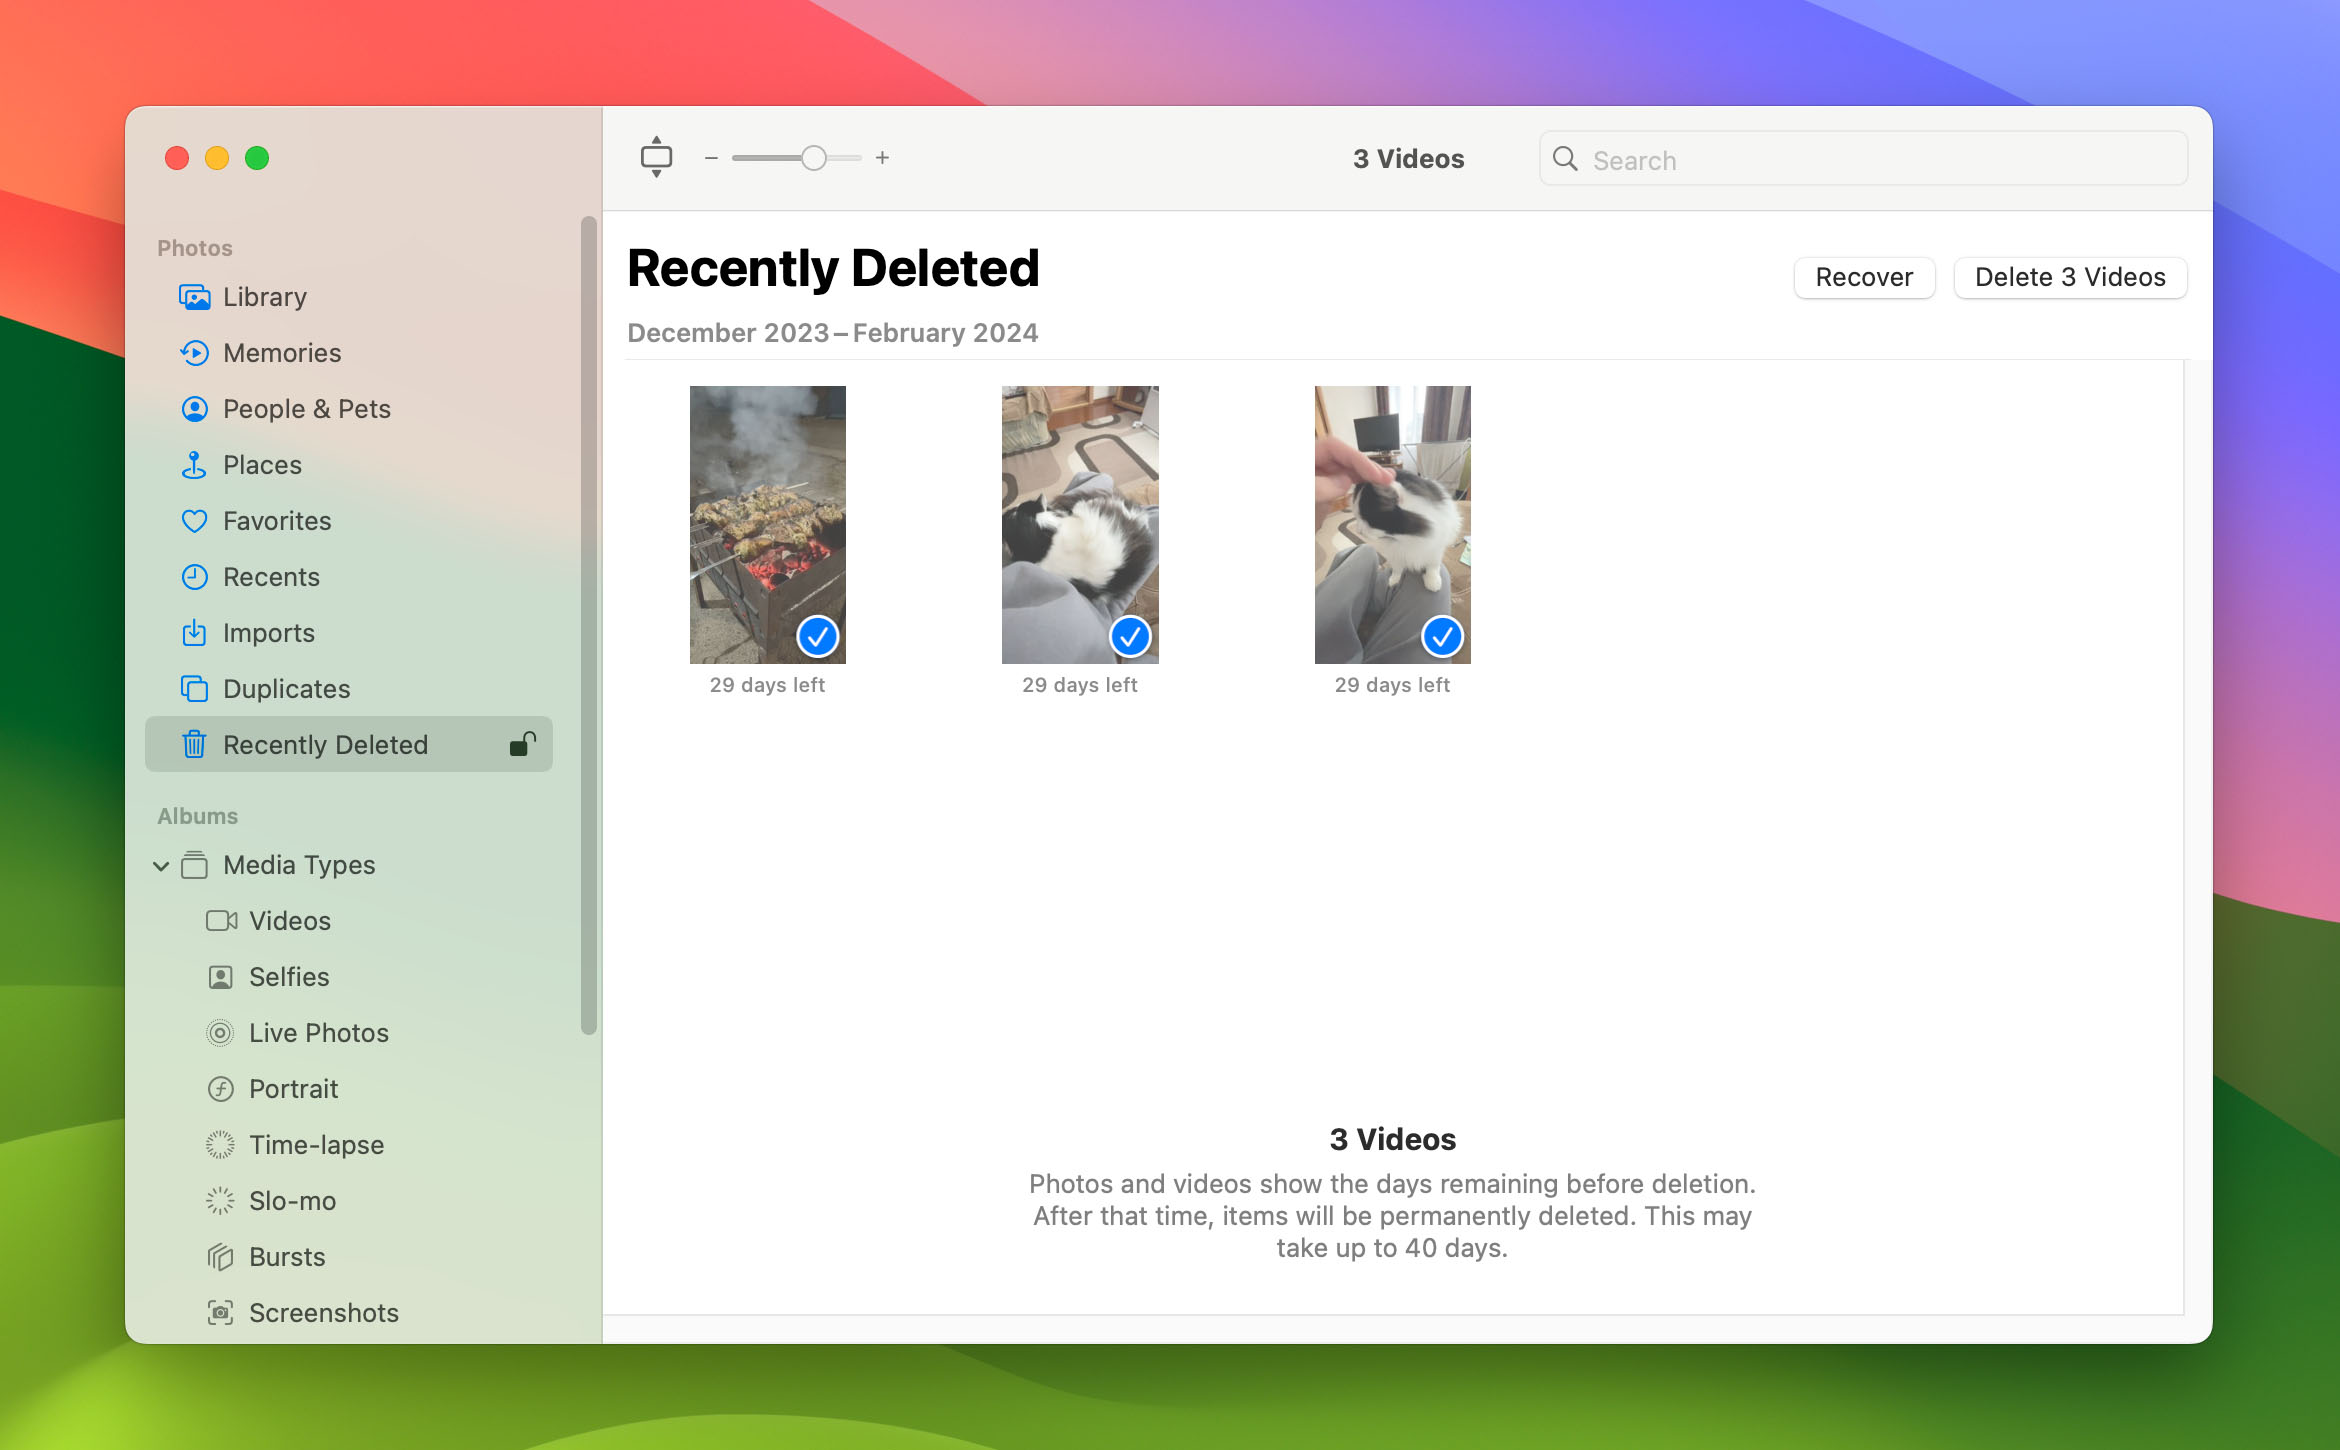
Below each video located in the Recently Deleted folder is a countdown telling how many days the video will remain available before it becomes permanently deleted. Just don’t let this feature lull you into thinking that you have a lot of time to recover your videos. It’s always best to avoid delaying data recovery as much as possible.
Method 4: Use Data Recovery Software for macOS (if not found in Trash or Photos)
If you’ve emptied the Trash or the video wasn’t in the Photos app, you can try using data recovery software.
💡 Important: Data recovery software doesn’t always guarantee success and can be risky. To increase recovery chances, choose trusted software and stop using the disk with the deleted videos.
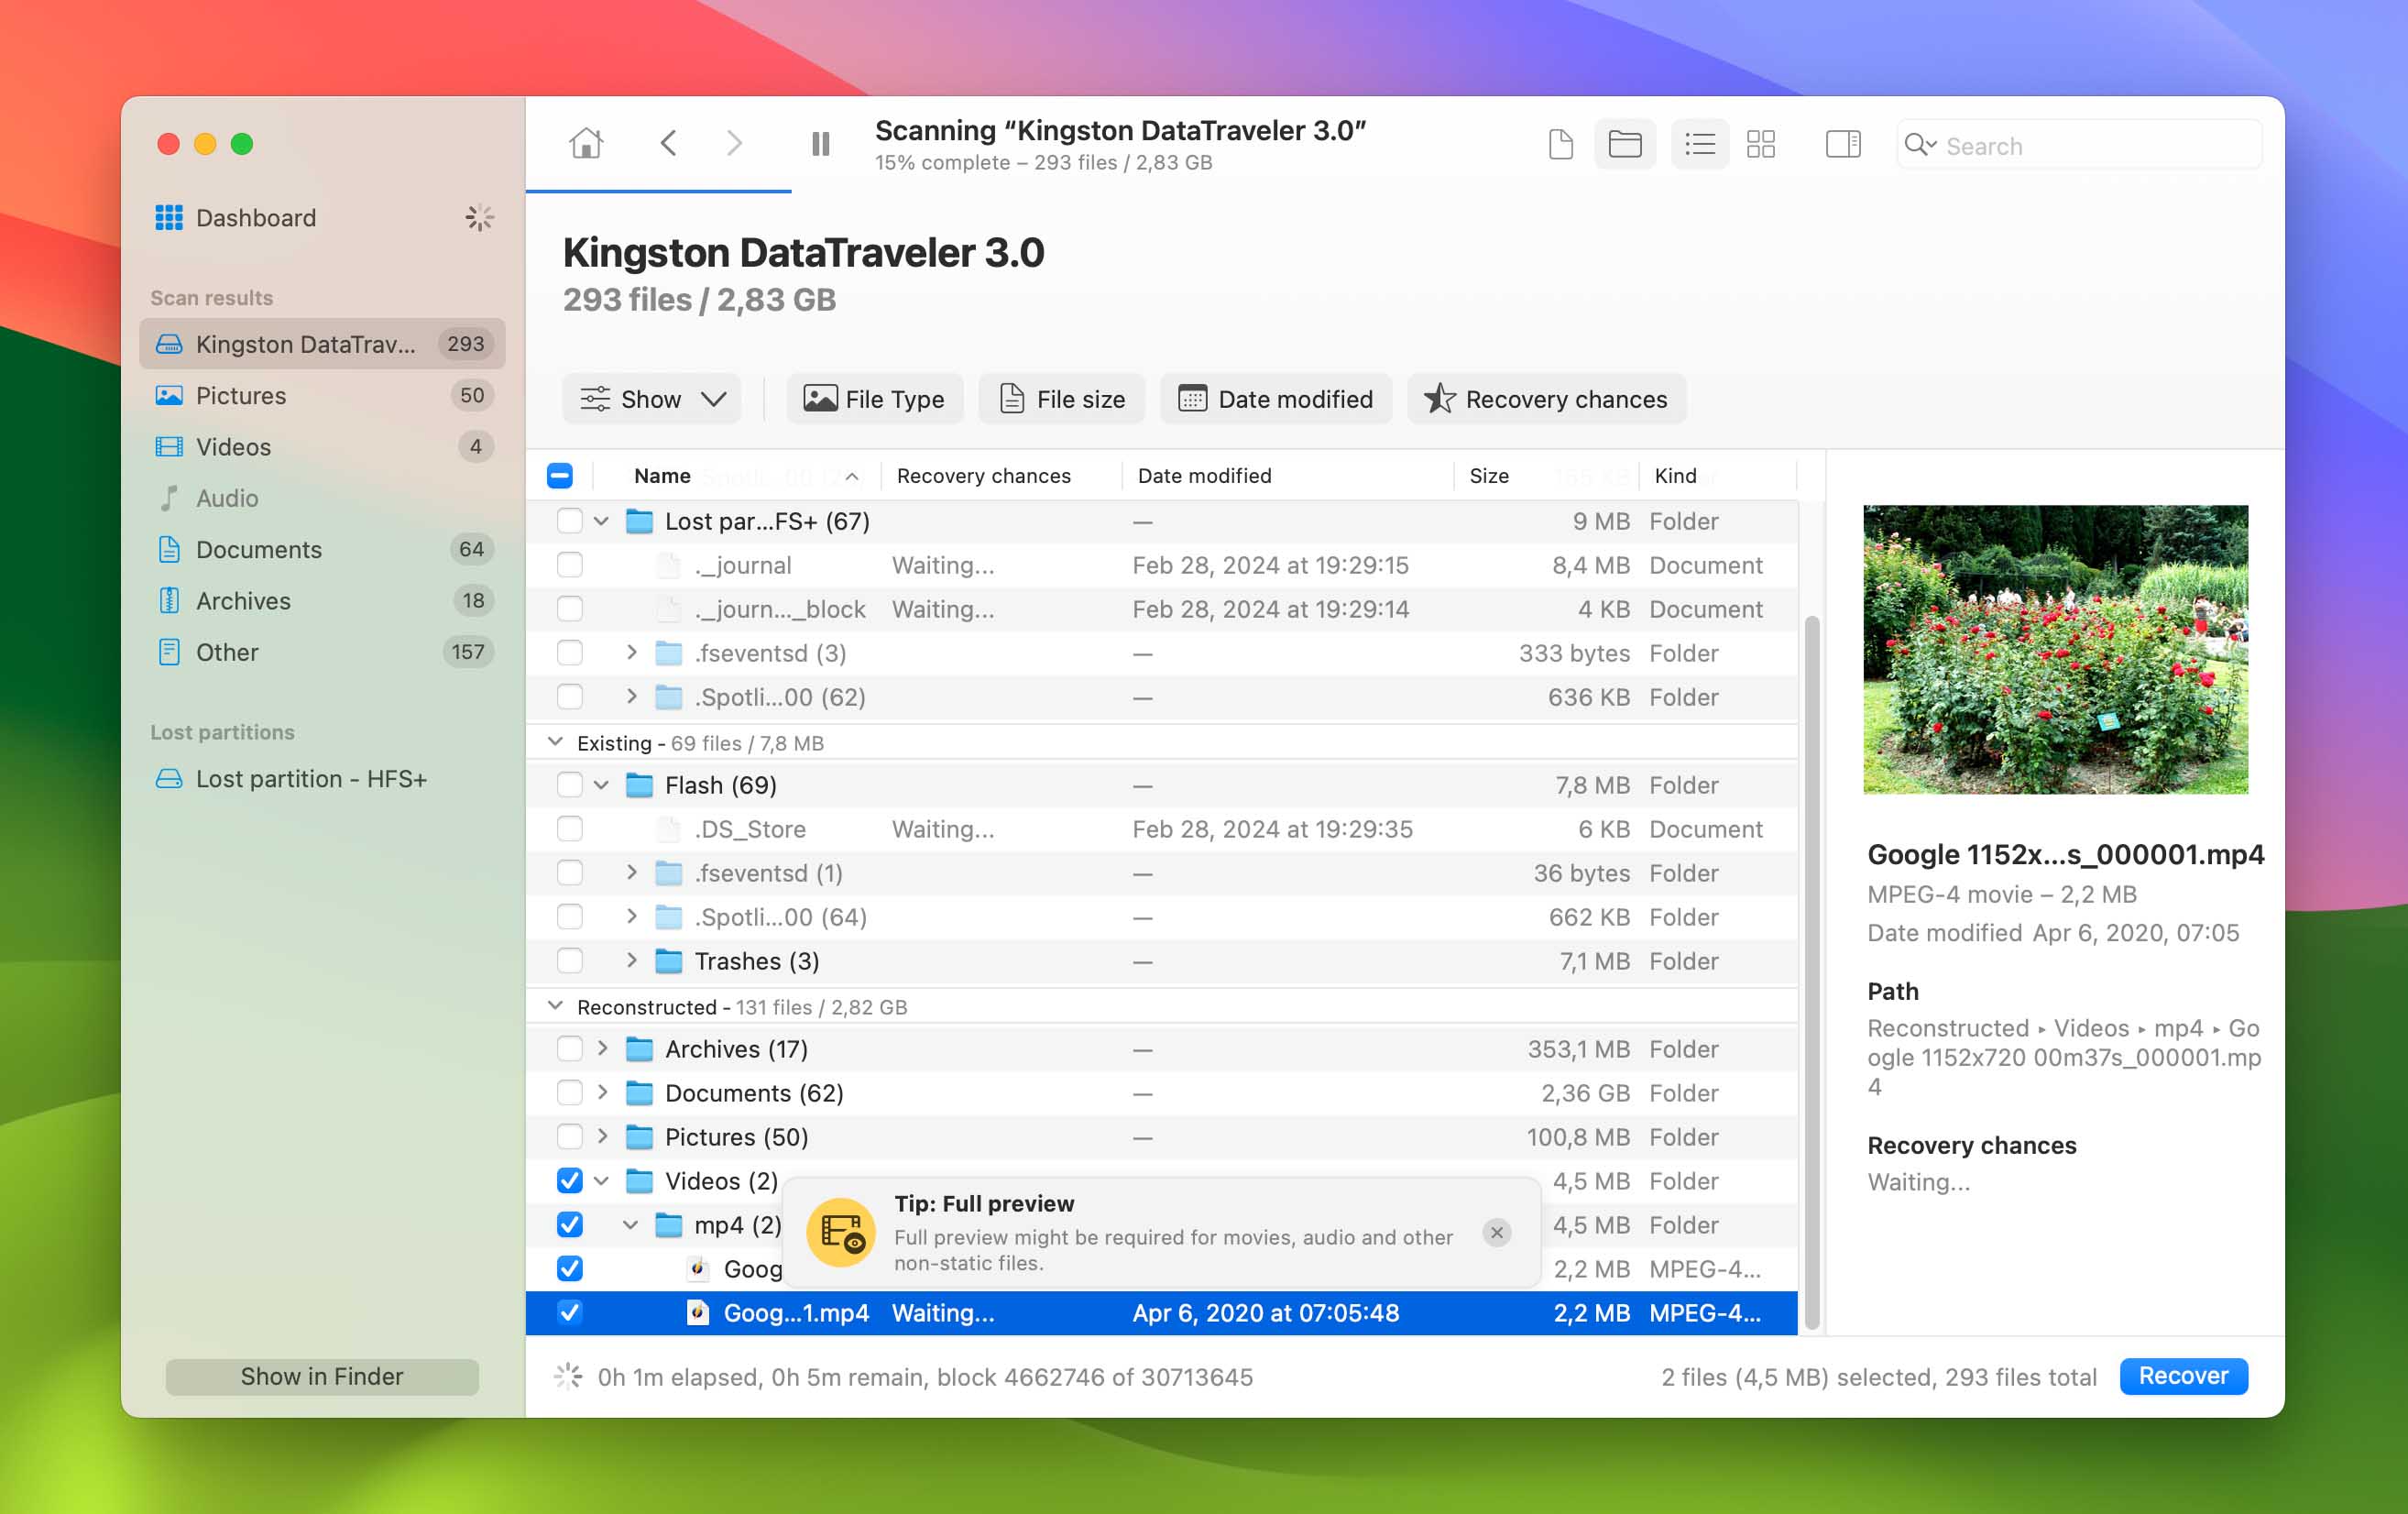
Based on personal experiences of losing and subsequently recovering data, one practical tool is Disk Drill. This tool stands out for its ability to recover a wide range of video formats, including commonly used ones like MP4, MOV, M4V, and even specialized RAW formats such as R3D and CRM. Here’s how you can use it effectively:
- Download, install, and open Disk Drill for Mac.
- Select your storage device from the list and click Search for lost data. Enter your APFS decryption password if prompted to do so.
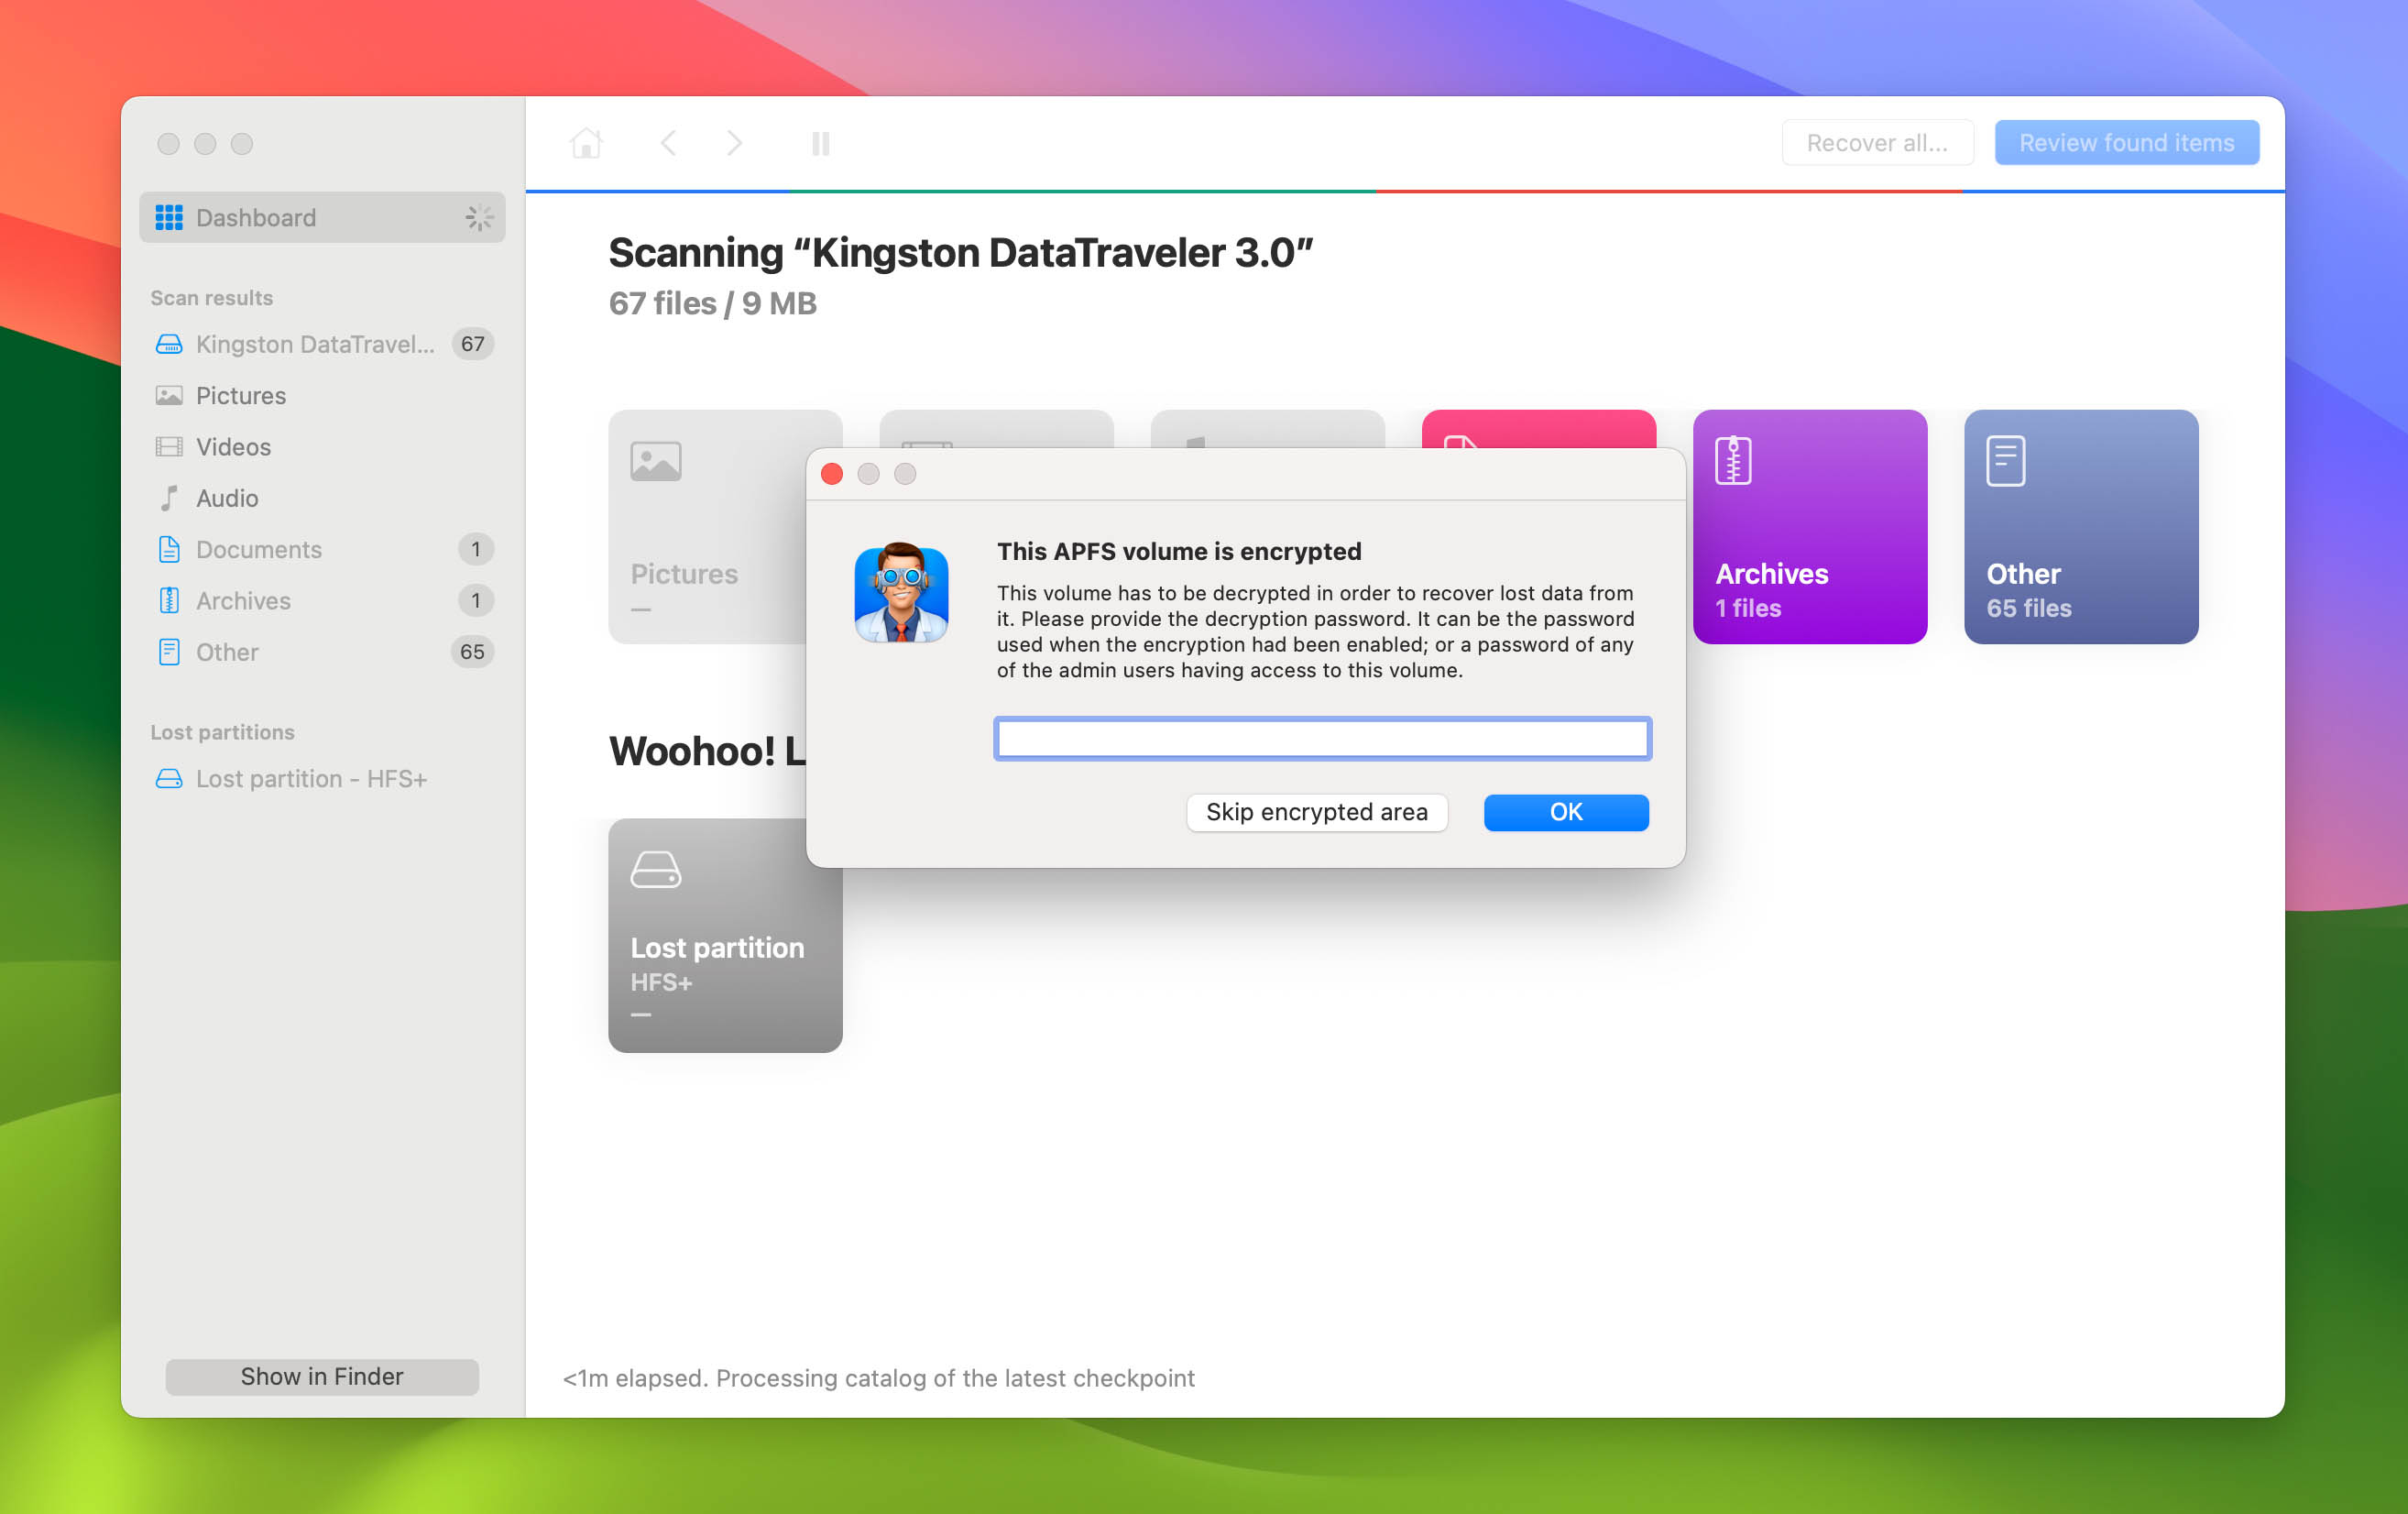
- When the scan completes, click Review found items. Then, from the left sidebar, apply the video file format filter. Take advantage of the preview feature to verify the integrity of found video files.
- Select the video files you want to recover by clicking the checkboxes next to them.
- Click the Recover button. When prompted, select the desired recovery destination.
Hopefully, you’ve managed to recover your lost video files. If not, there are other ways how to recover deleted videos on Mac that you can explore.
Method 3: Recover from a Time Machine Backup
No luck locating your videos in the Trash Bin or the Photos library? Don’t worry! As long as you have your Time Machine backup drive near you, you should be able to recover everything without much trouble:
- Press the command key (⌘) and tap the space bar to open Spotlight.
- Type “time machine” and press Return.
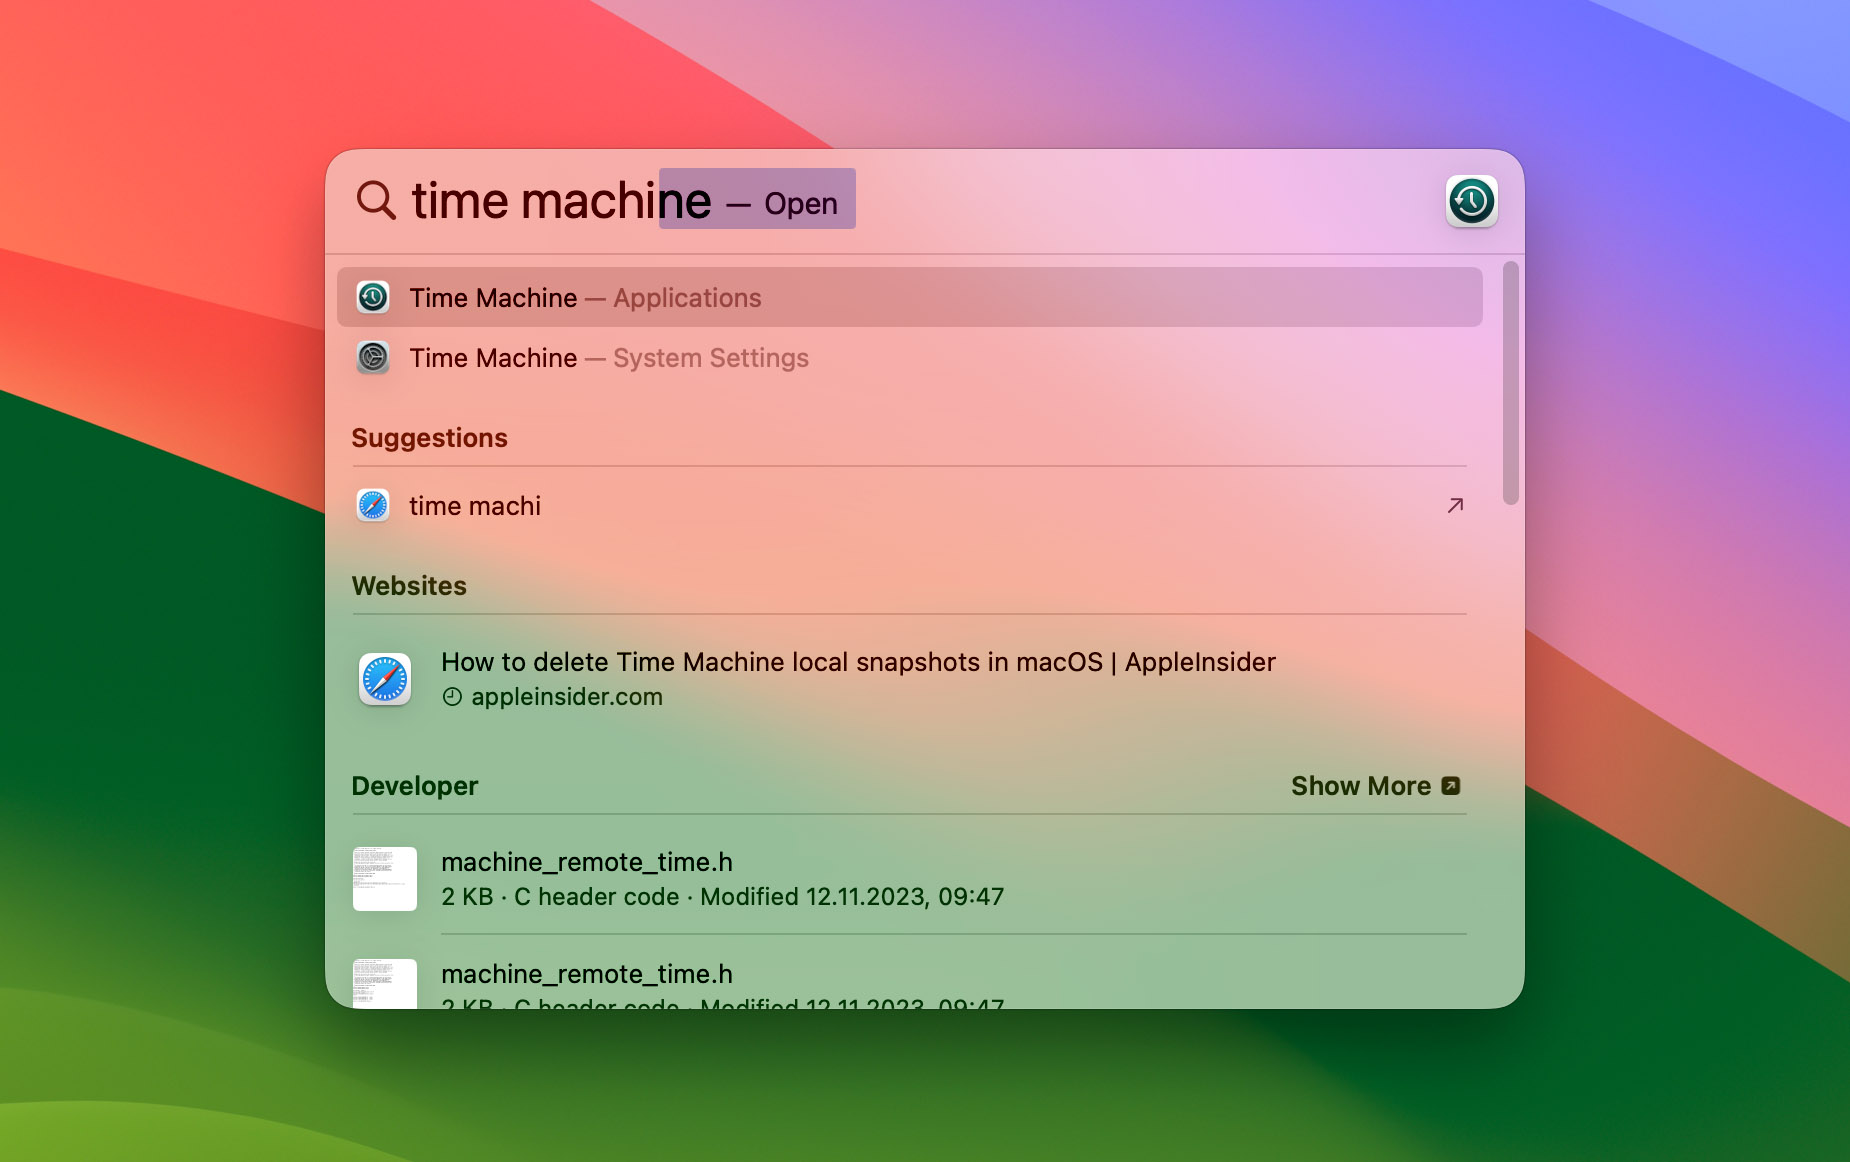
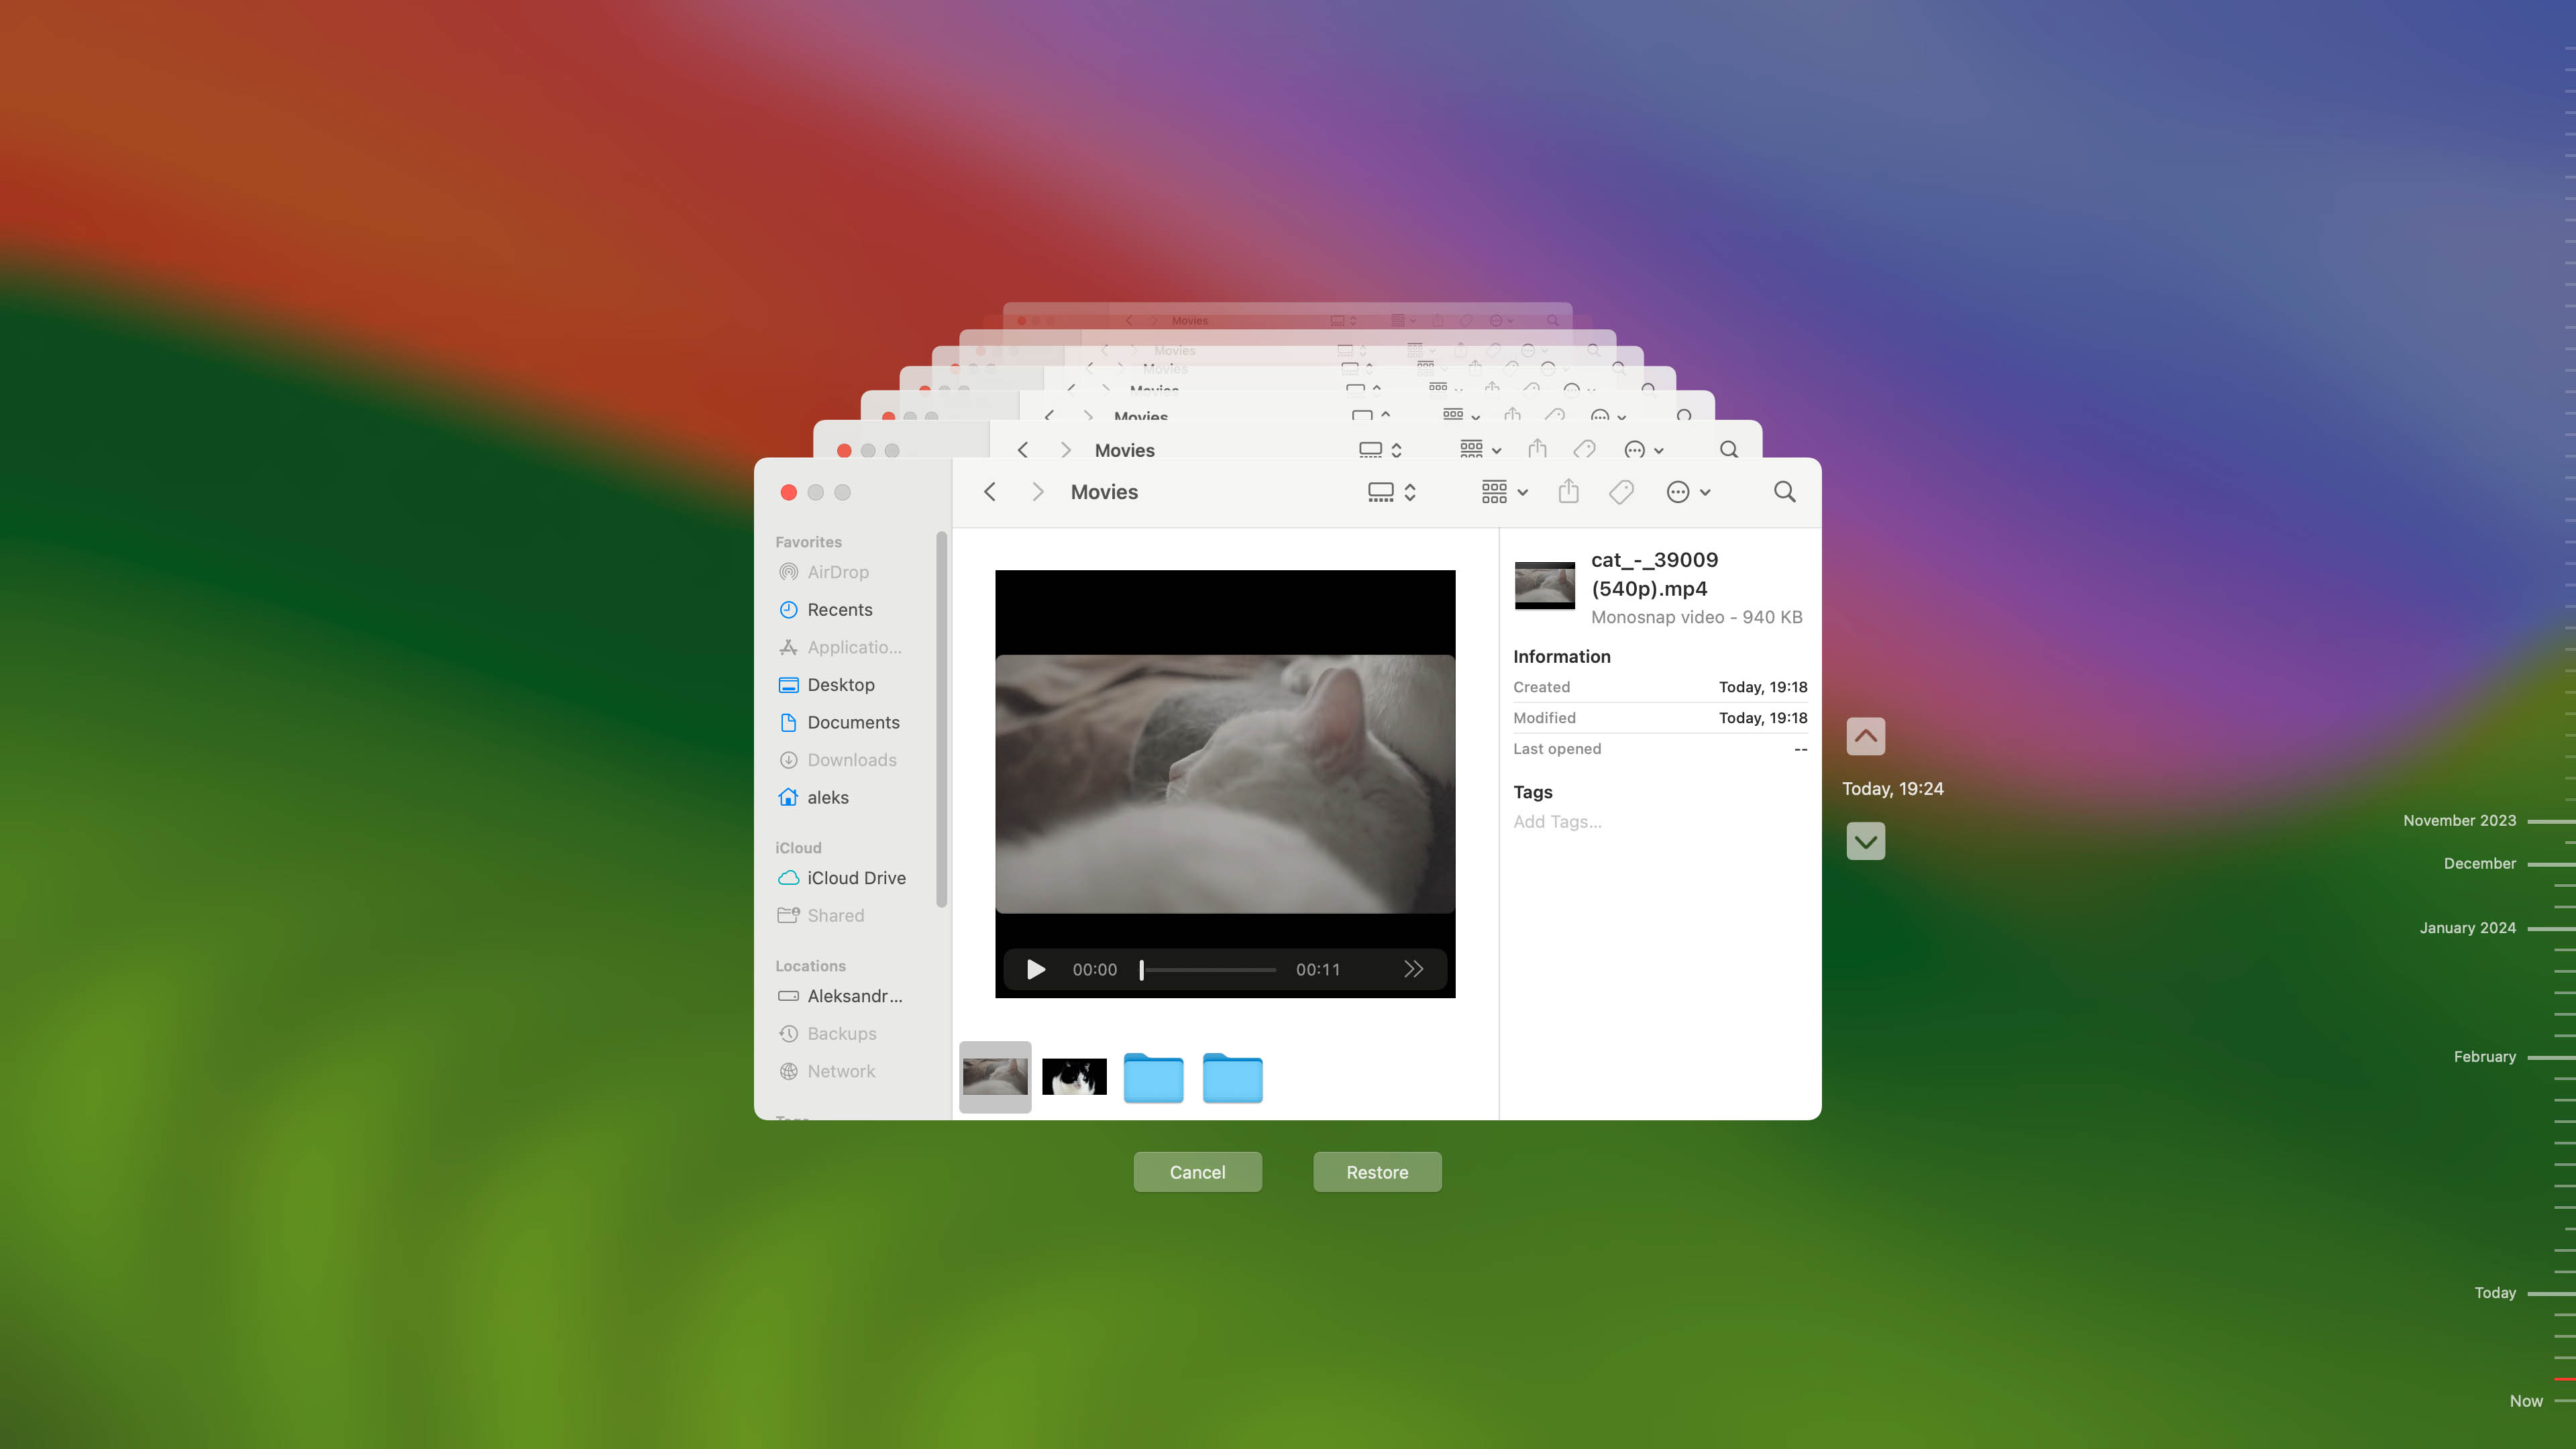
- Navigate to the folder where your videos were located and use the timeline to select a backup that contains them.
- Select the videos you want to recover.
- Click the Restore button to recover them.
If you don’t have Time Machine enabled on your Mac computer, this method won’t help you, but you should still check your backup drives to see if they contain the lost videos.
Recover Deleted Videos on Android Smartphones
 Android smartphones make it easy to record, edit, and share videos, but can they also recover videos that have become deleted? Yes, they can! The only problem is that the differences between Android smartphones from various manufacturers can be quite pronounced, so you may need to improvise a bit when following the instructions below.
Method 1: Restore from the Trash/Recently Deleted Folder
Many Android manufacturers, such as Xiaomi and Samsung, implement a temporary storage area for deleted files, including videos. This folder is typically called Trash or Recently Deleted, and you can access it from the default Gallery app. Here’s how to do just that on a Xiaomi smartphone:
- Tap the Gallery app to launch it.
- Go to the Albums tab.
- Scroll down all the way to the bottom.
- Open the Trash bin folder.

- Long-press the video you want to recover and select the Restore option.
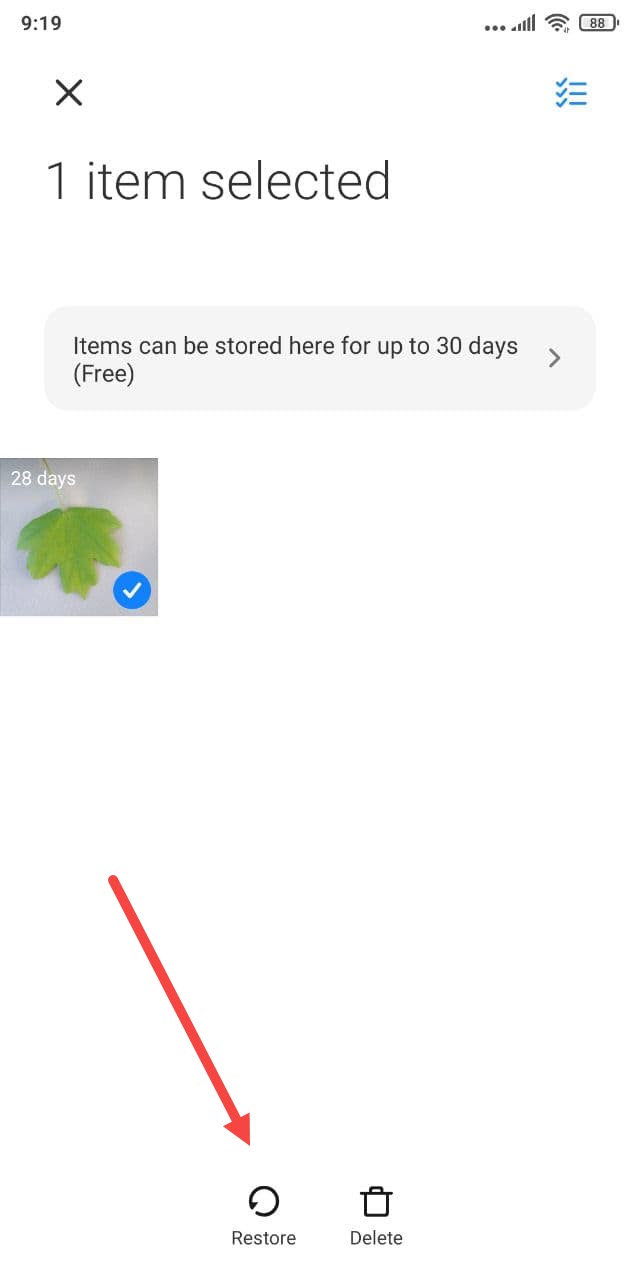
Deleted videos are kept in the Trash bin folder for up to 30 days, so you better hurry up before it’s too late.
Method 2: Retrieve Videos from a Cloud Backup
There are many photo-sharing and cloud storage apps for Android that can automatically upload recorded videos to the cloud, allowing you to access them from anywhere, easily share them with others, and recover them in the event of a data loss incident. A great example of a popular cloud-based photo-sharing app is Google Photos.
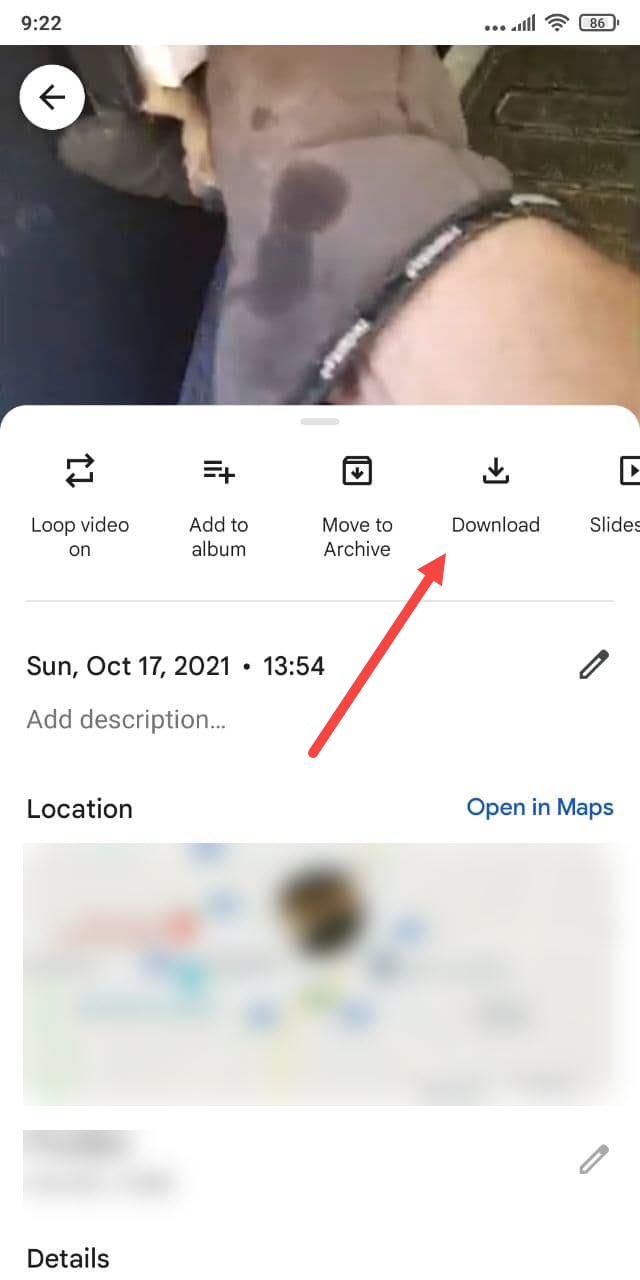
Since Google Photos comes pre-installed on many Android devices, it’s possible that it has been quietly backing up your videos without you even knowing about it. In any case, you can follow the steps below to check if your video can be retrieved from Google’s servers:
- Tap the Google Photos app to launch it.
- Look for the deleted video.
- Open the video you want to recover.
- Tap the three vertical dots and select the Download option to download the video to your device.
You can also keep your videos only on Google’s servers and know that they’re perfectly safe there. Still, having a local copy is handy because you can then access your videos even if you don’t have a working internet connection.
Method 3: Use an Android Video Recovery App
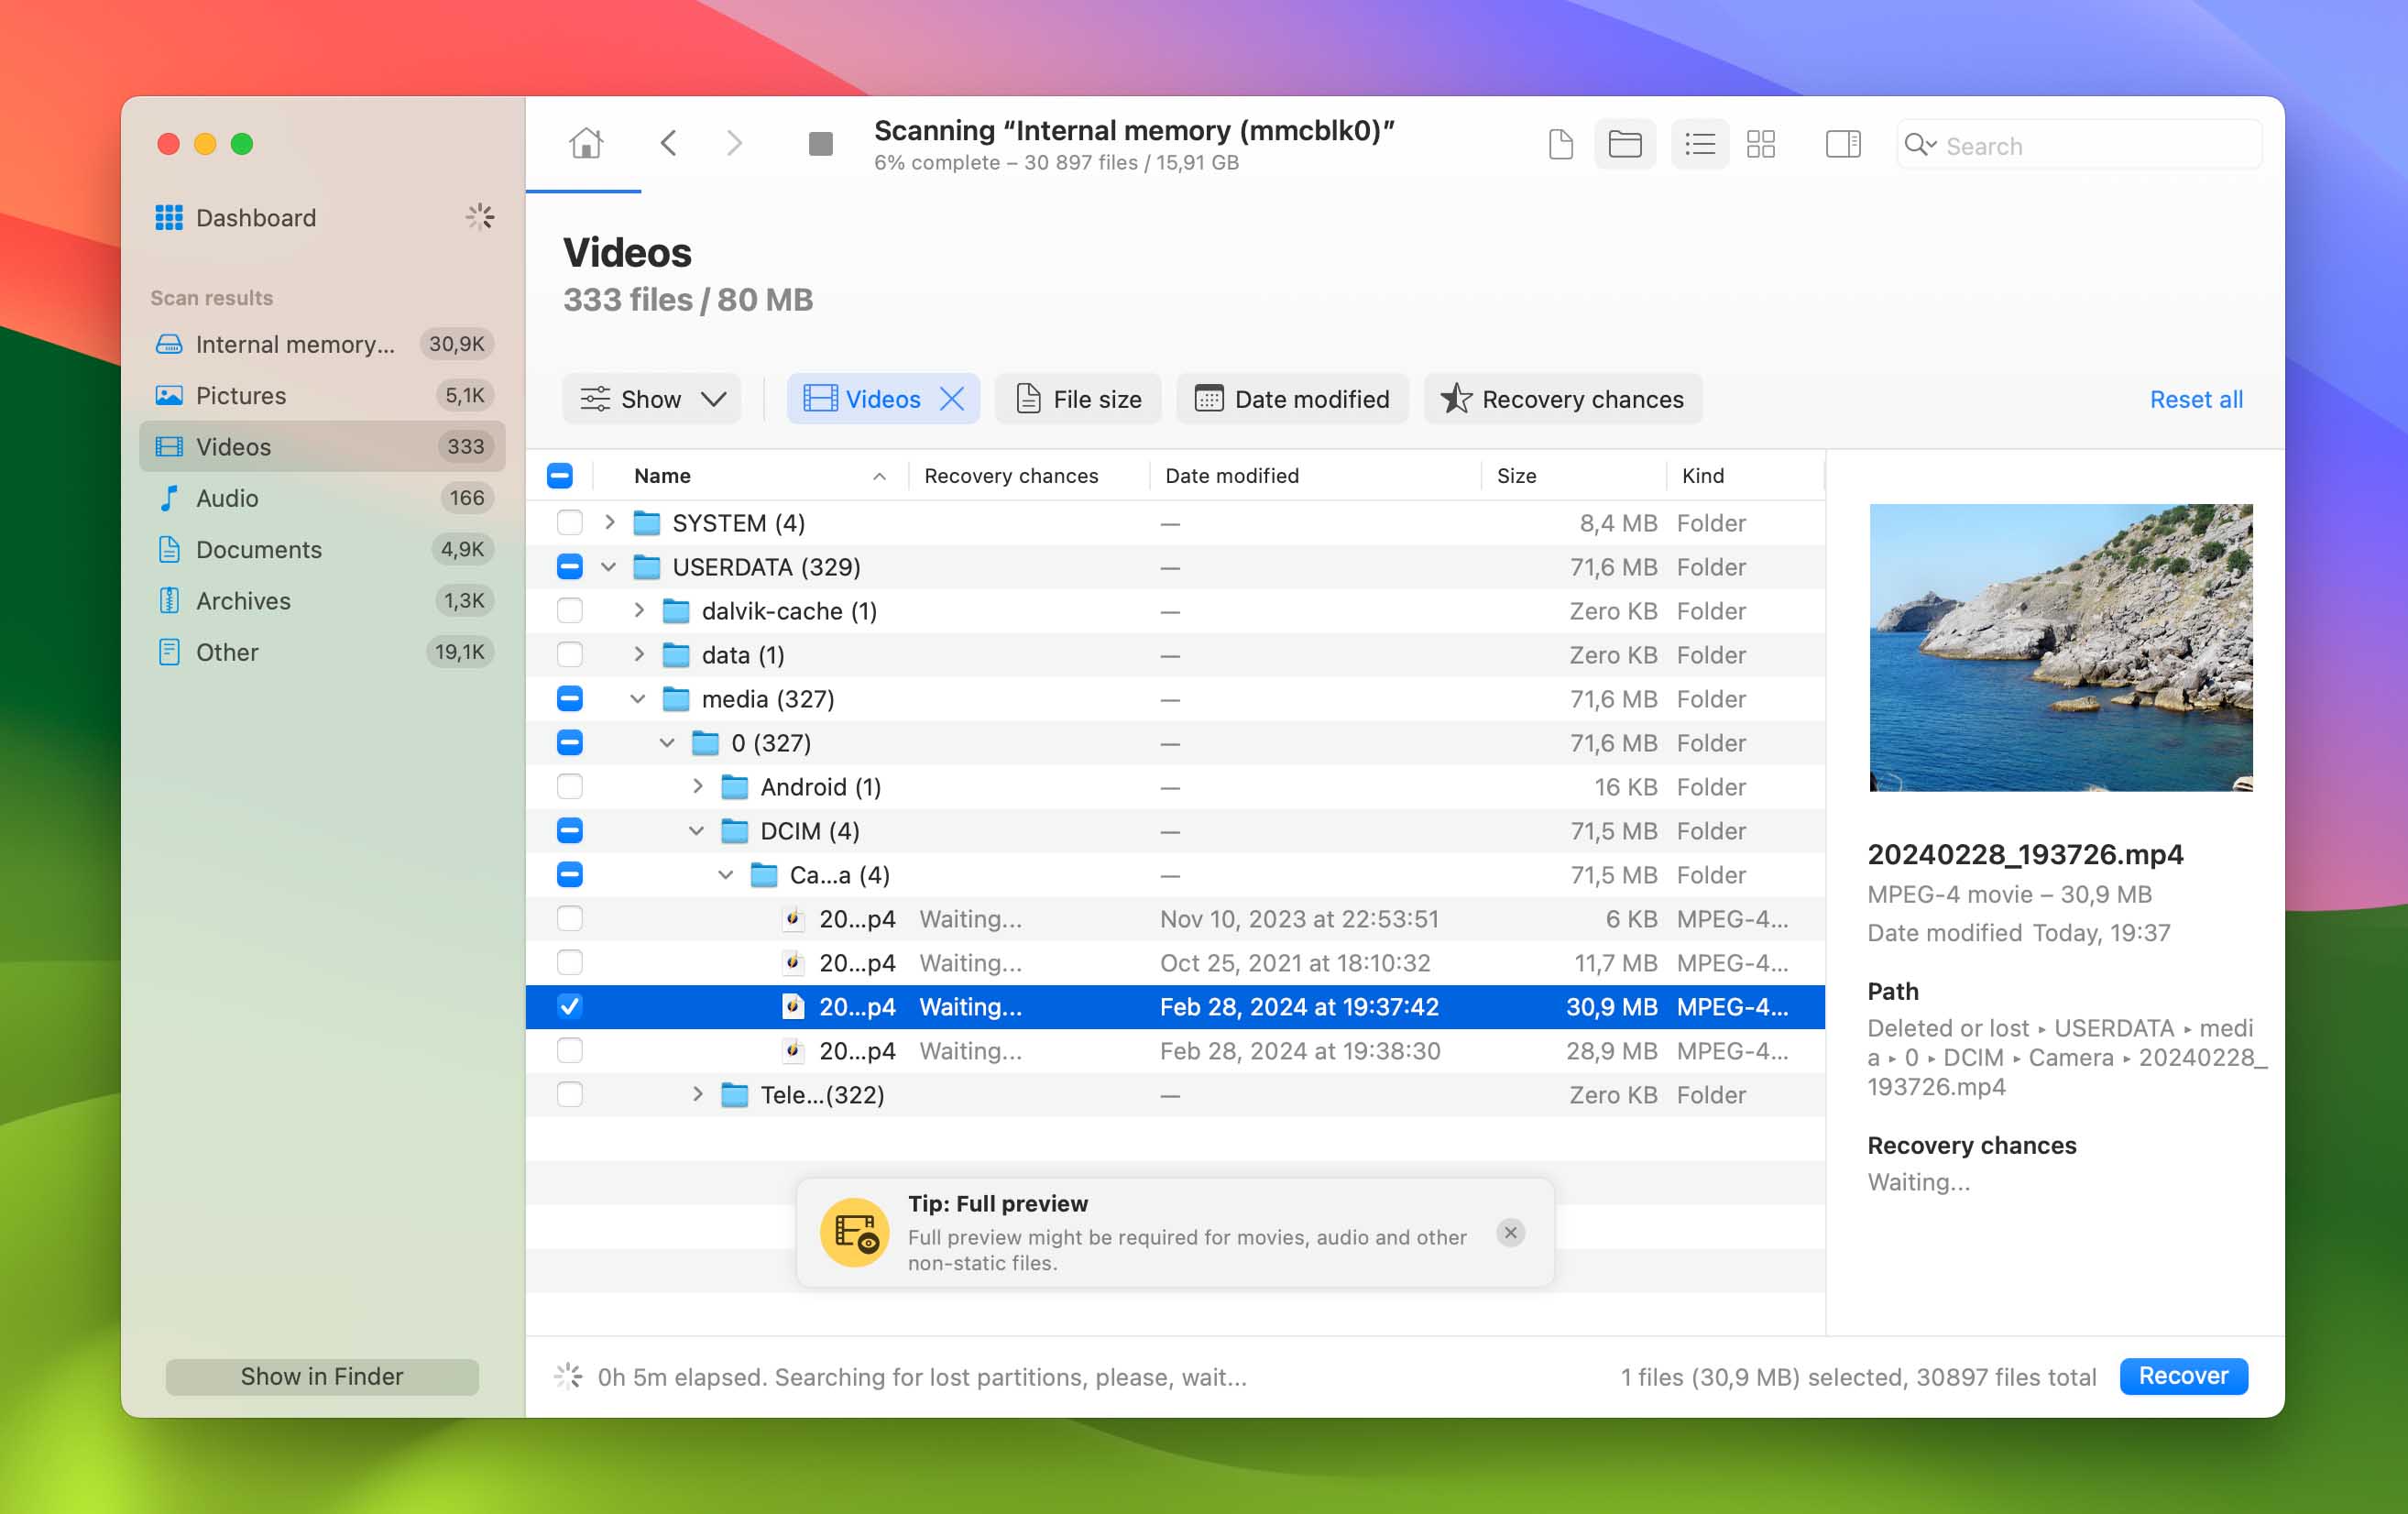
By connecting your Android device to a computer using a USB cable, you can access its internal storage, which is where videos are typically recorded. You can then use a data recovery software application like Disk Drill (for Android recovery, it works only on a Mac) to analyze the internal storage space and recover permanently deleted video files from it:
- Connect your rooted Android phone to your computer and enable USB debugging.
- Launch Disk Drill and select your Android device from the Android Devices section.
- Click the Search for lost data and wait for the scan to finish.
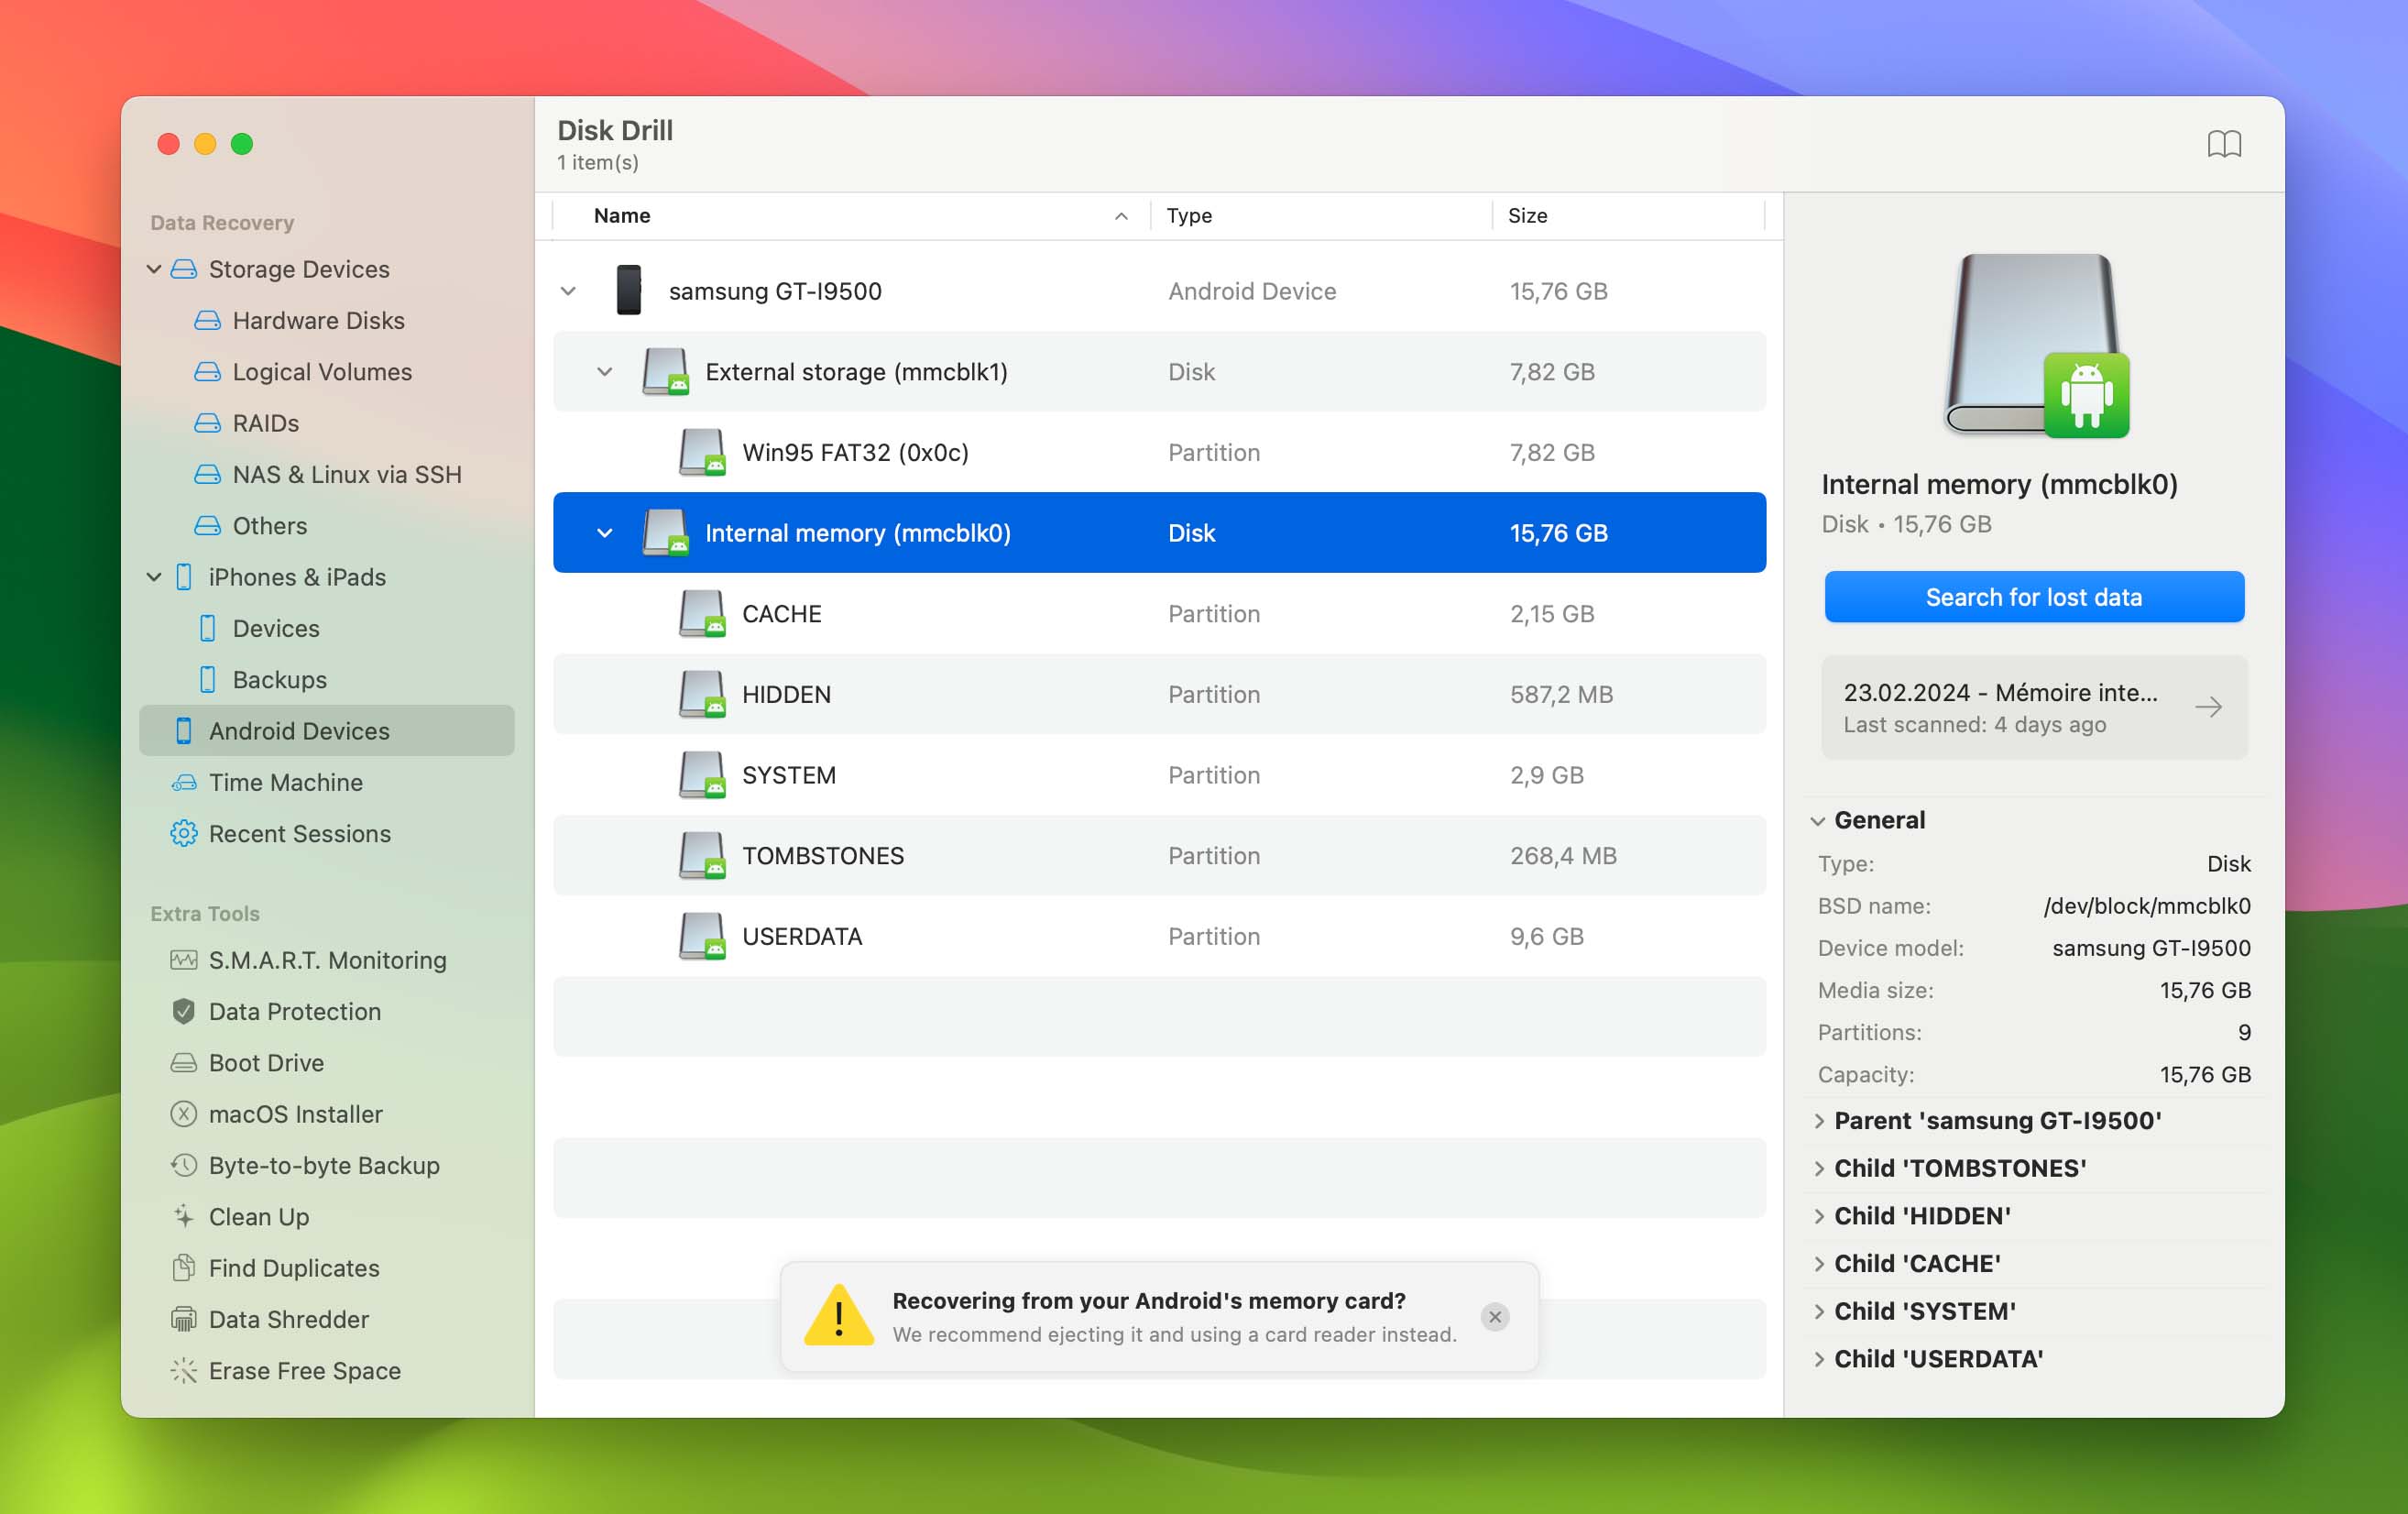
- Go through the scan results and select deleted videos for recovery.
- Click the Recover button and pick a suitable recovery destination.
If the deleted videos were located on an SD card, then you can remove the SD card from your Android device, connect it to your computer using an SD card reader, and recover it using Disk Drill just like you would any other external storage device:
- Connect the SD card to your computer using an SD card reader.
- Launch Disk Drill and select the SD card.
- Click the Search for lost data and wait for the scan to finish.
- Go through the scan results and select deleted videos for recovery.
- Click the Recover button and pick a suitable recovery destination.
Disk Drill can recover data from all kinds of SD cards, including standard SD cards, SD High Capacity (SDHC), and SD Extended Capacity (SDXC).
Lost Video File Recovery on iPhone
![]() Since the first iPhone was released in 2007, the entire line of Apple’s smartphones has been known for its exceptional video recording capabilities. Given how much iPhone users like using their devices to capture everything from life’s most memorable moments to footage for commercial projects, it shouldn’t come as a surprise that video file loss is a fairly common problem. Fortunately, effective solutions are readily available.
Since the first iPhone was released in 2007, the entire line of Apple’s smartphones has been known for its exceptional video recording capabilities. Given how much iPhone users like using their devices to capture everything from life’s most memorable moments to footage for commercial projects, it shouldn’t come as a surprise that video file loss is a fairly common problem. Fortunately, effective solutions are readily available.
Method 1: Recover from the Recently Deleted Folder on iPhone
When you delete a video on an iPhone using the Photos app, the video is moved to the Recently Deleted folder, where it stays for up to 40 days before becoming permanently deleted. To recover it, you need to do the following:
- Tap the Photos app icon to open it.
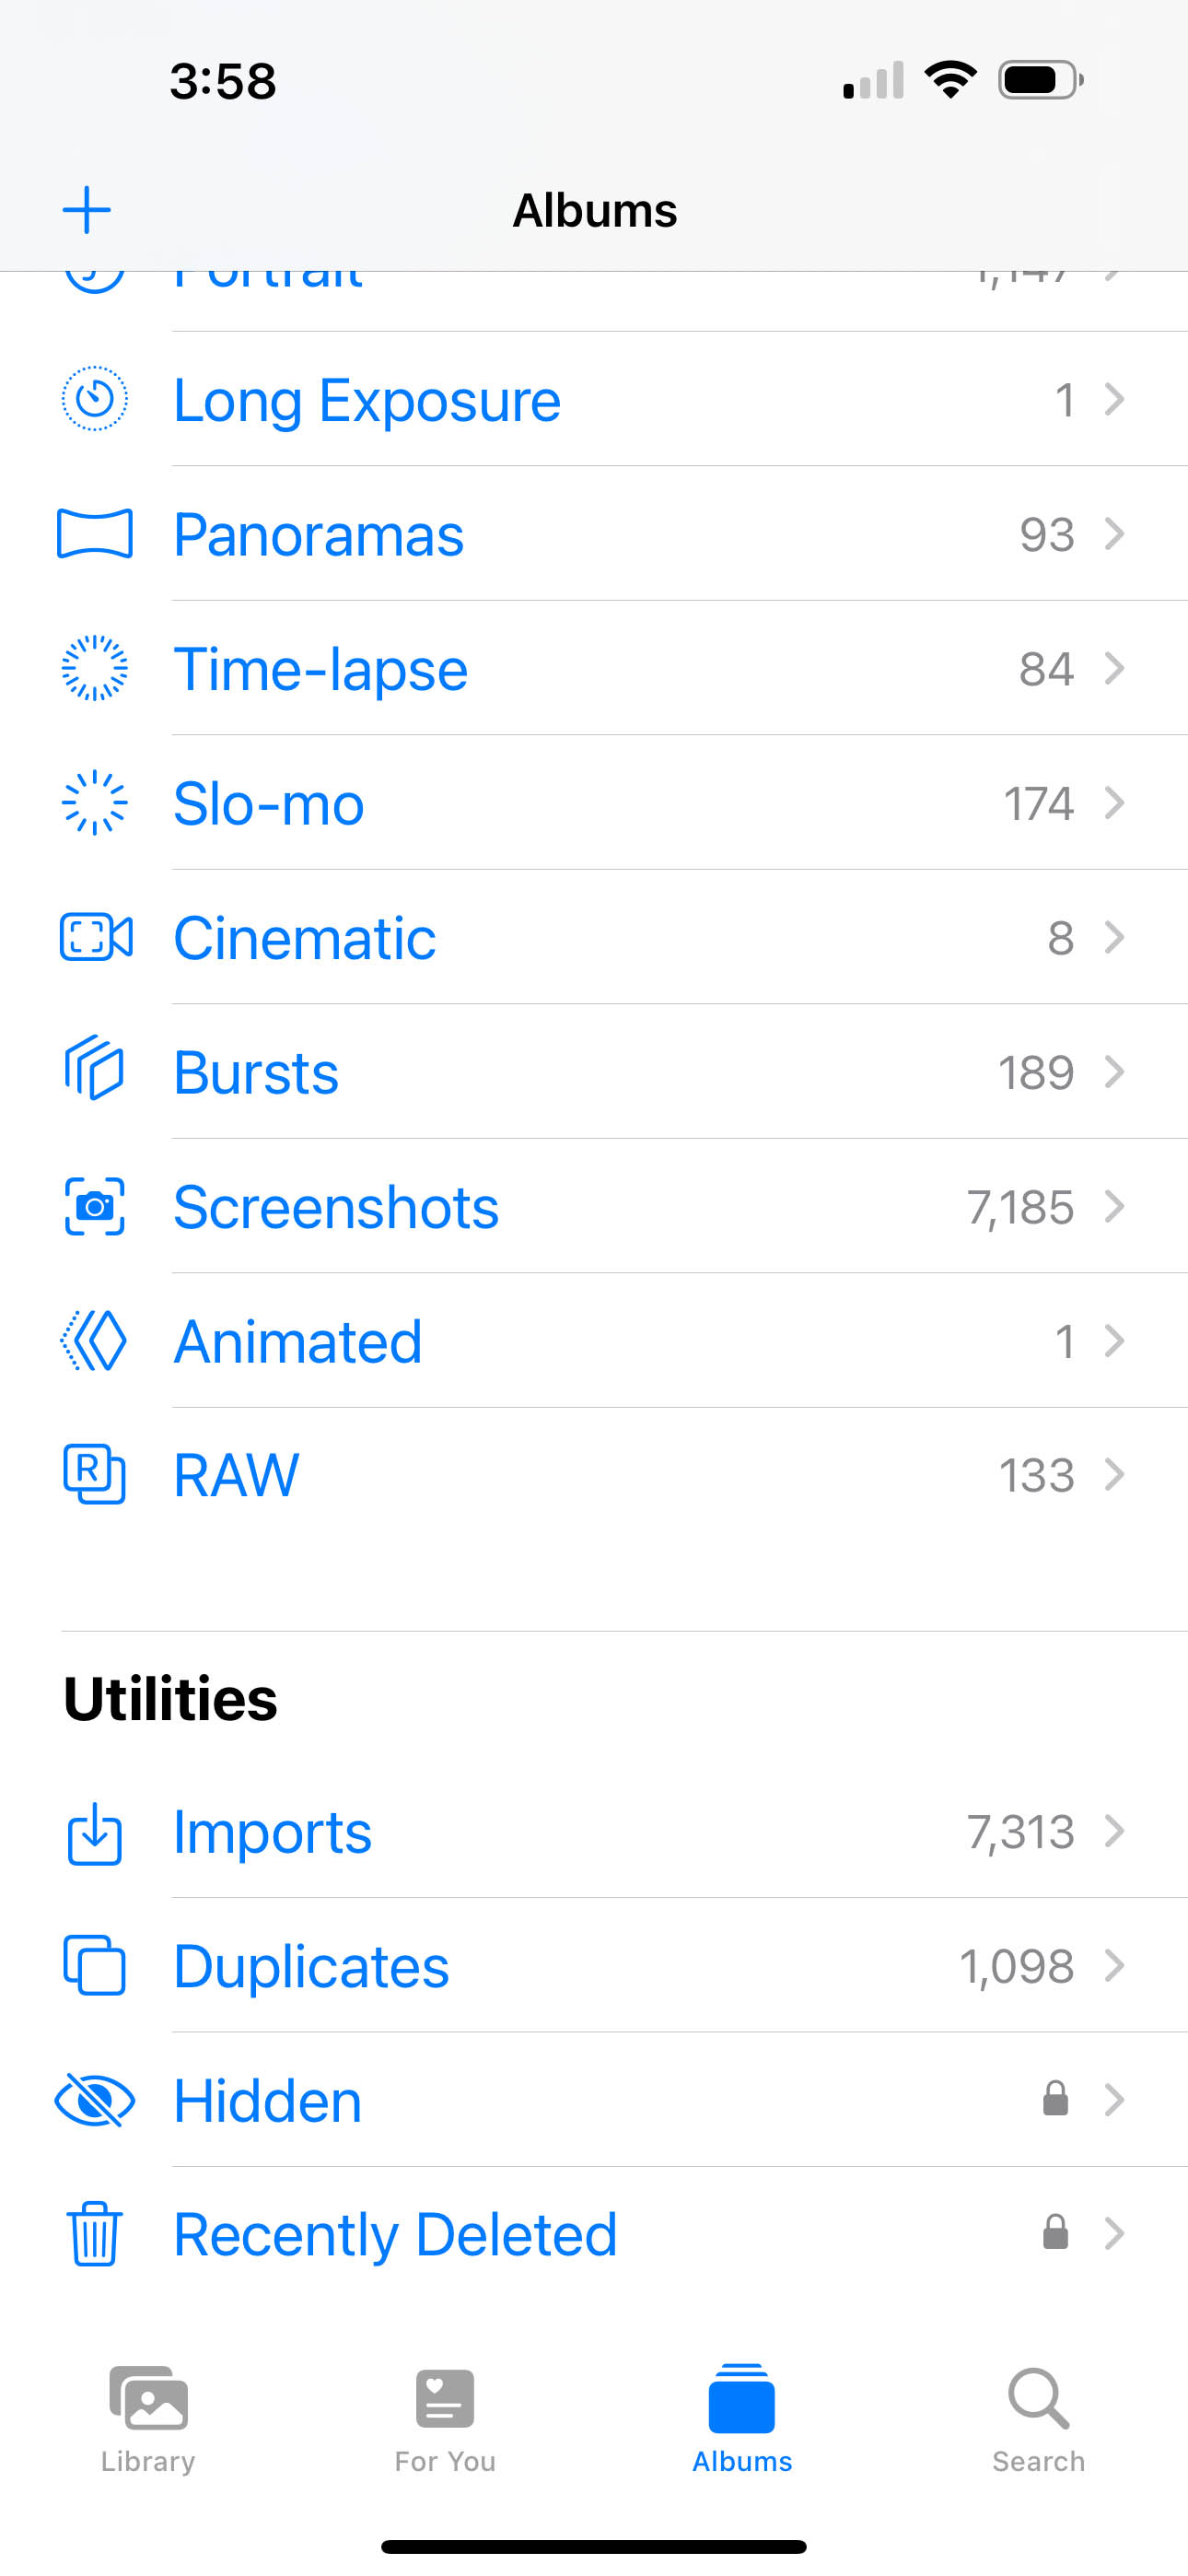
- Navigate to Albums and select the Recently Deleted folder in the Utilities section.
- Select the video you want to undelete and tap the Recover button.

Method 2: Use an iPhone Video Recovery App
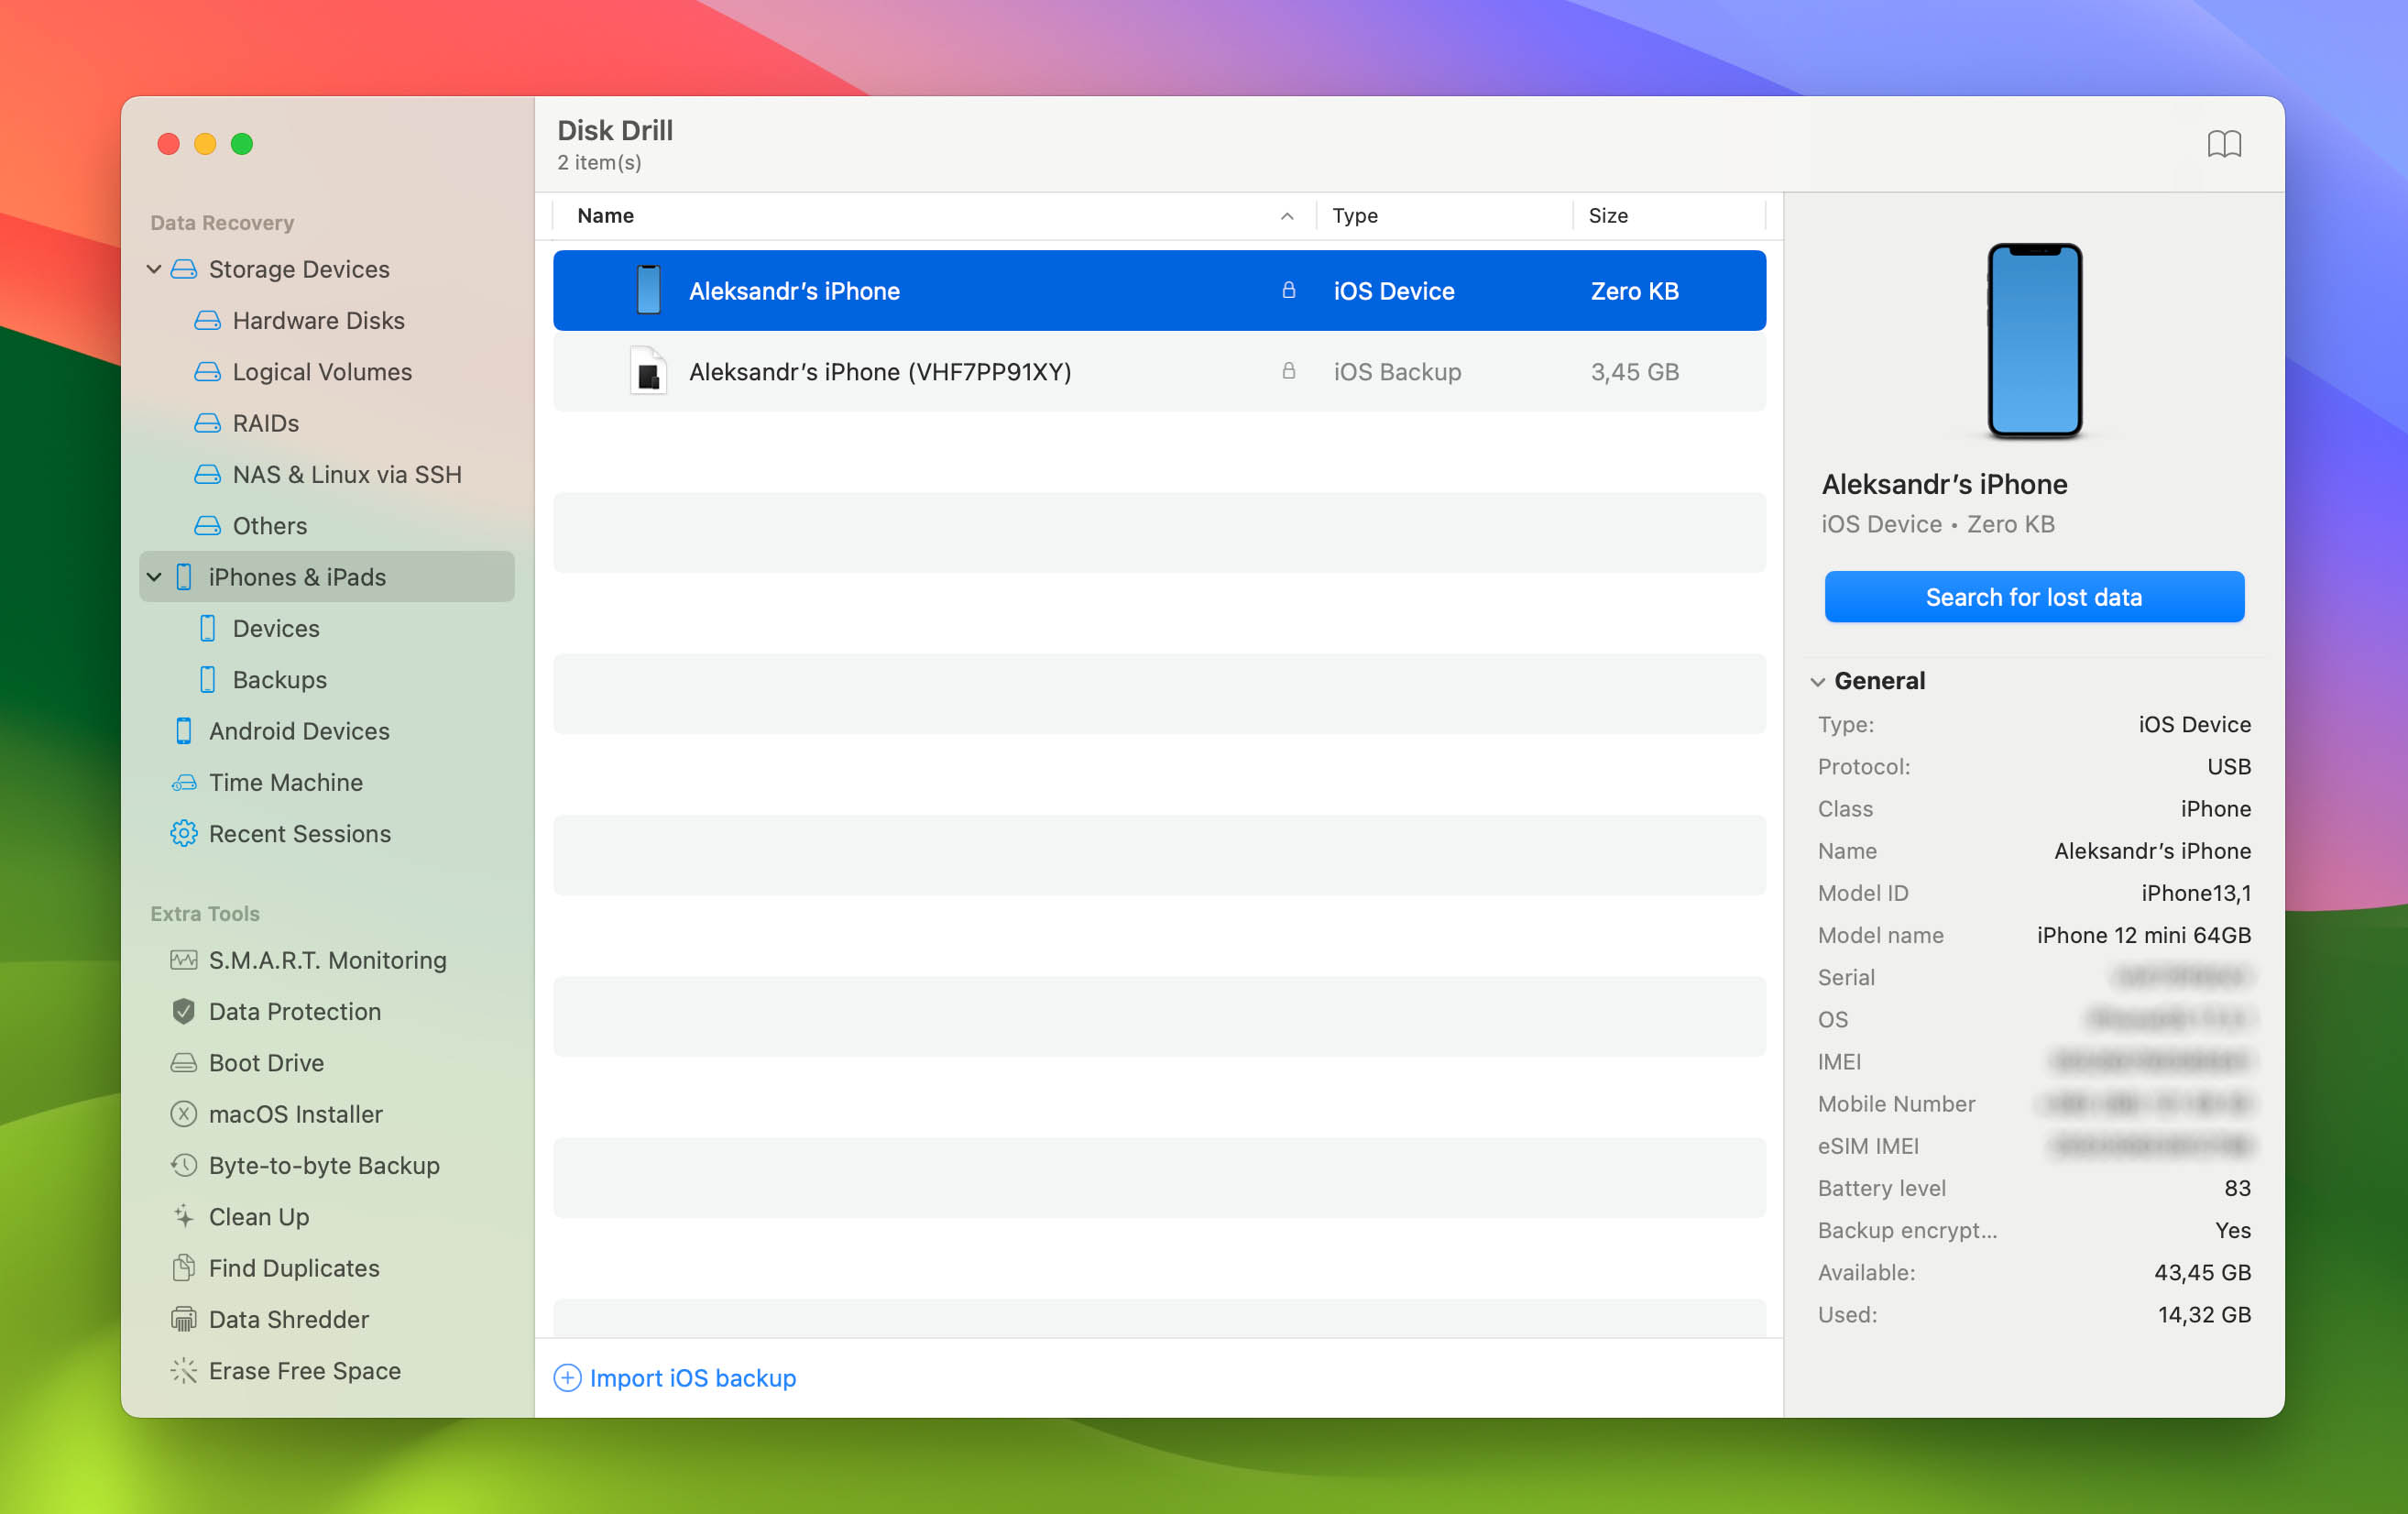
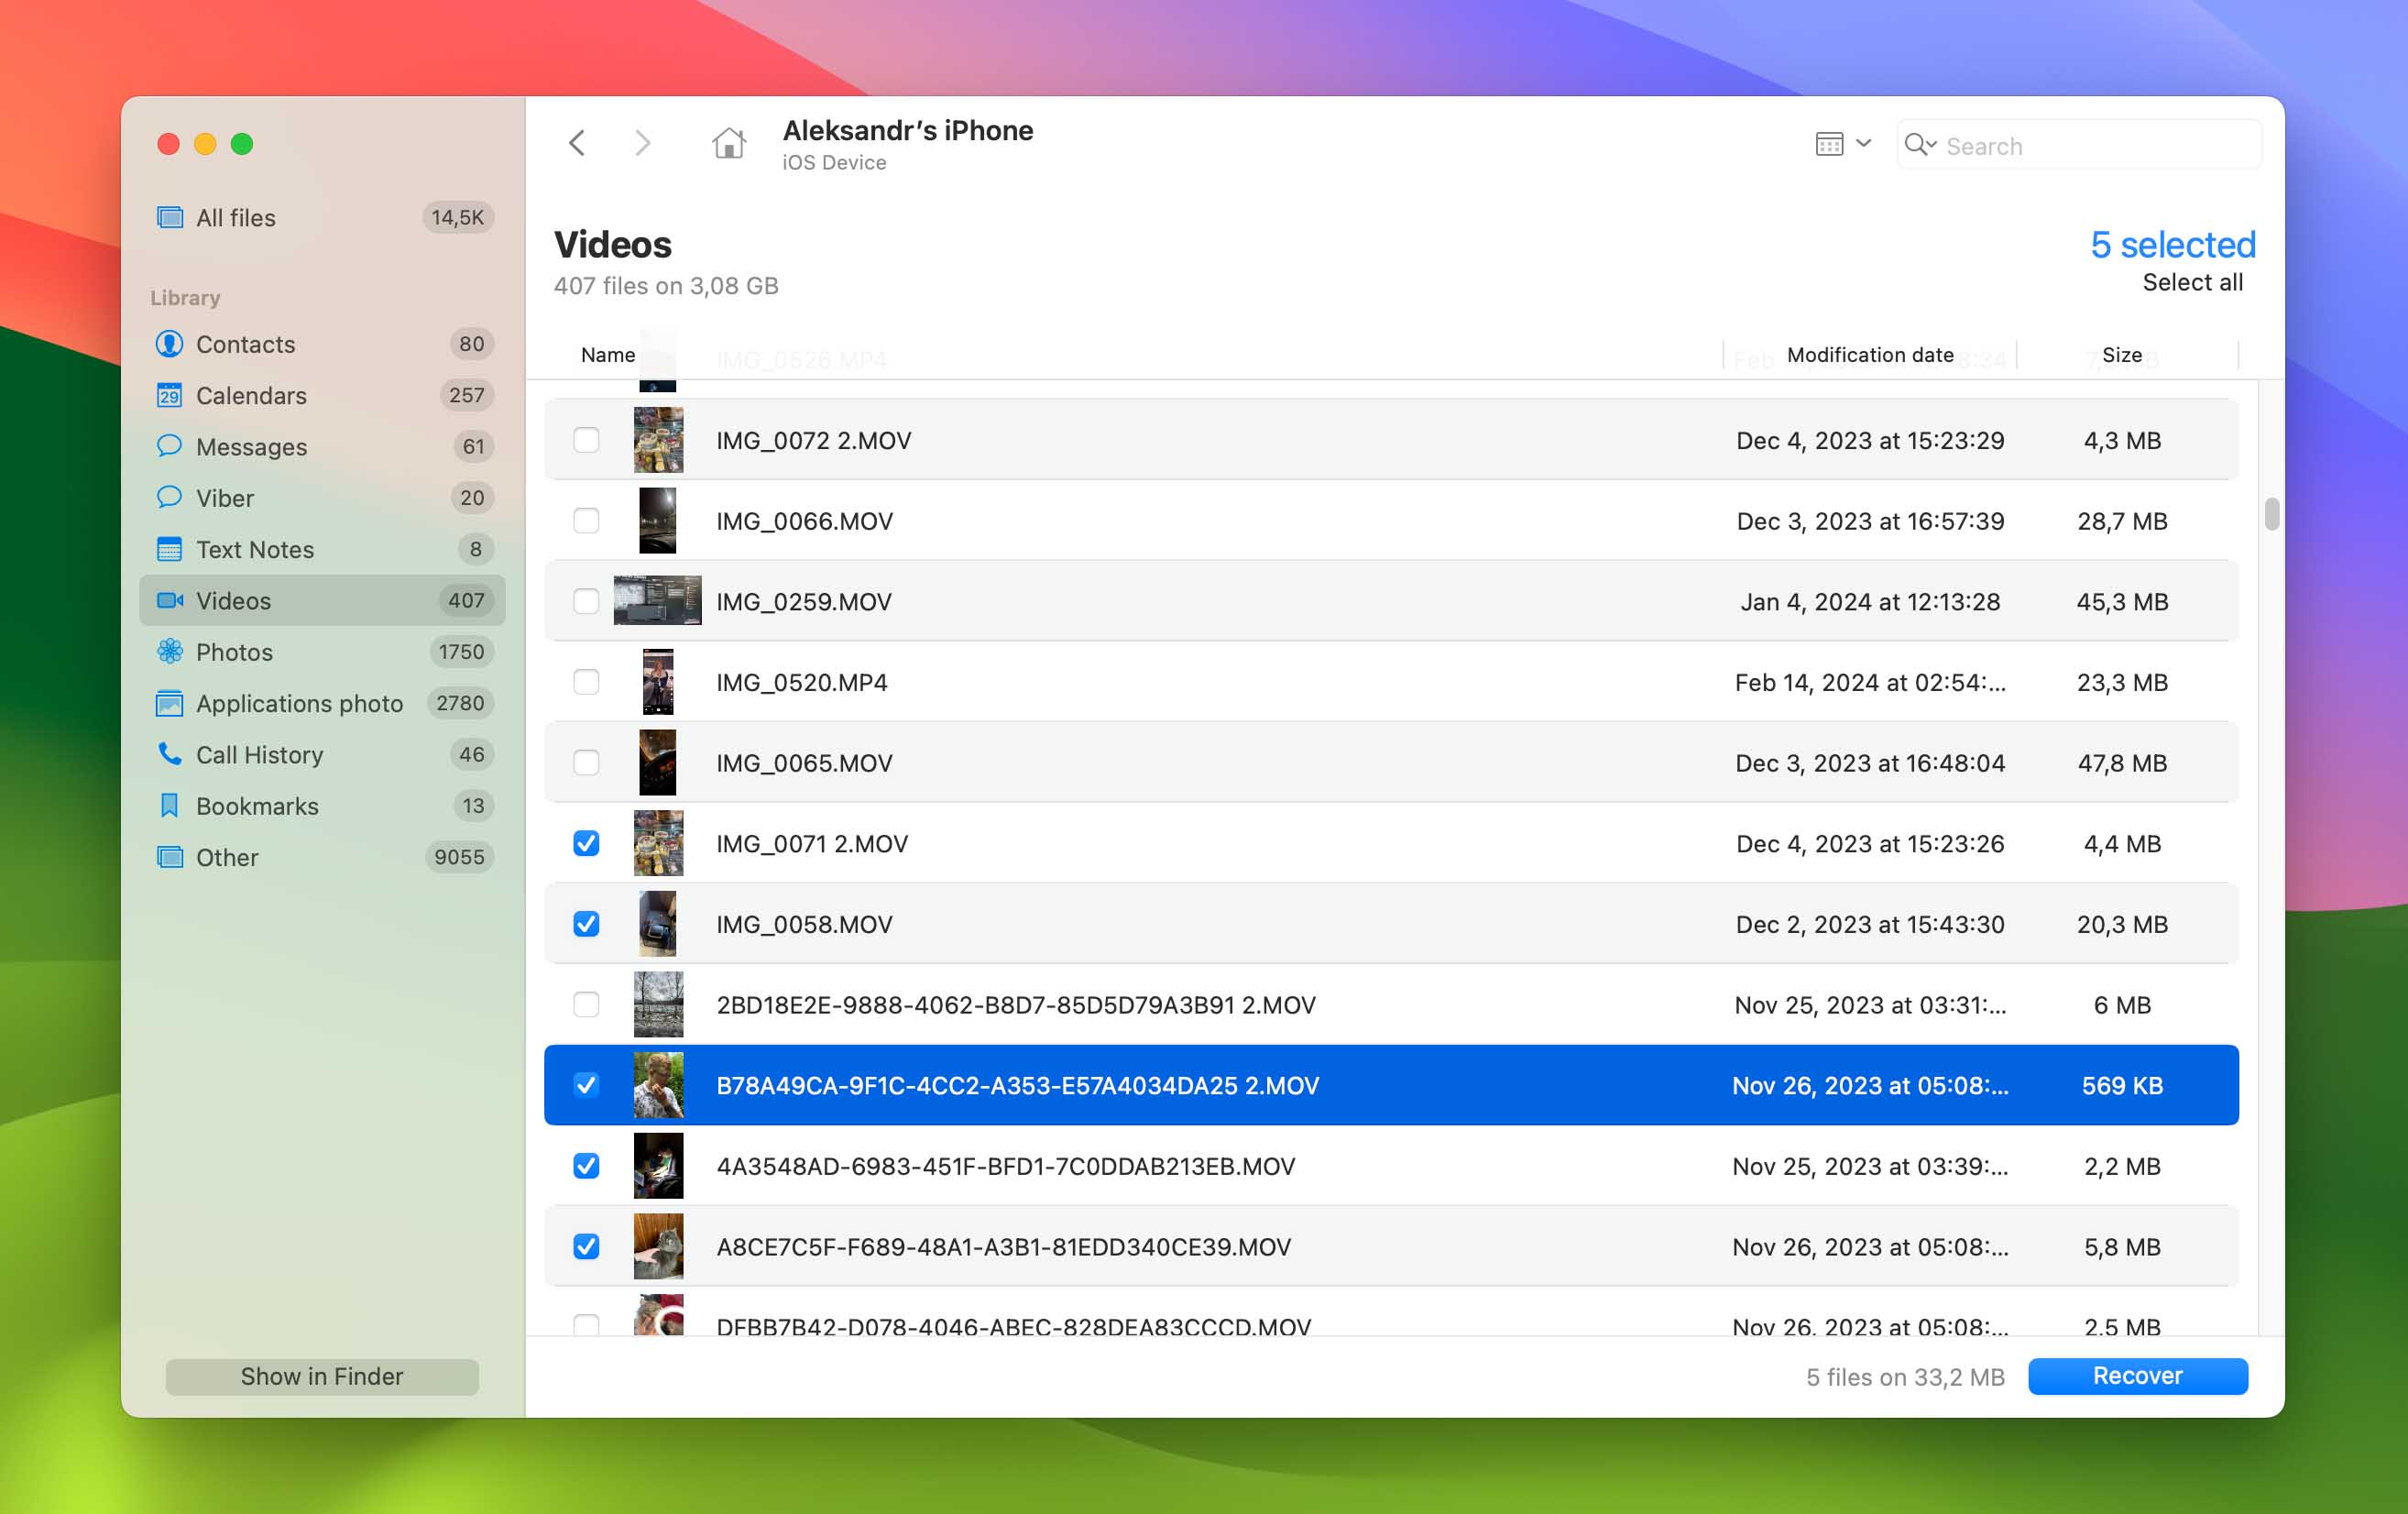
If you have a Mac computer at hand, you can use it to recover lost videos from your iPhone using an application like Disk Drill. The process is simple, and it enables you to recover even permanently deleted videos that are no longer in the Recently Deleted folder:
- Download Disk Drill and install it on your Mac.
- Connect your iPhone to your Mac using a Lighting cable.
- Tap Trust on your iPhone if asked whether you want to trust your Mac.
- Launch Disk Drill and click the iPhone & iPads option located in the left pane.
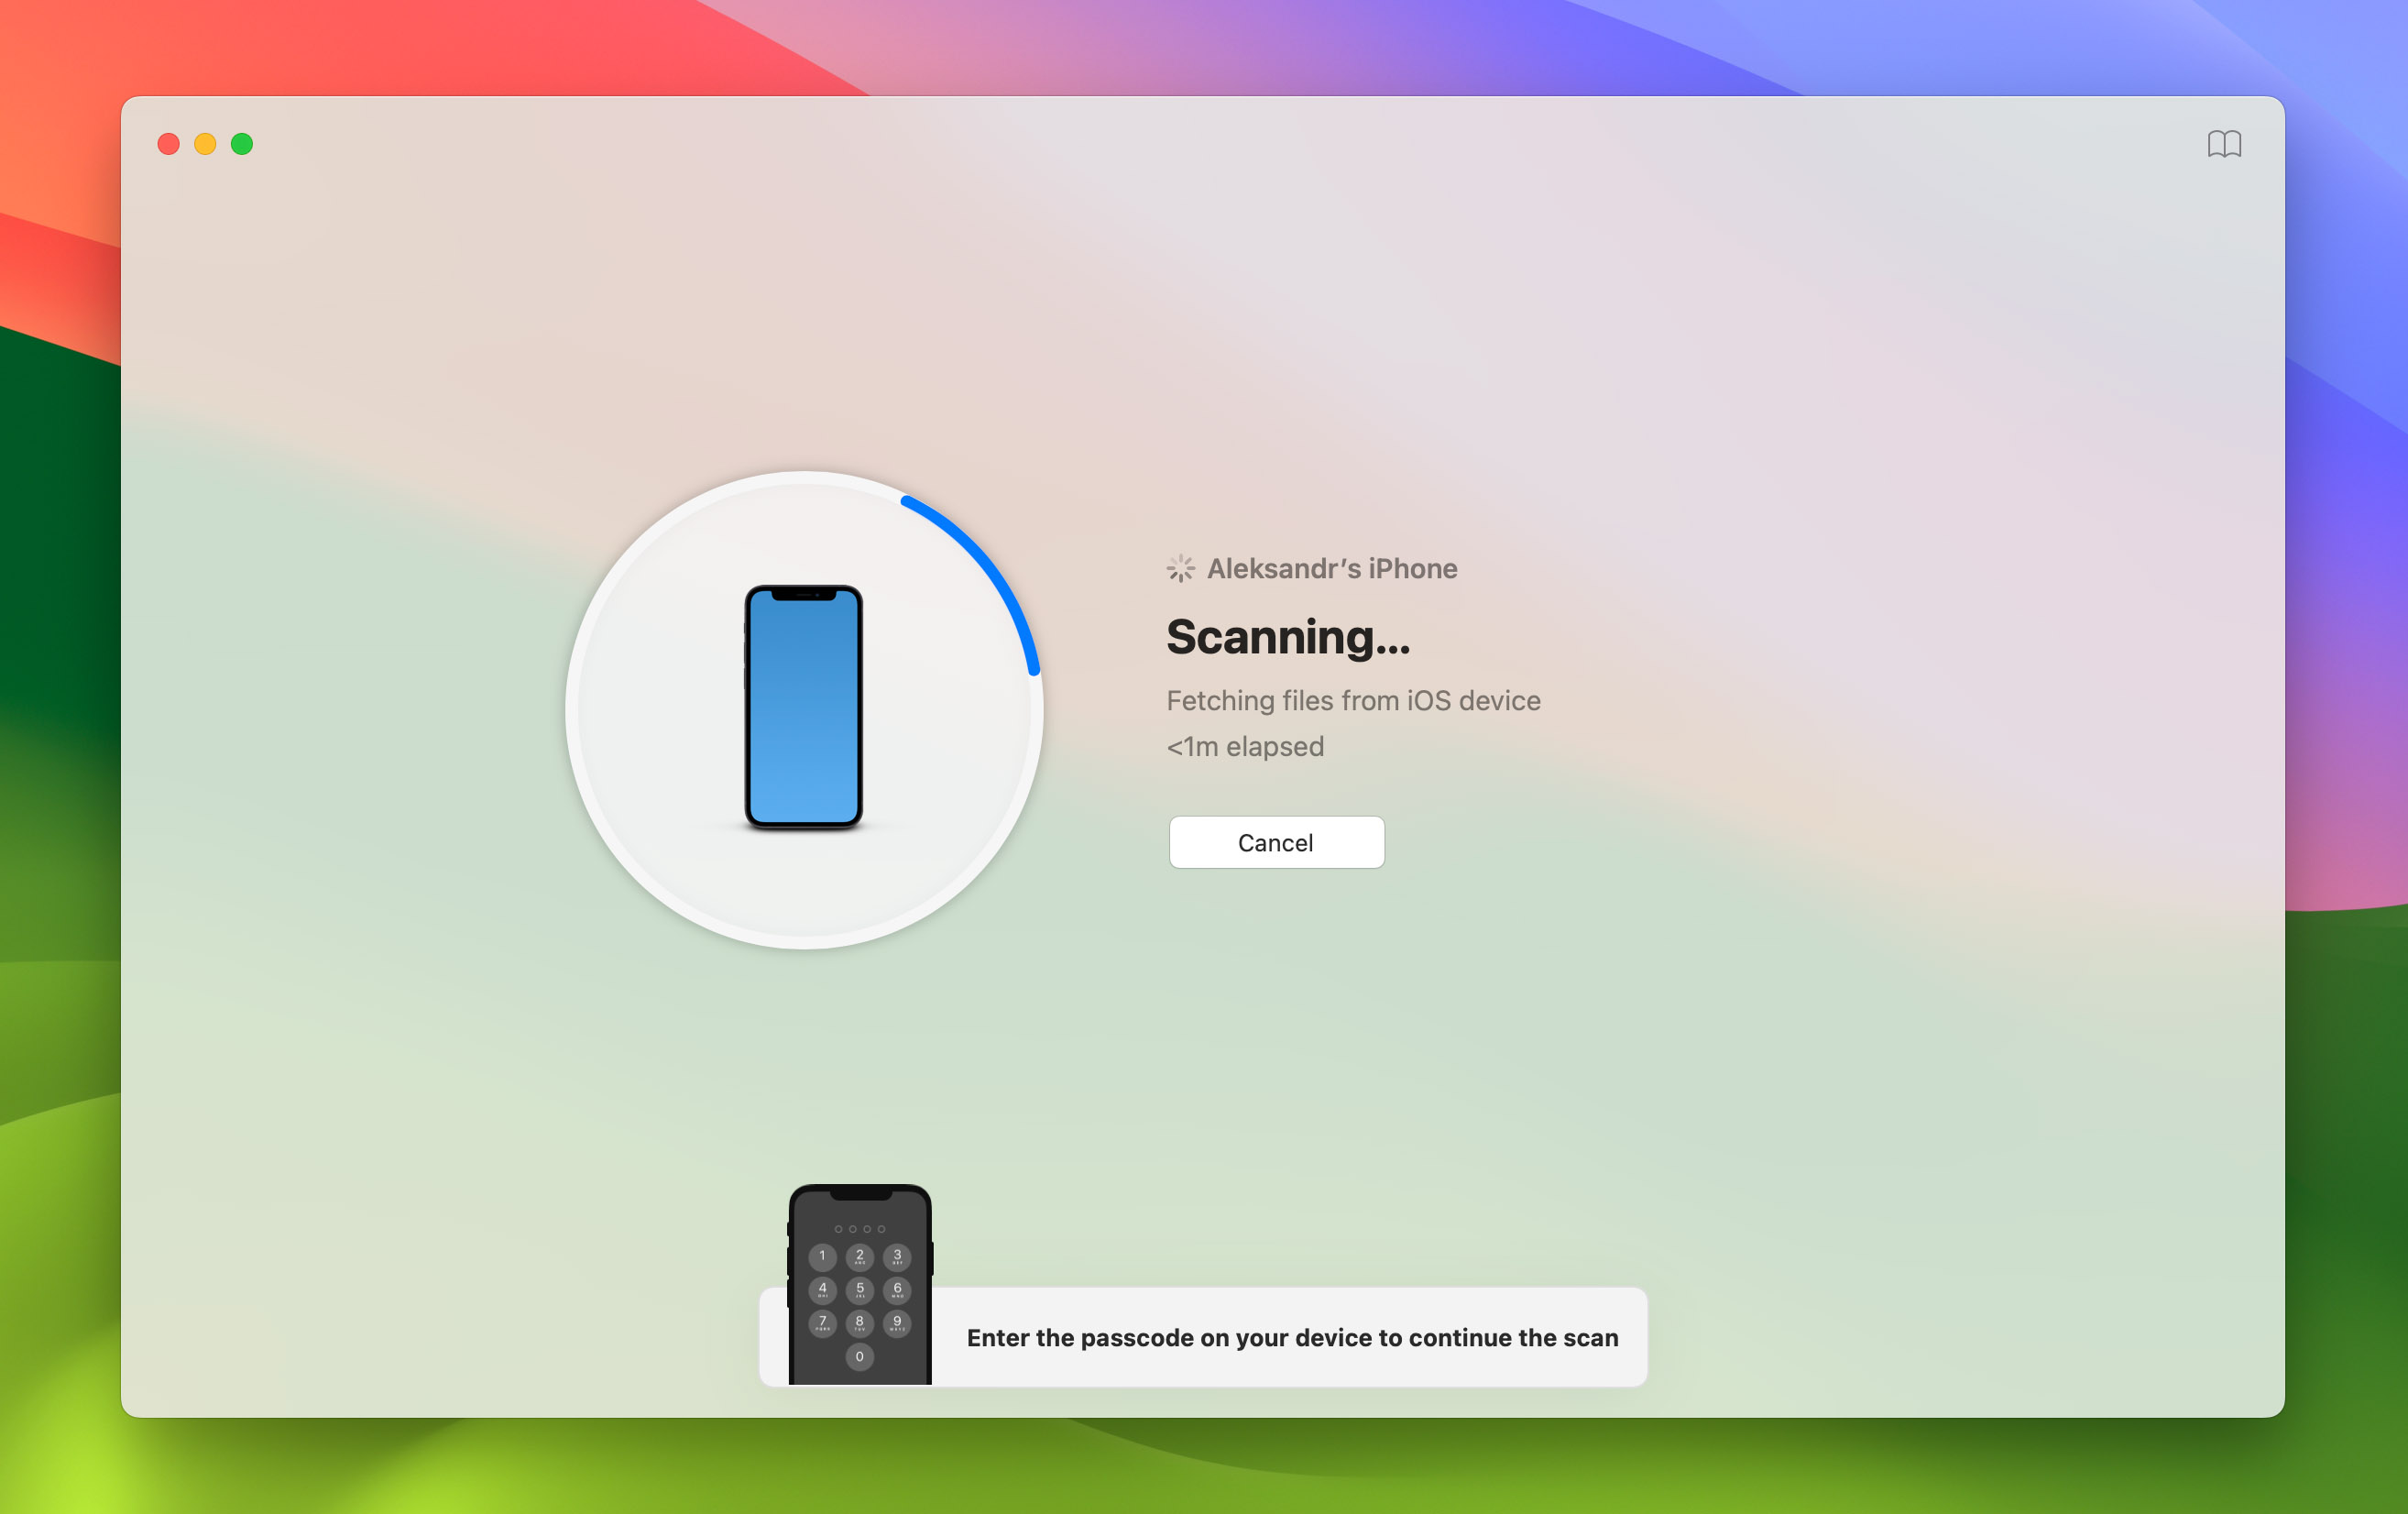
- Select your iPhone and click the Search for lost data button.
- Wait until Disk Drill is done scanning your iPhone and select the Video filter to narrow down the scan results.
- Select all videos you want to recover and click the Recover button.
Method 3: Retrieve Videos from a Cloud or Local Backup on Your Phone
There are two main backup mechanisms available to iPhone users: iCloud and local Finder backups (iTunes backups on older versions of macOS). Let’s take a closer look at each of them, starting with iCloud.
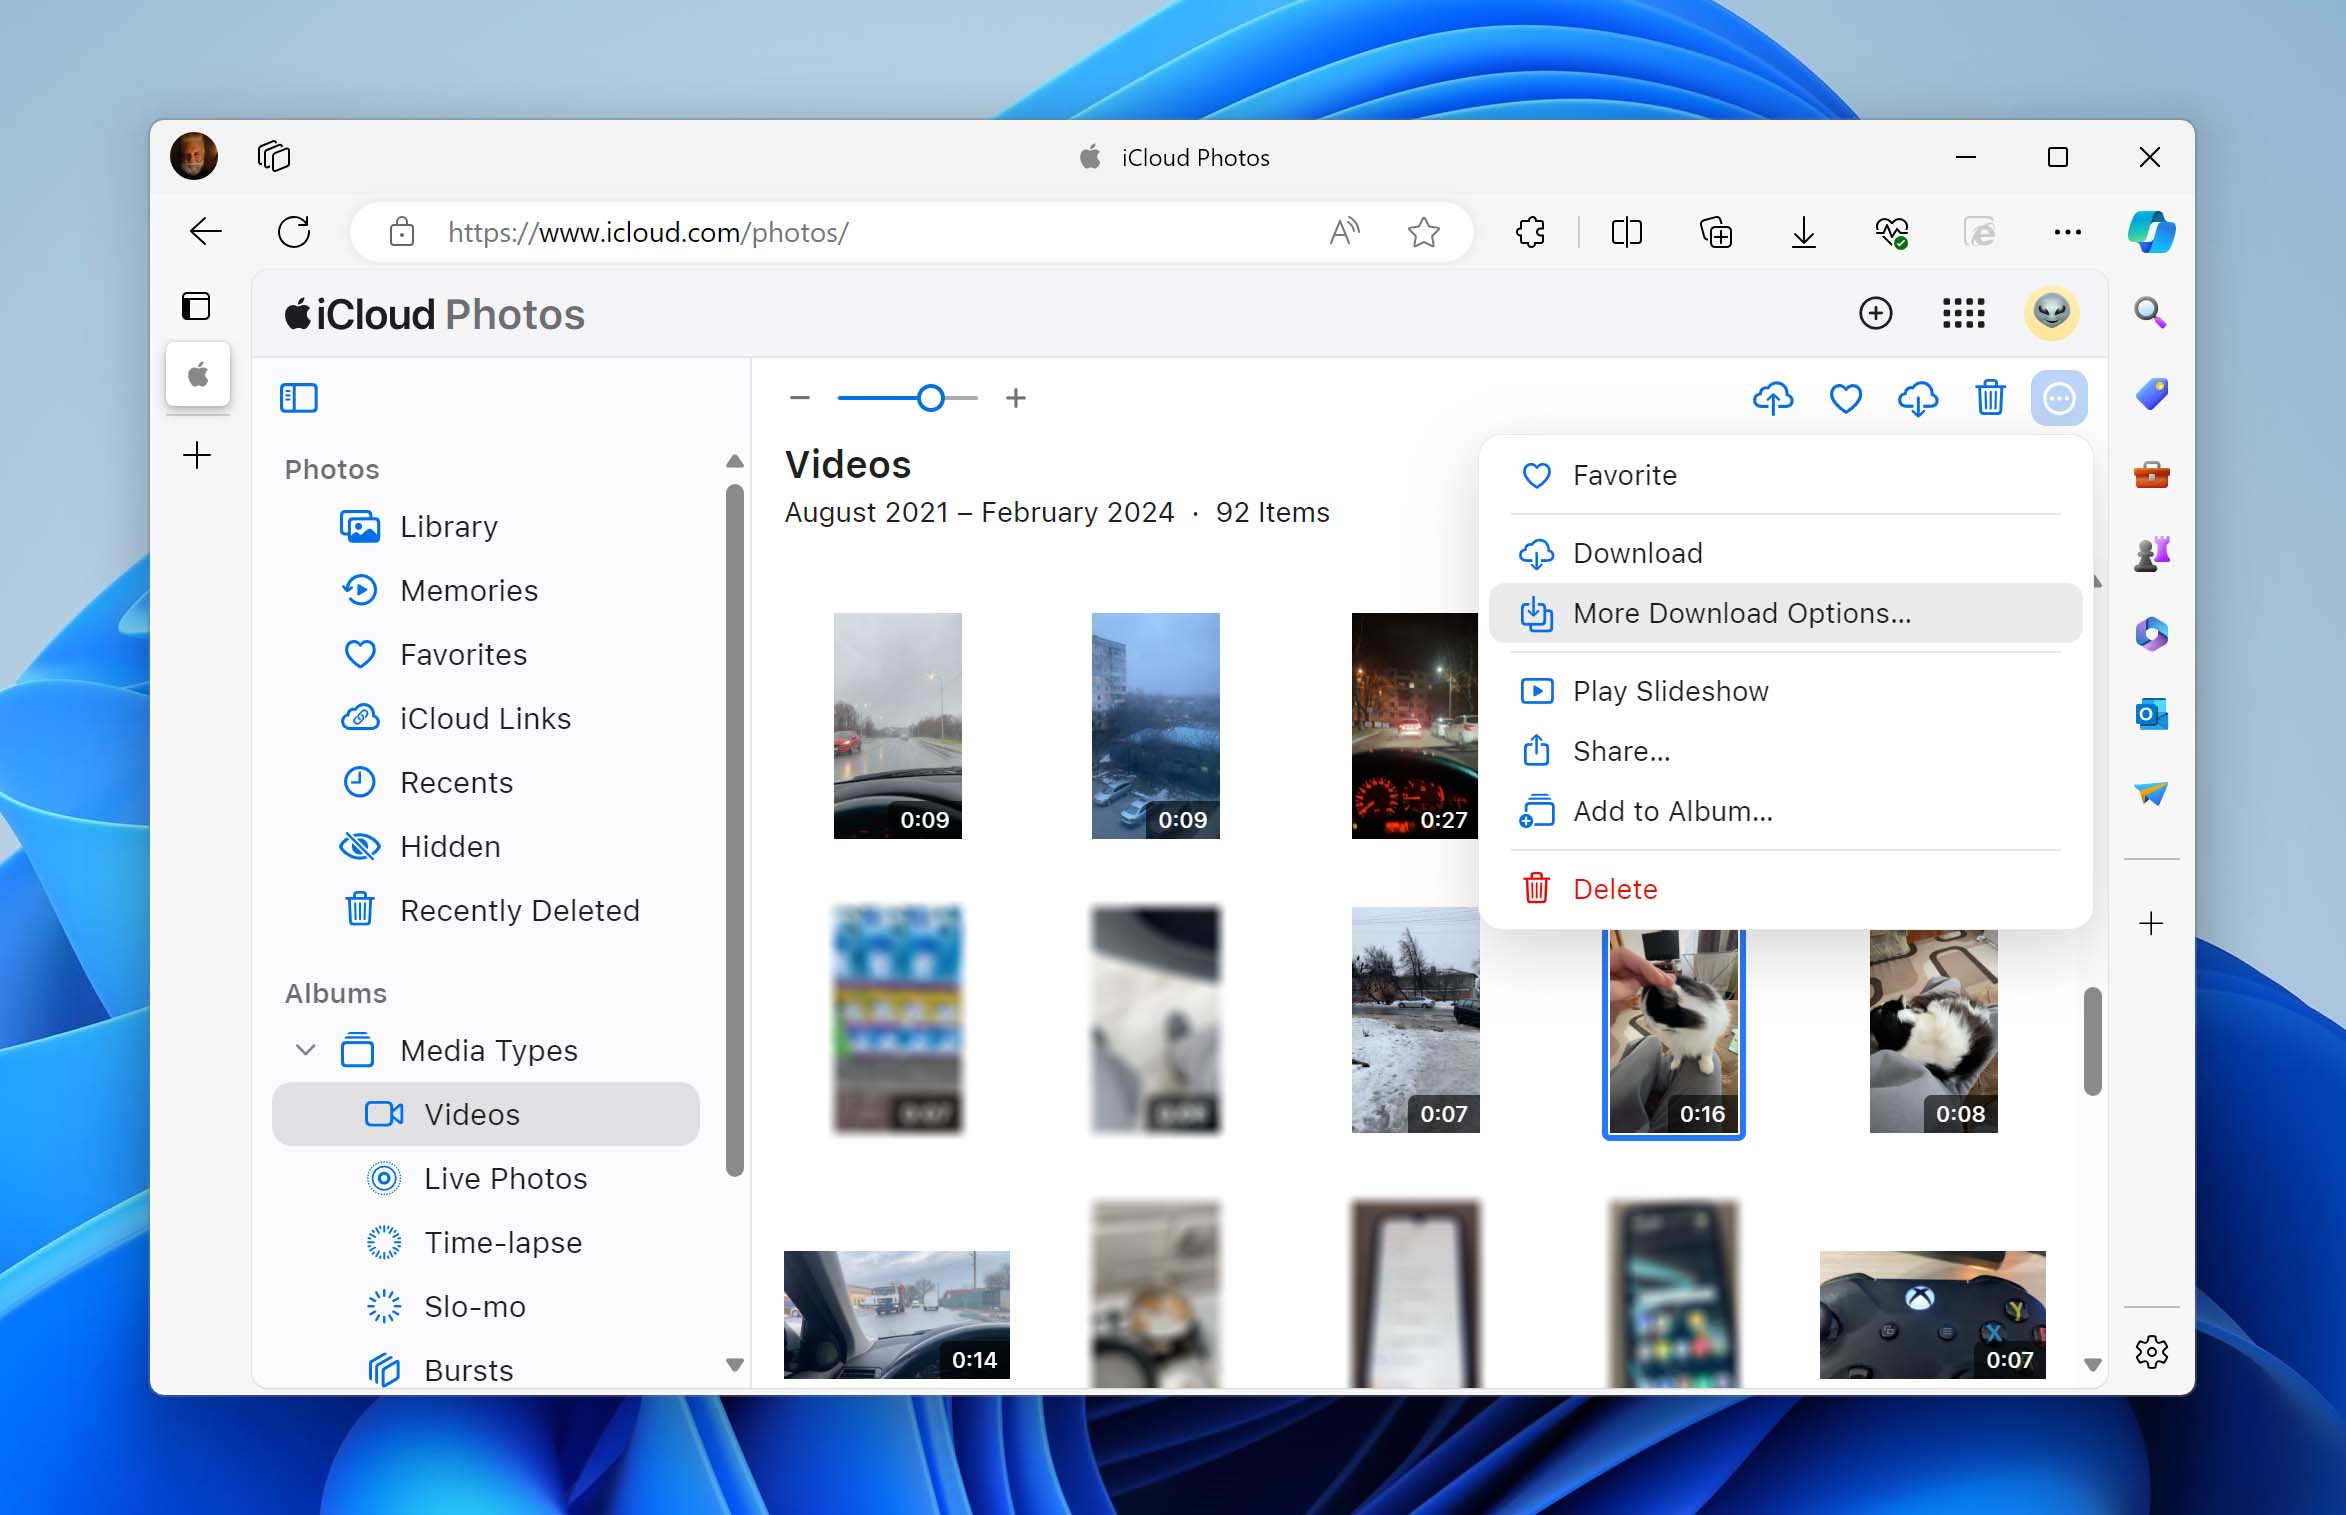
To retrieve videos from your iCloud account:
- Go to: iCloud.com
- Log in with your username and password.
- Select the videos that you want to download.
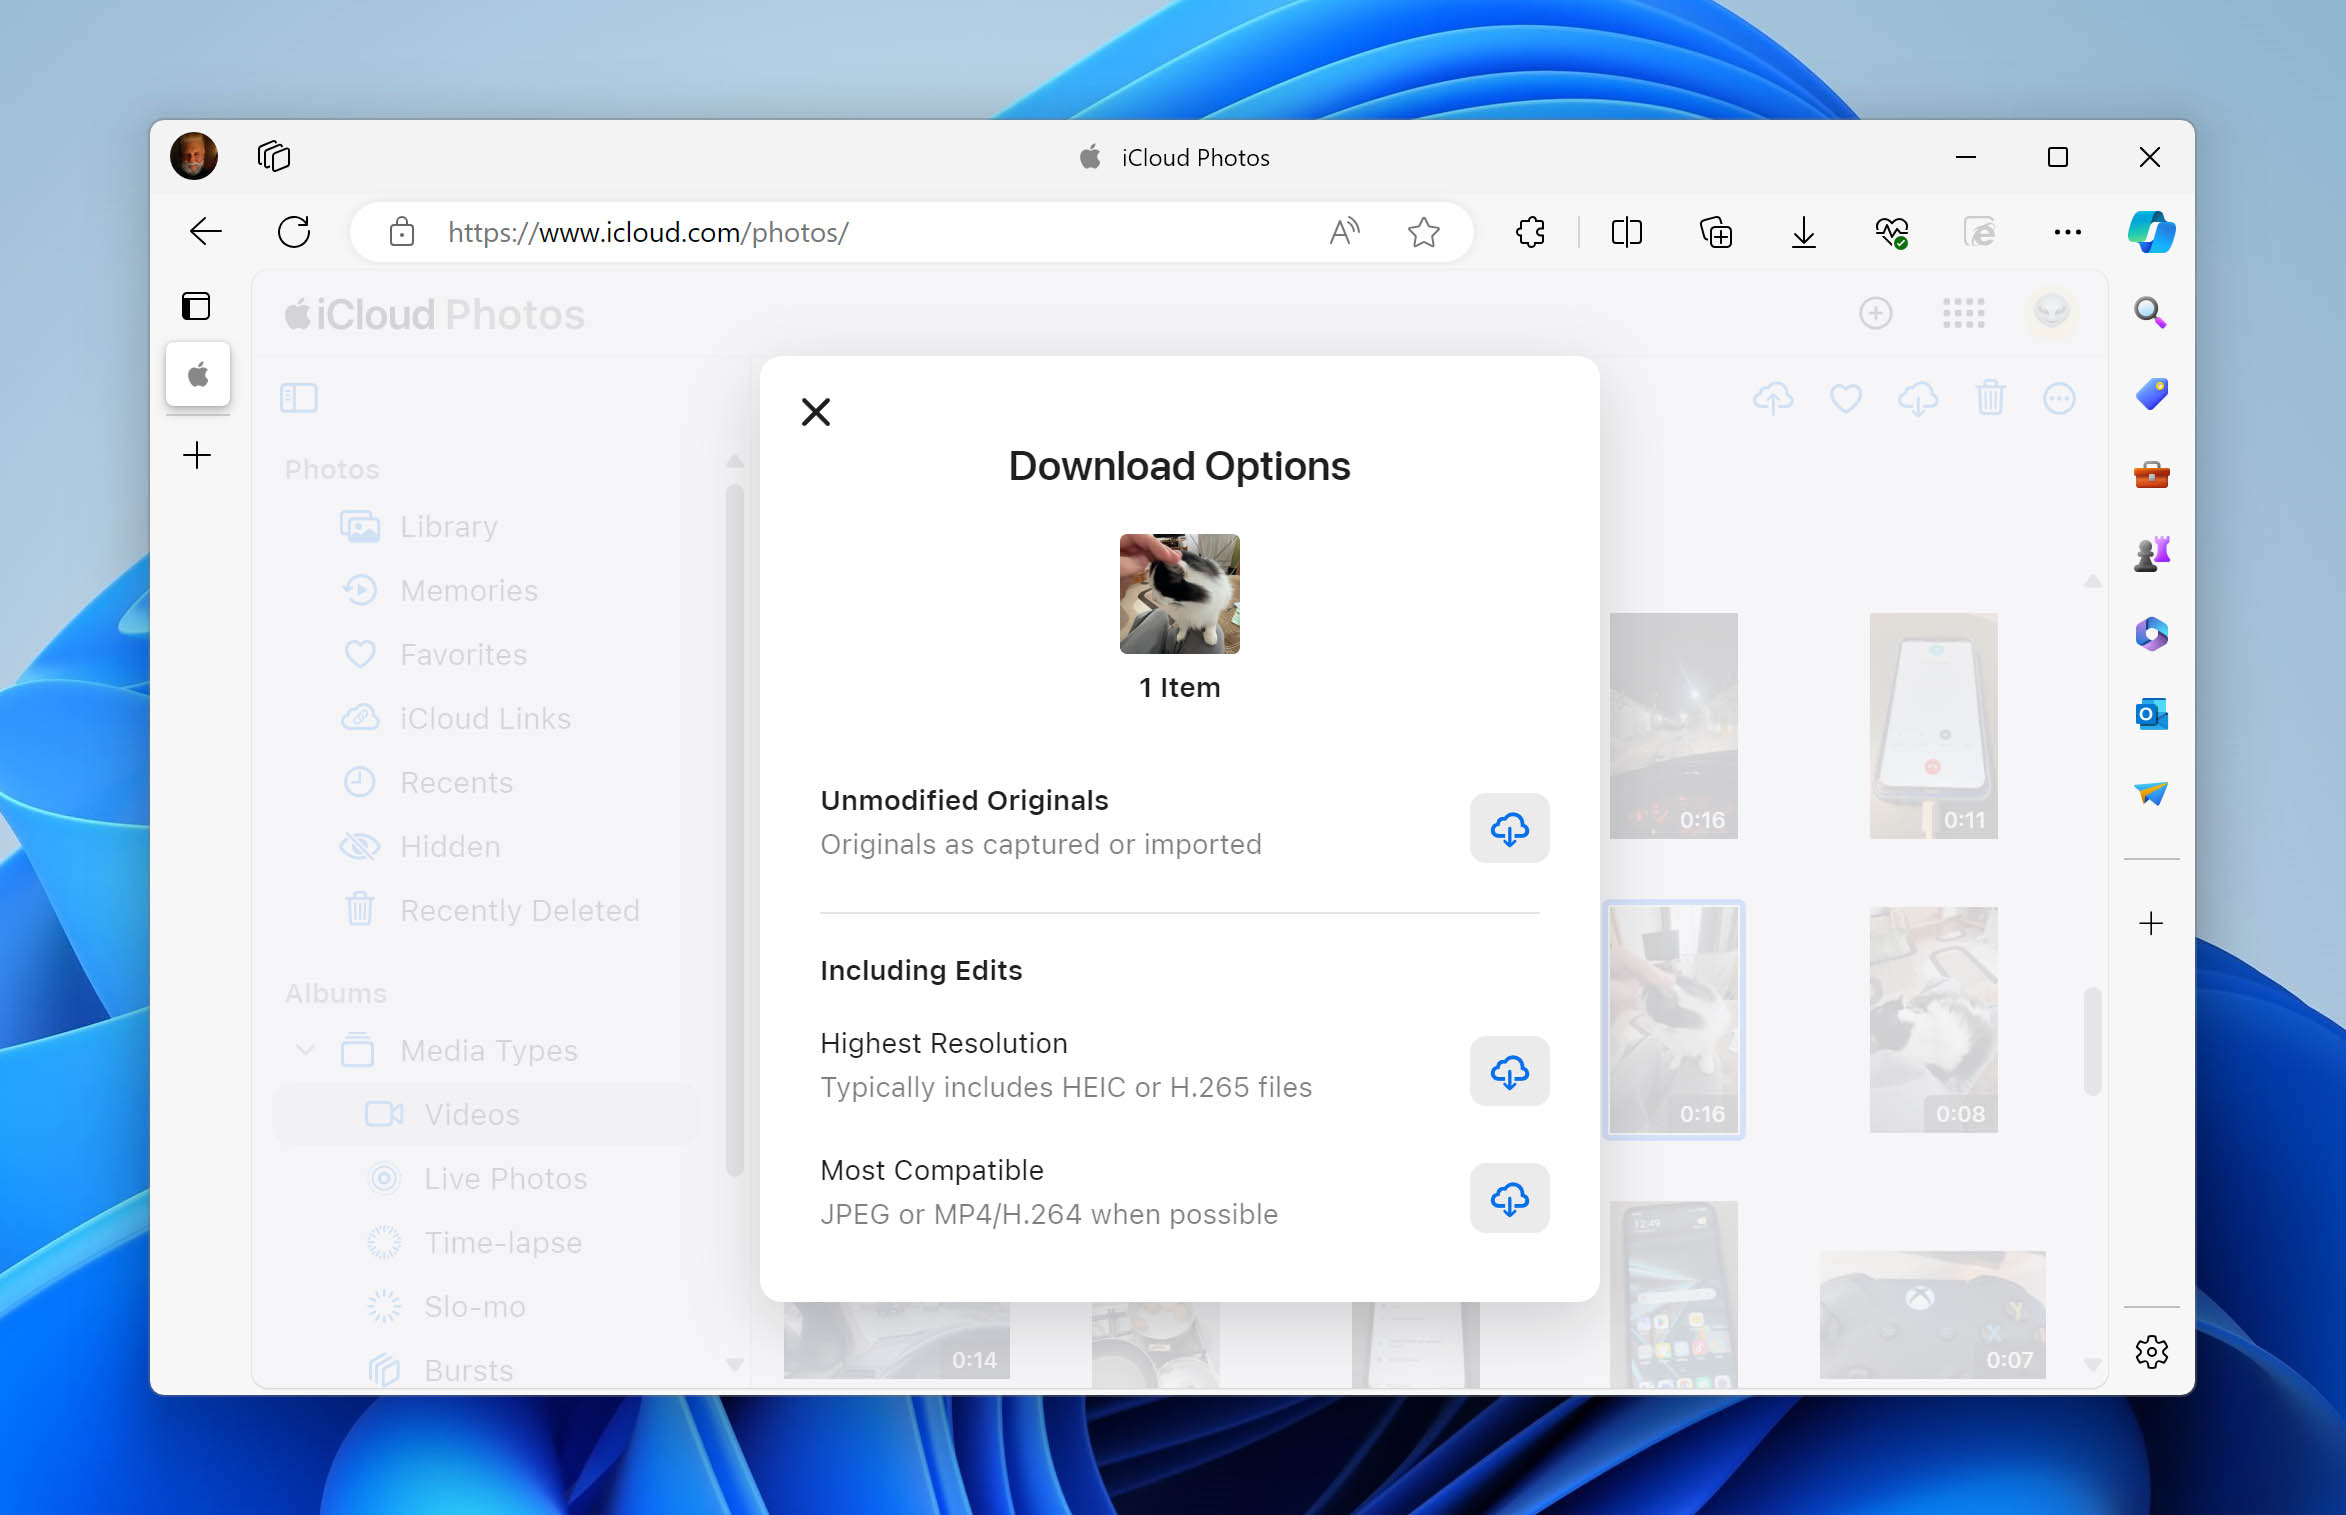
- Click on the three dots and in the dropdown menu, select ‘More download options…‘.
- Decide if you want to download unmodified originals or edited versions of your videos.
- Click Download button to confirm.
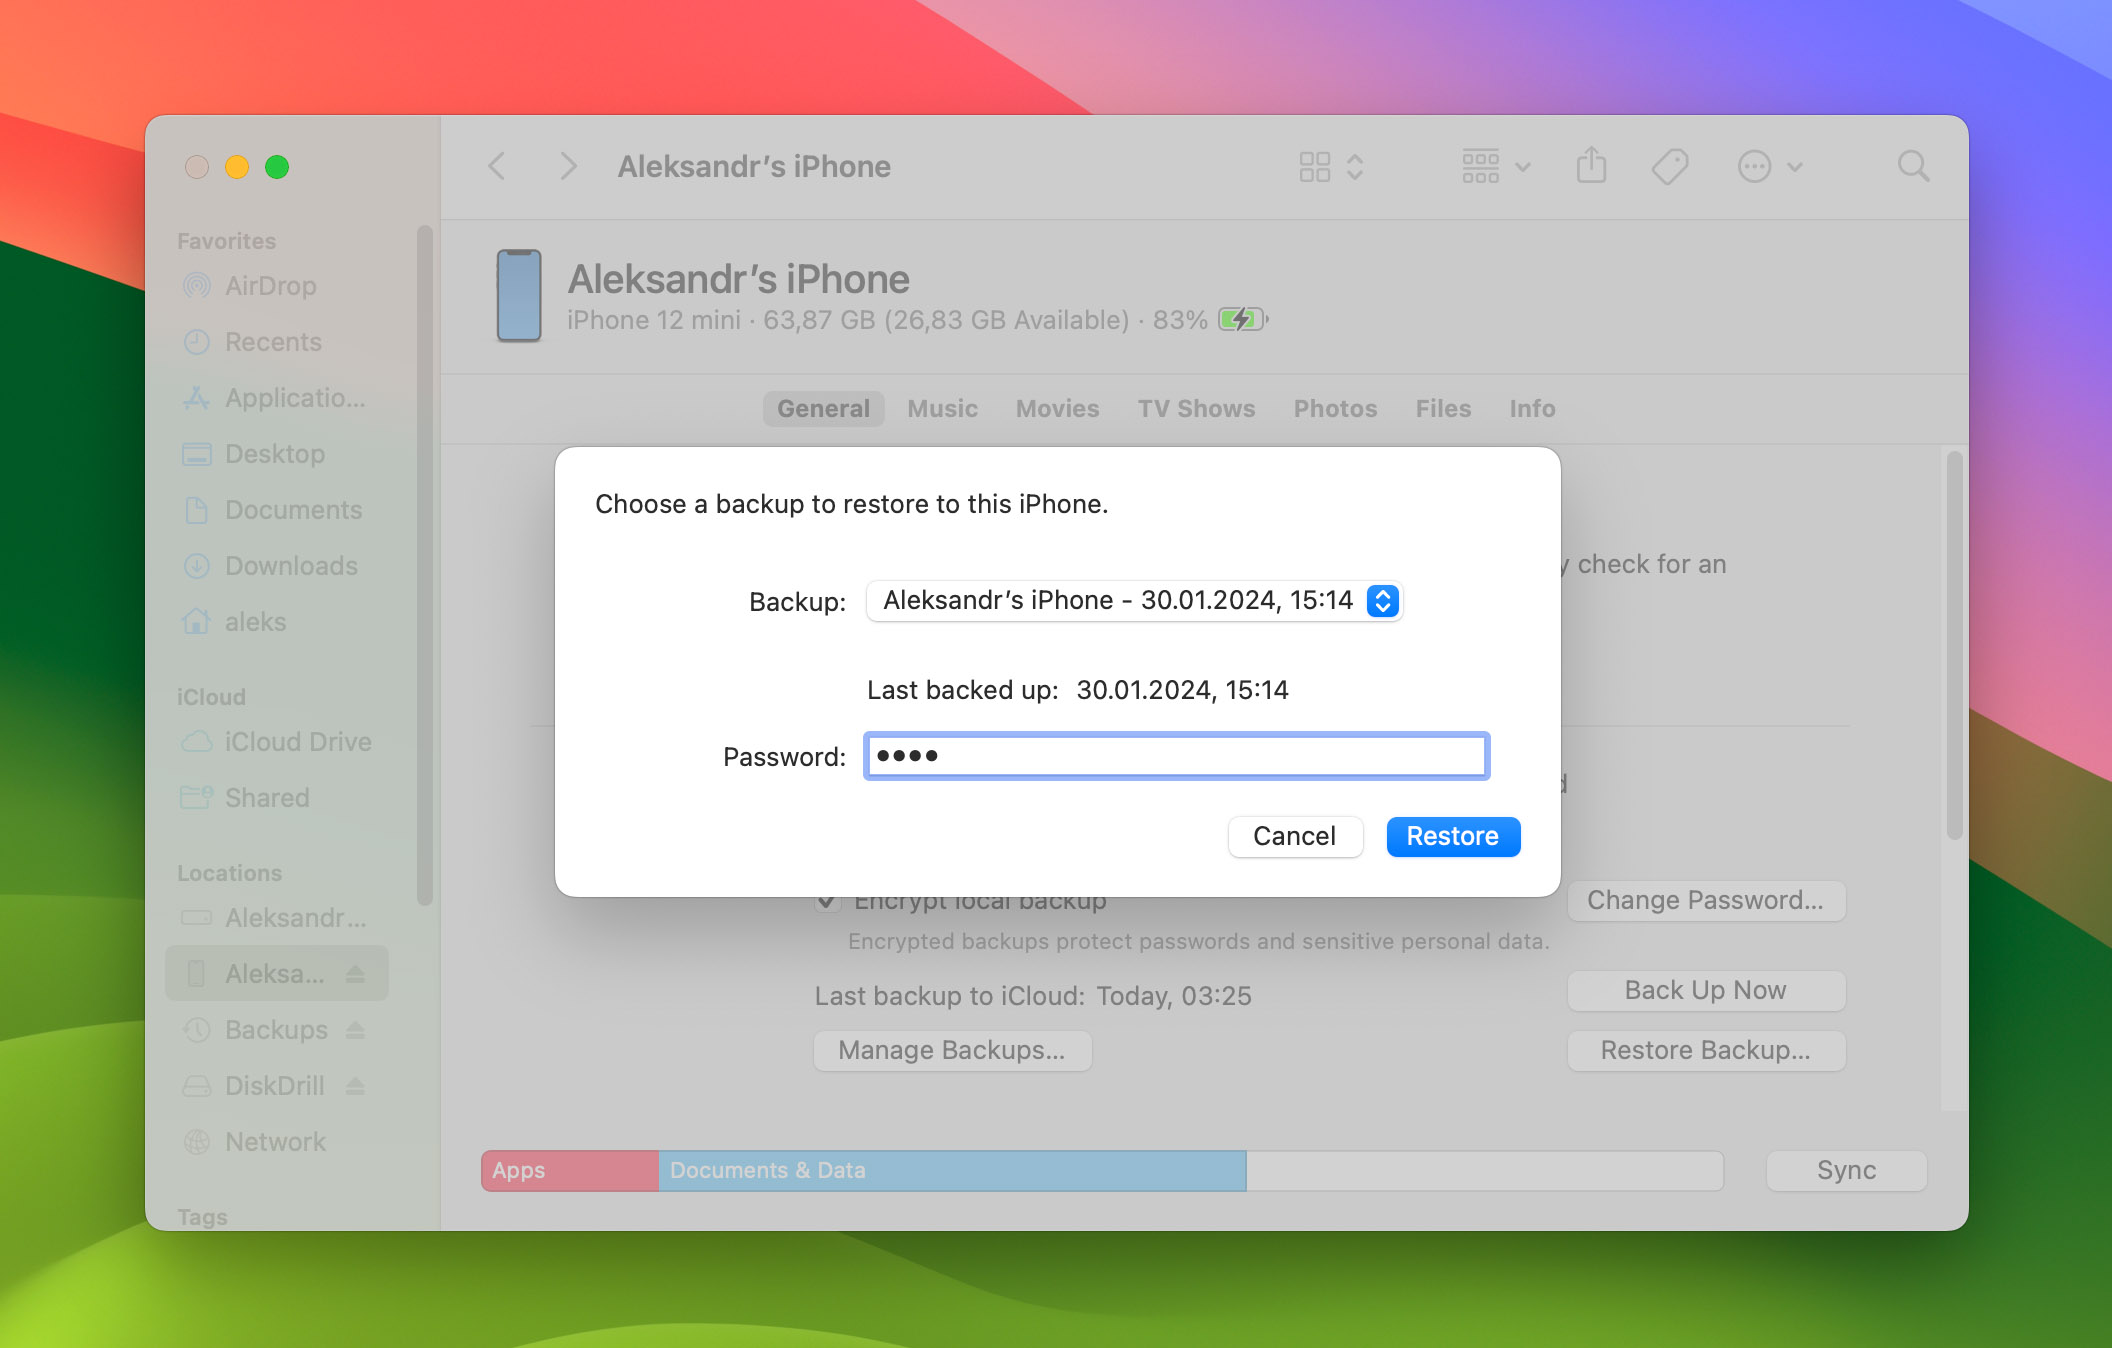
To recover videos from a local backup on macOS Catalina and newer:
- Launch Finder.
- Connect your iPhone to your Mac.
- Select your iPhone from the list of available locations on the left.
- Click the Restore Backup… option and select the most recent backup containing your videos.
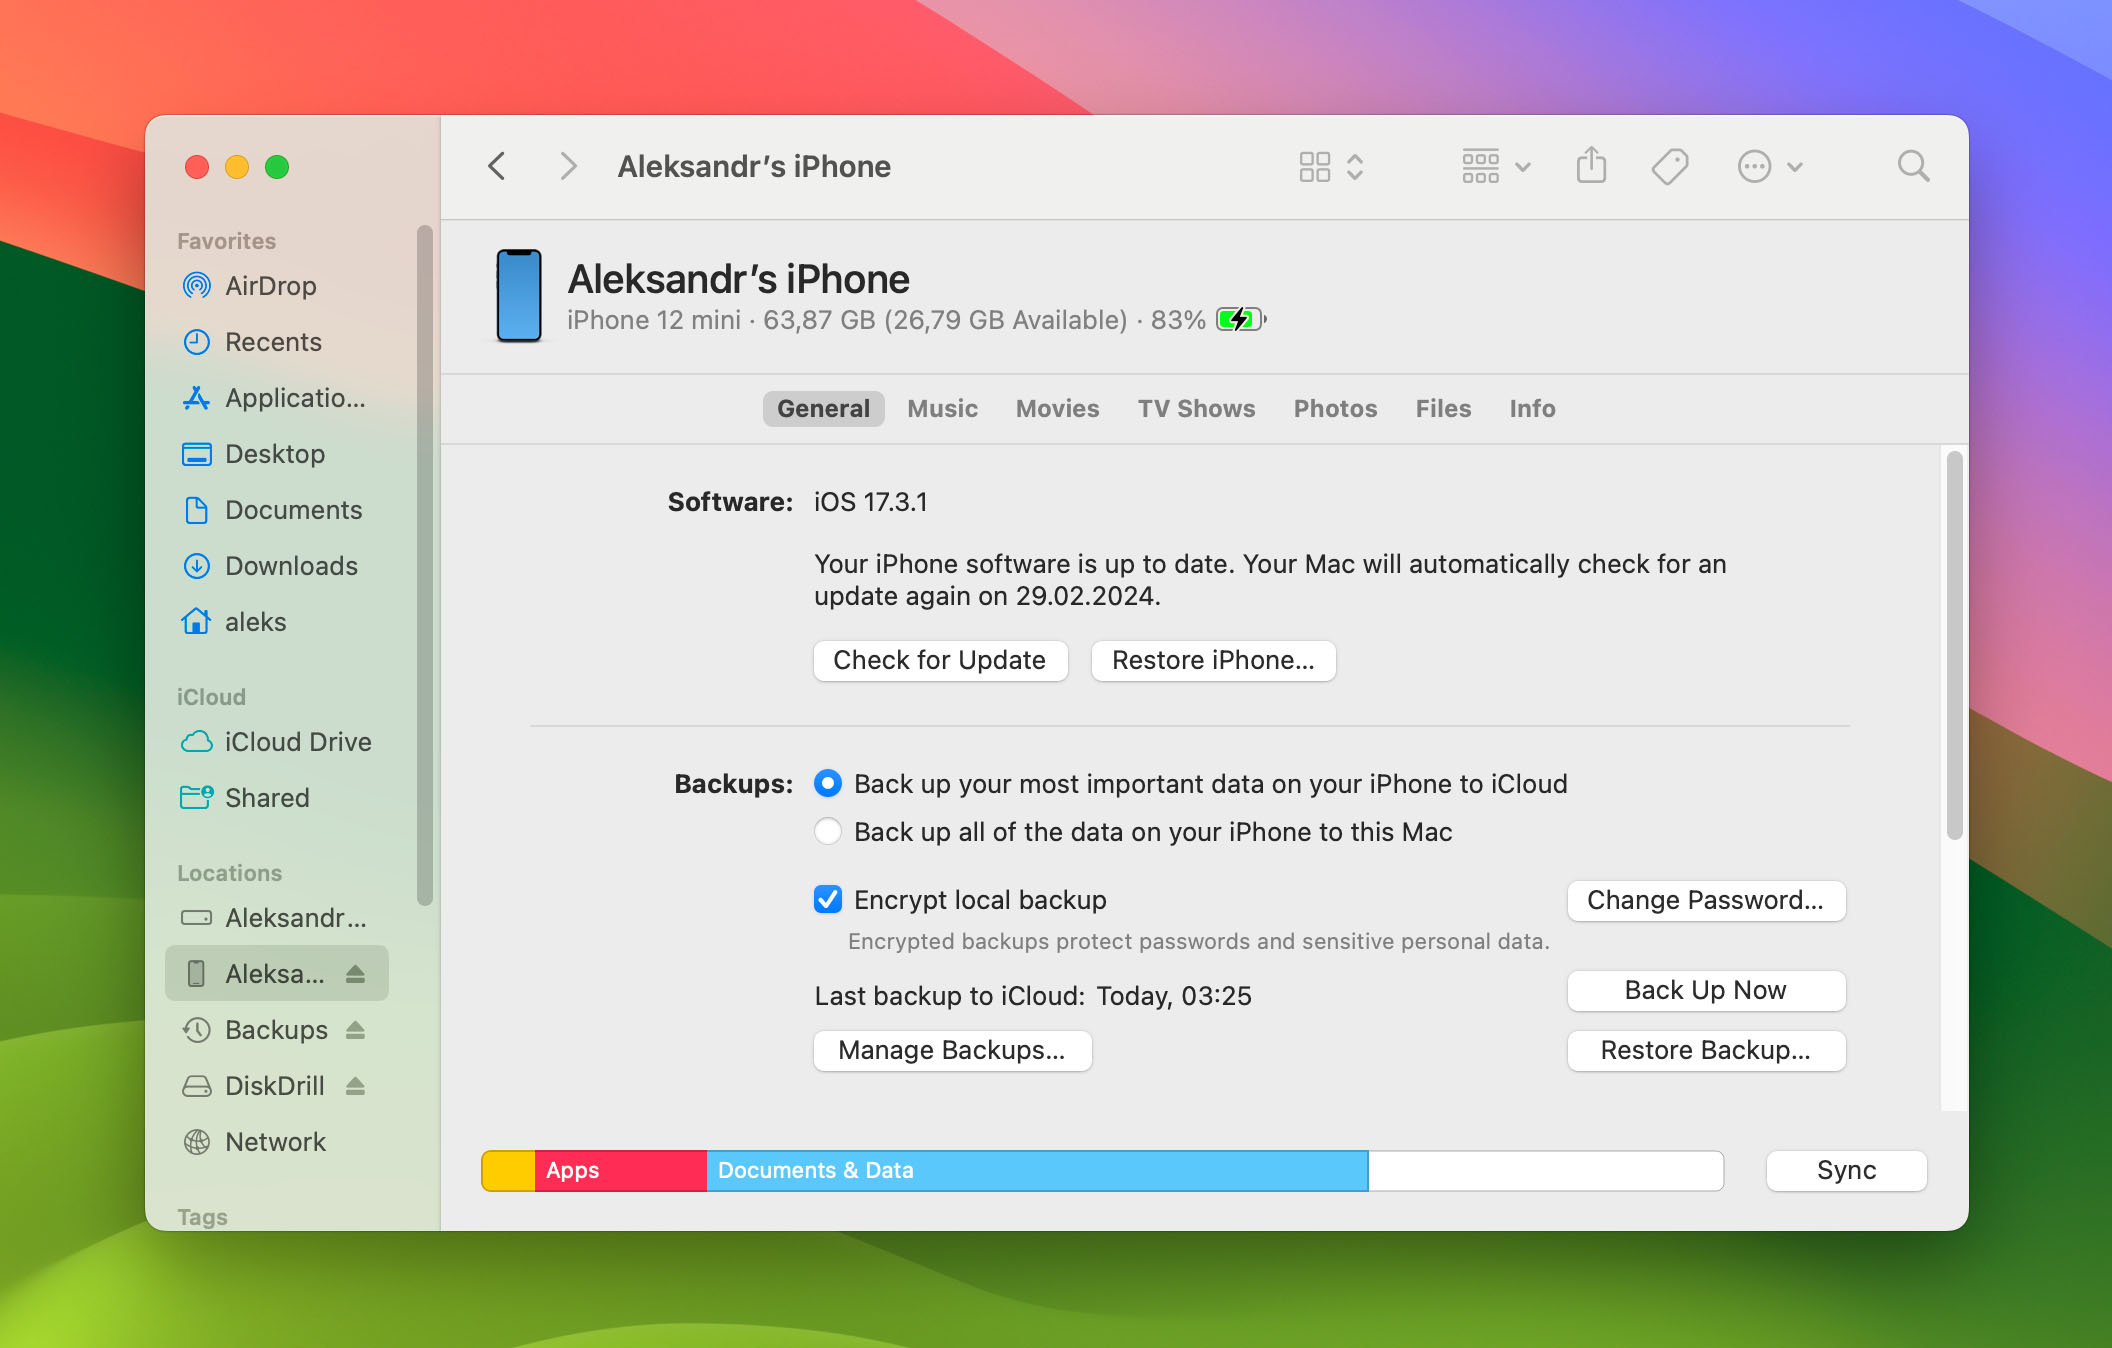
- Click Restore and wait for the restore time to finish.
How to Avoid Losing Important Videos
In my years recovering data, I’ve seen countless heartbreaks over lost videos. Trust me, there’s nothing worse than realizing those precious moments are gone, potentially forever. But fear not, because I’m here to share some battle-tested tips to keep your videos safe and sound:
- 💿 Back up your videos: Despite highly effective and easy-to-use data recovery software being readily available, backups remain the most surefire means of recovering lost videos. My go-to recommendation? The 3-2-1 rule: three total copies, two different local storage locations (like an external hard drive and your computer), and one copy stored offsite (cloud storage is perfect for this).
- 🗃️ Record to multiple memory cards: Putting all your eggs in just one basket is never a good idea. Memory cards have become fairly affordable, so there’s nothing stopping you from using multiple smaller memory cards when recording video instead of one large one.
- ☁️ Store videos in the cloud: The cloud is a great place to store important video files because leading cloud storage services are designed to be highly secure and resistant to data loss. They also give you the added convenience of being able to access your videos from anywhere and from any device.
- 💻 Take good care of your computer: If you use your computer to edit or manage videos, then you need to take good care of it to prevent it from becoming infected with malware or crashing all the time as a result of poor maintenance.
- 🤔 Be mindful when recording: It’s easy to press the wrong button in the heat of the moment, such as when you spot the opportunity to record something interesting. One wrong click can lead to previously recorded videos becoming deleted or overwritten, so being mindful when recording is an easy way how to avoid a costly mistake.
Should you experience video loss despite following these tips, don’t feel bad. Instead, accept it as an inevitable part of life and do your best to promptly address it by applying the recovery methods described in this article.
Conclusion
Deleted video files can be recovered using multiple different methods from Windows computers, Macs, as well as Android and iOS smartphones and tablets. You should start with methods that require the least time and effort, such as checking the Recycle Bin/Trash folder, before moving on to methods that can address even permanent file deletion.
FAQ
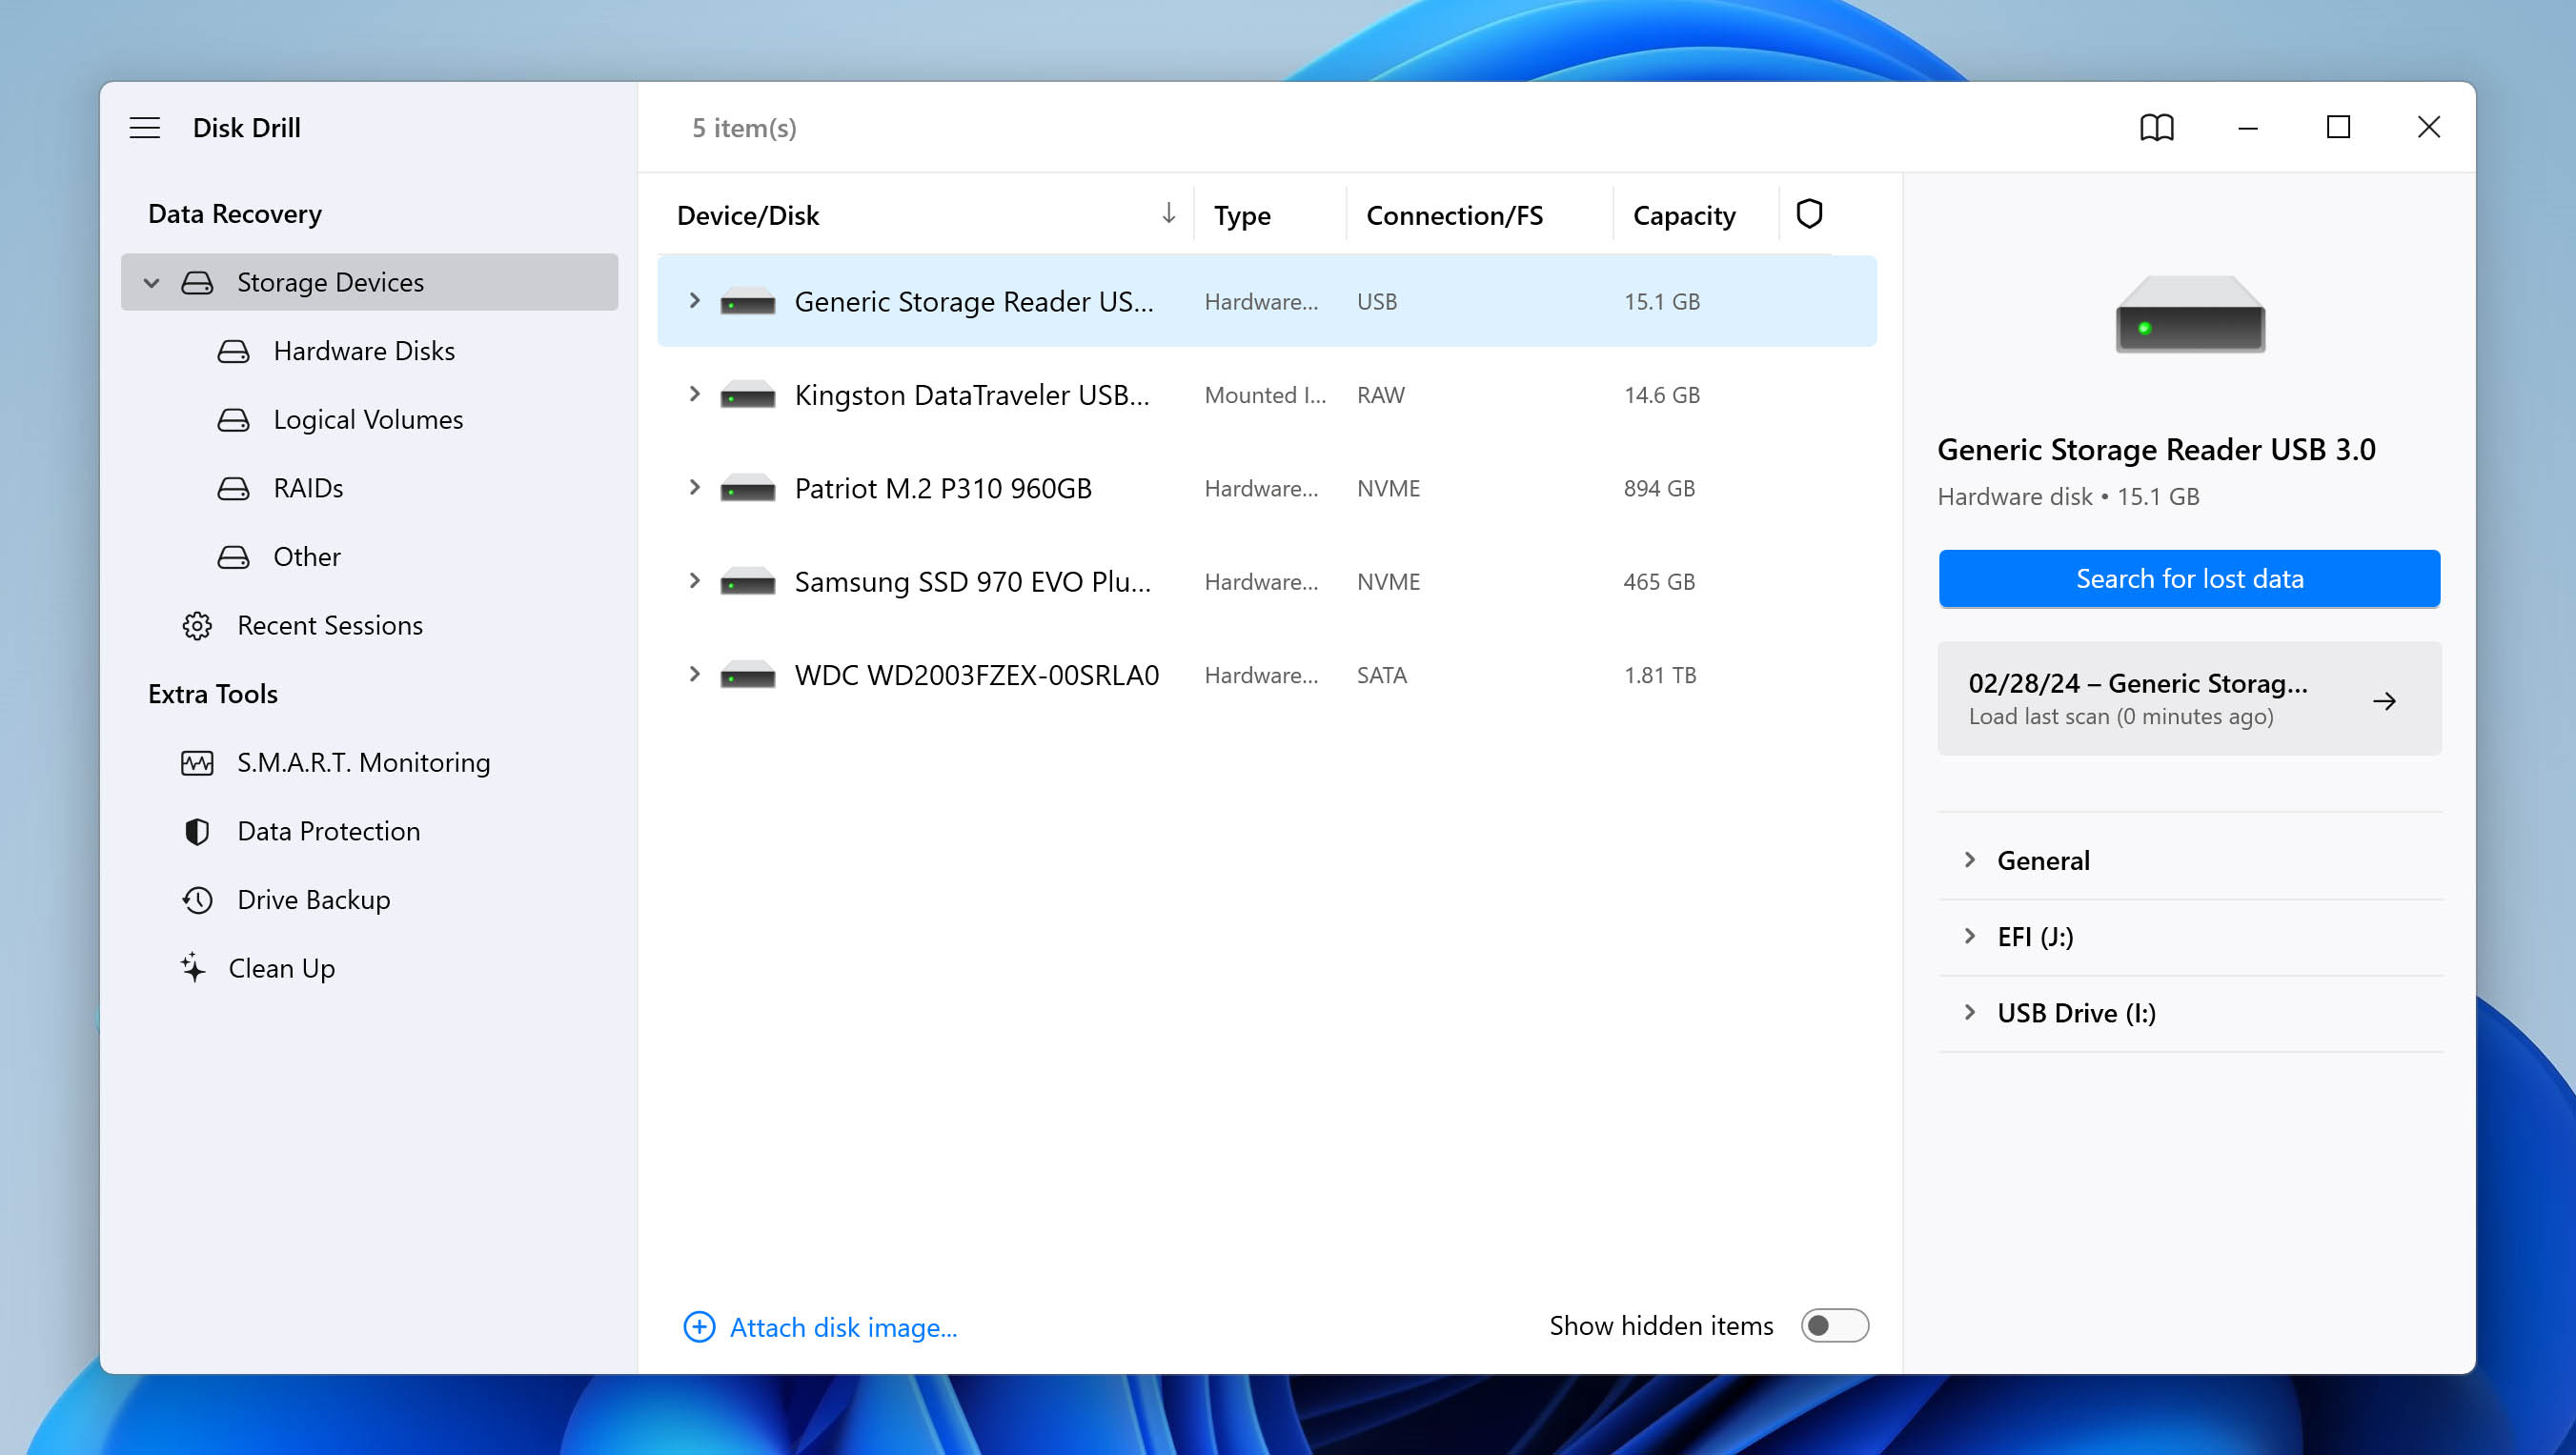
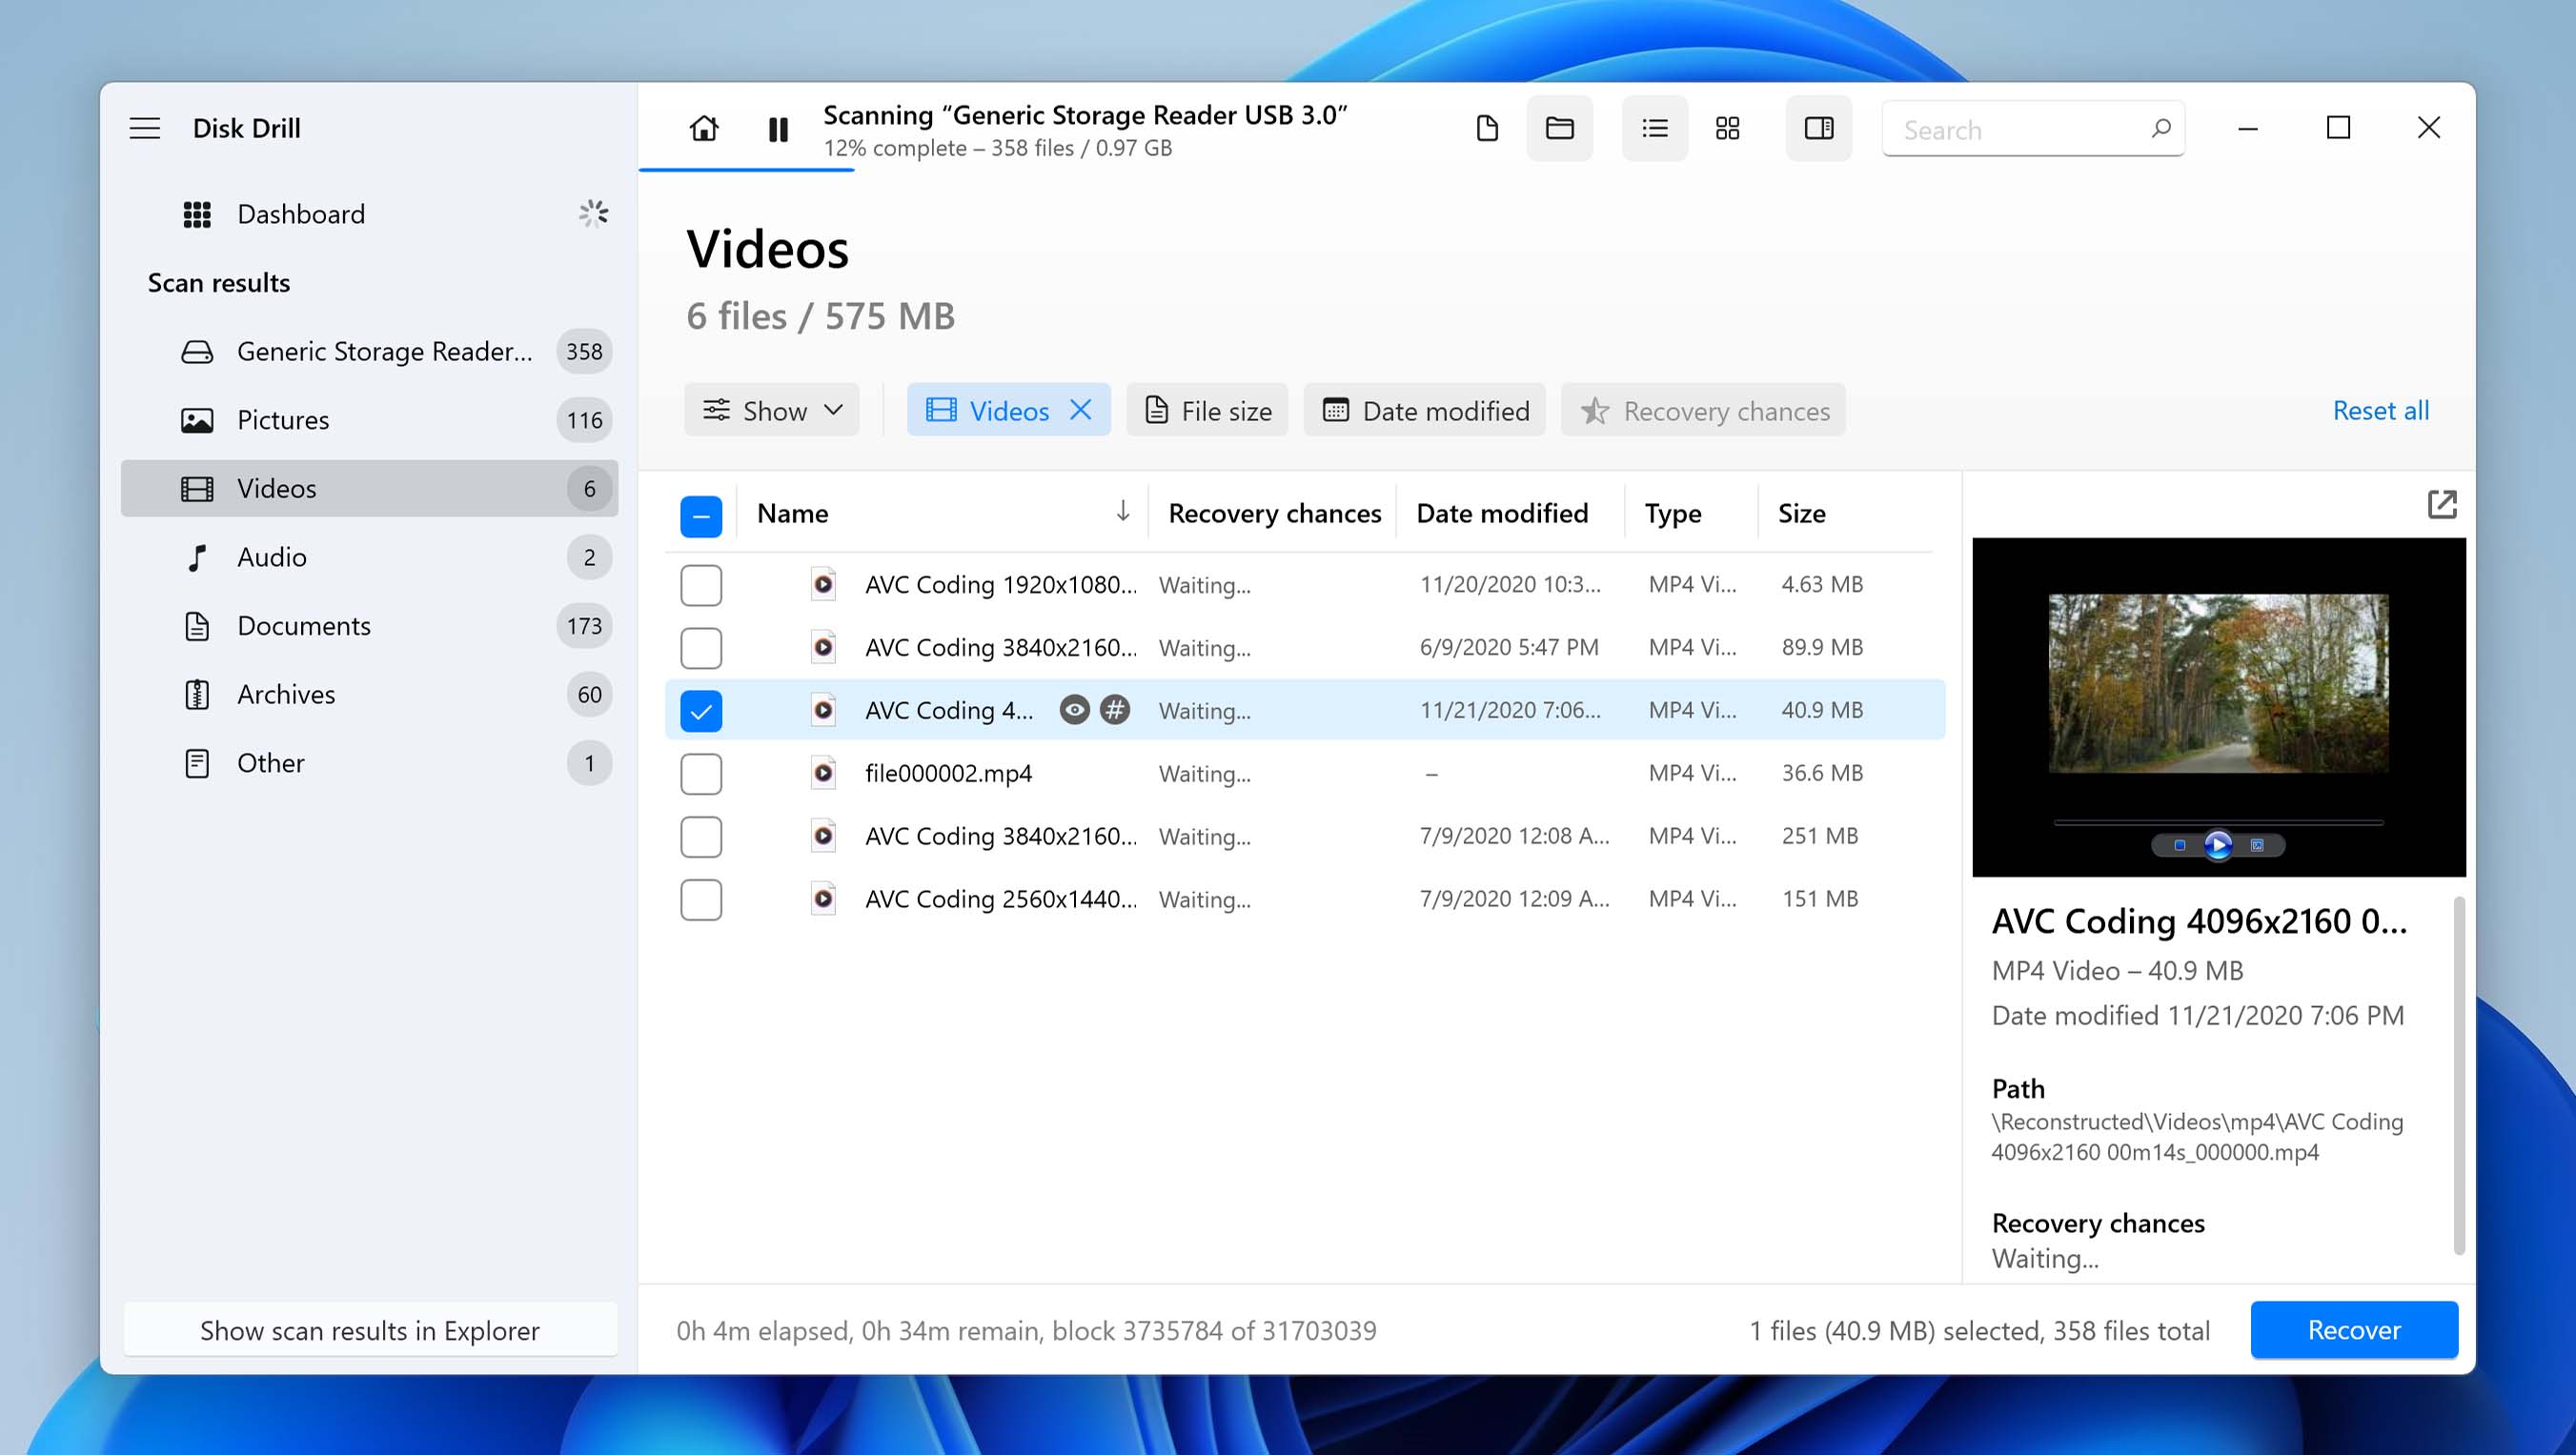
To recover lost video files with Disk Drill from an external drive:
- Connect the external drive to your computer.
- Launch Disk Drill and select the external drive.
- Click the Search for lost data button.
- Wait until Disk Drill is done scanning the external drive.
- Go through the scan results and select all lost video files.
- Click the Recover button.
- Specify the recovery destination and click OK.
Most modern surveillance cameras record footage on memory cards or hard drive, so you can recover it using readily available video recovery software, like Disk Drill.
If you recently deleted some videos, they can easily be recovered from the Windows Recycle Bin. When files are deleted, they’re temporarily stored in the Recycle Bin until it’s emptied. This gives you a window of recovery. To restore videos from the Recycle Bin, follow these steps:
- Open Recycle Bin on your desktop.
- Select the file(s) you want to restore.
- Right-click on one of the selected files, then click Restore.
Bear in mind that there is a limit to how much the Recycle Bin can store. Therefore, if the files were too large, it’s possible they skipped the Recycle Bin.
Yes, you can recover a video even after it has been deleted. If you’re unable to restore it from the Recycle Bin, you can recover it using data recovery software, like Disk Drill. Disk Drill has the ability to scan your drive for recoverable files and restore them to a folder of your choice.
Follow these steps to recover a deleted video using Disk Drill:
- Download and install Disk Drill.
- Select the drive that contains the deleted video, then click Search for lost data.
- Click Review found items once Disk Drill’s scan is finished.
- Select the video file you want to recover. Use the search bar to find it easier if necessary. When ready, click Recover.
- Choose a recovery location. Make sure it’s on a separate physical partition to the one you’re recovering from, like another internal drive or a removable USB stick.
Once recovery is finished, Disk Drill will present you with an overview of the recovery.
Yes, you can recover permanently deleted videos from your phone as long as you act quickly. When your file is deleted, it’s vulnerable to being overwritten by new data, rendering it unrecoverable.
To do this, we’ll use DiskDigger, a recovery app for Android. Bear in mind that your device needs to be rooted in order to recover videos. Follow these instructions:
- Install DiskDigger from the Google Play Store.
- Tap Start Basic Photo Scan.
- Select the videos you want to recover, then tap Recover.
- Choose where you want to recover your video files.