It is easy – all too easy – to accidentally delete files you needed. You may select an extra file or two by accident, or you may just happen to hit the Delete key at the wrong moment. But there is no need to panic. Just because you have deleted a file, it does not mean that it is gone forever. In this article, we’ll take a look at the various ways you can recover deleted files in Windows 8 and Windows 8.1.
If you have ever wondered how to go about restoring deleted files in Windows 8, we have good news – there are several options available to you. It does not matter if you have wiped out files through accidental deletion or that you have emptied the Recycle Bin. Even if you have pressed Shift-Delete to bypass the Recycle Bin, all is not lost.
You’ll be pleased to hear that even if you have made a change to a file and want to access a previous version, this is possible with Window’s ability to roll back through file history. So… read on as we reveal just how you can how to recover deleted files in Windows 8.
Method 1. Recover Deleted Files on Windows 8 from a Recycle Bin
If you delete a file by accident, or you simply change your mind about a deletion, your first port of call should be the Recycle Bin. This handy location is a temporary store for deleted files, and it gives you the chance to restore files you decide you need to keep.
You will find the Recycle Bin on the desktop, but if the icon is not visible here, you can also find in if you open Explorer. Open the Recycle Bin by double-clicking the desktop icon, or open Explorer from the taskbar or Start screen and click the Recycle Bin icon in the left-hand navigation pane.
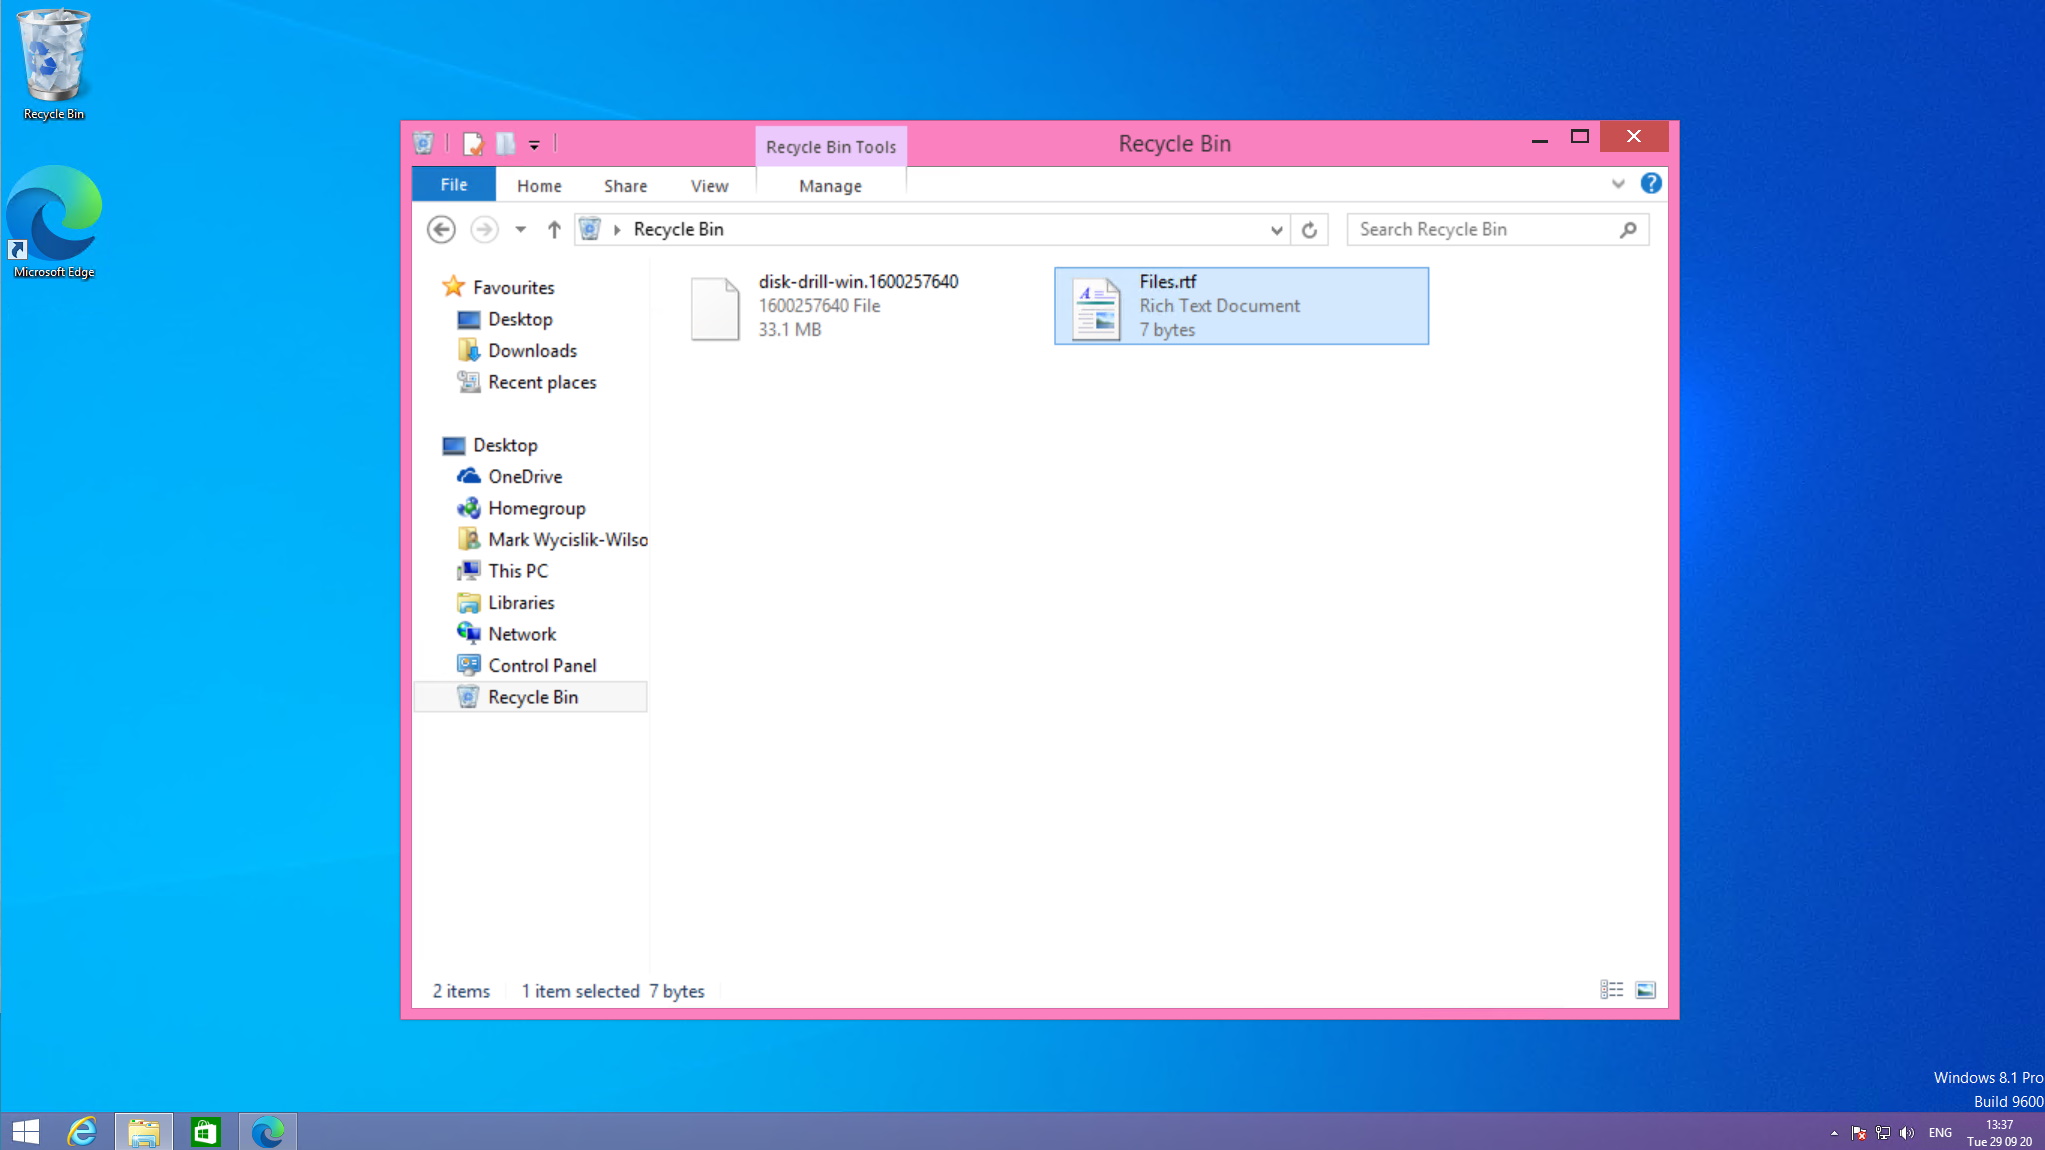
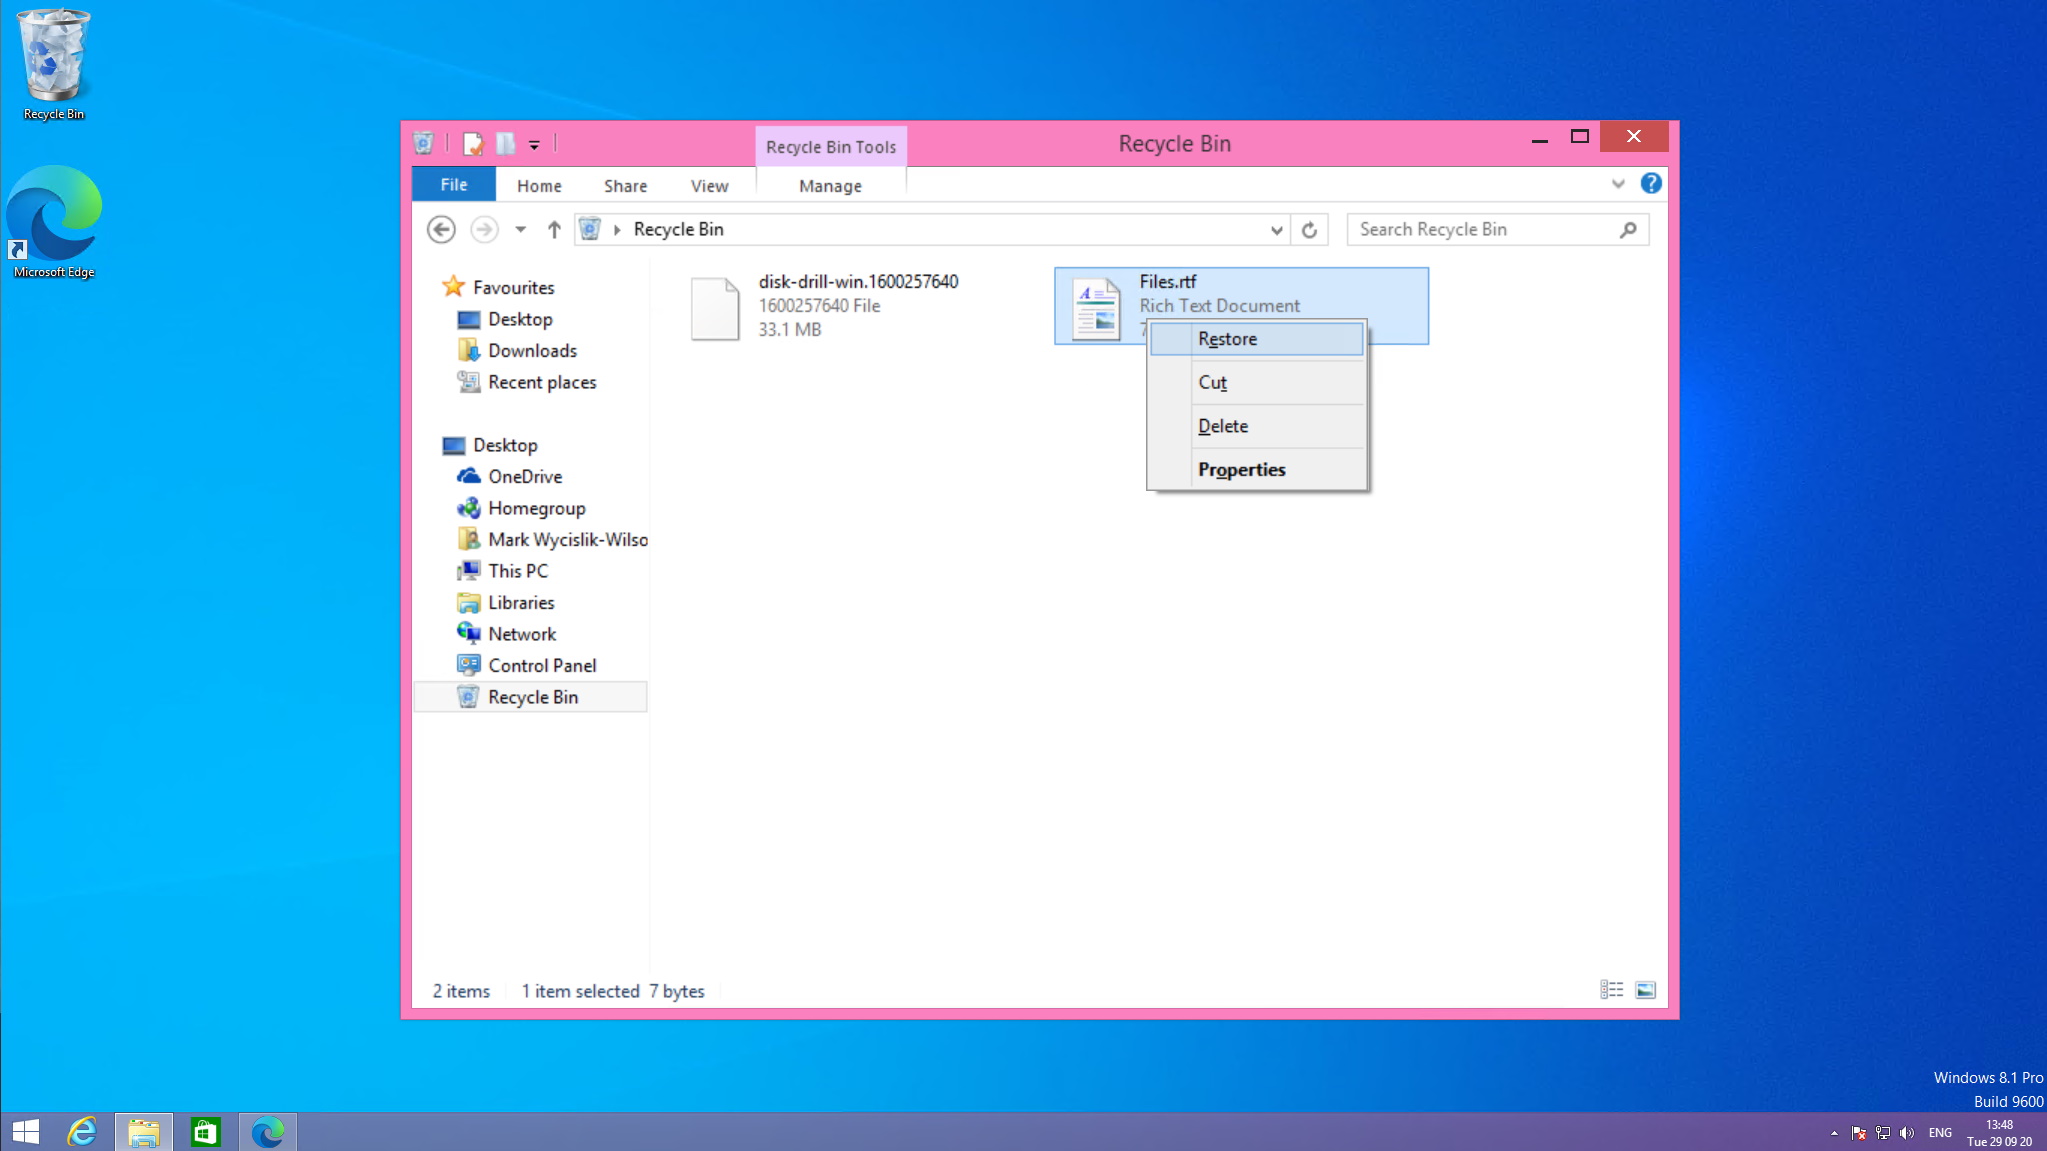
You can browse through the contents of the Recycle Bin just as if it was a normal folder. Track down any files you would like to recover, right-click them, and select Restore from the menu that appears.
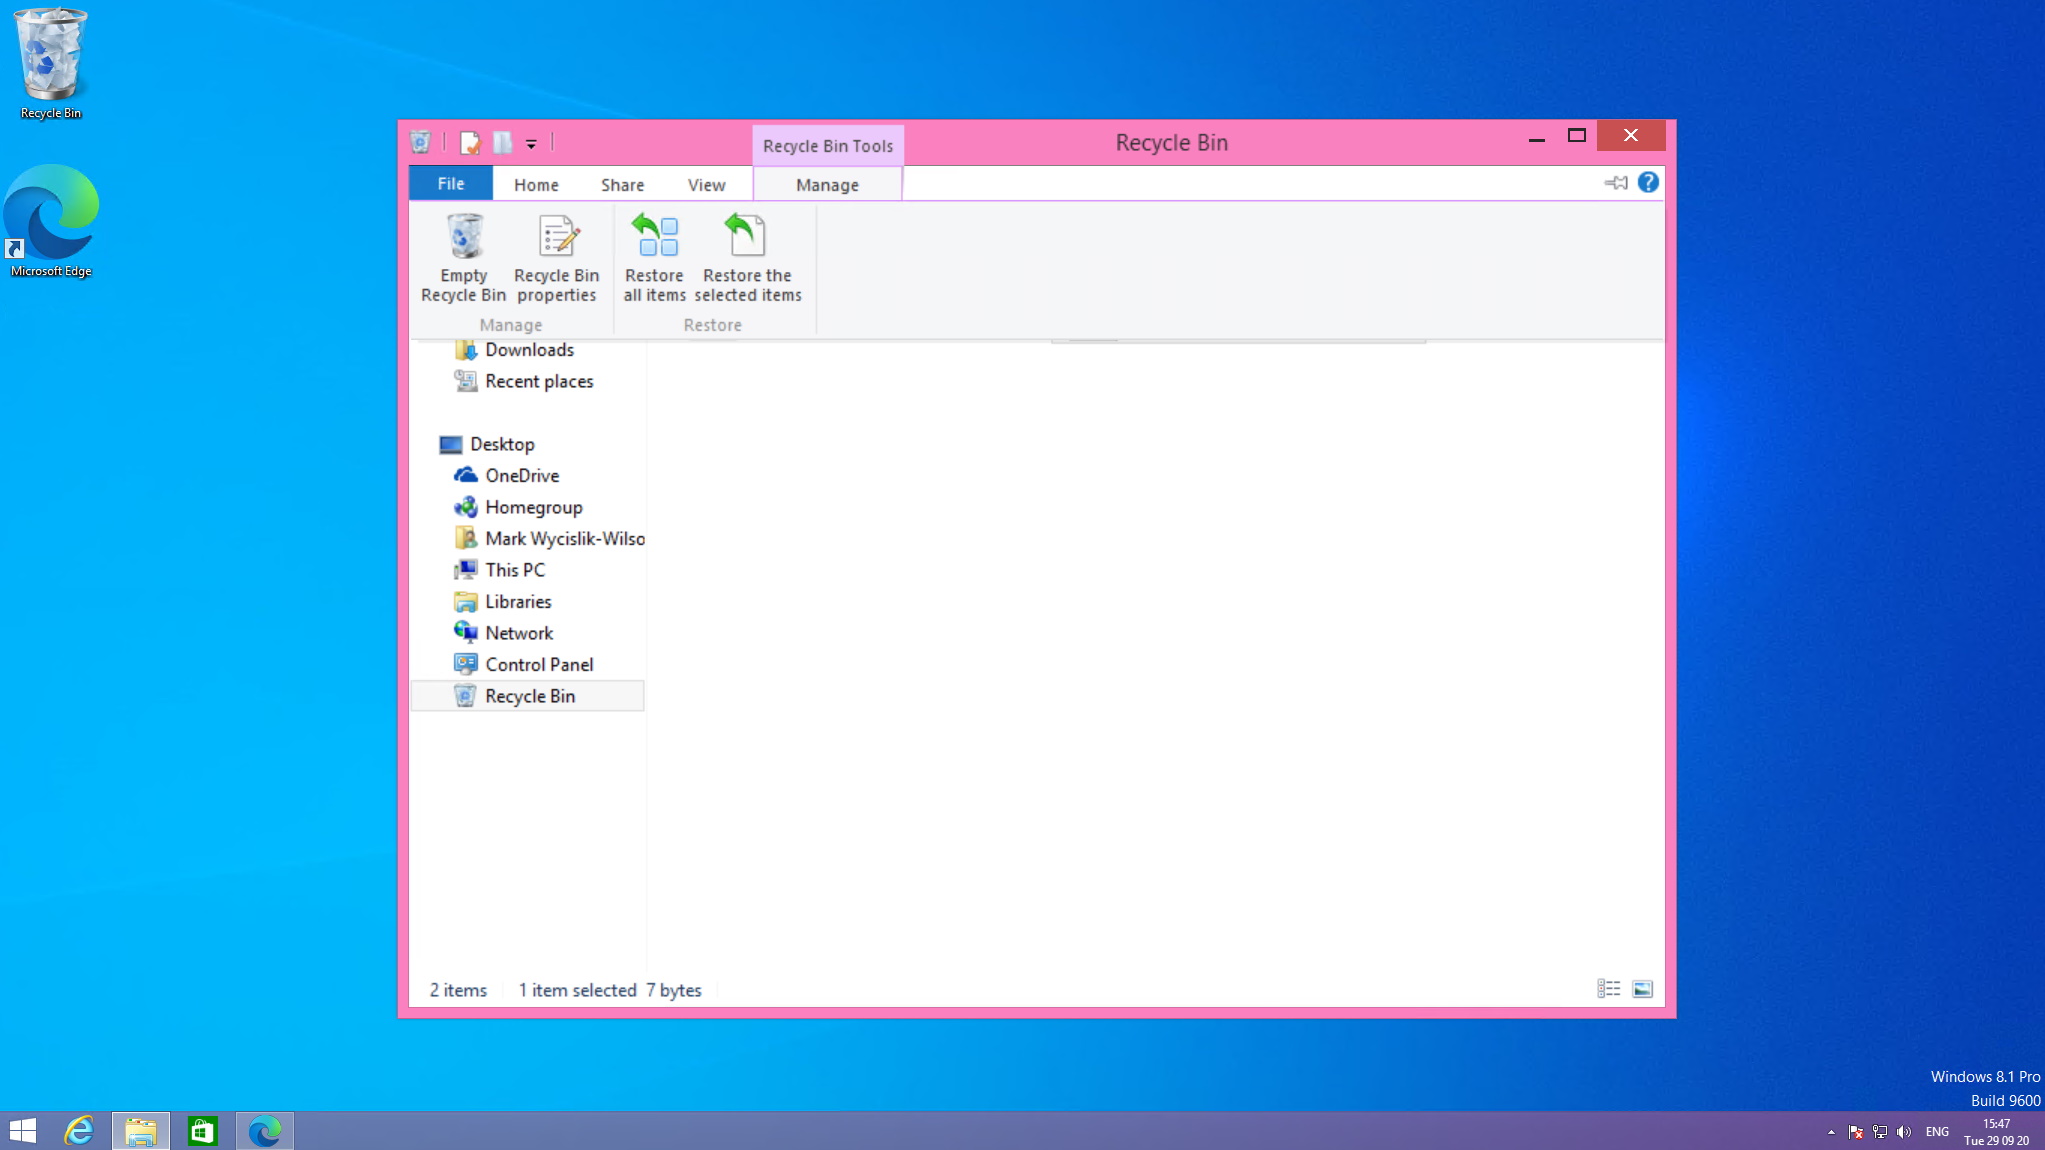
You can select one or multiple files to restore in this way, and you also have the option of clicking the Manage tab and then using the Restore all items or Restore the selected items toolbars buttons.
Method 2. Undelete Files using the File History Option
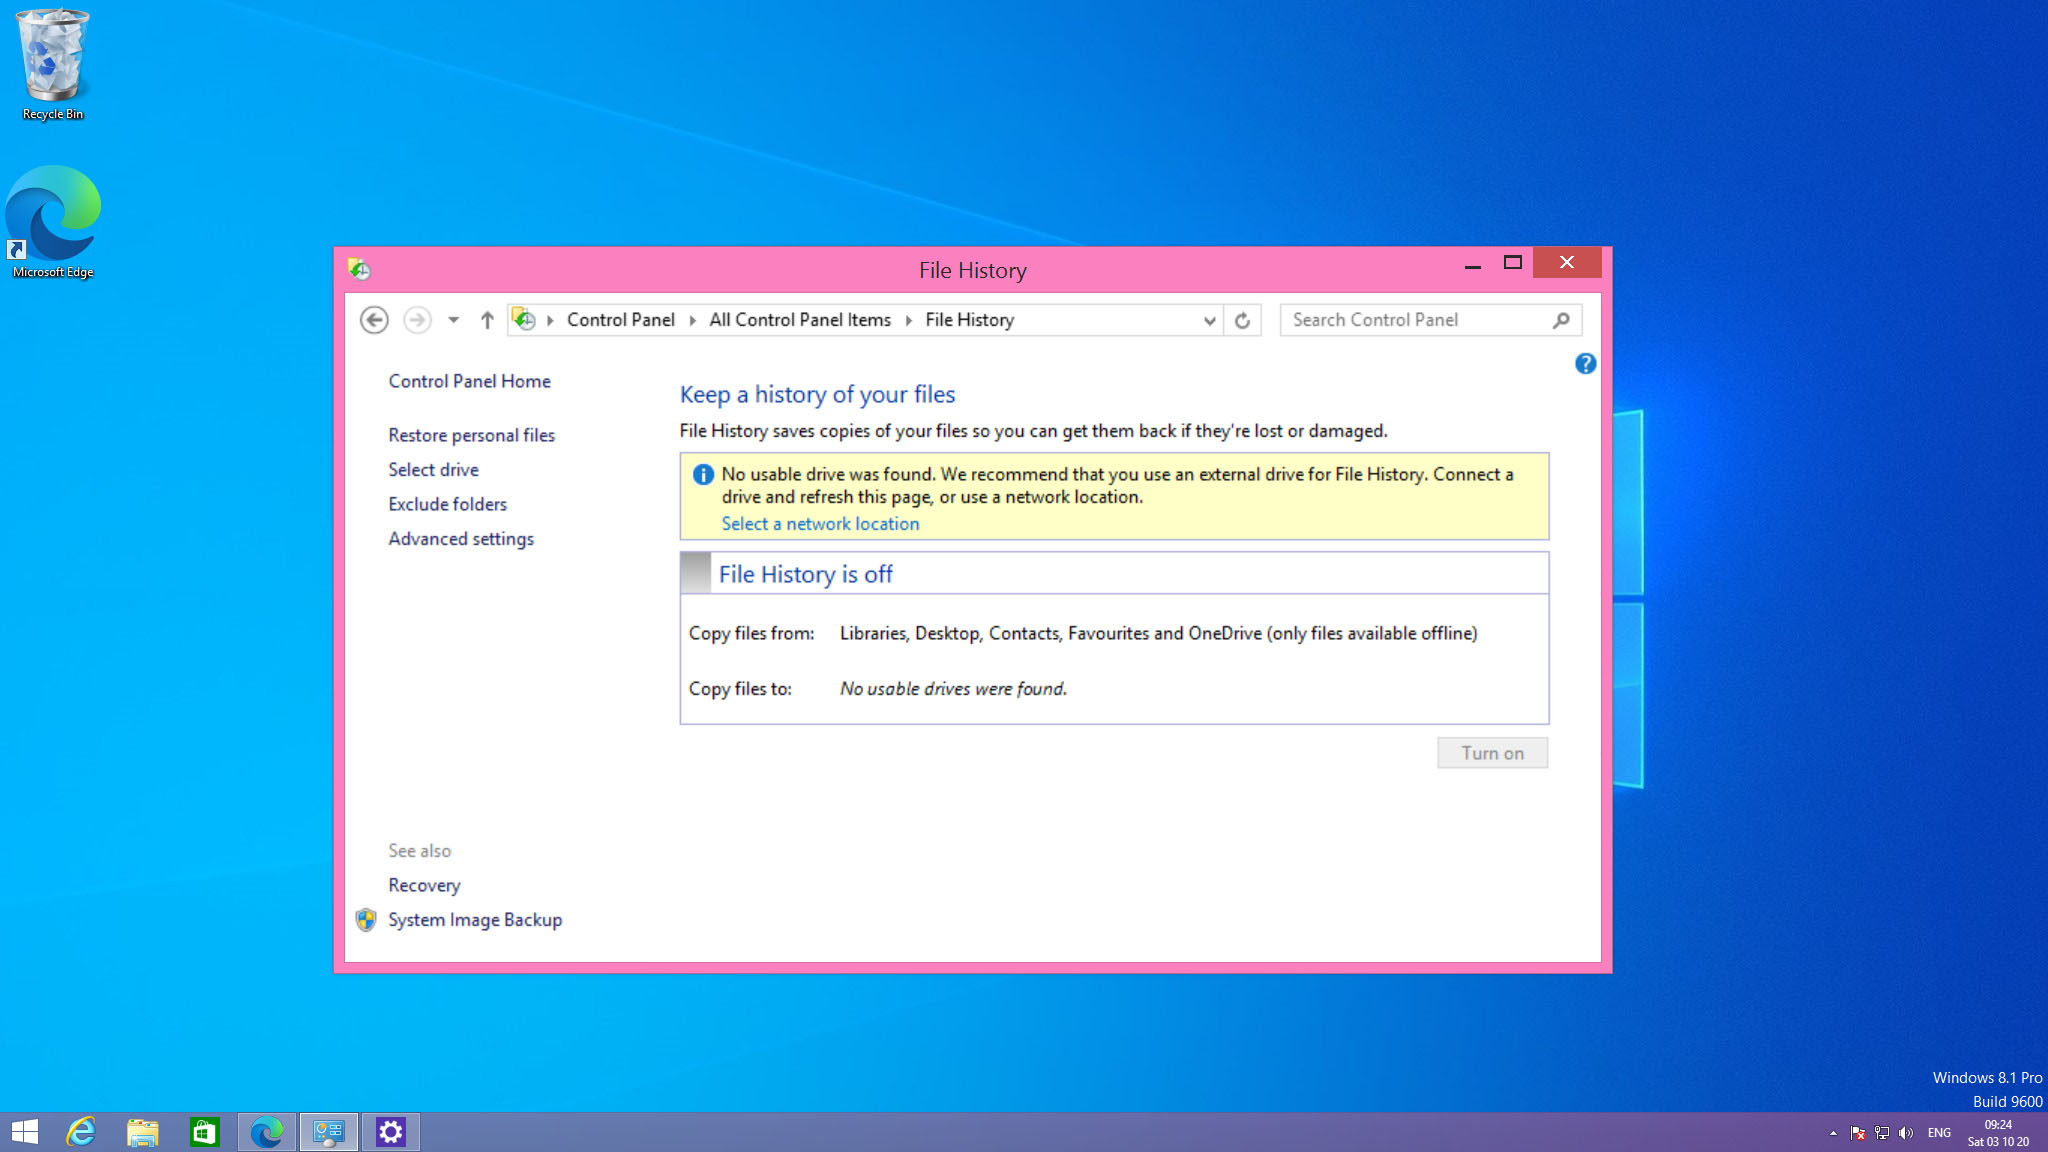
The Recycle Bin is not the only option built into Windows 8 that can be used to get back deleted files – there is also a useful feature called File History (which replaces the “Previous versions” feature found in earlier versions of Windows.
While not exactly infallible (and it will only work if you had the feature manually enabled), it offers you a second chance to recover files you have deleted or those that you have forgotten to save.
To use File History to recover deleted files on Windows 8:
- Click the Start button, type File History, and then click the search result labeled Restore your files with File History.
- In the search box, type the name of a file you would like to recover.
- When you have located the file you are interested in, use the left and right arrows to browse through the available versions of the file in question.
- To restore the file to its original location, select it and then click Restore. To restore a file to a different location, right-click it select Restore To, and then select the folder you would like to use.
💡 If you do not have File History enabled but would like to have it in place as a safety net for the future, use the following steps. It is something of a shame that in order to get the most from this useful tool, it is reliant on you have made the choice to use it ahead of time.
- Make sure that you have some form of external driver connected, be it a USB drive or an external hard drive.
- Click the Start button, type File History and then click the search result labelled File History settings.
- Move the File History toggle to the On position. In future, you will be able to use the previous instructions to recover files.
Method 3. Recover Deleted Files using a Third-Party Software
While Windows 8 includes various safety nets that can help you to recover data, they will not work in all circumstances. The chances are that if you are reading this article, you find yourself in a situation where you are simply not able to get to the files you need.
Should you find yourself unable to restore files using the method outlined above, data recovery software may well be able to help. One tool that does this very well is Disk Drill. The free version of the program lets you recover up to 500MB of data.
Steps to recover files on Windows 8 using Disk Drill:
Step 1: Install and launch Disk Drill, and then move to the Data Recovery section.
Step 2: In the center of the program window, under the Device/Disk heading, you will see a list of all of the drives connected to your computer. This list includes all of your internal and external drives, so you may see several entries here. Click the small arrow to the left-hand side of a drive to see a list of all of the partitions it contains.
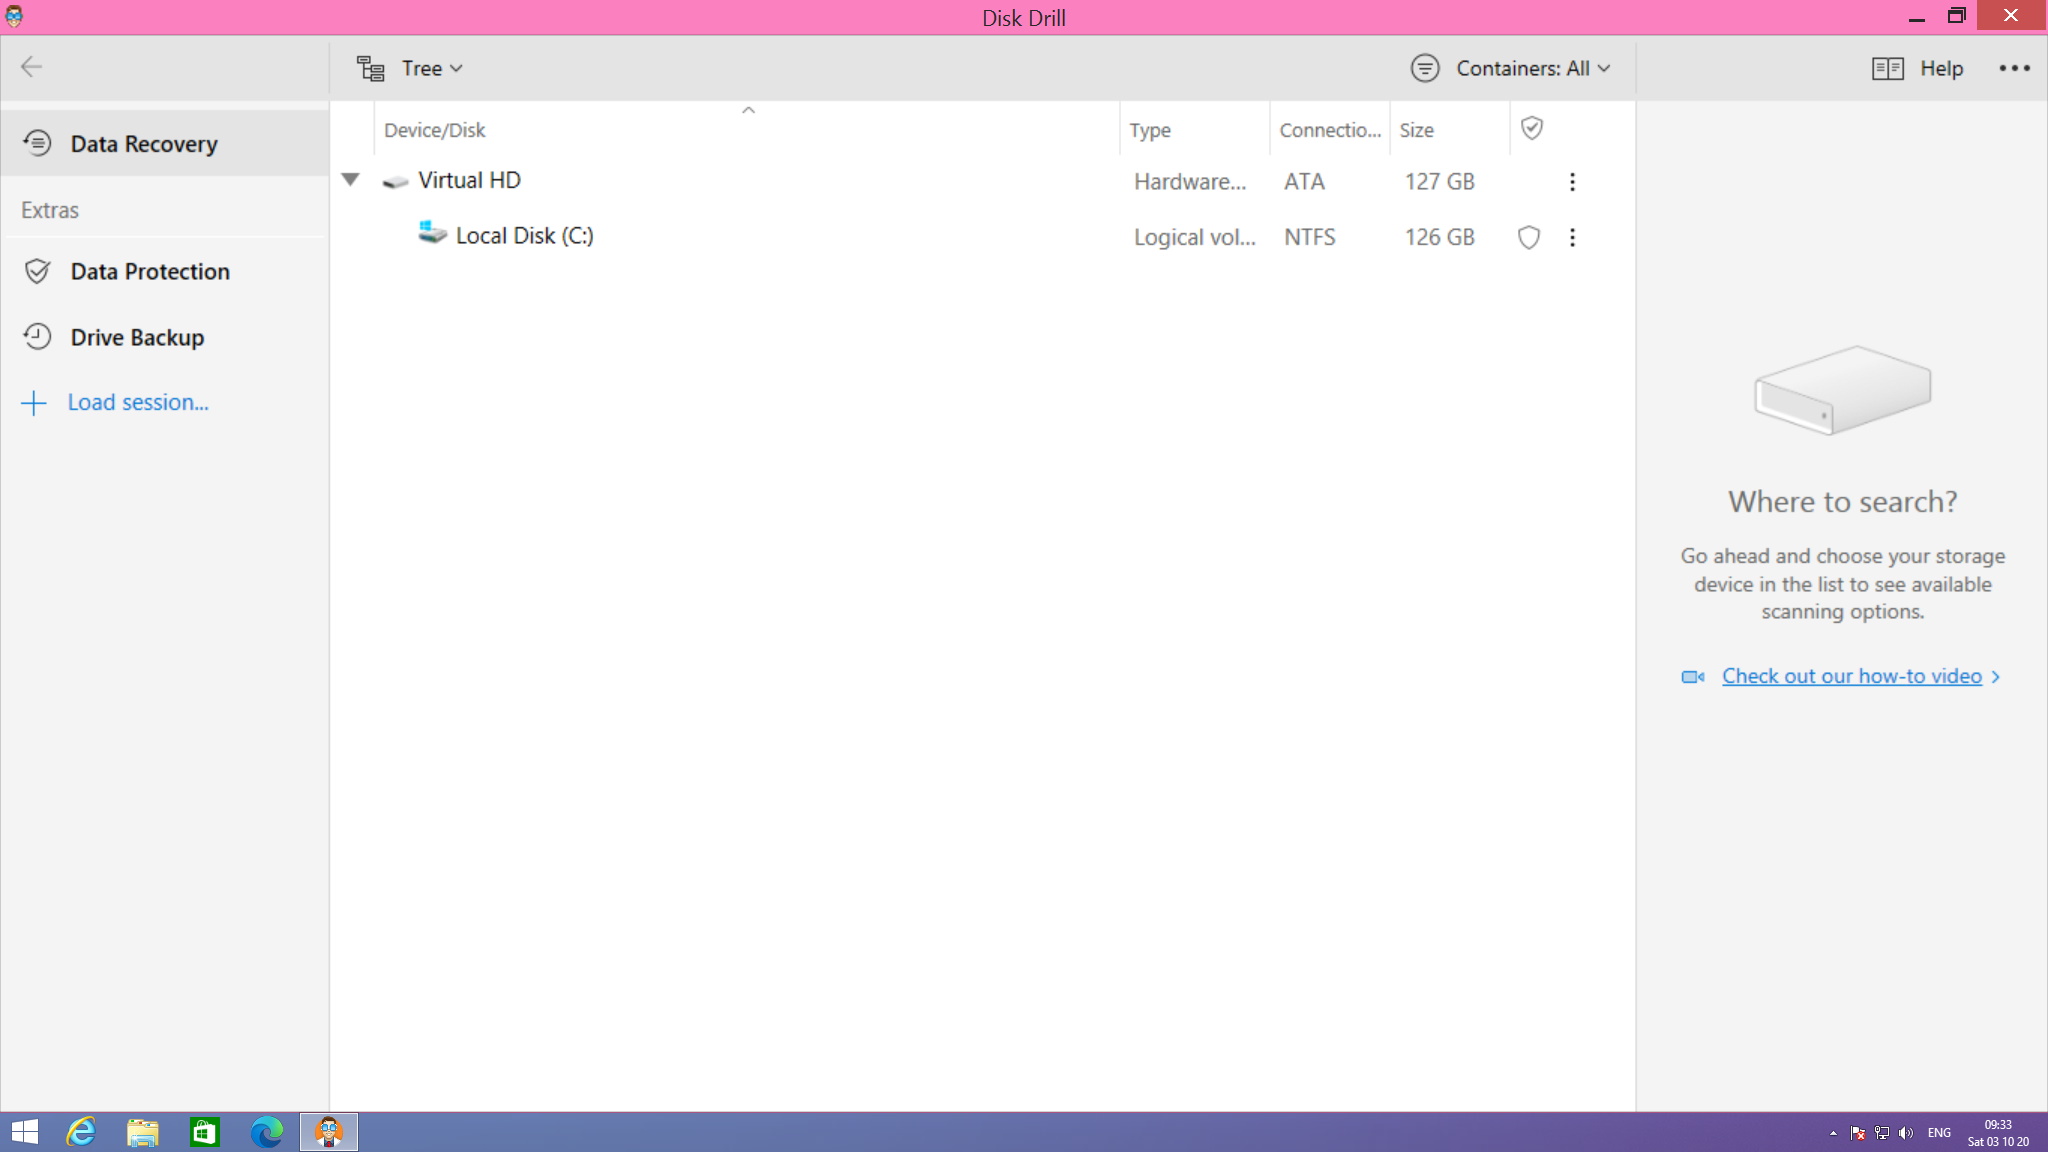
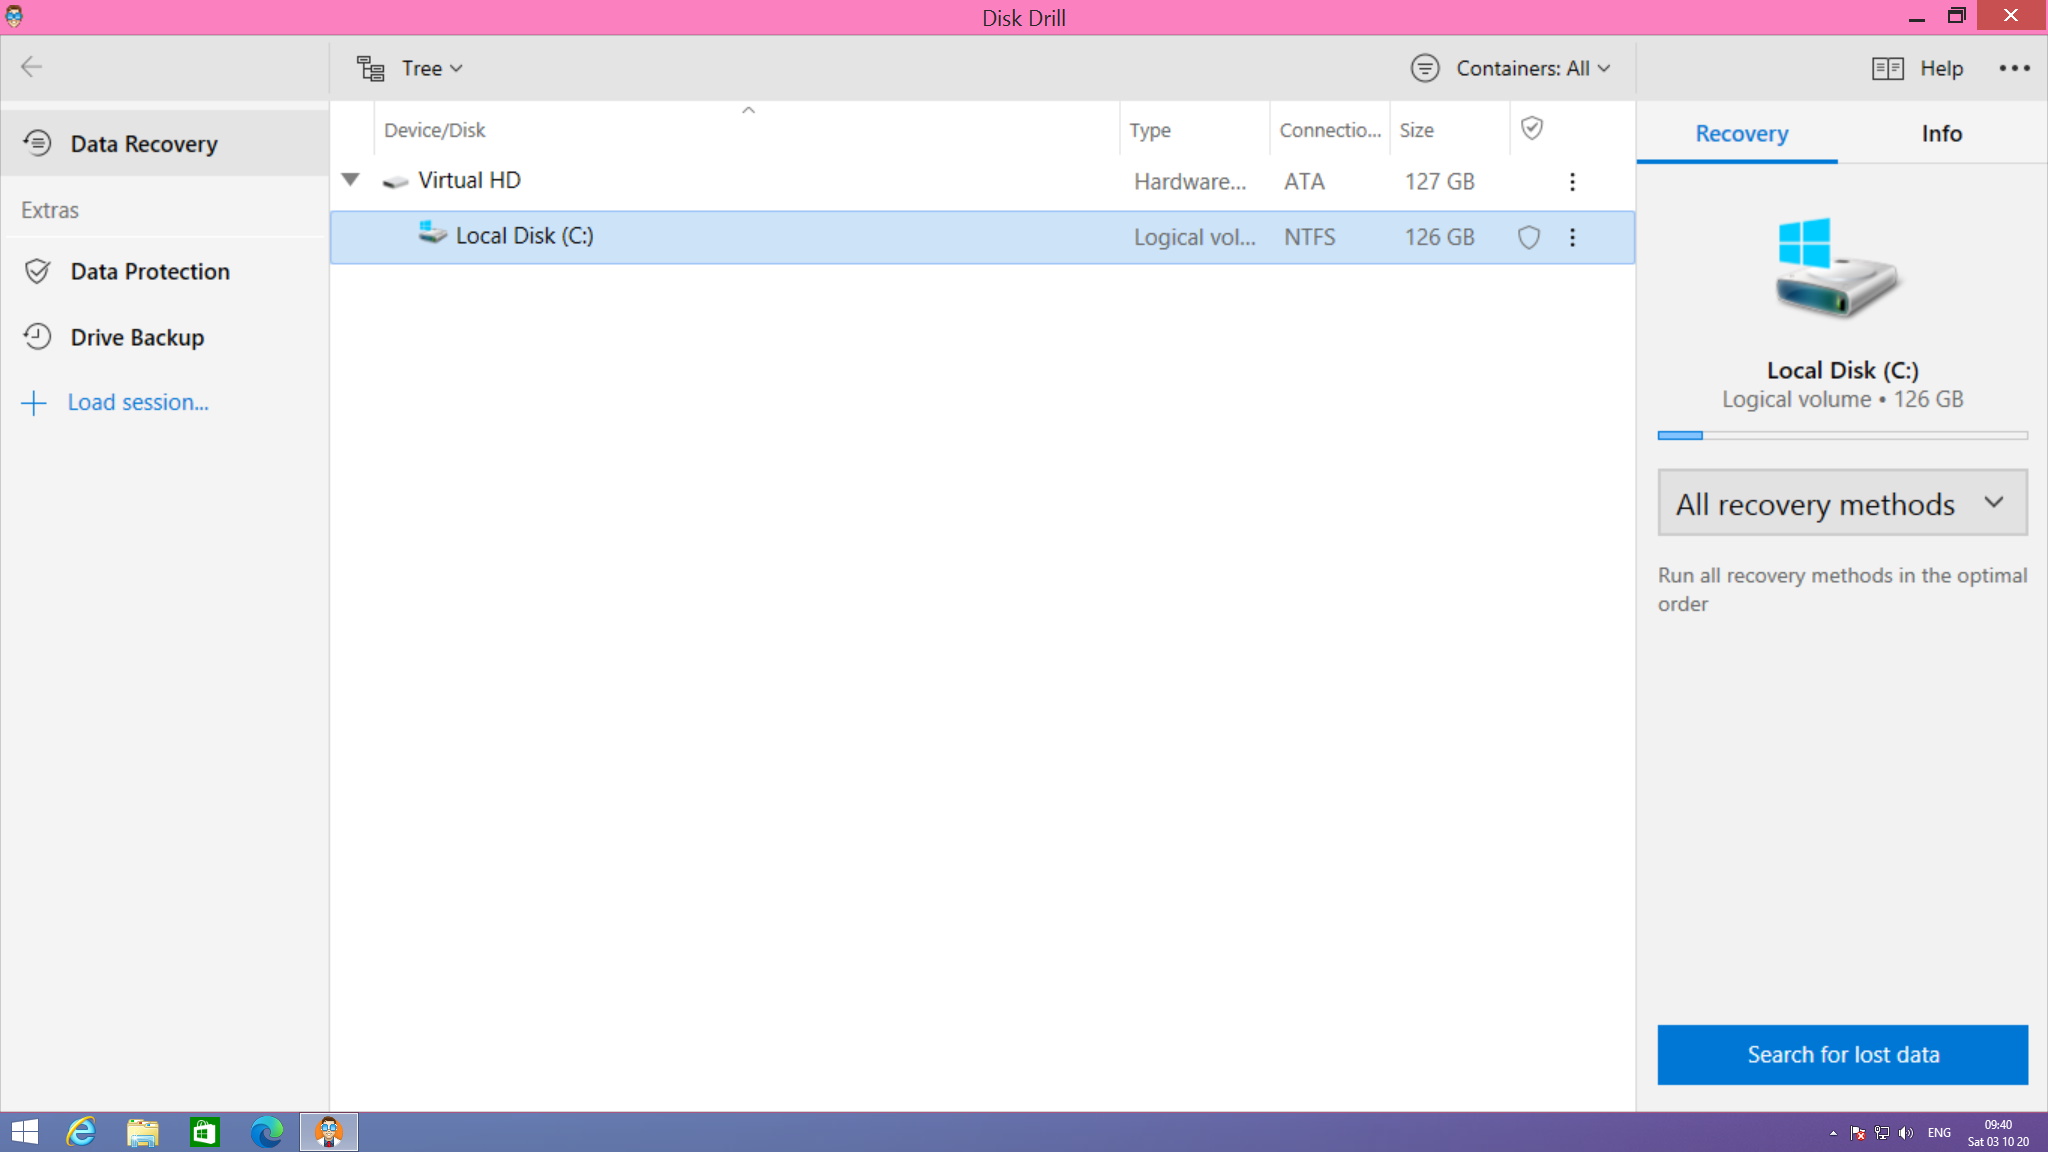
Step 3: Select the drive or partition that you would like to recover data from and make sure that you have the All recovery methods option selected to the right. Click the Search for lost data button in the lower right-hand corner of the application window.
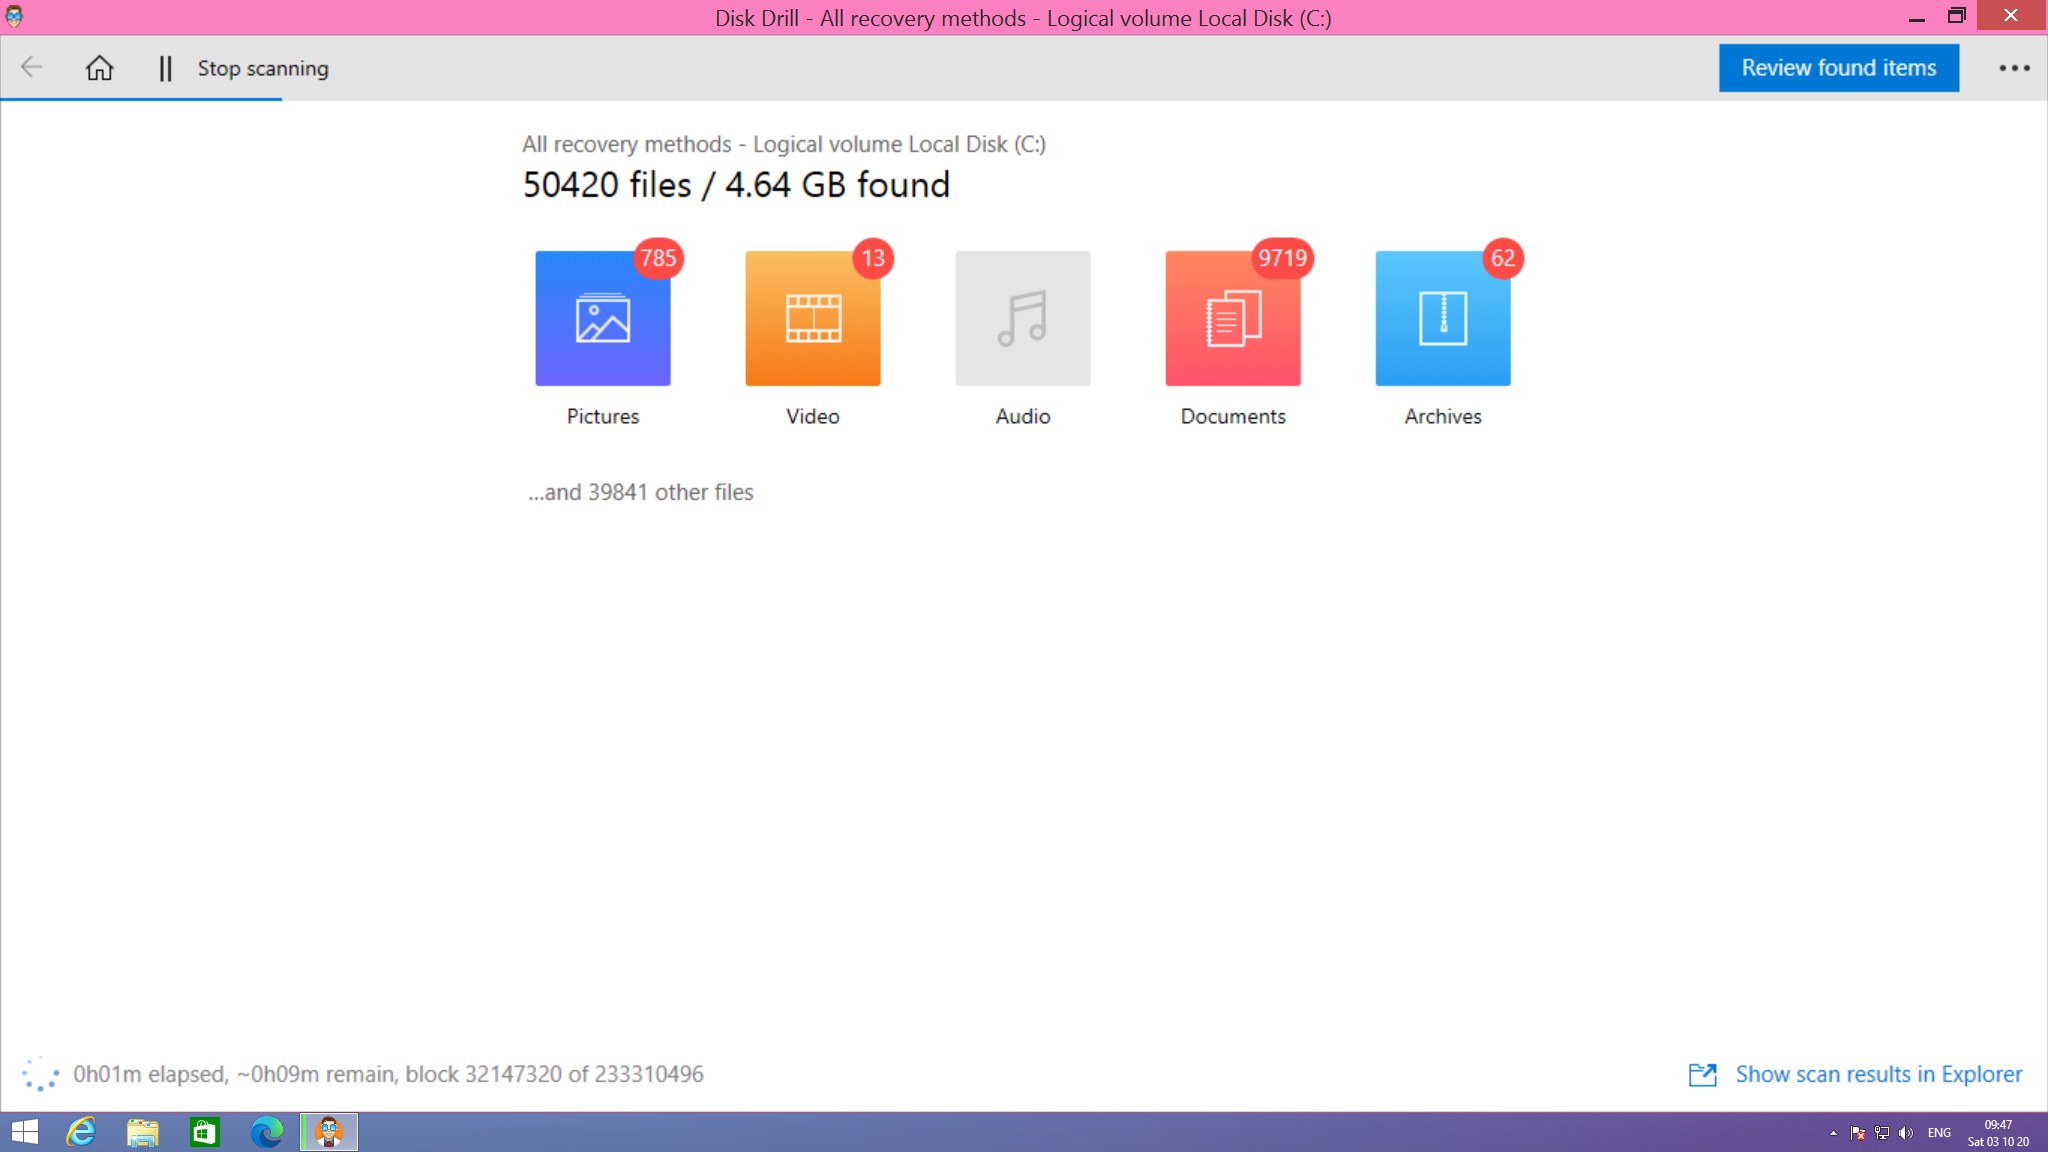
You will now have to wait while Disk Drill performs a scan to analyze your selected drive or partition for recoverable data. This process should not take too long, but just how long it takes will vary depending on the size of the drive being scanned, the amount of data involved, and the speed of your computer. As the scan runs you can see a running update of how many files have been found and at the bottom left-hand side of the screen you can see an estimate of how long is remaining before the scan is complete.
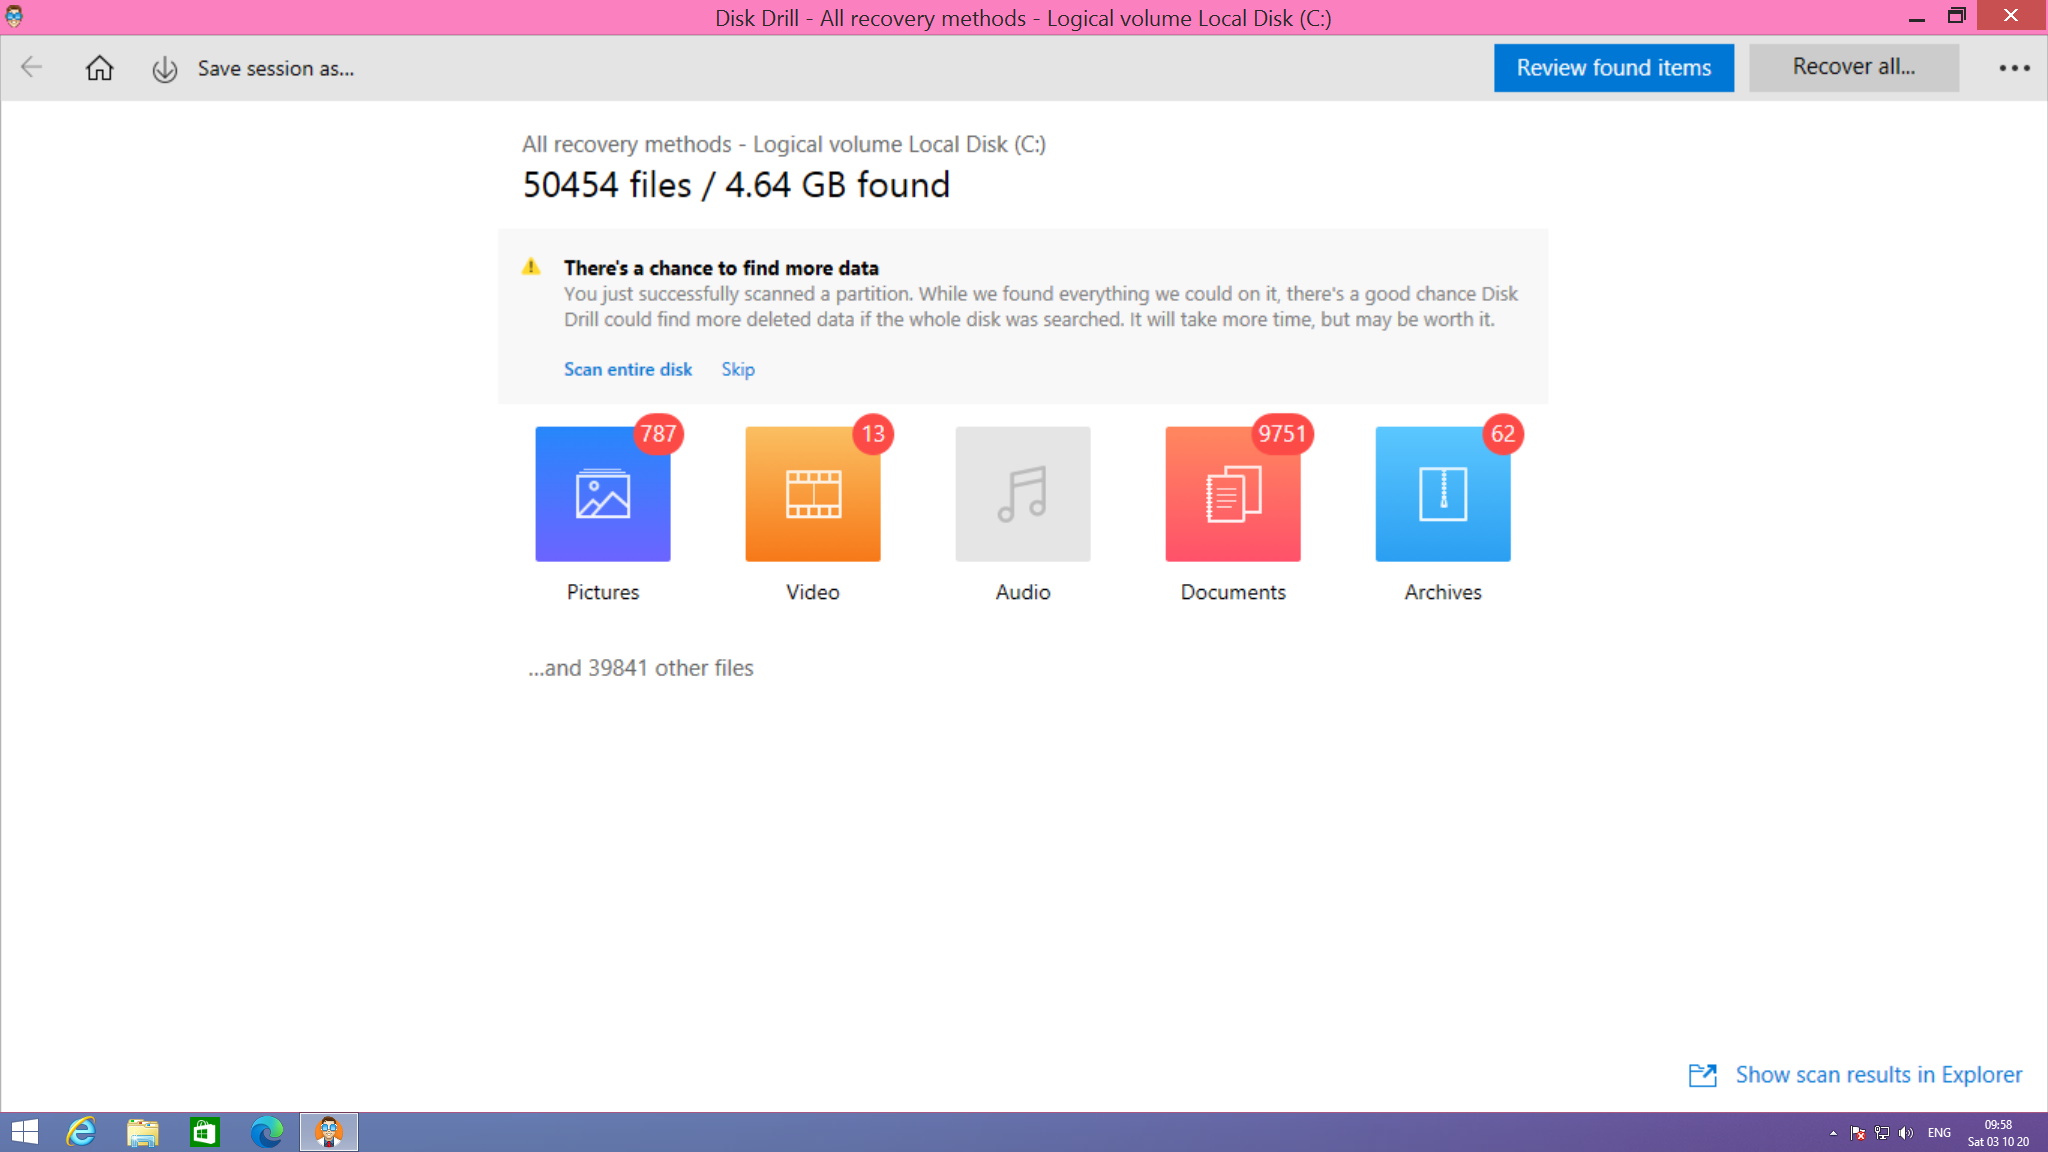
Step 4: Once the scan is complete, it is time to either perform a lengthier in-depth scan of your drive or take a look at what Disk Drill has found. To perform a deeper analysis of your drive, click the Scan entire disk link in the box labeled There’s a chance to find more data – you will only see this option if you initially opted to scan a partition rather than a drive.
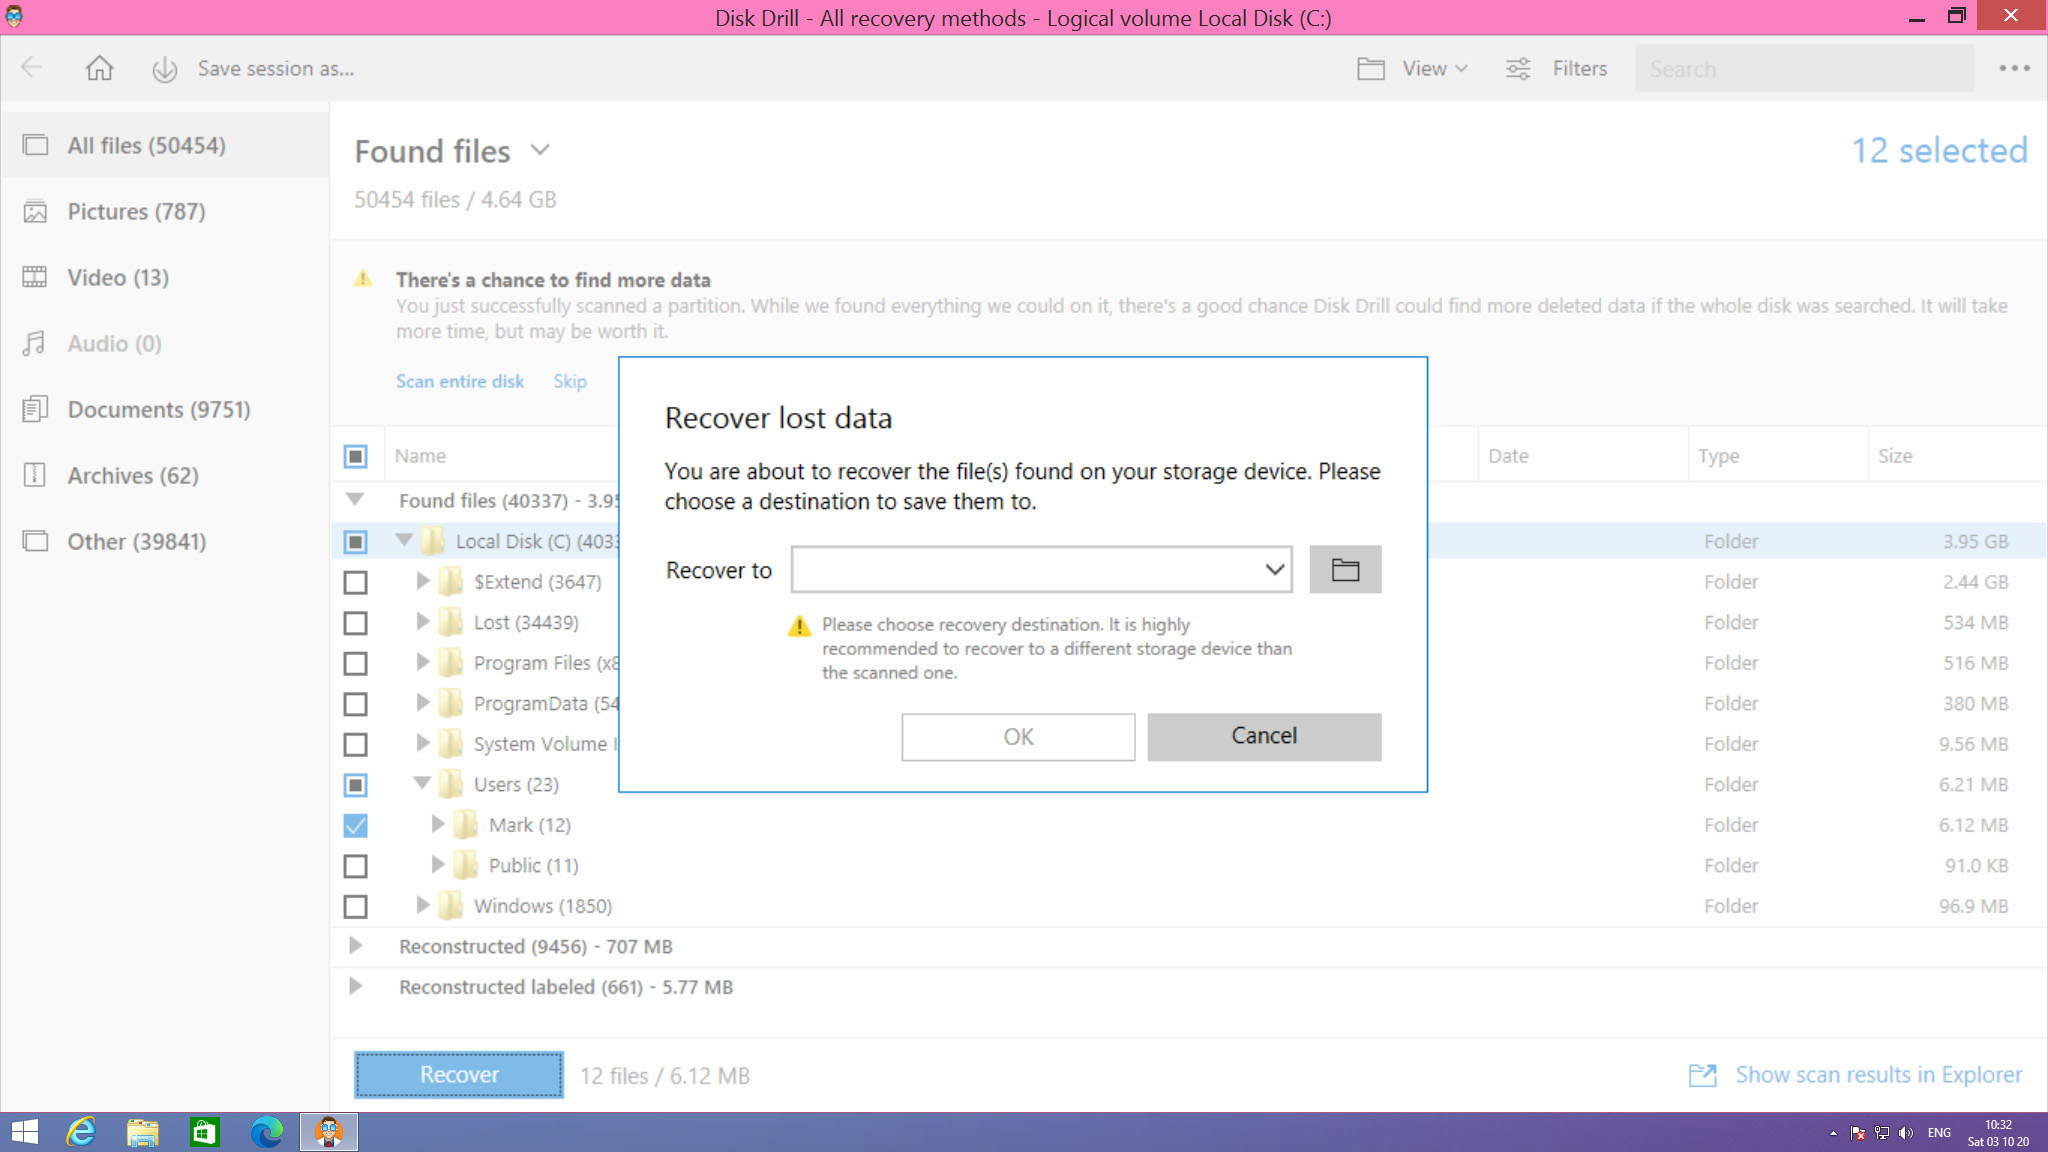
Step 5: If you would like to simply recover all of the data that has been found, click the Recover all button and then choose where you would like to save the files to. But if you would like to recover just a few files, click the Review found items button at the upper right of the screen and browse through what Disk Drill has located.
To the left-hand side of the screen, you will see labels for different types of files – such as Audio and Video; you can click these to home in on a particular file type that you want to recover. You can also browse through the files that have been located by using the Explorer-style tree structure in the centre of the window. To home in on file, you can click the Filters button or you can perform a search using the search box to the upper right.
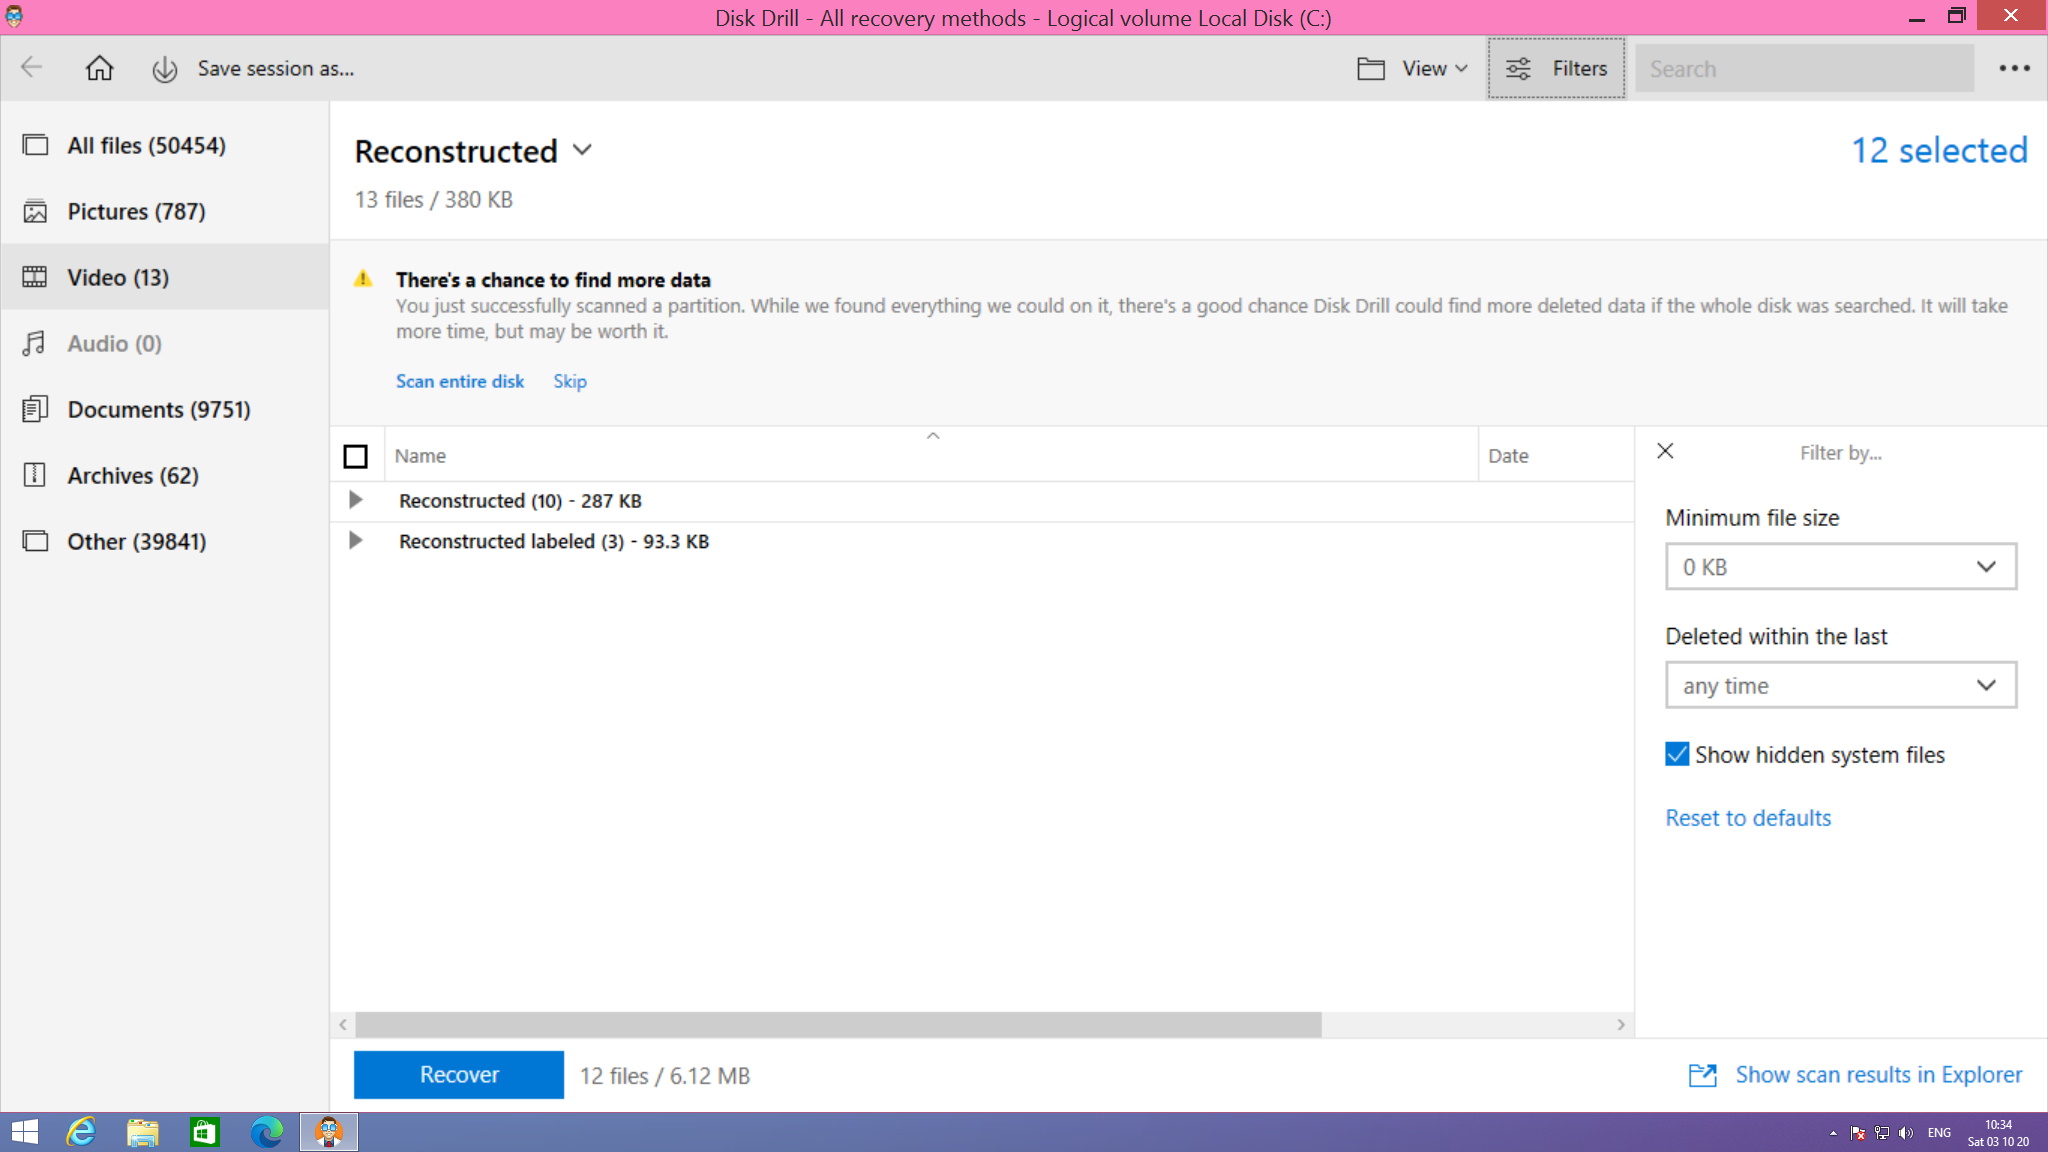
Step 6: To recover data, tick the box next to the files or folder you are interested in and then click the Recover button at the bottom of the screen. You will be prompted to choose a location to save the recovered files to; select a folder, making sure it is on a drive other than the one you are recovering data from.
Method 4. Your Windows 8 PC has been Physically Damaged? Try Data Recovery Services
There will be occasions, sadly, when nothing you try works. If you have been through all of the options mentioned in this article and you have not been able to recover your files, it may be time to think about calling in the data recovery experts. If you take a look online for data recovery services you may be overwhelmed by choice. This is why we have drawn up a list of some of the best options available. Take a look at this list of the five best recovery services; you will be pleased to learn that all of them offer free drive assessments, so you can know the chances of successful recovery before you have to pay anything.


Conclusion
Once a file is deleted, it’s not always gone forever. In most cases, you’ll find there’s more than one way to recover a deleted file. The methods demonstrated in this article will help you restore your deleted data in no time. Once you’ve restored your data, be sure to make backups so you can restore your files easily in the future.
FAQ
Permanently deleted files in Windows 8 can be recovered using data recovery tools. Data recovery tools use advanced algorithms to scan your drive for any data that can be recovered. One such tool that does this well is Disk Drill. To minimize the chances of your data being overwritten, perform recovery as soon as possible.
Follow the below steps to recover permanently deleted files in Windows 8 using Disk Drill:
- Download and install Disk Drill to a separate drive.
- Select the drive that contains the deleted files, then click Search for lost data.
- Click Review found items once the scan is complete.
- Mark the files you want to recover. The Recovery chances column indicates how likely a successful recovery is for each file. When ready, click Recover.
- Choose where you want to store your recovered files. Don’t recover to the same drive you’re recovering from as it poses the risk of corrupting the data you’re trying to recover.
Windows 8 includes a backup feature called File History. When File History is enabled and configured to back up your files, it will periodically take snapshots of your data. This allows you to not only recover it after deletion, but also restore to a specific version. Bear in mind that this is only possible if File History was set up prior to the deletion of your data.
To recover permanently deleted files in Windows 8 using File History, follow these steps:
- Click Start and search File History. Select the result that says Restore your files with File History.
- Find the file you want to recover by entering the filename. The left and right arrows can be used to cycle through the different versions.
- Once you’ve selected the files you want to recover, click the Restore button. This will restore them to their original location. Alternatively, right-click the Restore button and click Restore To to choose a new location.
Booting into repair mode gives you various options for diagnosing and troubleshooting issues with your Windows 8 computer. To do so, follow these simple steps:
- On the Windows login screen, click the Power icon, then hold Shift and left-click Restart.
- Click Troubleshoot once your computer boots back up.
- Click Advanced options.
- Click Startup Settings.
- Click Restart.
- Choose how you want to boot into Windows.