iOS updates can cost a lot of storage, especially during major releases (sometimes costing over 10 GB). If you don’t have enough, you’ll need to systematically free up space until you can upgrade–but if you haven’t explored iOS or kept track of your data, that can take time.
After analyzing the historical requirements of the latest iOS roll-outs, as well as the storage habits of hundreds of iPhone users, we wrote this in-depth guide to show you how to update an iPhone without storage as quickly as possible.
How Much Free Space Do You Need for an iPhone Update
The exact amount of storage space you need for an iOS update varies by its version, as well as its contents. While some iOS updates implement major changes that require a lot of space (e.g., interface upgrades), others are much less dense and only cost a few hundred MB (e.g., patches).
In this section, we break down an approximation of how much storage space you need for different kinds of updates and demonstrate how to check the exact requirements for the specific update you want to install.
| Update type | Approximate storage space requirement | Inclusions |
| Software upgrade (e.g. iOS 18 → iOS 26) | 10 ~ 15 GB | Full iOS overhaul |
| Point release updates (e.g. iOS 26.4.0) | 4 ~ 6 GB | New features or major feature updates |
| Patches/bug fixes (e.g. iOS 26.4.1) | 1 ~ 2 GB | Critical fixes and security updates |
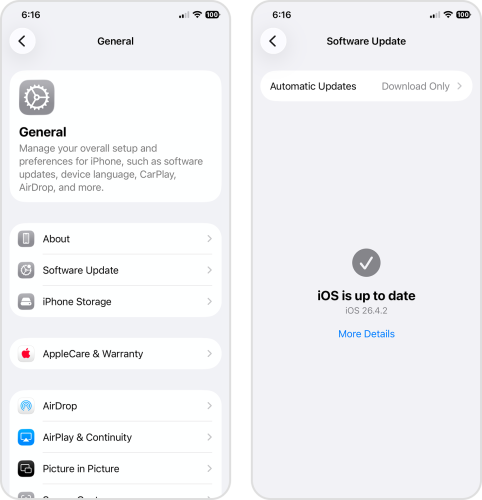
Before updating your device, we recommend checking the exact storage space requirement by navigating to the Software Update page via Settings app > General > Software Update.
What if the update failed?
Without the appropriate free storage, when you attempt to update your iPhone, “Not enough storage to update” (or something similar) appears as a warning. In this case, you’ll need to free up more space before trying again. The most efficient approach is to identify what type of data is using the largest amount of storage on your device, then eliminate it.
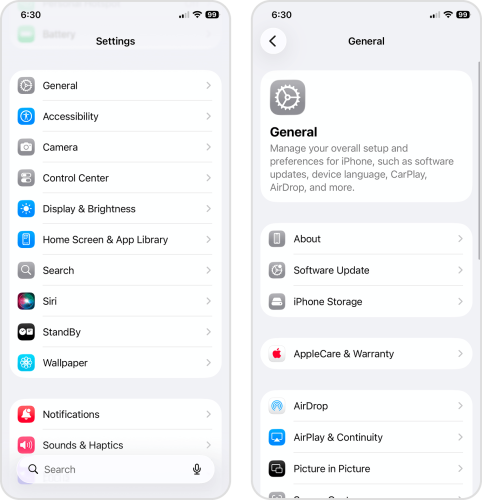
Open the Settings app > General > iPhone Storage. The storage bar indicates how much storage each data type uses, relative to your device’s total capacity.
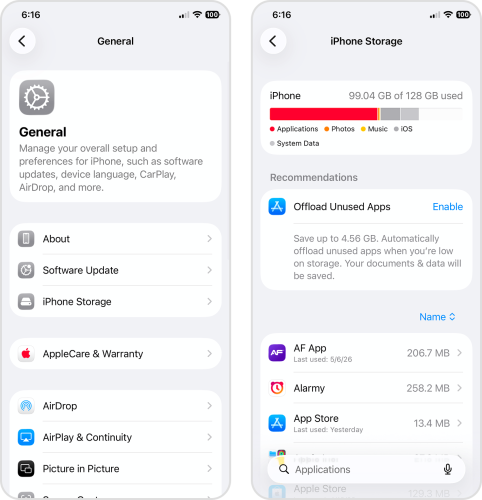
Use the information displayed above to prioritize resource-intensive data. For example, on my device, apps take up the most space (color)–so it makes sense for me to delete unwanted apps first. In the following section, we cover the most efficient methods of cleaning up different types of data, so you can take action on your own device’s storage.
What to Do When iPhone Says Not Enough Storage to Update
If you need to update your iPhone, freeing up storage space is an urgent priority; to help you cover as much ground as possible, we identified the most resource-intensive data types–photos and videos, applications, and attachments–and how to clean them up effectively.
The method you should focus on depends on what kind of data populates your iPhone the most. But we recommend using all of them to reclaim as much storage as possible.
Option 1: Delete Photos and Videos in the Photos App
For most iPhone users, photos and videos take up a massive chunk of storage space. While the Photos app does offer manual cleaning features, consider using third-party apps instead. Unlike the all-around Photos app, third-party cleaning apps are specially designed to optimize and even automate cleaning your iPhone.
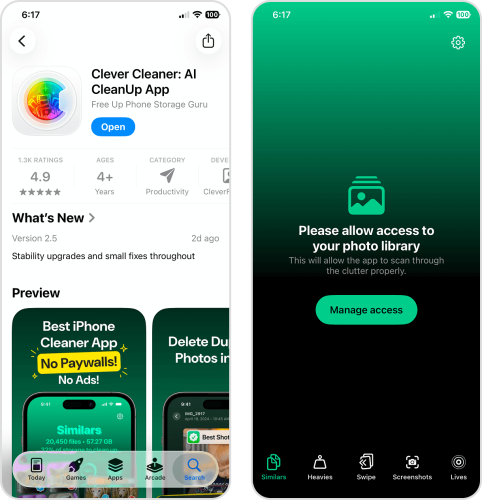
There are several to choose from in the App Store, but we’ll be featuring an app called Clever Cleaner in this guide. It’s completely free as of this writing, has no ads, and provides several different cleanup tools that we’ll cover after these instructions. First, to show you how the app works, we’ll demonstrate using Clever Cleaner’s Similars tool to eliminate similar and duplicate photos.
- Download the Clever Cleaner app from the App Store.
- Grant Clever Cleaner Full Access to your Photo Library (don’t worry, it’s safe!).
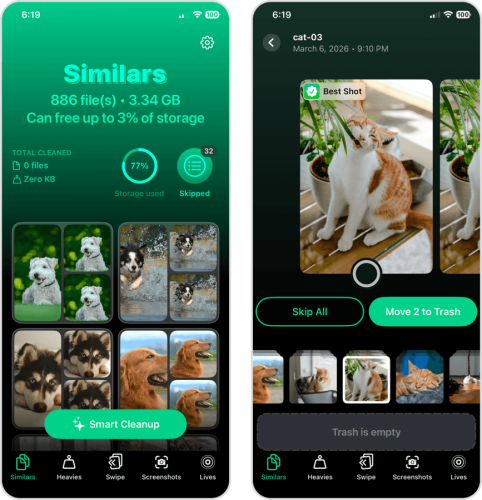
- On the bottom menu, tap Similars. Then, tap any cluster of similar photos you want to review. Alternatively, you can tap Smart Cleanup to instantly purge all similar and duplicate images from your library–Clever Cleaner will select the best copy to leave behind.
- Tapping a cluster of similars opens a new interface, where you can review sets of similar and duplicate photos. Clever Cleaner automatically chooses the “best copy” for you; you just need to tap Move to Trash to delete the rest. Alternatively, you can make your selection manually.
- After deleting your similar and duplicate photos, tap the pop-up dialog at the bottom of the screen to open Clever Cleaner’s Trash folder.
- Use the slider at the bottom of the screen to confirm the deletion of your photos.
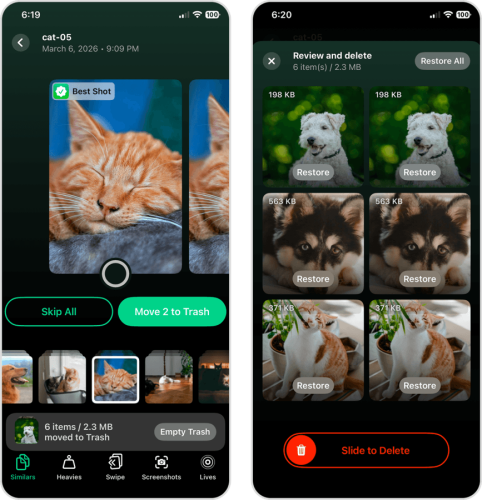
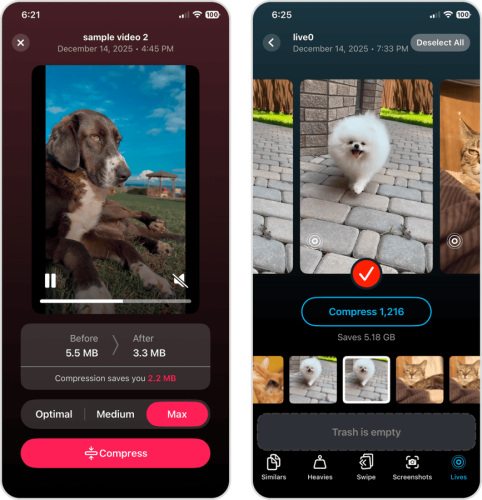
We recommend exploring Clever Cleaner’s other features to free up even more space on your device; Heavies lets you compress and mass-delete large videos, while Lives can convert all your Live Photos into still images at once (and delete the originals automatically).
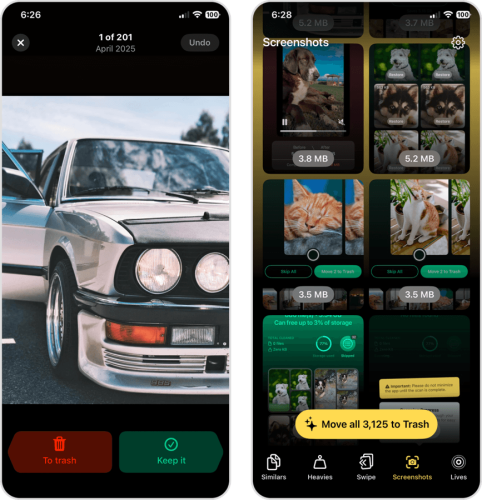
Swipe Mode provides swipe controls for faster cleanup of individual photos. The Screenshots feature gives you a one-tap delete button for screen captures, but it also just completes the round-up for photo types that you can manage using Clever Cleaner.
Option 2: Remove Unused Apps and Reinstall Large Ones
One of the most resource-intensive data types on your iPhone is applications. And it’s not the number of apps that matters, but their total size; some apps are small and static (a simple calculator), while others are huge and grow even more over time (e.g., social apps, video games, and media streaming apps, etc.).
It’s impossible to pinpoint the exact culprits, so the most efficient solution is to simply eliminate apps you don’t need. You can also uninstall and reinstall important apps, which purges any cached data that might have built up over time. In this section, we’ll show you a convenient way to manage your apps through the Settings app.
- Open the Settings app on your iPhone.
- Tap General.
- In the General settings page, select iPhone Storage.
- Scroll down until you see the list of all the apps installed on your iPhone. You can sort them according to Size or Last Use Date to determine which apps should be uninstalled. Tap any app to proceed.
- Finally, tap Delete App.
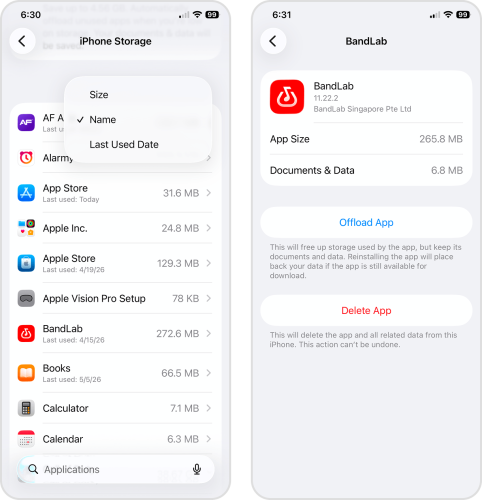
Once the app is deleted, you can download it again from the App Store. After downloading the app and using it a few times, check your iPhone Storage page again to observe whether the app’s storage usage remains low or if it suddenly fills up your device again.
Option 3: Clear Large Attachments in Messages
Messages can take up a lot more storage space on your iPhone than you’d initially think. While the text itself has a small file size, attachments (like photos and videos) can reach up to 100 MB in size. You won’t find your iPhone messages as a distinct data type in the iPhone Storage page; instead, the Messages app itself increases in size.
One way to get rid of attachments is to delete the message thread itself. But if you want to keep your messages (and the option to download the attachments again later), this guide shows you how to delete individual attachments, based on the sender.
- Open the Messages app. Then, open the message thread containing the attachments you want to remove from your iPhone.
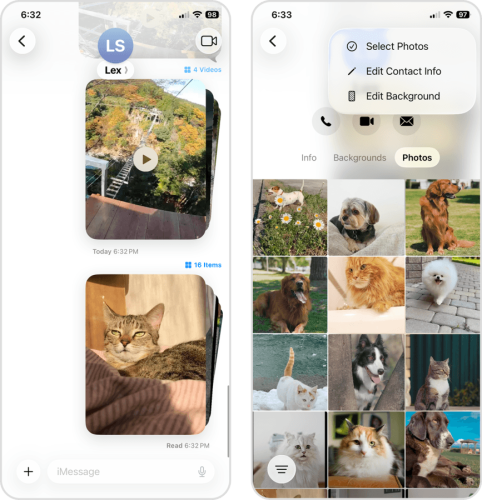
- At the top of your screen, tap your contact’s name or icon.
- On your contact’s message history page, tap Photos. Then, tap Edit in the top right corner of the screen and choose Select Photos from the context menu.
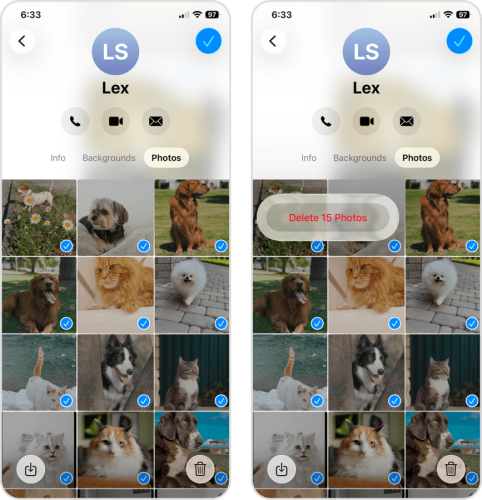
- Select the attachments you want to delete. Then, tap the trash icon (🗑️) in the bottom right corner of the screen.
- Finally, tap Delete Photos to confirm the action.
How to Update iPhone Without Enough Storage Using Finder on Mac
If you’ve eliminated everything you possibly can from your iPhone, but you still don’t have enough storage space to update iOS, you can use your Mac instead. Connecting your iPhone to your Mac gives you access to several device management tools, including the ability to save iOS update files to your computer–instead of your iPhone–during the upgrade.
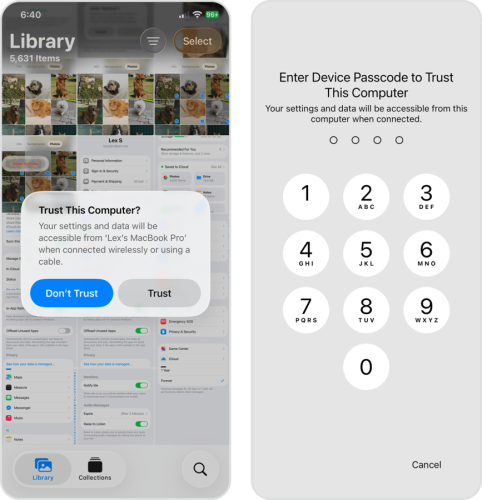
- With the appropriate cable, securely connect your iPhone to your Mac. On your Mac, allow the connection if prompted.
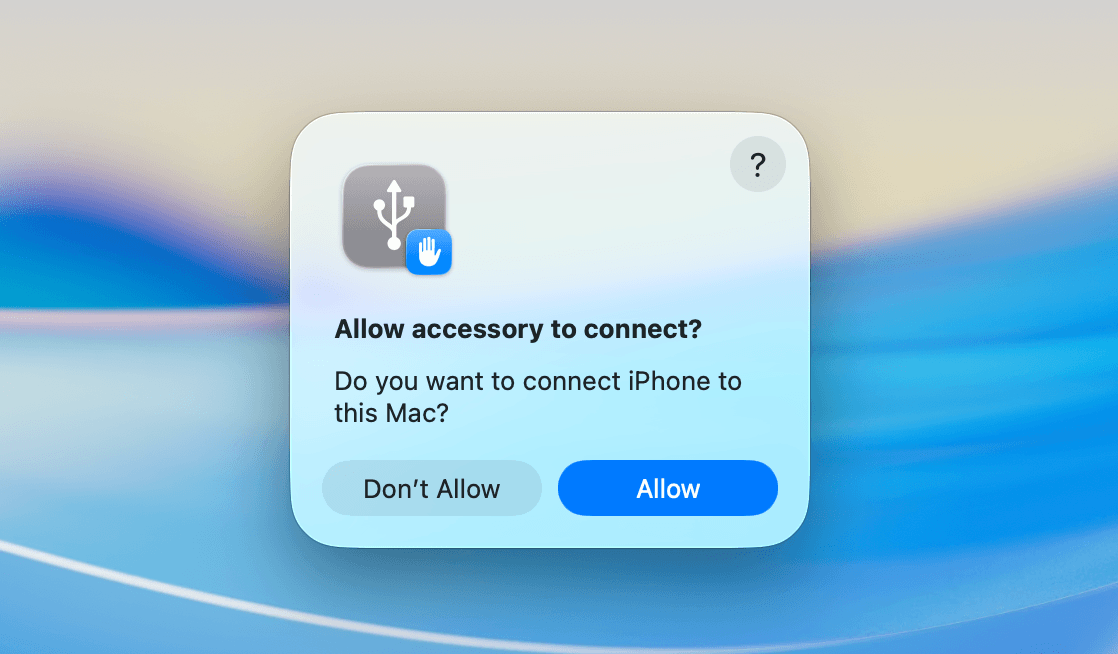
- On your iPhone, Trust your Mac and enter your passcode if prompted.
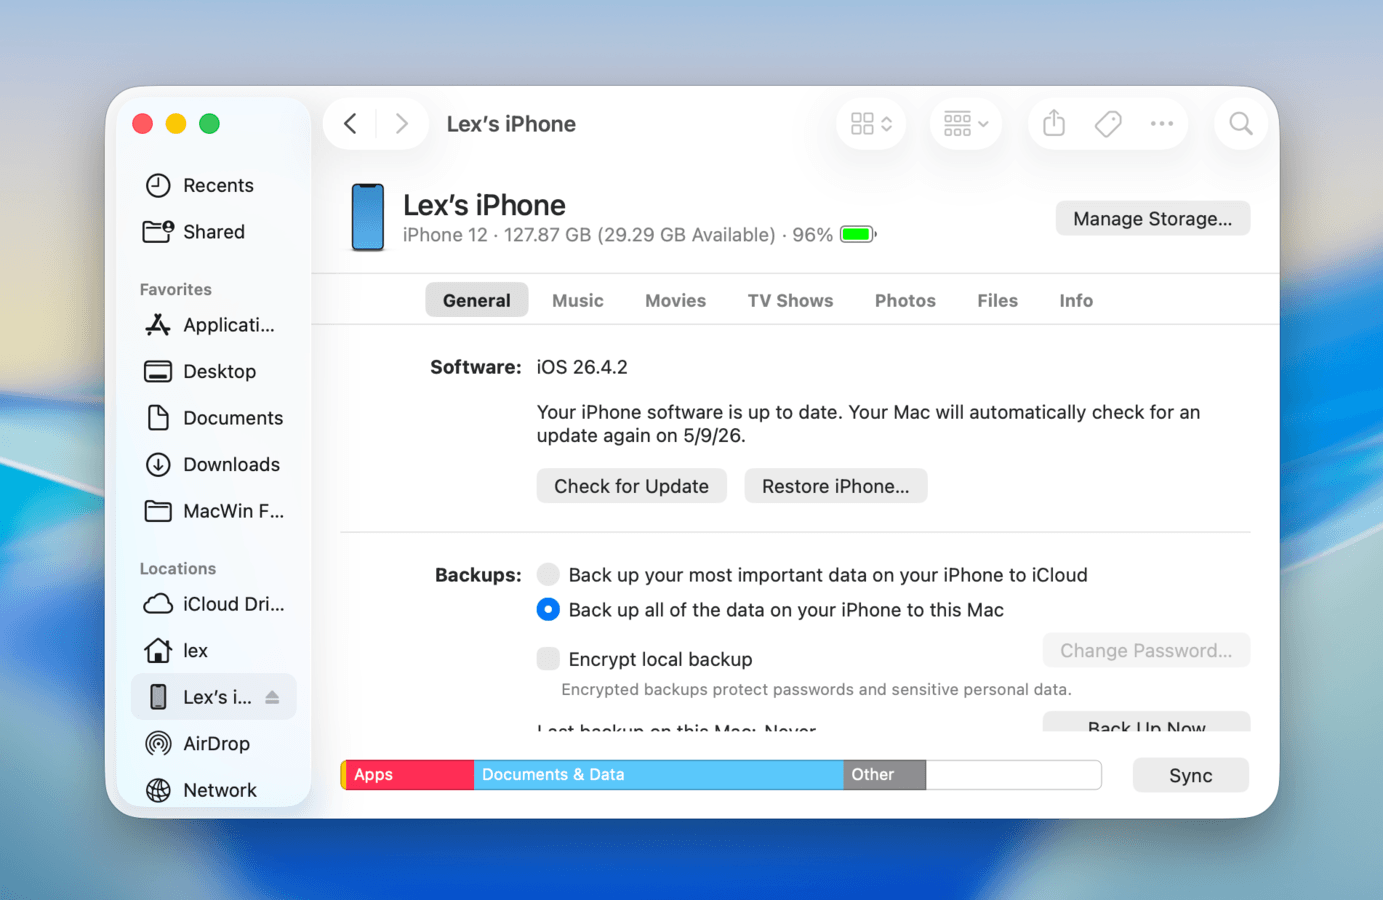
- On your Mac, open Finder. Then, select your iPhone on the left sidebar (under Locations). Your iPhone’s device page should appear; navigate to the General tab and click Check for Update.
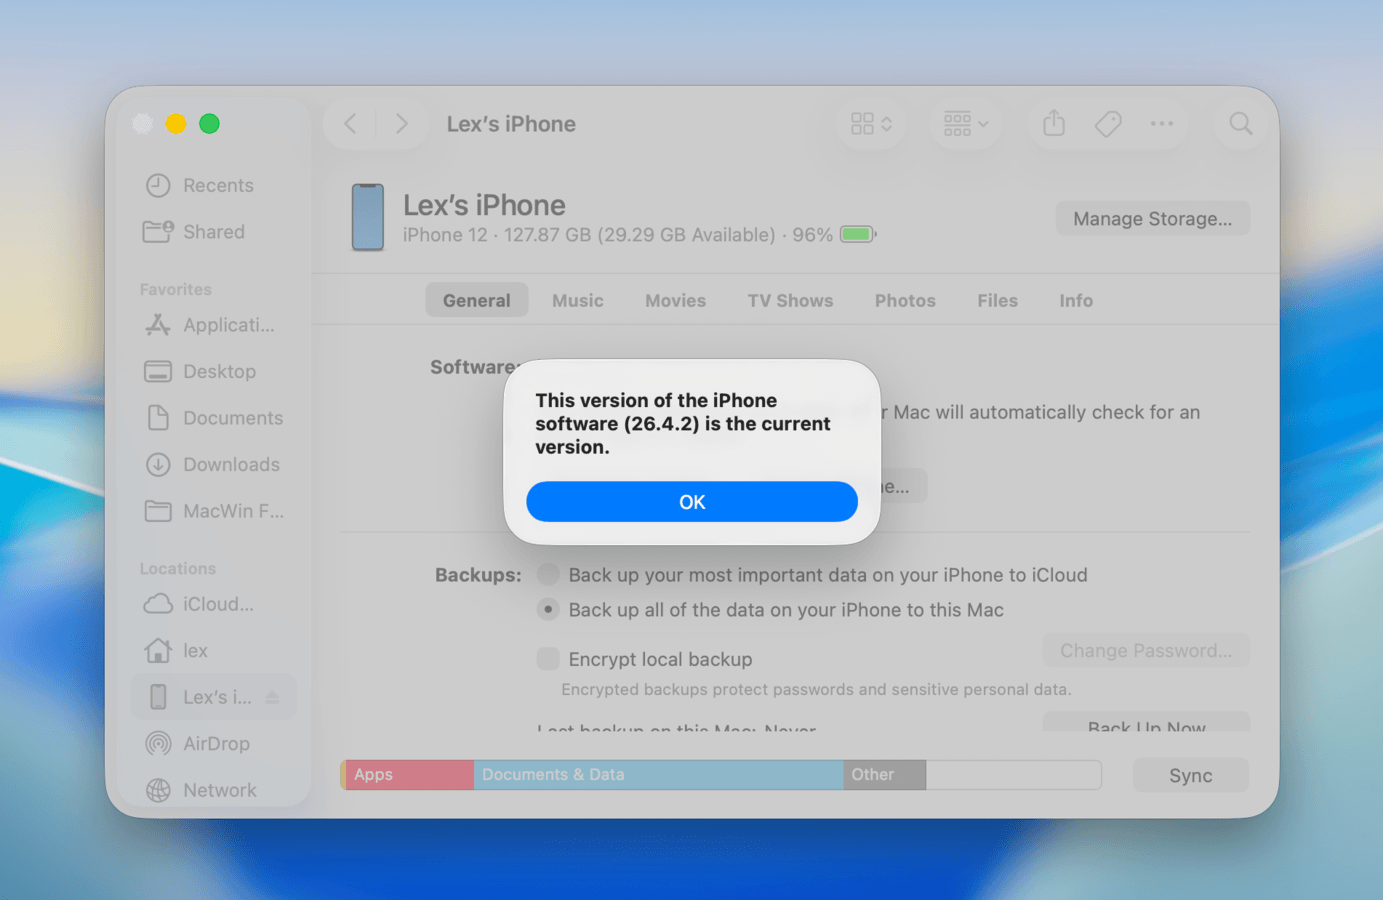
- If an update is available, click Download and Update to proceed. Otherwise, your Mac will inform you that you’re already running the latest version.
How to Keep Enough Space on iPhone for Future iOS Updates
Even after successfully updating iOS, we strongly recommend that you observe good storage hygiene. Keep a healthy amount of free space available for smooth system operations, saving new photos and videos, installing new apps, and updating to a newer iOS version (it never ends).
But managing your device storage can be boring and tedious; so, we dedicated this section to the most low-effort, high-reward methods of maintaining your iPhone’s storage space. It covers photos and videos, apps, and messages (as well as their attachments), so you can pick which makes the most sense for your device or use all 3 (recommended).
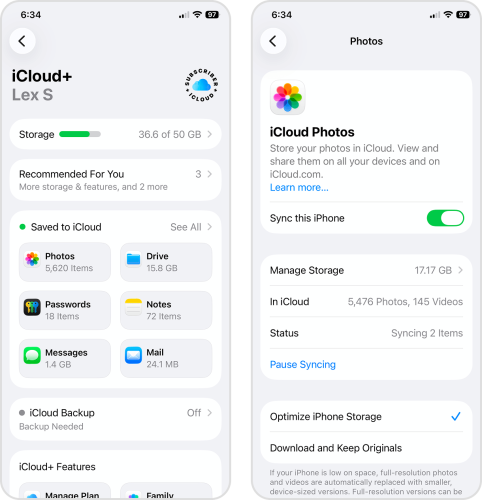
Option 1: Optimize Photos and Videos with iCloud
If you have a big photo library, a convenient and effective way to manage your storage space is by using the Optimize iPhone Storage setting. This setting automatically uploads the original copies of your photos and videos to iCloud, while only retaining lower-definition (but still high-quality) versions on your local storage.
According to Apple Discussions, optimized versions of your iPhone’s media can be as small as 10%~20% of their original size. That means activating this setting can theoretically shrink a 100 GB+ photo library to 10~20 GB.
Info: Depending on how many photos and videos you have, you may need to subscribe to one of the iCloud+ plans available for your device and country.
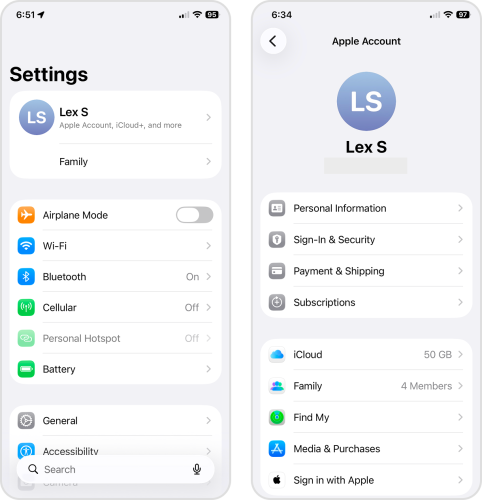
- Open the Settings app.
- Tap your Apple Account at the top of the page.
- In the Apple Account page, select iCloud.
- Scroll down to the Saved to iCloud section and tap Photos.
- Beside the Sync this iPhone option, slide the toggle switch to the ON position (green). Then, tap Optimize iPhone Storage to enable it as well.
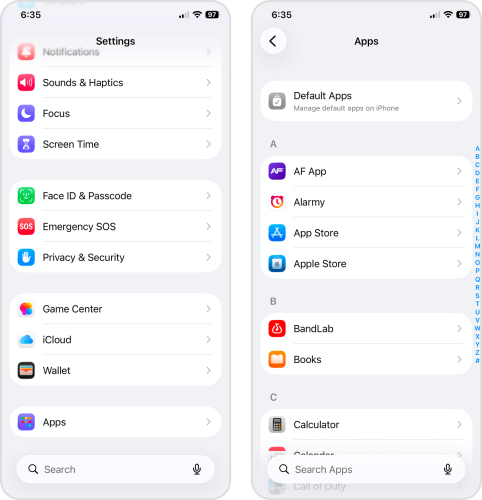
Option 2: Turn On Automatic App Offloading
“Offloading” an app means deleting the app itself, while retaining its documents, data, and settings. This allows you to free up the space being used by the app, while letting you pick up from where you left off if you download it again later.
Using a setting called Offload Unused Apps, your device can automatically offload apps you haven’t used in a while whenever it detects that your storage space is running low. You can simply redownload offloaded apps when you need them or after updating iOS.
- Open the Settings app.
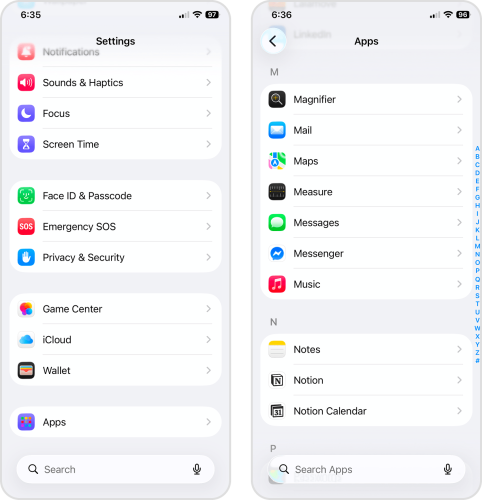
- Scroll down to the very bottom of the page, then tap Apps.
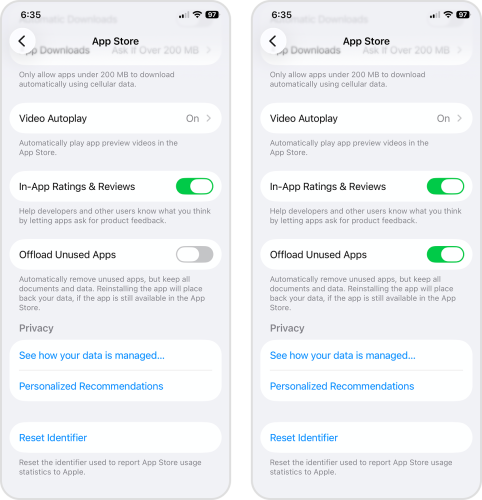
- At the top of the Apps list, select App Store.
- Scroll down to the bottom of the App Store settings page until you find the Offload Unused Apps setting. Beside it, slide the toggle switch to the ON position (green).
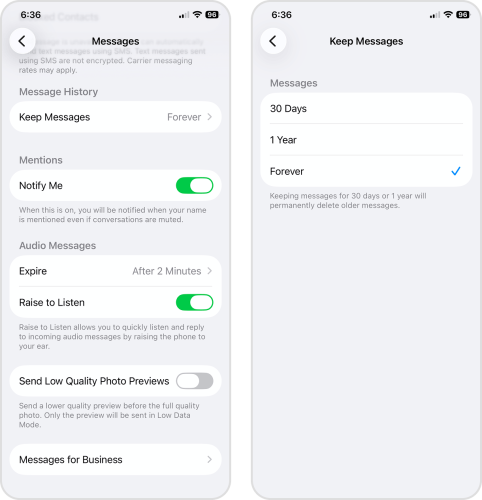
Option 3: Adjust Message Settings for Automatic Deletion
By default, the Messages app saves all your messages, along with their attachments, on your device forever. Given that attachments can be a few dozen megabytes in file size, the app gets bloated over time. For an automated solution, we’ll show you how to change “Forever” to either “30 days” or “1 year” via the Settings app.
- Open the Settings app.
- Scroll all the way down, then tap Apps.
- Locate and select the Messages app.
- Scroll down to the MESSAGE HISTORY section. Then, tap Keep Messages.
- Choose the duration of time that you want to keep messages stored on your device. For example, selecting 1 Year means that messages will be deleted 1 year from the day that you receive them.
To Wrap It Up
To end on a productive note, we prepared a quick recap of the entire guide, along with handy links to the appropriate sections. If you can’t update your iPhone due to storage:
- If you have a lot of photos and videos, especially unwanted ones (e.g., duplicates, blurry photos, etc.), clean up your library.
- Do you have a lot of apps you seldom use? Consider deleting them or reinstalling your biggest apps (which clears out their cache data).
- Message attachments can take up a lot of space, especially if you don’t delete old conversations. You can delete the messages themselves or remove downloaded attachments.
- To ensure you have enough storage space for future iOS updates, use iCloud’s optimization feature, allow iOS to offload apps automatically, and set a time limit for saving messages (and their attachments).
Even with perfect data hygiene, your iPhone’s storage requires regular attention; you use it to store and process gigabytes of data daily–and having a 512 or 1 TB device just gives clutter more room to hide. Set aside time each week (or, at least, each month) to tidy up, so you can prevent useless data from accumulating.
If you still need more storage space after applying the recommendations in this guide, we wrote another article specifically on the topic of freeing up iPhone storage. There, you’ll find new tools and methods to try.