I recently needed to free up space on my iPhone before a family trip because I really didn’t want the “Storage Almost Full” notification to ruin my day. The problem was that there were no apps I was willing to delete (and I was already offloading unused apps anyway), nor did I have thousands of duplicate photos cluttering my camera roll. But when I dug deeper into my storage settings, I discovered that a huge chunk of my storage was taken up by video files.
Are There Easy Ways to Sort Videos by Size on iPhone?
Apple gives you options to sort media by date (newest to oldest or vice versa), organize by albums, or filter by favorites, but there’s no built-in way to see which videos are taking up the most storage. As we already mentioned in the intro, you simply can’t filter iPhone videos by size within the Photos app itself.
At most, you can check the size of each video manually:
- Open the Photos app and navigate to the Collections tab at the bottom.
- Tap Videos under Media Types to see all your video files.
- Select a video you want to check.
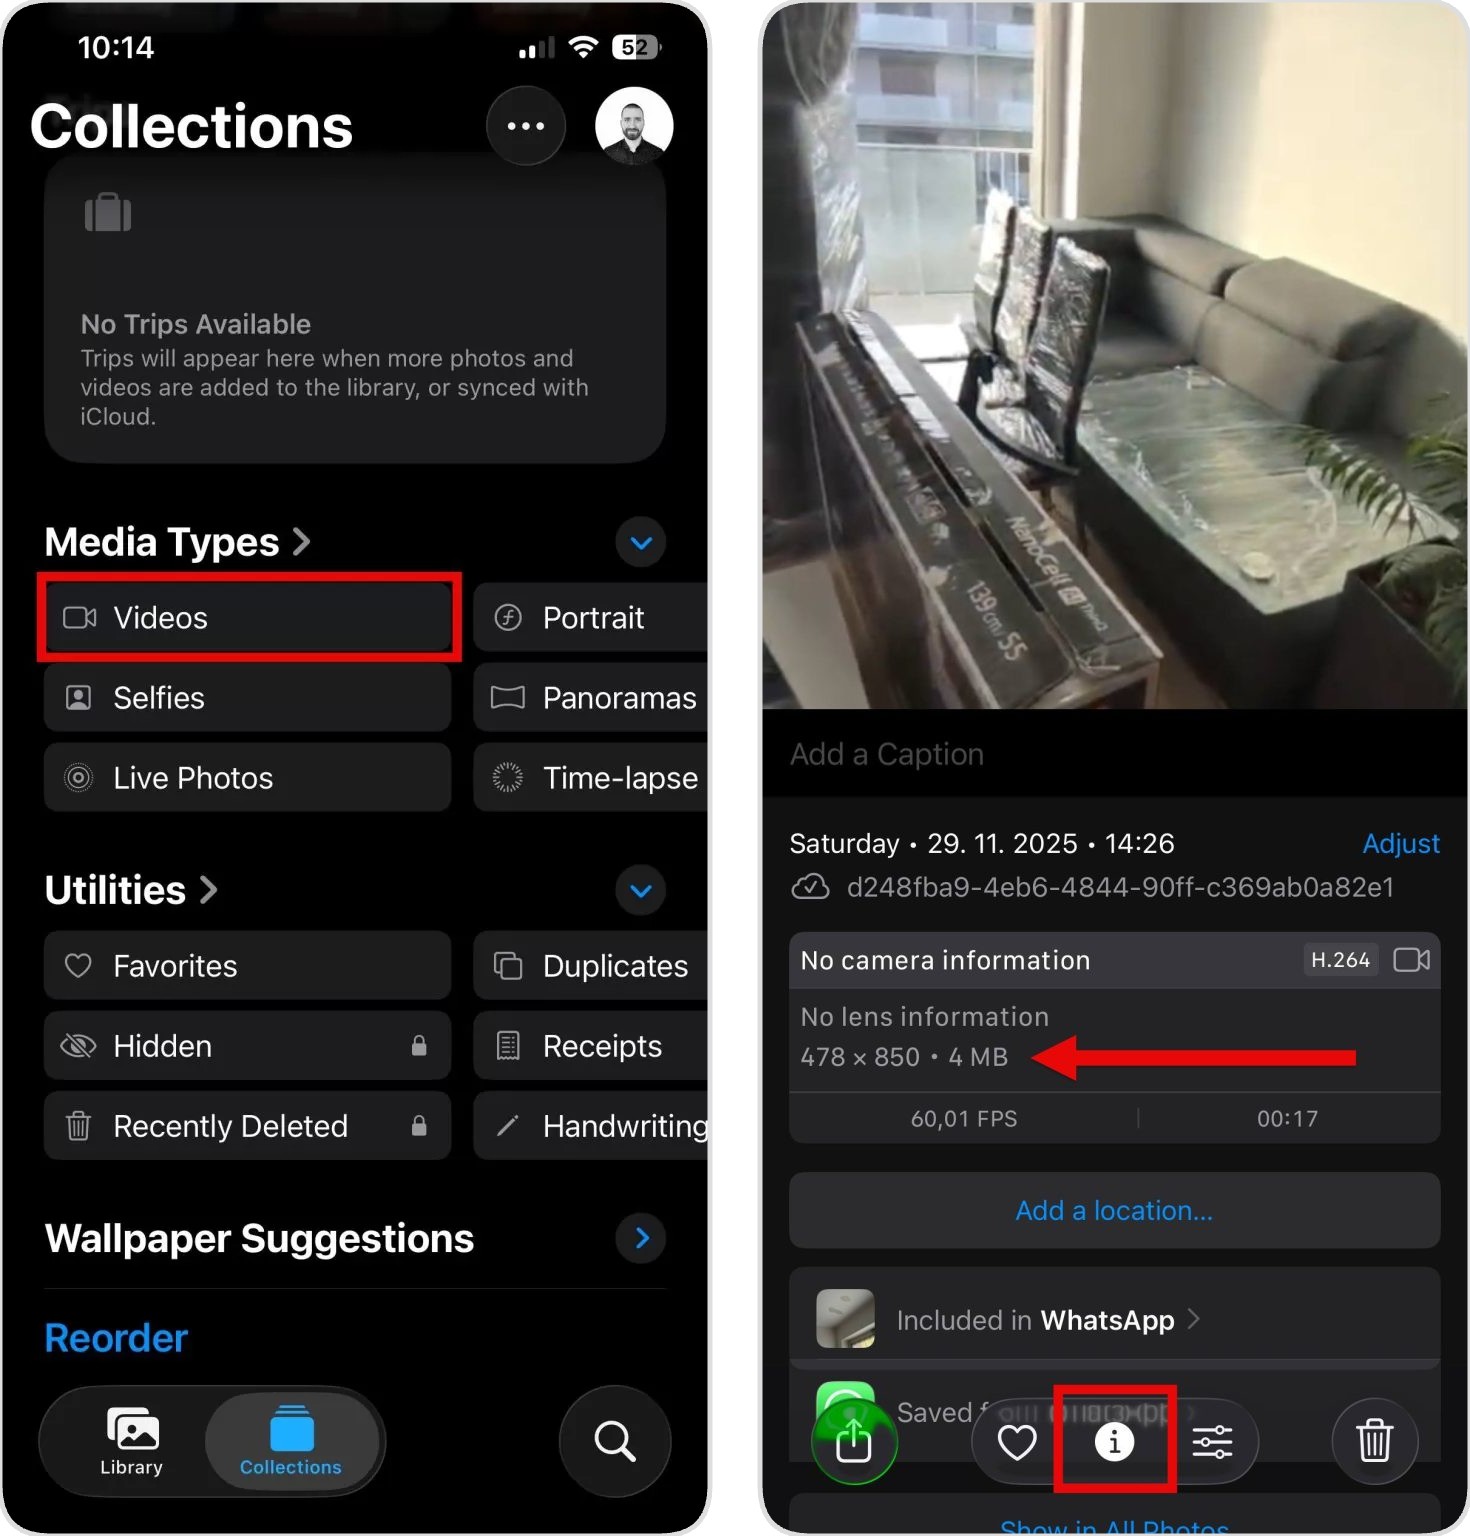
- Tap the info icon (it looks like a circled “i”) at the bottom of the screen.
- Look for the file size listed in the details.
Alternatively, you can sort videos by length on iPhone as a proxy for finding large files. In the Videos album, tap the three-dot menu icon in the top right corner and choose to sort by duration. While this isn’t perfect (a short 4K video can sometimes be larger than a longer 1080p clip), it’s generally true that the longest videos on iPhone are also the largest in file size.
The option to sort by size exists only for videos saved in the Files app, such as videos you’ve downloaded directly from Safari, saved from messaging apps into Files, or manually moved there from other apps. But being a general-purpose file browser, the Files app has its own limitations when it comes to finding large videos on iPhone, and we’ll cover how this works later in the guide.
Workarounds to Find the Largest Videos on iPhone and Delete Them Instantly
Since Apple doesn’t make it easy to see which videos are taking up the most storage, you need to get creative. I’ve tested several workarounds to find the biggest videos on iPhone more efficiently, and in this section, I’ll walk you through the three methods that actually work without eating up your entire afternoon.
Option 1: Use iPhone Cleaning Apps to Find Large Videos on iPhone
Most iPhone cleaning apps are known primarily for finding and removing duplicate photos, but the better ones also include specialized tools for managing other storage-heavy file types, such as videos. Among the various cleaning apps available, I’ve found Clever Cleaner to be the best one.
The app is completely free and without ads (no hidden subscriptions, no feature paywalls, and no annoying banner ads interrupting your cleanup session).
To find large videos, you need to use Clever Cleaner’s Heavies feature, which automatically sorts all your videos by file size and shows you exactly how much storage each one occupies. But the app offers several other useful tools for managing photos and freeing up space, which I’ll cover after we walk through the main process.
Here’s how to use Clever Cleaner to see the largest videos on iPhone:
- Download Clever Cleaner from the App Store. You can click this direct link to go straight to the download page or use the search feature in the App Store.
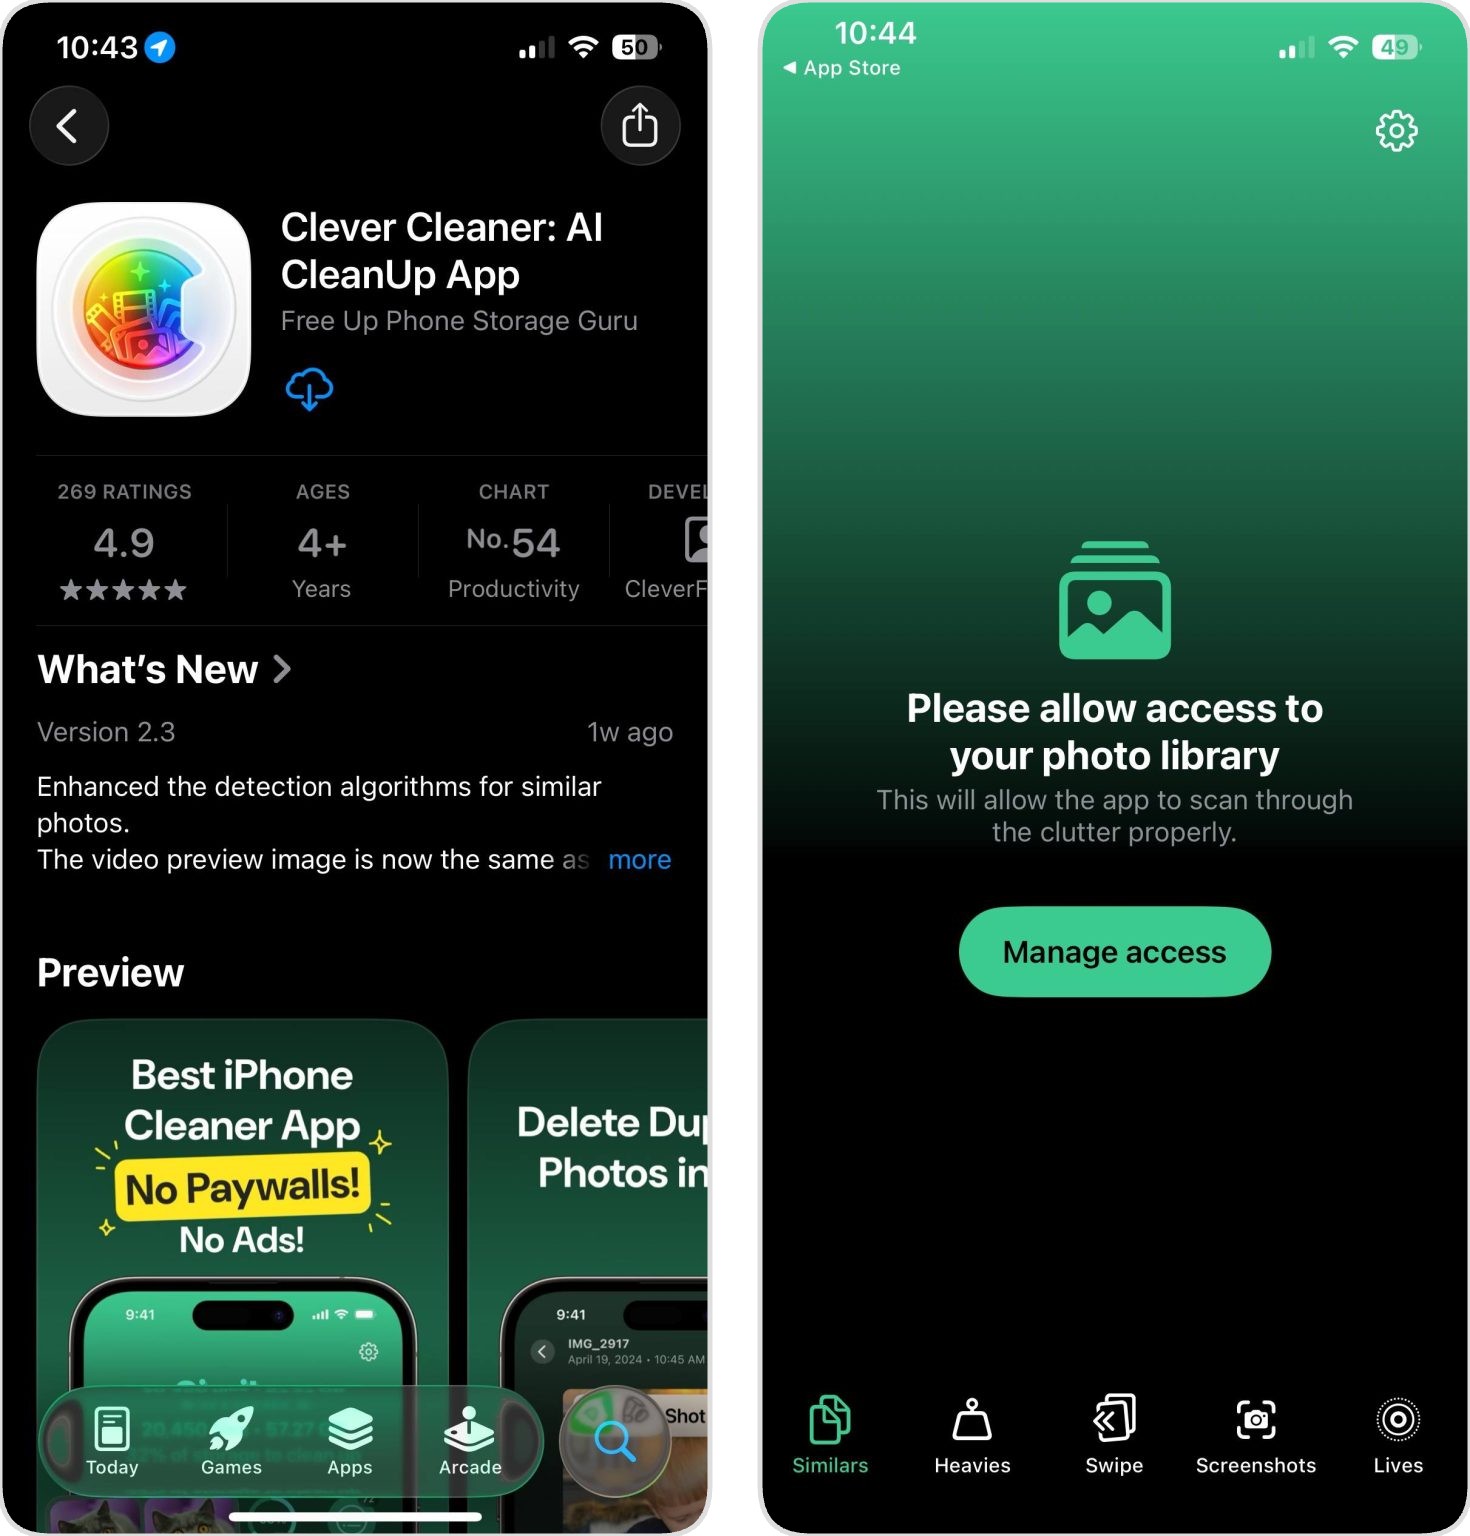
- Open the app and grant it permission to access your Photos library when prompted. This is necessary for the app to scan and analyze your video files (Clever Cleaner respects your privacy and doesn’t upload or share your files anywhere).
- Wait for the initial scan to complete. This usually takes 2-10 minutes, depending on how many photos and videos you have.
- Once the scan finishes, you’ll see five main categories at the bottom of the screen: Similars, Heavies, Swipe, Screenshots, and Lives. Tap on Heavies to check video size on iPhone.
- The Heavies screen will display all your videos sorted by file size, from largest to smallest.
- Tap any video to open the selection screen. From here, you can go through your videos and mark those that you no longer need. As you select videos for deletion, Clever Cleaner displays exactly how much storage space you’ll recover.
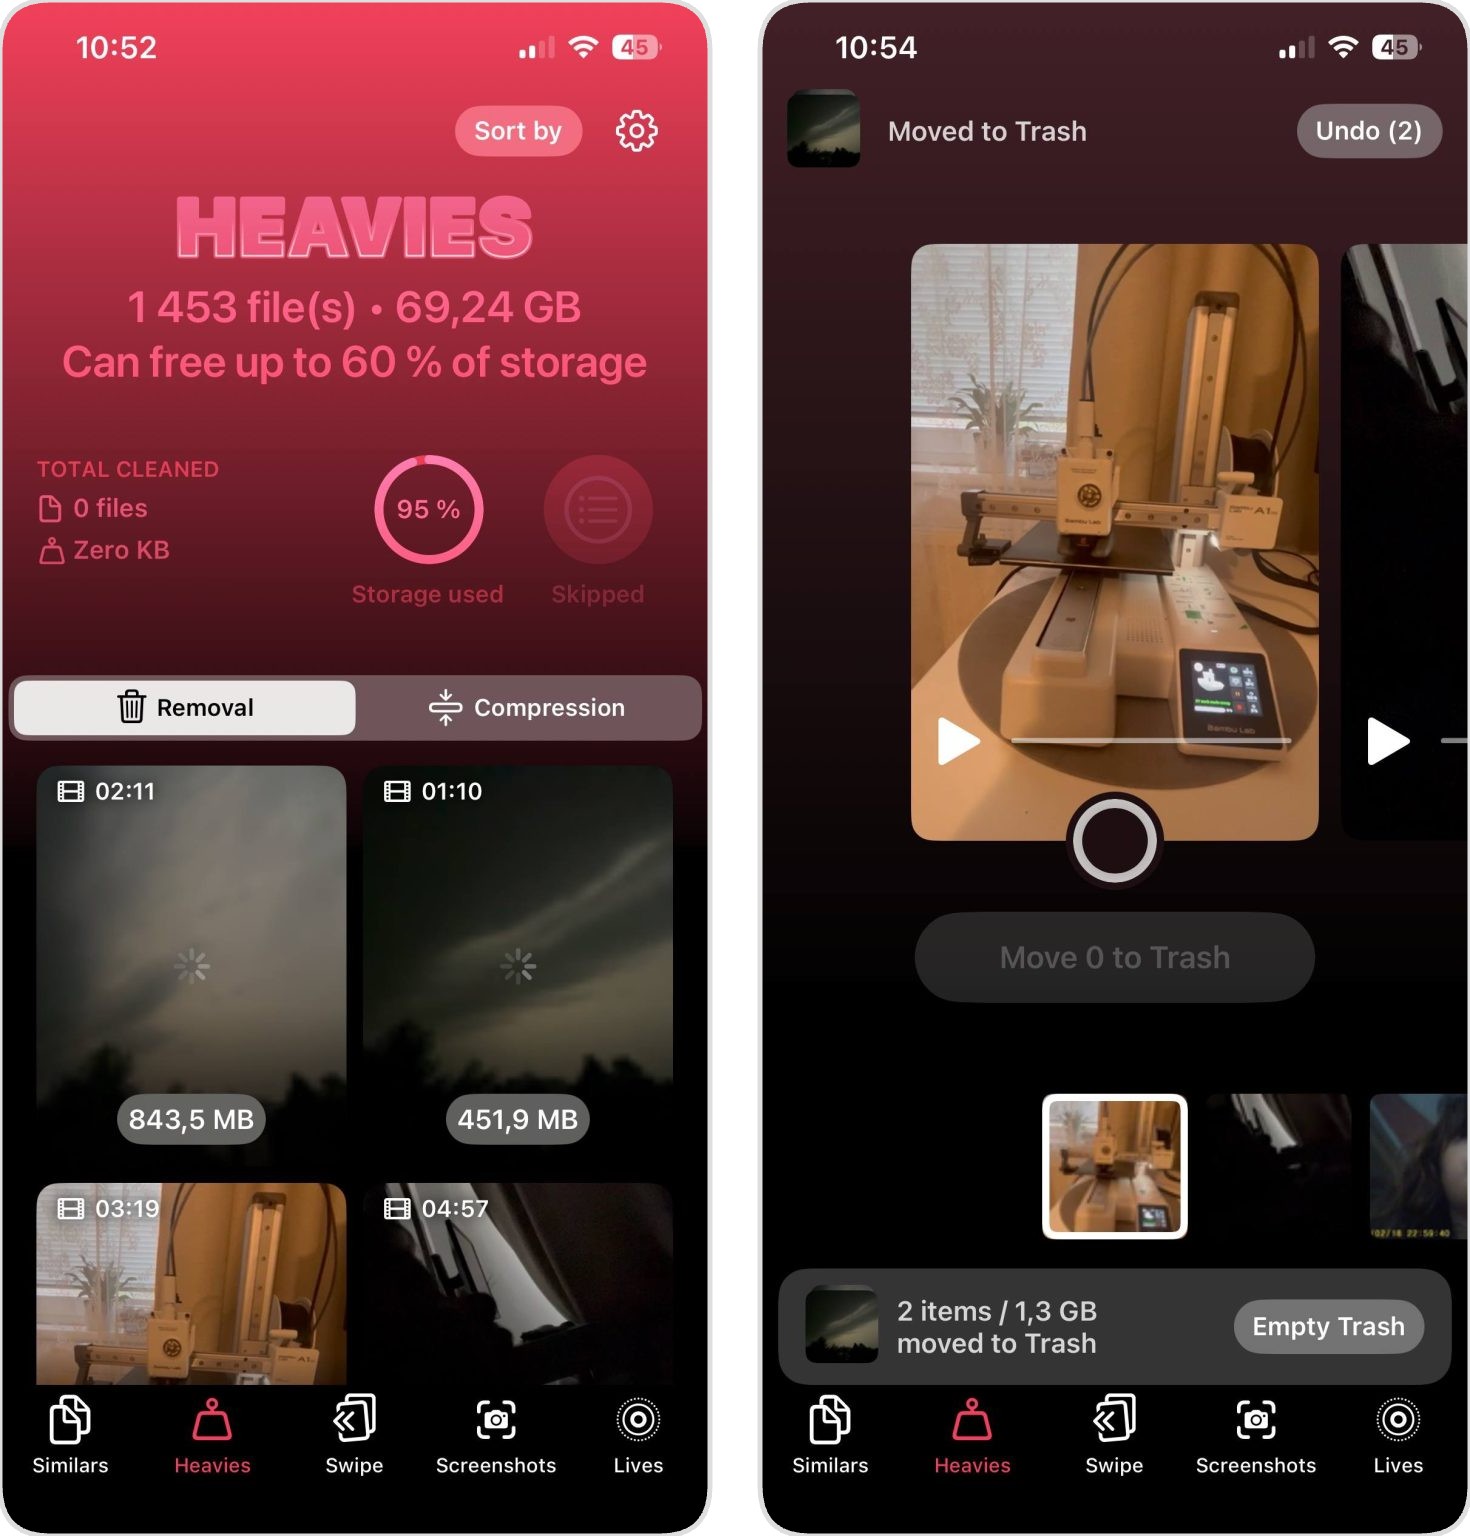
- Once you’ve made your selections, tap Move to Trash. Your files will be instantly moved to Trash.
- Finally, you need to empty the Trash to free up the storage space occupied by your video files. Alternatively, you can change your mind and retrieve the videos from Trash.
The Heavies tool also includes a video compression option that can be very useful if you want to keep certain videos but need to reduce their file size. I personally use it for long family videos that I probably won’t watch again in their entirety until I’m old. Since the value of such videos is primarily nostalgic anyway, the reduced video quality won’t matter at all to me.
What other features does Clever Cleaner offer?
- 📸 Similars: Clever Cleaner can find similar shots like burst photos, repeated angles, and nearly identical images. You can use Smart Cleanup to let the AI automatically decide what to keep and what to delete, or you can review each group manually.
- 👉 Swipe: This feature lets you go through all your photos grouped by month. Simply swipe right to keep a photo or swipe left to delete it.
- 📱 Screenshots: Screenshots accumulate quickly and rarely serve any long-term purpose. Clever Cleaner calculates how much space they’re using and gives you two options: remove them all at once or check them manually before deleting.
- 🎞️ Lives: Live Photos consume significantly more storage than regular photos because they include a short video clip. With this feature, you can convert them to still images with a simple tap.
Option 2: Sort iPhone Videos by Size via Apple’s Native Shortcuts App
If you prefer not to install third-party apps, then you can use Apple’s built-in Shortcuts app to find the longest videos on iPhone. Shortcuts is an automation tool that comes preinstalled on iPhones running iOS 13 and later. It lets you create custom workflows that can perform various tasks automatically.
The biggest obstacle to using Shortcuts to sort videos by length on iPhone is the setup required to create the actual shortcut. Let me walk you through every single step, so you won’t need to figure anything out by trial and error.
Here’s how to create and run the shortcut:
- Open the Shortcuts app on your iPhone. If you can’t find it, swipe down on your home screen and type “Shortcuts” in the search bar.
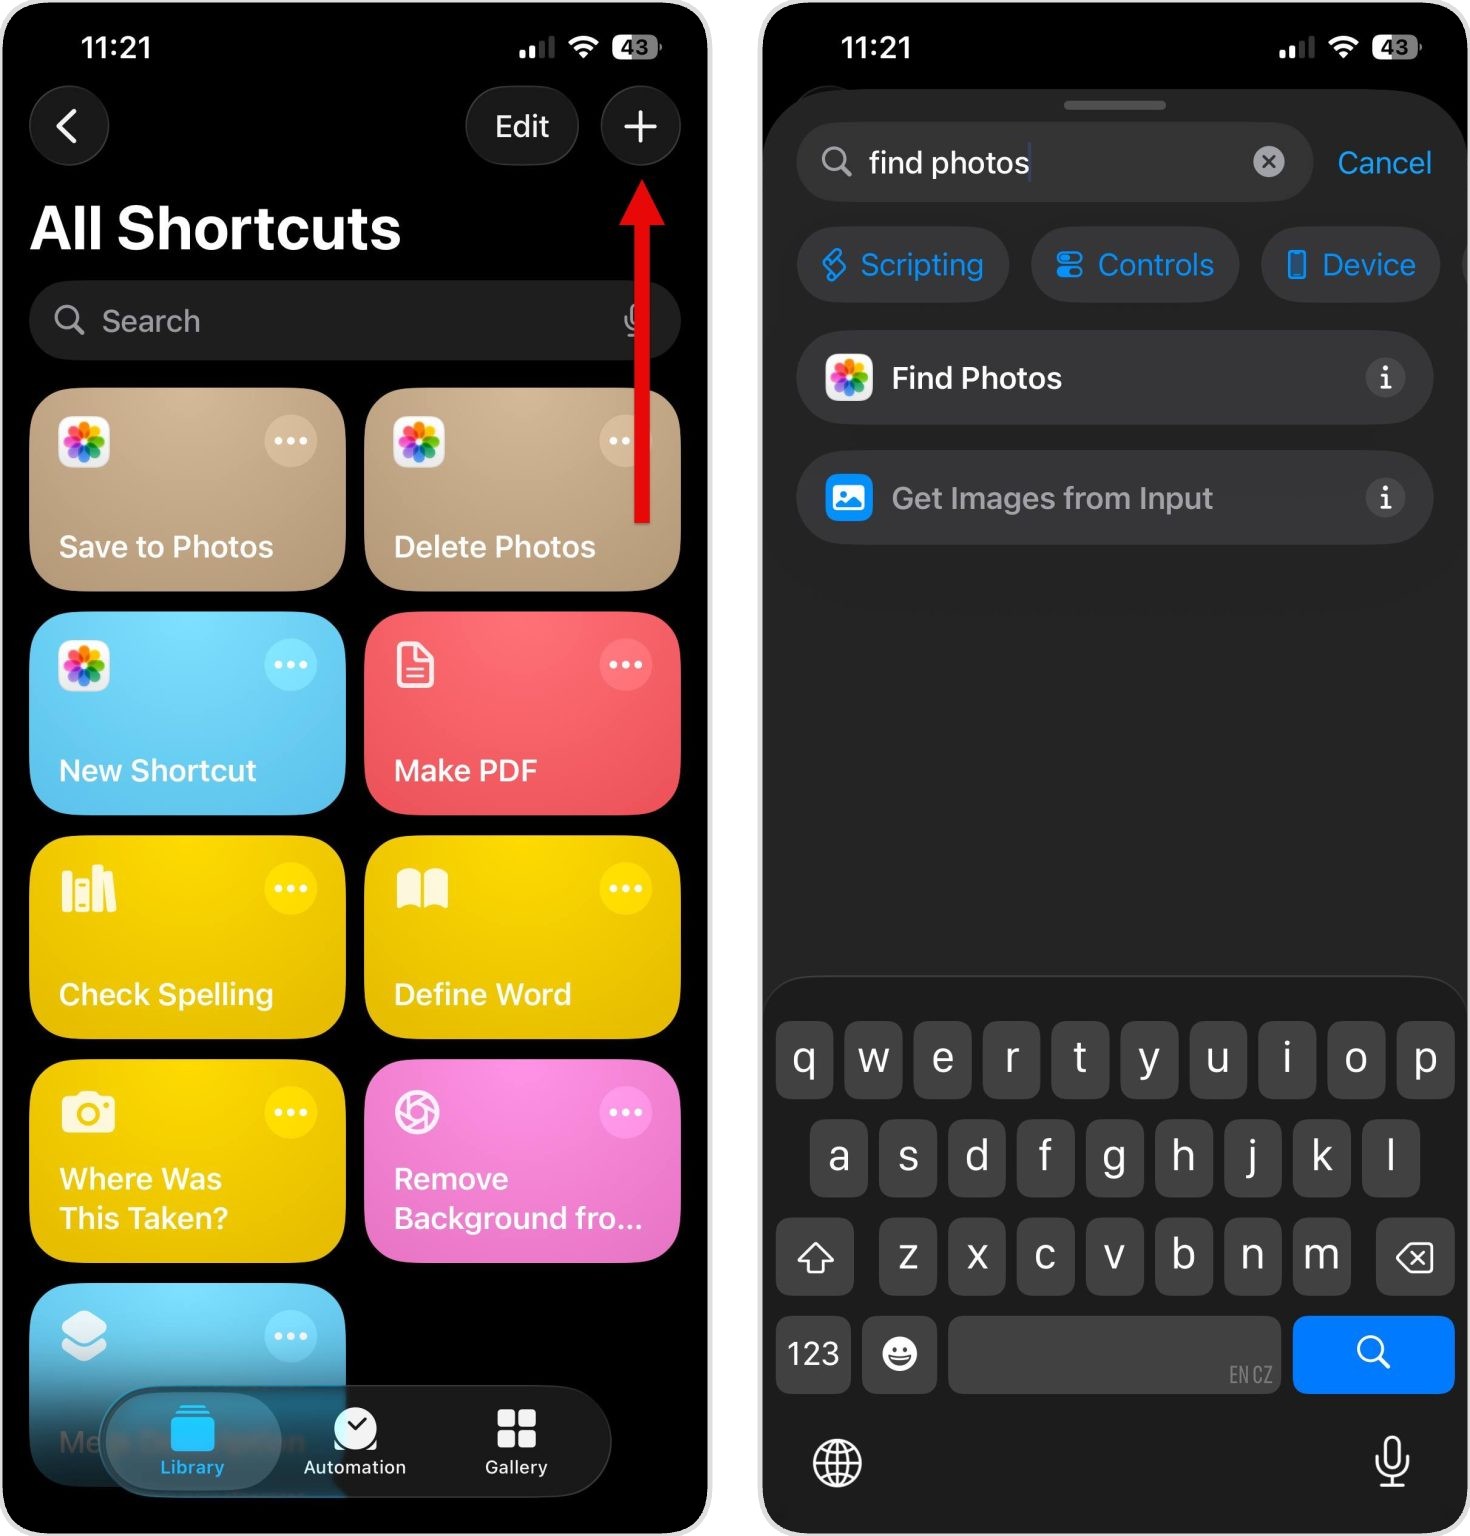
- Tap the + icon in the top right corner to start creating a new shortcut.
- In the search bar, type “Find Photos” and select the Find Photos action when it appears.
- In the Find Photos block that appears, tap Add Filter.
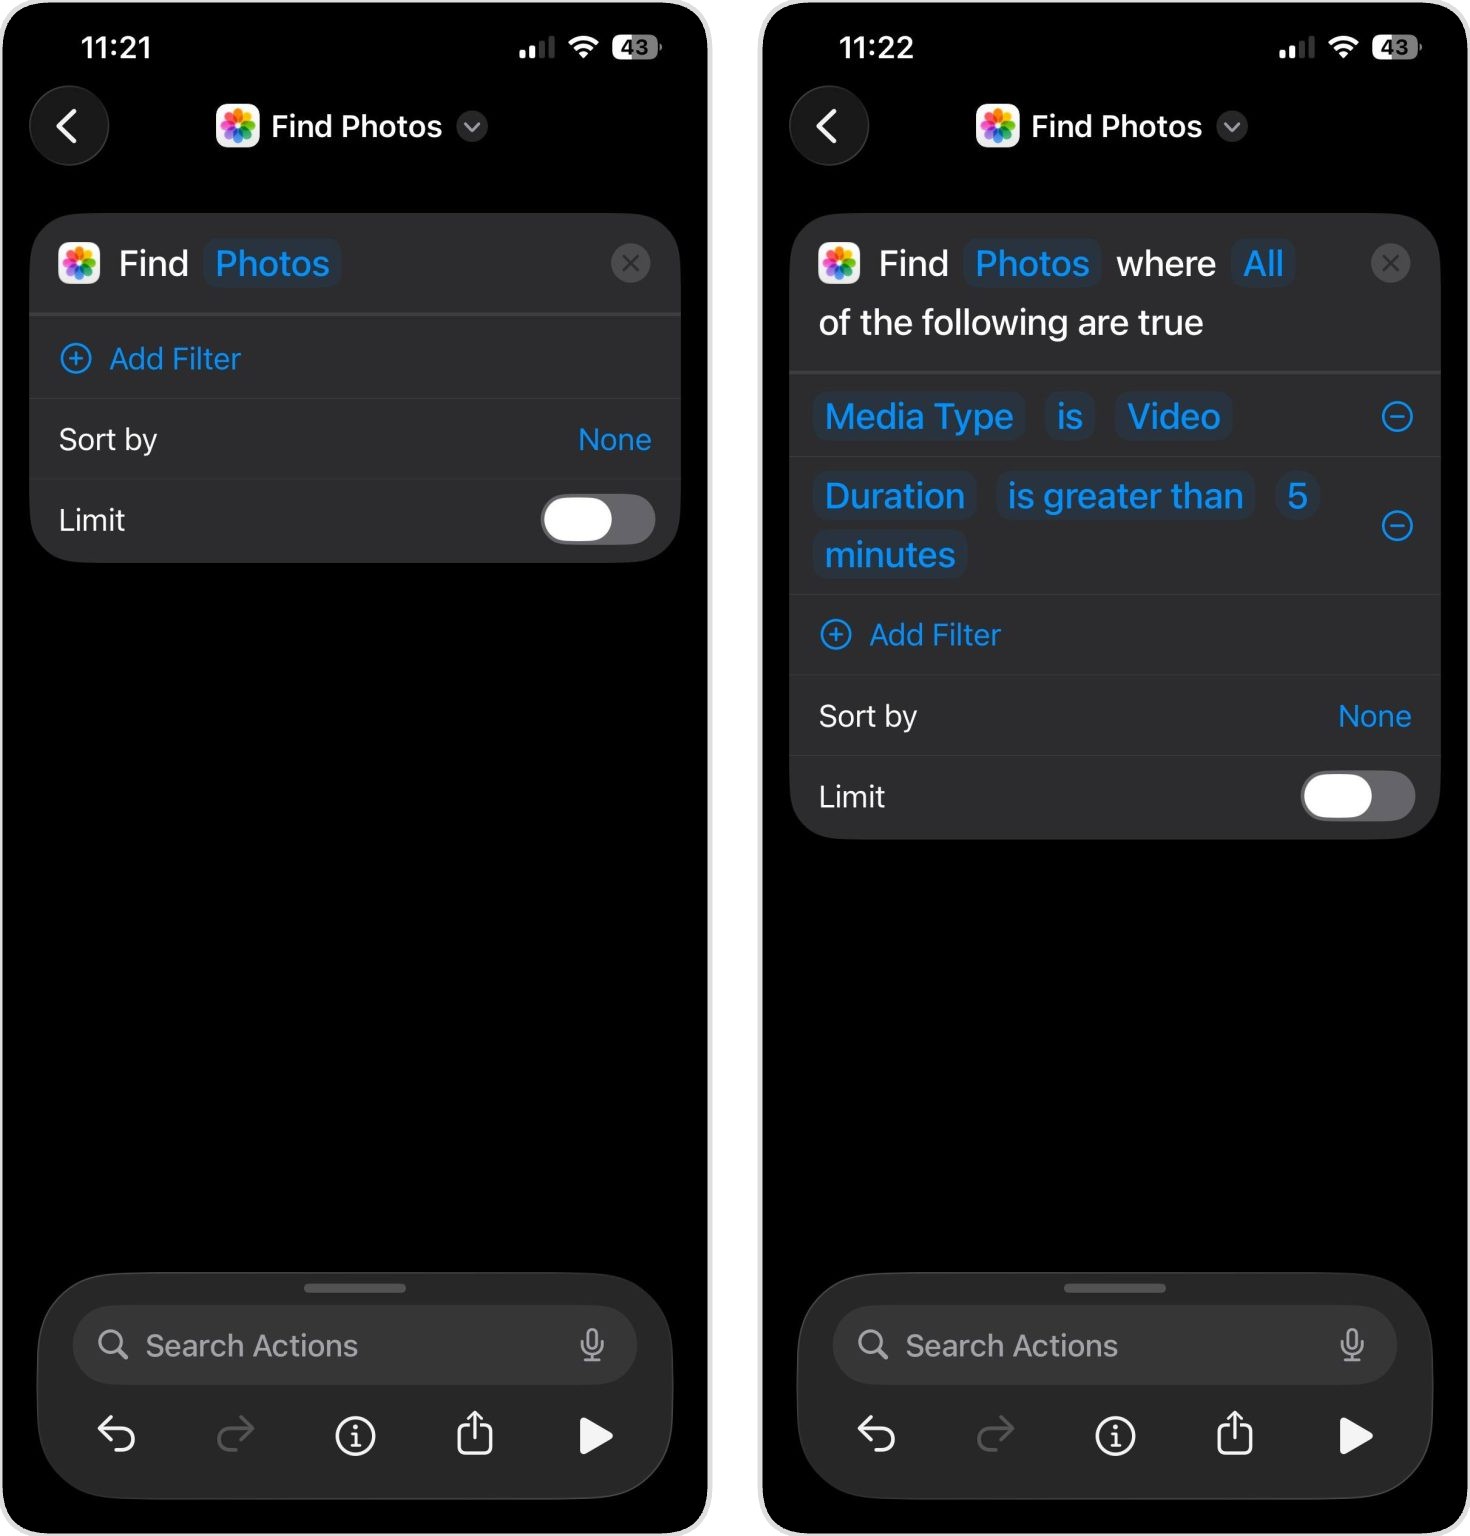
- Tap the default filter, scroll through the filter options, and select Media Type.
- Tap the word after “Media Type” (it probably says “is Photos”) and change it to is Video.
- Tap Add Filter again to add a second condition.
- Select Duration from the filter options. This shortcut will only find videos that meet the specific duration you set. If you created a shortcut to find videos longer than 5 minutes, it won’t show you videos that are 4 minutes long.
- By default, it will say “Duration is…” but you want to change this. Tap the middle field (where it says “is”) and select is greater than.
- Now you need to set your minimum video length. Tap the number field and enter how long a video needs to be before the shortcut flags it. For example, if you want to see the biggest videos on iPhone that are longer than 3 minutes, enter “3” and then select “minutes” from the time unit dropdown. You can start with a higher number like 5 minutes if you want to focus only on very long videos.
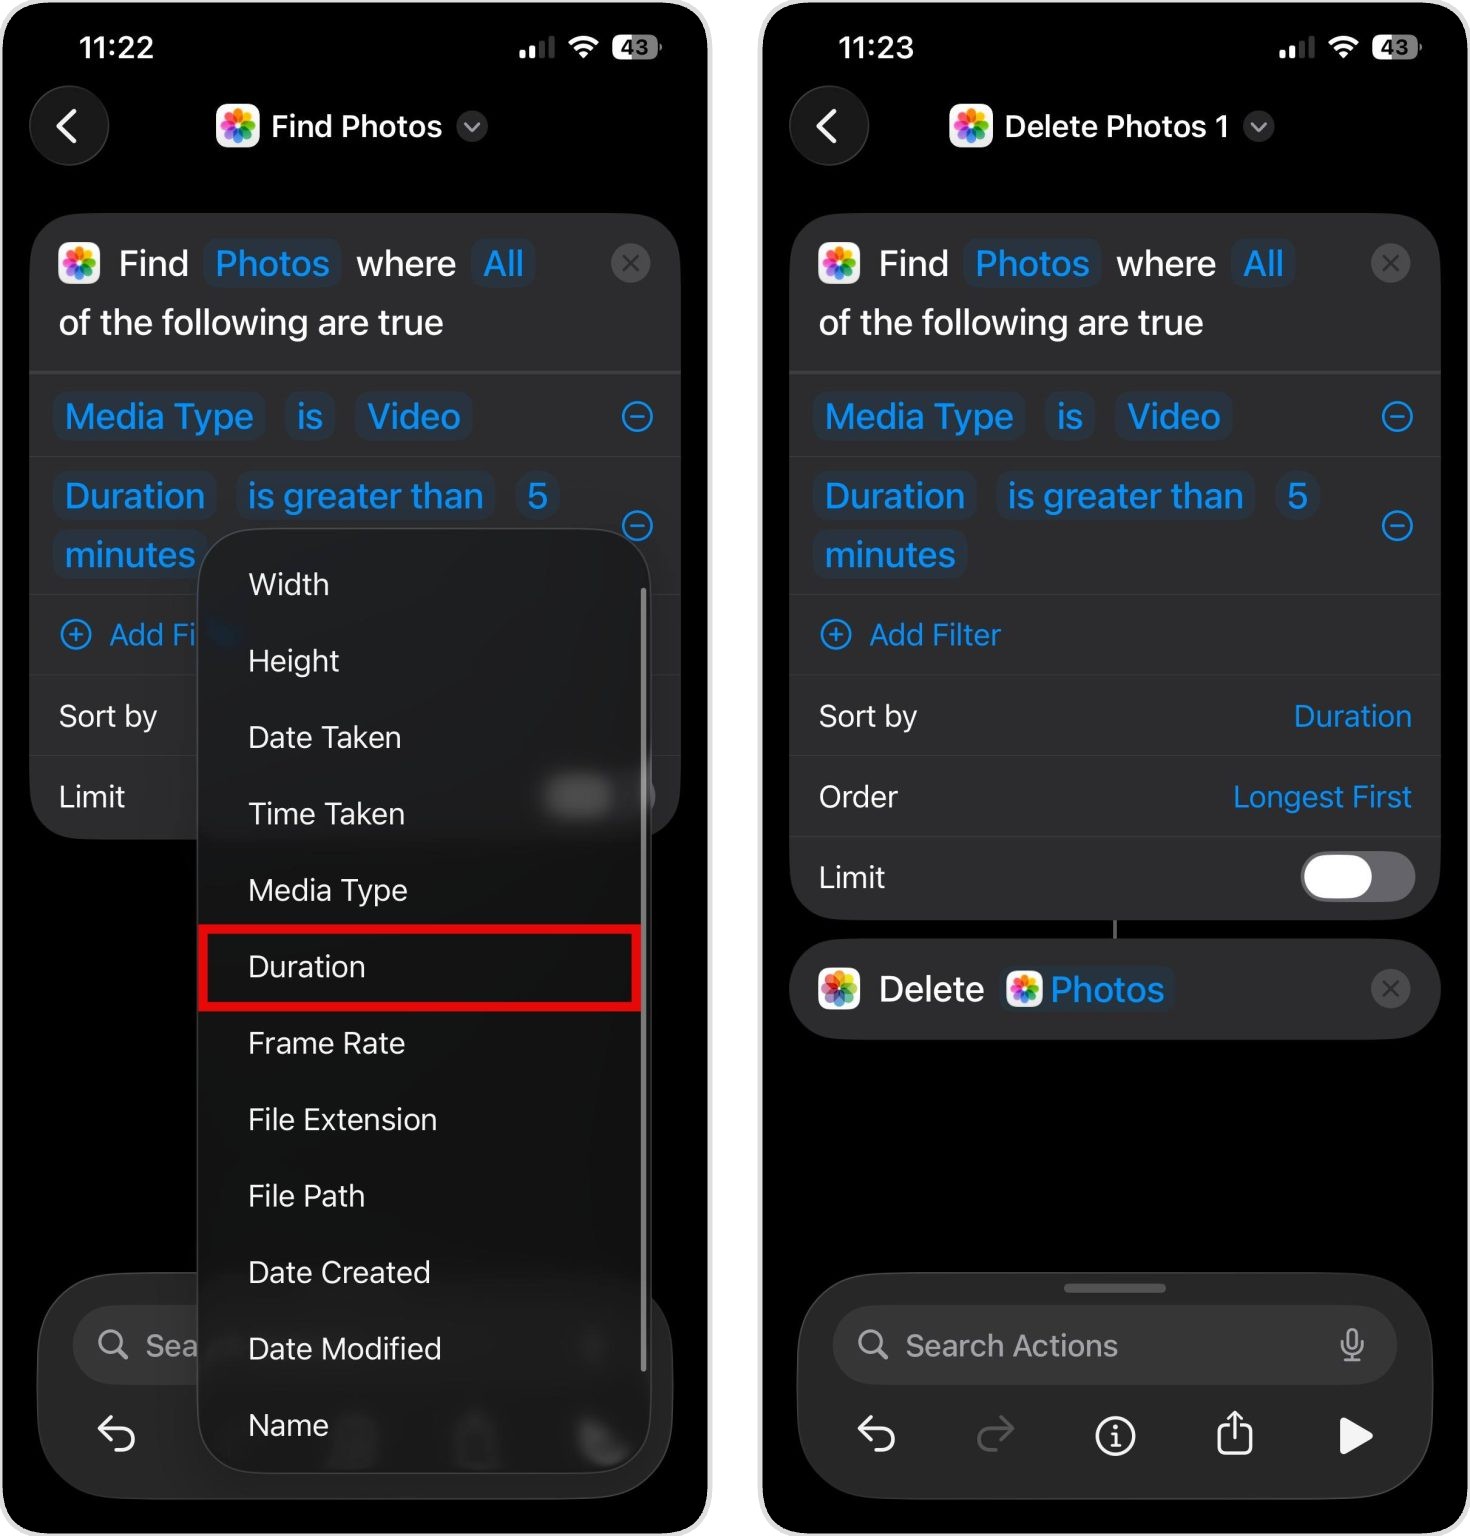
- Tap the default Sort by value and change it to Duration.
- Tap the default Order value and change it to Longest First.
- Tap the search bar again and choose Delete Photos.
- You can now run the shortcut by tapping the “play” button. The shortcut will look for videos that match your criteria and ask you to confirm their deletion.
- It’s also a good idea to tap the shortcut name at the top of the screen and rename it to something memorable like “Delete Long Videos” or “Find Large Videos.” Whenever you now want to delete large videos on iPhone in the future, just open the Shortcuts app, find your saved shortcut by name, and tap it to run the same process again.
Once you get comfortable with the Shortcuts app, you’ll discover it’s genuinely useful for automating repetitive iPhone tasks. The built-in Shortcuts Gallery includes dozens of ready-made workflows for everything from morning routines to travel planning. You can also search online for shortcuts that other users have created and shared. For example, the r/Shortcuts subreddit is an excellent source of automation inspiration.
Option 3: Use the Files App to Find the Largest Videos on iPhone
The third method to sort videos by size on iOS takes advantage of Apple’s built-in Files app. Unlike the Photos app, the Files app actually includes a native option to sort files by size, which is exactly what we need to see the largest videos on iPhone.
Here’s how to find the largest videos on iPhone in the Files app:
- Open the Files app on your iPhone. You can find it on your home screen or by swiping down and searching for “Files.”
- Navigate to the location where your videos are stored.
- Once you’re viewing the contents of the folder, tap the three-dot menu icon (•••) in the top-right corner of the screen and choose the Size option.
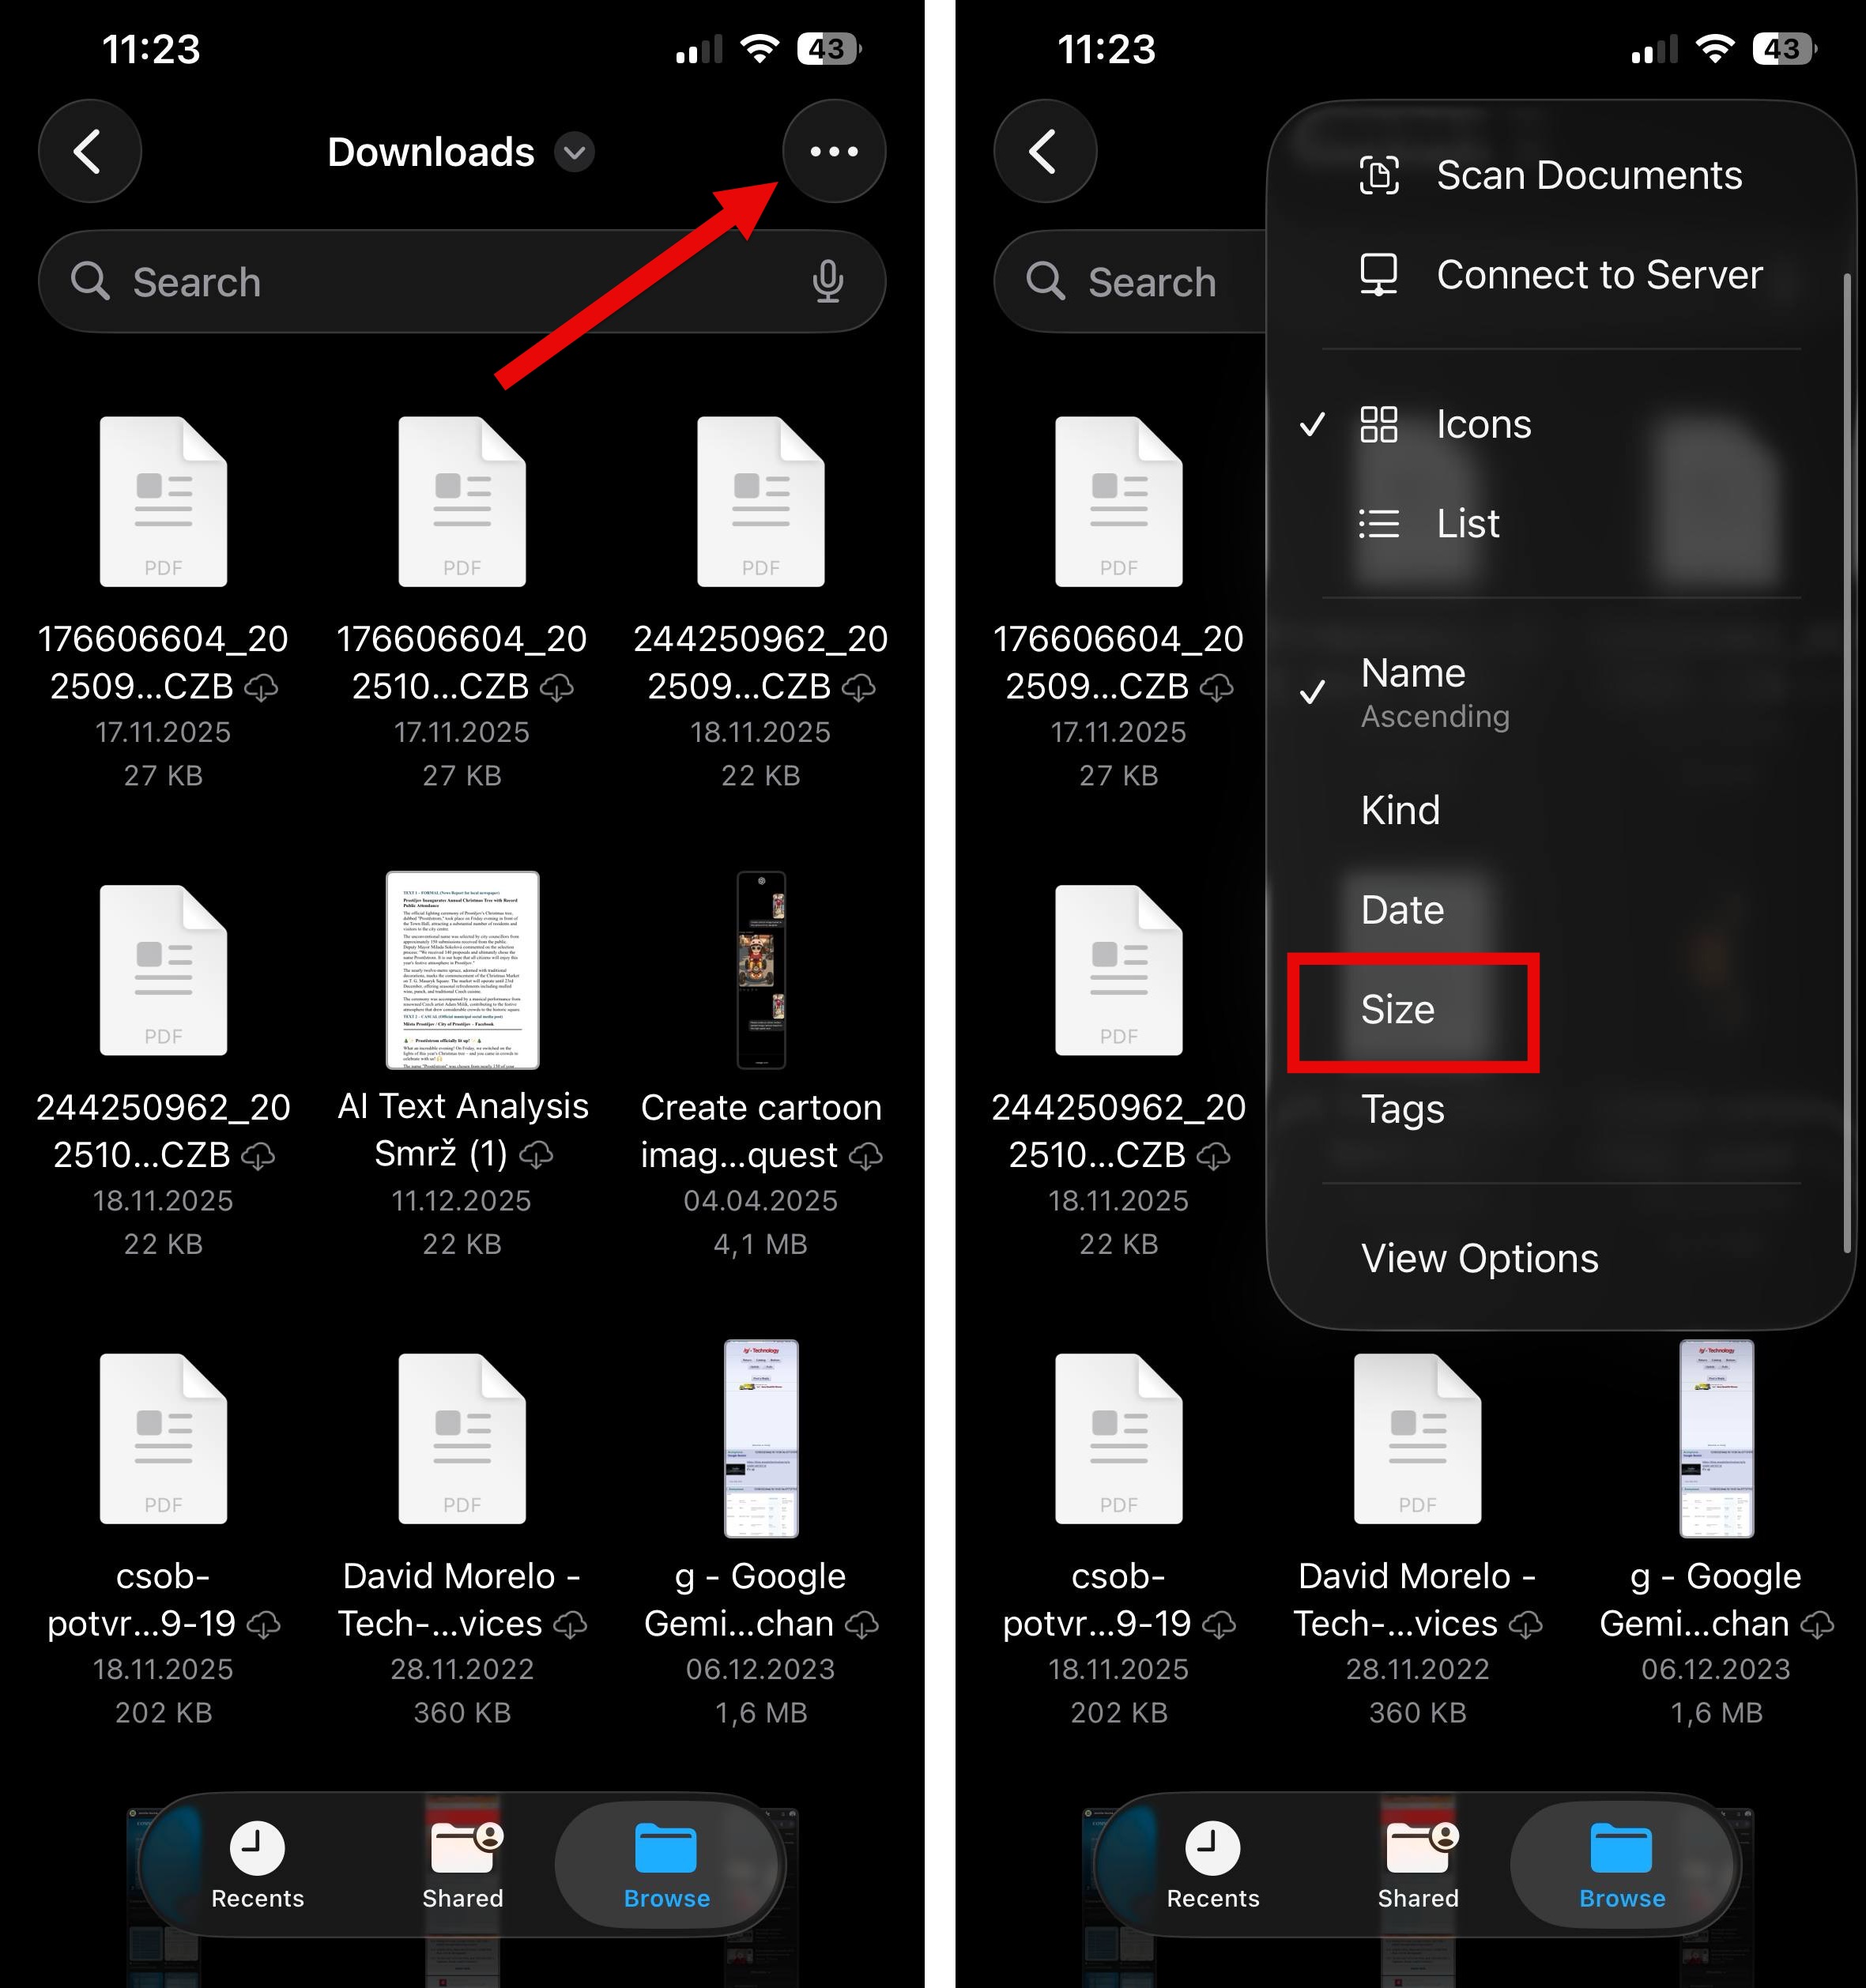
- Your files will now be sorted from largest to smallest, so you should be able to easily find the largest videos on iPhone that are eating up your storage.
- To delete large videos on iPhone from this location, simply tap and hold on a video until a menu appears, then select Delete. You can also tap Select in the three-dot menu (•••) to choose multiple videos at once and delete them in bulk.
Keep in mind that the Files app displays all types of files stored on your device and not just videos. When you’re browsing through the sorted list, you’ll see documents, images, audio files, and other file types mixed in with your videos. This can be confusing because there’s more stuff to go through, but the hidden benefit is that you might discover some other large non-video files that you would otherwise miss.
Found the Largest Videos on iPhone but Don’t Want to Delete Them? Consider These Alternatives
Sometimes the videos taking up the most space are also the ones you care about most. For me personally, it was several long videos of my kid’s first steps. There’s nothing that would make me delete them to free up storage space. At the same time, each of the videos was much larger than dozens and dozens of smaller videos combined.
The good news is that deleting isn’t your only option. There are several ways to keep your valuable videos while still reclaiming the storage space your iPhone desperately needs:
- Compress videos to reduce file size: Video compression can dramatically shrink file sizes without noticeable quality loss for most everyday viewing. Apps like Clever Cleaner (which we mentioned earlier) include a built-in video compression feature that can reduce video sizes while maintaining quality so that the footage still looks perfectly fine on your phone screen. You can also use online compression tools if you prefer not to install additional apps (just make sure that they respect your privacy first).
- Enable the Optimize iPhone Storage feature: If you haven’t already enabled this feature, then you should go to Settings > [Your Name] > iCloud > Photos and turn on both “iCloud Photos” and “Optimize iPhone Storage.” The Optimize iPhone storage feature will then keep full-resolution videos backed up in iCloud while storing smaller, space-efficient versions on your device.
- Move your video files to cloud storage: For videos you want to preserve but rarely rewatch, it makes sense to move them to cloud storage like iCloud Drive, Google Drive, OneDrive, or Dropbox. Most cloud storage services even let you play videos online, download them back to your iPhone when you want to watch them. Just make sure to double-check that the video has been uploaded successfully to the cloud before you delete the local copy.
Each of these alternatives has different advantages depending on your situation. Compression works best when you want to keep videos on your device but need to reduce their footprint. iCloud optimization is ideal if you want seamless access without thinking about it. Manual cloud uploads give you the most control and work with whatever storage service you already use.
Conclusion
Once you know the right approach, finding large videos on iPhone is easy. Here’s a quick recap of the three methods we’ve covered in this article:
- iPhone cleaning apps like Clever Cleaner offer the fastest, most automated way to identify and delete large videos with minimal effort.
- The Shortcuts app provides a free, built-in solution if you’re willing to spend a few minutes setting up a custom workflow.
- The Files app works well for the specific scenario where you’ve saved or moved videos outside of Photos.
The method you choose depends on your comfort level with technology and whether you prefer convenience over avoiding third-party apps.
Just because you now have practical tools that can help you quickly and easily reclaim valuable storage space, you should still prioritize making video management a regular habit rather than something you think about only when you see the “Storage Almost Full” warning.
Specifically, you can set a monthly reminder to review and delete large videos you no longer need and enable iCloud Photos with “Optimize iPhone Storage” to keep full-resolution files in the cloud. This alone can prevent most storage troubles before they happen.
FAQ
Unfortunately, iCloud.com has the same limitation as the Photos app on your iPhone. You can browse your videos through a web browser, but Apple doesn’t provide any option to sort them by file size.
If you go to Settings > General > iPhone Storage, you’ll see how much space the Photos app is using overall, and you can tap on it to see a breakdown of photos versus videos. However, this view won’t show you a list of individual video files sorted by size.
If you have “iCloud Photos” enabled (which keeps your photos and videos synced across all devices), deleting a video on your iPhone will also delete it from iCloud and all your other connected devices. The deleted video will end up in the “Recently Deleted” album, and it will stay there for up to 30 days before permanent removal.
Videos downloaded from apps like Netflix, Disney+, Prime Video, or YouTube for offline viewing are saved on your iPhone, and they can definitely consume a lot of storage space. To make things worse, these files are typically stored within the app’s own storage space rather than in the Photos app, so they won’t show up when you’re browsing your Videos album. That’s why it’s recommended to regularly check individual streaming apps to see how much space their downloads are using.