We’ve already mentioned the importance of granting Full Disk Access to Disk Drill on macOS Mojave. Since then Apple expanded the security sensors of macOS, and with the release of Catalina Full Disk Access is a native requirement for Disk Drill to access your storage devices for data recovery purposes. As always, we care about your privacy and data security, and this in no way changes the internal procedures of our app. We still have no access to your data, and abide by our Privacy Policy in all cases.
Since macOS 10.15 Catalina, Full Disk Access is a pre-requisite for all Disk Drill’s data recovery and protection features. That’s why you will see a friendly dialog that explains how to grant it when you launch Disk Drill for the first time in the new macOS. You will only need to follow these instructions once:
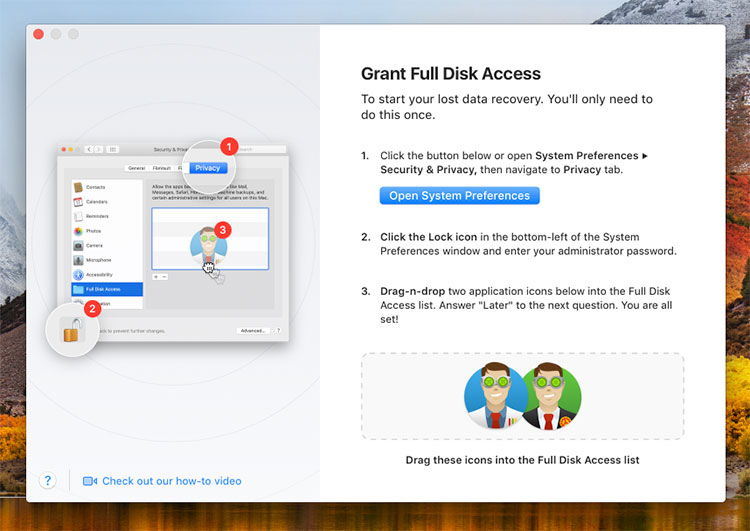
Here’s how to grant Full Disk Access to Disk Drill on macOS 10.15 Catalina:
- Make sure you are using the latest release of Disk Drill for macOS / Mac OS X.
- Open your Mac’s System Preferences and choose “Security & Privacy”, navigate to Privacy tab, highlight “Full Disk Access”.
- Click the Lock icon in the bottom-left of the System Preferences window and enter your administrator password.
- Use the “+” button to add “DiskDrill.app” and its “backservice.app” to the “Full Disk Access” list. For your convenience, you can just drag-n-drop the two icons from the Disk Drill’s wizard.
- Answer “Later” to the next question.
- You are ready to recover your deleted data on macOS 10.15 Catalina and use all other amazing features from Disk Drill’s arsenal.
Good luck! Let us know if this tutorial was helpful, or feel free to ask any other questions, our tech assistance team is always ready to help.