If your Mac suddenly died and you need to retrieve the data stored, you’ve come to the right place. We know how overwhelming it might be having to deal with recovering data from a dead Mac. But the good news is there is a chance of getting back your files even in the most complex situations.
Why Did My MacBook Become Dead?
Let’s break down why a Mac can become dead to help you determine your recovery options and assess whether you can solve the problem yourself. Below are the most common scenarios that users encounter when their MacBooks suddenly stop working:
- 🔋 Dead battery or power issues: While a dead battery itself won’t prevent data recovery from your MacBook, it can sometimes be mistaken for a more serious problem. If your MacBook won’t turn on even when plugged in, the issue might be with the power adapter or charging circuit.
- 🌡️ Overheating: MacBooks can shut down unexpectedly if their components overheat, which was a major issue when Apple relied exclusively on Intel chips. In severe cases, prolonged exposure to high temperatures can permanently damage the processor or motherboard and make it necessary to recover data directly from your MacBook hard drive.
- 💥 Physical damage: Dropping your MacBook or spilling liquid on it can cause severe internal damage. In such cases, you may need professional MacBook Pro data recovery services to either repair the damage or recover data from your Mac’s drive directly.
- 💽 Operating system issues: macOS is known as a stable and reliable operating system, but it’s not immune to bugs (here’s one regularly updated list of known macOS bugs). Users themselves can also make their operating system unable by disabling system integrity protection features, giving bad software elevated privileges, or directly modifying system files.
- 🔧 Hardware component failure: Your MacBook can become unbootable due to hard drive failure. While not a frequent occurrence, multiple users have reported their MacBooks becoming unbootable due to hardware issues on the Apple Support Community. Beyond drive failures, other components like the logic board, RAM, or GPU can fail due to age or manufacturing defects.
- 🦠 Malware infection: While Macs are generally secure, malicious software, such as LockBit, can corrupt essential system files and make your MacBook appear “dead.” This type of failure may manifest as repeated crashes, unusual startup behavior, or complete system unresponsivenes.
Generally, the above-listed reasons why MacBooks sometimes become dead can be divided into logical and physical issues:
- Logical issues include operating system corruption, malware infection, software conflicts, file system errors, and firmware problems. The good news is that logical failures usually don’t affect the physical integrity of your storage drive, meaning your data remains intact even if your system won’t boot.
- Physical issues, on the other hand, involve actual hardware damage – whether from component failures, liquid exposure, impact damage, power surges, or severe overheating. Unfortunately, physical issues make recovery attempts more difficult because they involve damaged hardware components that need repair or replacement.
In addition to determining the cause of your MacBook’s death, you should also identify your hardware configuration as it significantly influences your recovery chances:
- MacBooks with standard hard drives or without T2/M1-M4 chips offer more straightforward recovery options. If you have this type of MacBook, you can attempt recovery yourself using various methods like data recovery software or external drive connections before considering professional services.
- MacBooks with T2/M1-M4 chips have built-in encryption and additional security features that limit your recovery options. With these models, you’ll need to rely primarily on existing backups or professional services, as other DIY methods won’t be effective due to the encryption.
Here’s a quick guide to available recovery methods based on your MacBook type:
| MacBook Type | Available Recovery Methods |
| MacBooks with HDD or without T2/M1-M4 chips | |
| MacBooks with T2/M1-M4 chips |
In the following sections, we’ll show you exactly how to recover data from a broken MacBook using the methods best suited for your specific model.
How to Recover Data From a Dead MacBook Without T2/M1-M4 Chips
Older MacBook Pro and MacBook Air models don’t have T2/M1-M4 security chips, so it’s possible to access their storage drives directly, which makes data recovery more straightforward.
Method 1: Recover Data From a Dead MacBook With Data Recovery Software
Specialized hard drive recovery software for Mac is usually the most effective method to get files off a dead MacBook because it can retrieve files that are inaccessible or seemingly lost due to system malfunction or drive corruption. Such files would be missed by standard file copying methods that can only access files visible in the file system.
To recover data from a broken MacBook using data recovery software, you’ll need:
- 💽 An external storage drive with enough space to save your recovered files
- 🖥️ Access to another Mac to download the recovery software
- 🛜 A working internet connection
You can then follow these steps to recover data from a dead Mac using Disk Drill:
- Connect your external storage drive to your dead Mac (this is where you’ll save the recovered files).
- Boot into Recovery Mode by turning on your Mac and immediately holding down the Command + R keys until you see the Apple logo.
- Launch Terminal (click Utilities > Terminal in the top menu bar).
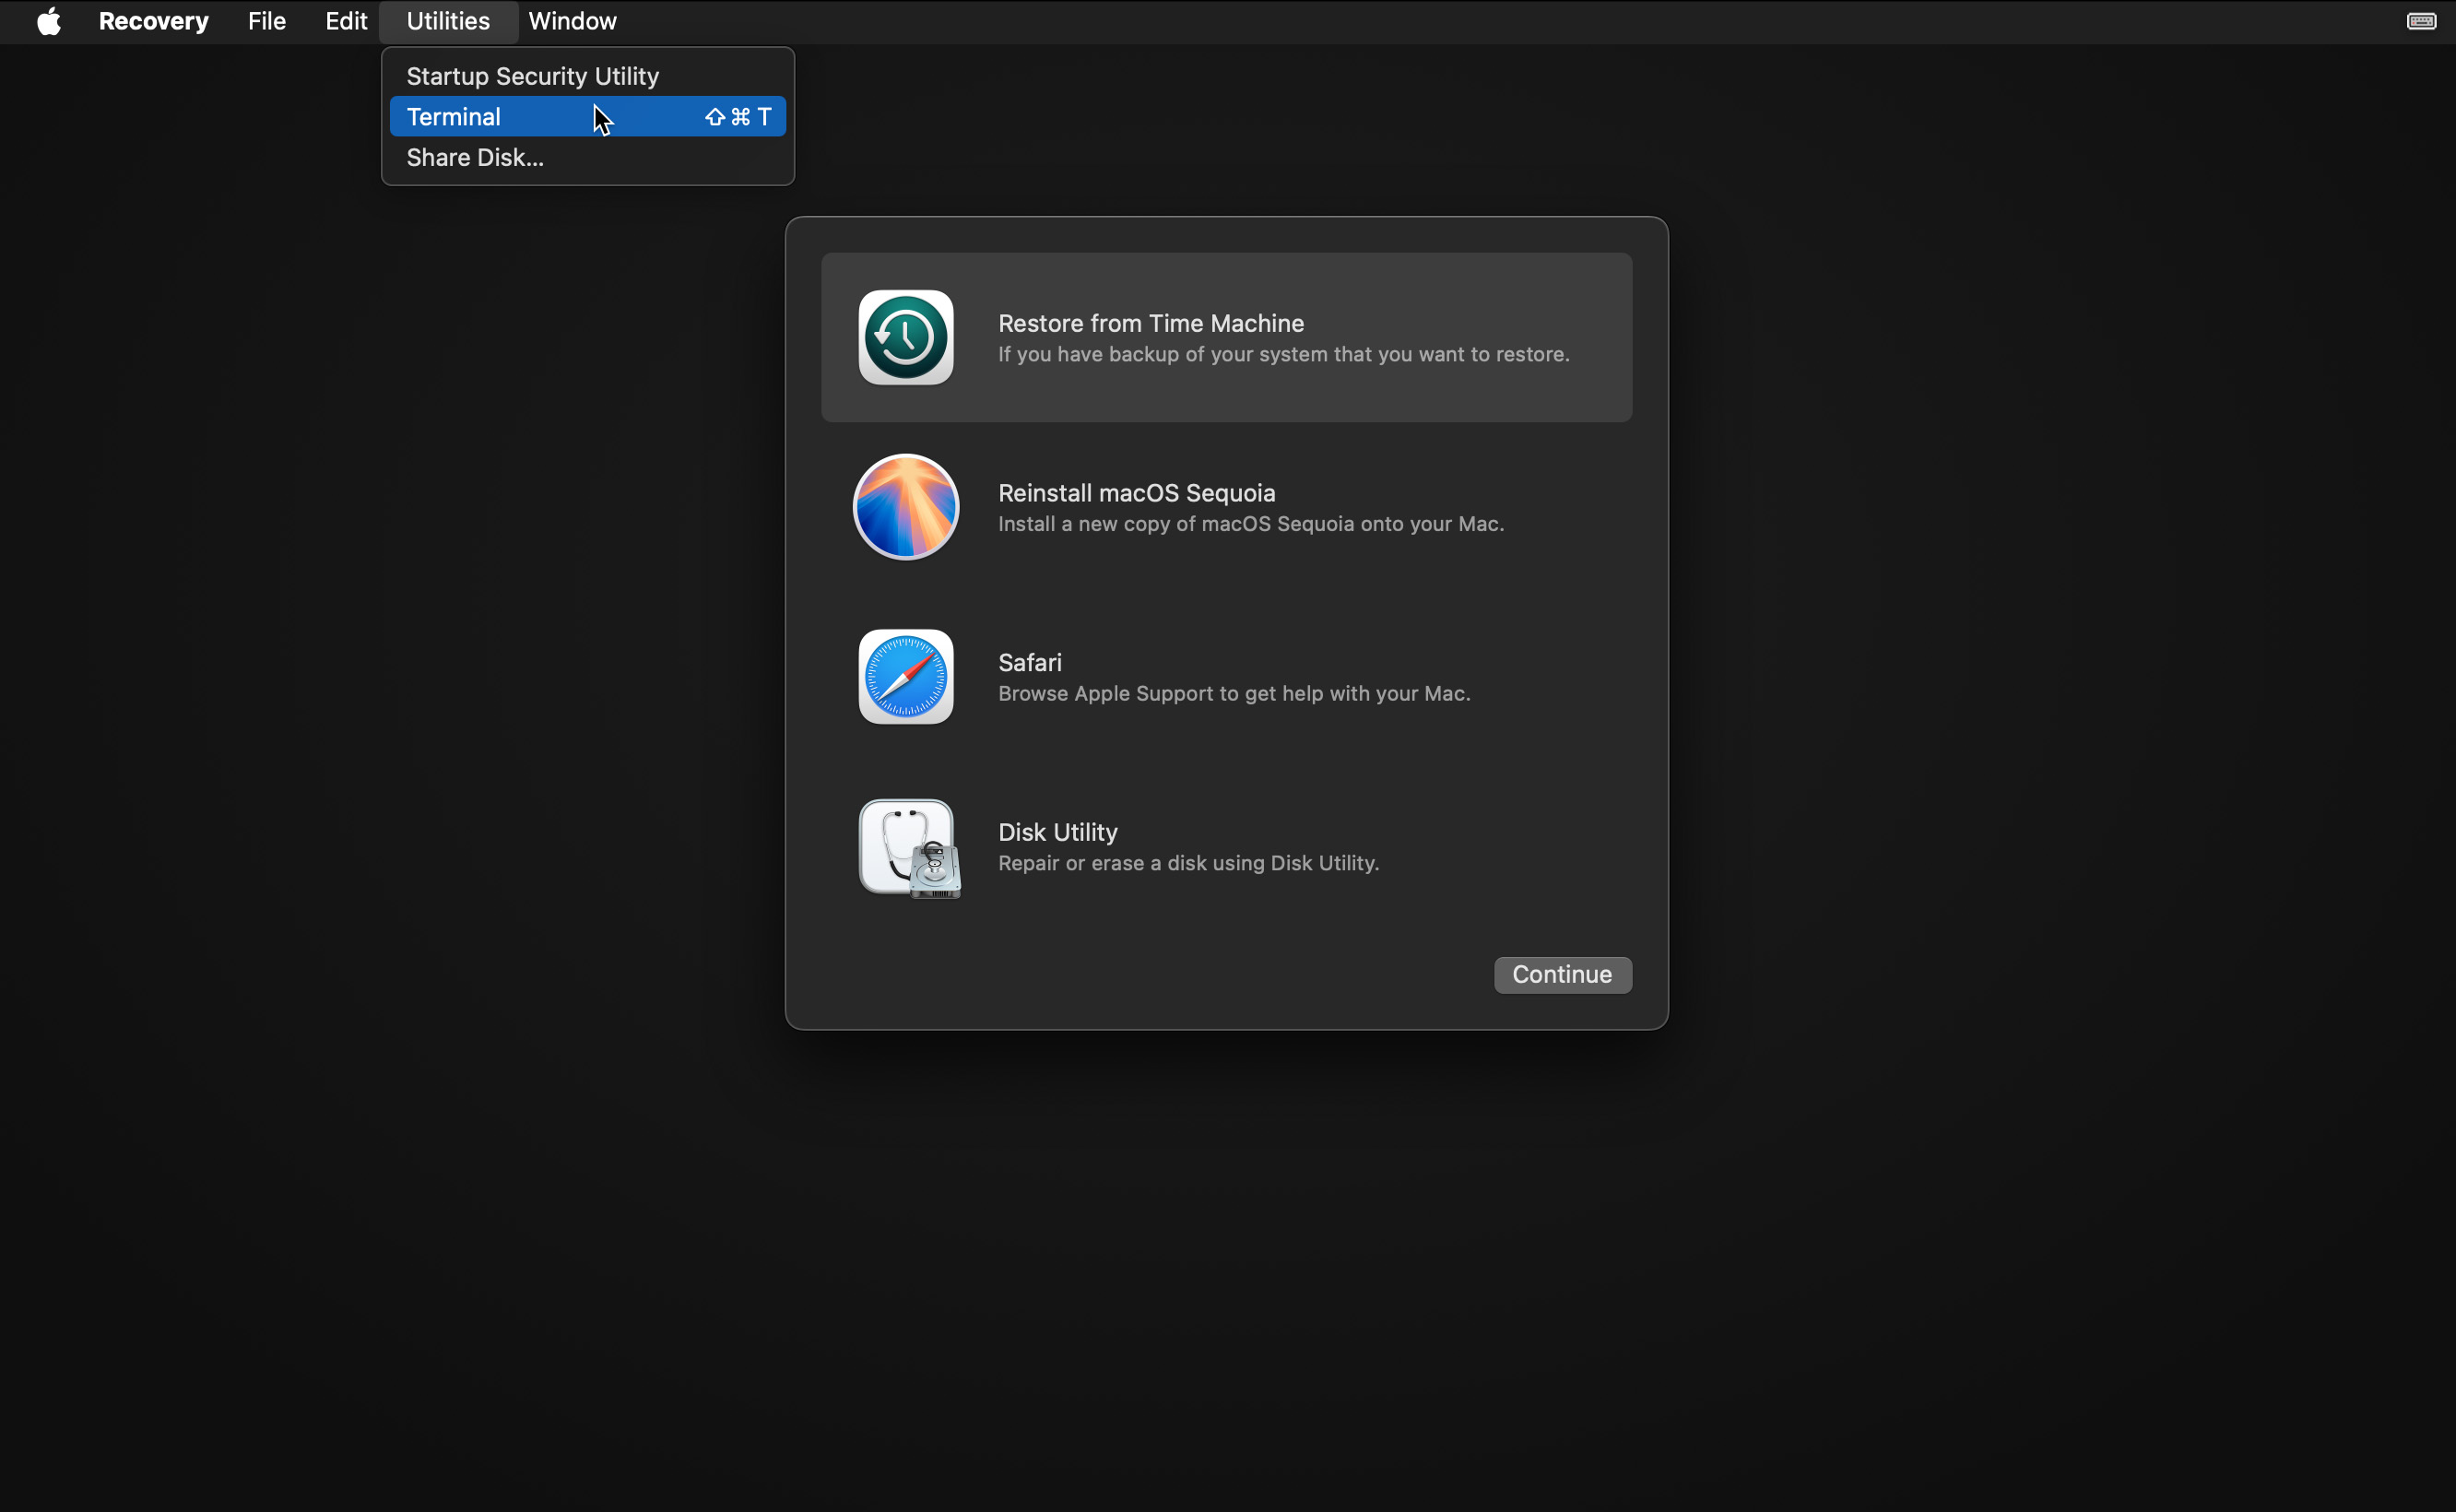
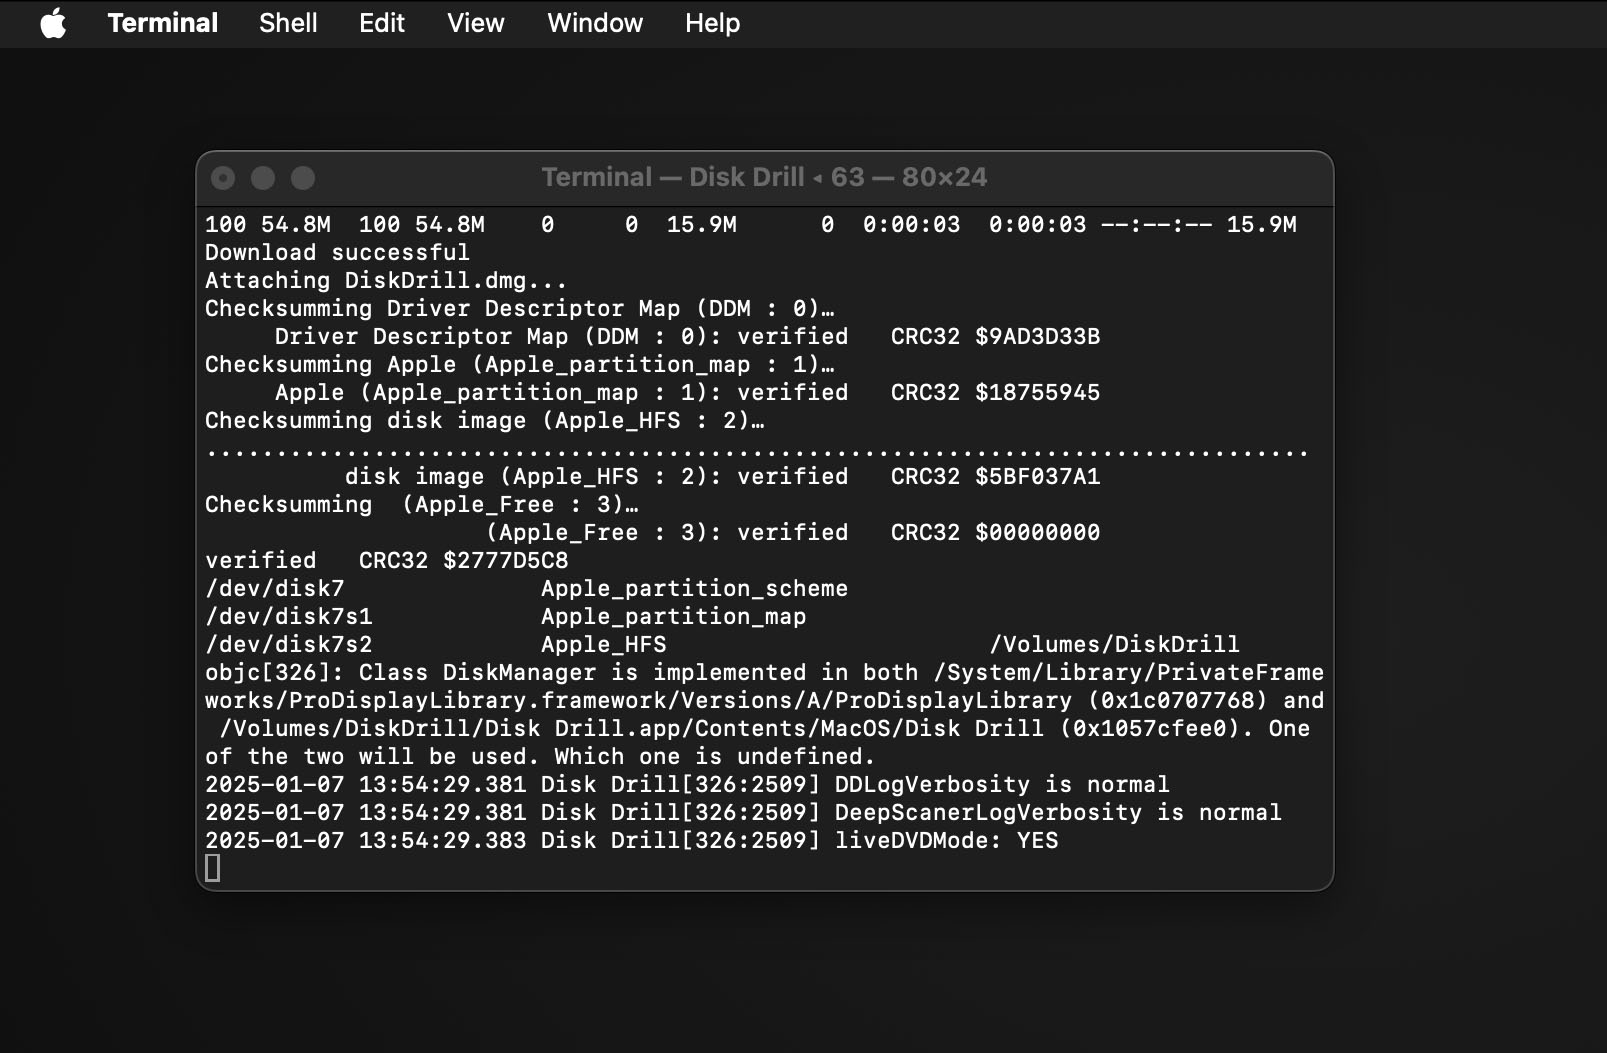
- In the Terminal window, enter this command and press Return:
sh <(curl http://www.cleverfiles.com/bootmode/boot.xml) - Wait for Disk Drill to download and launch.
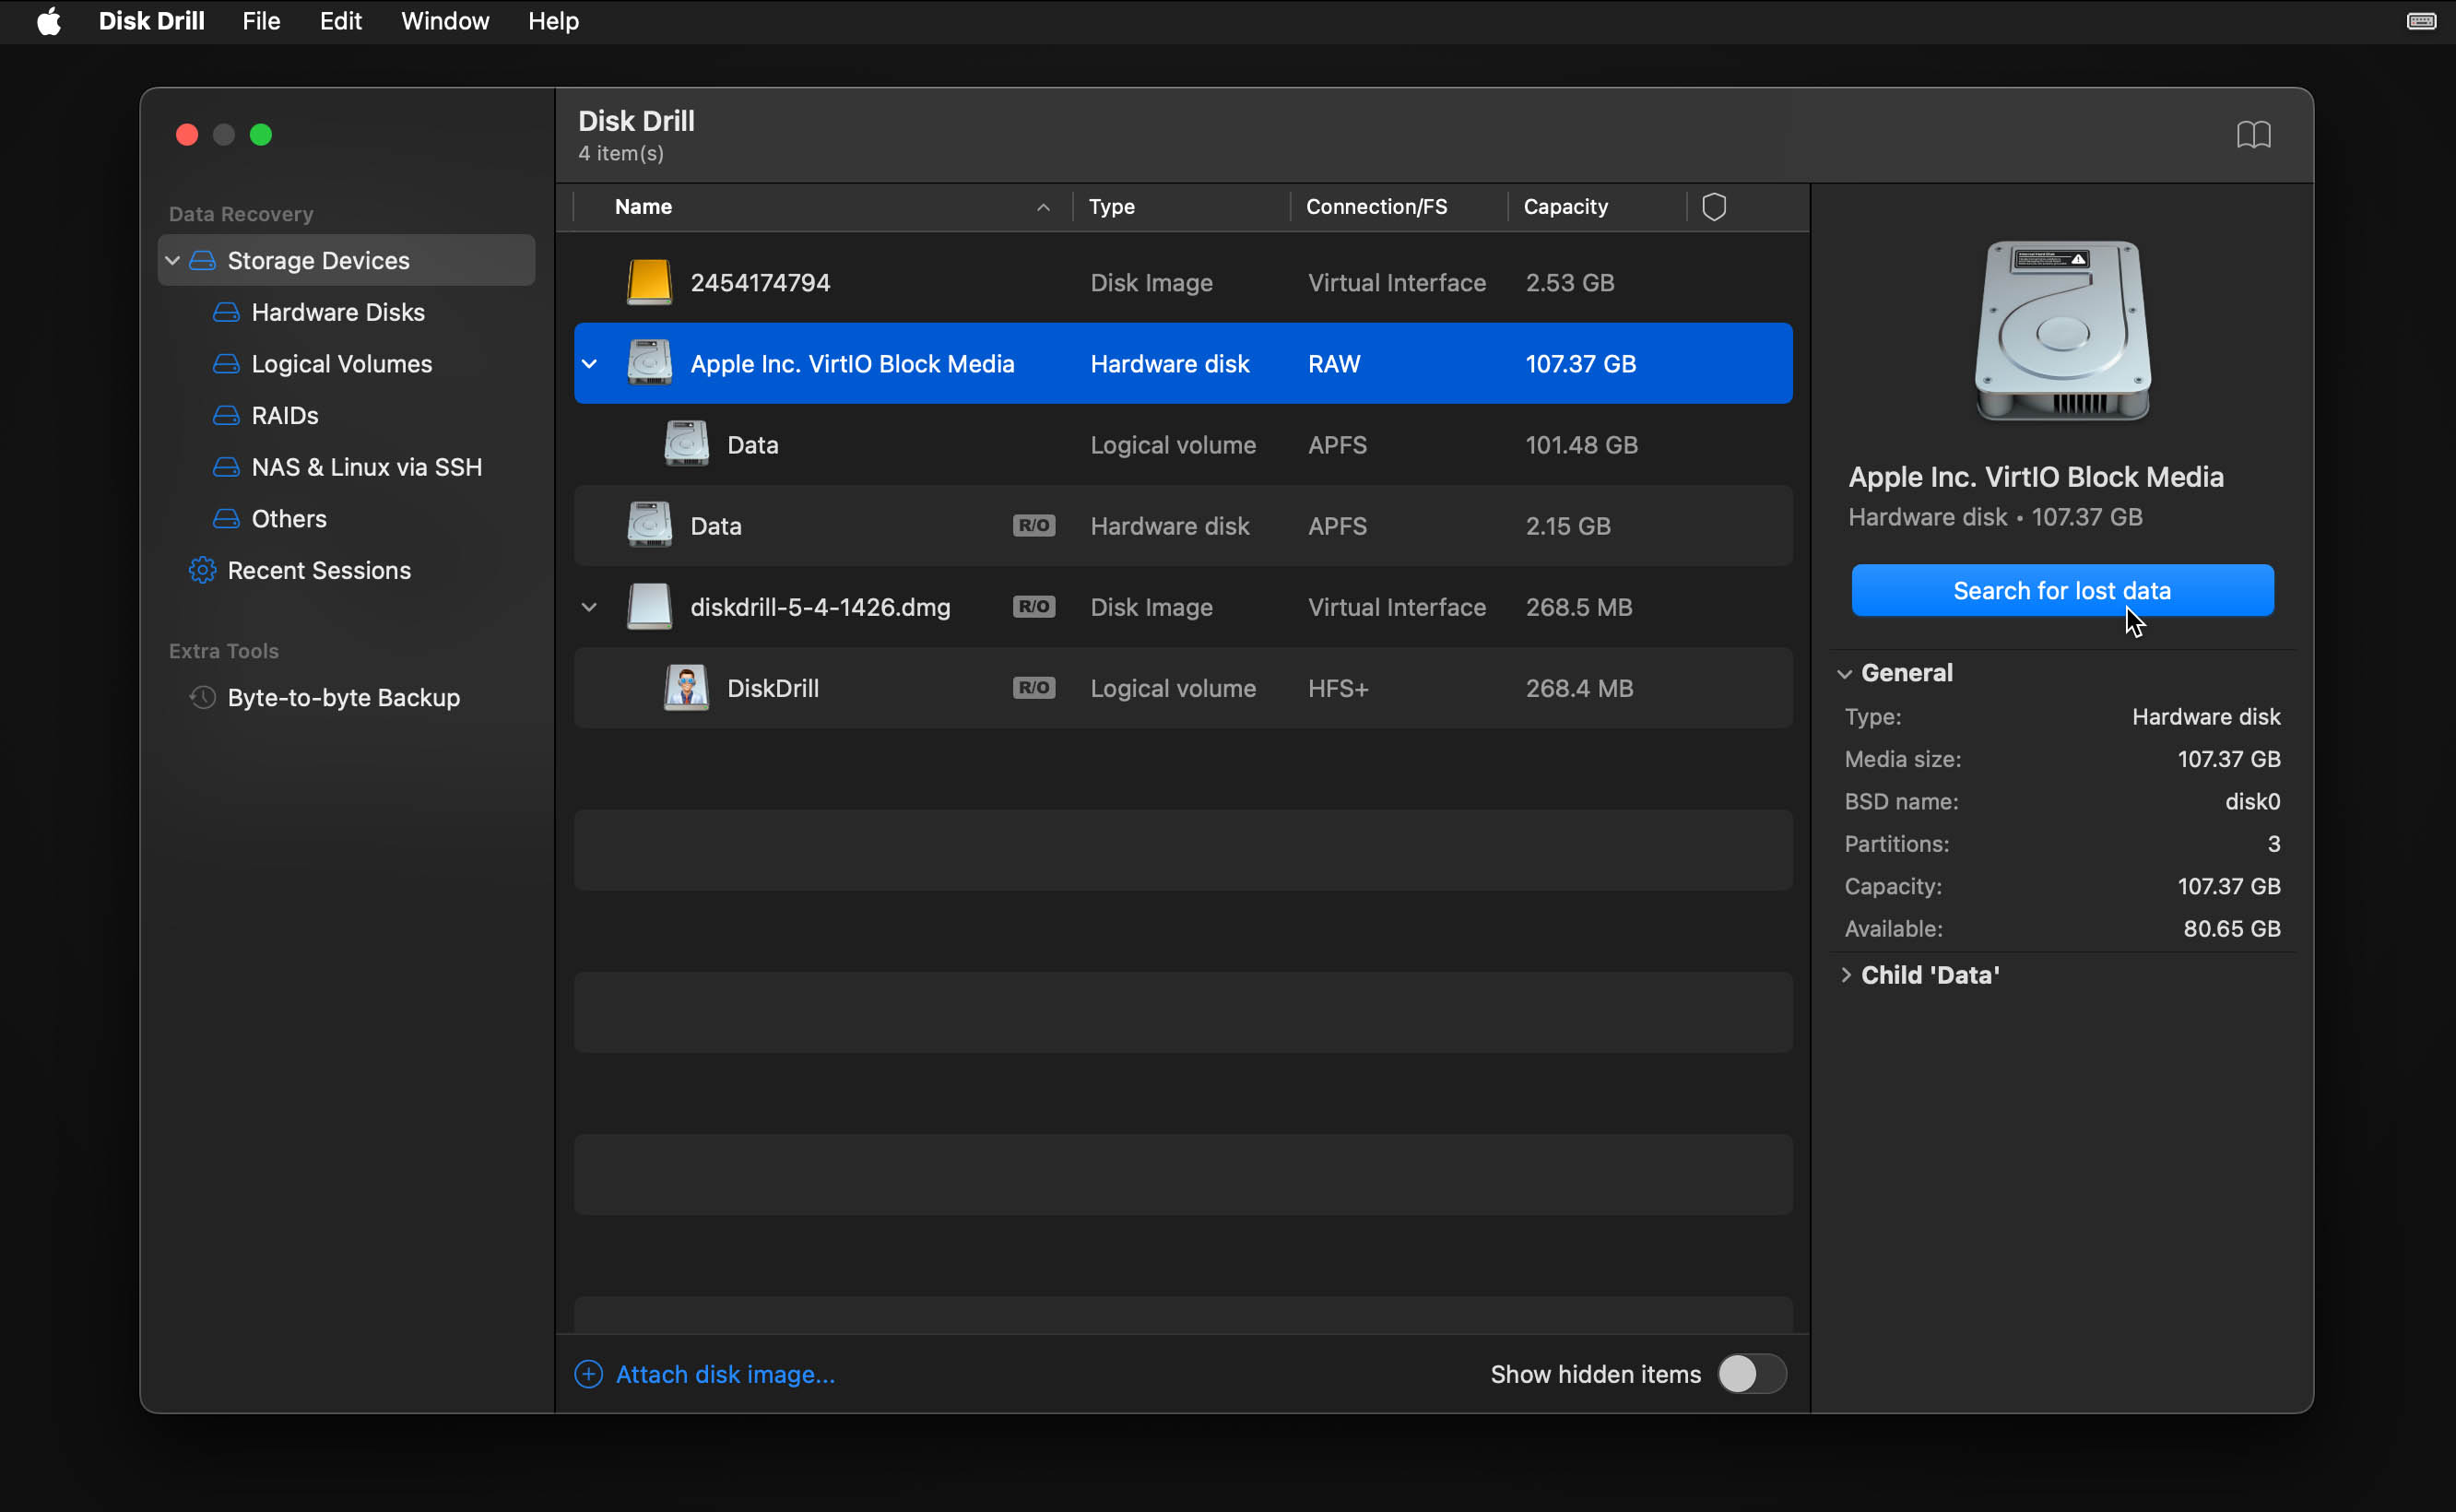
- Navigate to the Storage devices section in Disk Drill and from the sidebar on the left and select your Mac’s internal drive. Then, click the Search for lost data button to begin scanning your drive.
- Wait for the scan to finish and click Review found items.

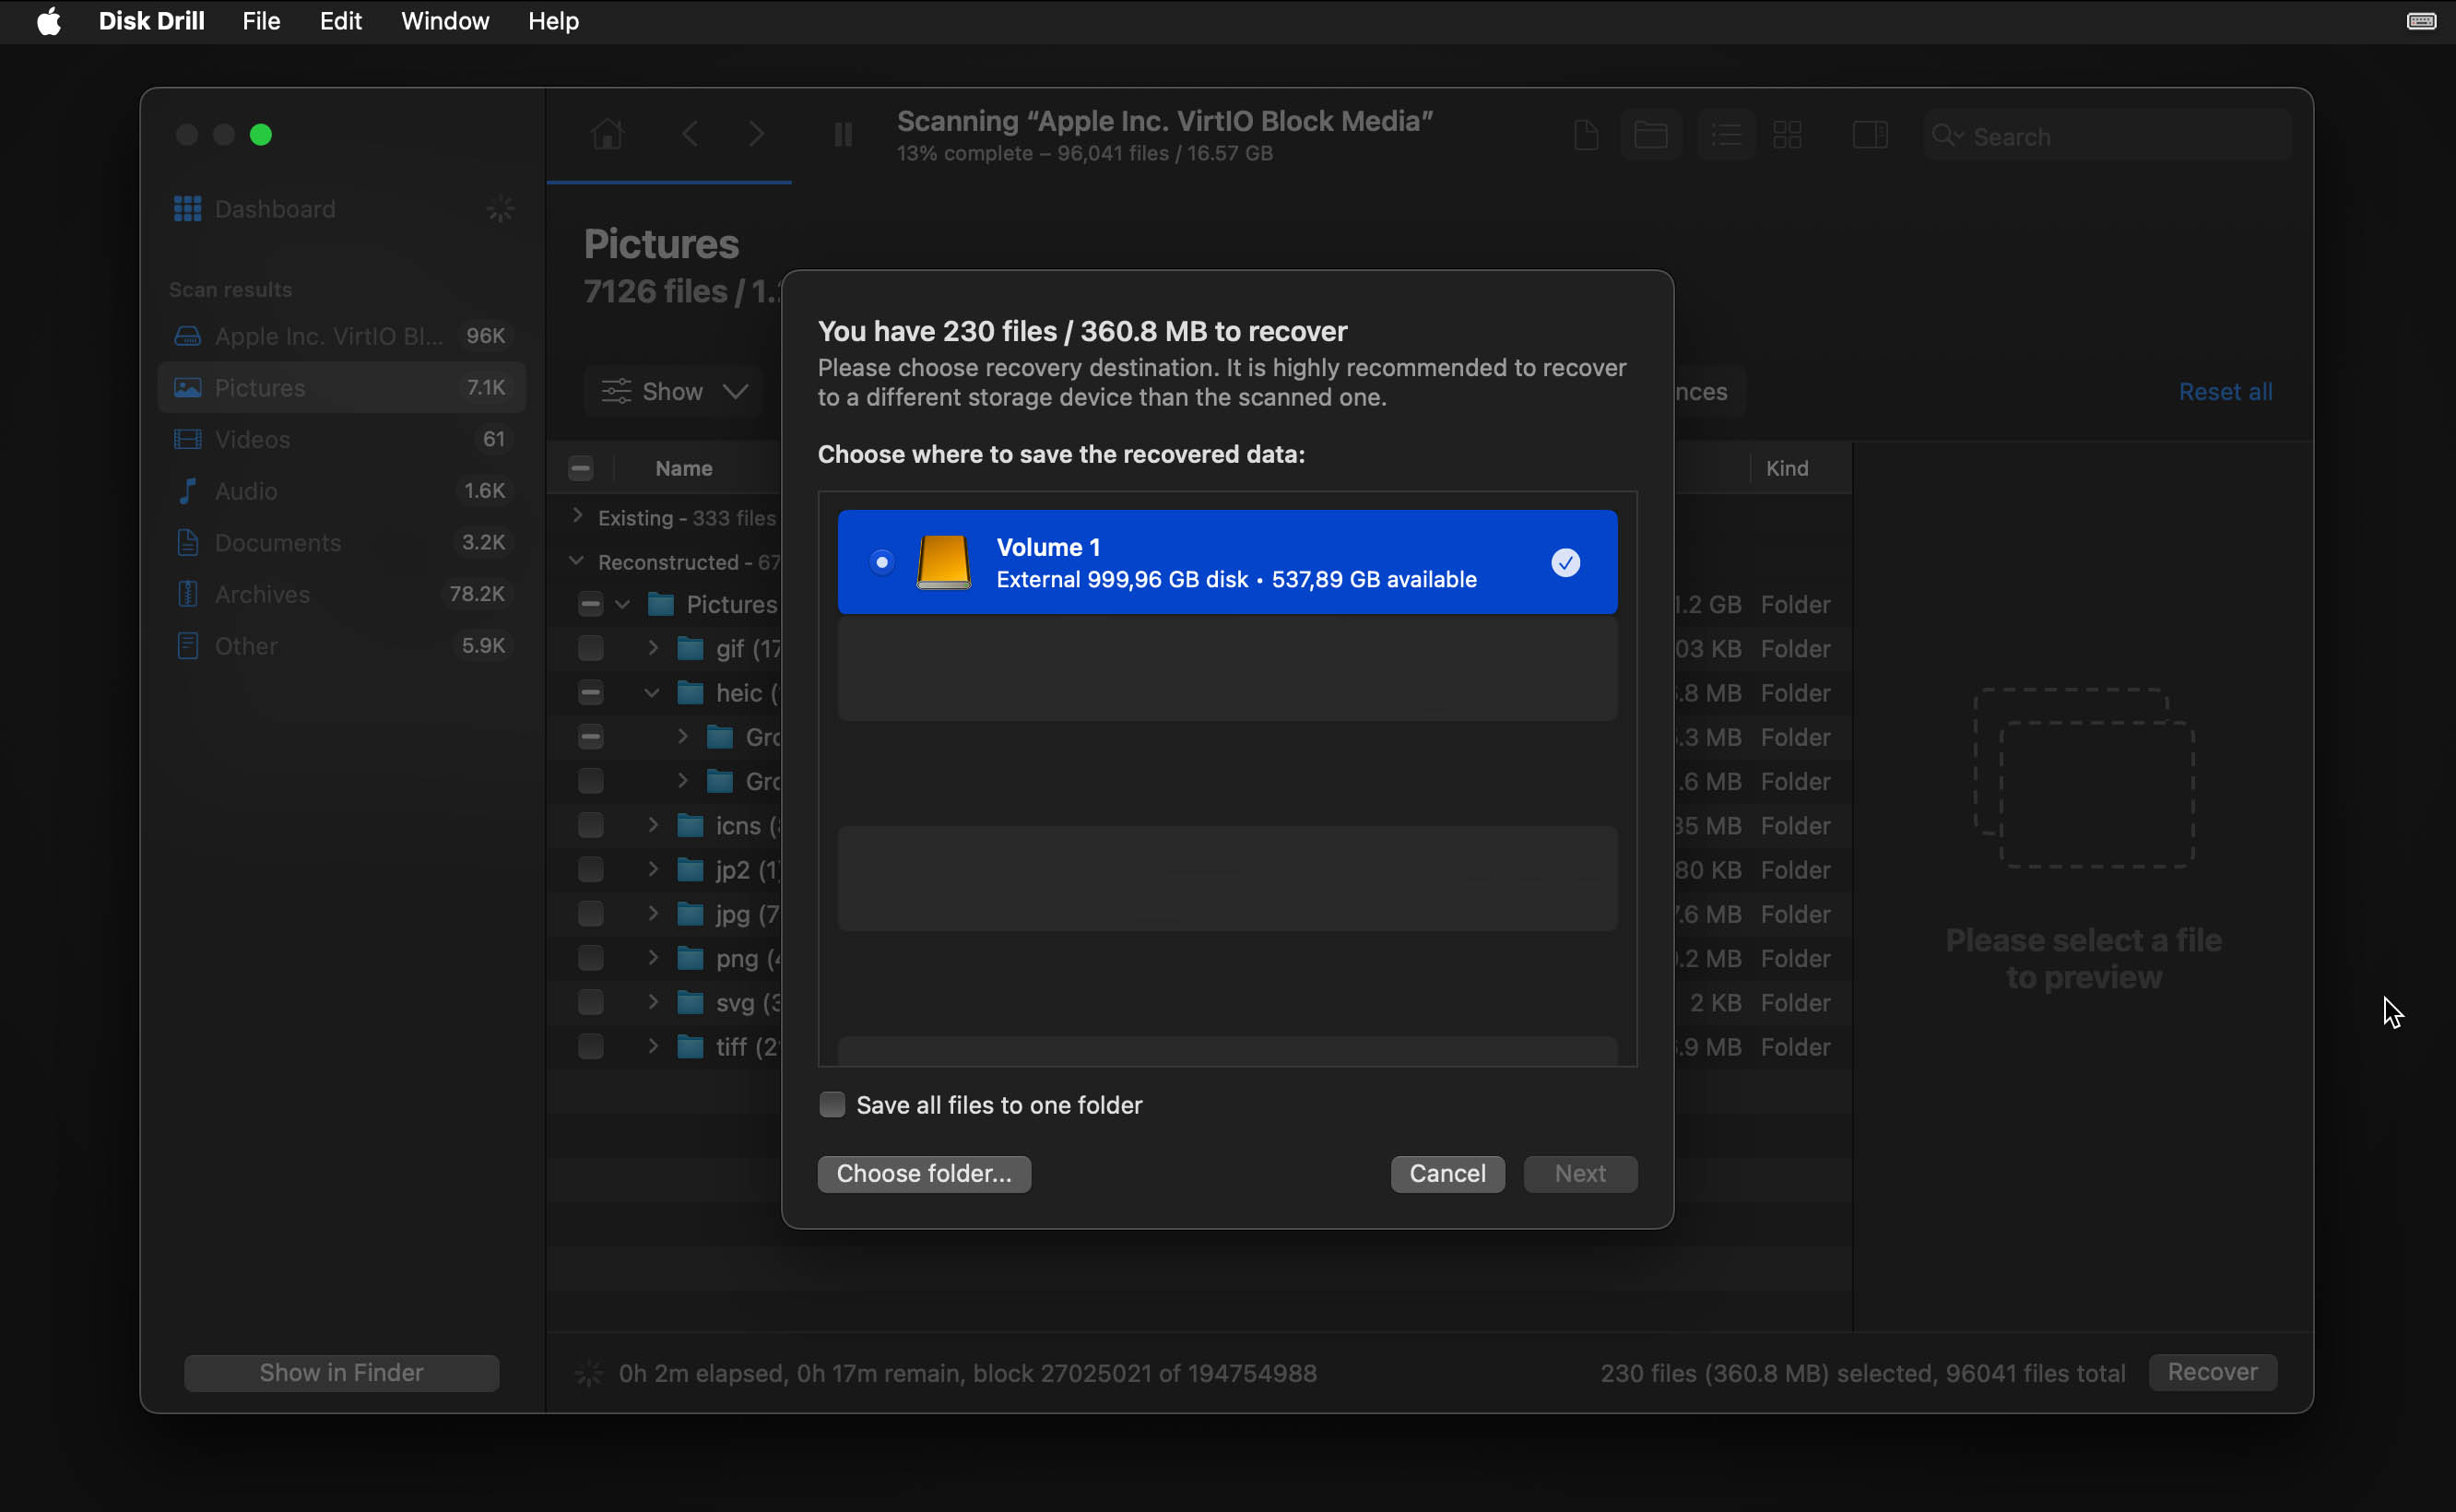
- Select the files you want to recover. Note that file preview is not available when running Disk Drill in Recovery Mode, so you’ll need to rely on file names, dates, and sizes to identify your files.
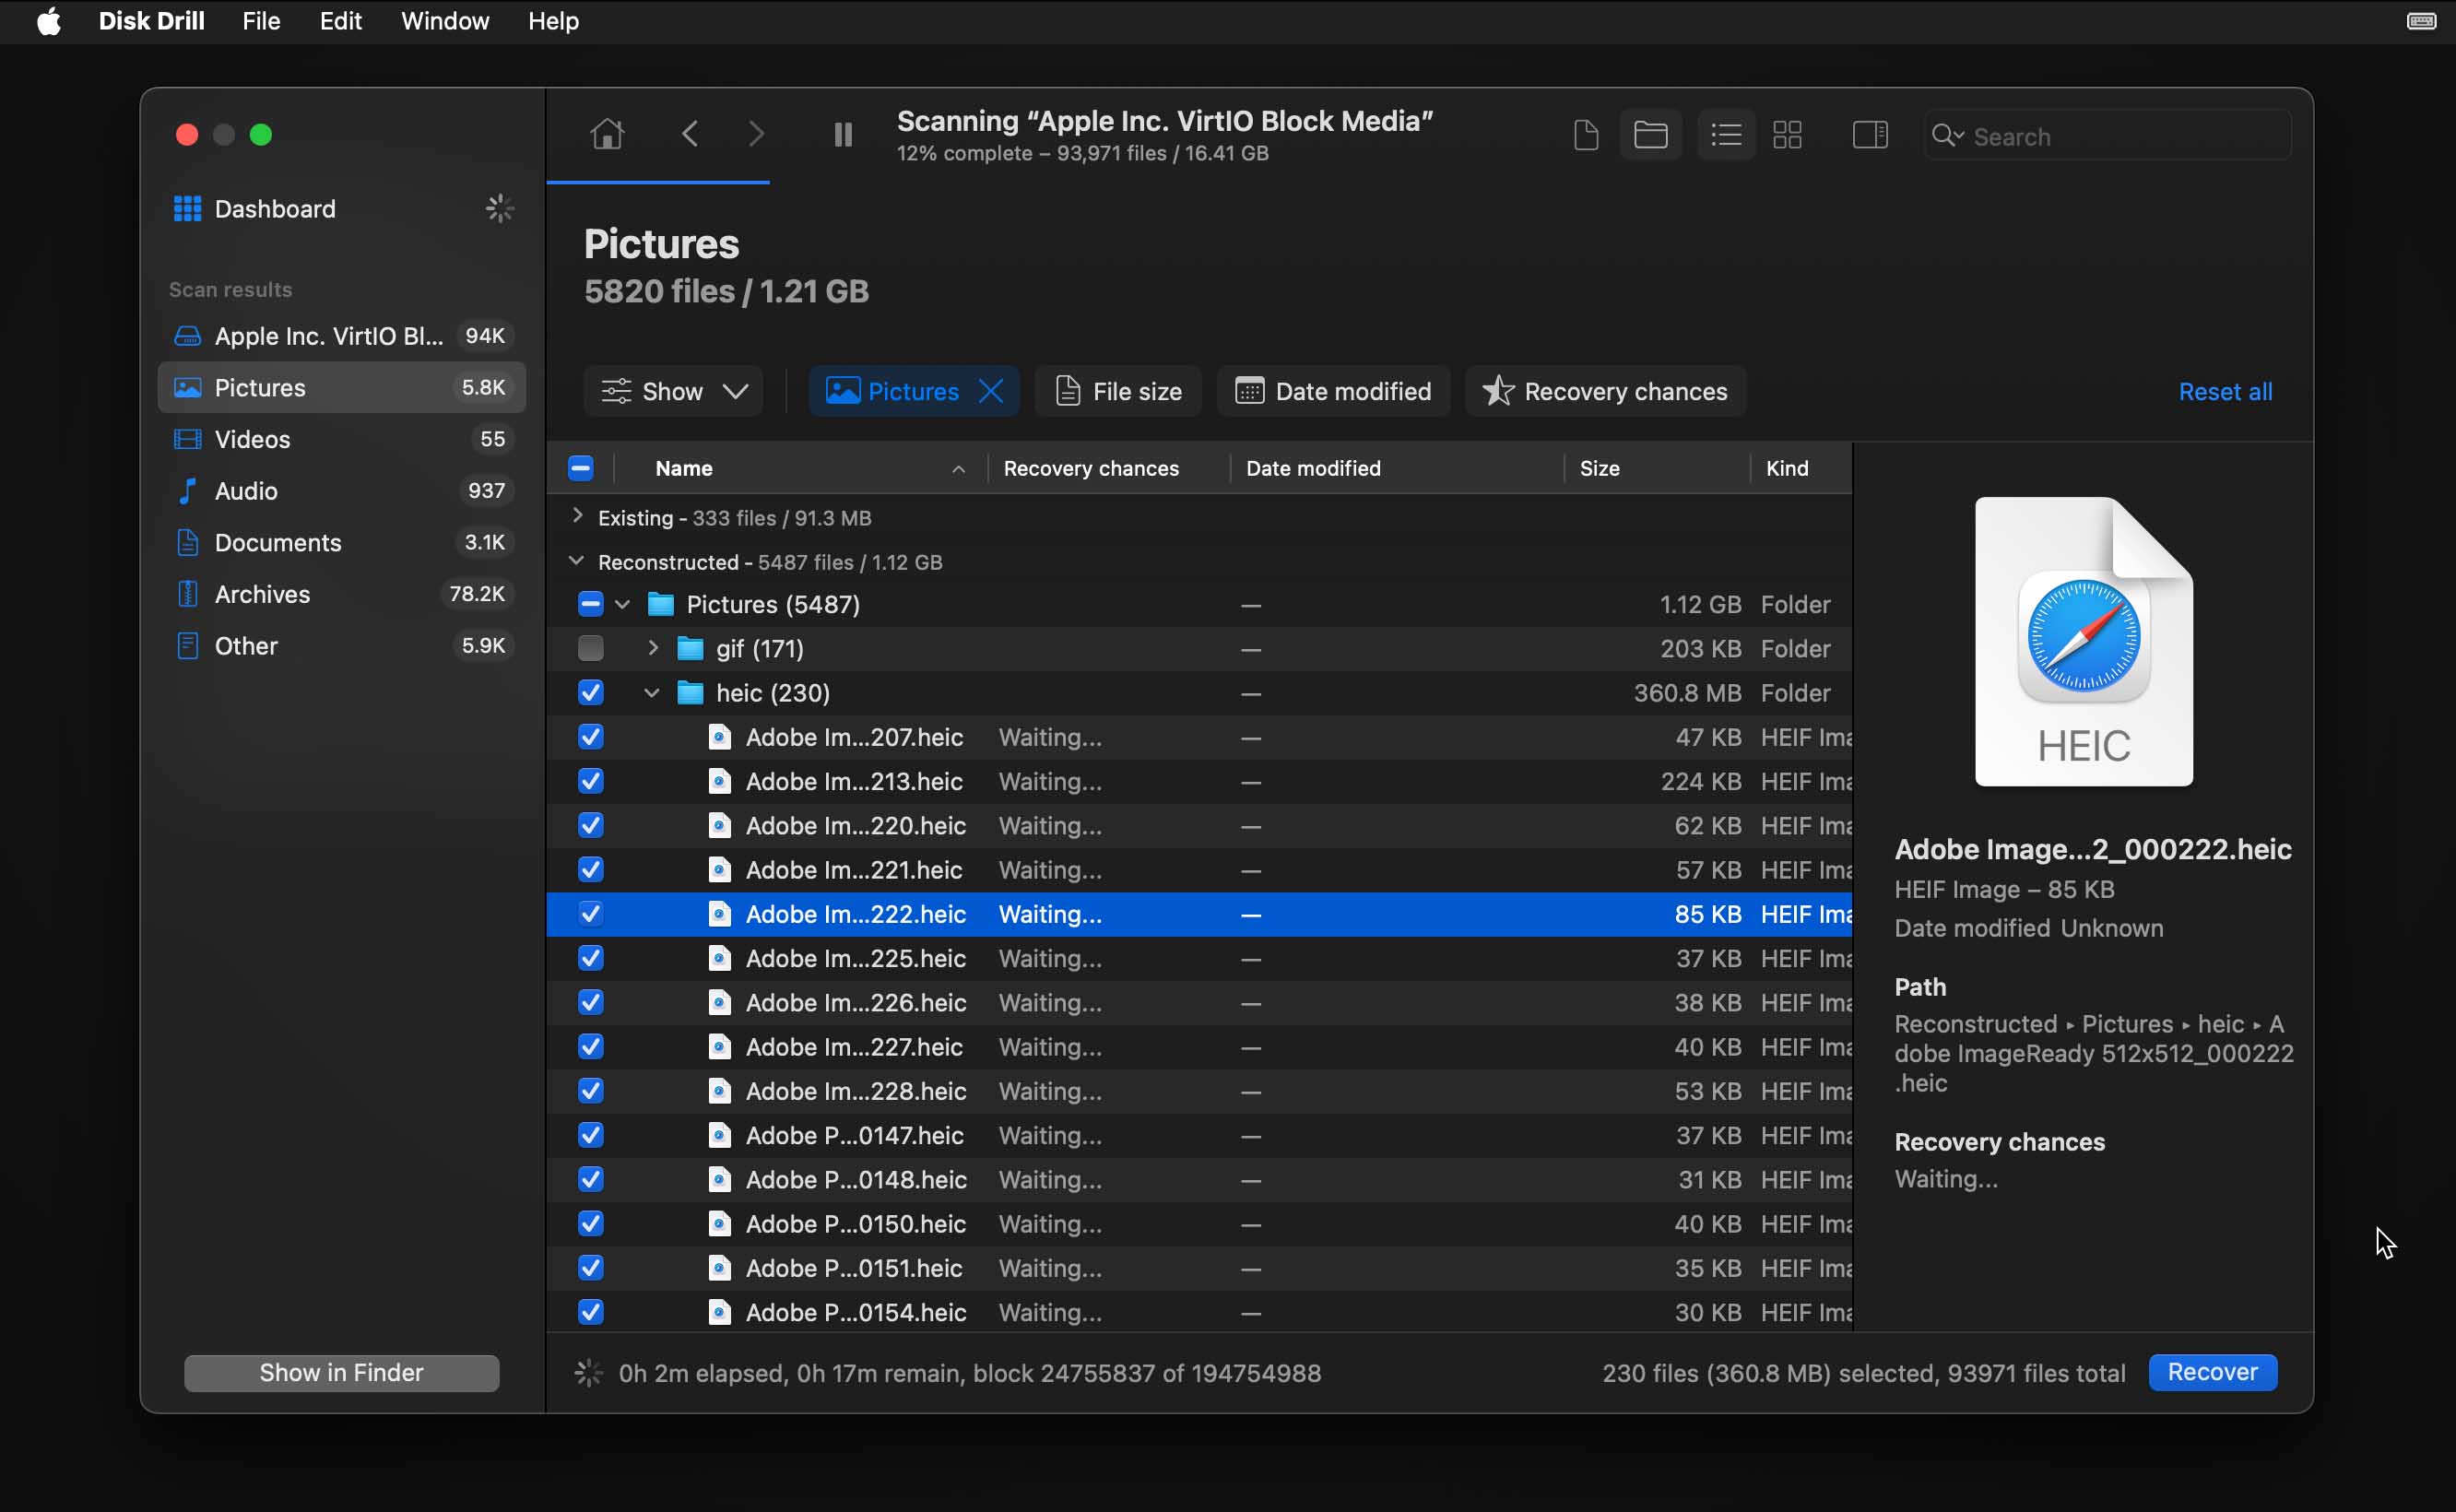
- Finally, click Recover and choose your external drive as the destination for recovered files.
After the recovery is complete, you can connect your external drive to a working Mac to access your recovered files.
Method 2: Use an External Hard Drive to Recover Data From a Dead Mac
If you need to retrieve the files from your unresponsive Mac, creating a DMG disk image backup offers a safer and more thorough approach than direct file recovery.
By working with a disk image, you preserve the exact state of your drive at the time of backup and can safely recover both visible and deleted files. Plus, if some files are corrupted or inaccessible in the initial transfer, you can always use data recovery software like Disk Drill to retrieve them from the image later.
For this method to transfer data from a dead MacBook Pro, you’ll need:
- 💻 Your unresponsive Mac
- 🖥️ A working Mac
- 💽 An external drive with enough space to store your entire Mac’s drive contents
- 🛜 Internet connection for downloading software
- 🧰 Data recovery software (we’ll use Disk Drill)
Ready? Here’s how to recover data from a dead MacBook Pro or MacBook Air:
- Connect the external drive to your dead Mac.
- Boot into Recovery Mode by turning on your Mac and immediately holding down the Command + R keys until you see the Apple logo.
- Open Disk Utility from the Recovery menu.
- Select your external drive in the left sidebar and click Erase. Name the drive, choose Mac OS Extended (Journaled) format and GUID Partition Map scheme, then click Erase.

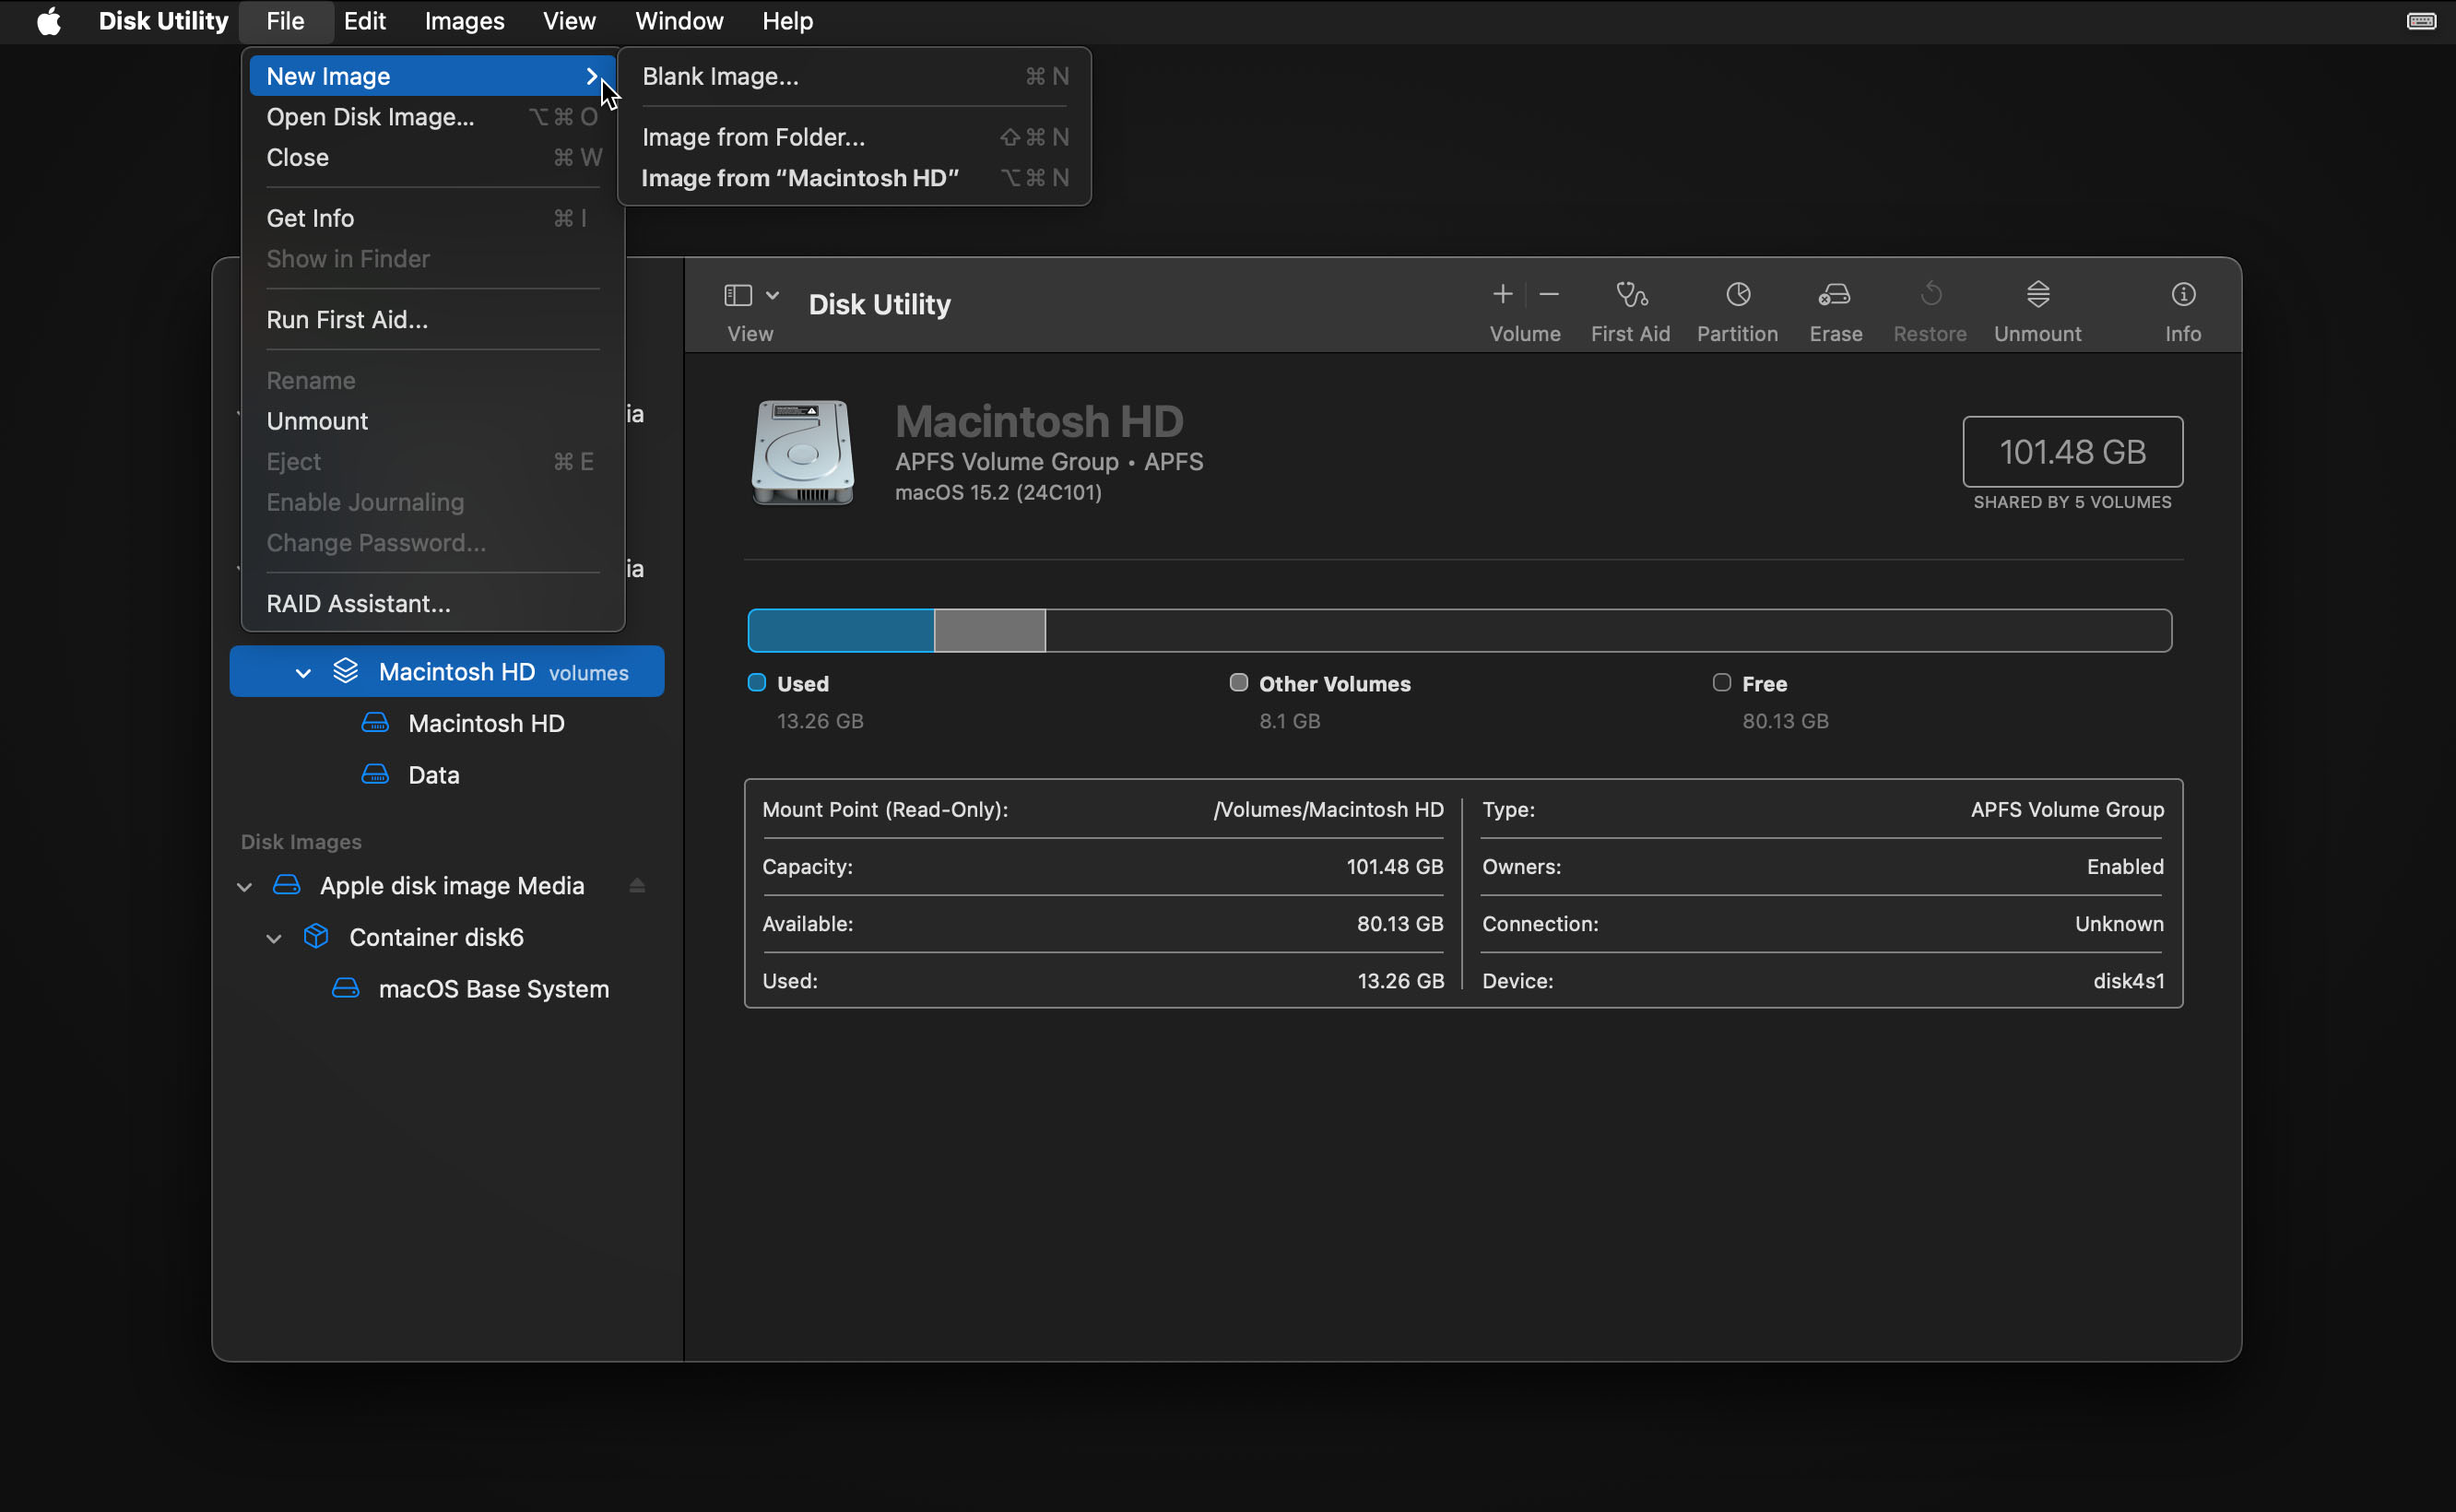
- Click Macintosh HD on the sidebar on the left and then use the menu bar at the top to go to File > New Image > Image from Macintosh HD.
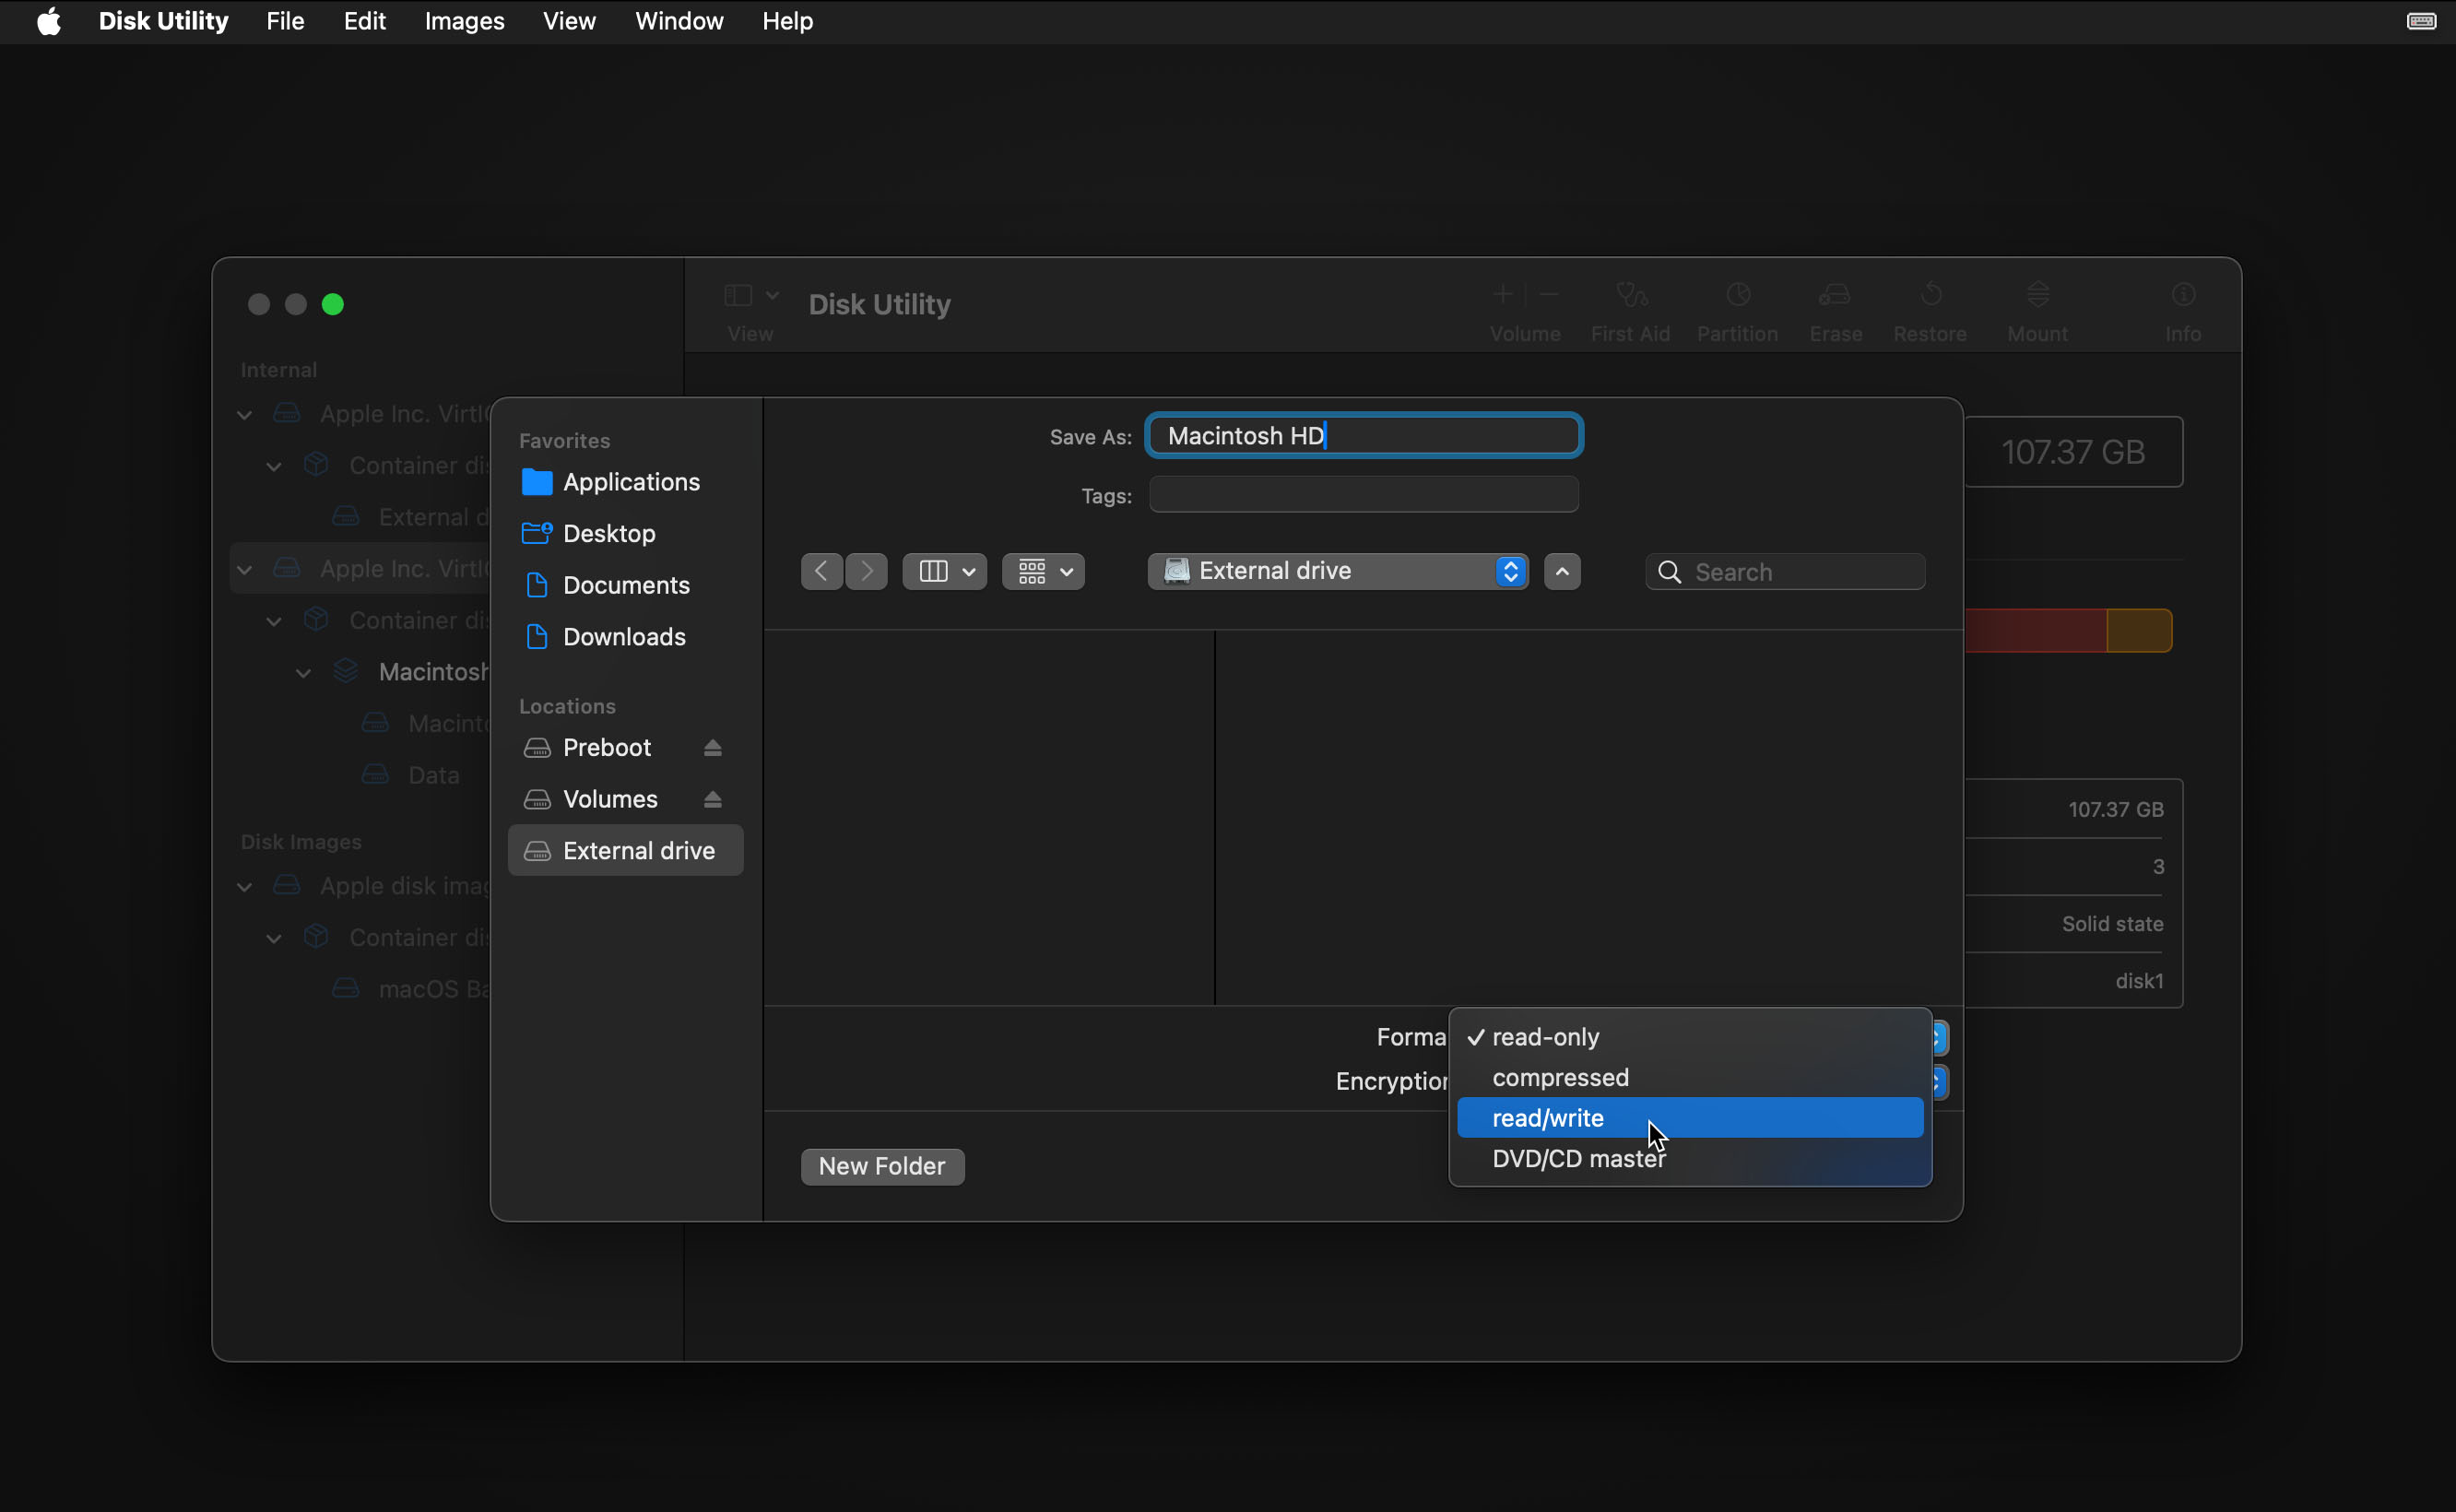
- Name your backup and choose a suitable destination for it (your external drive). Then set the image format as read/write and click Save to create the backup.
- After the image is created, safely eject the external drive and connect it to a working Mac.
- Download and install Disk Drill on your working Mac.
- Launch Disk Drill and click Attach disk image in the bottom left corner. Complete the recovery by following the steps in Method #1 (steps 6-10).


How to Recover Data From a Dead Mac With & Without T2/M1-M4 Chips
If your MacBook has a T2 security chip or Apple Silicon (M1-M4) processor, the system drive is automatically encrypted, so the above-described methods won’t help you. Fortunately, you’re not left without options. Let’s take a closer look at three methods that you can use to recover data from a dead MacBook even if it does contain a T2 or M chip.
Method 1: Restore Files from the Time Machine Backup
If you’ve been regularly backing up your MacBook using Time Machine (and you should!), you can recover your data even from a MacBook that won’t turn on. However, there’s an important detail to understand: you’ll need to reinstall macOS first before you can restore your files.
While Recovery Mode does have a “Restore from Time Machine Backup” option, it only works in very specific circumstances (when your backup is stored on a Time Capsule and contains all system files). For most users, the more reliable method is to:
- Get your MacBook working again with a fresh macOS installation.
- Use Migration Assistant to restore your data from the Time Machine backup.
Here’s how to recover data from a dead MacBook Pro or MacBook Air using Time Machine:
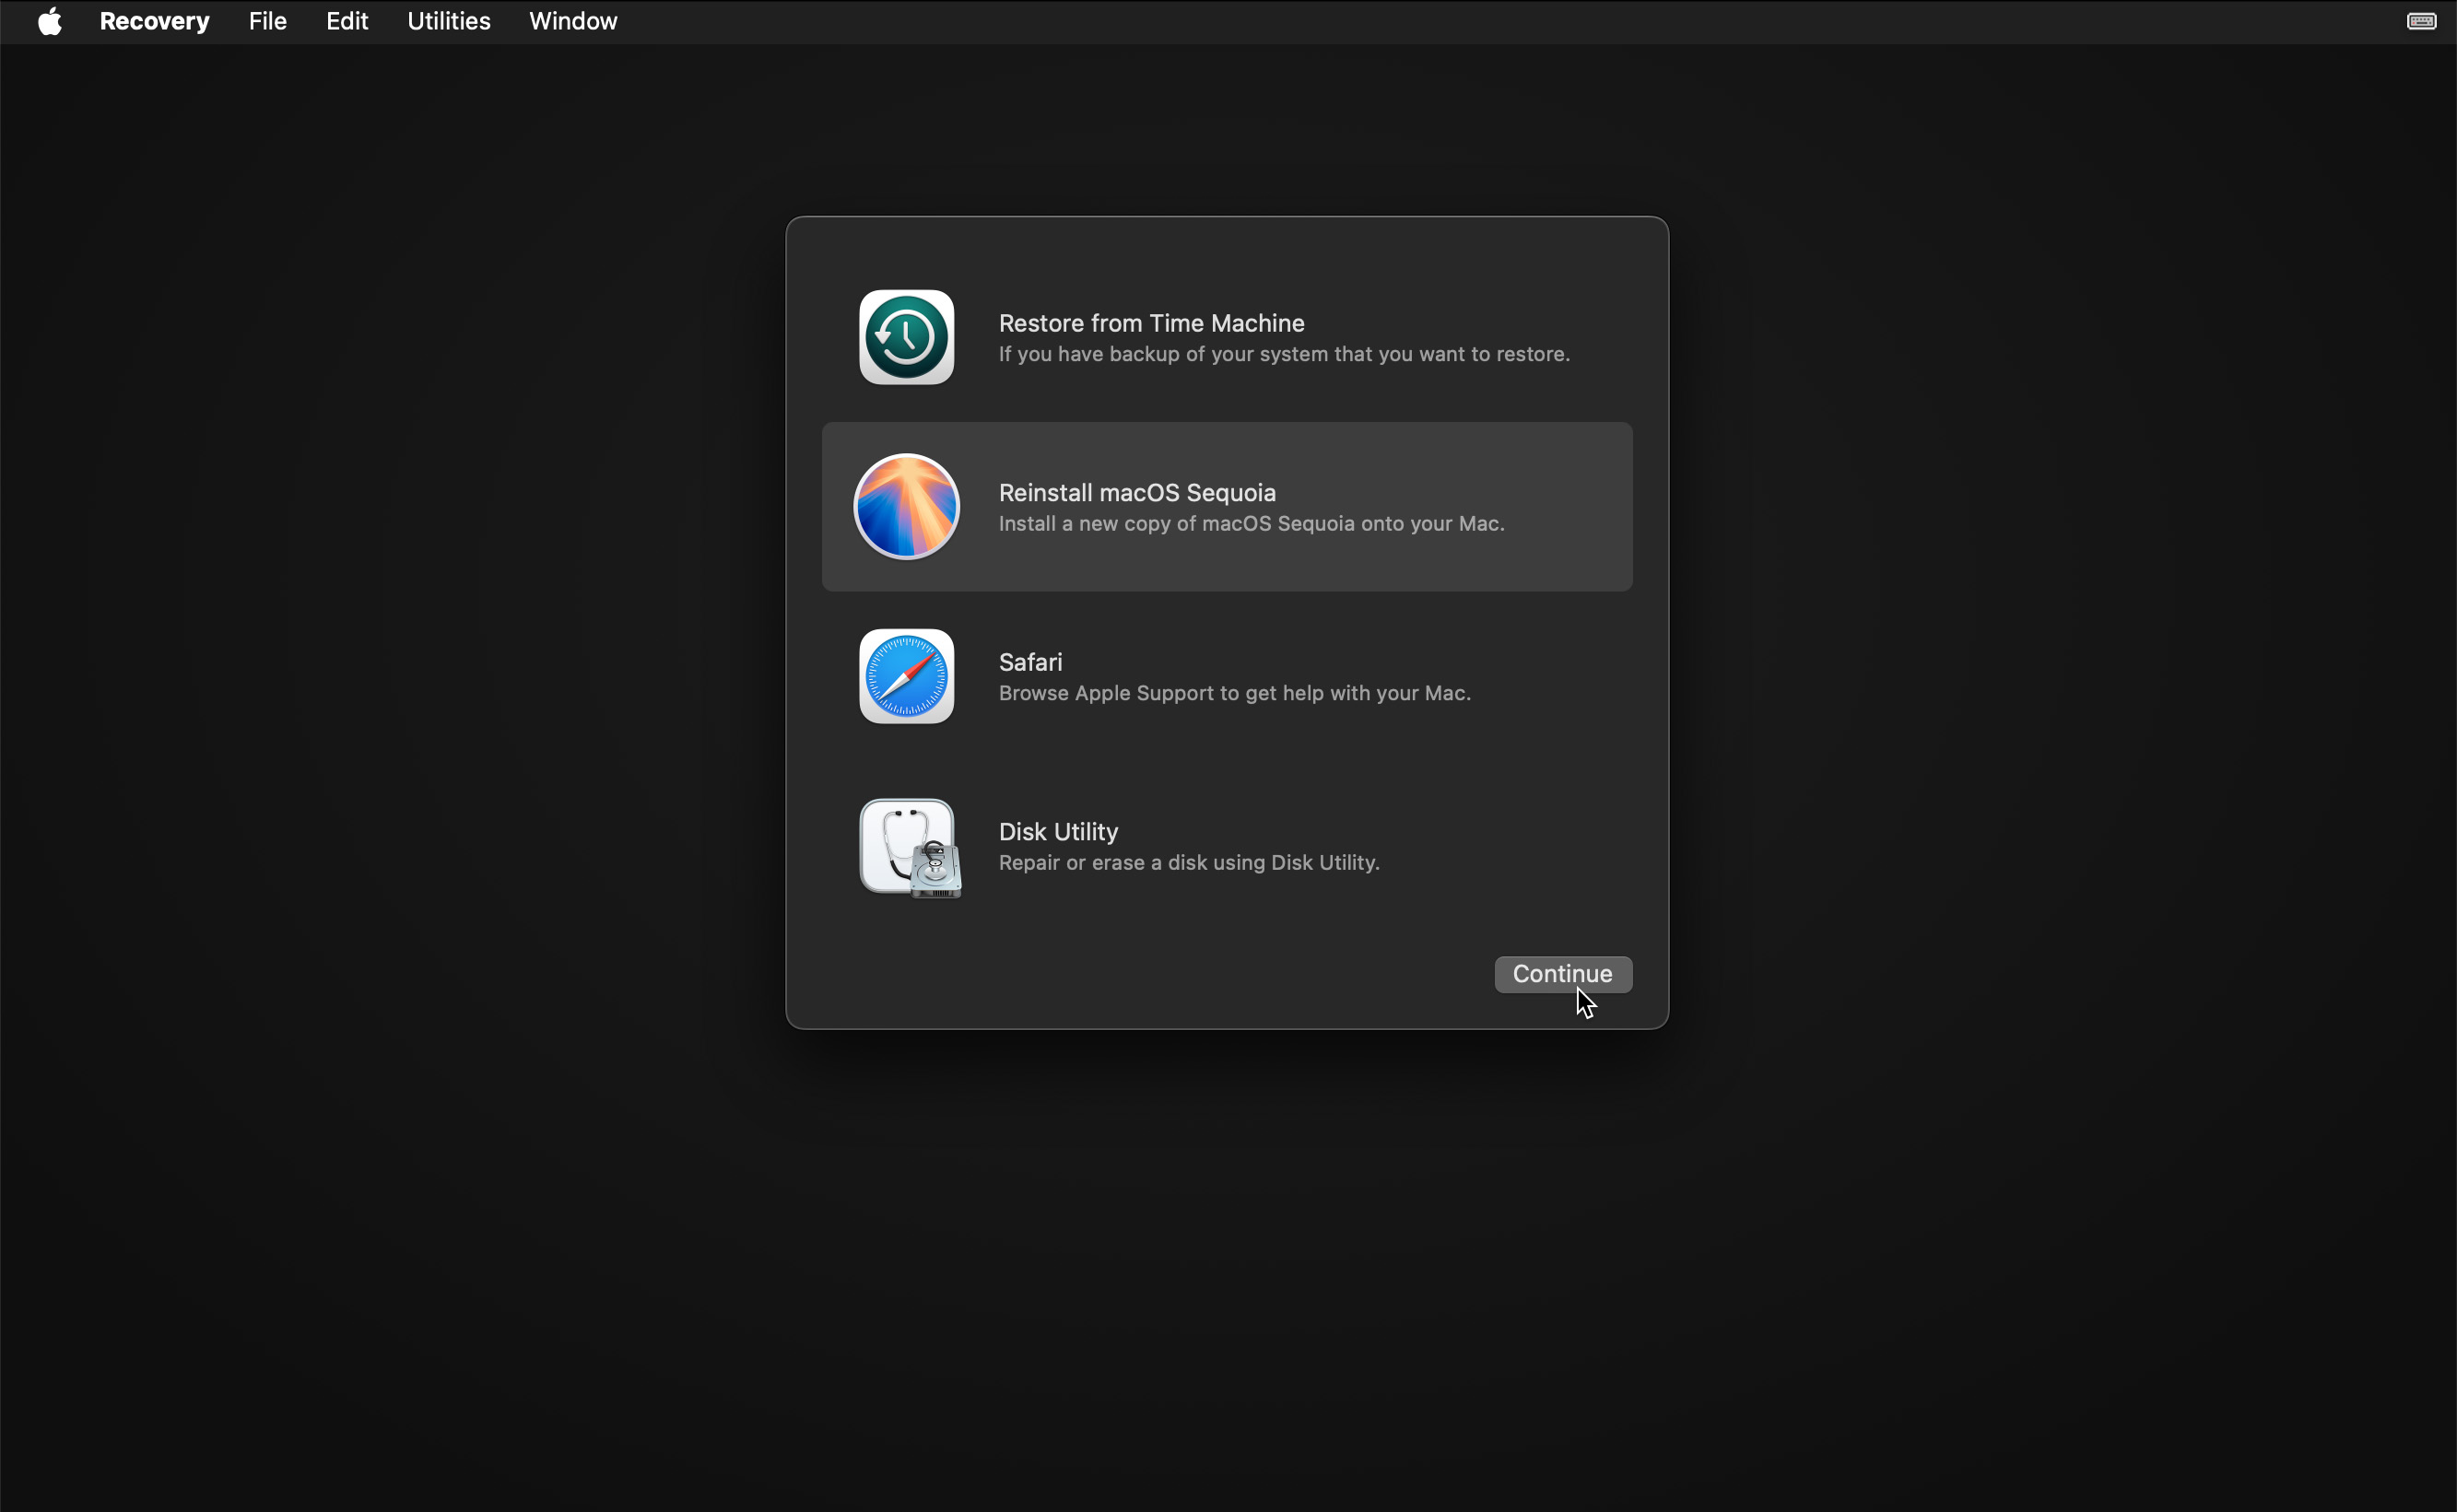
- Boot into Recovery Mode (for Intel-based Macs, turn on your Mac by pressing the power button and holding the Command + R keys; for M1 Macs, press and hold the power button until the Startup Options window appears).
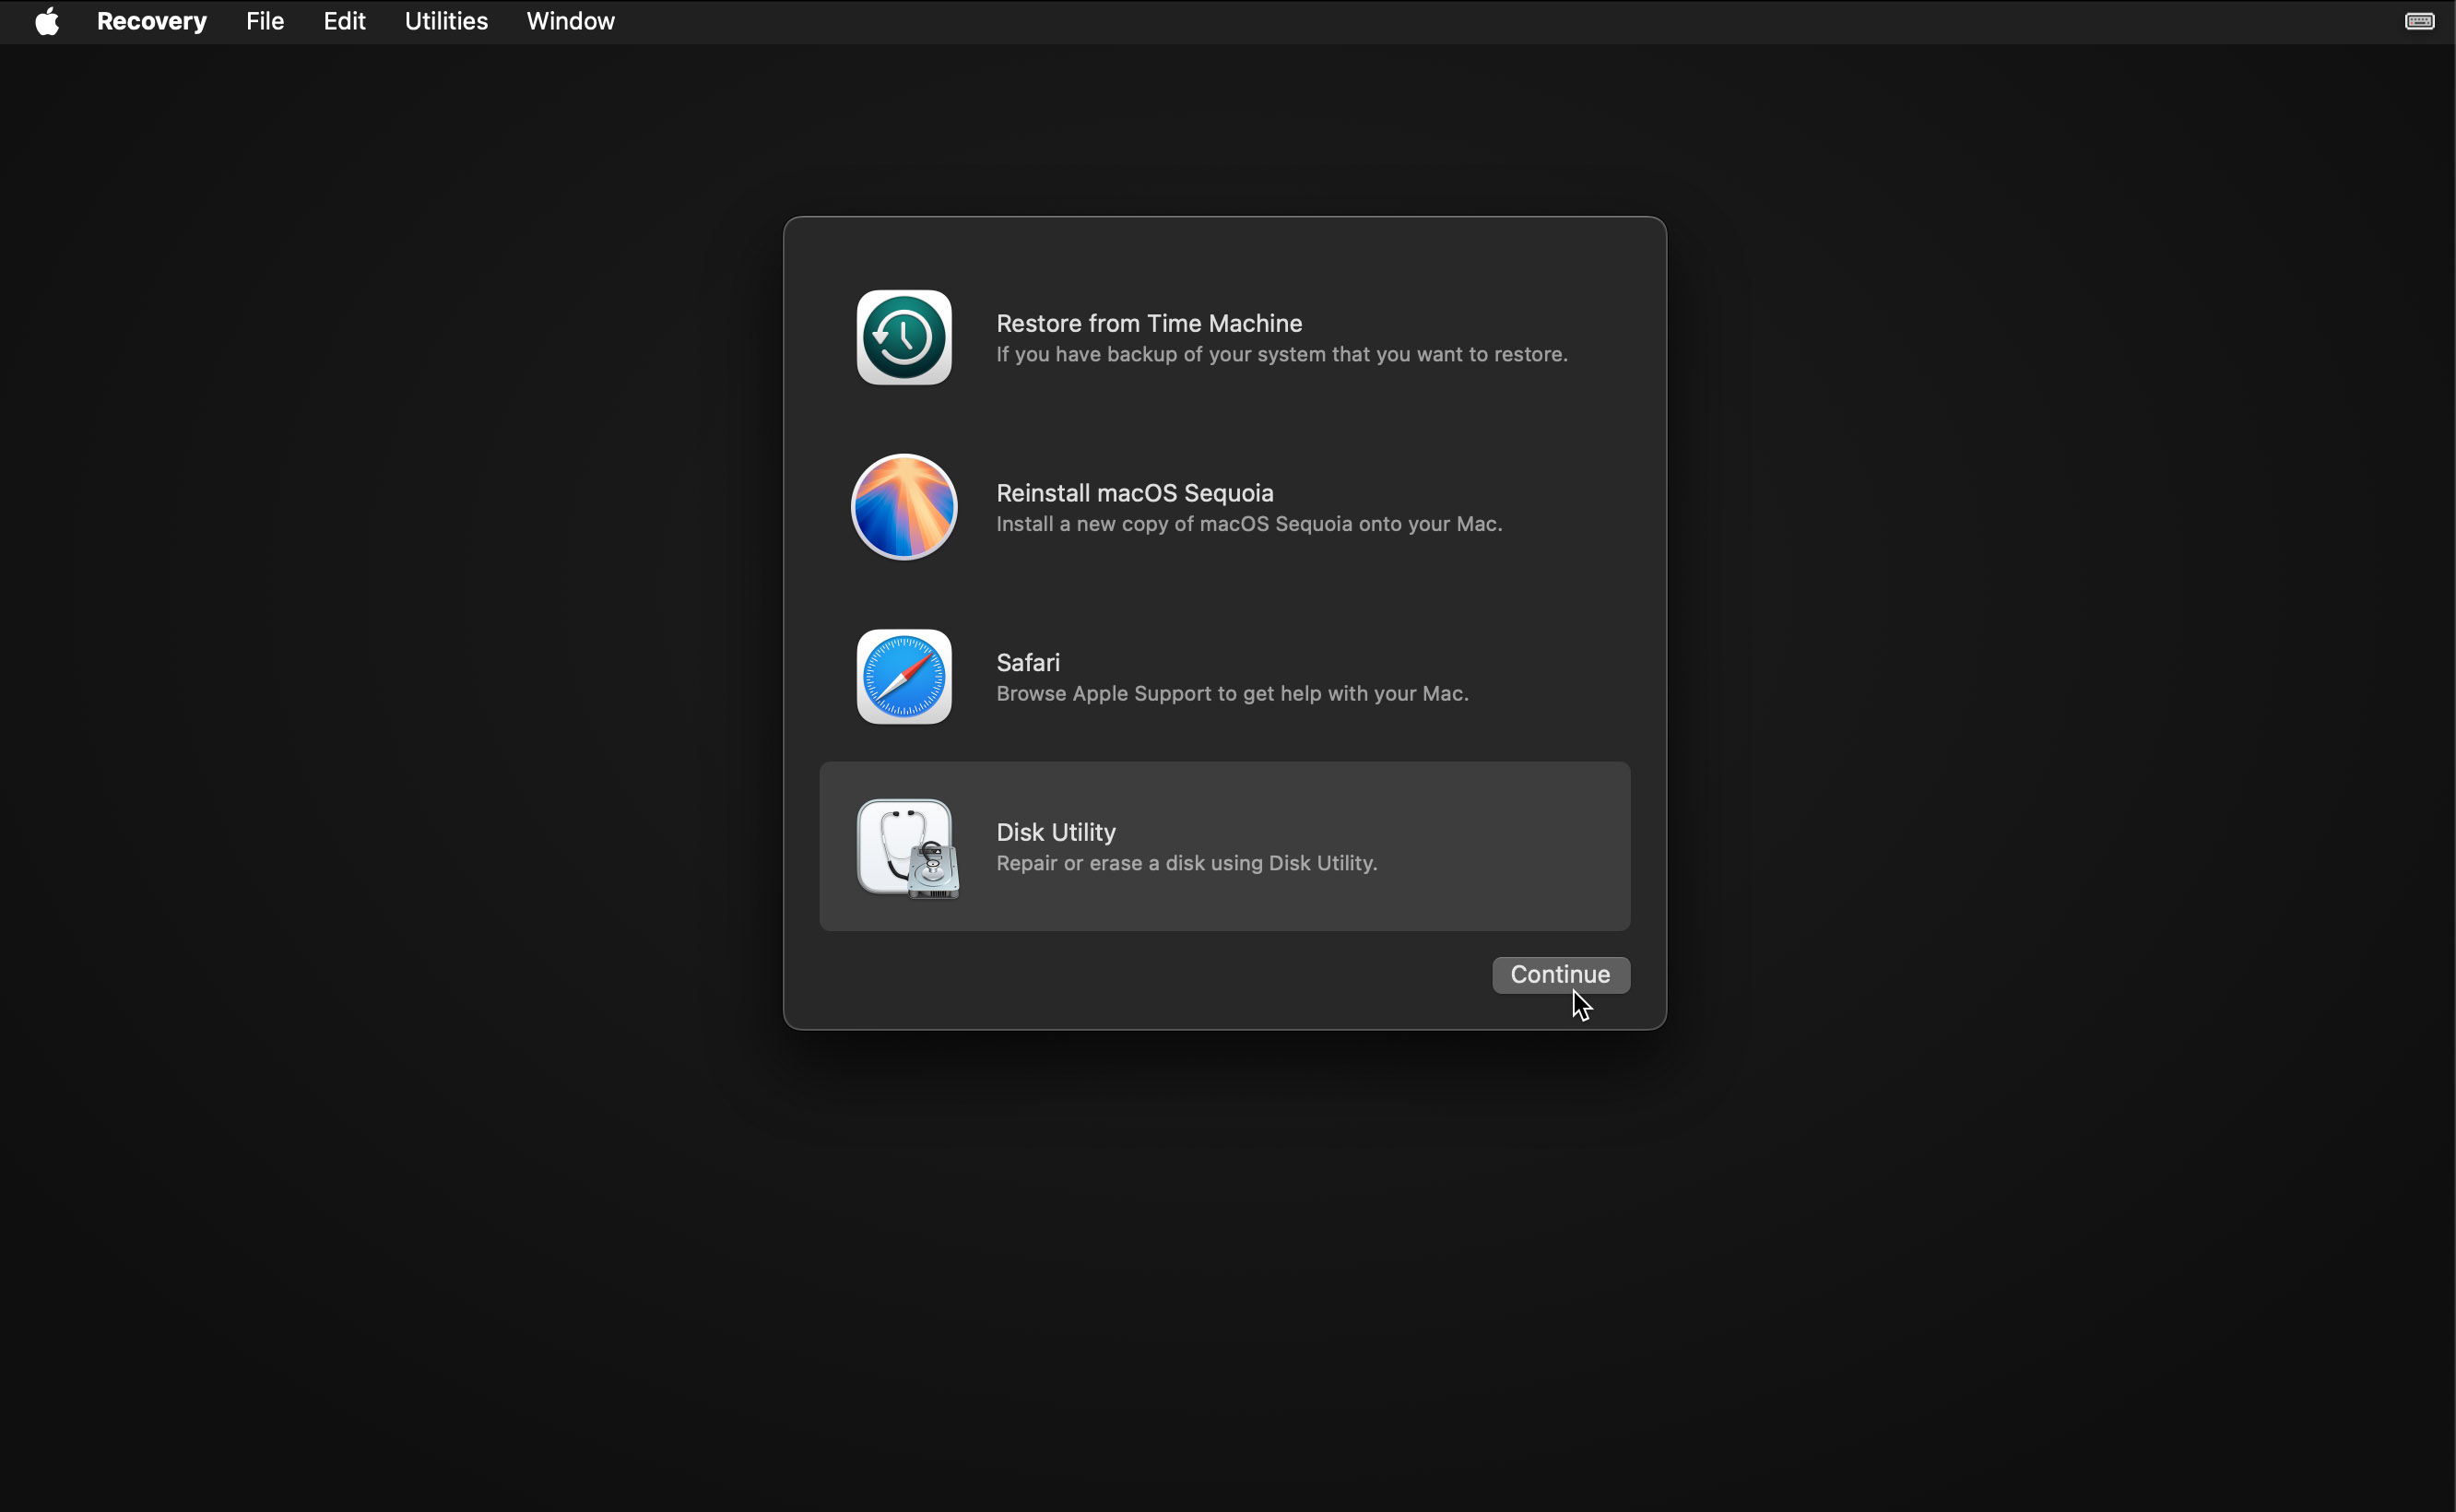
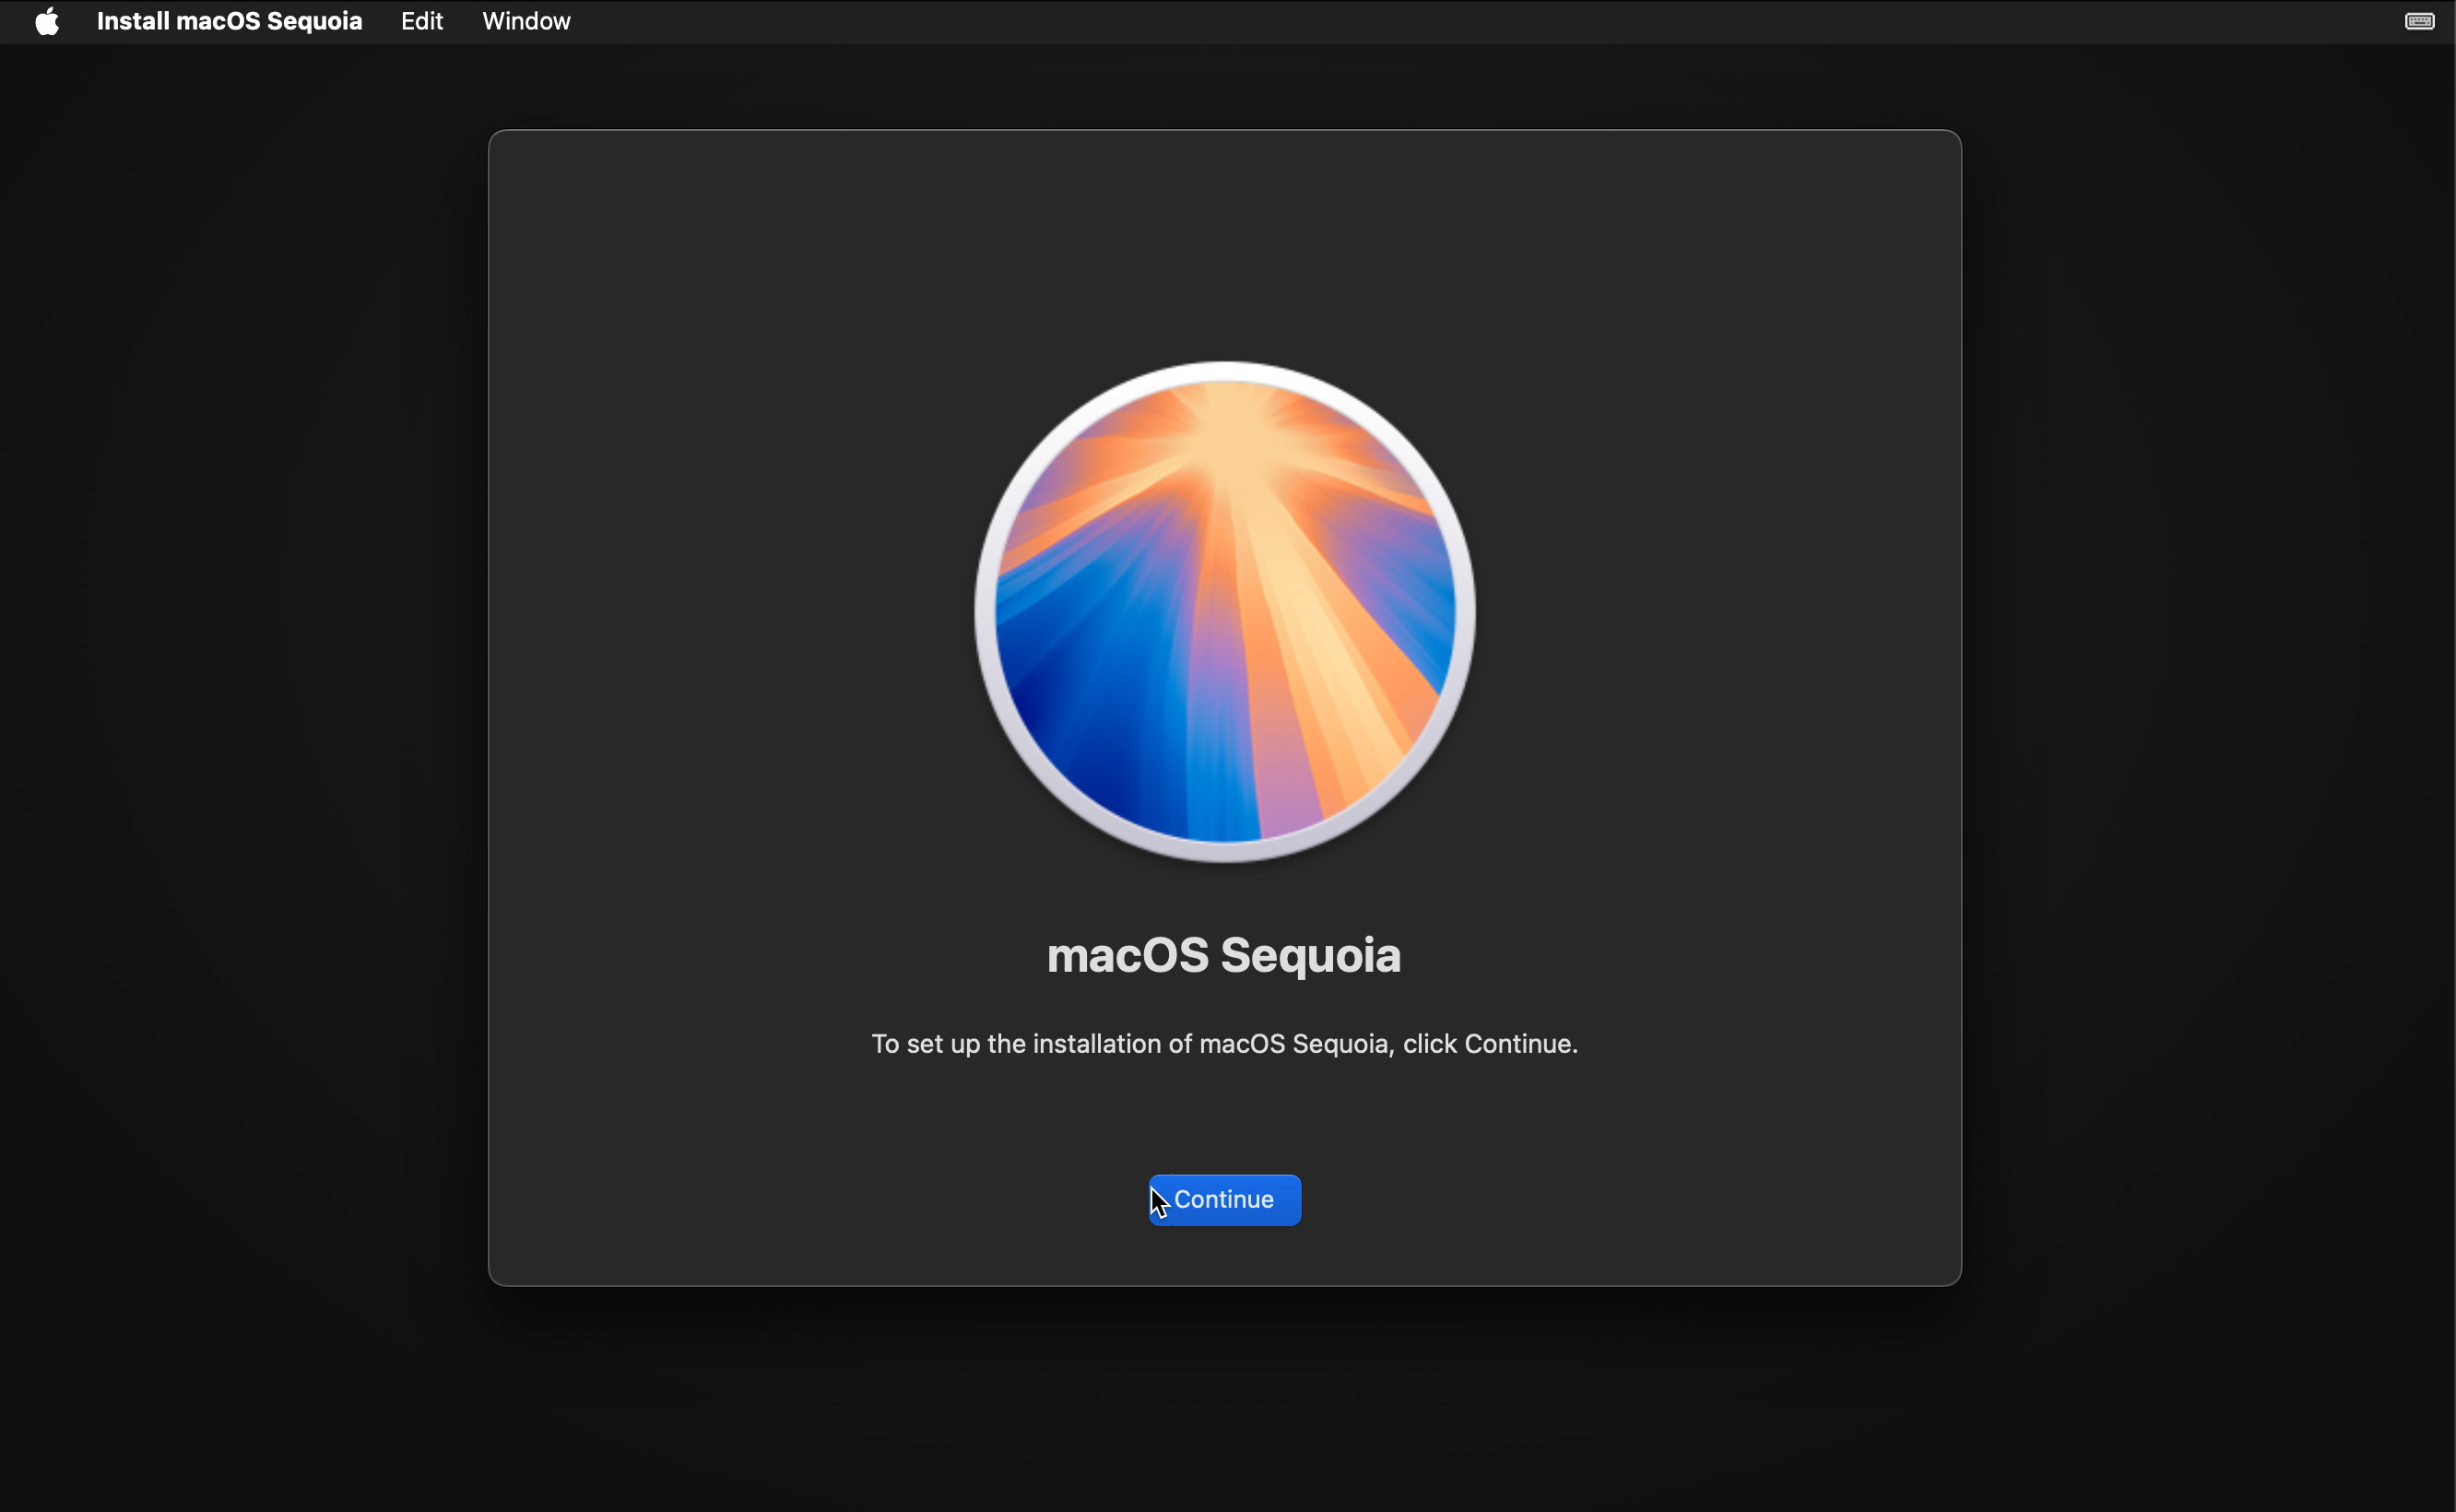
- Select Reinstall macOS from the macOS Utilities window.

- Follow the installation prompts to install a fresh copy of macOS.
- Once installation is complete and your Mac restarts, you’ll see the Setup Assistant.
- When asked if you want to transfer information, select From a Mac, Time Machine backup, or startup disk and click Continue.

- Connect your Time Machine backup drive to your Mac.
- Follow the Migration Assistant prompts to select and restore your backup.
For a more detailed guide on restoring from Time Machine backups, including troubleshooting tips and what to do if certain files are missing, check out our comprehensive guide on how to restore your Mac from a Time Machine backup.
Method 2: Use Target Disk Mode or Share Disk to Transfer the Data
You can use a built-in feature on your Mac to transfer data from the dead Mac to a new Mac. However, it’s important to point out that this method isn’t guaranteed to work in all situations.
If your MacBook won’t turn on due to logical drive damage or severe system corruption, you might not be able to access the user folders at all. Additionally, system encryption on newer Macs can sometimes prevent access even if the Mac starts up in Target Disk Mode.
Still, if your dead MacBook can at least power on, this method is worth trying before moving on to more complex solutions. You’ll need your damaged Mac, a working one, and a Thunderbolt cable to connect them.
Intel-based Mac Instructions
Follow these steps to recover data from a dead Mac using Target Disk Mode:
- Connect your dead Mac and a working one with a cable.
- Press and hold the T key and the power button on your dead Mac to boot it in Target Disk Mode.

- On the working Mac, go to Finder > Locations > Network. Double-click your broken Mac’s drive and navigate to Connect As > Guest, and choose Connect.
- Drag and drop the files which you want to recover from your dead Mac to the other one.
Apple Silicon-based Mac Instructions
Follow these steps to recover data from a dead Mac using Share Disk:
- Connect your dead Mac and a working one with a cable.
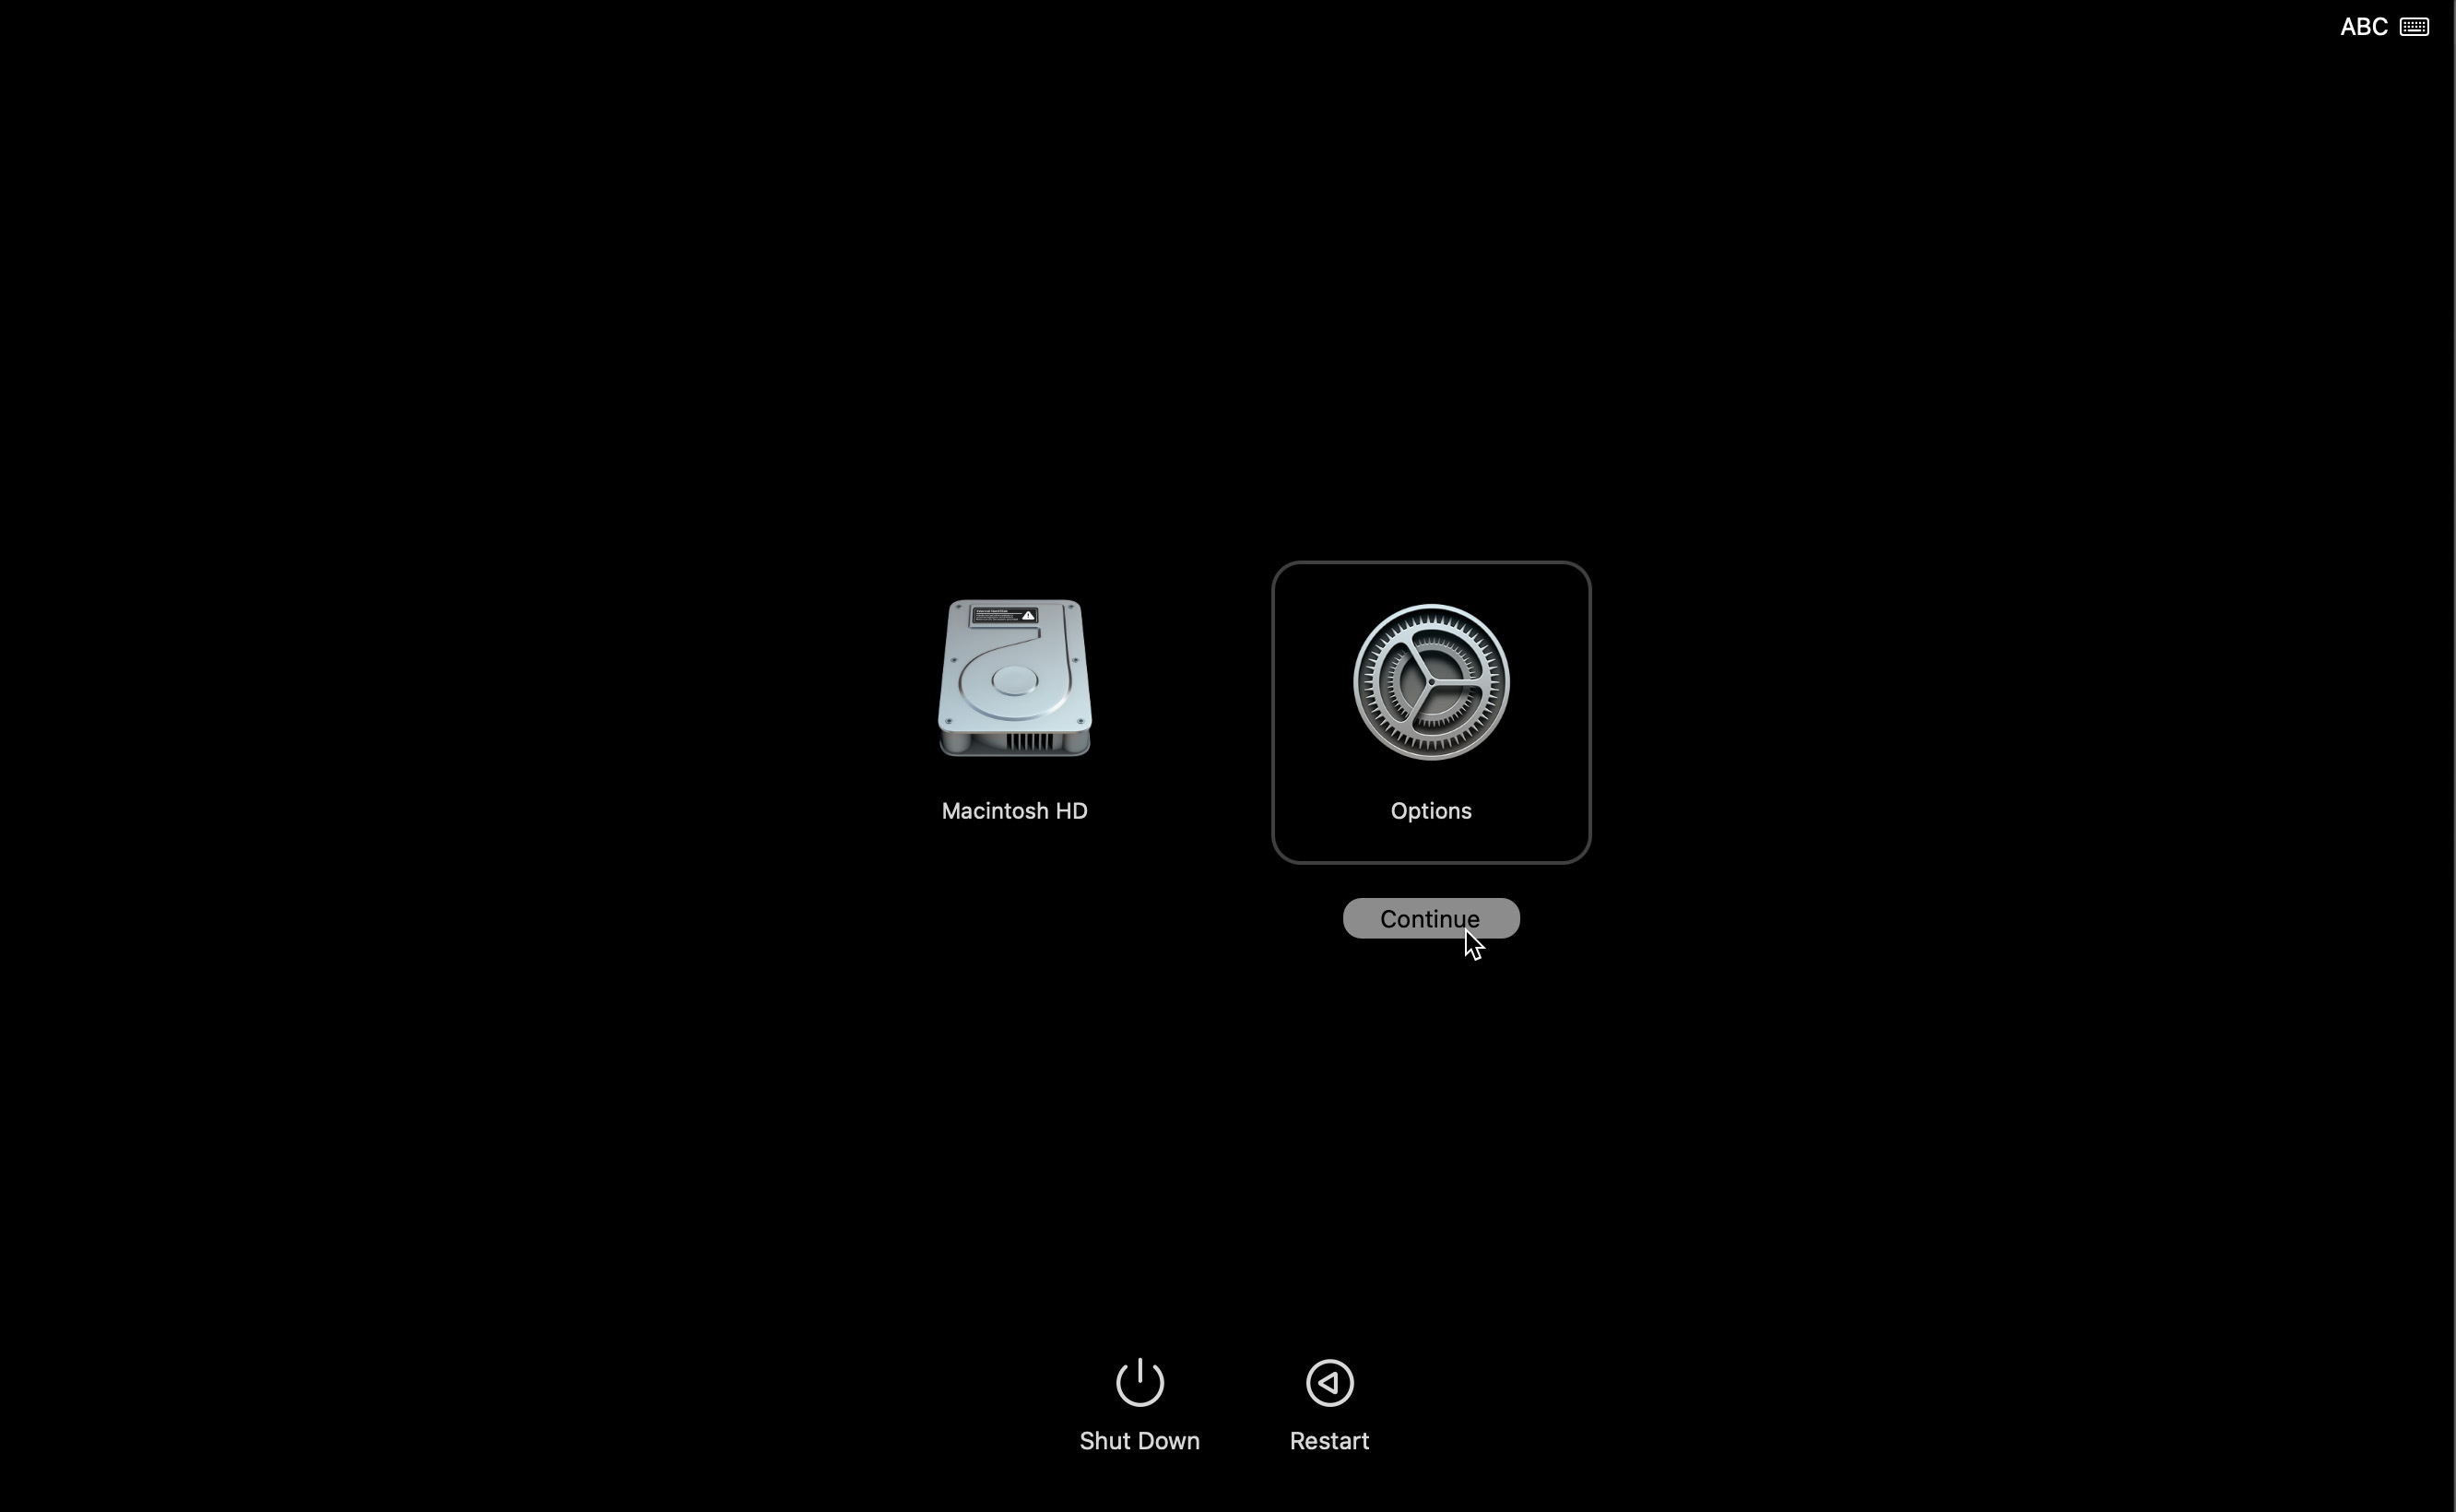
- Press and hold the power button on the damaged Mac until the Startup Options window appears.
- Click Options > Continue.
- Using the menu bar, go to Utilities > Share Disk.
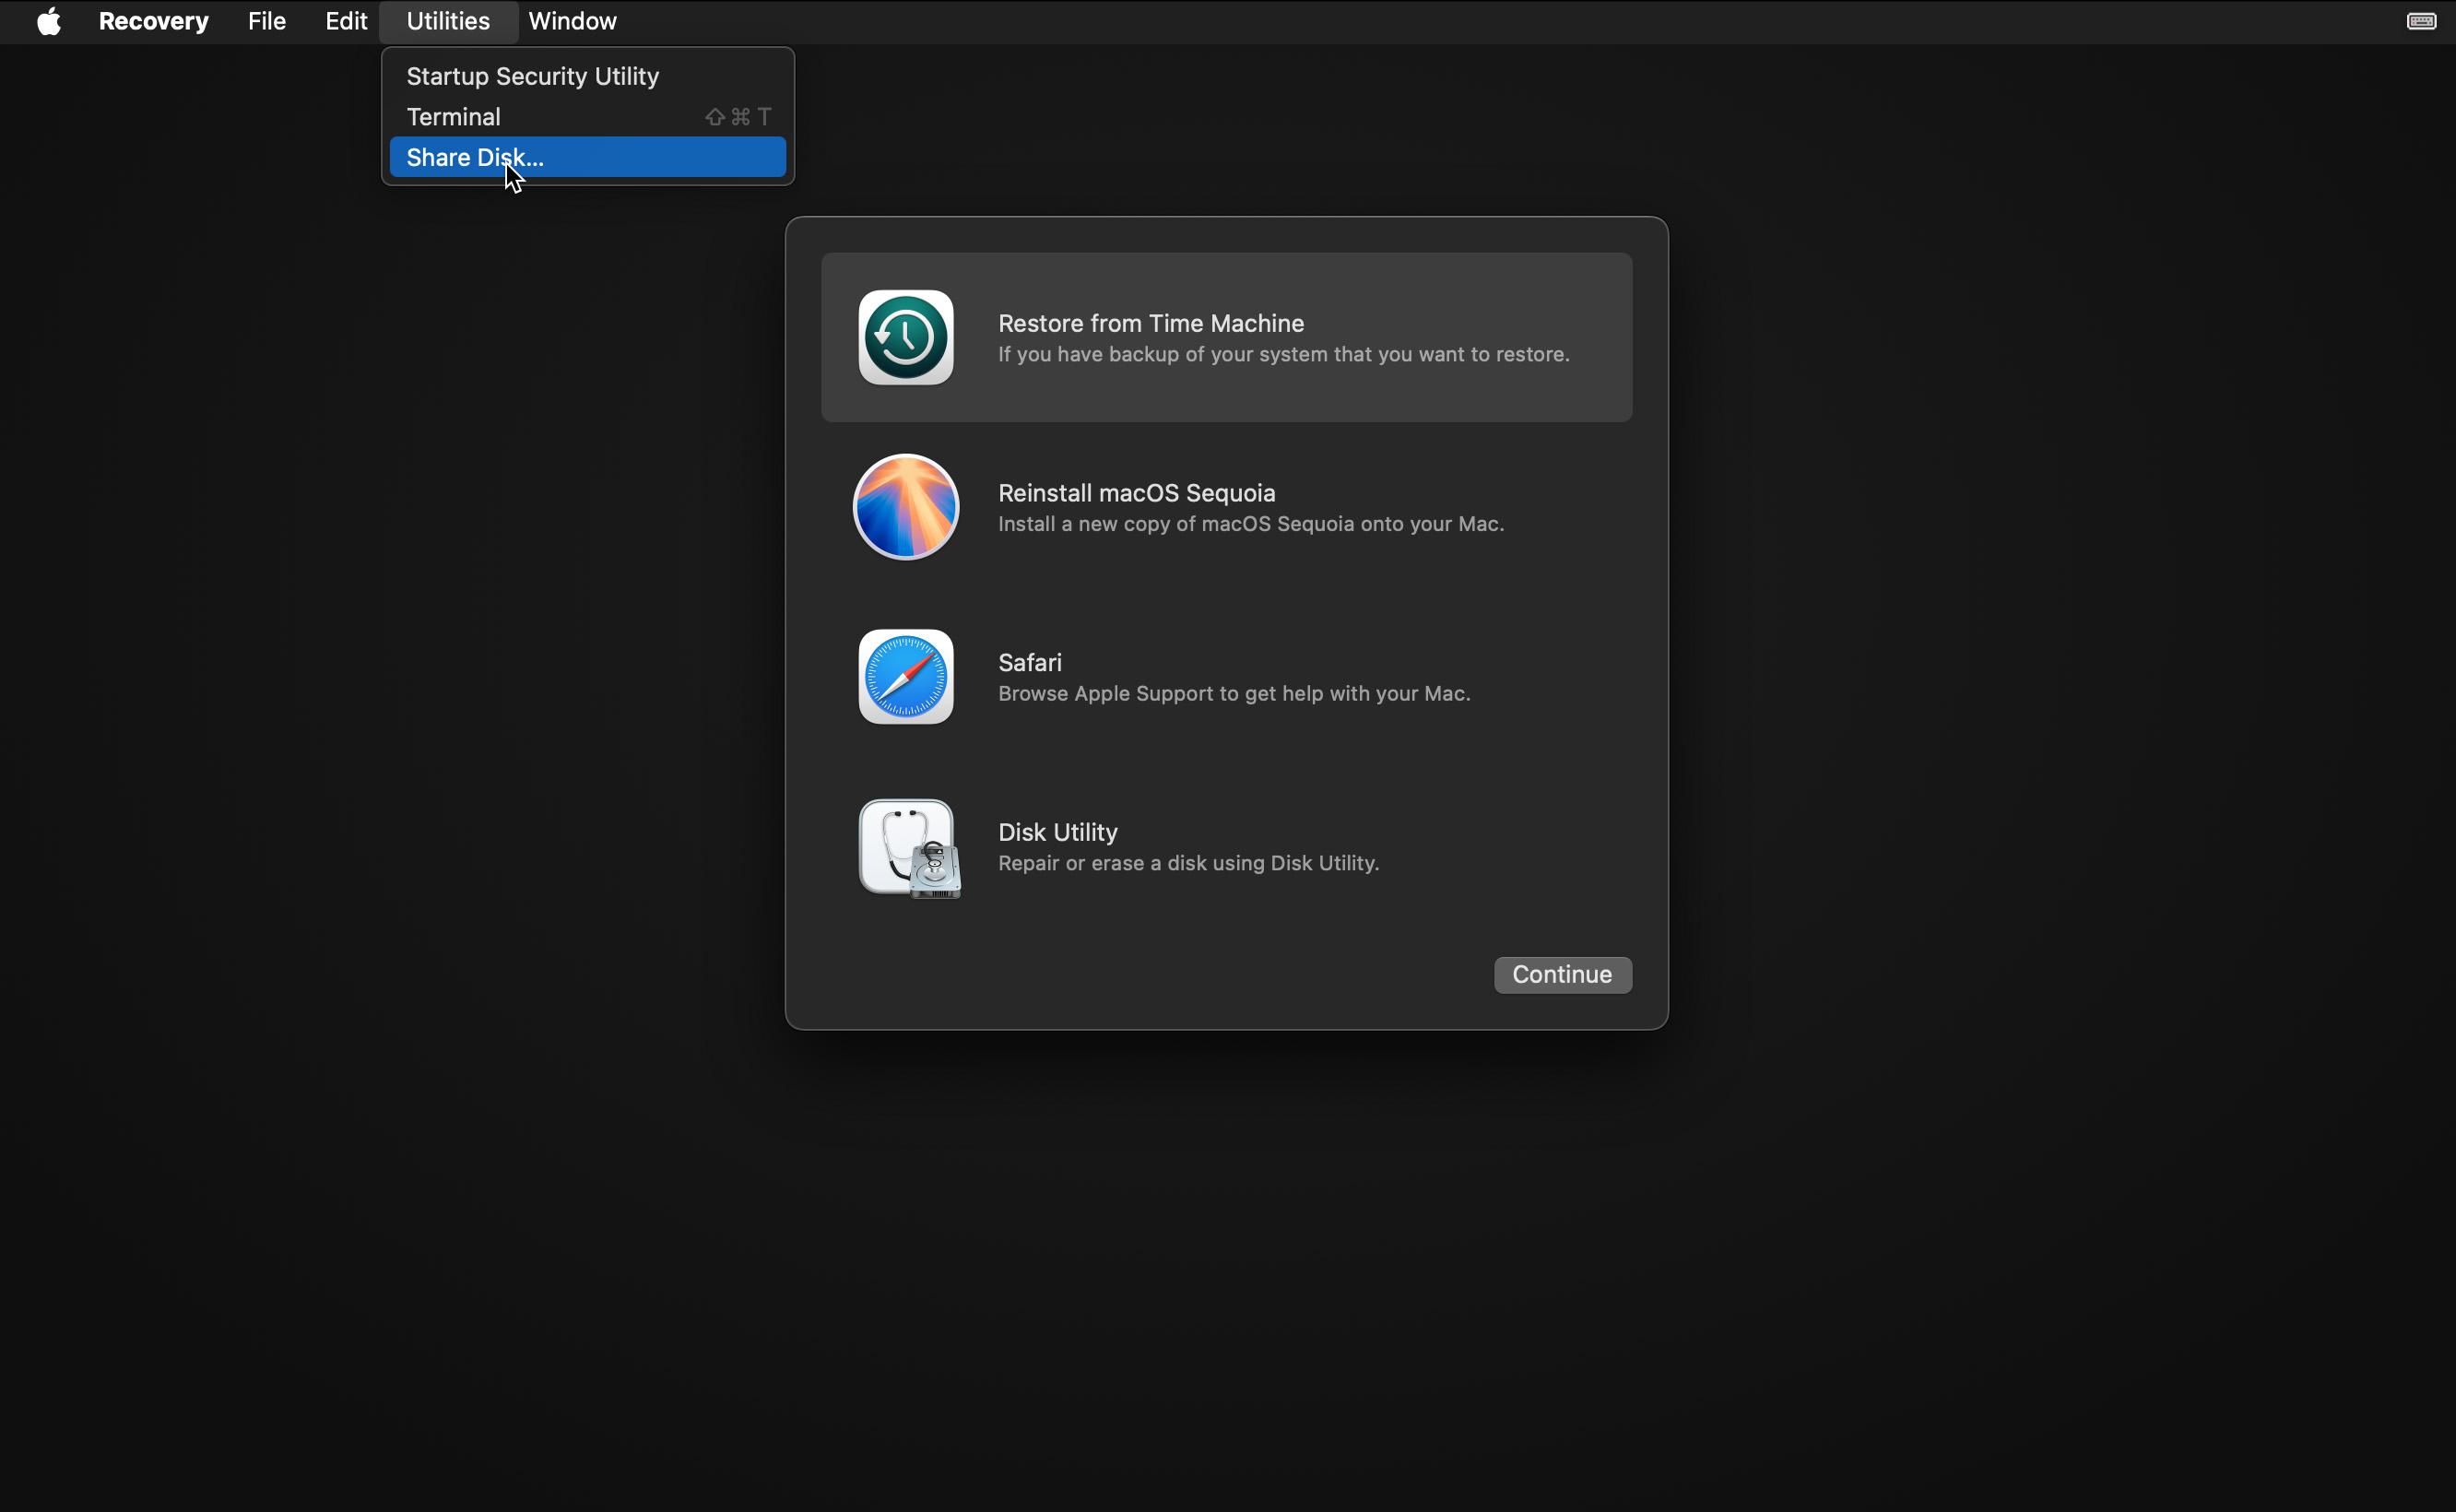
- Select your Mac’s main drive and click Start Sharing.

- On the working Mac, go to Finder > Network and double-click the damaged Mac’s drive to access the data stored there.
- Drag and drop the files which you want to recover from your dead Mac to the other one.
Method 3: Resort to a Professional Data Recovery Service
If the methods described above gave no result, the other solution that you can try is to allow data recovery professionals to see what can be done to recover the data from your dead MacBook Air or MacBook Pro. Even in the worst-case scenarios, reputable data recovery centers have the capabilities and suitable tools that can help effectively retrieve the files from an unresponsive Mac.
How to Fix/Repair a Dead MacBook
Once you’ve recovered the data from your dead Mac, you can try to repair your computer. Here are some options that can help to fix your unresponsive Mac:
Way 1: Force a restart

Sometimes your MacBook just needs a fresh start. Press and hold the power button for 10 seconds to force a shutdown, then press it again to restart. If you would like to learn why restarting can almost magically solve so many Mac issues, then give this How-To Geek article a read.
Way 2: Start your Mac in Safe Mode
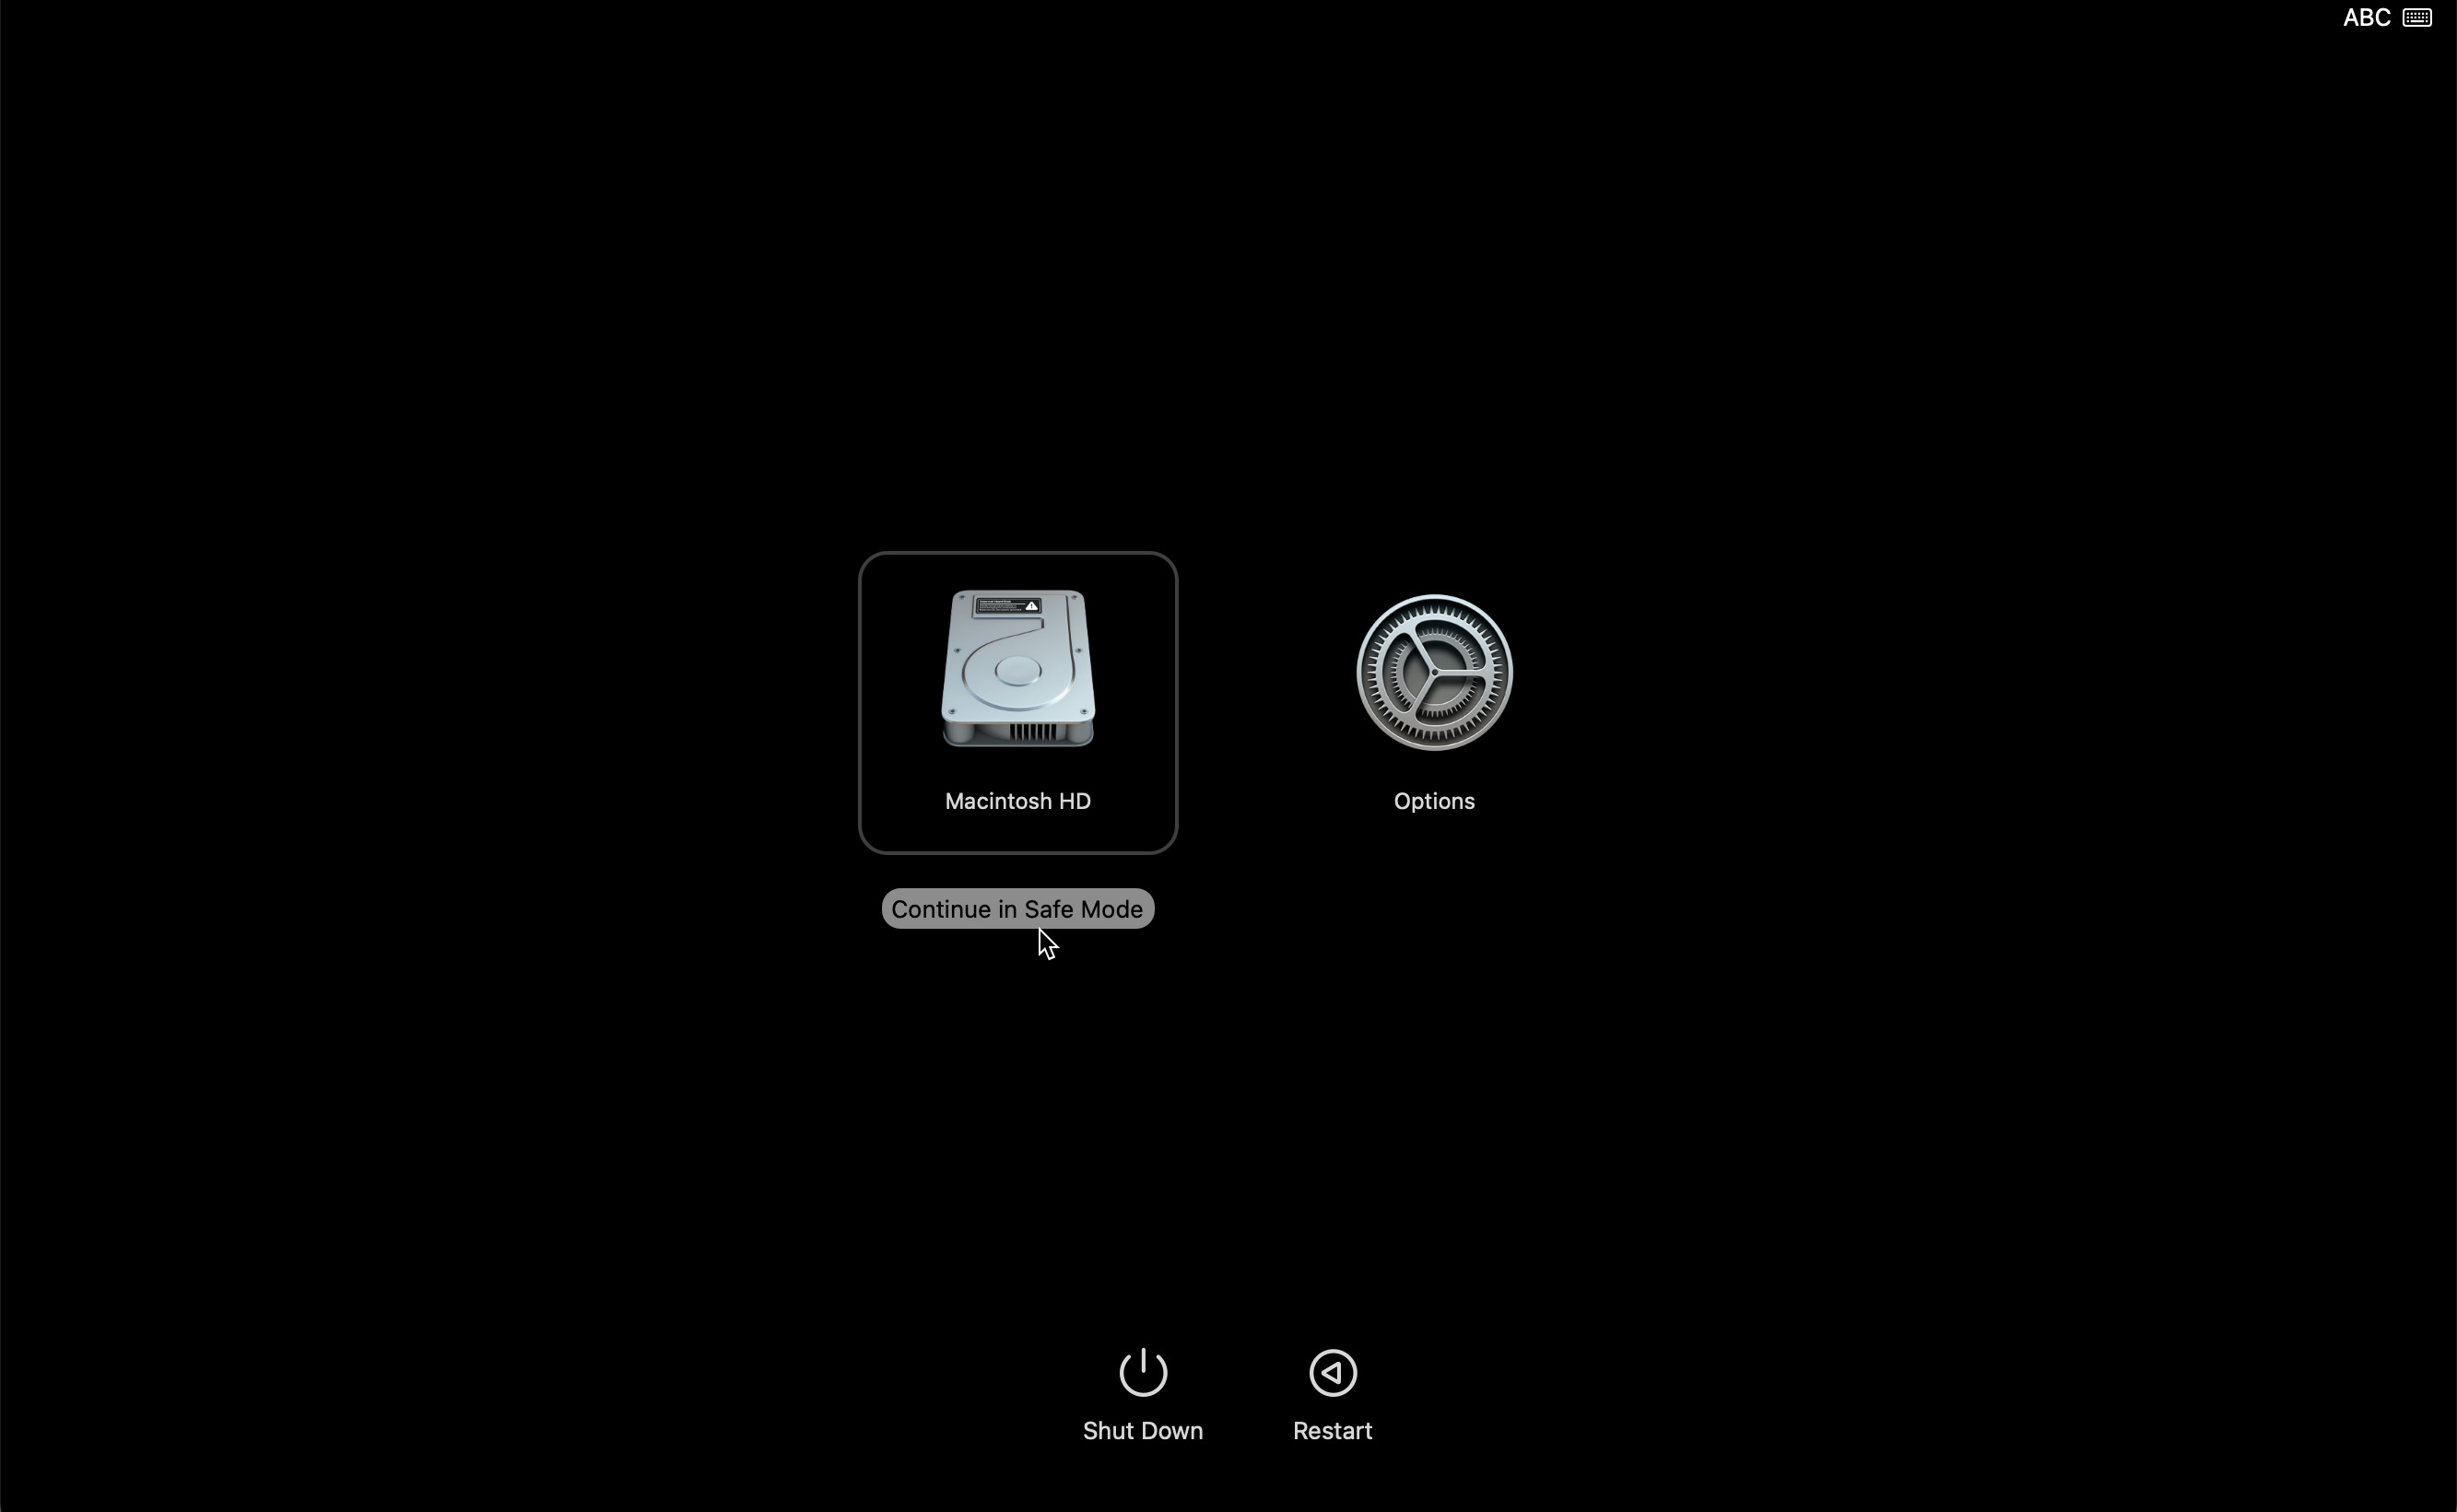
Starting in Safe Mode loads only essential system software. To do it, hold Shift during startup for Intel Macs, or for Apple Silicon Macs, or hold the power button for Startup Options and then hold Shift while selecting your drive.
Way 3: Use Disk Utility’s First Aid feature via Recovery Mode
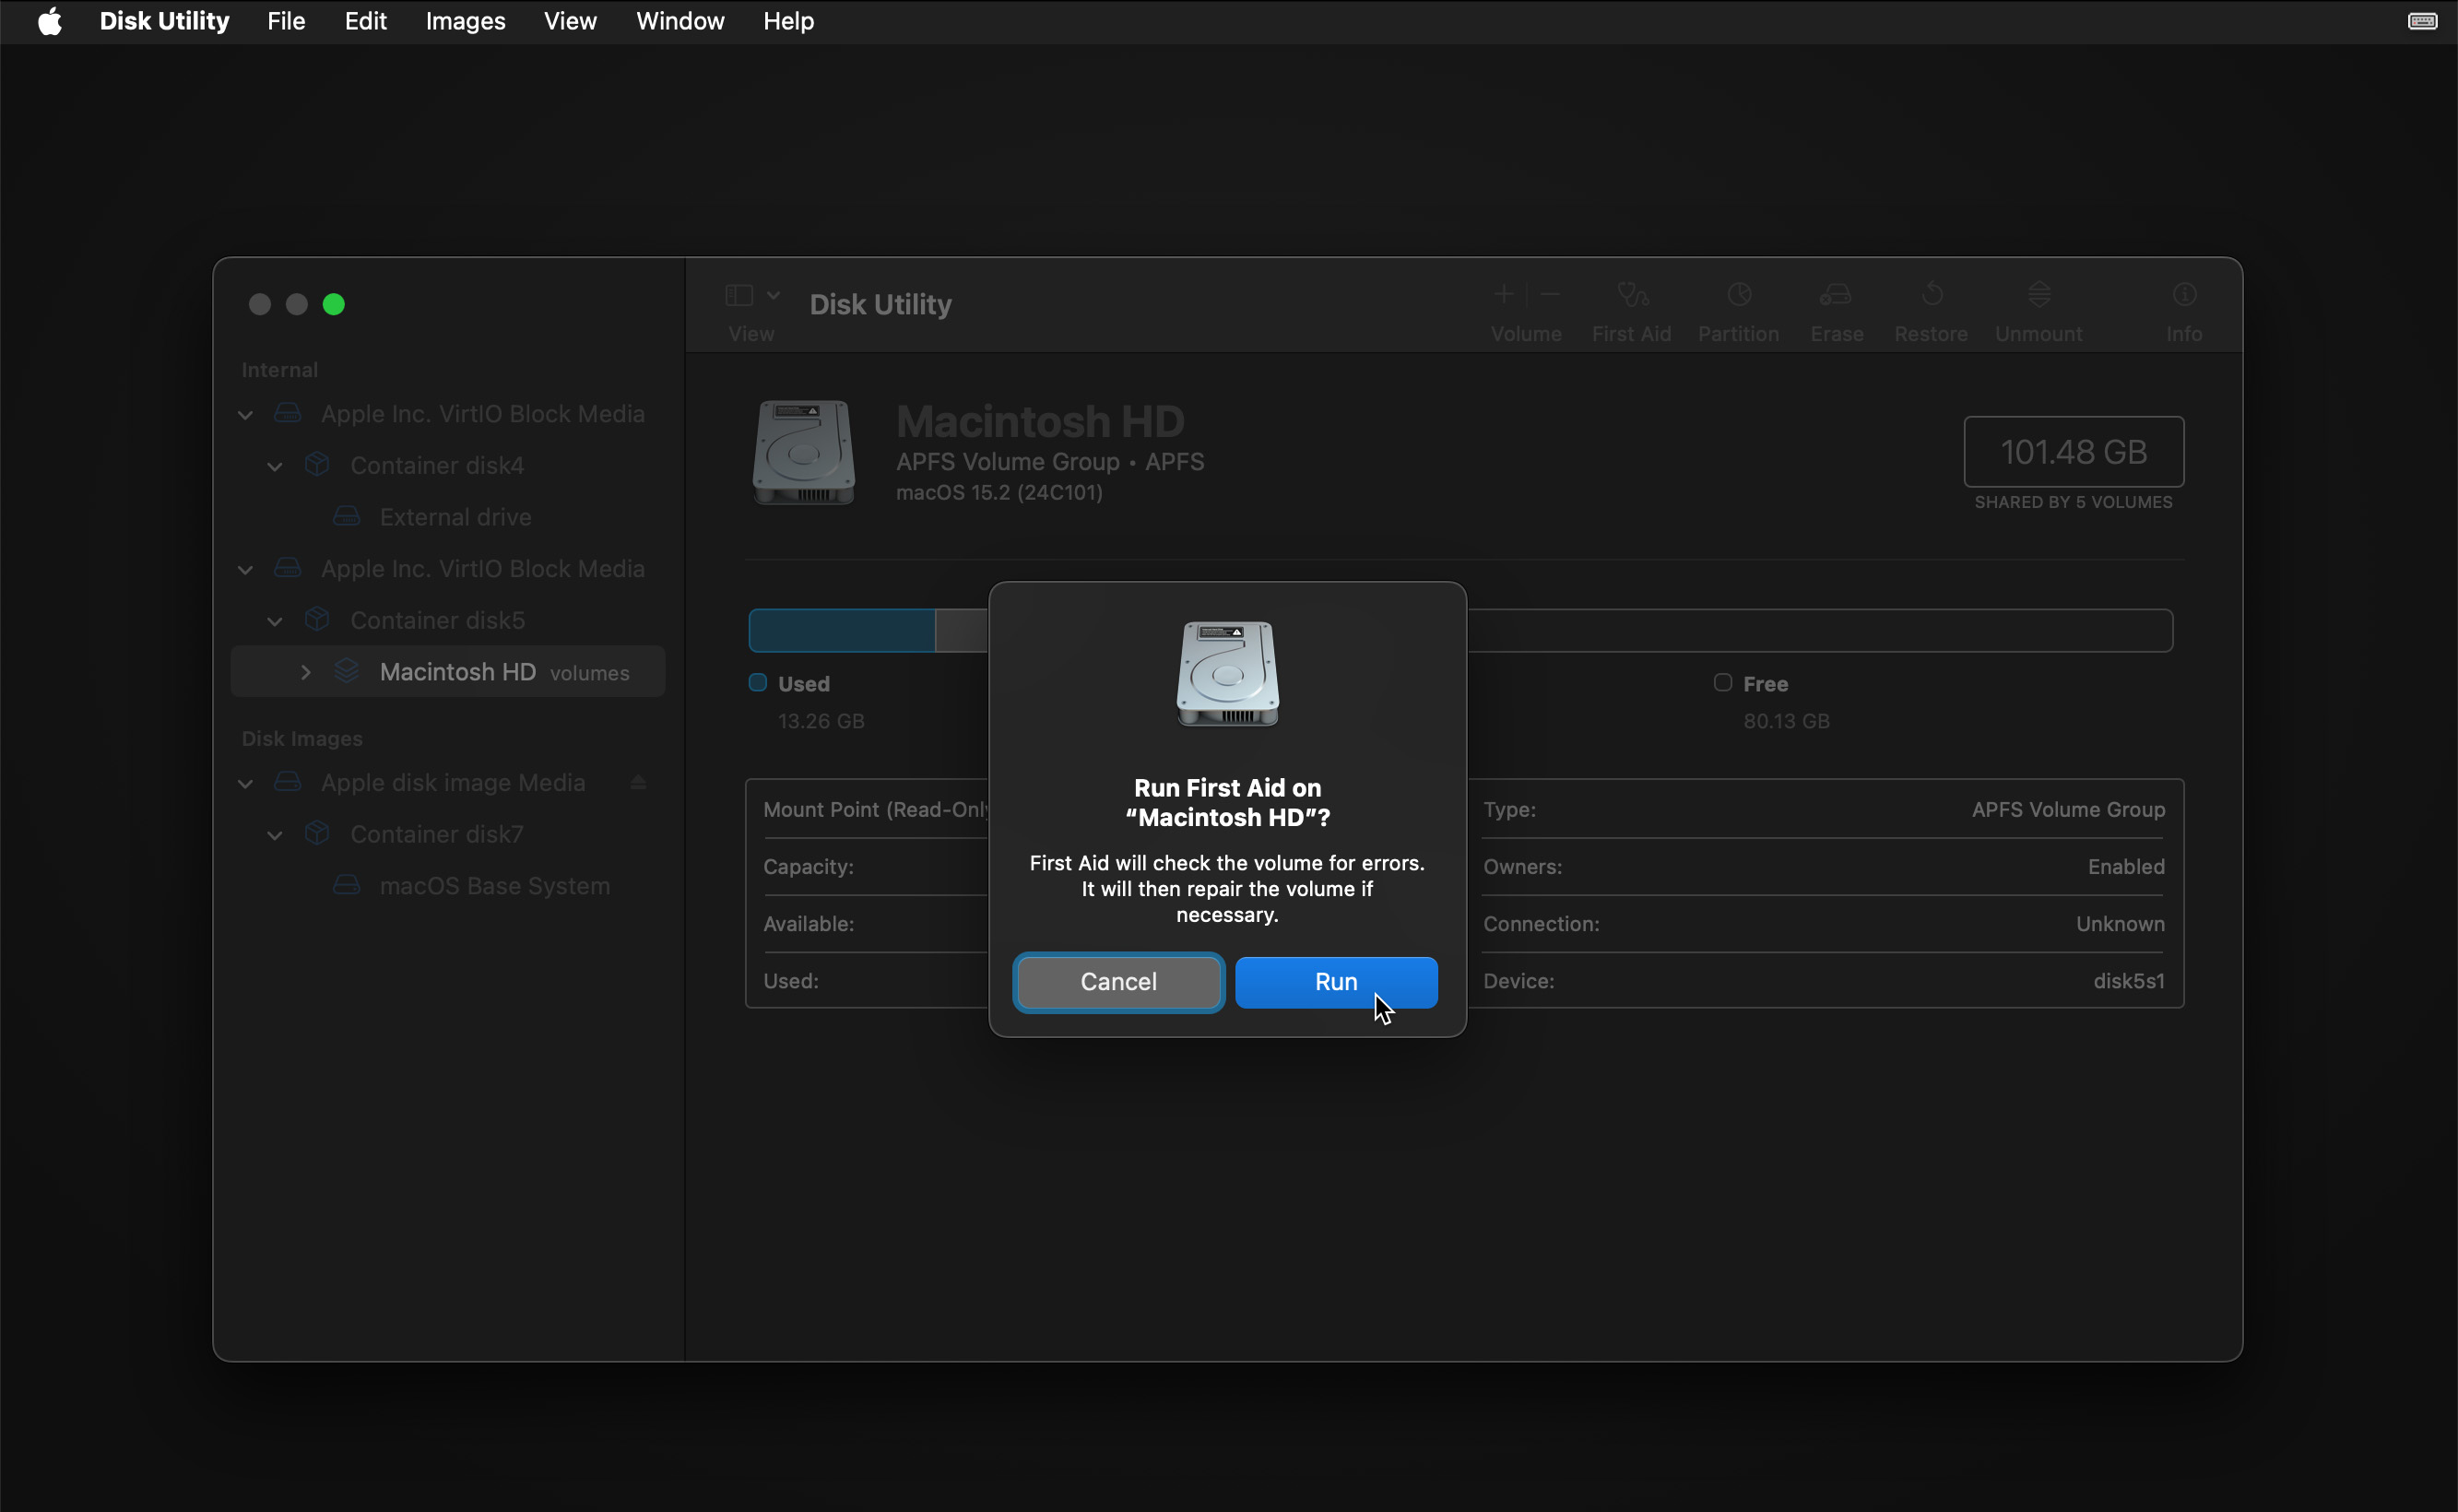
Boot into Recovery Mode and run First Aid from Disk Utility to repair directory issues, fix permissions, and resolve many common drive-related problems that might prevent your MacBook from starting up properly.
Way 4: Reset the system management controller firmware
Available only on Intel-based Macs, resetting the SMC can resolve various hardware-related issues like power, battery, fan, and thermal problems. The key combination varies by model. For MacBooks with the T2 chip, it’s Control + Option + Shift (right side) for 7 seconds, then add the power button for another 7 seconds.
Way 5: Reinstall macOS
A fresh operating system installation can fix corrupted system files while preserving your data (if you choose that option).
Way 6: Boot in Single User mode and use FSCK
If you have an Intel-based Mac, then you can hold Command + S during startup to boot in single-user mode and then run the FSCK (File System Check) command to verify and repair disk issues that might prevent startup, as described in this Apple Community discussion thread.
Way 7: Reset the NVRAM (Intel Macs only)
Hold Command + Option + P + R during startup to reset basic system settings by wiping your Mac’s NVRAM. Hopefully, this will bring your dead Mac back to life.
For more information on how to fix/repair a dead Mac that doesn’t boot properly, you can visit Apple’s official startup troubleshooting support page.
How to Prevent Your Mac From Being Dead
If you take good care of your Mac, it can last even up to a decade. Here’s what you should do to prevent your Mac from suddenly becoming unresponsive and prolong its lifespan:
- 📈 Regularly check the S.M.A.R.T. status of your Mac’s drive: Regularly check the S.M.A.R.T. status of your Mac’s drive using tools like Disk Drill’s free S.M.A.R.T. monitoring feature or Disk Utility to receive warnings about potential drive failures before they happen.
- 🔌 Keep an eye on battery health: A battery that’s significantly beyond its expected lifespan (usually after 1000+ charge cycles) can shut down your MacBook unexpectedly or refuse to hold a charge at all. Fortunately, you can check it from System Settings.
- 🔥 Don’t let your Mac overheat: High temperatures can damage internal components and shorten your Mac’s lifespan. That’s why you should keep your MacBook’s vents clear of dust and debris, avoid using it on soft surfaces that block airflow (like beds or couches), and consider using a laptop stand for better air circulation. Review Apple’s recommended operating temperatures and care to help maintain a safe environment for your Mac.
- 🎵 Pay attention to strange sounds coming from your Mac: Unusual noises can be early warning signs of hardware problems. Clicking or grinding sounds from your drive often indicate imminent failure, while a high-pitched coil whine might signal power delivery issues. For example, this user’s iMac died after making a loud popping noise—don’t ignore similar noises to avoid ending up in the same situation.
That said, even with diligent maintenance and monitoring, you can never completely protect against hardware failures or accidents that could render your Mac unusable.
It’s also worth considering keeping a backup computer—even an older model or a basic Chromebook or PC—so you can stay productive and access your cloud-stored files while dealing with Mac repairs.
Conclusion
You can never be completely sure that your Mac won’t develop any hardware or software issues. Such things can happen to anyone. Therefore, you need to always be ready, even for the worst case scenario. And the best way to do it is to regularly back up your Mac so that you won’t have to deal with data recovery problems if your Mac gets damaged or dies.


FAQ
Yes, you can recover data from a dead Mac. The most reliable method is restoring from your Time Machine backup. If you don’t have a backup, you can try Target Disk mode (if your Mac powers on) or use data recovery software/professional services (if it won’t start). Acting quickly increases your chances of successful recovery.
Follow these steps to retrieve data from your broken Mac:
- Connect the damaged Mac with a working one using a Thunderbolt cable.
- Boot your broken computer in Target Disk / Share Disk mode.
- On the working Mac, launch Finder and go to Network.
- Double-click your Mac’s drive to access the data.
- Copy-paste the files from the damaged Mac to the other one.
You can try to force start the dead Mac. To do it, press and hold the power button on your MacBook Pro for at least 10 seconds. If that didn’t help, try booting your computer in Recovery Mode and using Disk Utility to fix it.
Yes, it’s possible to recover data from a dead MacBook Pro SSD, but your options depend on your MacBook model:
- For MacBooks without T2/M1-M4 chips: You can use data recovery software like Disk Drill in Recovery Mode or create a disk image backup.
- For MacBooks with T2/M1-M4 chips: Due to built-in encryption, you’ll need to use Time Machine backups, Target Disk Mode while the Mac can still power on, or professional data recovery services.
The most reliable way to transfer data from a dead Mac to a new one is to use a Time Machine backup if you have one. If your dead Mac can still power on, you can try using Target Disk Mode or Share Disk to directly copy files. For Macs without T2/M1-M4 chips, you can also use data recovery software in Recovery Mode to retrieve the data.
If you have recent backups, restoring from Time Machine is your best option. For older MacBooks without T2/M1-M4 chips, you can try booting into Recovery Mode to use data recovery software, while newer MacBooks might need to be coaxed into Target Disk Mode.