The Downloads folder allows us to have every file that we download go into one place. This makes it easy for us to always know where the last file we downloaded went.
If you can’t find your Downloads folder, or if you don’t know where it is to begin with, then this article is for you. Let’s take a look at how to restore the downloads folder on our Mac and what to do if we can’t find it.
Why Can Downloads Folder Disappear on Mac?
The Downloads folder can be found in Finder and on our Dock making it easily accessible to us. We want to easily be able to get to our files when we download them onto our Mac.
The biggest reason that the Downloads folder may disappear is that we were moving our cursor on our Mac and we dragged it away from our Dock. The folder isn’t gone forever, and neither are the contents in it, we just have to add it back.
Another reason is that the Downloads folder or the files inside it were accidentally deleted. This can happen when cleaning up storage or removing files in bulk. If you’re sure that this is what happened, go to the recovery section and start with the built-in recovery options.
How to Restore Downloads Folder on Mac
Adding the Downloads folder back is actually quite easy and it only takes a few steps. In the steps below we’re going to walk through how to add the Downloads folder to a Finder window and then how to get it back onto our Dock.
- Open a Finder window. You can do this by clicking on the Finder icon on your Dock. It’s the one with a face on it and it’s usually all of the way on the left-hand side.
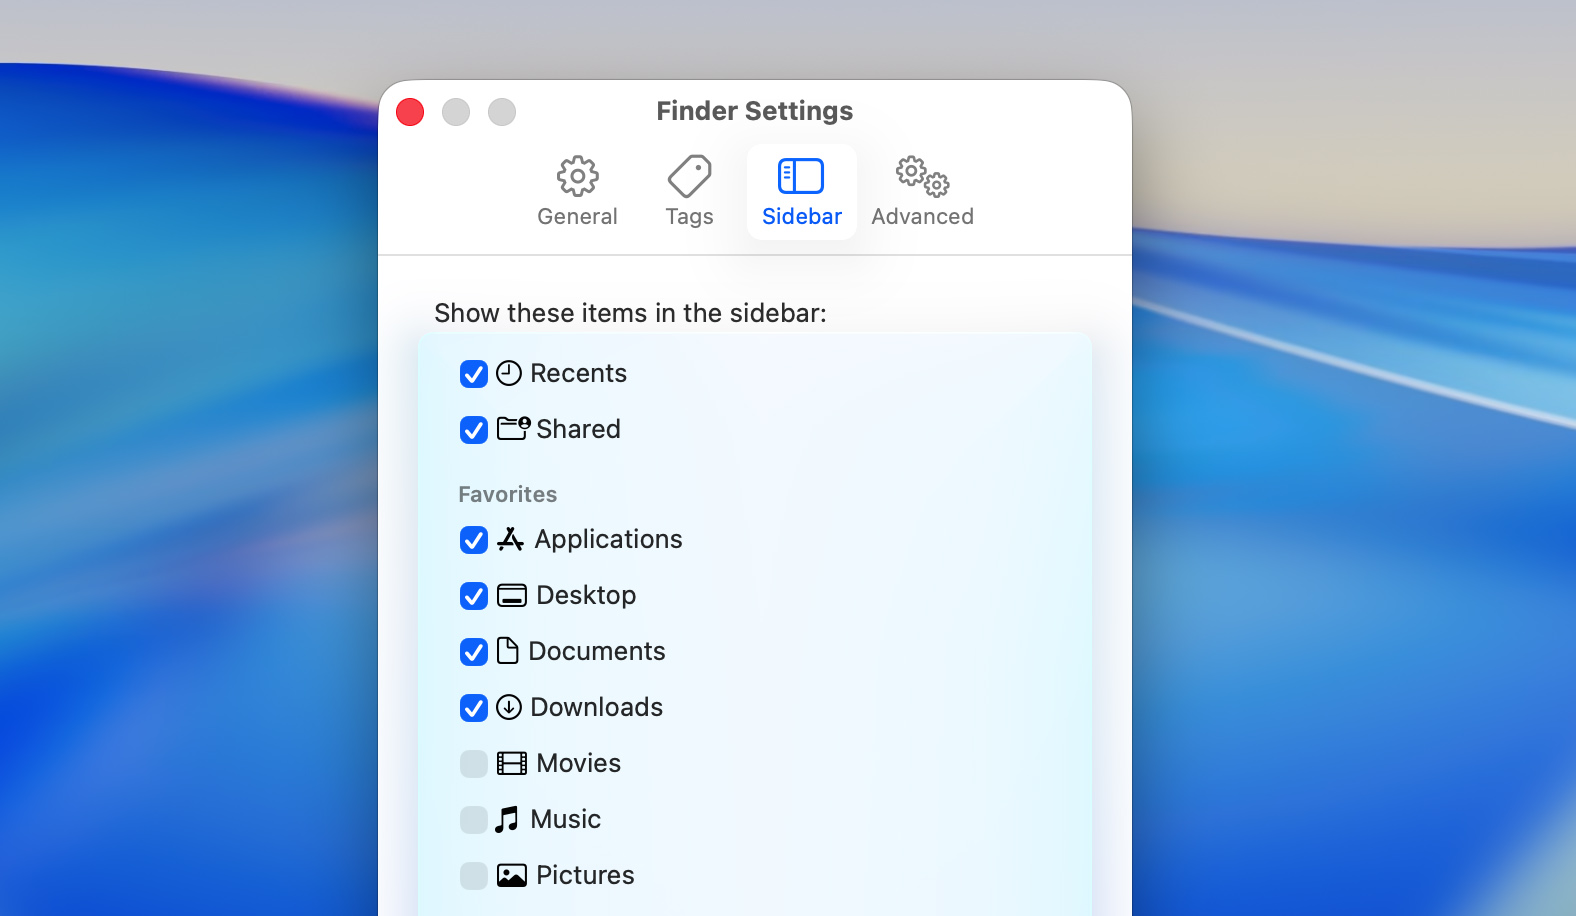
- Once you’ve launched Finder, make sure that you have the Downloads folder on your left-hand side column as an option. If you don’t, then press the keys Command + , with Finder as the active app.
- You will then see the Preferences for Finder where you will want to select and make sure that you’re seeing the Downloads folder as an option. You can actually make multiple changes to what folders appear within Finder so if you see other folders that you wish were there, go ahead and make the changes now.
- After doing that or if your Downloads folder was already there as it should be by default, we can now drag the Downloads folder from the left-hand side column to the Dock.
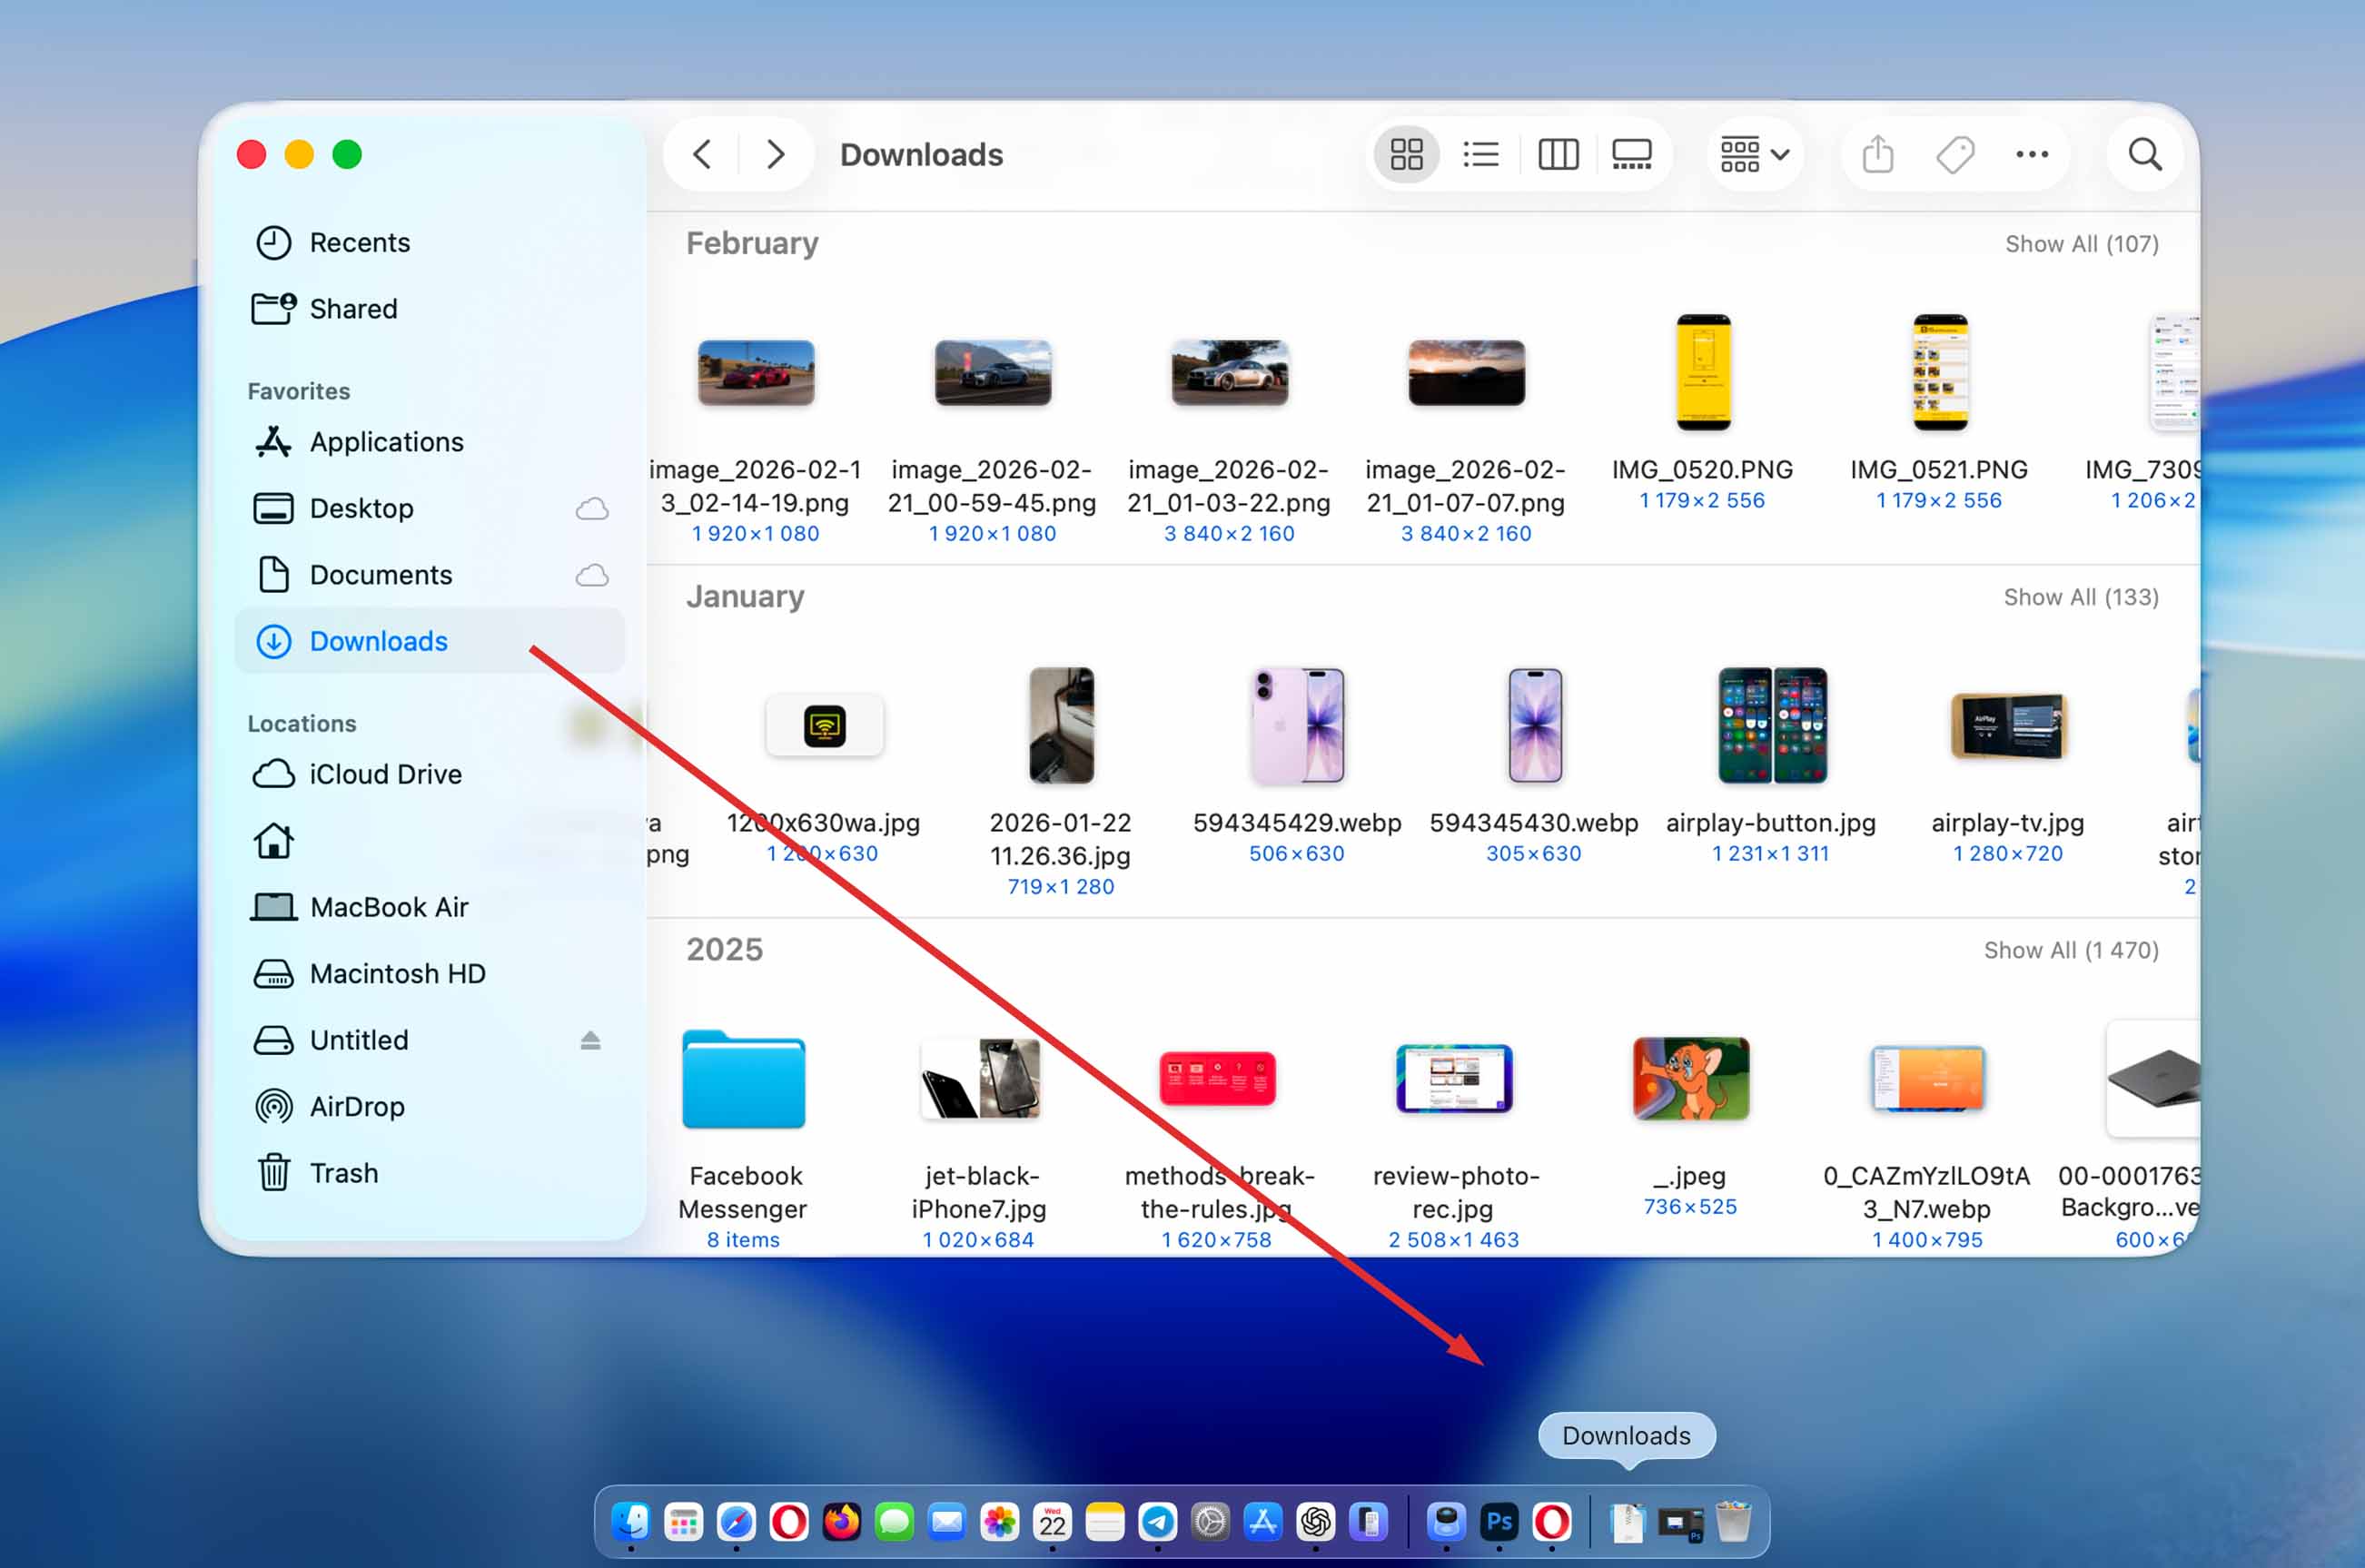
- You will want to drag the Downloads folder name under Favorites to where I have mine on my Dock. You will then be able to access the folder in each location.
Now that we have the Downloads folder back onto our Dock, let’s talk about what we can do if we’ve lost files that are in the Downloads folder.
With us downloading so many things, you may have gone through and cleaned out the Downloads folder at some point and deleted things that you wish you hadn’t.
How to Recover Files Deleted From Downloads Folder with Native macOS Tools
If you want to get the Downloads folder back on your Mac after it was deleted, there are several ways to recover it using built-in macOS tools. Each method depends on certain conditions, so it may or may not work in your case. If at any point you realize that these options won’t help you restore a lost Downloads folder on Mac, don’t worry, there is still another way to recover it, which we cover in the next section.
Let’s take a look at built-in methods and how they can help us restore deleted files from the Downloads folder. First, let’s start with restoring the Trash as that is our best bet.
How to Restore Deleted Downloads Folder by Using the Trash
When you delete a file on your Mac, it will usually go to the Trash first. So if you accidentally deleted the Downloads folder on Mac without using keyboard shortcuts for immediate deletion, and its size didn’t exceed the available space, it may still be there waiting for you.
Follow the steps below to check your Trash for deleted Downloads or any file in general.
- Go to your Dock and click on the Trash icon. It’s the icon all of the way to the right that looks like a trash can.

- Once within the trash, find what you would like to put back on your Mac and right-click on it. You will then have the option to put it back onto your Mac.
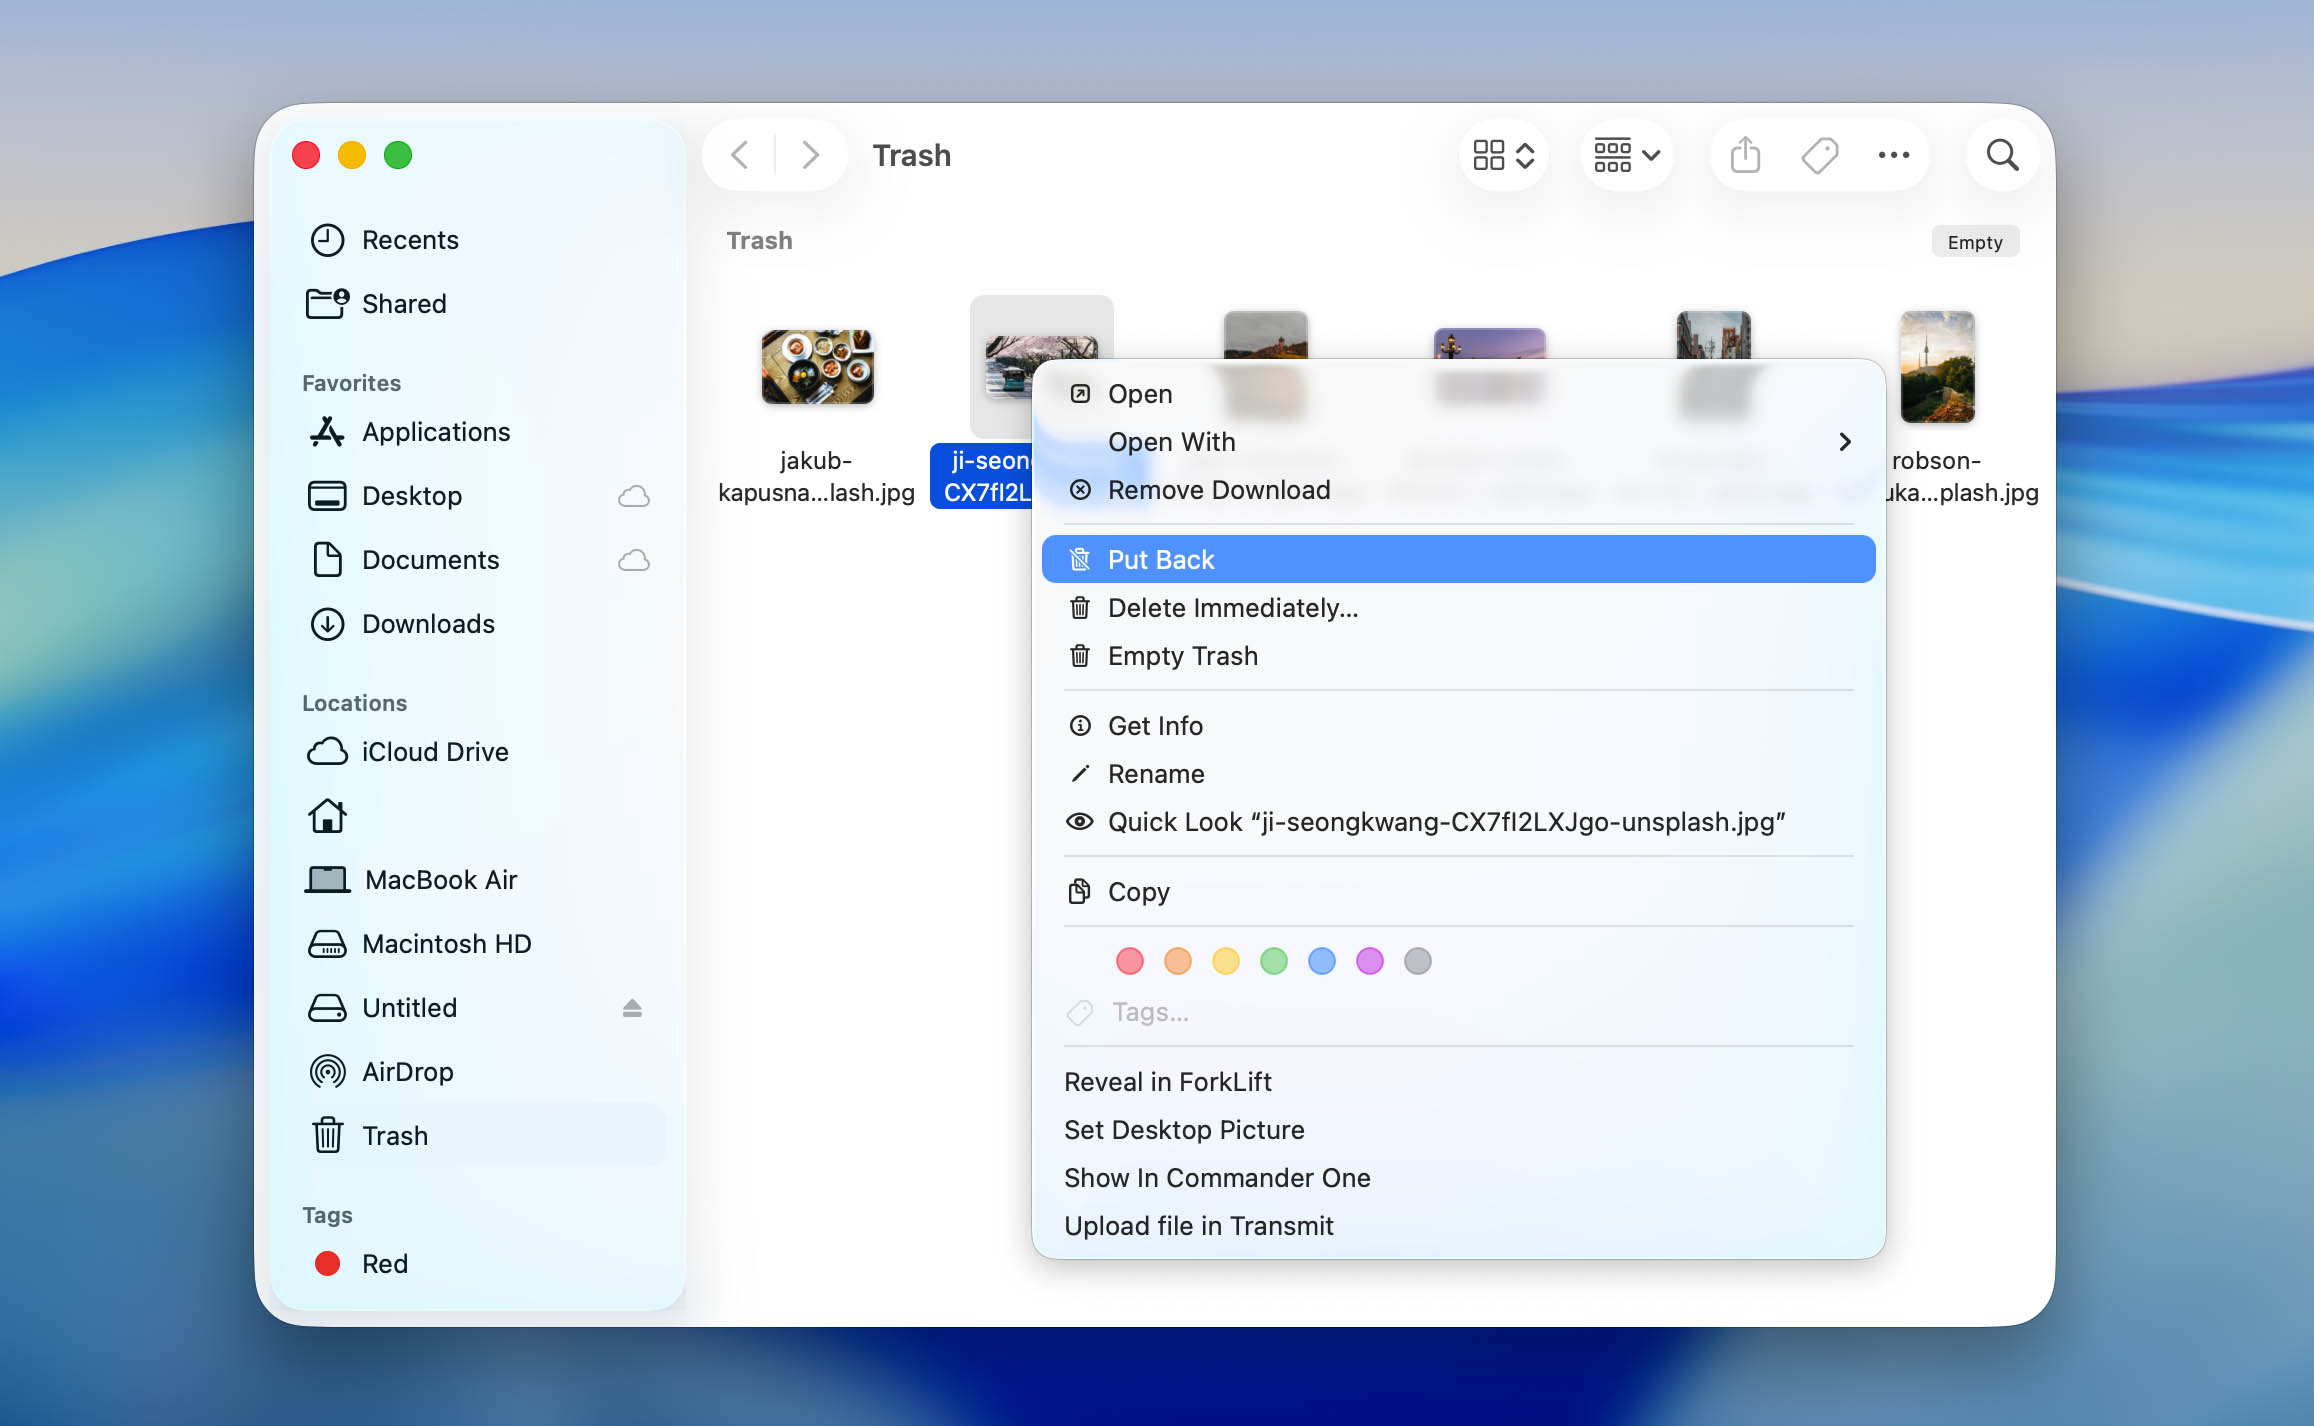
- If you would like to recover multiple files, you can select them and then choose the Put Back option. You can also empty the Trash here and all its contents which will help free up some space on your Mac.
If you’re not seeing missing items from your Downloads folder here, there’s a chance that automatic removal after 30 days is enabled in your settings and the files were already cleared from the Trash. Another possibility is that the files were never deleted at all and were simply moved to a different location on your Mac. At this point, it makes sense to use Finder search or Spotlight to try to locate them. If nothing turns up and your Downloads folder on Mac is really missing, then we can try recovering it from a Time Machine backup.
How to Restore Deleted Downloads Folder Files From a Time Machine Backup
I love Time Machine! It’s a built-in backup tool that saves all of your data. If you already have a backup in place, then we can restore files from that backup and put the Downloads folder back on your Mac.
Time Machine comes built into macOS for free and it will keep the following for all of your data:
- 💽 Local snapshots
- ⏰ Hourly backups
- 1️⃣ Daily backups for the past month
- 7️⃣ Weekly backups for all previous months
This is perfect for if you deleted a file from your Downloads folder and then, later on, decide that you want it back. You can plug in your external hard drive and restore the file.
- Plug your external hard drive into your Mac.
- Launch Spotlight by pressing the keys COMMAND + SPACE BAR. You can also click on the magnifying glass in the upper right-hand corner of your Mac. This would allow you to use the Spotlight search function so that we can then search for the Time Machine app.
- Type in Time Machine and then hit return on your Mac keyboard.
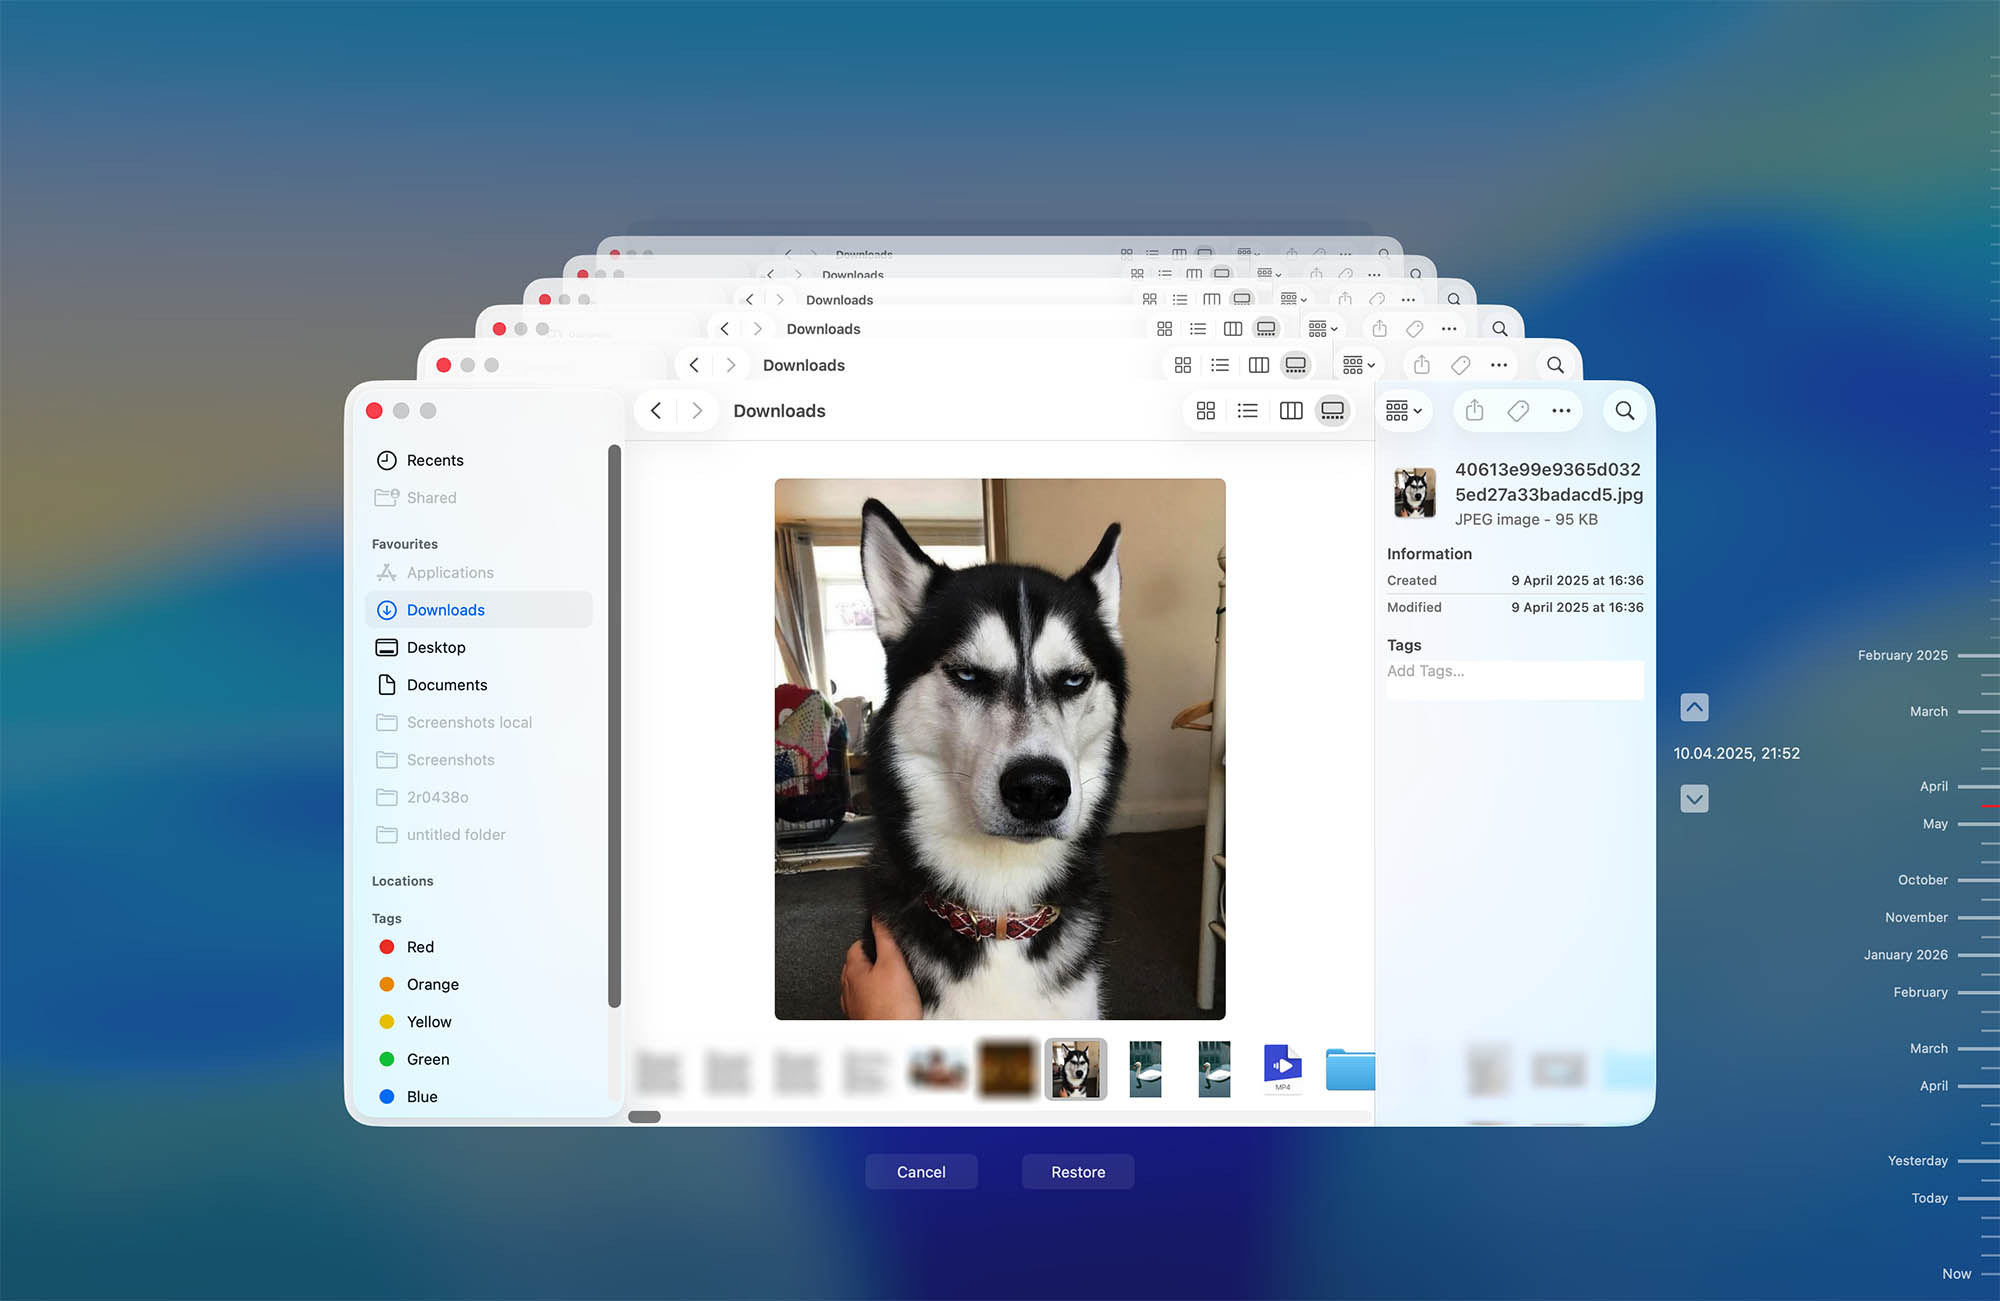
- Navigate to the folder where your files were originally located, then use the timeline on the right side of the screen to select the appropriate backup and check if the required version of your files is available there.
- Select your missing files, then click Restore.
Time Machine also creates local snapshots, even when your primary Time Machine drive isn’t connected. However, restoring from these snapshots doesn’t require any additional steps. The snapshots will appear on your timeline when you restore files using Time Machine. This can help if your full Time Machine backup runs less frequently and the file was downloaded and deleted before the next scheduled backup.
If you don’t have a Time Machine backup in place, then let’s take a look at a third-party data recovery option.
How to Recover Deleted Downloads Folder Files Using Disk Drill
Disk Drill is data recovery software that scans the storage device where the deletion happened and can help you recover data on your Mac if you weren’t able to find the files in your Trash and don’t have a Time Machine backup in place, as long as the files haven’t been overwritten by new data.
I love using Disk Drill as I have tested many third-party data recovery apps and I’ve found that Disk Drill is just the most reliable, it has the best interface, and it’s the most worth the money. It’s a good app that can find all of the data on your Mac.
- Download and install Disk Drill on your Mac. Make sure you don’t install it on the same drive where your Downloads folder was located, as this can overwrite deleted files.
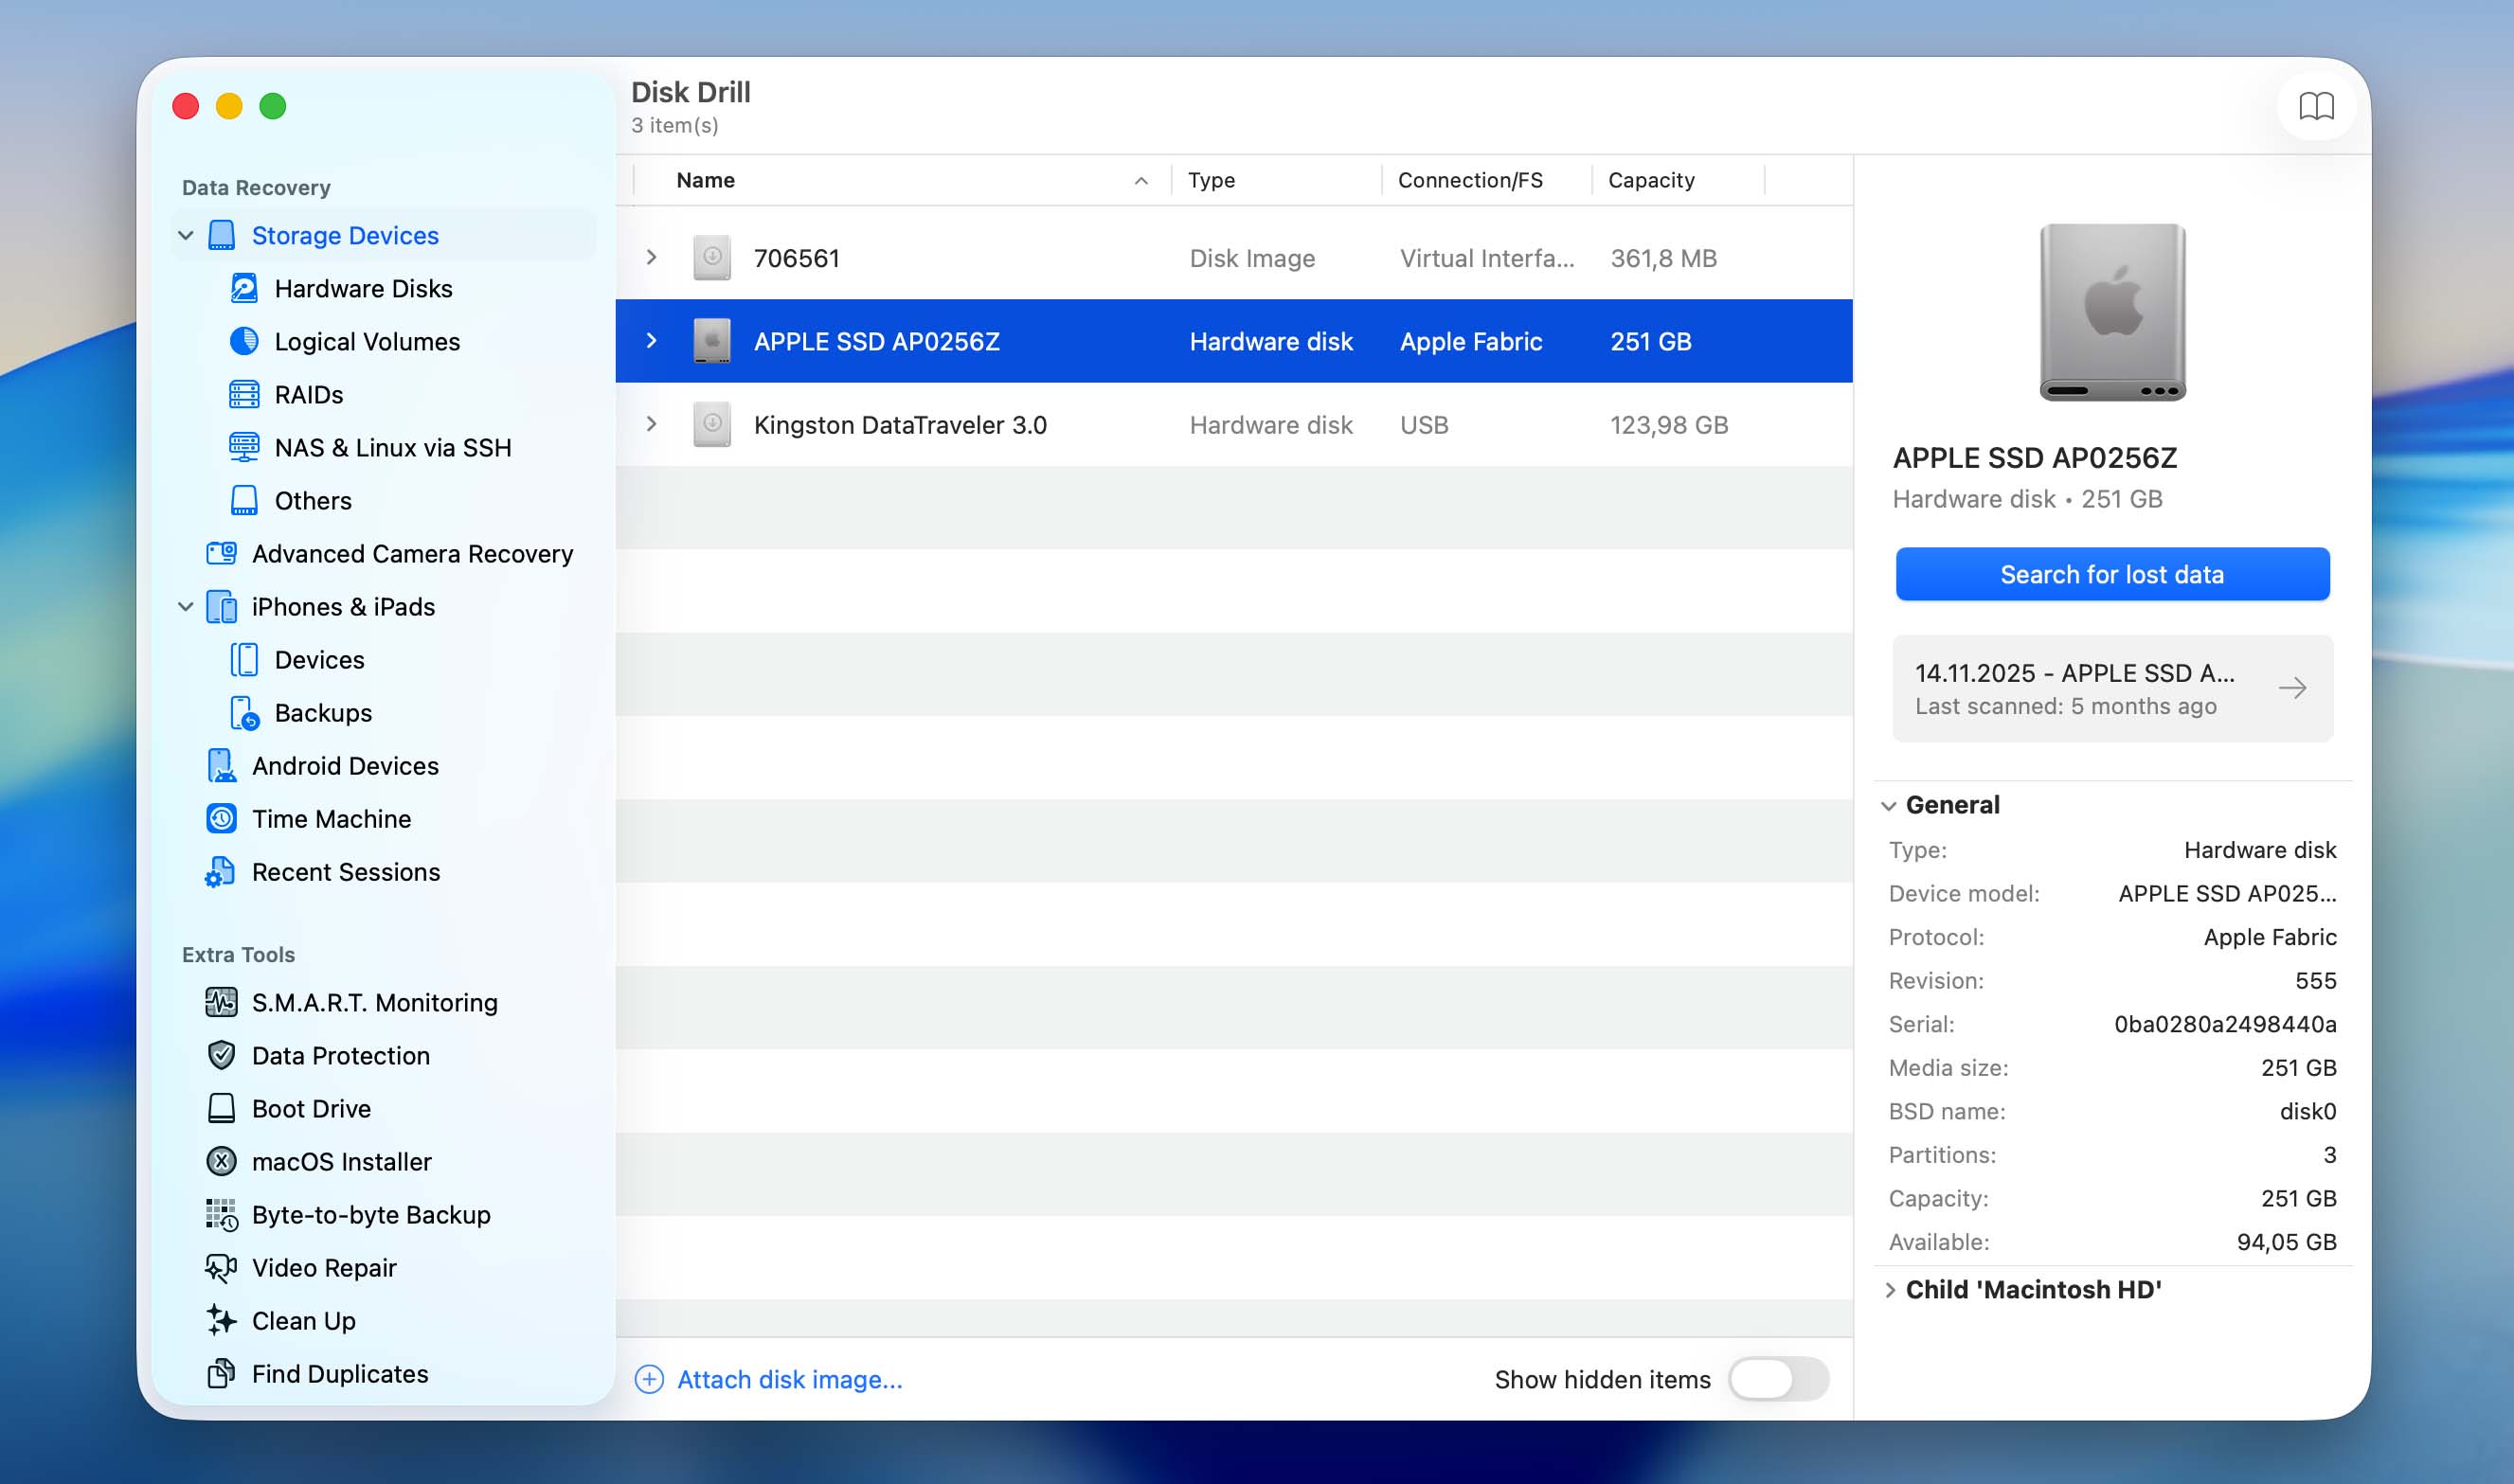
- Launch Disk Drill, select the storage device that you would like to recover the deleted Downloads folder files from, and click Search for lost data.
- Wait for the scan process to complete. This can take some time depending on how much data you have.
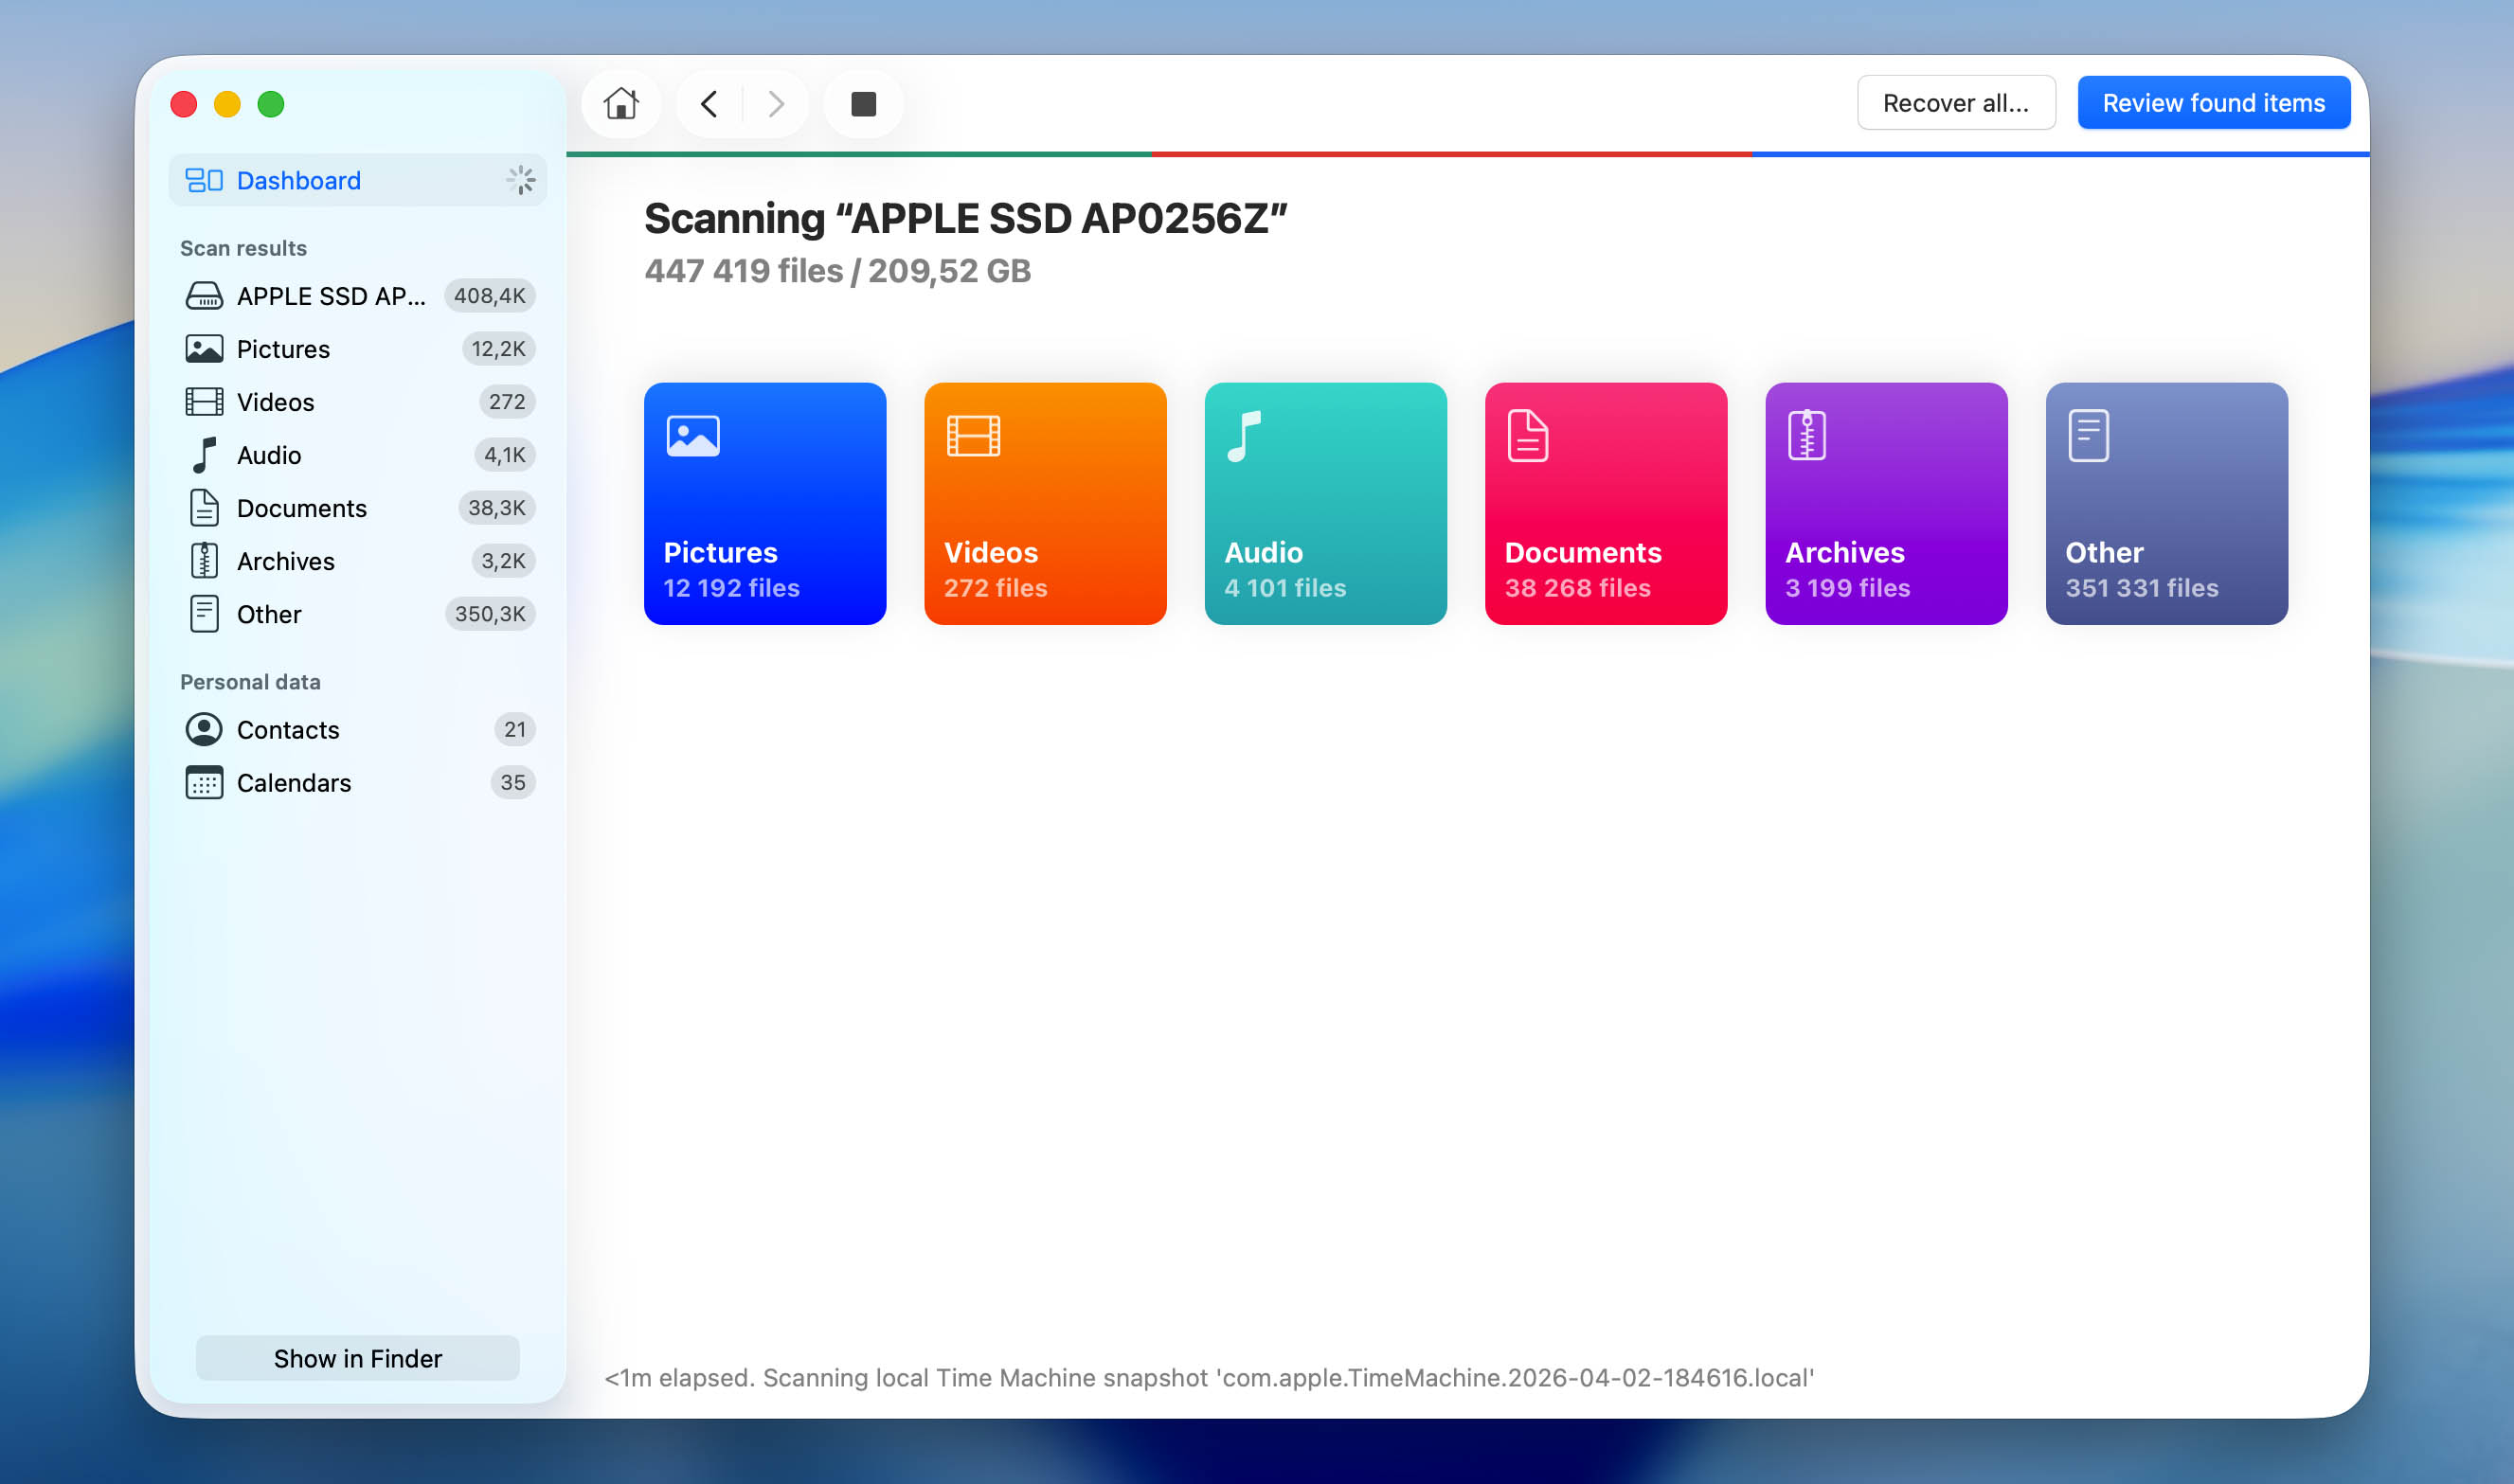
- Once it’s done, click Review found items. Look through categories like Deleted or Lost and use the search bar to quickly find files from your Downloads folder. You can also use the super handy preview feature that lets you view the file before recovering it.
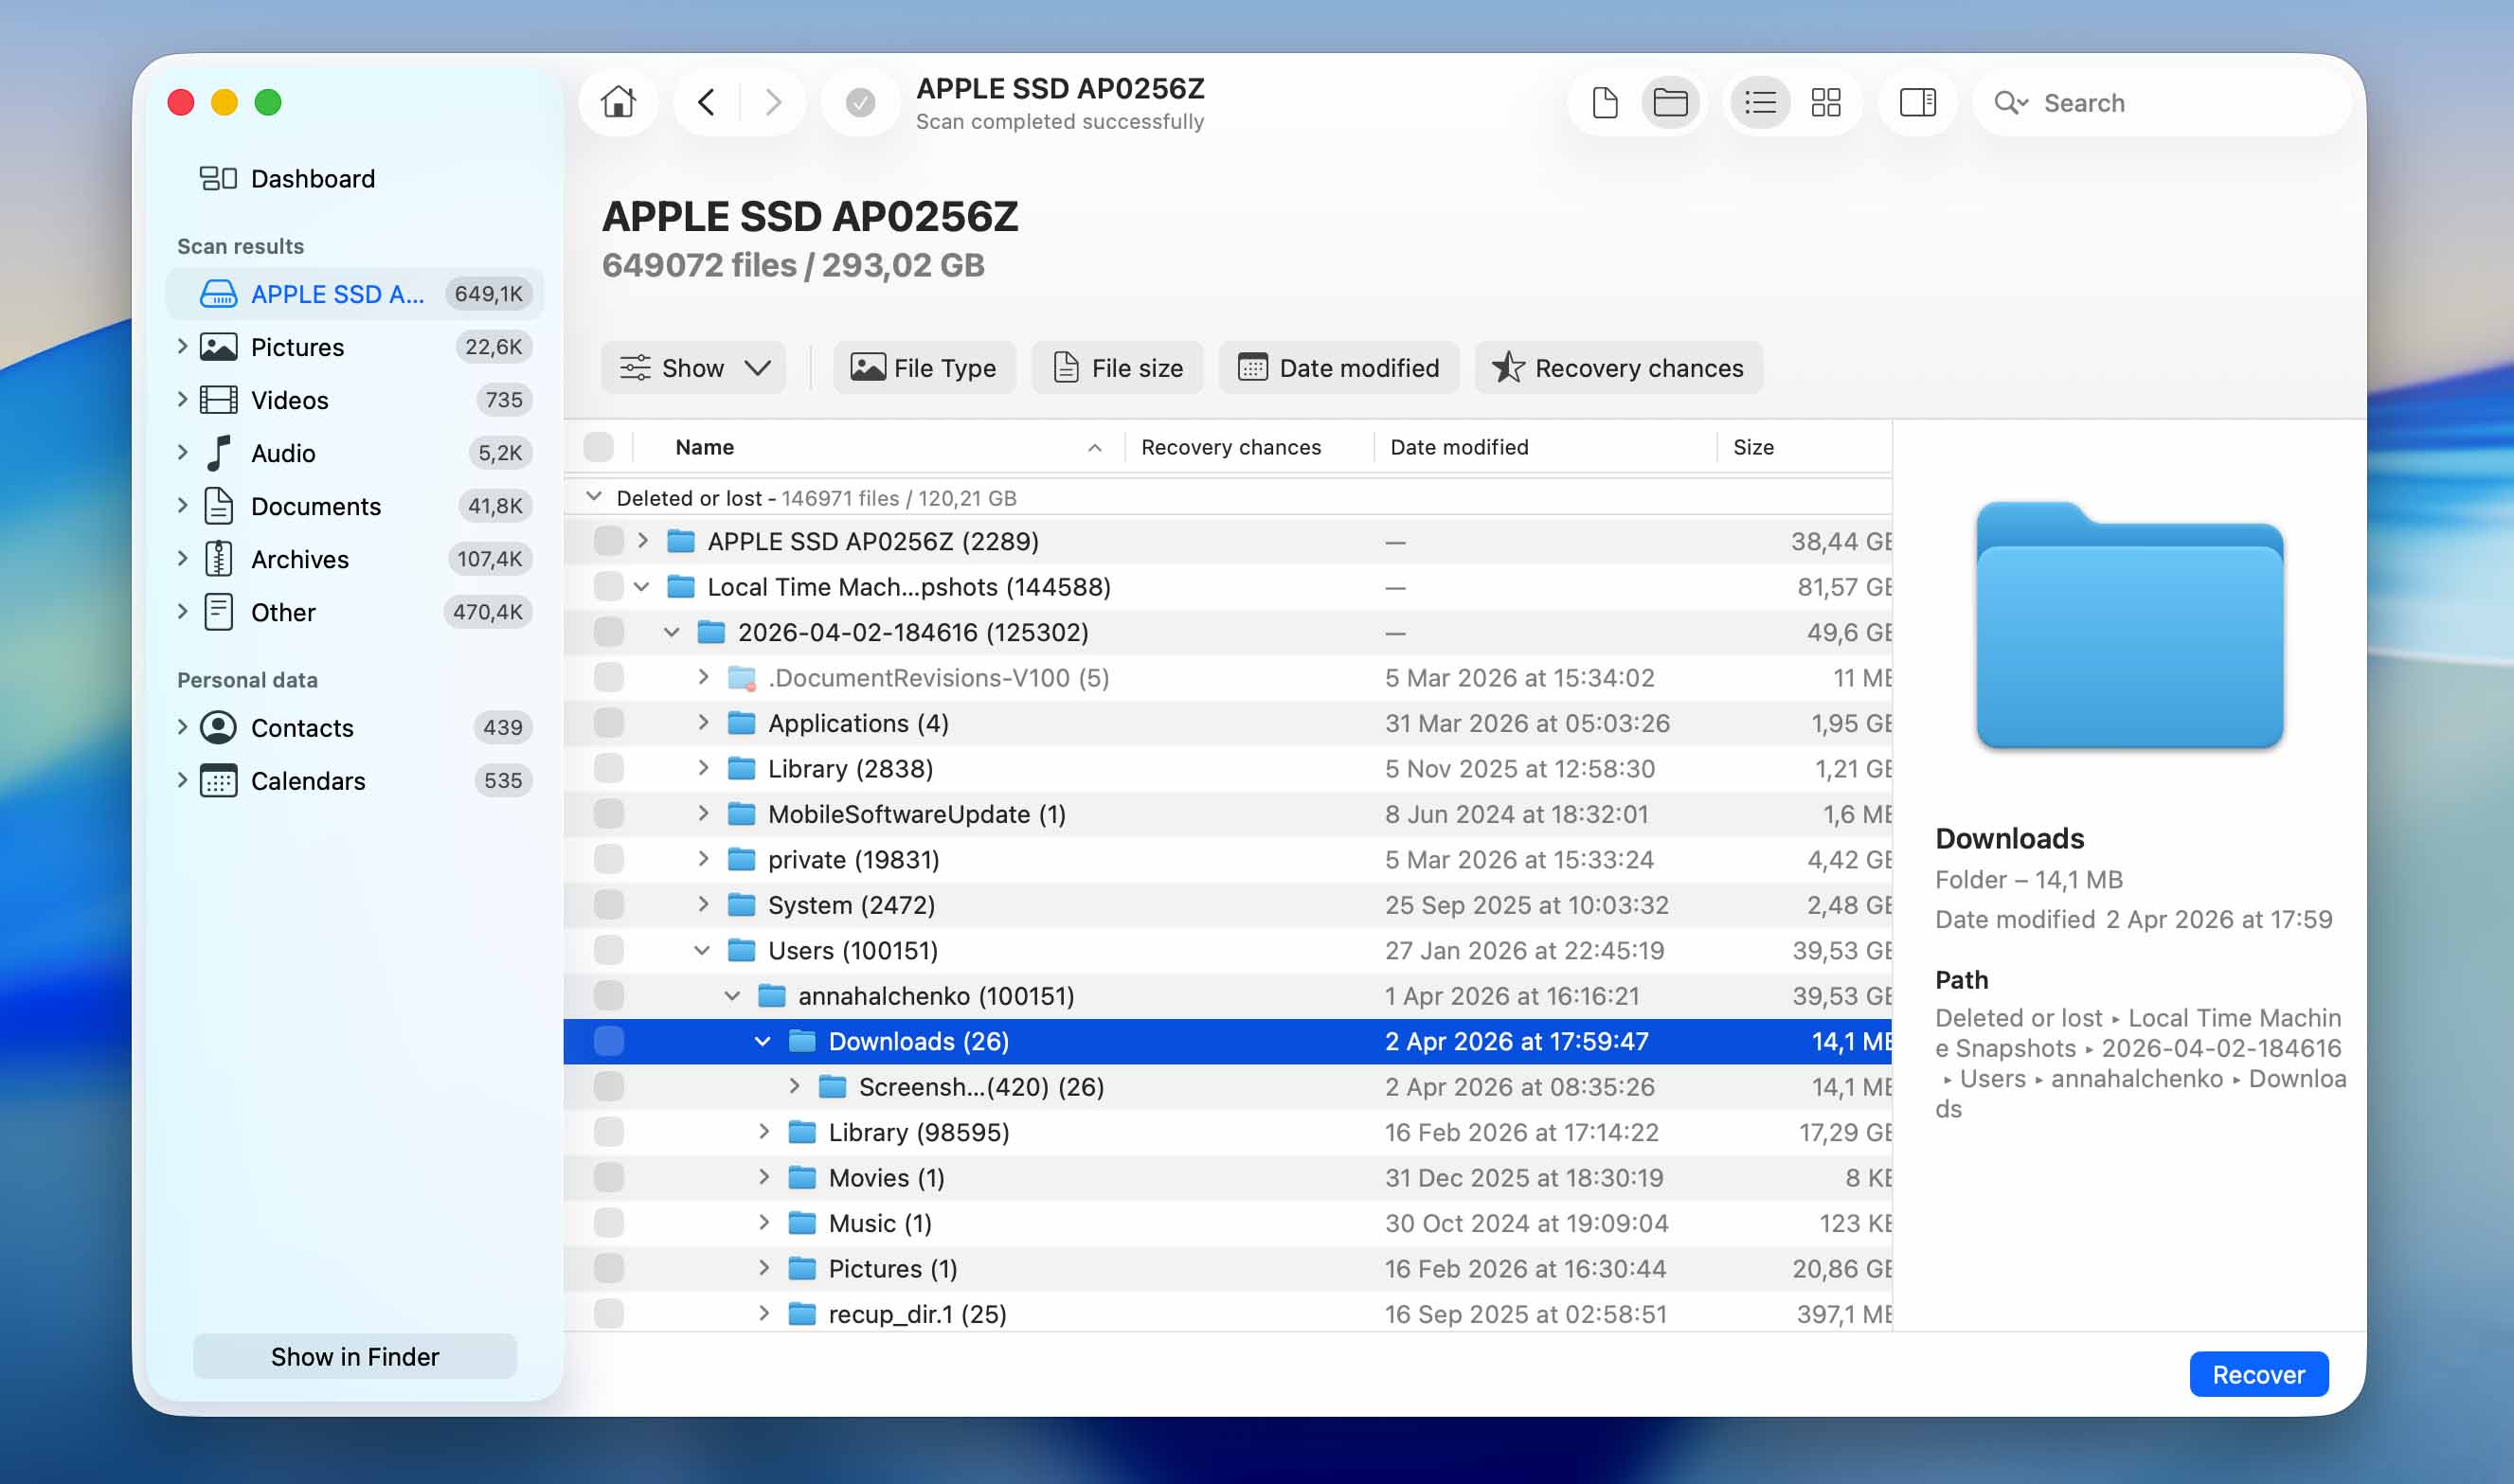
- Select the files that you would like Disk Drill to recover and then click on the blue Recover button.

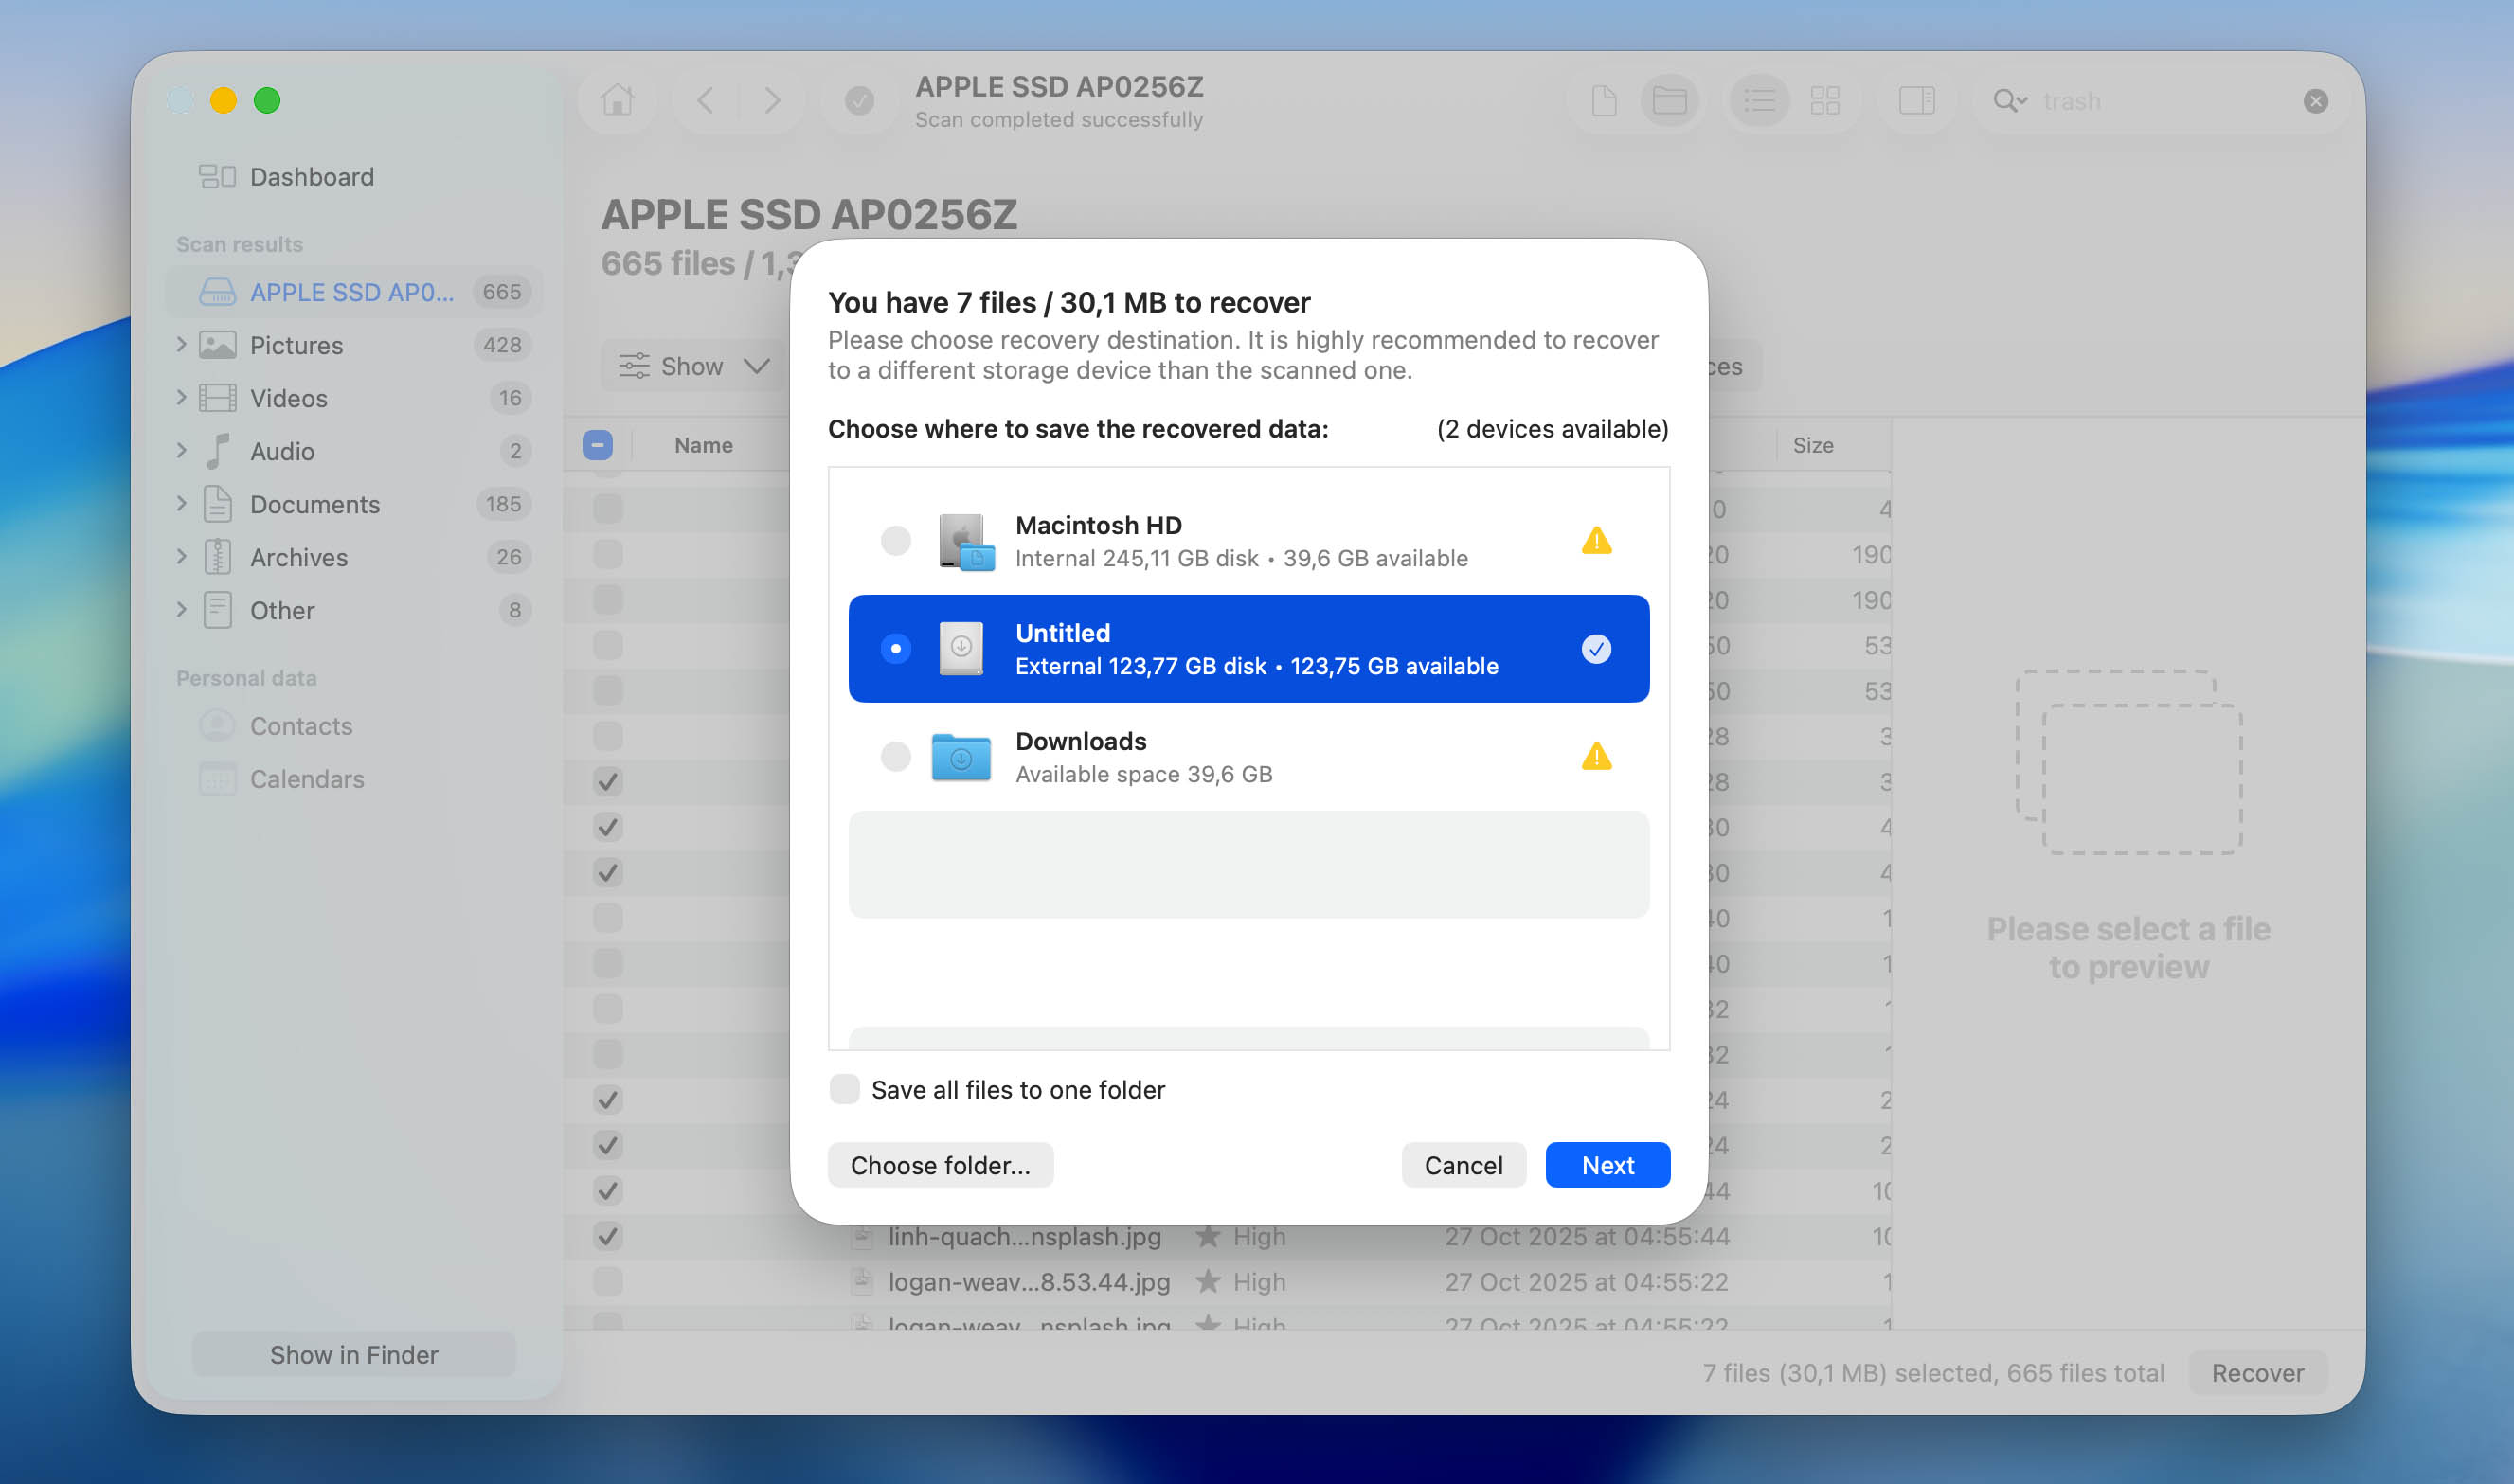
- Choose a different location to save the recovered files so you don’t overwrite anything on the original drive. and click Next.
There you have it! If you can’t recover your files either by using the Trash or Time Machine, Disk Drill is awesome for data recovery.
Conclusion
The Downloads folder makes using our Mac a much easier and straightforward experience. Now that we know how to find it if it’s gone, we can continue to enjoy that easy-to-use and robust experience.
At the same time, situations where the downloads folder disappeared on Mac can happen again. You might accidentally remove the folder from the Dock or delete files from it without noticing. To reduce the chances of this:
- Be careful when working on your Mac and avoid accidental actions with your cursor or keyboard.
- It’s also a good idea not to keep everything in the Downloads folder. Organize your files into other folders so important data doesn’t stay in one place.
- Take advantage of built-in features like Time Machine and keep regular backups. If files are no longer in the Trash and SSD TRIM has already cleared them, a backup may be the only way to get them back.
FAQ
Yes, you can. If you go into your Downloads folder and delete files, they will be transferred to the Trash and once the Trash is emptied, they will be permanently deleted.
However, we can get them back by using Disk Drill.
- Download and install Disk Drill onto your Mac.
- Launch Disk Drill and scan the storage device that you would like to recover the deleted Downloads folder files from.
- Wait for the scan process to complete. This can take some time depending on how much data you have.
- Once the scan process has been completed, you can review what Disk Drill was able to find.
- Select the files that you would like Disk Drill to recover and then click on the blue Recover button.
Another method is to use Time Machine to restore the file back onto our Mac from an external hard drive if we have been backing up our Mac.
- Plug your external hard drive into your Mac.
- Launch Spotlight by pressing the keys COMMAND+SPACE BAR. You can also click on the magnifying glass in the upper right-hand corner of your Mac.
- Type in Time Machine and then hit return on your Mac keyboard.
- Navigate through your Mac to find the files that you want to restore. This will put it back to the version that it was at that time.
- Click on Restore.
If you’ve hidden or moved your Downloads folder, we can put it back and make it appear again by following the steps below.
- Launch Finder and look at the left-hand column and see if your Downloads folder is there. If it’s not, press the keys Command + , to then open your Finder Preferences where you will then want to check the box to make the Downloads folder visible.
- Drag the Downloads folder from the left-hand side to the Dock and you will now have your Downloads folder back. You can also drag it to your Desktop if you would like it to be there as well.
The good news is that you can’t completely delete your downloads folder on your Mac, but you can hide it. If you have hidden it or dragged it off of your Dock by accident, we can get it back by following the steps below.
- Launch Finder and look at the left-hand column and see if your Downloads folder is there. If it’s not, press the keys Command + , to then open your Finder Preferences where you will then want to check the box to make the Downloads folder visible.
- Drag the Downloads folder from the left-hand side to the Dock and you will now have your Downloads folder back. You can also drag it to your Desktop if you would like it to be there as well.
iCloud usually doesn’t back up the Downloads folder by default, so it won’t help restore it in most cases. The Downloads folder is stored locally unless you’ve manually moved it into iCloud Drive or enabled Desktop & Documents syncing and included it there. If your Downloads folder was synced with iCloud Drive, you can check it by opening Finder > iCloud Drive and looking for your files there or in the Recently Deleted section on iCloud. If not, you’ll need to rely on other methods like the Trash, Time Machine, or data recovery software.