Our title almost tells the whole story, and you feel like time is of the essence. If you need to get files off a dead laptop, here’s the reality in plain terms: your machine might look completely gone, but your files often aren’t. Let’s walk through what actually works.
How Can You Lose Your Files from Your Laptop?
There are many reasons your laptop may have started acting dead and seemingly taking your precious files with it.
- 🔨 Did you bump or accidentally drop your laptop? This could have caused damage to its fragile Hard Disk Drive (if it’s using one).
- ⚡ Was there a recent storm or other possible cause of an electric surge? It could have “fried” some of its electronics.
- ⏲ Is your laptop relatively old, or did you use its storage a lot? Storage devices aren’t immune to time and wear. Maybe yours is close (or past) its End of Life point.
- 💾 An interrupted write process can corrupt a storage device’s file system.
Here’s the good news: in most of these cases, your files are still there. You just need the right approach to recover laptop data. No matter what you’re dealing with, we’ll walk you through practical, DIY steps to help you get your files back (and who knows, maybe even get the machine running again).
Step 1: Start with the Fastest Recovery for Laptop (No Disassembly)
When it comes to laptop data recovery, there are basically two paths you can take.
- The first is trying to figure out whether the laptop is truly “dead” or if only part of it failed. Sometimes the issue is surprisingly small. If you can get it to power on again, even temporarily, recovering your files becomes much easier.
- The second path is removing the drive from the laptop and using it like an external drive on another computer. That route is usually necessary when the laptop itself won’t cooperate at all.
We’ll start with the simpler things first – quick checks and troubleshooting steps that may get the machine running again. As we go, we’ll eliminate possibilities one by one and move toward the more advanced recovery methods only if needed.
Check Power Brick & Cord
Does your laptop seem completely dead, with no single LED lighting up?
Double-check the cables connecting your laptop to its power brick, and the power brick to the wall socket. Are both fully plugged in?
Replace Battery (if Possible)
Does your laptop work fine when plugged in but not when out and around? The problem’s probably its battery.
With older or more user-upgradable models, you can replace their battery. Note its serial number and other identifying markers, and use them to order an identical replacement.
Newer laptops have their batteries seamlessly packed next to other components to save space and reduce weight. Like with other hardware problems, the only solution is to have them replaced by an expert.
Check For Display Problems
Can you hear the laptop coming to life, but nothing appears on the screen?
Some laptops come with a fault by design: the repeated opening and closing of their lid can damage the connection between the monitor and the GPU. If the monitor springs to life when the cover’s at a specific angle, you’ve found the culprit.
Another reason for a laptop not displaying anything on the screen could be the GPU. GPUs produce a lot of heat when in active use, especially on gaming laptops. If their cooling system or the laptop’s internal design can’t keep up with their needs for heat dissipation, GPUs can fail.
But how can you tell if the problem’s with the GPU and not the monitor if both have the same result: a blank screen?
Most laptops today come with an HDMI or MiniDisplay port which you can use with an external monitor. And many will detect you’re using a second screen during boot time and also show a signal on it.
So, connect an external monitor to your laptop. Then, check for any signs of life on both screens during boot. If anything like a loading screen shows up on the external screen, it’s probably your laptop’s monitor and not the GPU to blame.
Unfortunately, none of those problems are user-serviceable – and attempting to fix them would void your warranty. Sending your laptop to be serviced by experts is the only solution.
Step 2: Remove the Drive and Connect It to Another Computer
If nothing from Step 1 worked, that’s okay – we eliminated a lot of possibilities and now can move to the next recovery path.
Even when a laptop looks completely dead, its storage is often still fine. (And that’s all you really need.) You can recover data from a genuinely dead laptop by “transplanting” its storage to another computer. It might sound difficult (and on some laptops it is), but in many cases it’s something anyone with a bit of patience and a basic screwdriver can handle.
- Before you open anything, power the laptop down completely and unplug it.
- Search online for instructions on removing your laptop’s storage device.
- If possible, remove the battery. Then follow a guide specific to your model so you don’t miss hidden screws or clips (manufacturers design access differently).
- Once inside, take a second to identify what kind of drive you’re dealing with. It will usually be one of these: 2.5″ HDD or SSD (larger, rectangular, connected with a SATA cable), M.2 SATA SSD (thin, flat stick), M.2 NVMe SSD (similar “stick” shape, usually very slim and mounted directly on the board).
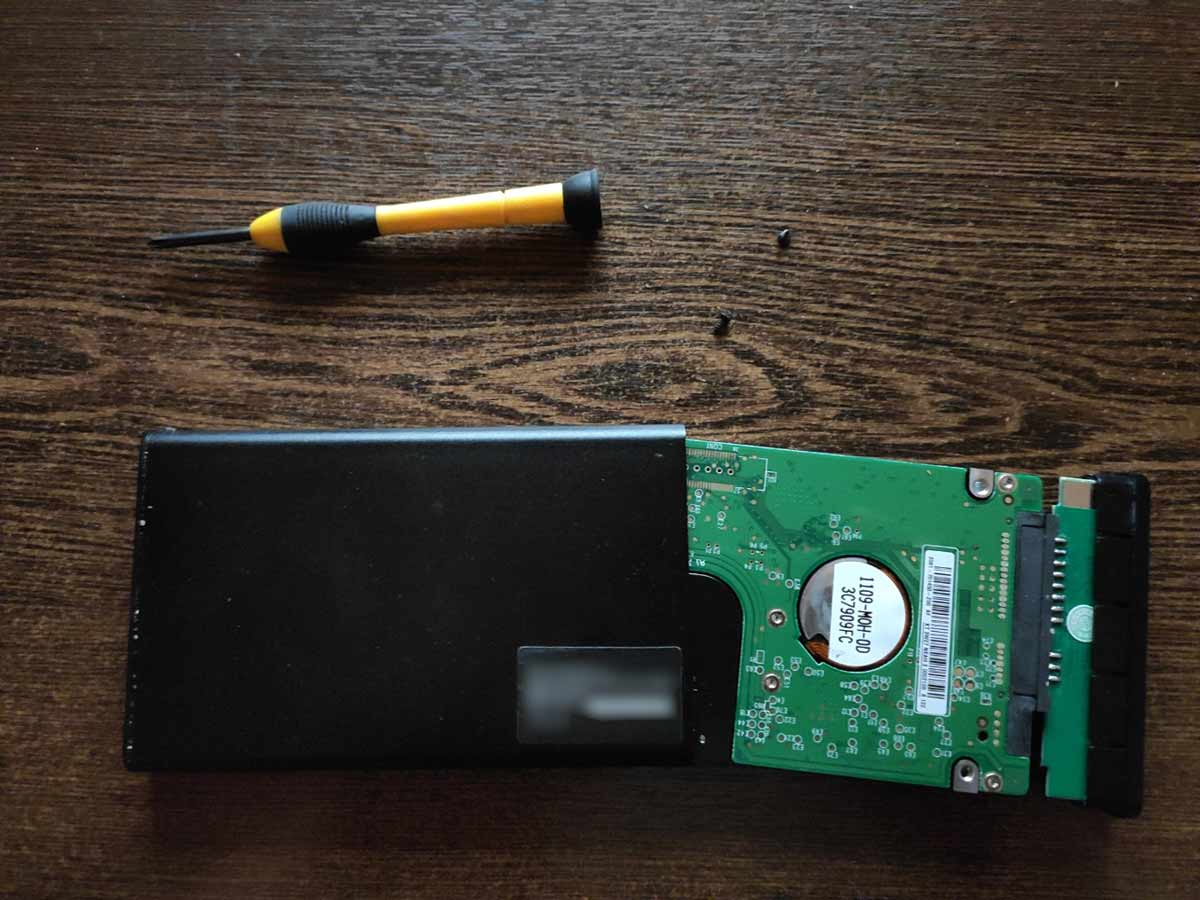
- You’ll have to purchase an external enclosure for the particular type of device. In our photos, you can see a 2,5” enclosure that can host both HDDs and SSDs as long as they fit inside and have SATA connectors.
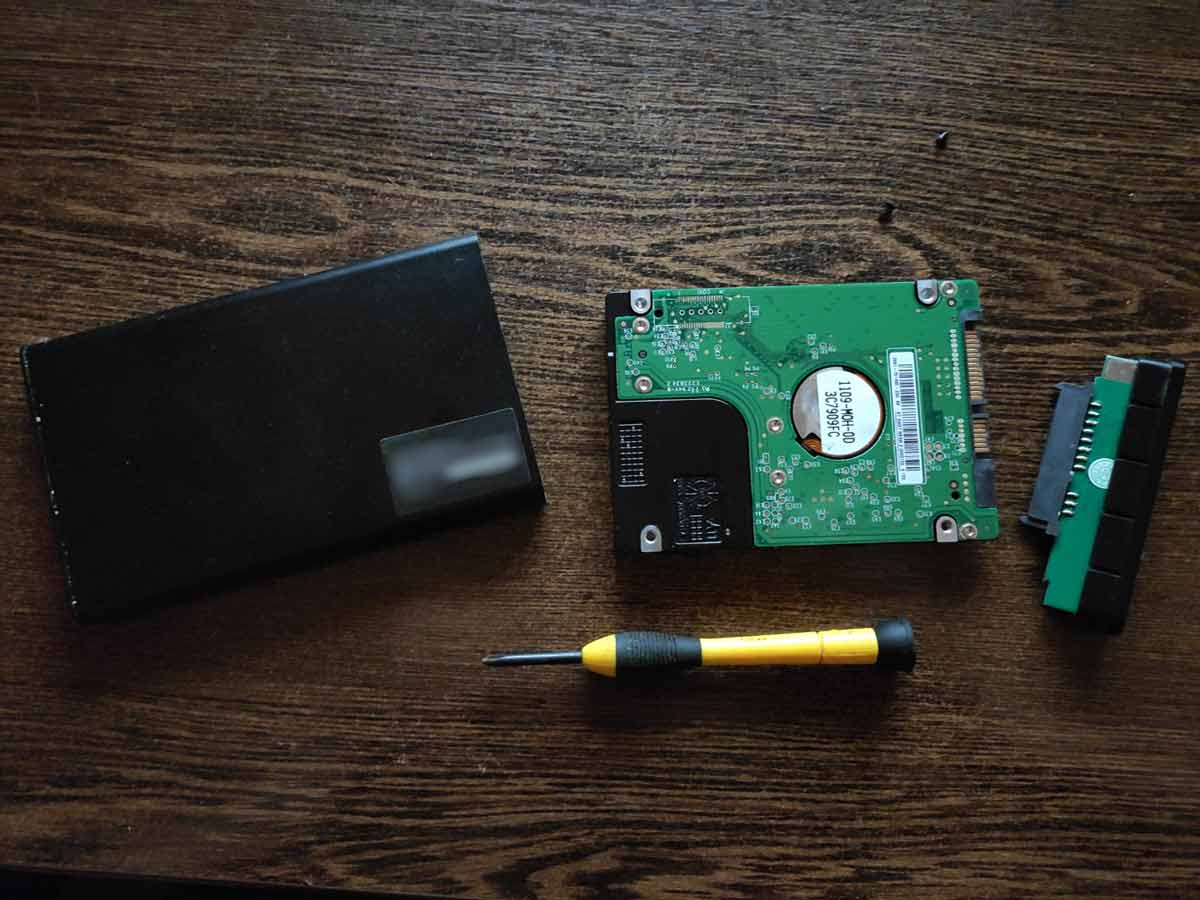
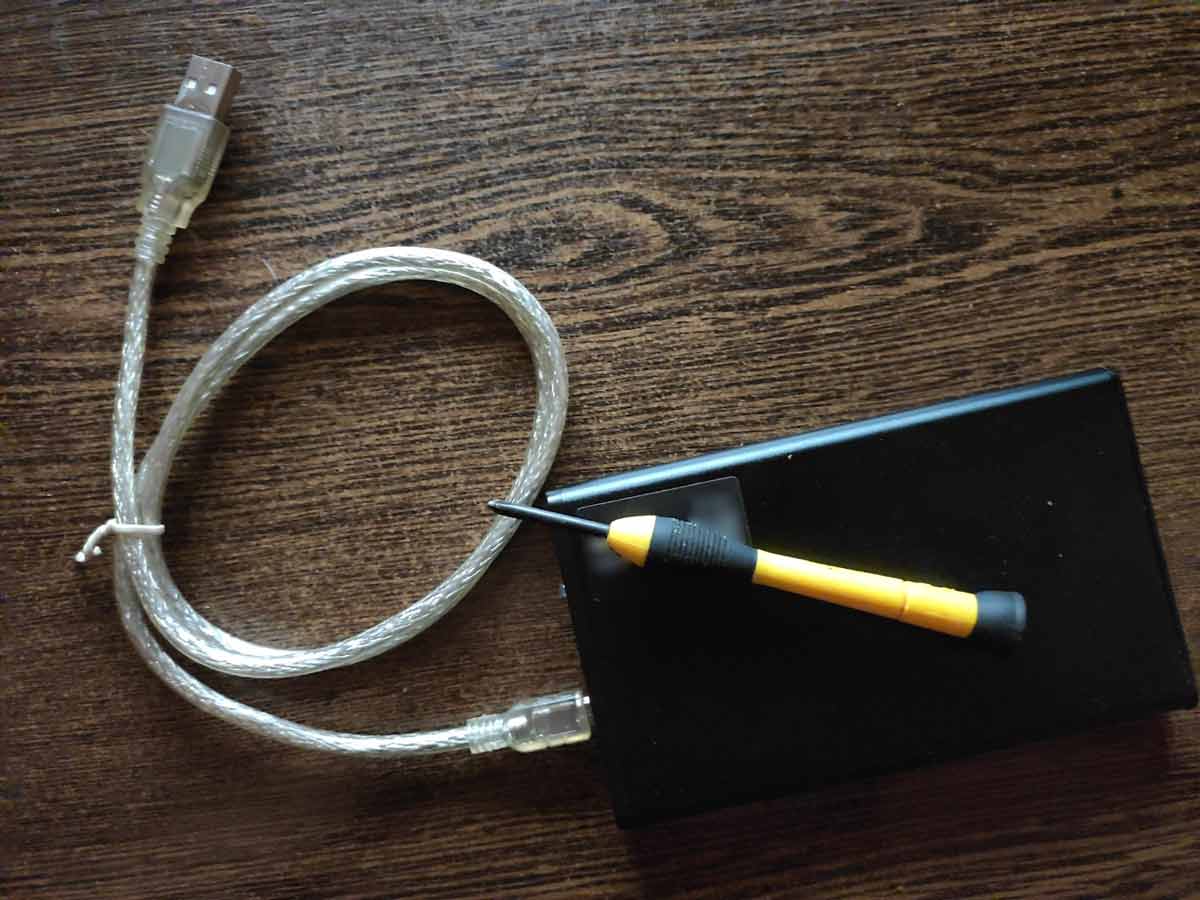
- Remove the storage device from your laptop and install it in the enclosure according to the instructions that came with it.
- Connect it to another computer and proceed with one of the methods we saw above for getting back your data.
Step 3: Check Whether the Drive Is Detected
Once you connect the drive to a normal working computer, the first thing you want to check is whether it’s detected.
On Windows, if everything is fine, it should show up in File Explorer next to your other drives. That’s the best-case scenario – you can just open it.
But don’t worry if it’s not there. That happens a lot, and it doesn’t mean the drive is dead. What to do:
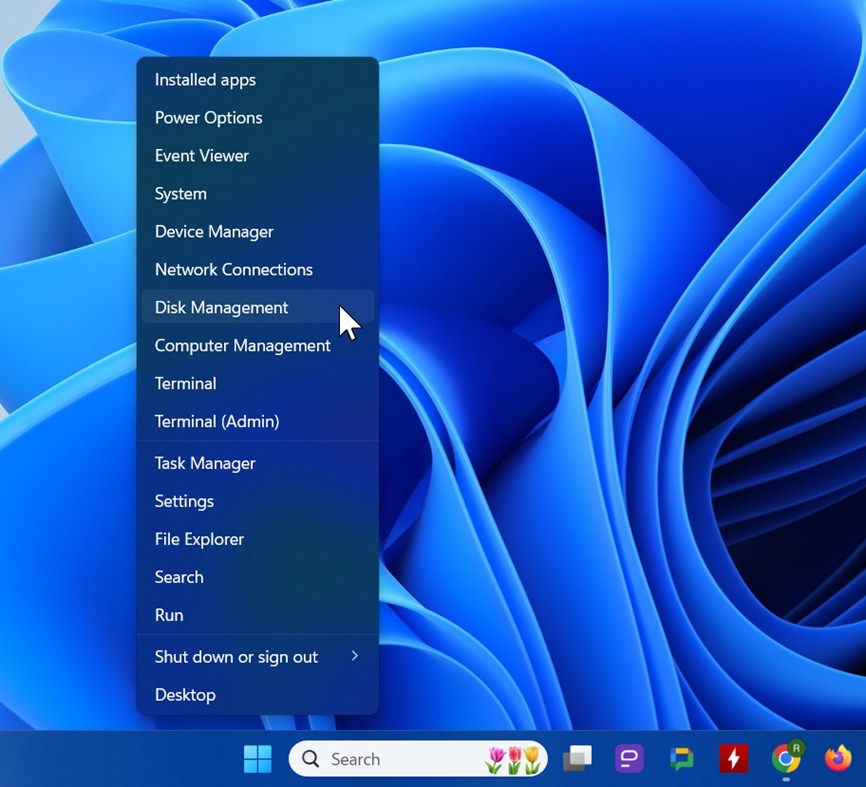
- Right-click the Start menu, search for Disk Management, and launch it.
- Look through the list of drives and find one that matches your laptop’s storage (or at least has a similar capacity).
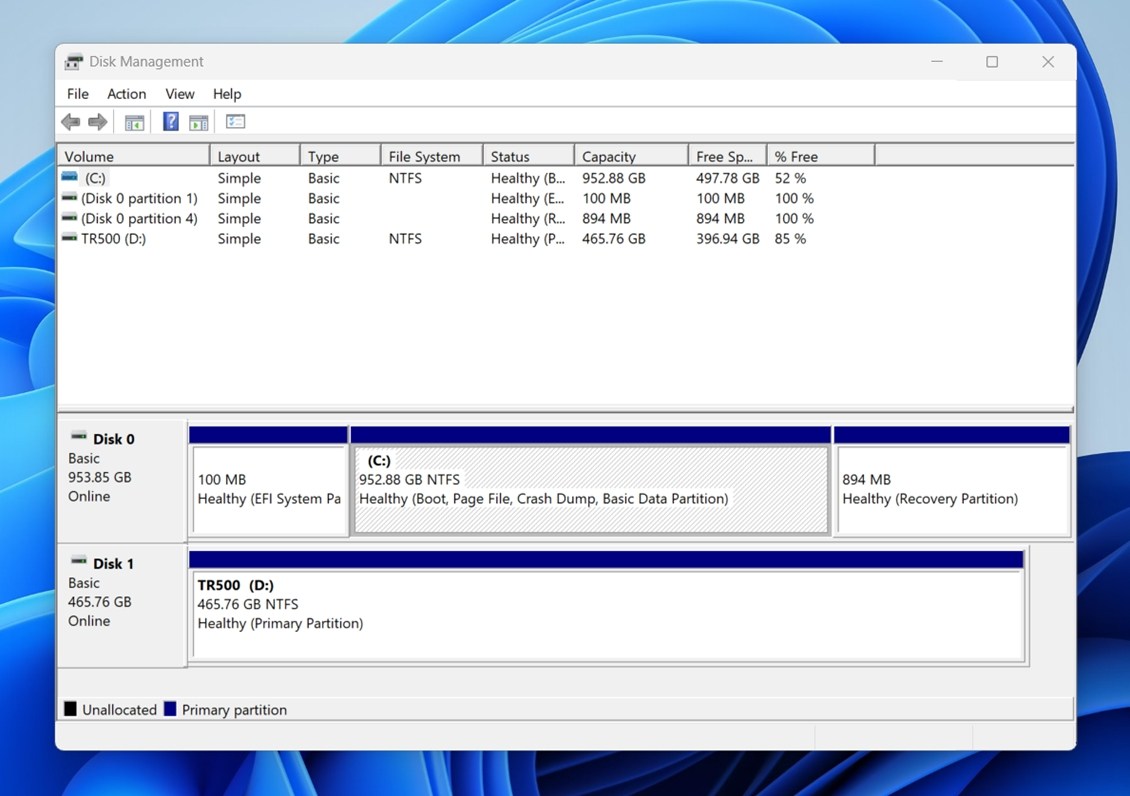
- If you see it there, that’s a good sign – the system detects the drive.
As long as the drive shows up in Disk Management with the correct (or close) capacity, you’re still in the game. From here, you can move on to actual recover laptop data methods.
Step 4: Recover Files From the Removed Drive
What you do here depends on what you saw in the previous step.
- If the drive showed up in File Explorer (and opened normally), go with Method 1.
- If it only showed up in Disk Management, or gave errors when you tried to open it, go with Method 2.
- If it didn’t show up anywhere, this is no longer DIY territory.
Method 1: Copy Files Normally
Best-case scenario. The drive works, Windows reads it, and your files are there.
Here’s what to do now:
- Open File Explorer.
- Find your connected drive (it will show up as a new disk like D:, E:, etc.).
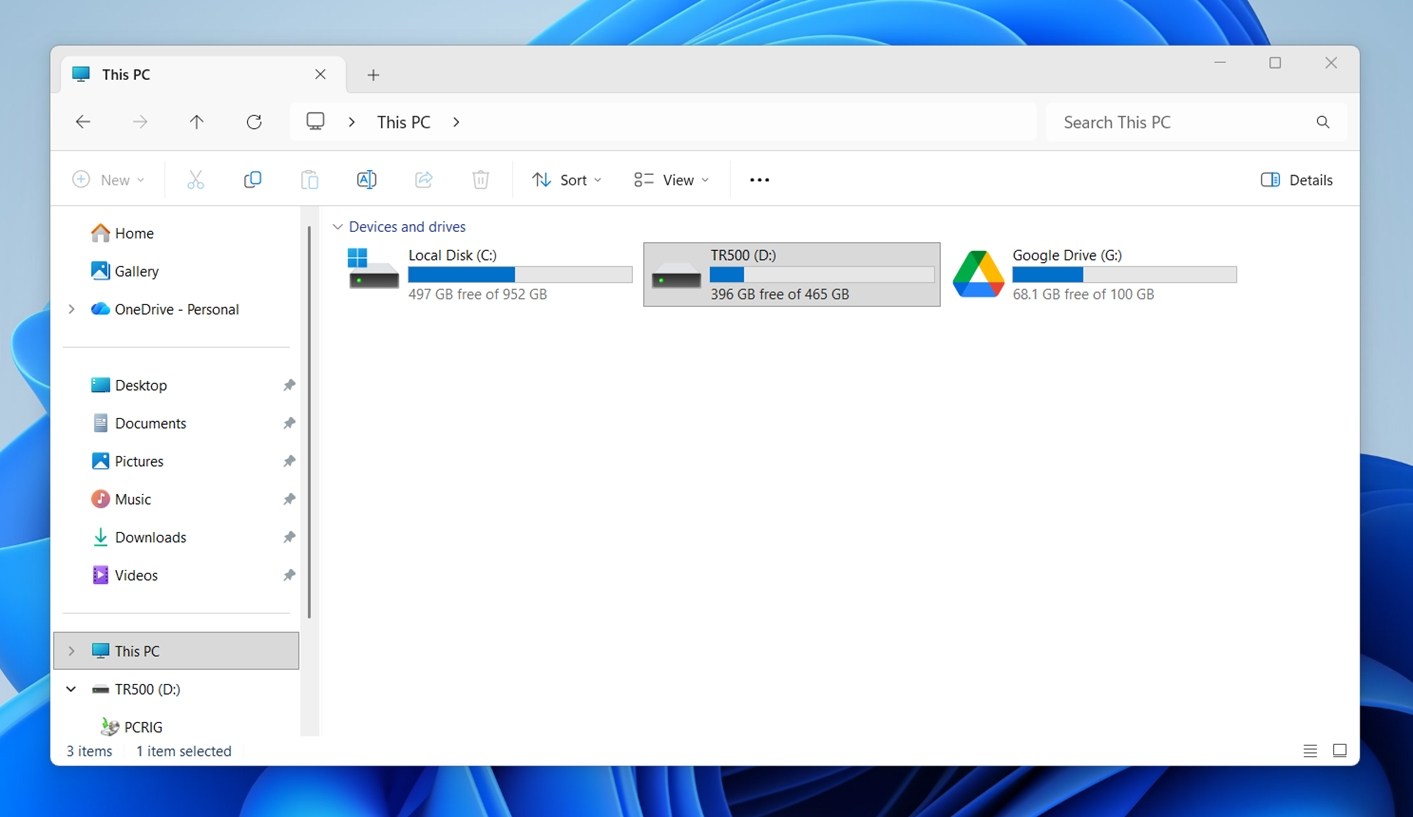
- Open it and select what you need.
- Press Ctrl + C (copy).
- Go to a safe location (another drive).
- Press Ctrl + V (paste).
One thing people miss all the time – hidden files.
You might notice that something feels “off.” Maybe you don’t see all of your files. That’s because Windows may hide certain folders. Click View at the top of File Explorer and turn on Hidden items.
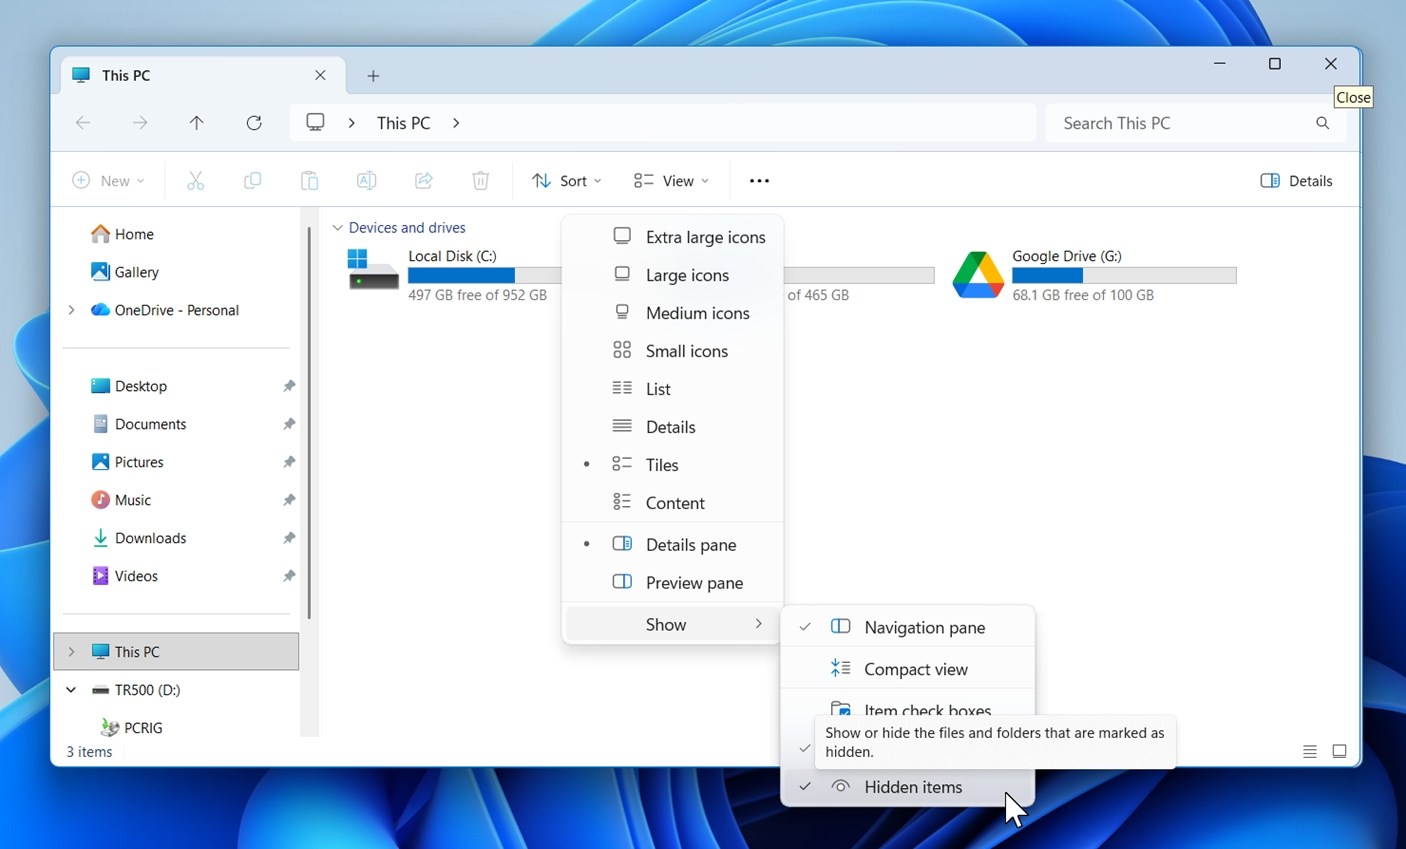
Suddenly, more folders appear. One of them is usually AppData. That’s where a lot of useful stuff lives – browser profiles, app settings. If you care about those, grab that folder too.
Method 2: Create a Byte-to-Byte Image and Scan It (Recommended)
If Method 1 didn’t work, don’t keep fighting the drive directly. There’s a better move – make an image of it first, then recover data from that copy.
This is common when you try to recover data from a dead laptop, because the issue often comes from the drive itself. And unstable drives can get worse the more you read from them.
So instead of stressing it over and over, you read it once. Carefully.
A great tool for this is Disk Drill. It has a byte-to-byte backup feature built specifically for unstable or failing drives.
What Byte-to-byte Backup does:
- Skips bad sectors at first so the backup doesn’t get stuck
- Comes back later and retries those damaged areas
- Uses parallel read/write to speed things up and reduce strain
- And when you scan the image, it will find both existing and deleted files – so you’ll usually recover a lot more than you’d ever see just browsing the drive in File Explorer
Here’s how to backup data from a broken laptop:
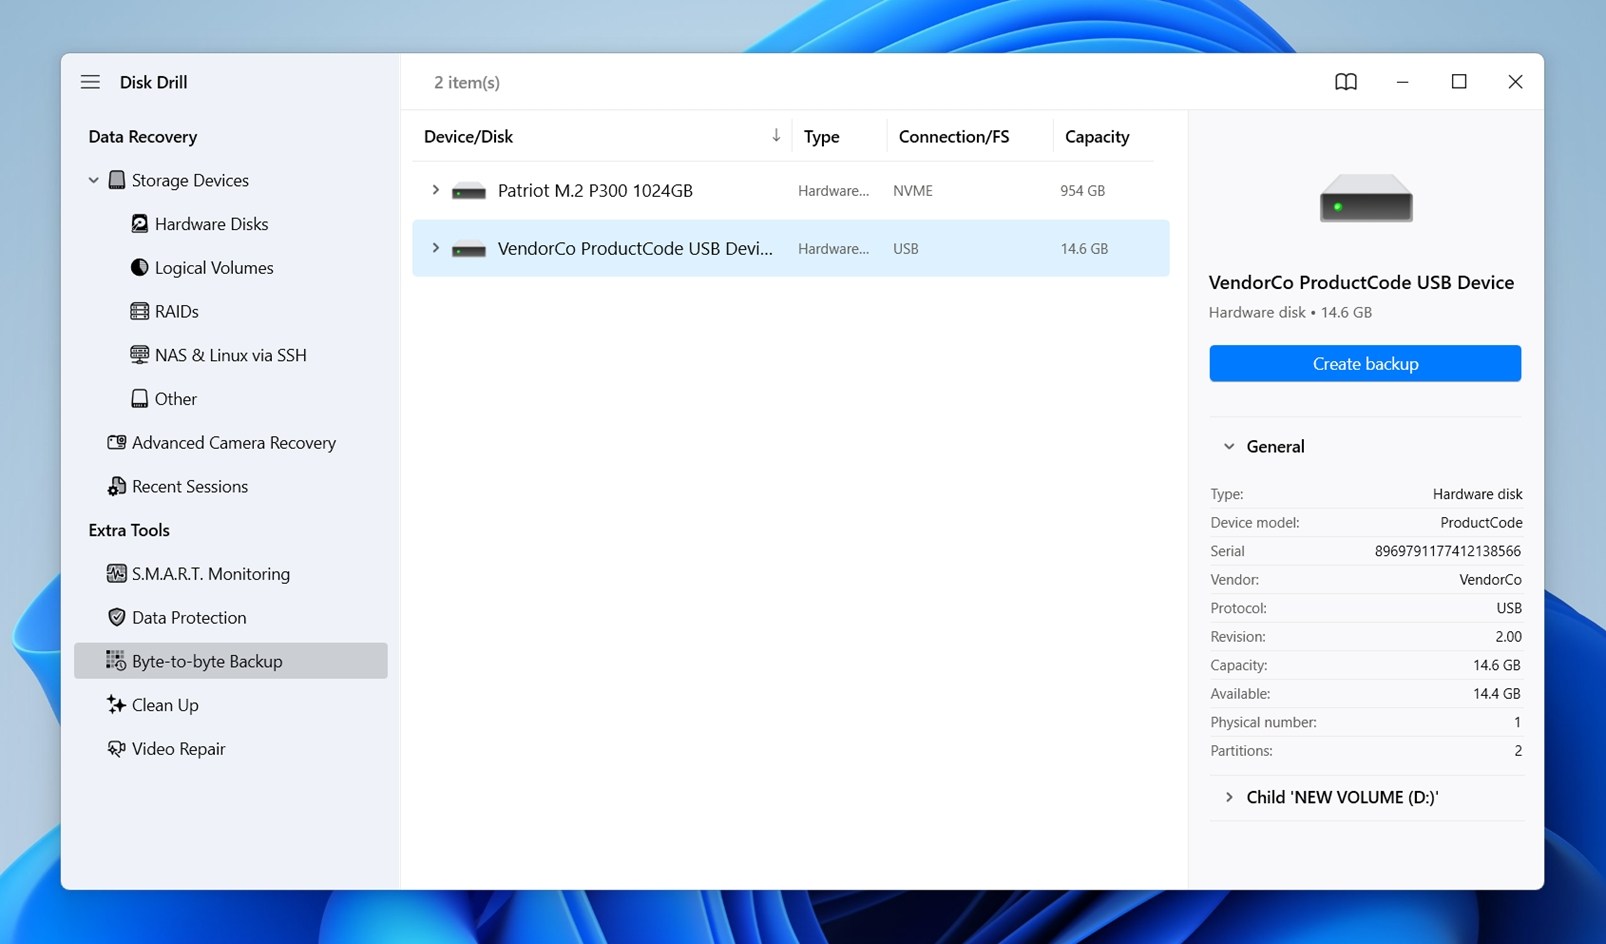
- Download Disk Drill. Then, install and run it.
- Head to Extra Tools, then click Byte-to-byte Backup. You’ll see a list of drives – pick the one from your dead laptop and hit Create backup.
- Next, choose where to save the image file. The destination drive needs enough free space to match the full size of the source drive (more is even better). If your laptop had a 500 GB drive, plan for at least that much space.
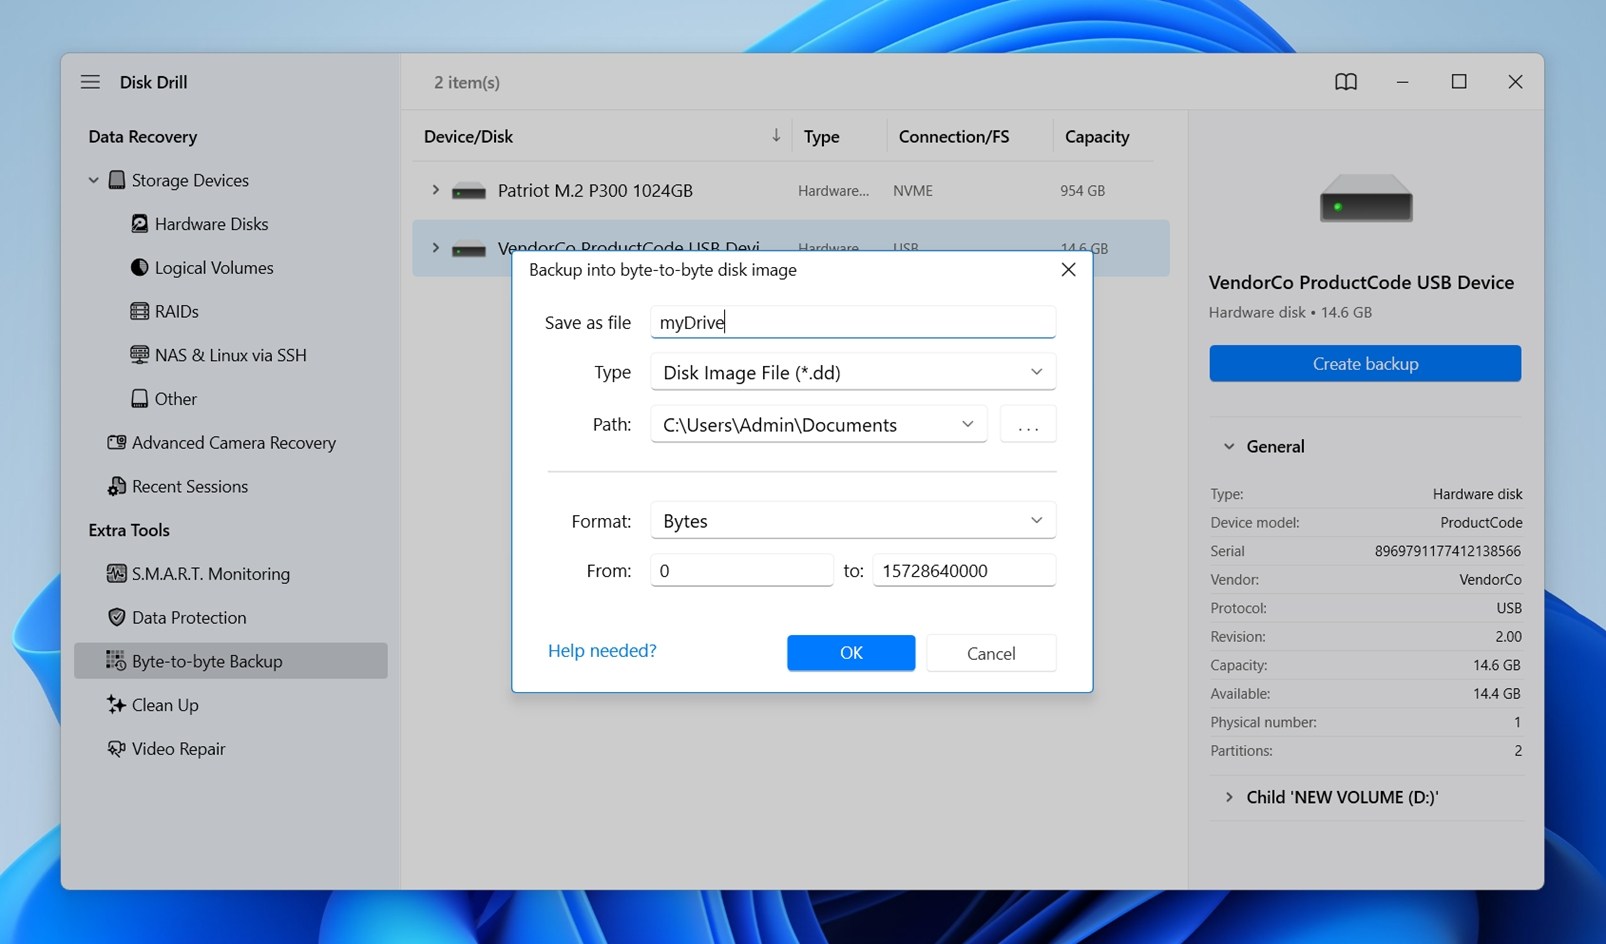
- Click OK, and the process starts.
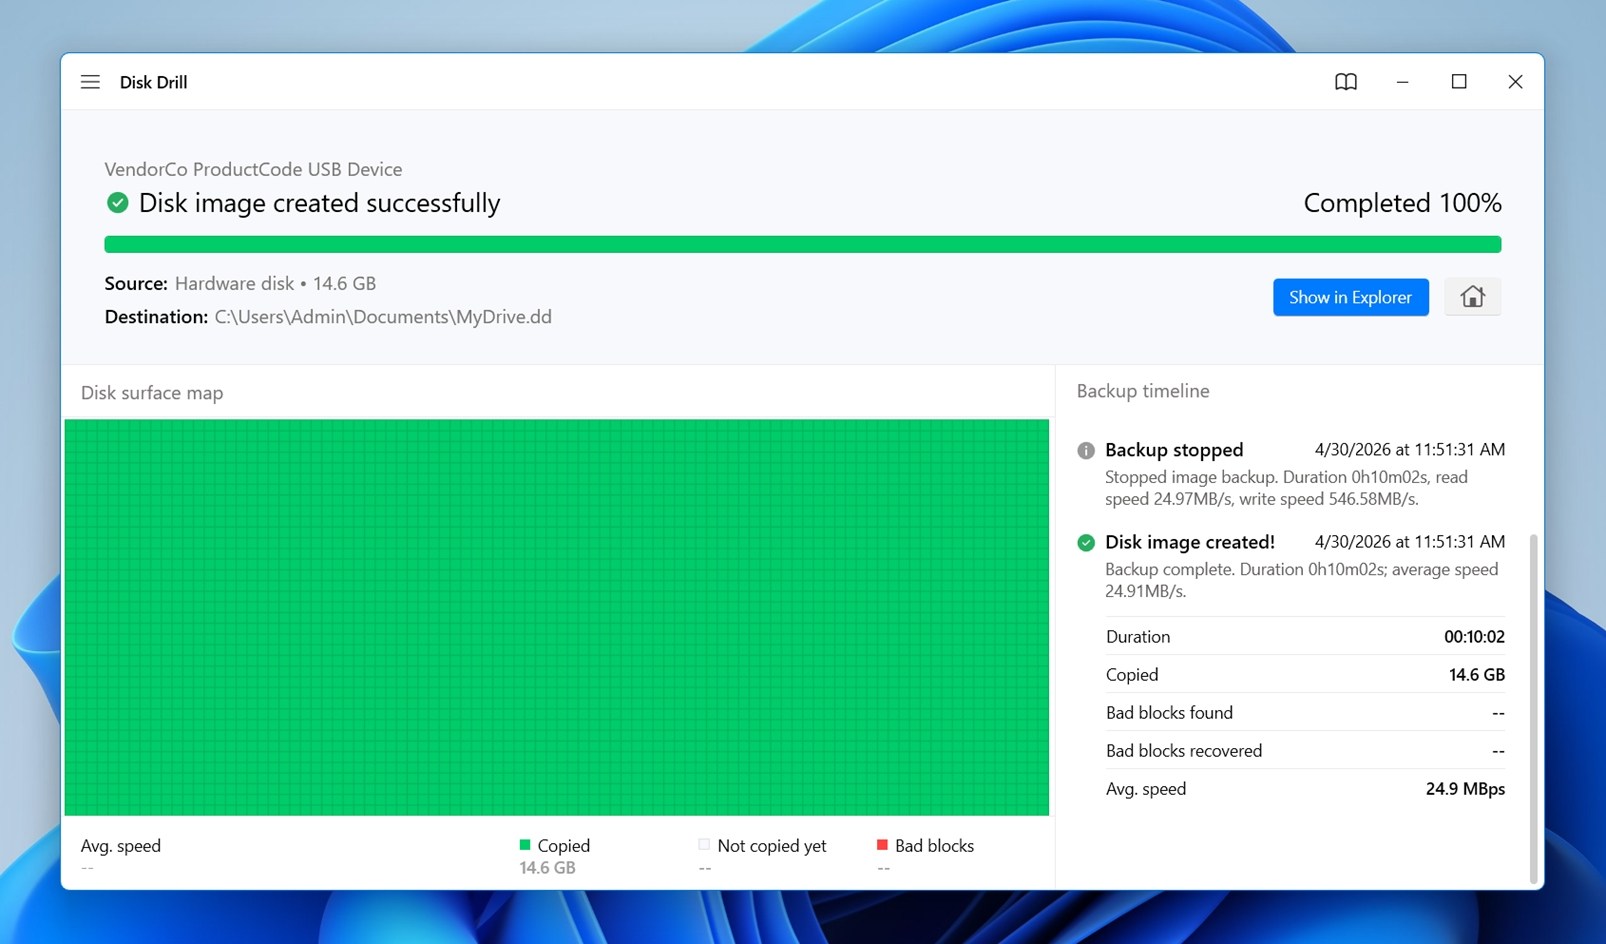
- You’ll see a progress bar slowly moving, maybe some notes about skipped sectors, that’s normal. If the drive is in rough shape, it can take a while. For larger drives, it may take hours. Let it run. Don’t interrupt it.
- Once it’s done, you’ll have a full image file ready to scan – no need to touch the original drive again.

How to scan the image and recover your files:
- Now, go back to the main Storage Devices screen.
- Click an option called Attach disk image, find the image you created, and double-click it.

- It’ll show up in the list like it’s a normal drive.
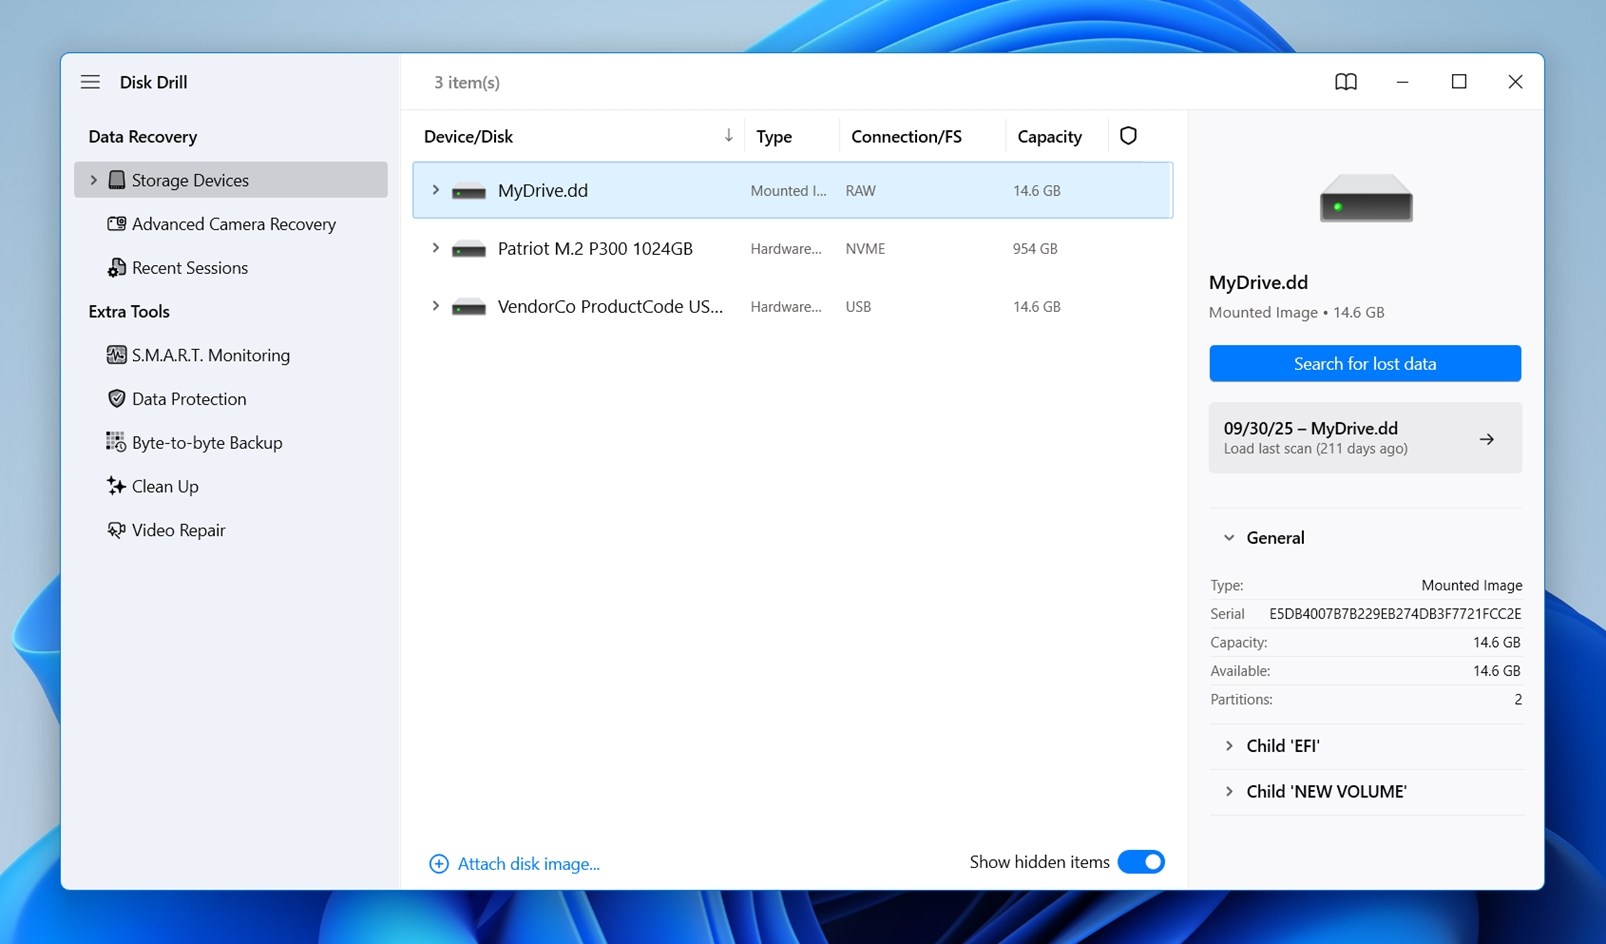
- Select it and hit Search for lost data. If it asks for a scan mode, go with Universal Scan.

- You’ll start seeing results populate. At this point, you can either: jump in and browse right away, or let the scan fully finish for more complete results.
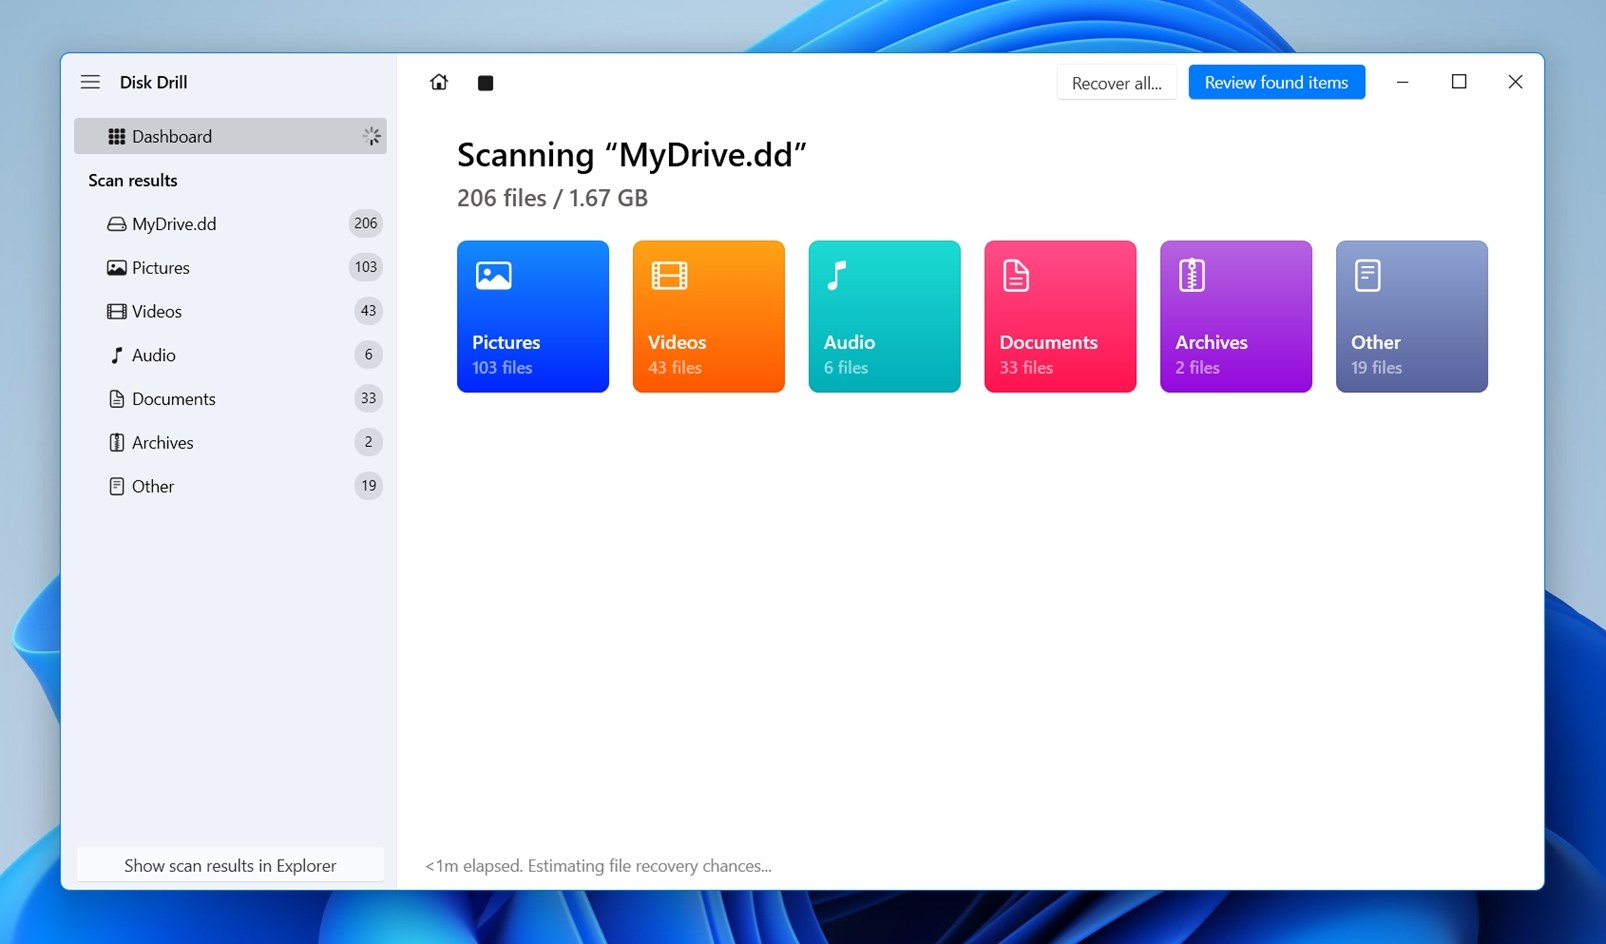
- Click Review found items when you’re ready. On the left side, you’ll see filters – Pictures, Videos, Documents, and so on. Super helpful if you’re hunting for something specific.
- You’ll also notice categories like Existing, Deleted or Lost, and Reconstructed.
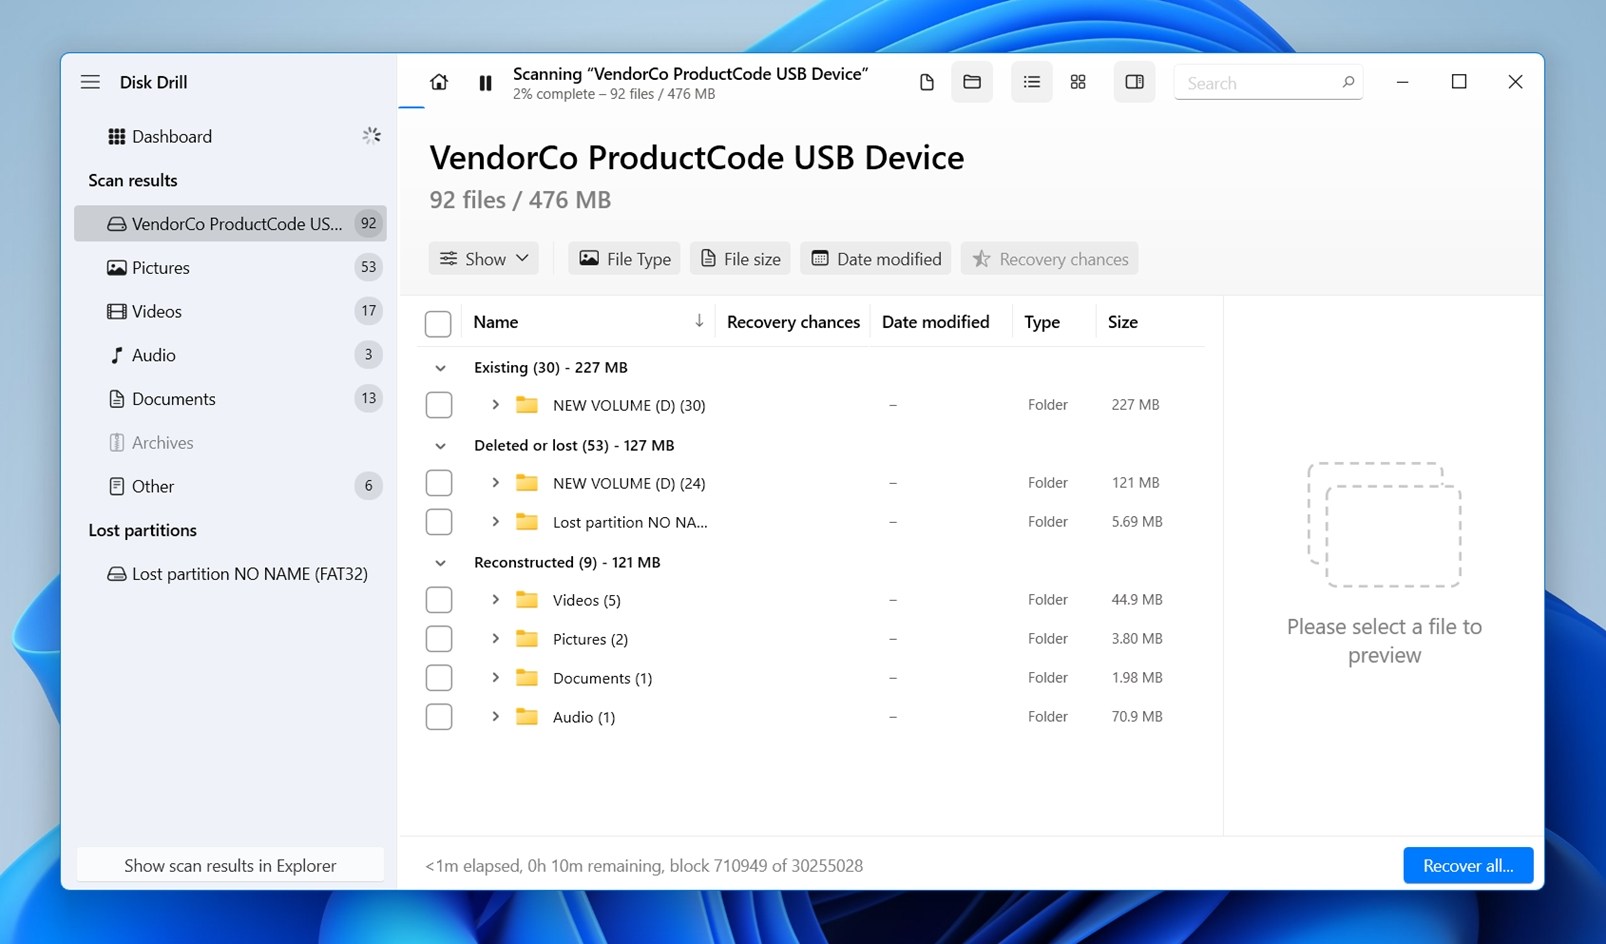 Existing are files that are still intact on the drive. If the drive had opened normally in File Explorer, you would’ve seen them there. Deleted or Lost – files that were removed or became inaccessible. Reconstructed is data pieced together from fragments. This usually happens when file system info is damaged, so the software rebuilds files based on raw data patterns.
 - You can click on any file to see a preview on the right, which helps a lot when file names don’t mean much.
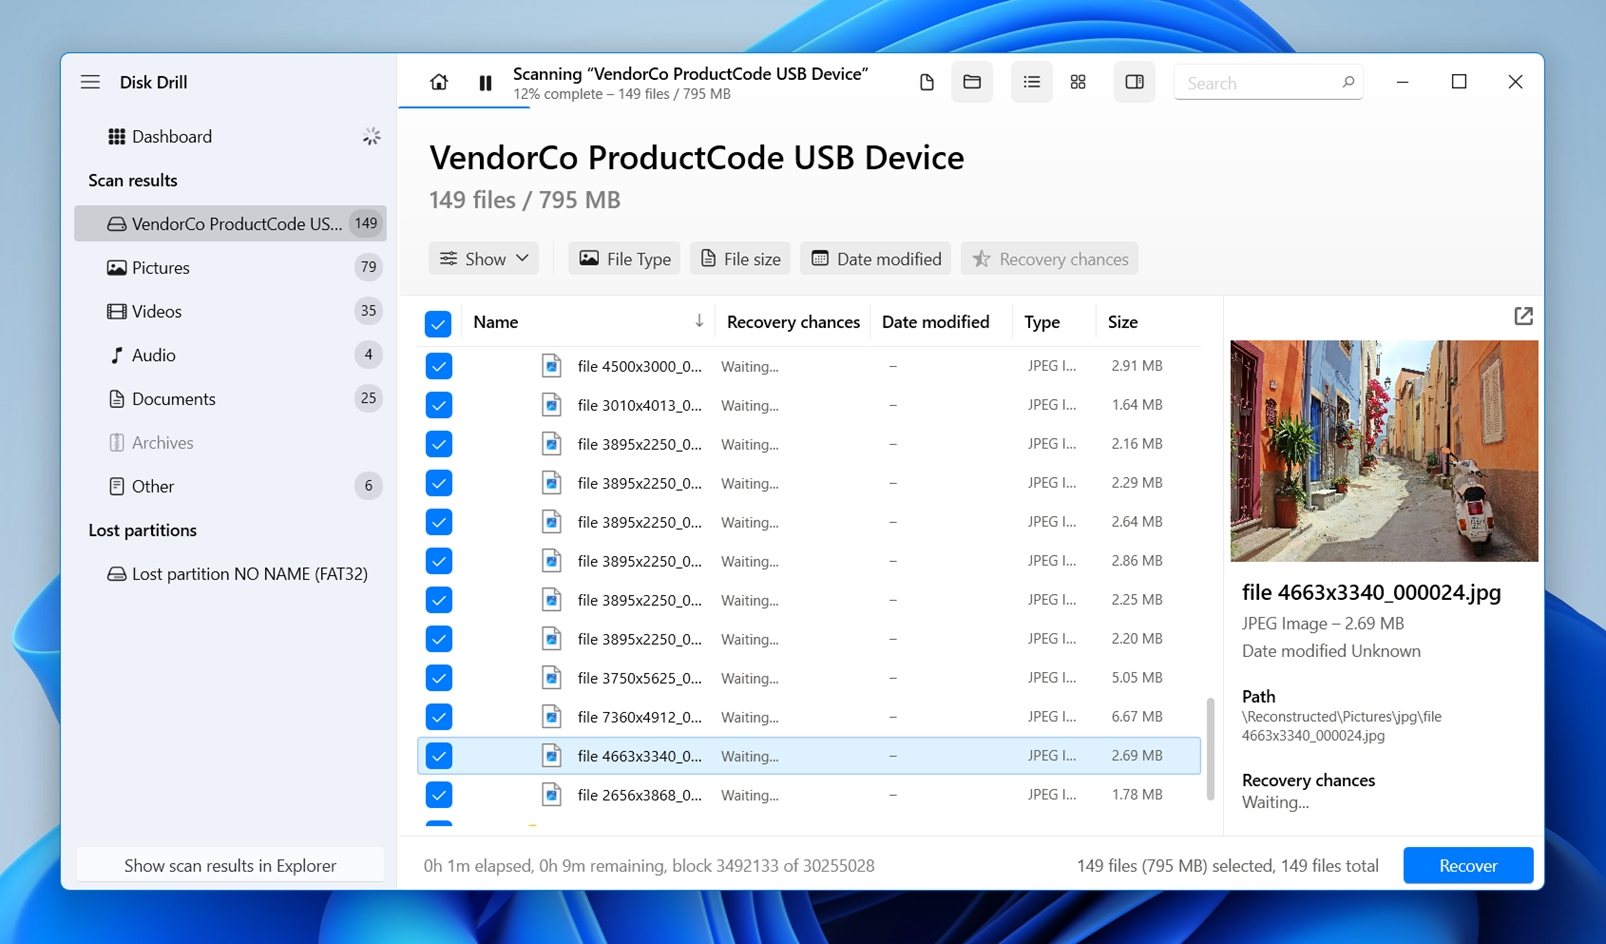 Disk Drill will preview anything your OS can normally open using built-in or installed viewers. If it opens correctly in preview, that’s a 100% sign the file will recover without issues.
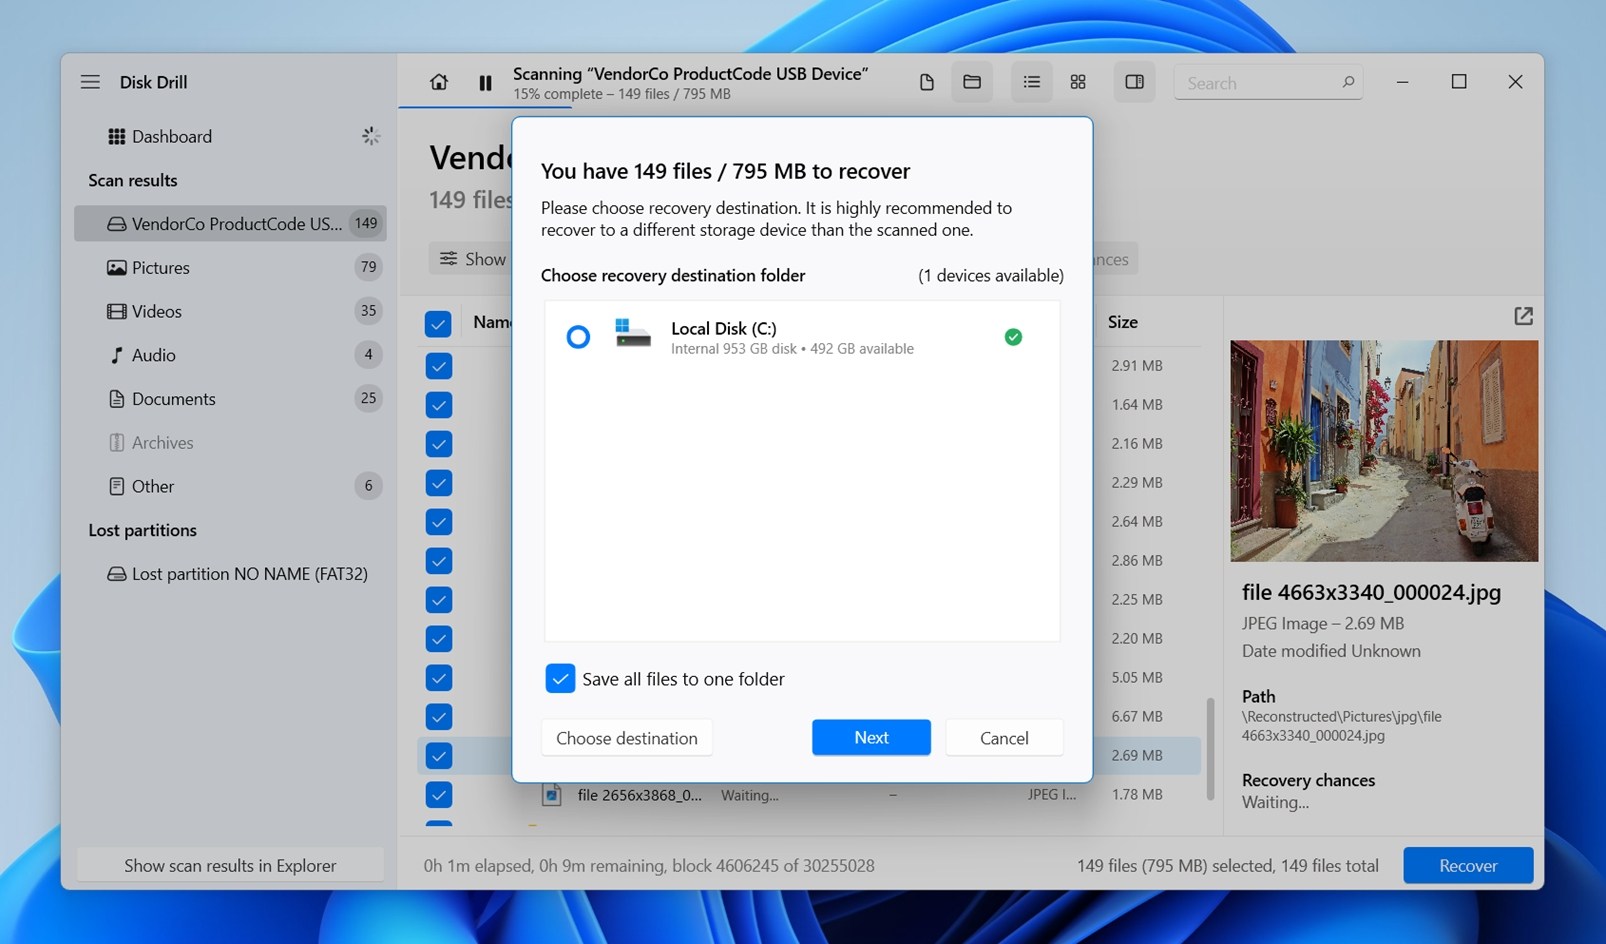
 - When you’ve picked what you need, click on Recover. Choose a different drive as the destination (never the same one), confirm, and let it finish.
At that point, your files are back in your hands.
Step 5: Decide What to Do With the Drive
At this point, you’ve got your data back. Now the question is what do you do with the drive itself?
If you still plan to use it, don’t jump straight into formatting and putting it back into service. Take a minute to check its health.
Open Disk Drill and find the S.M.A.R.T. Monitoring. Click Turn on, then select your drive from the list. You’ll see a table of attributes with statuses, basically a quick health snapshot of the drive.
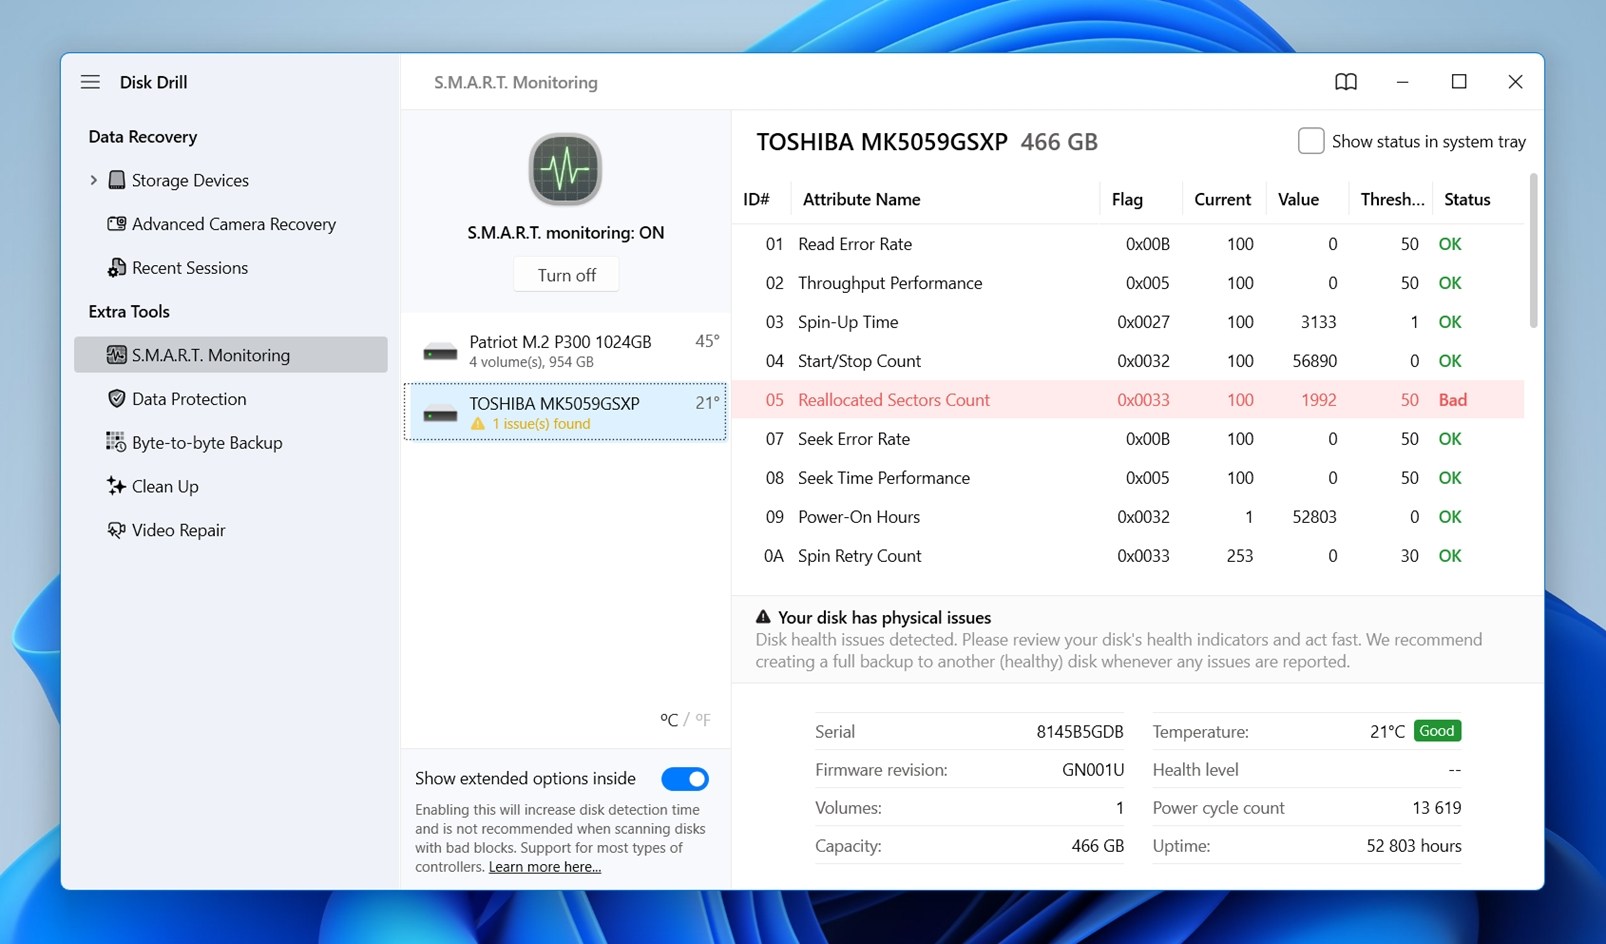
What you’re looking for is simple:
- Green (Good) status, the drive is fine
- Warnings or bad sectors indicate the drive has issues and may fail
In our case, if you look at the screenshot, the test drive clearly shows some issues. Reallocated Sectors Count is flagged as “Bad.” That’s a sign the drive has already started moving data away from damaged areas. Not great. But at the same time, the overall status still shows as “Good.”
What that actually means in practice: the drive is still working, and the system can read from it, but it’s no longer in perfect condition. It has already developed physical problems, and those tend to get worse over time, not better. And definitely not something we’d rely on without a backup.
So if your S.M.A.R.T. screen is full of red flags and warnings, it’s probably not a good idea to keep using that drive for anything important. You might get away with it for a bit, maybe it works fine for a week, maybe a month, but it’s unpredictable.
Turn to Laptop Data Recovery Experts For Non-Responsive Storage Devices
Up to this point, everything we covered was the DIY route. It works in a lot of cases. But if back in Step 3 your drive didn’t show up anywhere, not in File Explorer, not in Disk Management, then you’re likely dealing with something more serious.
At that stage, the drive is usually in too rough of a shape to handle at home. Could be controller failure, firmware issues, or physical damage. And there’s no software fix for that.
That’s where professional recovery services come in, like Cleverfiles’ Data Recovery Center.
These labs have tools and processes you simply don’t have access to:
- They can open drives in cleanroom environments
- Work directly with internal components
- Use specialized hardware to read data from damaged media
This isn’t something you can replicate with an adapter and a laptop.
One thing to keep in mind – once you’re in this territory, every extra attempt at home can make things worse. Repeatedly plugging in a failing drive, running scans, trying different tools, it all adds stress.
If the data matters, the safer move is to stop and hand it off.
How Can You Protect Your Laptop’s Storage From Data Loss?
After going through such an adventure, how can you make sure you won’t have to deal with a similar situation in the future?
- 🧱 Never drop or bump your laptop. Especially if it’s powered on and using a prone-to-shocks HDD for storage.
- ⚡ Use a UPS when at the office or home. A UPS provides constant power and protects all connected devices from electrical spikes that could “fry” their electronics.
- 🔌 Take a “protected” plug with you when away from your “base of operations”. Like a battery-less UPS, it can protect your laptop from electrical surges.
- 💾 Back up all your data on an external HDD. Then, don’t take it with you. This way, you’ll have two versions of your precious data at two different places. Even if an inescapable physical catastrophe destroys one, the other will remain accessible.
- ☁ Keep cloud backups of your most important files. This way, you’ll have access to your files no matter your device or where you’re using it, as long as there’s Internet access.
Conclusion
As we saw, “fixing” a misbehaving laptop can sometimes be straightforward. Even when it’s impossible, though, and your laptop’s dead, there’s still a chance of saving the data you had stored there. And in many cases, you can handle this yourself. Remove the drive from the dead laptop, connect it to a working computer with the right adapter or enclosure, then see what Windows detects. If the drive opens normally, copy and paste your files to a safe location. If it doesn’t, create an image and scan it with a specialized recovery tool like Disk Drill.
Of course, it’s not always that clean. Some cases are tougher than others. A drive with file system errors is one thing. A drive that doesn’t show up anywhere is a different story. But the overall path is simple: check the laptop, remove the drive, connect it elsewhere, recover what you can, then decide whether that drive is safe to keep using. That’s the whole game.


FAQ
In many cases, yes. A “dead” laptop doesn’t always mean a dead drive. A lot of the time it’s something else – motherboard failure, display problems – while the storage itself is still fine. You can usually take the drive out, connect it to another computer, and copy your files or run recovery software.
Even if the drive has problems, recovery is still possible depending on how bad things are. Logical issues (like file system corruption) are often fixable. Physical damage is tougher, but that’s where professional recovery labs come in.
The only time recovery becomes unlikely is when the drive is severely damaged and can’t be detected at all (even by specialized tools).
So the real answer is: it depends on what actually failed, but in a lot of cases, you still have a solid chance of getting your data back.
Start with the simplest checks (power cable, battery, external monitor) just to confirm it’s actually the laptop and not something minor. If it still won’t boot, the next step is to go straight for the storage.
Take the drive out of the laptop and connect it to another computer using a USB adapter or enclosure. Once connected, check if it shows up:
- If it opens in File Explorer, copy your files like normal
- If it shows up but won’t open, use Disk Drill to get your data
- If it doesn’t show up at all, the issue is likely physical and you’ll need a recovery service
Open your laptop and check our section on how to move its storage device to another PC. Then, recover your files using a data recovery app like Disk Drill.
- After you download and install Disk Drill, run it and choose your laptop’s storage from its Disk/Device list.
- Click on Search for lost data on the bottom right, and allow Disk Drill to complete its scan for optimal results. Then, click on Review found items.
- Select the files you want back by placing a checkmark on their left and then click on Recover. Tell Disk Drill in which destination folder you want them saved, and proceed with the recovery. Soon you’ll find them there.