Your iPhone is equipped with a powerful camera which can be used to take incredible photos. Its small size in comparison to other quality digital cameras combined with the fact that your phone is, after all, your major method of communication, means you almost always are prepared to snap a photo of whatever is happening at the moment.
We are going to show you how to take good pictures using the capabilities of your iPhone’s camera.
The Basics of Taking Great iPhone Photos
Taking a photo using your iPhone is a relatively easy procedure.
Follow these simple steps to take a picture with the camera on your iPhone:
- Tap on the Camera icon on your iPhone’s display.
- Using the phone’s screen as your viewfinder, point the camera at the object you will be photographing.
- Tap the round shutter button in the display screen to take the photo.
That’s all there is to it. We did say it was easy!
In the bottom right corner of your iPhone ![]() display when in camera mode is a button that reverses the lens which the camera uses to take a picture. Tapping this button allows you to take a selfie while monitoring how will look.
display when in camera mode is a button that reverses the lens which the camera uses to take a picture. Tapping this button allows you to take a selfie while monitoring how will look.
So now you know how to take pictures with your iPhone. Through the use of some tips, we will now show you how to take good photos with your phone.
7 iPhone Photography Tips
Here are a variety of methods and tips that show you how to take better pictures with your iPhone. Since you are dealing with a quality digital camera, many of these iPhone photography tips are relevant for taking pictures using any type of digital camera.
1 Take a lot of photos
Here are a variety of methods and tips that show you how to take better pictures with your iPhone. Since you are dealing with a quality digital camera, many of these iPhone photography tips are relevant for taking pictures using any type of digital camera.
2 Use the timer button
You can set a self-timer of three to ten seconds. This allows you to set your camera in a stable location and then insert yourself into the scene to be photographed. It increases the range of selfies to extend beyond the length of your arm or selfie stick.
3 Take photos in HDR
Give yourself options by taking photos in HDR and saving the original as well. High Dynamic Range (HDR) photos enable you to see detail in overly bright or dark areas but can appear a bit strange at times. Keeping the original lets you opt for the photo that best captures the results you intended when you took the shot.
4 Employ Portrait Mode
There are a number of methods which can be used in portrait mode to enhance your photos. Here are some iPhone camera tips related to this depth of field effect that first appeared in the iPhone 7.
- Get close to your subject.
- Minimize the background to eliminate distractions.
- Employ soft, diffused lighting to create stunning photos.
5 Clean your lens
This simple step can often be overlooked when taking photos with your iPhone but can lead to much crisper and sharper images. Your iPhone does not feature a lens cover as are found on more traditional cameras, and it may have been in your pocket or other places where it could have accumulated debris on its lens. A quick cleaning can drastically improve the quality of your photos.
6 Use Burst mode
Holding down the shutter button on your iPhone’s camera takes a burst of photos. This is perfect for taking pictures where movement is involved while not quite going as far as taking a video. In your camera roll, you can use the select function to scroll through all the pictures taken in the burst and save the one you want to keep.
7 Improve the focus of your shots
Here are some tips on attaining better focus when taking photos with your iPhone.
- Always tap to focus – Don’t rely on your iPhone’s autofocus, which generally resolves to the center of the image. To control the focus, tap the screen where you want the focus to be and the iPhone will make the correct adjustments.
- Tap and hold to lock focus – After tapping to focus your subject, hold for a couple of seconds to lock the focus and prevent autofocus from intruding if anything changes in the scene.
- Maintain distance after focusing – Changing distance after tapping to focus your photo will inevitably lead to a degraded image. If the distance changes, refocus to assure yourself of getting the correct shot.
Recover Deleted Photos from an iPhone
The digital photos resident on your iPhone can be inadvertently deleted. In the case of important or once-in-a-lifetime photographs, this can be devastating. All is not lost, however, and you can attempt to recover your photos using iPhone data recovery software such as Disk Drill. We will describe the steps required to recover your iPhone’s photos with a Mac computer.
Obviously, if you have previously backed up your iPhone then you can recover the photos from your backup. We are talking about suddenly realizing that you just deleted some photos before you had the chance to make a backup.
If this happens to you, follow these steps to try to restore your precious images:
- Stop using the device immediately. This is to prevent the system from overwriting the photos that still may be resident in the phone’s storage though not visible to its operating system.
- Download Disk Drill and install it on your computer. Provide your administrator’s password when requested to allow the application to make changes to your system.
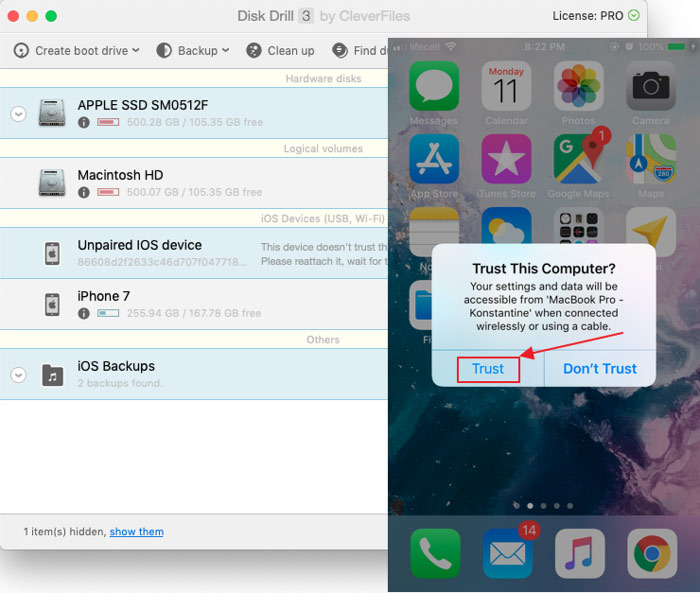
- Attach the iPhone to your computer. You may need to “trust” the computer if your phone has not been attached to it before.
- Select the iPhone from the list of disks presented by Disk Drill. Click the “Recover” button.

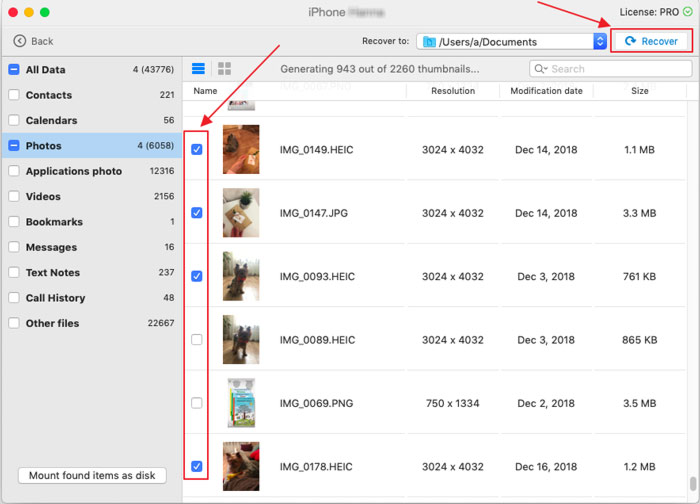
- Preview the files and photos that are available to be recovered. Click the “eye” icon next to each file to preview it.
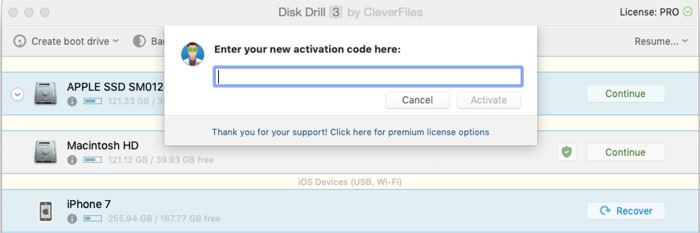
- Upgrade to Disk Drill Pro in order to recover the identified files.
- Select the files to be recovered and a storage location on your computer and click the “Recover” button.
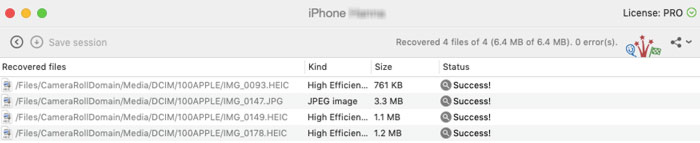
- Congratulations. Your files have been successfully recovered!

Conclusion
You are now equipped to upgrade the quality of the photos you take using your iPhone’s camera. Using the simple tips discussed above will enable you to take sharper and more compelling pictures. And if you experience an inadvertent deletion of your photos, you can use Disk Drill’s data recovery software to restore your images.