You tried to access the same file you were checking out half an hour ago, but nope, it’s not possible this time. Or, at least, that’s what it looks like, as the files you needed suddenly appear corrupted.
The apps you were using to “open” them don’t “recognize” them anymore. Maybe even their filename looks garbled. Thankfully, there’s hope.
How can files become corrupted?
There are many reasons your files might end up appearing as corrupted. Some of the most common ones are:
- 💀 Program crash: Use only stable versions of trusted apps.
- ☠️ System crash: Use only stable versions of genuine drivers for your hardware. Avoid installing the latest ones on their day of release, as well as “unofficial”, “tweaked”, or “hacked” drivers.
- ⚡ Unexpected power loss: Use a “smart” UPS that can both power your PC and instruct it to shut down automatically at the first hint of power loss.
- 🔨 Physical damage: If your storage device is physically damaged, the data stored on it might appear corrupted.
In all cases, your files can become corrupted after a writing process is interrupted. And unfortunately, our modern operating systems and software write on our storage devices almost every second. At least on the primary or active ones.
Thus, file corruption is an inevitable part of using tech, and at some point in time, you’ll probably need one of the solutions we’ll see next.
Can you recover corrupted files?
Being unable to open a file that was perfectly accessible earlier can be frustrating. Still, the situation doesn’t have to be a disaster. At least, not always. Before deeming your files forever lost, it’s worth trying the following potential solutions.
Method 1 Get your files back with Disk Drill
Disk Drill is one of the best solutions for dealing with corrupted storage devices. Most people use it when a volume is inaccessible, either by appearing as empty space or RAW.
The process goes as follows:
- Download Disk Drill from its official site, install, and run it.
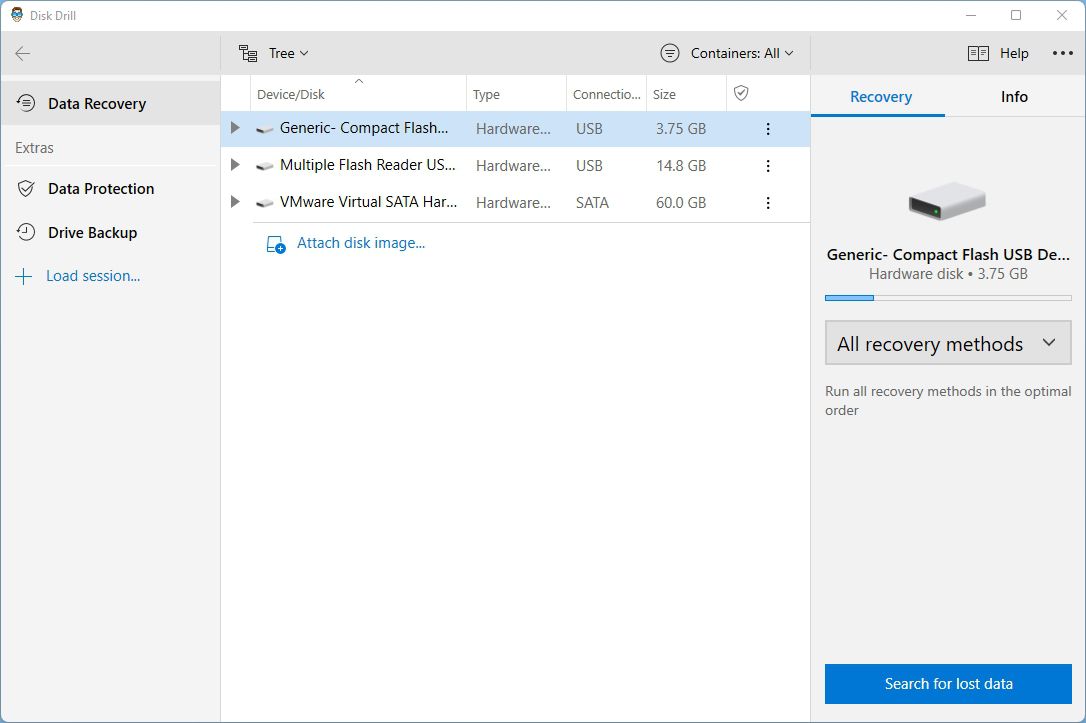
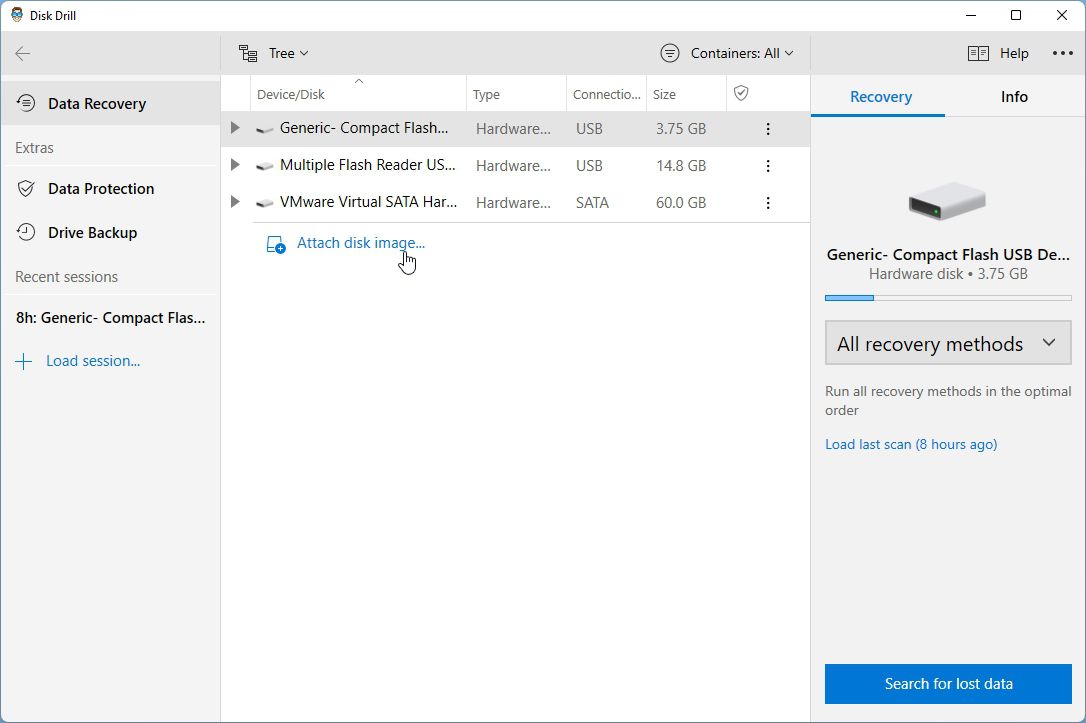
- Choose the device where your corrupted files are stored from Disk Drill’s Device/Disk list. Then, click on Search for lost data.
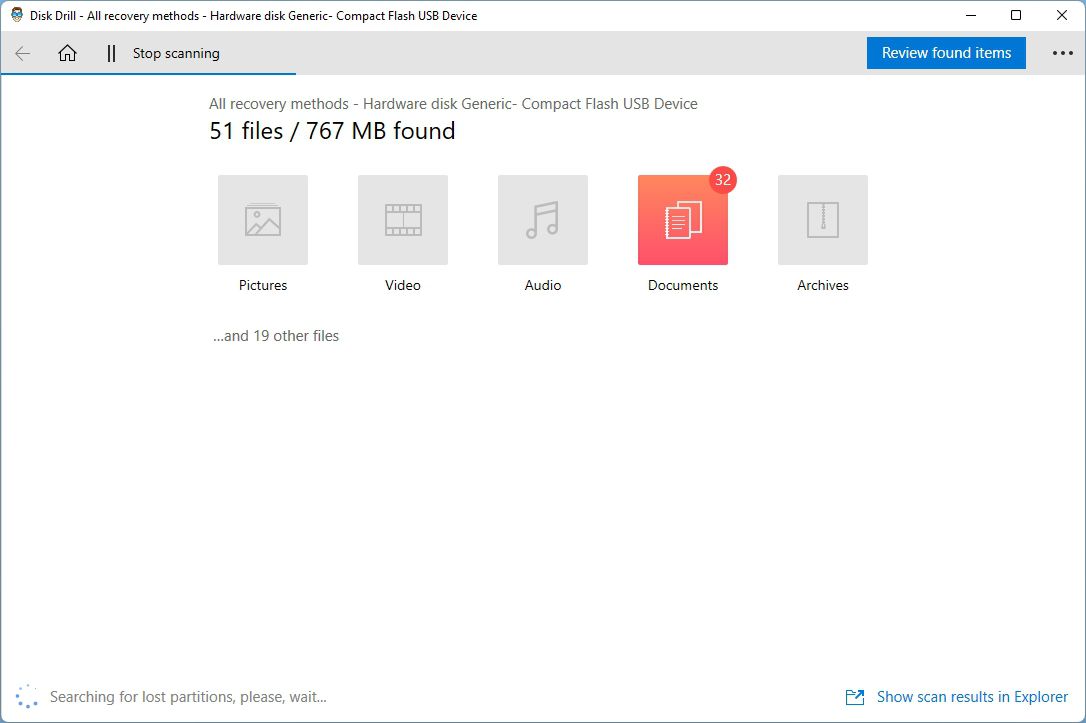
- Let Disk Drill scan your device. You can check the files it’s already scanned by clicking on Review found items on the top right. However, for optimal results, we suggest you let the scan complete.
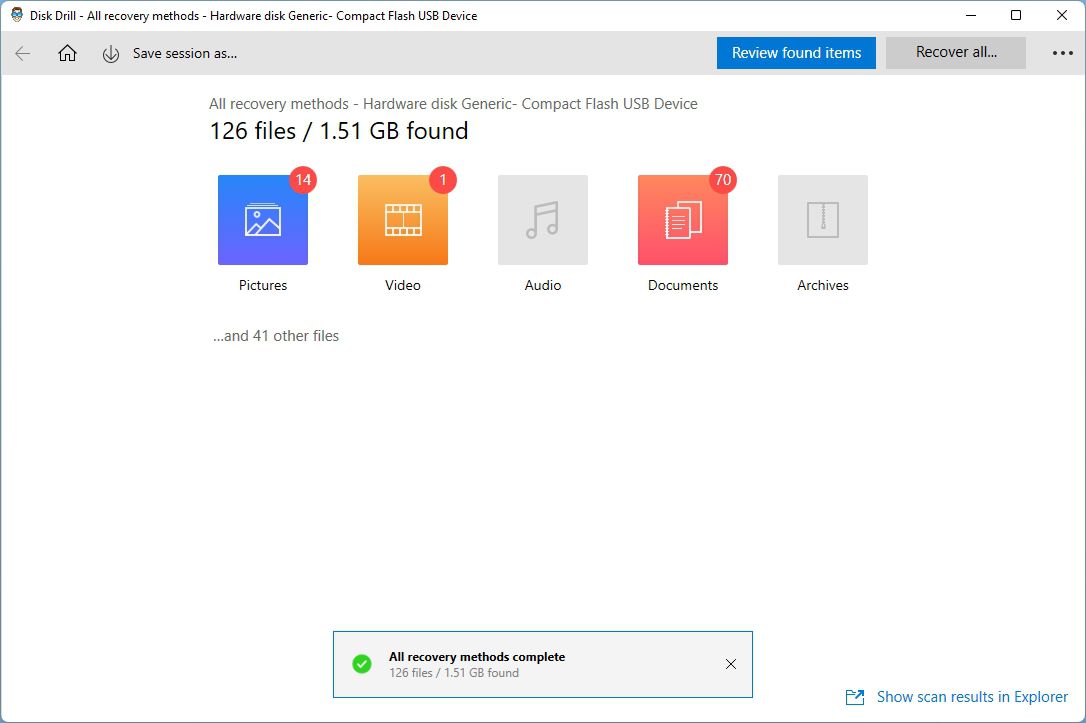
- When Disk Drill’s scan completes, click on Review found items.
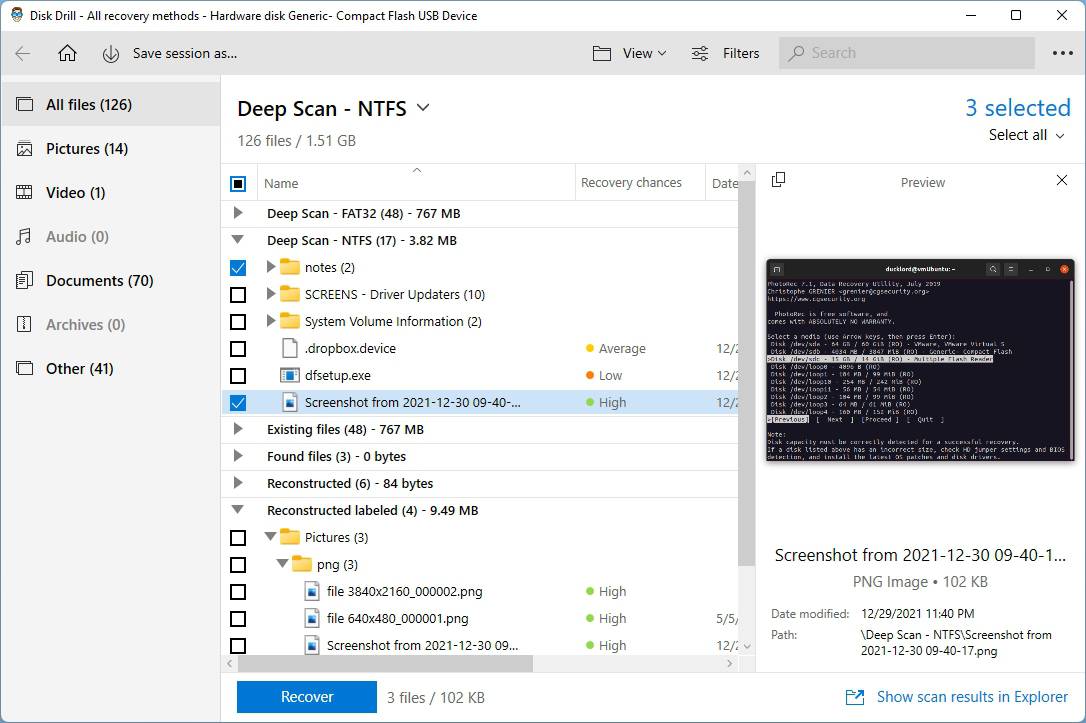
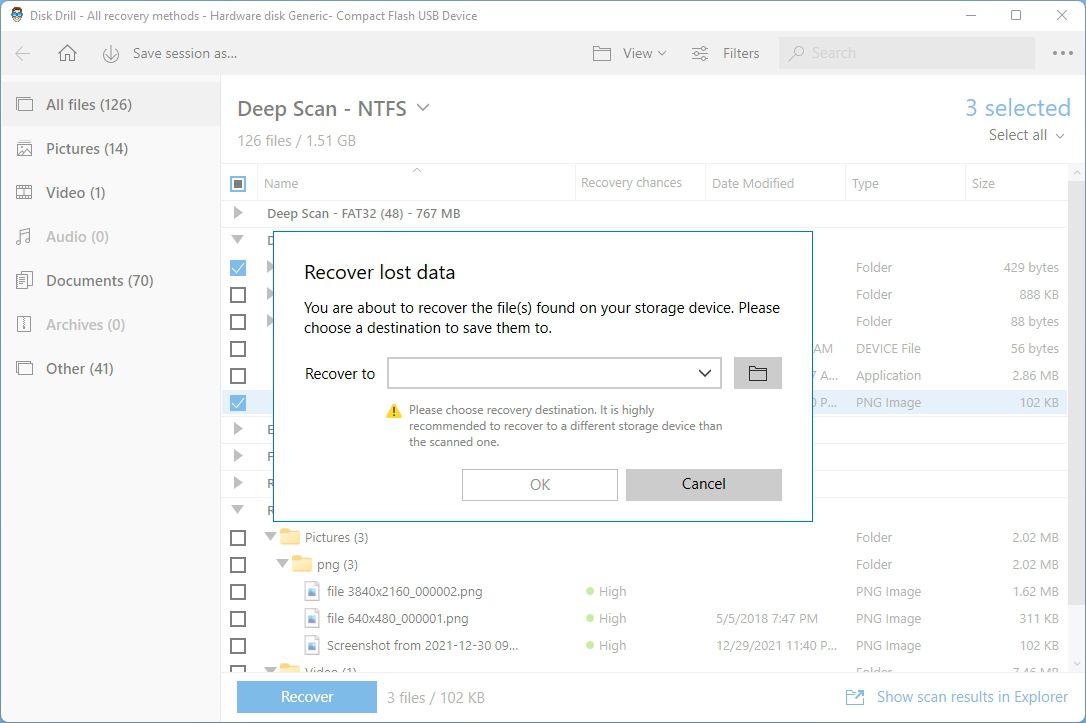
- Choose the files you want to recover by marking them with a checkmark on their left. Then, click on Recover.
- Choose the destination path for the recovered files. It’s best to choose a different storage device than the one from where you’re recovering data.
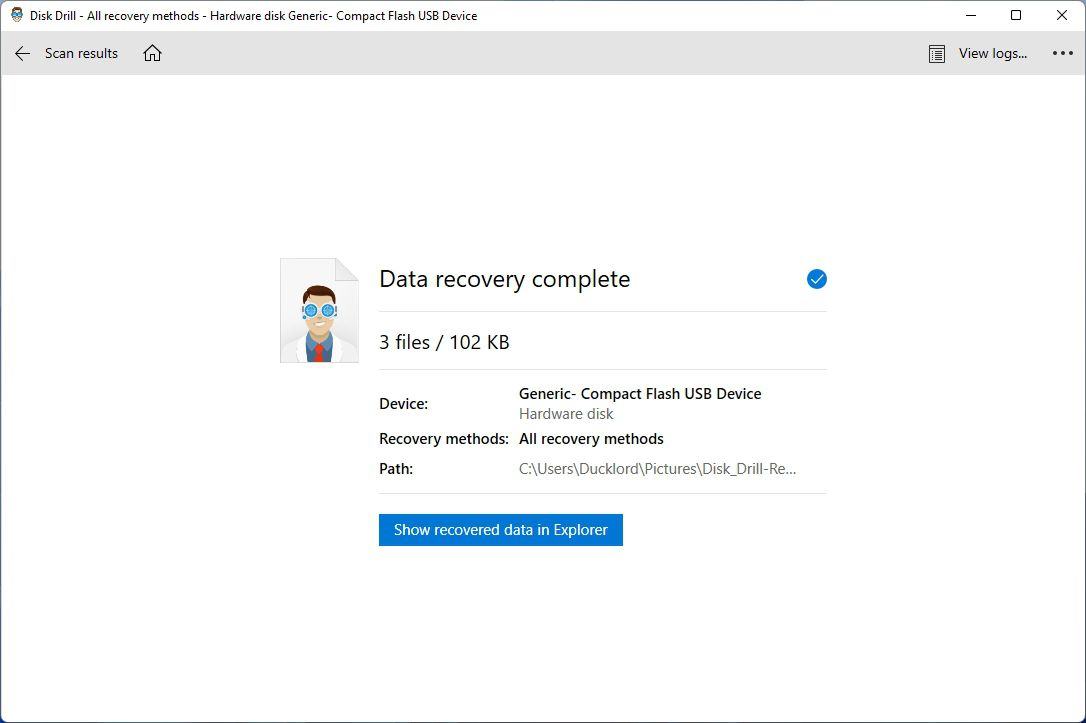
- When Disk Drill’s data recovery completes, click on Show recovered data in Explorer to check your recovered files in the default file browser.

Method 2 Make your files accessible with CHKDSK
Checkdisk is still better-known with its MS-DOS-era filename, CHKDSK. It’s a classic app, accompanying Windows for ages, specializing in checking and repairing corrupted disks. Thus, when dealing with a corrupted volume, it can render accessible again some of the files that appeared corrupted.
However, whereas Disk Drill would try to save all your lost files from a device, CHKDSK doesn’t care about them: it’s a tool for fixing whole volumes, not individual files. That’s why some of your precious files may become inaccessible forever after using CHKDSK.
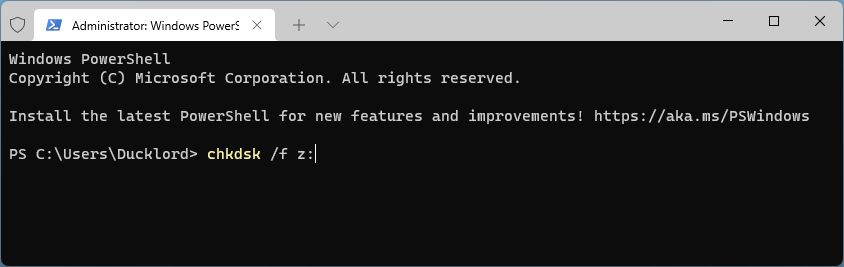
To repair the corrupted volume with the letter Z using CHKDSK:
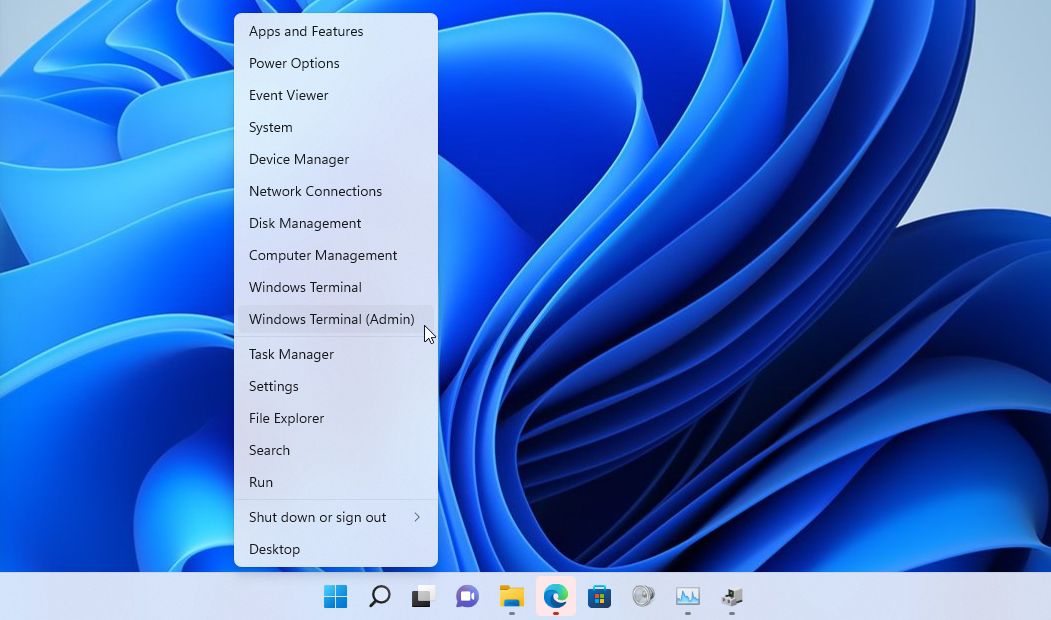
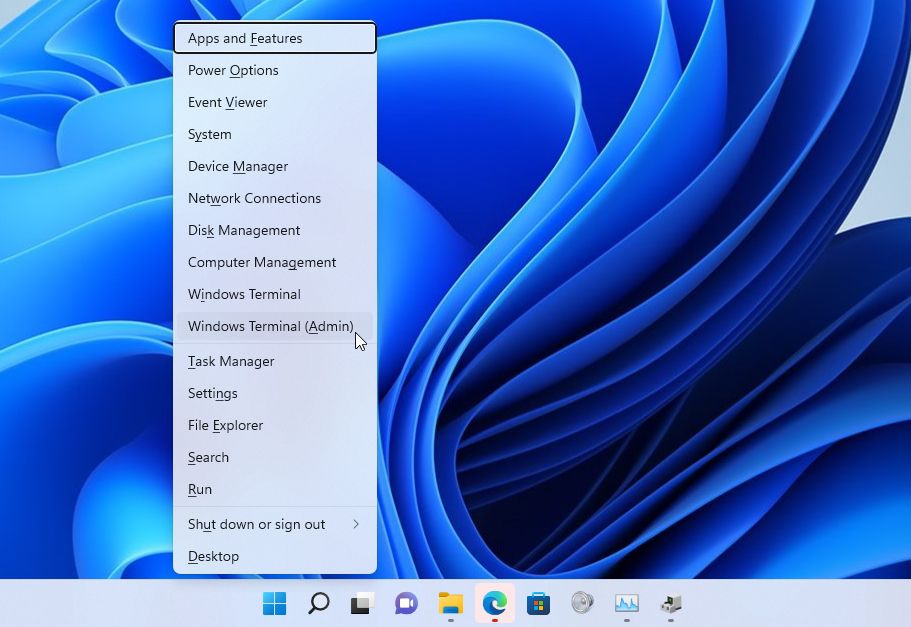
- Run an elevated Command Prompt – the quickest way is by pressing Windows Key + X and choosing Windows Terminal (Admin).
- Type chkdsk /f z: to run a scan on the file system level. This might render some of your files accessible again but won’t repair actual problems on the storage device. For that, you can use chkdsk /r z:. Note that this process can take significantly longer since it scans the whole storage for errors.
Method 3 Fix your storage device through Windows Explorer
There’s an easier way to perform the equivalent of CHKDSK’s checks without typing: use the mouse-friendly File Explorer.
- Fire up the Windows File Explorer. Either click on its icon on the taskbar or seek it in the Start menu. However, it’s quicker if you press Windows Key + E.
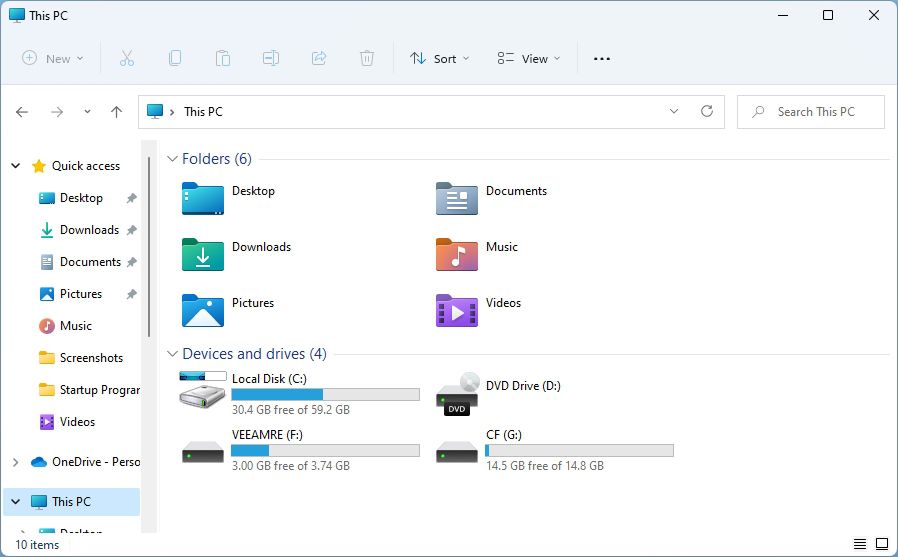
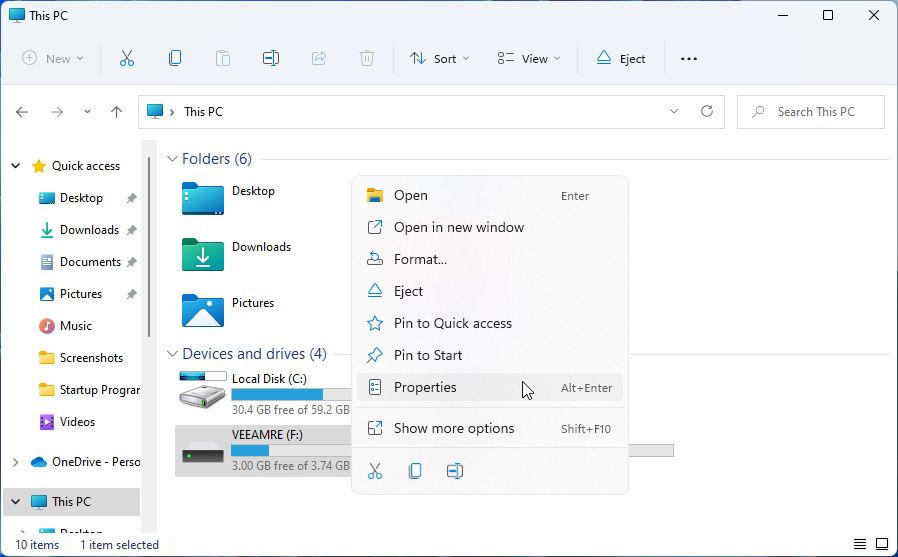
- Choose This PC from the list on the left. Right-click on the device you want to scan and choose Properties from the menu.
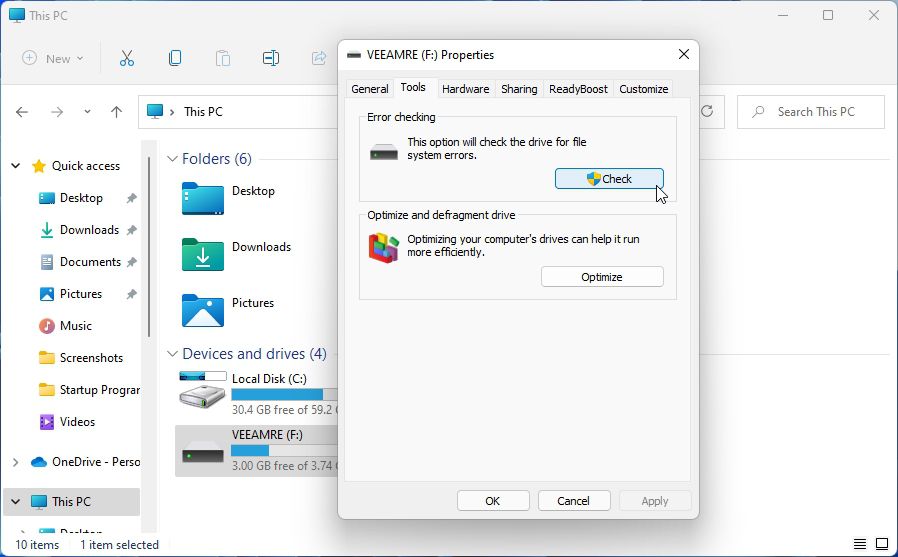
- Move to the Tools tab and click on the Check button.
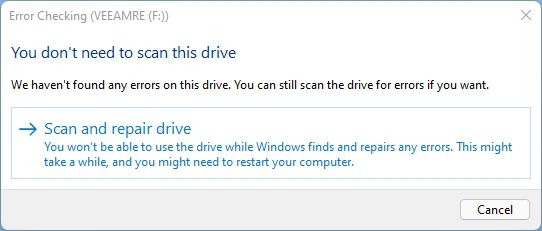
- Choose Scan and repair drive. Soon after, your drive should be “fixed”, and most of your files accessible again.
Method 4 Fish your files out of a backup
If you were using a file backup solution, you can individually restore previous versions of your corrupted files. What if you have a full volume backup, though? Does that mean you’ll have to fully erase the whole storage device to get back a handful of files? That could lead to further data loss! Thankfully the answer’s a friendly “nope”!
Even if that’s not an option, many apps that create such backups allow you to access them from within the app itself. For example, Disk Drill allows you to take byte-for-byte backups of volumes. If you have one that contains “good” versions of your corrupted files, you can recover them from within it.
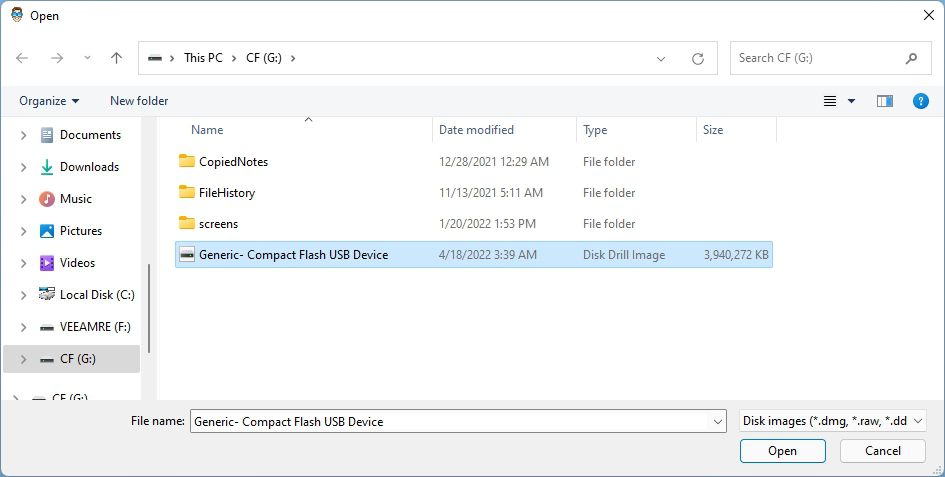
- Run Disk Drill and click on the Attach disk image link at the end of the device list.
- Point Disk Drill to your byte-for-byte full volume backup file.
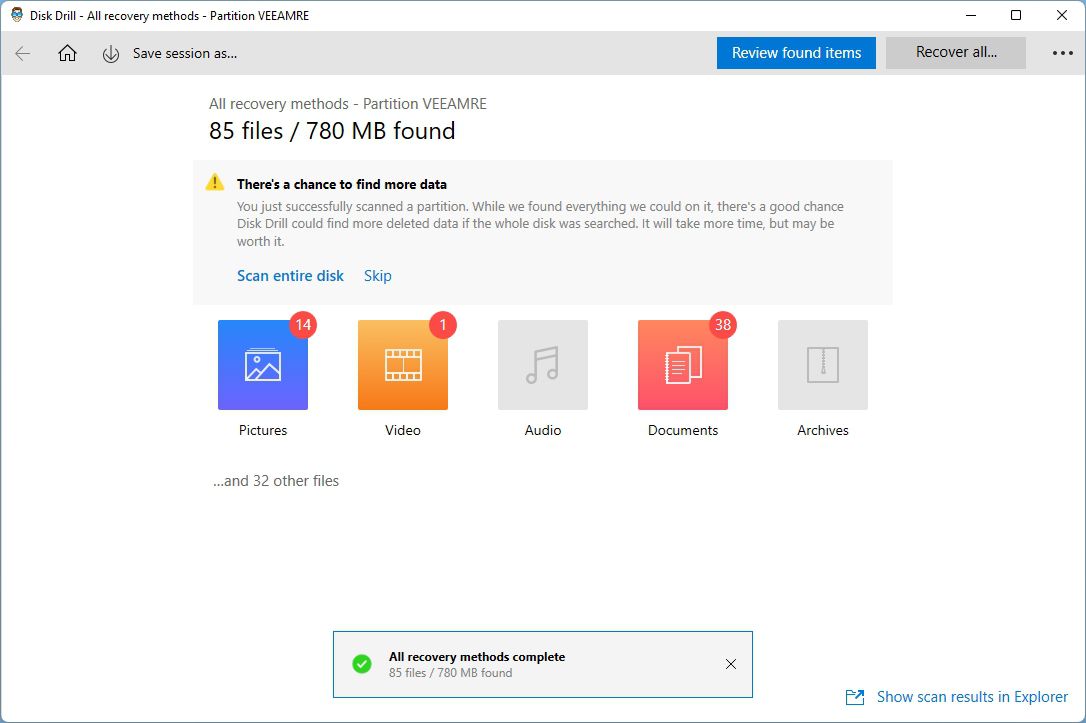
- Choose the mounted image (as stated in the Type column). Then, start a scanning process by clicking on Search for lost data.

- Proceed as we saw above, like a typical Disk Drill data recovery process. Soon you’ll have back non-corrupted versions of your files “recovered” from your mounted byte-for-byte backup.
Method 5 Restore pristine versions of your corrupted files
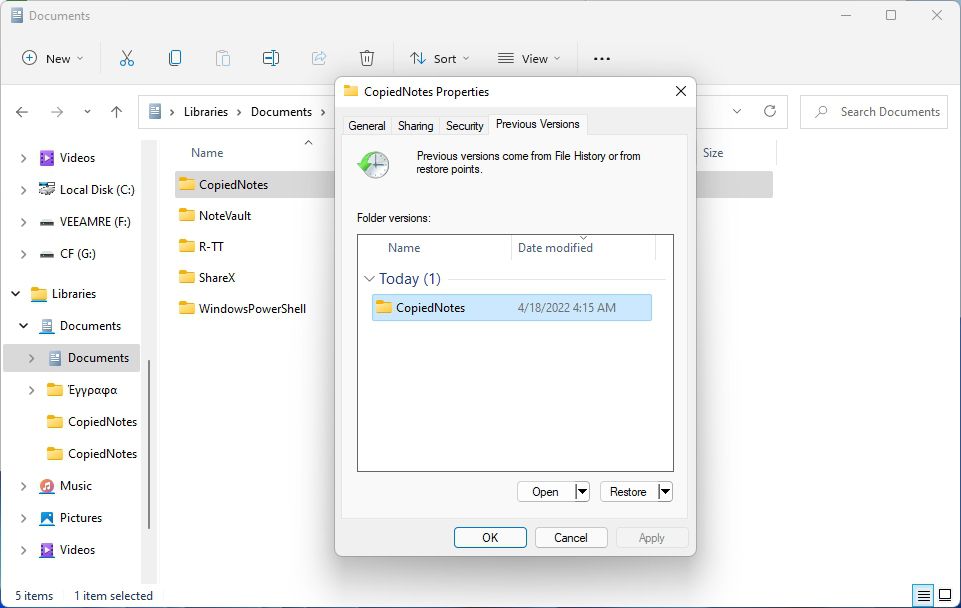
If you were using File History and your corrupted files were included in its folders, you can recover them from there. The quickest way to do that is through File Explorer.
- Run File Explorer – the quickest way is with the Windows Key + E key-combo. Then, locate your corrupted files, or the folder were they were stored. Right-click on it and choose Properties.
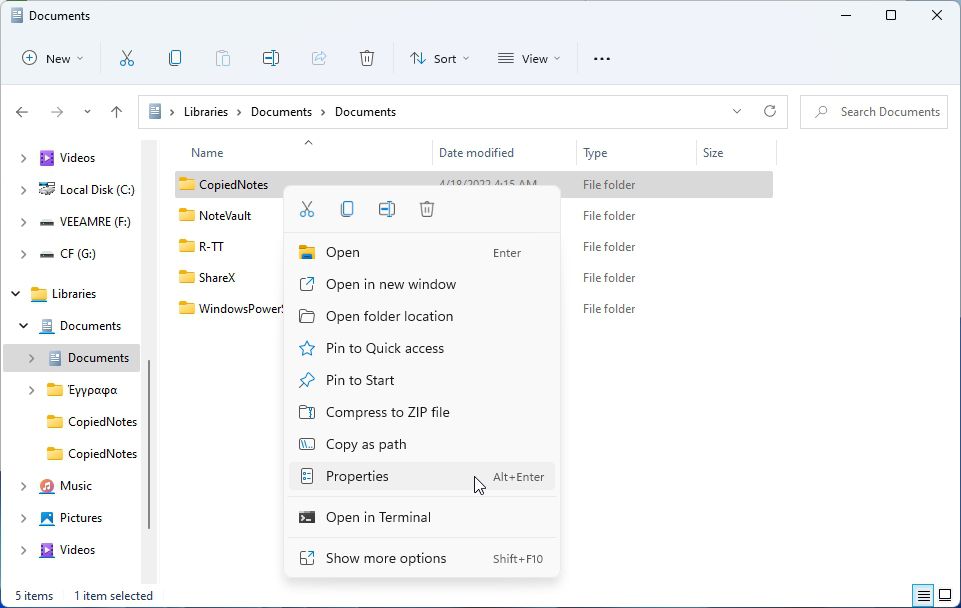
- Move to the Previous Versions tab, and you’ll see a list of all available backups of the selected file or folder. Choose the version of your content you want to get back and click on Restore. Note that you can see only a single entry as an example in our screenshot.
How to Repair or Fix Corrupted Files in Windows
Even if you don’t have a backup available, there’s an alternative: you could try to fix the corrupted files.
Although that’s not always possible, there are many potential solutions. One of the following could work for you.
Fix corrupted Windows files with DISM and SFC
When the corrupted files belong to the OS itself, you should avoid doing anything that could cause any instability. Instead, take advantage of the fact you still have access to your OS to try to fix any problematic files. Thankfully, that’s easy with modern versions of Windows, thanks to two tools that accompany the OS: the Deployment Image Servicing and Management, and the System File Checker. Or DISM and SFC for short.
- DISM downloads the latest Windows “image” that’s best for the version you already have installed.
- SFC checks all system files and replaces those it recognizes as corrupted with original “untainted” versions.
Both are command-line tools, but they’re pretty straightforward to use. For DISM..:
- Launch an elevated Command Prompt from where you’ll use the DISM and SFC tools. The quickest path to it is by pressing Windows Key + X and choosing Windows Terminal (Admin).
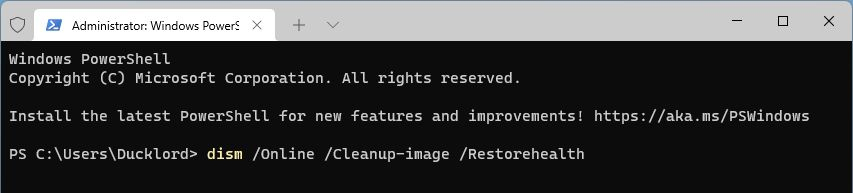
- Use the following command to have the DISM tool download the best version of the proper Windows cleanup image available online: DISM.exe /Online /Cleanup-image /Restorehealth.
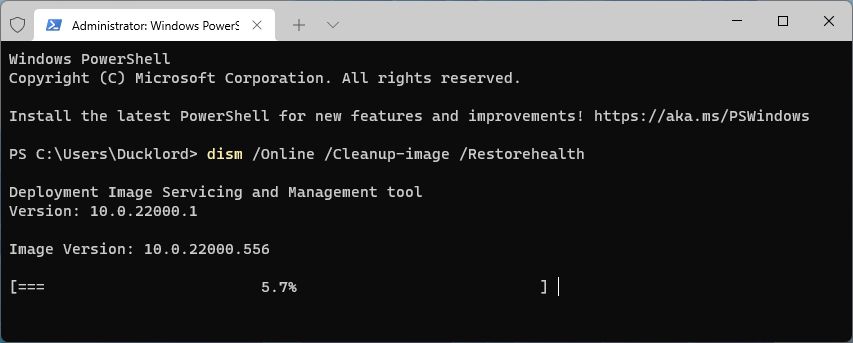
- Give DISM some time to download the image. It’s smart enough to report any problems it meets. It can’t tell if you don’t have online access or it’s blocked from your firewall, though. Thus, you should ensure it’s allowed to “pass through” your firewall.
After DISM, proceed with SFC:
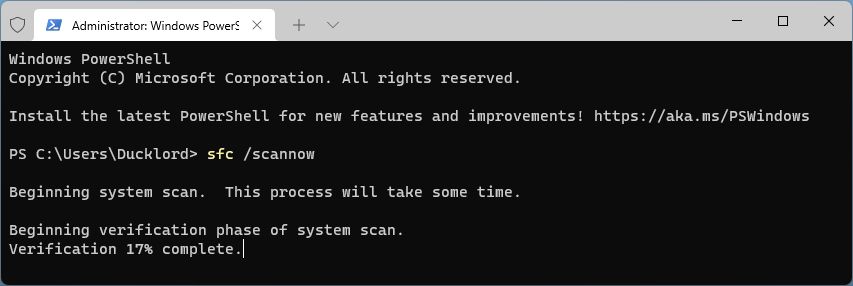
- Type the command sfc /scannow and press Enter to have SFC scan the operating system files’ integrity.
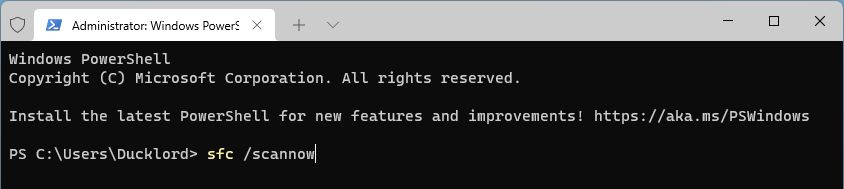
- The process will need some time to complete. It depends on the speed and condition of the storage device and, up to a point, your PC’s CPU. You should not interrupt the process, for that could lead to further corruption.
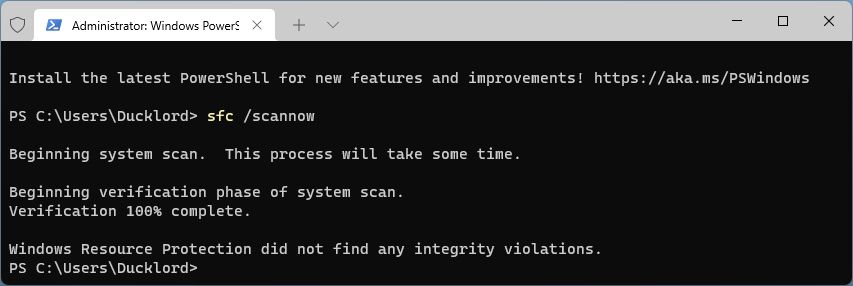
- When SFC completes its scan, it will inform you about any tweaks it performed or, as in our case, if it didn’t find any integrity violations.
Fix an unbootable Window installation’s files with SFC and DISM
Have the corrupted files rendered your Windows installation useless? Are you stuck “outside” your desktop? Maybe the same DISM and SFC tools we saw above can help.
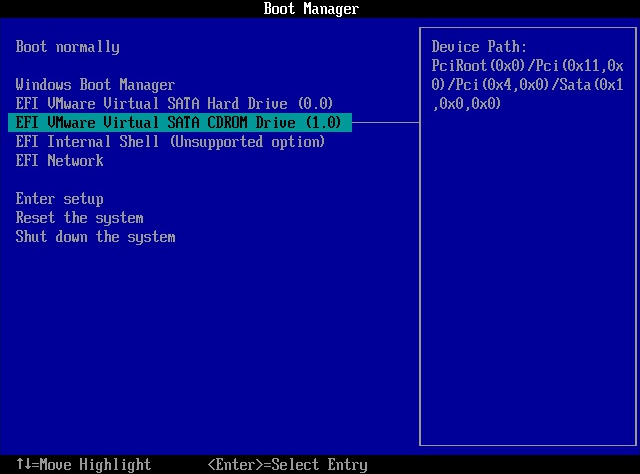
- Boot your computer from the Windows installation media. On many PCs you can enter the boot selection menu by pressing Esc, F1, F2, F8, F10, or F11 during the computer’s initial startup. The key varies between motherboards. Thus, you’ll have to consult your own motherboard’s manual on how to do it.
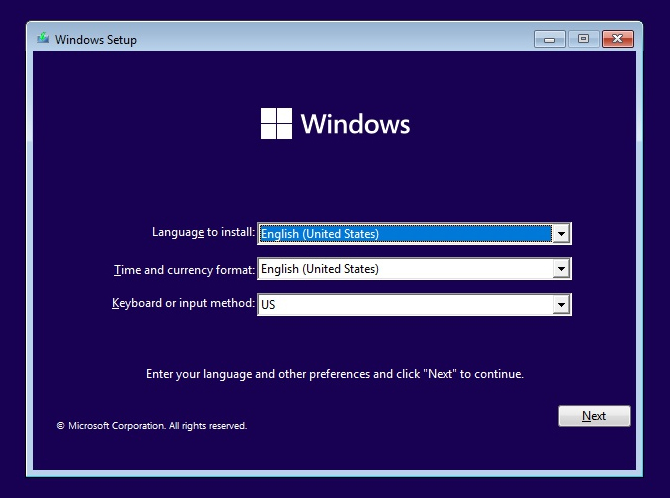
- When the Windows installer loads, choose the installation Language, Time and currency format, and Keyboard or input method. Click on Next as if you were going to reinstall Windows from scratch.
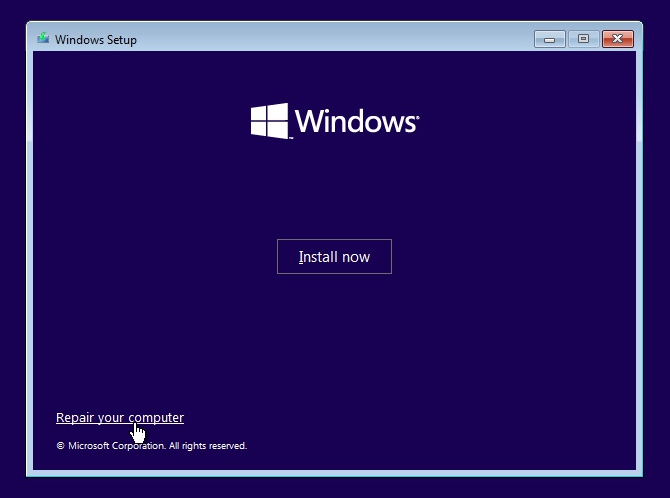
- However, don’t click on Install now on the next screen. Instead, go for the smaller Repair your computer link on the bottom left of the Windows Setup window.
- When the repair options show up, click on Troubleshoot. Then, from the options within it, choose Command Prompt. Alternatively, you can press the Shift + F10 shortcut to launch a new command prompt instance at anytime.

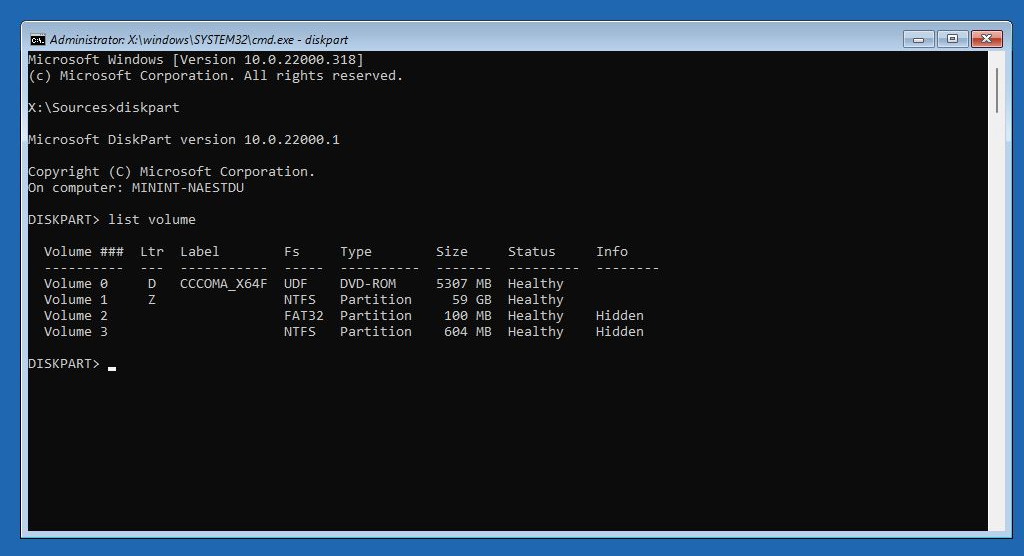
- Use the commands diskpart and then list volume to see a list of all accessible storage devices and their partitions.

- Note the letters for your partitions on the Ltr column. Their capacities under the Size column will help you tell them apart. Note down the volume number and letter of three volumes: the small boot partition, the one where Windows is installed, and the mounted installation media. If they all already have assigned letters, skip to step 11.
- If the boot and Windows partitions don’t have letters assigned, use the select volume X command to select them one after the other. Replace X with their number. Then, use the asign letter Z command to, as it states, assign a letter to each of them, from which you’ll be able to access their contents.

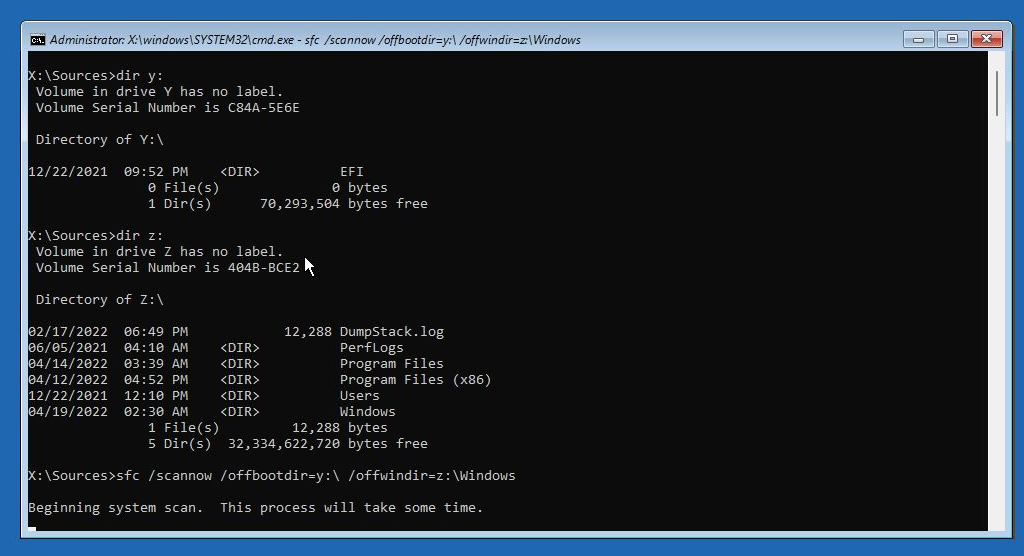
- Use the dir X: command to ensure you’ve mounted the correct volumes by checking their contents. Replace “X” with the letters you assigned to your volumes.
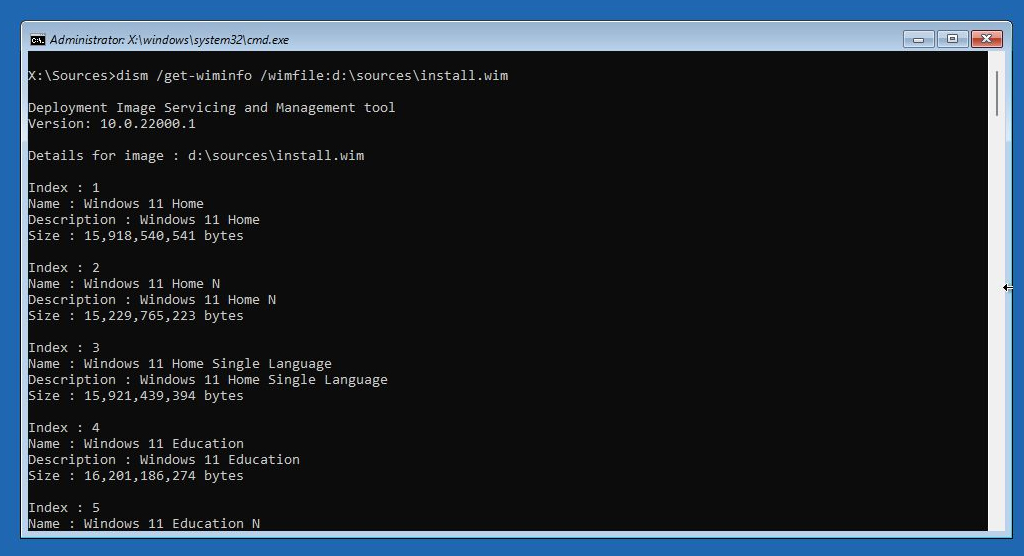
- For typical Windows 11 (and 10) installation media, use the command dism /get-wiminfo /wimfile:DRIVELETTER:\sources\install.wim to check the contents of the base installation image. Usually, it will contain multiple versions of Windows (Home, Education, Pro, etc.). Note the Index number of the one you’re using.
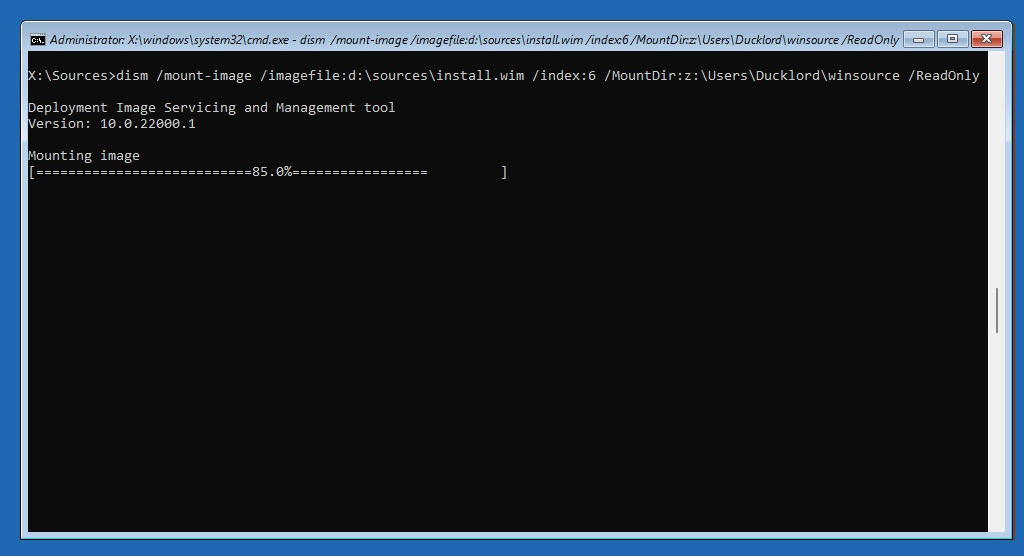
- Create a directory on any of your volumes using the mkdir command. We created one under our user account, on the Windows volume, with mkdir z:\Users\Ducklord\winsource. “z” was the letter we assigned to the Windows volume, “\Users\Ducklord” was the path to our user account, and “winsource” was the name of the new folder. Then, mount the installation image with dism /mount-image /imagefile:LETTER_OF_MOUNTED_INSTALLATION_MEDIA:\sources\install.wim /index:INDEX_NUMBER_OF_YOUR_WINDOWS_VERSION /MountDir:FULL_PATH_TO_MOUNTED_INSTALLATION_IMAGE /ReadOnly. In our case, the command was dism /mount-image /imagefile:d:\sources\install.wim /index:6 /MountDir:z:\Users\Ducklord\winsource /Readonly.
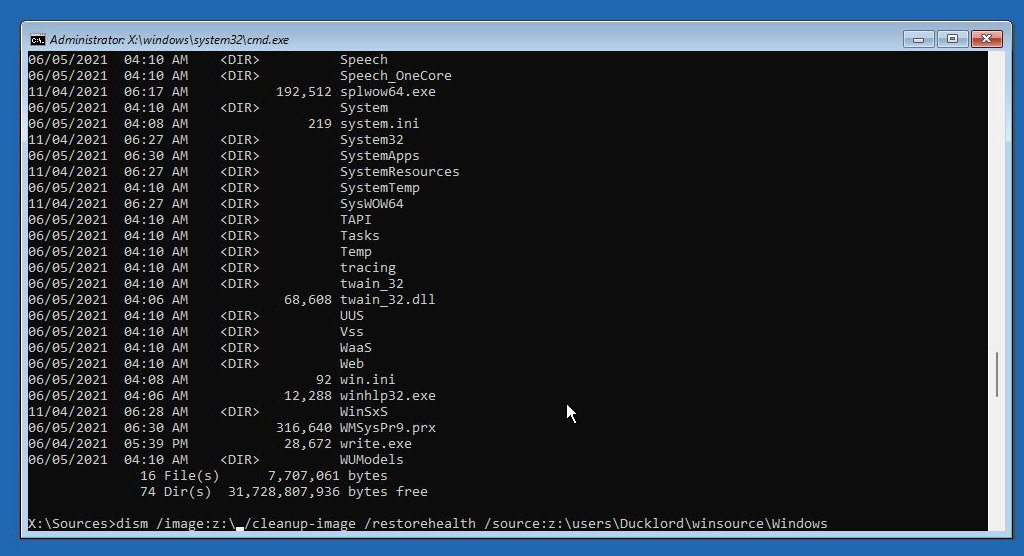
- Scan your Windows installation with dism /image:LETTER_OF_MOUNTED_WINDOWS_INSTALLATION:\ /cleanup-image /restorehealth /source:FULL_PATH_TO_MOUNTED_INSTALLATION_IMAGE\Windows. Our command was: dism /image:z:\ /cleanup-image /restorehealth /source:z:\users\Ducklord\winsource\Windows.
- After DISM, it’s time to turn your attention to SFC. Unleash it on your volumes with sfc /scannow /offbootdir=Y:\ /offwindir=Z:\Windows. In this example, “Y” is the letter of your boot partition, and Z is the letter for the partition with your Windows installation. Note that you might run into a little problem: an error about “Windows Resource Protection” might pop up.
- If such an error appears, use net start trustedinstaller to start the needed module. Then retry SFC – this time, it should work without a hitch.

Don’t proceed with the Windows installation after both DISM and SFC scan your volumes and possibly replace some files. Instead, go back through the installer’s options until you find an option to either proceed to a normal boot or reboot your computer.
Revert Windows and its files with a System Reset
The closest equivalent to a nuke button before a full format is the option to Reset your PC. It’s pretty drastic but also one of the easiest ways to “uncorrupt” a Windows installation.
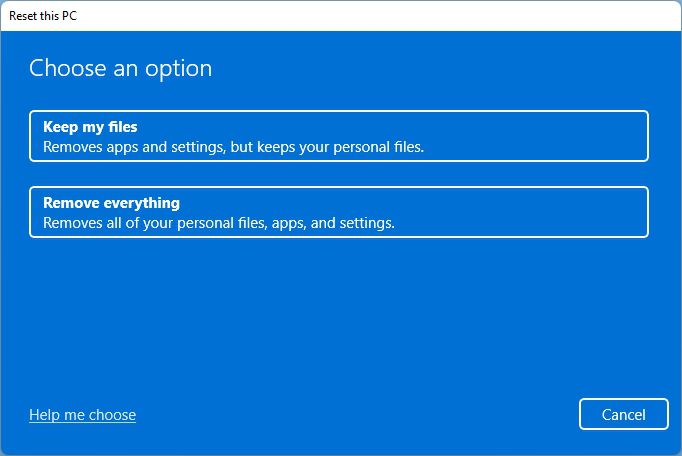
The “Reset this PC” option offers two paths. One allows you to keep your existing data files. The other eliminates any trace you’ve been using your computer and starts anew.
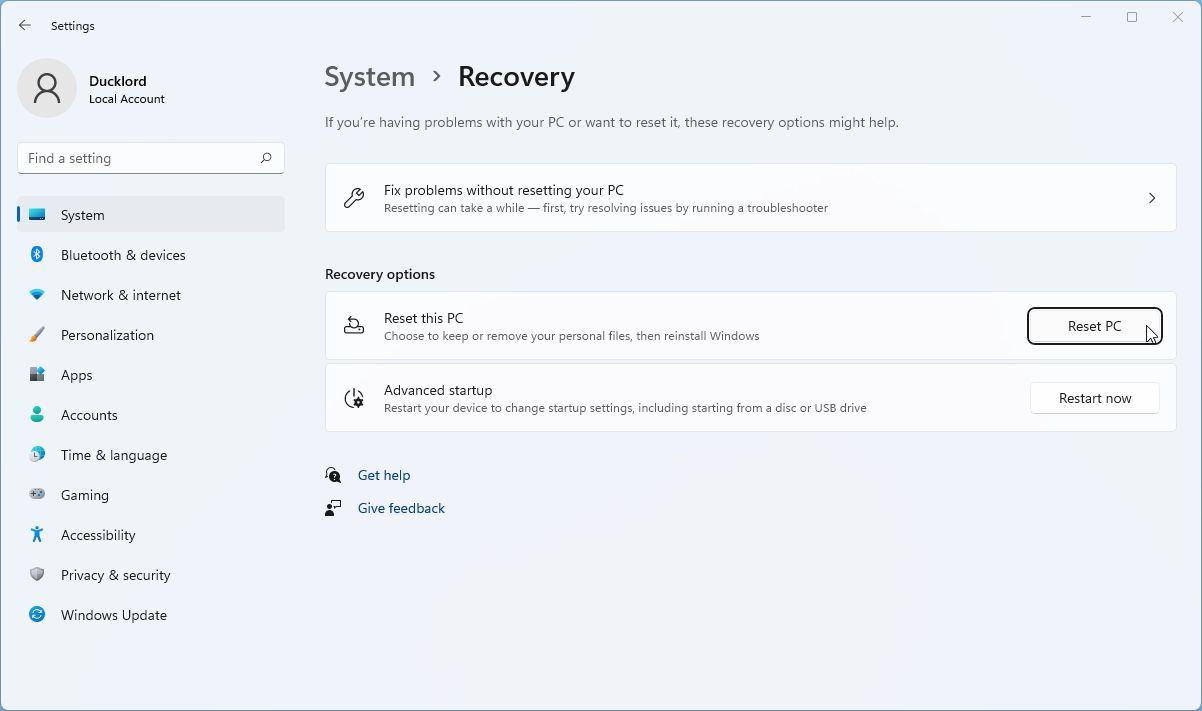
- Open the Start menu and use its search functionality to seek “reset this PC”. Open the entry when you locate it.
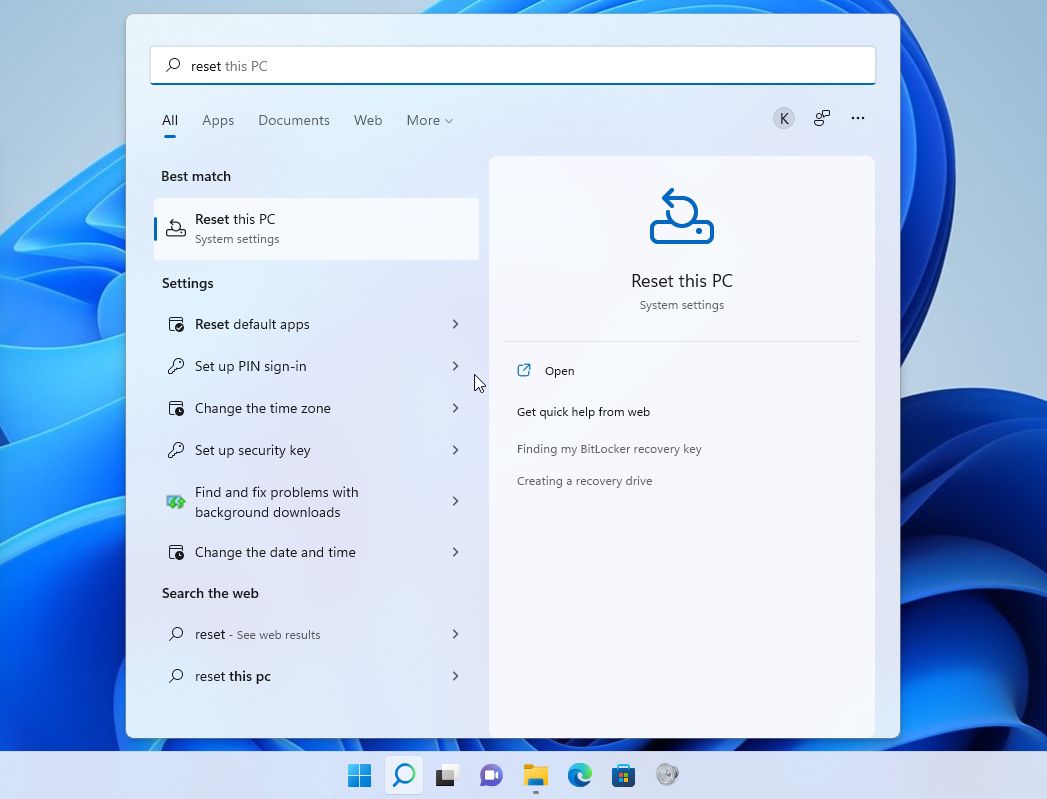
- When at the System > Recovery window, click on the Reset PC button on the right, under Recovery options.
- A new window will show up with the classic blue-is-for-problems as its vivid background. It’s designed to pop out for a reason: if you go on with this process, your PC will return to the equivalent of a blank slate. Please ensure you have backups of all of your important data before proceeding. Even if you choose the option Keep my files, but especially if you go for Remove everything.
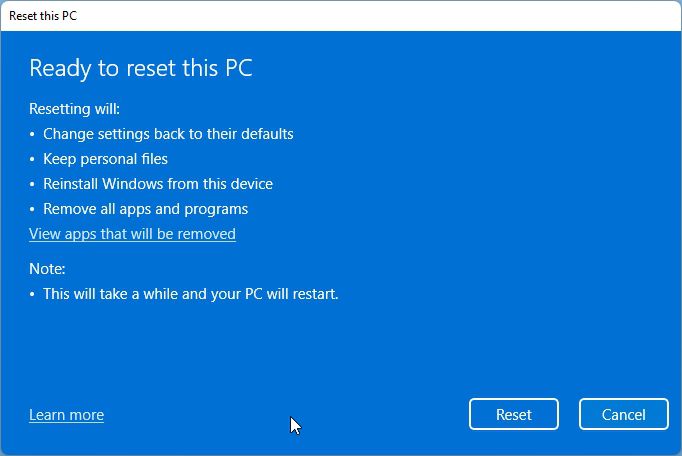
- The next step offers the option to Change settings of the process, but feel free to skip that bit.

- Finally, you’ll see a summary of what will happen after resetting your PC. Click on Reset if you’re sure you want to proceed.
Access what remains with corrupted-file-friendly tools
Many programs refuse to “deal” with any file with the slightest hint of corruption. But not all. Some support accessing corrupted and incomplete files.
Thus, even if you don’t manage to get back your files in pristine condition, you can try accessing them with such software. Here are some of the more fault-tolerant apps worth trying out, depending on the type of the files you want to access:
- Notepad++: Text and Markdown documents, “coding” formats (from HTML to Python).
- VLC: Most types of media (audio/video files).
- VirtualDub: AVI, MP4, and MKV videos.
- Audacity: Most types of audio files (from WAV to MP3).
- XnView: Most types of image files (from JPGs to TIFFs).
- LibreOffice: Office file formats (Doc, XLS, etc.)
Trust a professional data repair service

Did you try everything but still can’t access your corrupted files? There’s a final possible solution for getting your precious data back: turning to a professional data repair service.
So, if your attempts at data recovery were fruitless or you don’t want to invest the time and effort, it’s worth contacting them.
How can you prevent your files from getting corrupted?
You might have dealt successfully with a severe case of file corruption this time, but how can you ensure it won’t happen again in the future? The following tips could help you minimize the chances data corruption shows up again.
- 🔋 Never abruptly power off your PC. Always shut it down from the respective option in Windows (or any other OS you’re using).
- ⌚ If a shutdown process takes too long, give it up to two hours. The OS may be updating crucial files. After at least that amount of time, press the power button on its chassis once to send another power-off signal. Cut the power only after giving it another five to ten minutes.
- 👎 Never forcefully remove any storage device. Always use any option to “disconnect it”, “eject it”, or “disable it” through the operating system.
- 💾 Mechanical HDDs don’t like staying dormant for long periods. If you use them for long-term backup, power them on and access their contents at least once per month. It works as “exercise” for their mechanical parts (motor, ball bearings, etc.).
- 💾 Also, remember that mechanical HDDs are more prone to physical damage. Even a tiny drop can harm their fragile internals.
- 💻 All SSDs come equipped with batteries, but they, too, shouldn’t be left for years stuck in a drawer. Connect and power them on occasionally.
- 💻 SSDs also come with a limited amount of writes. Theoretically, they can still last longer than most mechanical HDDs despite that restriction. Practically it would be better if you didn’t actively try to wear them down. Avoid needless writes and rewrites on them. Use a secondary mechanical HDD for temporary files, cache, downloads, or even the OS’s swap and hibernation files.
- 📦 Keep your removable storage devices in good condition. Don’t get your USB flash drives or SD cards wet or leave them exposed to direct sunlight for hours. Carry them in cases and avoid having their connectors exposed in any way that could lead to wear (like carrying unprotected SD cards in your pocket with keys and coins).
- 👓 Use software like HD Sentinel to monitor your drives’ SMART condition. It can detect upcoming problems and alert you about them, and offer estimates on each device’s “health level”.
Conclusion
As we saw, there’s no reason to despair at the first hint of data corruption.
- You have various solutions that can attempt to “fix” your files or bring back uncorrupted versions from their past.
- Tools built in modern OSes can deal with system-file corruption and restore the operating system to its former glory.
- Third-party tools can assist further in recovering damaged files.
- Versatile software designed with support for incomplete or damaged files, like VLC player or LibreOffice, may still allow you to access the chunks you manage to recover.
- When nothing else works, data recovery experts may be able to assist.
Quite probably, you’ll soon have your files back and forget about this little adventure. Add our tips on how to avoid such mishaps in the future, and this may be the last time you had to deal with corrupted files.

FAQ
Yes, but the way to do it depends on the particular case of corruption and your personal preferences on how to deal with it.
If it’s the OS’s files that are corrupted, you can use the tools that come with it to deal with such issues. If the problem expands to the whole device, like when everything appears garbled because of file system corruption, CHKDSK or its File Explorer-accessible and mouse-friendlier version can help.
Is it your own files that are gone, like documents, photos, videos, etc.? You can use software like Disk Drill to recover them from a failing storage device.
Usually, it’s because of two possible reasons: either a write process on the storage device was interrupted, damaging its file system, or the device itself is failing.
There’s no single solution for every case of file corruption. There are many ways to fix corrupted data. The one you choose depends on your particular case of data loss and personal preferences.
Some of the possible solutions are:
- Use tools that accompany Windows if it’s the OS’s files that are corrupted.
- CHKDSK in the command line and the Check Disk tool through File Explorer can locate and repair damage on a storage device’s file system.
- Specialized data recovery software, like Disk Drill, can bring back lost files from the brink.
- Third-party tools, like HD Sentinel, can alert you about a failing drive before its contents get corrupted, giving you time to back them up.