Apple’s MacBooks have some of the fastest and most reliable storage that you can get these days. With these benefits, there are drawbacks though. The storage can’t be upgraded once you have purchased your computer. l which can cause issues when it comes to us always having free space available to us.
This can cause a problem if you end up storing more things on your Mac than you thought that you would. Macs are generally very reliable computers that you will use for years and purchasing a new computer isn’t the best choice when it comes to this issue due to cost.
In this article, we’re going to talk about how to free up space on your Mac. First, let’s take a look at how to check and see how much storage we’re using and how much our Mac has to begin with.
How to Check How Much Storage Is Available on Your Mac
Everything that you save to your Mac is stored on the solid-state hard drive inside of your computer. Let’s take a look at the available disk space on your machine as a full hard drive could cause issues when saving new files and it could also cause slowdowns.
- Click the Apple logo in the upper left-hand corner of the screen.
- Click on About This Mac.

- Select the Storage tab.
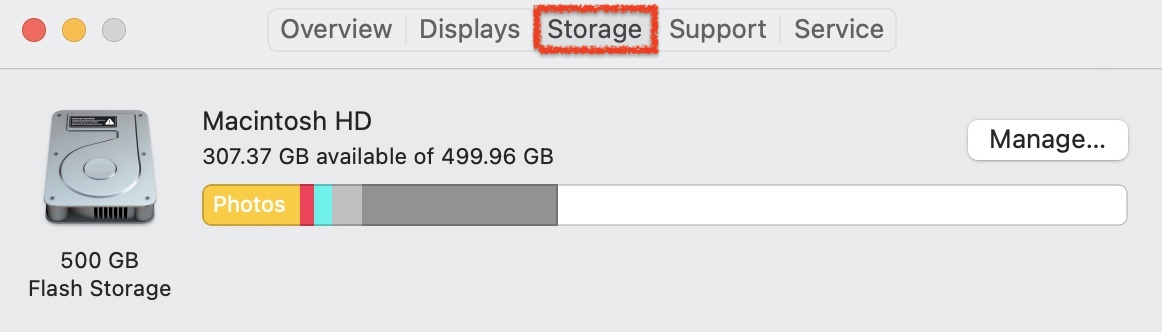
You can see here that I have a 500 GB hard drive built into my MacBook Pro. Out of the 500 GBs of MacBook storage, I have 307.37 GBs available for use.
When looking at my storage, it is color-coded and you can hover your mouse cursor over the sections to see what they stand for. Sometimes they can be quite vague, but this gives you a rough idea of what is taking up space on your Mac.
How Does Full Storage Affect Your Mac
When your Mac hard drive is full, there are a couple of things that happen.
- 💾 First off, you can’t save new data to your hard drive which can be frustrating as we save more things than we think that we do. We’re constantly creating and downloading content onto our Mac.
- 🐌 Second off, if you have a full hard drive it can cause slowdowns. This is because your Mac sometimes moves running apps to your hard drive when your memory is full and if it can accomplish this swap, your Mac will have to close things in memory which can cause slowdowns and stop us from getting things done.
Next, let’s take a look at the best and most proven methods for clearing space on our Mac.
Method 1: Optimize Storage and Uninstall Apps
You can use the Manage Storage feature built right into macOS to get rid of large files that you may not have known were still there. This is a free and easy way to free up space.
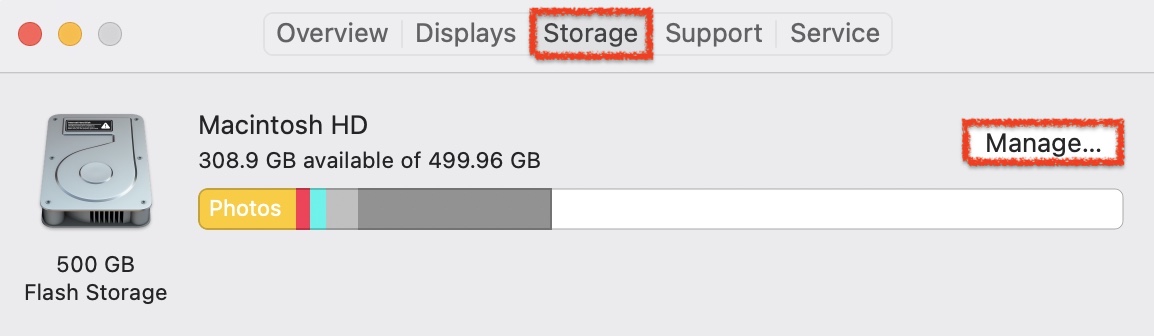
- Click on the Apple logo in the upper left-hand corner of the screen.
- Select About This Mac.
- Go to the Storage tab and click on Manage.
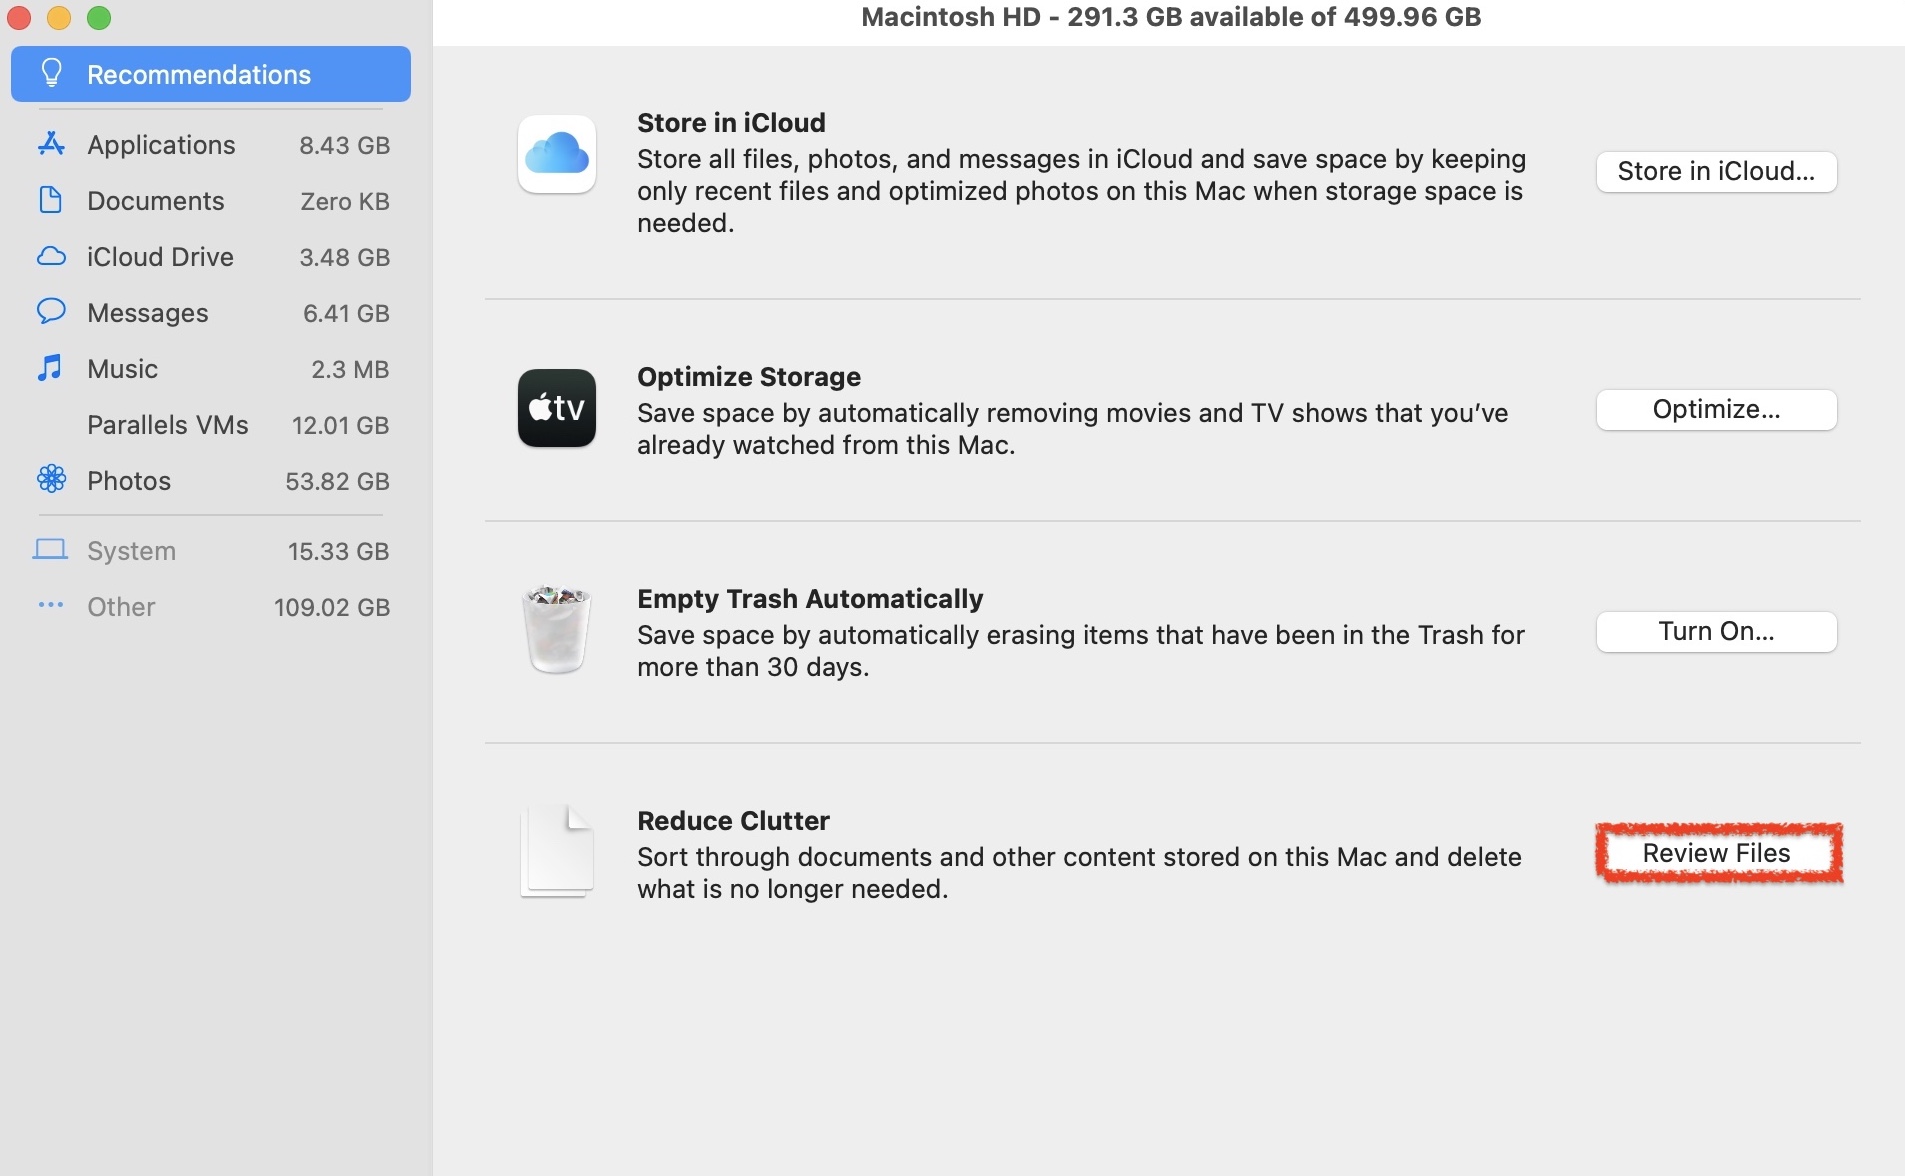
- You will be greeted by multiple options within this window and I would encourage you to take a look around to see what is taking up storage on your Mac. I find that selecting Review Files in the Reduce Clutter section is normally the best option as we tend to download things from the internet and then forget about them. Selecting this option will allow you to review them and clean up your Mac hard drive.
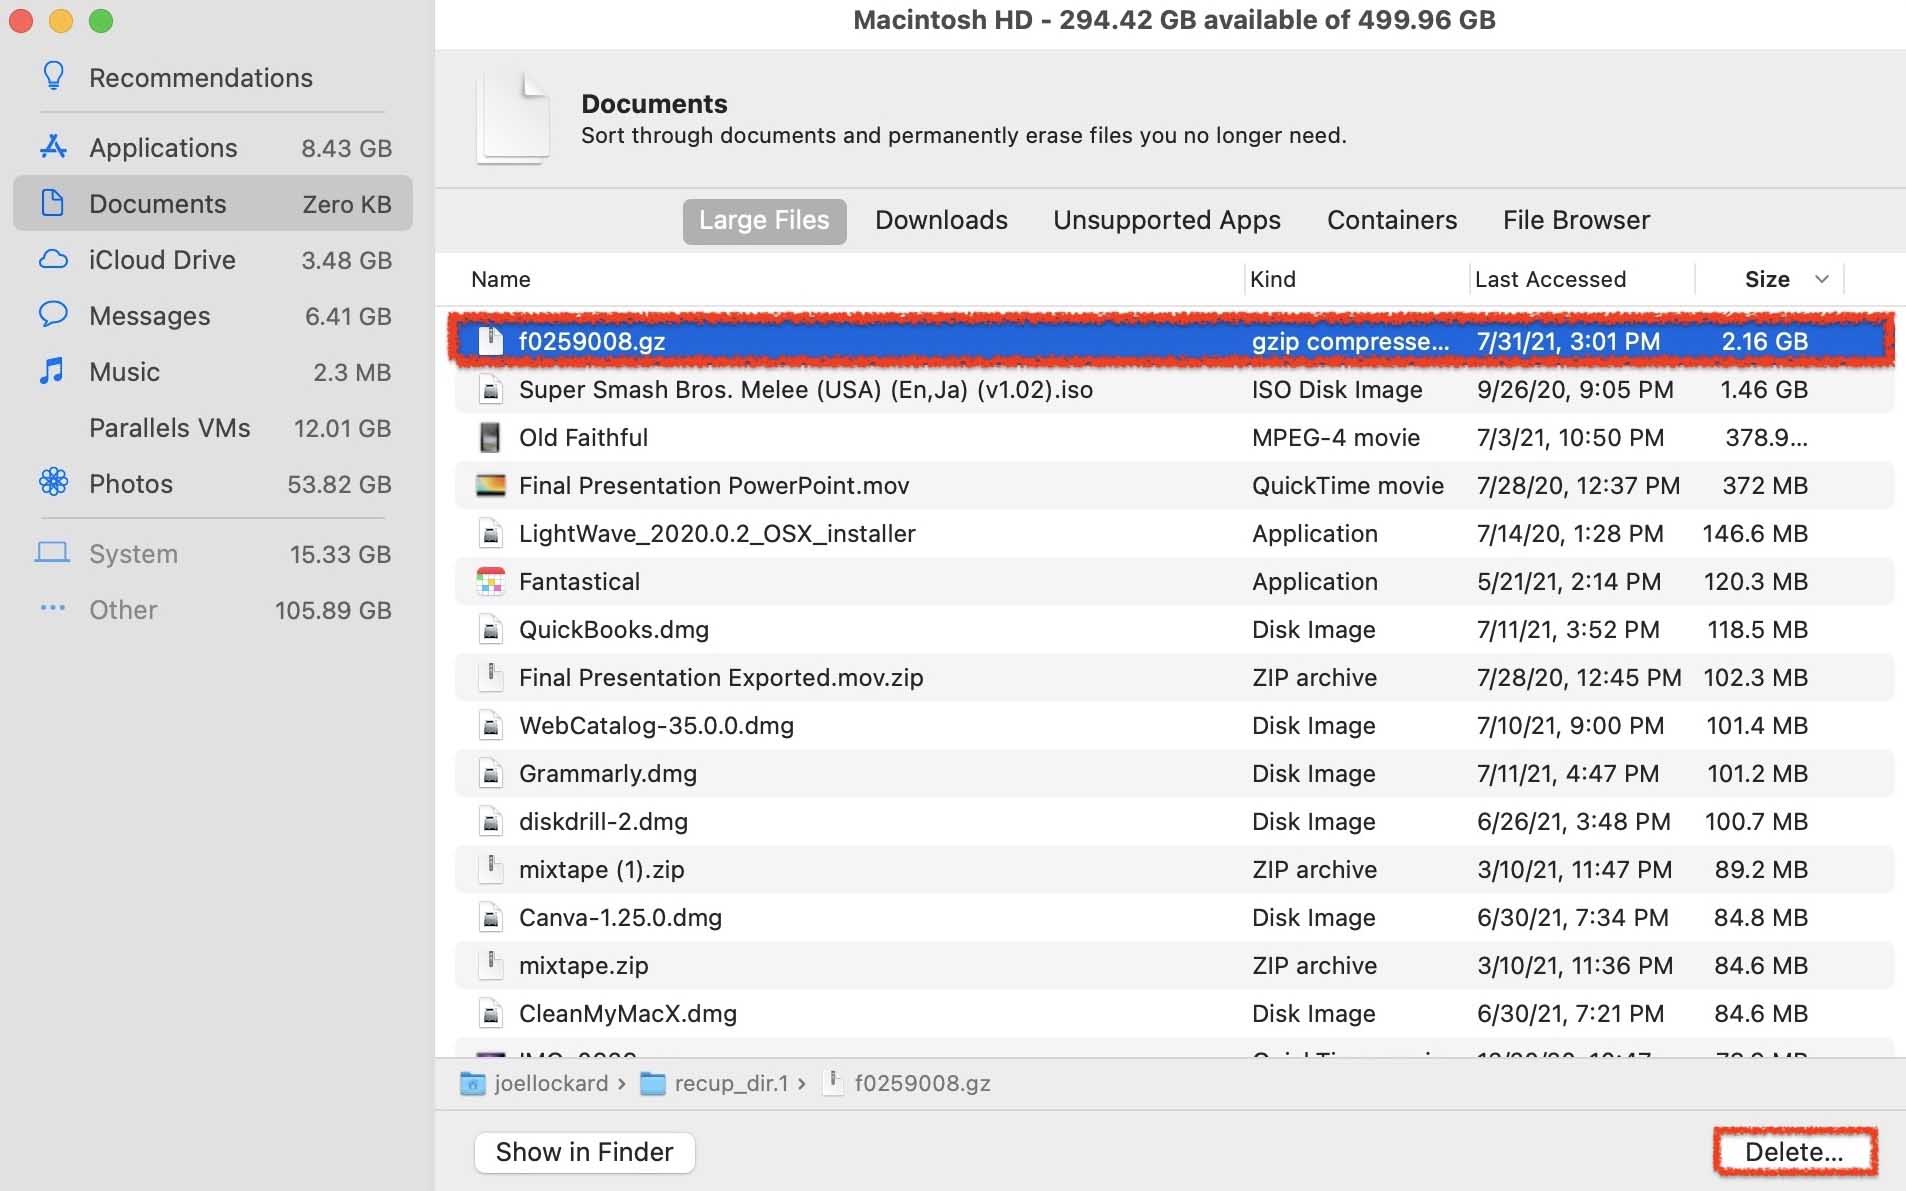
- You will then be greeted by the files on your Mac that are taking up the most storage from the largest in size down to the smallest in size. You can select what you would like to delete from here to free up storage on your Mac. Simply highlight the file that you would like to delete and then click on the Delete button in the lower right-hand corner.
- Now let’s uninstall apps that we don’t use. Select the Applications option from the navigation bar on the left-hand side.
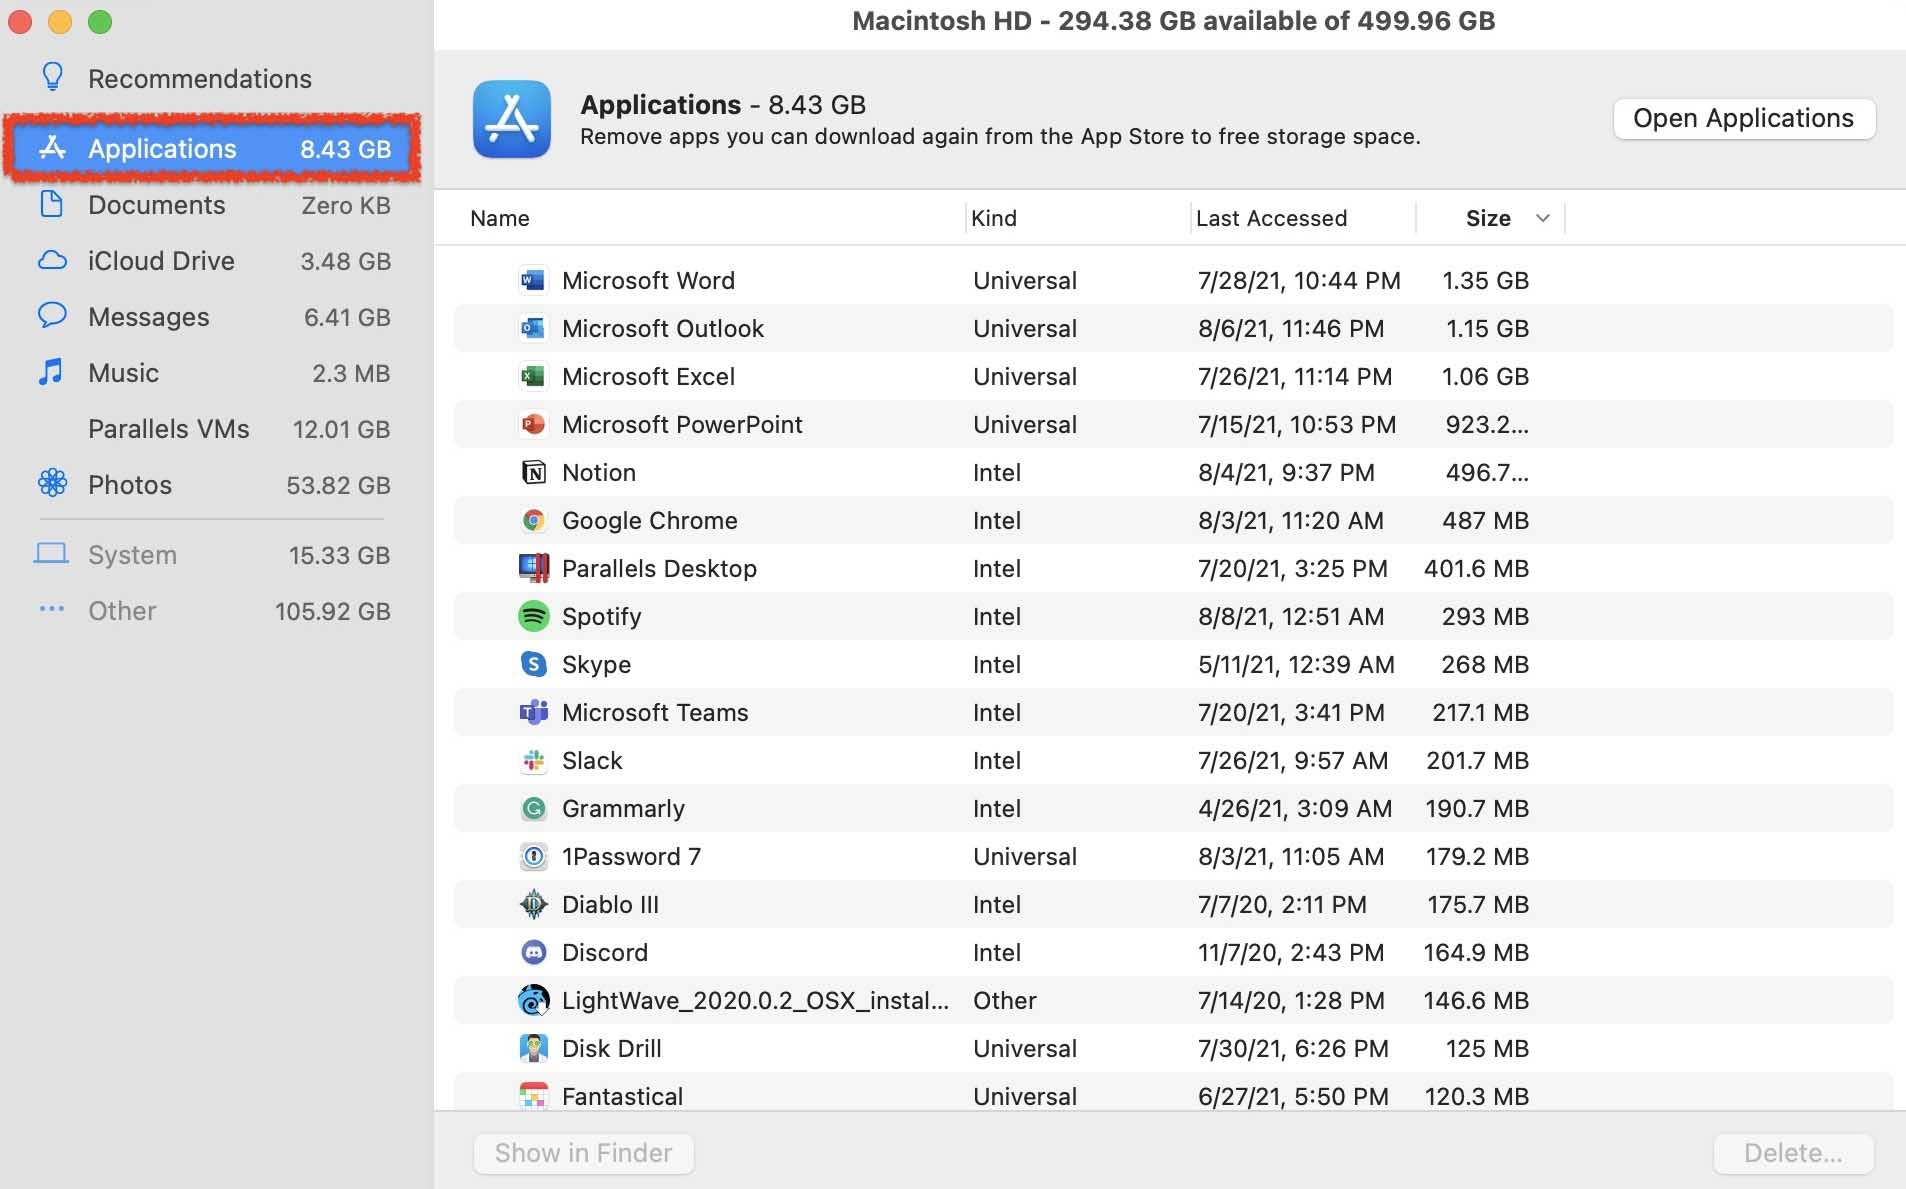
- From within this window, the process will be the same as it was for deleting large files. Scroll through this list and delete any applications that you don’t find yourself using anymore. The applications will be listed in order from the largest in size, to the smallest.
After uninstalling the applications that you don’t use, you can select other options from the navigation bar on the left-hand side to go through other sections of your Mac to free up more Mac storage for free.
Next take a look at how to free up space by removing duplicate files.
Method 2: Free Up Space by Removing Duplicate Files
Disk Drill is a data recovery tool, but it also comes with some powerful features that will allow us to scan folders on our Mac for any duplicate files that we may have.
I like using Disk Drill because of its modern and easy to use interface, not to mention that it’s also a powerful tool for basically anything that involves the data on your Mac.
- Download and install Disk Drill onto your Mac.
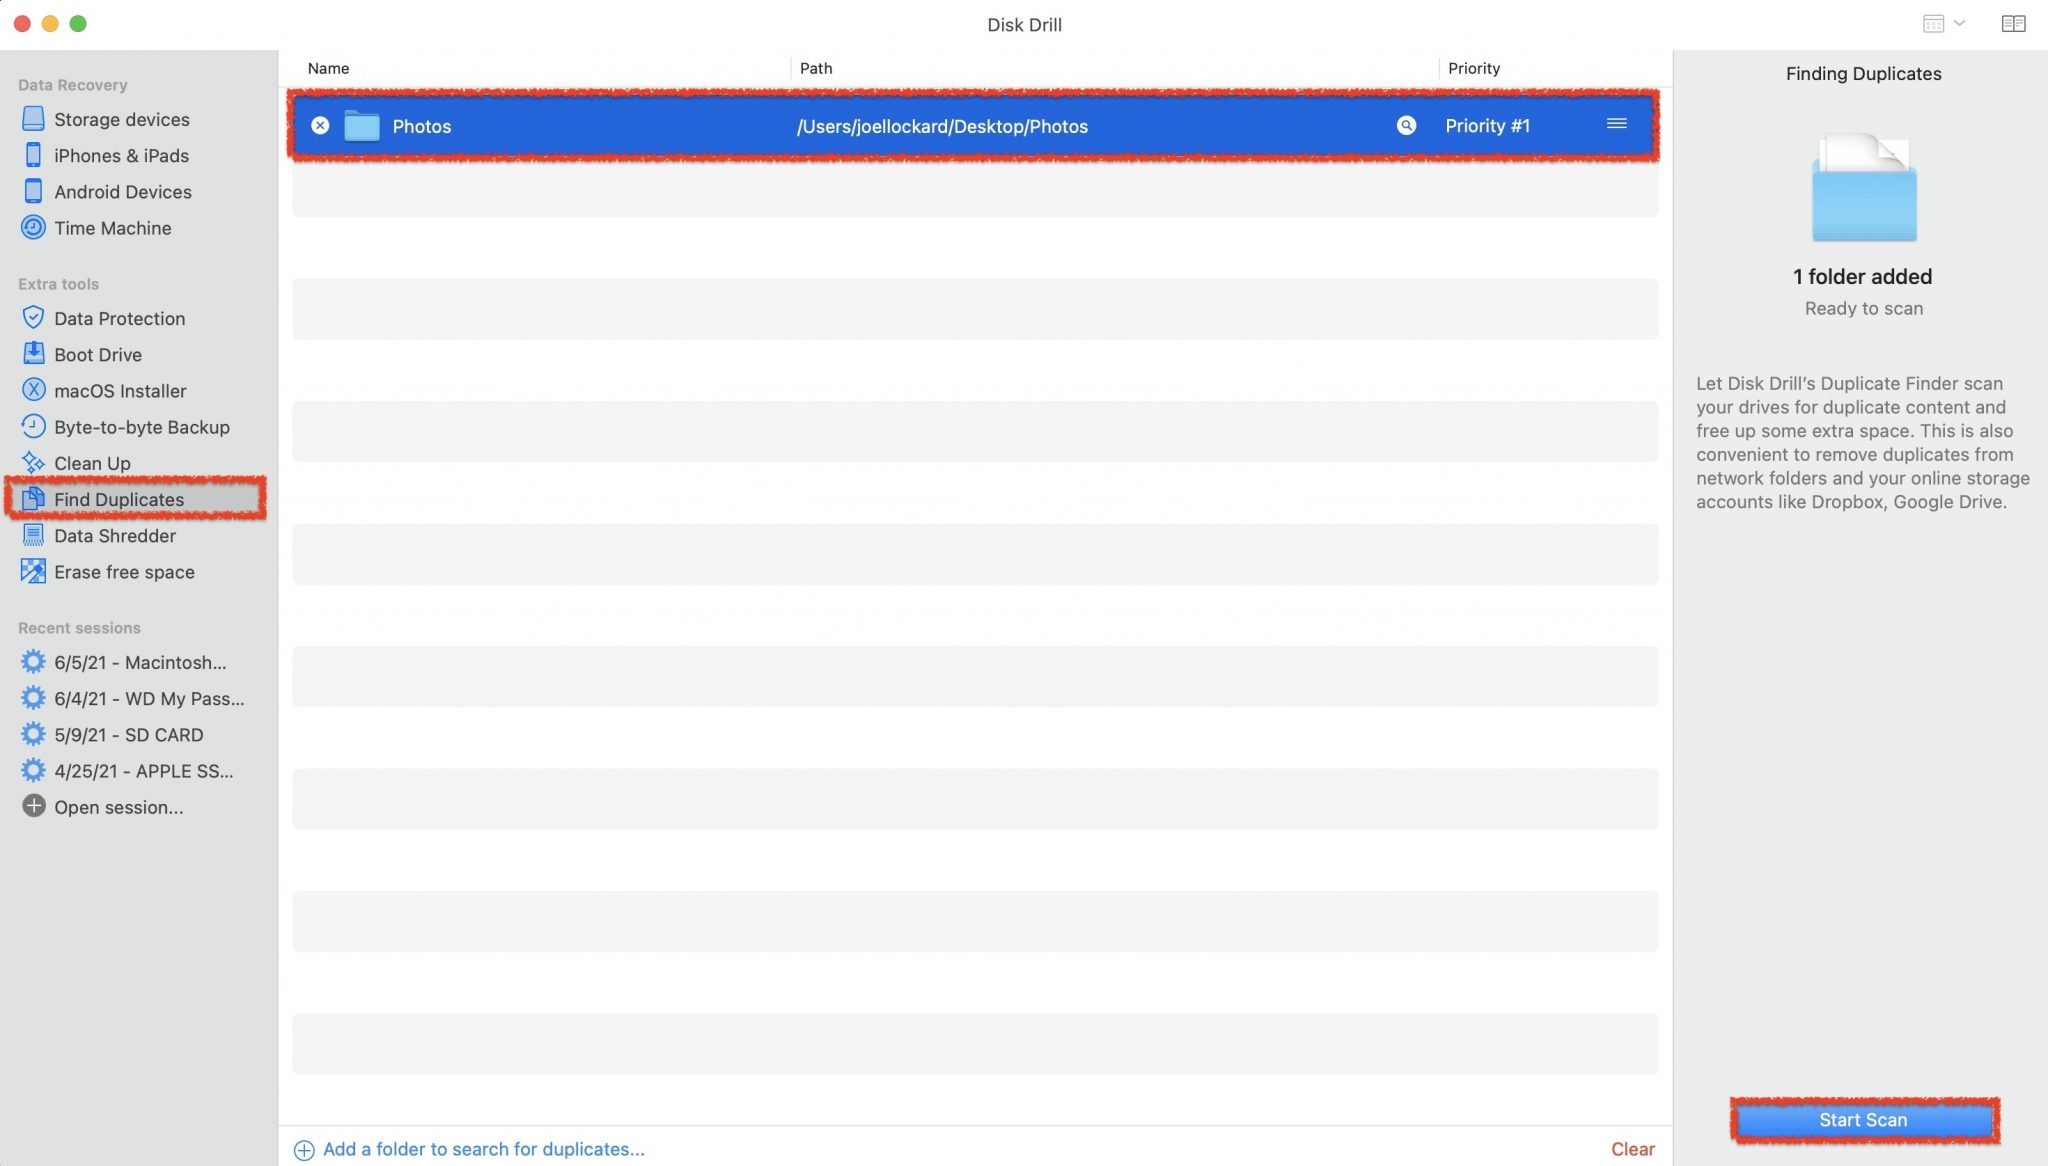
- Launch Disk Drill and select Find Duplicates from the sidebar. You can drag any folder into this section that you would like. For my example, I’m going to drag a Photos folder of mine. Then, click the Start Scan option and Disk Drill will scan the folder for duplicate files.
- Review the results and click the box to mark what you would like to remove. After you have reviewed the duplicate files that were found, click on Remove.
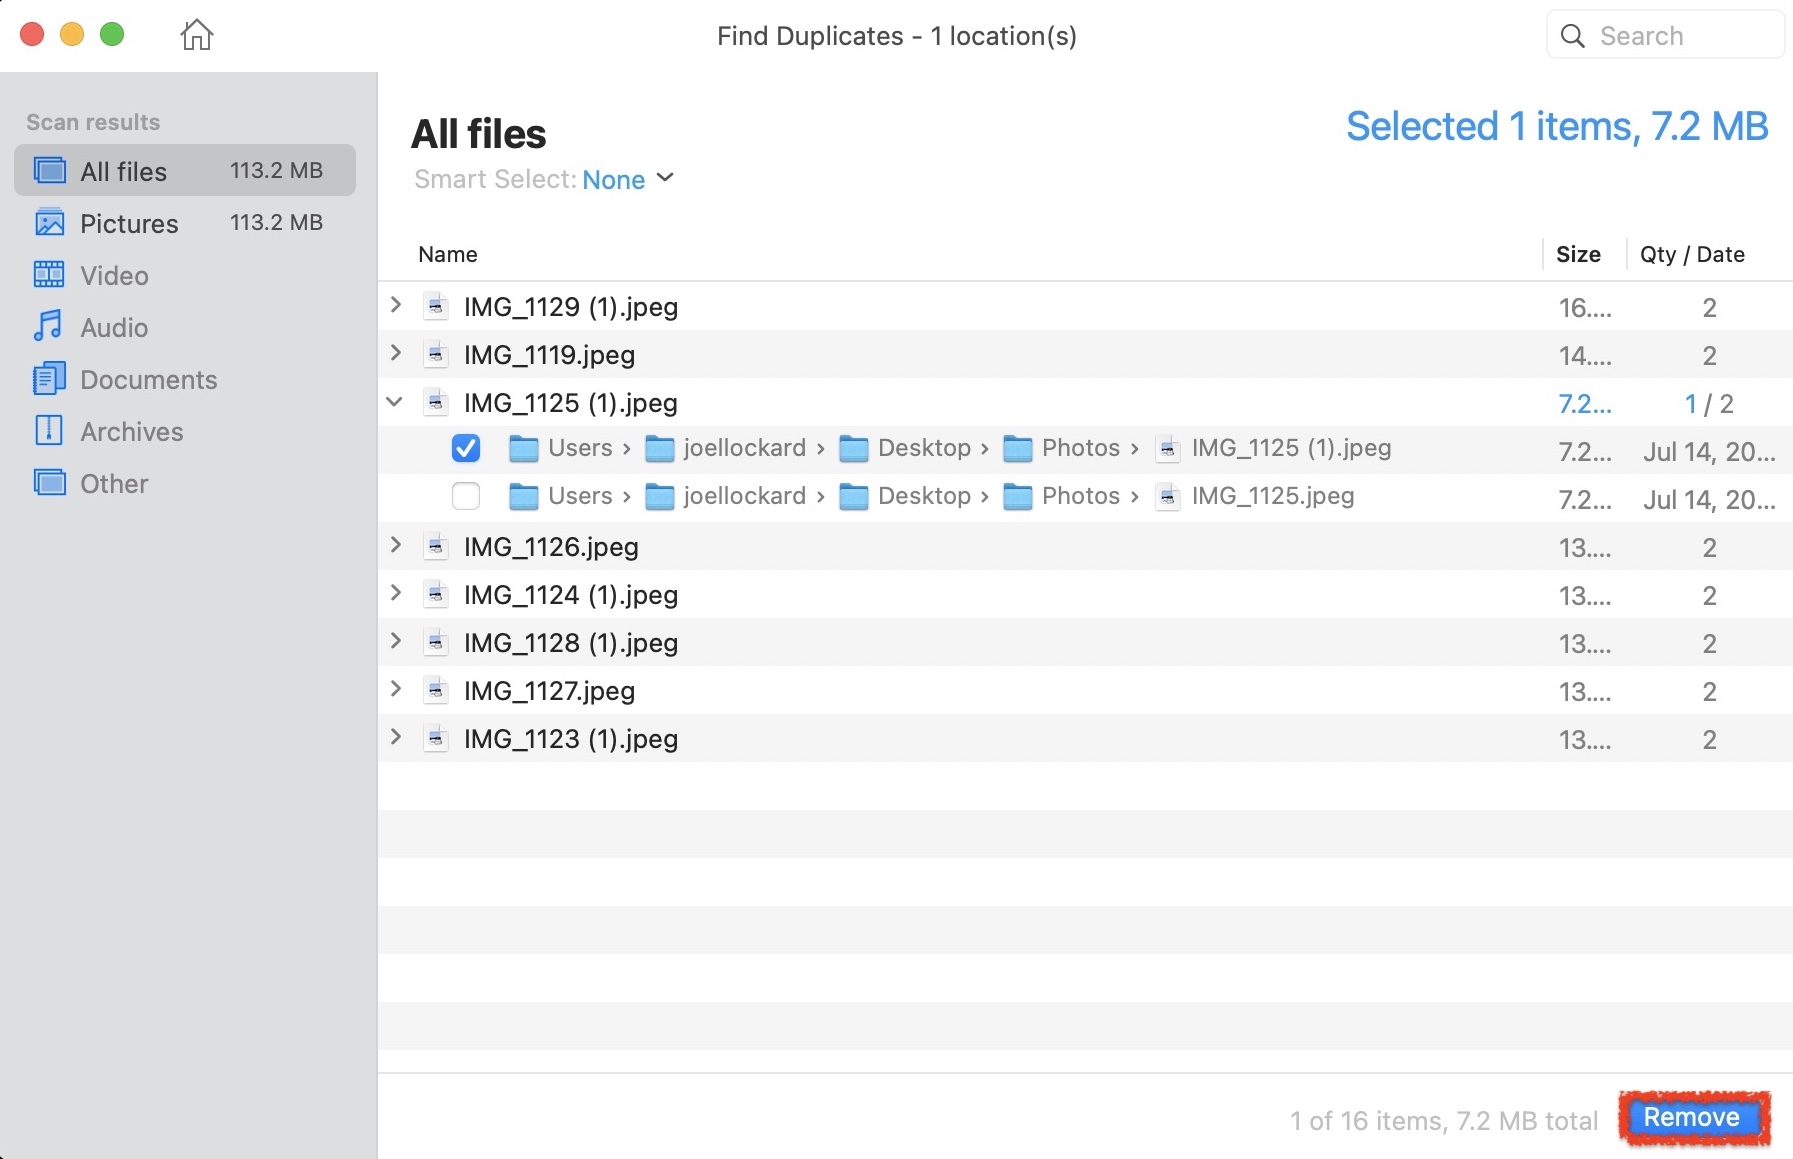
That’s it! Disk Drill is a simple and powerful option for removing duplicate files on your Mac. This is also a free method and you don’t need to purchase Disk Drill to remove duplicate files from your computer.
Method 3: Empty Your Trash to Free up Space on Your Mac
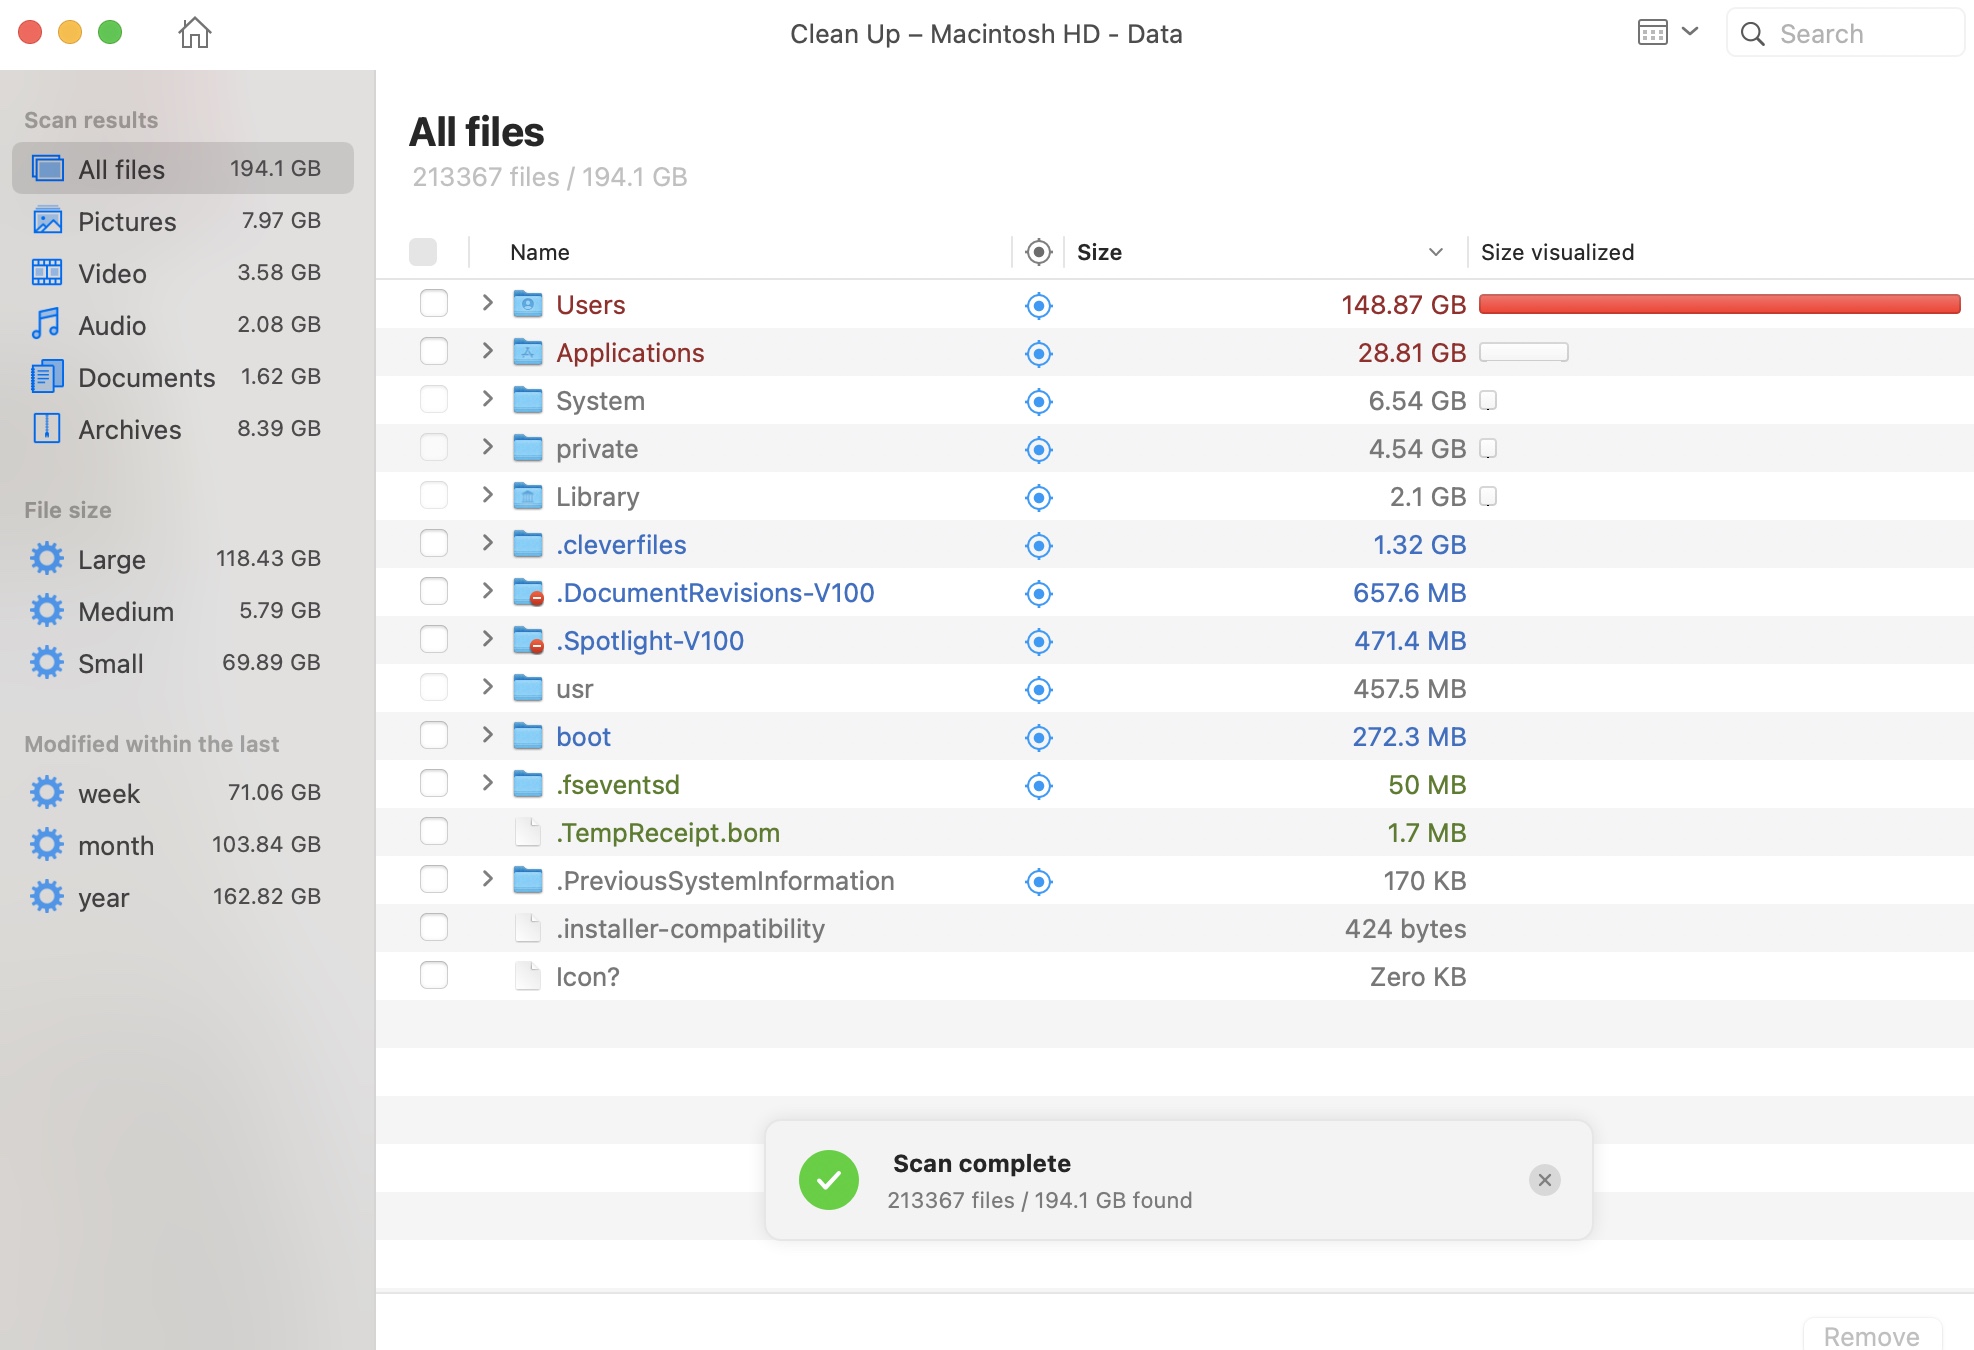
Disk Drill not only helps you find duplicate files, but it also allows you to view all of the files and applications taking up space on your Mac. There are many benefits to using this method as Disk Drill will show us the amount of storage that an area is using by folder which can really help us sort through our files as we may not know exactly what is taking up space on our computer.
Things that are taking up the most storage will be color-coded in red, those that are of medium size are yellow, and those taking up the smallest amount of space are green.
- Download and install Disk Drill onto your Mac.
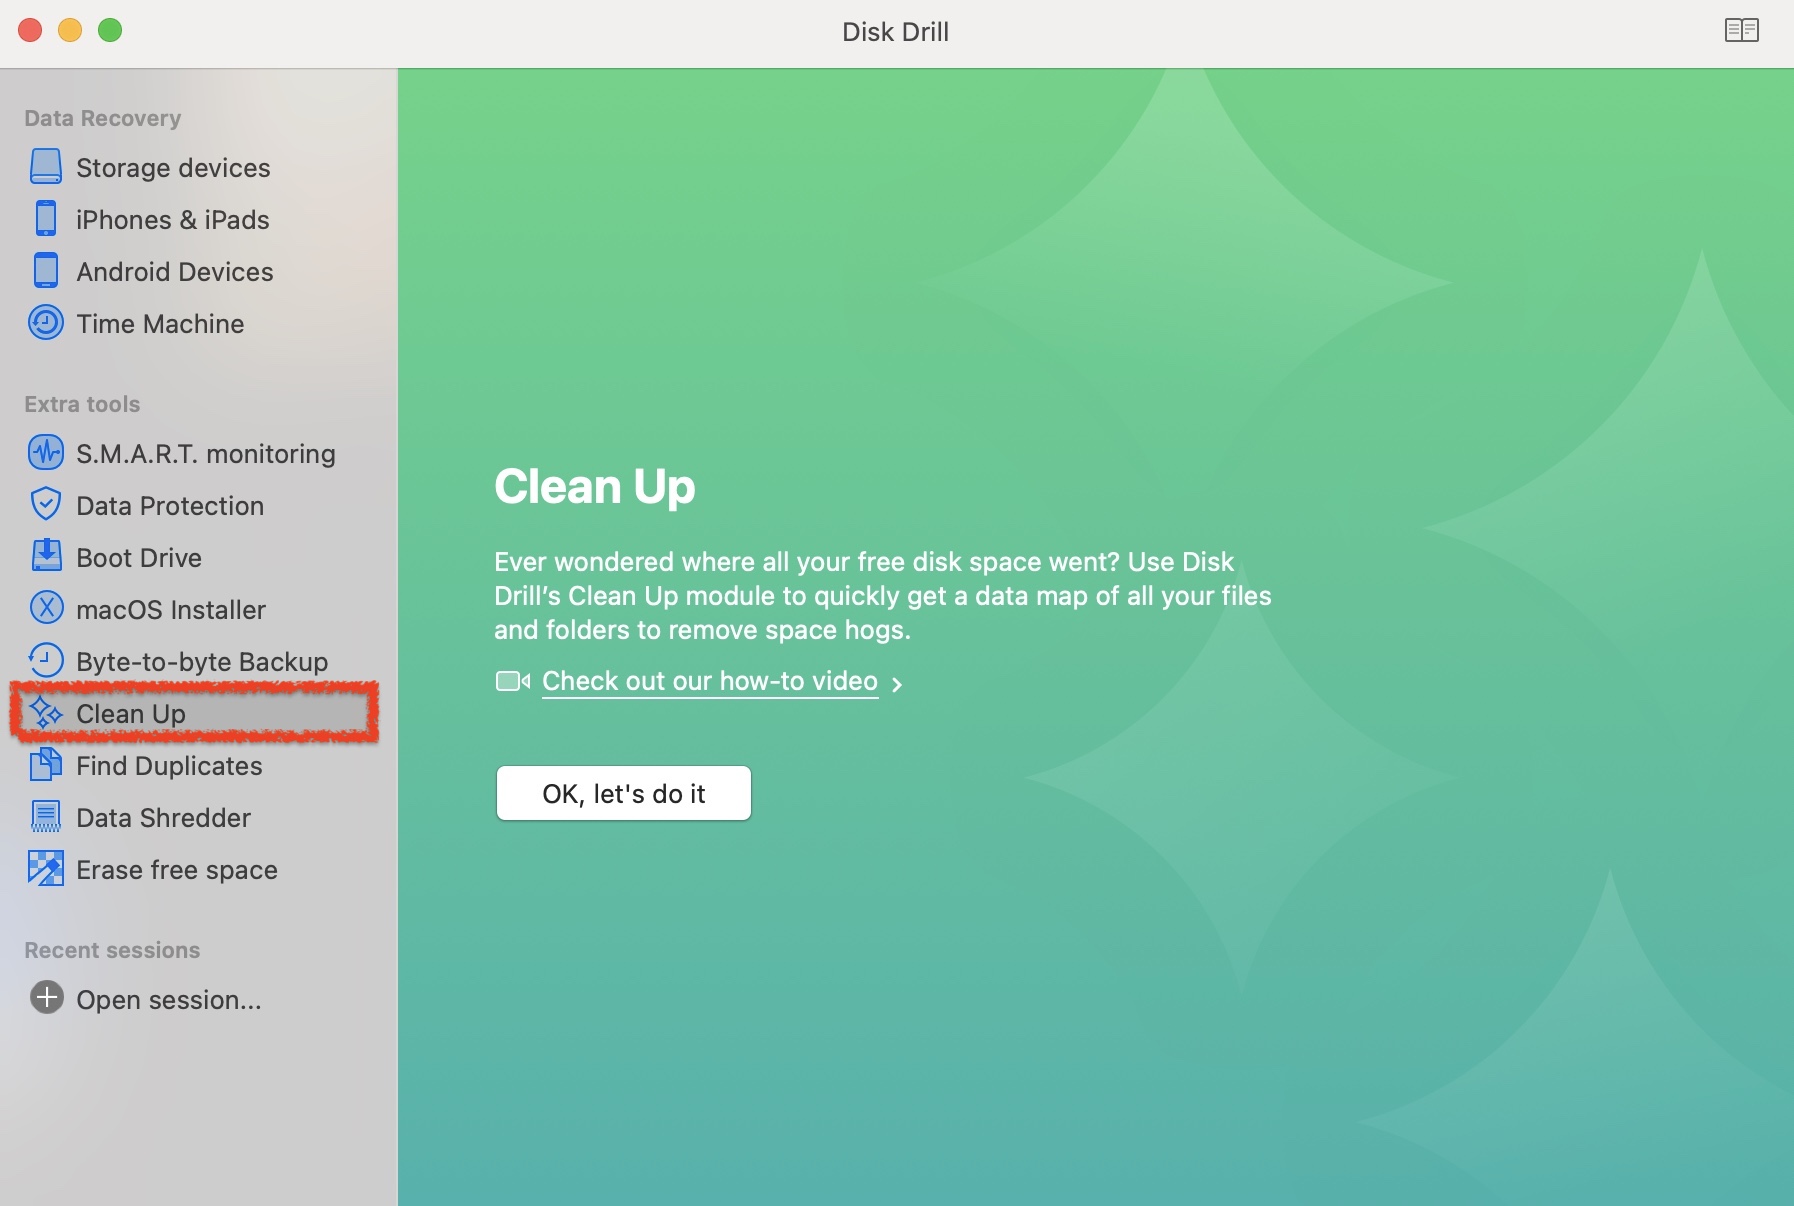
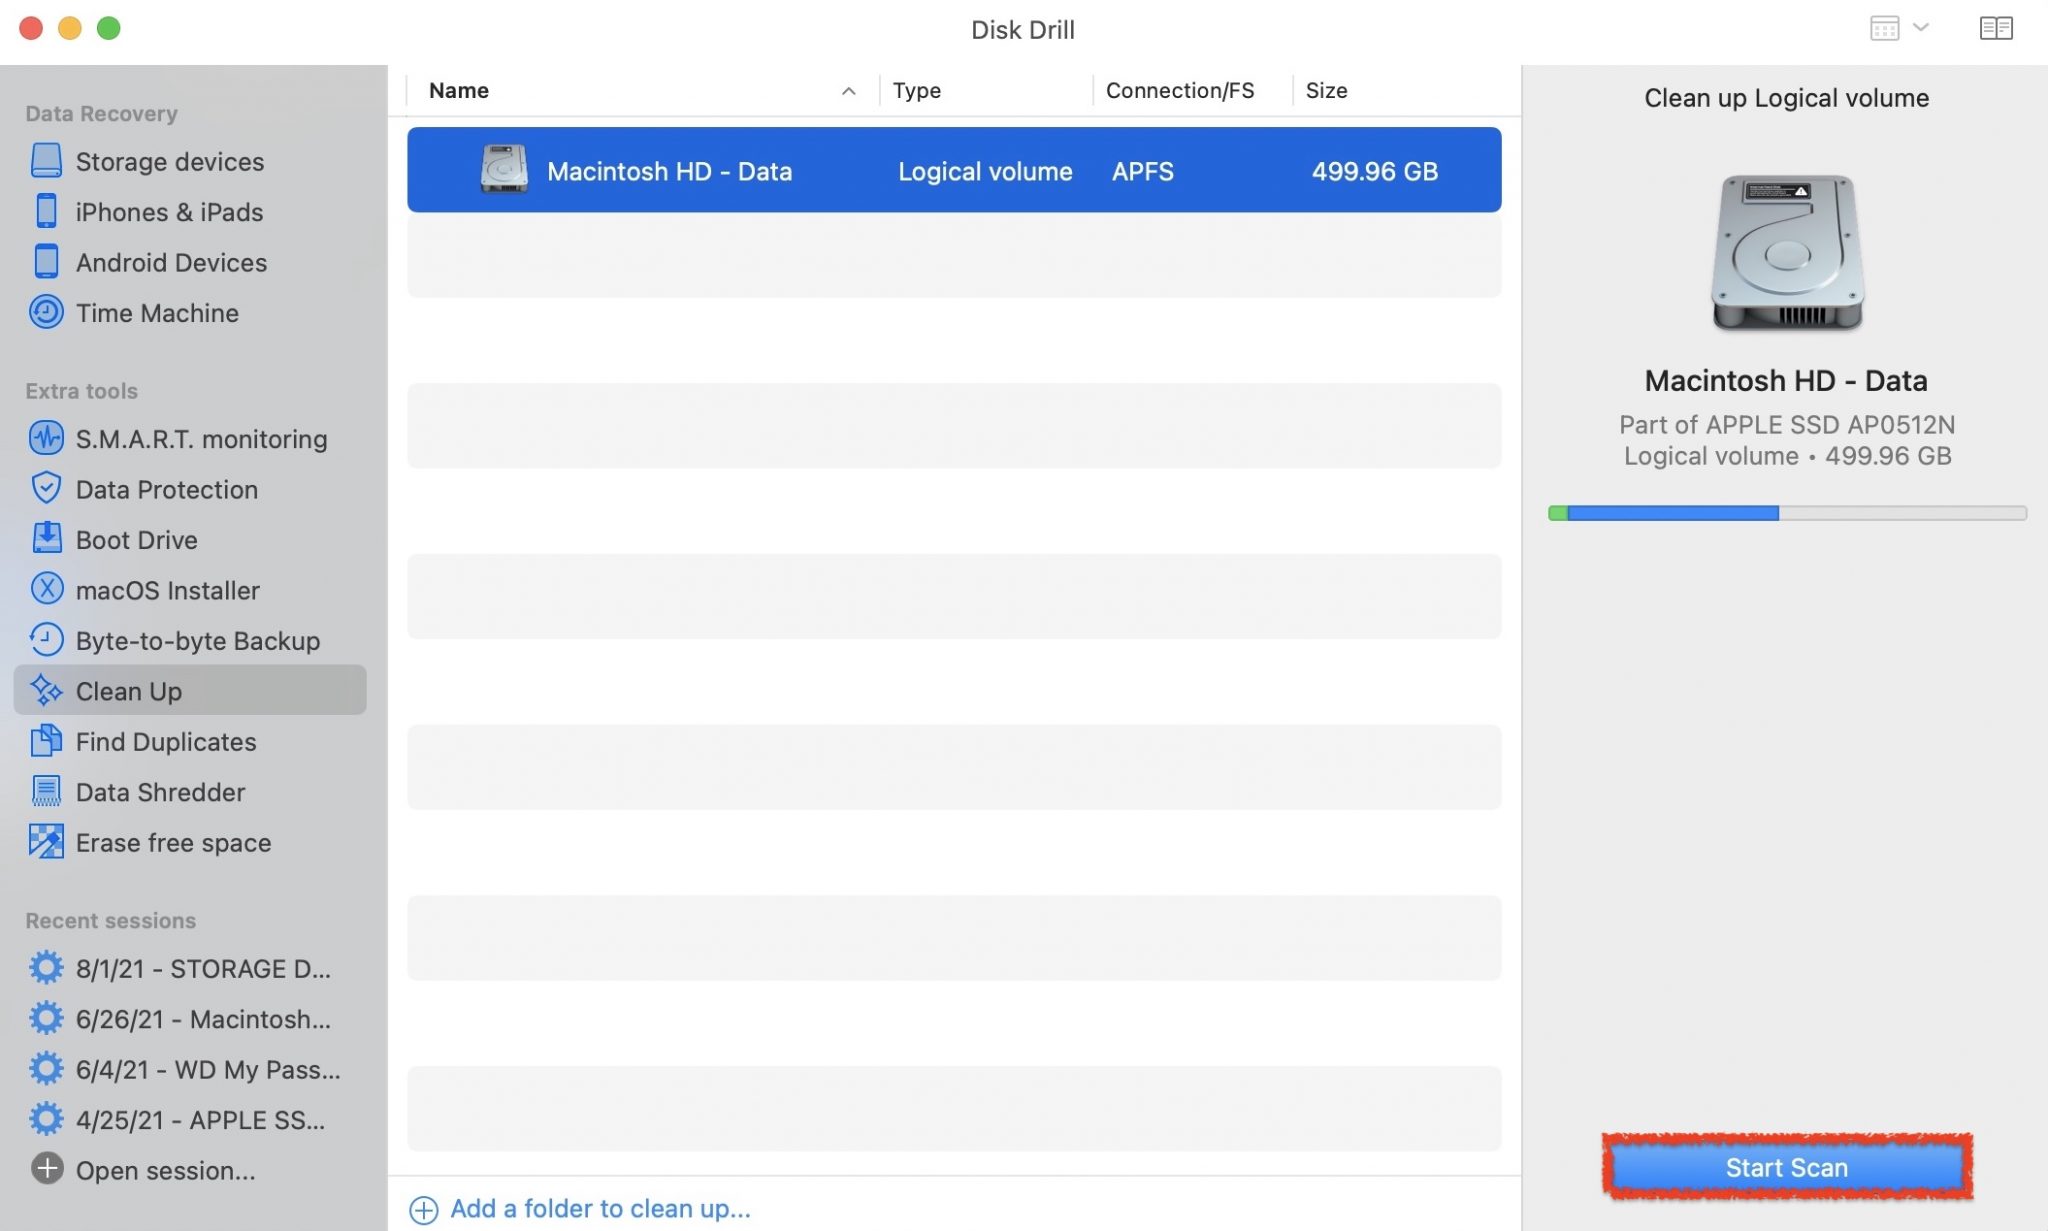
- Launch Disk Drill and choose the Clean Up section from the navigation bar on the left side.
- After you have selected the Clean Up section, select the storage device that you would like to scan. Most likely, this will just be an internal volume but you can also scan any external hard drives that you have plugged into your Mac.
- After the scan has been completed, you can review the files that you can clean up using Disk Drill. I would recommend going towards the folders that are marked in red as they will contain the files that are the largest in size making the clean-up session super effective.
- Now, don’t delete your entire Users folder just because it’s red. It’s red because there are a lot of folders within the Users folder. I’m going to go into my Users folder and empty the trash as that is something that people forget about and it takes up space on your Mac. Check what you would like to delete and then click on the Remove button.
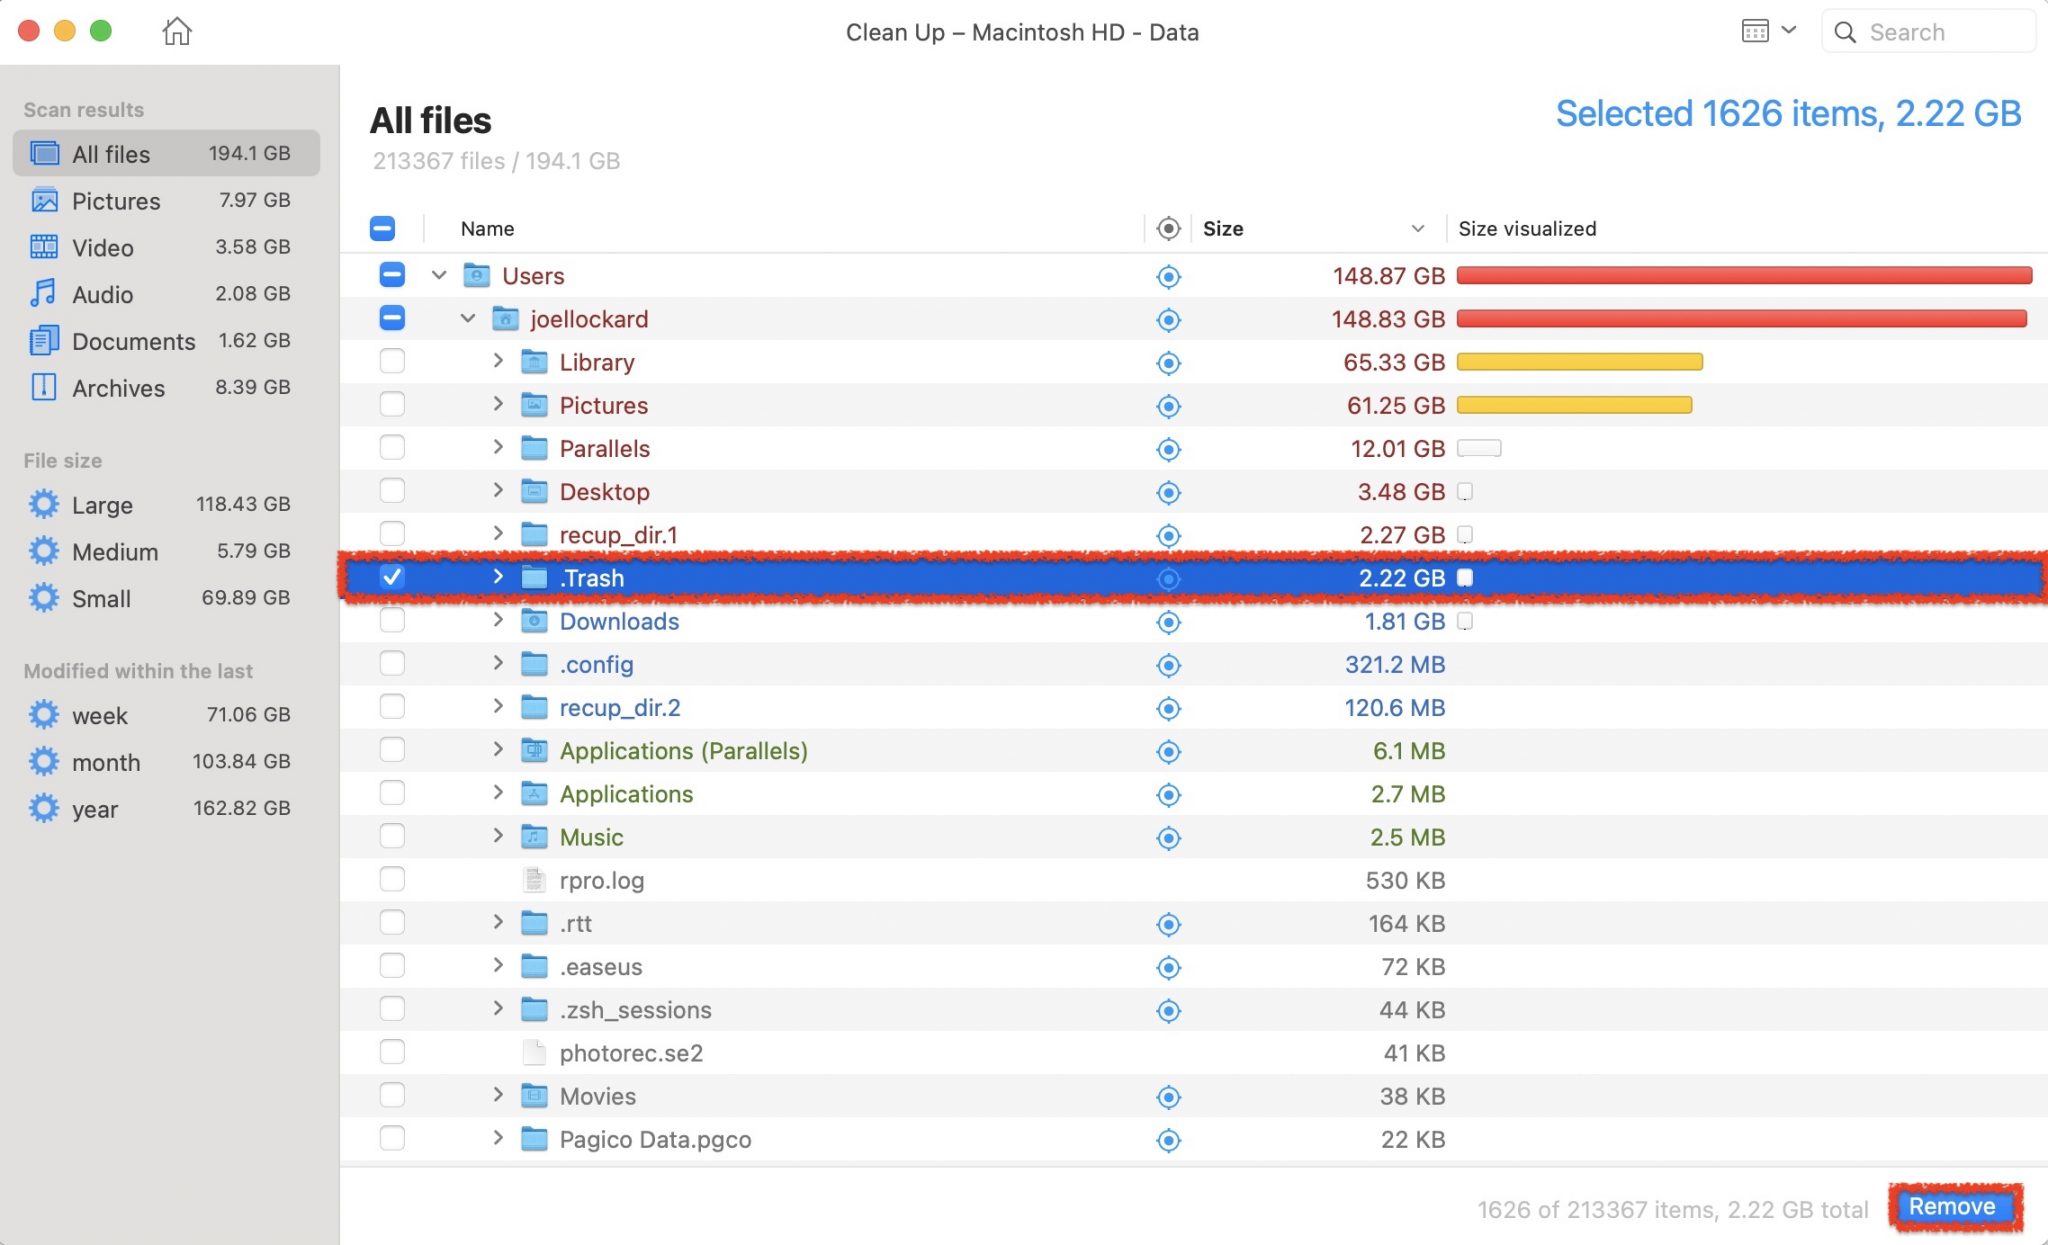
That’s it! You can check other folders to empty files that you don’t need and free up space on your Mac. This is a free feature in Disk Drill and is one that is quite powerful as well. I would recommend that you take some time and look through some of the other folders that are under your Users section and see what else is on your Mac that you may have forgotten about.
If you want a more graphical way to view what’s taking up space on your Mac, then I would recommend using DaisyDisk.
Method 4: Freeing Up Space Using DaisyDisk
DaisyDisk allows you to see what’s taking up space on your Mac. I really like DaisyDisk and it stands out to me due to the level of polish that has been added to it. The developer’s website and the app both have an attractive appearance that makes viewing the data on your Mac hard drive a fun one.
Let’s take a look at how to use DaisyDisk to free up space on our Mac.
- Download and install DaisyDisk on your Mac.
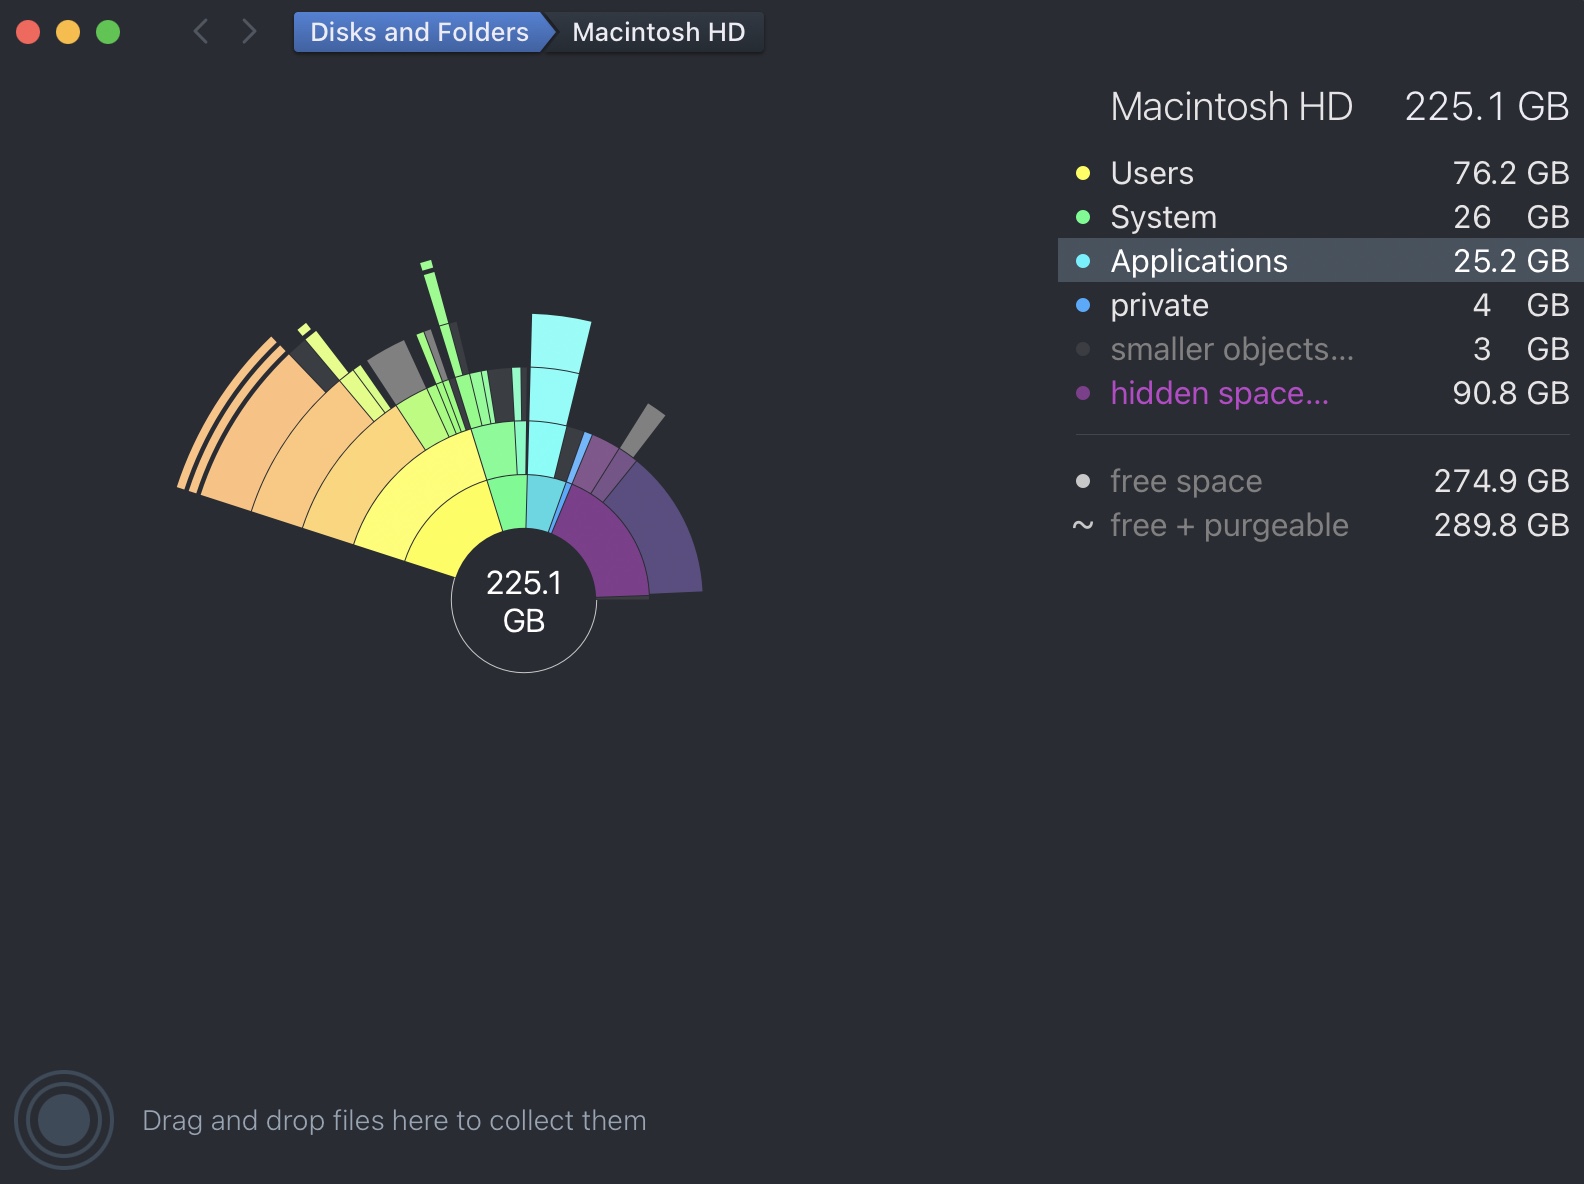
- Once you launch DaisyDisk you will see this screen. I only have one storage device that is detected right now but if you have more than one or an external hard drive, you can choose to scan that as well. In this example, I’m going to scan my Mac hard drive and look at a graphical view of my data. Press Scan on your Macintosh HD to view the contents of your hard drive and free up space on your Mac.

- Wait for the scan process to complete and then you will be greeted by a colorful screen that shows all of the data on your Mac in a visual layout. In this example, I’m going to go to my Applications folder and remove an application from my Mac. You can also go to any other area such as Users and remove files from there as well.
- Once within your Applications folder, select the application that you would like to remove. Simply drag it to the lower right-hand corner of the screen where the drag and drop section is. After you have dragged the files that you would like to delete, click on the red Delete button and you will free up disk space on your Mac.
DaisyDisk requires a purchase to keep using it. You can only free up a certain amount of space before you have to purchase the app, unlike Disk Drill.
Method 5: Free Up Space by Storing Files in iCloud
iCloud is great as it allows you to store all files, photos, and messages in iCloud and save space by keeping only recent files and optimized photos on your Mac when storage space is needed.
To store things in iCloud, follow the steps below. It is important to note that if you’re someone who frequently doesn’t have an internet connection, this may not be the best option for you as if you need to download a file that has been moved to the cloud, you will need to connect to the internet to do so.
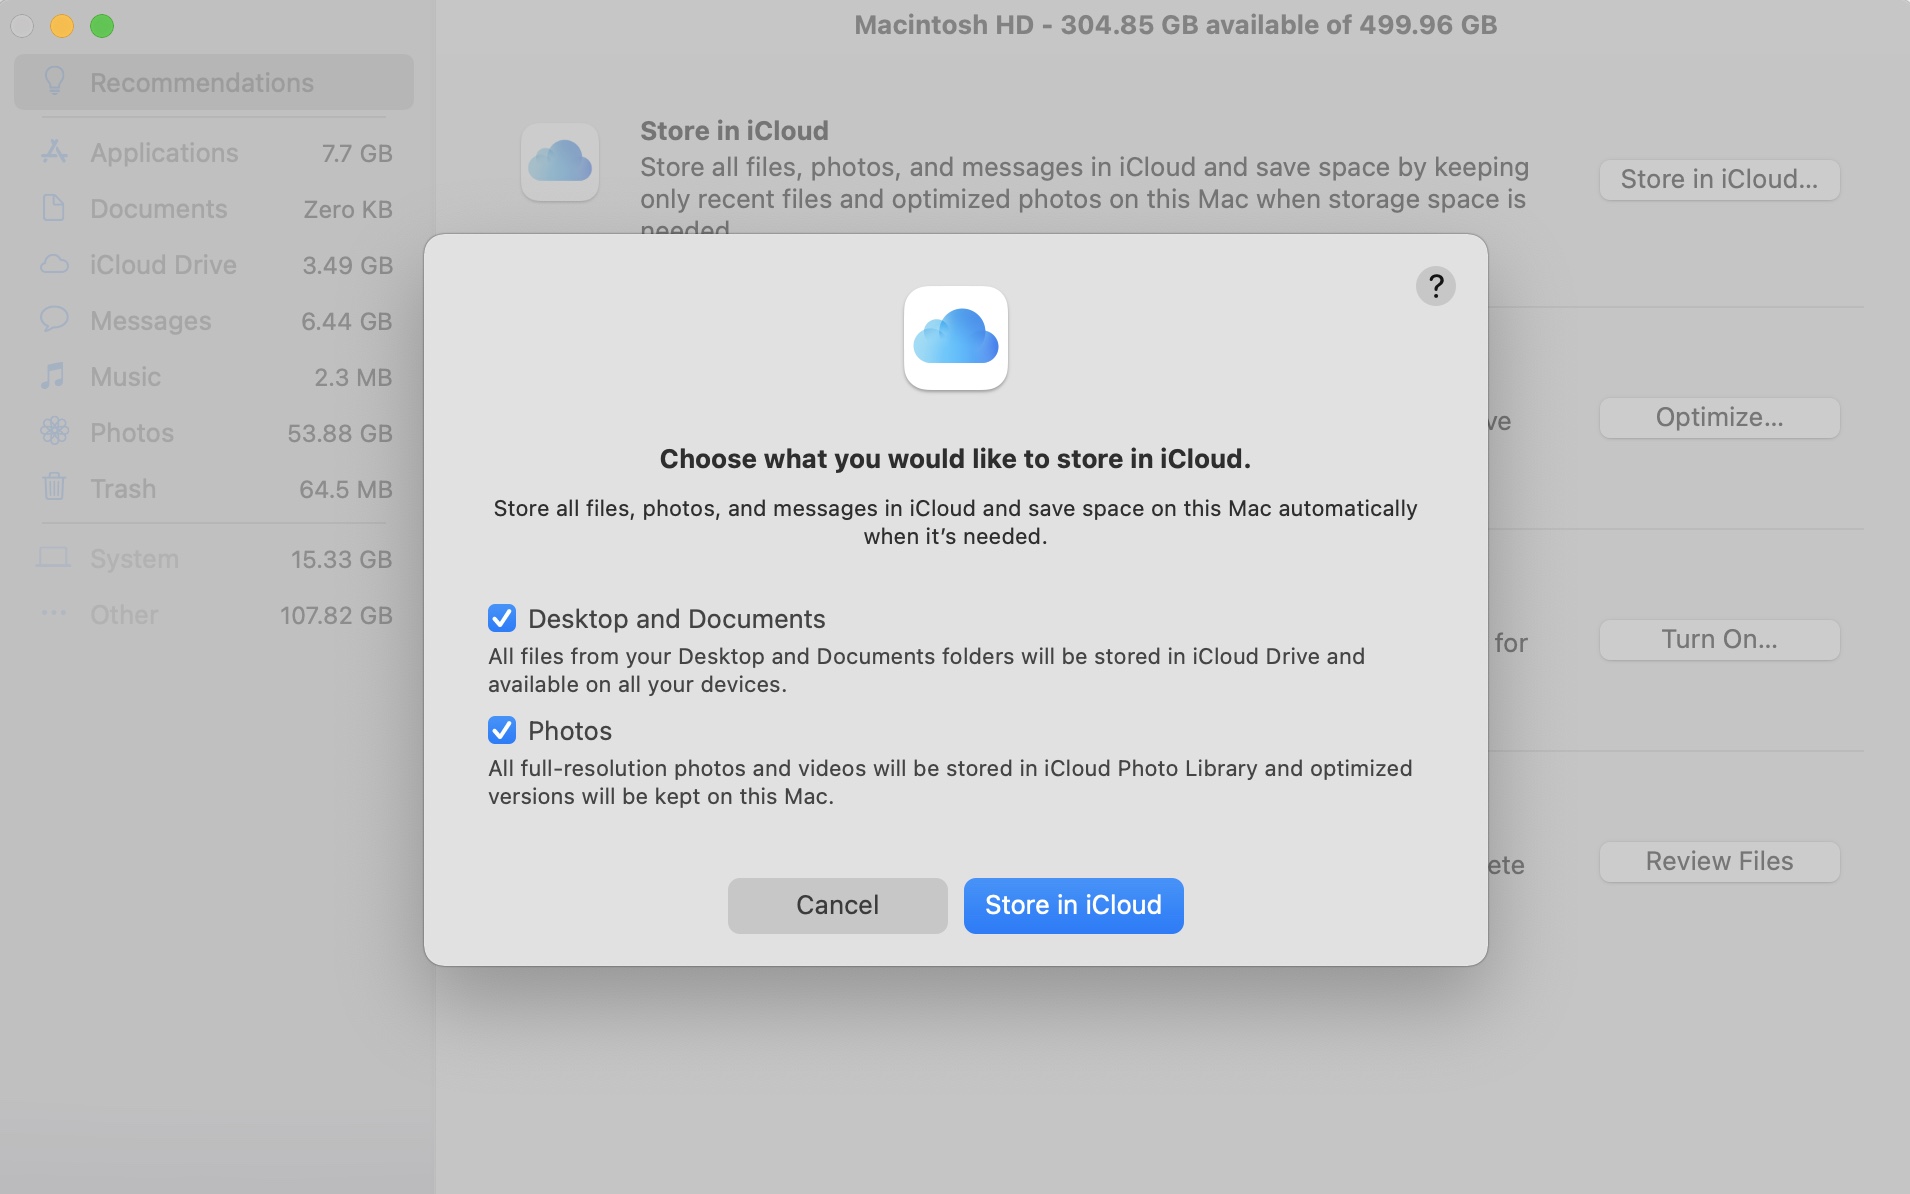
- Click the Apple logo in the upper left-hand corner of the screen.
- Click on About This Mac.

- Select the Storage tab and then click on Manage.

- Choose Store in iCloud… and then review the options before choosing to store your files in iCloud. You will have the option to store your desktop and document files and you can also choose to do your photos as well. iCloud is smart and will learn what you have been using most recently and it won’t store those files, but it will store older files that you haven’t made changes to or opened in a while.
I really like iCloud and I’m a strong advocate for it and I think that everyone should use it. If after turning on this feature you’re out of iCloud storage, you can upgrade your storage to a higher tier to help you store more files in the cloud. Storage doesn’t cost much and they have a list that displays how much it costs to upgrade your storage. Currently, I’m using the 200GB plan which costs me $2.99 a month and it’s worth it if you ask me. Upgrading your storage is cheaper than buying a new Mac and any Apple device that you own can use this storage. It’s a great way to manage storage on Mac.
Method 6: Clean Out Your Downloads Folder
We download so many things when we use our Mac that we might not realize how much space this can take up over time. If your disk is full on your Mac, then going through your Downloads folder would be a good way to free up some space and it doesn’t require you to download any additional software.
- You can access your Downloads folder from your Dock. It’s located on the right-hand side by the Trash.
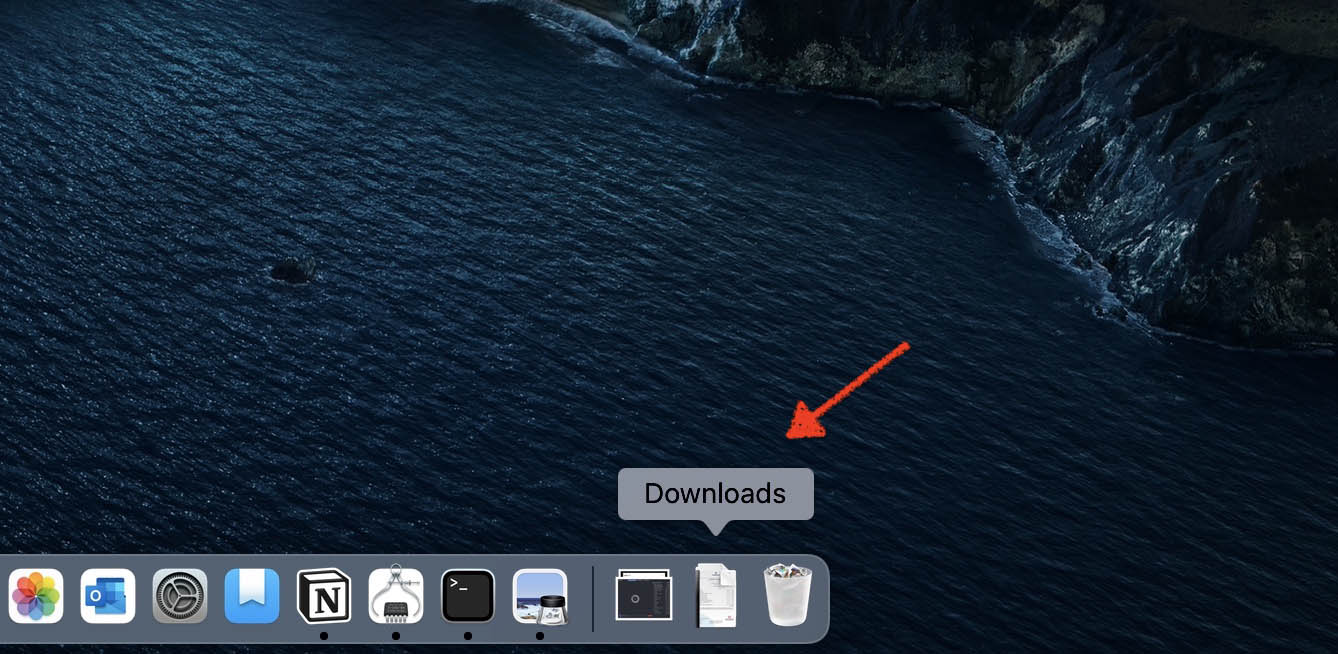
- Click on the Downloads folder to launch it and then go through it and find any files that you no longer need and move them to the Trash.
- The Downloads folder can be one of the biggest uses of space on our Mac so it’s important to make sure that we check this folder frequently if storage space is an issue.
Now, let’s talk about some of the best practices that we can do to help use less space in the future.
How to Use Less Space in the Future
Now that we’ve been able to free up space on your Mac, it’s best to put into place some best practices to reduce how much storage you use from here on out.
- Set your Trash to automatically delete. This can be done by going to your Finder preferences.
- Plug in an external hard drive and move files to it that you don’t need to have with you at all times.
- Compress files when you’re able to.
- Delete unneeded emails if you use the Mail app.
- After watching movies or TV shows on your Mac, delete them to reduce how much space they will take up.
- Go through your Downloads folder frequently to clean it out and delete files that you no longer need to have.
Conclusion
When you purchase your Mac, the storage that you choose at the time of purchase is what you will have for the entire time that you own the computer as it can’t be upgraded.
Knowing how to free up space on your Mac allows you to make sure that your Mac will keep running fast and that you will always be able to save new files to it when you need to.


FAQ
The easiest way to quickly free up storage on your Mac would be to use Apple’s built-in manage storage option. This doesn’t require you to download any other software to free up space on your Mac and this option is free.
Step 1. Click the Apple logo in the upper left-hand corner of the screen.
Step 2. Click on About This Mac.
Step 3. Select the Storage option.
Step 4. Click on Manage….
Step 5. Within this window, you will have the ability to quickly clean up space for free by selecting the following from the navigation bar on the left-hand side:
- Recommendations
- Applications
- Documents
- iCloud Drive
- Messages
- Music
- Photos
- Trash
- System
- Other
Your Mac most likely is running slowly due to your hard drive being full. This can cause issues when it comes to saving data to your Mac or when your memory is full and your Mac needs to use your hard drive space to store apps that you’re not currently using to free up memory space.
You can make your Mac run faster by freeing up some space on your computer. One of the quickest ways to do this is to empty your trash as this is something that people usually forget to do.
Emptying your trash is super easy and it only takes a few steps.
- Launch the Trash by clicking on it from your Dock.
- Once within the Trash, click on Empty on the upper right-hand corner.
- Your Trash will then be emptied and you should have more free space on your Mac.
You can clean up your Mac by using the Clean Up feature built into Disk Drill. This feature is free and doesn’t cost you anything to use.
- Download and install Disk Drill onto your Mac.
- Launch Disk Drill and choose the Clean Up section from the navigation bar on the left side.
- Select the storage device that you would like to scan for files to clean up.
- After the scan has been completed, you can review the files that you can clean up. Everything will be color-coded by how much space it takes up. Red will contain the files that are the largest in size, yellow is medium, and green is the smallest. Cleaning out the files marked in red will make the clean-up session the most effective.
- Review files before you choose to delete them and make sure that you’re deleting files that you don’t need.