Your flash drive worked just fine yesterday, but now you plug it in, and the drive looks empty (or partially empty) and possibly even shows the wrong size. The good news is that files disappearing from a USB drive doesn’t mean your data is gone forever. In most cases, it means the file index is broken or the files are hidden. This guide shows you how to recover files missing from a USB drive safely and then fix whatever caused the problem in the first place.
Why Did Files Disappear from Flash Drive?
Before you begin the recovery of the files missing from your USB drive, it helps to understand what’s actually going on. Here is a short list of the most common reasons for lost files. It will help you narrow down your search and, in some cases, even avoid having to recover files using third-party tools:
| Reason | Description | Recommended Recovery Methods |
| 🧍♂️ Accidental User Actions | You might have deleted files without realizing it, or accidentally set them to hidden by changing their file attributes. Note that Windows does not send deleted files from USB flash drives to the Recycle Bin by default, so they are permanently deleted. However, you can click View in the top File Explorer menu to make sure Hidden items is checked. If your files reappear after enabling this option, you’ve found your problem and can skip straight to the fix section below. | Try to Unhide Files In Properties or Use Data Recovery Software. |
| 🕷️ Virus or Malware Infection | Some malware specifically targets removable drives and either hides your files or marks them as system files so they don’t show up in normal view. If files disappeared from the memory stick right after you plugged it into a public computer or a friend’s PC, this is a likely scenario. | Try to Unhide Files In Properties and then Run Antivirus. You can also Use Data Recovery Software to find any lost files. |
| 💥 File System Corruption | This happens when you yank out the drive without safely ejecting, experience a power surge during file transfer, or when the drive simply starts to approach the end of its lifespan, and the file allocation table gets scrambled because the storage blocks where it lives stop working correctly. You can learn more about recovering a corrupted flash drive in our detailed guide. | Try to Use Error-Checking Tool or Format USB Drive to Fix Major Issues. You can also Use Data Recovery Software to recover your files first. |
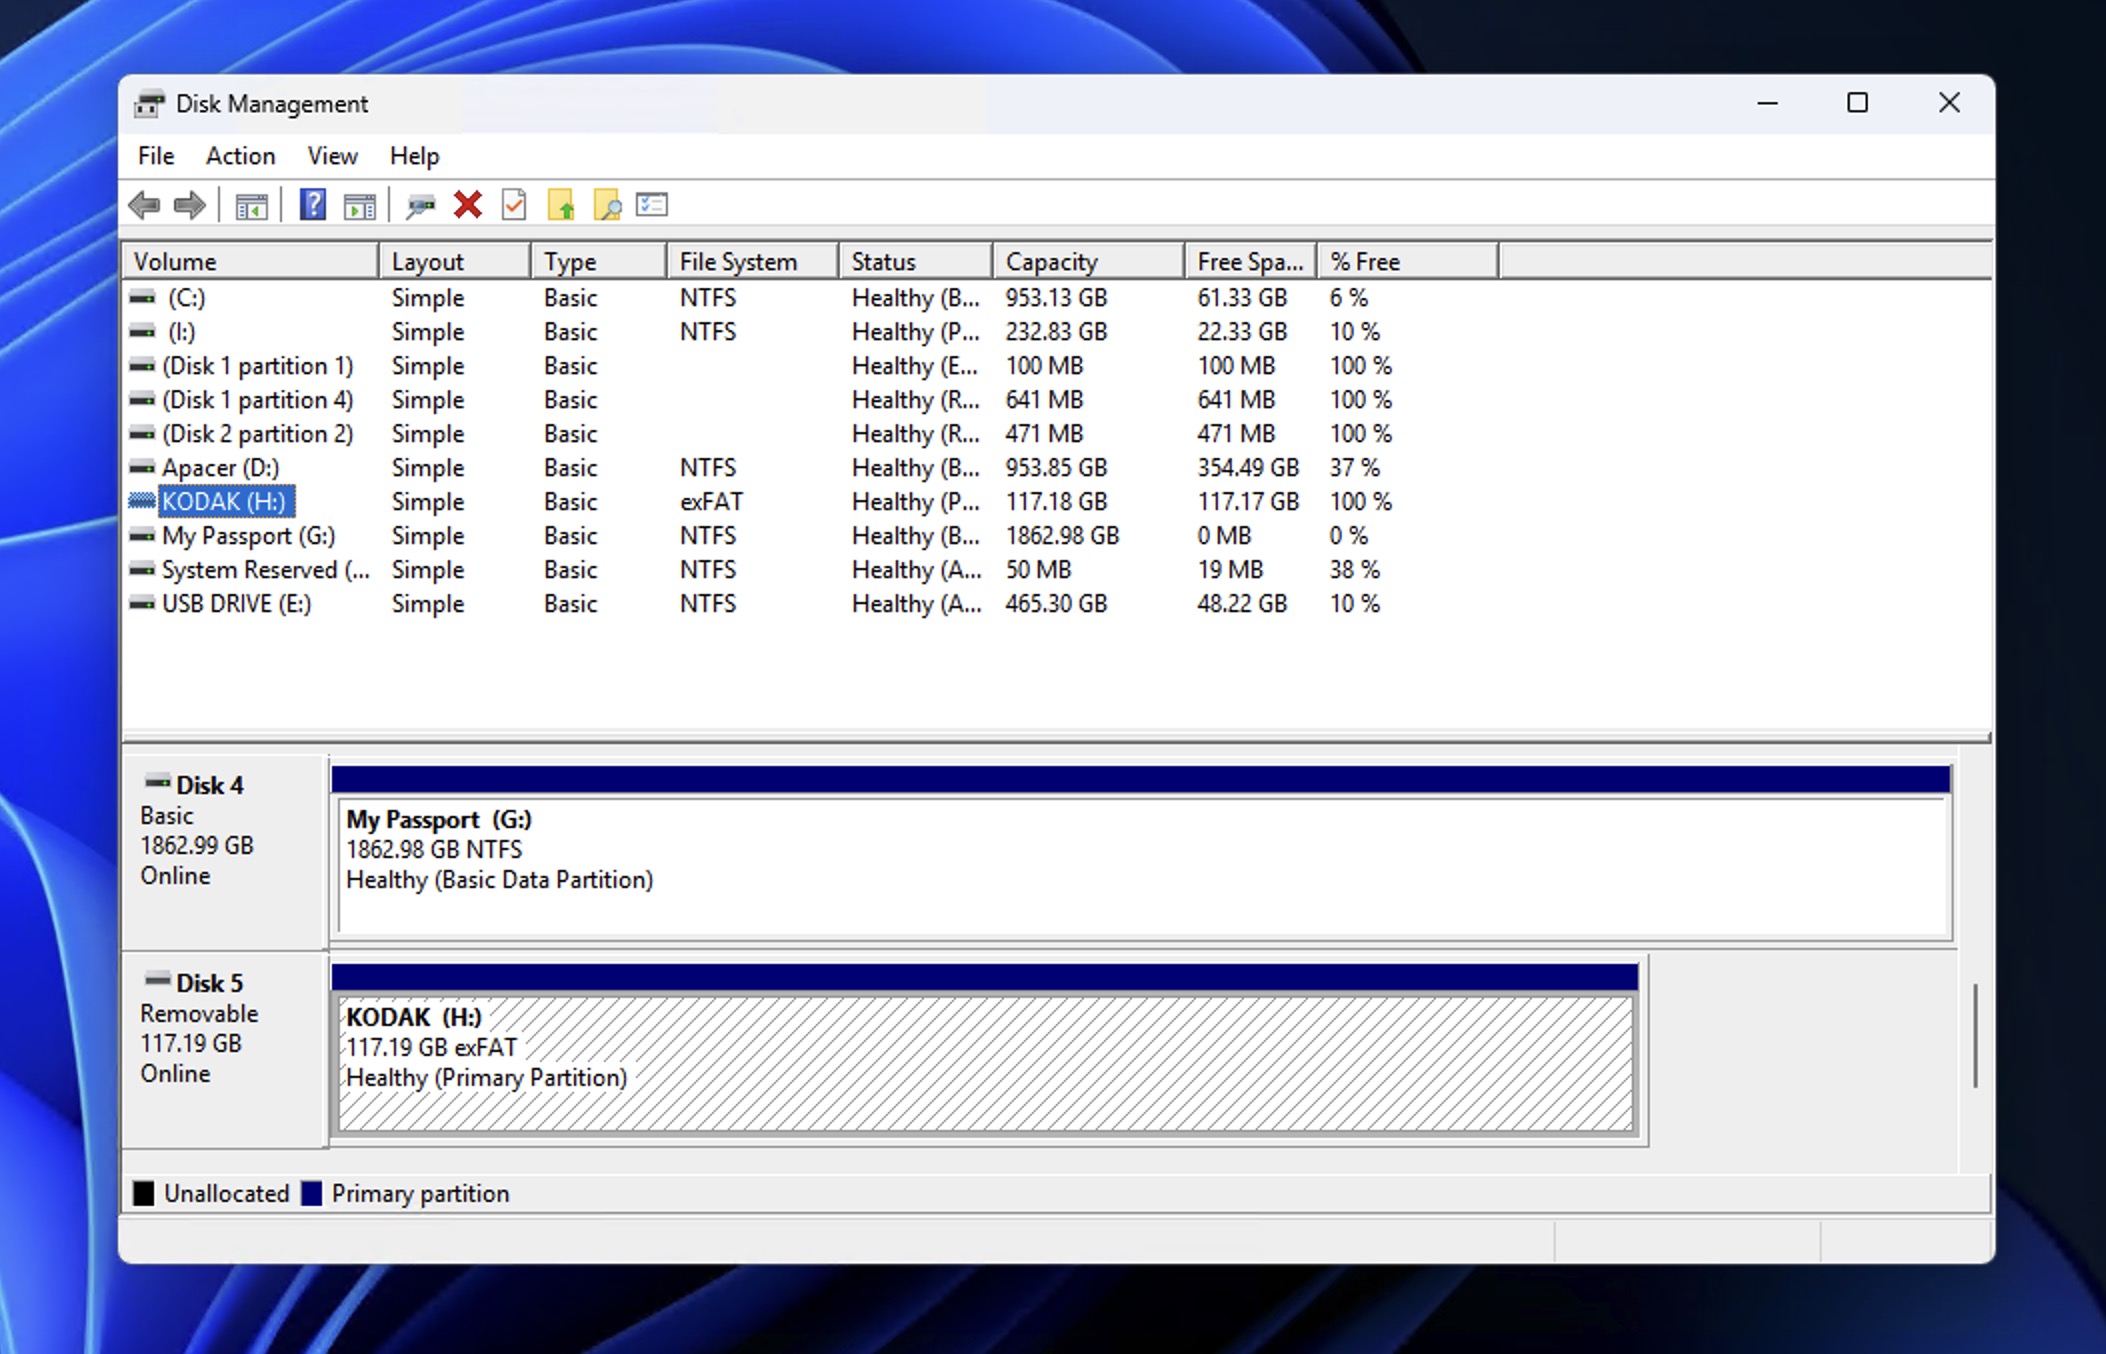
| 💿 Hardware Failure | If your USB drive isn’t recognized at all, you might be dealing with a controller chip failure, damaged memory cells, or physical damage. You can check if the issue is too serious for DIY recovery by opening Disk Management (press Win+X and select it from the menu) to see if your flash drive appears there. If it shows up with the correct size but no drive letter, that’s actually good news because it means the hardware is fine and you’re likely dealing with a software issue. | Try to Use Data Recovery Software to scan the drive before attempting any fixes. |
What the above-described causes have in common is that the data is likely still on the drive, just inaccessible through normal means.
If the USB flash drive itself communicates with your computer, then you can use data recovery software to scan the drive at a low level and, if necessary, bypass the damaged file system and read the raw data directly from the storage chips, which is exactly what we cover in the next section of the article. That said, if you’d rather skip the software route for now, your data isn’t mission-critical, or you haven’t yet checked whether your files are simply hidden, feel free to jump ahead to the fix section first and circle back to recovery if needed.
How to Recover Files Disappeared from a USB Drive
Regardless of why your USB files disappeared, the best approach at this stage is to run flash drive recovery software to check whether your files are still present and recoverable.
For this guide, we’ll use Disk Drill, a recovery tool that finds everything this type of software can possibly locate on a storage device: hidden files, deleted and lost data, and even content that’s no longer accessible through File Explorer when a flash drive has read issues.
You won’t know until you try, and the entire recovery process comes down to the following steps:
- Download and install Disk Drill on your computer. Install it on your internal drive, not on the flash drive you’re trying to recover from, to avoid overwriting any data.
- Connect your USB flash drive to your computer. Wait until you hear the notification sound confirming the drive has been recognized, and verify this by checking if it appears in File Explorer or Disk Management (press Win+X to open it). Then launch Disk Drill.
- Consider creating a backup first. If your flash drive shows signs of physical issues (clicking sounds, intermittent connection, or very slow read speeds), select the Drive Backup tool in the left sidebar before scanning to create a byte-to-byte image of your drive that you can scan instead. Keep in mind that you’ll need free space on your computer equal to the size of the flash drive (or disk image). You can then click Attach disk image at the bottom of the main window to mount and scan the backup.
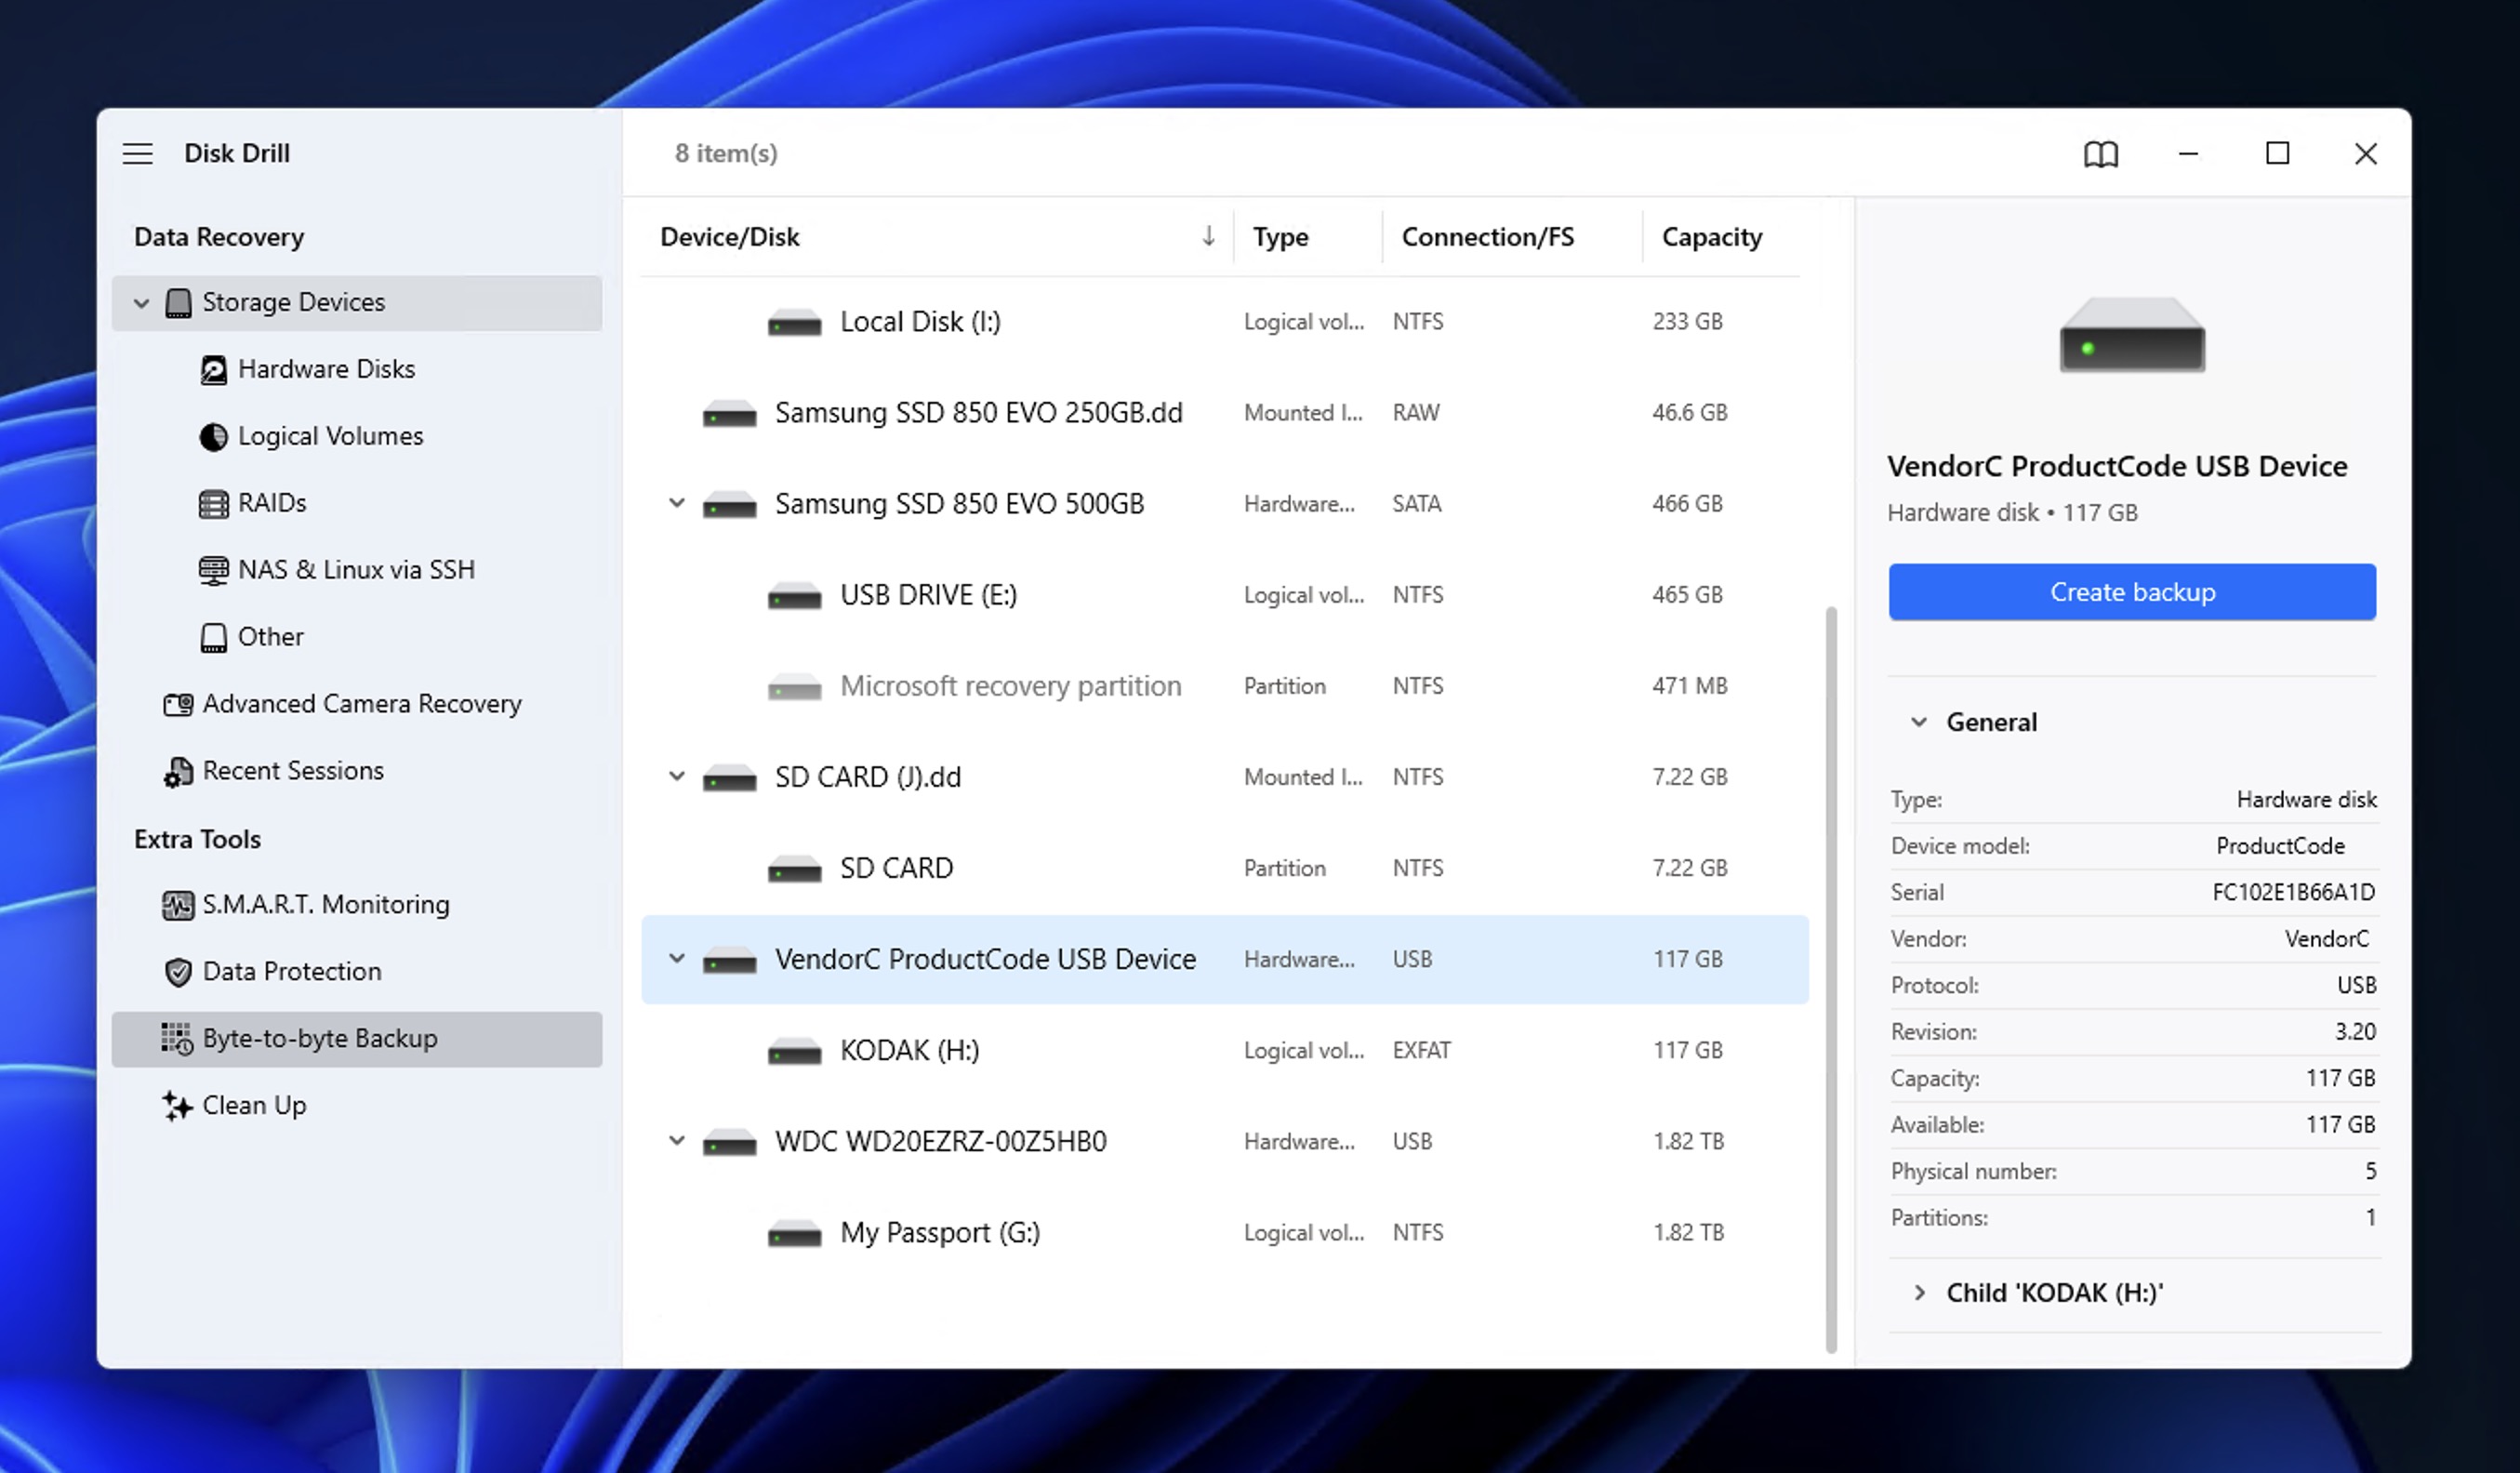
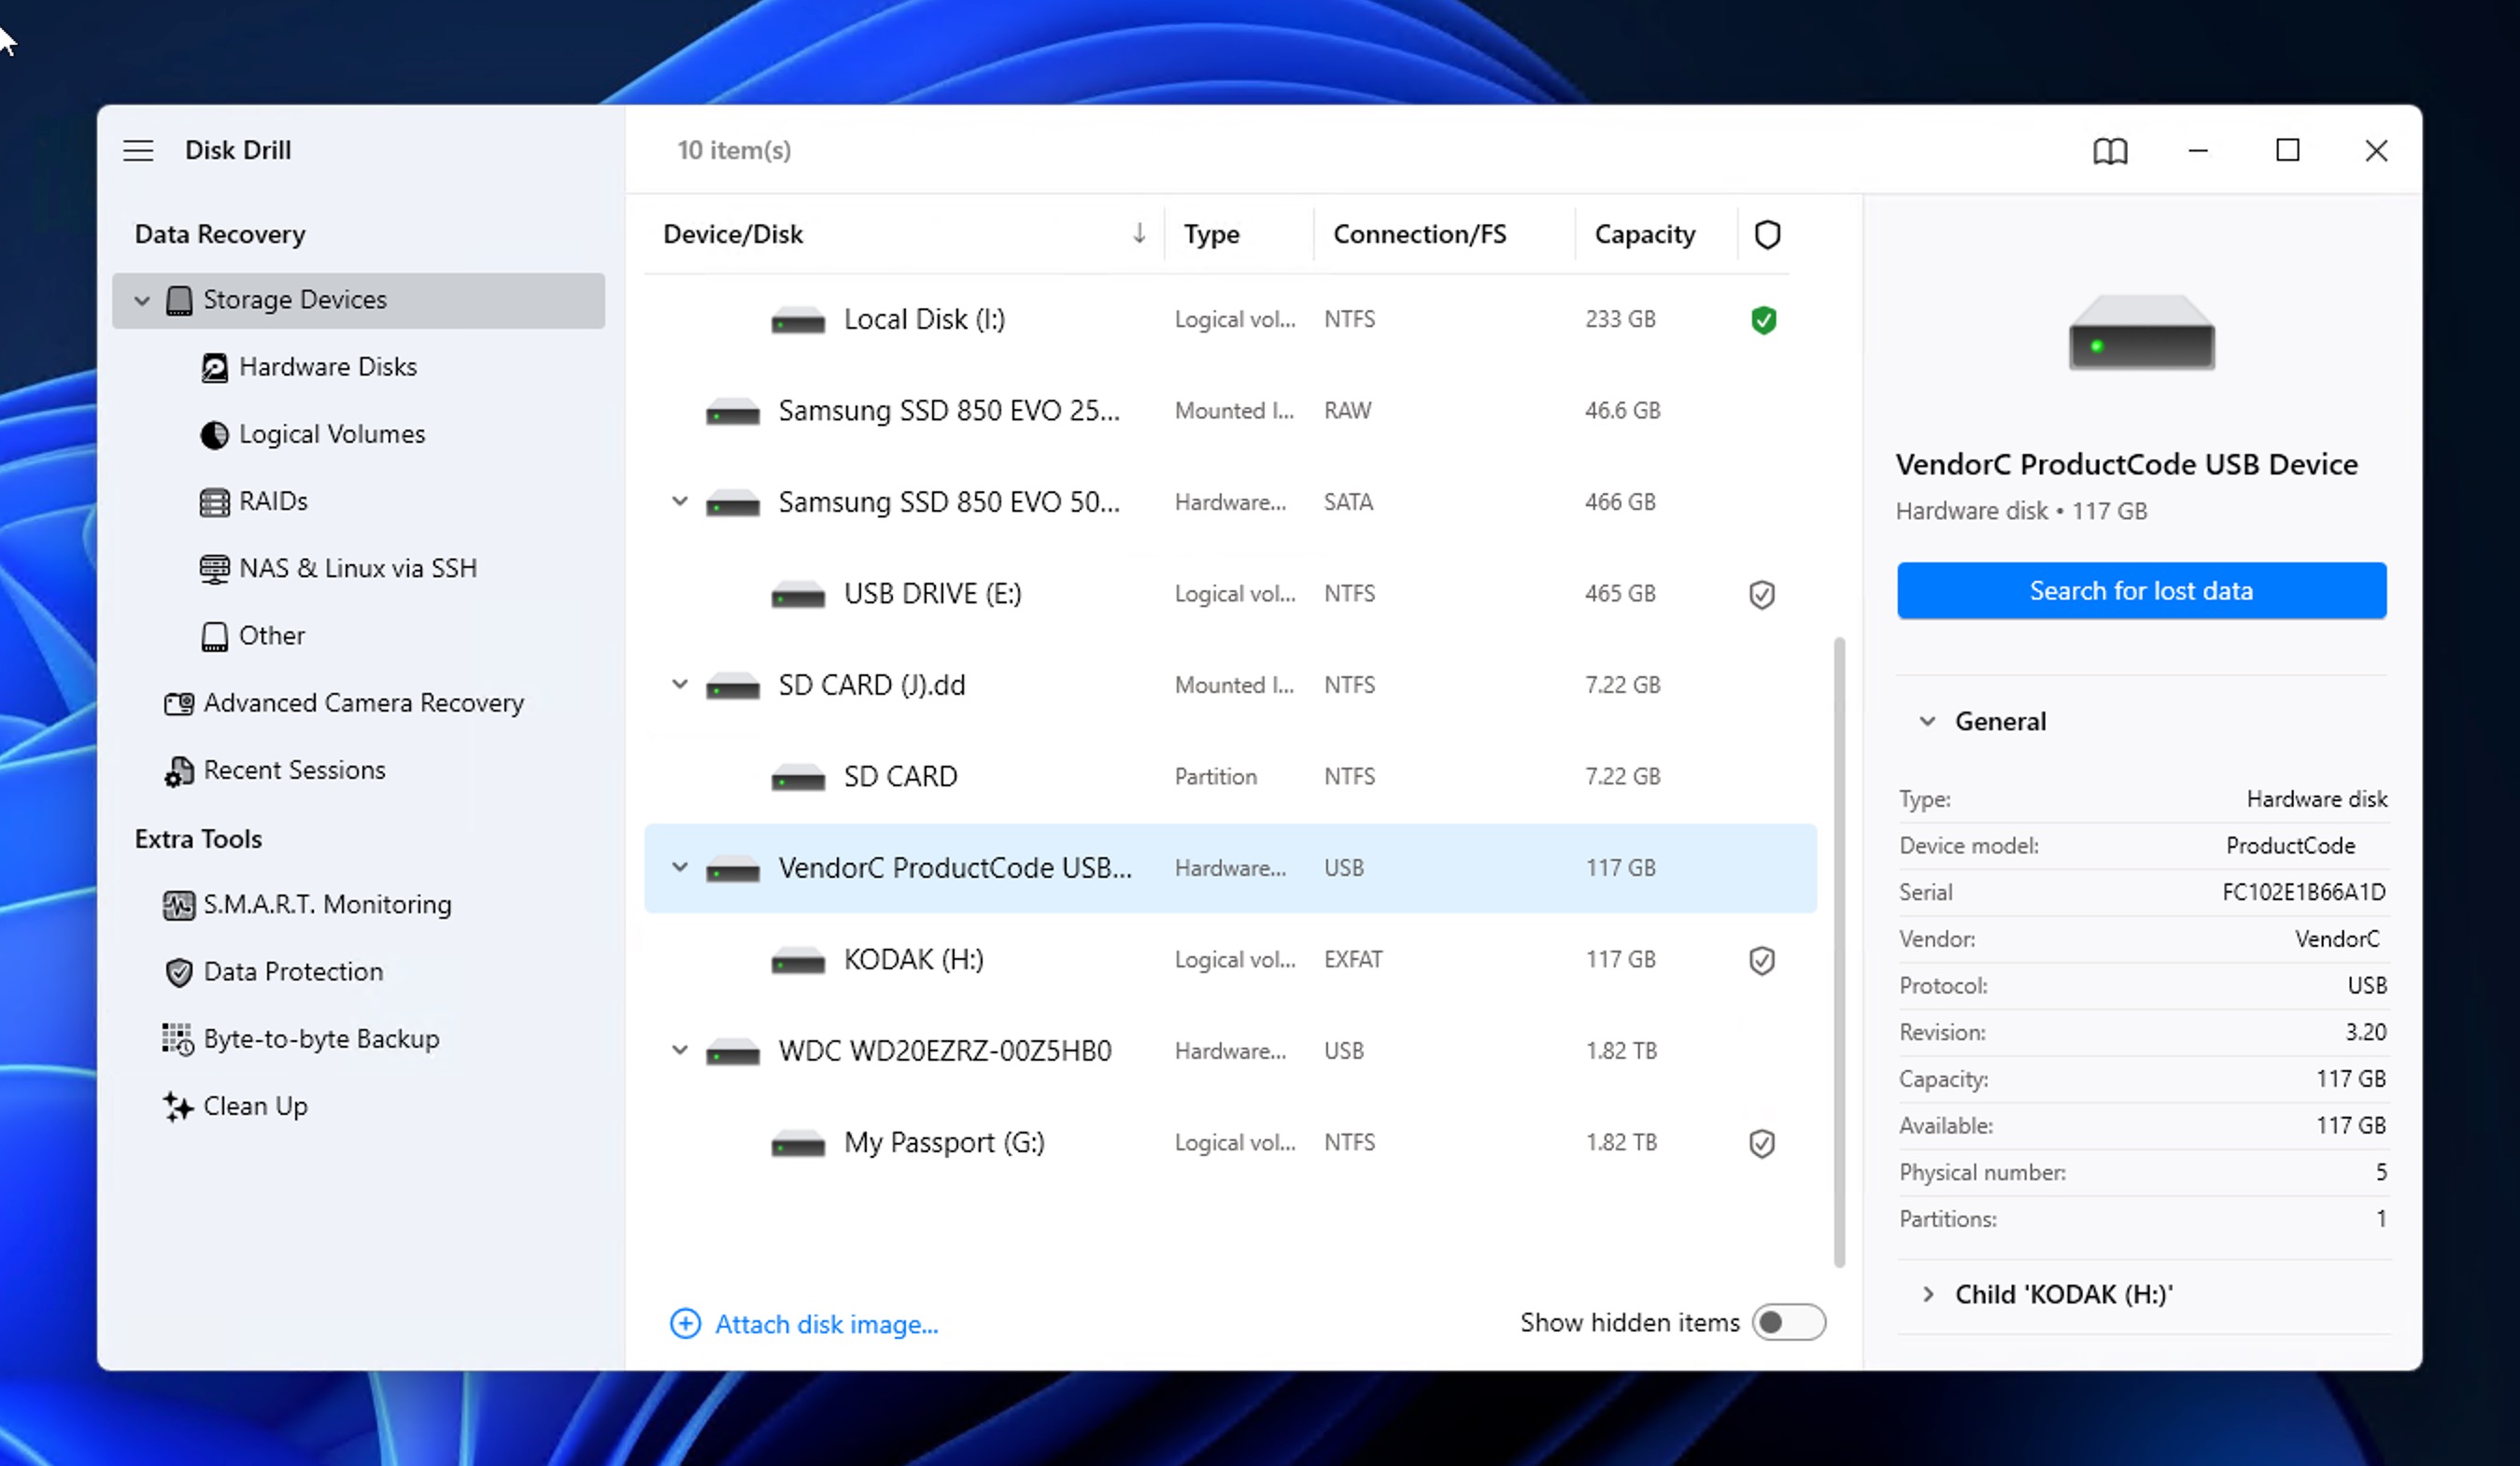
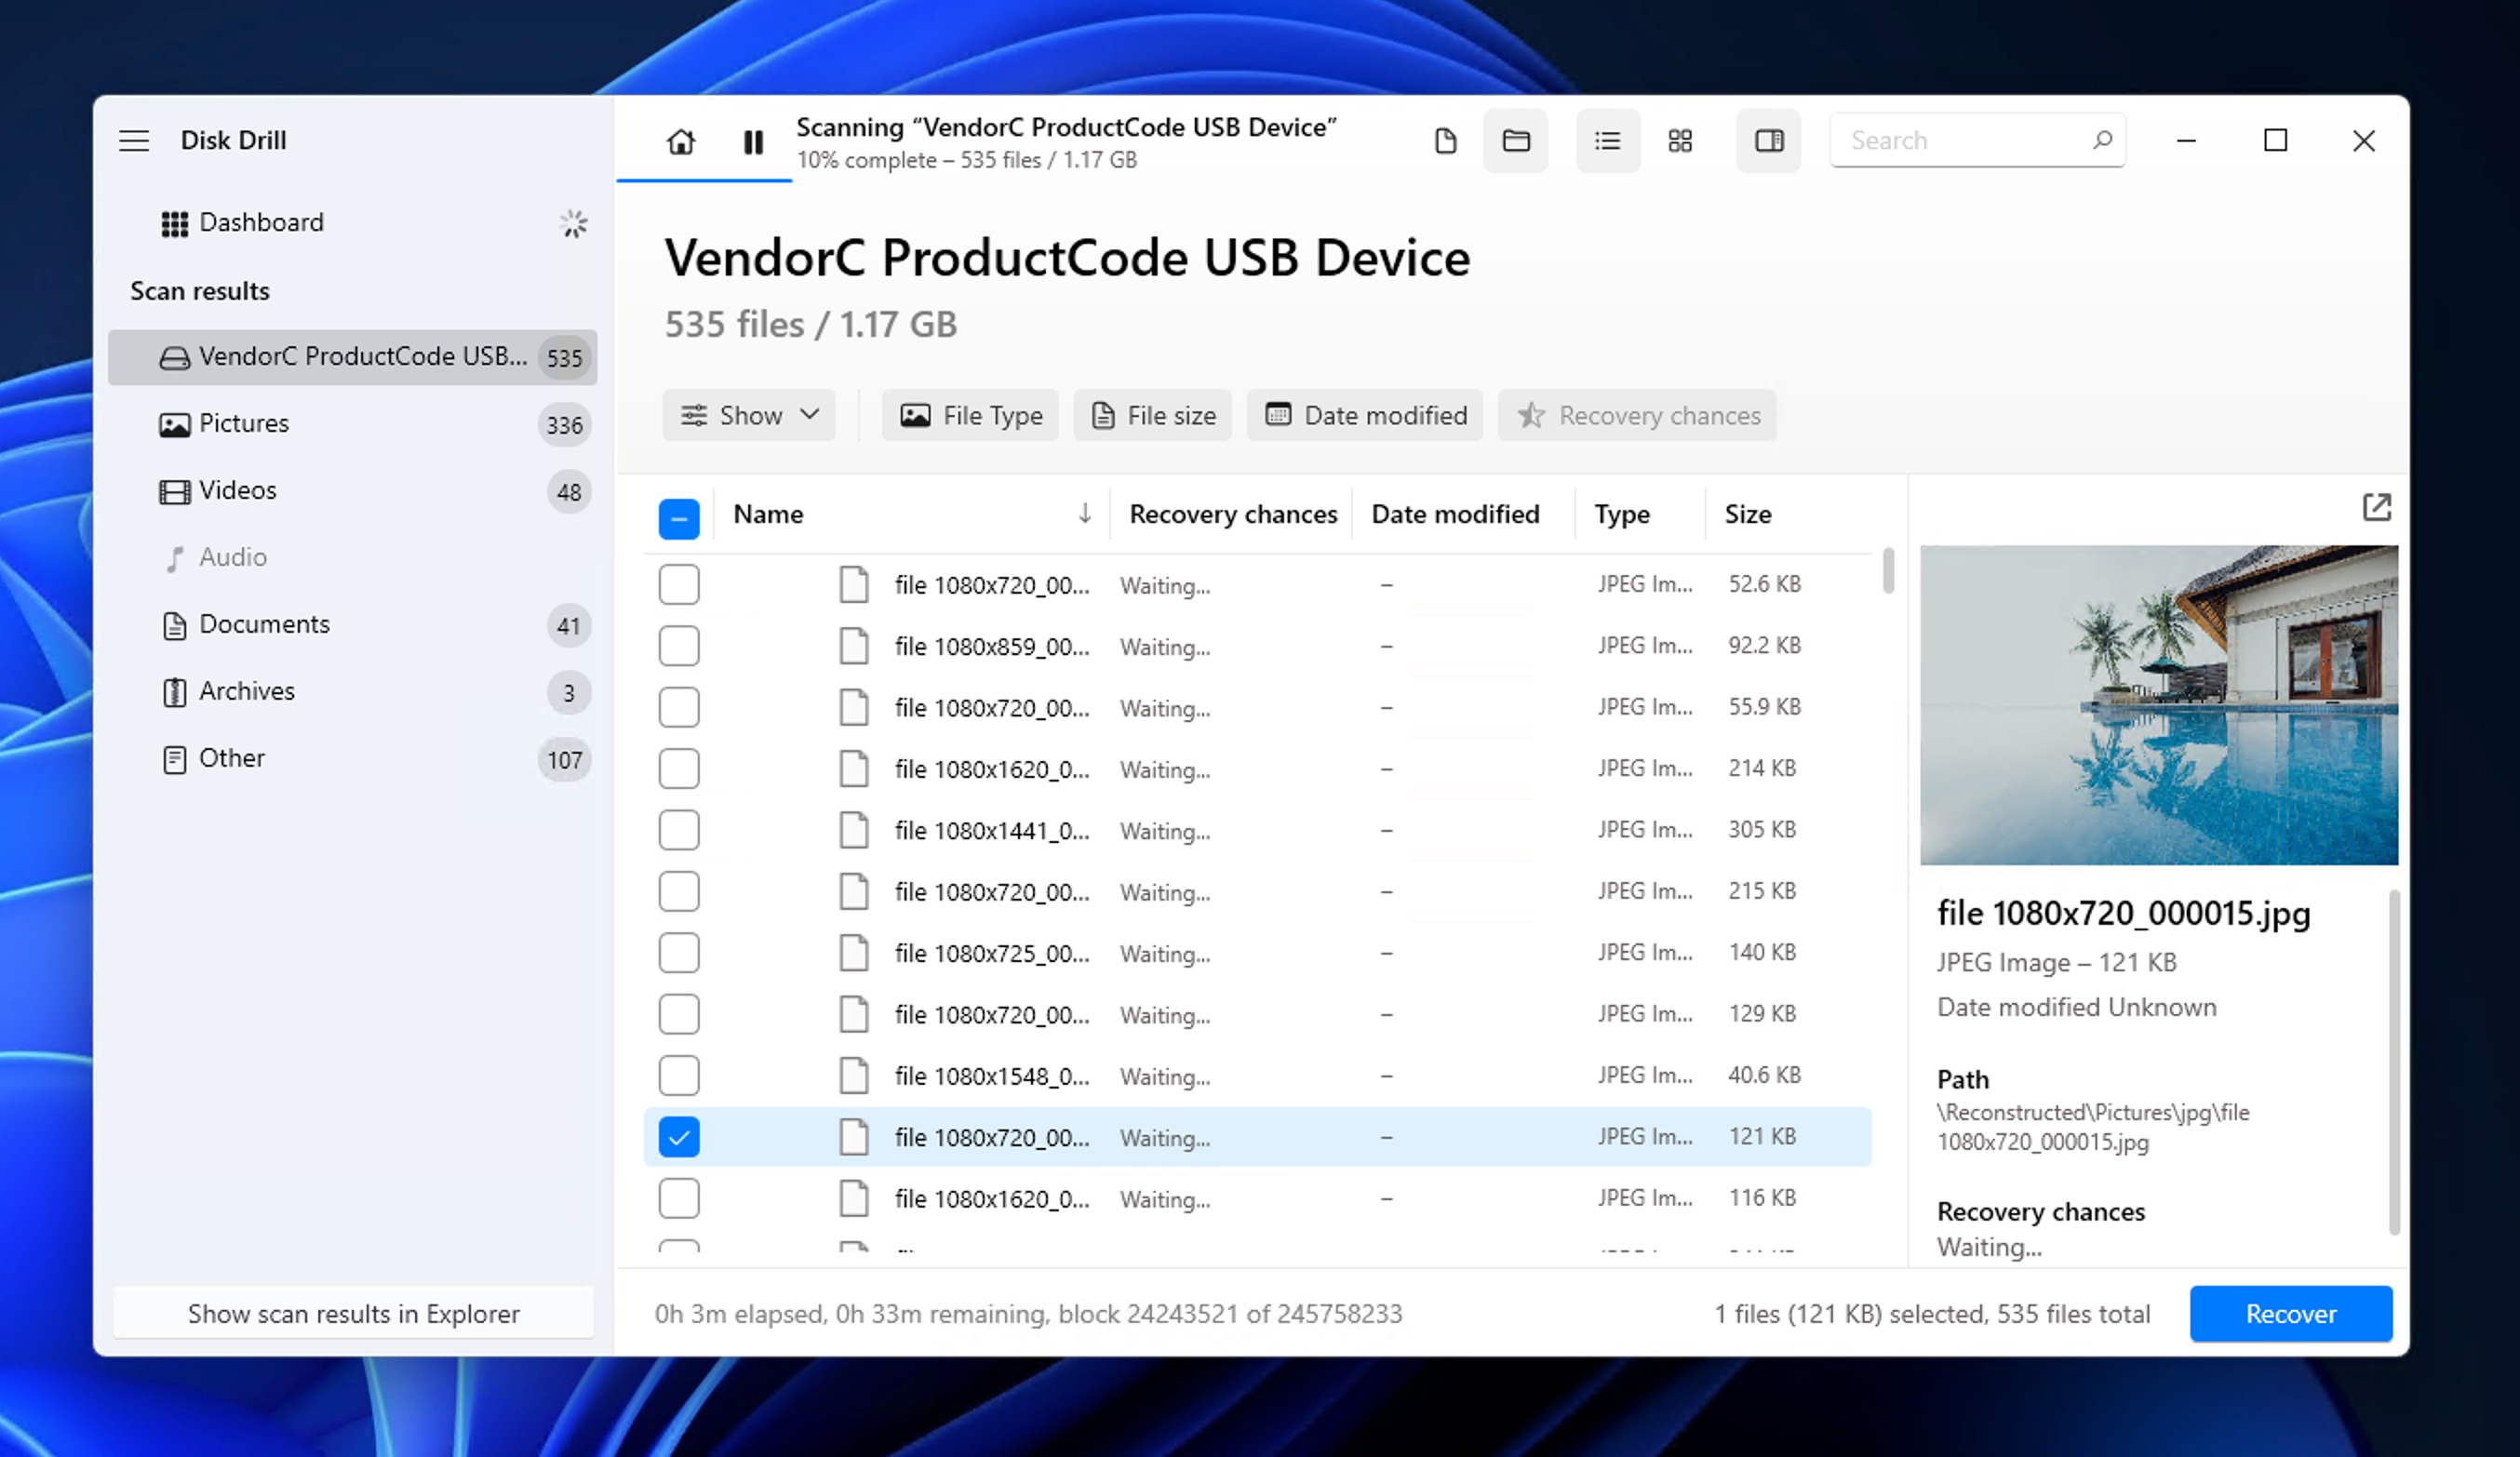
- Select your flash drive or disk image from the list of available Storage devices and click Search for lost data to start the scan. Disk Drill will ask you to choose between Universal Scan and Advanced Camera Recovery. For most flash drive recovery scenarios, Universal Scan is the right choice. Use Advanced Camera Recovery only if your drive contains primarily photos and videos from a camera.
- Wait for the scan to complete. Disk Drill will run through several recovery methods automatically. You can click Review found items at any point to browse results while the scan continues in the background.
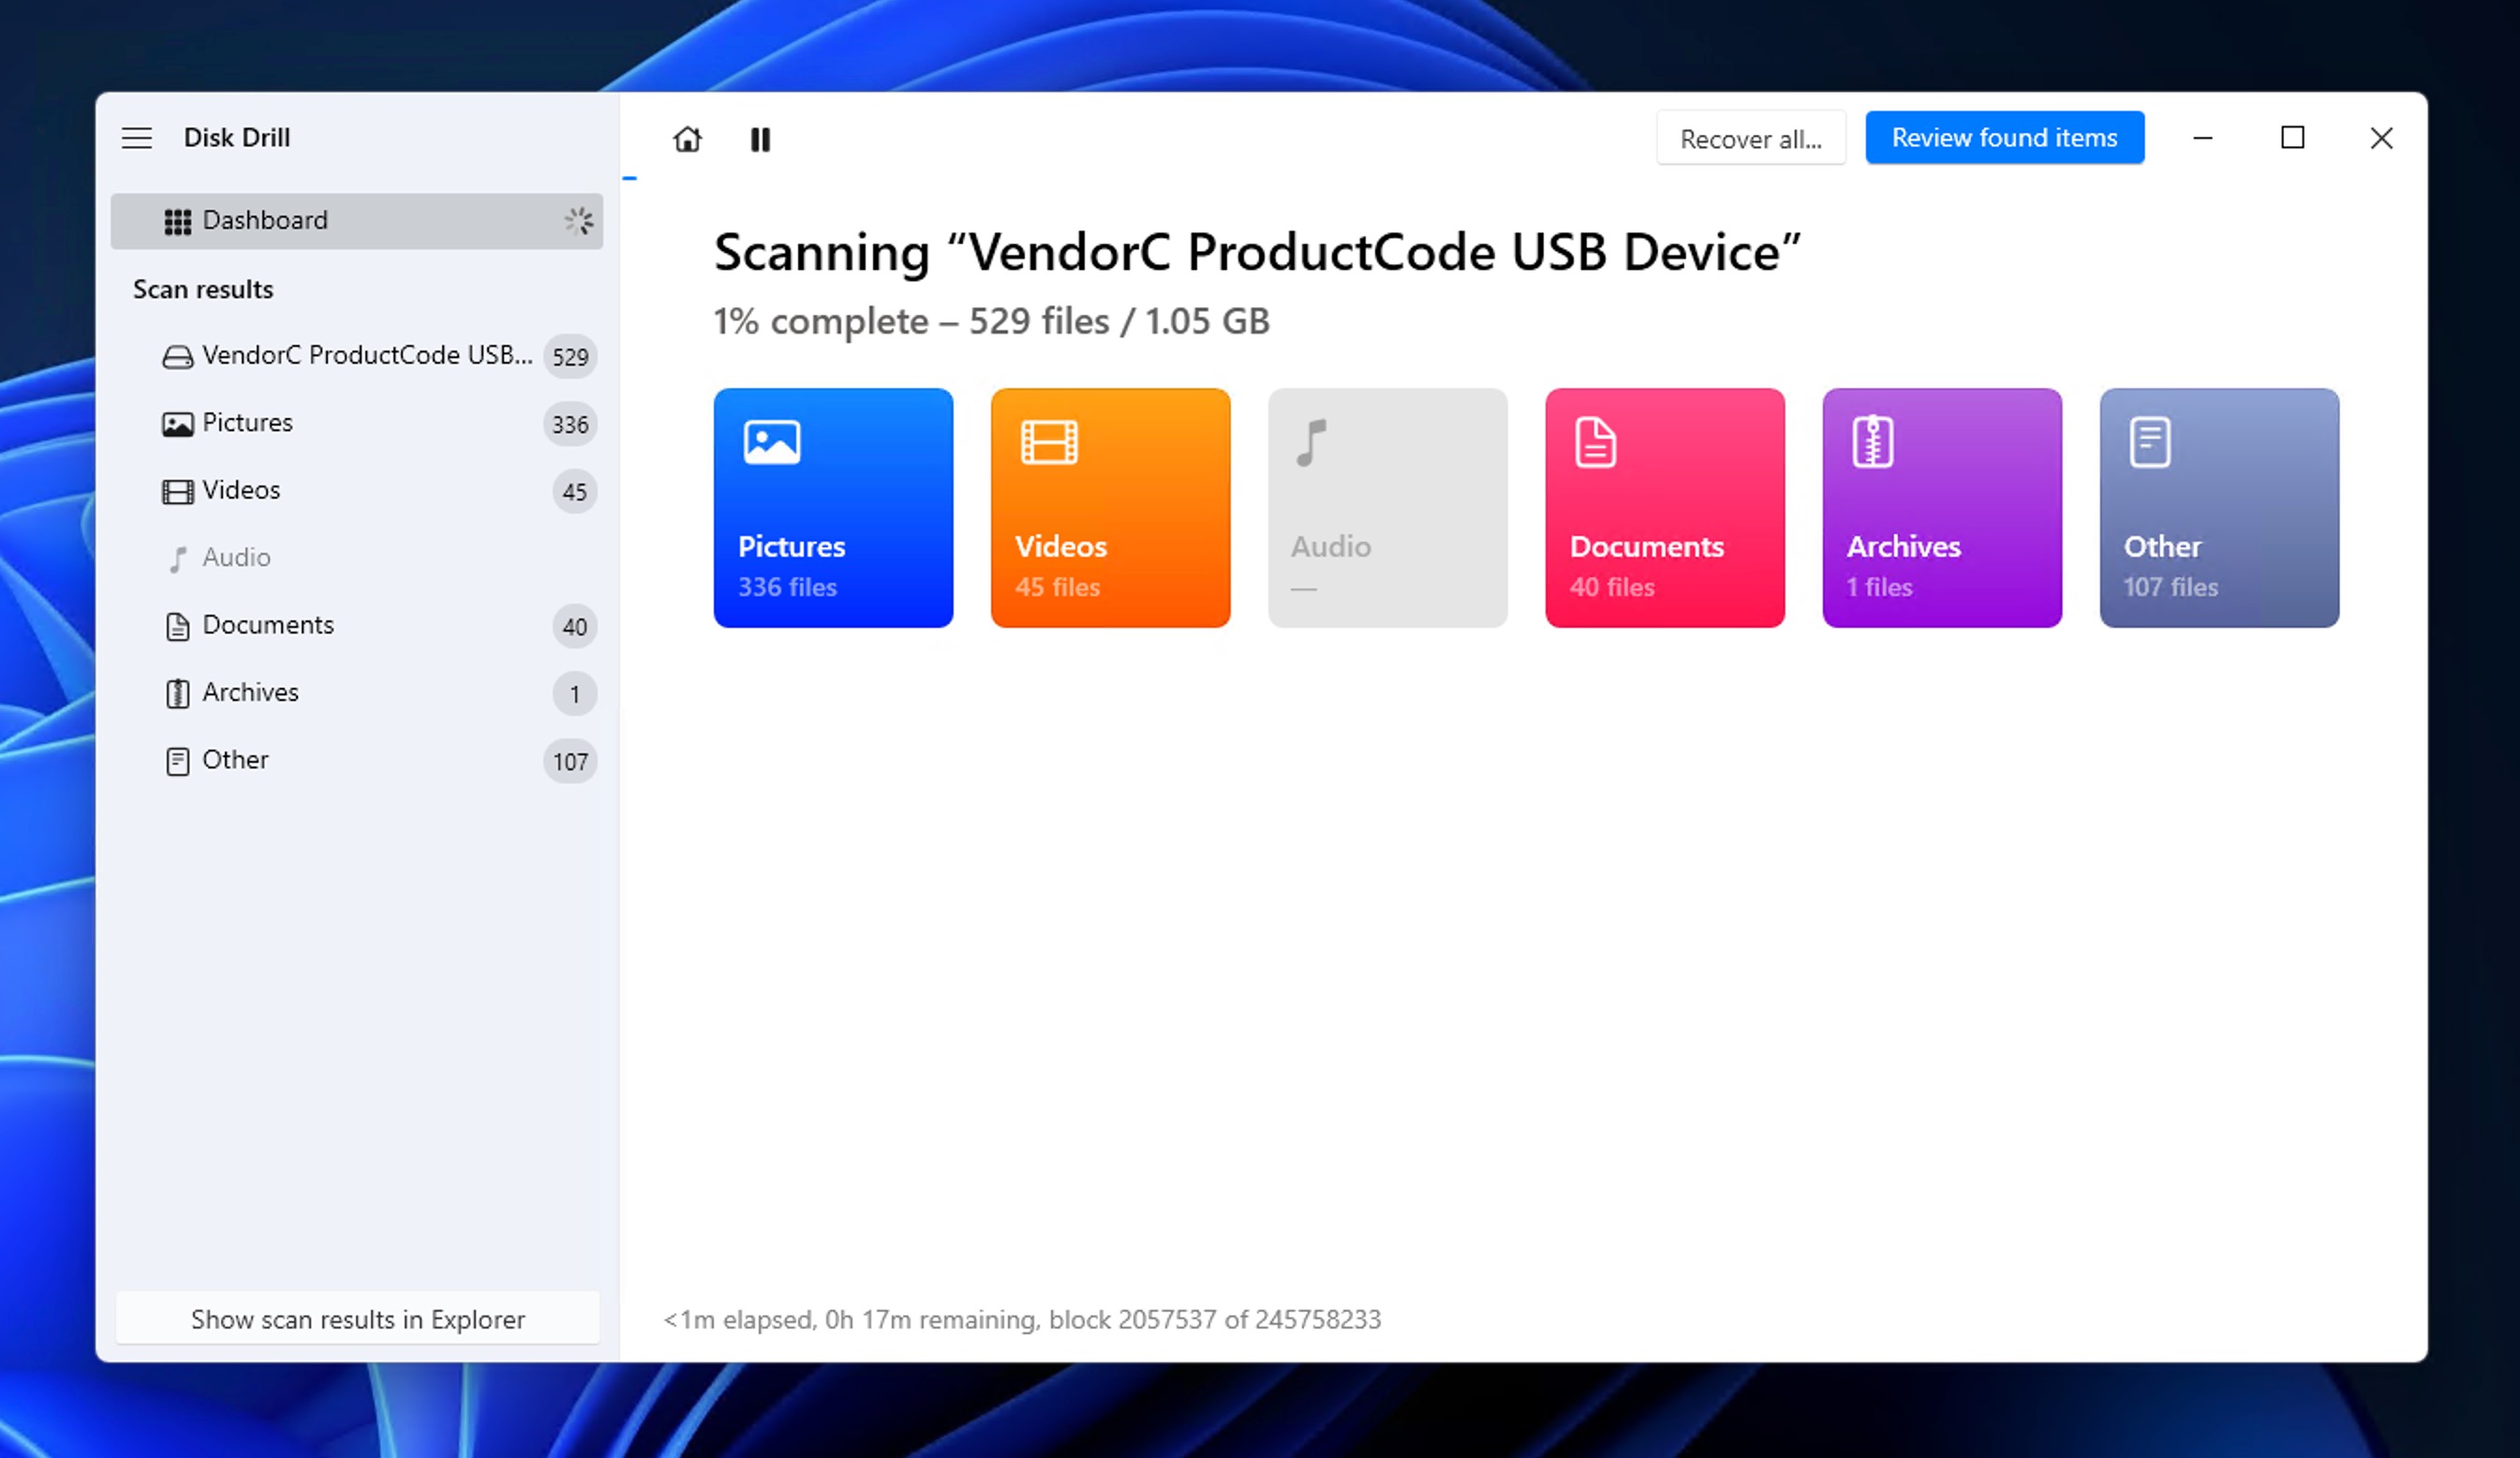
- Browse the results. Depending on what happened to your files, they can show up in different categories:
- Existing files are those that are still intact on the drive but might be hidden or inaccessible through normal browsing. In practice, these are files that should already be visible in File Explorer under normal circumstances. Worth noting: recovering them doesn’t count toward Disk Drill’s free recovery limit.
- Deleted or lost files are those that were removed but haven’t been overwritten yet, with their file names and folder structure often still intact.
- Reconstructed files are recovered using file signatures when the file system data is too damaged. These files get generic names, but the content is fully recovered. Disk Drill recognizes around 400 file signatures, which means it can identify and reconstruct documents, photos, videos, and archives even when the file system is completely destroyed.
- Preview and select your files. Click on any file to preview it before recovery to confirm you’re getting back what you need. Disk Drill can preview most common file types that Windows itself supports, including images, documents, and videos. This step matters because if a file previews correctly, it’s almost certainly recoverable in full. You can use the filters in the left pane to narrow down by file type, or use the search bar to find specific files by name.
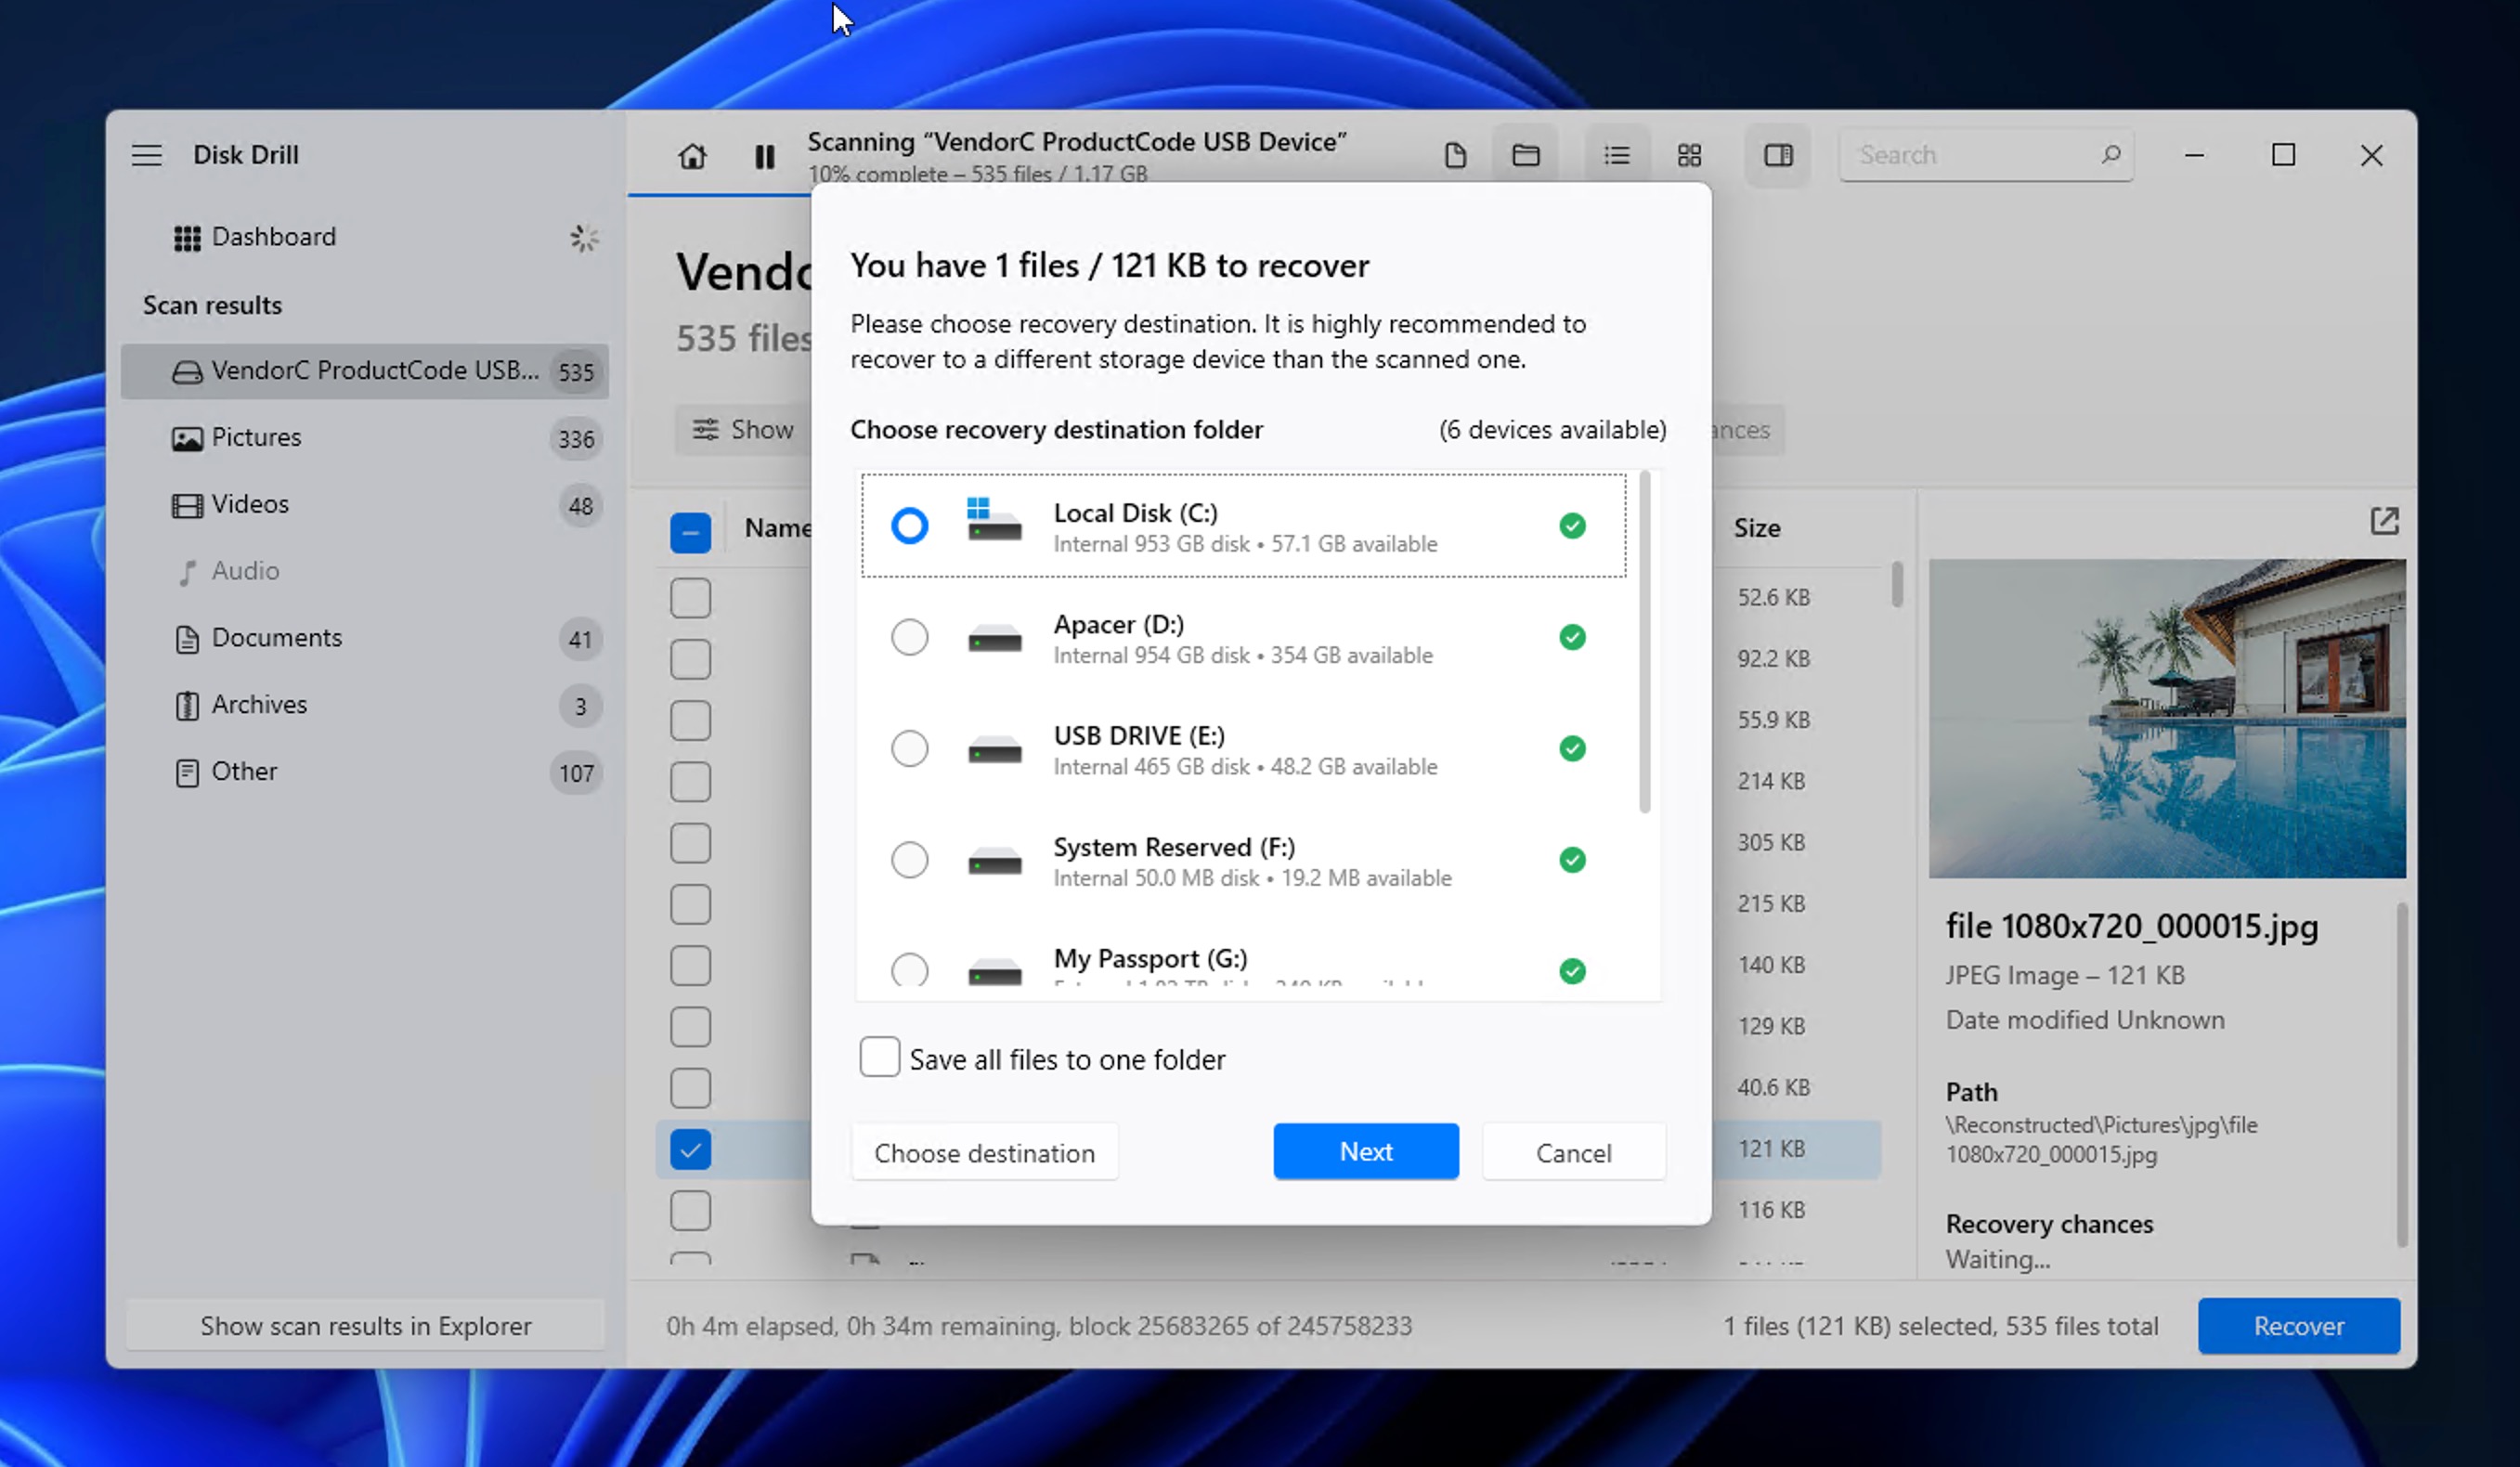
- Recover to a safe location. Select the files you want and click Recover. When prompted, choose a destination folder on a different drive (not back to the same flash drive) and click Next.

On Windows, Disk Drill lets you preview all recoverable files for free, and you can recover up to 100 MB of data at no cost. If you need to recover more, you’ll need to upgrade to the Pro version.
For users dealing with files disappeared from a flash drive on Mac, Disk Drill offers a native macOS version with the same recovery capabilities, including full support for APFS, HFS+, and Windows file systems like FAT32 and exFAT that are commonly used on USB drives. And if you’re on Windows but need to recover data from an Apple-formatted drive, Disk Drill 6 now supports that directly without needing a Mac.
Fix the Cause After Files Disappeared from USB Drive
If you haven’t recovered your data yet, stop and think carefully. Most of the methods in this section carry some risk of data loss, and a few will wipe recoverable files entirely. If your data matters, go back and complete the recovery steps first.
If you’ve already recovered everything you need, the simplest path forward is to format the drive and start fresh. The methods below are mainly for users looking for alternatives to using data recovery software or those who want to try fixing the drive without formatting.
Method 1: Unhide Files In Properties
Enabling Hidden items in File Explorer will show hidden files, but it doesn’t actually change their attributes. This means those files will become invisible again if you disable the option or view the drive on another computer. The attrib command in Command Prompt can strip away all these attributes permanently, so your files stay visible without needing to change any view settings.
Here’s how to unhide files using Command Prompt:
- Connect your USB flash drive to your computer and note which drive letter it’s assigned (for example, E:). You can see the letter assigned to your USB flash drive in Disk Management (press Win+X and select it from the menu) or the This PC section of File Explorer.
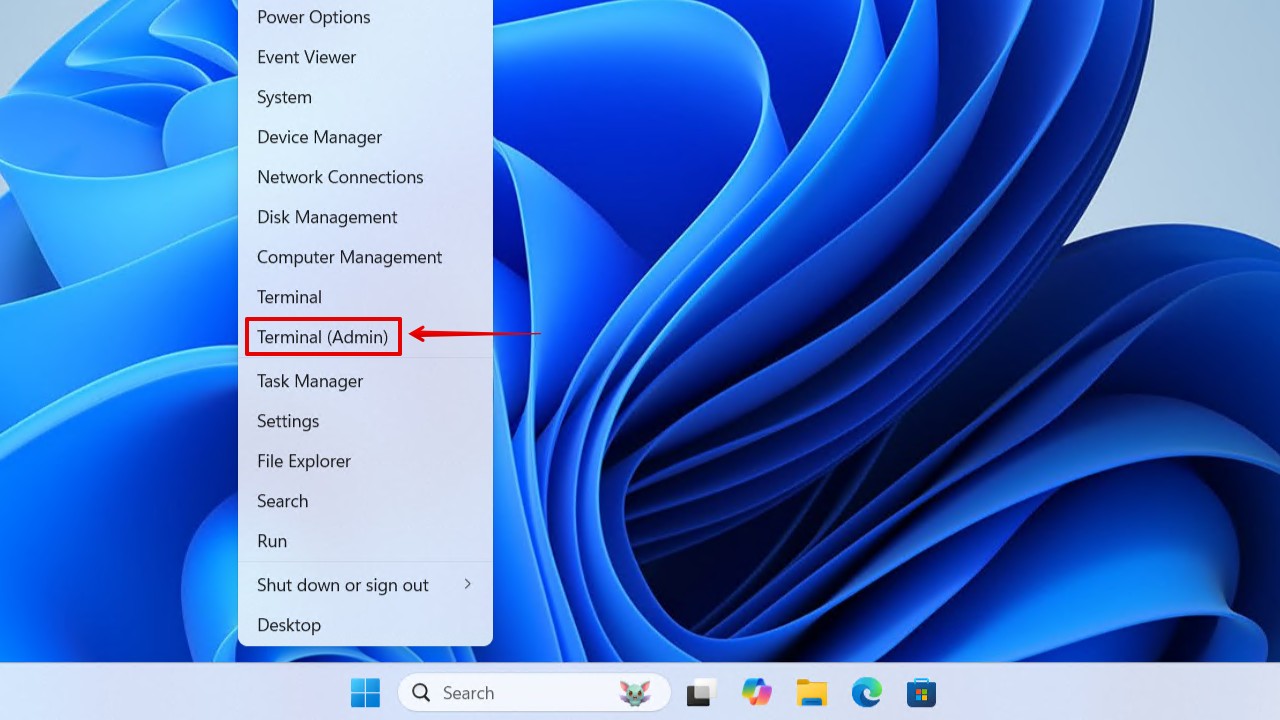
- Press Win+X and open Terminal as administrator.
- Type the following command and press Enter (replace E: with your actual drive letter):
attrib -h -r -s /s /d E:\*.*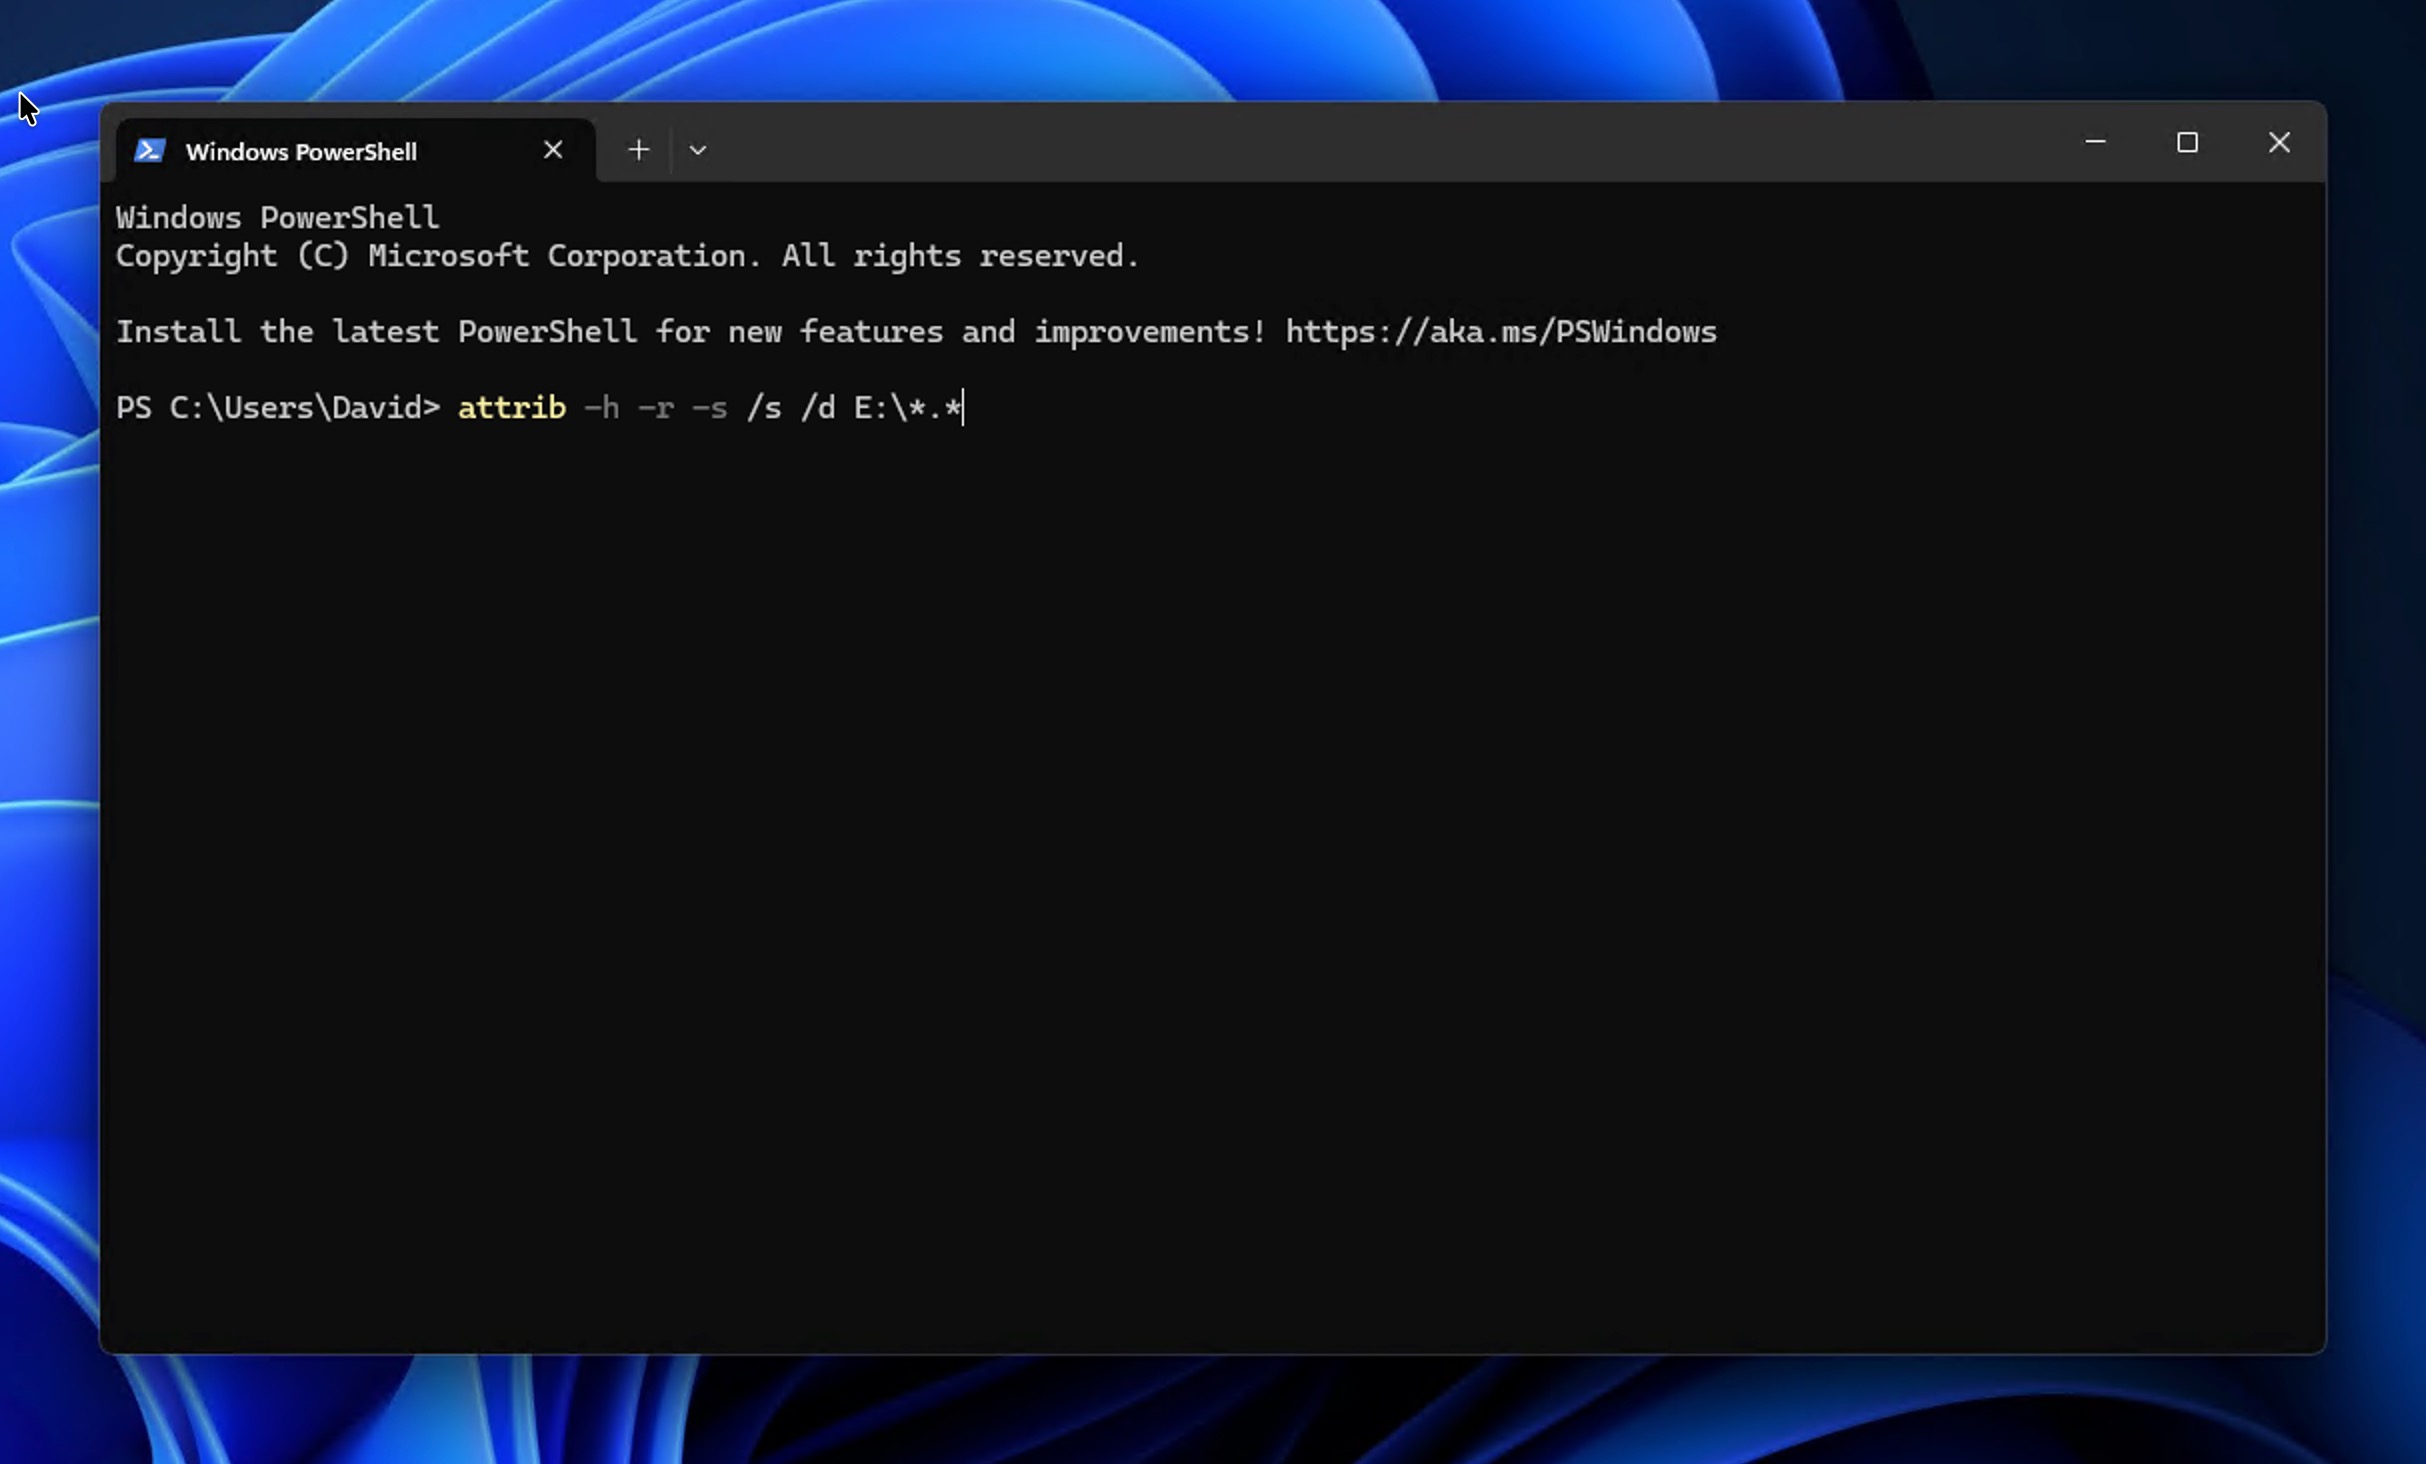
-h removes the hidden attribute, -r removes the read-only attribute, and -s removes the system file attribute. The /s switch applies these changes to all files in subfolders, while /d includes the folders themselves in the process.Assuming the command has completed without any errors, open File Explorer and navigate to your flash drive. Your previously hidden files should now be visible. If this method reveals your files, you’ve confirmed that the issue was attribute-based, likely caused by malware. In that case, you should also run Method 2 to make sure the infection is cleared.
Method 2: Run Antivirus
If malware was responsible for hiding your files, you need to make sure that it’s gone from the drive and/or your computer so that it doesn’t make files disappear from your flash drive again. To do this, it’s best to run a full antivirus scan. On Windows, you already have an excellent antivirus software included with your operating system, and its name is Windows Defender.
- Connect your USB flash drive to your computer.
- Open the Start menu, search for Windows Security, and open it.
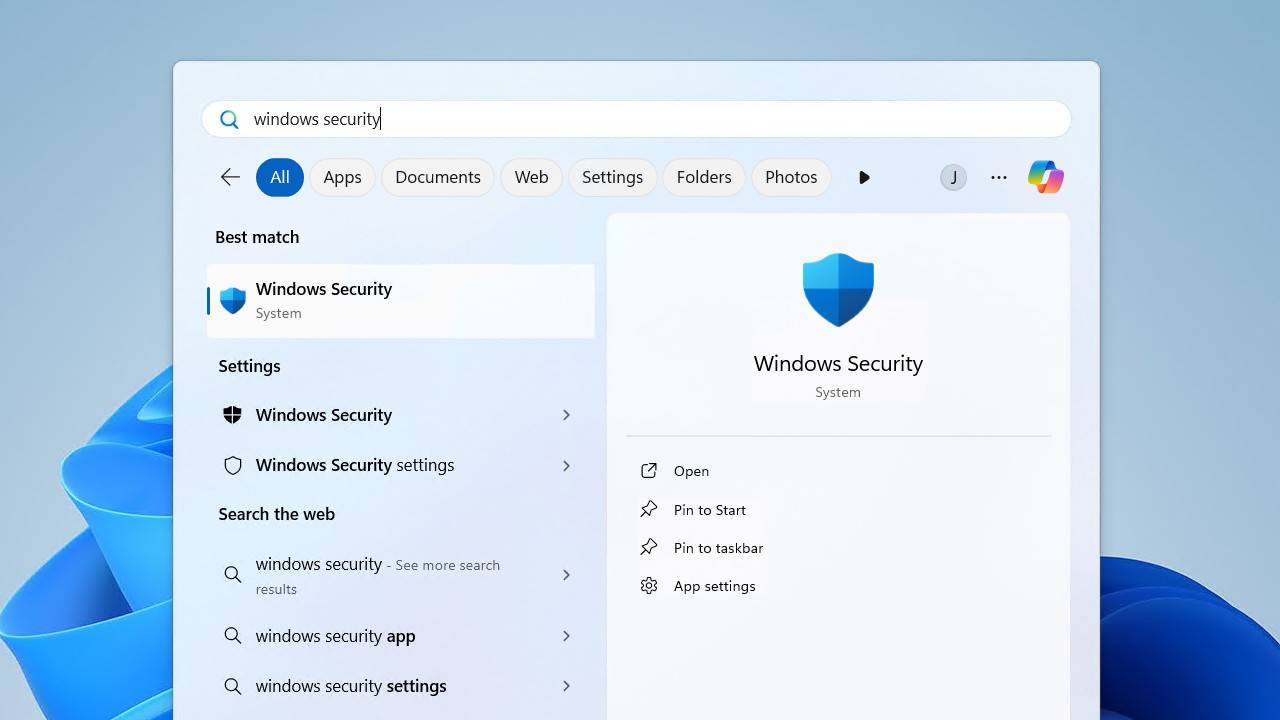
- Click on Virus & threat protection.
- Click Scan options below the Quick scan button.
- Select Custom scan and click Scan now.
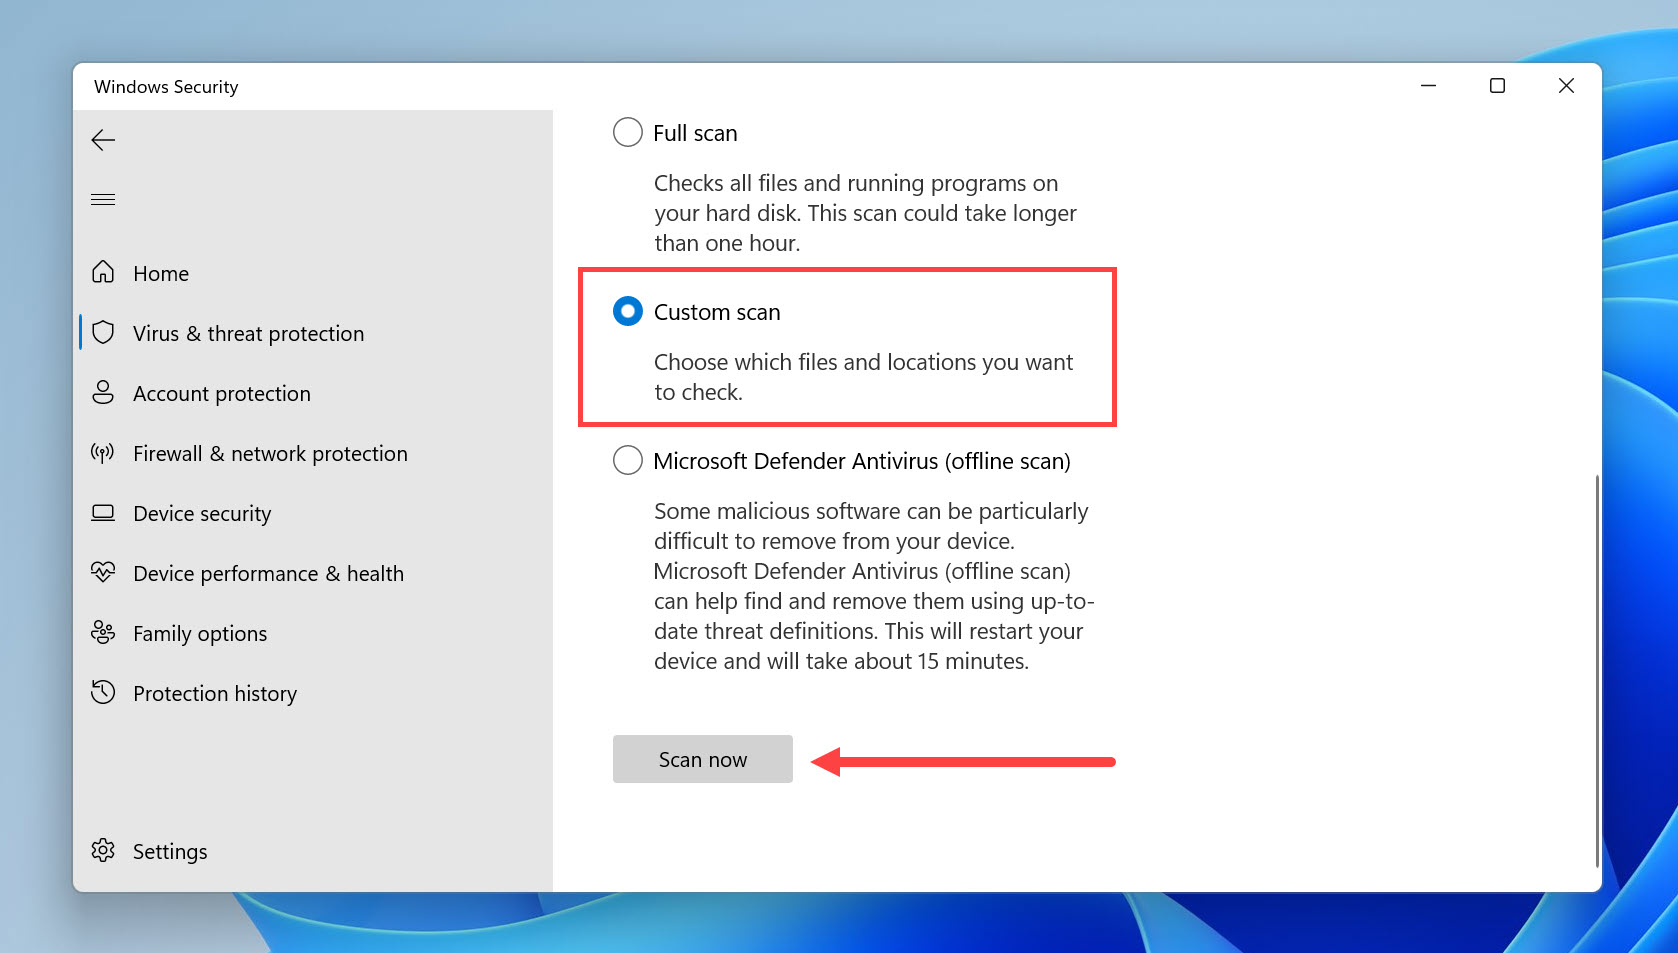
- In the file browser that appears, select your USB flash drive and click Select Folder.
- Wait for the scan to complete. If any threats are found, follow the prompts to remove or quarantine them.
After cleaning your USB drive, it’s a good idea to run a full scan of your system drive as well. Go back to Scan options and select Full scan this time to check your entire computer for any malware that might have spread from the infected flash drive.
Method 3: Use Error-Checking Tool
Windows includes a built-in error-checking tool called CHKDSK that can fix minor file system issues without formatting the drive. It scans for problems like bad sectors, lost clusters, and directory errors, then attempts to repair them while keeping your existing files intact.
Here’s how to run CHKDSK on your USB drive:
- Connect your USB flash drive to your computer.
- Open File Explorer and right-click on your flash drive.
- Select Properties and go to the Tools tab.
- Under Error checking, click Check.
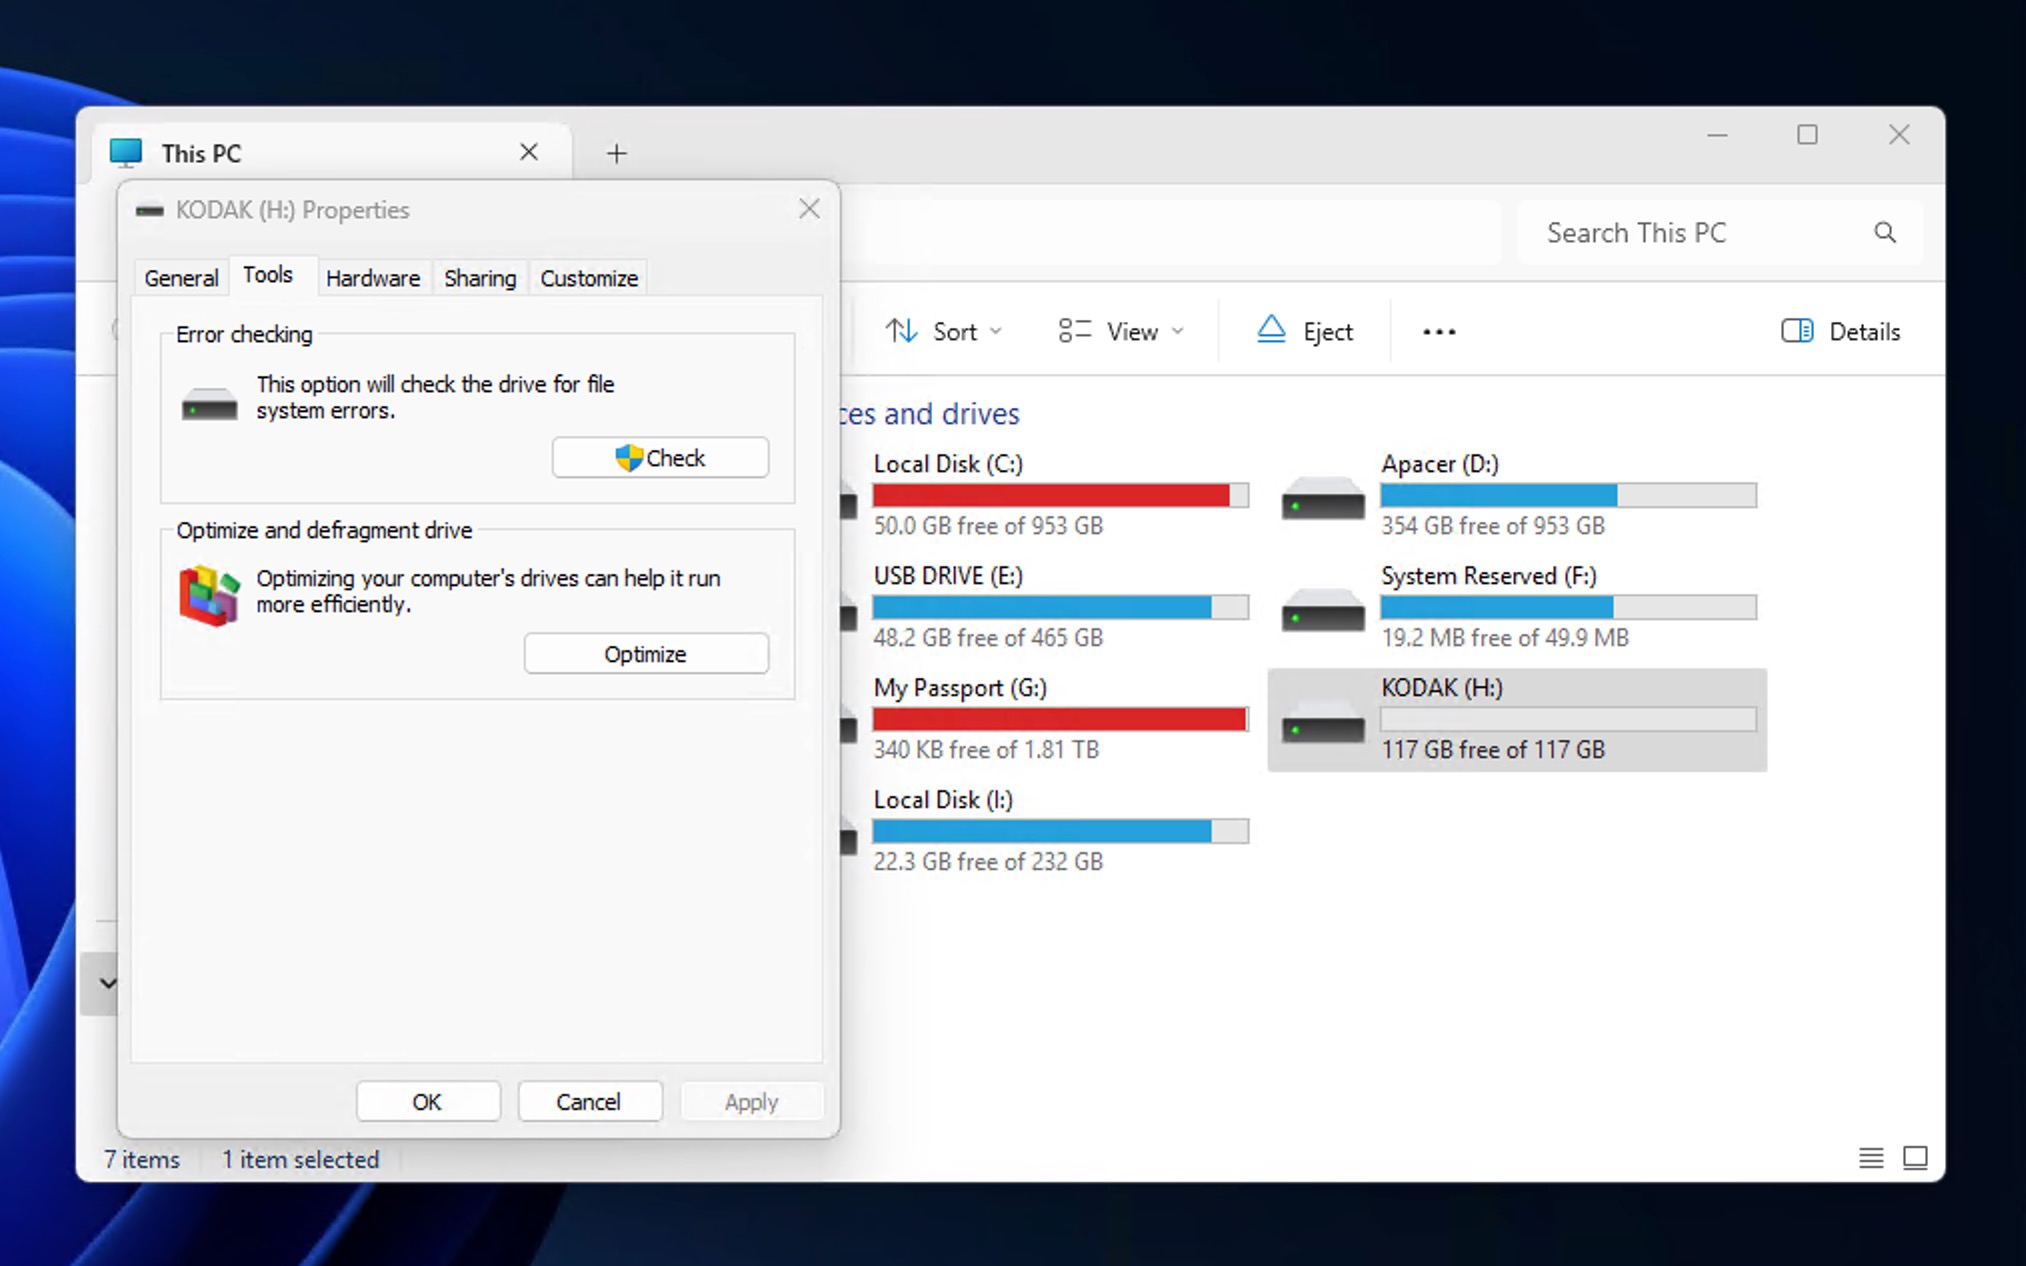
- If Windows finds errors, follow the prompts to repair them.
Alternatively, you can run CHKDSK from the command line for more control:
- Press Win+X and open Terminal as administrator.
- Type the following command and press Enter (replace E: with your actual drive letter):
chkdsk E: /f /r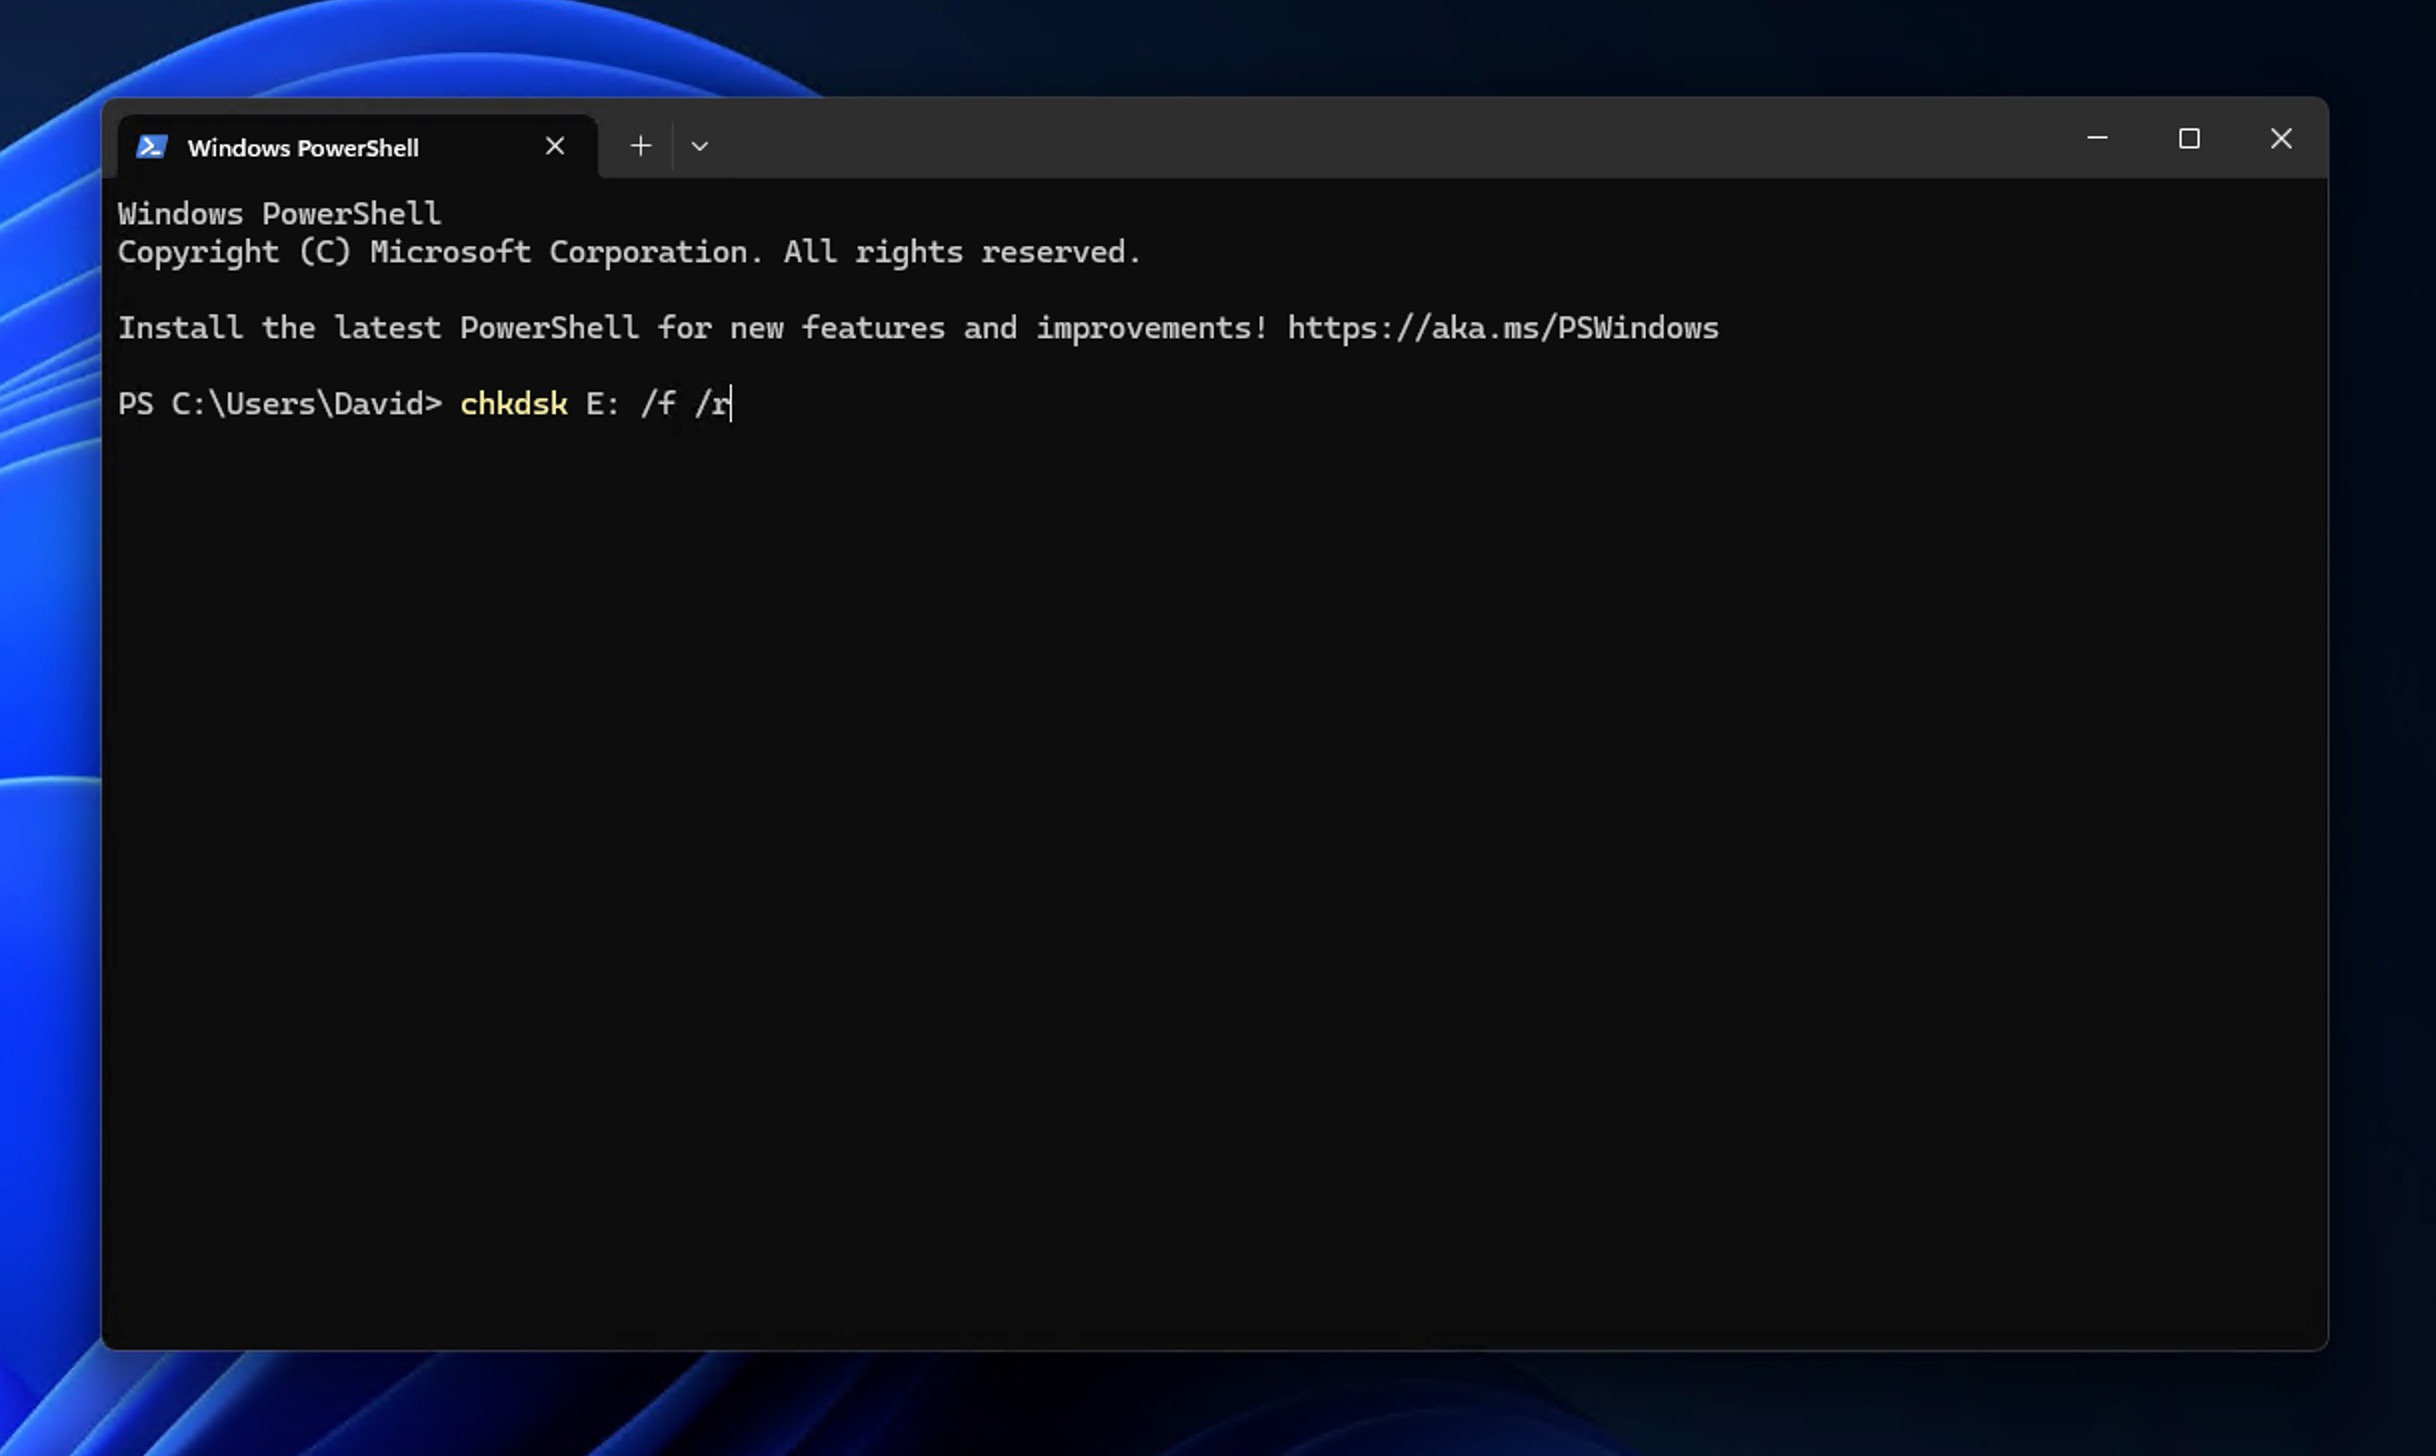
The /f parameter tells CHKDSK to fix any errors it finds, while /r locates bad sectors and recovers readable information from them. This process can take anywhere from a few minutes to an hour, depending on your drive’s size and condition.
If CHKDSK reports that it fixed errors, your drive should be stable again. However, if the tool finds a large number of bad sectors or keeps reporting the same errors after multiple runs, your flash drive may be failing, and you should consider replacing it. You can learn more about dealing with problematic flash drives in our guide on how to fix a broken USB stick.
Method 4: Format USB Drive to Fix Major Issues
There are two main ways to format a USB flash drive in Windows. The first method is simpler and works through File Explorer, but it only affects the currently visible partition. The second method uses Disk Management to wipe all partitions and create a single new one from scratch. Use method A if your flash drive shows the correct size in File Explorer. If the size appears wrong or the drive shows as RAW, go with method B.
Method A: Format through File Explorer
- Connect your USB flash drive to your computer.
- Open File Explorer and right-click on your flash drive.
- Select Format from the context menu.
- Choose your file system. For most users, exFAT is the best choice because it works on both Windows and Mac and supports files larger than 4 GB. If you only use the drive with Windows computers, NTFS is also a solid option.
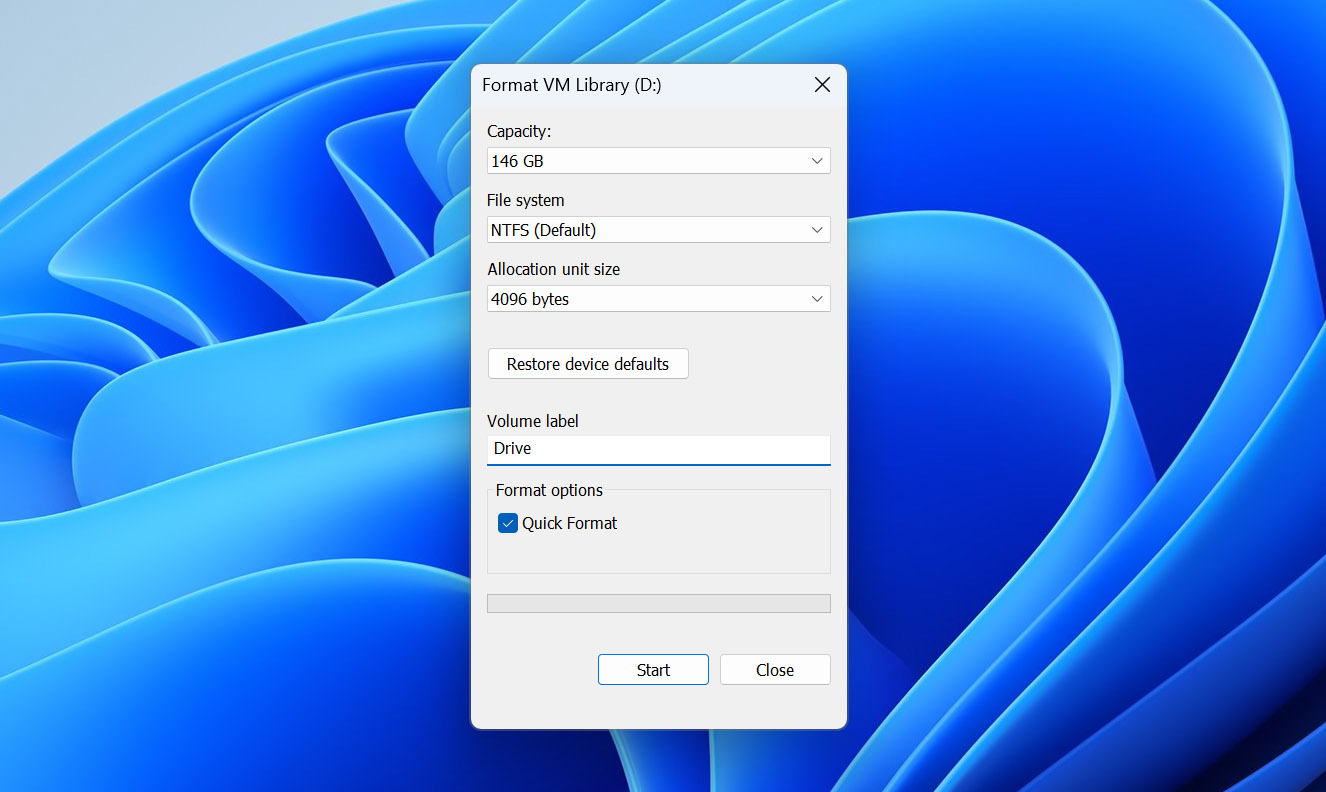
- Keep Quick Format checked unless you suspect the drive has bad sectors.
- Click Start and confirm that you want to erase all data on the drive.
Method B: Format through Disk Management
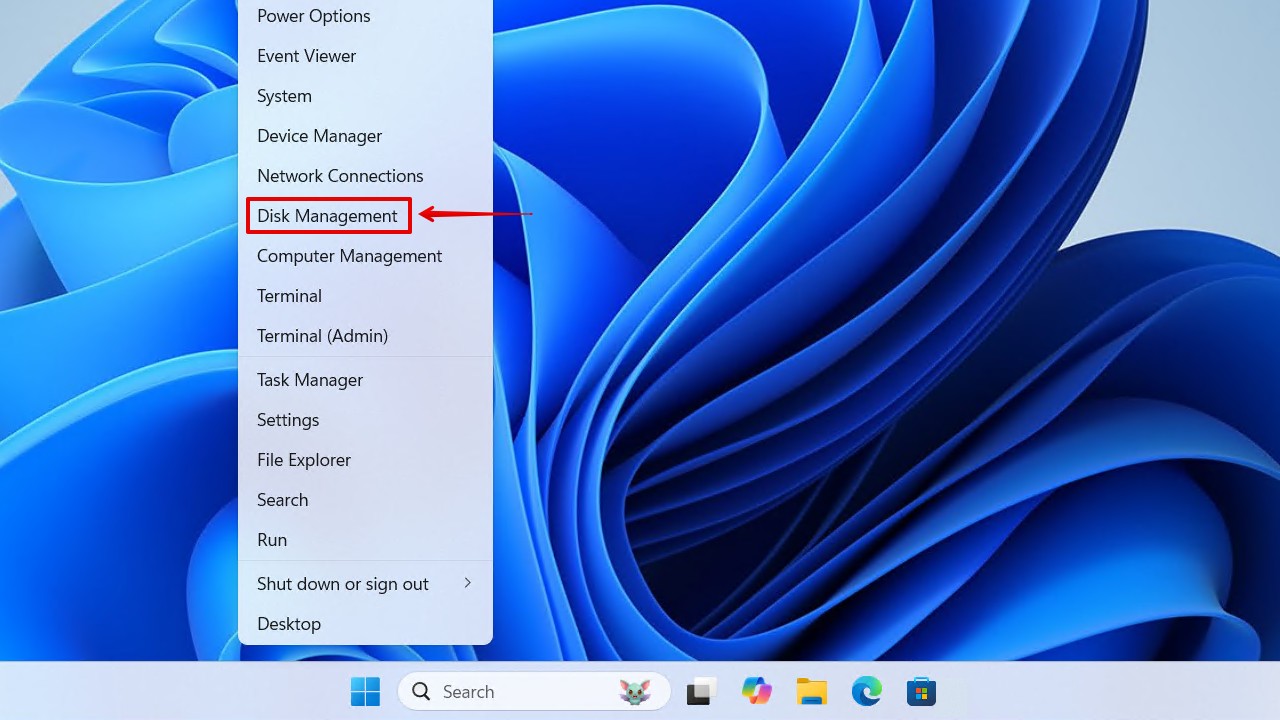
- Press Win+X and select Disk Management.
- Find your USB drive in the list (look at the size to identify it correctly).
- Right-click on each partition shown on the drive and select Delete Volume until the entire drive shows as unallocated space.
- Right-click on the unallocated space and select New Simple Volume.
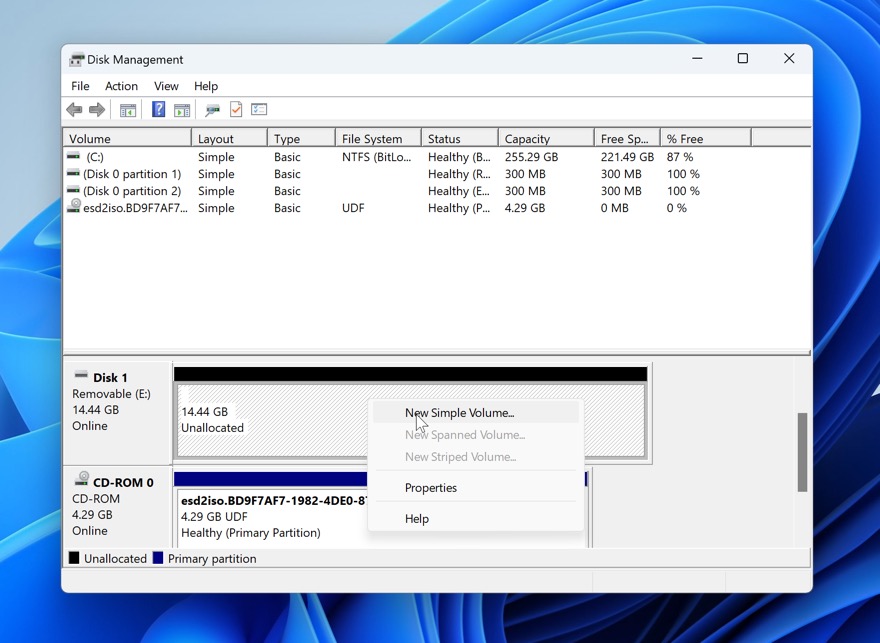
- Follow the wizard, choosing your preferred file system and drive letter.
- Click Finish to create the new partition and format the drive.
If your flash drive consistently shows the wrong capacity no matter what you do, there’s a chance you’re dealing with a counterfeit drive. Fake flash drives are programmed to report a larger size than they actually have, which causes data loss once you exceed the real storage limit. You can verify whether your drive is genuine using ValiDrive or h2testw.
FAQ
No, the methods to recover files missing from a USB drive are mostly the same. However, the tools used can be different. For example, Mac users can use First Aid in Disk Utility to repair file system errors instead of CHKDSK. The good news is that leading data recovery software like Disk Drill looks and works the same on both Windows and macOS.
Yes, the odds of successful recovery are high in this specific scenario because you’re likely dealing with file system corruption, and the actual file data usually remains intact on the drive. All you need to do is scan the corrupted USB flash drive directly using data recovery software like Disk Drill.
It depends on why the drive shows 0 bytes. If the drive appears in Disk Management with its correct capacity but shows 0 bytes in File Explorer, the file system is likely corrupted and recovery software should be able to find your data. However, if Disk Management also shows 0 bytes or doesn’t recognize the drive at all, you’re probably dealing with a hardware failure, such as a dead controller chip or damaged memory cells. In this case, successful DIY recovery is unlikely, but there’s no reason not to give free data recovery software like Disk Drill a try anyway.
This is a classic sign that your files are still on the drive but hidden, which can happen due to user error or malware. In most cases, enabling Hidden items in File Explorer’s View menu is enough to reveal the invisible files that are taking up your storage space.