SSD data recovery on Mac is not that complicated if you use the right tools and prepare adequately. SSDs are generally more resilient and don’t fail as often as HDDs, but they are still not immune to data loss.
And while keeping consistent backups is of course always important, sometimes you’re hit by sudden loss of data and there’s nothing you can do other than attempt to recover what you’ve lost. Let’s see what your options are.
Is It Possible to Recover Data from an SSD on a Mac?
Mac SSD data recovery is not too different from recovering from a regular hard drive. The most important thing to consider here is whether your disk is using TRIM (more on that below). If you want to recover data from a Mac with an SSD, you should either use specialized software for the purpose, or send your disk to a recovery center if that fails.
If you opened this guide looking for a way to handle Mac SSD recovery for an internal drive, it’s important to set expectations early. It doesn’t mean you should give up without trying. You can still follow the steps from a desktop file recovery guide to check what data can still be recovered.
And of course, if you have any backups or copies of your files, that can save you. Take a moment to check if those files exist elsewhere (use Spotlight to search your Mac, and also look through your email or iCloud to see if the data is still available there).
How Does TRIM Affect SSD Recovery on a Mac?
TRIM is a special command used with SSDs which informs the drive that specific pieces of data are safe to delete. Normally, data is not physically erased from the disk, but is just overwritten. When something is marked as “deleted”, what happens in reality is that the space occupied by that data is marked as free, allowing applications to write over it.
Because of this, you can still recover files after they’ve been deleted, but you need specialized tools for that.
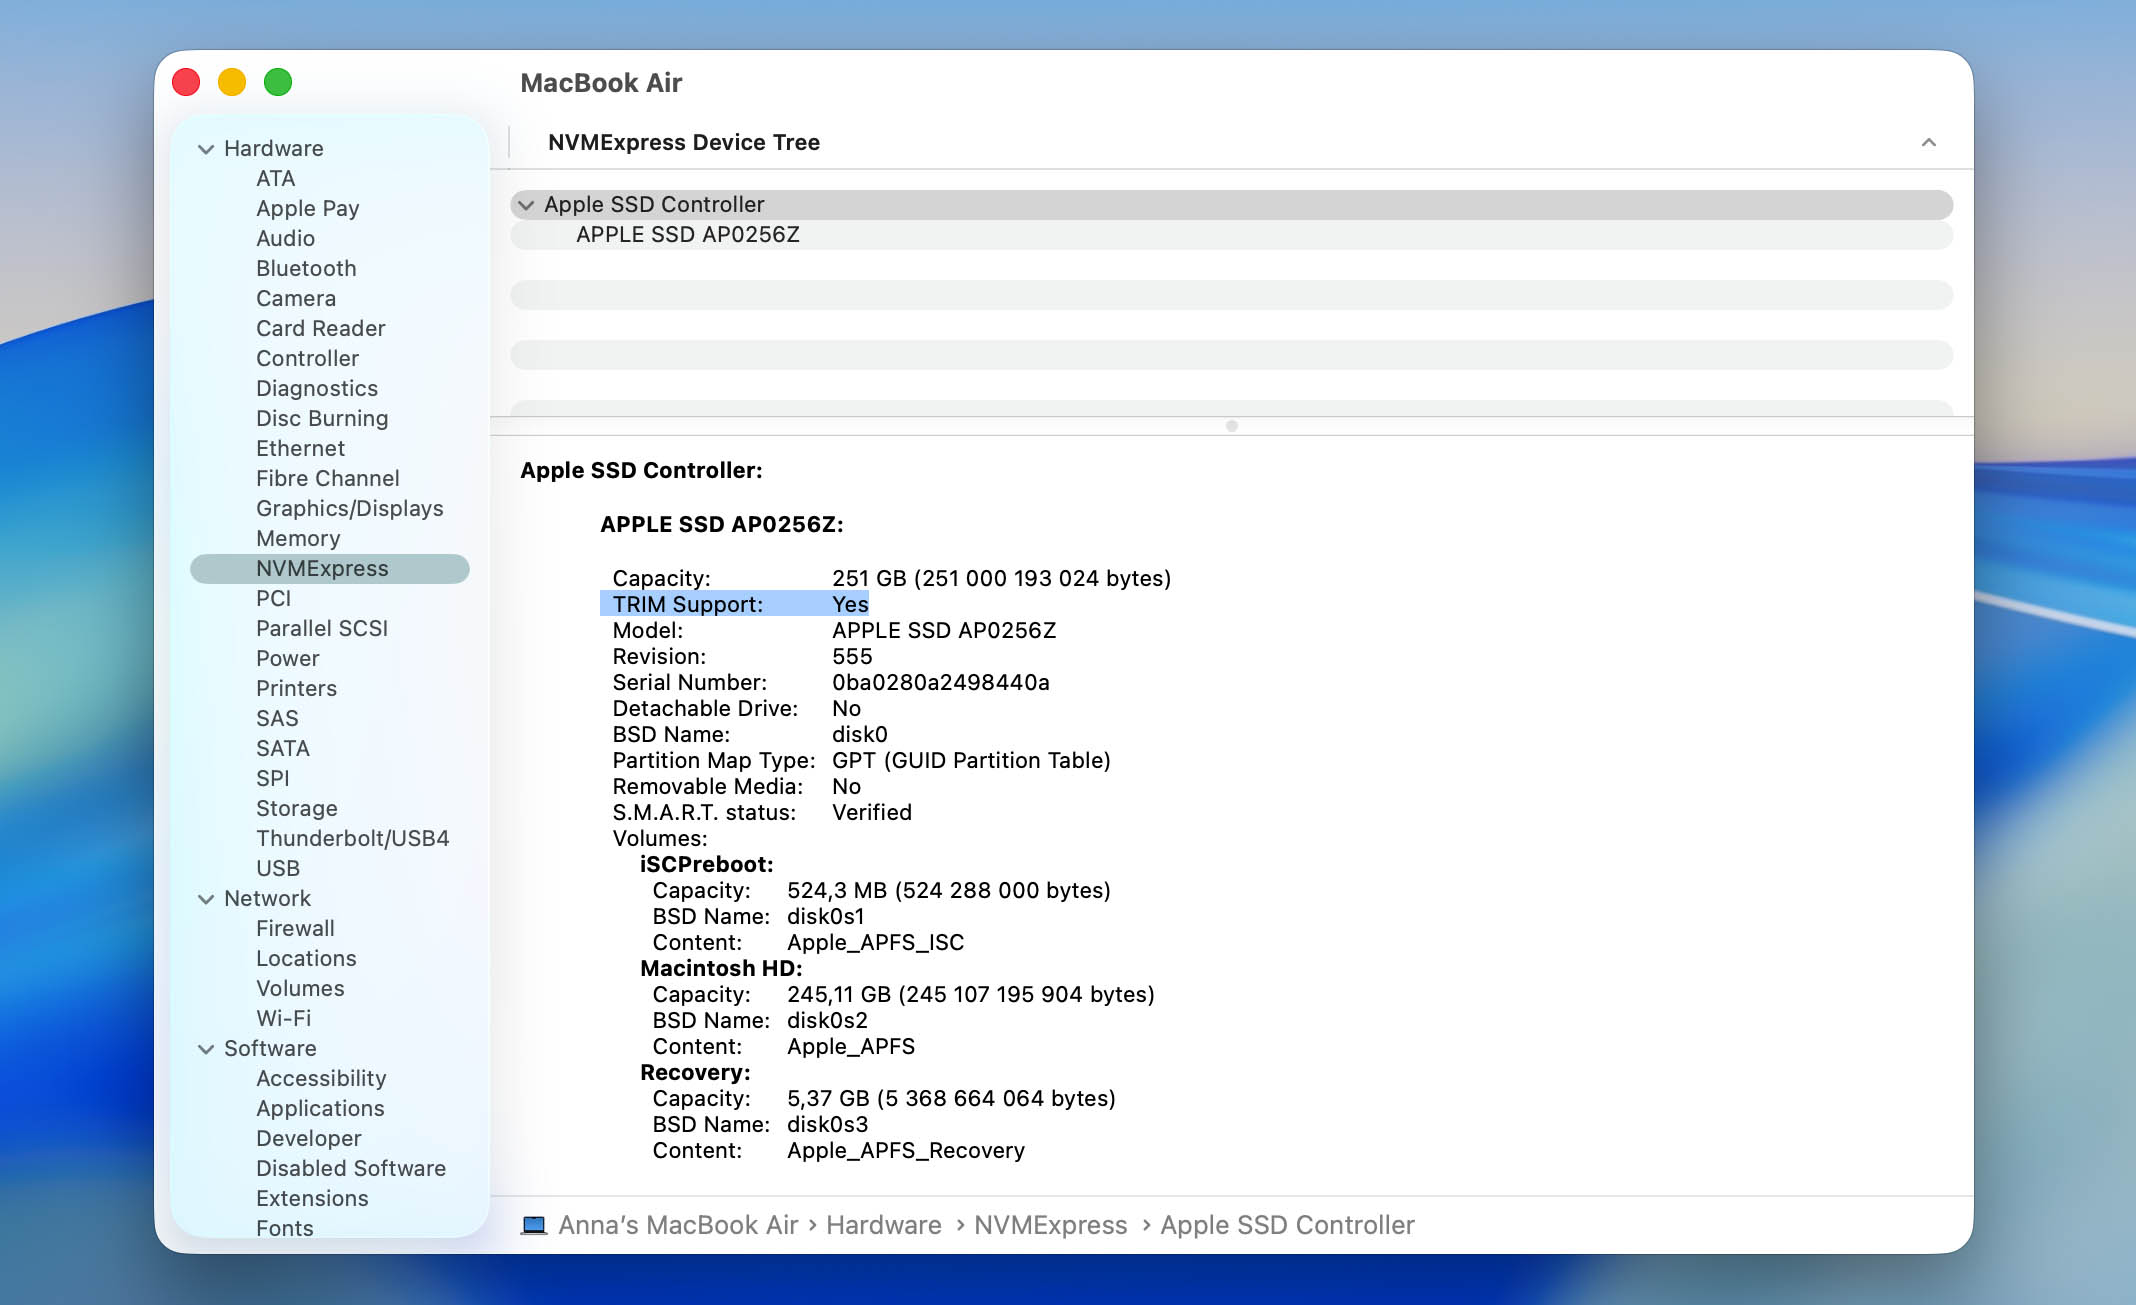
When it comes to external drives, the situation is often more favorable. TRIM support there depends on the SSD controller, connection type (Thunderbolt), and the file system used (APFS or HFS+). In many real-world cases, TRIM isn’t supported, so deleted data isn’t cleared right away. As a result, external Mac SSD data recovery is often more feasible than internal drive recovery—provided that overwriting is avoided
If the drive continues to be used, new data can overwrite the old one. Because of that, the first recommendation is always to stop using the device immediately and set it aside until you decide on the next steps.
How to Recover Data from an SSD on a Mac
Can you recover data from an SSD on a Mac? Certainly – there are actually several methods available. It’s recommended to check the Trash as a first approach, and only use the alternative options if that doesn’t work out.
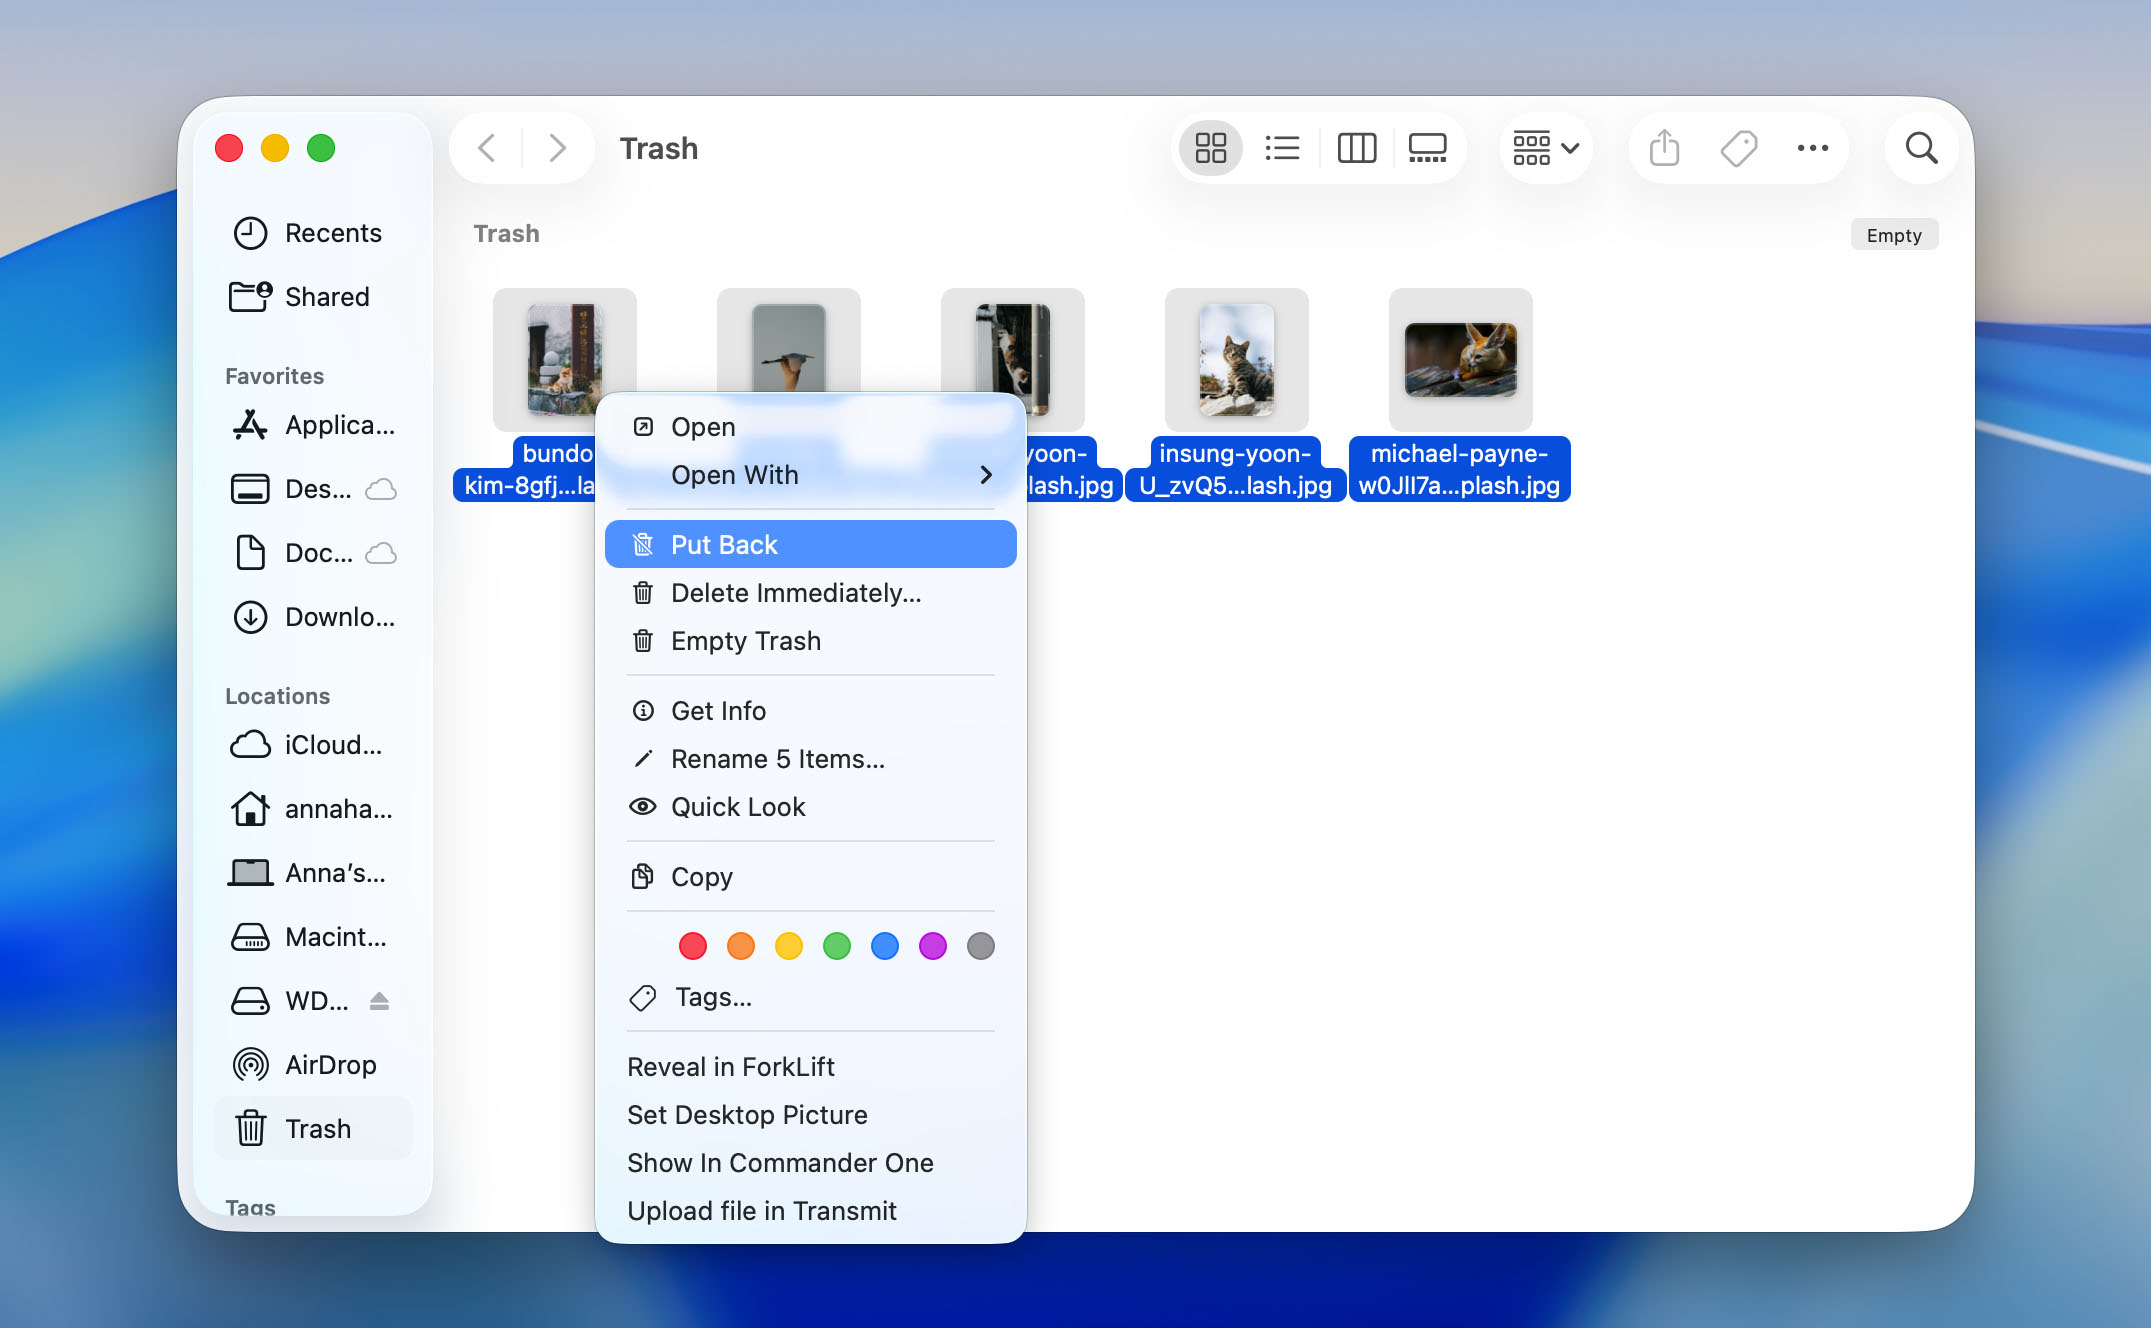
Method 1: Check the Trash on Your SSD
If your data was lost due to accidental deletion, the first place to check is the Trash on your Mac. When you delete files from an SSD, they are usually moved to the Trash and stay there until you empty it or the system removes them automatically.
Follow these steps to recover files from the Trash:
- Open Trash from the Dock. If your files were stored on an external SSD, connect it to your Mac first.

- Look through the files to find the ones you need.
- Drag the file to another folder on your Mac, or right-click it and select Put Back to restore it to its original location.
Method 2: Use Data Recovery Software to Recover Data from Mac SSD
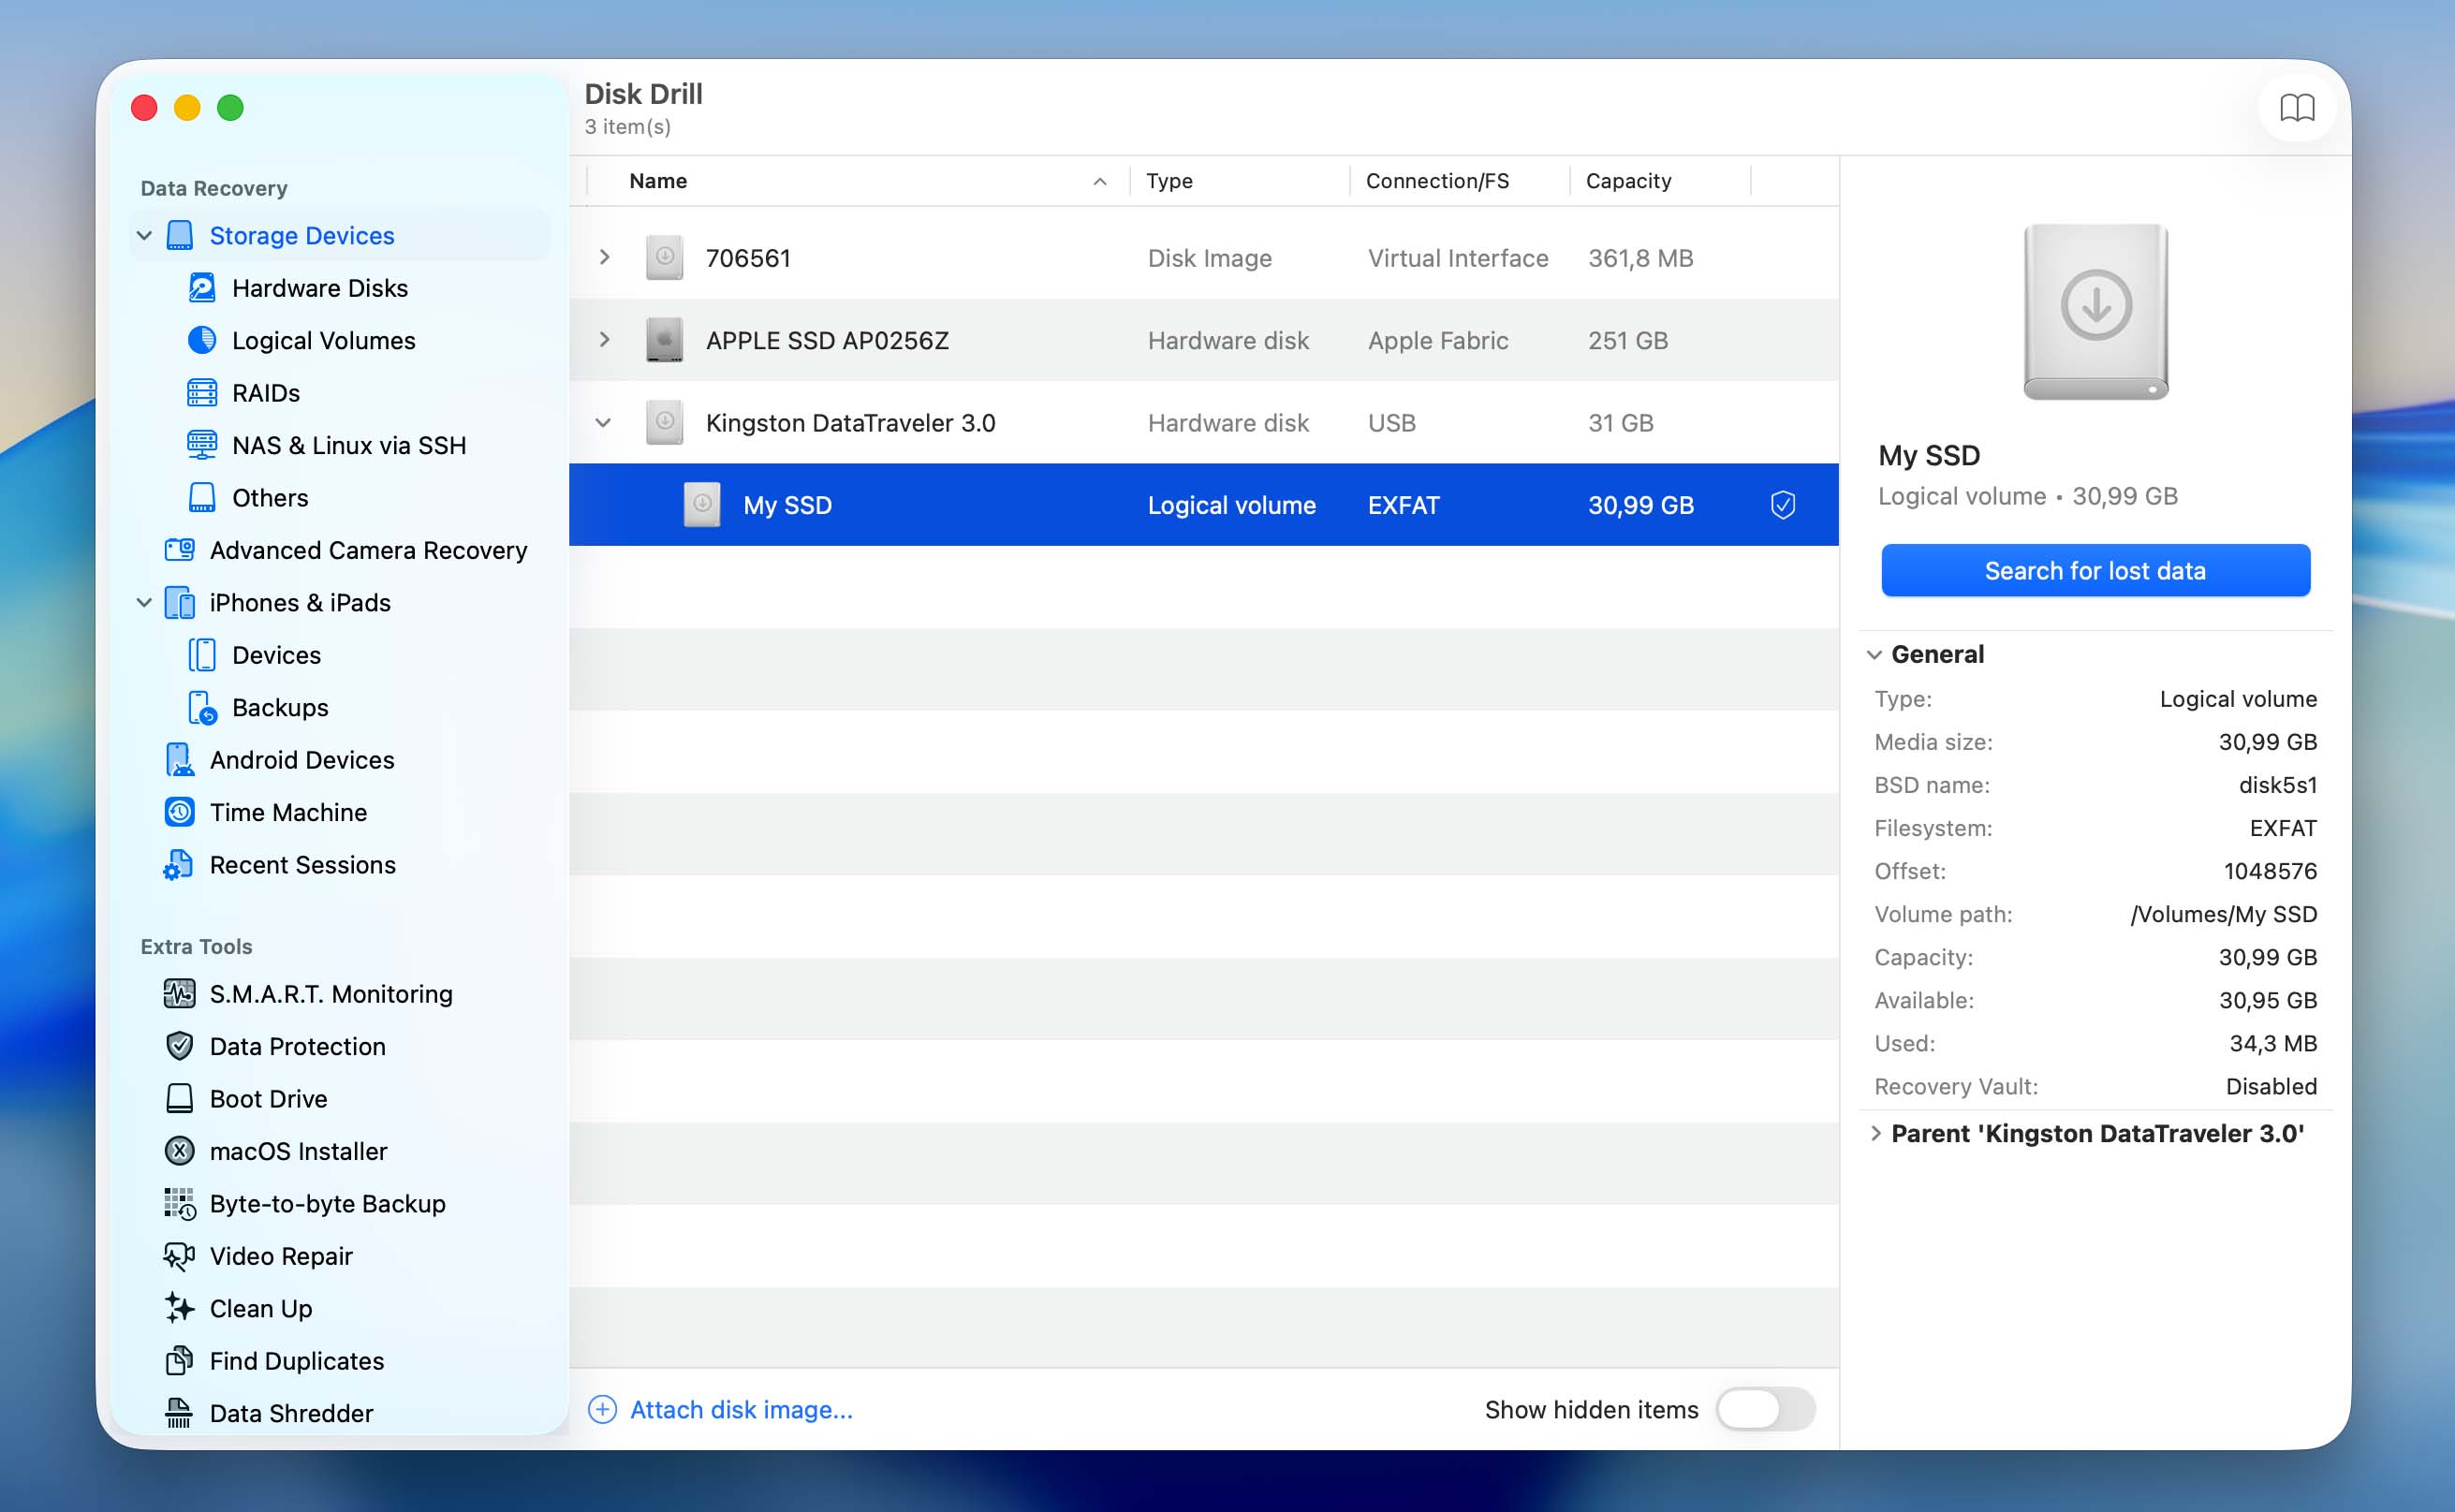
There are also specialized tools on the market that can assist you with data recovery. Some of those, like Disk Drill, can even recover data that’s already been deleted. This has one major prerequisite: you must stop using the disk as soon as you’ve deleted files from it. Otherwise, they will get overwritten by processes very quickly.
To use Disk Drill to recover your data, follow these steps:
- Download and install Disk Drill, then launch the software.
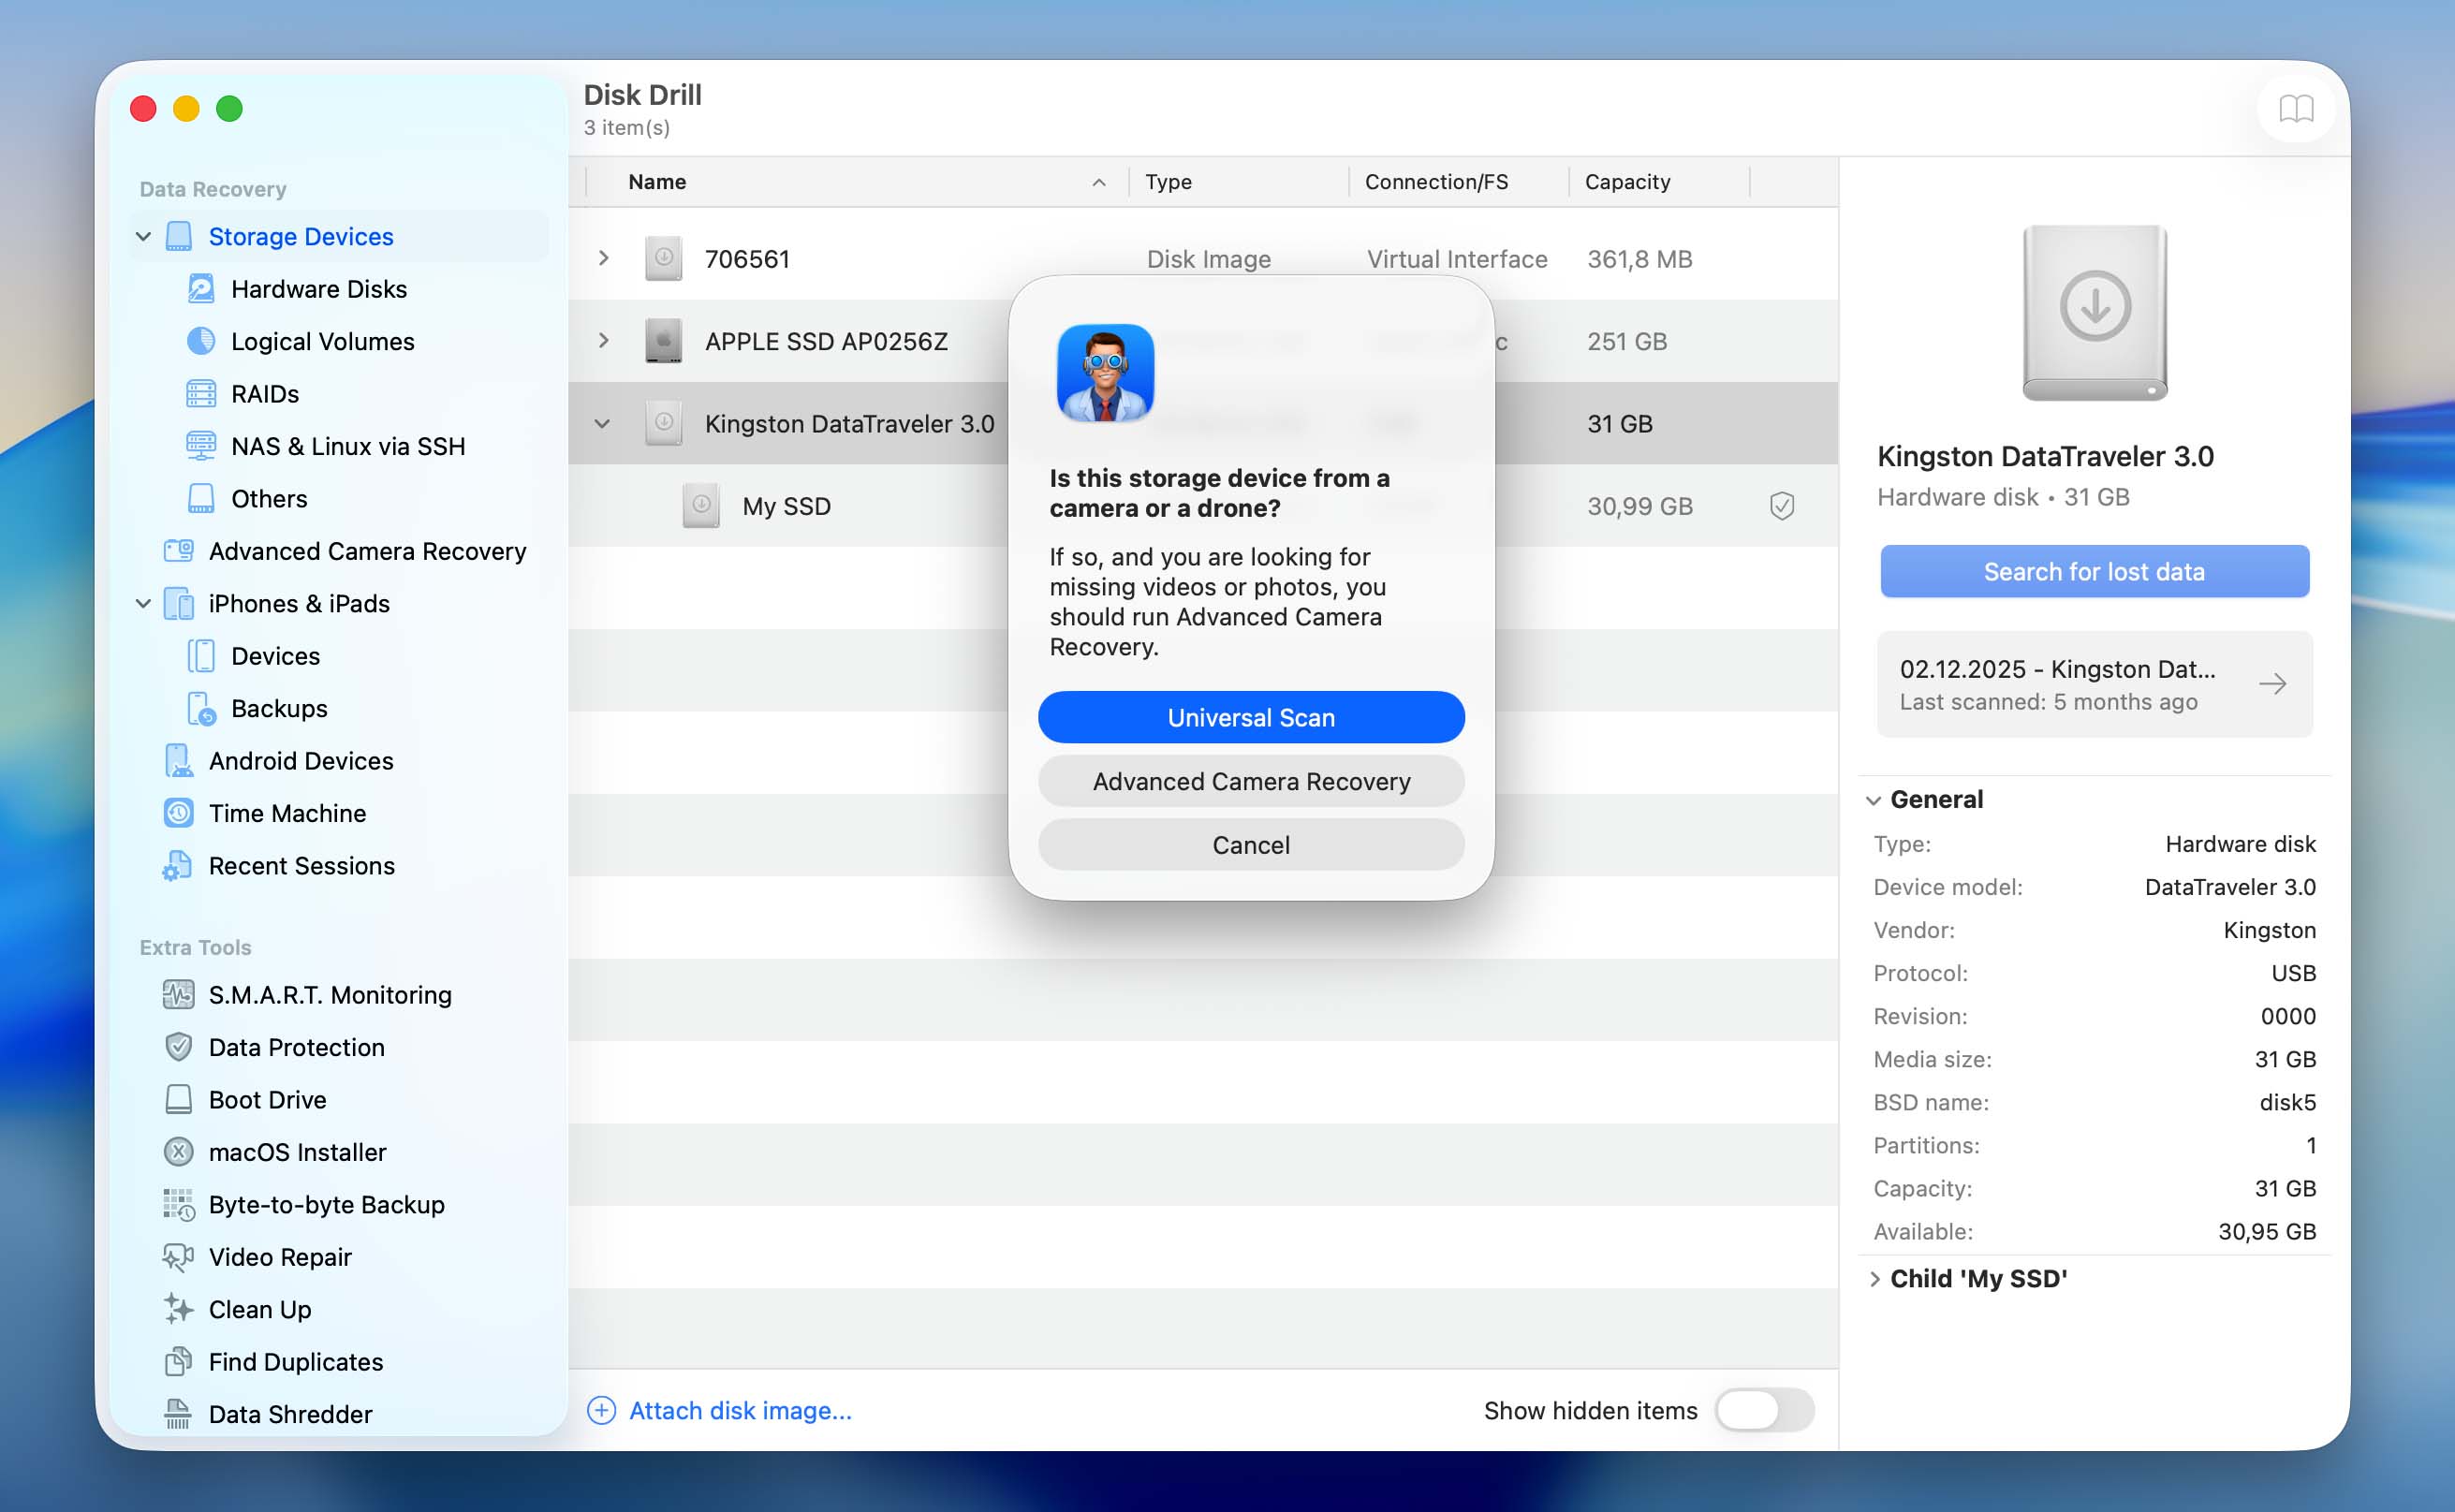
- Choose your drive from the list and click Search for lost data. If you created a disk image beforehand, click Attach disk image at the bottom and select it instead.
- If prompted, choose the scan type. Start with the Universal scan. The Advanced Camera Recovery option was designed to recover fragmented videos from cameras and drones, so you can run it as a second scan if needed.
- Wait for the scan to finish, then click Review found items.
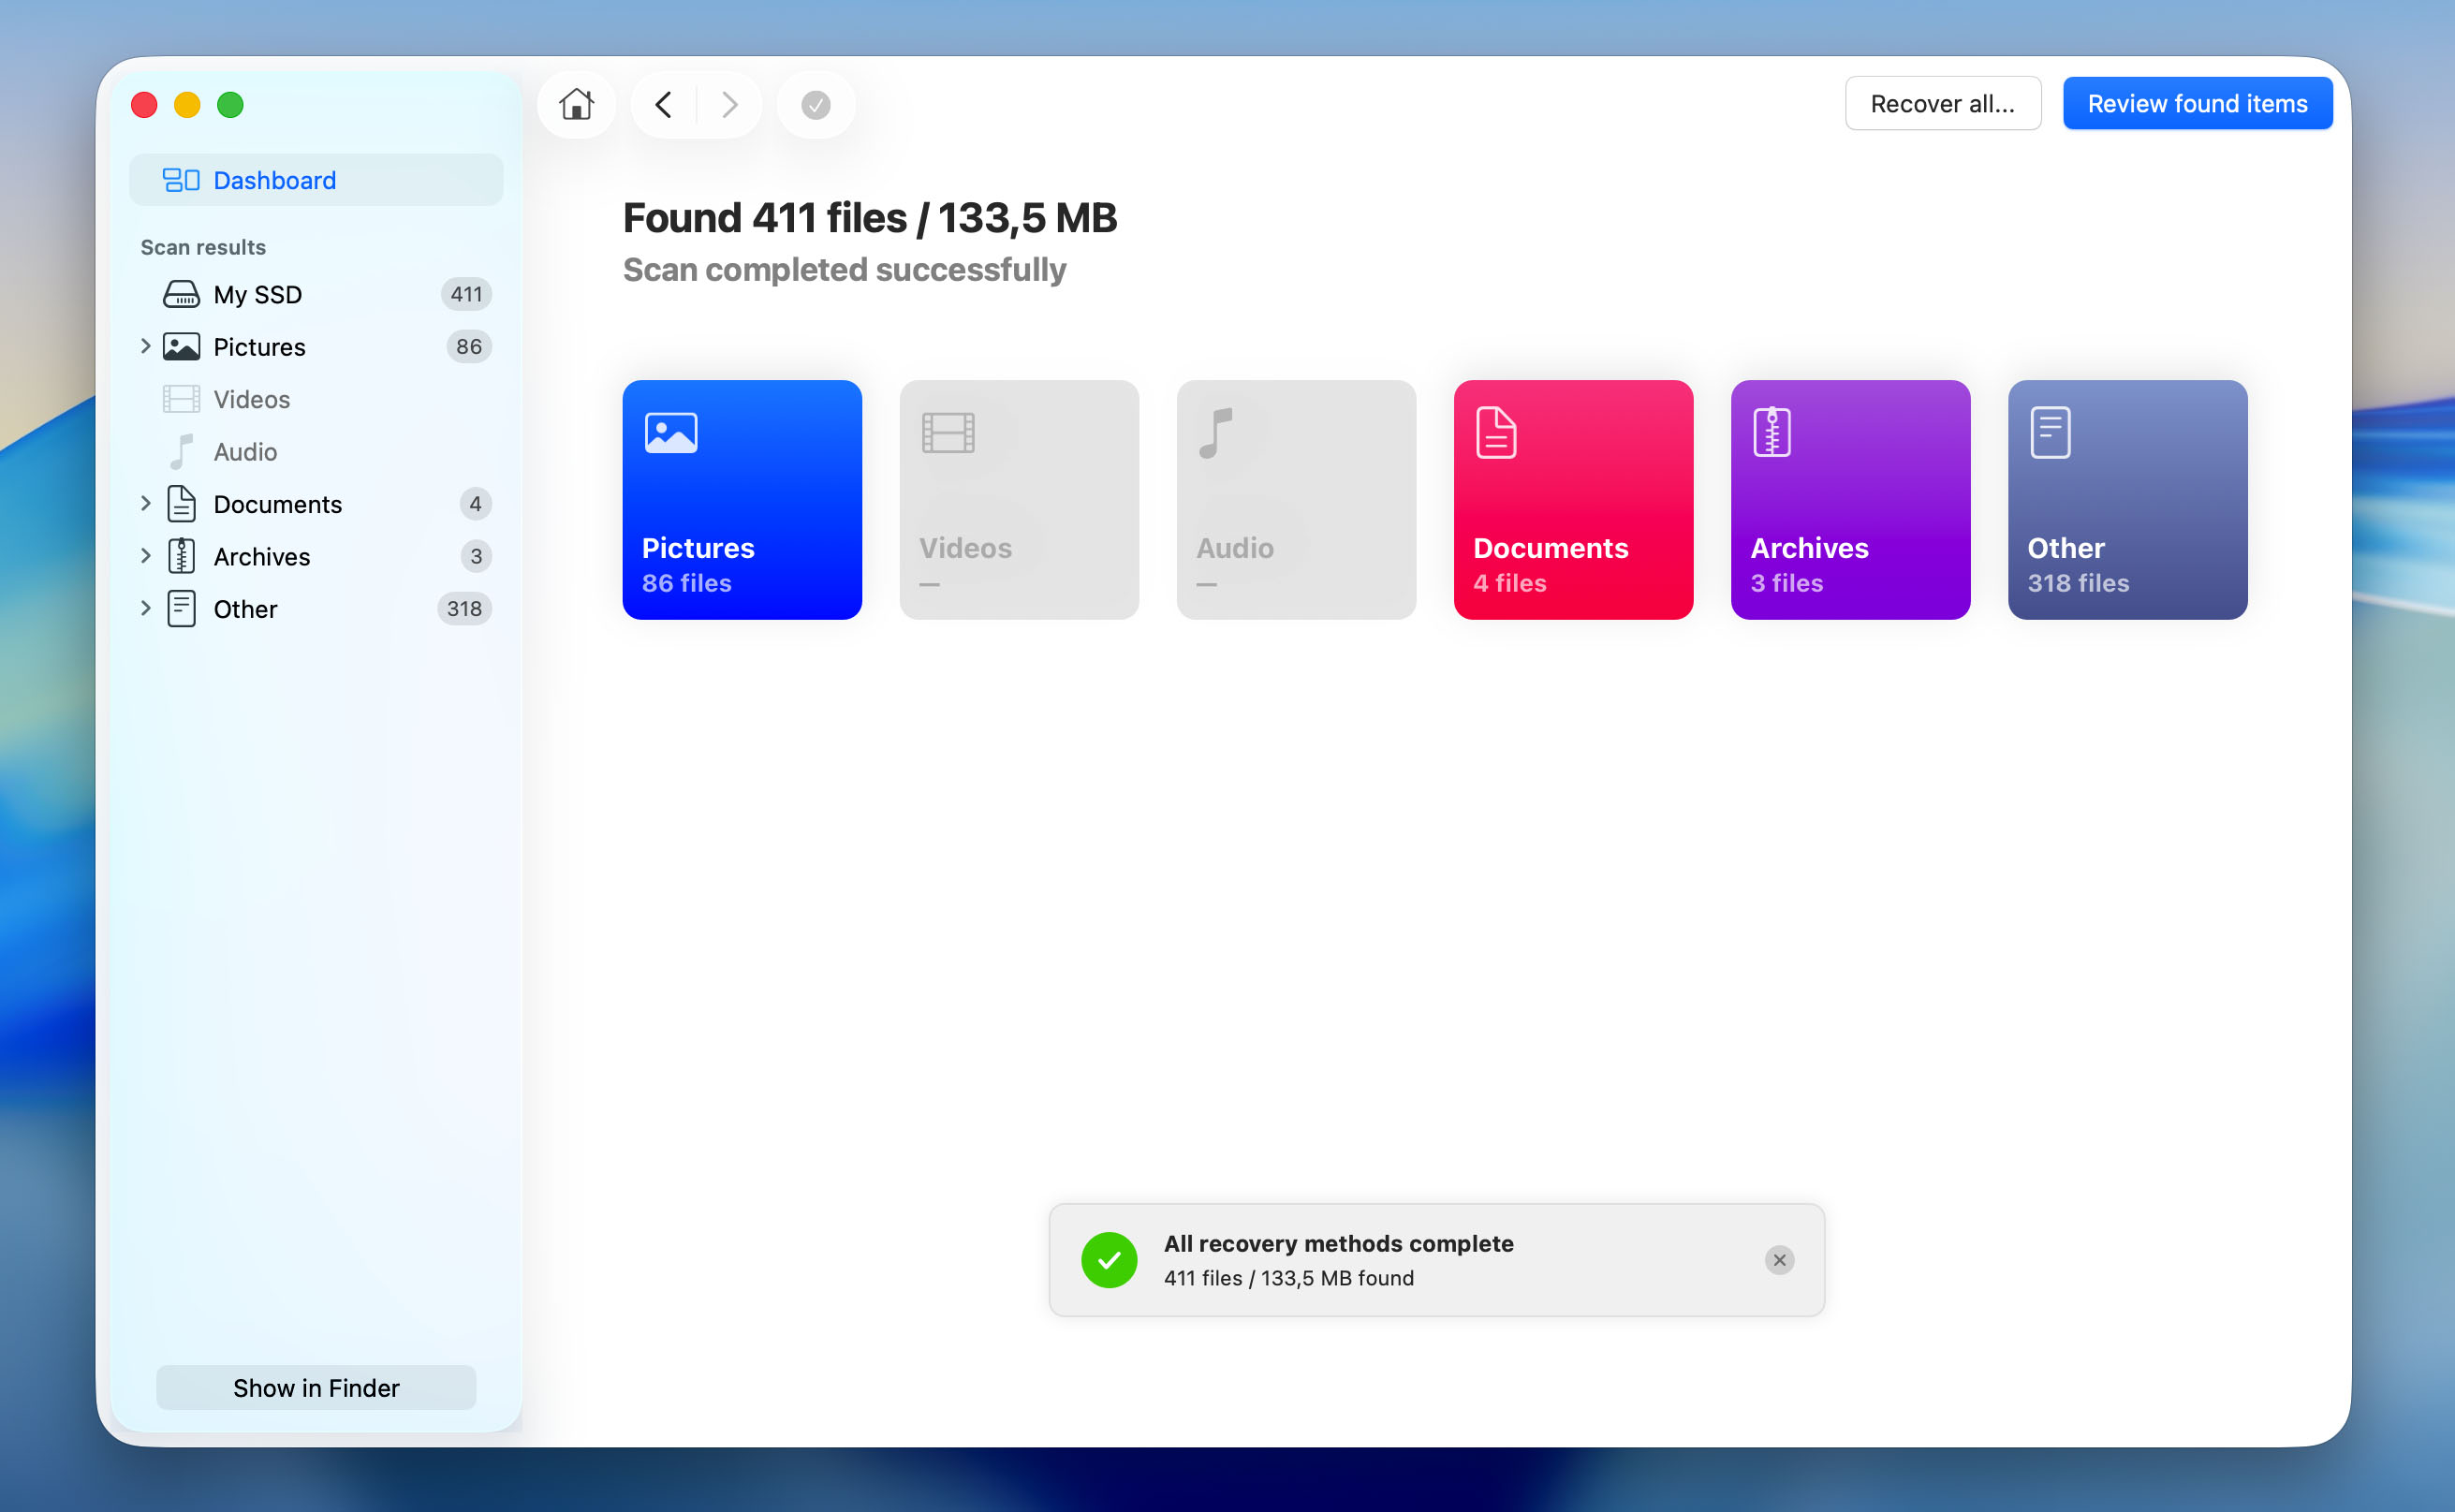
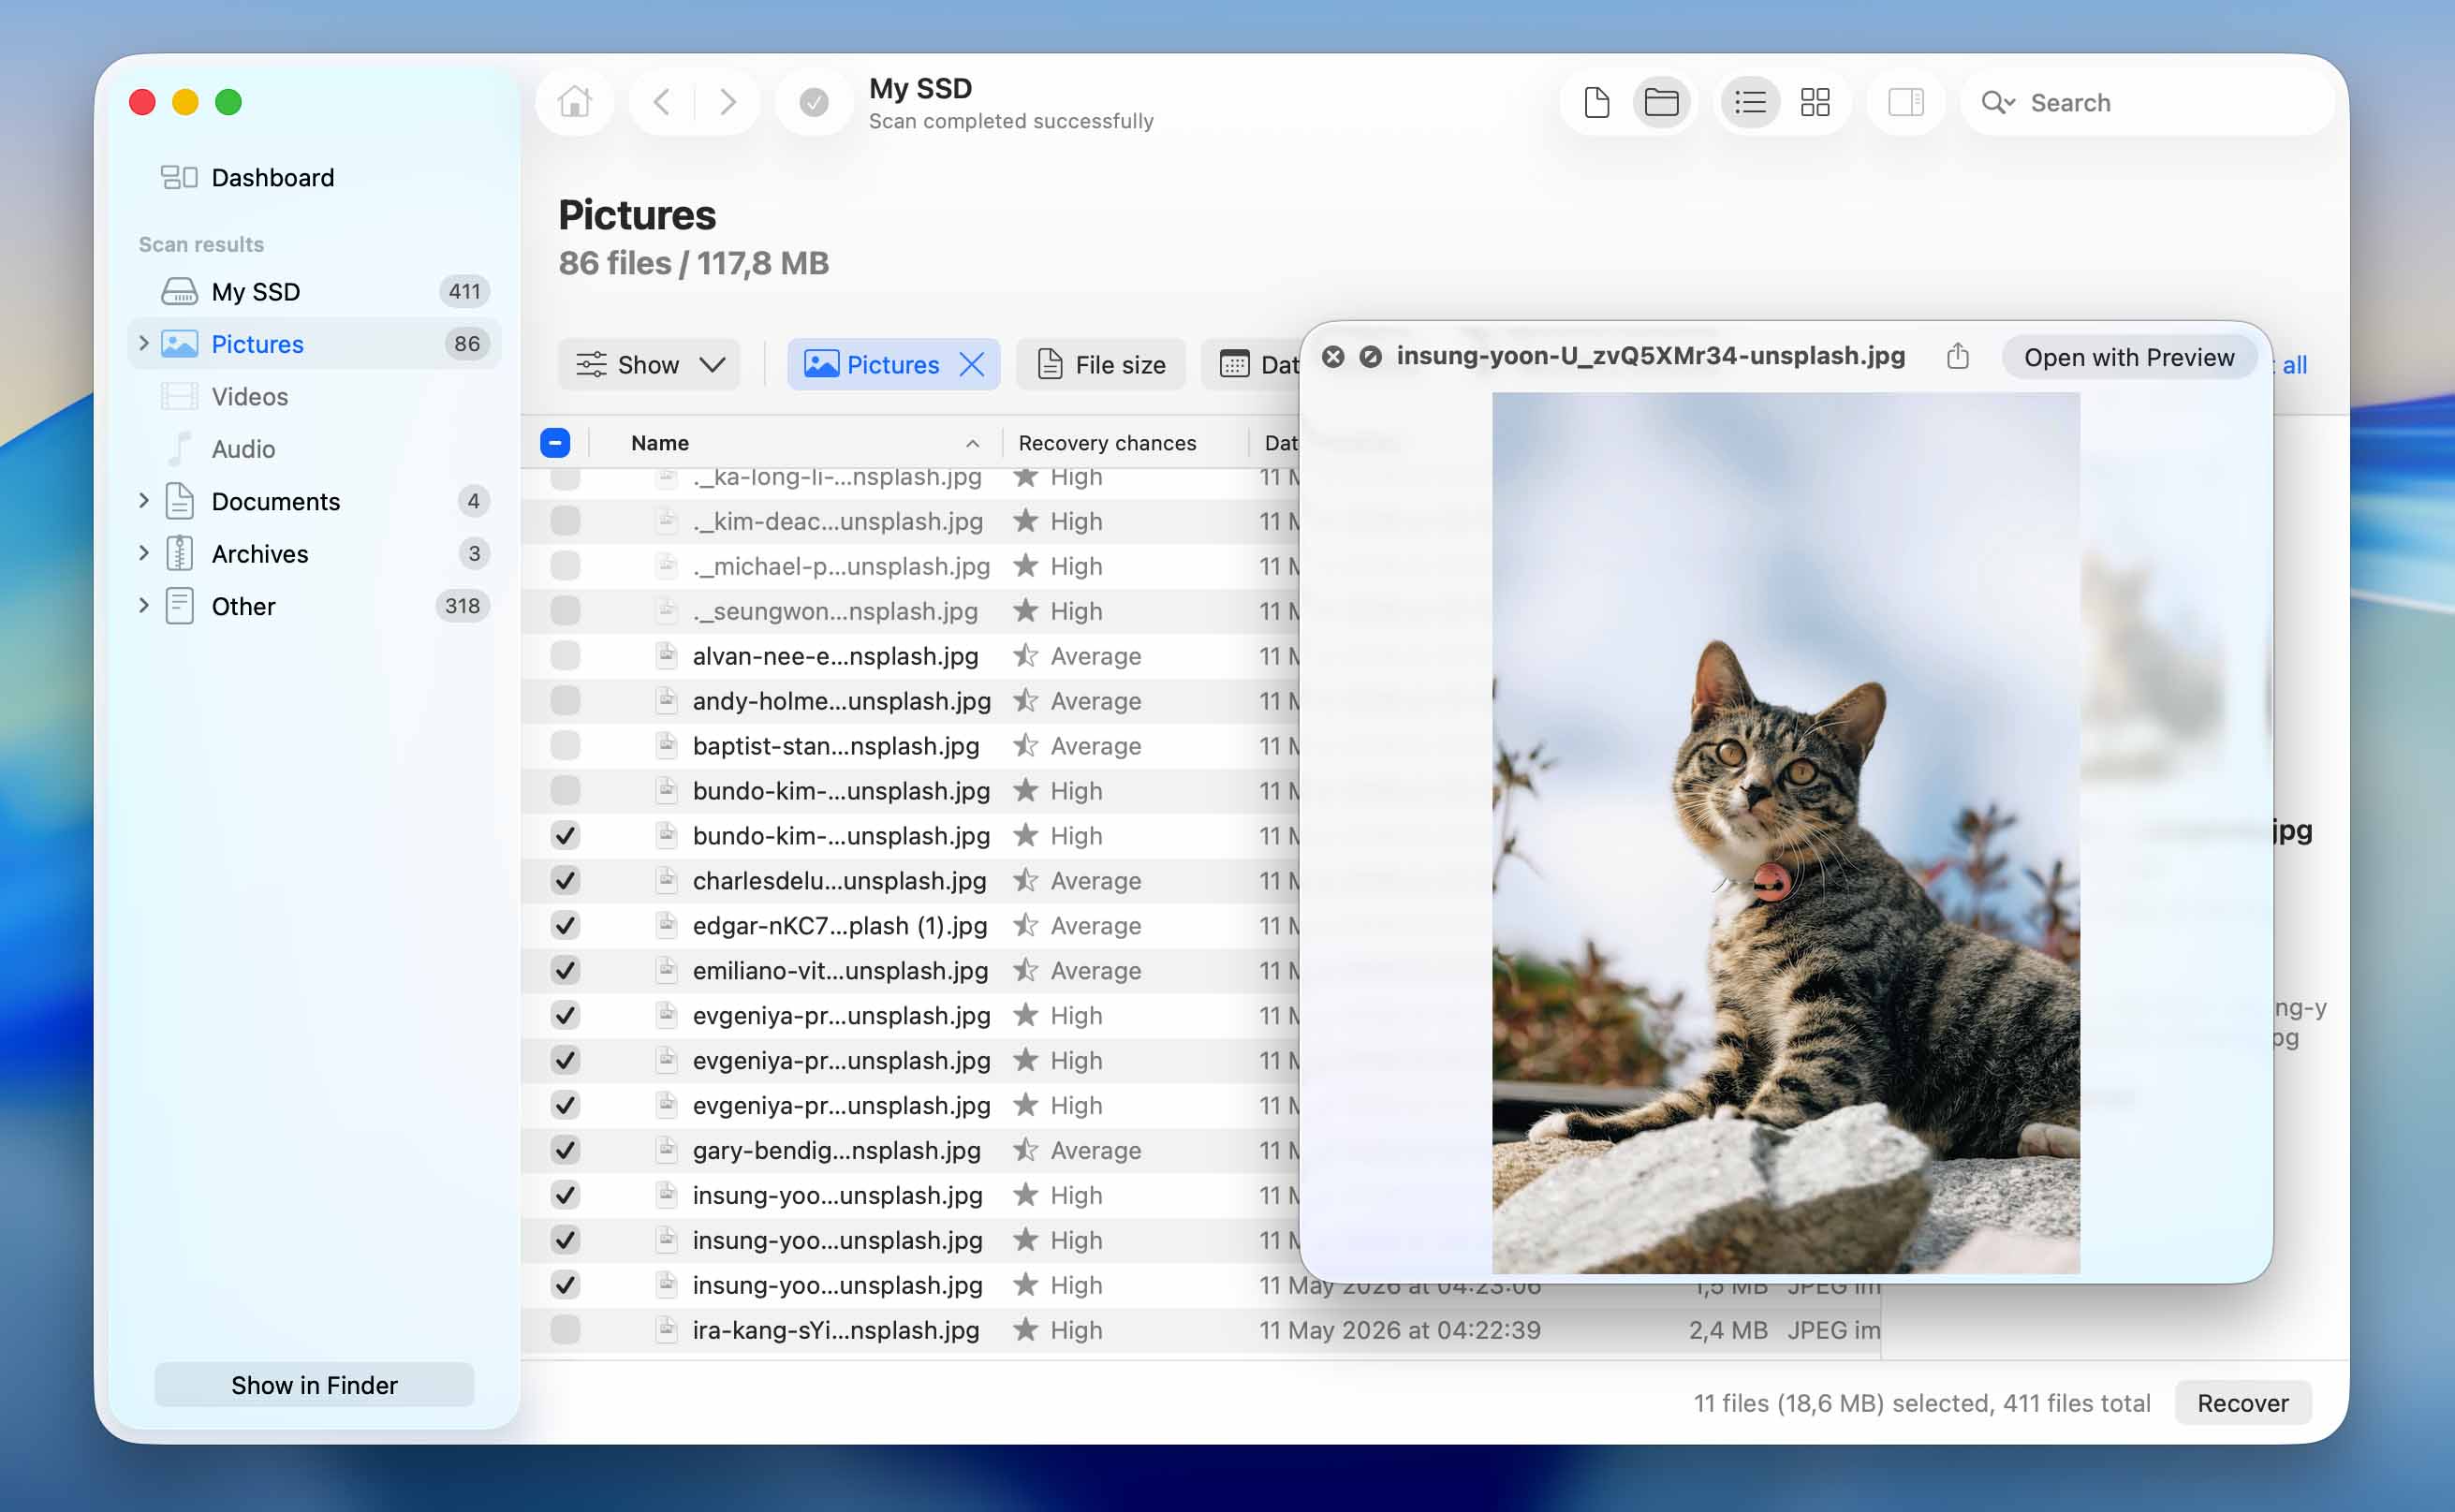
- You will now see a list of all files and folders that you can recover. Go through the list and select any files you want to get back. Once you’re done, click Recover to save them.
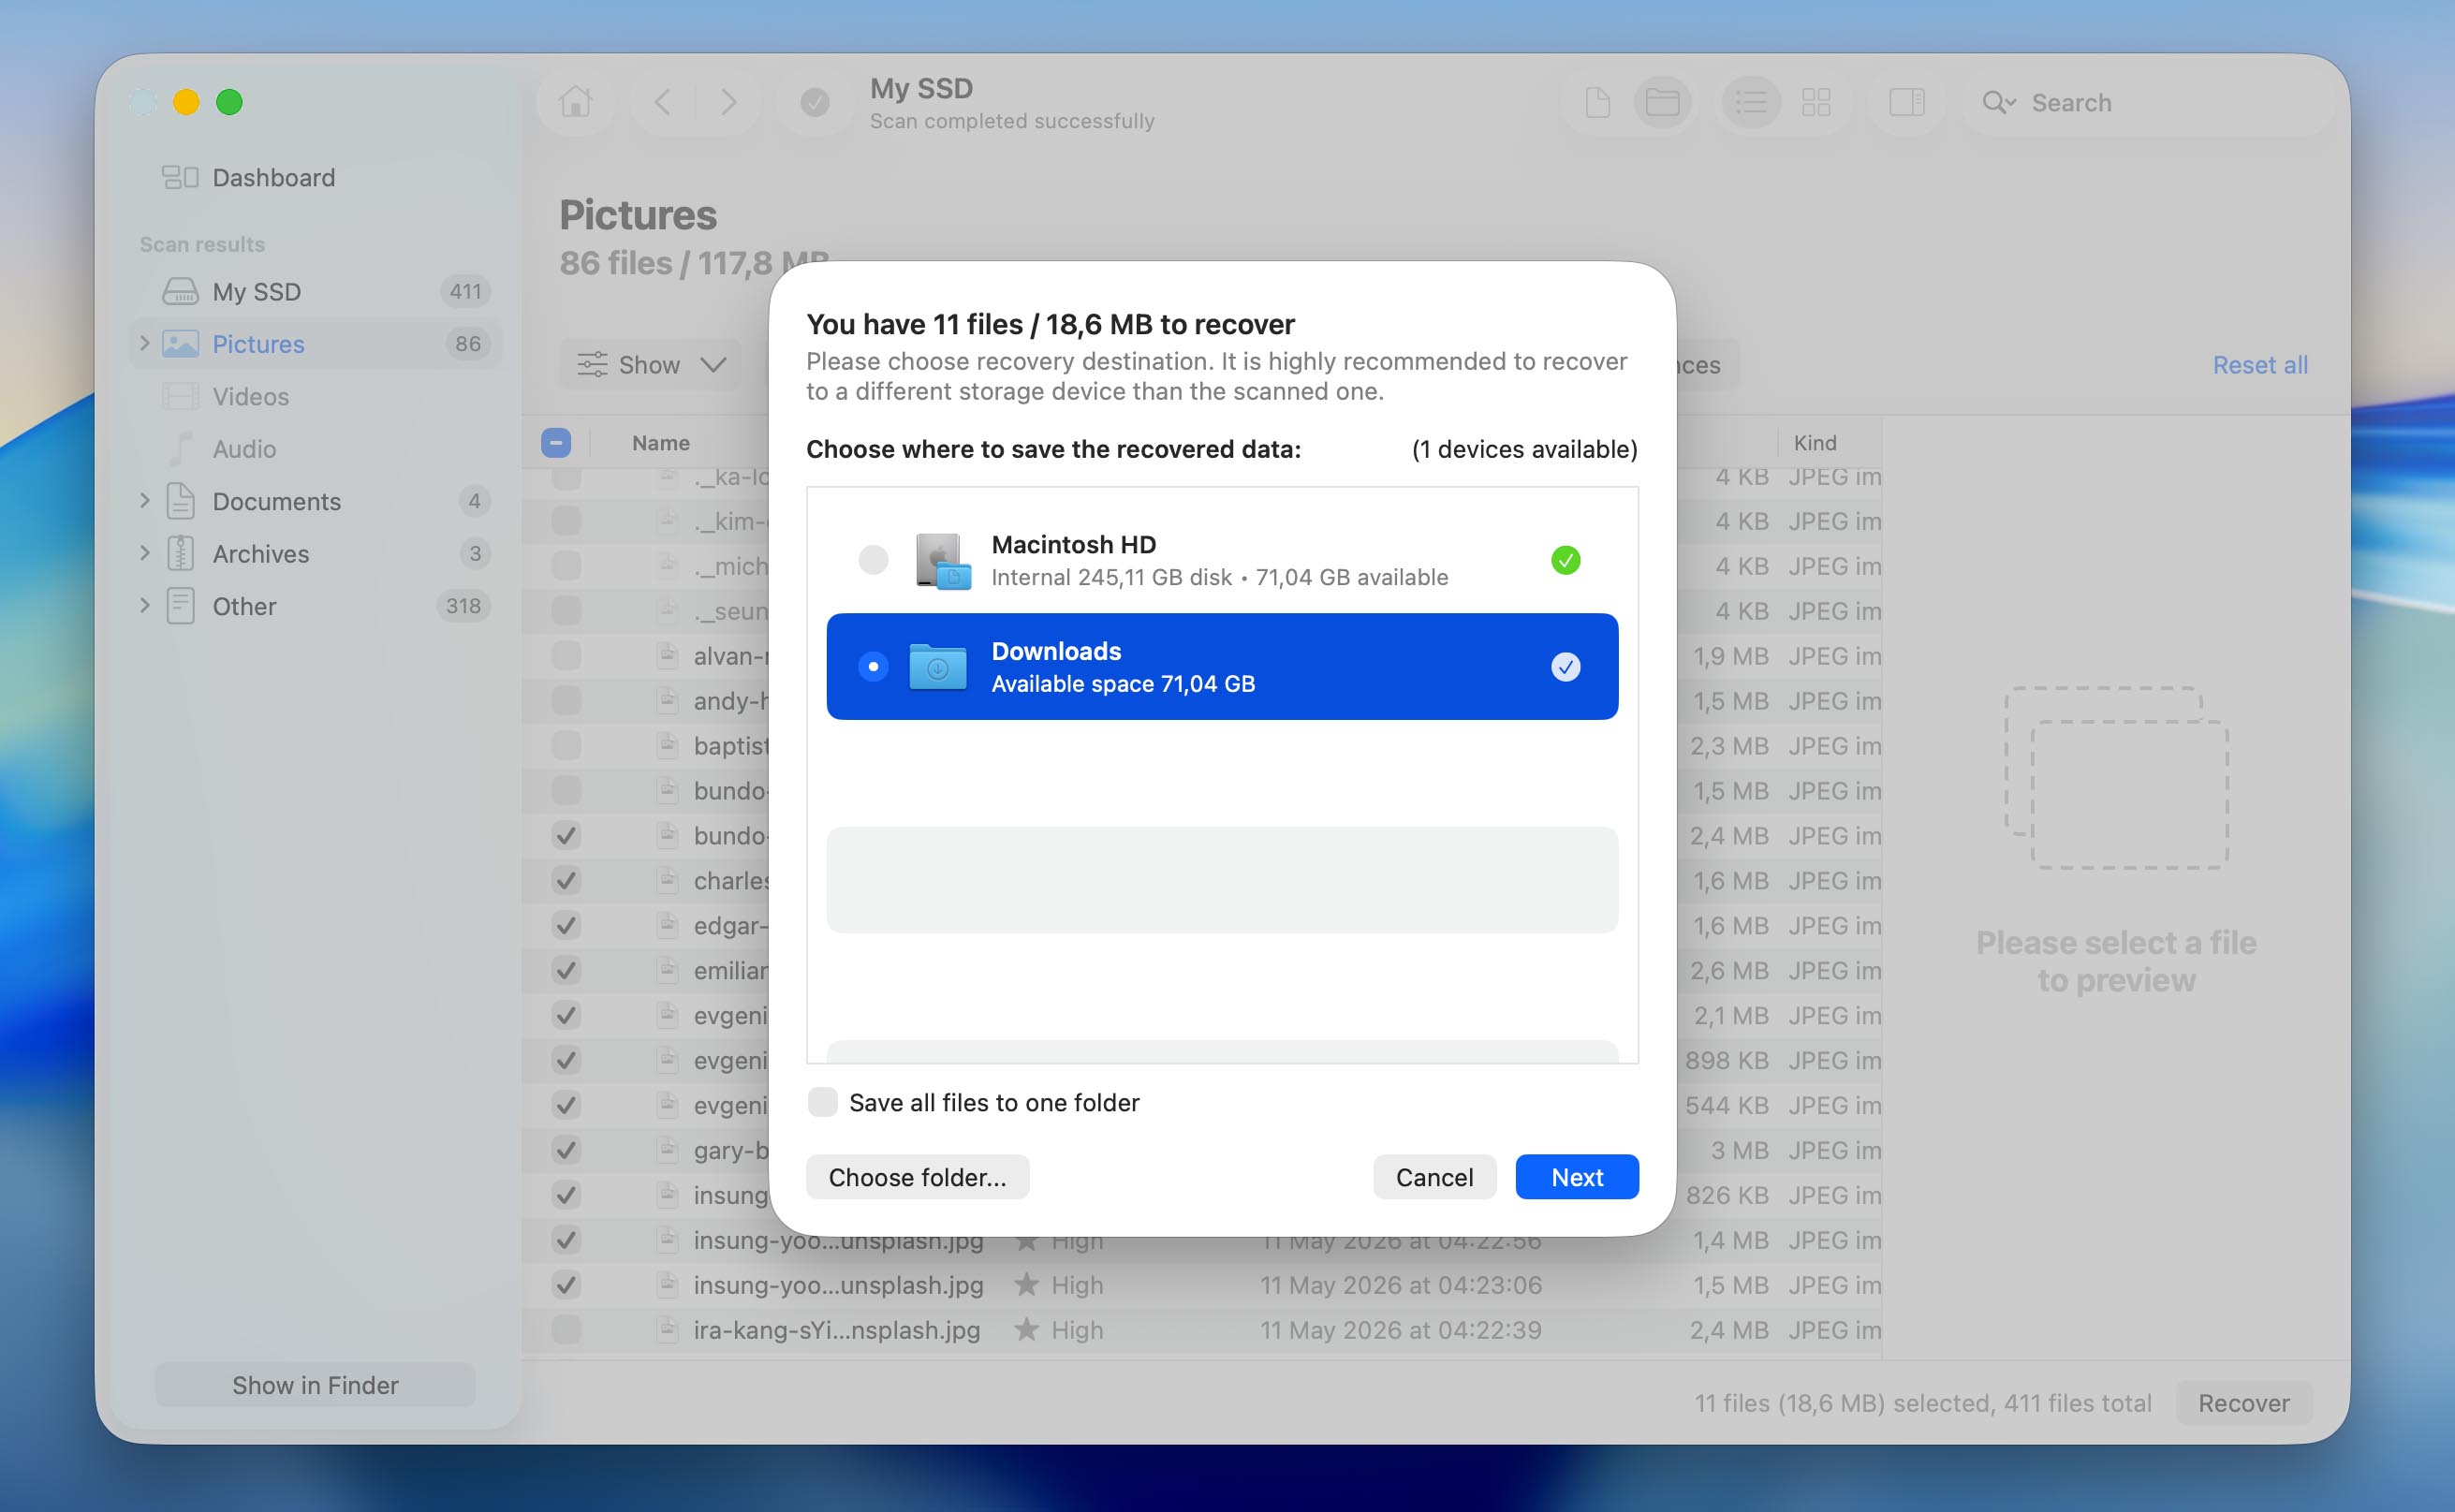
- Choose a location separate from your SSD in all cases and click Next. Otherwise, you risk corrupting your data by writing directly over it.

Method 3: Check Your SSD for Errors Using Disk Utility
Disk Utility is not a MacBook SSD data recovery tool and won’t help you get back files that you’ve deleted. However, it can still be useful if your drive is not physically damaged but behaves incorrectly, for example, it’s not recognized by the operating system, files disappear on their own, or folders become inaccessible.
In those cases, Disk Utility can analyze the SSD’s file system and attempt to fix any errors it finds. Keep in mind that this process modifies the drive’s structure, so it’s best to run it only after you’ve recovered your data or created a disk image.
To attempt to recover your drive using Disk Utility, simply follow these steps:
- Start Disk Utility
- Choose your drive from the left-side list
- Click First Aid at the top
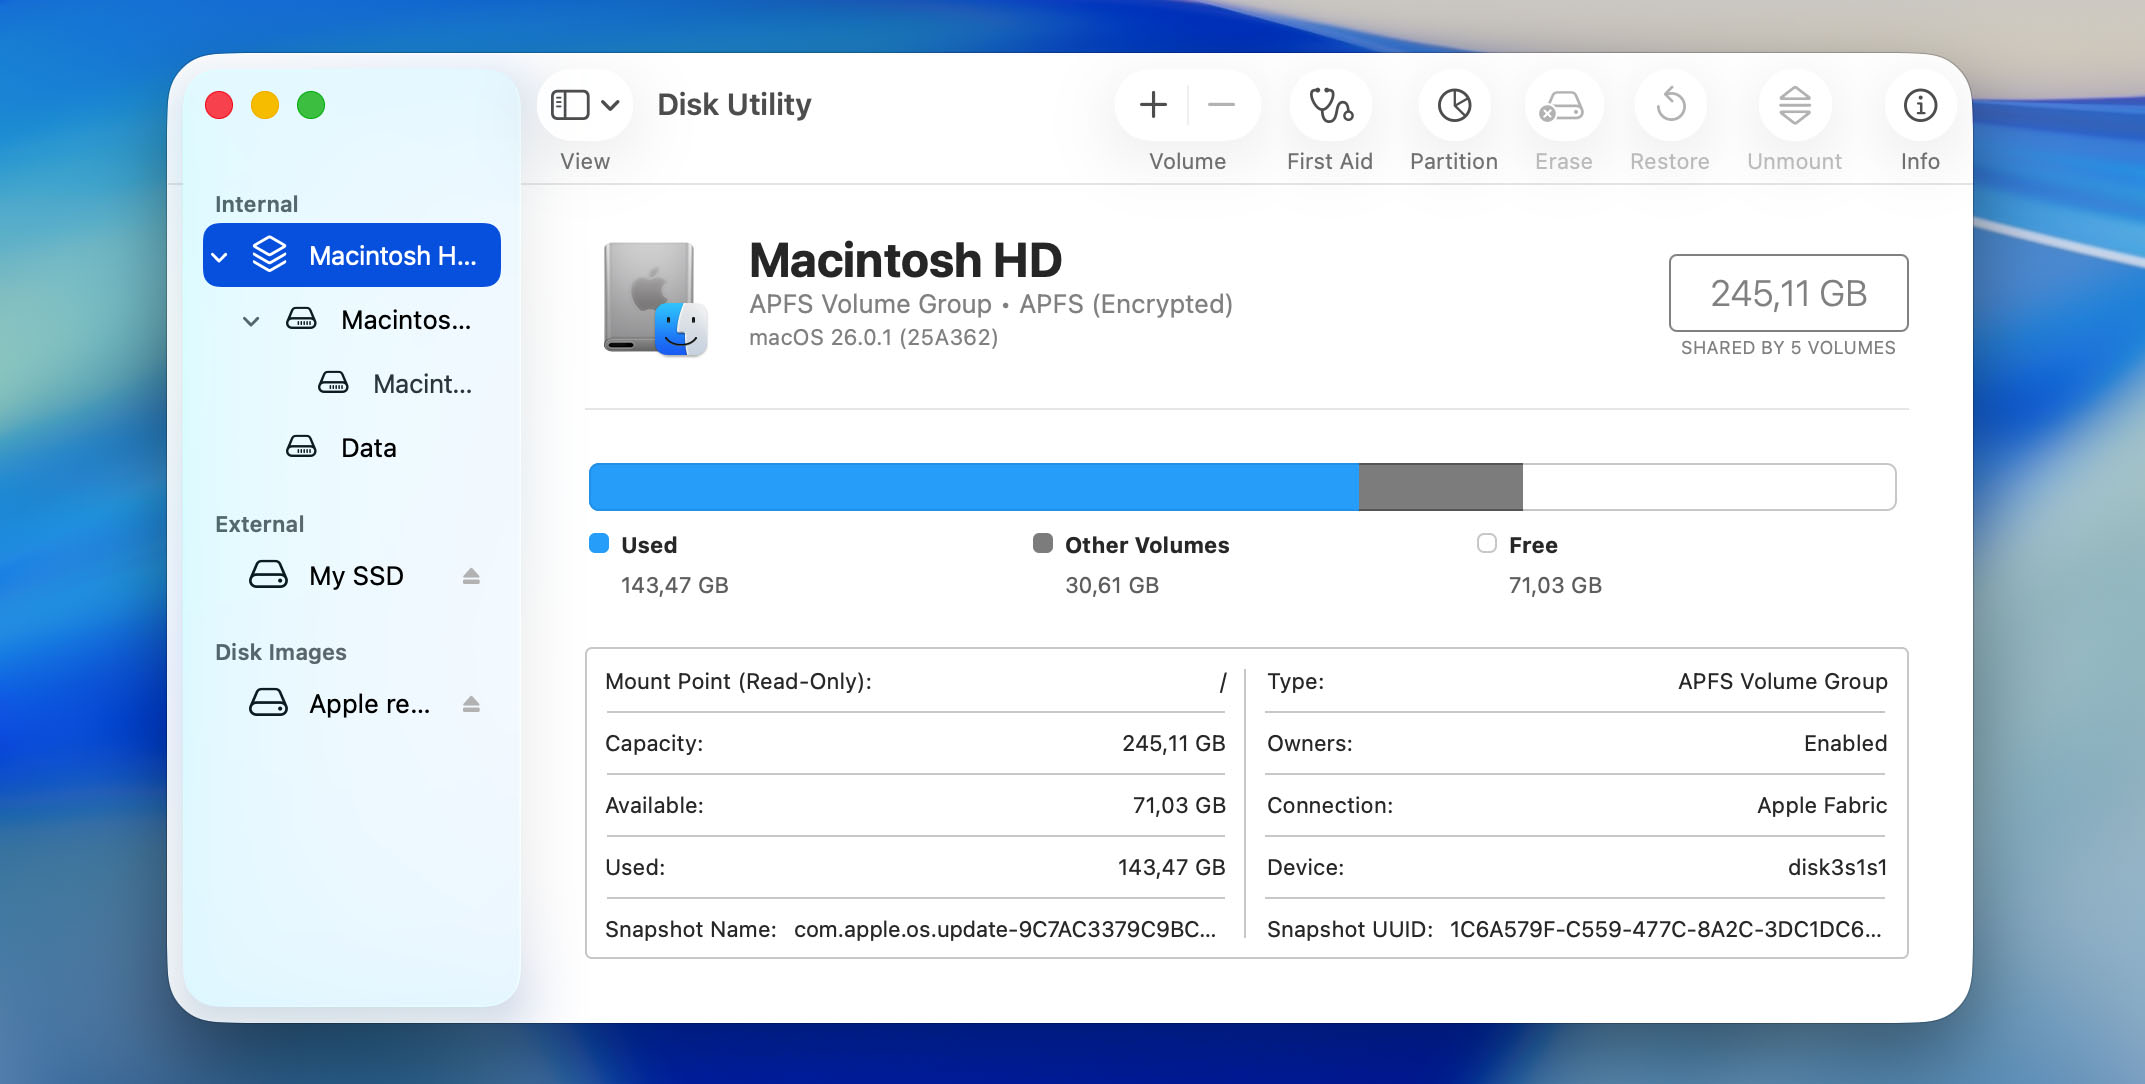
- Click Run
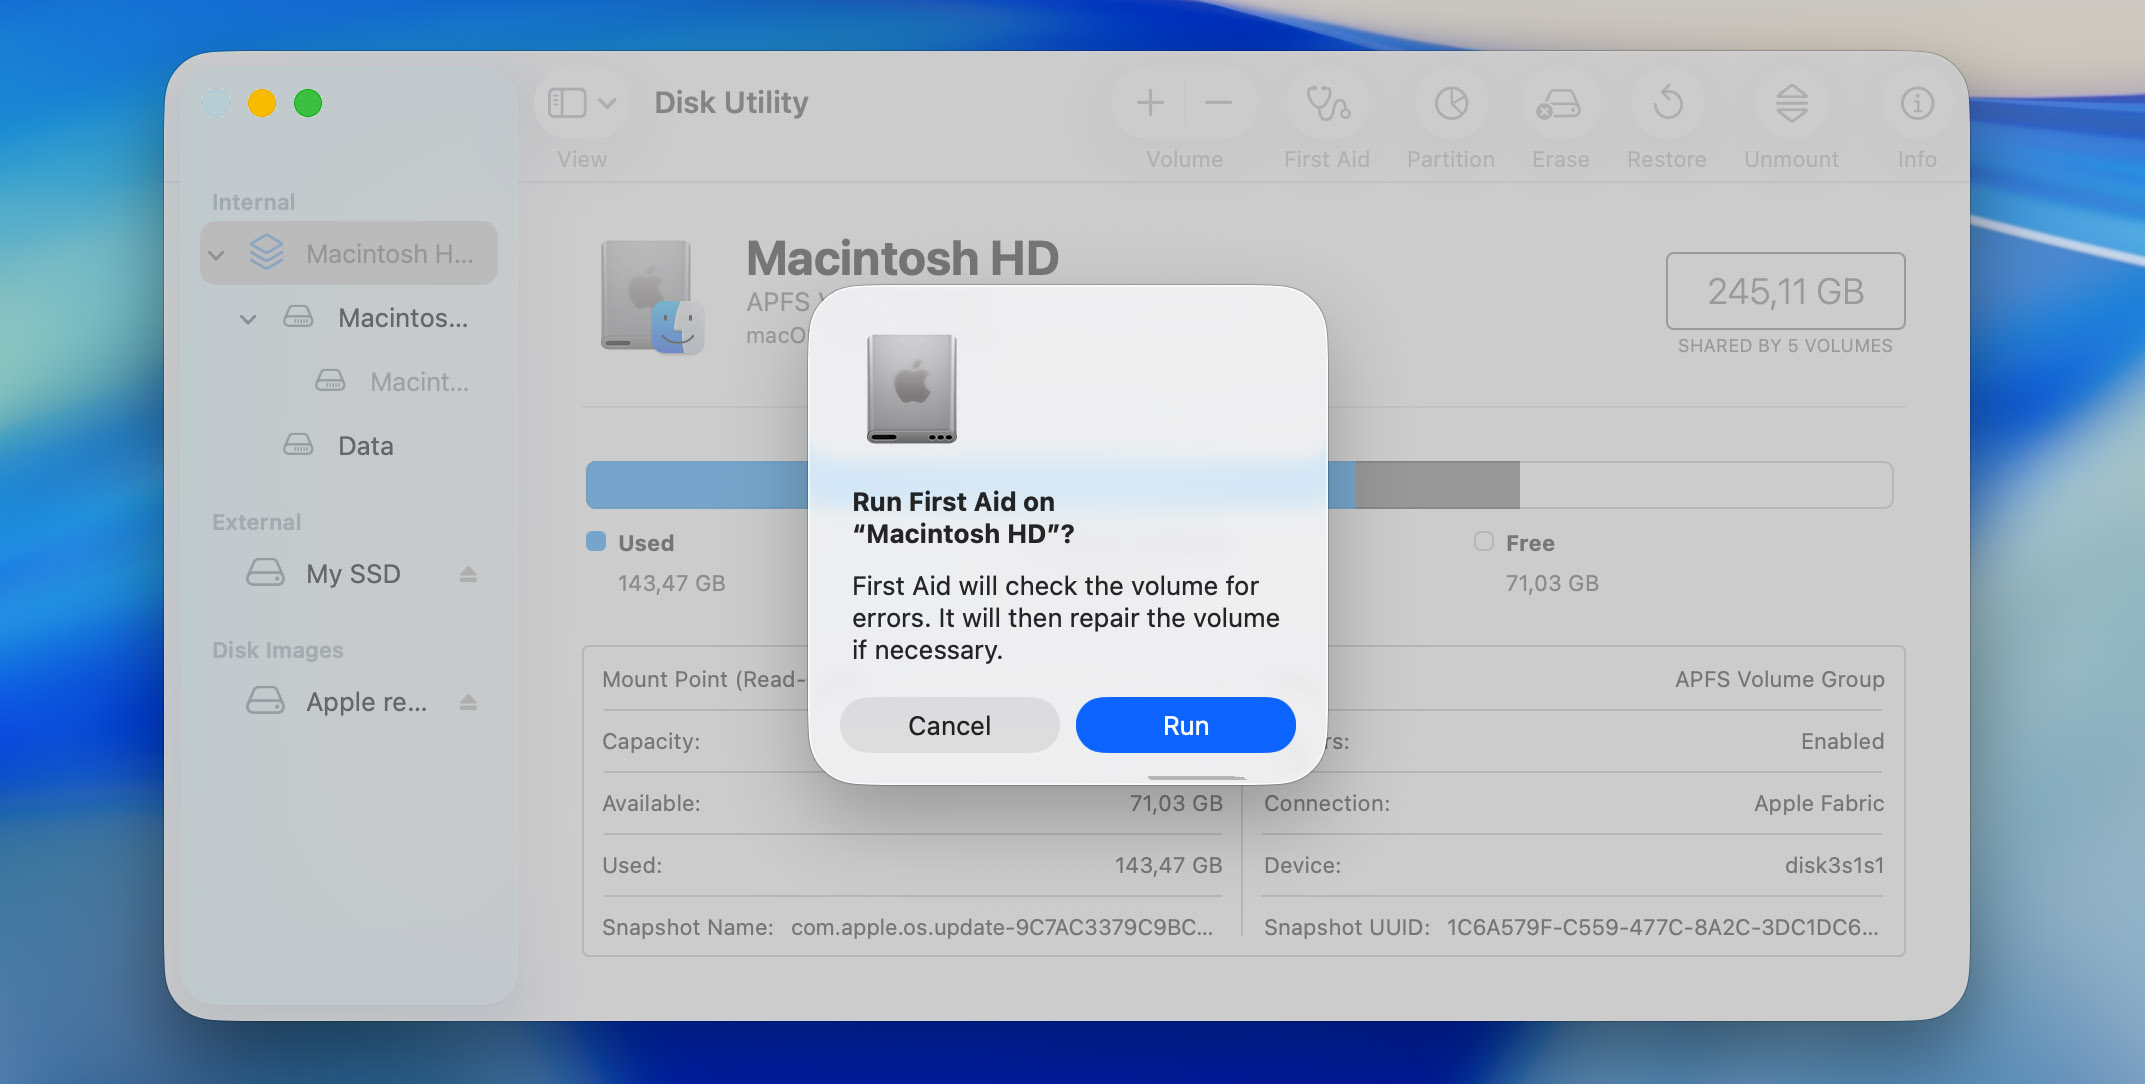
Your computer will now attempt to recover and mount the disk properly. If this works, you should be able to access it as you normally do through the operating system.
Method 4: Send Your SSD to a Data Recovery Service
If the above options don’t work out, you can also consider sending your drive to a data recovery center. Cleverfiles Data Recovery Center is a well-known example on this market. These services have advanced technological capabilities that allow them to access data which would normally be inaccessible via regular methods.
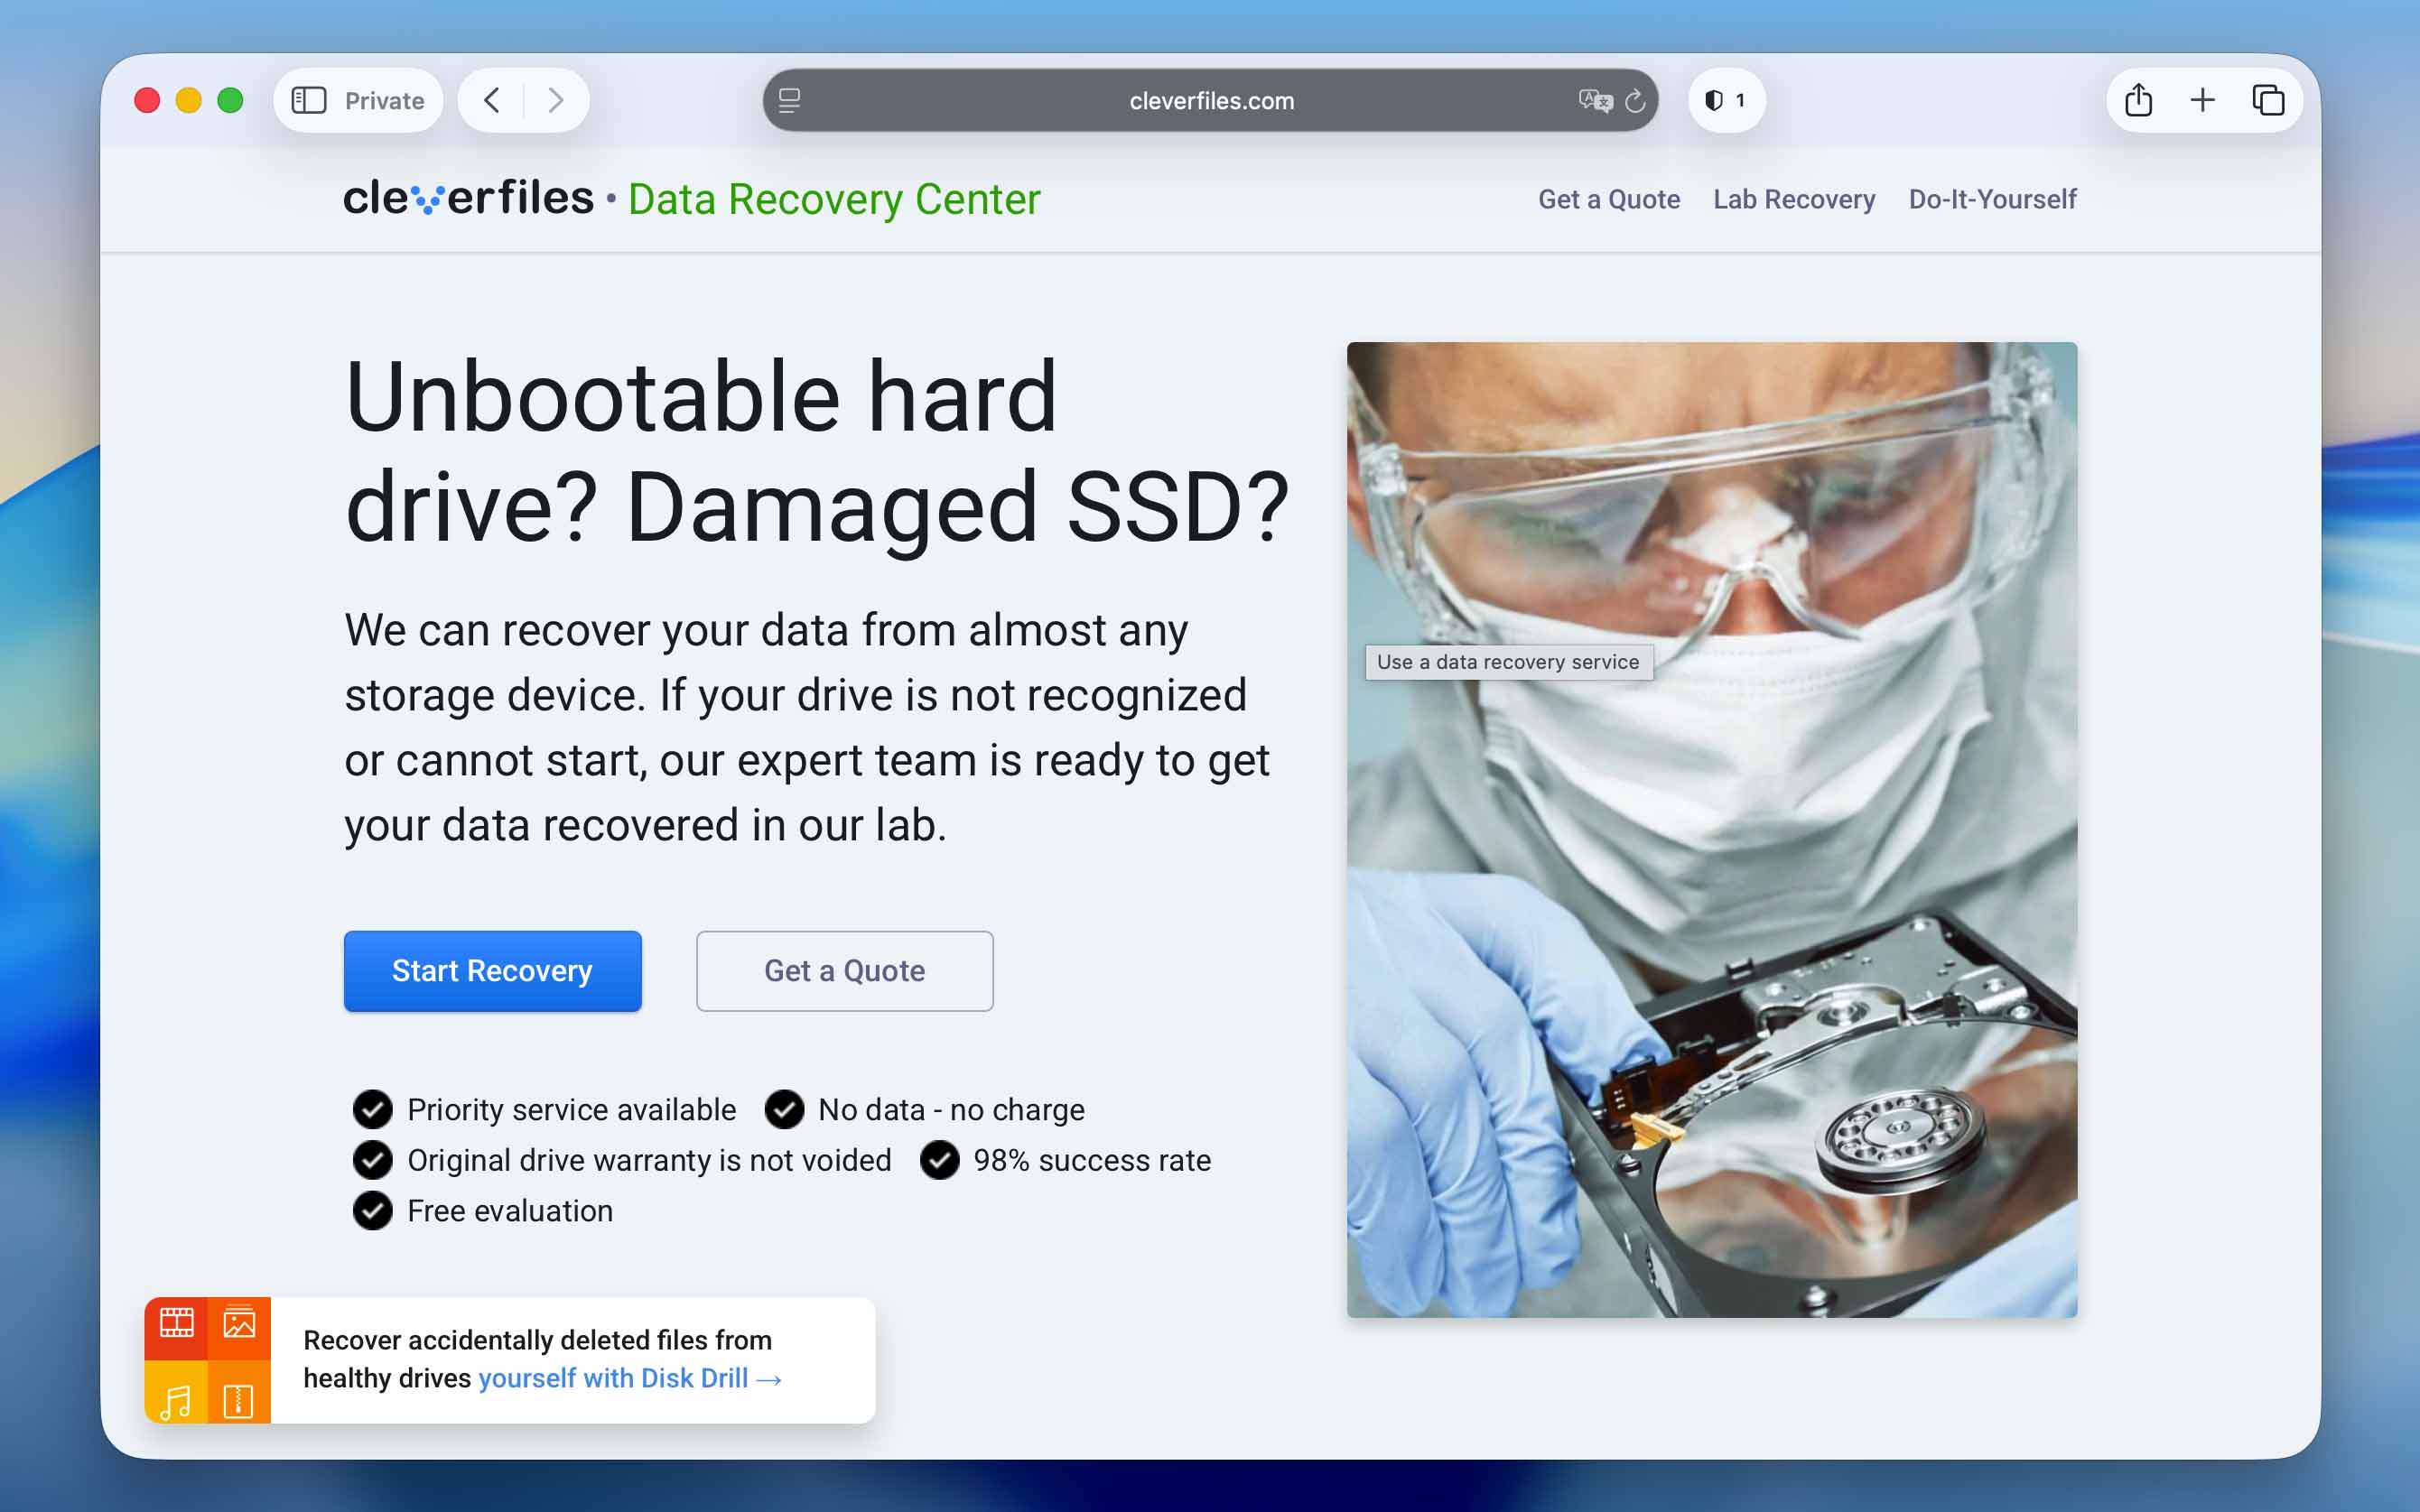
This often involves disassembling the disk and accessing the data stored on it directly. This is a risky process if you don’t know what you’re doing, as it can lead to permanent damage to your SSD.
Keep in mind that data recovery centers are still not guaranteed to get your data back. Depending on how it was lost, and what you’ve been doing with the drive since then, it’s possible that it’s gone forever. As a general rule, you should send in your disk as soon as you’ve realized that you’ve lost data from it.
You should also prepare to wait a long time until you get your drive back, and possibly pay a high fee for the recovery.
How and When Do SSDs Fail?
One major advantage of SSDs compared to regular hard drives is that they don’t use any moving parts for data storage. In a hard drive, data is stored on magnetic plates which are constantly spinning and are read by a moving arm.
This makes HDDs very susceptible to physical damage. One light hit could be enough to completely destroy a hard drive and make it unusable.
SSDs don’t suffer from this problem. They are very resilient to physical damage. However, they have a limitation in terms of how long they can be used. The NAND memory used in SSDs has a limited lifespan, measured in read/write cycles. Once that limit is reached, your disk will start to die.
Usually, an SSD can last for a good 7-10 years before it dies. This depends on how actively you use it though. If you’re an avid gamer, for example, your SSDs might not last as long, as games will constantly read data from the disk.
To stay on top of your SSD’s condition, it’s worth monitoring its health regularly. You can use Disk Drill, mentioned earlier in the Mac SSD data recovery section, specifically its S.M.A.R.T. monitoring feature. It tracks key parameters (wear level, reallocated blocks, read/write errors), which are usually enough to warn you when the SSD starts approaching the end of its lifespan.
Conclusion
To sum up, recovering data from an SSD on a Mac depends on the type of drive. On internal SSDs, the chances are usually moderate to low, especially if TRIM has already cleared the data. In these cases, having a backup system in place is far more important than any recovery attempt. On external SSDs, the chances are often much higher. In both cases, acting quickly and avoiding further use of the drive can improve the outcome.
At the same time, it’s not something you want to deal with more than once. To reduce the chances of running into data loss again, there are some general precautions you can take to stay on the safe side:
- 💽 Always eject external SSDs through the operating system before unplugging them
- 💾 Avoid filling an SSD with data completely
- 🛑 Don’t download any suspicious programs from unverified sources
- 🛑 Don’t share your Mac credentials with anyone you don’t trust
- 🛑 Don’t defragment your SSD. Unlike a regular hard drive, an SSD doesn’t need defragmenting. Not only that, but doing so can actually shorten its lifespan because it results in lots of read/write operations.

FAQ
Yes, you can recover data from a Mac SSD. The easiest way to do that is by using a tool like Disk Drill. Simply follow these steps:
- Download and install Disk Drill, then launch the app.
- Choose your SSD from the list and click Search for lost data. If you created a disk image beforehand, click Attach disk image and select it instead.
- Choose the scan type and start with the universal scan.
- Wait for the scan to finish and click Review found items.
- Go through the results and select the files you want to recover, then click Recover.
- Choose a location separate from your SSD and proceed. Saving files to the same drive can overwrite data and reduce your chances of successful recovery.
It depends on how dead your SSD actually is. If the drive still appears in Disk Utility and shows the correct capacity, you should create a disk image with Disk Drill and scan it to recover your files. Once your data is safe, you can run First Aid in Disk Utility to check the drive for file system errors and try to fix them. If the SSD doesn’t show up in the system at all, then software methods won’t help. In that situation, your only real option is a professional data recovery service.
Accessing an SSD on a Mac is no different from accessing any other of your drives. Simply go to Finder, and navigate to Devices. You should see your SSD listed there, ready to be accessed.