SSD data recovery on Mac is not that complicated if you use the right tools and prepare adequately. SSDs are generally more resilient and don’t fail as often as HDDs, but they are still not immune to data loss.
And while keeping consistent backups is of course always important, sometimes you’re hit by sudden loss of data and there’s nothing you can do other than attempt to recover what you’ve lost. Let’s see what your options are.
Is It Possible to Recover Data from an SSD on a Mac?
Mac SSD data recovery is not too different from recovering from a regular hard drive. The most important thing to consider here is whether your disk is using TRIM (more on that below). If you want to recover data from a Mac with an SSD, you should either use specialized software for the purpose, or send your disk to a recovery center if that fails.
How Does TRIM Affect SSD Recovery on a Mac?
TRIM is a special command used with SSDs which informs the drive that specific pieces of data are safe to delete. Normally, data is not physically erased from the disk, but is just overwritten. When something is marked as “deleted”, what happens in reality is that the space occupied by that data is marked as free, allowing applications to write over it.
Because of this, you can still recover files after they’ve been deleted, but you need specialized tools for that.
Depending on what you use the drive for, it might be a good idea to avoid using TRIM at all. Consult an expert if you’re in doubt about this, and describe your general usage patterns to them to see what they will say.
How to Recover Data from an SSD on a Mac
Can you recover data from an SSD on a Mac? Certainly – there are actually several methods available. It’s recommended to go with Disk Utility as a first approach, and only use the alternative options if that doesn’t work out.
Fix 1: Disk Utility
Disk Utility can work well if your drive is not physically damaged. It’s a useful tool for bringing a “dead” SSD back to life if it’s not getting recognized by the operating system, for example. However, it won’t help you get back files that you’ve deleted. You’ll need to use one of the below methods for that.
To attempt to recover your drive using Disk Utility, simply follow these steps:
- Start Disk Utility
- Choose your drive from the left-side list
- Click First Aid at the top
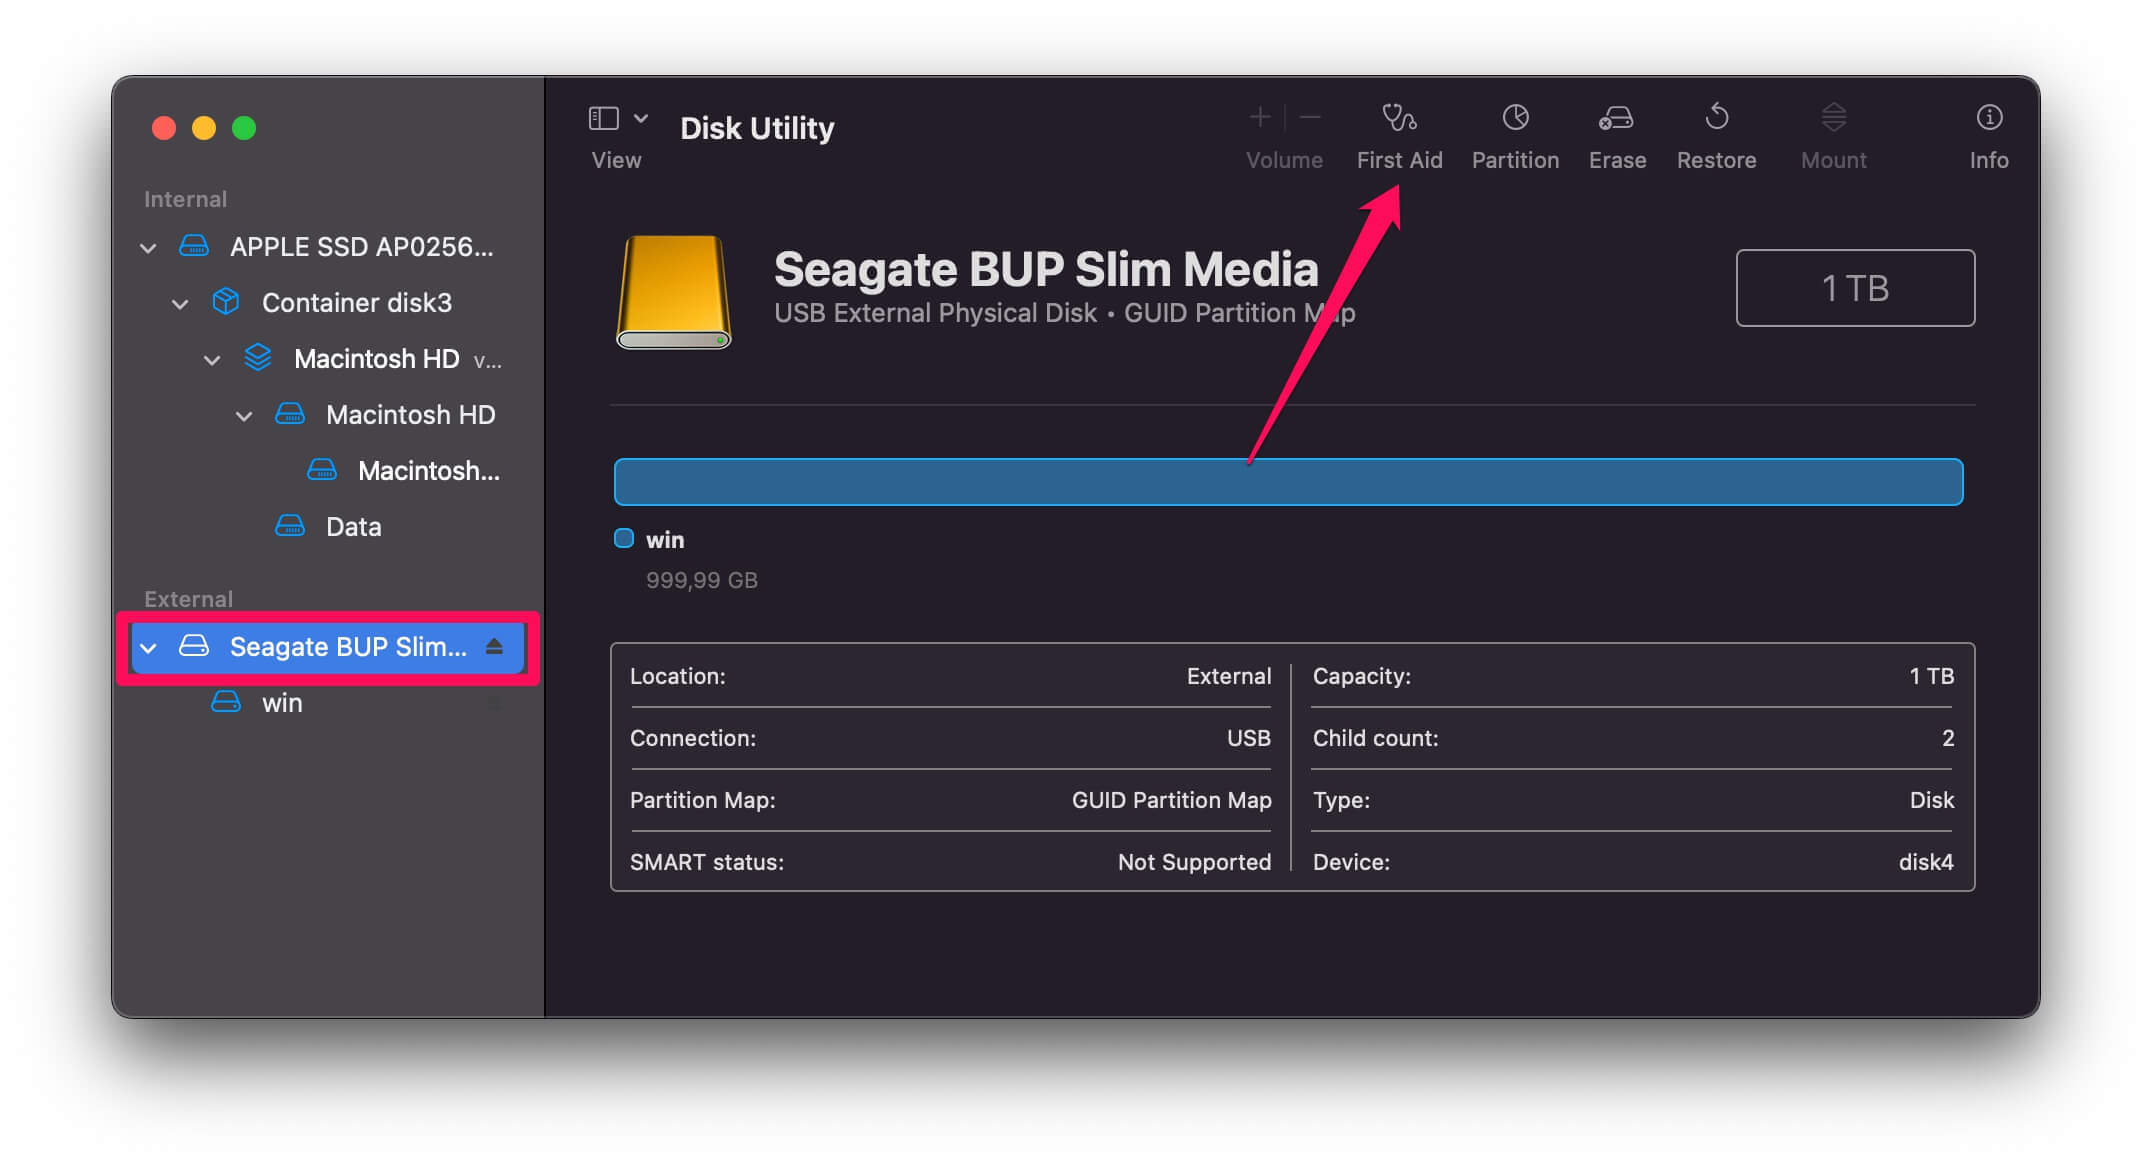
- Click Run
Your computer will now attempt to recover and mount the disk properly. If this works, you should be able to access it as you normally do through the operating system.
Fix 2: Data Recovery Software
There are also specialized tools on the market that can assist you with data recovery. Some of those, like Disk Drill, can even recover data that’s already been deleted. This has one major prerequisite: you must stop using the disk as soon as you’ve deleted files from it. Otherwise, they will get overwritten by processes very quickly.
To use Disk Drill to recover your data, follow these steps:
- Download and install Disk Drill
- Launch Disk Drill
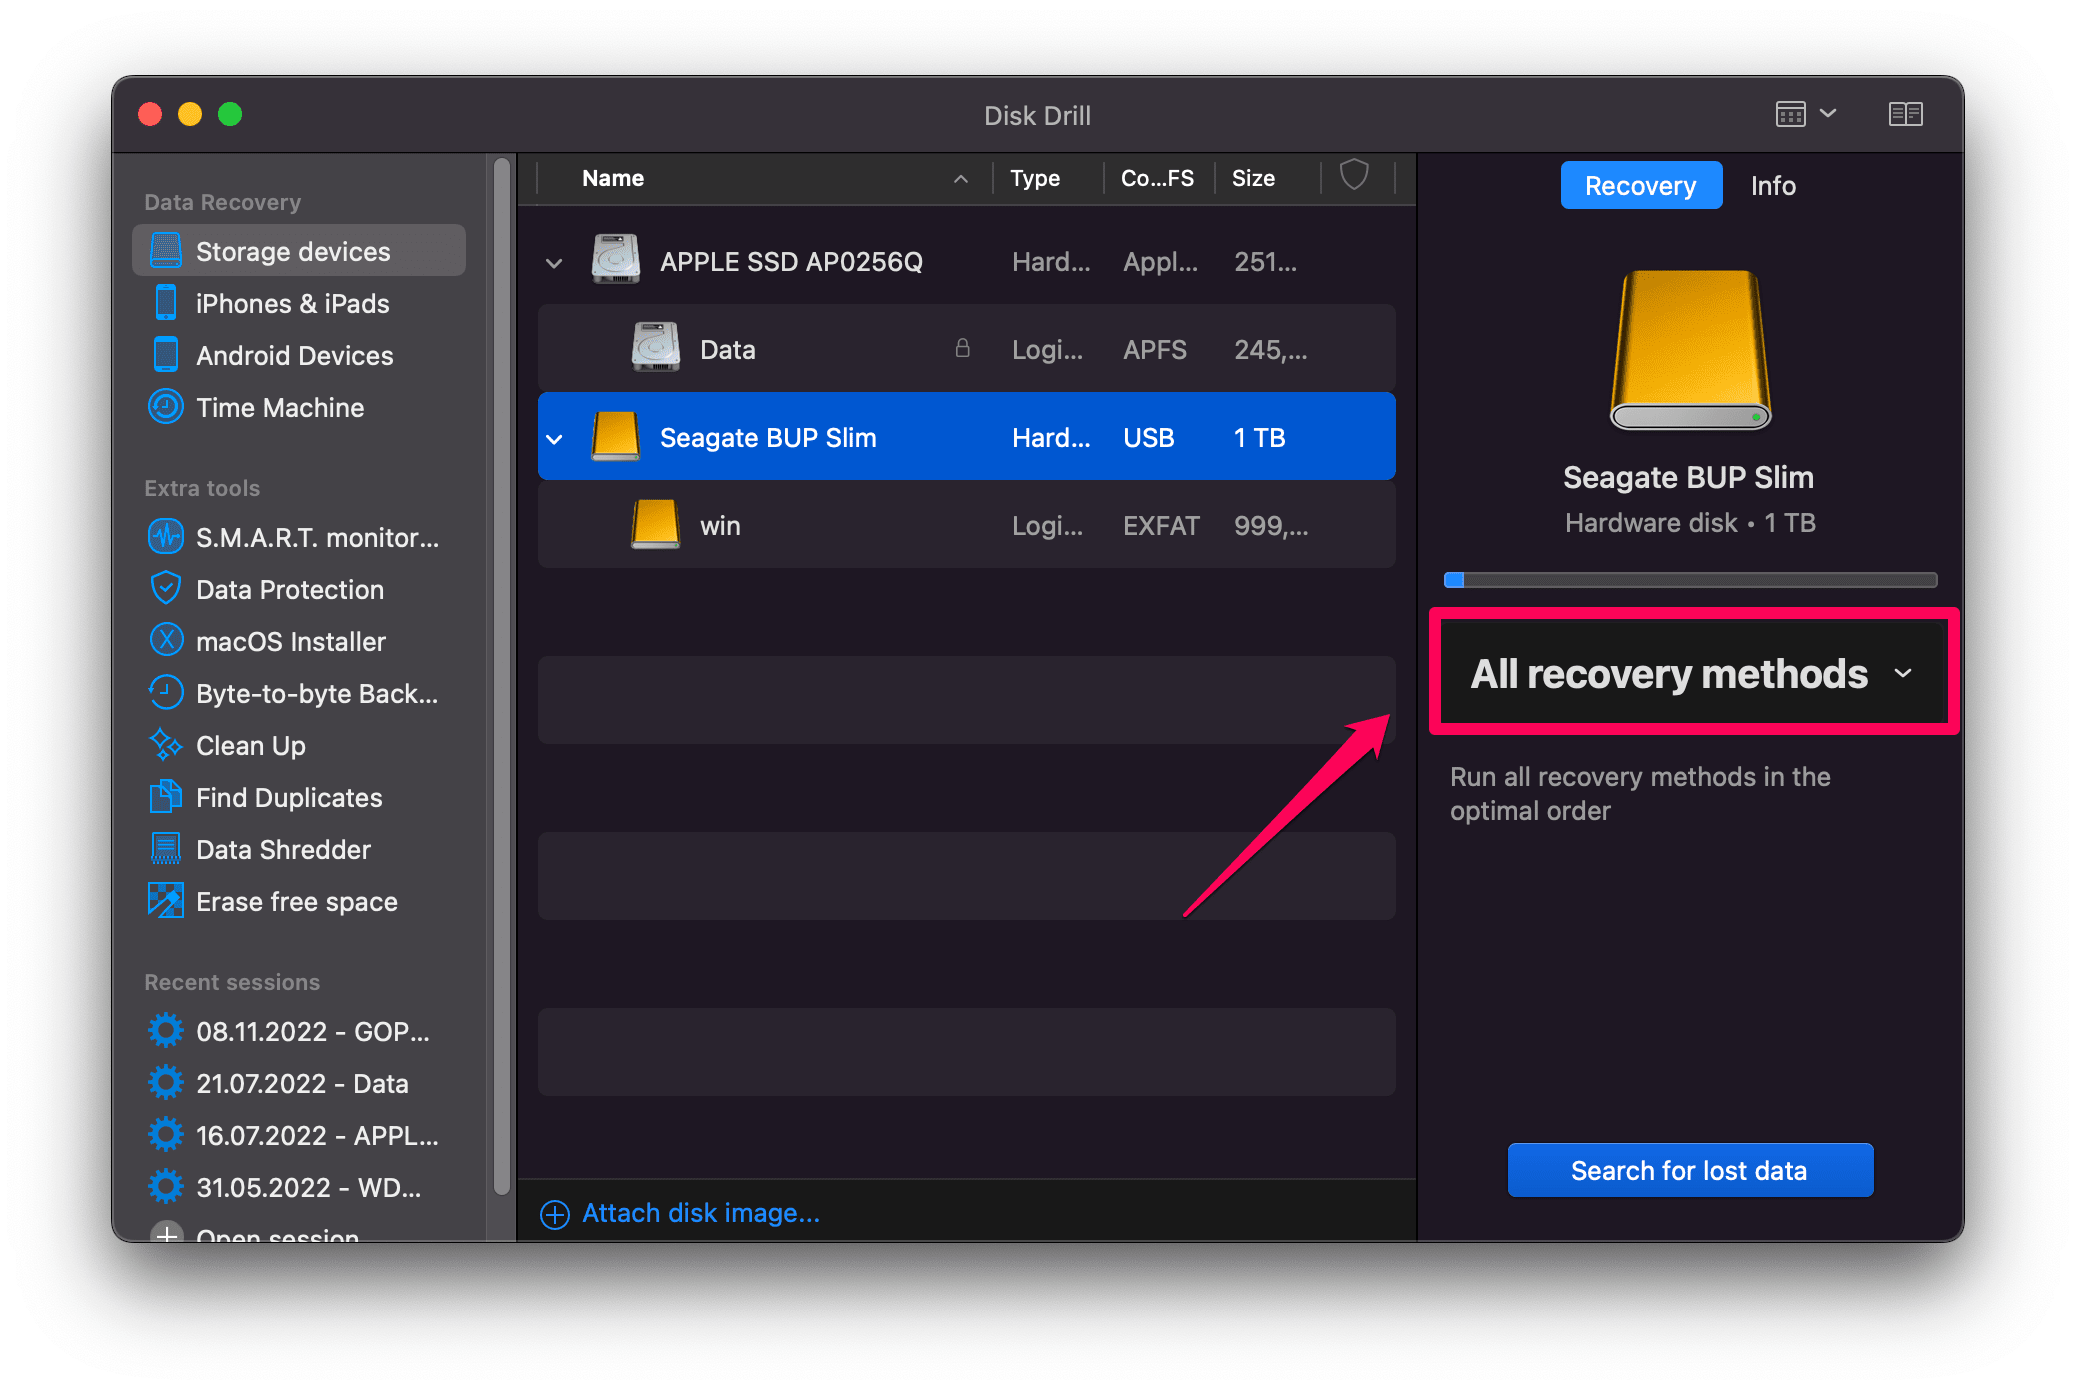
- Choose your drive from the list of drives
- Select All Recovery Methods
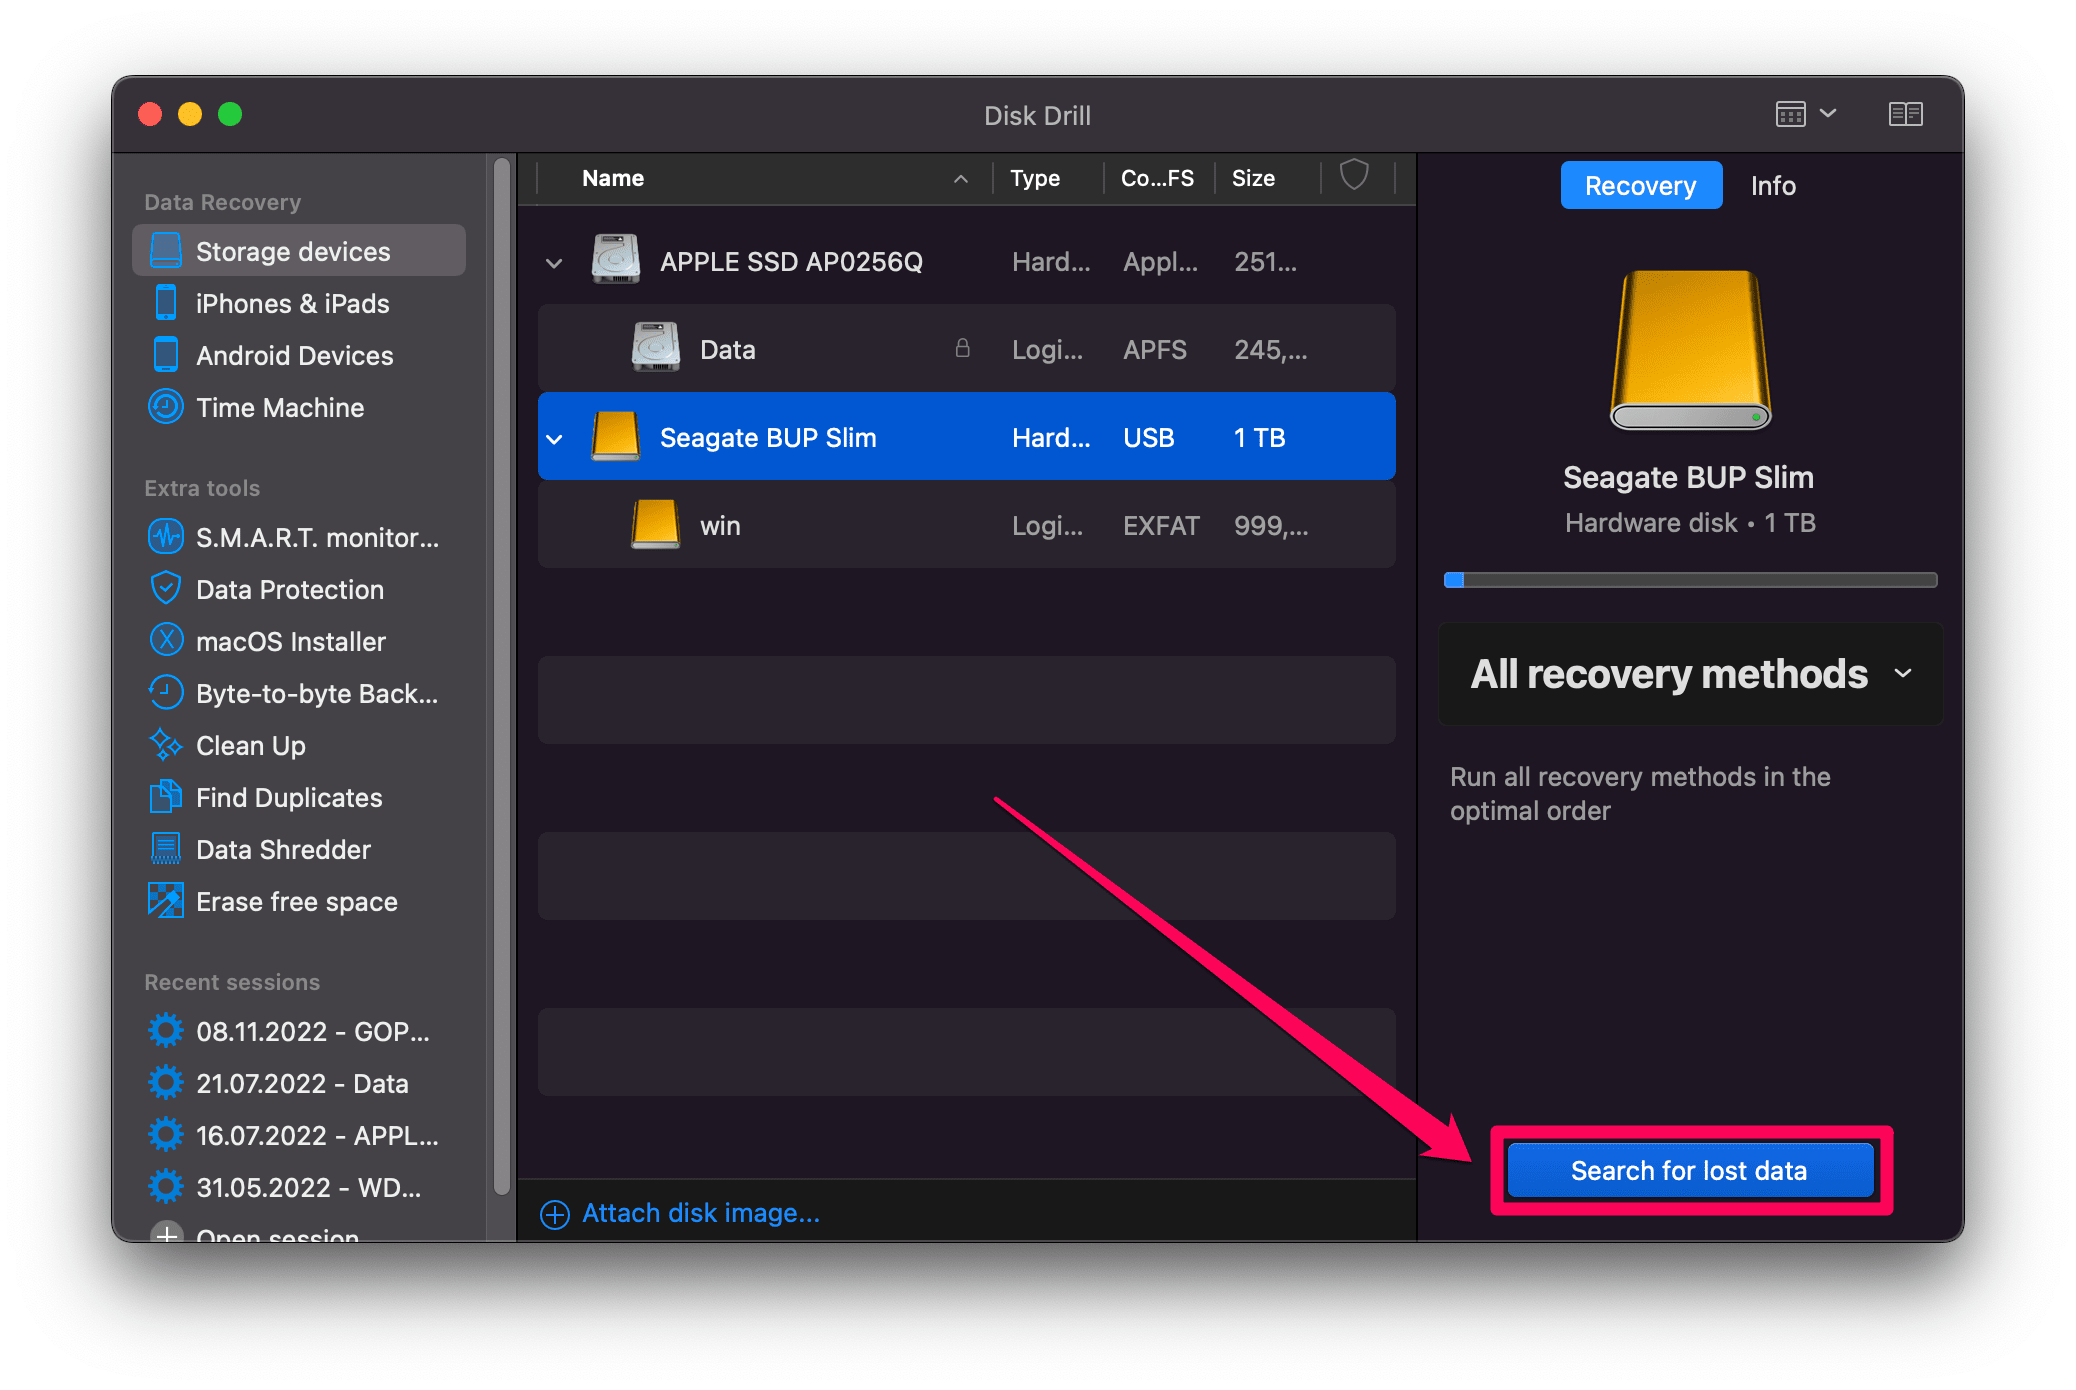
- Click Search for lost data and wait for the scan to finish.
- Click Review found items
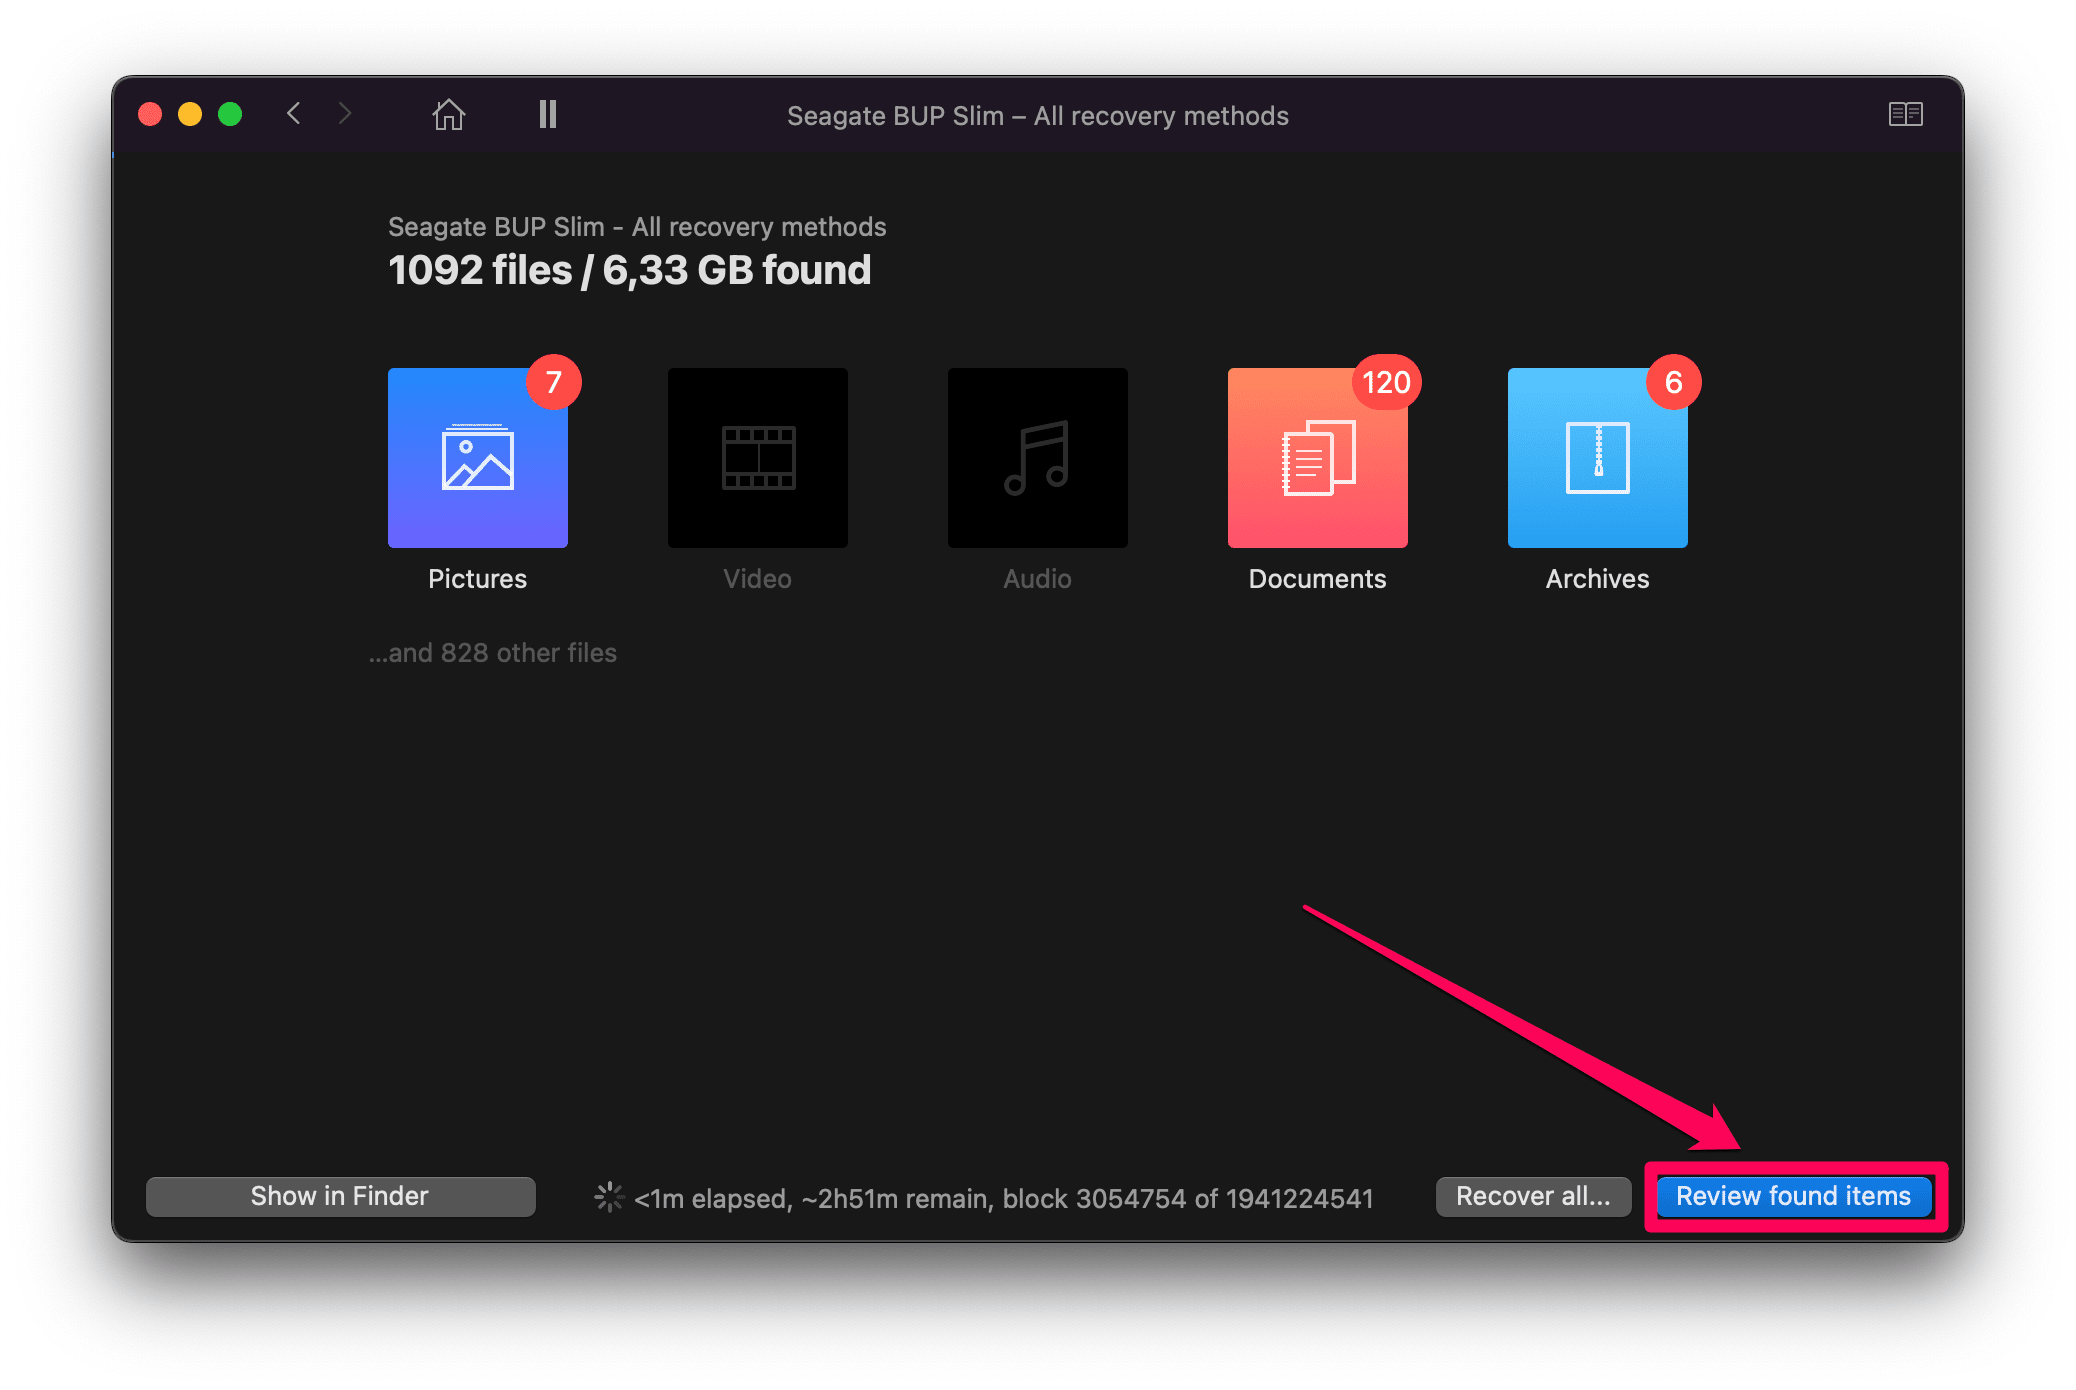
- You will now see a list of all files and folders that you can recover. Go through the list and select any files you want to get back. Once you’re done, click Recover to save them.
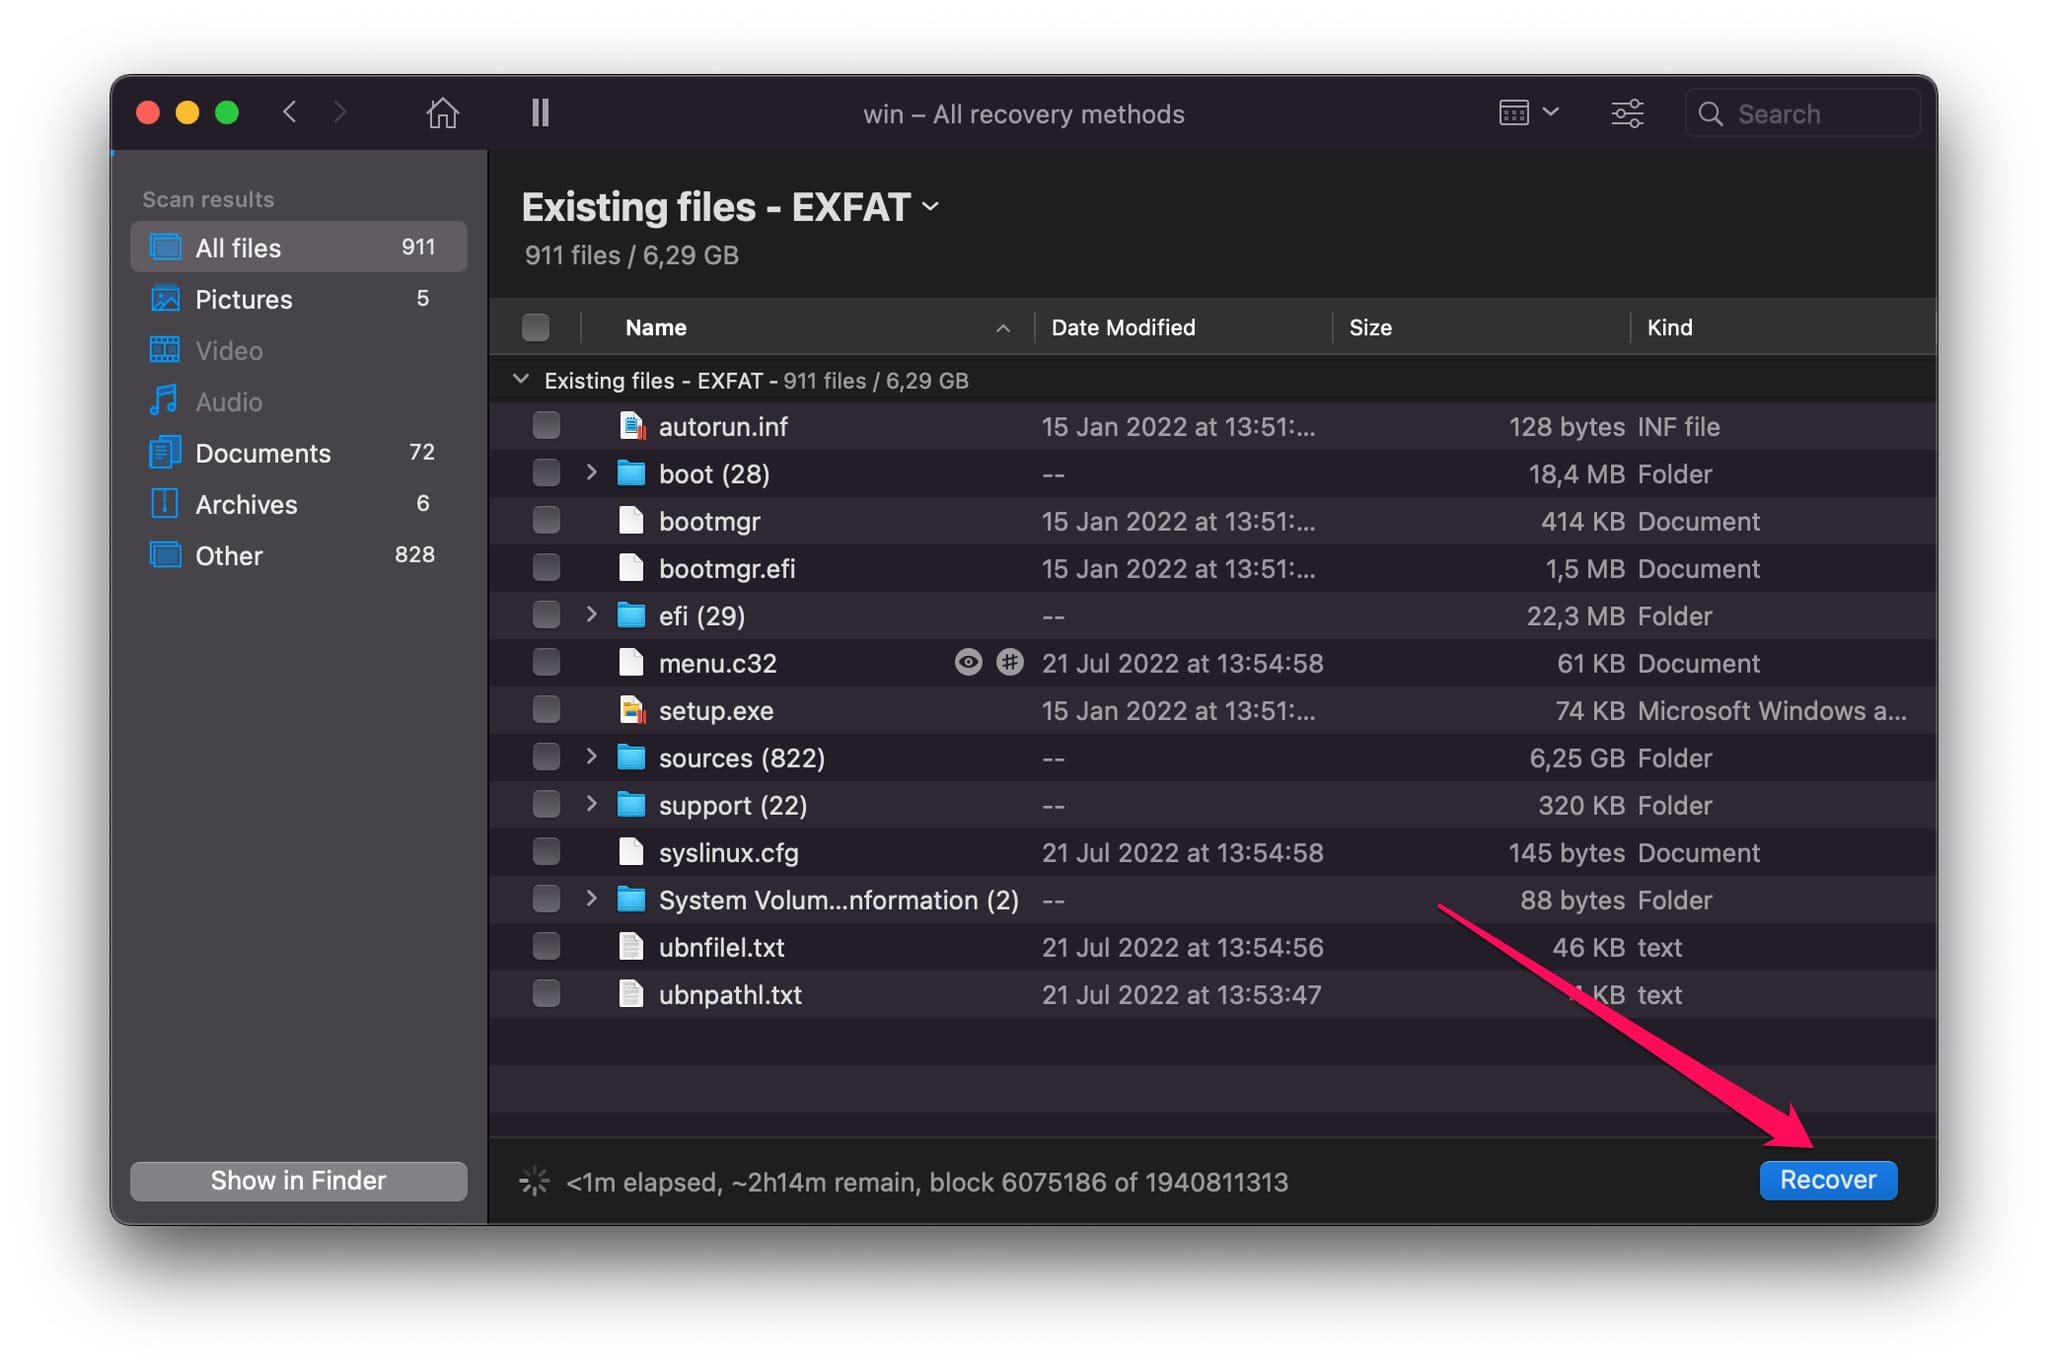
- Choose a location separate from your SSD in all cases. Otherwise, you risk corrupting your data by writing directly over it.
Fix 3: Data Recovery Service
If the above options don’t work out, you can also consider sending your drive to a data recovery center. Cleverfiles Data Recovery Center is a well-known example on this market. These services have advanced technological capabilities that allow them to access data which would normally be inaccessible via regular methods.
This often involves disassembling the disk and accessing the data stored on it directly. This is a risky process if you don’t know what you’re doing, as it can lead to permanent damage to your SSD.
Keep in mind that data recovery centers are still not guaranteed to get your data back. Depending on how it was lost, and what you’ve been doing with the drive since then, it’s possible that it’s gone forever. As a general rule, you should send in your disk as soon as you’ve realized that you’ve lost data from it.
You should also prepare to wait a long time until you get your drive back, and possibly pay a high fee for the recovery.
How and When Do SSDs Fail?
One major advantage of SSDs compared to regular hard drives is that they don’t use any moving parts for data storage. In a hard drive, data is stored on magnetic plates which are constantly spinning and are read by a moving arm.
This makes HDDs very susceptible to physical damage. One light hit could be enough to completely destroy a hard drive and make it unusable.
SSDs don’t suffer from this problem. They are very resilient to physical damage. However, they have a limitation in terms of how long they can be used. The NAND memory used in SSDs has a limited lifespan, measured in read/write cycles. Once that limit is reached, your disk will start to die.
Usually, an SSD can last for a good 7-10 years before it dies. This depends on how actively you use it though. If you’re an avid gamer, for example, your SSDs might not last as long, as games will constantly read data from the disk.
How to Protect Your SSD on a Mac
Protecting your SSD is not too different from protecting a hard drive, with the exception that you don’t need to watch out for physical damage. There are some general precautions you can take to stay on the safe side.
- 💽 Always eject external SSDs through the operating system before unplugging them
- 💾 Avoid filling an SSD with data completely
- 🛑 Don’t download any suspicious programs from unverified sources
- 🛑 Don’t share your Mac credentials with anyone you don’t trust
- 🛑 Don’t defragment your SSD. Unlike a regular hard drive, an SSD doesn’t need defragmenting. Not only that, but doing so can actually shorten its lifespan because it results in lots of read/write operations.
Conclusion
Recovering data from an SSD on a Mac is easy if you know what tools to use and have taken some necessary precautions to keep your data safe in the first place. As with any type of data recovery, it’s important to take immediate action to avoid incurring further data loss. And whenever you’re in doubt, send your drive to a data recovery center to maximize your chances of success.
FAQ
Yes, you can recover data from a Mac SSD. The easiest way to do that is by using a tool like Disk Drill. Simply follow these steps:
- Download and install Disk Drill
- Launch Disk Drill
- Choose your drive from the list of drives on the right side
- Click on All Recovery Methods, and wait for the scan to finish
- You will now see a list of all files that you can recover. Go through the list and select any files you want to get back.
- Choose a location separate from your SSD in all cases. Otherwise, you risk corrupting your data by writing directly over it.
If your drive is dead and isn’t getting recognized by the operating system, you should attempt to recover the disk with Disk Utility. After that, you can follow the above steps to recover deleted data. To use Disk Utility to recover a drive, follow these steps:
- Start Disk Utility
- Choose your drive from the right-side list
- Click First Aid at the top
- Click Run
Accessing an SSD on a Mac is no different from accessing any other of your drives. Simply go to Finder, and navigate to Devices. You should see your SSD listed there, ready to be accessed.


