Why You Should be Running Windows Updates
Windows as an Operating System is the most popular and widely used in the world but that also means it’s the most commonly exploited. Windows is not perfect and can be compromised. The risk goes up considerably when you plug your PC into the Internet where there is a sea of threats awaiting such as malware, viruses, worms, trojan horses, ransomware and phishing attacks.
Running Microsoft (Windows) updates on your system helps mitigate the risk of the aforementioned threats by patching loopholes and security flaws as they are found by Microsoft’s risk mitigation team which works around the clock.
Aside from fortifying your system, the updates add more features and functionality to Windows and other software included with Windows. Microsoft Updates are crucial for the mitigation of security risks and smooth operation of your Windows Operating System.
It is estimated that the vast majority of vulnerable systems which become exploited with worms, trojan horses and botnets are directly vulnerable due to the lack of recent Windows updates and therefore the infection and spread of many types of malware and viruses could be mitigated with regular updates.
Whether we are dealing with Windows 10 updates or Windows 7 updates, Microsoft updates can be categorized into the following categories:
- Security updates:
These updates patch any security loopholes that could allow your Windows system to be compromised. They can be classified as critical, important, moderate, low and non-rated. The most important of these are the critical updates. Ignoring critical updates could render your PC or server extremely susceptible to malicious attacks from hackers and other security related risks. - Critical updates:
Critical updates help fix any major issues that could cause software errors (exploits) or unexpected behavior. In conjunction with security updates they account for the ‘High Priority’ category of updates from Microsoft and should be configured to download and install automatically. - Software updates:
These fix non-critical issues like minor bugs and often provide extended features for software applications included with Windows. - Service Packs:
These consist of a roll-up of all software patches for a specific software or OS and often come with additional feature changes and new tools and software.
Each update is identified by a number called it’s KB (Knowledge Base) number. This provides more information on the changes made to the system or software. Security updates also get tagged with a Microsoft Security (MS) number which can be used to research more information about what the patch fixes and the original exploit.
Having touched on the different types of updates that are vital for the optimal performance of your Windows system, allow us to further explain the importance of ensuring that your system is constantly updated and patched with the latest security patches.
1. Keeping Malicious Software at Bay
No software is 100 % perfect nor secure and sooner or later loopholes are discovered. These loopholes can then be exploited by attackers to illegally access your system, steal important or personal information and potentially damage your system. Security loopholes reside in various components of the Windows Operating System including .NET framework, ActiveX and Internet Explorer to mention just a few.
When you have an application that you hardly run or use, it’s prudent to patch it even when you are running an antivirus software. This is because your anti-malware or antivirus may not sufficiently shield you from imminent Windows issues. Potential repercussions of not installing the required security updates are dire and include loss and theft of data, damaged software and unfixable damage to the operating system. Annually, malware causes damages of an estimated hundreds of millions of dollars at a global level due to the lack of critical security updates by users.
A good example of this is the “Wanna cry Ransomware” attack that hit the internet on May 12th 2017 and affected systems running unpatched versions of Windows 7, Windows 8, 8.1, Windows server 2003 & 2008 and Windows XP whose support by Microsoft came to an end and thus users were left critically vulnerable to security breaches and intrusion.
The malware took down 150,000 systems in more than 100 countries (this figure continues to rise). It grounded hospitals in the UK and even led to a loss of patient data. All that would could been avoided if the systems had been patched with the critical MS17-010 Security update. Vulnerabilities are exploited within hours of their discovery and therefore once a security update is available it’s imperative that you install and fix your system before malware strikes.
2. Resolving Non-critical Windows Issues and Bugs
This type of update addresses general issues and bugs of the Windows Operating System. The updates are rolled up into one big update and while they may not be responsible for fixing any security vulnerabilities, lack of these can adversely degrade a system’s performance and stability. It’s generally considered important to install these updates to resolve or avoid performance issues with Windows and other installed components and applications.
3. Access to New Windows / Software Features
Windows updates open you up to a world of new features while fixing some known Windows issues. These updates come with significant improvements and sometimes add new core features. Inevitably, Microsoft will cease support of outdated software, for instance, the previous version of Internet Explorer. In fact, all users are expected to upgrade their old software to the latest or current versions.
How to Turn on Automatic Updates for Windows 7
There are a couple of methods for updating your copy of WIndows 7. These methods are simple for most users to follow.
Method 1
- Hit the Start button.
- In the search text box that appears, type update and select the Windows Update option in the results list.
- Select change settings in the left pane once it appears. Under important updates click the install updates automatically (recommended) option.
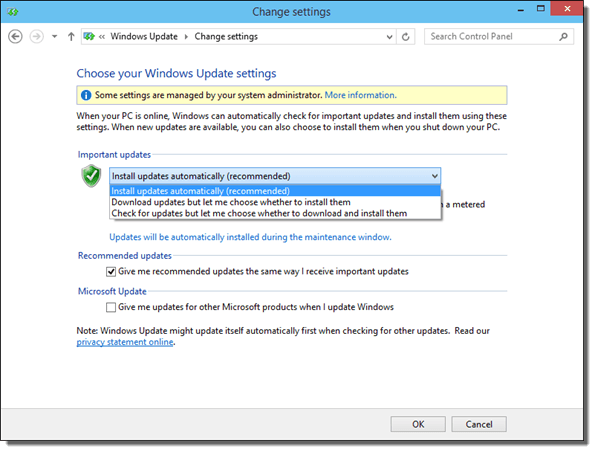
- Under the recommended updates option check the “Give me recommended updates the same way I receive important updates” option and click OK.
Method 2
- Hit the Start button.
- Select Control Panel option.
- Select System and Security.
- Repeat steps 3 and 4 from the above method.
How to Turn on Automatic Updates for Windows 10
By default Windows 10 comes with Updates automatically turned on. It is quite difficult to disable automatic updates on Windows 10, nonetheless we are including instructions below for manually searching for updates since there is no need to re-enable them manually:
- Hit the Start button then click on the Settings icon.
- Proceed to Update & Security.
- For manual checking of updates select the Check for Updates option.
- If you wish to view update history hit the Update history option below Check for Updates.
How to View Installed Windows 7 Updates
- Hit the Start button.
- Select Control Panel > Programs.
- Select the view Installed updates option under Programs and Features.
- You’ll find an update history with a list of all installed updates.
How to View Installed Windows 10 Updates
- Select the Start button.
- Proceed to Settings > Update and Security.
- Select Windows Update.
- Navigate to Advanced Options and select View your Update history
While most updates for Windows are flawless, on occasion you may run into an update which causes issues for your system. There is usually no need to clean install Windows 10 or other versions of Windows if this happens. Most of the time you can use a few simple steps to remove a Windows 10 update or an update from other versions of Windows.
Sometimes it may be necessary to remove or uninstall Windows updates, this includes partially failed installations such as ones that give the famous “windows update error 0x80070057”.
How to Uninstall Windows 7 Updates
- Click on the Start button.
- Select Control Panel.
- Proceed to Programs and under Programs and Features, hit View installed updates.

- Select your preferred update for removal and click on uninstall.
How to Uninstall Windows 10 Updates
Uninstallation of windows updates is discouraged, however, should there arise a need for you to uninstall them, follow this procedure to stop Windows 10 update:
- Click on the Start button then go to Settings.
- Select Update & Security then Windows Update and hit on Advanced Options.
- Select View your update history and finally hit Uninstall updates.
- Select the update you prefer to uninstall and click on Uninstall.
Please note uninstalling Windows 10 updates is not the same as fully removing a Windows 10 Update. Windows 10 updates can’t be removed, only uninstalled.
How to Disable Windows 7 Updates
Disabling windows 7 updates is not recommended, if you do need to disable updates you should do so cautiously.
- To disable Windows Updates click on Start and then on the run option type “services.msc”
- then press the run button. This will bring up the services window.
- Look for Windows Update entry and right click on it then click on properties.
The Windows Update properties screen will load. Change the startup type to disabled and click on the stop button under Service Status to stop the windows update.
How to Disable Windows 10 Updates
To disable Windows 10 Updates from your system:
- click on Start button and on the search tab type “services”
- then click or press enter on the Services icon that appears. The Services window will appear.
- Look for the Windows Update option and double click it.
- The Windows Update Properties will pop up, here you need to change the Startup type to Disabled
- and then on the Service status click on the Stop button.
- Then click Ok to close the window.
Note: Some versions of Windows 10 such as OEM modified versions do not allow this option. In those cases the only way to disable Windows 10 updates is to set your wireless internet connection to “metered” in the Windows Networking panel and thus trick your computer to disable windows 10 updates. If you connect to another wireless network updates may resume normally.
Windows 10 Update Stuck or Frozen
It’s possible to run into a number of situations which can lead to windows update not working. While this type of situation is not common Windows 10, if you do have issues with Windows 10 update there are a few solutions.
- Your Windows 10 Update might get stuck or even frozen at some point and render the update unusable. After making sure the update is truly stuck or frozen, press Ctrl+Alt+Del, this command will bring the Windows login screen.
- Restart your computer by using the “restart” option on the power screen. If you are unable to do this you may also use the reset button or by holding down the power button for 10 seconds and turning it back on (not recommended except as a last resort). Your computer will now reboot, your computer may also reboot into Windows Safe Mode automatically.
- If your Windows updates install properly in safe mode, simply restart your computer and you should be able to use your computer as normal. If you are still having problems from Safe Mode, then complete a system restore to undo any changes made by the incomplete update Installation.
If none of the aforementioned options work you may need to clean install Windows 10, the procedure for this will vary depending on your computer manufacturer.
Challenges Encountered when Updating Windows 7 and 10
While Windows constantly receives updates in the background, not every Windows Update goes smoothly. Sometimes, the Windows update may get stuck, display an error message such as “Windows Update not Working”, take too long or refuse to install or even worse, cause your computer to get stuck in a boot loop. In some cases, WiFi or ethernet drivers may get uninstalled or become inoperable.
If the Windows Update progress bar seems to get stuck at one point during installation, be patient and wait for it to complete. If no observable change happens, then you may need to try an alternate solution, but wait, don’t go searching for “How to install Windows 10” just yet, we have a few tricks that can help.
Below are some of the most common solutions for both Windows 7 and 10, we even included some advanced instructions as a last resort.
1. Using the Windows Troubleshooter
Windows comes with a built-in troubleshooter that identifies and resolves issues affecting the smooth download and installation of updates. It’s not always helpful as it may say it has fixed errors while it has not, but it’s worth giving it a try.
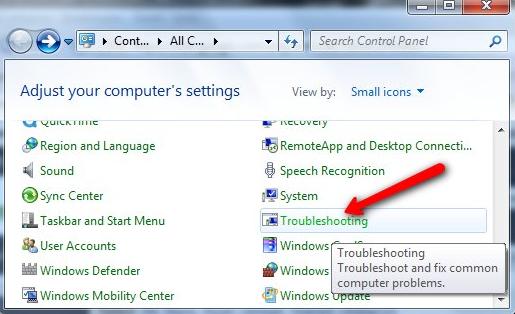
In the Windows search bar type Troubleshoot and select the troubleshoot System Settings option. Under the Troubleshoot section, select Windows Update and click the Run the Troubleshooter option. This will open another window with an option to Try troubleshooting as an administrator.
Allow troubleshooting as an administrator and wait for the troubleshooter to diagnose the problem. When the troubleshooting is complete, close the window and reboot your system to see if this truly resolved the issue. If that doesn’t fix the issue keep on reading!
2. Clear the Updates to download folder
If your Windows updates get stuck or refuse to install, you may have a problem with the update file itself. You may need to clear the folder where all the update files are normally stored, this will force your Windows system to download a fresh copy of the update which may resolve the issue you are having.
To clear previously downloaded Windows updates:
- Hit the Windows Key + R to open the run tool.
- Type C:\Windows\softwareDistribution\Download in the text box and click OK.
- Delete everything in the Download folder but leave the folder itself. Select CTRL + A to highlight everything and hit Delete to erase of all the files.
If some files refuse to delete, boot into safe mode and repeat this procedure. Restart your computer and run Windows update to proceed.
Another thing you may try is to disable your antivirus software. Normally, your anti-virus shouldn’t impede the update process, but in some cases temporarily disabling antivirus during the update process does help, especially with newer updates. Each antivirus program has its own way of being temporarily disabled, you should check your specific anti-virus program for more details.
Resolving Windows Update error 0X80070057
This is one of the most infamous Windows Update errors. This error usually occurs when there is file corruption during the backup phase of the update installation. Generally when this happens you will get this error message: Windows update error 0x80070057.
Common causes for this particular error are:
- The System Reserved partition has been corrupted during installation of Windows OS.
- There are corrupt registry entries that interfere with the update process
Remedies to Windows Update Error 0X80070057
While there is no single solution for this error we have some quick tips which have helped get past this error in some situations:
 Renaming the Software Distribution folder
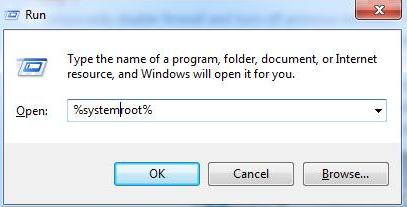
- Hit the Windows key + R to open the Run dialogue.
- Type %SystemRoot% and hit enter.
- Locate the SoftwareDistribution folder and rename it to SoftwareDistribution.old.
- Restart your computer and attempt the update again.
Altering the Decimal Symbol
- Click on Start and select Control Panel.
- Navigate to Clock, Language, and Region.
- Under region click change date, time, or number formats. In the pop-up window that appears select additional Settings. Make sure that there’s a period / full stop adjacent to the decimal symbol option. Click Apply and finally OK.
If you run into a more serious issue during Windows updates and you are unable to boot your computer normally or into safe mode, you may need to make a bootable USB drive. This can help you to access safe mode or install Windows 10 from USB if you have no other option.
Making a Windows Bootable USB Drive
There is an official tool release by Microsoft to help create a Windows Bootable USB Drive. This can be used for recovering your system or to help with a clean install of Windows 10.
To create the bootable USB follow these steps:
- Download the Media Creation tool for Windows 10.
- Run the tool once downloaded and select “Create installation media for another PC“.
- Select the preferred language, edition, and architecture.
- Insert your USB stick into a free port and ensure its properly formatted and has at least 4GB of free space.
- Select your newly inserted USB drive in the Media Creation tool.
- The tool will download Windows 10 installation files and make a bootable version of Windows 10.
Once the Media Creation tool is finished, you can then use the USB flash drive to perform a clean install of Windows 10. Similarly, it can be used to upgrade your Windows or PC to Windows 10.
Data Recovery and Backup
Updating your system is always the best option. Keeping your computer safe and secure will help reduce the chances of catastrophic failure, but that doesn’t mean one won’t happen. We always suggest planning for the worst case scenario to make sure you are not left in a difficult situation where your files have been lost or corrupted. Rather you’d like to plan ahead or try to fix an issue once it’s too late, Disk Drill is the perfect tool.
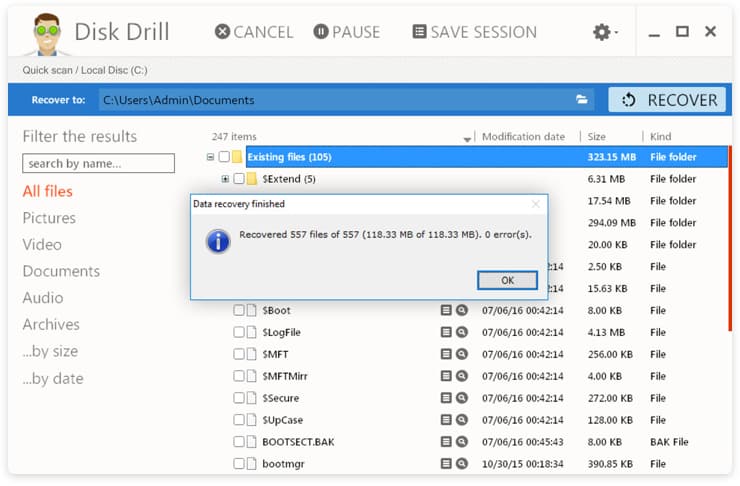
Disk Drill is the great for backing up your precious files such as family, birthday and vacation photos, videos, work documents, software and lecture notes. Disk Drill is especially great if you have sensitive information you just can’t afford to lose like tax information or business information on your computer.
You can download and try Disk Drill for free to take advantage of many of the great features such as Guaranteed Recovery and Recovery Vault which protect your files from data loss. If you’ve already lost important data due to a failed Windows Update or any other reason, Disk Drill’s advanced file recovery features can help to scan your computer and find lost files. This oustanding tool allows up to 500MB of free file recovery.
