We’ve all done it, and most of us will do it again at some point in the future. We’re talking, of course, about permanently deleting important files on Windows 10. Most commonly, this is through the use of the Shift + Delete shortcut, but it can also happen because the Recycle Bin is emptied, a file exceeds its storage limit, or the feature is disabled.
The good news is that not all hope is lost, and there are, in fact, many options for how to recover permanently deleted files on Windows 10. We’re going to share some of these data recovery methods with you in this article.
| Data Loss Scenarios | Recommended Solution |
| Accidentally deleted files in Windows 10 and they are in the Recycle Bin | Recover files from the Recycle Bin. |
| Deleted files using Shift + Delete shortcut or files deleted on Windows 10 without a backup | Use third-party software like Disk Drill ✅ or Windows File Recovery to restore permanently deleted files. |
| Files deleted and Recycle Bin emptied | Use data recovery software or restore the data using File History or Backup and Restore (Windows 7). |
| Files lost due to system crash or disk corruption | Use data recovery software or restore the data using File History or Backup and Restore (Windows 7). |
| Files missing, but backups are available | Restore files using File History or Backup and Restore (Windows 7). |
💡 Tip: To give yourself the best chance of recovering your deleted files, try not to use the drive where they were stored. Saving new data there might accidentally overwrite the deleted files. Also, it’s best to install any recovery software on a different physical drive.
How to Recover Deleted Files from a Recycle Bin in Windows 10
As you may know, when you normally select a file in Windows 10 and hit Delete on your keyboard, the file moves to the Recycle Bin, where it sits until you manually empty the Recycle Bin (or it’s automatically emptied by Storage Sense, if enabled), giving you time to change your mind and easily rescue the deleted file.
The problem with this way of deleting files is that it doesn’t immediately free up any storage space, which is why most people delete files in the first place. Instead, you can use the Shift + Delete shortcut to delete files permanently right away. When you delete a file using the Shift + Delete shortcut, you immediately free up storage space, but you deprive yourself of the possibility to simply recover it from the Recycle Bin.
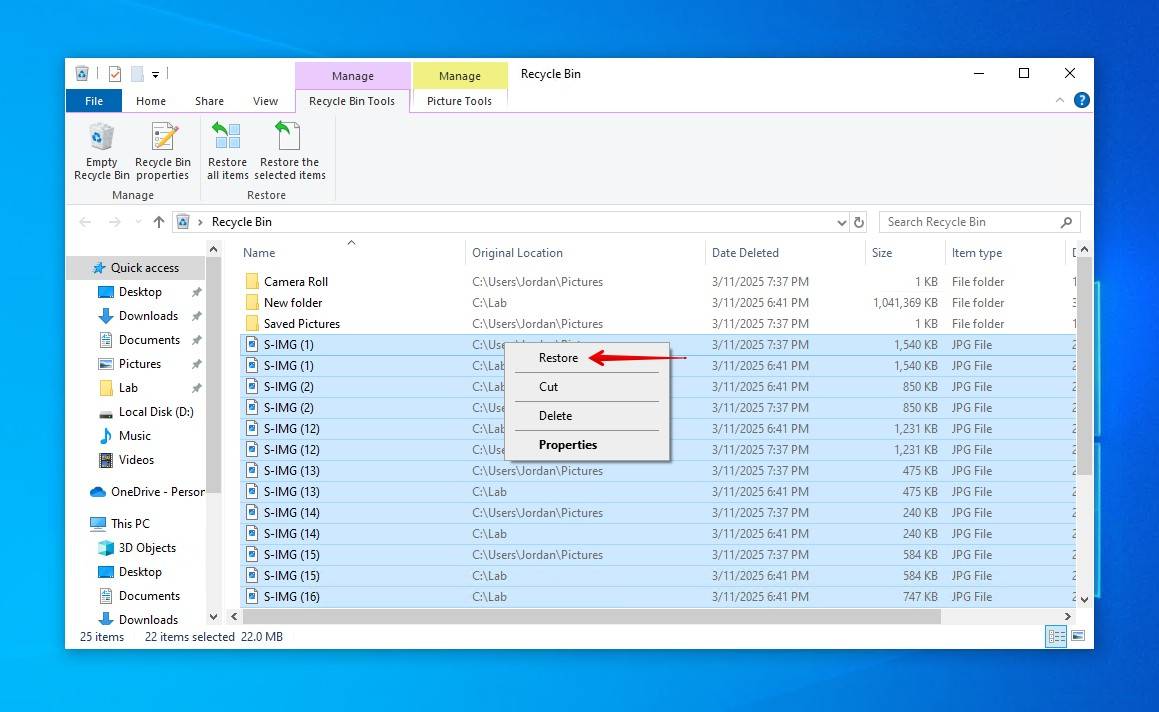
To recover deleted files from the Recycle Bin on Windows 10:
- Open the Recycle Bin, which is located on the Desktop.
- Check the box to the left of the filename you want to restore.
- Right-click on a selected file and choose ‘Restore’ to recover the file to its original location on Windows 10.
As the Recycle Bin can only store so much data, you will notice that some files are too large to be sent to it. But if you increase how much space is allocated to the Recycle Bin, larger files (within the limit) will no longer skip it. To increase the allocated limit, right-click the Recycle Bin icon and click Properties. From there, you can specify a custom size (in MB), which determines how much data can be sent and stored there.
However, just because you can’t recover permanently deleted files from the Recycle Bin doesn’t mean you can’t recover them at all. Just keep in mind that you need to act quickly and recover your permanently deleted files before they get overwritten.
Recover Deleted Files in Windows 10 Without Third-Party Software
It’s possible that your data still physically resides on the drive but one thing or another is preventing it from showing up. The first option we’re going to start with involves using CMD to (1) fix any file system issues that have caused the files to become temporarily lost, and (2) unhide any data that may have been hidden by a bug or virus.
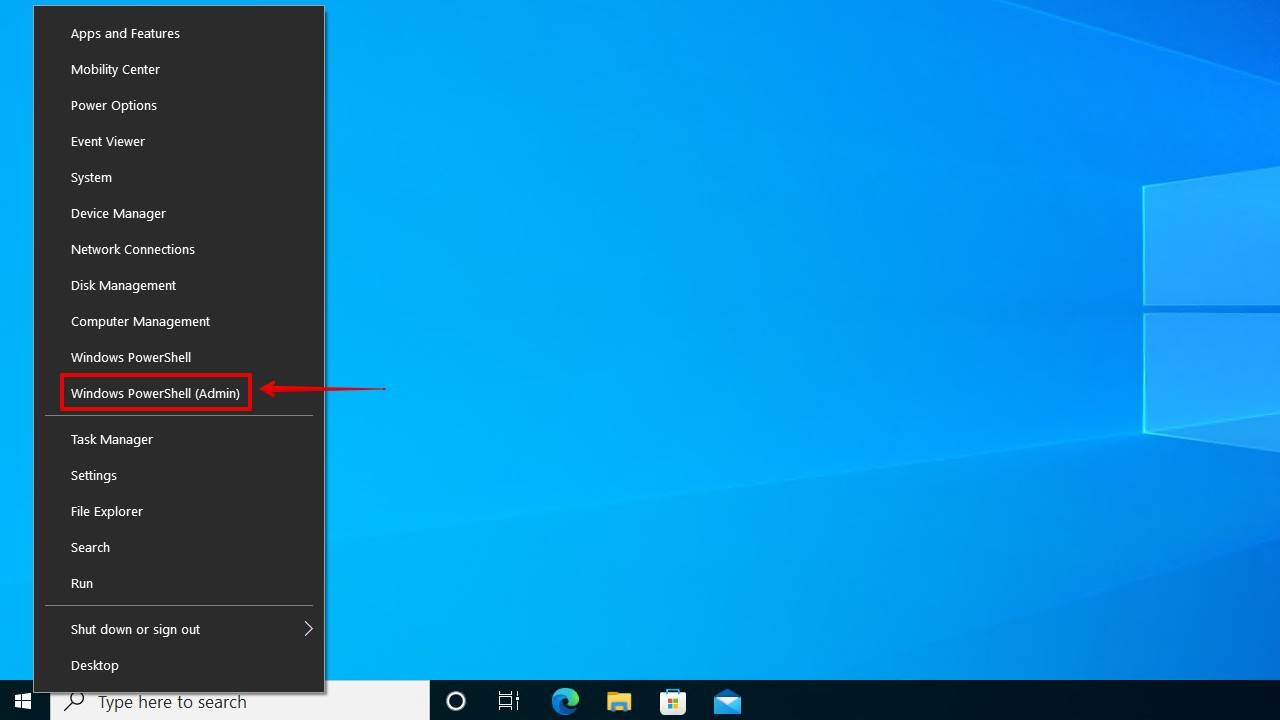
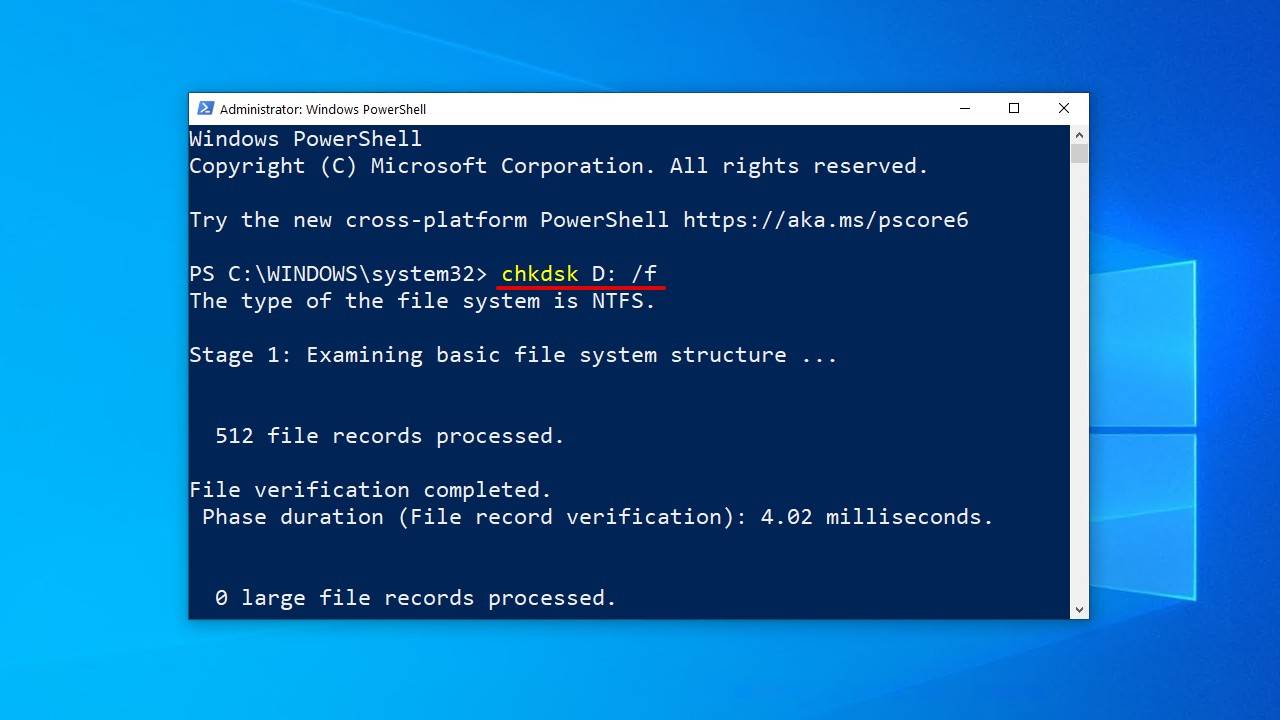
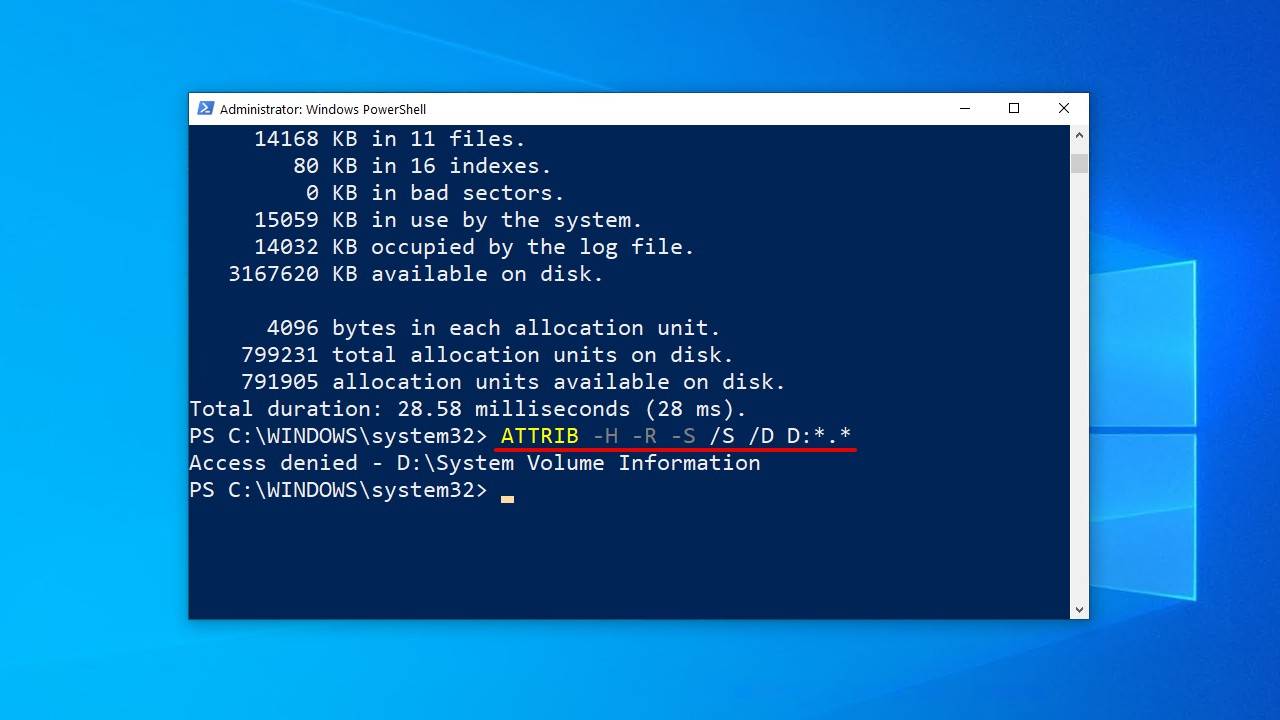
This is how you can restore access to lost data using CMD:
- Right-click Start and click Windows PowerShell (Admin).
- Type chkdsk X: /f and hit Enter on your keyboard. Replace X with the letter of your hard drive.
- Type ATTRIB -H -R -S /S /D X:*.* and hit Enter. Again, replace X with the letter of your hard drive.
Once the scan has started, CHKDSK can take some time to finish. Running CHKDSK is safe when using the /f flag, but you should avoid interrupting the process, as this can cause further damage to your file system.
Recover Permanently Deleted Files from an Older Backup
Windows Vista introduced a new data recovery component called Backup and Restore, which allowed users to create backups that can be used to restore files from. It also included the ability to create a backup of your system files, allowing for quick recovery in the event of a system crash.
- Open the Start menu.
- Type “Backup” and hit Enter on your keyboard.
- Select the Go to Backup and Restore (Windows 7) option under Looking for an older backup?.
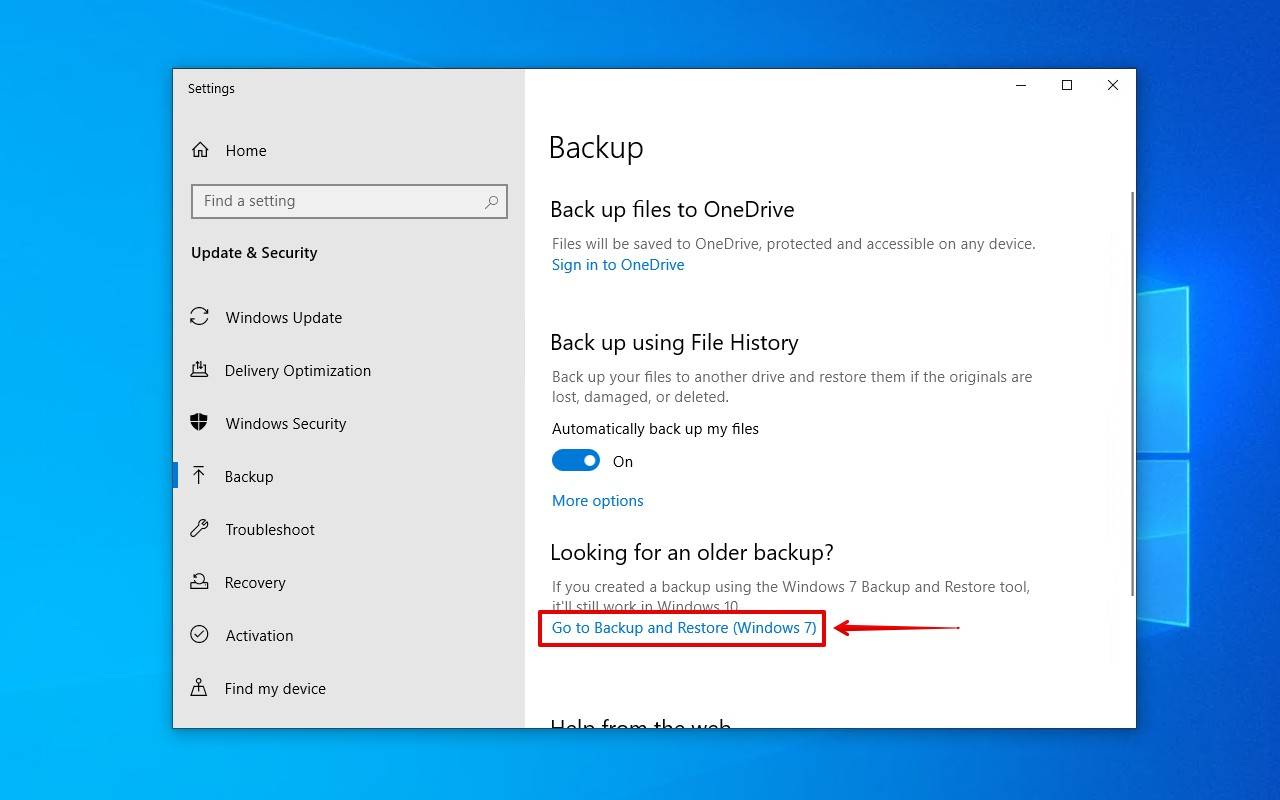
- Click Restore my files.
- Click Browse for files and select the permanently deleted files you want to restore.
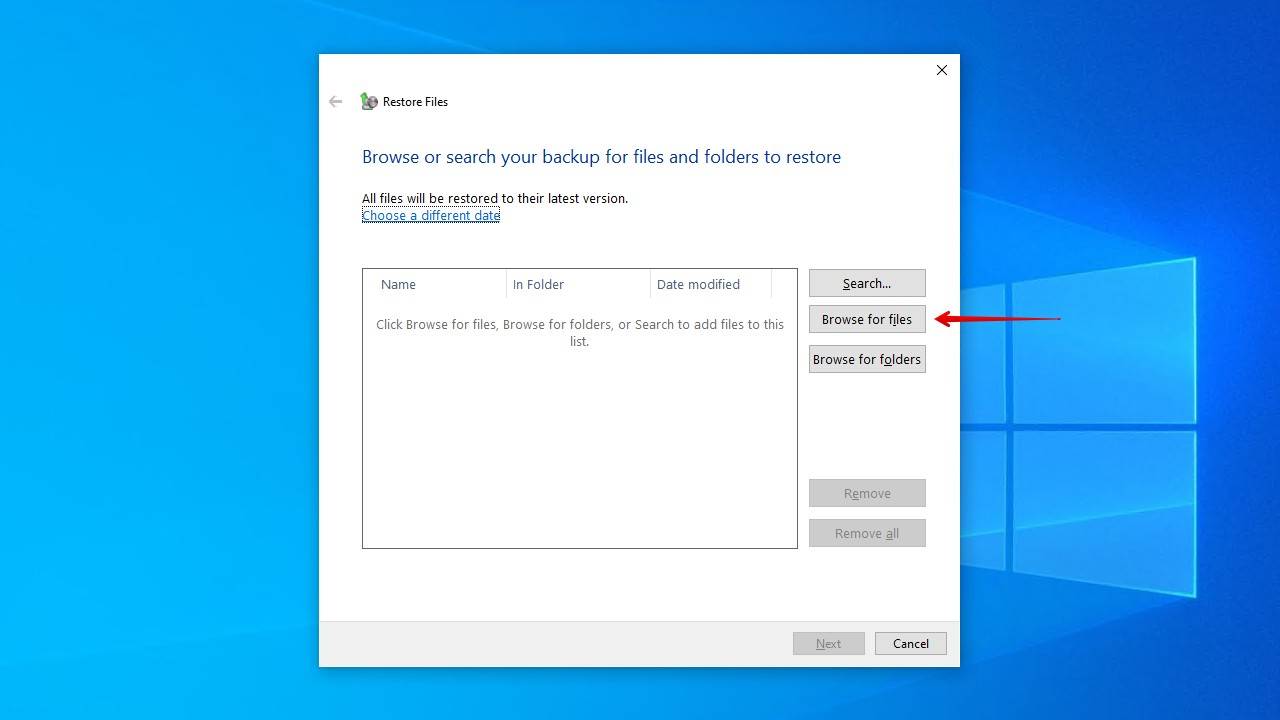
- Click Next.
- Choose where you want to restore the files, then click Restore.

Recover Deleted Files Using Data Recovery Software ✅
Without a backup, your only option to find deleted files in Windows 10 is to use data recovery software. Choosing the right data recovery tool for the job can be a challenge on its own, but our preferred choice is Disk Drill for a few reasons.
Disk Drill’s scan utilizes several scanning methods, which pulls up all recoverable data it can find. Whether it’s existing, hidden, deleted, or lost due to file system corruption or formatting, you have a chance of recovering it so long as it hasn’t been overwritten. Better yet, it works with external devices as well as all Windows file systems.
To recover deleted files in Windows 10, follow these steps:
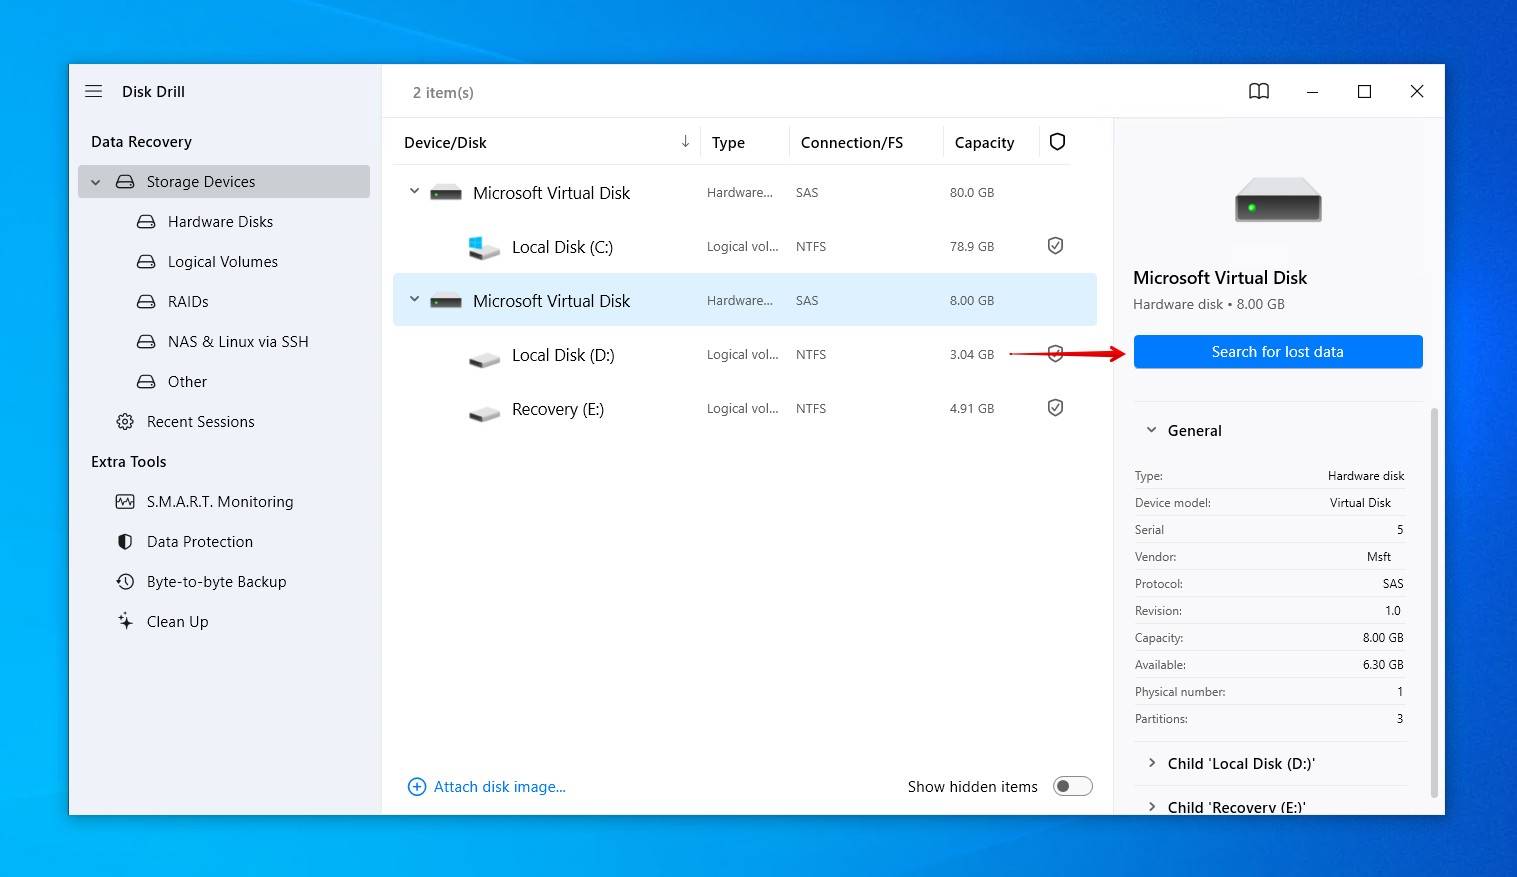
- Download Disk Drill and install it as you would any other Windows 10 application. Be sure to install it on a separate physical disk to avoid overwriting your data. When installed, open it.
- Select the drive containing the permanently deleted files, then click the Search for lost data button. Disk Drill will automatically utilize all available scanning methods.
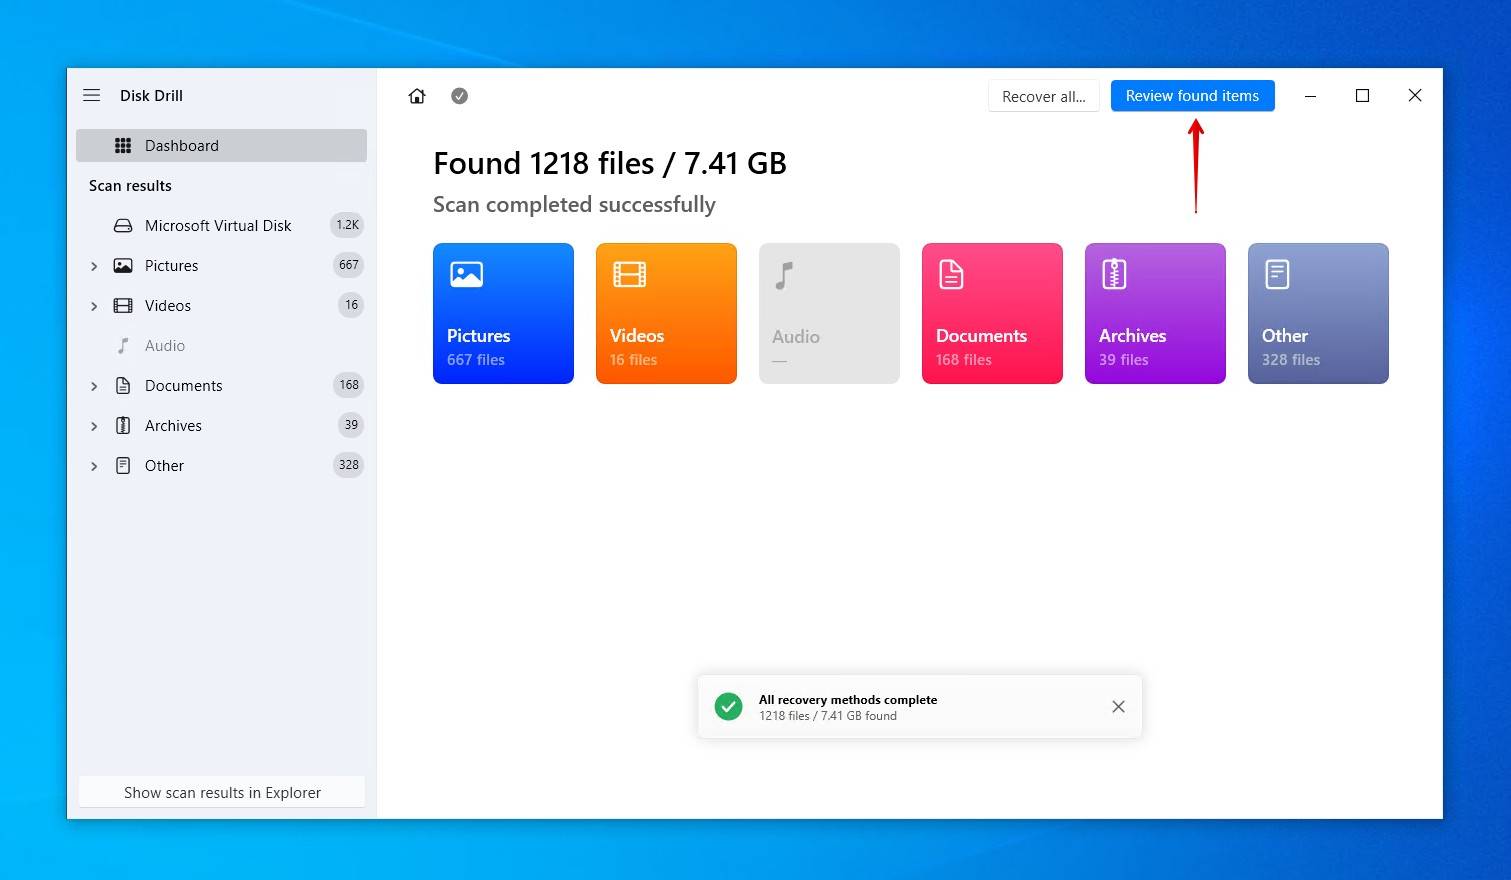
- Click Review found items at any point during the scan to view what Disk Drill has found. Alternatively, you can click one of the colored file type icons to filter the results, or click Recover all to restore everything that was found.
- Select which files you want to recover. It’s recommended that you preview the files you wish to recover to confirm they’re intact. If you’re facing a mountainous list of files, use the filter options above the recovery results screen to hide irrelevant files. When you’re ready, click Recover.
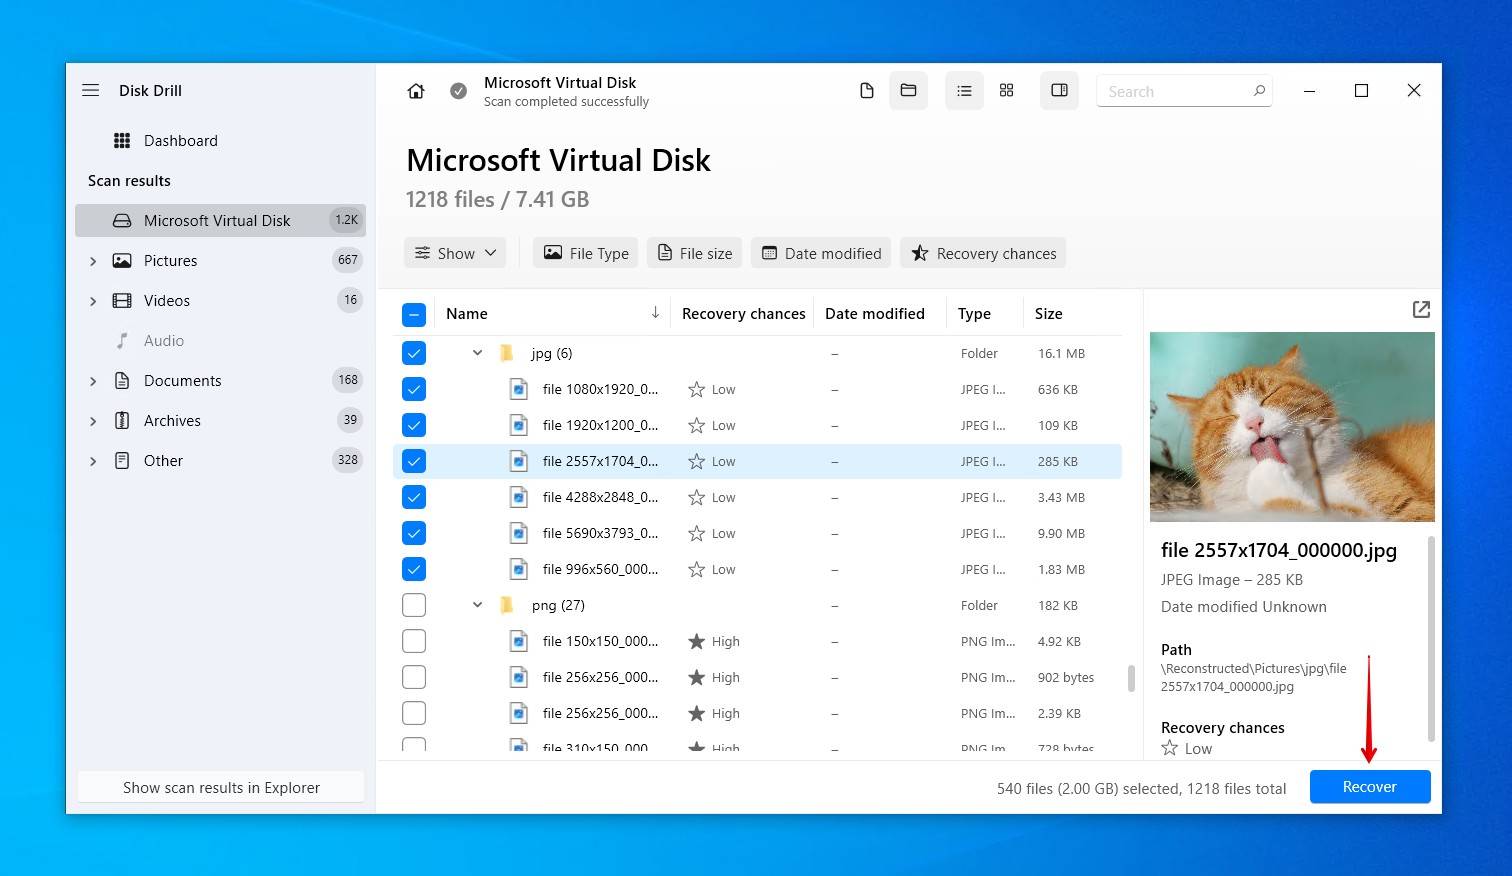
- Choose a recovery location on a separate physical drive. When you’re ready, click Next.

Disk Drill allows you to recover up to 500MB of data without paying, and it comes with a tool to protect your files against data loss.
Recover Deleted Files Using Windows File Recovery Tool
Microsoft has released its own data recovery tool, called Windows File Recovery, and you can use it to recover deleted files in Windows 10, even after emptying the Recycle Bin. It uses a command-line interface (CLI), so it’s not nearly as intuitive as Disk Drill and other graphical data recovery tools. It can be downloaded for free from the Microsoft Store, provided you’re running Windows 10 build 19041 or later.
Here is the command we’ll be running:
winfr D: E:\Recovered /regular
- winfr – Invokes Windows File Recovery Tool.
- C: – The drive letter of the partition that is being scanned. Replace this with your own.
- E:\Recovered – Where the recovered data will be stored. Replace this with your own.
- /regular – Performs a regular scan, the standard option for NTFS drives. Can be replaced with /extensive for a more thorough search.
You can find more information about the available recovery modes and switches on the official support page.
Here’s an example of how the latest version of the Windows File Recovery tool can be used to recover permanently deleted files:
- Right-click Start and click Windows PowerShell (Admin).
- Type the following command, then press Enter.
winfr D: E:\Recovered /regular
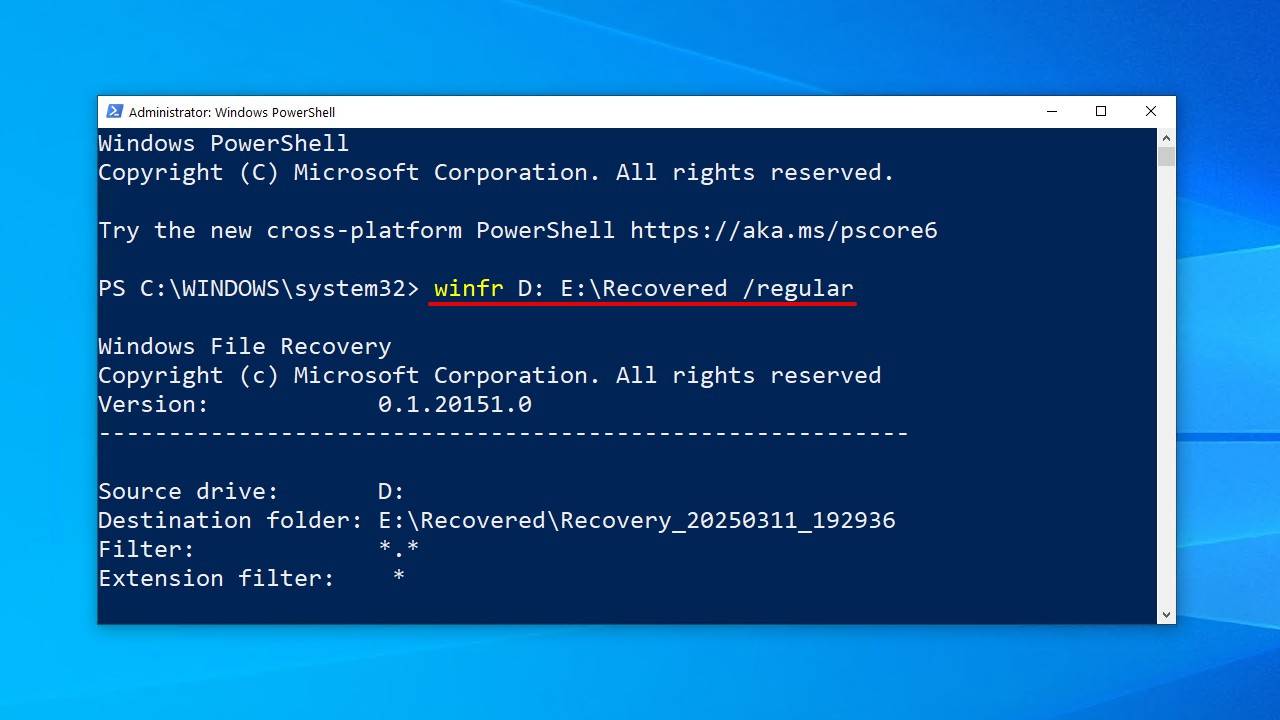
- Press Y to start the recovery.
Windows File Recovery won’t let you recover files to the same partition they’re coming from, but it’s a good idea to be extra safe and restore the files to a separate physical disk.
Restore Permanently Deleted Files in Windows 10 for Free from a File History Backup
File History is the primary backup utility in Windows 10. It differs from Backup and Restore in that not only does it store a copy of your data but also several versions of each file. This allows you to restore a specific version of a file in case one of them has been mistakenly overwritten with unwanted changes.
To recover deleted files on Windows 10 for free:
- Open the Start menu.
- Type “Restore files” and hit Enter on your keyboard.
- Locate and select the permanently deleted files.
- Select the Restore button in the middle to undelete Windows 10 files to their original location.
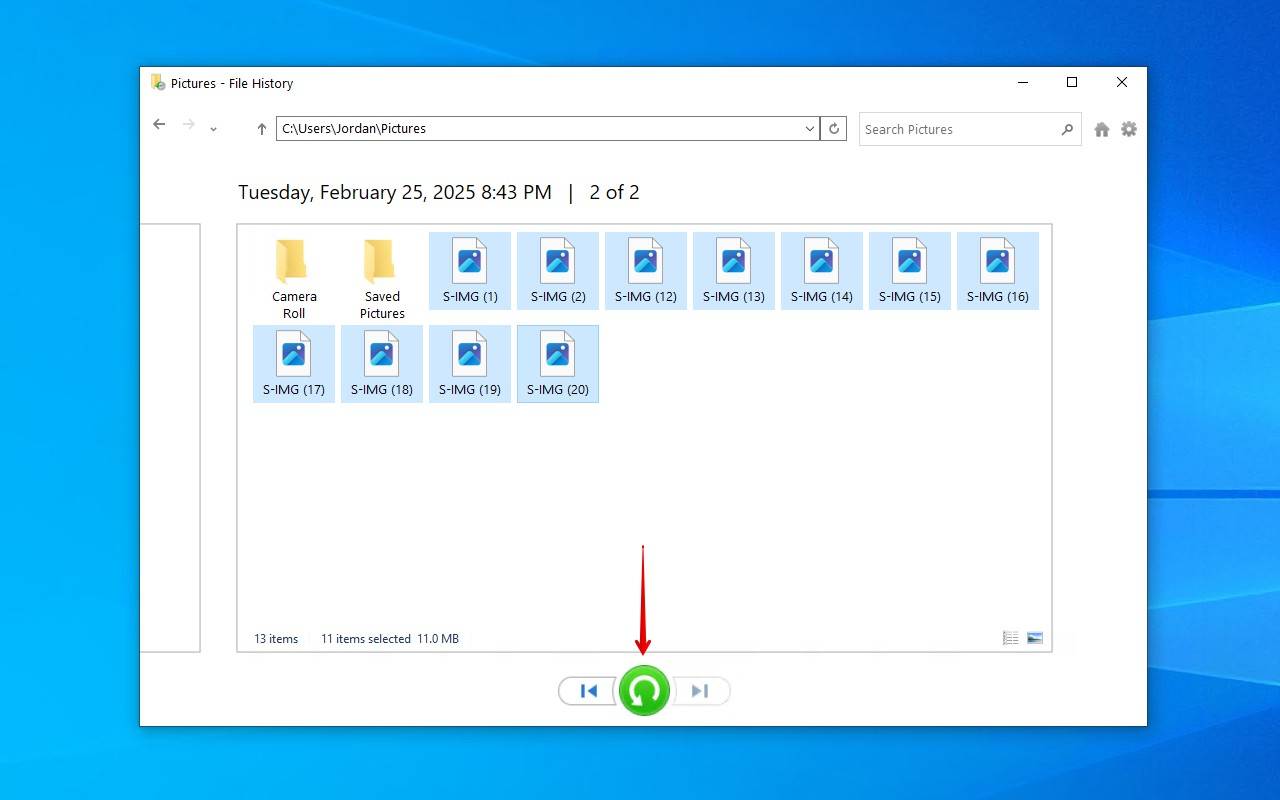
If you cannot see any folders, that’s probably because File History is turned off. In that case, you should see an option to turn it on. It’s important to mention that File History doesn’t back every file up by default. Instead, it only backs up your default libraries. For other folders and files, you must manually add them under Backup options.
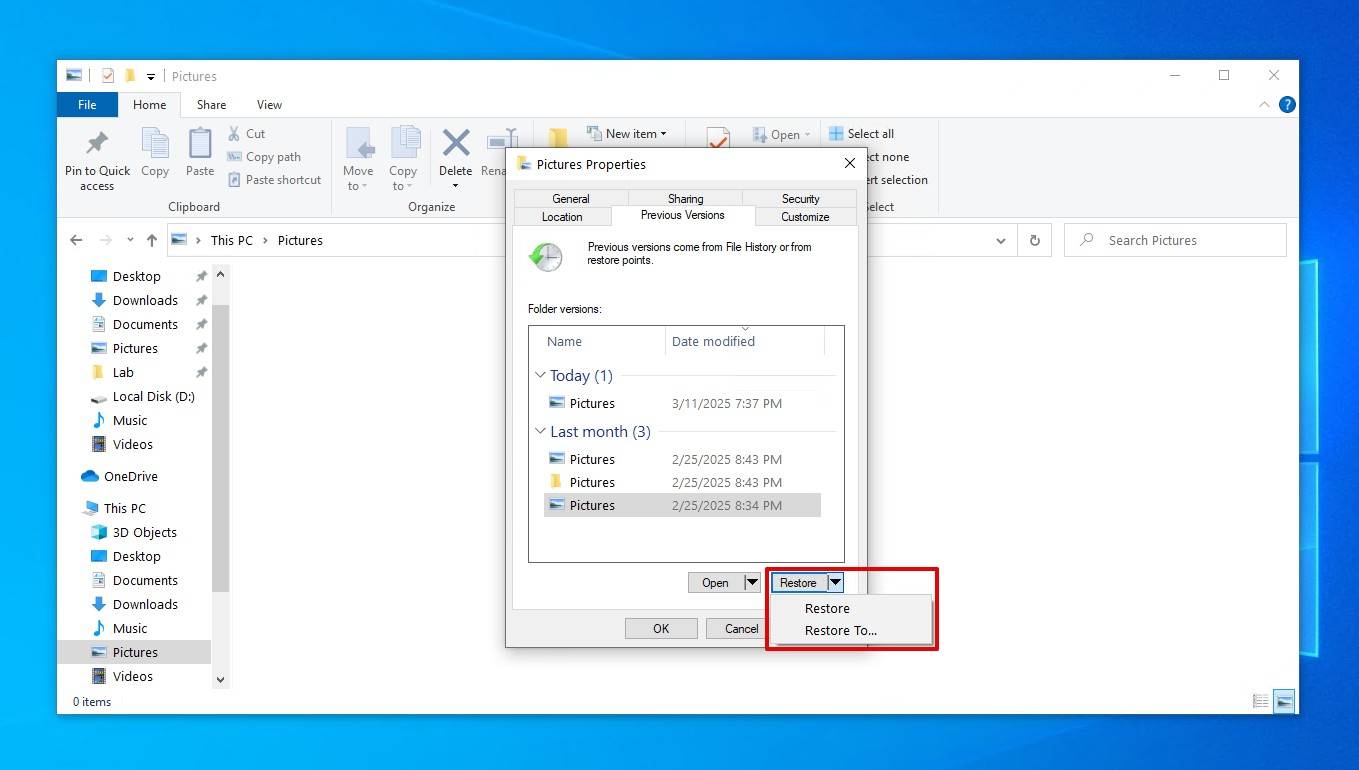
Use the Restore Previous Versions Feature
File History gives you another way of restoring files directly from the location they were last location, provided a backup was run before they were lost. This is through the use of the Previous Versions function that File History uses, which allows you to restore a folder to a previous point in time when it contained the data that was lost.
Here’s how to recover deleted files in Windows 10 that are not in the Recycle Bin using the ‘Previous Versions’ method:
- Navigate to the folder that contained the files before they were deleted.
- Right-click an empty space in the folder, then click Properties.
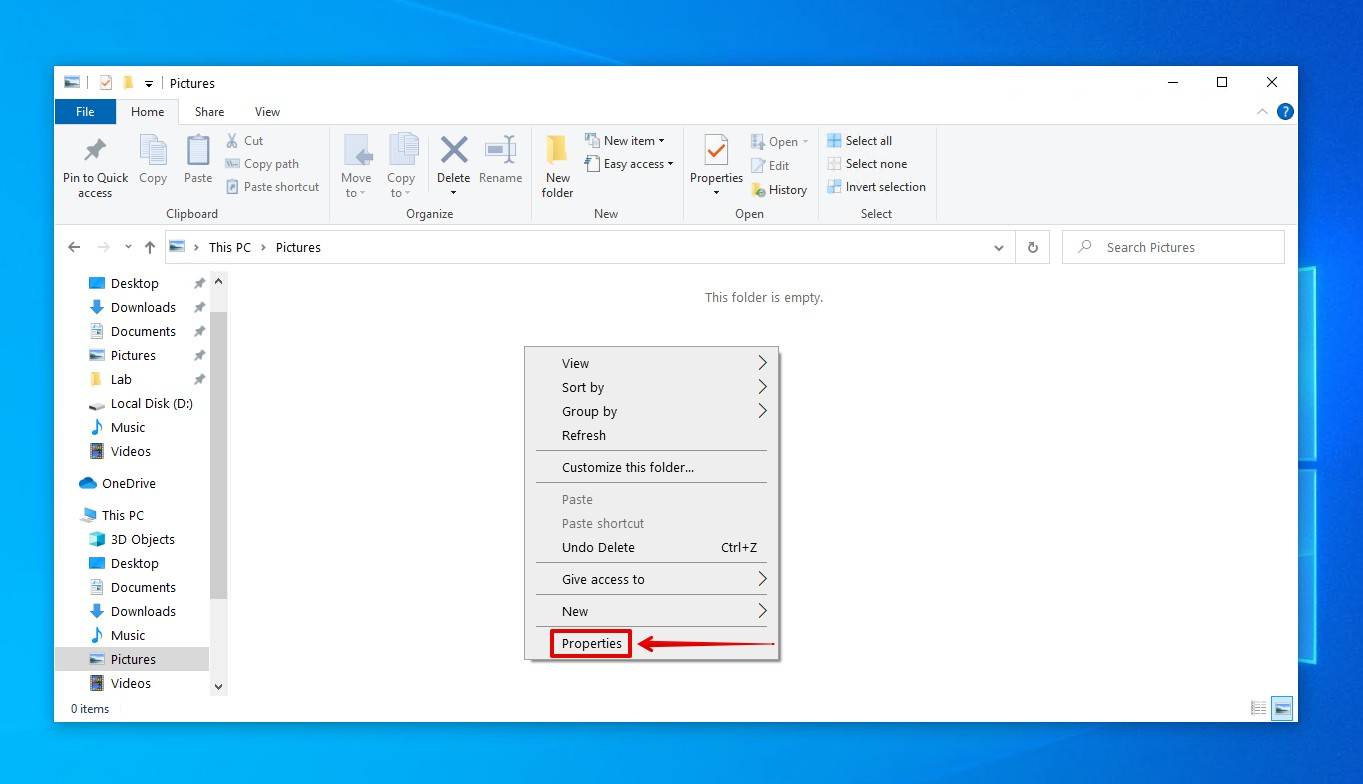
- Click Previous versions.

- Select the version you’d like to restore, then click Restore. Alternatively, you can choose Restore To to restore the files somewhere else.
How to Recover Permanently Deleted Files from OneDrive
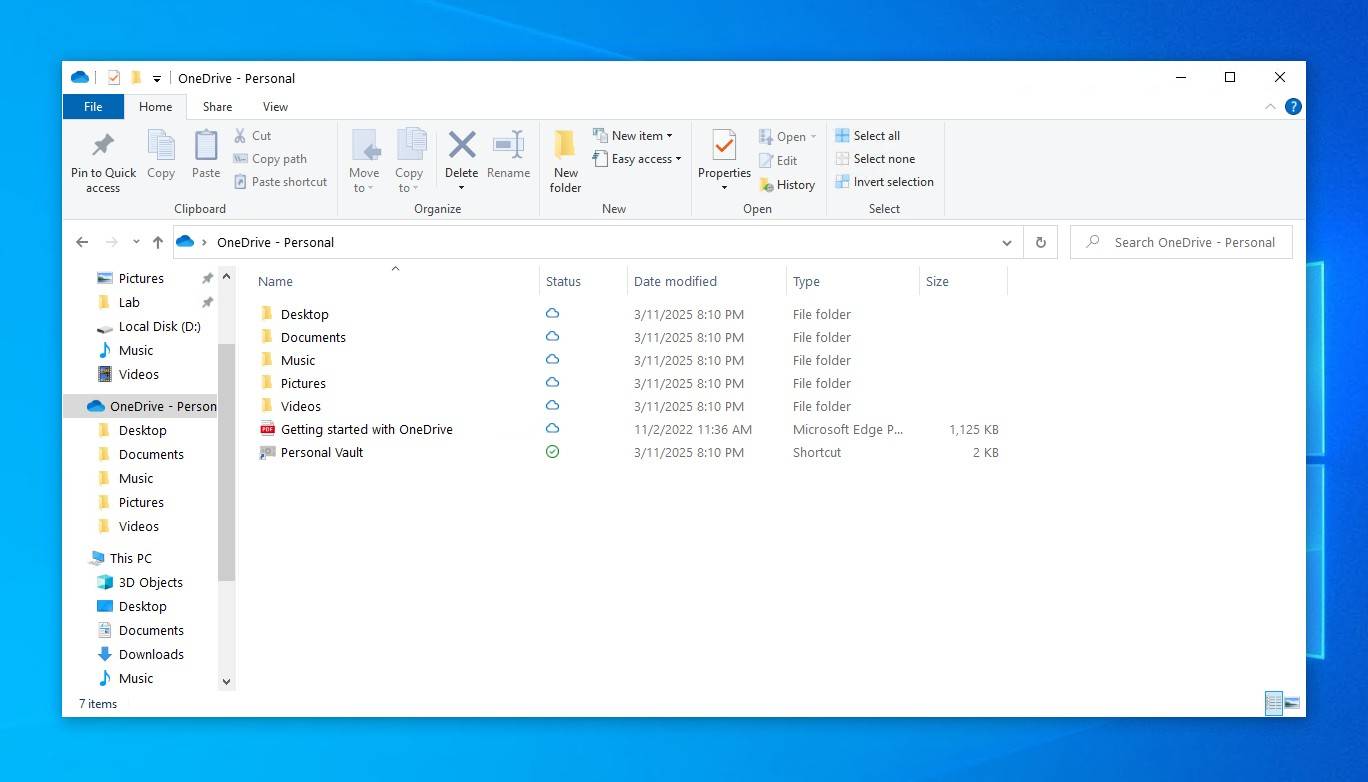
Windows has its own cloud storage service, OneDrive. OneDrive comes preinstalled with Windows 10, and you’ve probably seen it once or twice. As part of the Windows setup process, OneDrive is suggested to be enabled. If you choose to enable it, OneDrive will automatically back up all files in your Desktop, Documents, Pictures, Music, and Video folders by default.
You should check your OneDrive folder to see if a copy of your data is stored there. On your computer, a OneDrive option is located in the left pane of File Explorer. Otherwise, you can access your OneDrive through a browser by logging in at onedrive.live.com/login.
Conclusion
As you can see, even when files are “permanently deleted” in Windows 10, there’s still a very real possibility that they can be recovered. As long as you know what to do and act quickly enough, data recovery software can be a saving grace in a data loss scenario like this.
Going forward, the best thing you can do is set up a backup schedule. As useful as data recovery software is, it’s not a replacement for a proper backup. Many experts recommend investing in a few extra drives and following the 3-2-1 backup rule, which includes keeping 3 copies of your data across 2 storage mediums, keeping 1 of them off-site.

FAQ
You won’t find a recovery tool preinstalled that can recover lost files on Windows 10 if they weren’t backed up already. However, if you happened to enable File History or Backup and Restore, you can restore a copy of the deleted data from one of these backups.
You can recover deleted files in Windows 10 without third-party software by restoring them from the Recycle Bin:
- Double-click the Recycle Bin icon on your desktop.
- Select the deleted files you want to recover.
- Drag them from the Recycle Bin to any folder you want.
Yes, there are several free data recovery software solutions for Windows 10 that you can download for free:
- Disk Drill (user-friendly UI, great performance)
- TestDisk (command-line interface, average performance)
- Windows File Recovery (command-line interface, average performance)
- PhotoRec (command-line interface, average performance)
- Recuva (graphical user interface, low performance)
That depends on two things: your luck and whether you’re backing up your data. If you’re lucky, the deleted file is still present on your hard drive, which means that you can recover it with data recovery software. Of course, backups, such as those created with File History, can be used to recover any file regardless of how long it has been deleted.
When you either empty the Recycle Bin with deleted files or use the Shift + Delete shortcut to delete files, Windows marks the files as deleted and removes all pointers to them, which is why such files become invisible for the user.
Moreover, the space that was used by the deleted files becomes marked as free space. So technically, the deleted files will still be physically present on your computer until Windows overwrites them with new data, giving you the opportunity to recover files from Recycle Bin after it has been emptied.
Without a backup, the only way to recover permanently deleted files in Windows 10 is through the use of data recovery software. Such software will scan your drive for the deleted data and give you the chance to recover it if it hasn’t been overwritten.