


Scenario: you need to free up storage space, but you can’t afford to delete more photos, files, messages, or any other personal content. Fortunately, there are several workarounds that can help you reclaim a lot of storage while preserving your data.
We tested every one of those workarounds on our own iPhone device, with the latest iOS version, to verify them for this guide. Here are 6 proven methods to free up storage on your iPhone without deleting anything.
Can You Actually Free Up iPhone Storage Without Deleting Files?
Yes, you can technically free up space on an iPhone without deleting anything. For example, a certain iOS setting uses synchronization features to optimize your photo storage. Some apps help you modify photos and videos to take up less space.
Others accumulate a lot of cache data, which are files that get saved locally on your device to avoid having to load them again each time you run the app. You don’t need them for the app to function, and they can end up consuming gigabytes of storage space over time.
This type of “non-destructive” cleanup is the focus of this guide; to give you a gist of how each method handles your data, here’s a simple breakdown of what they do, along with their links:
| Method | What it does |
| Method 1: Free Up Space by Compressing Media | Shrinks the file size of photos and videos, in exchange for a small drop in quality. Nothing gets deleted. |
| Method 2: Turn On Optimize iPhone Storage for Photos | Saves the original, high-resolution copies of your media and retains space-saving versions in local storage. Nothing gets deleted. |
| Method 3: Clear Safari and App Cache | Deletes cache data from apps (like thumbnails and site cookies); no user files are deleted. |
| Method 4: Offload Unused Apps | Uninstalls the app and deletes its binary, but retains local user data. |
| Method 5: Remove Local iCloud Drive Downloads | Removes the offline version of your iCloud Drive files, but retains them on iCloud’s servers for you to download; the files also don’t disappear from their original location. |
| Method 6: Remove Offline Media (from streaming apps) | Deletes offline content from streaming apps (e.g., a Netflix episode you downloaded for later viewing). The content isn’t removed from your library or playlists. |
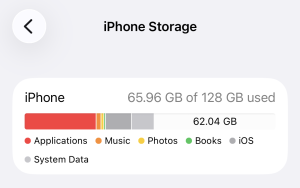
To determine which method you should prioritize, check your iPhone’s storage calculation in the Settings app. It shows you how much available space you have left, as well as how much storage each data type currently uses. Here’s how to find it:
- Open the Settings app.
- Tap General.
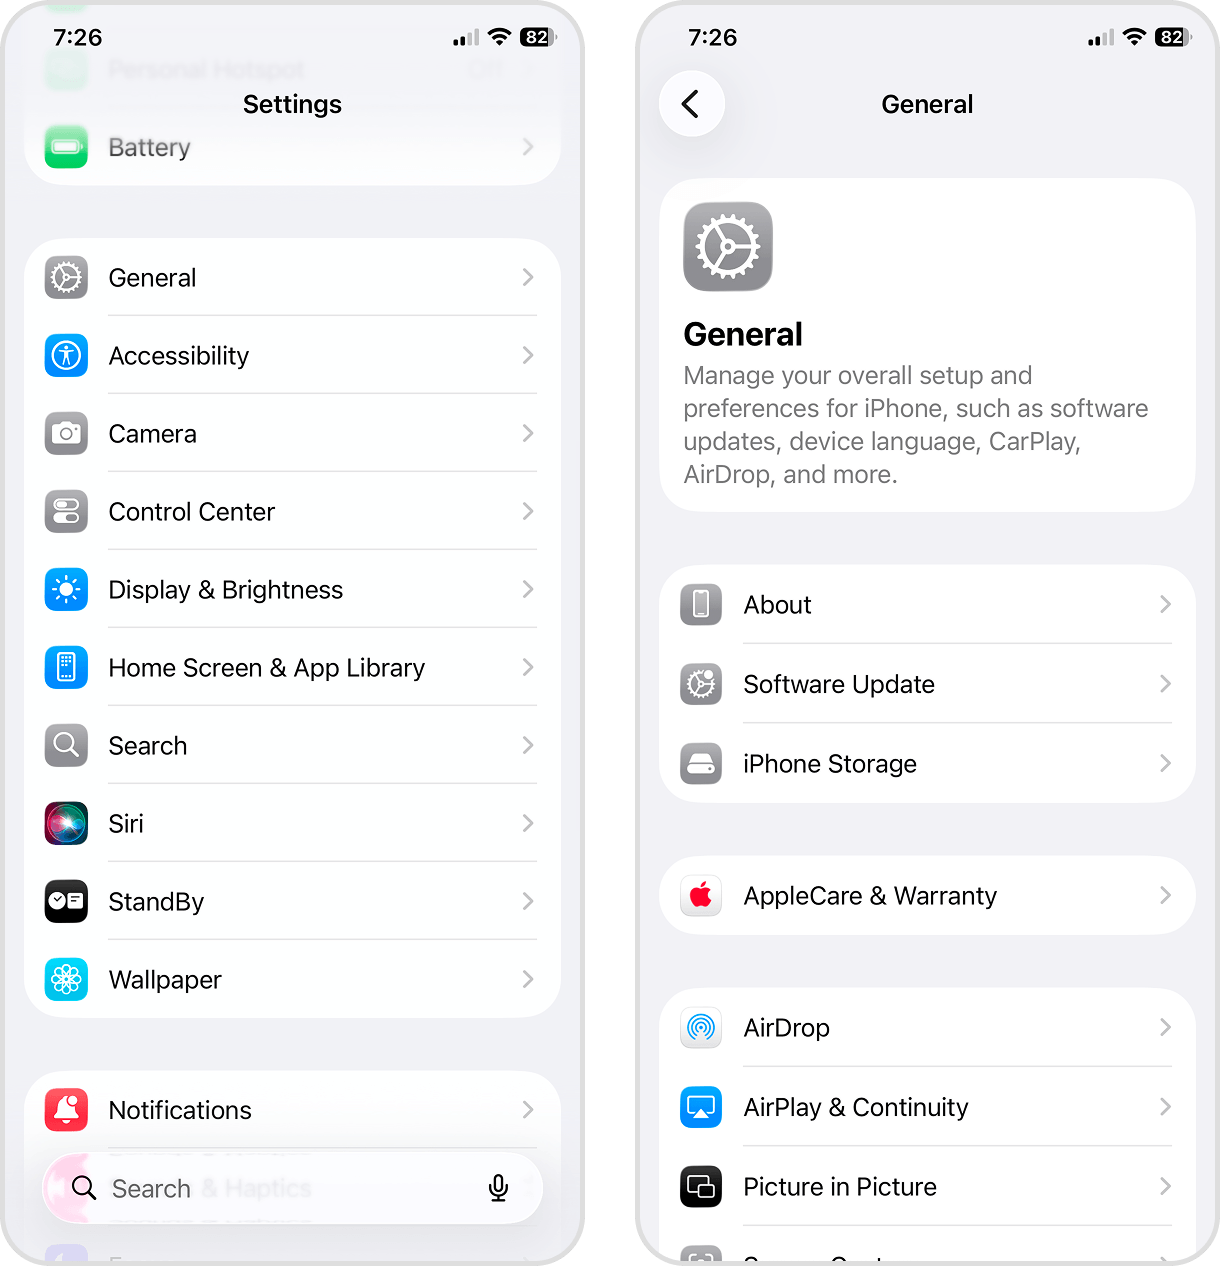
- Select iPhone Storage. You’ll see your iPhone’s storage bar at the very top of the page.
How to Clear iPhone Storage Without Deleting Anything
In this section, we’ll cover 6 reliable methods to free up iPhone storage without deleting anything. We start with methods that best preserve your content, then we cover those with more trade-offs.
Note that most users don’t need to use every single method on this list. Instead, use our mini-guide at the end of the last section to prioritize accordingly, then use 1 or 2 methods before checking again.
Method 1: Free Up Space by Compressing Media
If you have a big library, one of the best ways to free up space on your iPhone without losing photos or videos is to reduce how much storage your photos and videos use via compression. Compression can shrink the file size of a photo, video, or screenshot by removing small image data you won’t easily notice.
Unfortunately, iOS doesn’t provide any built-in compression features; you’ll need to rely on a third-party app like Clever Cleaner, which has a dedicated photo and video compression tool (we chose it for this guide because it preserves metadata and works for Live Photos).
You can also download it for free and use all of its features with a pretty generous limit compared to most apps, while its Swipe tool (covered later) is free to use without limits.
- Download Clever Cleaner: AI Cleanup App from the App Store.
- Run Clever Cleaner. In the main menu, tap Compress.
- First, let’s start with videos; select the Videos category above the gallery. Then, tap any video you want to compress.
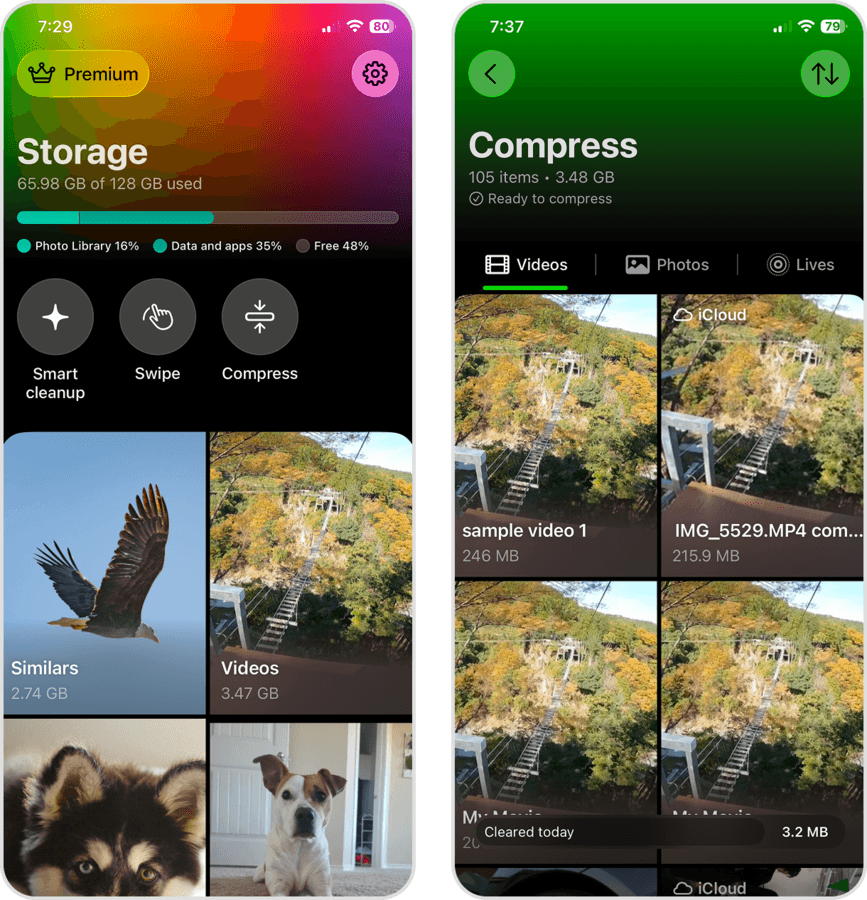
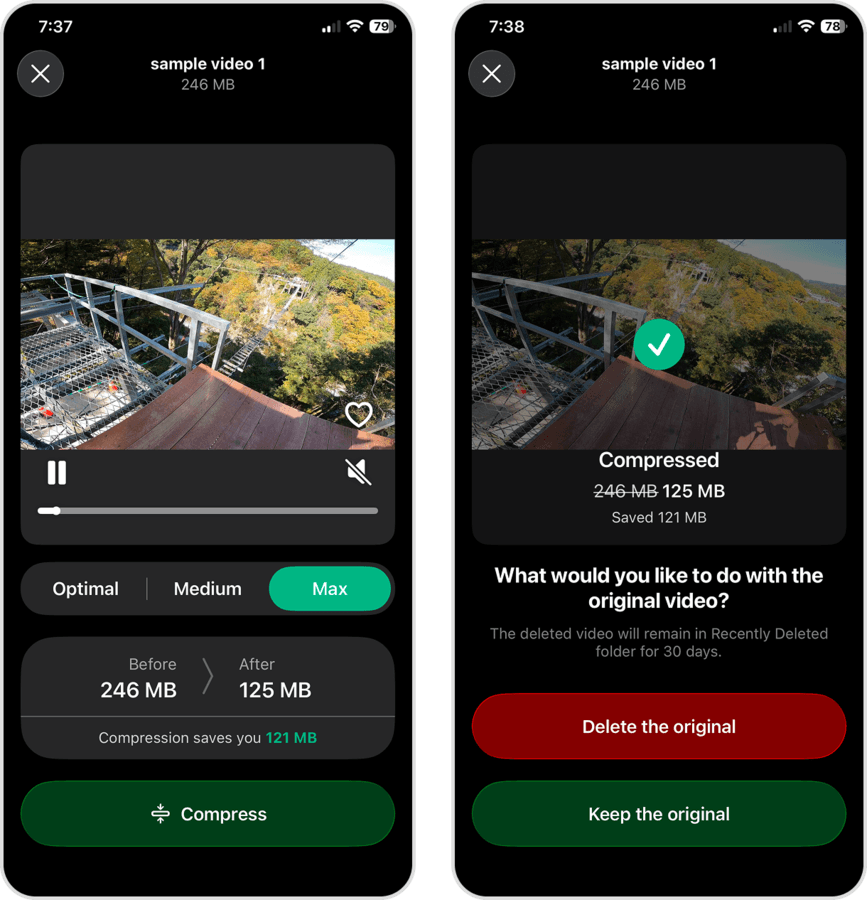
- Choose a compression level; Optimal gives you the best balance between file size and quality, while Max shrinks your video’s file size as much as possible (nearly half in our case). Once you’ve made your selection, tap Compress.
- Tap Delete the Original to remove the non-compressed version (do this for photos and screenshots as well).
- After compressing your videos, return to the main Compress page. This time, select the Photos category and tap the photos you want to modify (or tap Select All). Once you’ve made your selection, tap the Compress button.
- Finally, select the Lives category from the main Compress page. Tap to select Live Photos for compression, or simply tap Select All. Then, tap Compress.
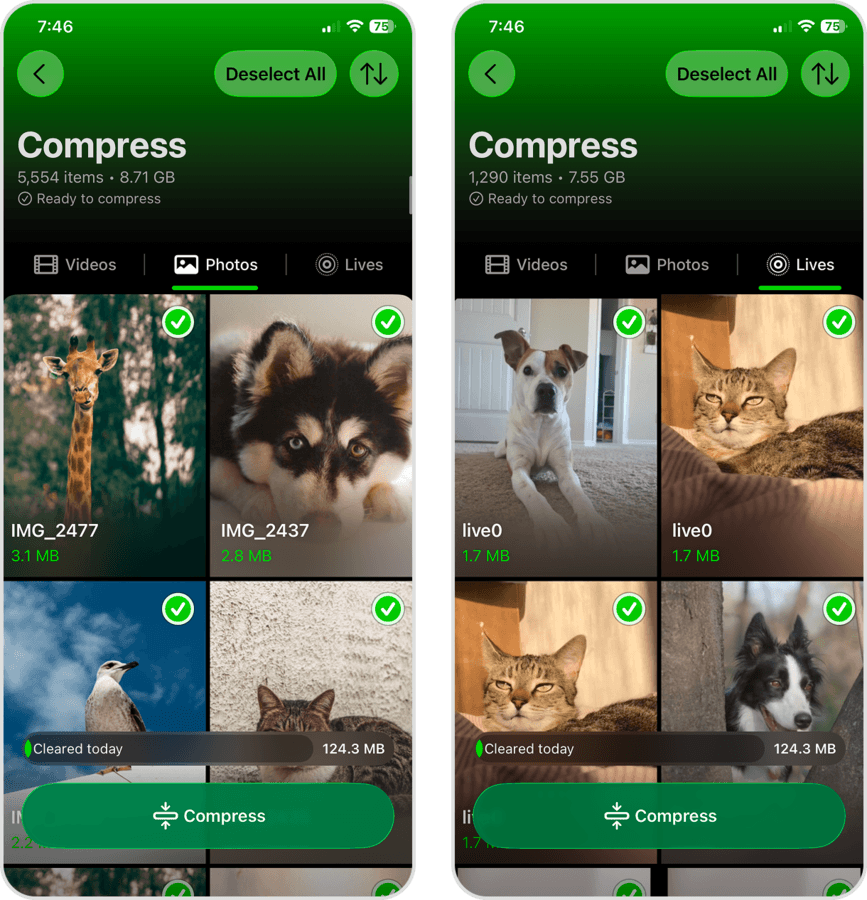
The combined effect of these three actions can free up a surprisingly large amount of space, especially if your storage is mostly taken up by media. And if you’re willing to consider deleting junk files (e.g., duplicate or blurry photos), you can use Clever Cleaner’s other tools.
For example, Similars helps you remove similar and duplicate photos, while Swipe lets you use left and right swipe gestures for a more efficient way to review individual photos in your library (which are auto-sorted into useful categories).
Method 2: Turn On Optimize iPhone Storage for Photos
The Optimize iPhone Storage setting for iCloud Photos is the strongest built-in option to free up storage without deleting photos or videos. This setting keeps full-resolution versions of your media in iCloud, while only retaining smaller, space-saving versions in your local storage.
Don’t worry! iCloud automatically re-downloads the original copies of your media whenever you attempt to view, edit, or share them; just note that you’ll need a stable internet connection for it to work.
- Open the Settings app.
- Tap your Apple ID.
- In the Apple Account menu, select iCloud.
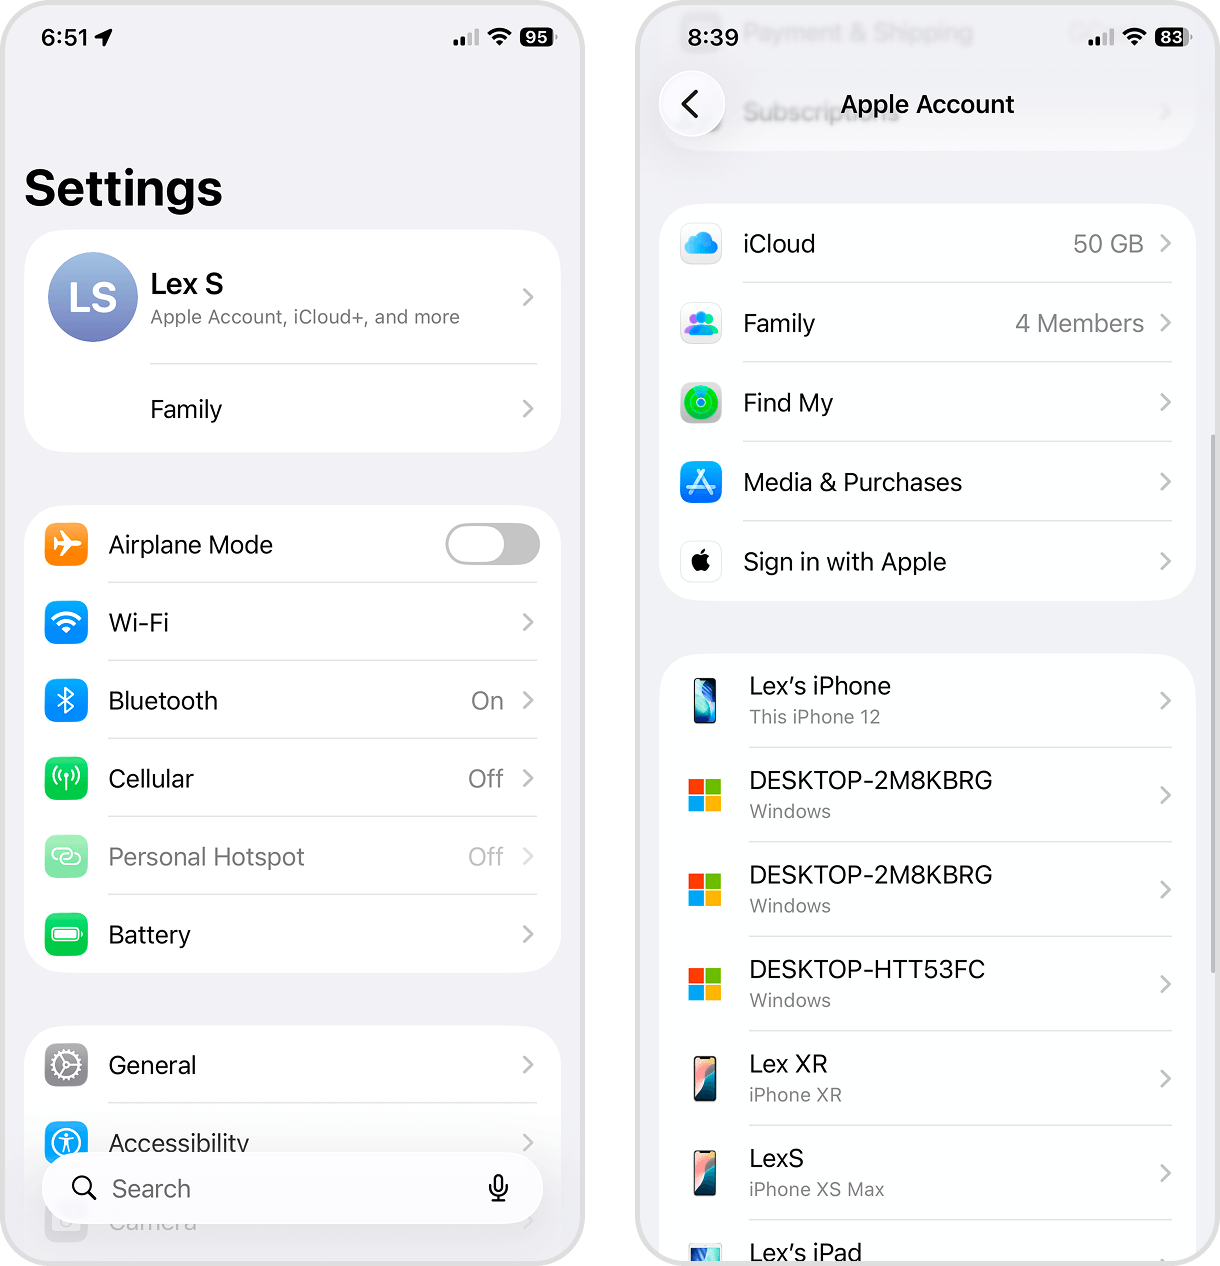
- Select Photos from the Saved to iCloud section.
- Finally, activate Sync this iPhone by sliding the toggle switch to the ON position (it should turn green). Then, tap the Optimize iPhone Storage option to activate it as well (it should be marked with a check).
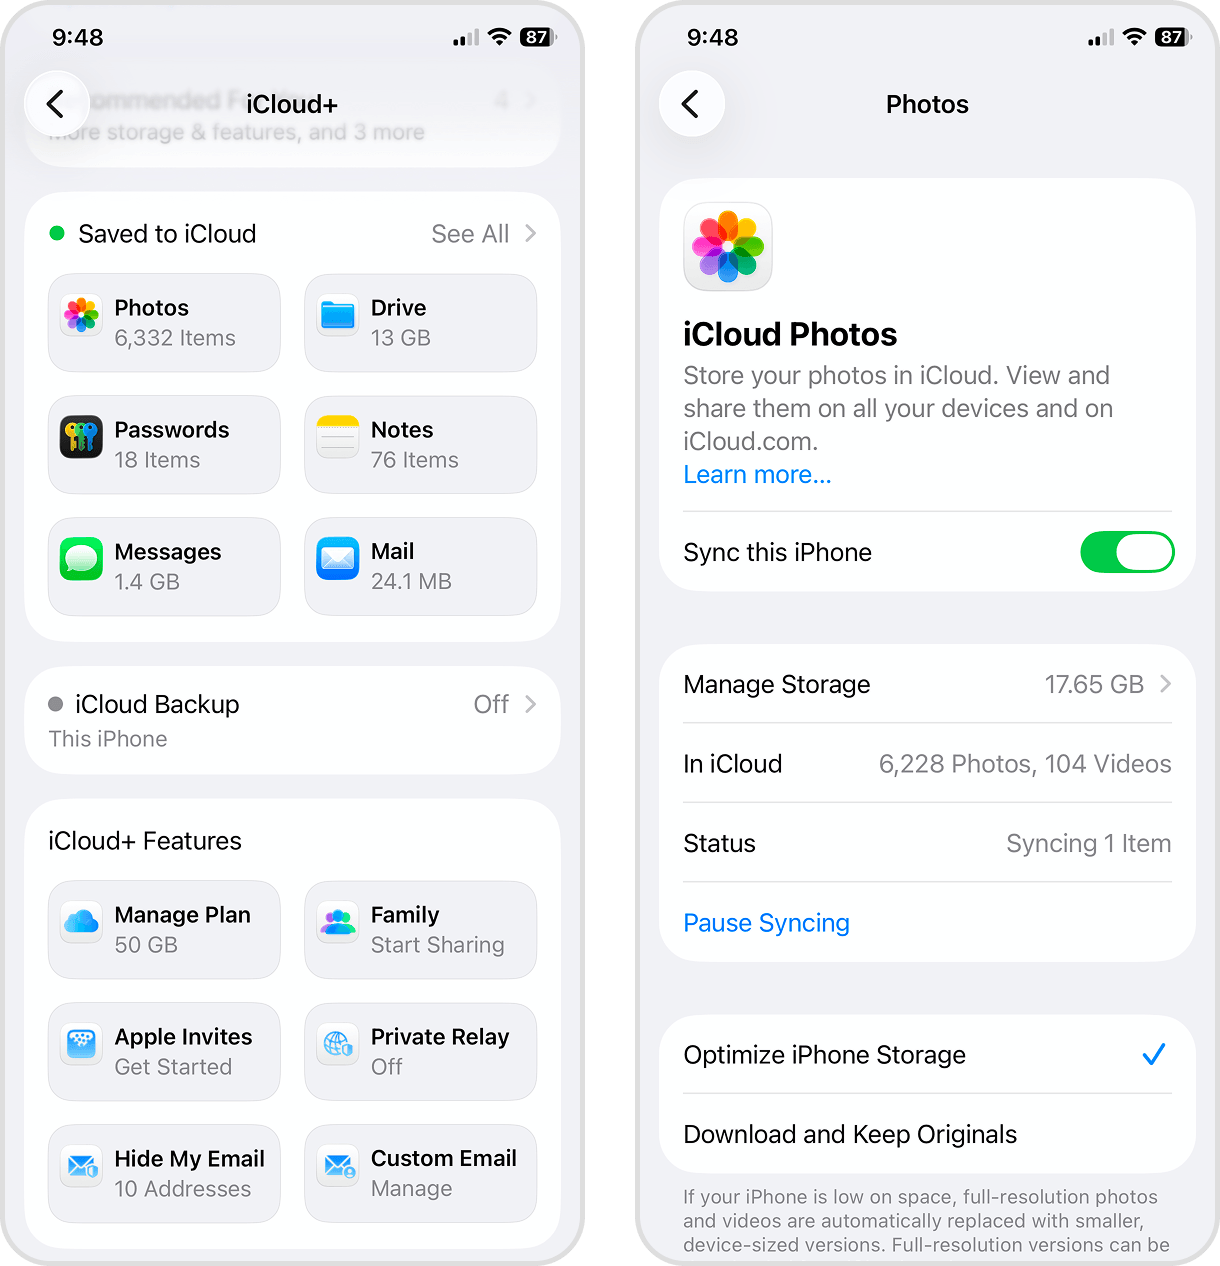
Note that you may not get storage gains immediately; iOS needs time and a stable network connection to upload your entire library to iCloud. You may also notice some storage space gets used up occasionally, as iOS re-downloads the original copies of photos or videos that you try to view, edit, or export.
Method 3: Clear Safari and App Cache
Aside from downloading files from the internet or installing new apps, it’s also possible to accumulate “invisible” app data that ends up consuming a lot of storage space over time. For browsers, like Safari, app data comes in the form of web assets (like images) or login credentials (a.k.a. cookies). They get saved to local caches to avoid having to load/input them again later.
For non-browser apps, like Telegram or Spotify, app data is mostly thumbnails or fragments of the served media (like a short clip of a full video). They get saved locally so you don’t have to wait for them to load while you use the app. Removing them is the best way to clear app data without deleting the app.
We’ll show you how to clear Safari’s cache and Telegram’s cache to demonstrate this cleanup method more clearly. Just note that third-party browsers typically store their cache management features in their own settings page.
To clear Safari’s cache:
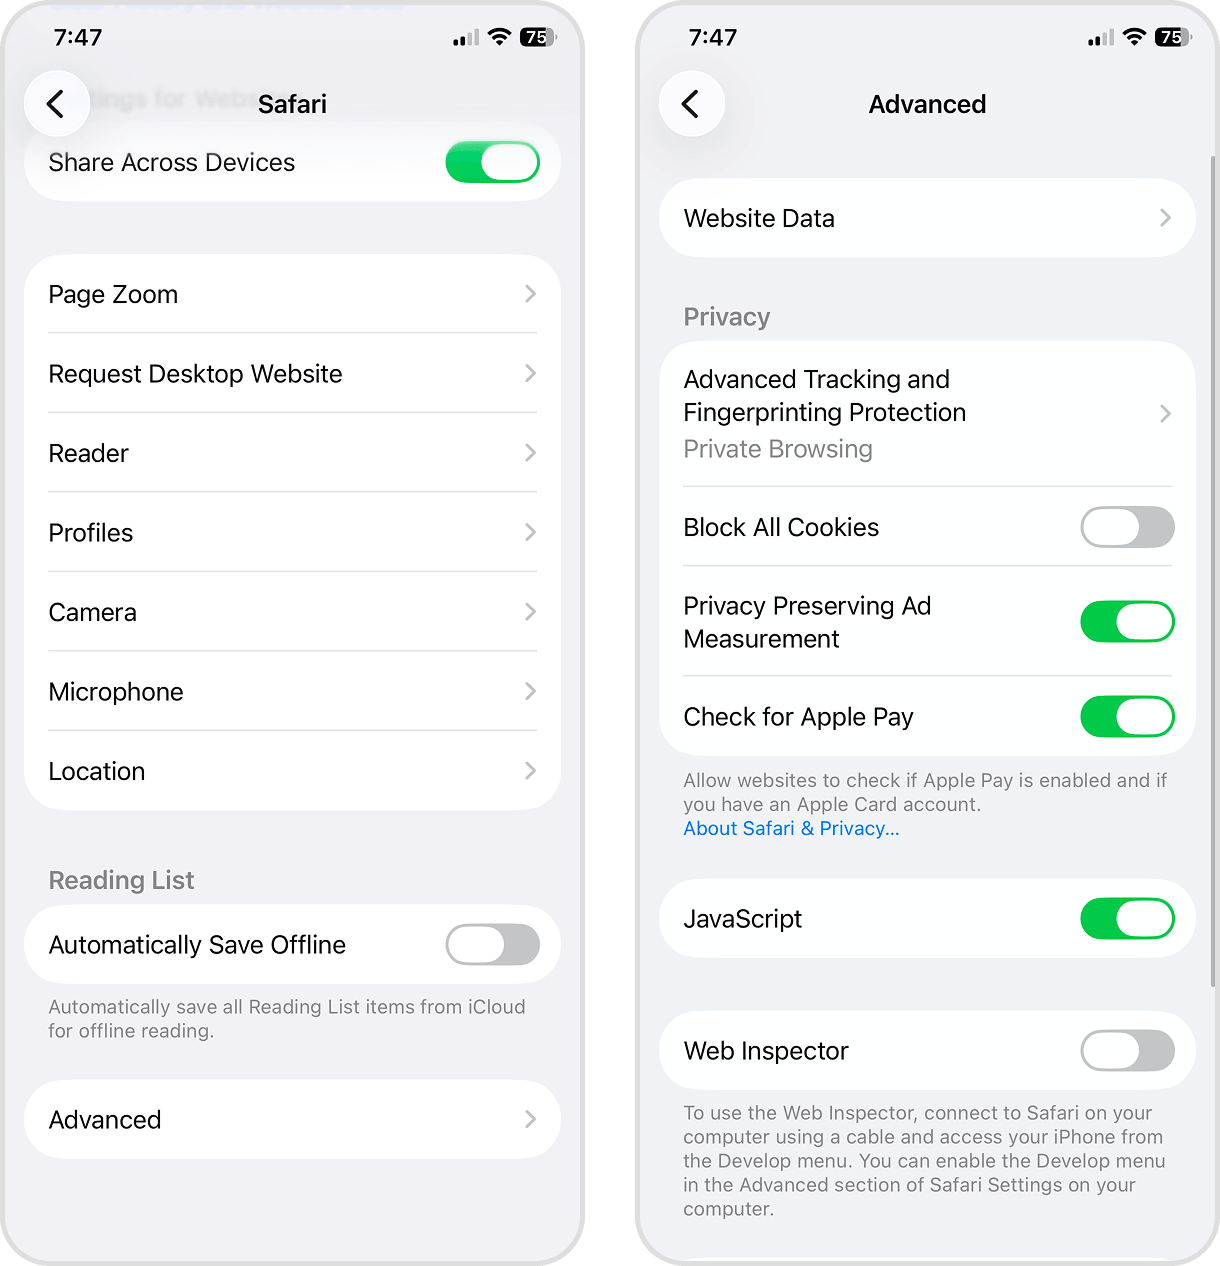
- Open the Settings app.
- Scroll down to the very bottom of the menu, then tap Apps.
- Find and select the Safari app.
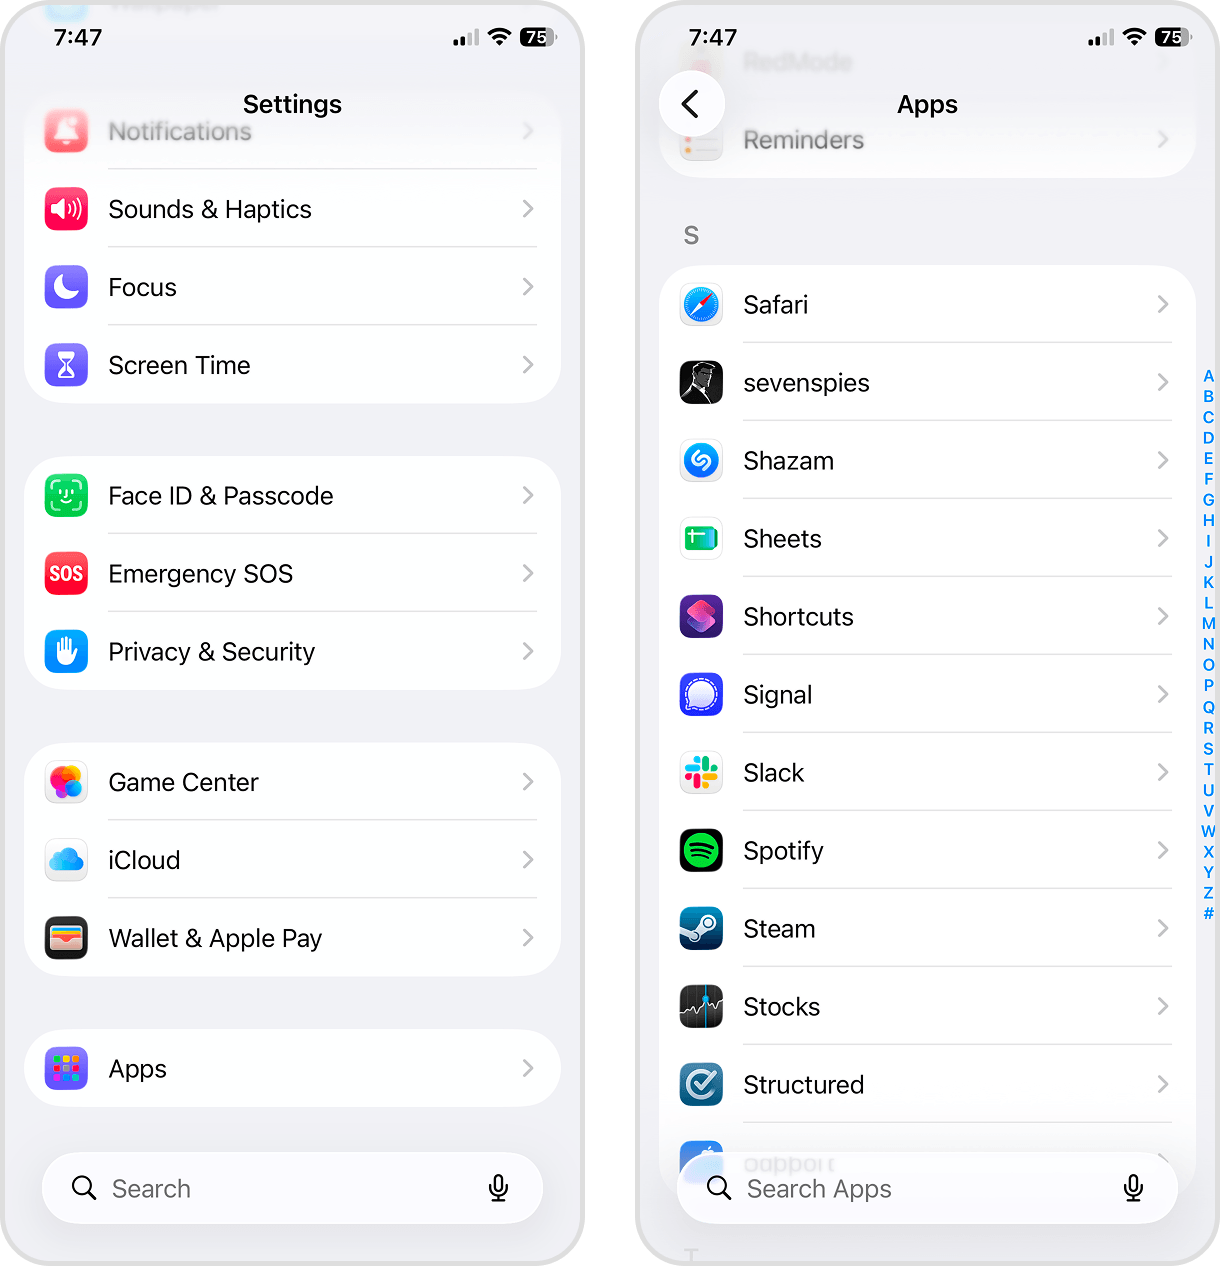
- Go to the bottom of Safari’s app menu, then tap Advanced.
- Select Website Data.
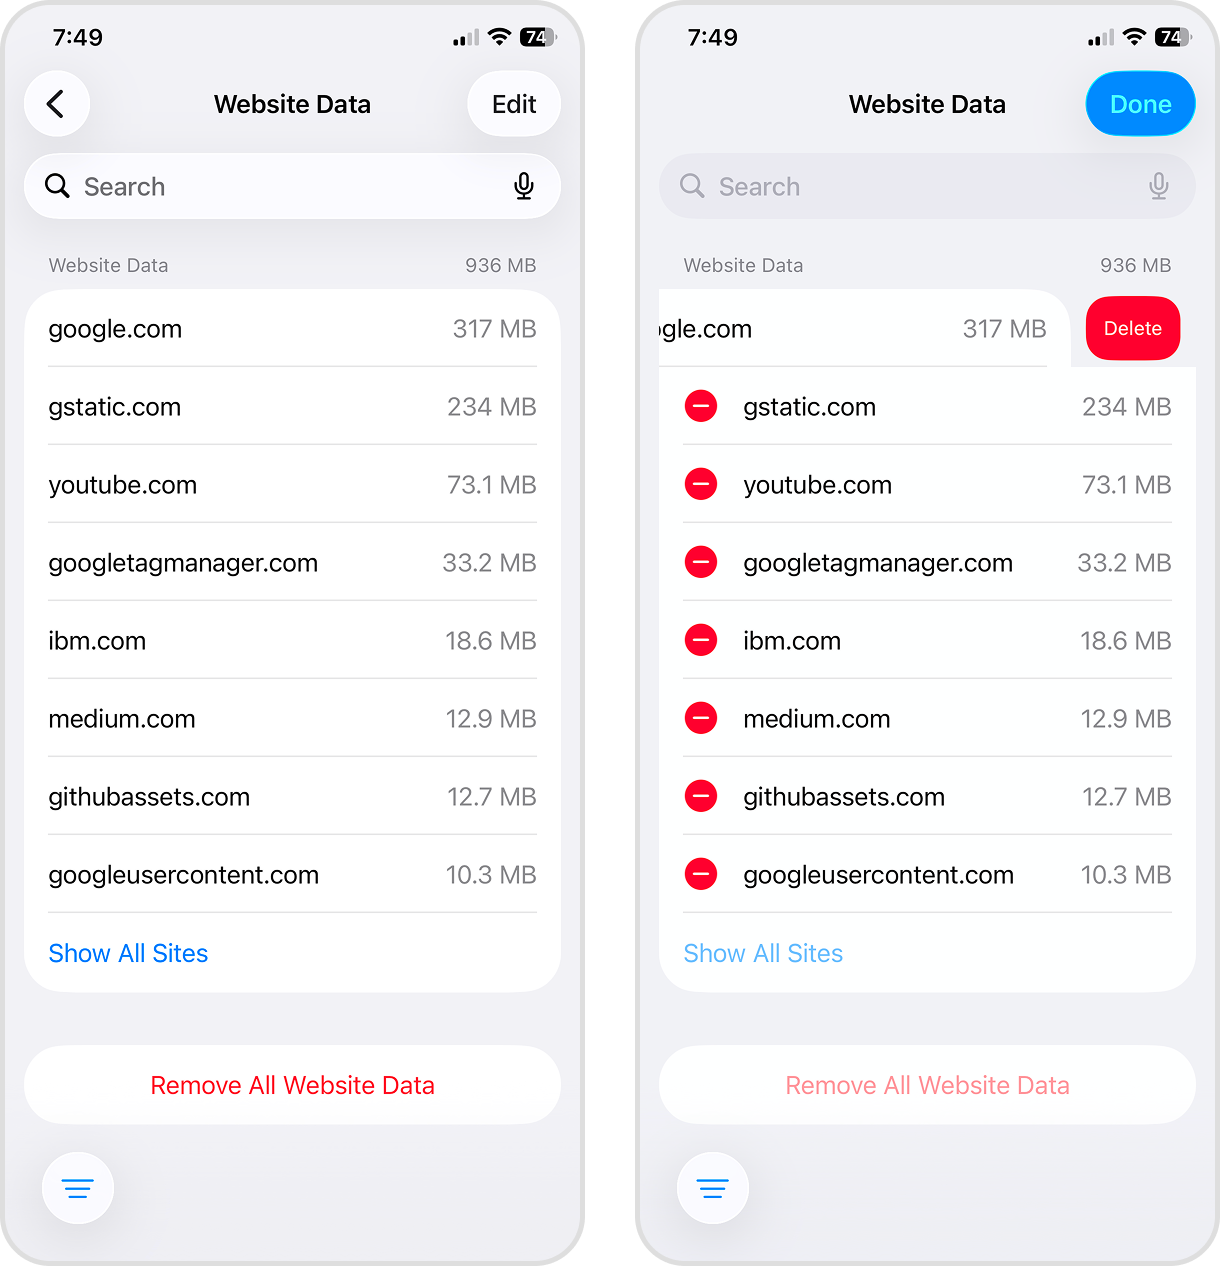
- Tap Edit in the top right corner of the screen.
- Beside Website Data entries you want to remove, tap the red – button. Then, tap Delete. Alternatively, tap Remove All Website Data at the bottom of the screen.
To clear Telegram’s cache:
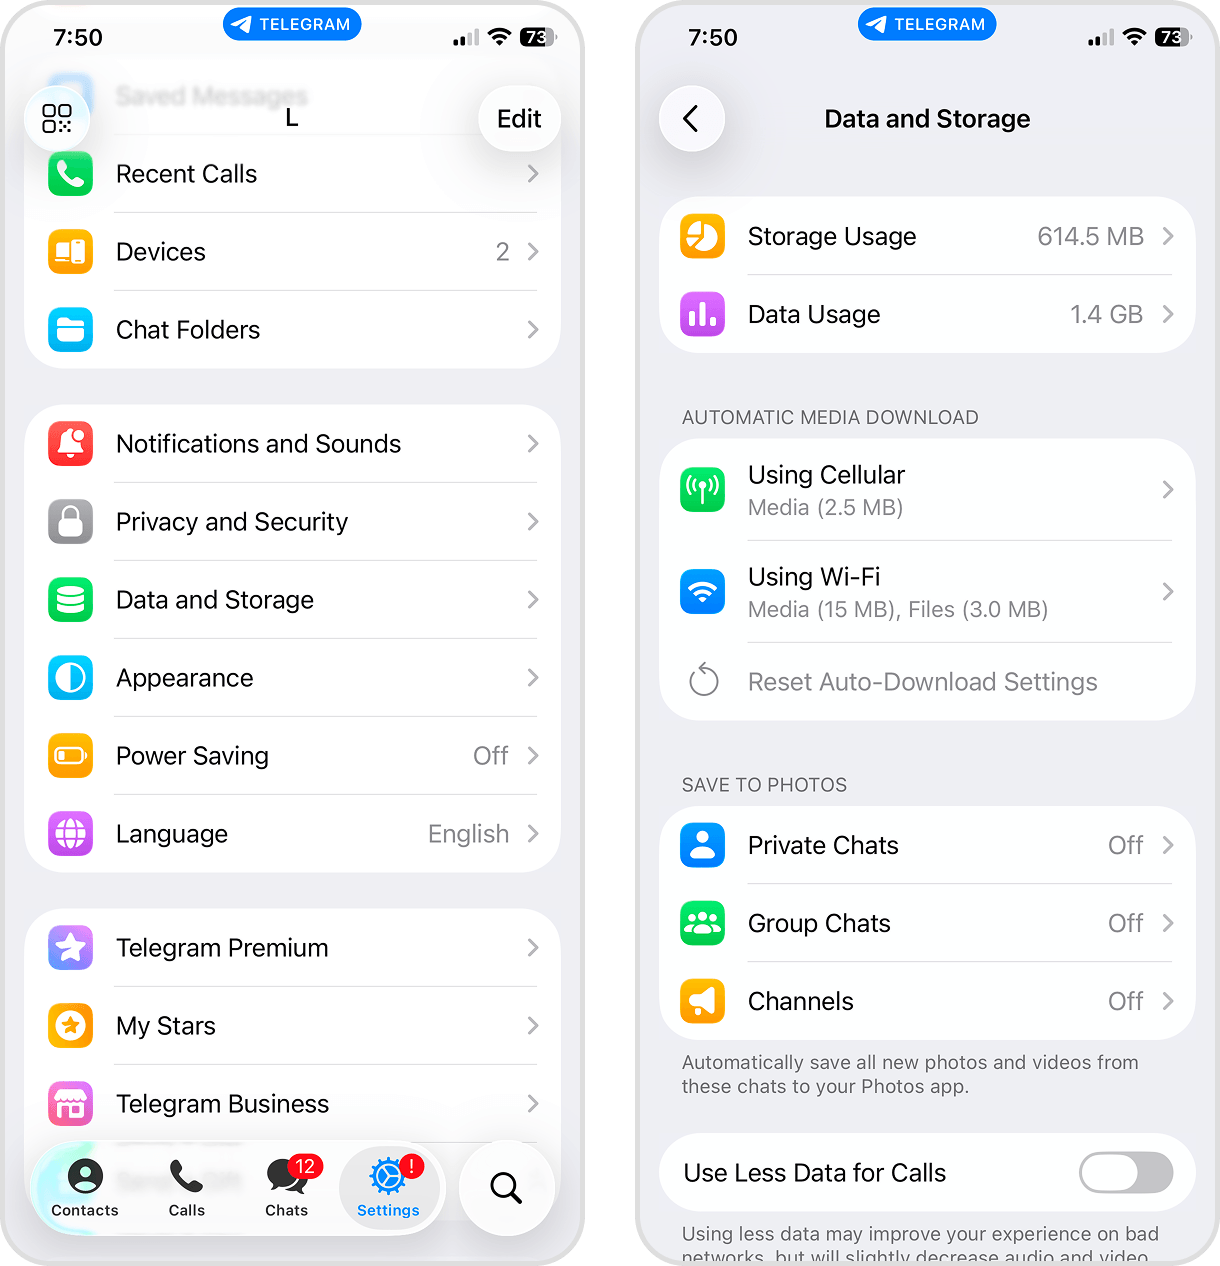
- Open the Telegram app (or another app that you want to clean up).
- Tap Settings from the bottom menu.
- Scroll down a bit, then select Data and Storage.
- Select Storage Usage.
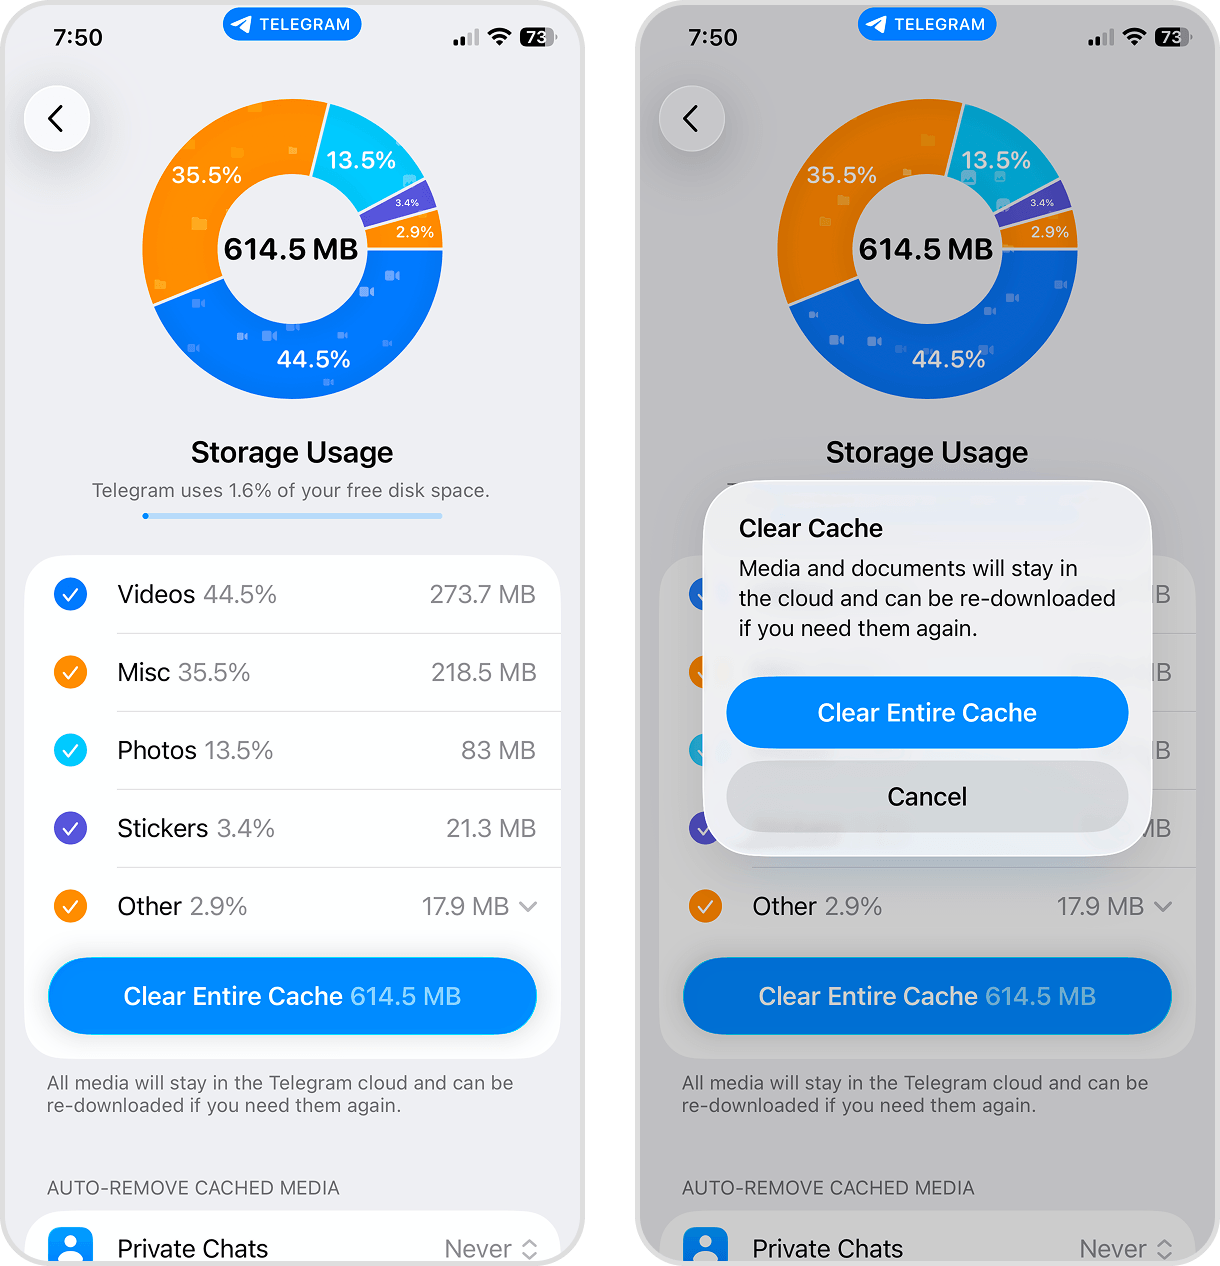
- Tap the Clear Entire Cache button.
- Finally, in the pop-up dialog that appears, select Clear Entire Cache again to confirm the action.
Method 4: Offload Unused Apps Without Losing App Data
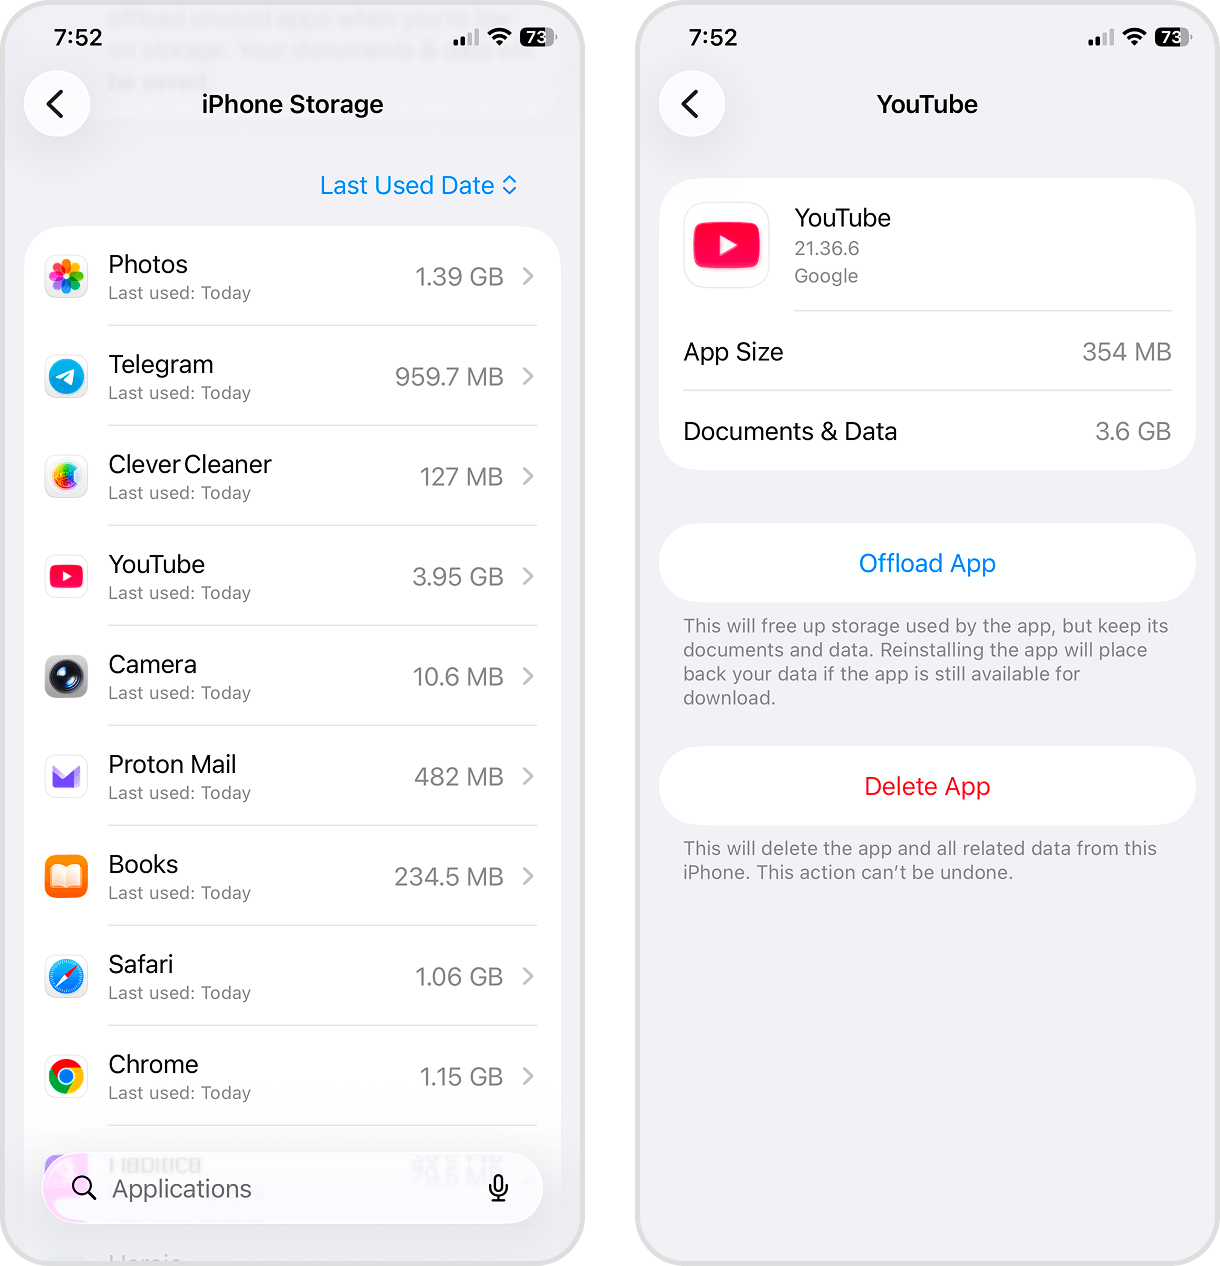
For apps that you rarely use but don’t want to totally delete, you can Offload them instead. Offloading an app means that you delete the app binary itself, but its documents and data remain on your device.
This ensures that any local data gets restored to the app when you choose to reinstall it later, while still allowing you to free up significant storage space. Offloaded apps also stay on your home screen, and you can simply tap the cloud button beside any app to re-download it.
- Open the Settings app.
- Scroll down a bit, then tap General.
- Tap iPhone Storage.
- Scroll down to the app list, then select the app you want to offload.
- Tap Offload App. Confirm when prompted in the dialog box.
Method 5: Remove Local iCloud Drive Downloads Without Deleting Files
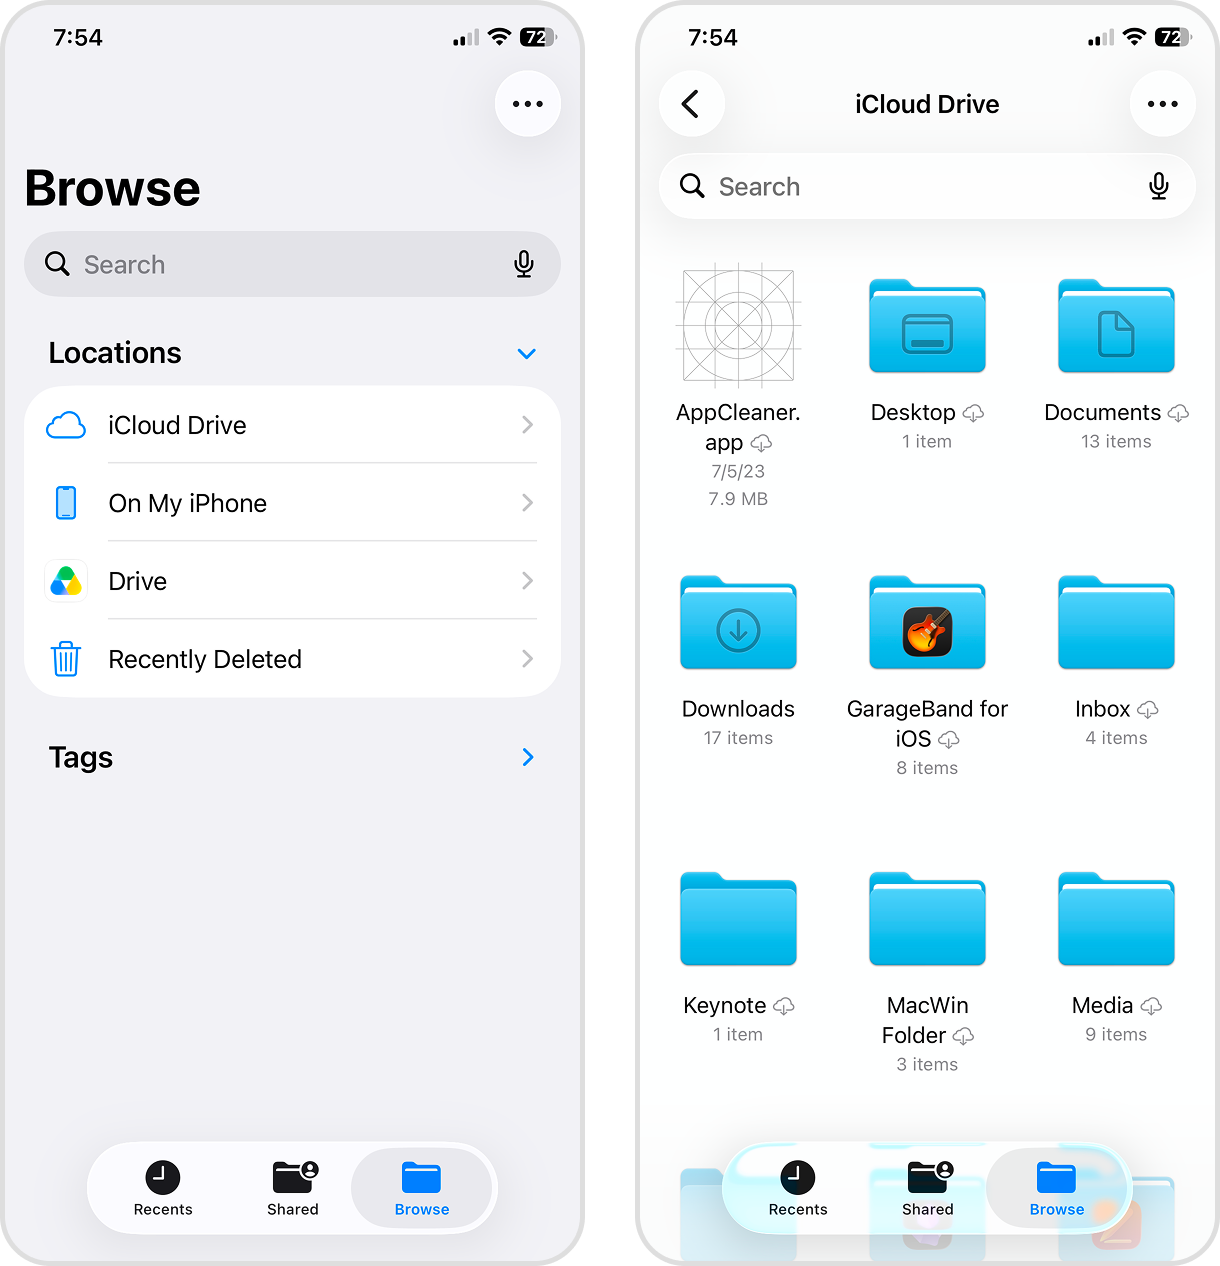
If you have iCloud enabled on your iPhone and you save or download a lot of data to the Files app, a great way to free up a lot of storage is to remove the offline versions of your files. This means that your files will be removed from local storage but remain accessible in iCloud.
You’ll still see your files in their original location in the Files app, but the tradeoff is that you’ll need to re-download them (by tapping the cloud icon) before viewing, editing, or sharing. It’s still a legitimate way to reduce iPhone storage usage without deleting anything.
- Open the Files app.
- Tap Browse at the bottom of your screen to navigate to the main Browse menu. Then, under Locations, select iCloud Drive.
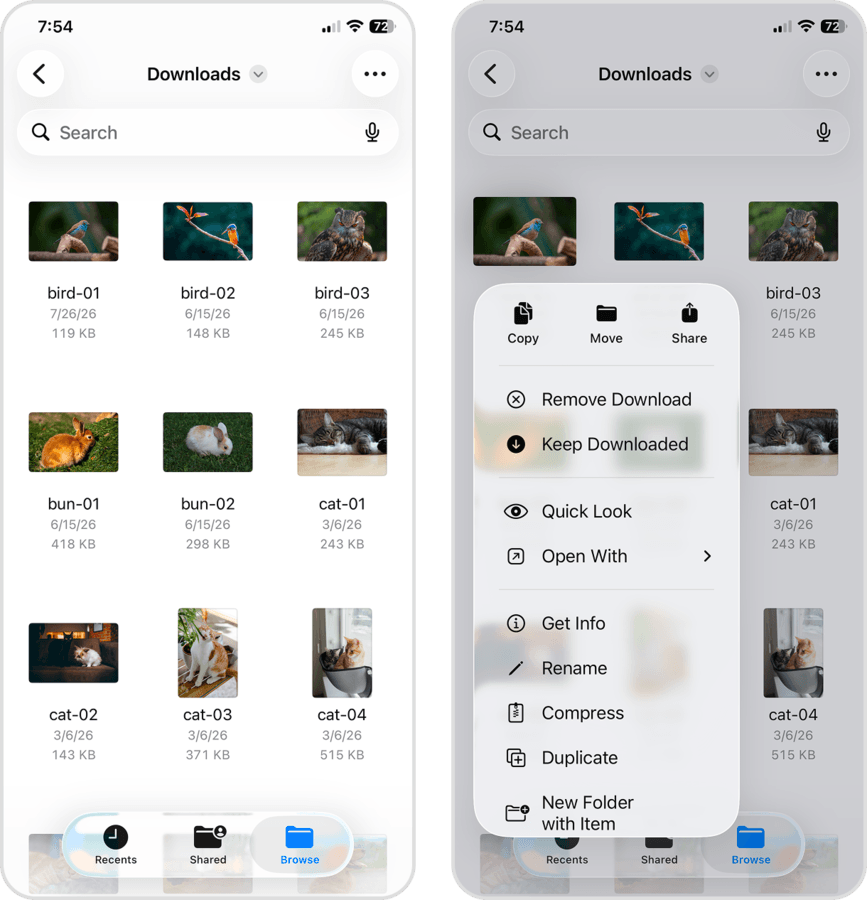
- Open the Downloads folder, or any other general or app-related folder you want to clean up.
- Tap and hold the file or folder you want to remove from local storage, then select Remove Download.
Method 6: Remove Offline Media Without Losing It From Your Library
Most media streaming apps, like Apple Music, Netflix, and YouTube, provide a feature that lets you save content to your local storage (so you can watch it later without Wi-Fi). To free up storage space, you can remove the downloaded content.
We’ll show you exactly how it works in the Music app, but the steps should look similar for any streaming app with offline downloads.
- Open the Music app (or any other app you want to clean up).
- Select Library from the navigation menu. Then, tap Downloaded.
- Tap Songs.
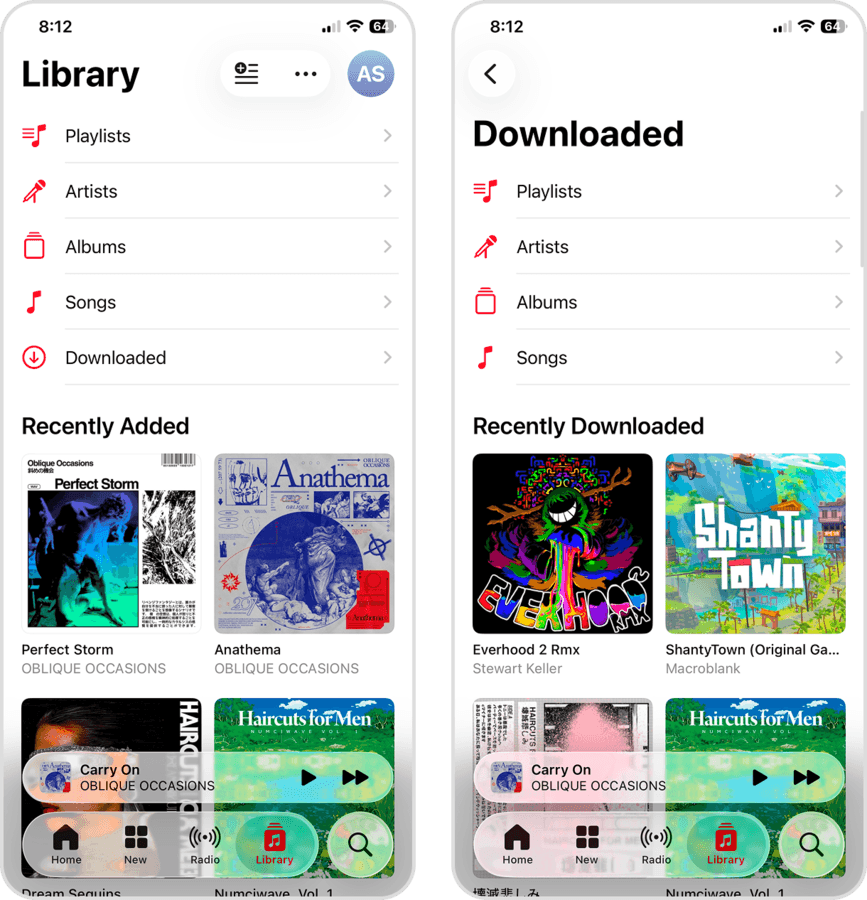
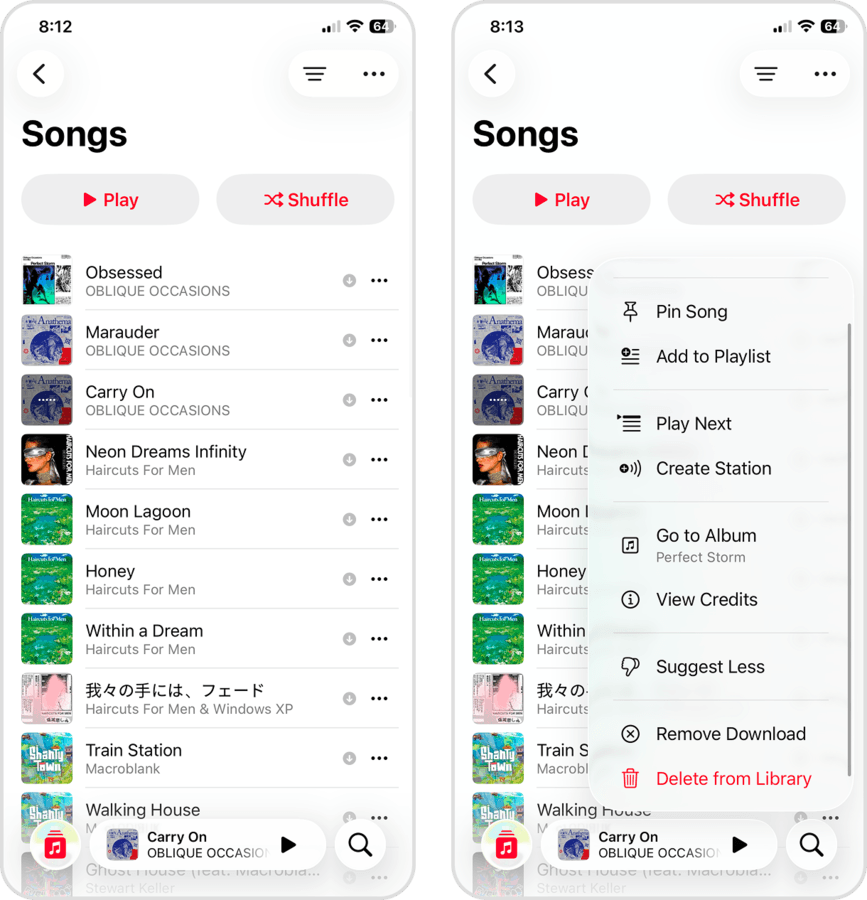
- Beside each downloaded song you want to remove, tap the menu button ⋯.
- Finally, select Remove Download from the context menu that appears.
How to Stop Your iPhone Storage From Filling Up Again
After cleaning up your iPhone, we strongly encourage you to use some additional methods to keep your storage space in check. We want to avoid having to constantly delete old files and media whenever you save new ones.
In this section of the guide, we’ll briefly go through easy-to-find but effective settings on your iPhone that can help you prevent apps, media, and other files from unnecessarily taking up too much storage.
Use High Efficiency Camera Formats
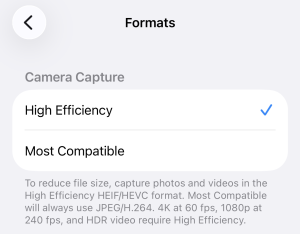
Instead of the standard JPEG/H.264 formats, iOS lets you change the settings of your iPhone camera to use HEIF (High Efficiency Image File) and HEVC (High Efficiency Video Coding) for photos and videos.
HEIF/HEVC are media formats that can store photos and videos with a smaller file size, without compromising image quality. They’re also compatible with most modern systems; you’ll likely only encounter problems if you need to export your media to an older device or app.
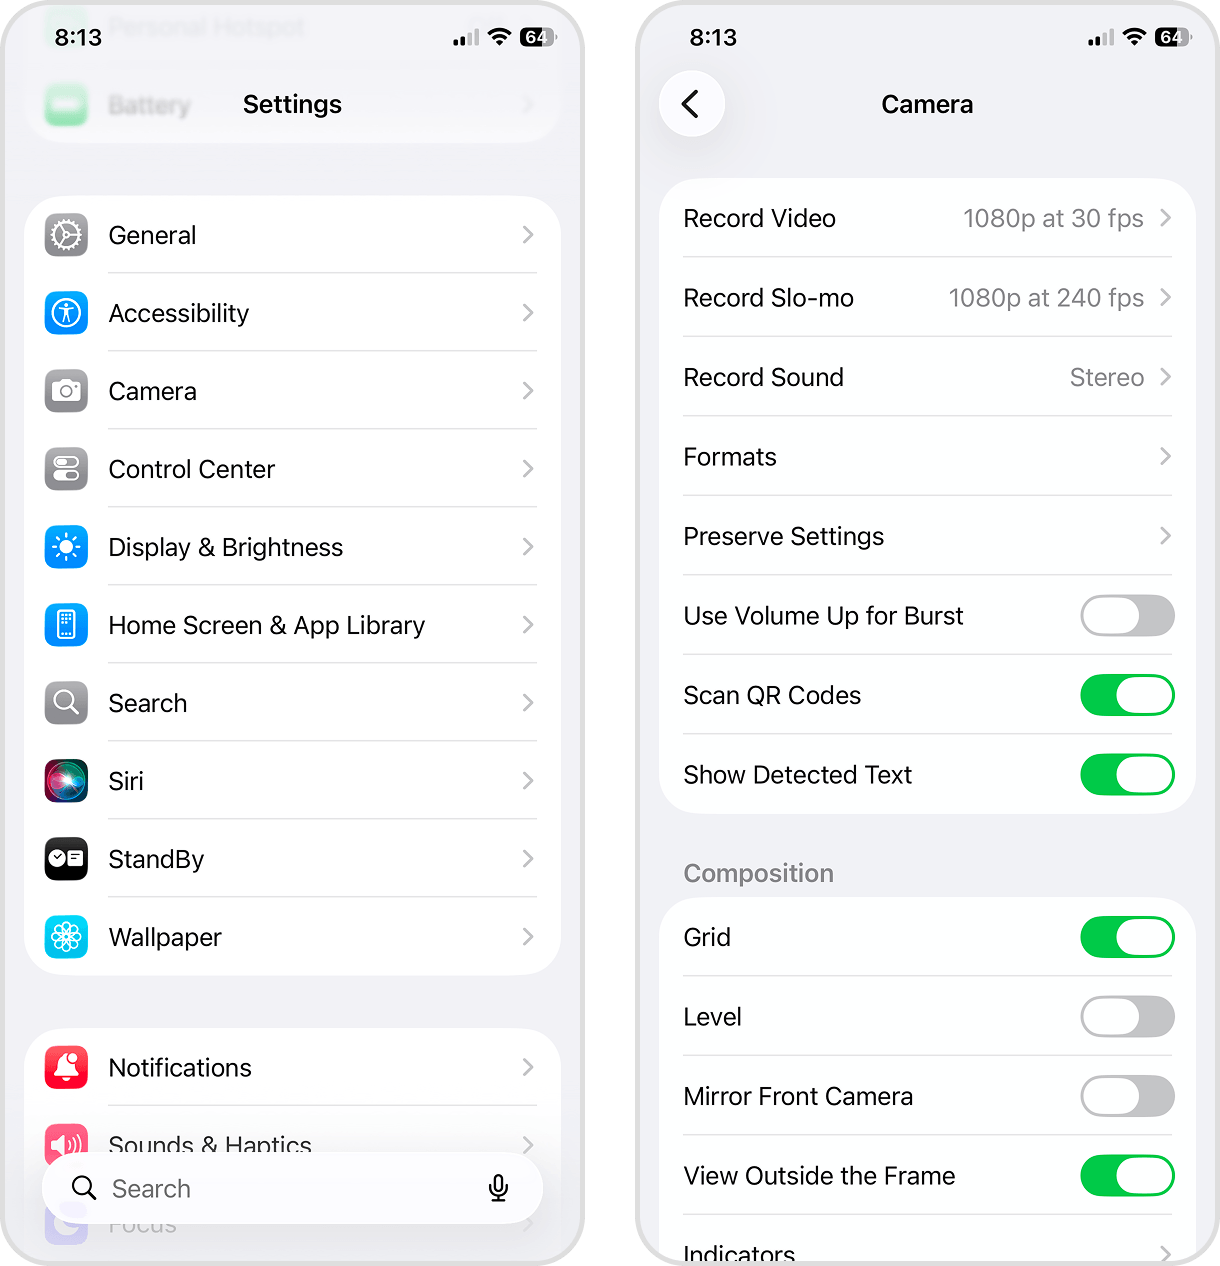
- Open the Settings app.
- Scroll down a bit, then select Camera.
- Tap Formats.
- Finally, select the High Efficiency option.
Limit Automatic Media Downloads
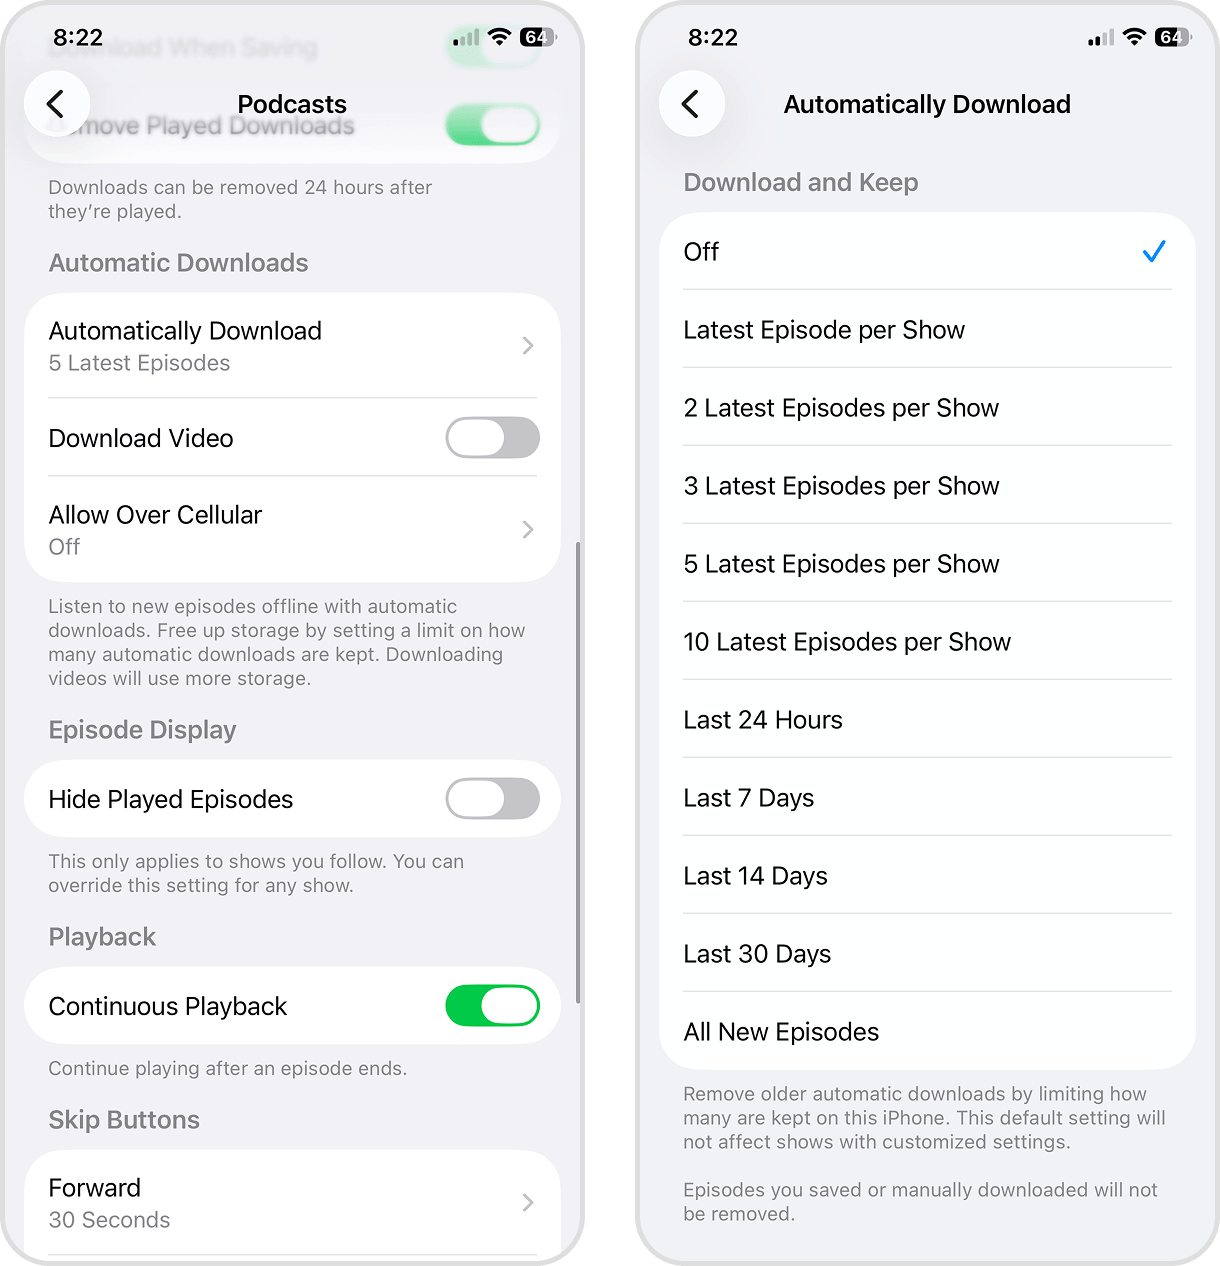
Many streaming apps with the ability to download offline content often tack on another feature: Automatic Downloads. This setting checks your streaming history and automatically saves upcoming episodes or similar media to your local storage (without asking you first).
We’ll show you how to disable this setting in the built-in Podcasts app, but the steps should look similar for other media streaming apps.
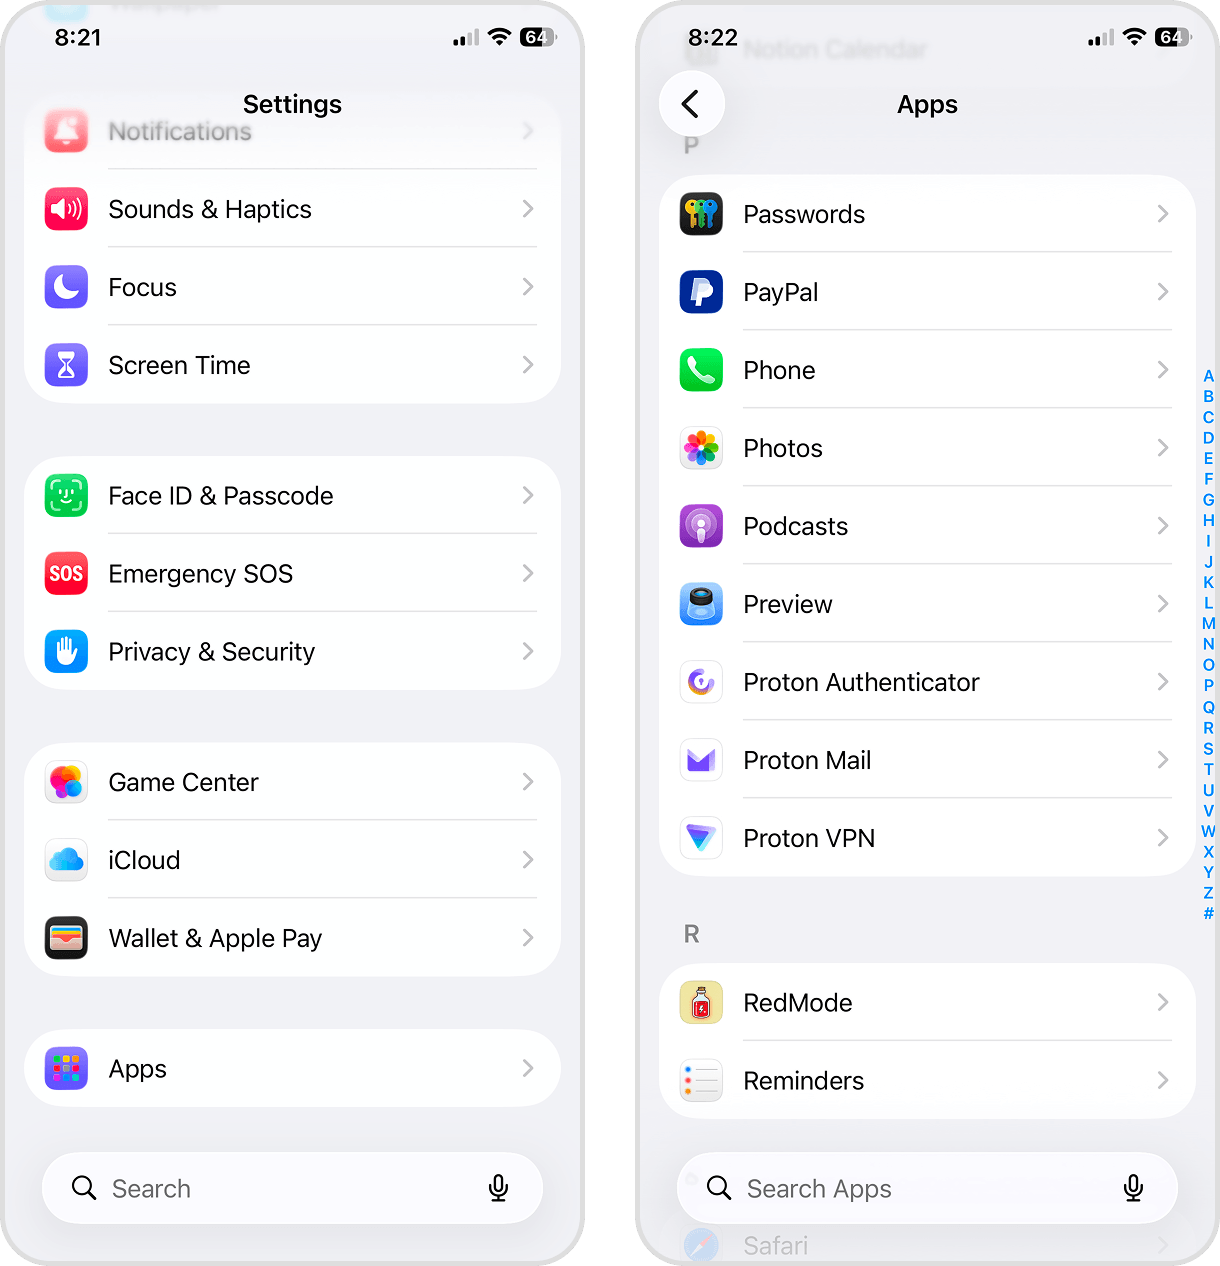
- Open the Settings app.
- Scroll down to the very bottom of the main page, then select Apps.
- Find and select Podcasts (or whatever app you clean up).
- Scroll down to the Automatic Downloads section. Make sure Download Video and Allow Over Cellular are disabled. Then, tap the Automatically Download option.
- Finally, select the Off option at the very top of the list.
Keep Storage Optimization Features Enabled
If you used the Optimize iPhone Storage (for Photos) and Offload Unused Apps features we mentioned earlier in the guide, keeping them on is a low-effort, high-reward method for maintaining storage. They both work continuously to get more space on your iPhone without deleting anything.
But if you’re still on the fence, here’s a more detailed list of each feature’s pros and cons to help you decide which setting is right for you:
| Pros | Cons | |
| Optimize iPhone Storage |
|
|
| Offload Unused Apps |
|
|
Check iPhone Storage Before It Gets Full
Our final and most important recommendation is to simply check your iPhone’s storage space regularly–especially before downloading new apps or large files. Visit the iPhone Storage settings page (covered in this section of the guide) once a month, which not only shows you how much available space you have, but also what types of data use up the most storage.
Use the colored labels (e.g., Photos, Applications, etc.) to determine what needs attention. Then, you can use Clever Cleaner’s Swipe feature (covered in this section of the guide) or download another app with automated cleaning tools.
If you want more tips on how to manage your data and storage consumption that aren’t covered in this guide, see our article on increasing iPhone storage beyond iCloud.
The Short Version
Here’s a brief recap of everything we covered on how to clear your iPhone storage without deleting anything, along with links that take you to the appropriate sections.
- Start with compressing your photos and videos to reduce their file size.
- Next, activate Optimize iPhone Storage to move high-resolution copies of your media to iCloud, leaving space-saving copies in their place.
- Clear your browser and app caches, which removes accumulated temporary files that you might not need anymore. Your user files will remain untouched.
- You can also remove local iCloud downloads, which removes them from your iPhone’s storage but keeps them in iCloud.
- If you still need more storage space, you may need to compromise a bit more. Start with offloading unused apps; offloading preserves the app’s local data (unlike deletion).
- Finally, if you have streaming apps installed, delete any downloaded content you don’t need to save offline. It won’t affect your library or playlists.
In summary: while you can’t increase your iPhone’s built-in physical storage capacity, you can reduce how much storage space your data uses; the second half of our guide shows you how to keep it that way.
FAQ
There are several ways to get more storage on your iPhone without deleting anything:
- Compress photos and videos instead of deleting them. Compression reduces their file size in exchange for minimal impact on quality. We recommend using an app called Clever Cleaner for this, because it keeps your metadata (e.g., date and location) intact.
- Enable iCloud’s Optimize iPhone Storage feature (Settings > Apple ID > iCloud). If you have a big library, you might need to upgrade your iCloud subscription.
- Clear your browser caches (Settings > Apps > Safari > Advanced > Website Data).
- Use the Remove Download option for any files stored in iCloud Drive (in the Files app).
- Delete offline downloads in streaming apps.
Yes, there are two ways to free up space without deleting photos:
- Enable iCloud’s Optimize iPhone Storage setting, which uploads the original high-definition media to iCloud and only retains lower-quality versions in your iPhone’s local storage. The original versions will automatically be redownloaded whenever you try to view, edit, or share your media.
- Compress your photos to reduce their file size in exchange for a small dip in quality. There are several tools you can use, but we recommend Clever Cleaner because it intentionally tries to preserve metadata (like date and location).
Compression itself doesn’t always strip metadata, but some tools include this functionality to further shrink the photo’s file size. Some apps, like Clever Cleaner, intentionally try to preserve photo metadata and only focus on the image itself.
Depending on your iPhone’s storage capacity, how much data you have, and how many files you deleted, iOS’ storage recalculation can take a few minutes to several hours. We recommend keeping your iPhone plugged into a charger and leaving it alone for a while, so iOS can use all of its resources for calculation and indexing.
It depends. Here are two ways some apps allow you to manage in-app data:
- Many messaging and social apps, like Telegram and WhatsApp, have a “Clear Cache” feature in their settings pages. This deletes content the app automatically saved to avoid having to load it while you scroll.
- Media streaming apps, like Netflix and Apple Music, let you download content for offline viewing. This content is stored in your local storage, so deleting it frees up space.
For apps that don’t have either feature, your best option is to delete the app, then reinstall it immediately after.
No, you can’t increase the physical storage capacity of your iPhone. You have two alternative options:
- Upgrade your iCloud subscription to a higher tier, then utilize the Optimize iPhone Storage feature for Photos, Files, and other compatible apps.
- Purchase a compatible external storage device that can connect directly to your iPhone.
