


Need to manage your iPhone storage before it gets full? iPhones generate so much different data just through normal daily use, so getting ahead of the problem is the only way to prevent running out of space. But… Where do you start?
This guide answers that question in full detail. After hundreds of guides on iOS throughout the years, we’ve perfected the art of optimizing every last megabyte of your storage to ensure you keep a healthy amount of free space at all times.
Check Your iPhone Storage Usage
The very first step of iPhone storage management is analyzing how the space is being used to find out what needs your attention. For example, maybe you’ll notice a data category that’s bigger than it should be, which means it needs cleanup or organizing.
Fortunately, iOS provides a convenient breakdown of your iPhone’s storage allocation in the Settings app. We’ll show you where to find it, then briefly explain what’s on-screen:
- Open the Settings app.
- Tap General.
- In General, select iPhone Storage.
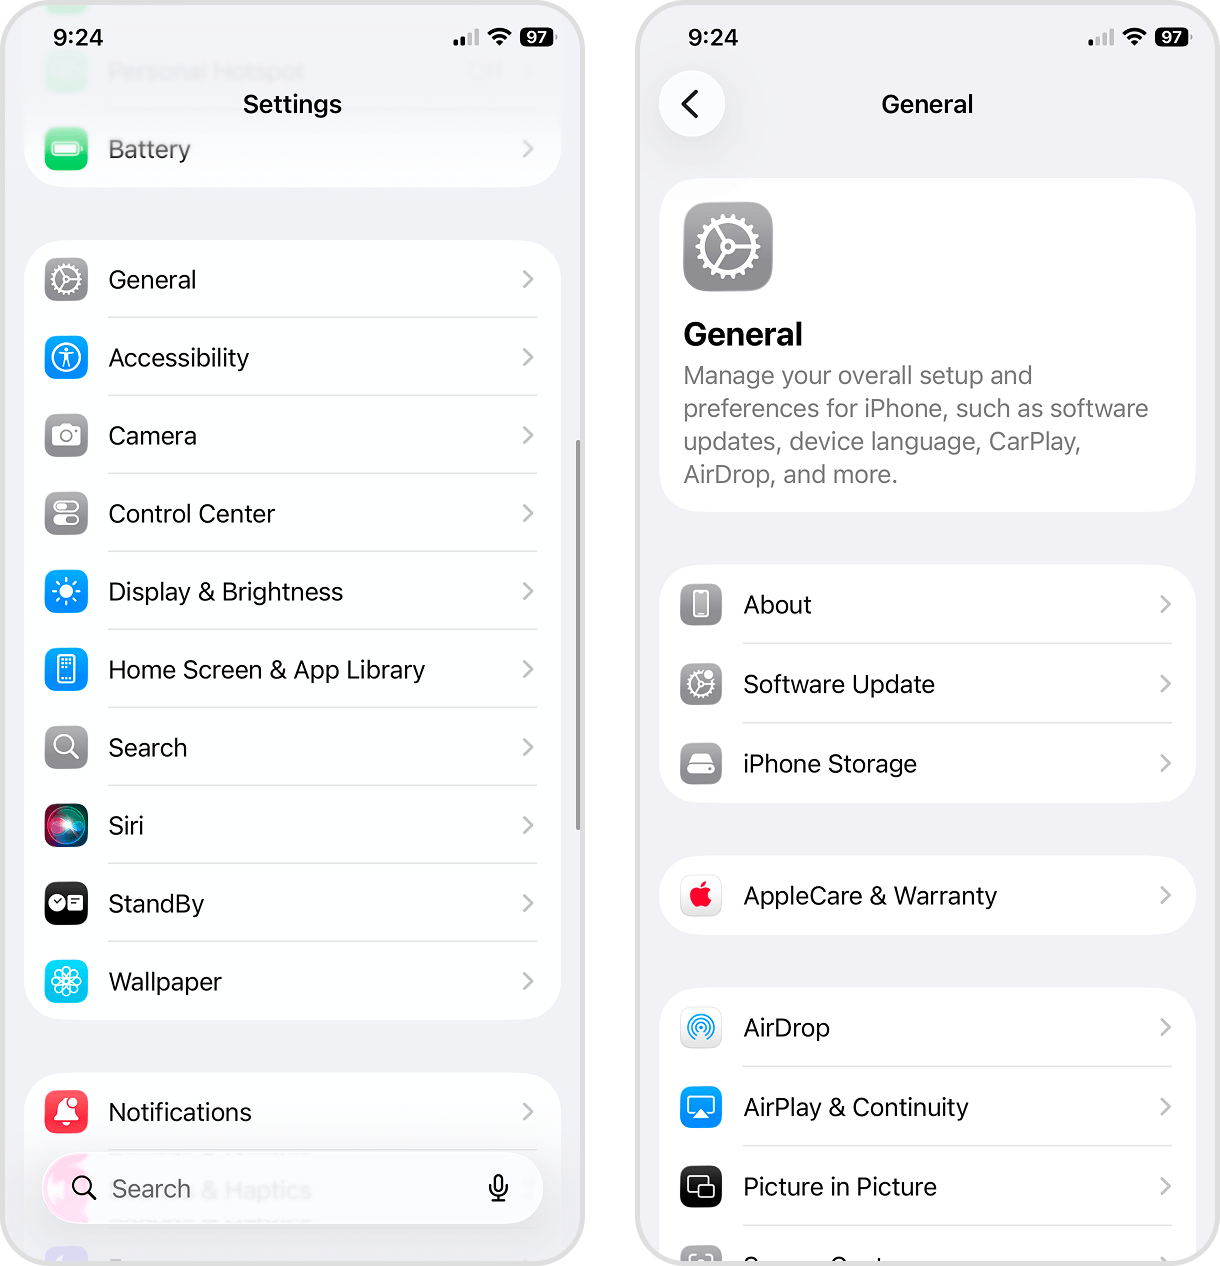
At the very top of the iPhone Storage page, you’ll notice a colored bar. The whole bar represents your device’s total storage capacity, while each colored section represents different types of data and how much storage they consume.
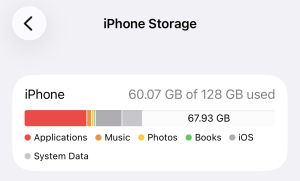
And if you look further down the page, you may also find a section labeled Recommendations. They show up when iOS detects potential cleanup opportunities on your device, which you can activate directly from that Settings page.
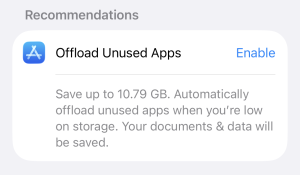
These recommendations can help you free up a lot of storage space, and they also serve as an indicator of what you need to organize.
Manage Your Photo Library
For most users, the photo library takes up a massive amount of storage space, and it has the most potential to generate unwanted files or clutter (e.g., duplicate photos, obsolete screenshots, old videos).
Even if you’re not a serial picture-taker, years of pet photos and recipe screenshots add up. So it’s always worth picking up the tips in this section, which focuses on the most efficient ways to manage your photos and videos.
Option 1: Clean Up Your Photos and Videos Manually
“Manual cleanup” doesn’t mean just browsing your library and albums to find photos and videos you want to delete. The Photos app actually has several built-in albums and utilities that group your media in a way that makes cleanup a bit easier.
Specifically, we’ll show you how to take advantage of the most useful built-in Media Types and Utilities categories (found at the bottom of the Collections page).
Useful Media Types:
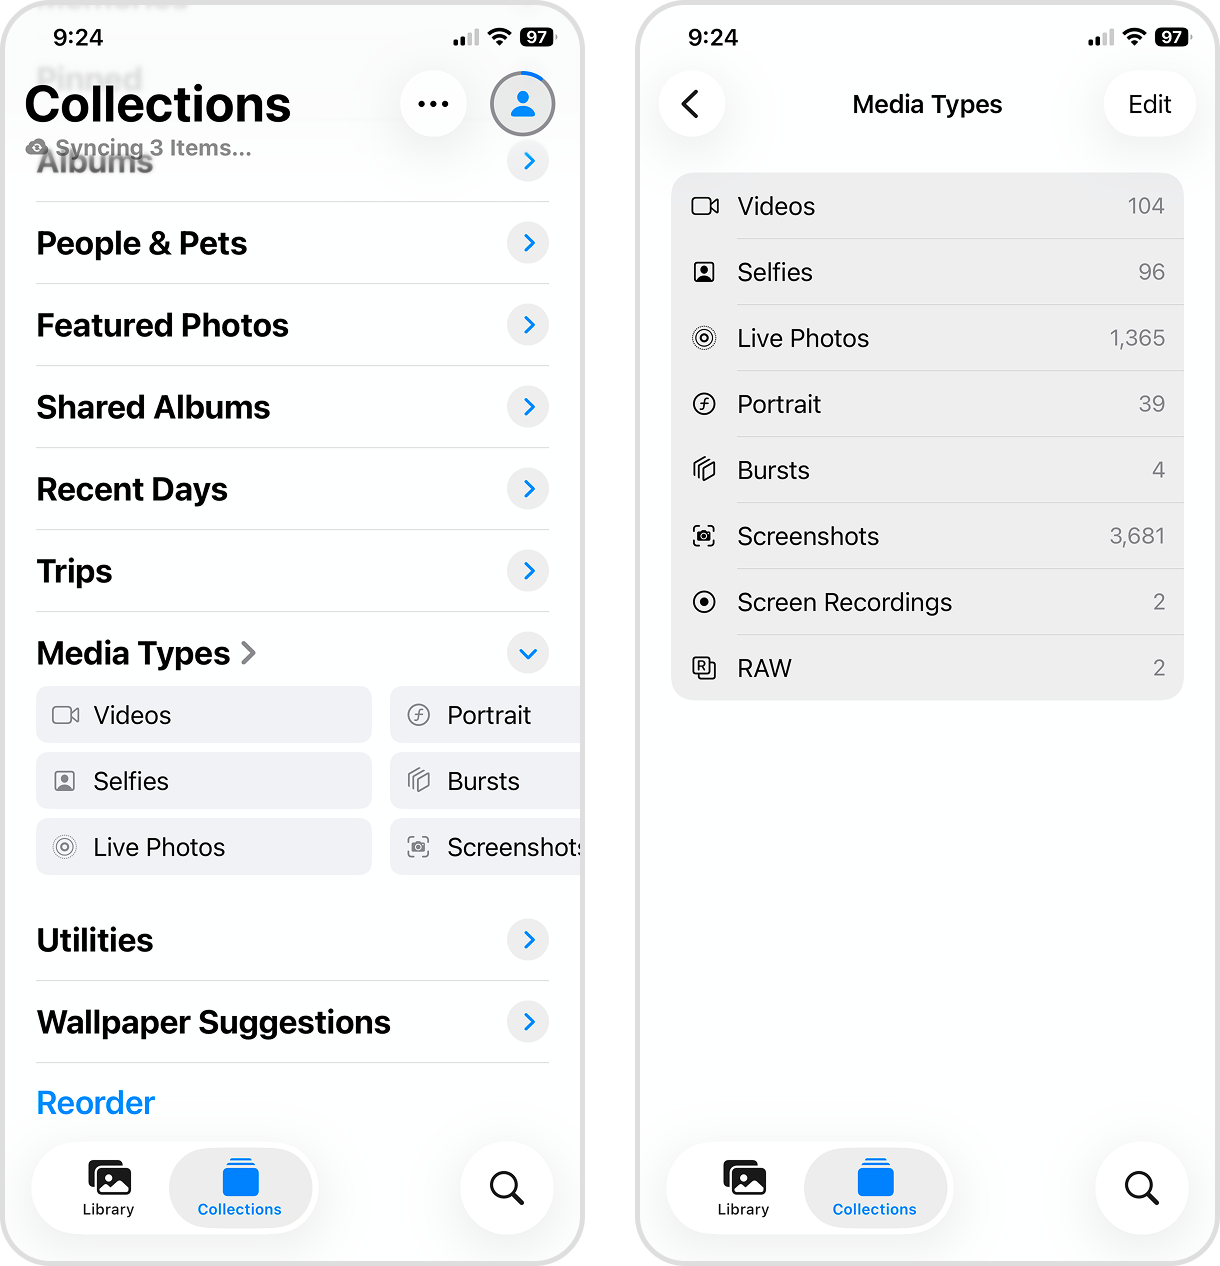
- Videos: All the videos in your library are stored in the Videos collection. Aside from the standard sorting and filter options, you can also filter for screen recordings.
- Selfies: This collection saves photos you capture with your iPhone’s front camera, as well as images you saved that were captured with another device’s front camera (e.g., your friend’s Snapchat picture).
- Live Photos, Portrait, Bursts: The Live Photos, Portrait, and Burst Collections store the media you captured with one of your iPhone camera’s special effects or settings. Each Collection has built-in cleanup and optimization features (e.g., you can remove individual images from Burst Photos).
- Screenshots, Screen Recordings: Images and videos you captured of your iPhone screen are also saved in their own Collections. If you want to delete an old recipe you saved from Instagram, go here.
- RAW: Any uncompressed media files get saved to the RAW folder, whether you captured it on your iPhone (e.g., Apple ProRAW) or imported it from another device (e.g., DSLR files).
Useful Utilities:
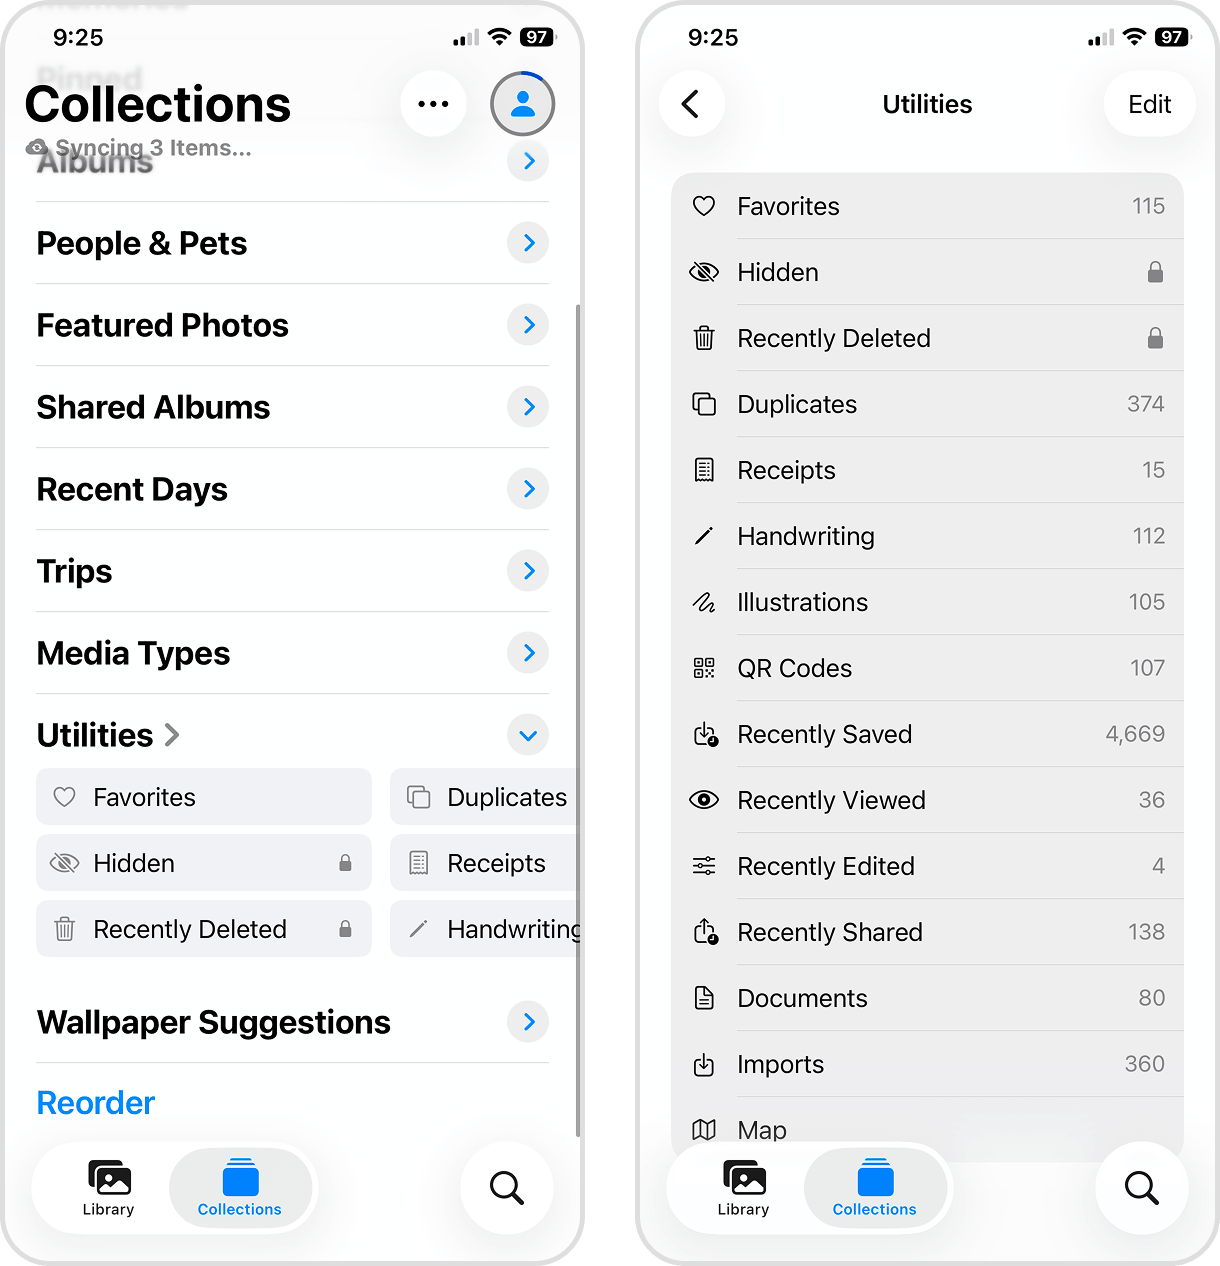
- Favorites, Hidden: Photos and videos that you choose to favorite or hide are saved to their own dedicated folders.
- Recently Deleted: Any media you deleted from your library is saved to this folder for 30 days before getting permanently removed from your device (to prevent you from losing anything important).
- Duplicates: The duplicates folder is a special utility that automatically detects multiple exact copies of your photos and allows you to merge them. Unfortunately, it doesn’t work for similar-looking photos–to find similar or identical images that are not exact duplicates, see the next section.
- Receipts, QR Codes: Got old receipts and QR codes from cafes or shops? iOS can detect them in your photos, so you can easily find them in one of these folders.
- Recently Viewed, Edited, Shared: These folders help you easily review and get rid of any photos you recently interacted with (e.g., photos you edited a few days ago).
- Map: The Map utility literally opens a scrollable and zoomable digital map of the world, where you can track which location any photo or video was captured in. For example, you can delete pictures from an old vacation you already backed up or don’t need.
There are several other utilities that might come in handy during your cleanup, like Handwriting, Illustrations, Documents, and Imports. If any of these are in your library, you’ll find them in the appropriate utility folder.
Option 2: Manage iPhone Storage With a Cleaner App
While the built-in Photos app has a rich set of organization features, it falls short in the cleanup and maintenance department. By comparison, third-party iPhone cleaning apps provide tools that make cleanup faster and MUCH more convenient; they have more (and better) features, their UI designs are optimized for storage management, and they usually have more automation.
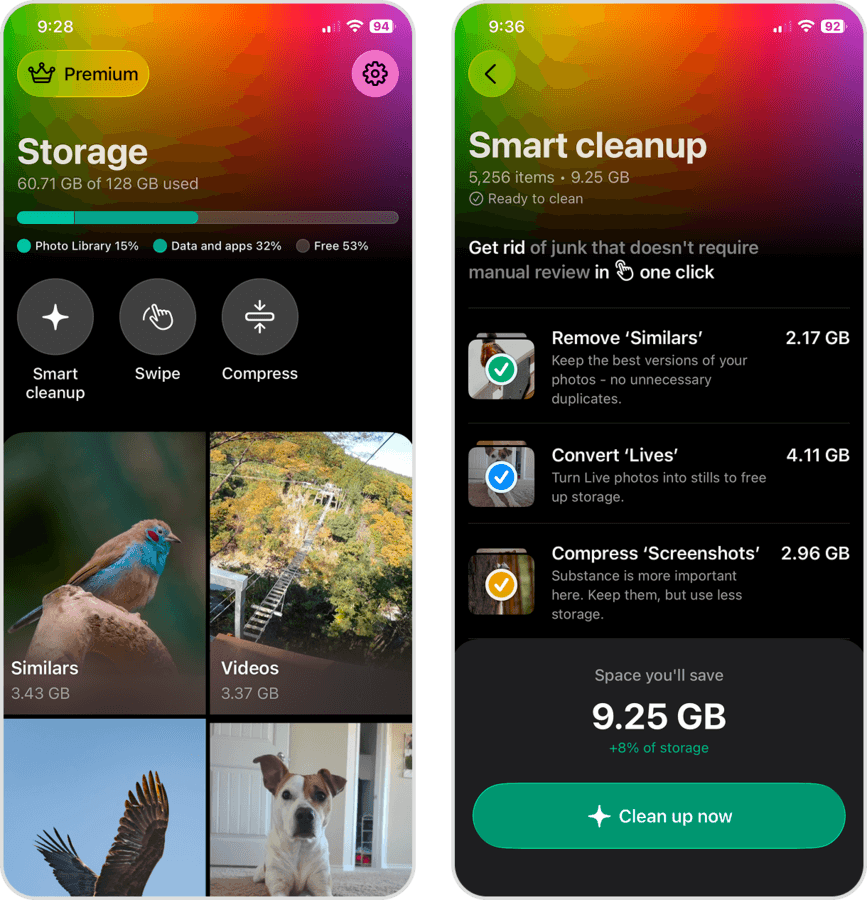
The tool we recommend for this guide is Clever Cleaner: AI Cleanup App. Even when tested with a moderately large library, the Smart cleanup feature alone instantly freed up over 9 GB of storage space by deleting and compressing photos (without even touching videos). We’ll talk about this and its other features in more detail below.
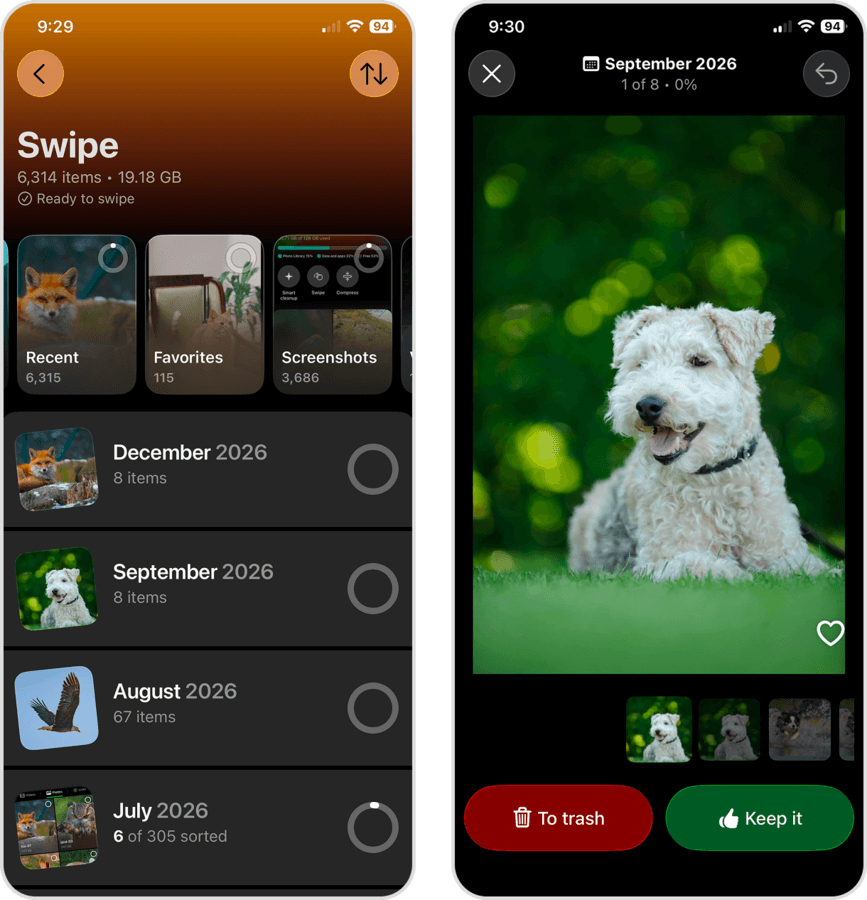
- Swipe: The Swipe tool compiles all your photos and videos (including screenshots and Live Photos) into monthly albums, which you clean individually with left and right swipe gestures. It’s a great tool for daily 10 to 15-minute cleanup sessions.
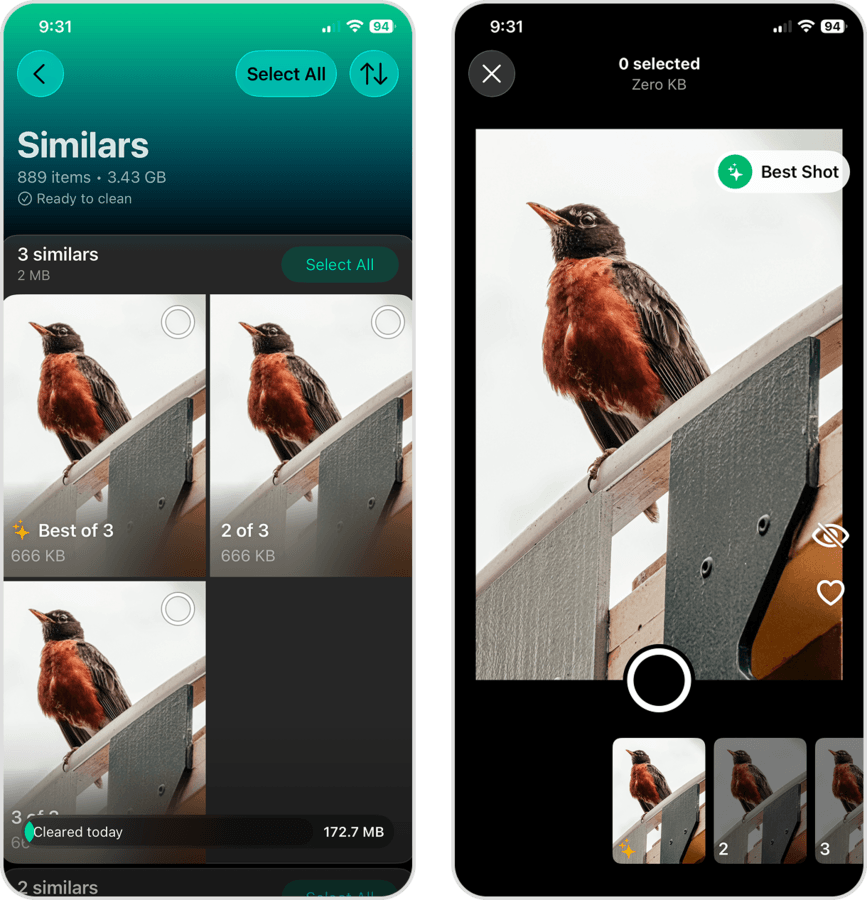
- Similars: Clever Cleaner can remove similar and duplicate photos in your library, whereas the native Photos app only detects exact copies. The “Best Shot” is also selected for you automatically, while the rest get marked to be deleted (which you can do all at once).
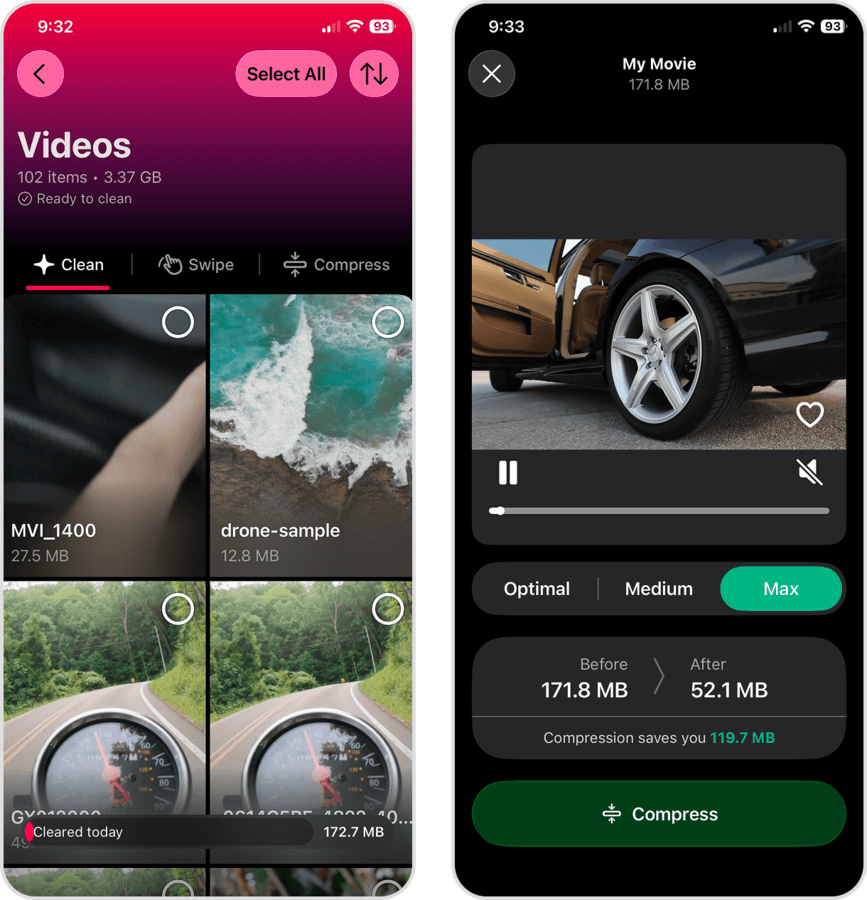
- Videos: Also unlike the Photos app, Clever Cleaner can sort videos by size or date, and compress videos to reduce their file size (with several options). Or you can just delete your videos.
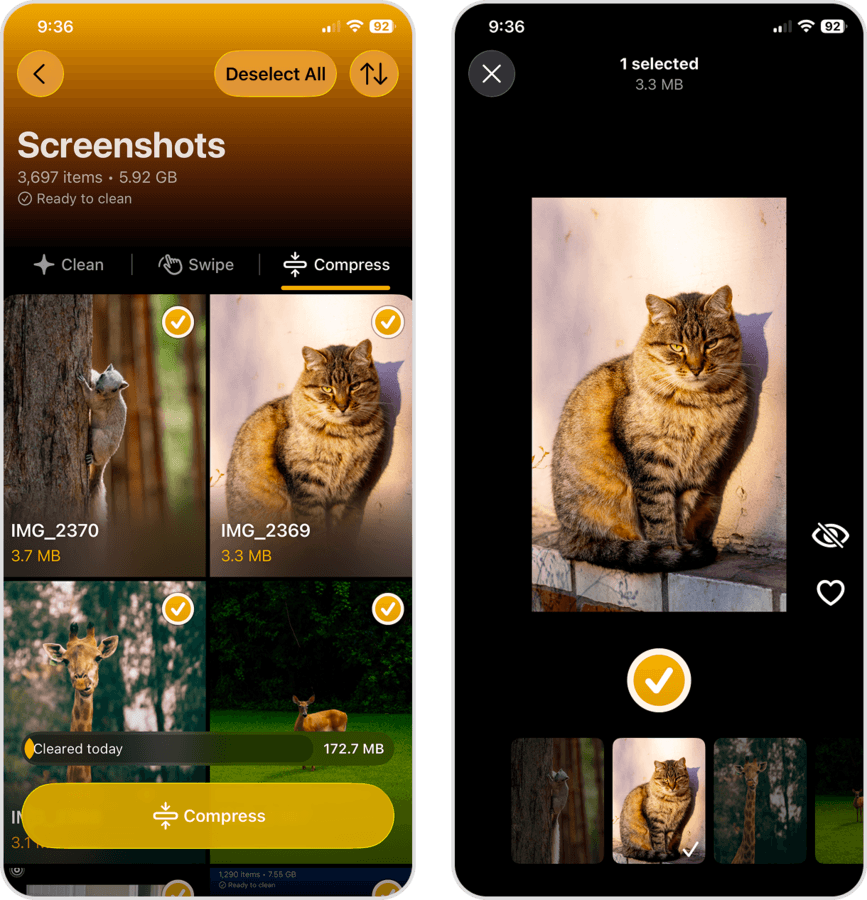
- Screenshots: Screenshots can also be compressed (which reduces the size of the image) if you don’t want to delete them, or you can delete them in bulk or via the Swipe tool.
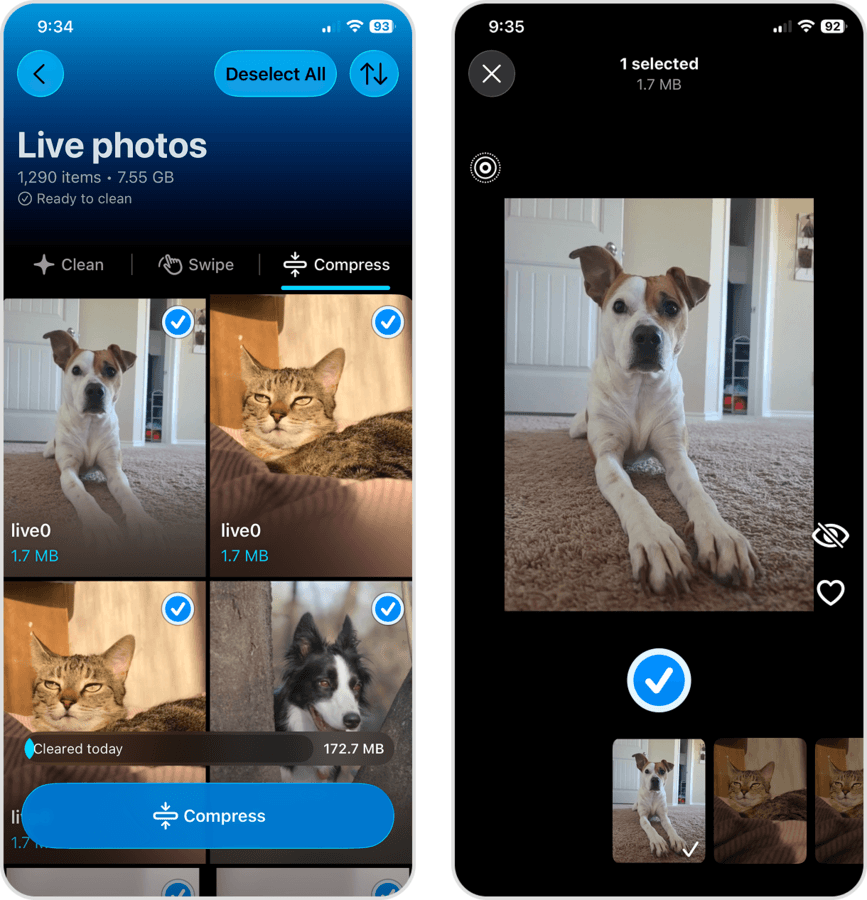
- Live Photos: You can remove Live Photos from your library, convert them into still images (even all at once), and they can also be reviewed through the Swipe tool.
- Smart Cleanup: Smart Cleanup automates some of the other tools we mentioned and lets you apply them to your entire library from one place. Specifically, you can: Remove Similars, Convert Lives, and Compress Screenshots. Here’s over 9 GB of junk getting removed, like we mentioned earlier.
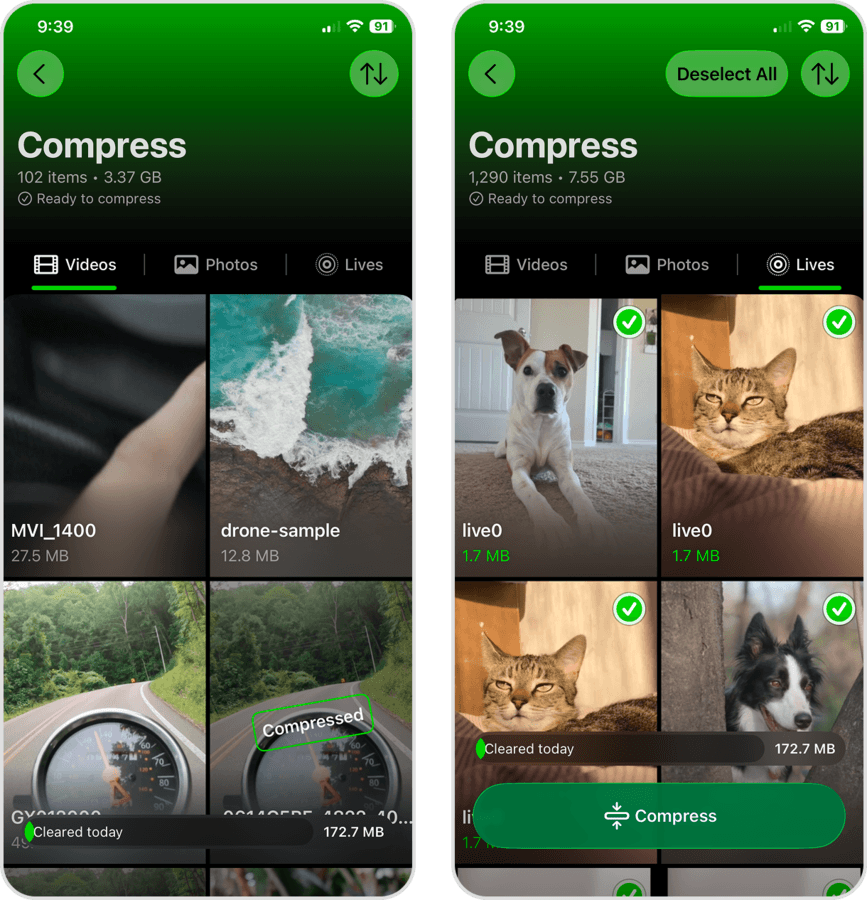
- Compress: The Compress tool simply compiles all of your media (videos, photos, Live Photos, and screenshots) and allows you to compress them from one place. Some other cleaning apps offer video compression, while almost none of them offer photo compression–this makes a huge difference in how much space you can potentially free up.
Manage Apps and App Data
After optimizing your photo library, apps come next. Not only do iPhone apps use up a lot of storage space for installation files, but they also accumulate more and more data over time in the form of temporary files and downloaded content that you don’t really need to save.
This section is divided into two parts. For apps you don’t want to delete but need to clean up (because they got too big), the first option shows you how to clear app caches and downloaded content. The second option covers the fastest way to delete apps (as well as useful alternatives).
Option 1: Clear Cached Data in Your Apps
Many iPhone apps store various types of data locally on the device. What that data is made of (and how it’s used) depends on the app, so there’s no one-size-fits-all solution. Instead, we’ll cover the two common data management features you’ll find in most apps.
Clear App Cache
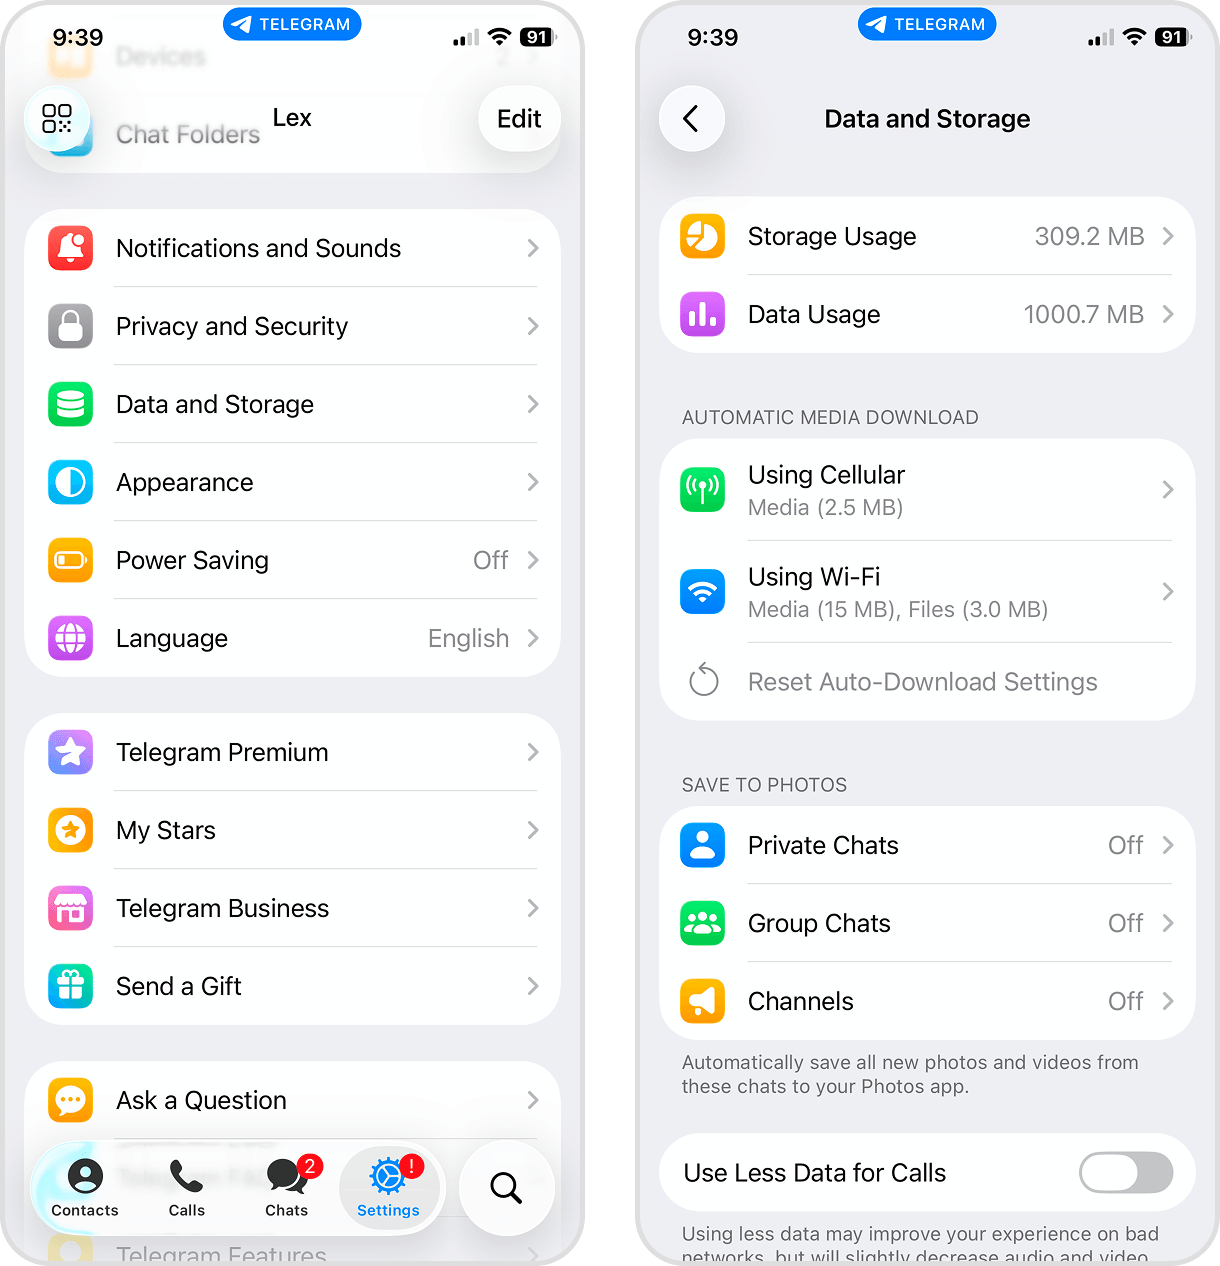
Many messaging and social media apps, like Telegram, TikTok, and Snapchat, store cached data to load content in advance–so the user doesn’t have to wait for a photo or video to load while scrolling. Some of these apps also provide a built-in tool to delete cached files manually, which we’ll demonstrate with Telegram:
- Open the Telegram app.
- Tap the Settings button at the bottom of the screen. Then, scroll down the page and select Data and Storage.
- Tap Storage Usage.
- Under the Storage Usage graph, tap Clear Entire Cache.
- Finally, in the pop-up that appears, tap Clear Entire Cache again to confirm.
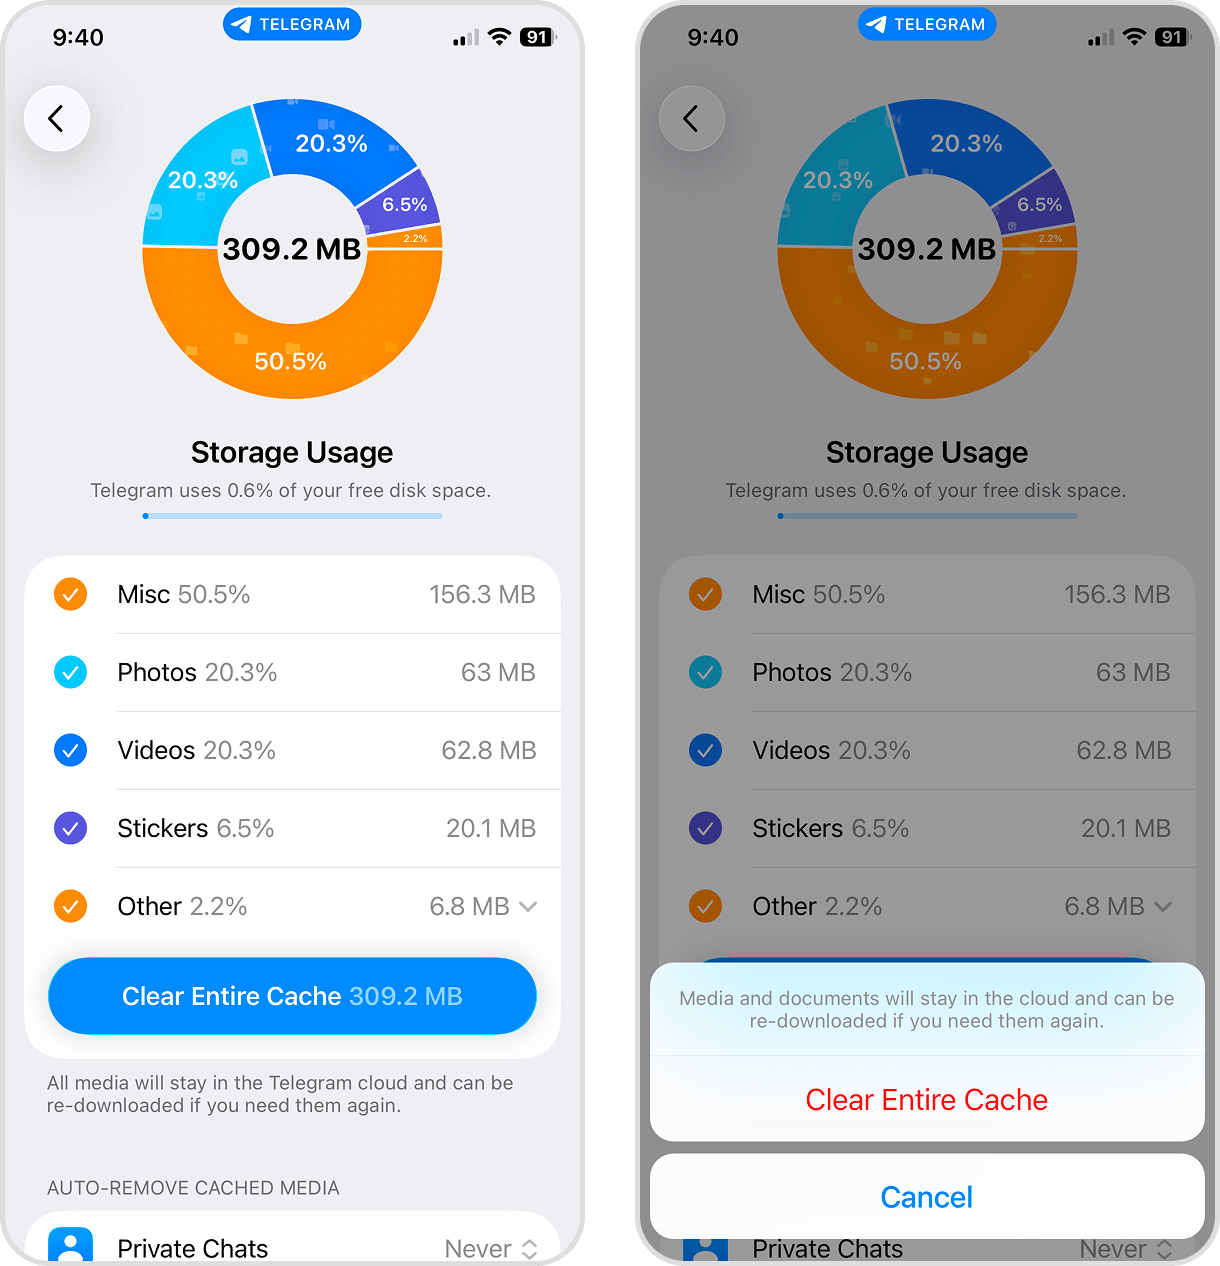
The exact navigation to finding the cache tools in different apps varies, but the overall process is generally similar: (1) look for the settings page, then (2) find any settings related to storage or data management.
Remove Downloaded Content
Aside from cache files, many apps let you download content so you can access it offline; this feature is especially popular with media streaming apps, like YouTube, Netflix, and Apple Music. If you don’t need offline access to your content, you can reclaim the storage space it’s using by deleting your downloads (don’t worry, you can still stream them online).
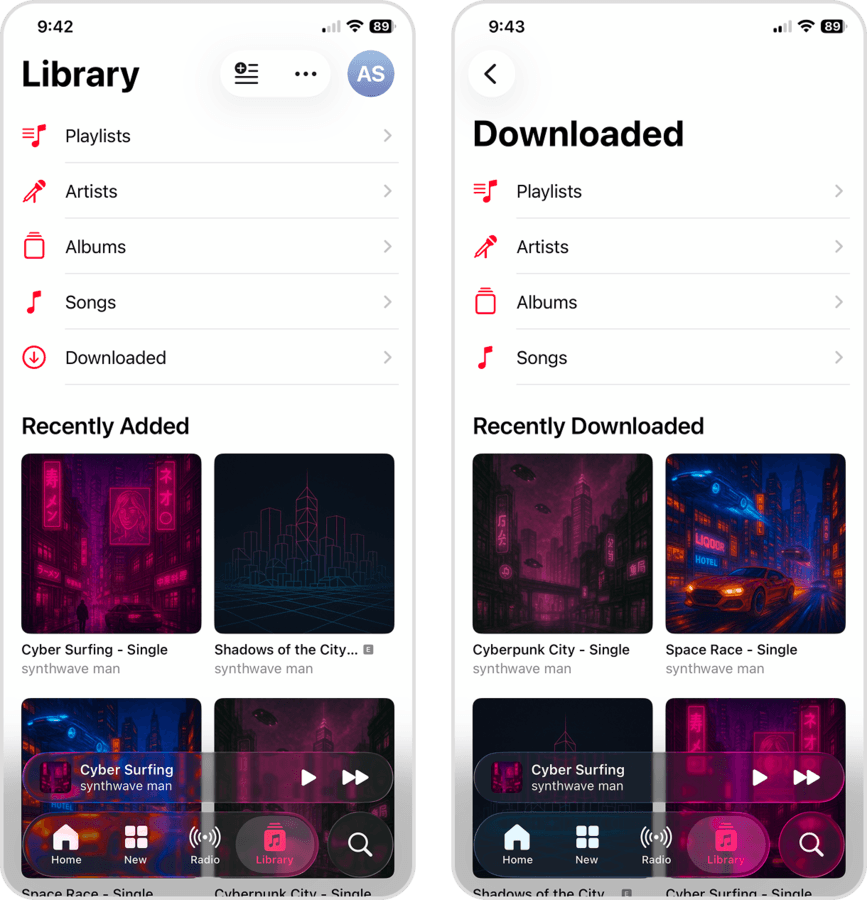
We’ll show you how it works in the Music app.
- Open the Music app.
- Tap Library in the bottom right corner of the screen. Then, select Downloaded.
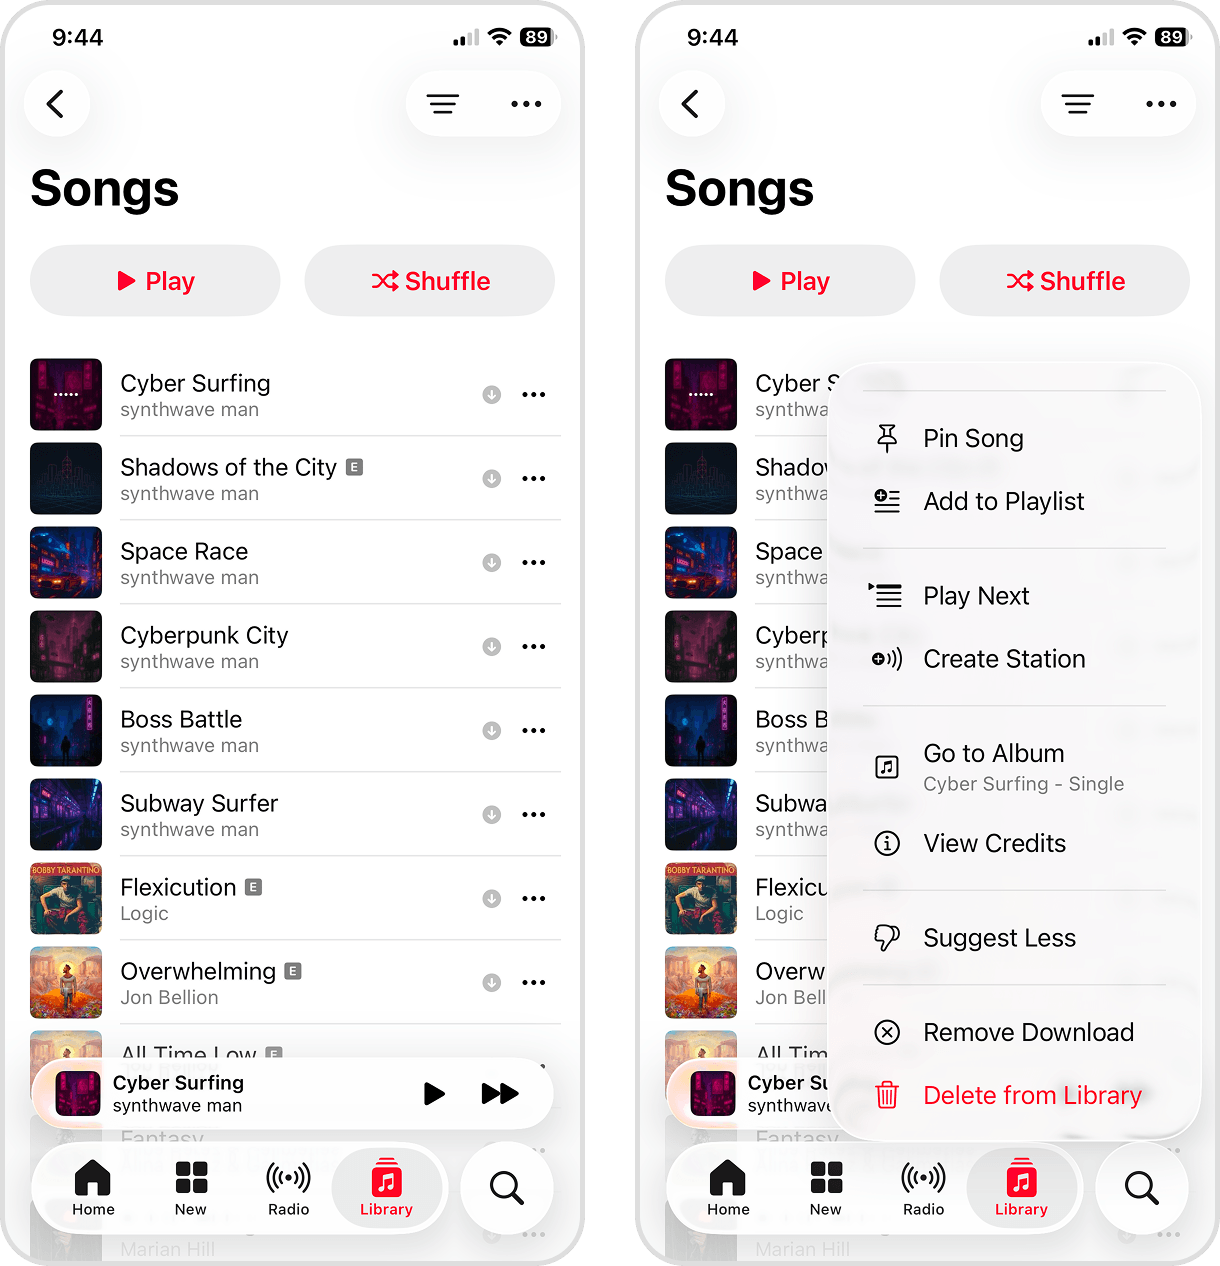
- Select the Songs category (it’s the easiest view to work with).
- Tap the menu button ···· beside the downloaded song you want to review and choose Remove Download.
Option 2: Delete Apps You No Longer Use
After cleaning up your important apps, decide which apps you can afford to uninstall. Even if you hardly use it, an app can continue to generate data, taking up storage space and cluttering your device with unwanted files. Here’s the fastest way to delete an app on your iPhone:
- Browse your home screen for the app that you want to delete.
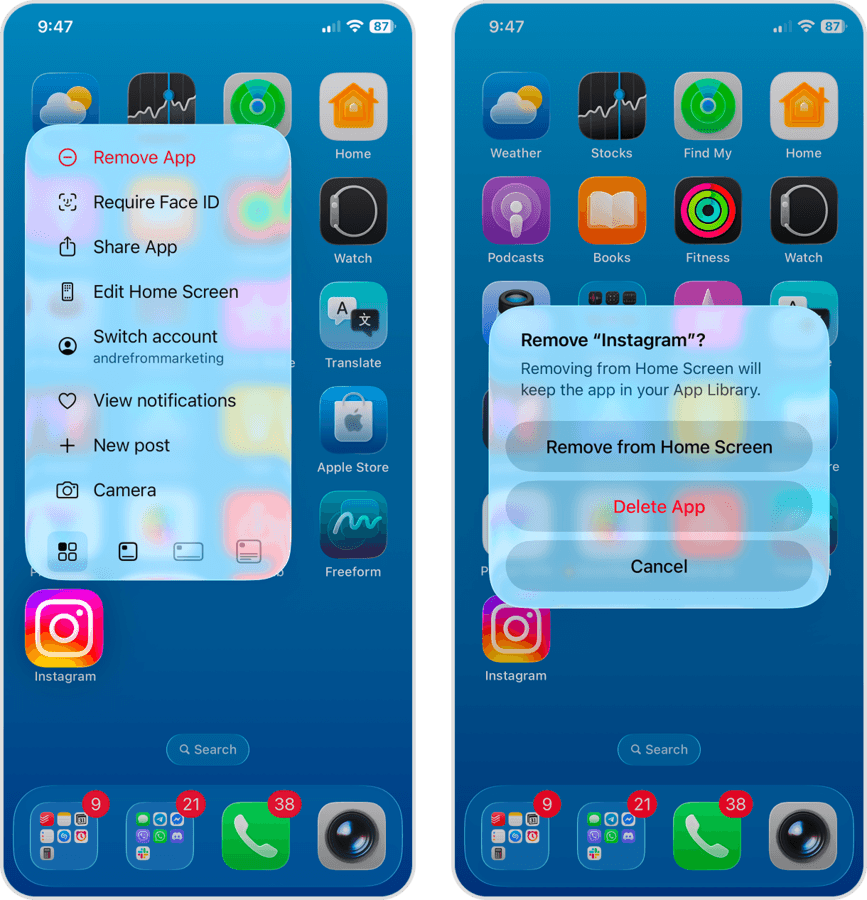
- When you locate the app, tap and hold its icon until a menu appears. From that menu, select Remove App.
- Finally, tap Delete App in the pop-up to confirm.
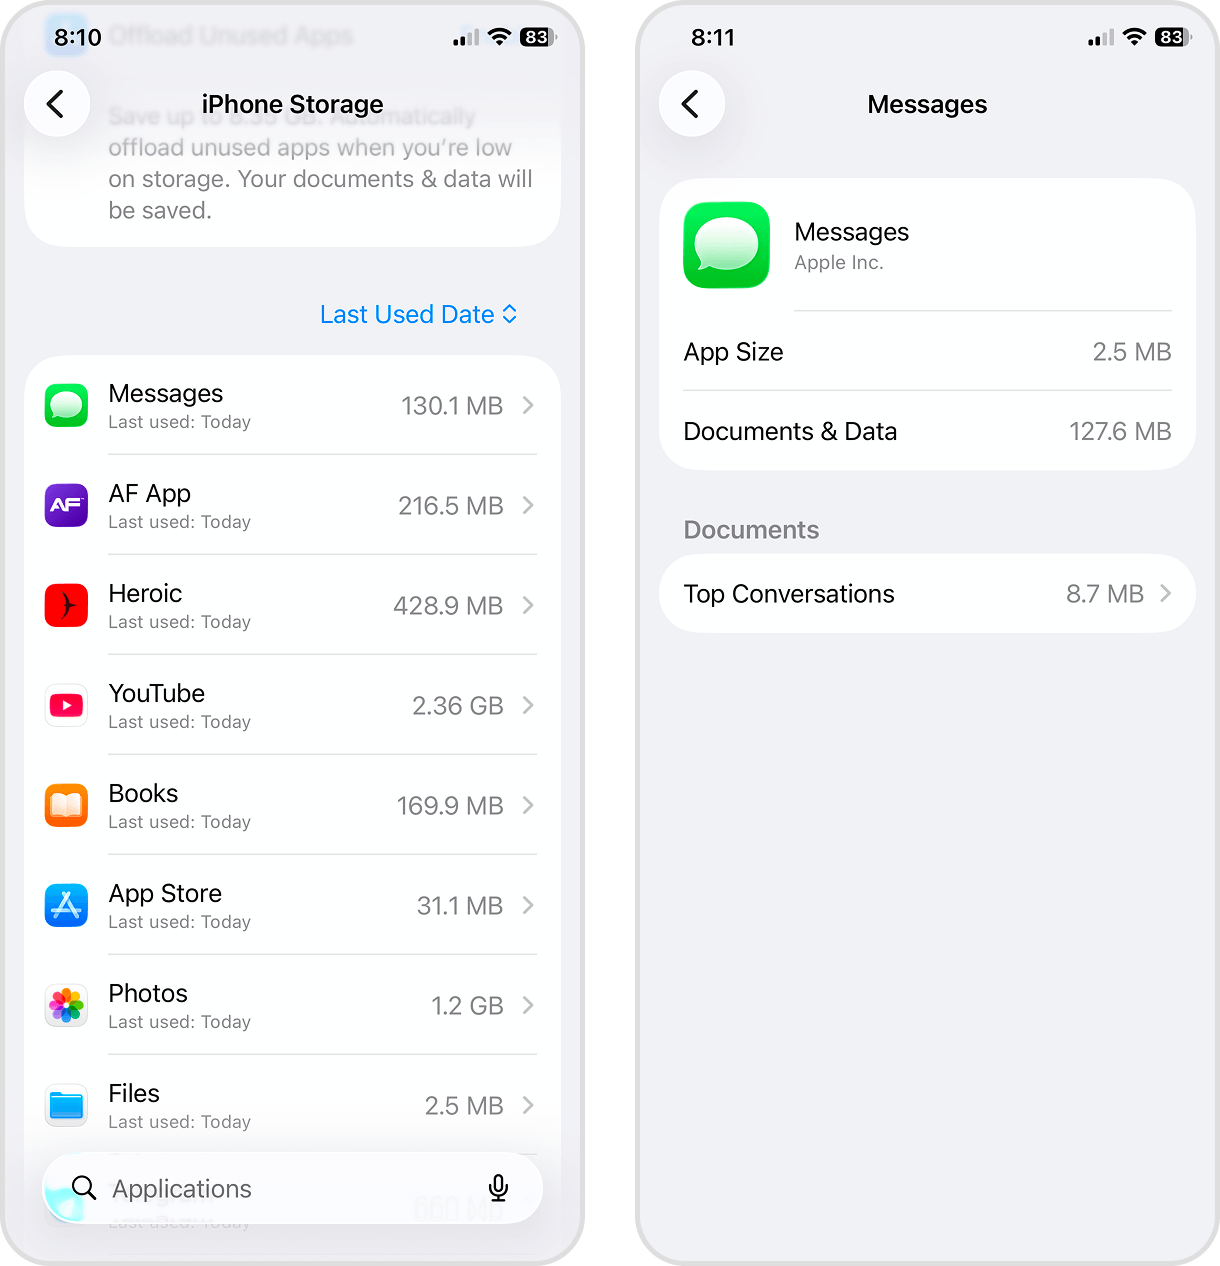
Alternatively, you can check the iPhone Storage page (Settings app > General > iPhone Storage) for a complete list of your apps that you can sort by size and delete directly from the Settings app. This way, you can quickly prioritize and eliminate the largest apps on your device.
Clear Out Your Messages
Messages often get neglected because most users think that texts don’t cost much storage space. But Messages are a prime cleanup target for two reasons–first, while the text itself doesn’t use a lot of space, attachments can have a file size of up to 100 MB each.
Your conversations may be storing dozens of photos, videos, and other files that are costing you gigabytes of storage altogether. Second, iOS keeps your messages forever by default (which you can change–see the end of this section). Do you really want to keep random texts from 5 years ago?
In this section, we’ll cover the most efficient ways to delete just your attachments, or your attachments and messages.
Option 1: Delete Photos, Videos, and Other Large Attachments
The fastest way to clean up your messages is by utilizing the iPhone Storage page in the Settings app. Here, iOS automatically compiles the biggest attachments it found in your messages, including photos, videos, and large files, so you can easily review and delete them.
- Open the Settings app.
- Tap General.
- On the General page, select iPhone Storage.
- Scroll down to the list of apps. Then, find and select the Messages app.
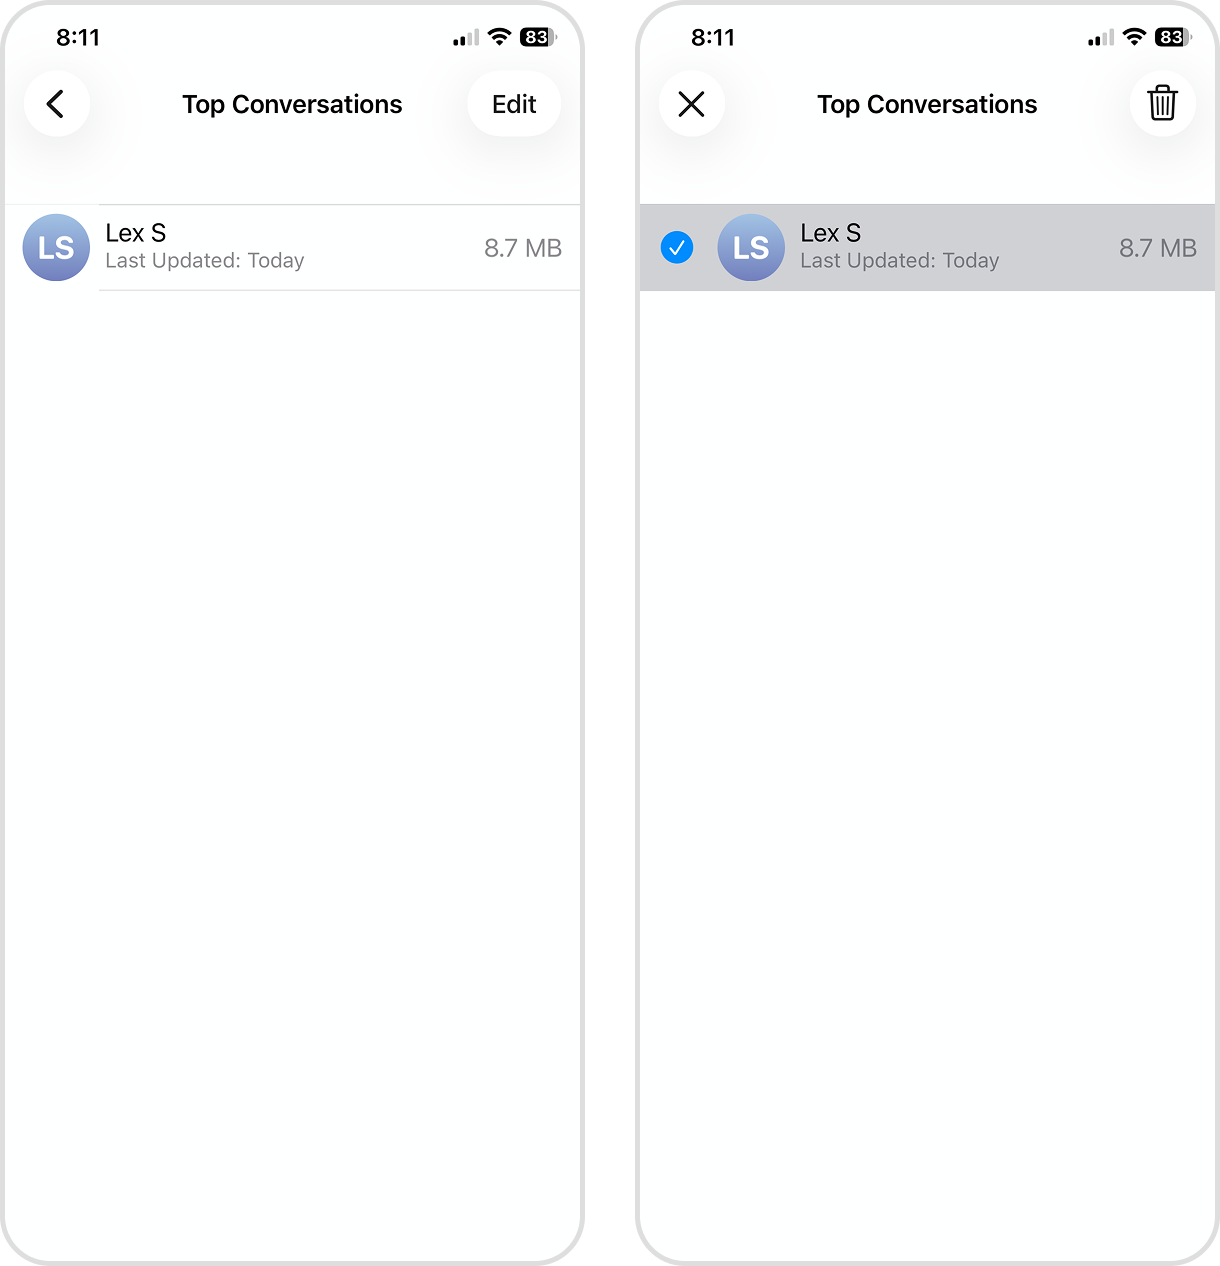
- Choose the Top Conversations you want to review.
- Tap Edit in the top right corner of the screen.
- Select the attachments you want to remove. Then, tap the trash button 🗑️.
Option 2: Delete Old Conversations You No Longer Need
Another convenient way to clean up your messages is to simply delete the conversations themselves–which also removes any associated attachments. This way, you can quickly get rid of old messages and media you received, or focus your cleanup efforts on unwanted attachments from specific conversations.
- Open the Messages app.
- Tap Edit in the top left corner of the screen. Then, choose Select Messages from the pop-up menu.
- Select the conversations you want to delete. Then, tap the trash button 🗑️.
Like the Photos app, the Messages app also has its own Recently Deleted folder. After deleting your conversations, go to the Messages app’s main menu > tap the filter button ᯤ > select Recently Deleted. Then, clear its contents to delete your messages for good and free up storage space.
Use iCloud to Reduce Local Storage
After cleaning up your photo library, apps, and messages, you can optimize your storage further by using iCloud. iCloud is Apple’s cloud storage solution that comes built into all of its devices. Aside from providing additional storage space, it also provides synchronization features that let you offload some of your data to Apple’s servers and free up local storage.
In this section, we’ll cover the 3 most effective ways to utilize iCloud to manage your iPhone’s storage space.
Option 1: Turn On Optimize iPhone Storage for Photos Library
The most common and effective way to utilize iCloud for storage management is to activate its optimization feature for your photo library. When iCloud Photos is enabled, the high-quality, full-resolution copies of your photos and videos are saved to Apple’s servers.
Only the low-resolution copies of your media remain on your iPhone, which take up way less storage space than the originals. But don’t worry–the original copies get redownloaded to your device automatically whenever you try to view them in the Photos app.
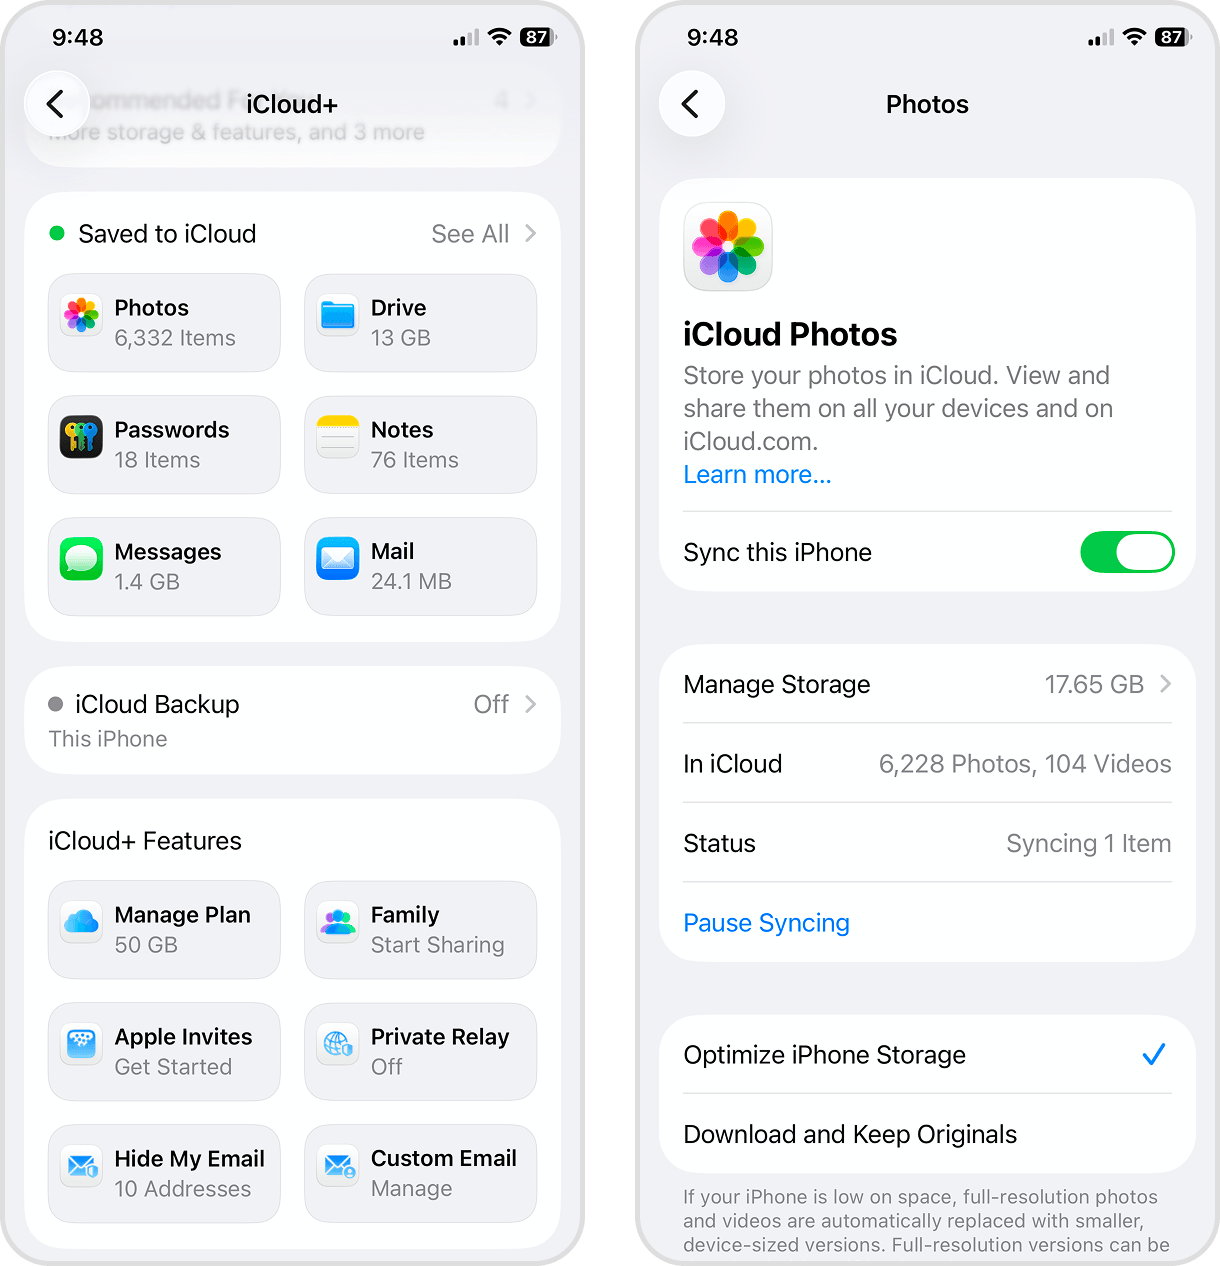
- Open the Settings app.
- Tap your Apple ID.
- In your Apple Account page, select iCloud.
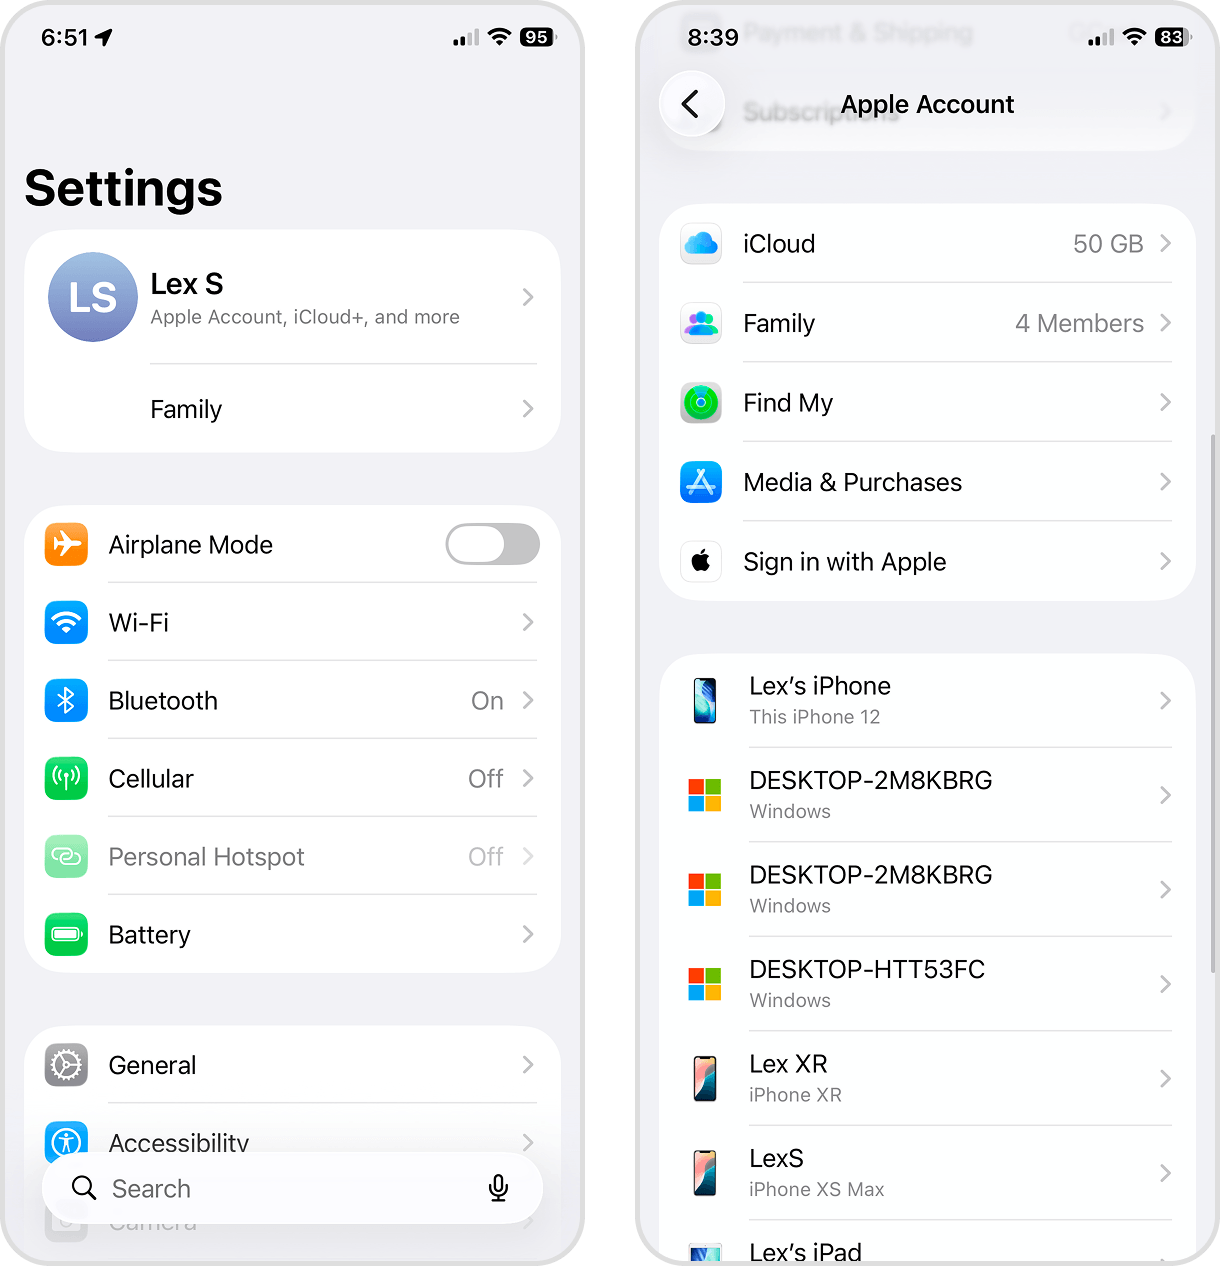
- In the Saved to iCloud section, tap Photos.
- Activate the toggle switch beside the Sync this iPhone option (it should turn green). Then, enable Optimize iPhone Storage (it should have a check mark beside it).
Option 2: Store Files in iCloud Drive
Once your photo library has been iCloud-optimized, consider doing the same for your files by activating iCloud Drive. iCloud Drive manages the Files app–whenever you’re close to running out of space, your files are removed from local storage (but remain stored on Apple’s servers). You’ll still be able to see the files, but they’re greyed out and not available offline.
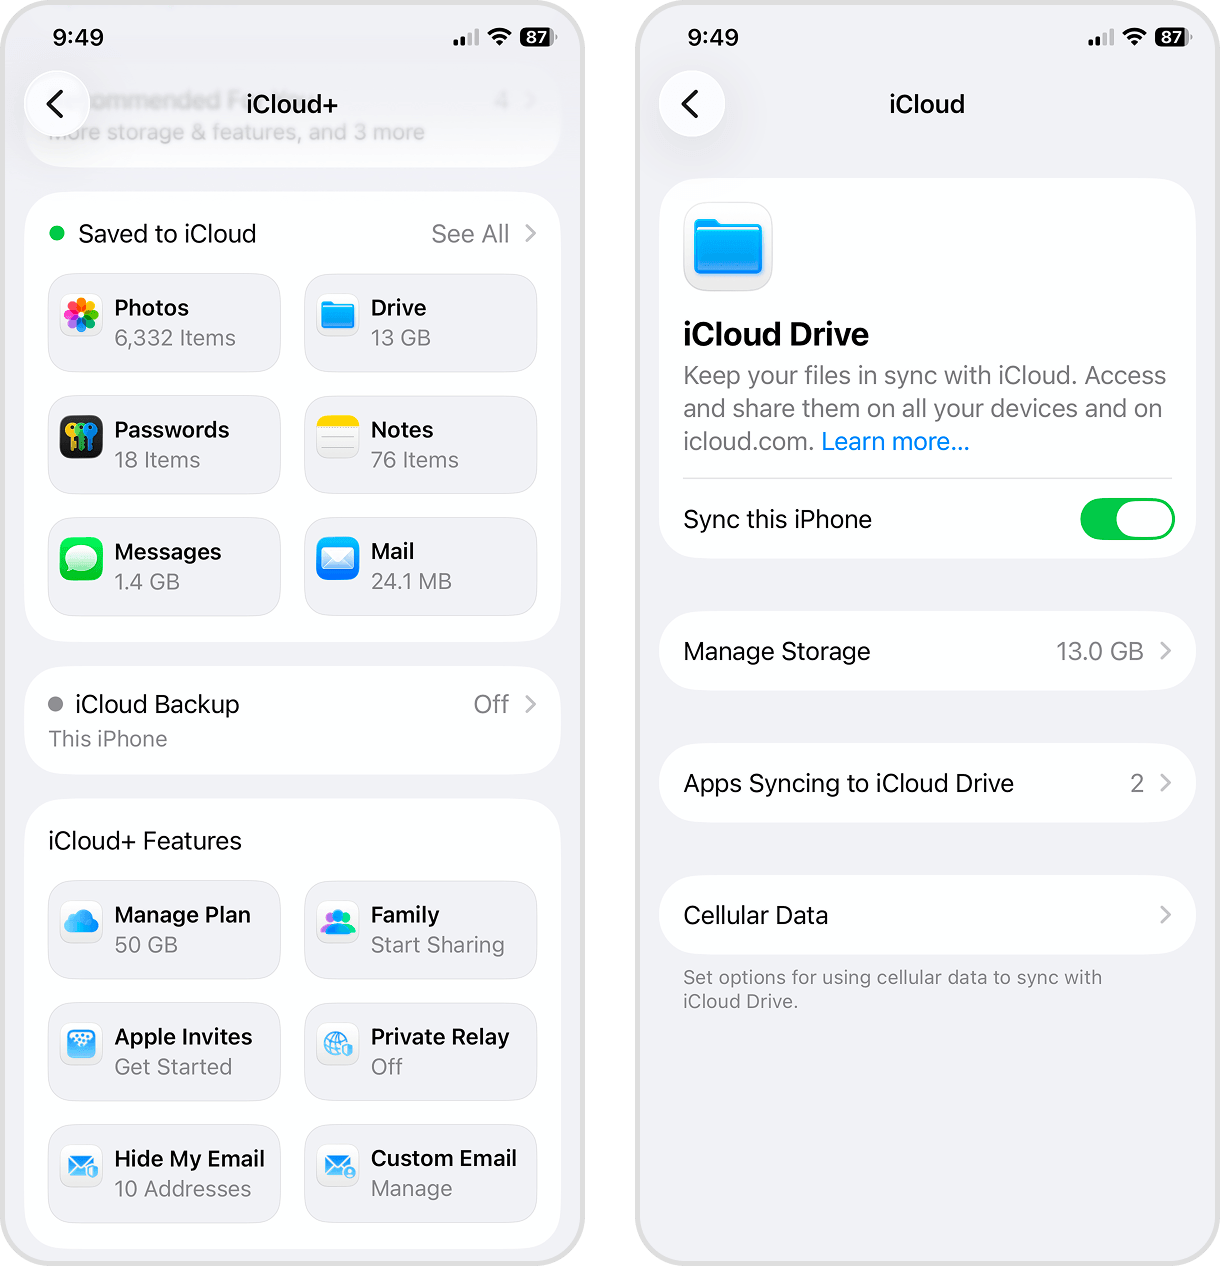
- Open the Settings app.
- Tap your Apple ID.
- Select iCloud.
- In the Saved to iCloud section, tap Drive.
- Beside the Sync this iPhone option, activate the toggle switch.
Option 3: Sync App Data With iCloud
Aside from your photo library and files, iCloud can also store app-related documents and data. For example, if you activate iCloud optimization for the Pages app, local copies of your documents will be offloaded to iCloud whenever you run low on storage. Fortunately, iOS makes it easy to enable iCloud for your applications through the Settings app:
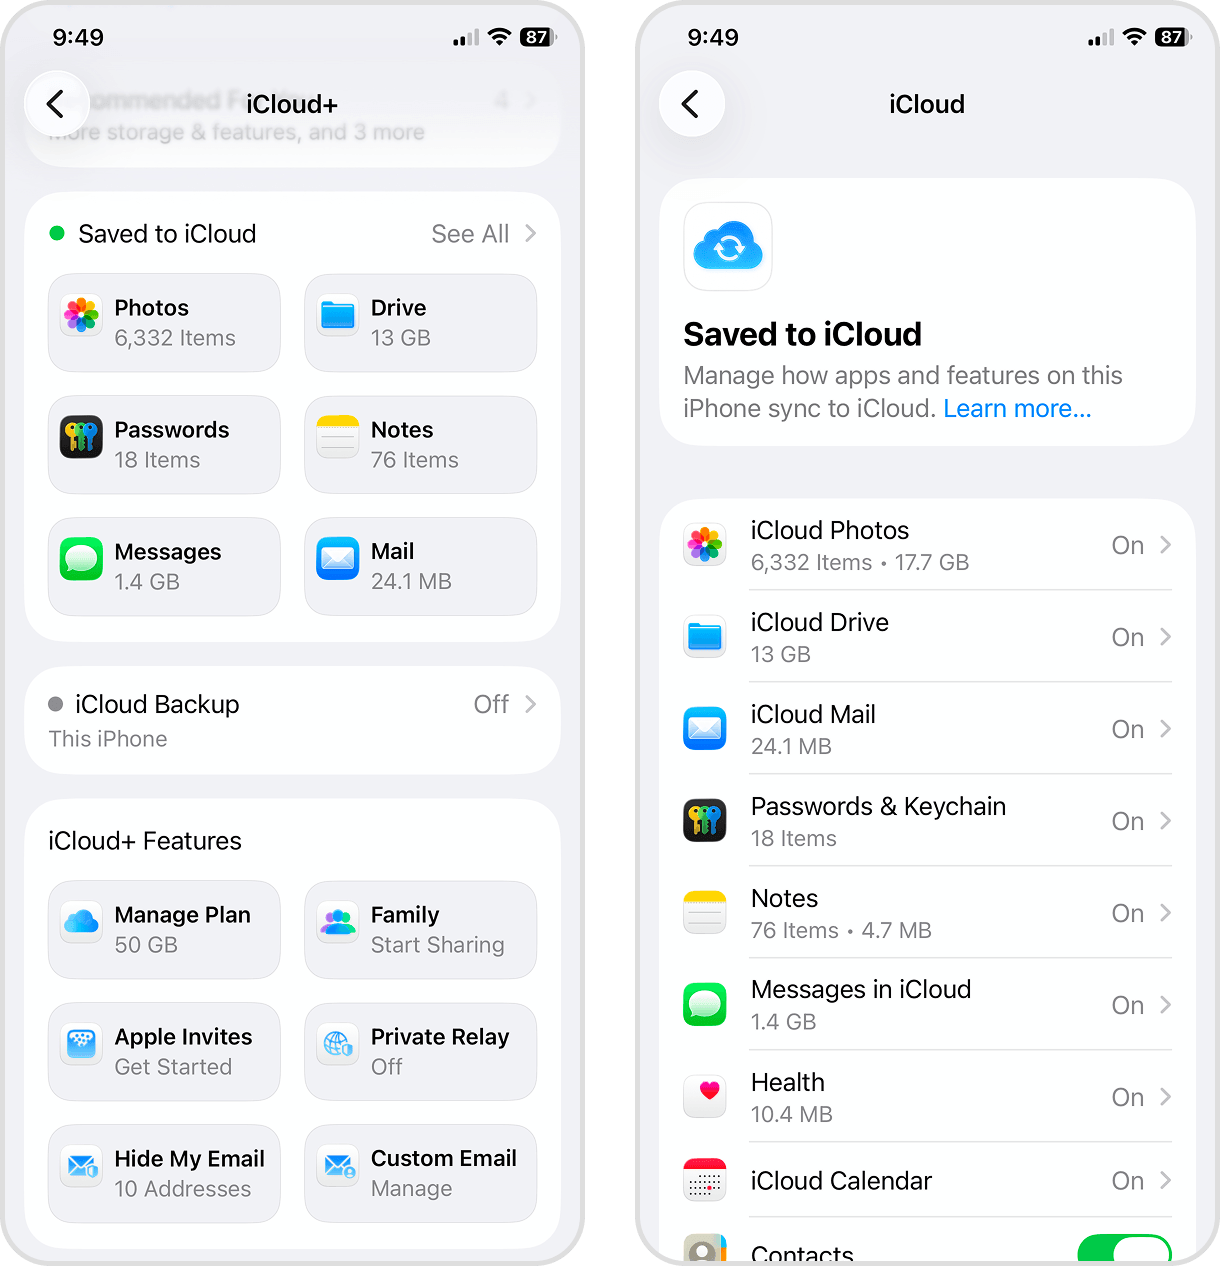
- Open the Settings app.
- Tap your Apple ID.
- Select iCloud.
- In the Saved to iCloud section, tap See All >.
- Activate iCloud for your preferred apps.
Manage Your iPhone Storage Before It Becomes Full
Storage management is an ongoing habit, rather than a one-time activity. So, we’ll end this guide with a summary with useful links to the appropriate sections, so you can return anytime you want to give your iPhone some TLC (tender love and care 😊).
- First, clean up your photo library. You can do it manually with the native Photos app, or you can use a third-party cleaning app to do it faster.
- Next, manage your apps and their data by removing downloaded content, clearing app caches, and uninstalling apps you don’t need anymore.
- Then, clear out your messages. You can focus on removing the biggest attachments quickly or take the opportunity to delete old or unwanted messages (which also removes their attachments).
- Finally, optimize your iPhone storage using iCloud’s synchronization feature. You can offload high-resolution media, store files, and let apps use iCloud for storage (if they have that feature).
We also want to remind you to always keep some free storage space available on your iPhone; iOS needs it for system updates and everyday tasks, and when it gets full, apps start getting sluggish, you’ll be unable to save any new data, and other basic functions suddenly go awry.
If you’re already experiencing this on your own device, see our guide on getting more storage on your iPhone (with free solutions).
FAQ
Managing iPhone storage comes down to clearing up unwanted data and maximizing iOS optimization settings. Here are 4 impactful ways to get started:
- Manage your photo library. Delete unwanted photos, clutter (e.g., duplicates), and large videos regularly. We recommend using a third-party app for big libraries.
- Clean up native and third-party apps. Delete or offload apps you don’t regularly use; for apps you need to keep, check their settings pages for a cache management tool. If none is available, and the app seems unusually large, try reinstalling it.
- Clear your messages and attachments. Remove old messages (along with their attachments) from your device. Deleting a conversation also deletes associated attachments.
- Utilize iCloud’s sync feature. Enable iCloud synchronization for your Photos, Files, and other built-in and third-party applications to offload as much data as you can to Apple’s servers. Open the Settings app > tap your Apple ID > iCloud > Saved to iCloud.
iPhone storage refers to the local storage space physically carried by your device in its storage disk. It stores iOS, System Data, app installations, and user data that hasn’t been offloaded to iCloud. On the other hand, iCloud is Apple’s cloud storage solution. When enabled, it grants you extra online storage space and optimization features. For example, with the Optimize this iPhone setting activated for Photos, iCloud stores the high-resolution versions of your media online, while keeping lower-resolution versions (which are smaller in file size) on your device.
There are 3 common reasons why your iPhone still appears full after deleting files:
- You haven’t emptied the Recently Deleted folder. Many iPhone apps have a built-in Recently Deleted folder; in the Photos app, it’s in Collections > Utilities. Find and empty it for each app you use heavily.
- iOS hasn’t reindexed your data. iOS doesn’t recalculate your storage space immediately after you delete an app or file. Start your iPhone to prompt it manually.
- The system is experiencing a bug. System bugs can interfere with data indexing or storage calculation. Update iOS (if one is available) or factory reset your iPhone–just make sure to back up important files beforehand.
System Data is a protected storage category, since it contains the files iOS needs to run. You can’t manage it directly. But there are workarounds you can try that sometimes reduce its size:
- Restart your iPhone.
- Clear Safari’s browser history and website data.
- Clear other app caches.
- Delete unwanted apps.
- Reset your iPhone.
For in-depth instructions on each method, as well as other information on the topic, check out our guide on clearing system storage on your iPhone.
