


Went to check your photos and videos, only to find the SD card empty? Or you connect it to your PC and notice that some photos that were there previously are now missing. This happens to SD cards from time to time, and the good news is that the photos aren’t actually destroyed in most cases; they’re just no longer visible to your device. Data recovery software can restore photos that disappeared from the SD card with relative ease. We’ve spent years testing SD card recovery tools and documenting exactly what works, and the steps below will guide you through the A to Z of safe, efficient recovery.
Why Did My SD Card Delete My Photos?
Photos don’t vanish on their own; there’s always an obvious or underlying reason. Here are the most common causes:
| Cause | What happened | Where to go |
| Hidden or in another folder | The photos are still on the card but hidden, or saved to a folder you’re not looking in. | Perform some basic checks. |
| Deleted or removed during use | Deleted by mistake, or removed during camera/computer use. | Recover the photos to a safe device. |
| The card was formatted | You (or the camera/computer prompt) formatted the card, clearing its index. | Recover the photos before doing anything else with the card. |
| Card is corrupted | File system corruption means photos no longer appear normal. | Recover the photos, then fix the SD card by formatting. |
| Fake SD card | A counterfeit card reports more capacity than it has and overwrites old files once the real limit is reached. | Check the card’s capacity to confirm it’s not fake. |
| Card failed while writing | The card dropped out mid-write during burst shooting or video. | Test the card for write failures. |
| Malware | An infected device hid, moved, or deleted files on the card. | Scan the card and remove the malware before doing anything else. Then, perform some basic checks, followed by recovery. |
Something important to remember is that pictures that disappeared from an SD card are not always gone for good. In many cases, if not most, the data is recoverable so long as the SD card is detected and reads the correct capacity.
Basic Checks When Memory Card Photos Are Not Visible
Stop using the SD card immediately. This is the single most important step once you’ve noticed data is missing. Every new photo, video, download, or even automatically created folder can overwrite the missing files that we’re trying to recover. Once overwritten, the data is as good as gone.
Next, there are a few preliminary steps that help us confirm if the photos are actually missing and not just hidden, sitting in another folder, or affected by malware. Let’s start by unhiding memory card photos that are not visible.
Reveal Hidden Photos
On Windows
- Open File Explorer and go to your SD card.
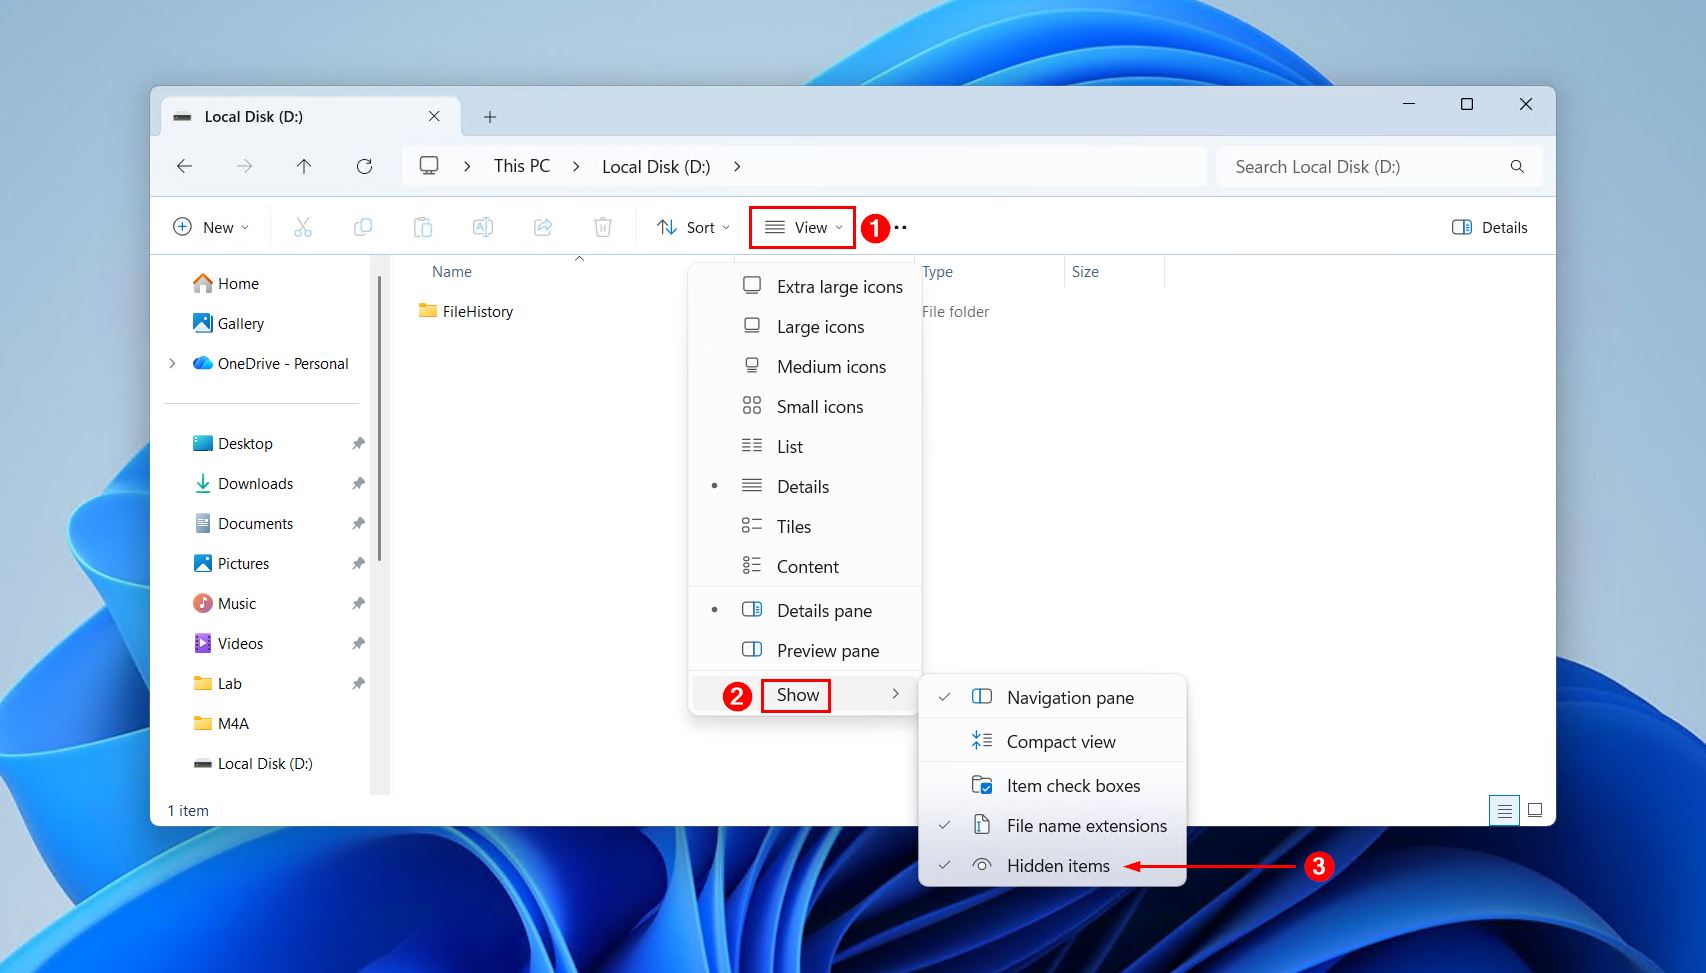
- Click View, then Show, and then make sure Hidden items is ticked.
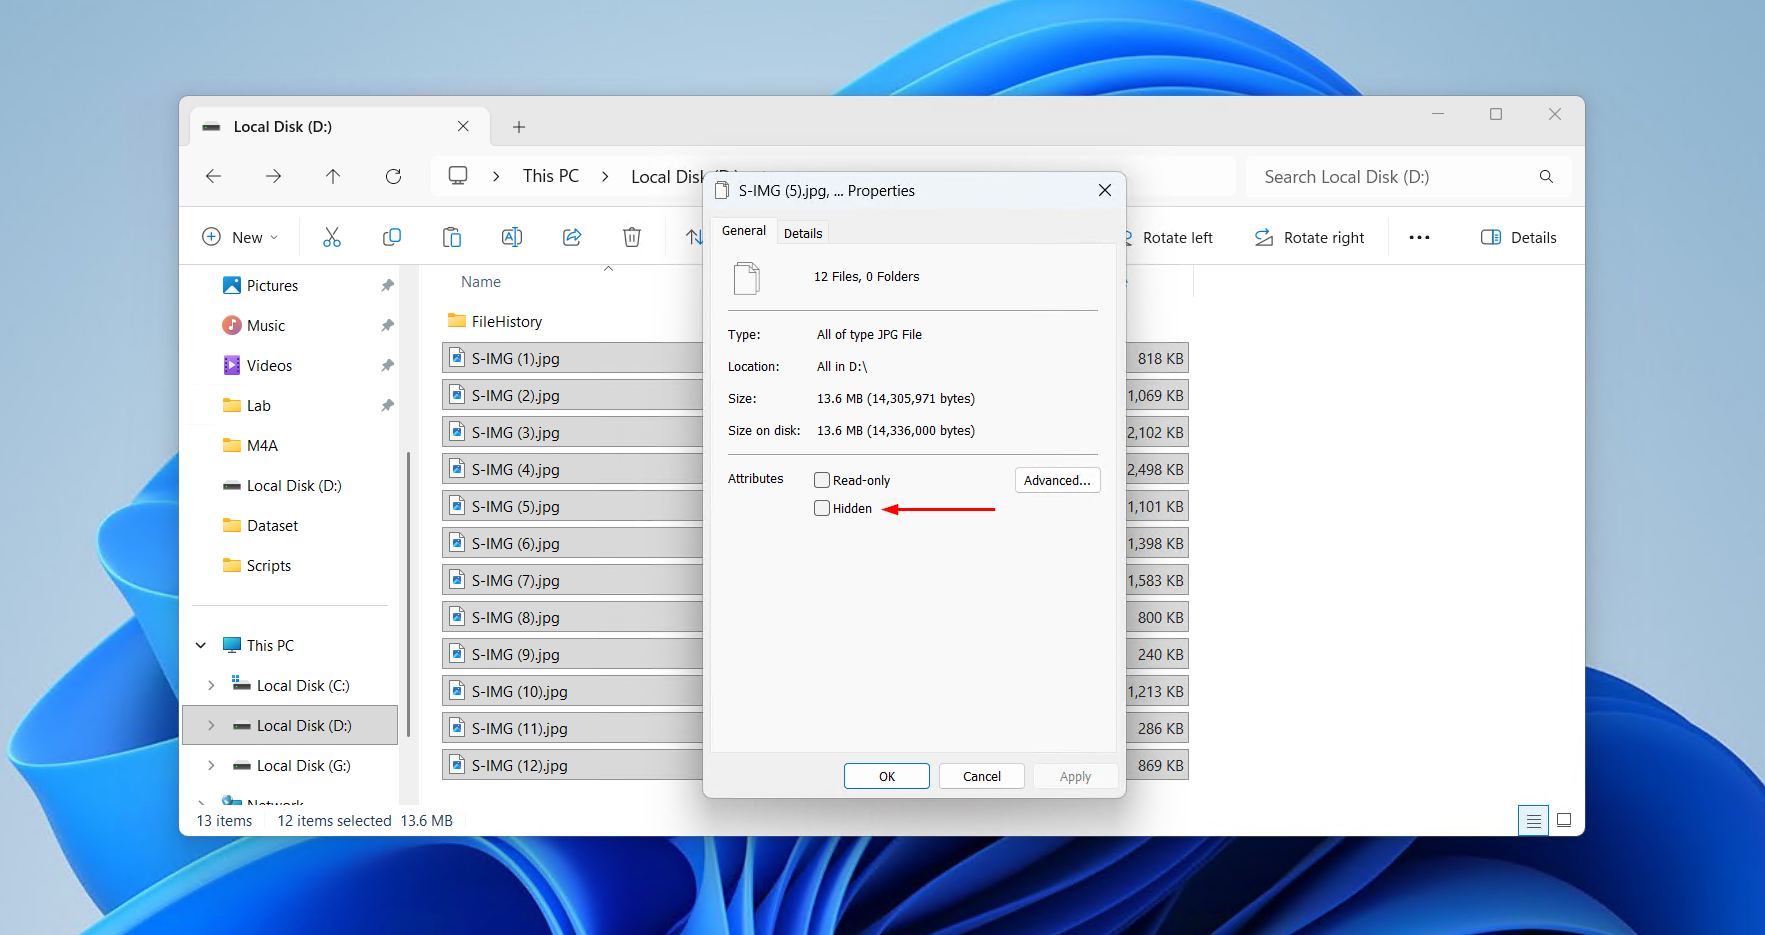
- If files reappear, right-click them and click Properties. From here, untick Hidden, then click OK.
On macOS
- Open the SD card in Finder.
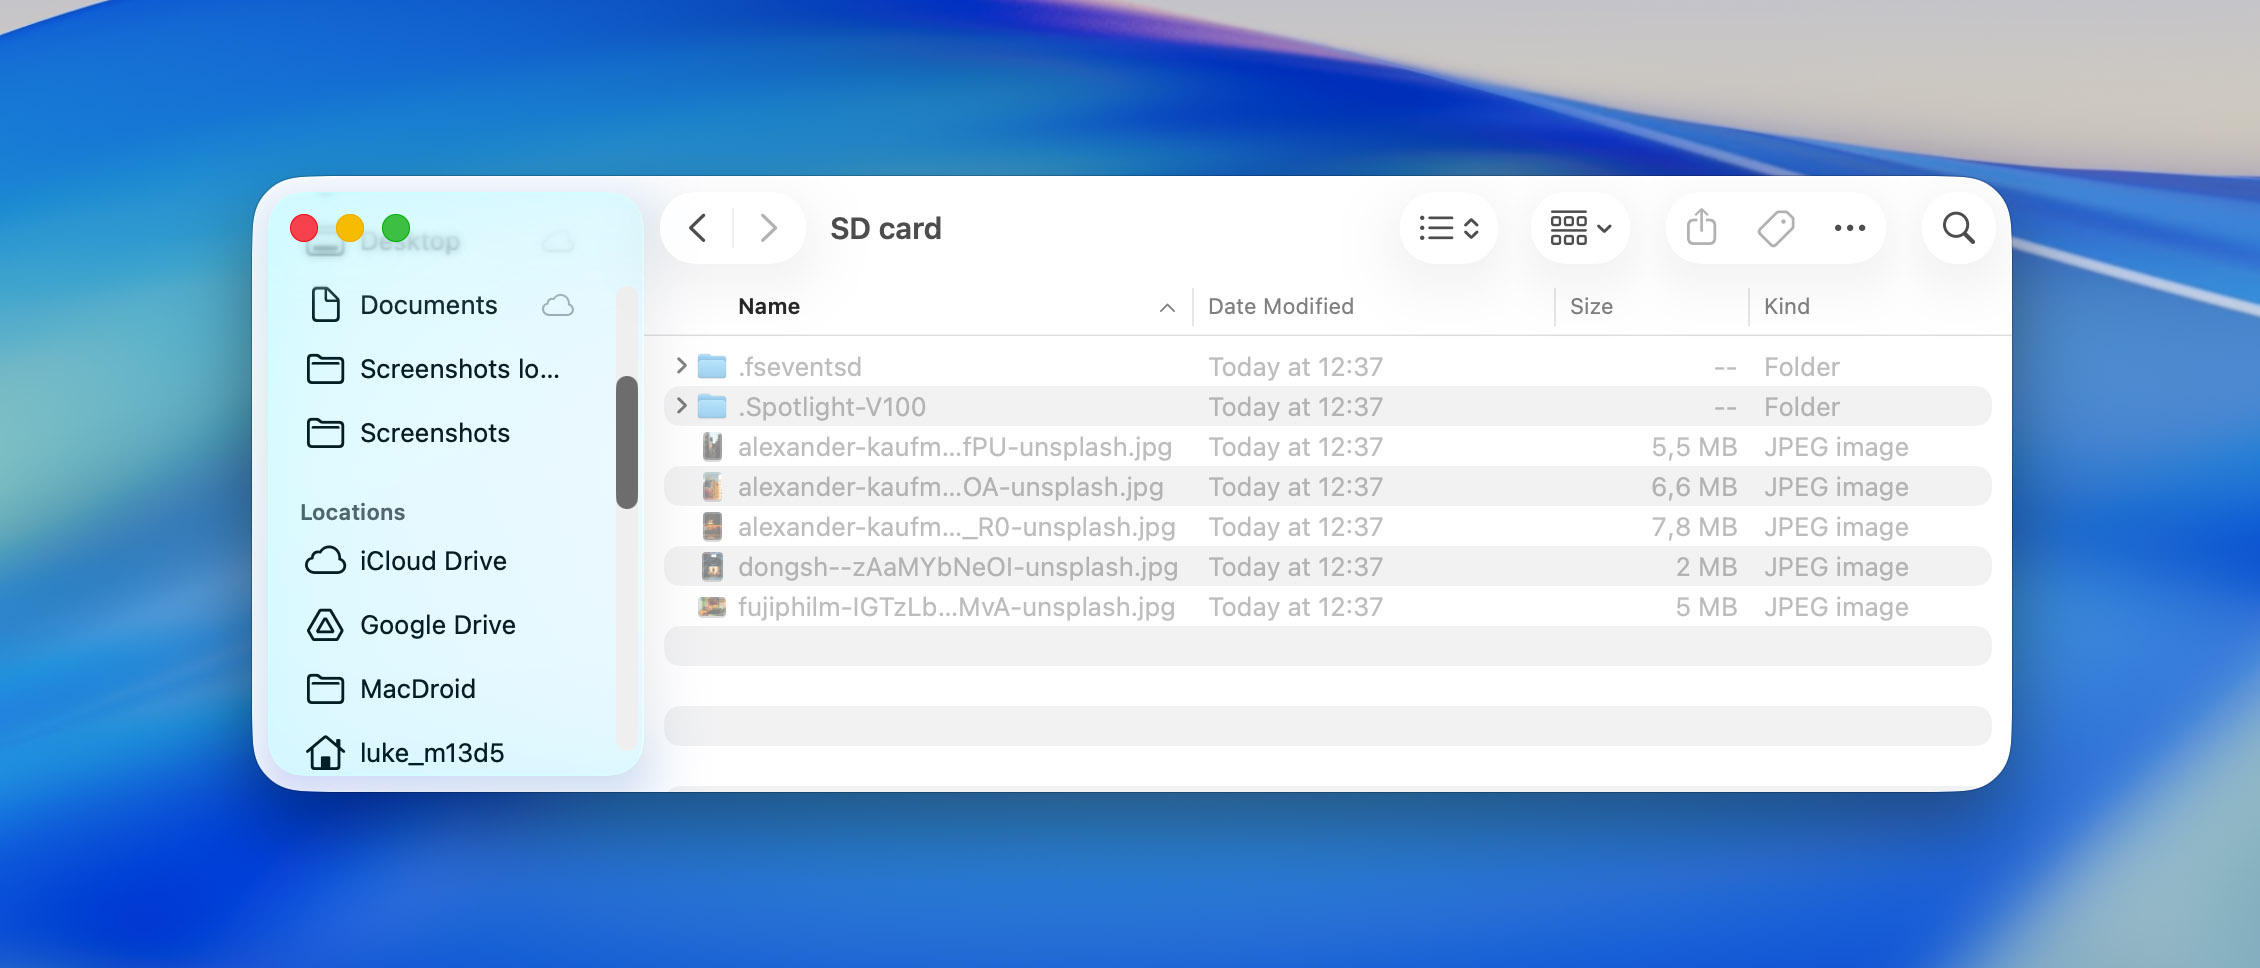
- Press Cmd + Shift + . to reveal hidden files.
Still no luck? Let’s try searching for them next.
Search by File Type
On Windows
- Open File Explorer and go to your SD card.
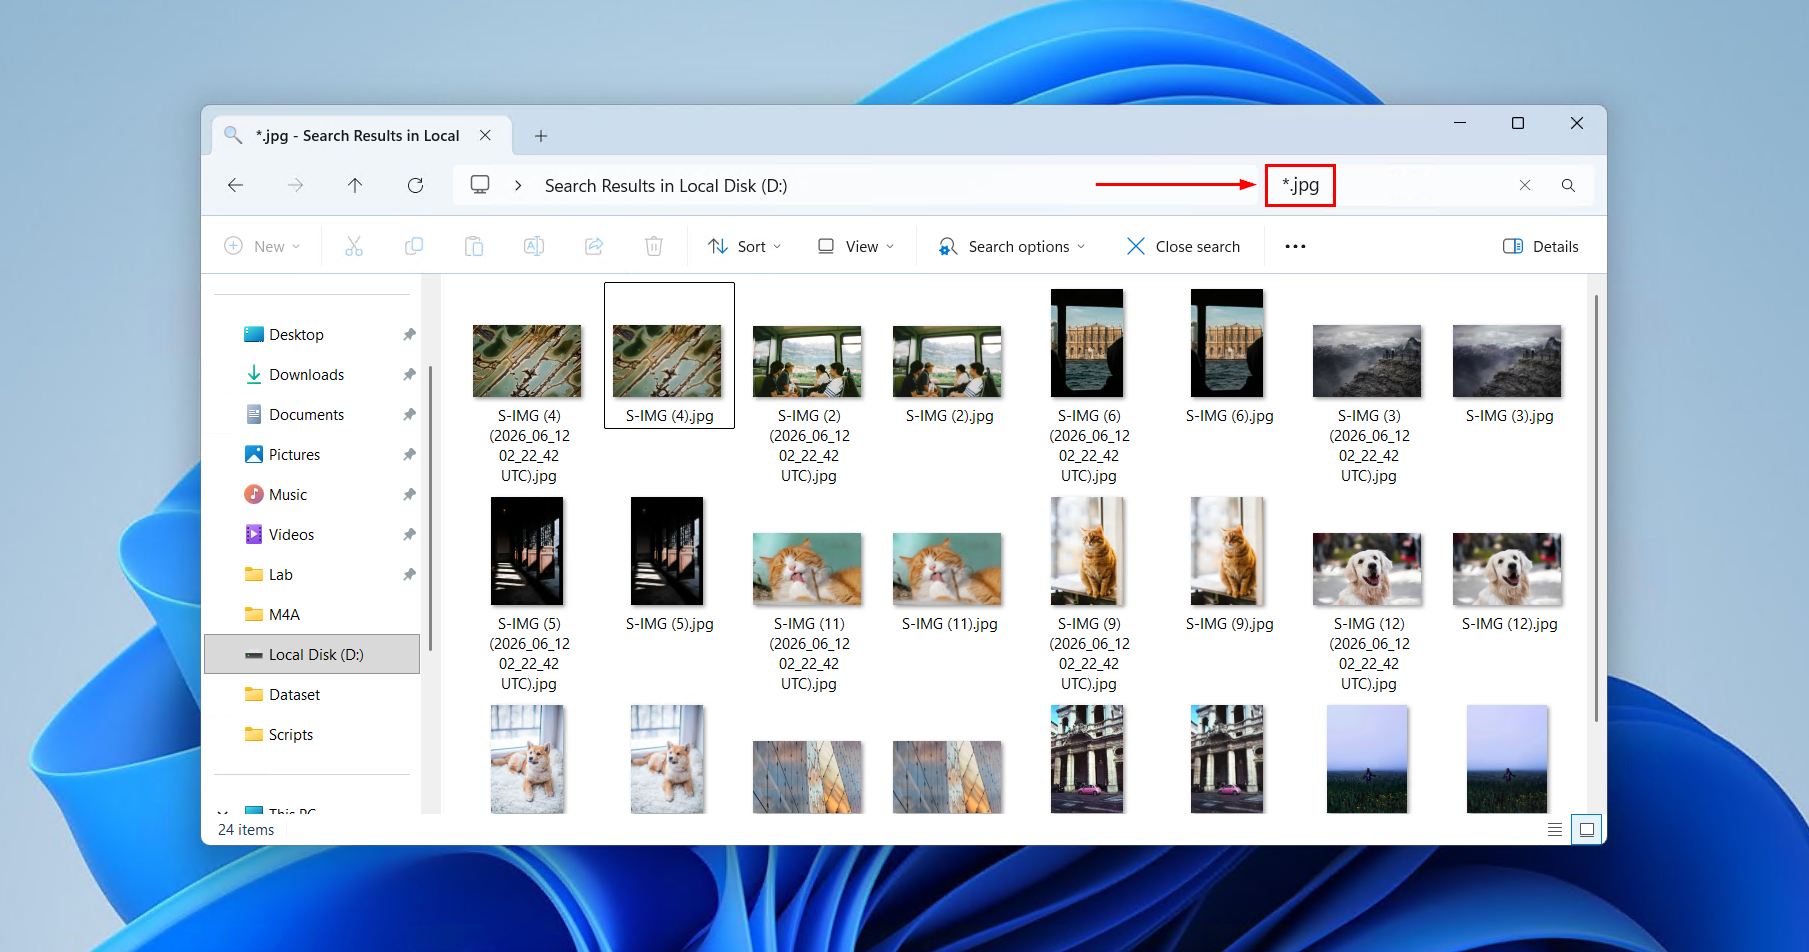
- Search for the file type using an asterisk followed by the file extension. E.g. *.jpg, *.jpeg, *.cr2, *.cr3, *.nef, *.arw, *.dng, *.mp4, *.mov etc.
On macOS
- Open the SD card in Finder.
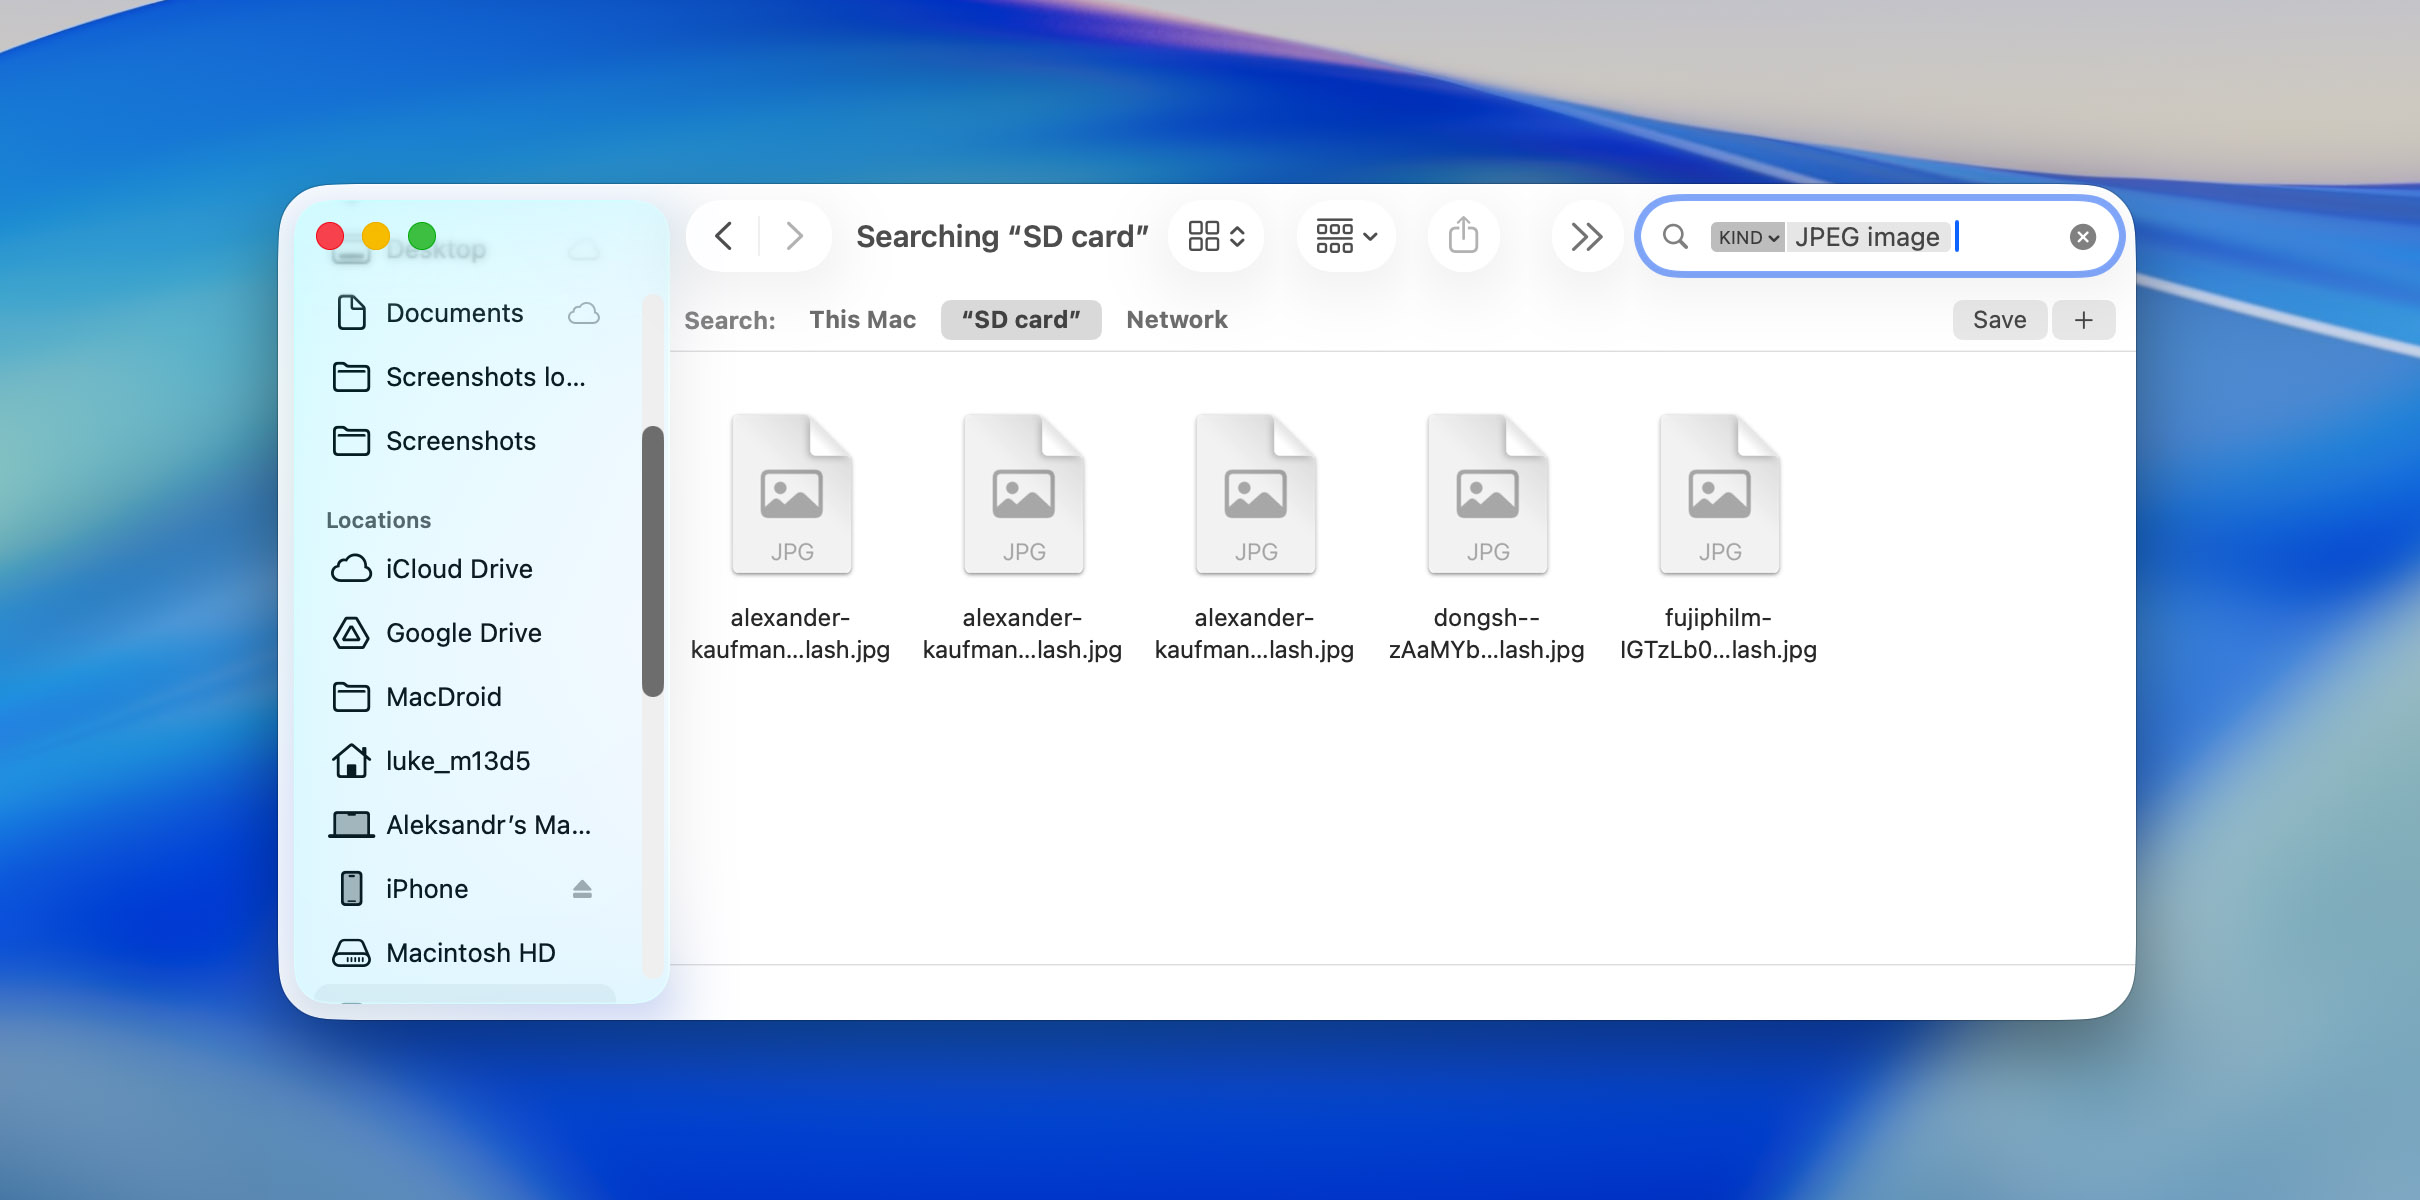
- Search for your files, making sure the scope is limited to the SD card.
Scan for Malware
Best to scan for malware if you suspect the card was connected to a suspicious or infected device. It’s important that you scan both the SD card and the computer before any recovery attempts, and see our guide on recovering virus-infected files.
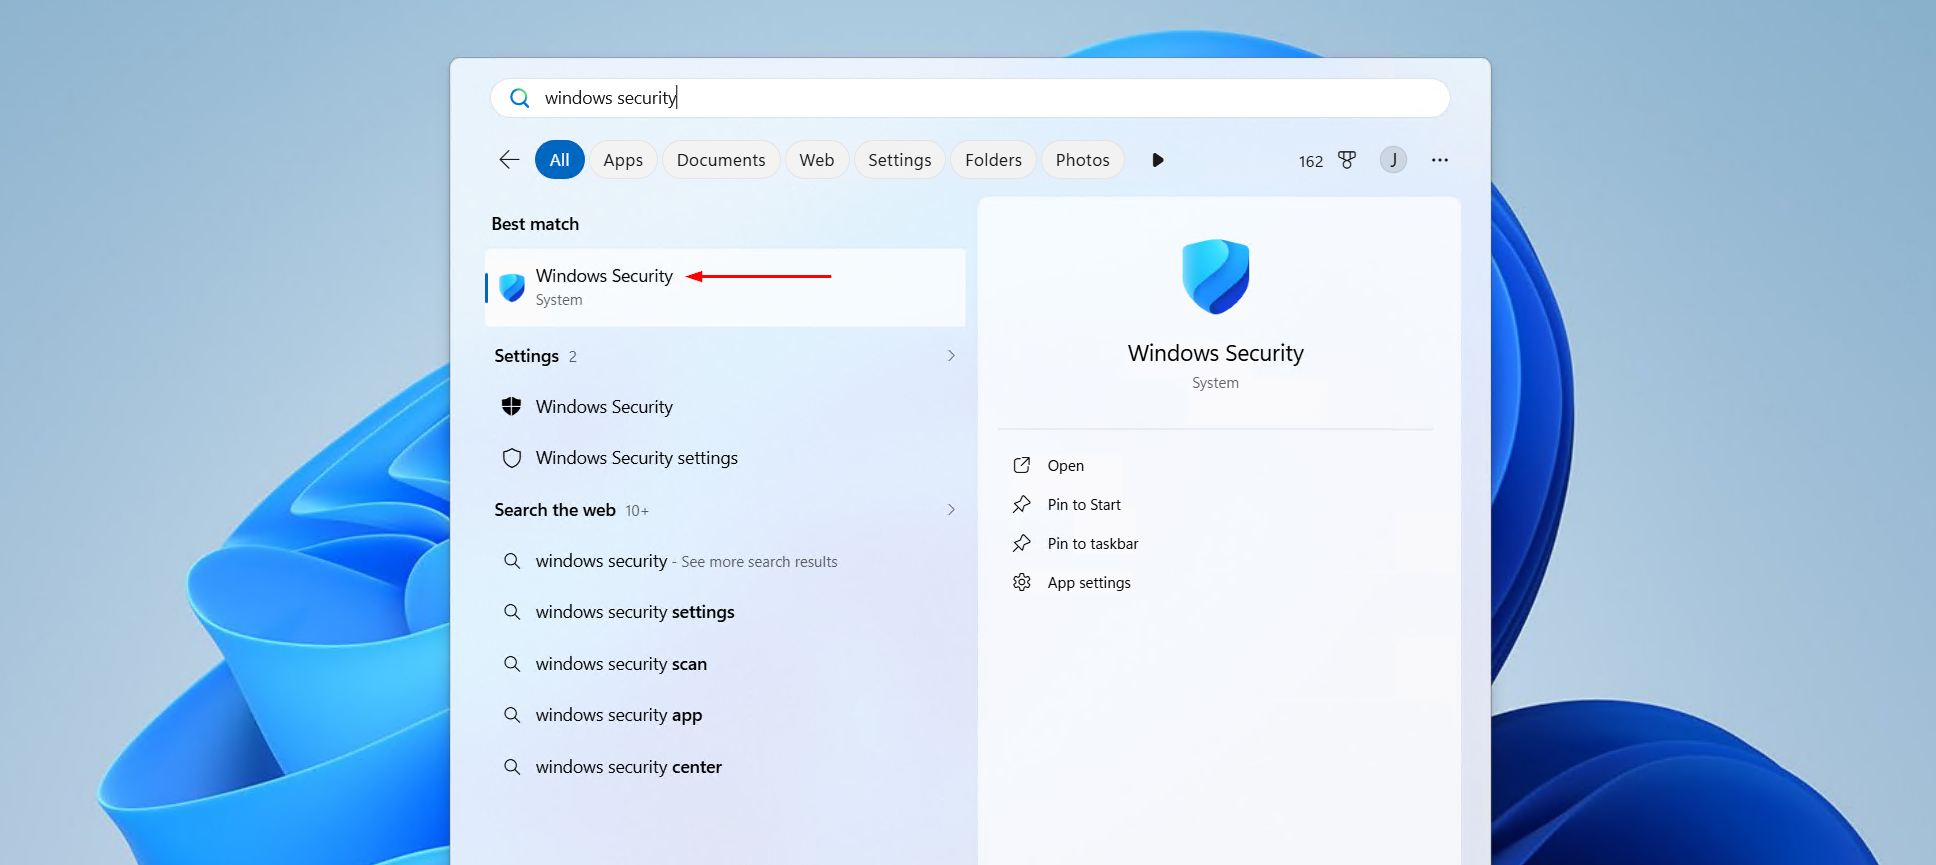
- Open Start, then search for and open Windows Security.
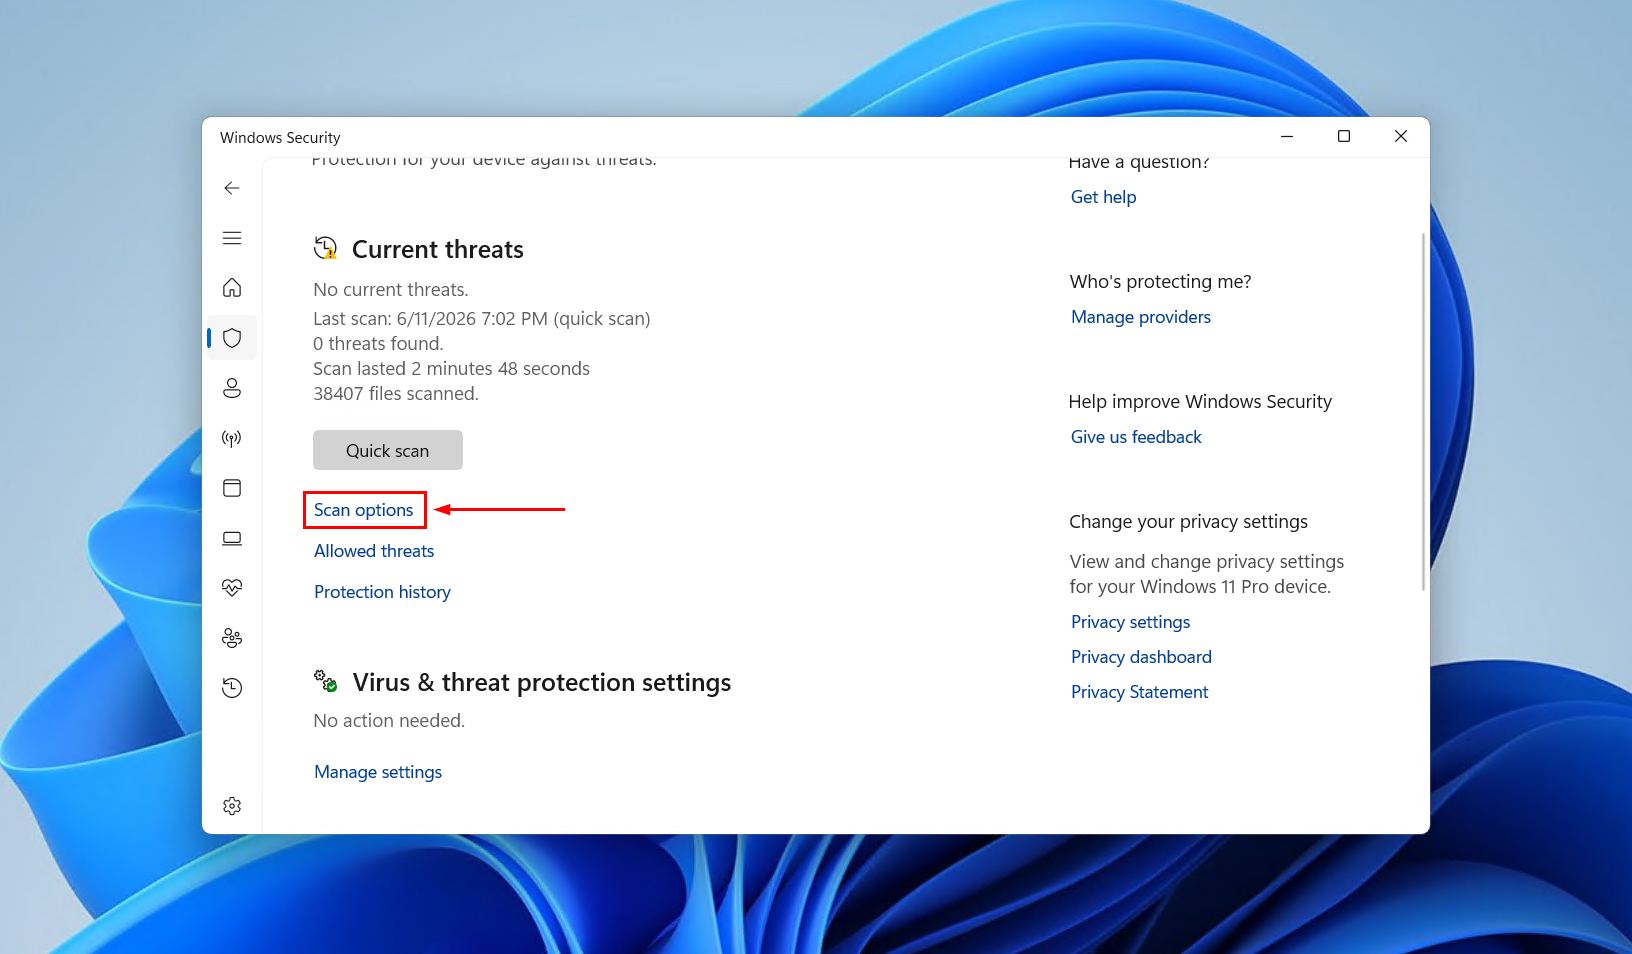
- Click on Virus & threat protection.

- Click Scan options.
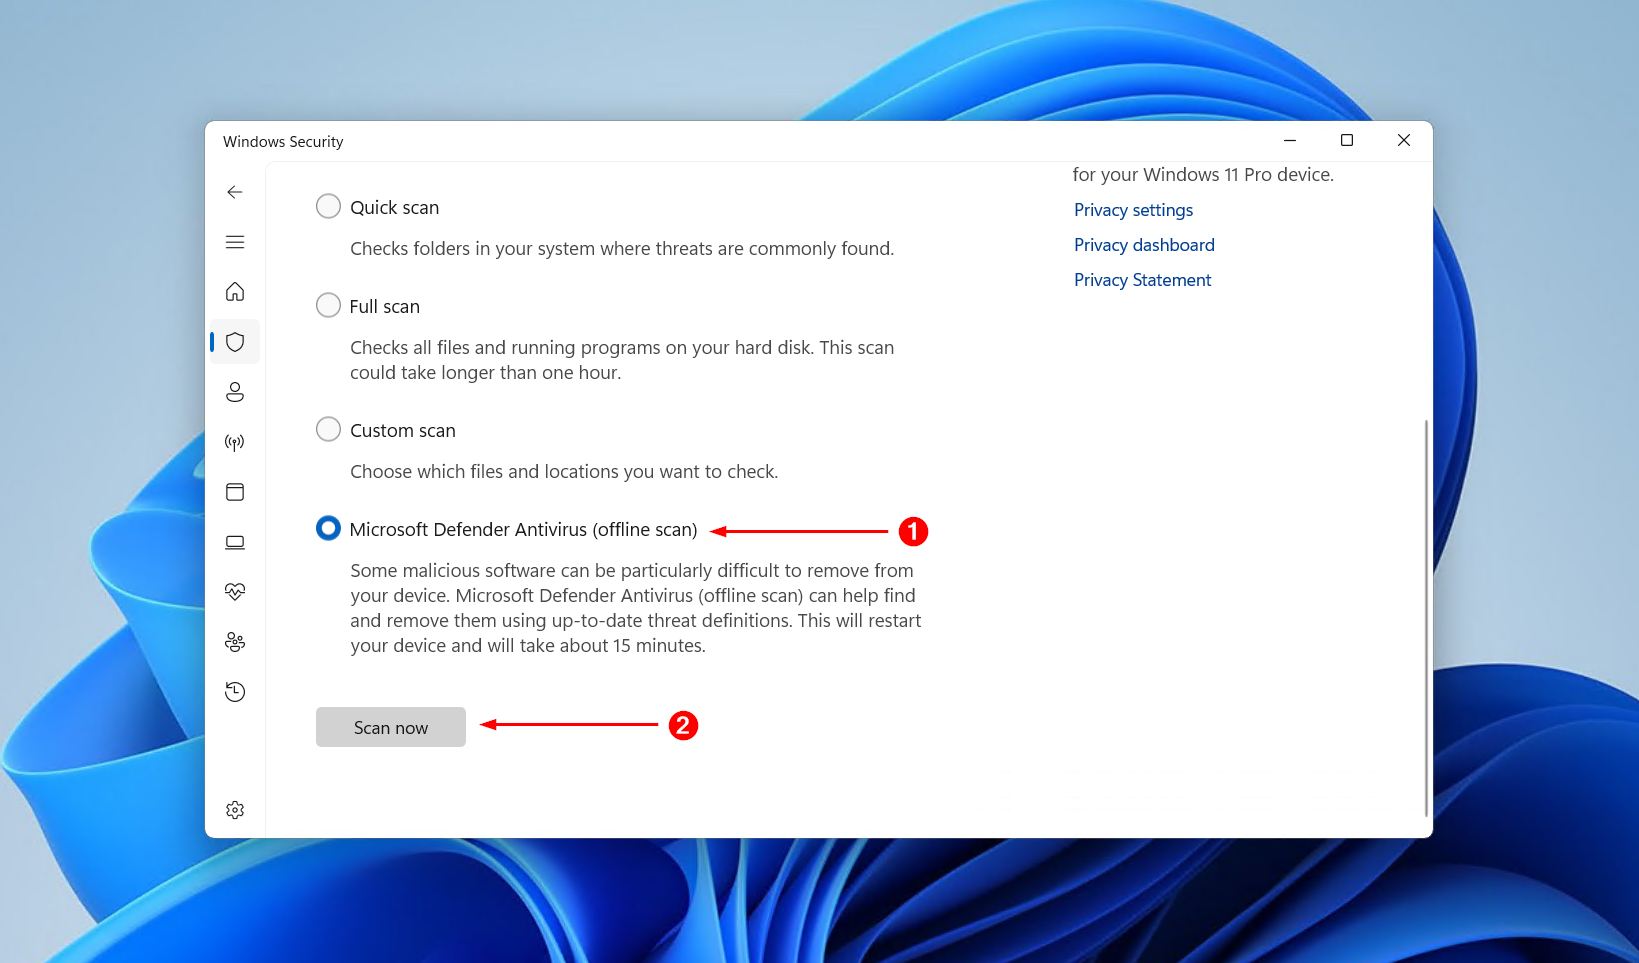
- Choose a scan and click Scan now. A Full scan is good, but the Antivirus Microsoft Defender (offline scan) is more comprehensive.
If you’ve ruled all of the above out, the next step is recovery software.
How to Recover Photos That Disappeared From an SD Card
SD card recovery software like Disk Drill can scan memory cards for lost or deleted photos when the operating system no longer shows them. This also includes photos and videos that disappear due to a malfunction, damage to the file system, or interruption to the recording or writing process. These tools see more than what File Explorer, Finder, a camera, or a phone does. They read the card directly, using file system records and file signatures to find data that’s still physically present and not overwritten.
For this case, we suggest Disk Drill for a few reasons:
- Its recovery engine supports all common file systems and hundreds of file types, including camera RAW formats.
- The Advanced Camera Recovery module can reconstruct video files shot by cameras, drones, and action cams.
- Provides file-by-file previews so you know exactly what you’re recovering.
- Includes complete disk imaging, allowing you to back up problematic cards.
It just takes a few clicks to recover photos disappeared from an SD card. Follow these Disk Drill recovery steps:
- Download and install Disk Drill from the official page.
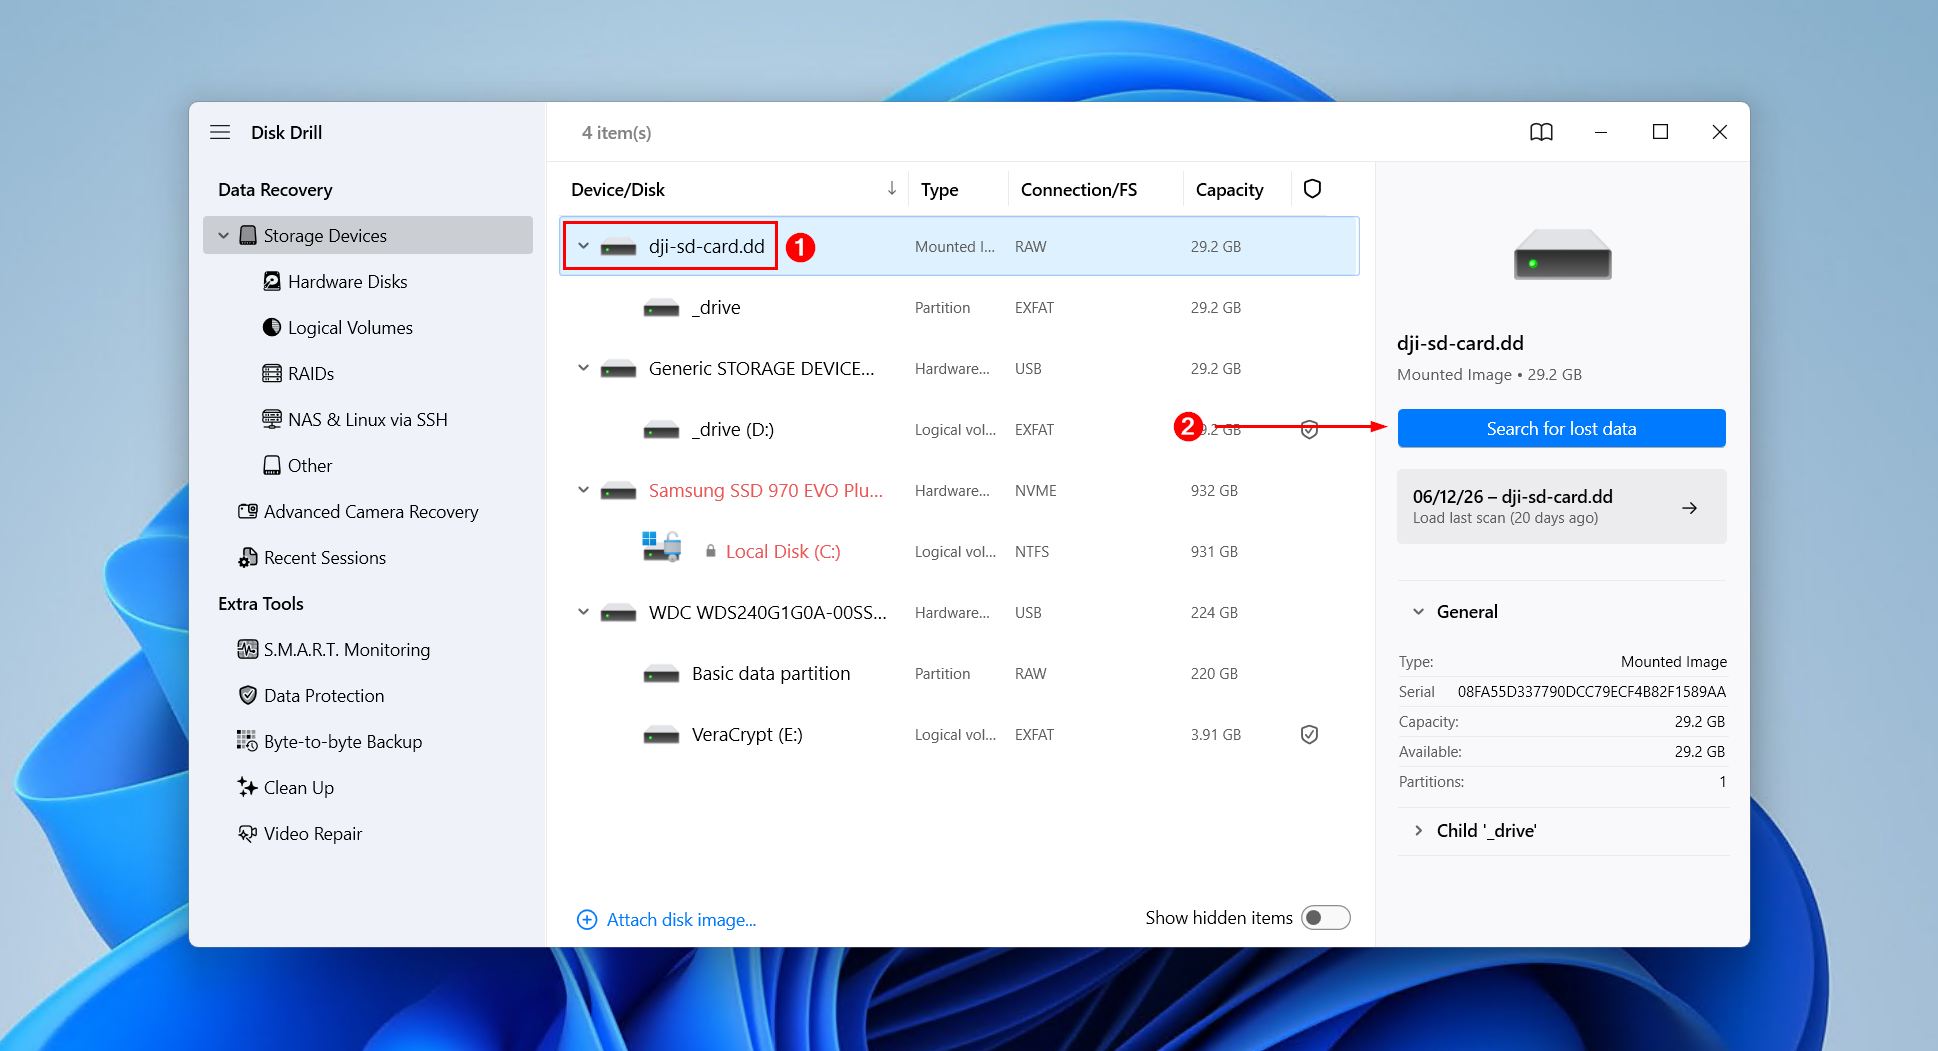
- Select the SD card from the device list, then click Search for lost data. Choose Universal Scan if you’re looking for all file types, or Advanced Camera Recovery if you’re recovering video from a camera or drone.
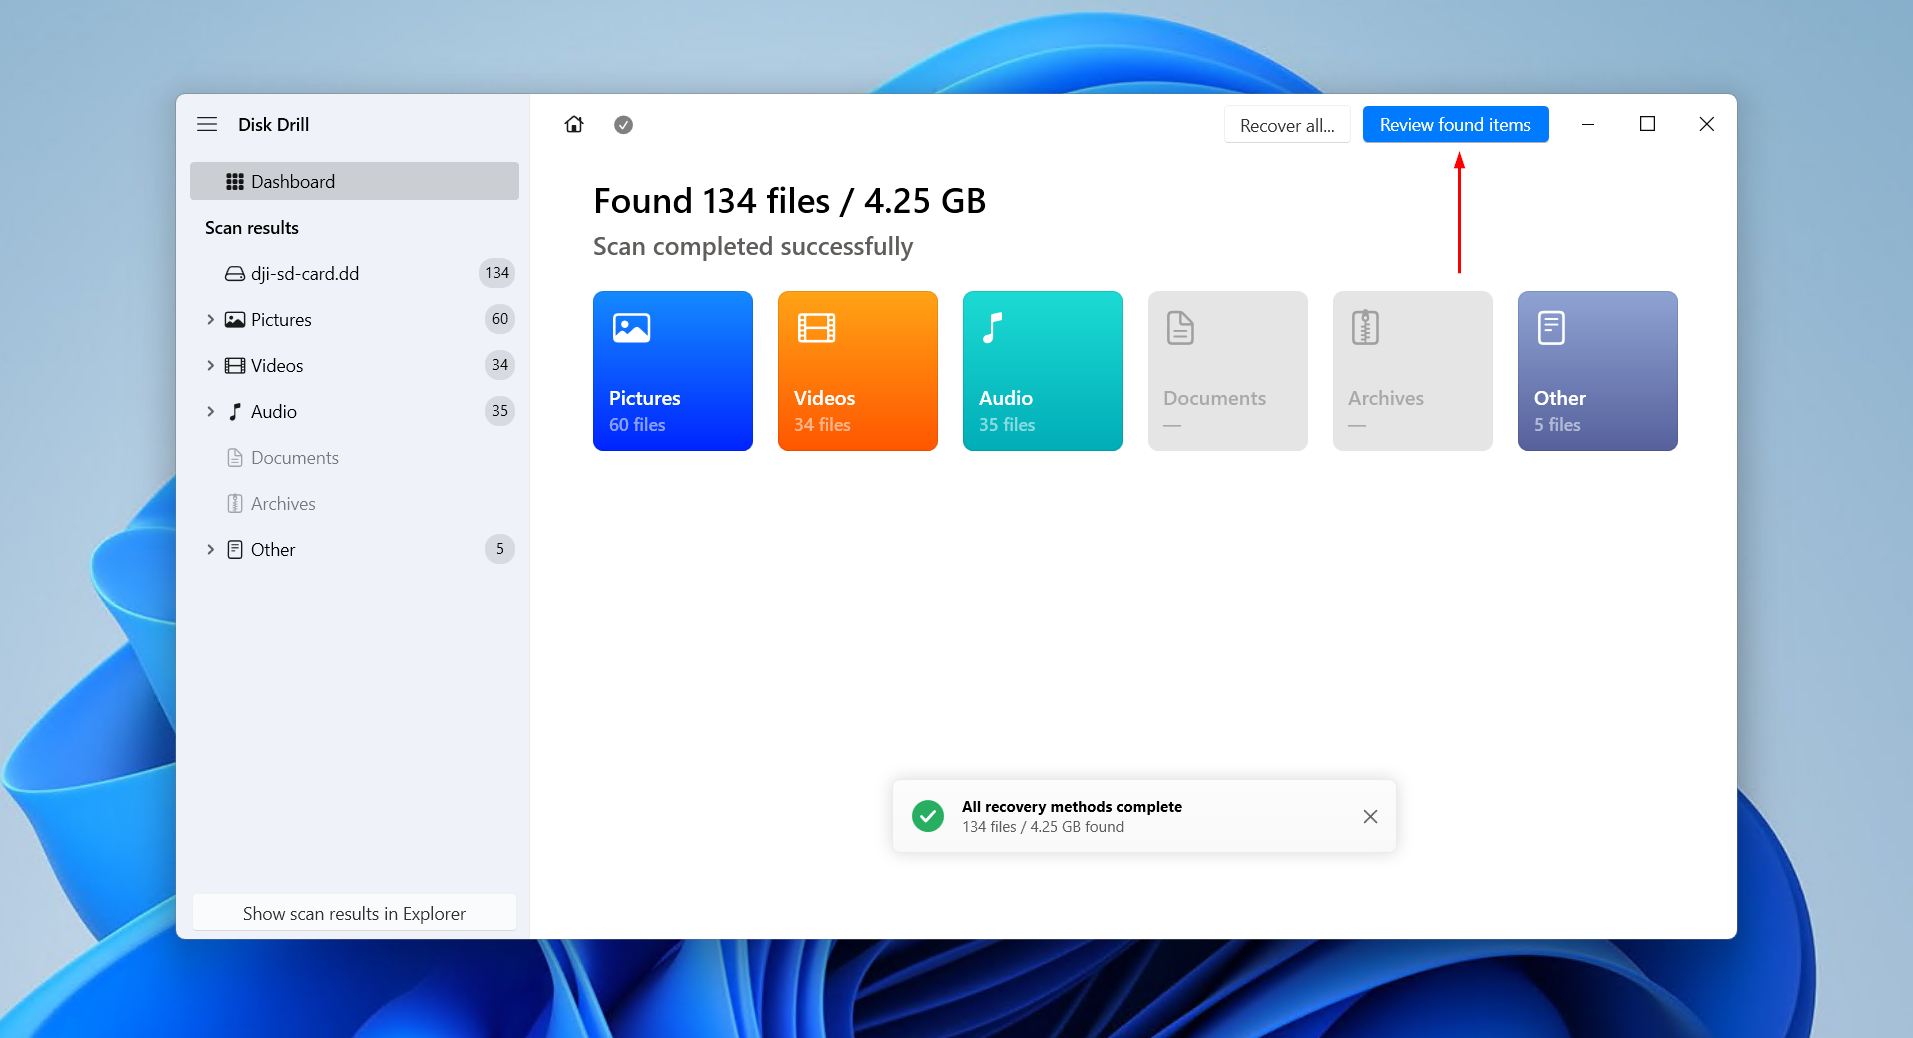
- Click Review found items once the scan is complete. Alternatively, if you simply want to recover everything now, click Recover all.
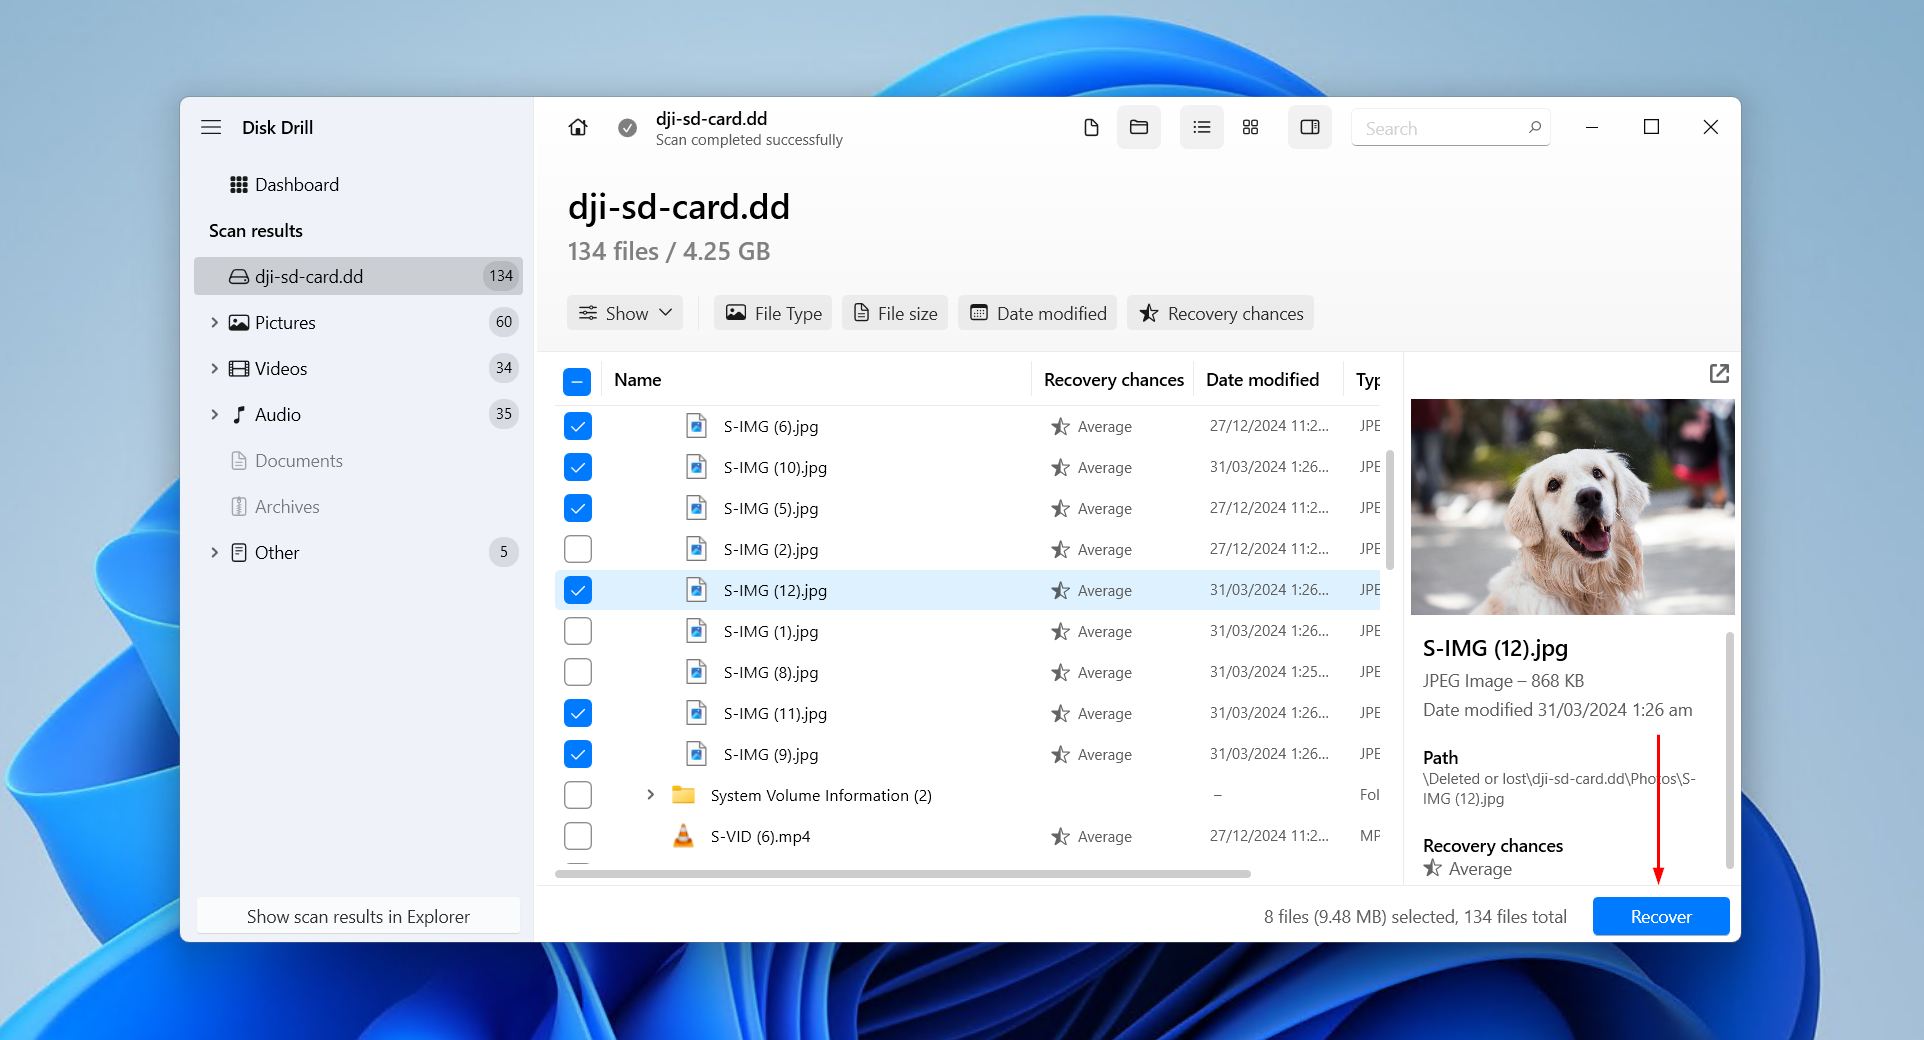
- Preview and select the files you want. If there are lots of files, narrow down the file list using filters and the search bar. When you’re ready, click Recover.
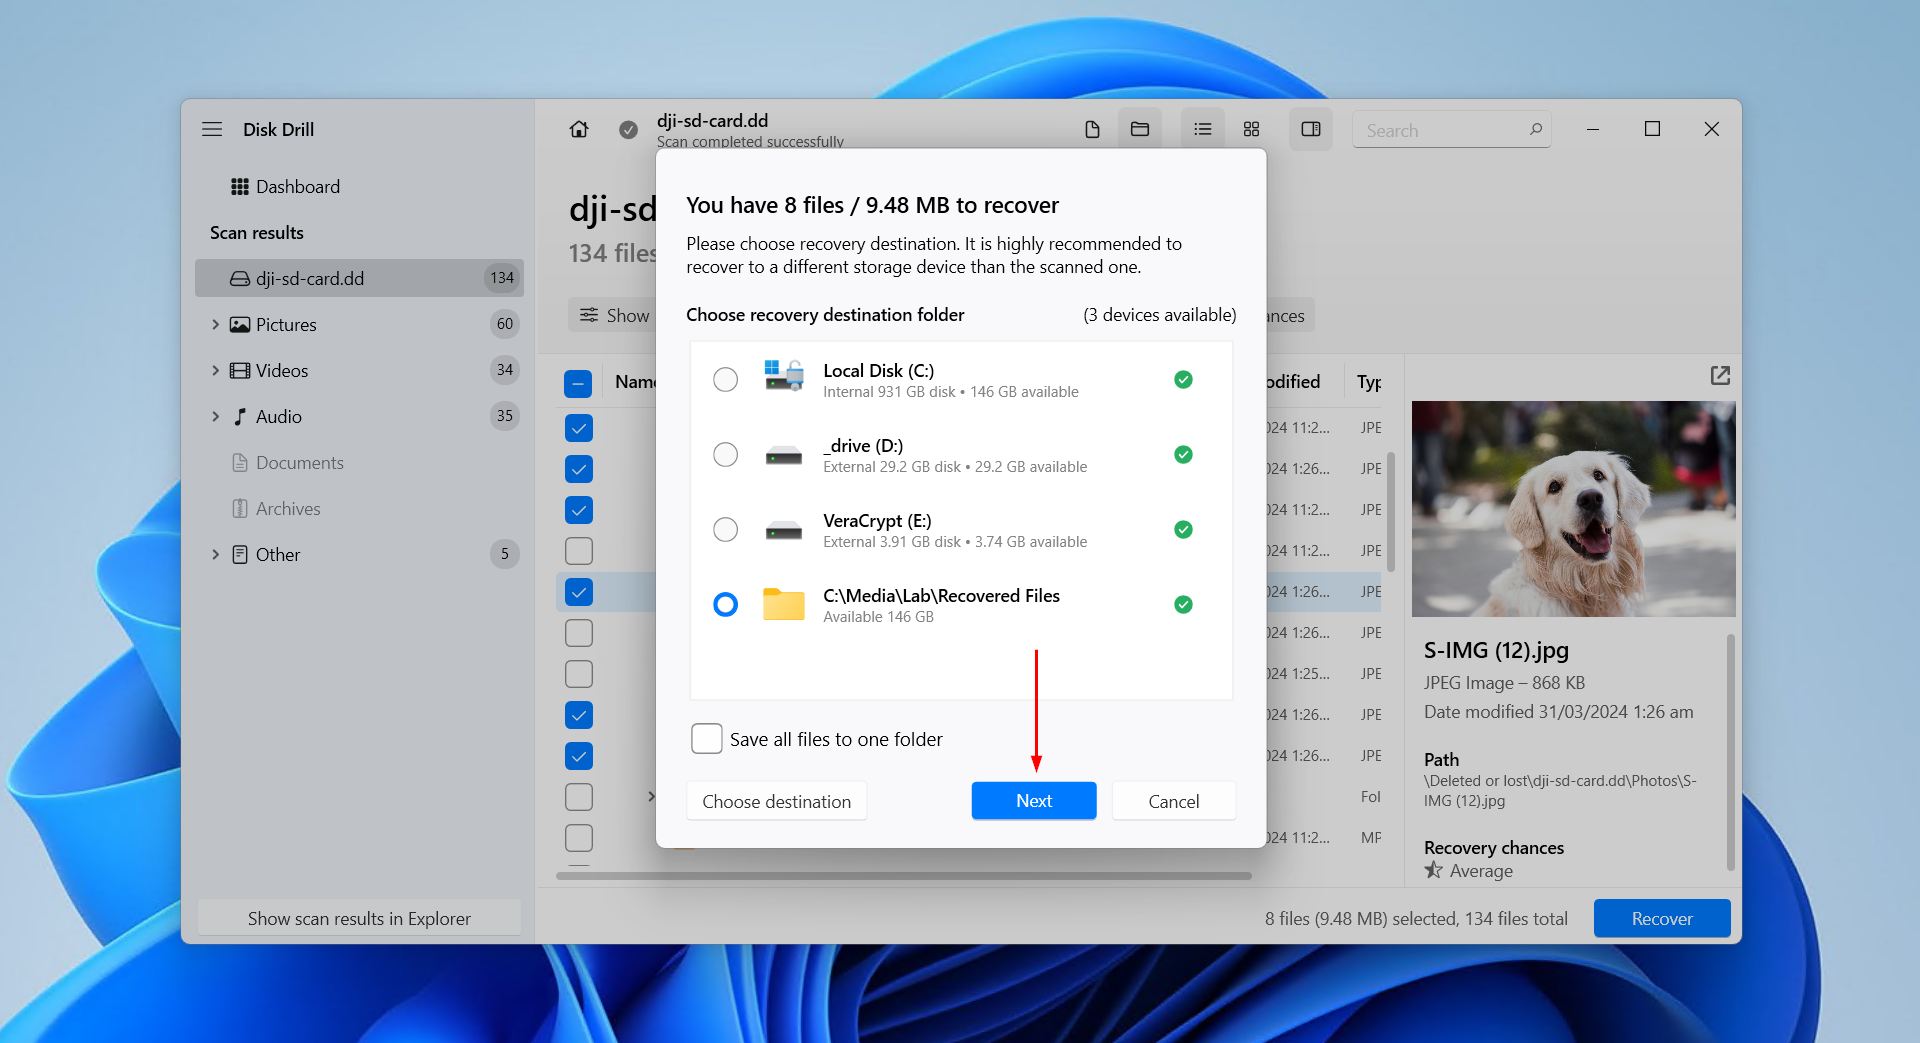
- Choose where you want to restore the files. Be sure to choose somewhere other than the same SD card, as recovering data back onto the card can render the data unusable.
Professional data recovery services are another avenue available to you. However, in this specific case, they’re usually overkill, not worth the time or money. If the card is still detected by the computer and reports the correct capacity, recovery software can produce pretty much the same results. Even so, they remain a solid last resort if recovery software doesn’t suffice.
When the SD Card Itself Causes Photos to Disappear
The sections we’ve covered so far solve the vast majority of cases we see: hidden files, wrong folders, accidental deletion, and formatting. But sometimes the SD card itself is the reason the photos disappeared or were never saved correctly in the first place. These next steps will cover those less common cases, so you get full coverage, and so you can finish this process with trust that your card won’t quietly fail during the next shoot.
Check the SD Card Capacity to Detect Fake or Failing Cards
Fake SD cards have modified controllers that report a much larger capacity than they physically have. A card may show as 128 GB in Windows but only store a fraction of that. Once the real capacity is exceeded, new photos silently overwrite older ones, resulting in a loop of the card deleting files by itself. Of course, don’t rule out the fact that a failing card could also report the wrong numbers.
This is easily tested using free tools:
- On Windows: H2testw
- On macOS and Linux: F3 (or F3XSwift for a graphical interface on Mac)
We’ll show you how to run this test on Windows with H2testw:
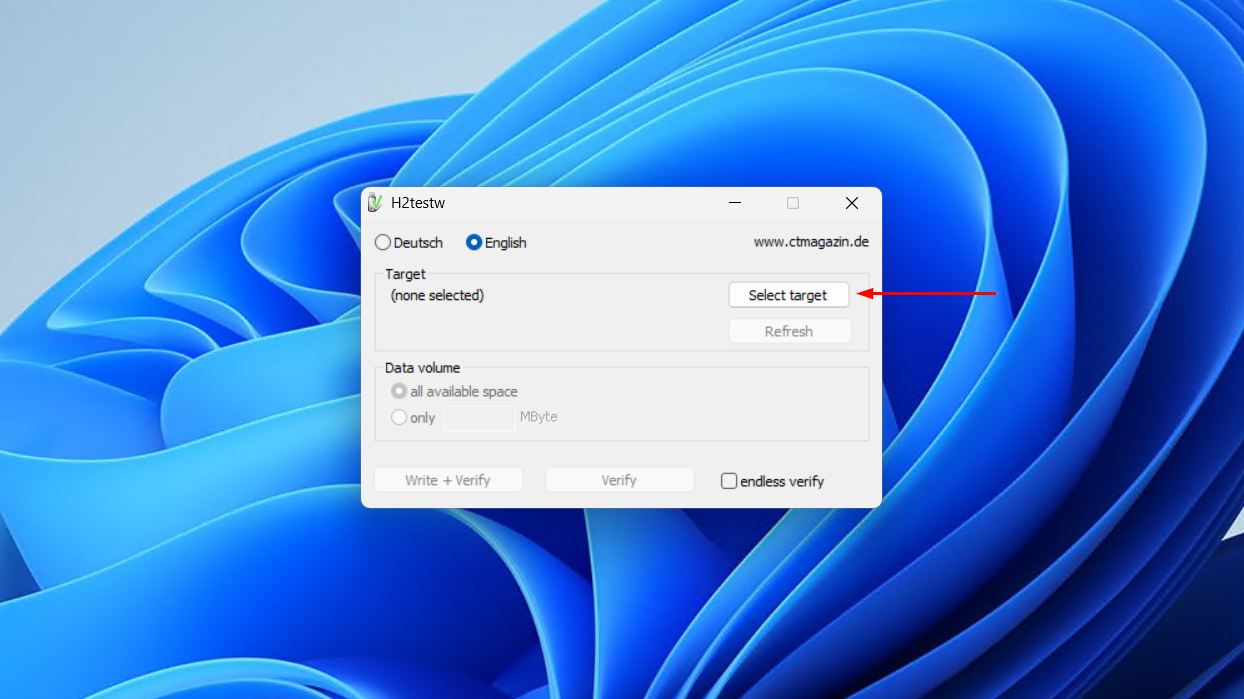
- Download and open H2testw.
- Click Select target and choose your SD card. Change the language to English if needed.
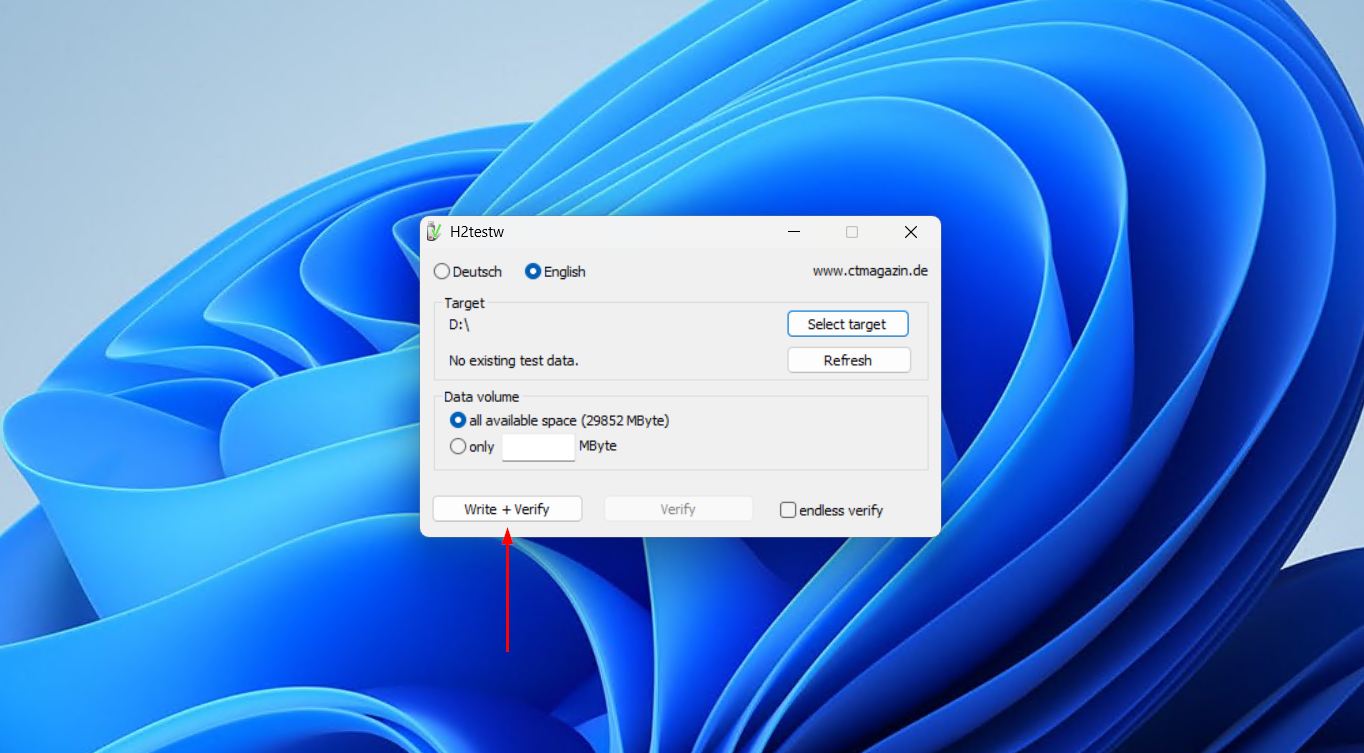
- Click Write + Verify, as it should have automatically selected to scan all available space.
If the card fails, stop using it for anything important and replace it. Formatting will not be able to fix it.
Test the SD Card for Write Failures
Not all photo loss is caused by deletion. Sometimes the card fails while the camera is writing to it. This is common during burst shooting, continuous RAW + JPEG capture, or video recording, as the camera depends on the card to accept data quickly and reliably.
Take this real-world case, for instance. A Canon EOS R6 wedding shooter reported losing a sequence of burst photos and later suggested an unstable card was dropping offline even during simple read operations. Because no obvious camera error appeared at the time, this is a particularly dangerous kind of failure for photographers.
Keep in mind, this isn’t just a Canon-specific problem. Any unstable card can become risky, especially if it’s old, slow, used with a weak adapter, or pushed to its limits with burst mode and video. Thankfully, figuring this out is the same as verifying the card’s authenticity. Run the same capacity test we mentioned above with H2testw or F3, and if the card shows errors, instability, or drops out during testing, treat it as unreliable and replace it.
Format the SD Card to Fix File System Corruption
Formatting helps resolve logical file system corruption that makes photos disappear. However, the order in which you do this is critical, as this is not a recovery method. You must always recover or back up your photos first. Format only after that, as it erases everything on the card.
A few rules of thumb:
- Formatting only fixes logical corruption. Physical damage, fake capacity, or unstable flash memory aren’t addressable by formatting.
- If the card failed the capacity or write tests above, formatting won’t help. Replace it instead.
- If the card passes testing and the only issue is file system corruption, formatting is a reasonable final repair step.
- Where possible, format in the device where the card will be used (camera, drone, dashcam, action cam). This creates the file system and folder structure that the device expects.
This is how you perform a format on Windows:
- Open File Explorer.
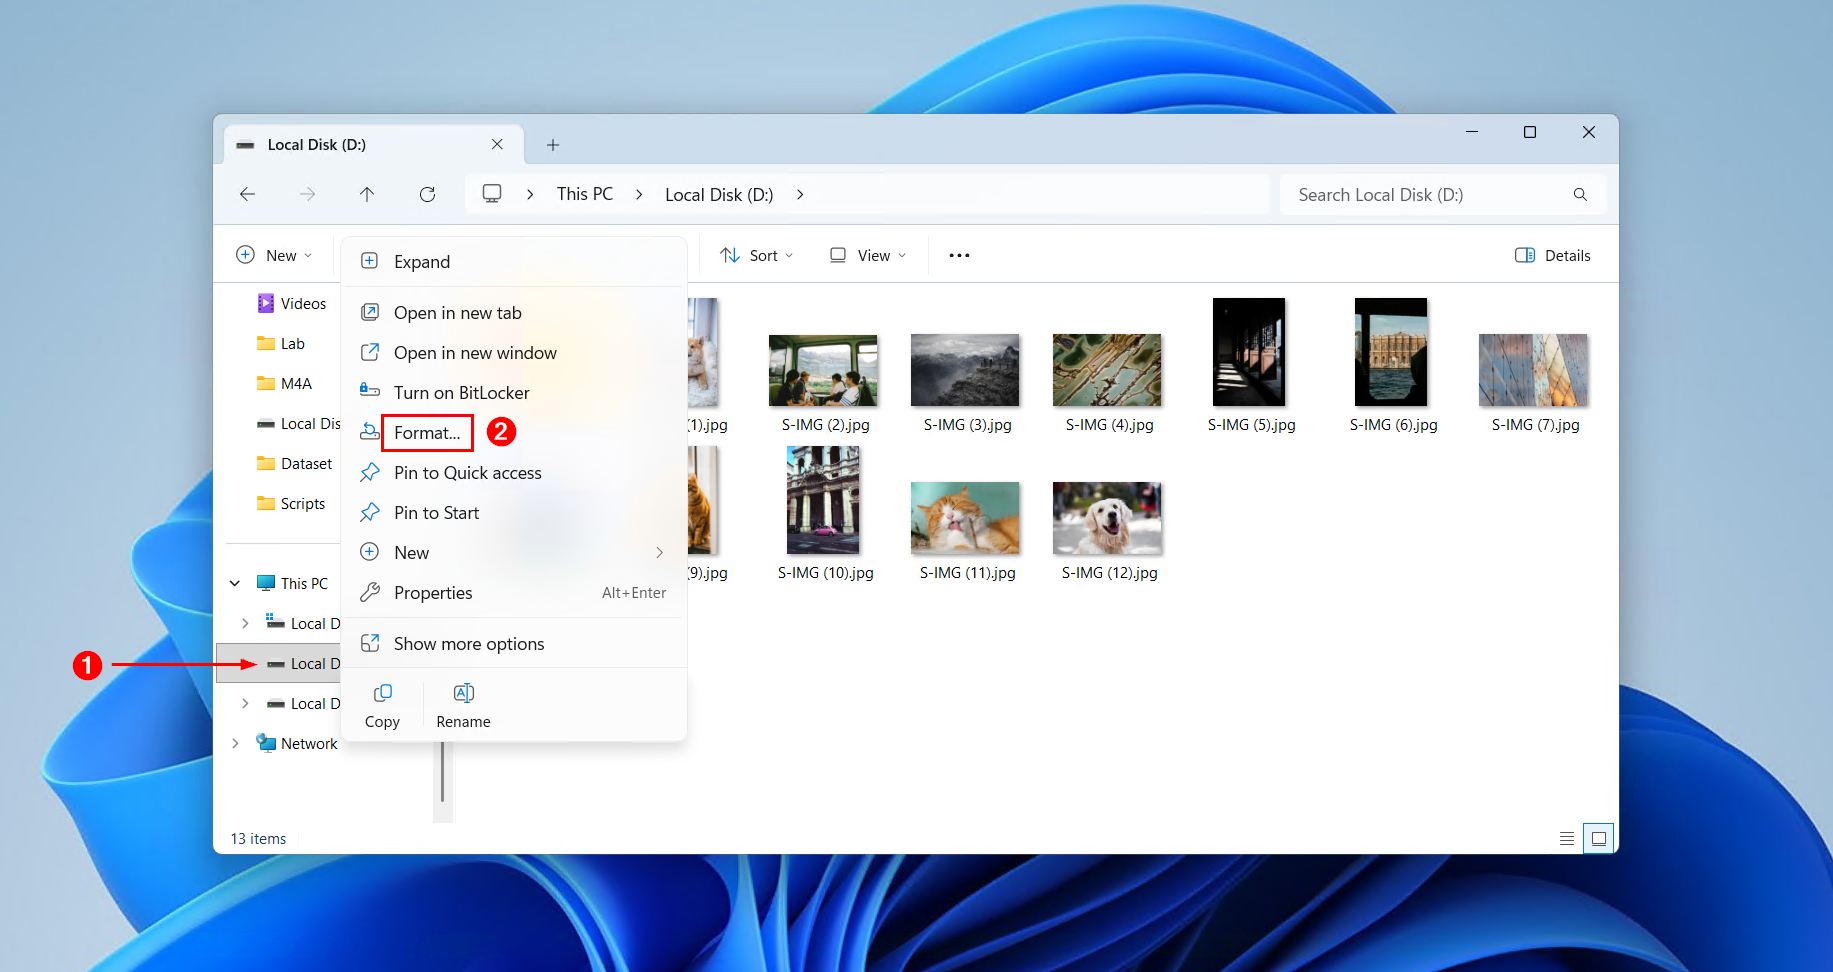
- Right-click your SD card, then click Format.
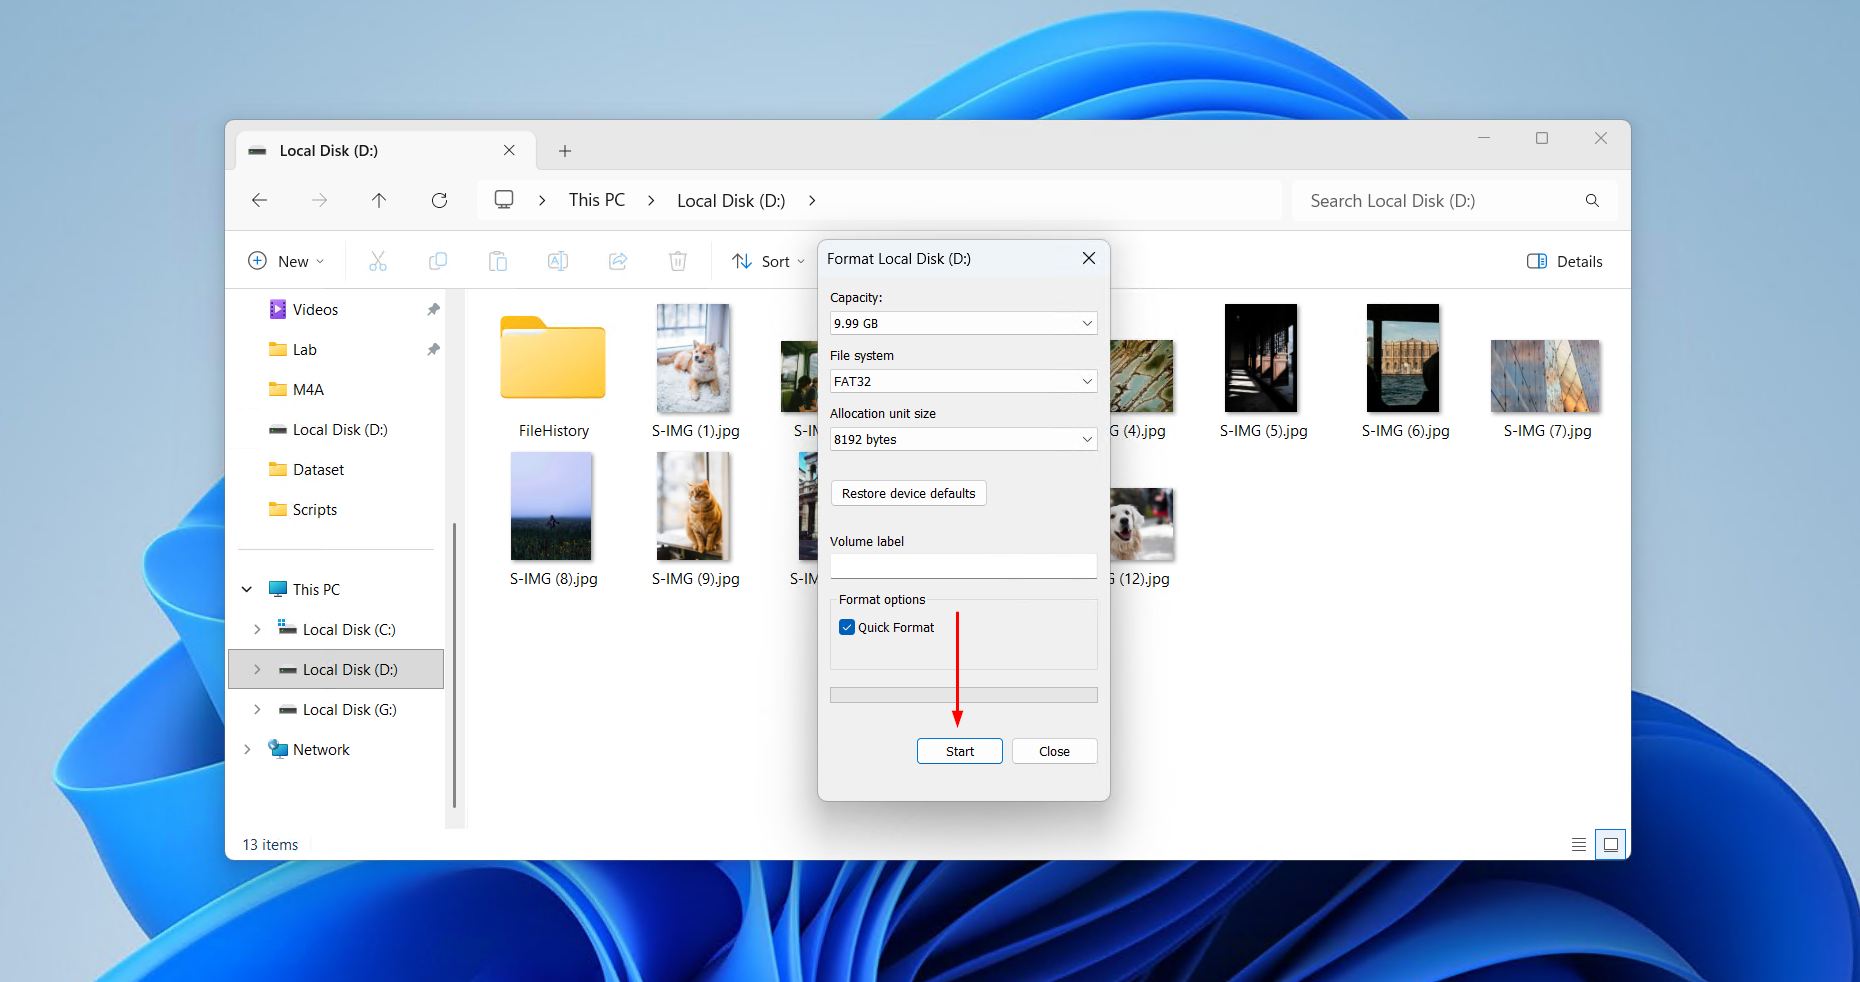
- Choose a file system, give the card a name, make sure Quick Format is ticked, then click Start.
- Click OK when prompted to confirm.
FAQ
If photos disappeared from your SD card and DIY recovery software couldn’t get them back, typically because the card is physically damaged, then a professional data recovery service is the next step. These labs work directly on cards that computers can’t detect and recover the data directly. However, they’re costly, and do take more time. For ordinary “disappeared photos” cases where the card is still detected and reading the correct capacity, recovery software is the faster and cheaper option, but services are available as a fall-back.
Photos don’t delete themselves. When this happens, the likely culprit is a fake card overwriting old data once its real capacity is exceeded, but it can also be a corrupted file system, malware, or an unstable card. Recover your photos first, then run a capacity and write-failure test with H2testw (on Windows) or F3 (on macOS and Linux) to find out which it is before trusting the card again.
You can’t always recover photos that disappear from an SD card, but most of the time you can. Recovery is possible when the data on the card hasn’t been physically overwritten. Your chances drop sharply after a full format, continuous use of the card, or when flash memory is physically damaged. If the card hasn’t been used since the photos were lost and is still detected with the correct capacity, your odds are good.
Make sure your SD card has been assigned a drive letter on Windows and correctly mounted on macOS. If they’re still not showing, make sure they haven’t been marked as hidden. If your camera has internal storage, also make sure the photos aren’t stored on the internal storage rather than the SD card. Lastly, make sure your SD card reader is working, along with the port it’s connected to.
Some common causes on Canon bodies include an in-camera format, an interrupted write during burst or video (i.e. a dead battery or early card removal), file system corruption, or an unstable/fake card. Stop using the card, recover the photos that disappeared from the SD card in the Canon (with software like Disk Drill), then test the card for write failures before using it again.
