


A drive with bad sectors is a ticking time bomb. While a small number of bad sectors may not cause any immediate problems, it signals that the drive has started to wear out. Each new read/write operation can bring it closer to complete failure, so if there are files on it you care about, you should learn how to recover data from bad sectors without any delay.
What Are Bad Sectors?
Every hard drive stores data in small units called sectors, usually 512 bytes or 4 KB each. A bad sector is a sector that no longer responds to read or write requests. Whatever was stored there becomes hard or impossible to access, and the drive may slow down or freeze each time it stumbles on one.
Bad sectors come in two flavors:
- Logical bad sectors, sometimes called soft bad sectors, are software-level errors. The disk surface is fine, but the data in the sector got scrambled, often after a power cut or a system crash. These can usually be fixed by overwriting the sector with fresh data.
- Physical bad sectors are spots with real damage, such as a messed-up platter surface, a head crash, flash memory cells that wore out after too many write cycles (in the case of SSDs), or a factory defect. Unfortunately, no tool can repair them. The drive can only mark them as unusable and shift work to spare sectors.
That said, the type matters less than your first move, which should always be to recover data from a drive with bad sectors before any repair attempt.
Can You Recover Data from a Hard Drive with Bad Sectors?
Yes, in most cases, you can recover data from a hard drive with bad sectors if (and this is really important) you image the entire drive before you let any repair tool touch it.
How much you can get back also depends on how badly the drive is damaged. If your computer can still detect the drive on a physical level, you have a realistic shot at recovering data from a hard drive with bad sectors using specialized software.
There are two things worth checking before you start:
- whether the drive shows up in Disk Management with its correct capacity (even if you can’t open it, the drive appears as RAW, Windows asks you to format it, or it freezes during read/write operations),
- and what its S.M.A.R.T. (Self-Monitoring, Analysis, and Reporting Technology) health data looks like.
Here’s a quick way to check if your computer can still detect the drive:
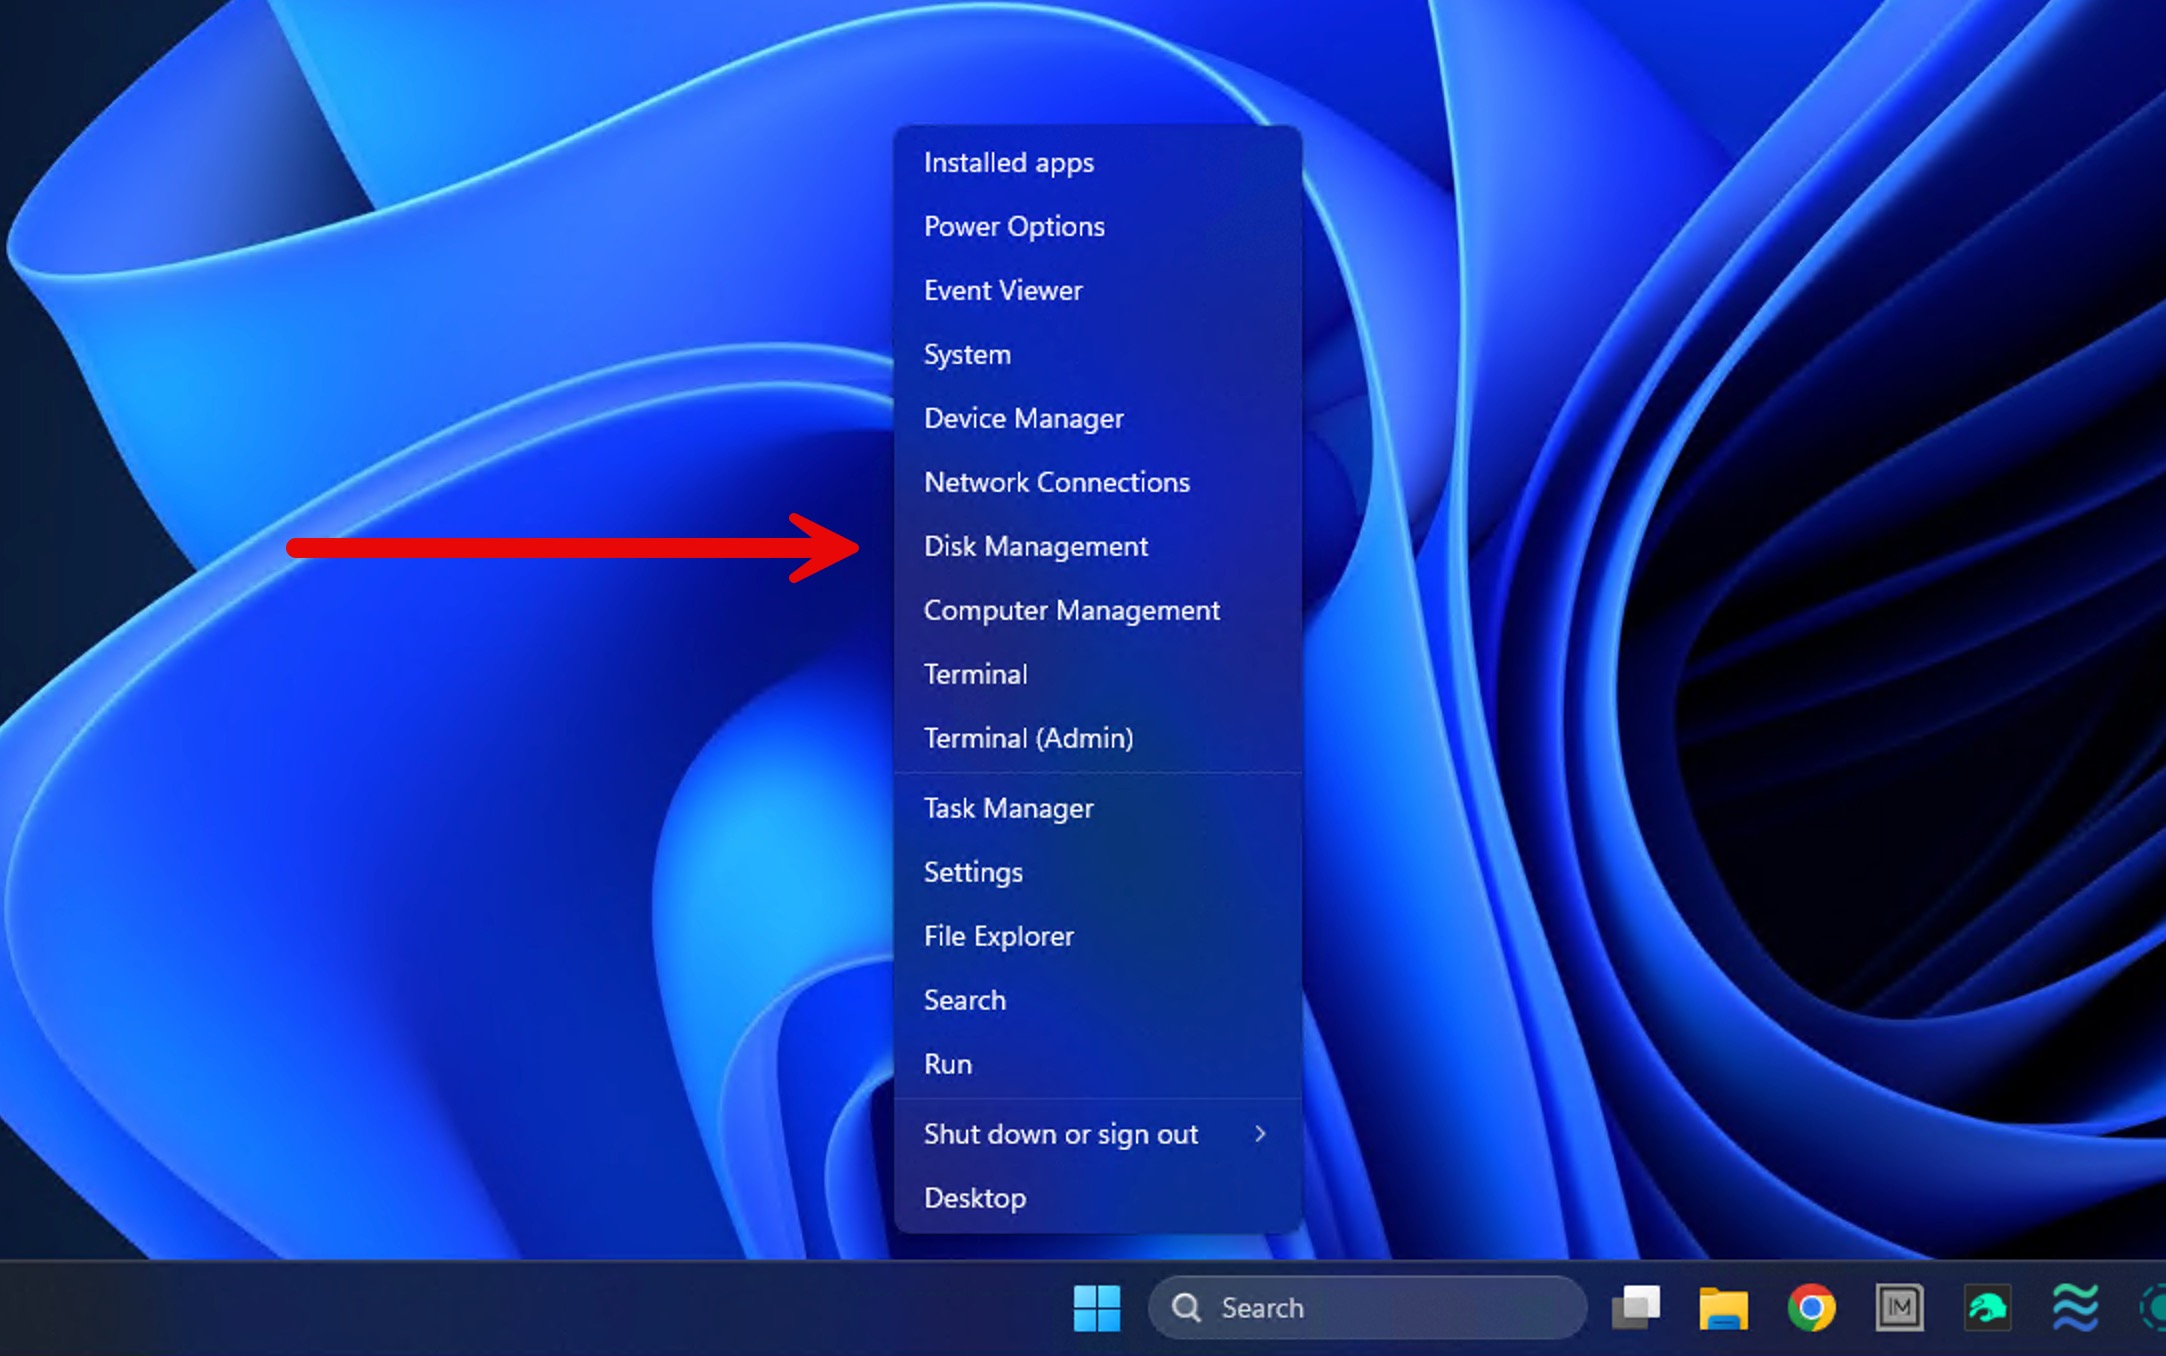
- Right-click the Start button and choose Disk Management.
- Find your drive in the lower part of the window.
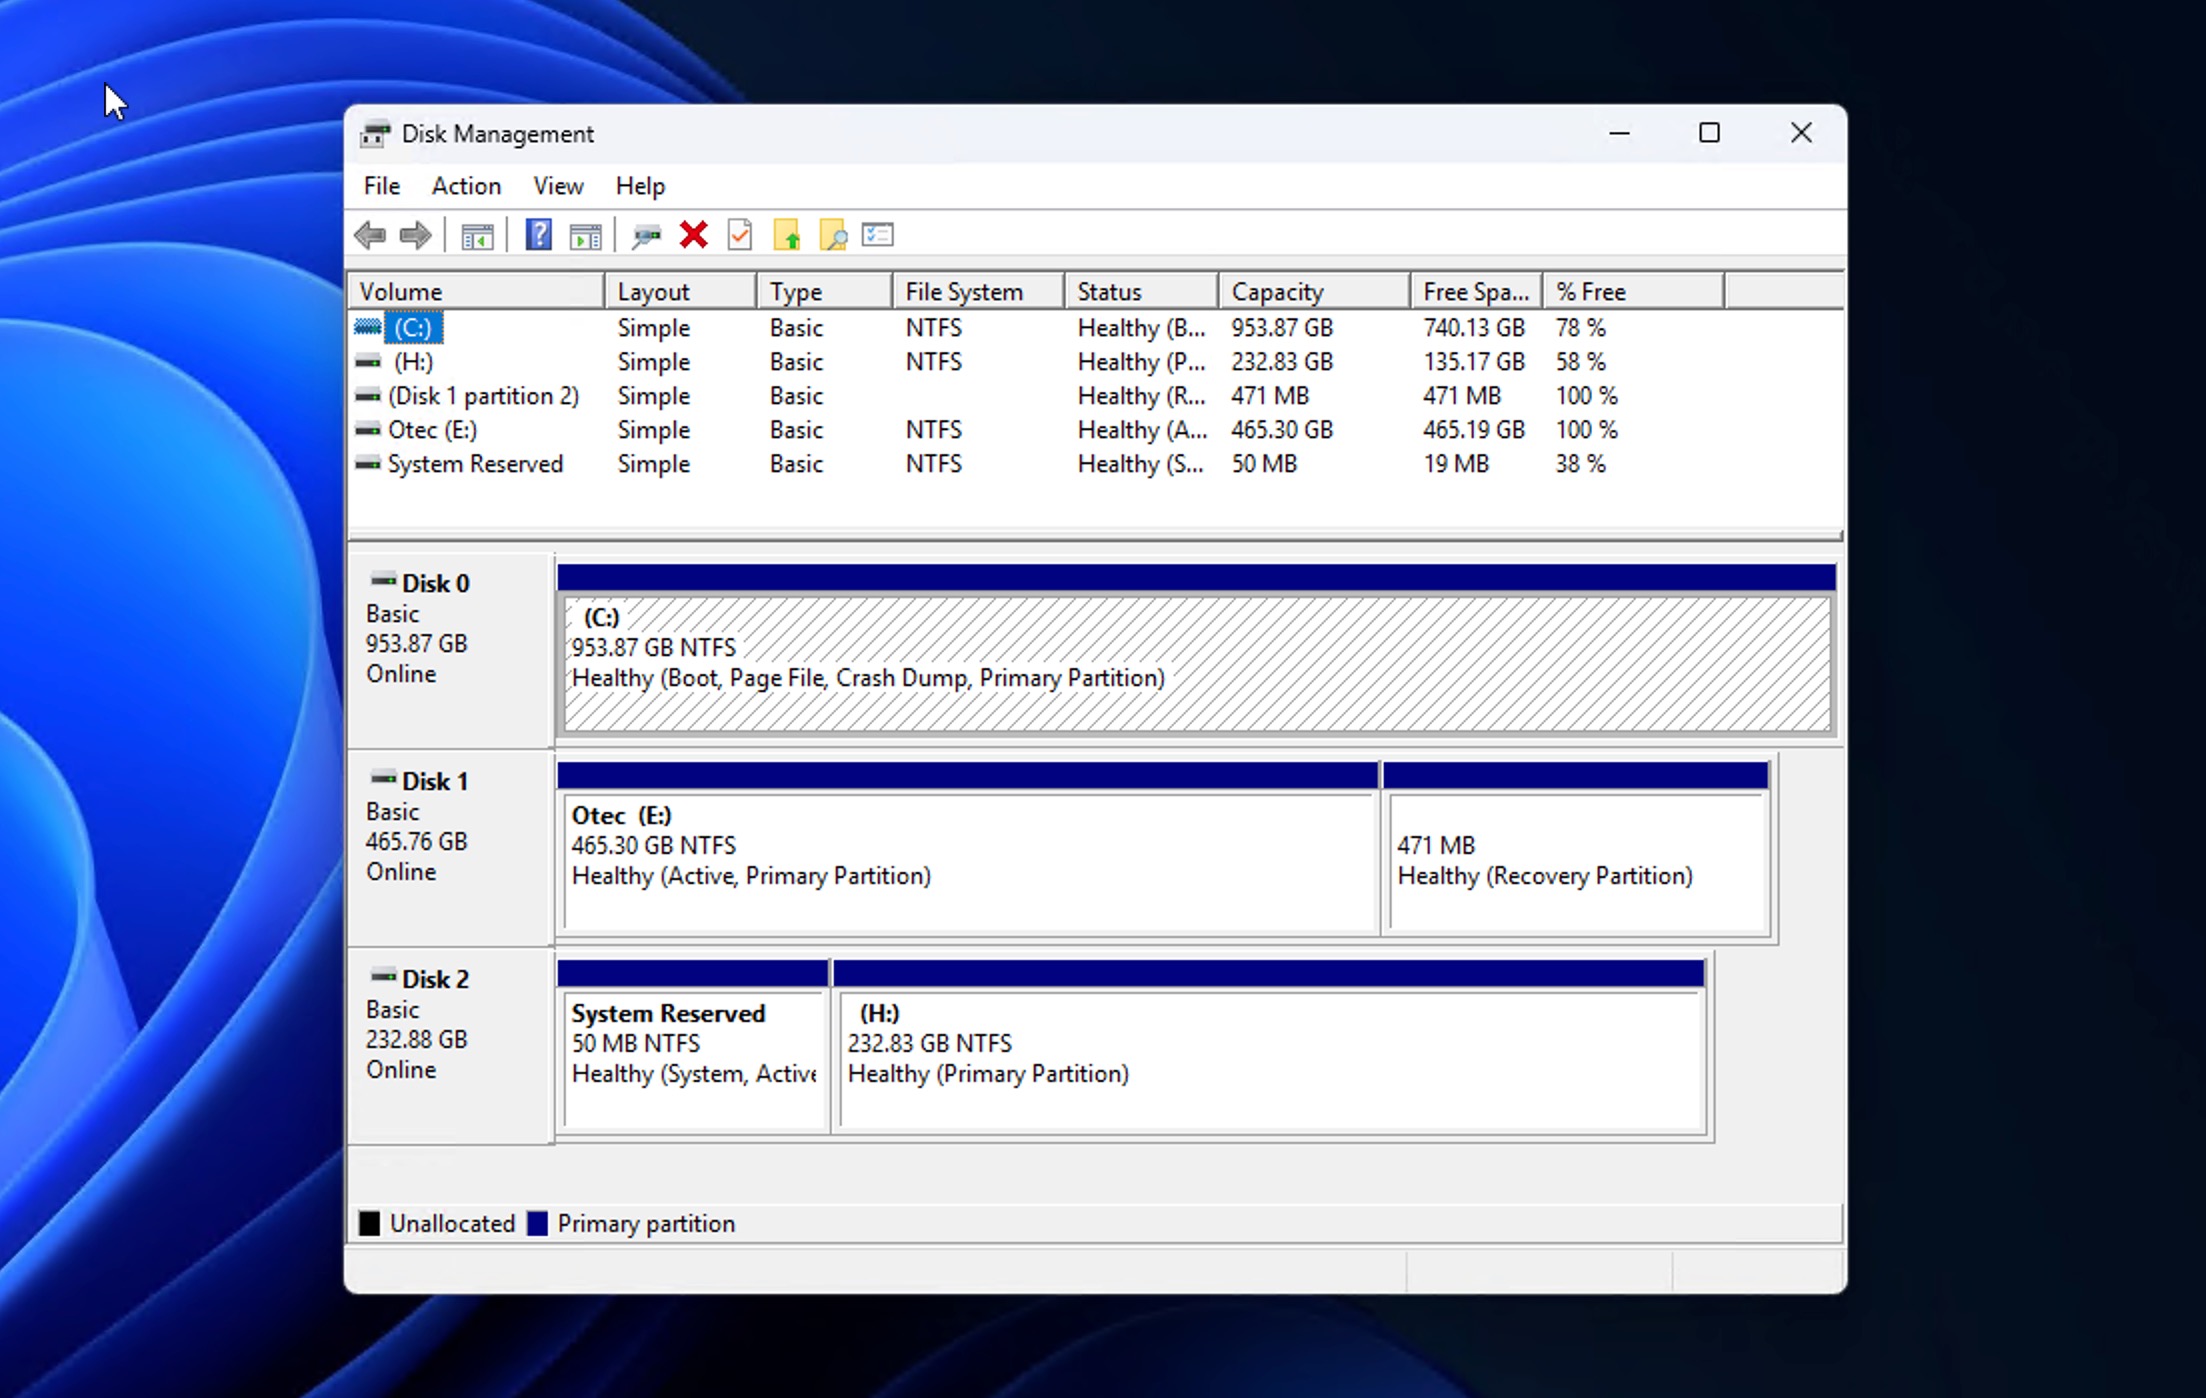
- Check the capacity listed next to it. It should match the drive’s real size, give or take. The numbers never match exactly because drive makers count in decimal while Windows counts in binary, so a smaller figure is normal. The table below shows what common drive sizes look like in Disk Management:
| Advertised capacity | What Disk Management should show |
| 250 GB | ~232 GB |
| 500 GB | ~465 GB |
| 1 TB | ~931 GB |
| 2 TB | ~1,863 GB |
| 4 TB | ~3,725 GB |
| 8 TB | ~7,451 GB |
A drive showing a slightly smaller or higher number than the label is fine, and you can move on to the recovery workflow below. A drive showing something wildly different, like 3.86 GB instead of 1 TB, is not good, and a drive that doesn’t show up at all is bad. In such cases, you should send it to a data recovery center and let professionals handle it (more on that later in this guide).
If the capacity looks right, check the drive’s S.M.A.R.T. status, which tracks internal health metrics like reallocated sectors and pending sectors. A drive can show up in Disk Management with the correct capacity while still being close to total failure.
Disk Drill includes free S.M.A.R.T. monitoring that reports a warning status or a quickly growing count of bad sectors in an easy-to-understand format, so you’ll know exactly when it’s in your best interest to skip the DIY route and go straight to a professional recovery service.
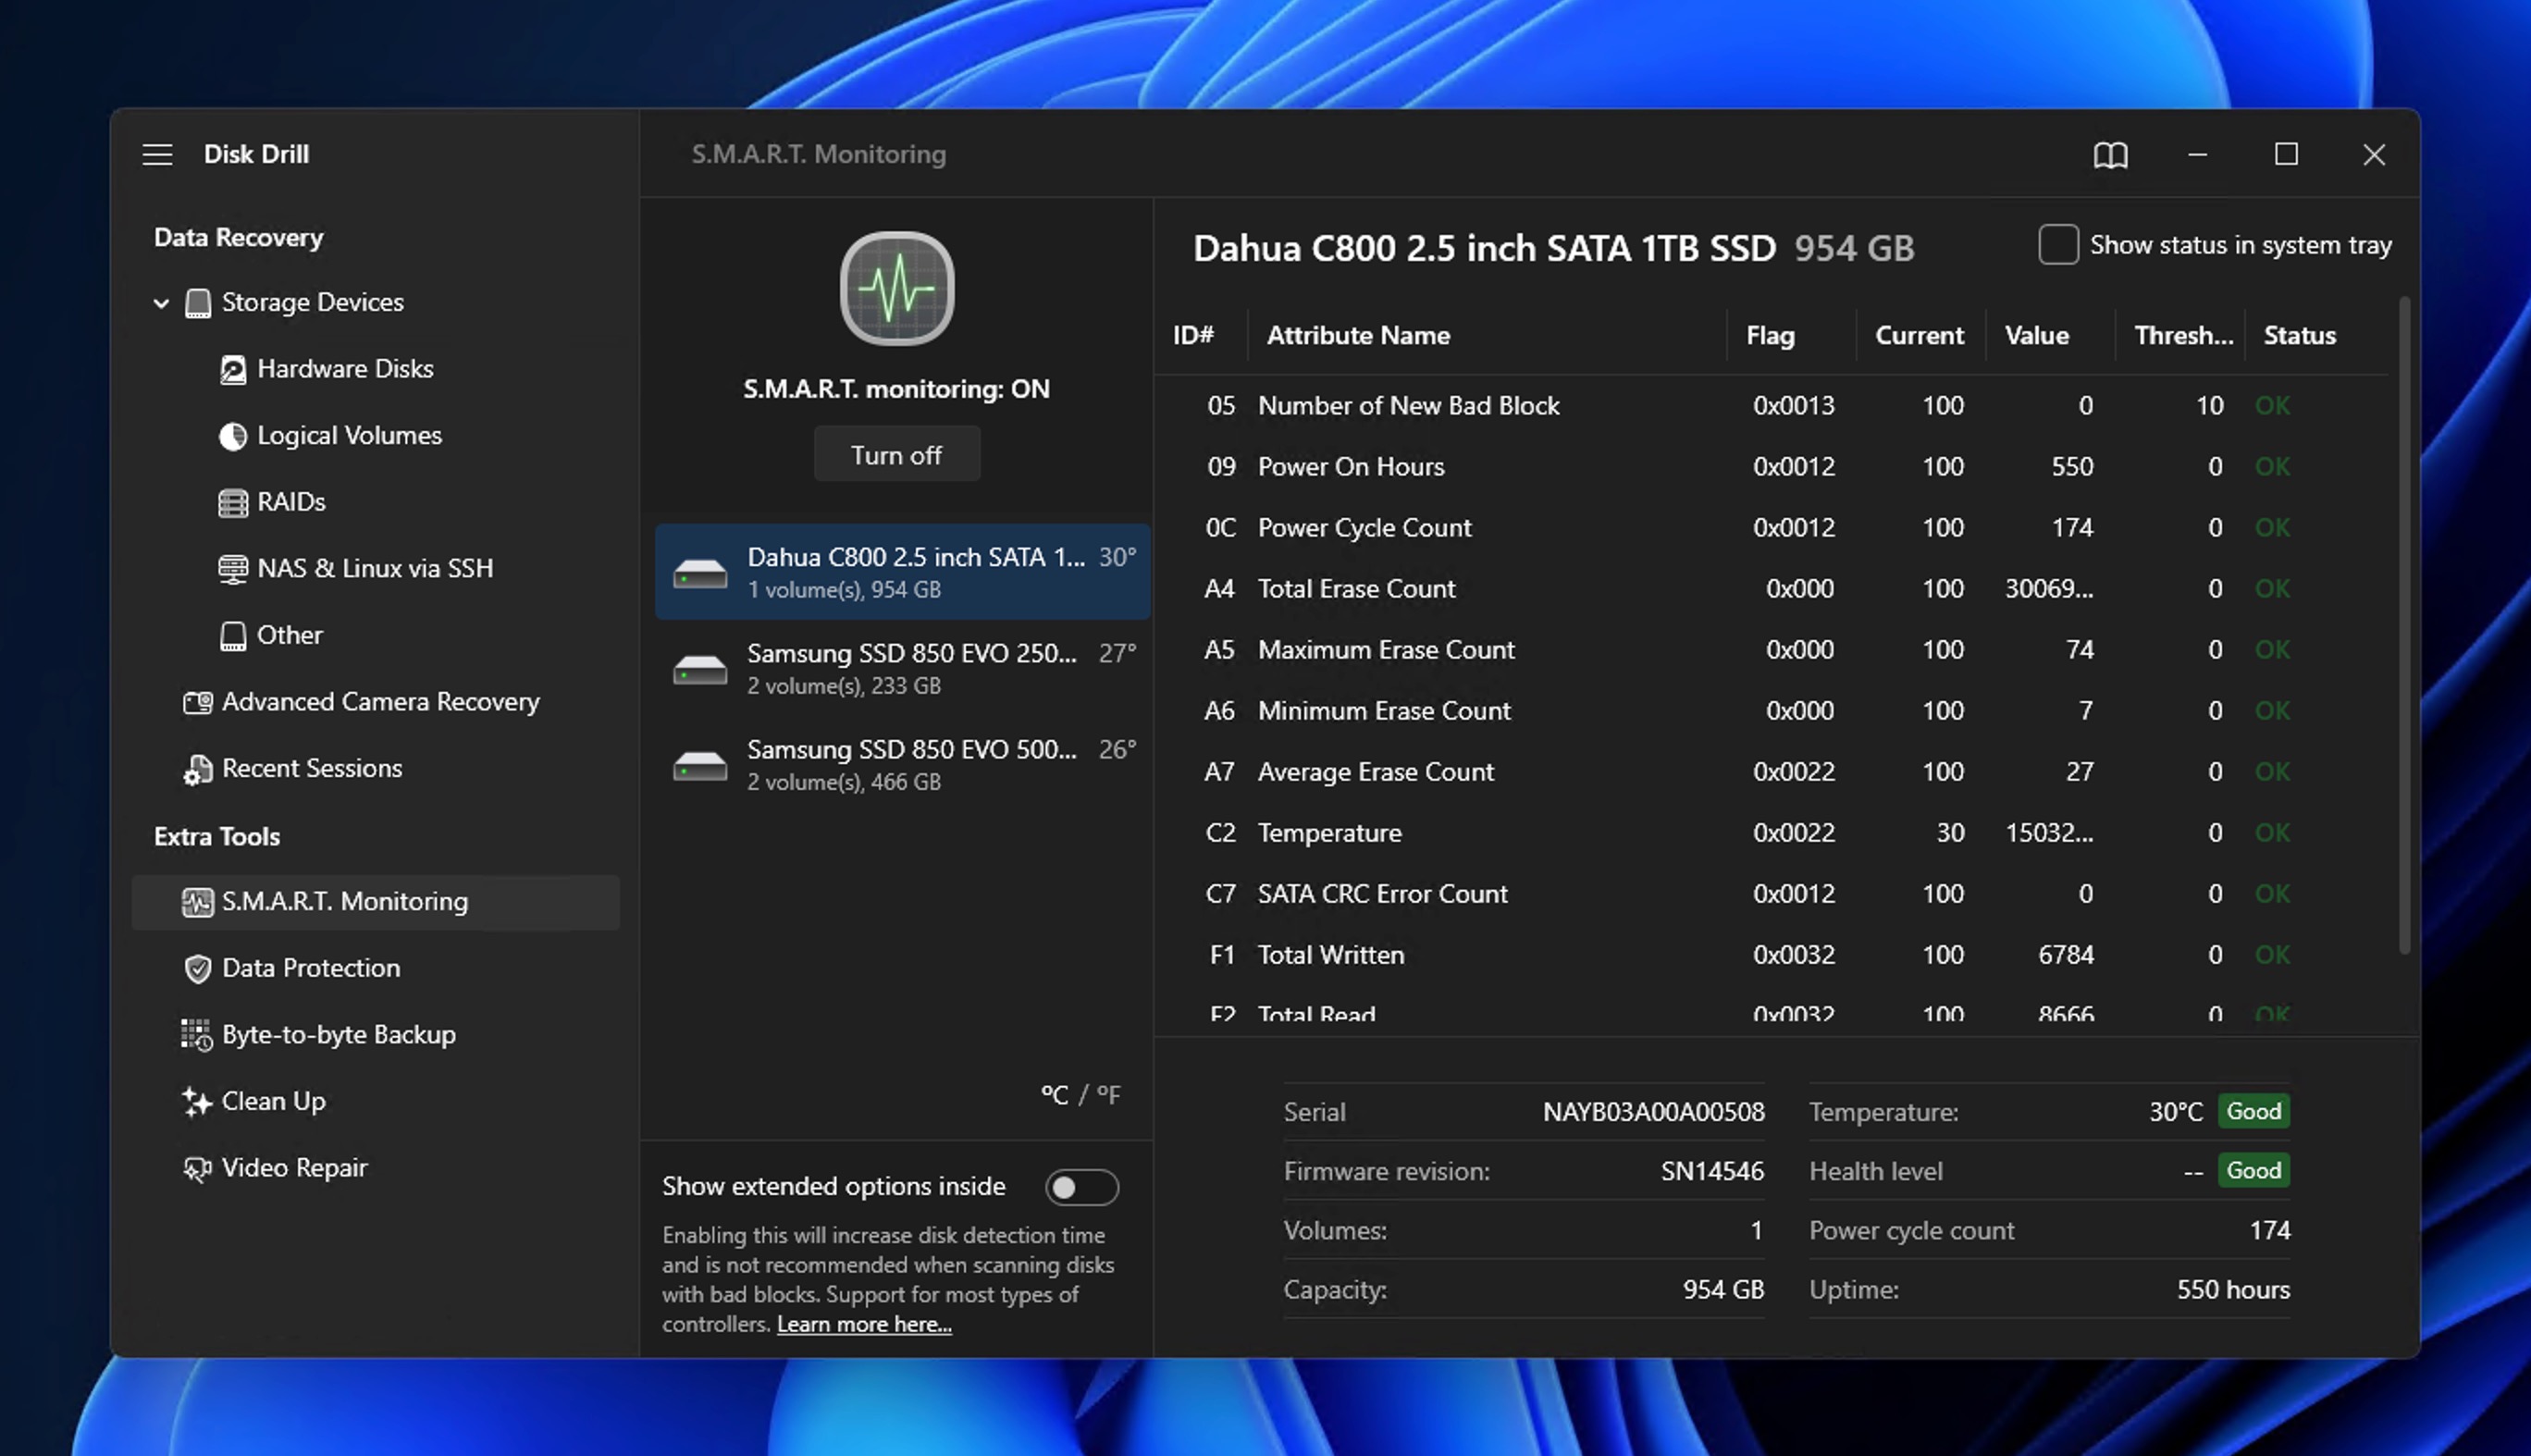
Does the capacity match and S.M.A.R.T. show no warnings? Then move on to the recovery workflow below.
How to Recover Data from a Hard Drive with Bad Sectors
The recovery of important data from a hard drive with bad sectors is a two-step process:
- First, you create a byte-to-byte disk image of the failing drive to capture everything still readable into a single image file (so the fragile disk only has to survive one careful pass instead of repeated scans).
- Second, you retrieve your files from that image while the damaged drive stays untouched.
Plenty of tools can handle disk imaging, and plenty can handle data recovery. For this guide, we’ll use Disk Drill because it covers both jobs in one interface.
What’s more, Disk Drill runs on Windows and Mac, so the steps below apply no matter what computer you have. Follow these steps to recover files from a hard drive with bad sectors without making the damage worse.
Step 1: Create a Byte-to-Byte Disk Image
The backup image of your damaged drive that you need to create will be as large as the full capacity of the drive (byte-to-byte copy includes every sector, even the empty ones), so you need to make sure the healthy destination drive has at least that much room, but ideally a bit more to stay safe.
For example, a 1 TB HDD needs roughly 1 TB of free space for the image, even if it only has 300 GB of files on it. Ideally, leave a little extra free space on the destination drive, too.
When you have a destination drive with enough free space on it ready, you can create the image:
- Download Disk Drill and install it. Pick any location except the failing drive.

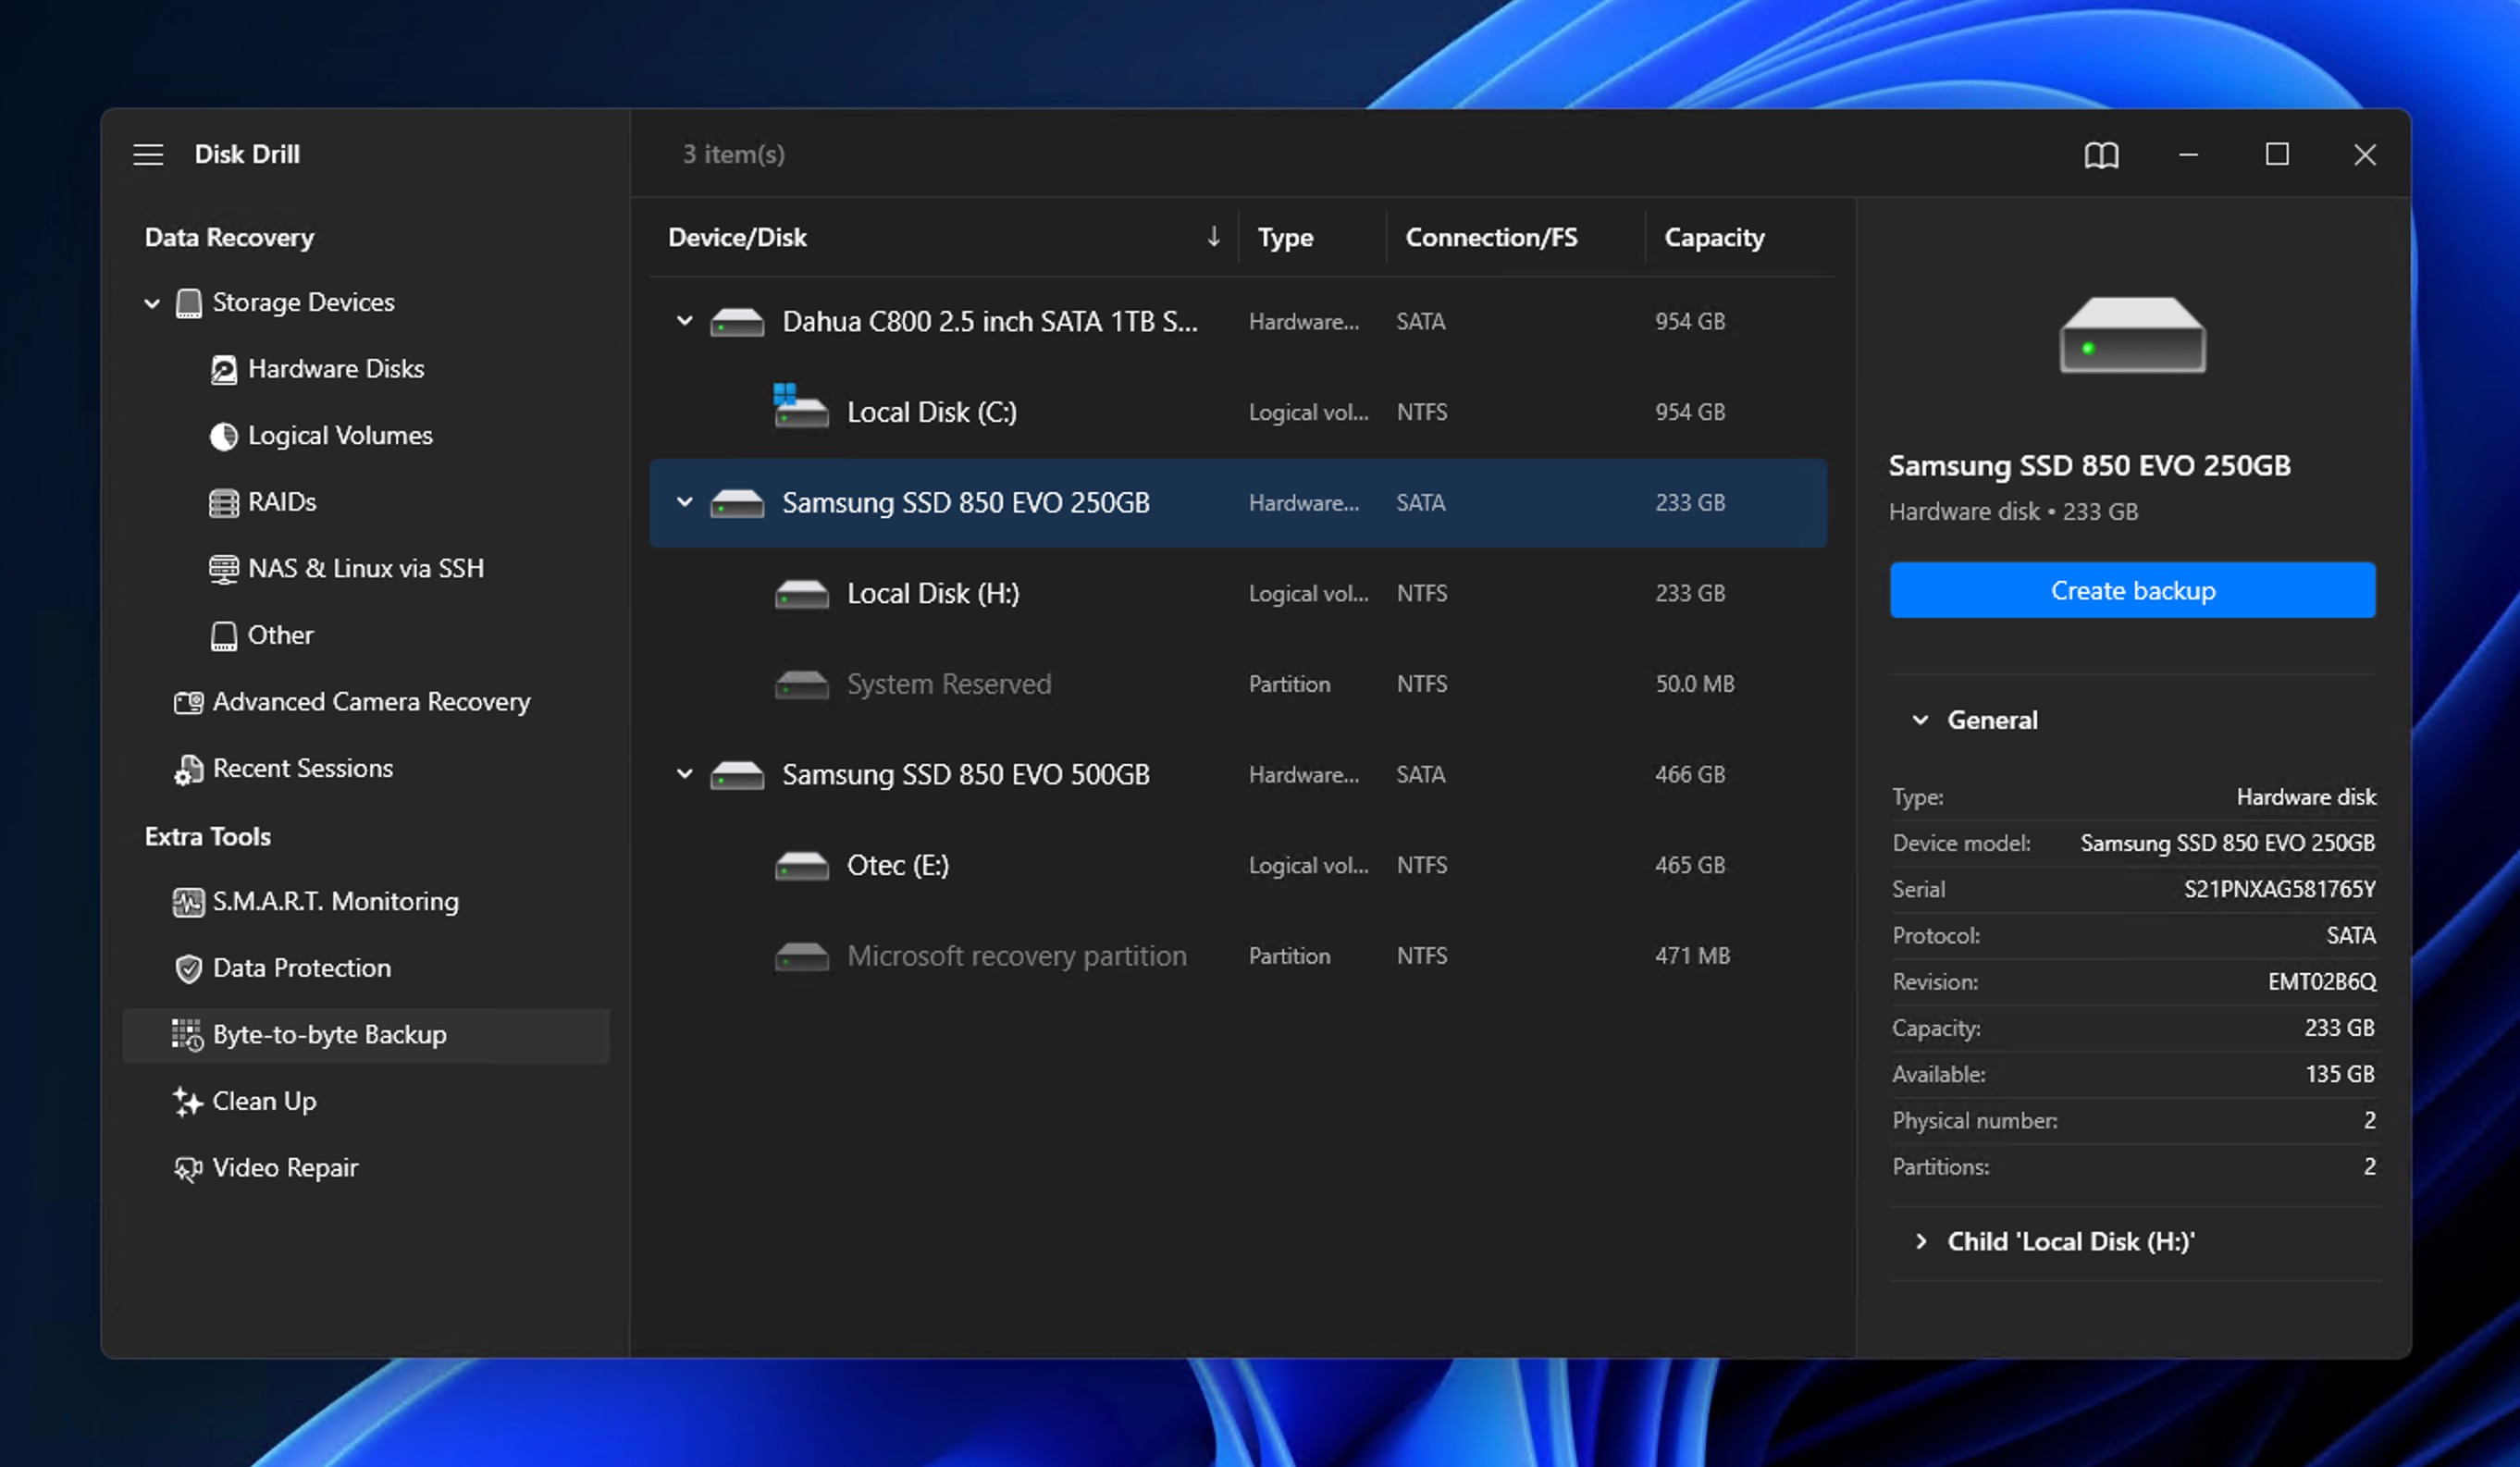
- Launch the app and select Byte-to-byte Backup in the sidebar.
- Choose the problem drive from the list.
- Click Create backup, choose a destination for the backup image, and let it run. On a damaged drive, this can take hours, and the time estimate may jump around. That’s normal. Disk Drill provides a visual map of the bad sectors, and you can finalize the image early if the areas you care about are already saved.
- Once it finishes, you’ll find the image file (
.ddon Windows,.dmgon macOS) in the destination folder.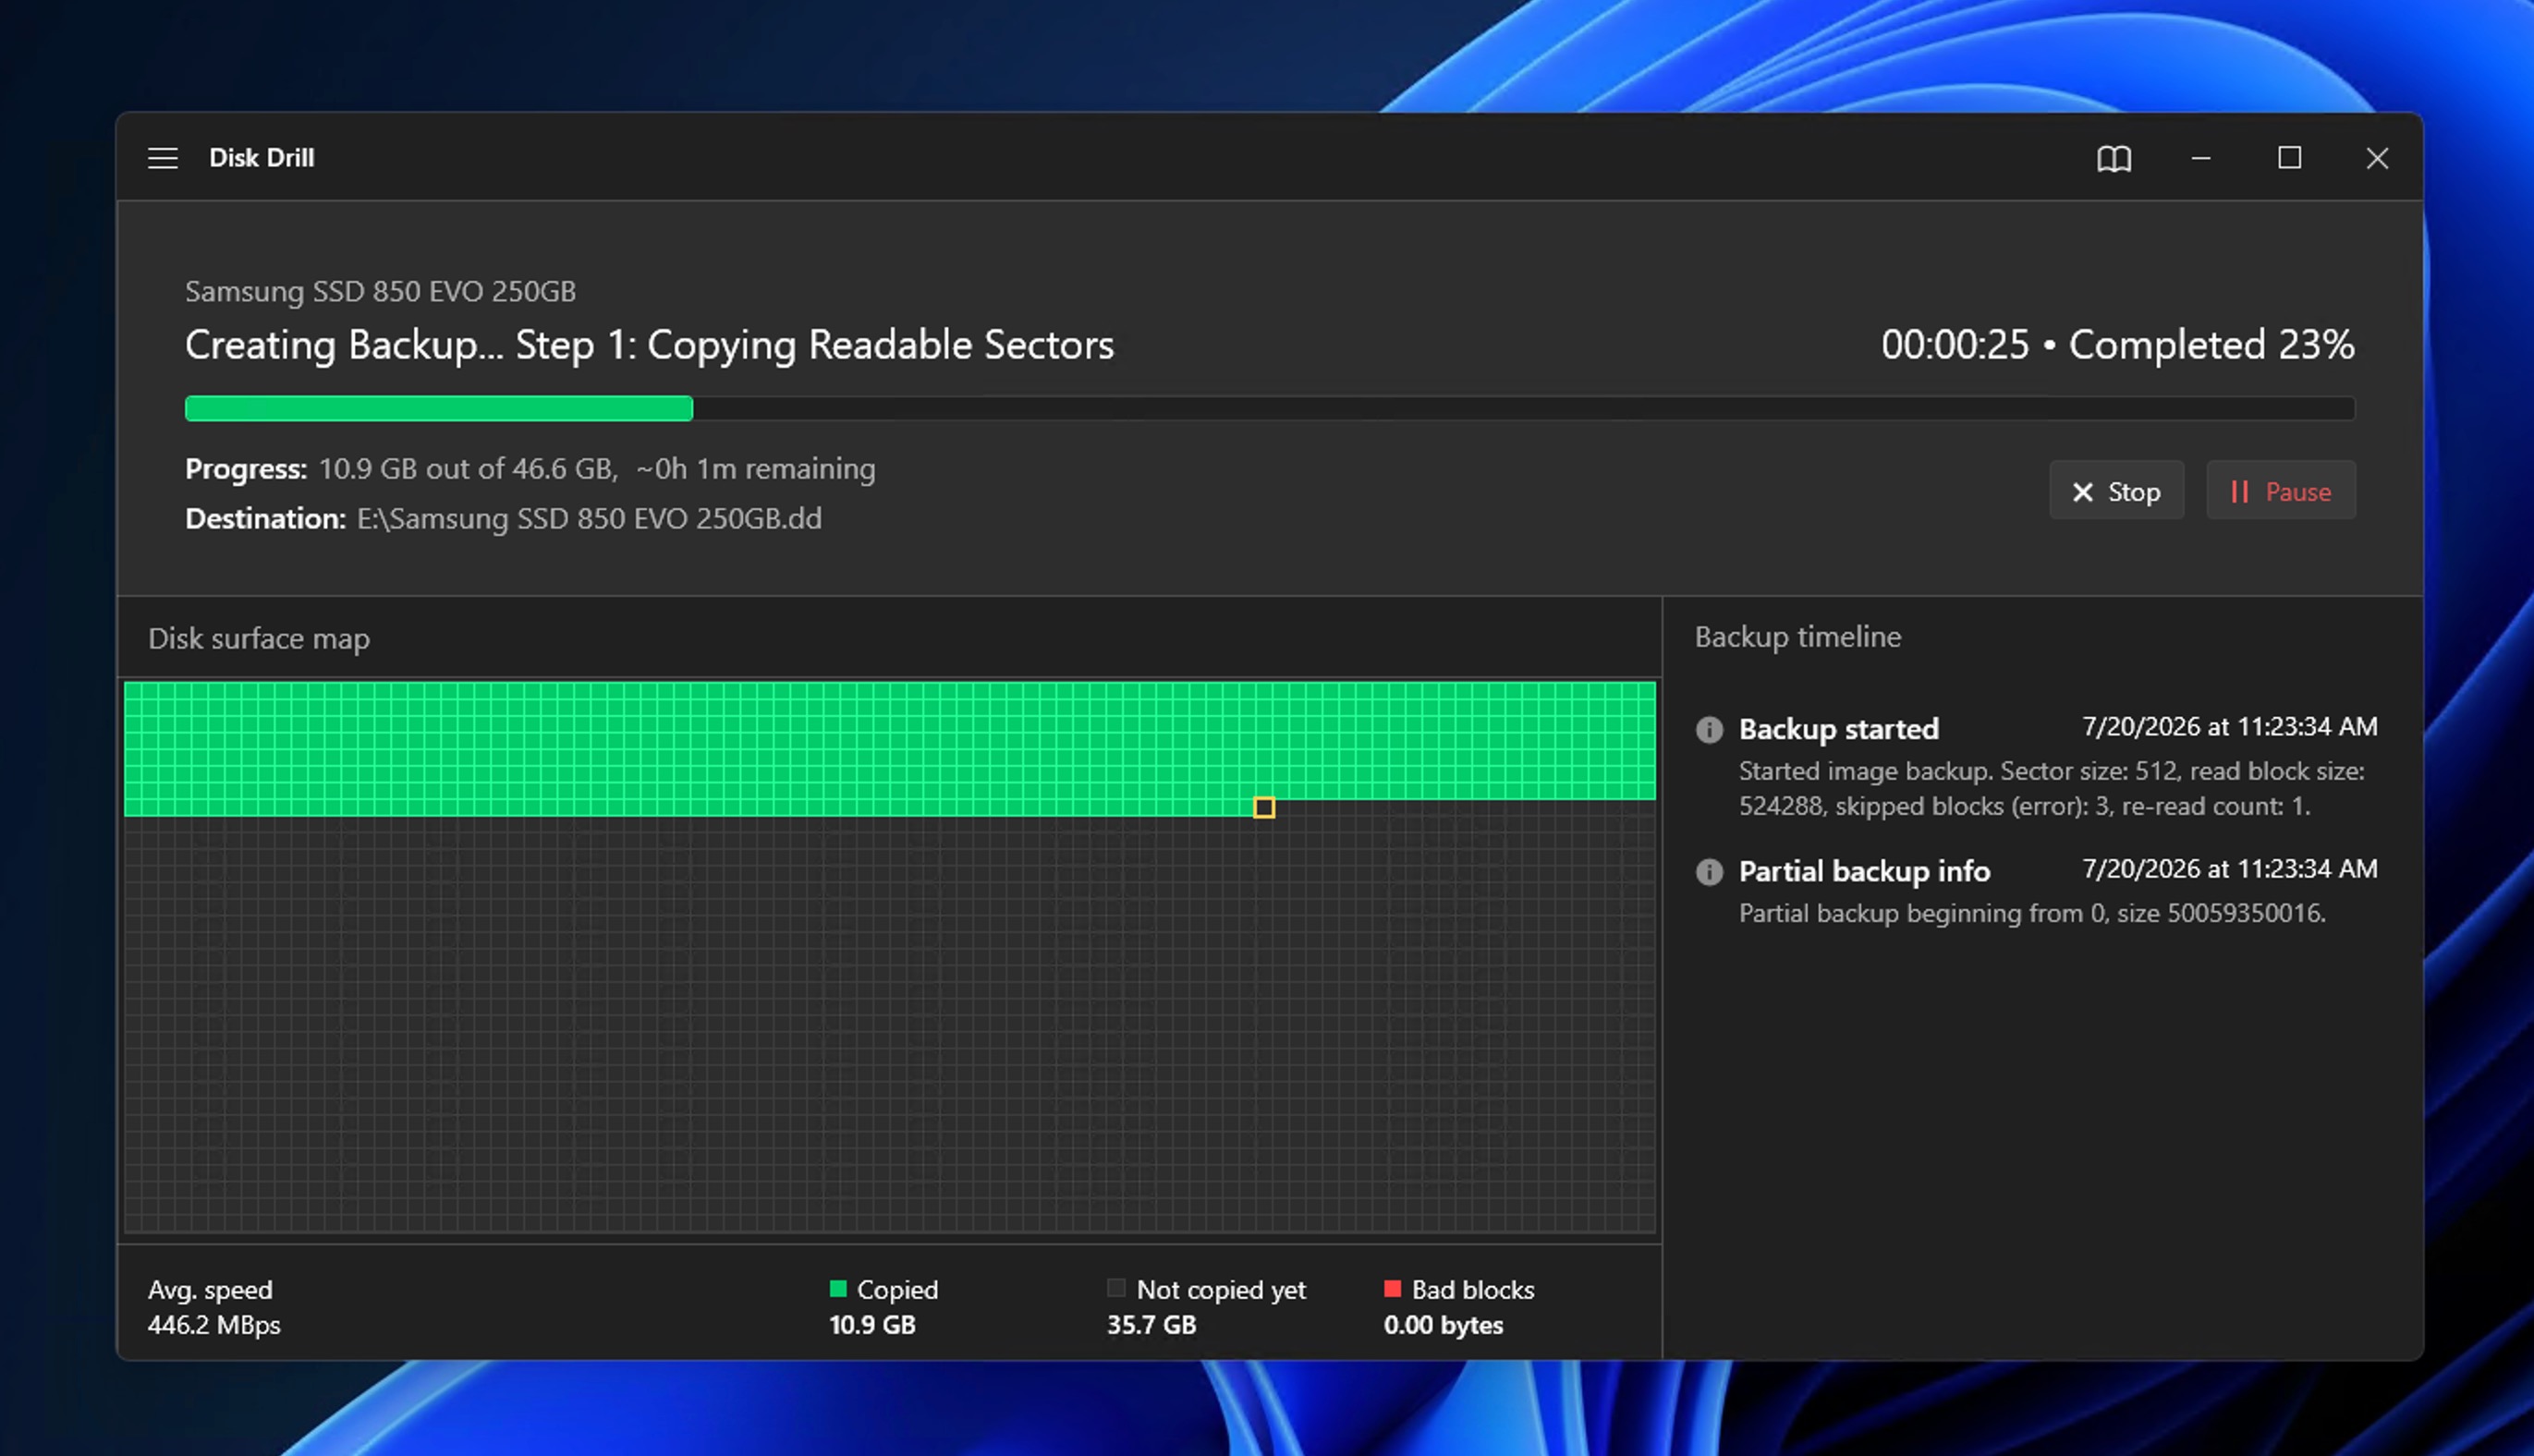
What makes Disk Drill’s byte-to-byte backup so great for damaged drives is how it handles bad blocks. Instead of getting stuck on the first unreadable spot, the scanner skips it and copies all healthy blocks first. Once that first pass is done, it goes back to the problem areas and retries them with a smaller cluster size to get out as much readable data as possible. As a result, the drive spends only the smallest amount of time necessary on damaged spots before it captures everything that’s easily readable.
Step 2: Retrieve Data from the Disk Image
With the image saved, the dangerous part is over. From here on, every scan touches only the copy, so you can recover data from an HDD with bad sectors at your own pace. There are several recovery tools that could handle this part, but not all of them accept disk images. Pick software that can attach or scan an image file directly. Disk Drill can, so let’s continue with it:
- Open Disk Drill and stay on the Storage Devices tab.
- Click Attach disk image and select the
.ddor.dmgfile you created in Step 1.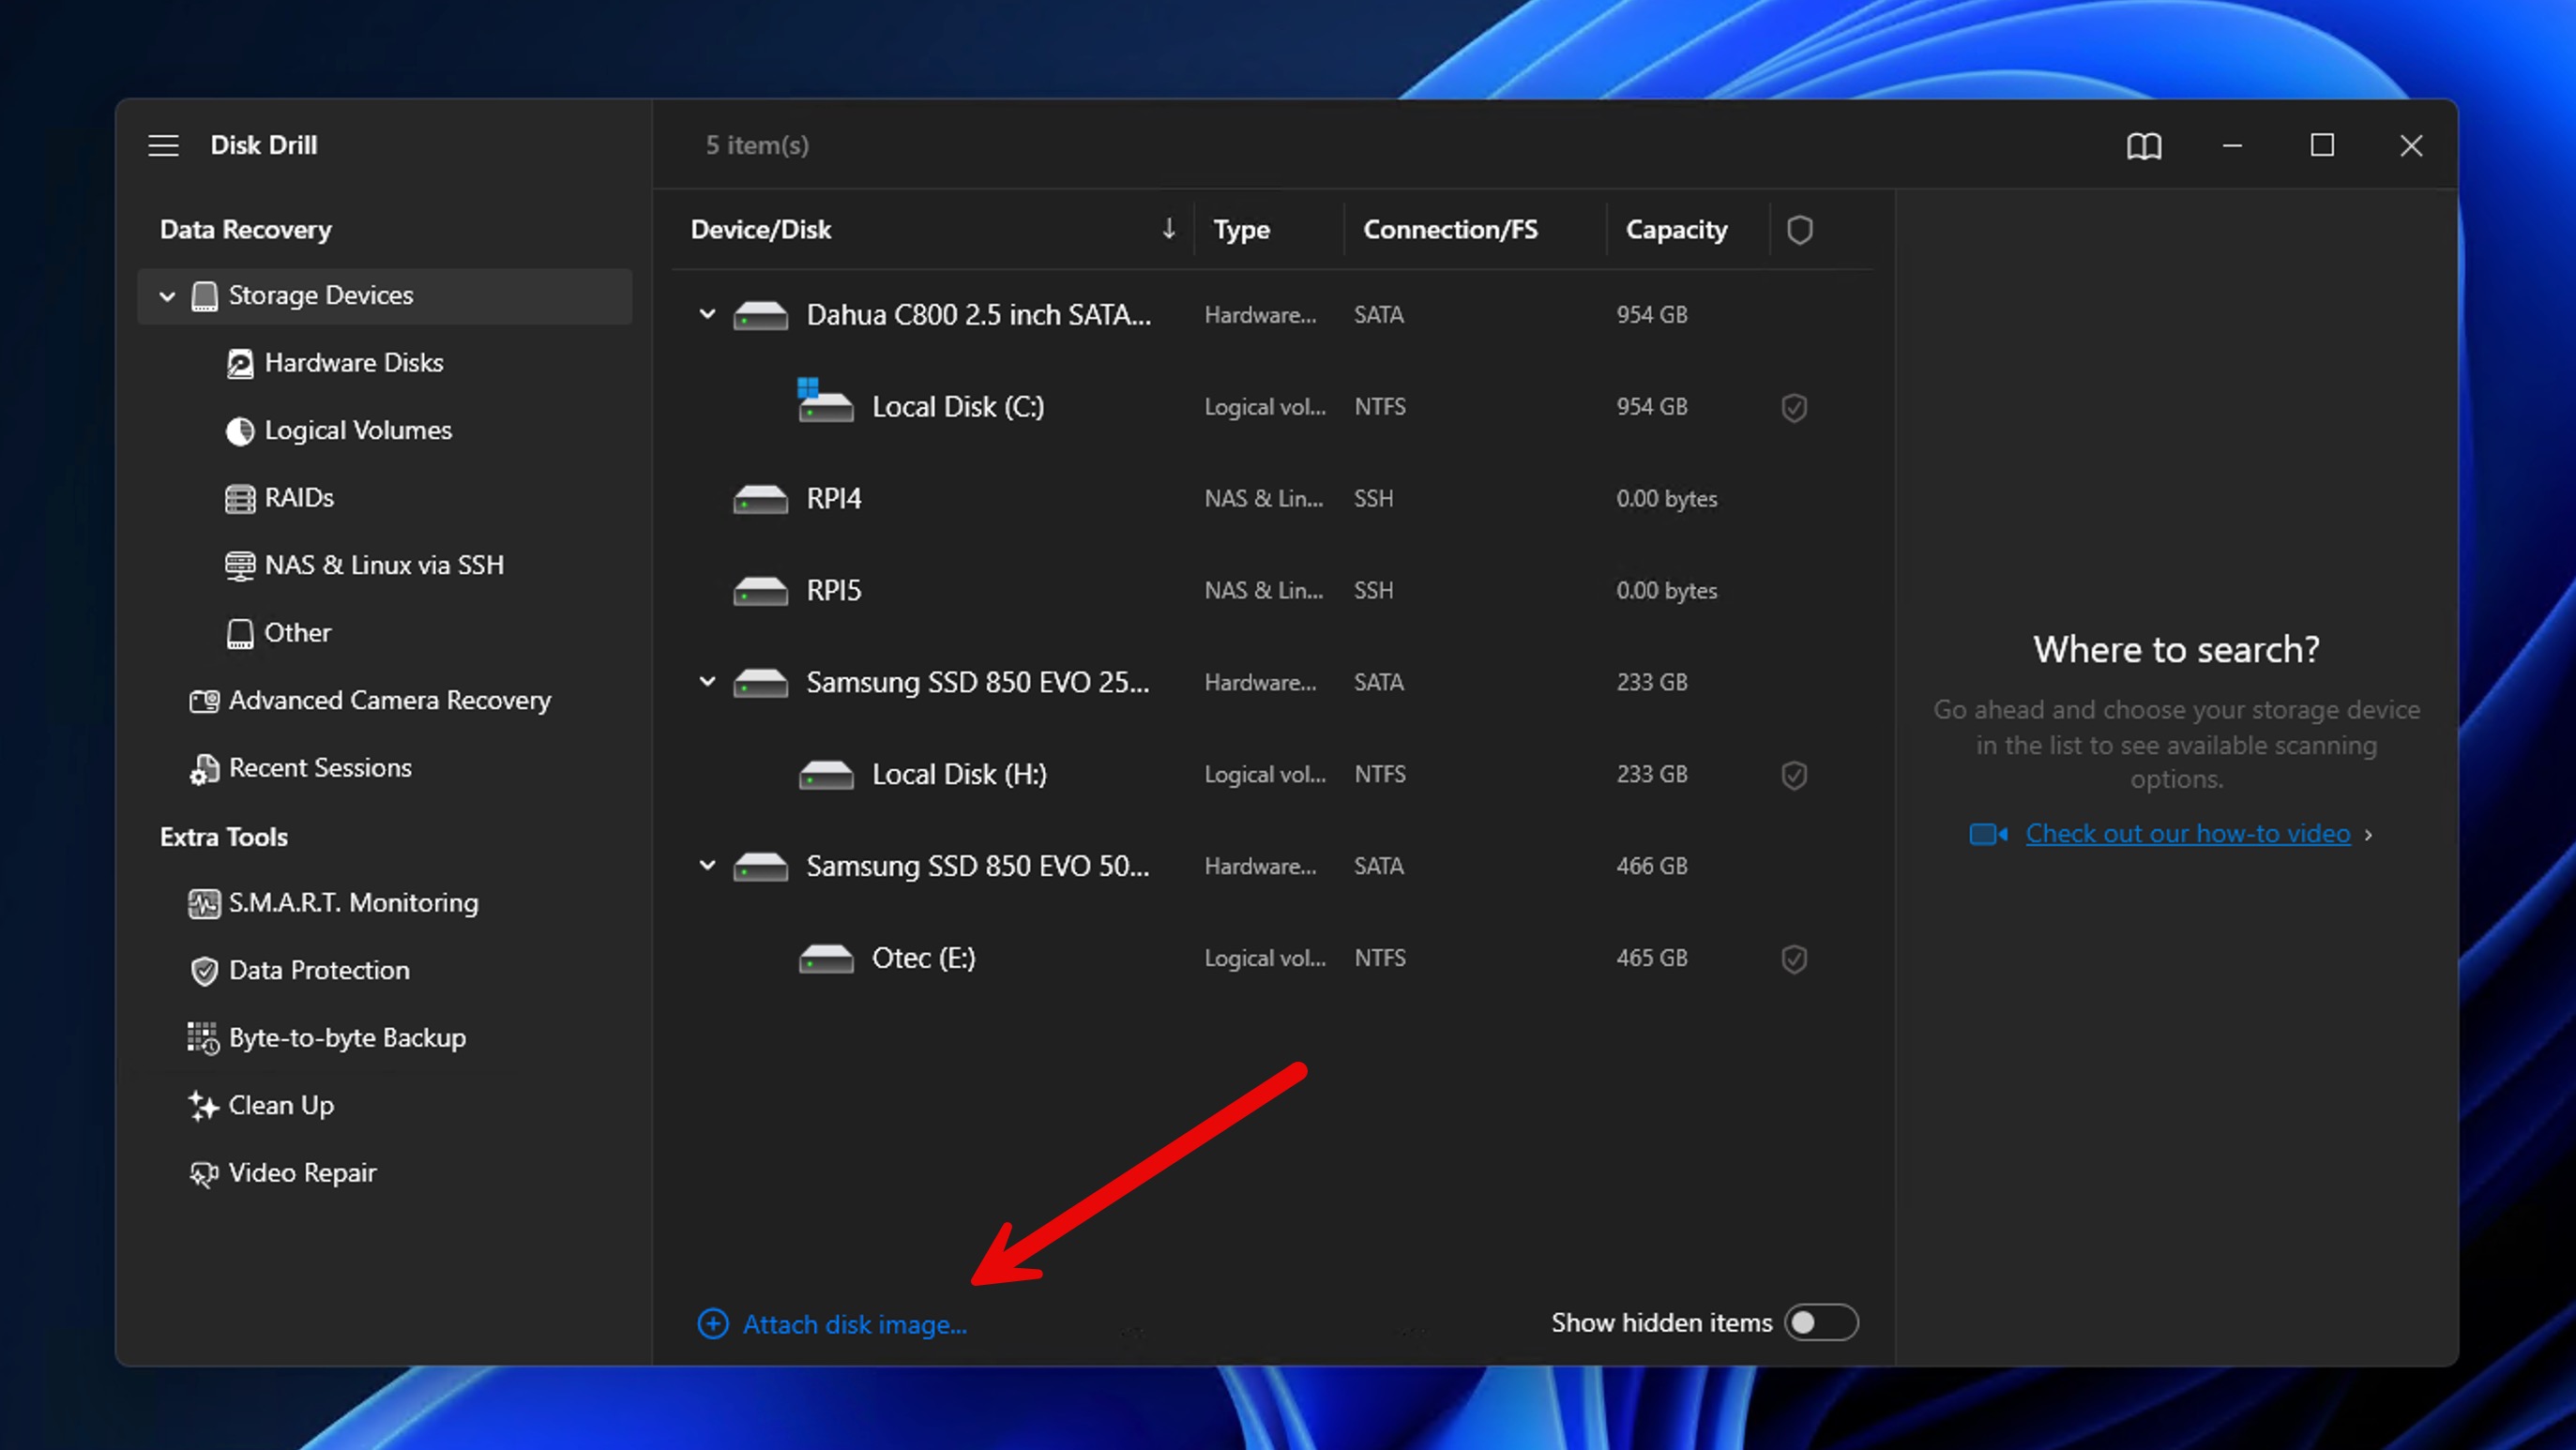
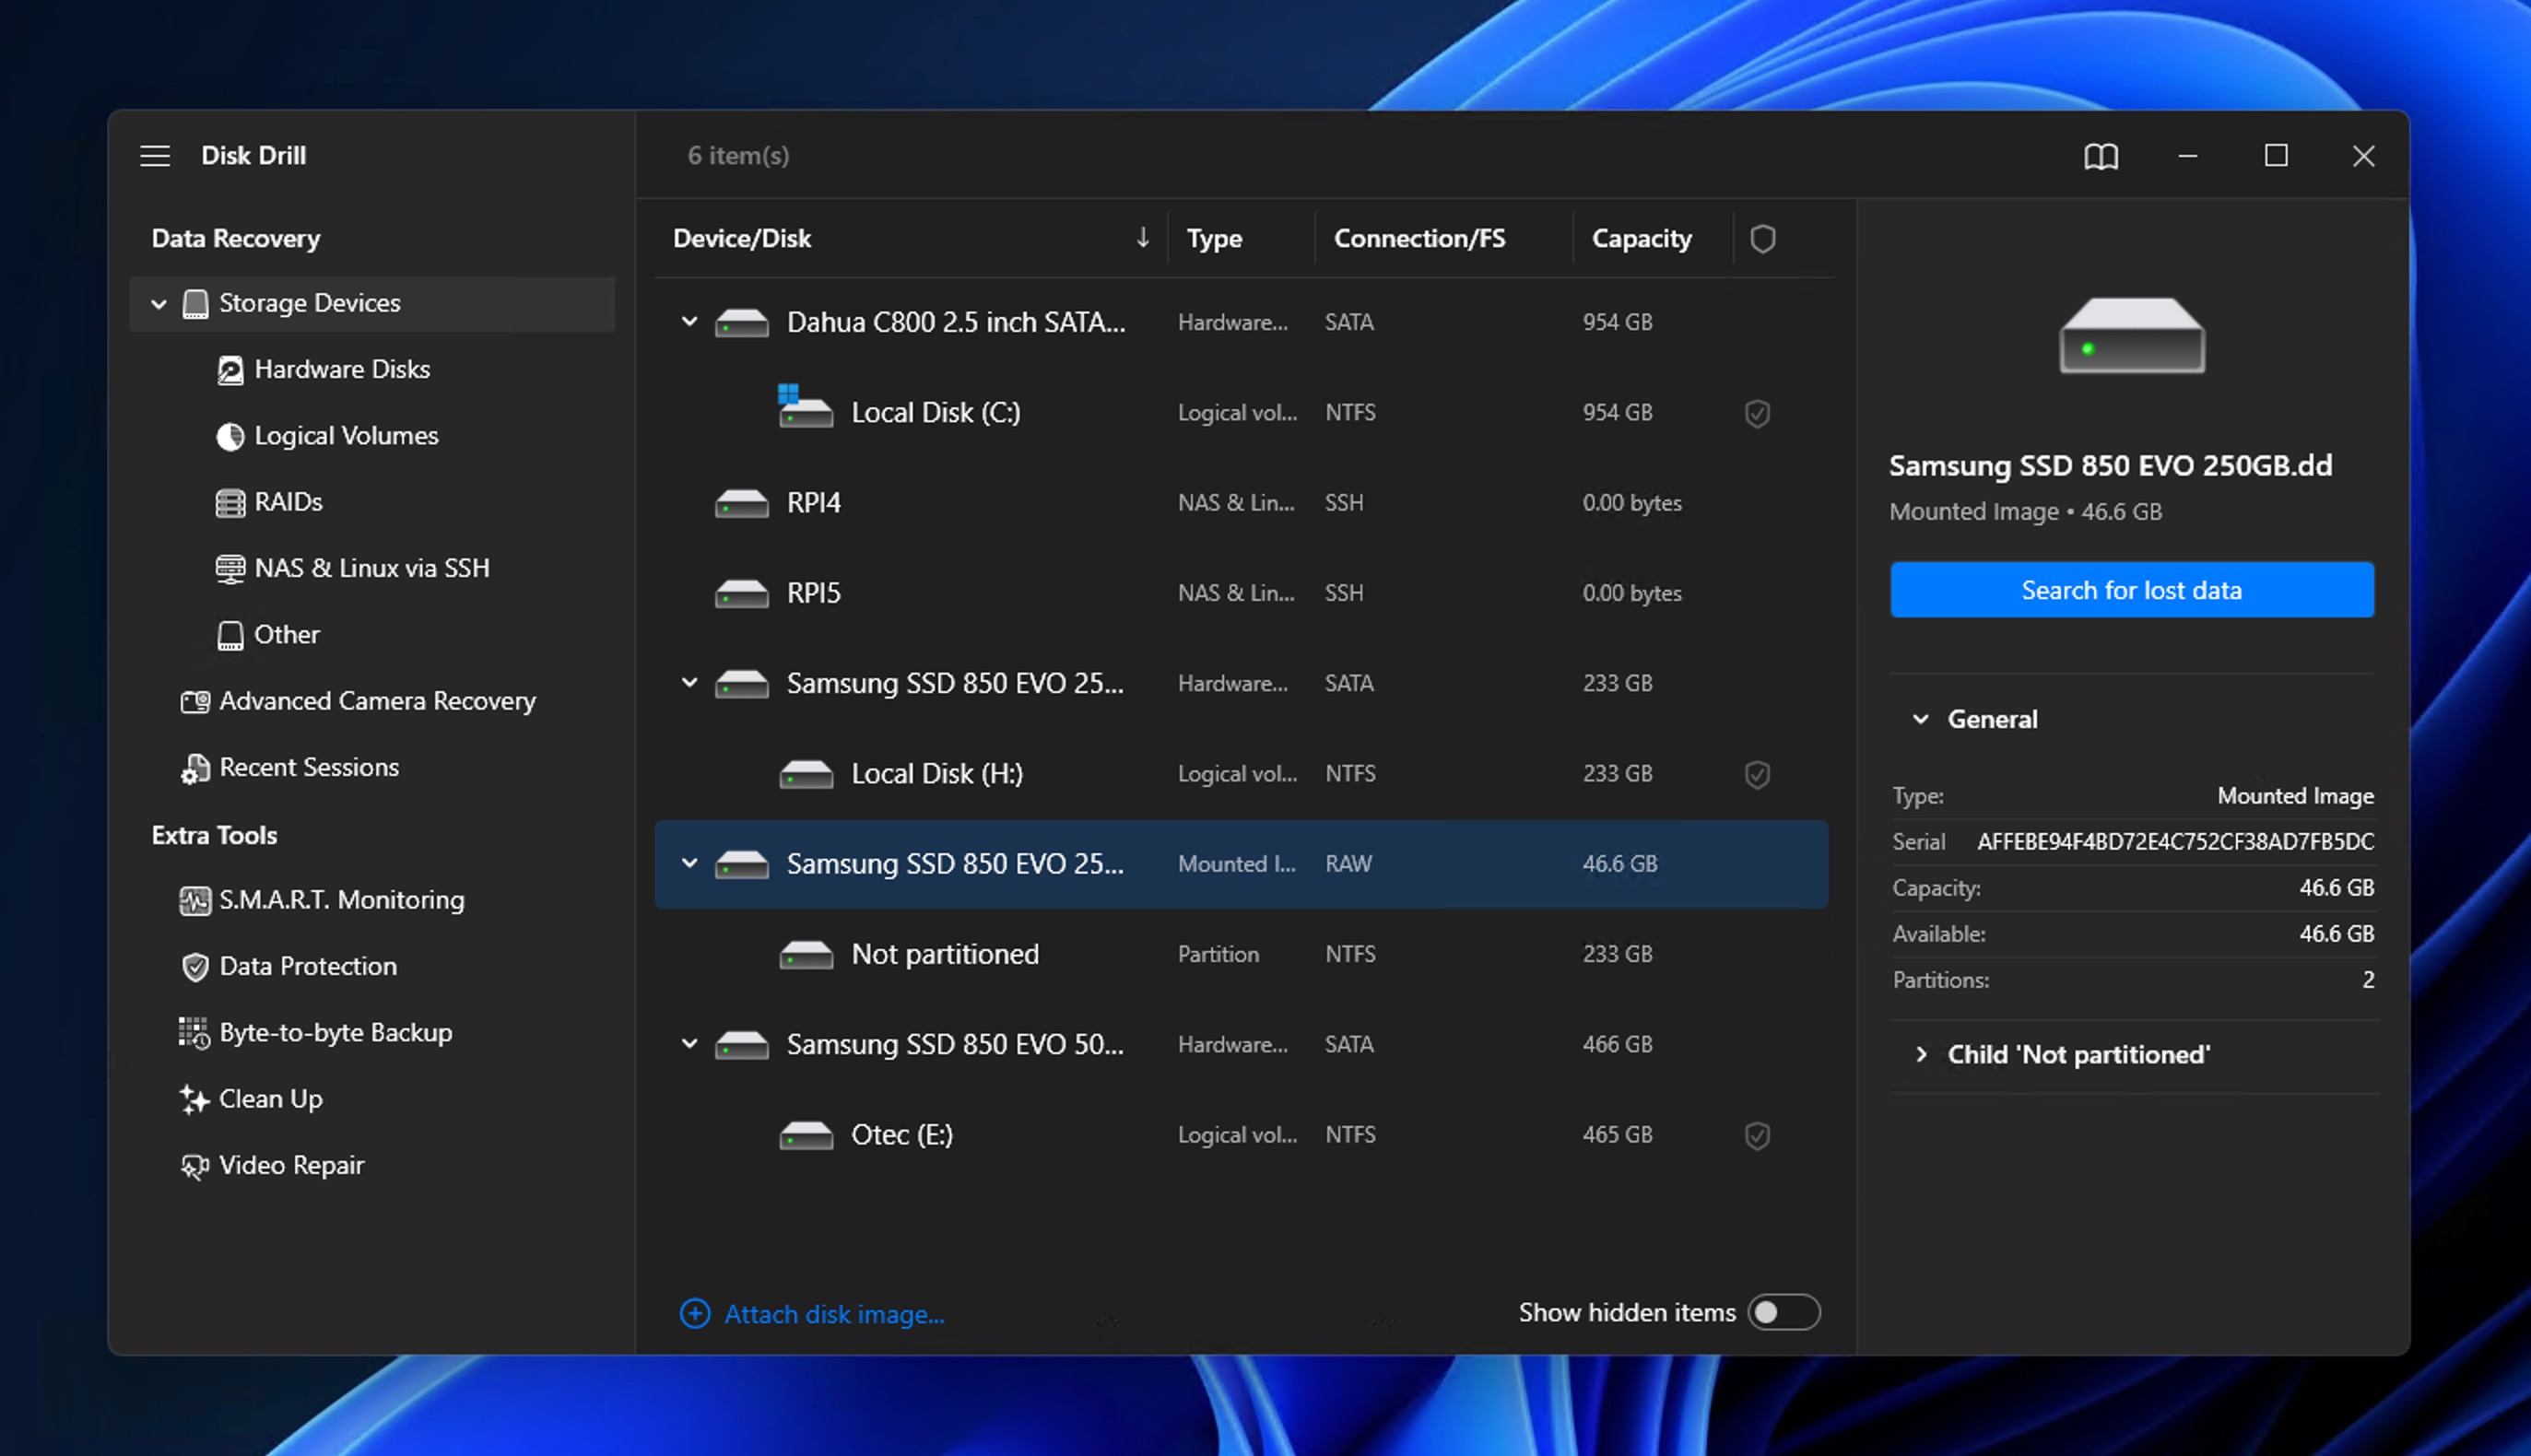
- Select the attached image in the device list and click Search for lost data.
- Wait for the scan to complete, then click Review found items.
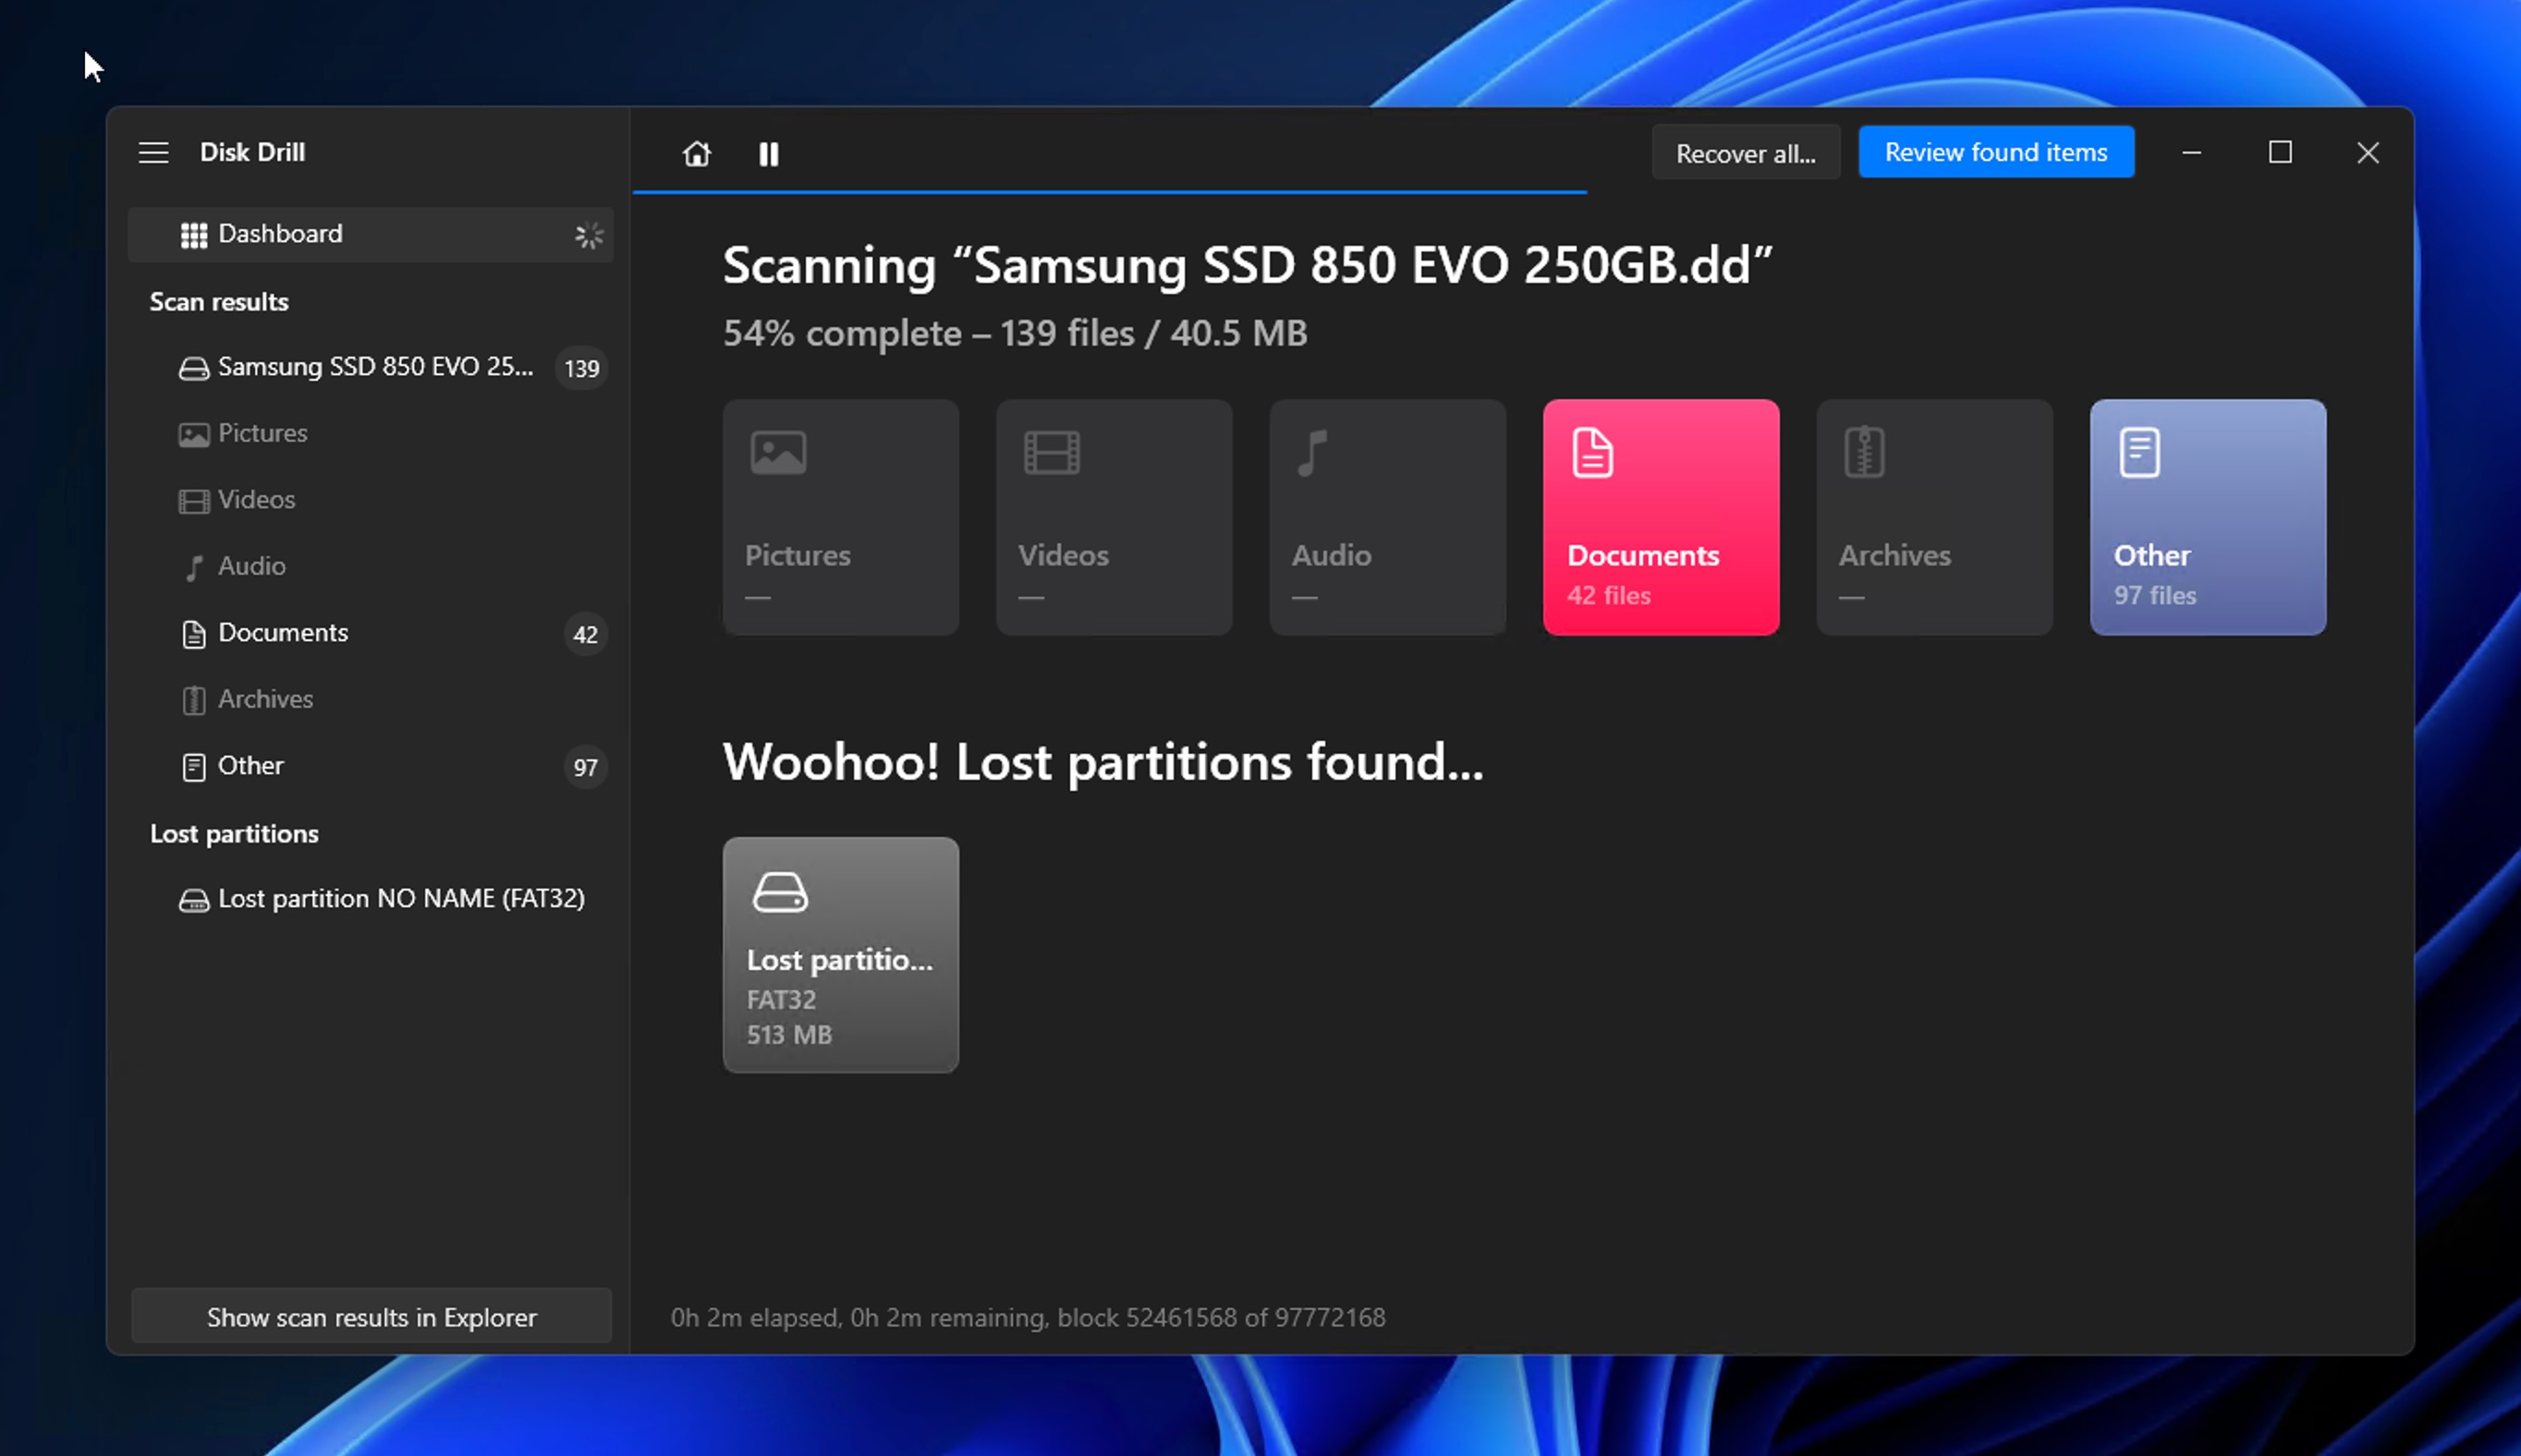
- Browse the results by category, or type a file name or extension into the search field. Click the eye icon next to any file to preview it.
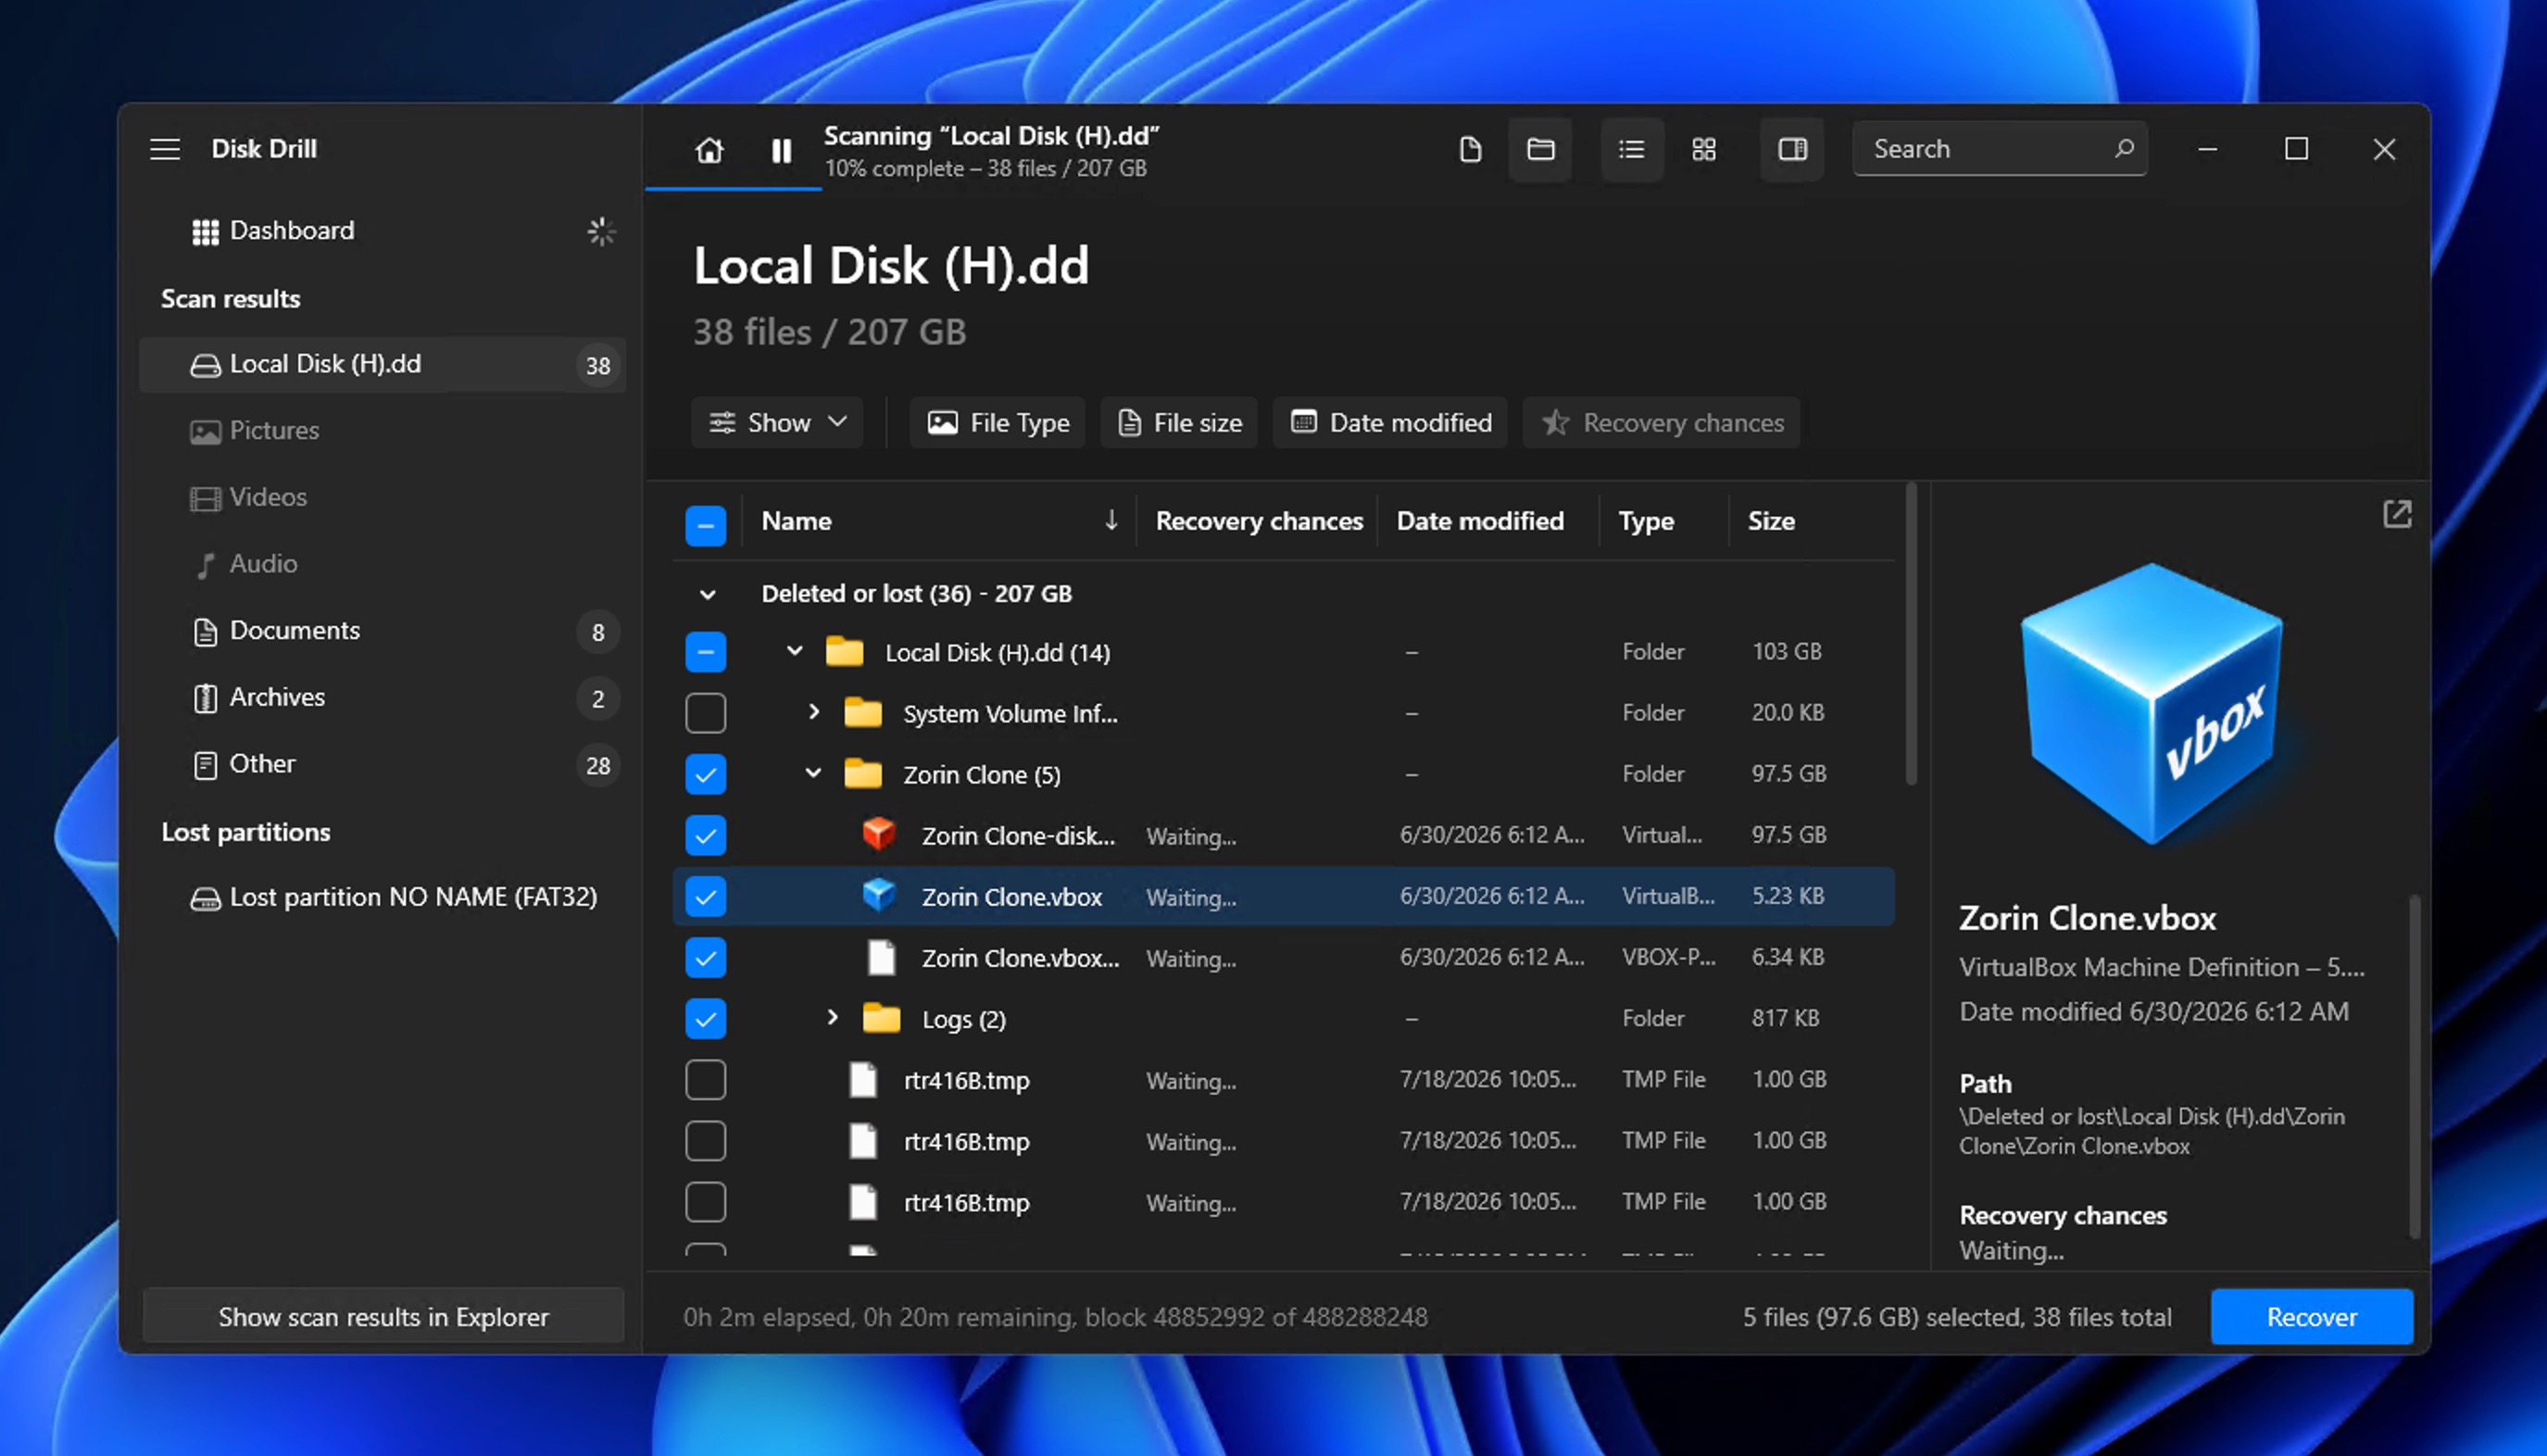
- Tick the files you want, click Recover, and choose a destination on a healthy drive. Never the original one.
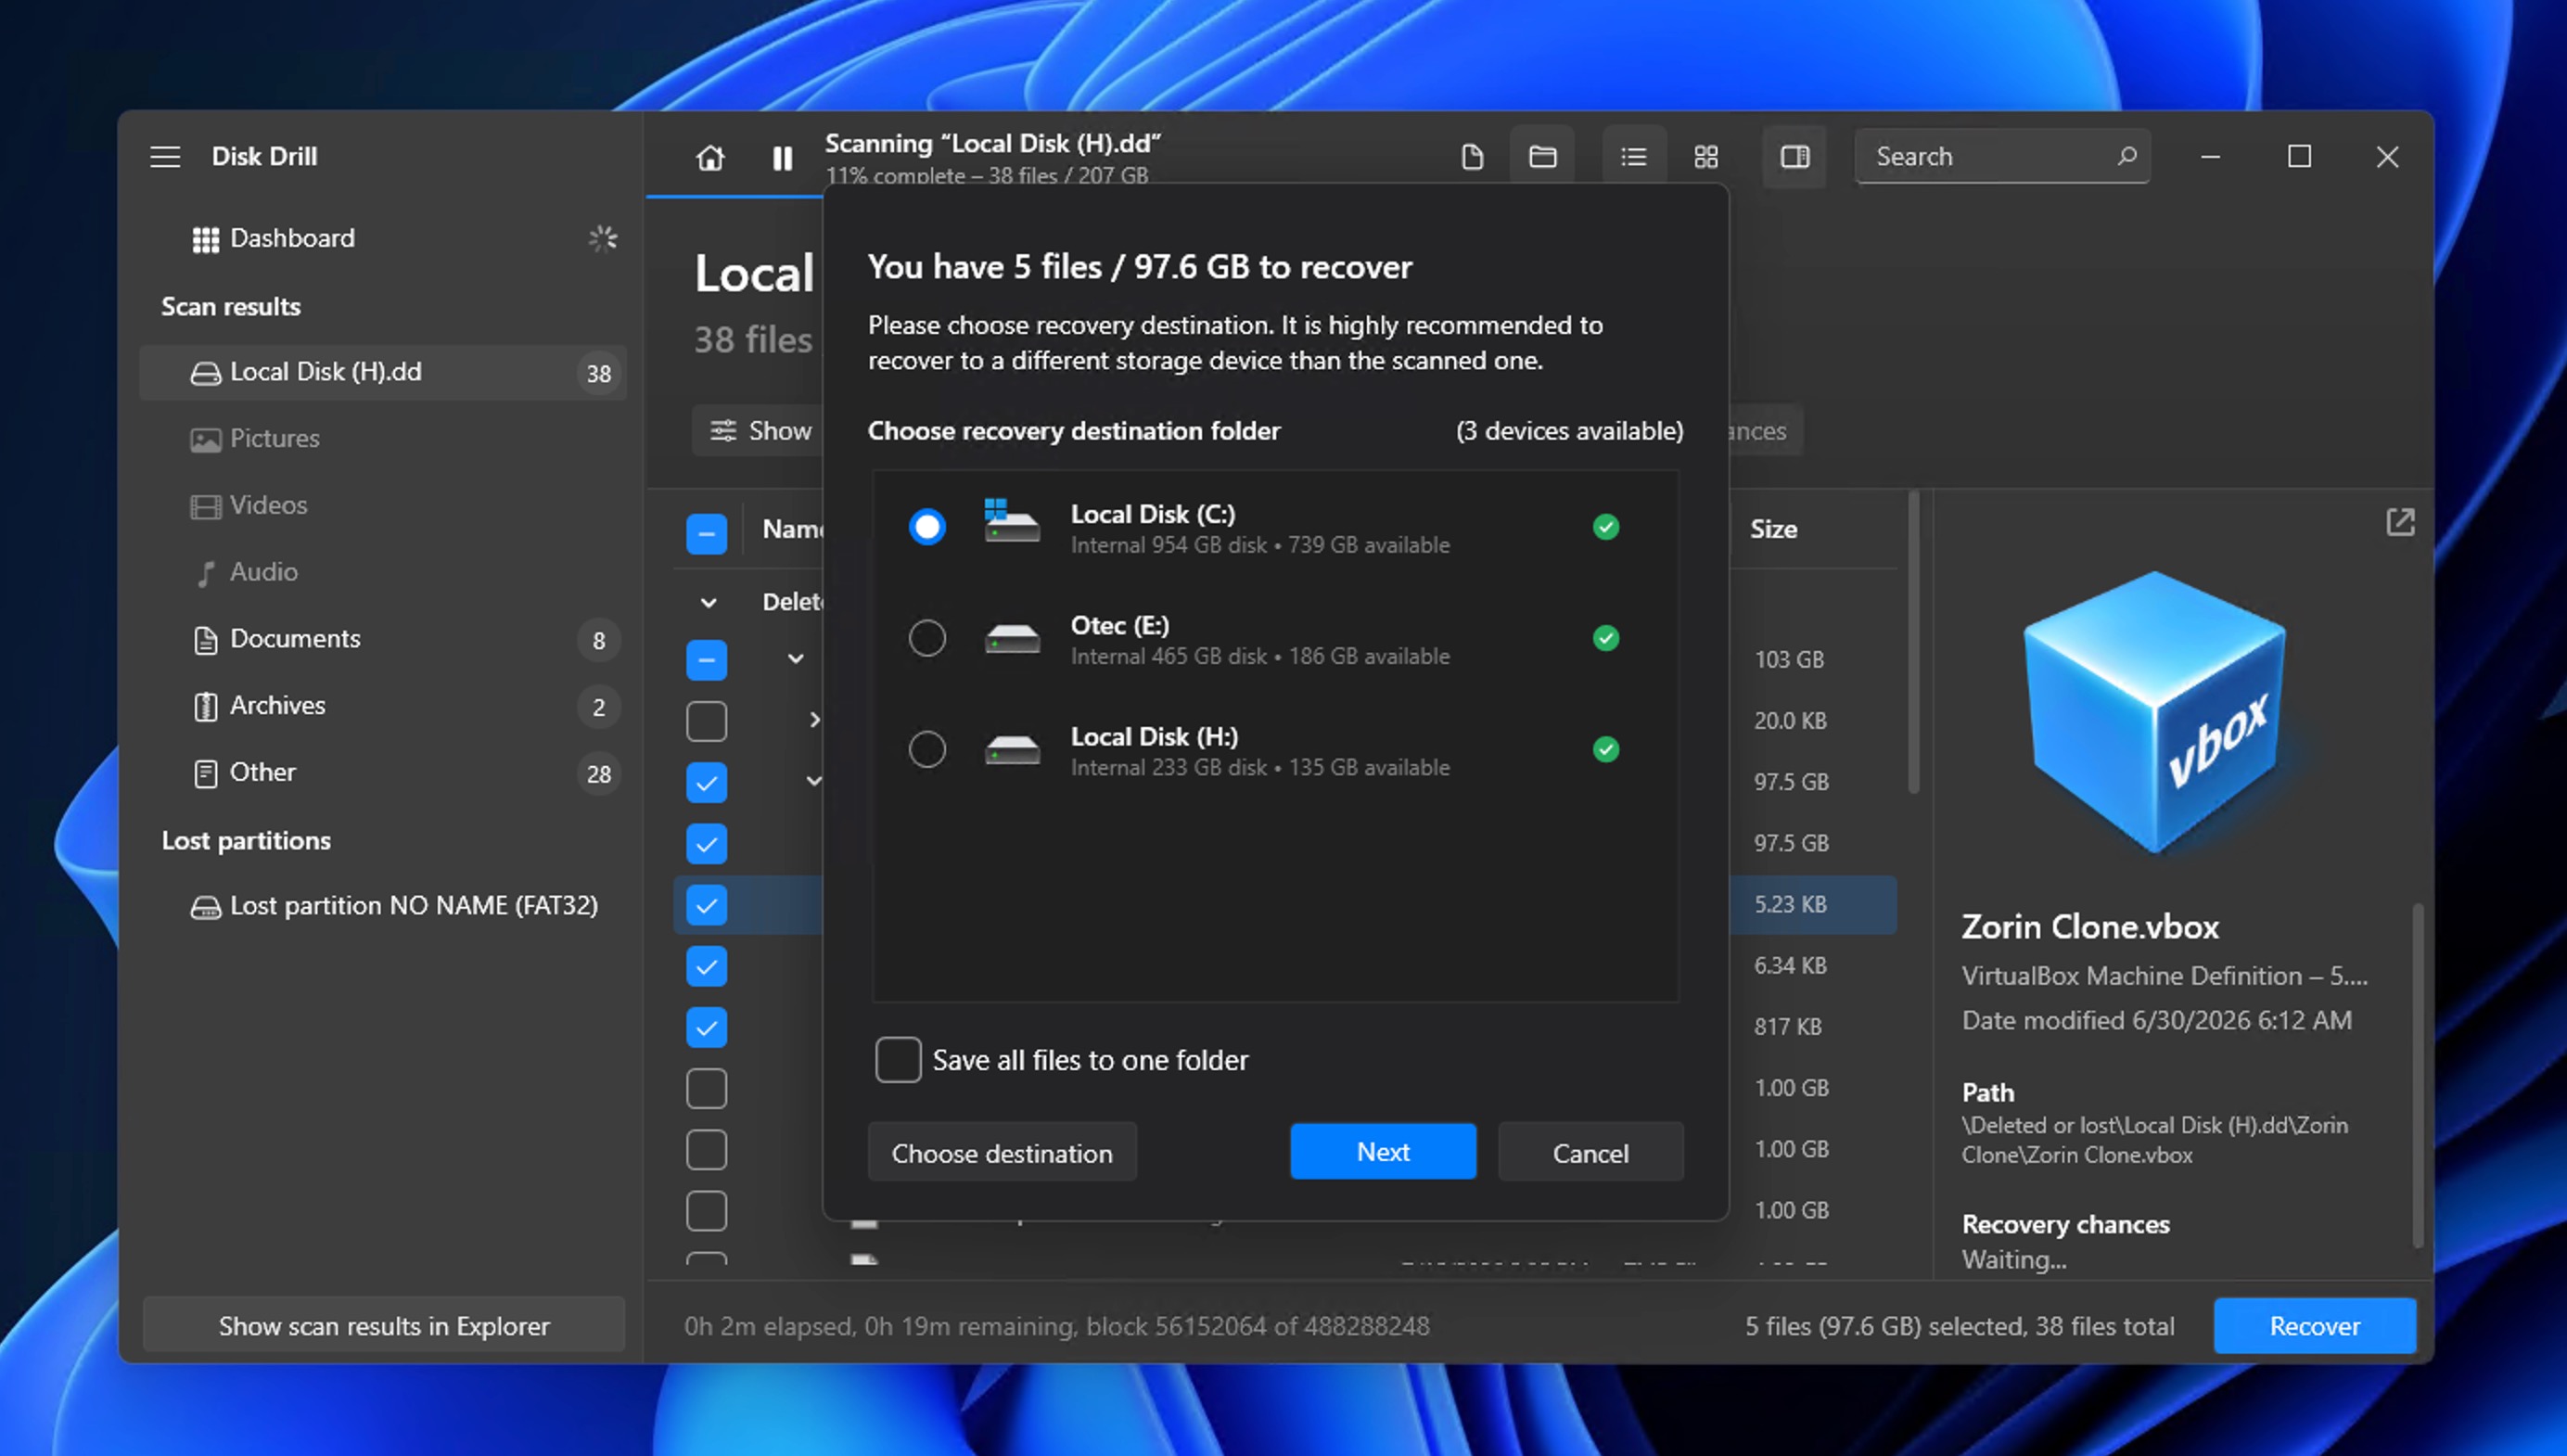
One thing that surprises people is that the scan often shows more files than the drive held before it started failing. Disk Drill also digs up deleted and lost files from older file system records and signature scans. Some of that may be data you deleted ages ago and still want back, so check the Deleted or lost category and use the preview before you commit.
Can You Repair Bad Sectors After Recovery?
It depends on which type you’re dealing with. Logical bad sectors can usually be fixed for good, but physical ones can’t, so a drive that has developed them rarely becomes trustworthy again. At best, it becomes temporarily usable.
The reason is that physical bad sectors can’t actually be “repaired.” When a tool “fixes” one, it really just marks the spot as off-limits so the file system stops using it. The drive may also remap it to a spare sector it keeps in reserve. Either way, the damage stays where it was, and the drive simply steps around it, which can stop read/write operations from freezing your file explorer or even the whole operating system.
If you want to trigger that remapping yourself, a free portable tool called Victoria (the website is Russian) can do it. Its Remap mode scans the entire disk surface and tells the drive’s firmware to swap each bad sector it finds for a spare one.
Here’s how to map out physical bad sectors with Victoria:
- Download Victoria (besides the official website, you can also get it from SourceForge) and unzip it. The tool is portable, so there’s nothing to install.
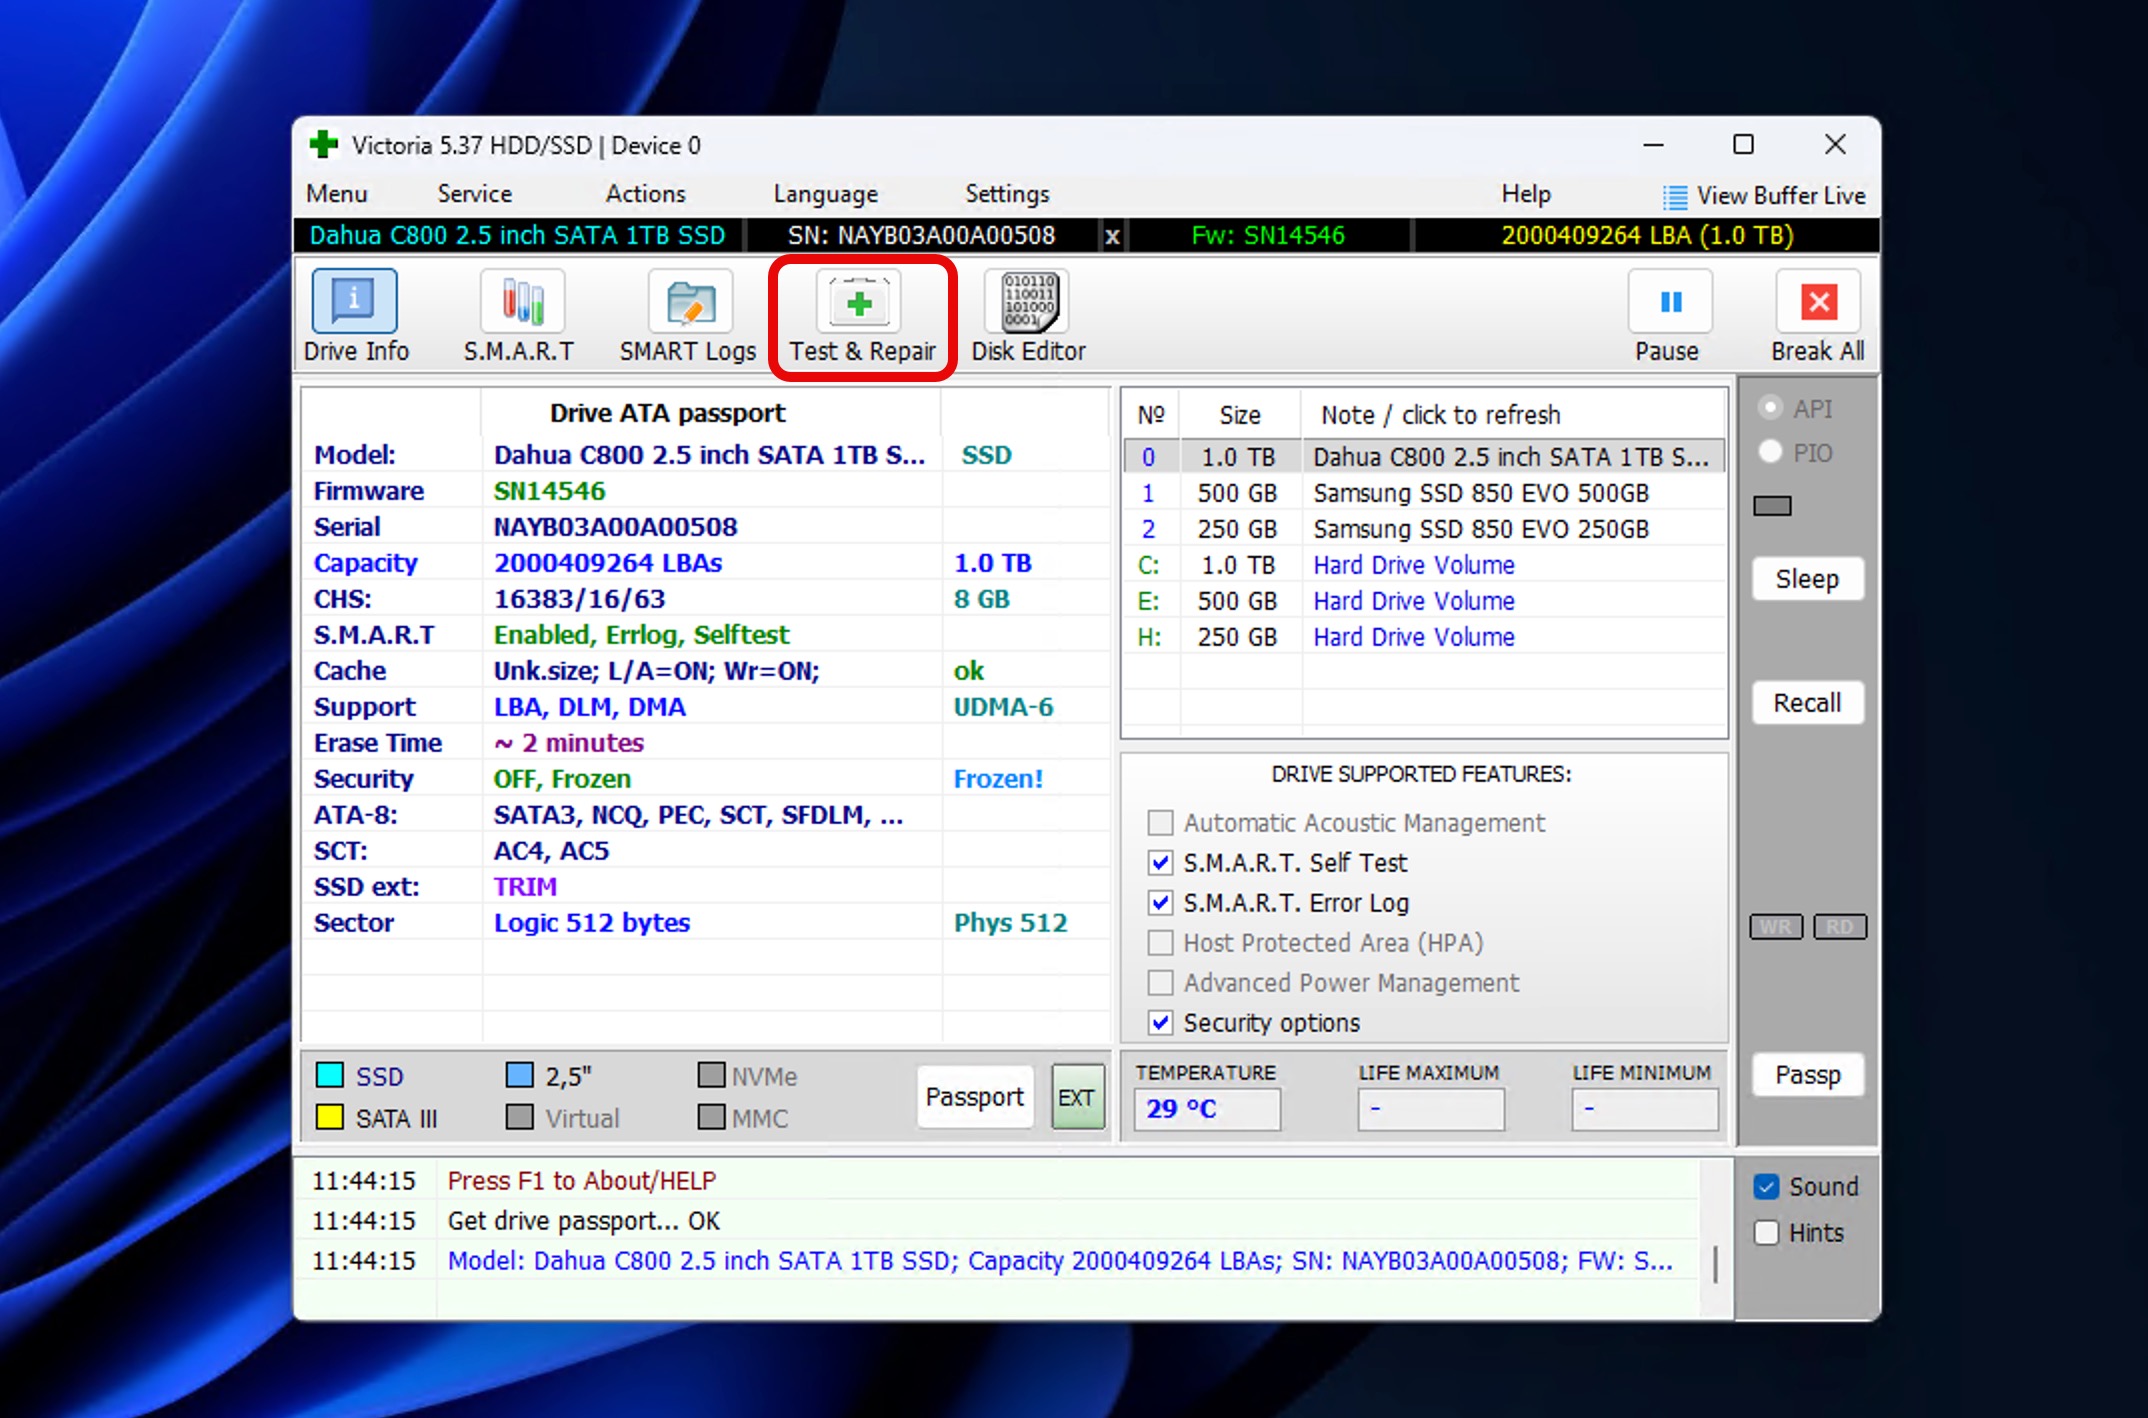
- Run it as administrator and pick the problem drive from the list.
- Open the Test & Repair tab.
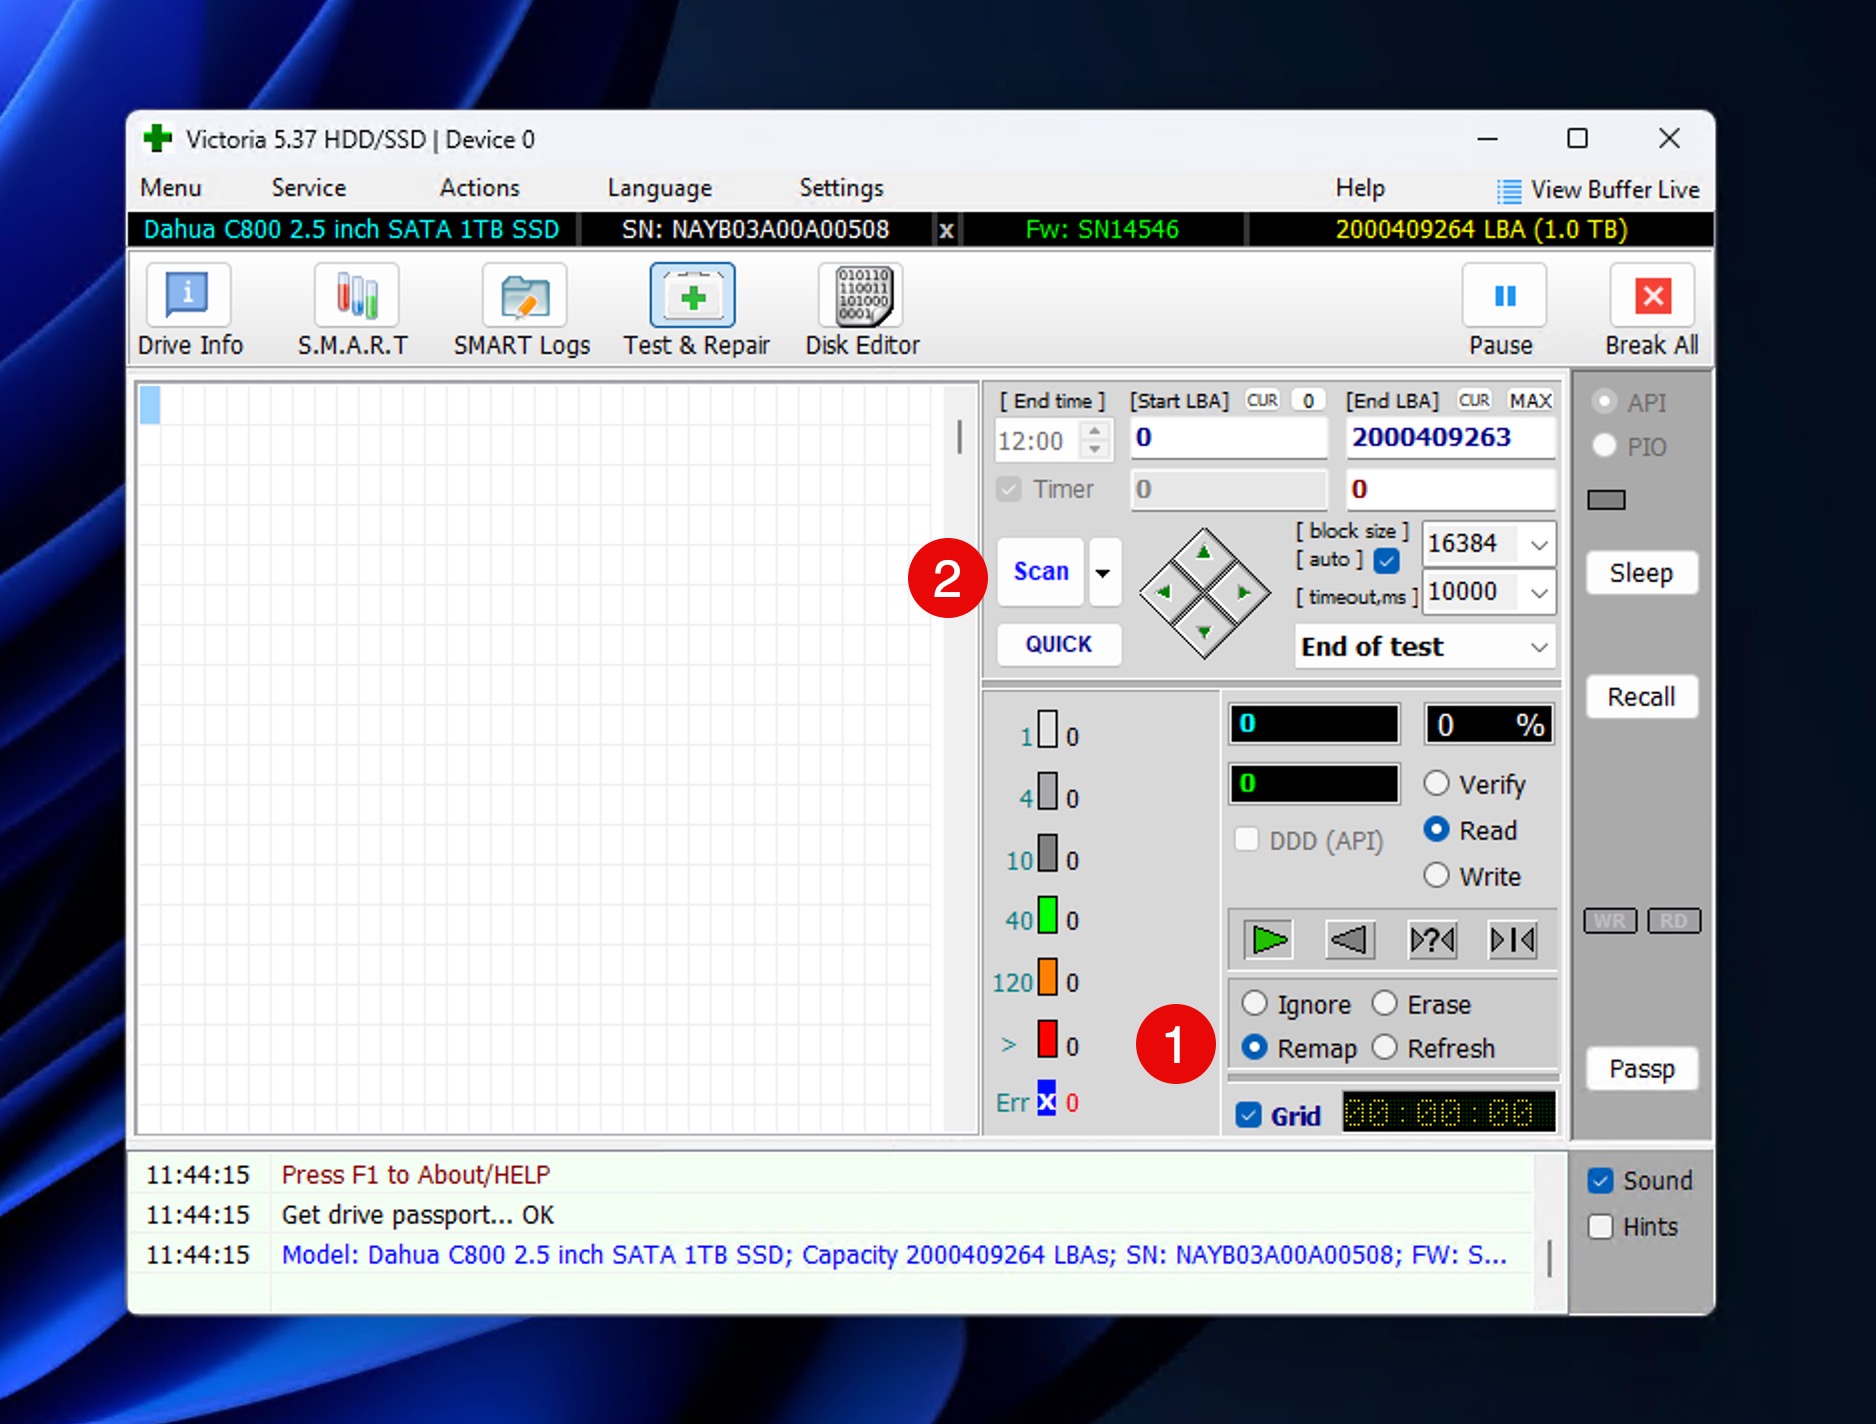
- Select Remap as the scan action.
- Click Scan and let it run. The test covers the whole surface, so it can take hours on a large or damaged drive.
- When it finishes, check the Reallocated Sector Count in the drive’s S.M.A.R.T. data. A higher number means the bad spots were moved to spares.
Logical bad sectors and file system errors can sometimes be corrected because the disk surface itself is undamaged, so overwriting the corrupted sector with new data makes it readable again. The standard tool for bad sector repair on Windows is CHKDSK, which is a command-line tool that comes pre-installed with the operating system.
To perform bad sector repair using CHKDSK, do the following:
- Type
cmdinto Windows search, right-click Command Prompt, and choose Run as administrator.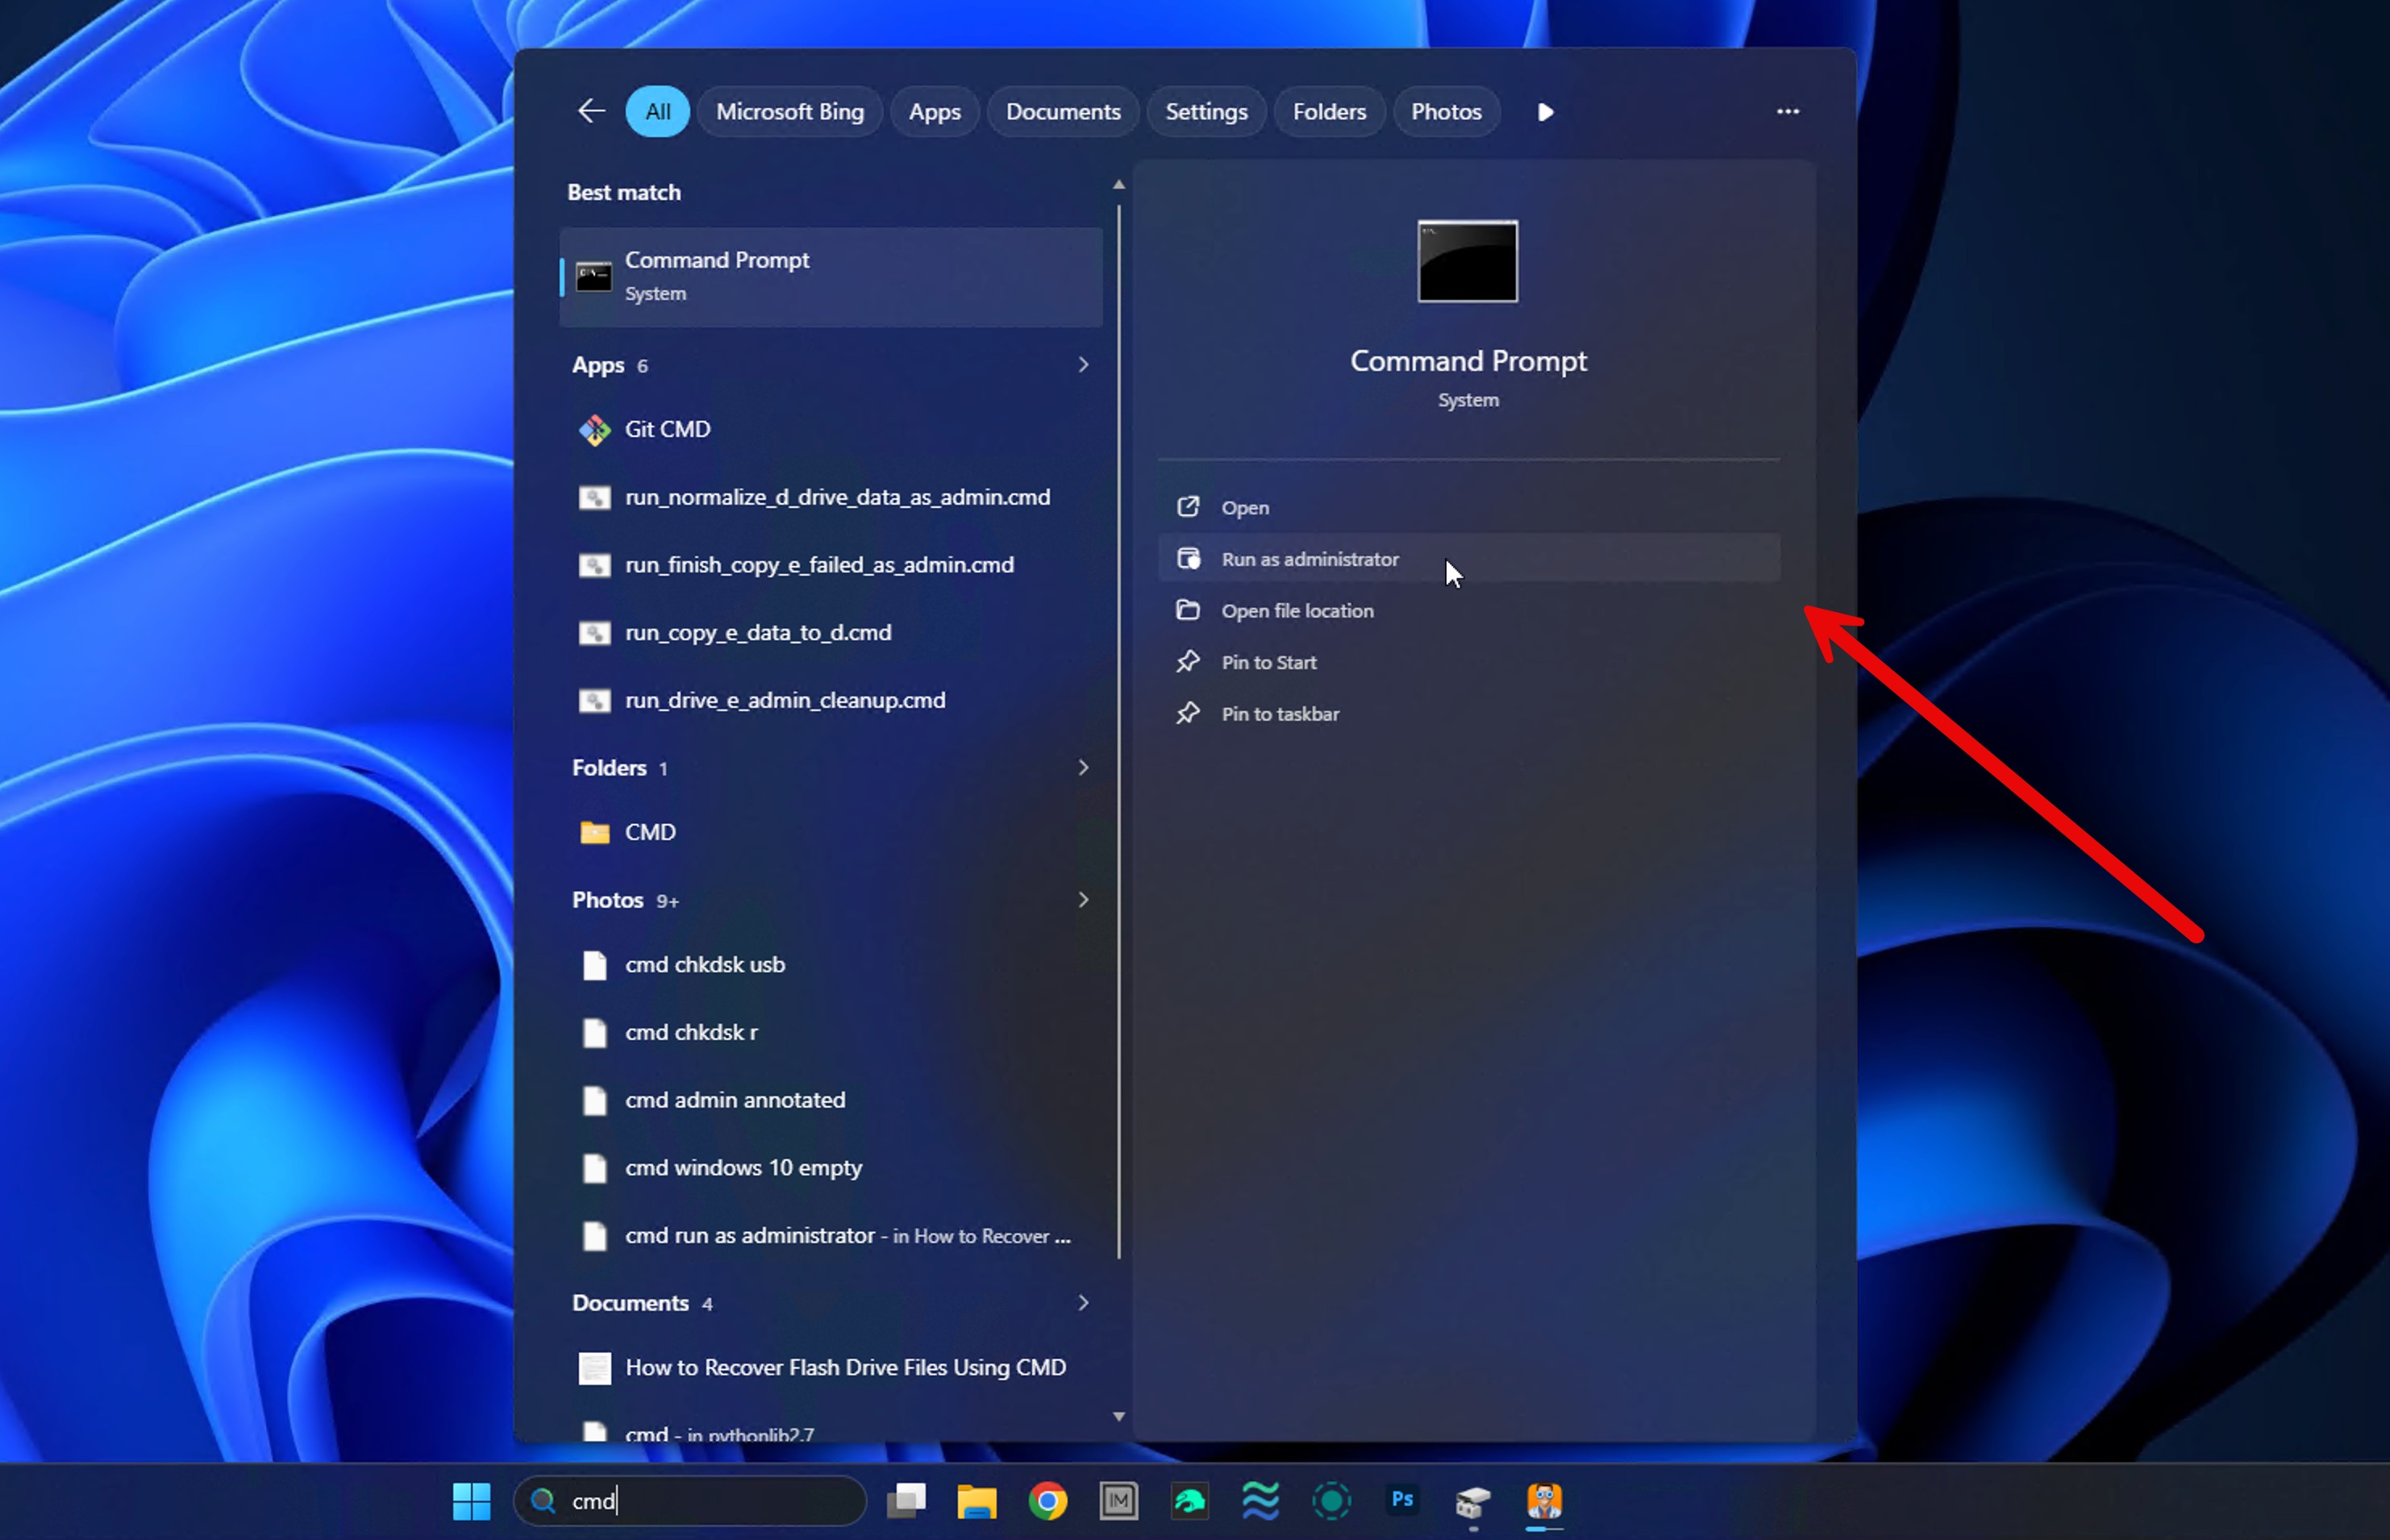
- Type
chkdsk X: /rand press Enter. ReplaceXwith the letter of the problem drive. The/rflag tells CHKDSK to locate bad sectors and recover whatever it can still read from them.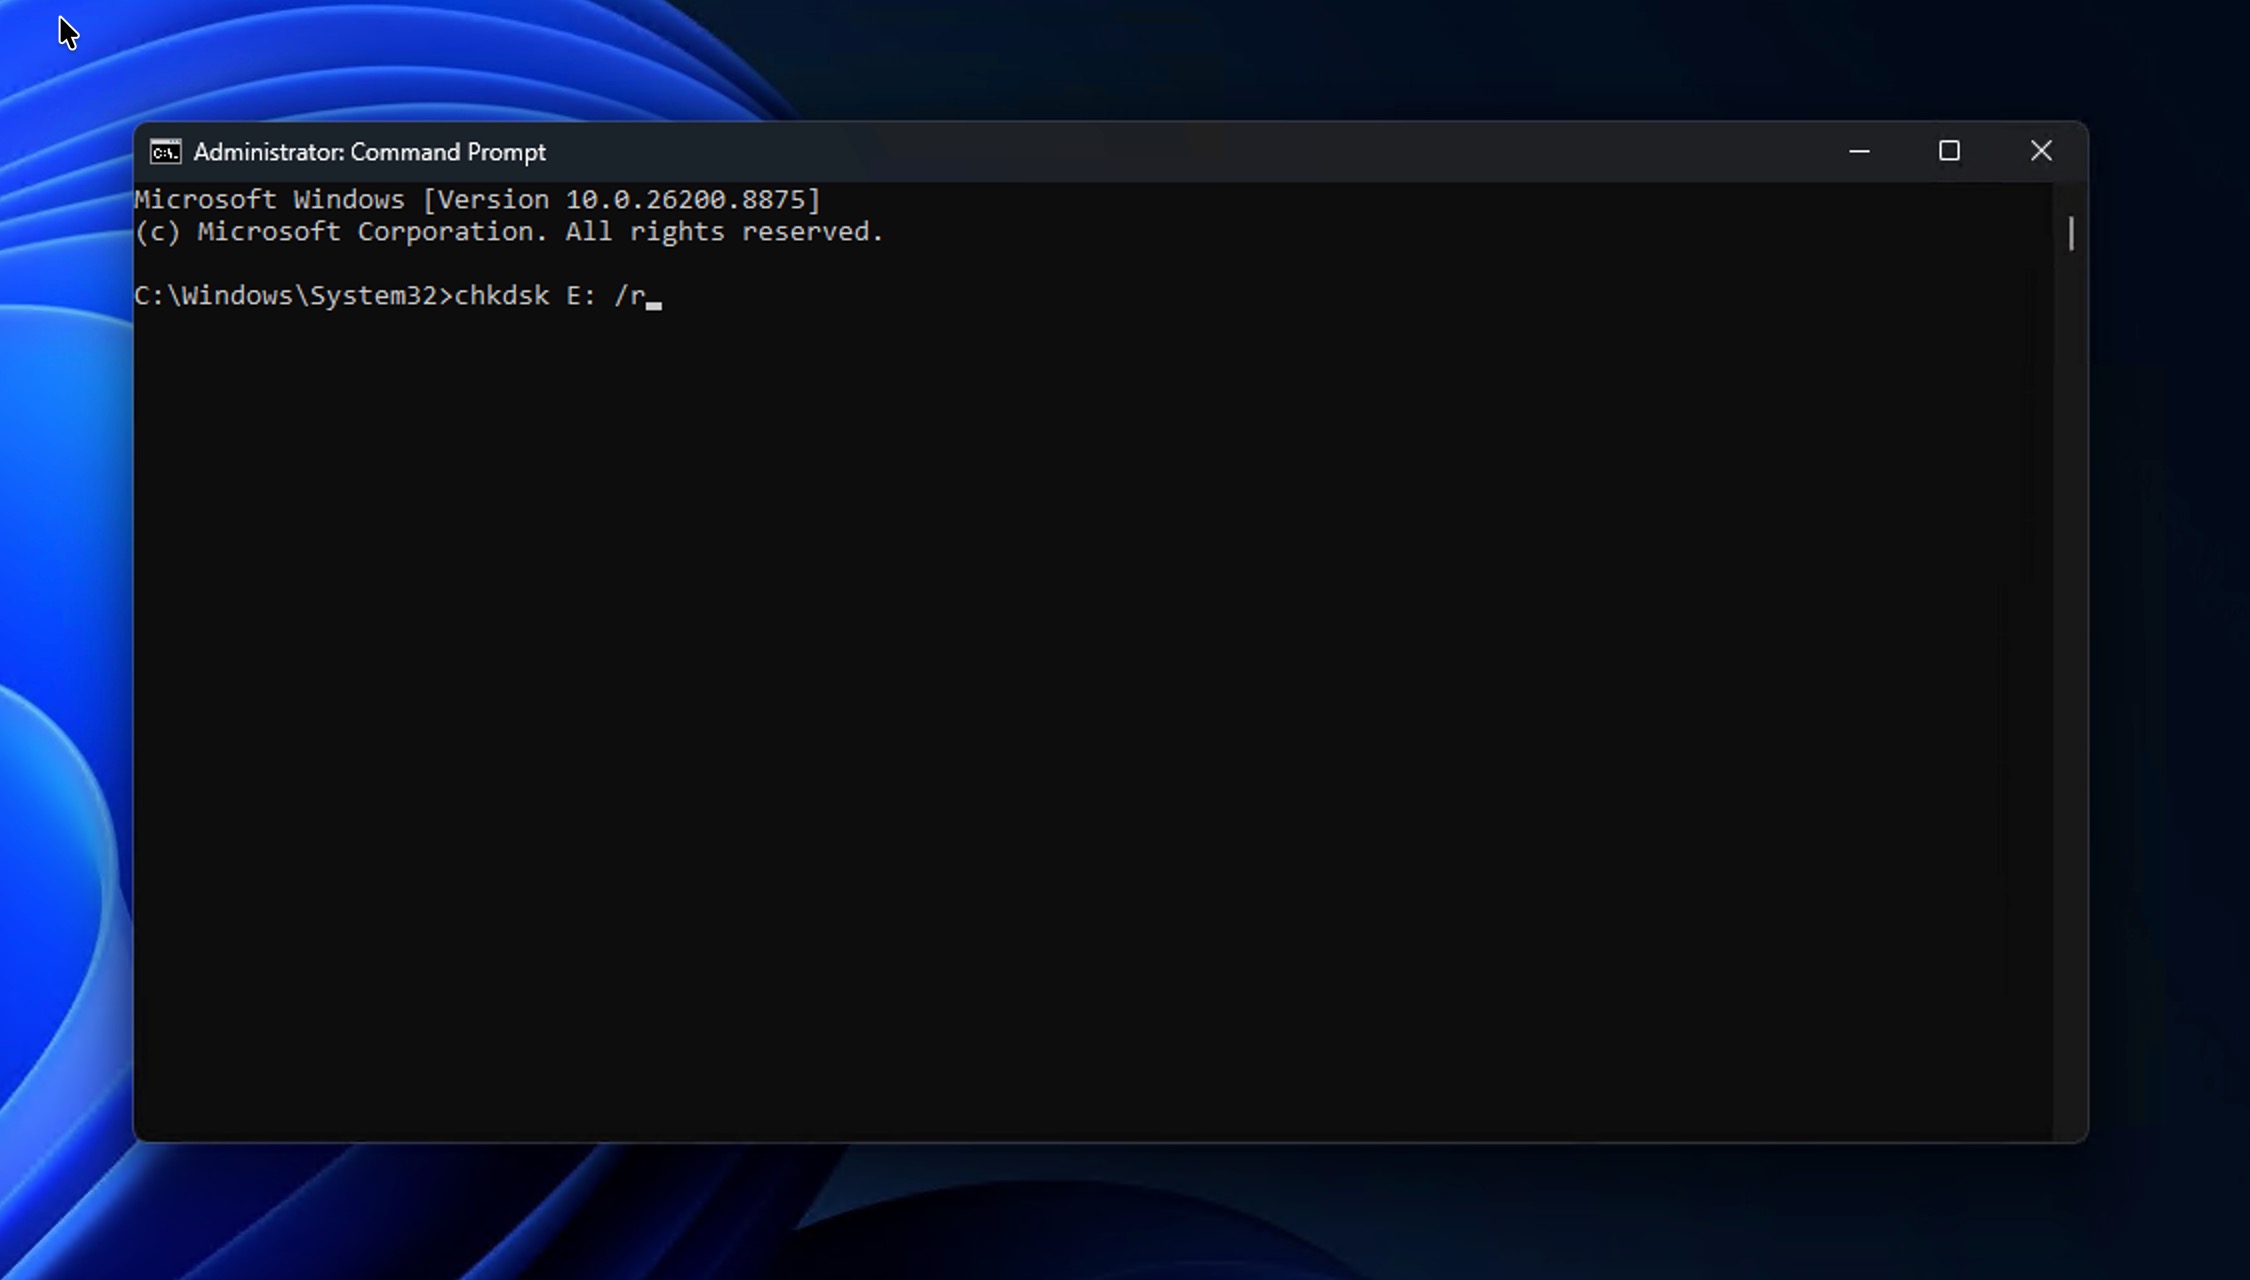
- If you’re checking the system drive, CHKDSK will offer to run on the next restart. Type Y and reboot.
- Let it finish. On a large or damaged drive, this can take a long while.
Once CHKDSK is done, you need to decide if the drive is stable enough to keep around or if it should be retired, and its S.M.A.R.T. data can help you with this decision. Disk Drill includes free S.M.A.R.T. monitoring that translates the drive’s internal health sensors into something you can actually read.
You don’t need to be an engineer to make sense of it. Look for an overall healthy status, no warnings, a stable temperature, and sector-related values that stay flat instead of creeping up over time. Recheck after a few days of light use. If the drive still shows warnings, suspicious values, or a growing count of remapped sectors, replace it. No file worth keeping belongs on a disk like that.
And if the drive does look healthy? Keep S.M.A.R.T. monitoring enabled if Disk Drill can read the drive’s health data. It can act as an early warning system by showing changes in temperature, reallocated sectors, pending sectors, and other warning signs before they turn into another data-loss situation.
When to Stop DIY Recovery and Contact a Data Recovery Service
As long as your computer detects the drive with the correct capacity, it’s reasonable to try to recover data from a drive with bad sectors on your own by following the image-first workflow above.
However, some situations call for a different approach:
- The drive is no longer detected by the computer at all.
- The reported capacity is wrong (like 3.86 GB instead of 1 TB).
- The drive keeps disconnecting every few minutes.
- You hear clicking, grinding, or beeping sounds.
What these situations have in common is that DIY recovery attempts would either fail outright or make the damage worse. All four point to hardware trouble that no software can reach, and clicking or grinding in particular usually means mechanical damage that gets worse with every spin of the platters.
Even if your drive shows none of the symptoms above, it’s still possible that the data stored on the drive is simply too valuable for any amateur recovery attempts (think business records, legal documents, cryptocurrency wallets, and recovery keys).
In such situations, it’s usually better to contact a data recovery service instead, and we keep a separate guide to the best data recovery services with ratings to help you pick a trustworthy one.
Final Thoughts
Recovering from a drive with bad sectors is mostly about doing things in the right order using the right tools. Basically, you should stop using the drive, check whether Windows detects it with the correct capacity, create a byte-to-byte disk image, recover files from the image, and only then consider CHKDSK or continued use. Disk Drill makes the process easy because the whole workflow (disk image creation, scanning, and data recovery) happens in one app that runs on both Windows and Mac.
Whatever you decide to do with the drive afterward, keep an eye on its health. If S.M.A.R.T. monitoring shows warnings or growing sector problems, retire it. And if the drive looks stable, be careful anyway and never make it the only home of files you care about.
FAQ
Bad block recovery is the process of getting data off a storage device that has unreadable blocks (the terms block and sector mean the same thing in practice). Instead of trying to fix the drive, it focuses on rescuing the files using specialized software that reads everything still accessible.
Only the logical kind, which is just corrupted data sitting on a healthy surface, so overwriting it with fresh data can fix it permanently. Physical bad blocks, on the other hand, can’t be repaired by any software. The drive can only remap them to spare sectors, which hides the problem rather than solving it.
Not in the way recovery software does. CHKDSK with the /r flag tries to read whatever it can from bad sectors and move that data to healthy ones, but its real job is repairing the file system, not rescuing files. It can’t find deleted data, and its repairs sometimes leave you with shortened files or unreadable fragments in FOUND.000 folders. That’s why CHKDSK should only run after your data has been recovered, ideally from a disk image of the drive.
Partially, yes. Disk Drill’s byte-to-byte backup is a free feature, so you can image the failing drive without paying anything, and scanning plus previews are free and unlimited too, so you’ll see exactly what’s recoverable. The free version for Windows lets you recover up to 100 MB of data, which can cover the most important documents. To recover more than that, you’ll need the PRO upgrade.
