Want to delete live photos from your iPhone, but still keep them as regular still pictures? Not every photo has to be Live, but the feature is on by default, and you might already have hundreds (if not thousands) of “wasteful” Live Photos in your library… Who needs Live receipts, right?
So, we wrote this guide to help you tidy up. After testing several methods, we found the most efficient workflow to remove just the “Live” part of the photos or delete all Live Photos from your iPhone entirely. It’s free and has helped us clear several gigabytes instantly (with a moderate-sized library).
Why Do Live Photos Take Up More Storage?
Live Photos are made up of a combination of (1) a still image and (2) short video clips before and after the image was captured (as well as the accompanying audio). This is why Live Photos take up so much more storage space compared to still images.
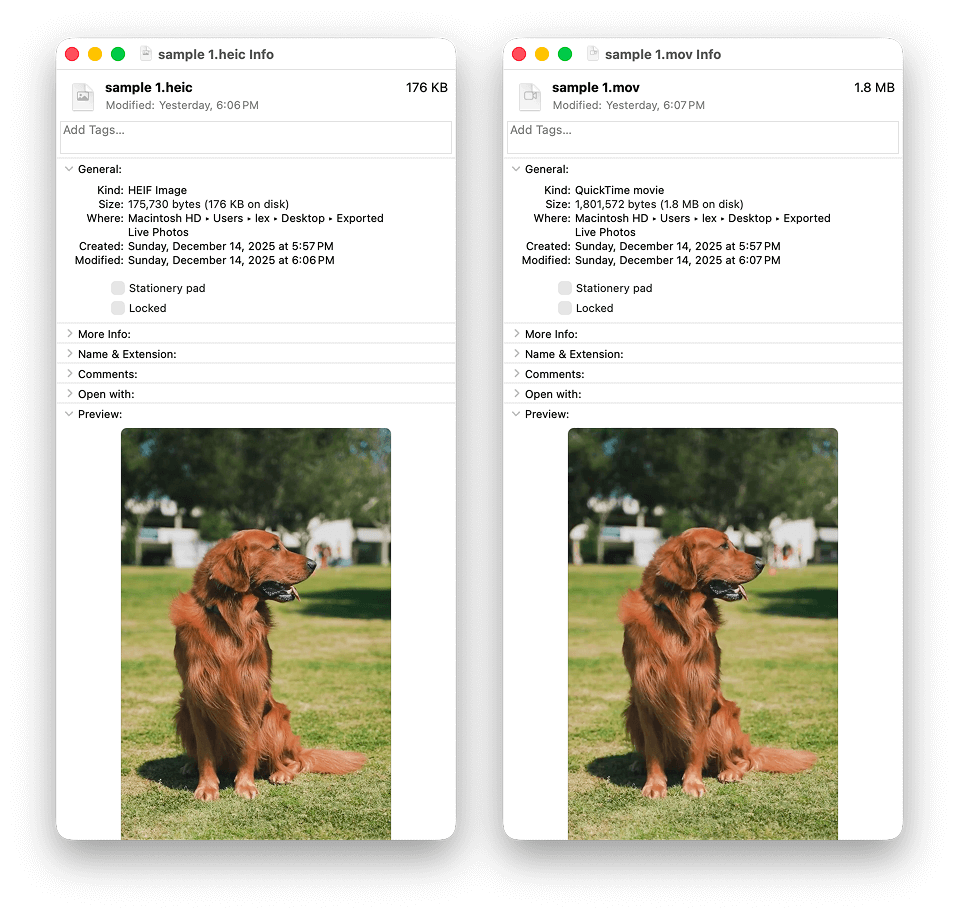
To show you a real-life example, we used the Export Unmodified feature in the Photos app on macOS on a Live photo from our library. This resulted in 2 files: the still image (left), and the video clip (right). The high-quality still image is 176 KB, while the video clip is 1.8 MB. The actual Live photo would combine both these files, resulting in a total size of 1.98 MB.
Live photos is an awesome feature for occasions that justify it—like someone blowing out their birthday cake, a surprise from friends, and other special events. But that only makes up a small part of most people’s photo library. For more mundane photos, like pictures of receipts, shots of menus from establishments, and other less “dramatic” (but more common) images, utilizing the Live photos feature just wastes a lot of storage space.
How to Remove the Live Part of a Photo on an iPhone But Keep the Still Version
In this section, we’ll show you 3 different ways to remove Live from your iPhone photos, while saving a copy of its still image. We wrote them in order of efficiency—starting with the method that accomplishes this two-step process (saving the still image, then eliminating the rest of the Live photo) with the least amount of effort.
Method 1: Use iPhone Cleaner App
After a lot of research and testing different ways to remove the “Live” part from your photos, we found that using an app provided the fastest and most efficient experience, especially for large libraries. It’s the only method that can almost automatically facilitate the entire process—from saving the still image to deleting the original photo—without additional setup and much user interaction. This is perfect for going through dozens of Live Photos quickly.
Most importantly, it has an excellent Live Photo “compressor.” It can instantly remove Live from ALL the photos on your iPhone at once (but you can also select individual or multiple photos if you want to have more control over the process).
Here’s how to use the Live Photos compressor to delete the Live part of a photo on your iPhone:
- Download and install Clever Cleaner: AI Cleanup App from the App Store.
- Open the Clever Cleaner app and tap Manage access.
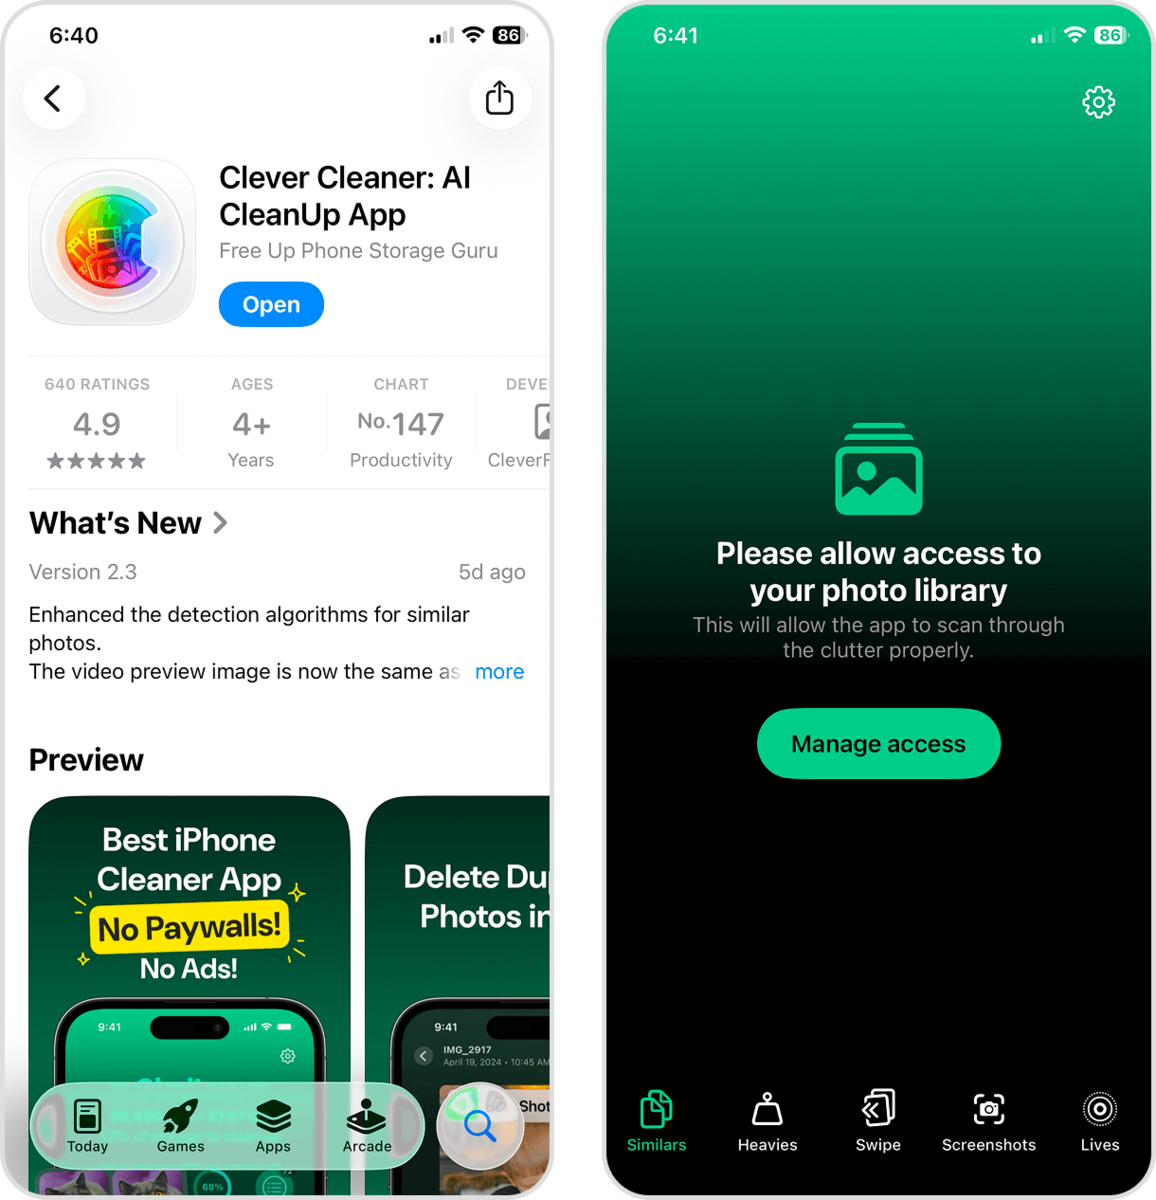
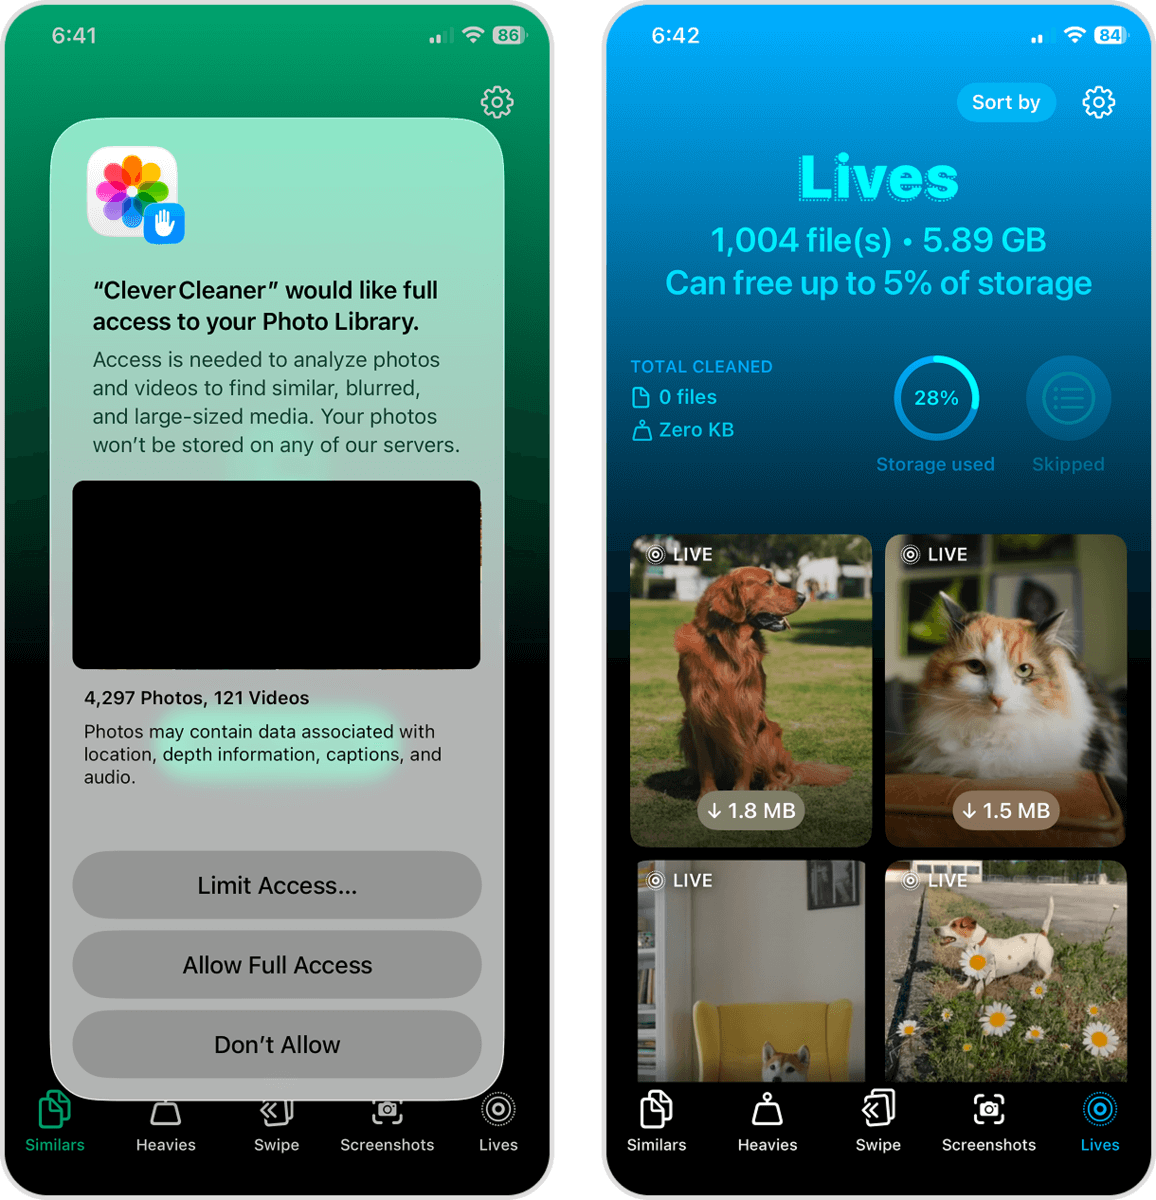
- In the dialog menu, tap Allow Full Access. Then, wait for Clever Cleaner to finish scanning your files.
- After the scan is complete, tap Lives in the bottom menu and tap any photo you want to compress.
- Select the Live photos you want to compress. Alternatively, you can tap the Select All button to apply compression to all of your Live photos at once.
- In the dialog that appears, you can tap Delete to send the photo directly to the Recently Deleted folder or Keep in Trash to continue storing it in Clever Cleaner’s own Trash folder.
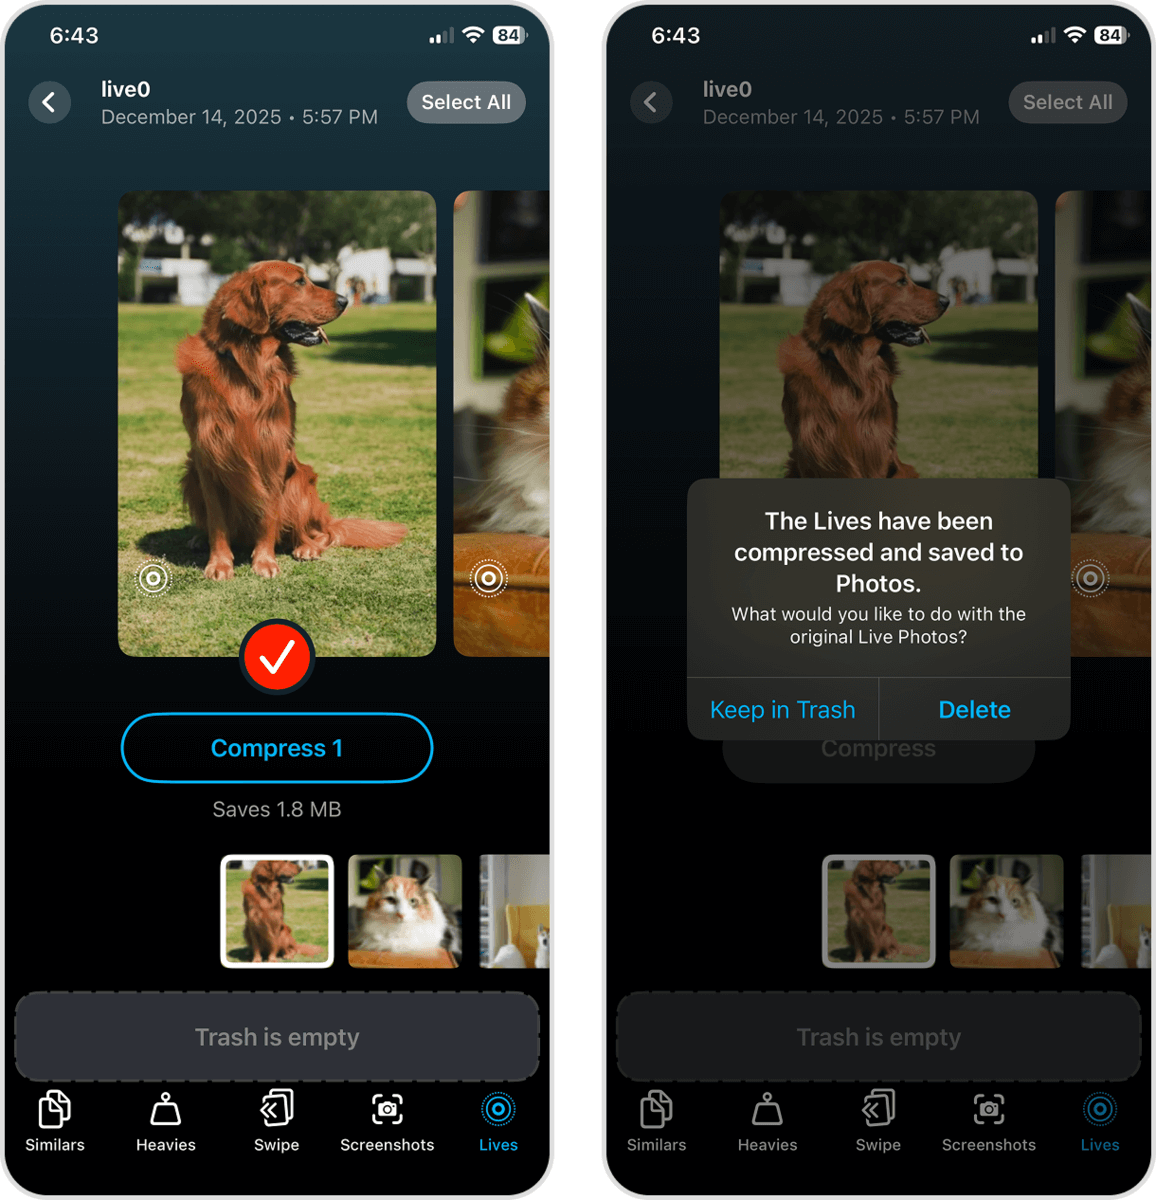 If you opted to keep the photos in the app’s Trash folder, a popup will appear at the bottom of your screen (tap it to open the folder). In the Trash folder, use the slider to confirm the deletion of the Live version of your photos.
- Finally, a confirmation pop-up will appear. Tap Delete to confirm the action.
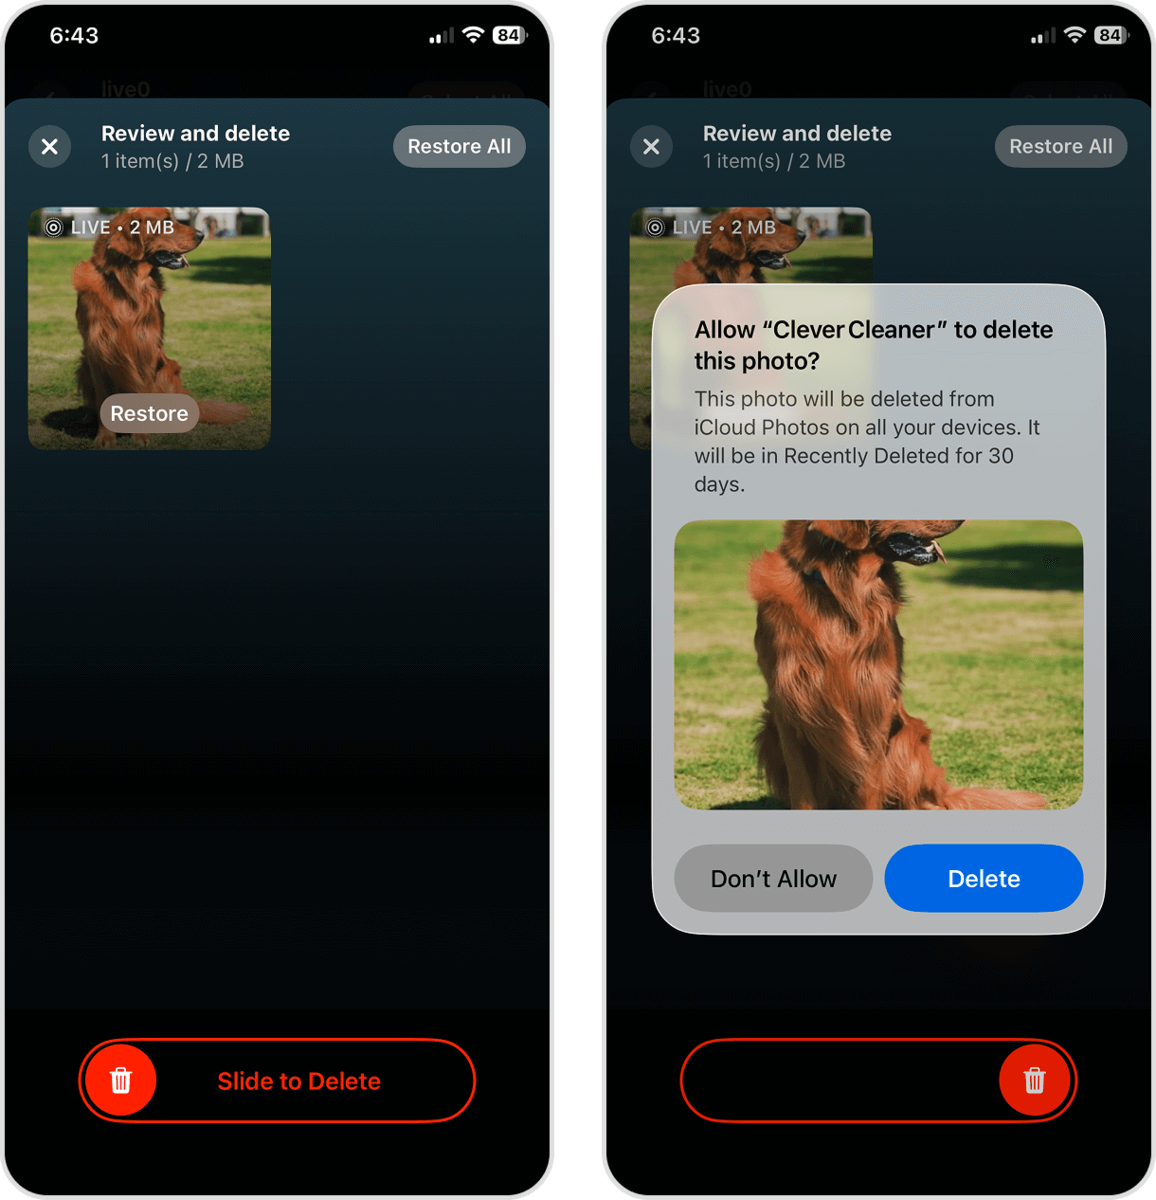
Even if you choose to delete the original Live Photos, they will remain in the Recently Deleted album in the Photos app for 30 days (then are deleted). This is a native iOS “safety net” that helps prevent unwanted permanent data loss–but that also means that any deleted photos will continue taking up storage space until you delete them from the Recently Deleted album as well.
Clever Cleaner also has other tools that can help you efficiently tidy up your photo library clutter, like:
- Similars: Delete similar and duplicate images in bulk, and automatically save the best copy for each group.
- Heavies: Quickly find the largest media files in your library by sorting your videos by size, then delete or compress them with a few taps.
- Swipe: Use intuitive swipe and tap gestures to efficiently review your photos one by one and send them to the bin.
- Screenshots: Review all your screenshots and delete them with one button.
Method 2: Remove Live Part From All Photos on iPhone Using the Shortcut App
If you don’t want to download a third-party app, you can use Shortcuts to create a custom command. Shortcuts is a default iOS app that lets you chain several different tasks into one command, which you can execute with a single tap.
We’ll show you how to create one that automatically converts your Live Photos into still images and deletes the original copies. This method has more steps than the rest, but you only have to set it up once.
Here’s how to create and set up this Shortcut:
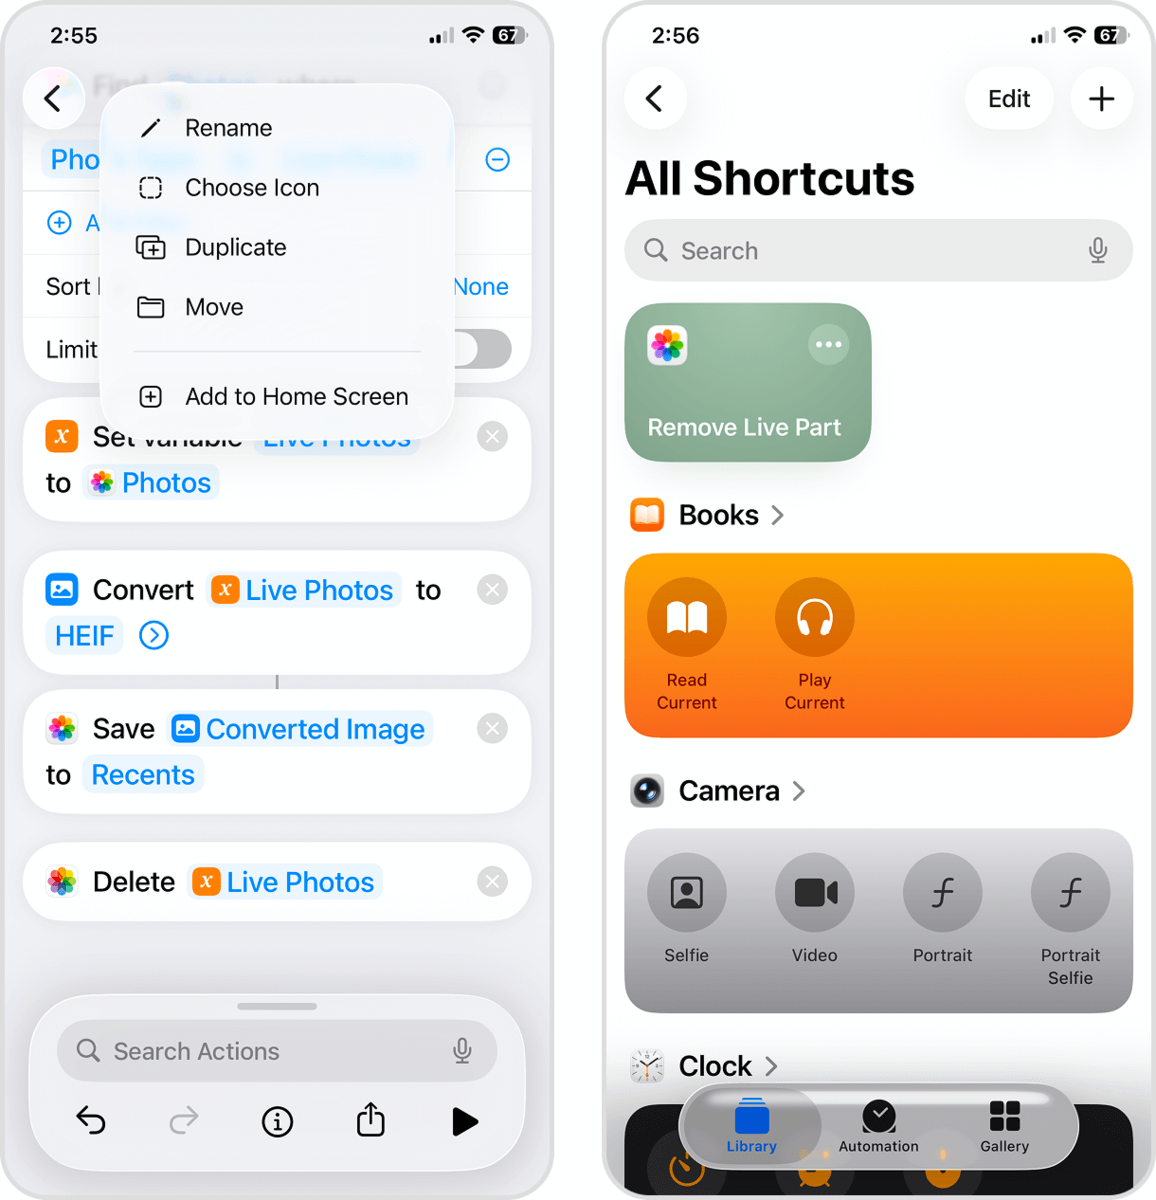
- Open the Shortcuts app (it’s stored in the Utilities folder by default on your home screens).
- On the bottom menu, select Library. Then, choose All Shortcuts.
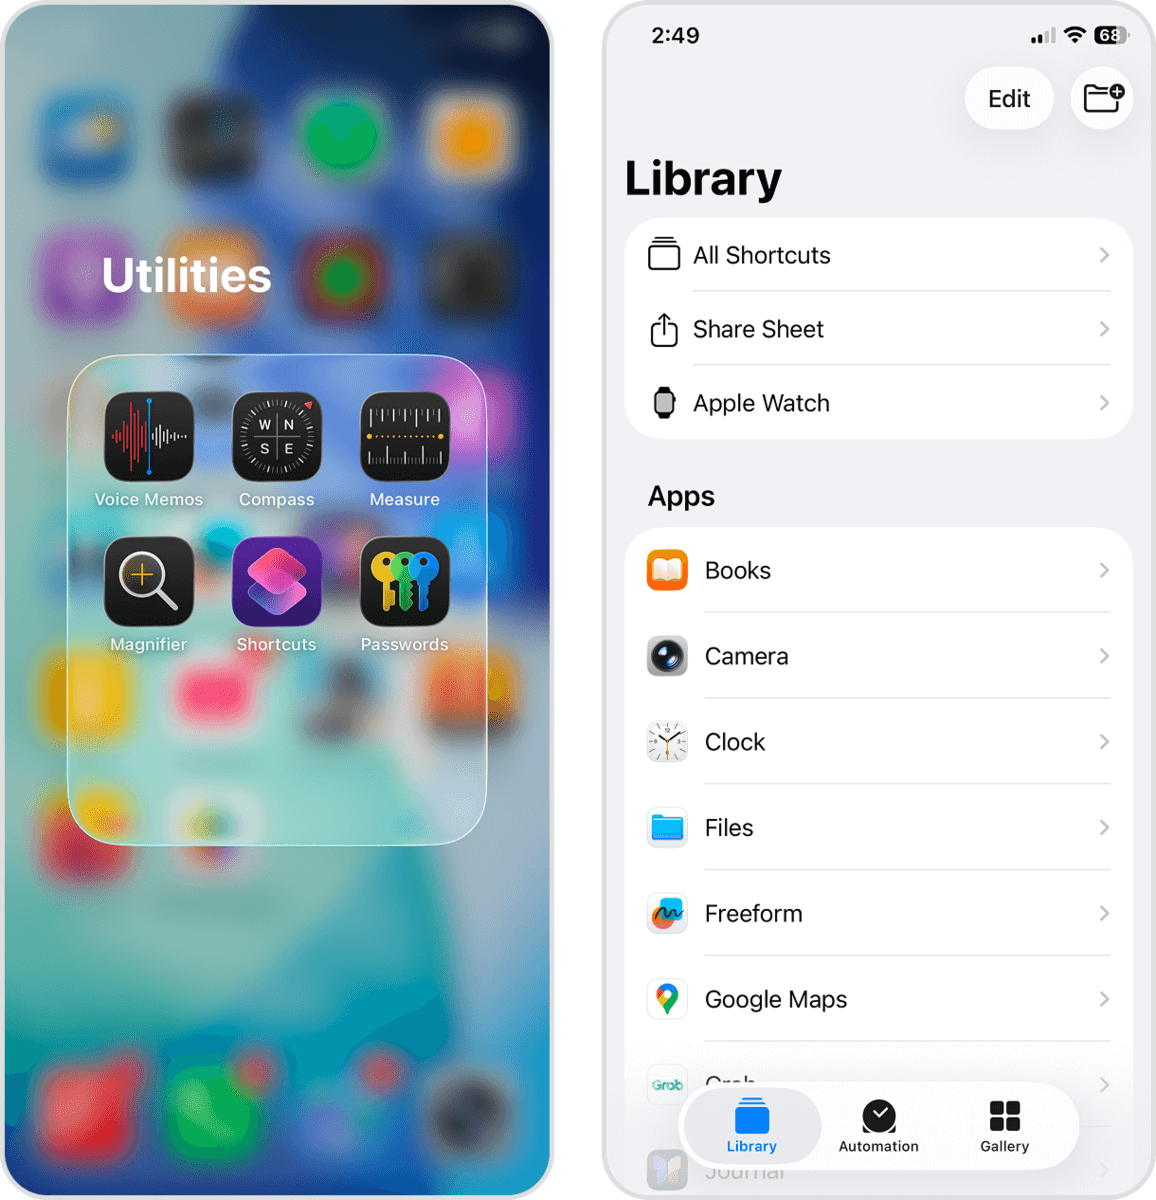
- In the All Shortcuts menu, tap the + button in the top right corner of the screen.
- Swipe up on the bottom menu to enlarge it. Then, scroll down the menu and select Photos.
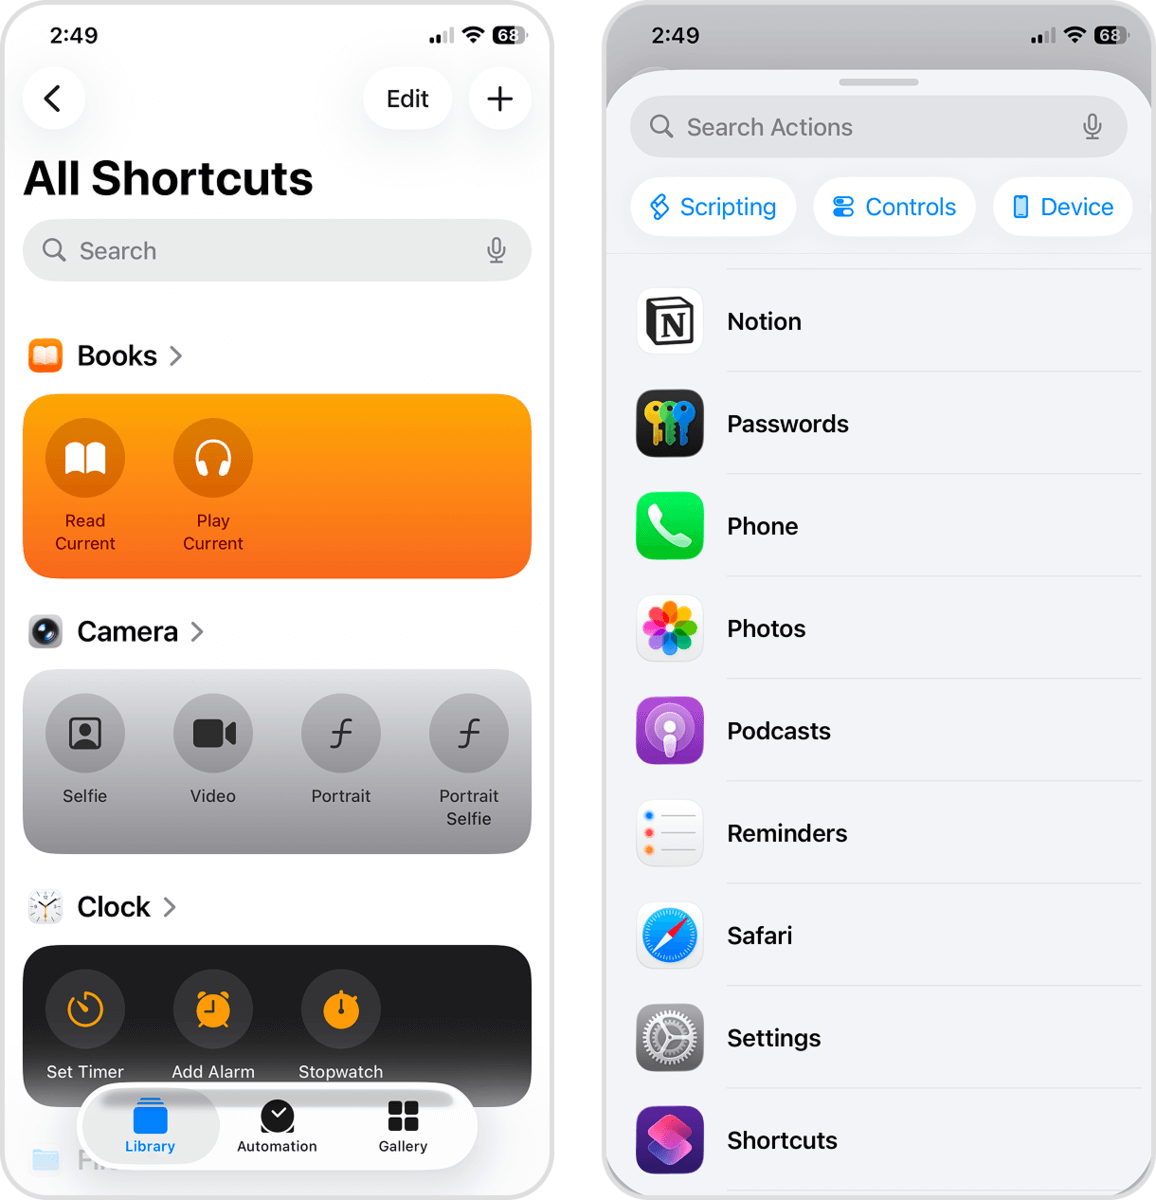
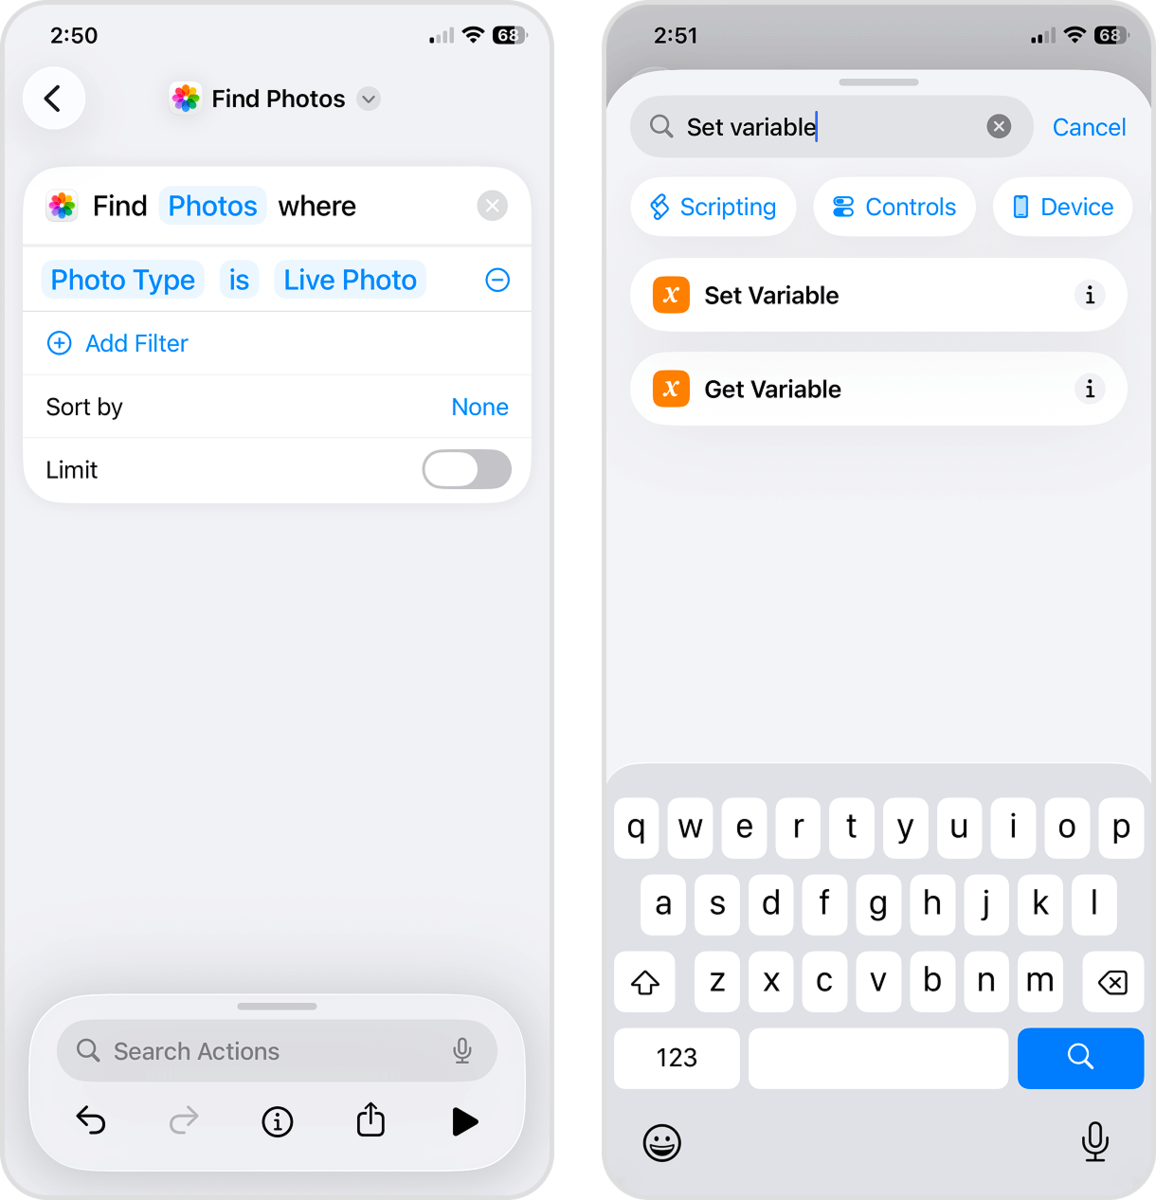
- Tap Find Photos, which will open a menu of possible actions (starting with the “Find Photos” action).
- In the Find Photos section, tap + Add Filter.
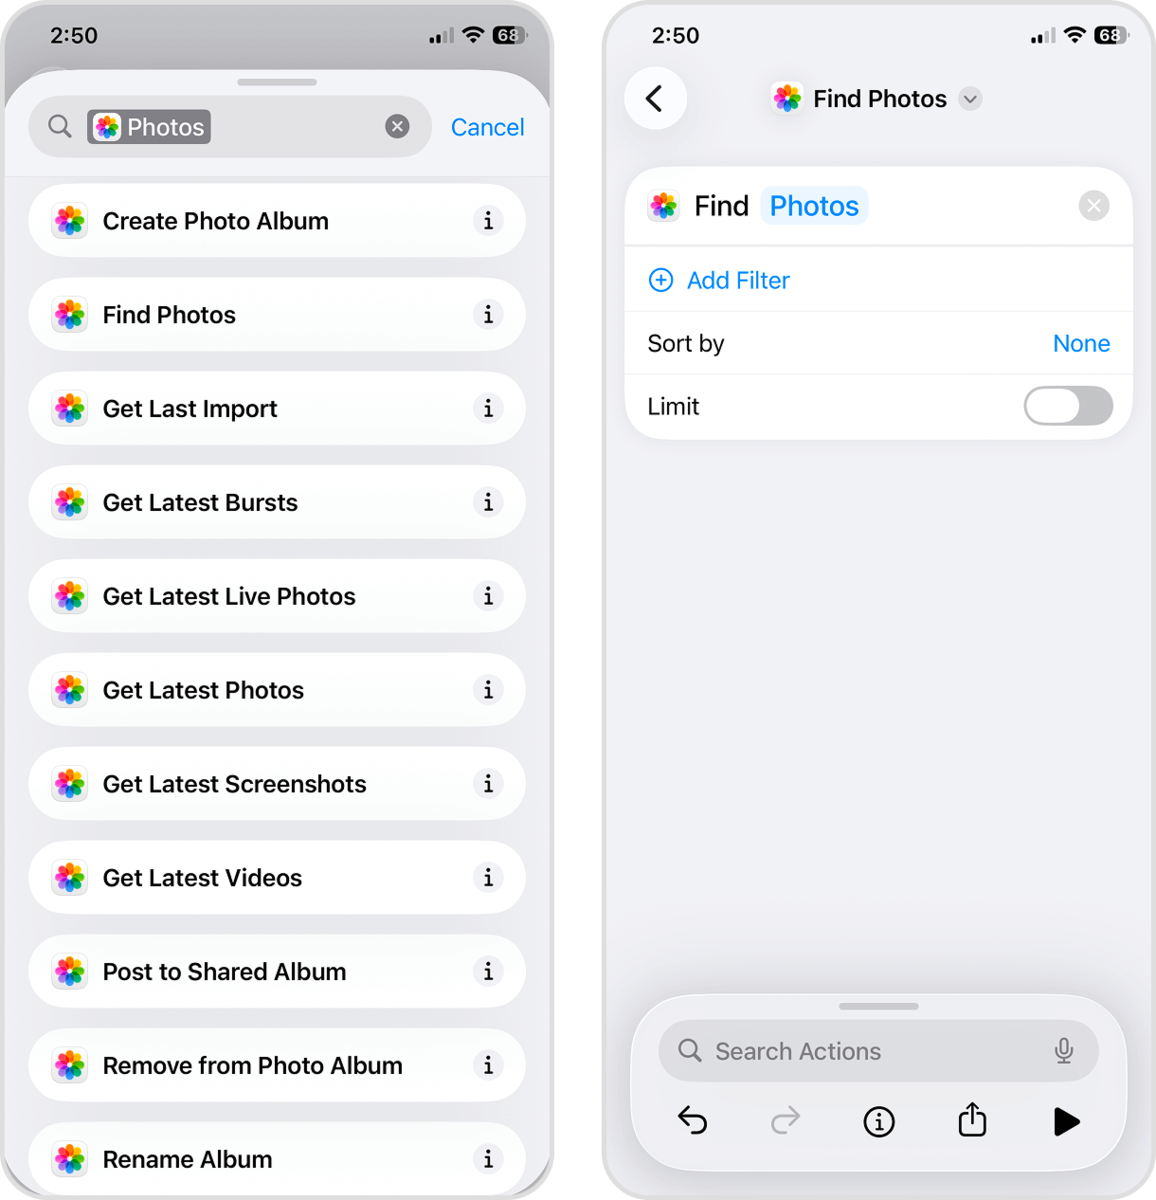
- Change the first parameter to Photo Type and the second parameter to Live Photo. Then tap the Search Actions field at the bottom of this menu.
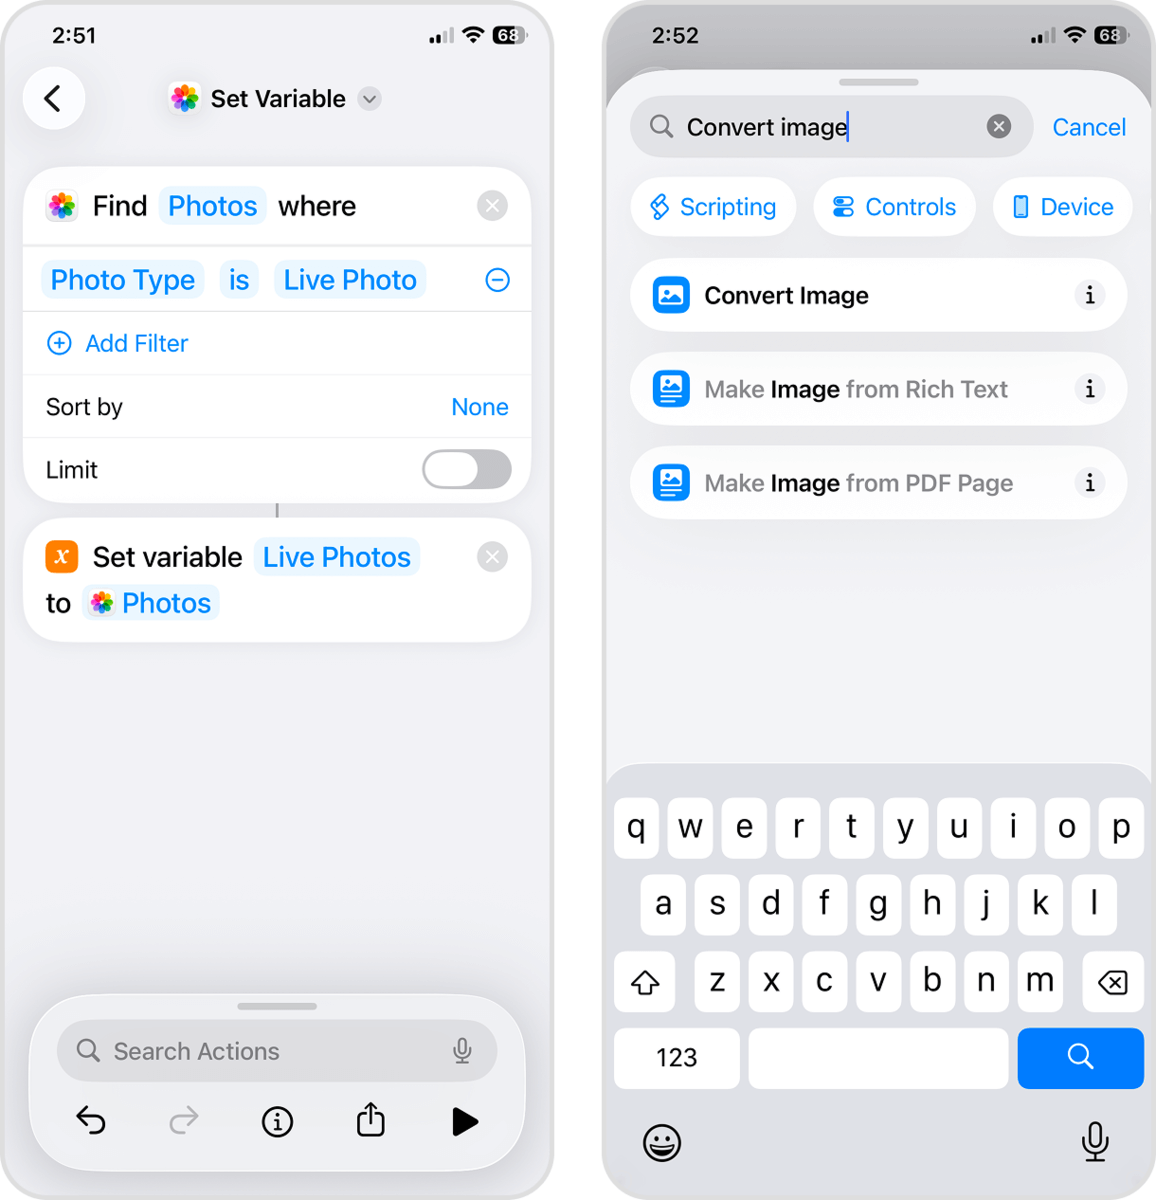
- Search for Set Variable and select it.
- Change the Variable Name parameter to Live Photos. Then, change the next parameter to Photos. Tap the Search Actions field again.
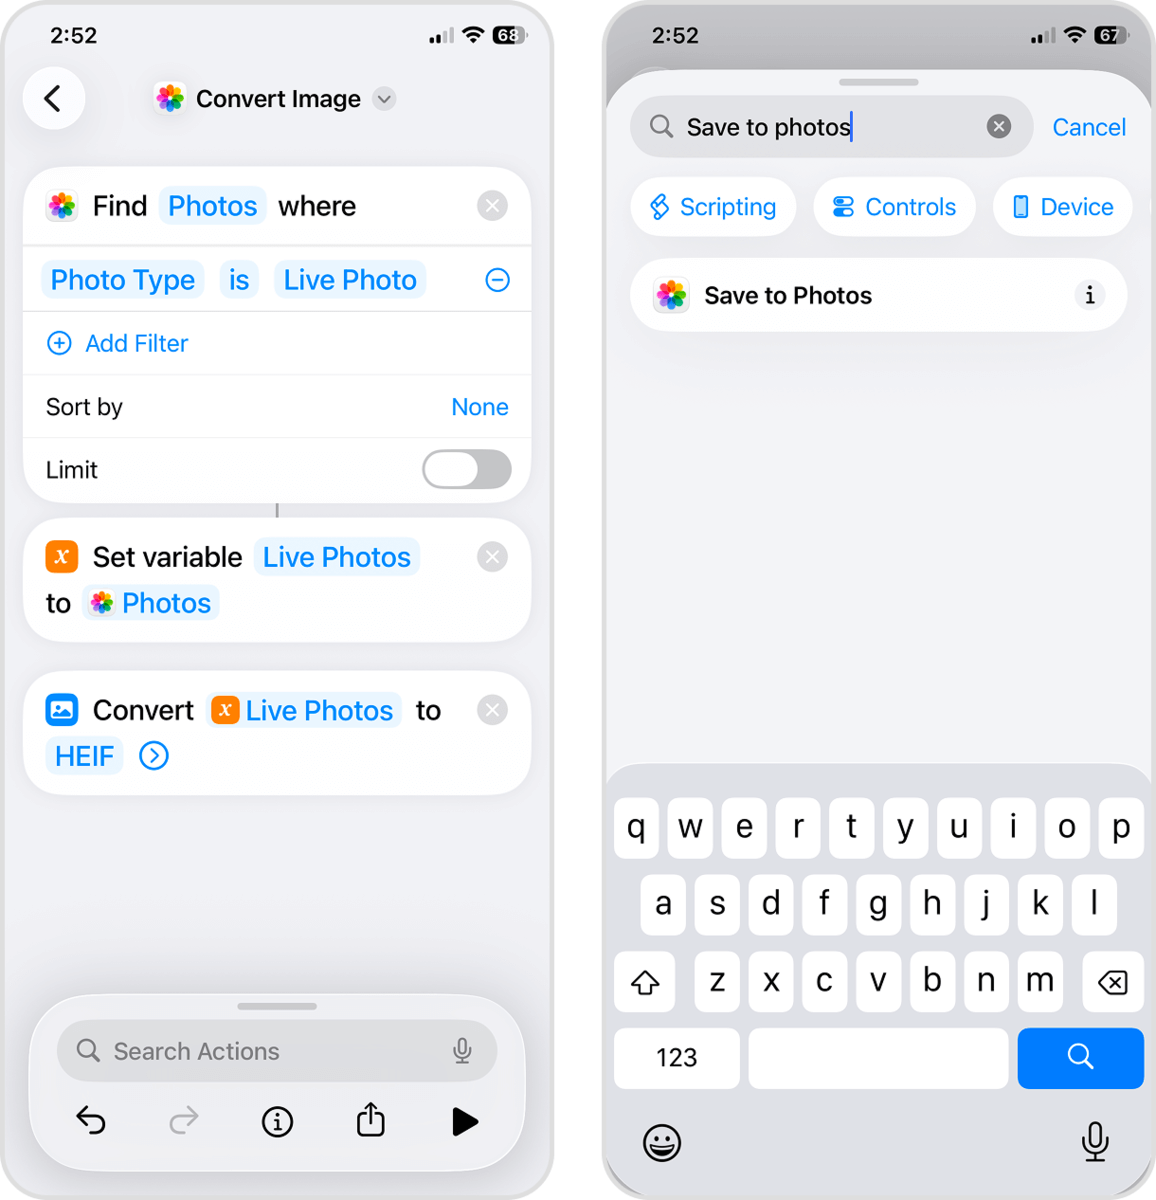
- This time, search for Convert Image and select it.
- Set the first parameter to Live Photos, and the second parameter to HEIF. Tap the Search Actions field again.
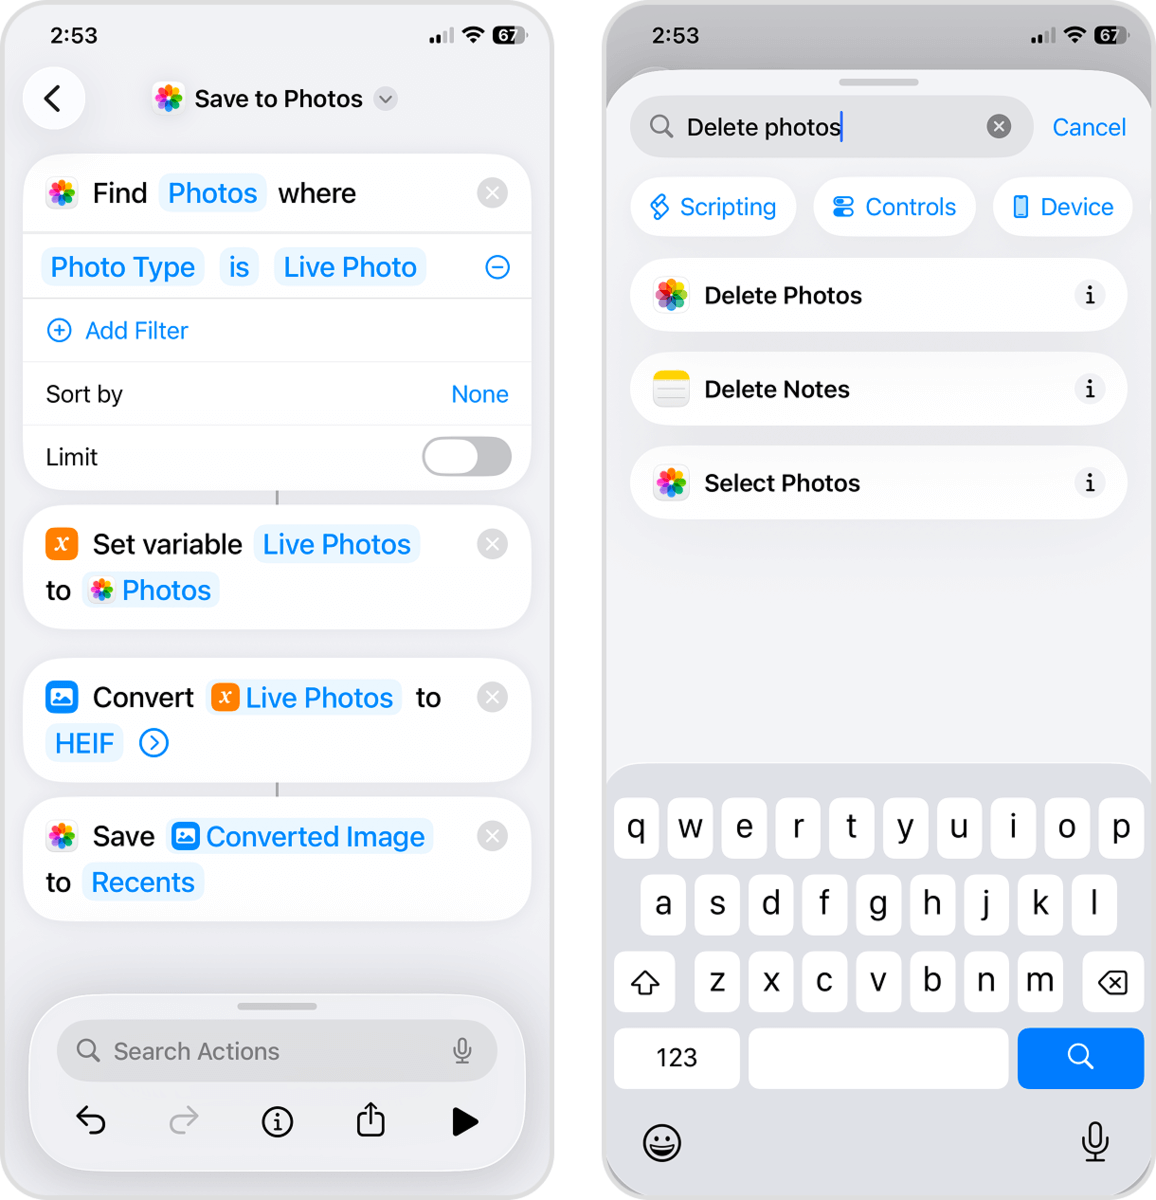
- Search for Save to Photos and select it.
- Set the first parameter to Converted Images and the second parameter to Recents. Then, tap the Search Actions field one last time.
- Search for Delete Photos and select it.
- Set the parameter to Live Photos. At this point, we recommend renaming the shortcut for safety purposes. Tap Find Photos at the top of the menu and choose Rename to do so. Click the back button to save the shortcut.
- Finally, in the All Shortcuts menu in your Library, you’ll find your newly created shortcut at the top. Tap it to run the series of actions you set up.
As in the previous case, make sure to delete your Live Photos again from the Recently Deleted album (in the Photos app) to free up storage space.
Method 3: Duplicate Live Photos as Still Images on iPhone
The Photos app has its own native feature that allows you to create a still image out of Live Photos. In your Collection of Live Photos, you can access a function called Duplicate as Still Photo. When you use it, the Photos app saves a copy of the image part of the Live Photo with the video and audio clips removed.
This feature is super convenient because you can apply it to multiple Live Photos at once. However, what this method lacks (that the other methods provide) is a way to automatically delete the original Live Photos. We’ll cover this in more detail at the end of this section.
Follow these steps to use the Duplicate as Still Photo feature:
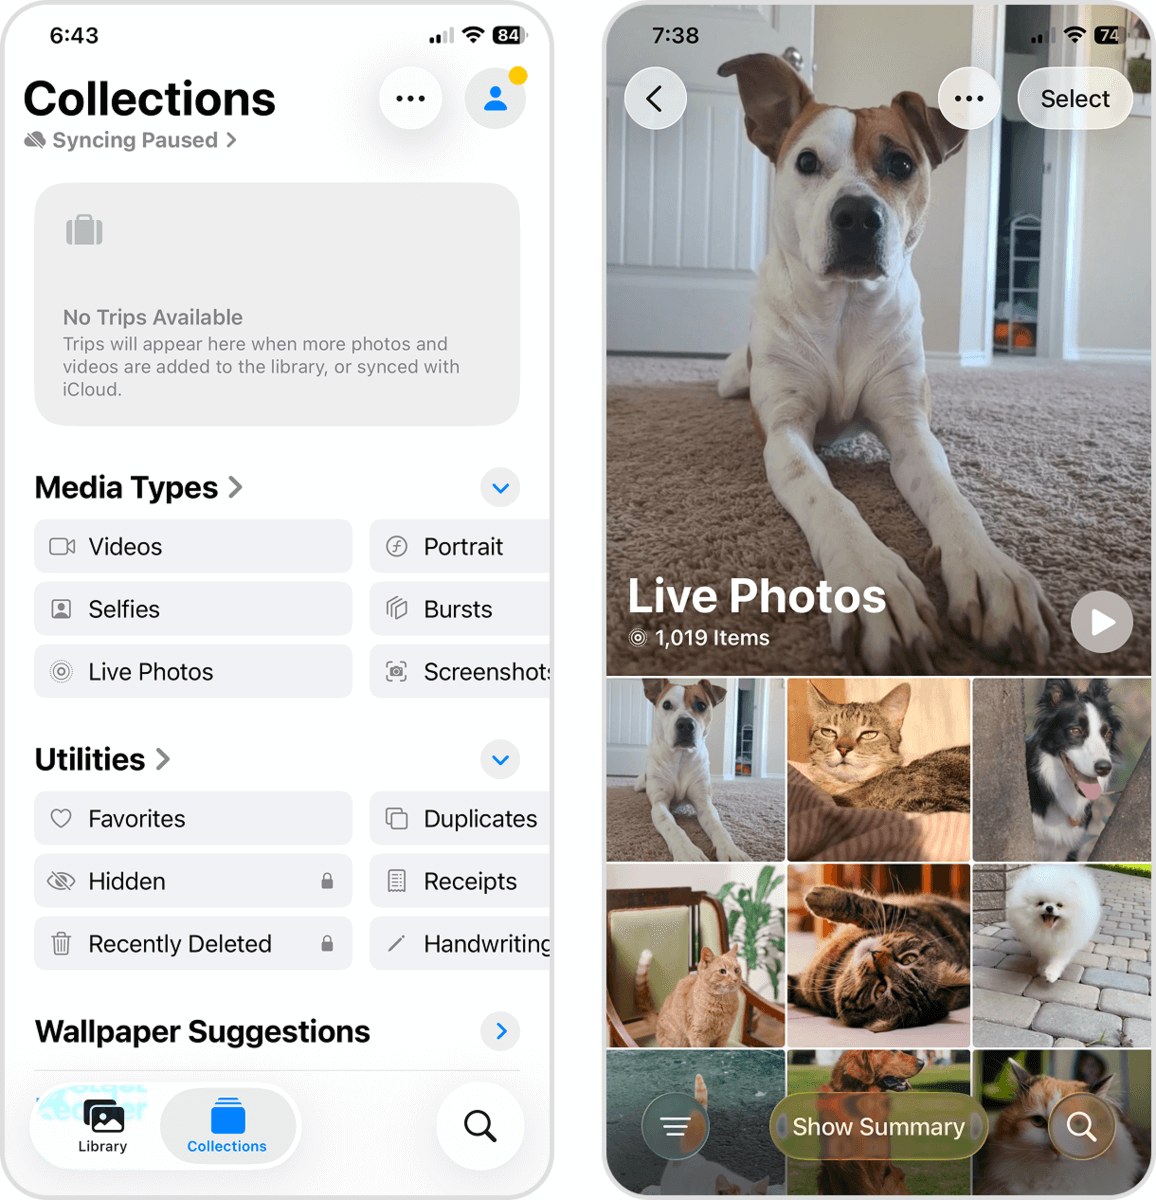
- Open the Photos app. In the bottom left corner of the screen, tap Collections. Then, scroll all the way until you see the Media Types section; select Live Photos.
- Tap a Live Photo you want to convert.
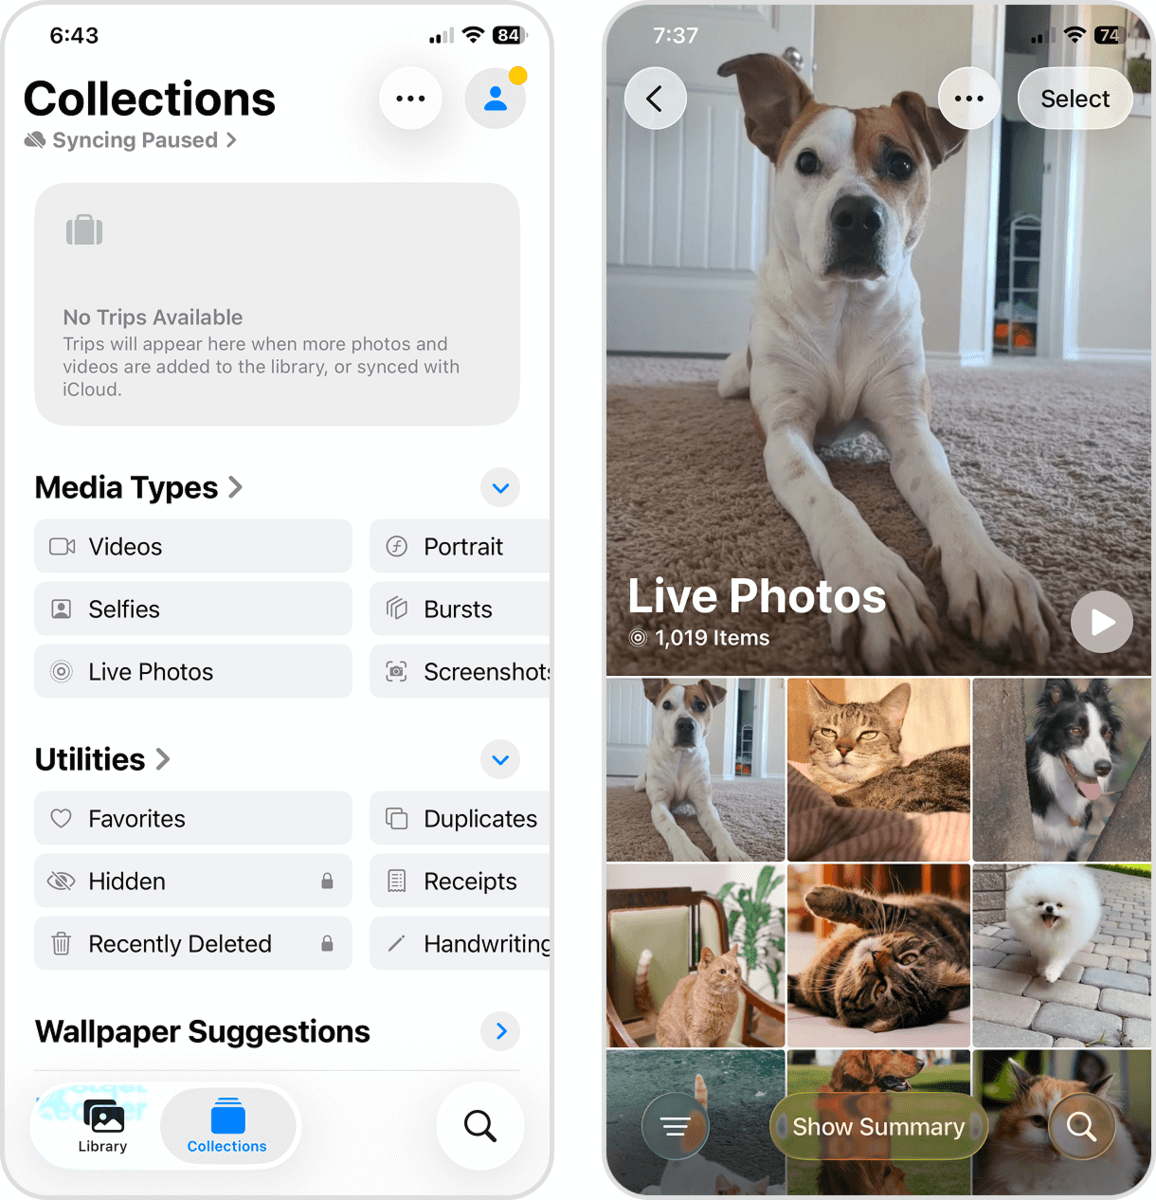
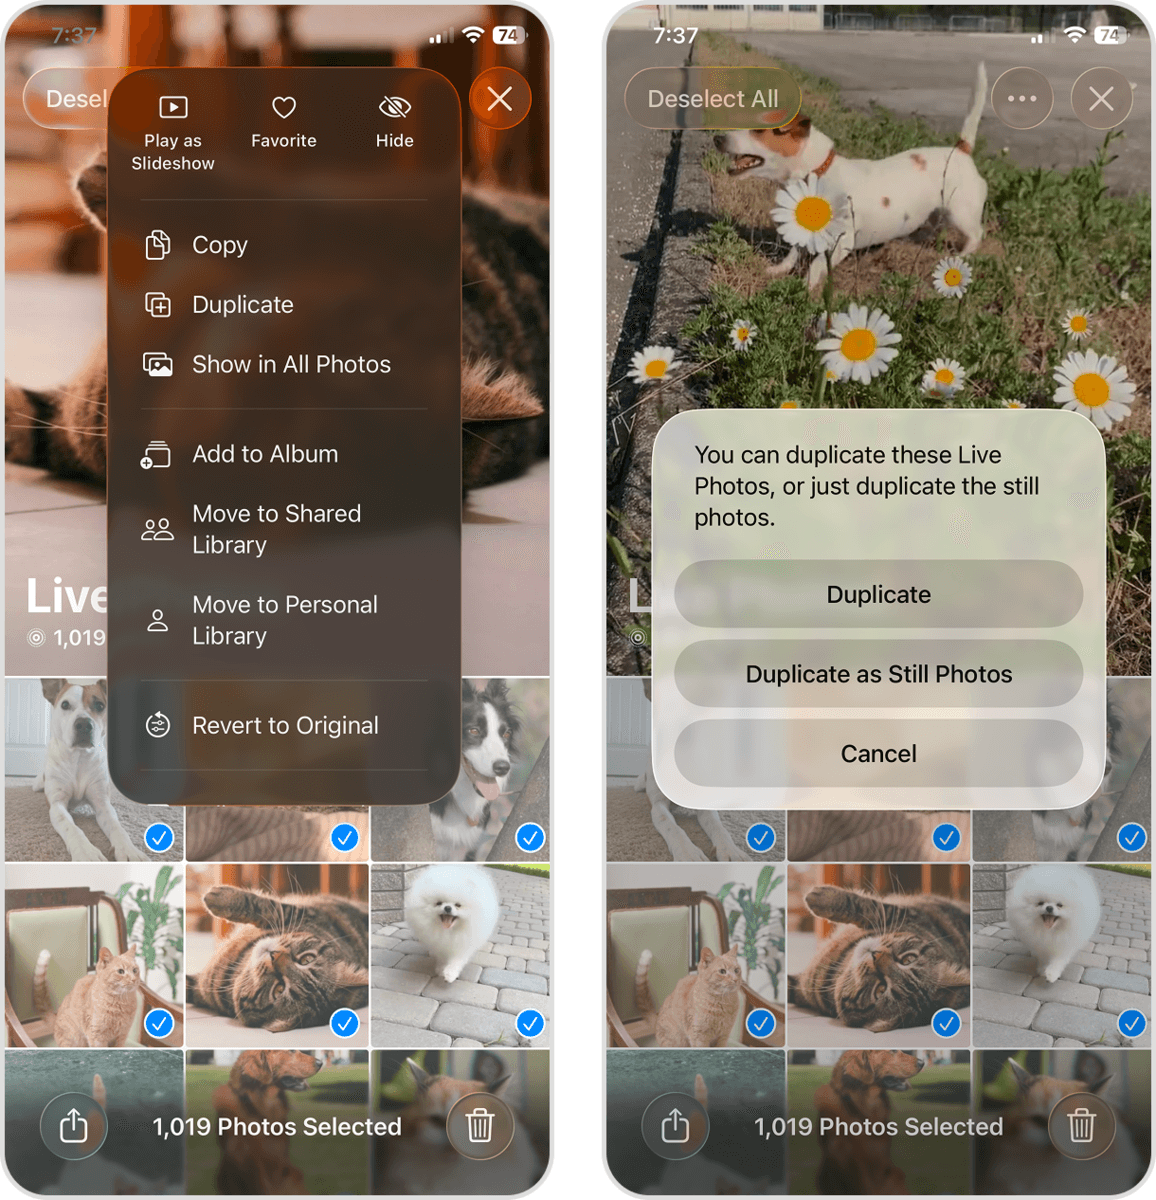
- In the top right corner of the screen, tap the meatball menu. Then, select Duplicate in the menu that appears.
- Finally, in the dialog pop-up, tap Duplicate as Still Photo.
After converting your Live photos using this method, new still-image copies will appear in your library. However, the original Live Photos will remain there as well; in the next section, we’ll show you how to delete all your Live Photos efficiently.
How to Delete All Live Photos from iPhone
Deleting Live Photos on your iPhone is a simple, native operation you can do in the Photos app. And based on what you need, you can delete individual Live Photos, multiple photos, or all of them at once. We’ll show you a brief demonstration of how it works.
- Open the Photos app. On the bottom left corner of the screen, tap Collections. Then, scroll down to the Media Types section and select Live Photos.
- On the top right corner of the screen, tap Select.
- Tap Select All in the top left corner of the screen. If you only want to delete specific photos, you’ll have to tap them individually or swipe across multiple images. Once you’ve made your selection, tap the trash icon in the bottom right corner of the screen.
- Finally, tap Delete again in the confirmation pop-up.
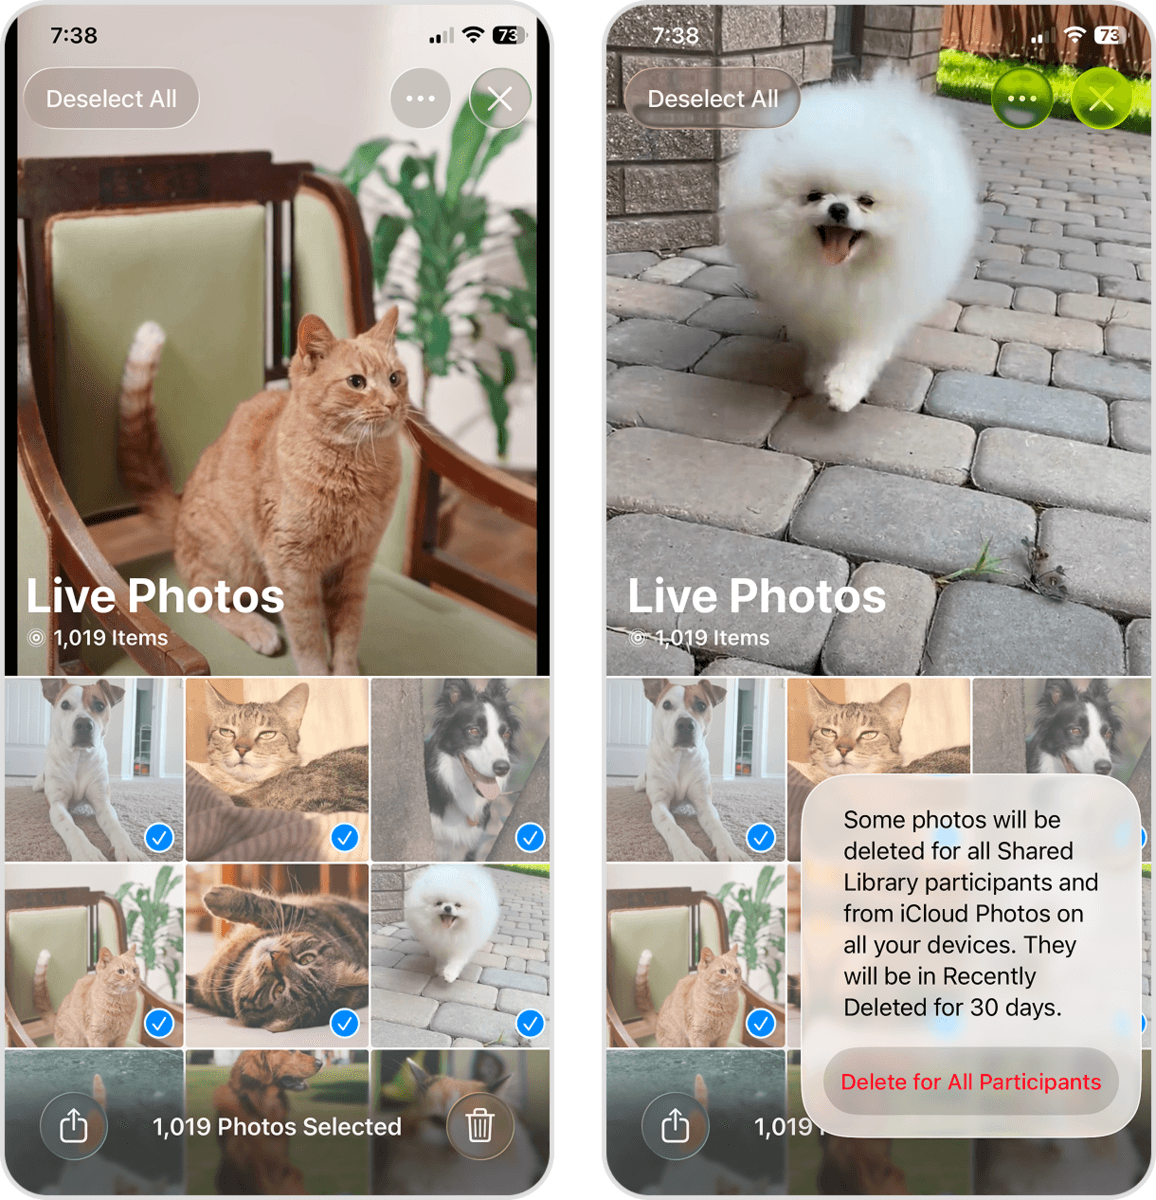
Make sure to delete your Live Photos again from the Recently Deleted folder (in the Photos app). Otherwise, they’ll remain on your device storage for 30 days before getting automatically deleted.
Change Camera Settings to Stop Your iPhone From Taking Live Photos
It’s too easy to take Live Photos by accident because the feature is turned on by default. And even if you turn off the Live feature in the Camera app, it may automatically reactivate when you next attempt to take photos.
Your iPhone has a built-in setting to disable this behavior. Through the settings app, you can enable a feature called Preserve Settings for your camera; this will allow you to keep Live permanently disabled until you enable it manually.
- Open the Settings app. Then, scroll down to the third section of the Settings menu and tap Camera.
- In the Camera menu, select Preserve Settings.
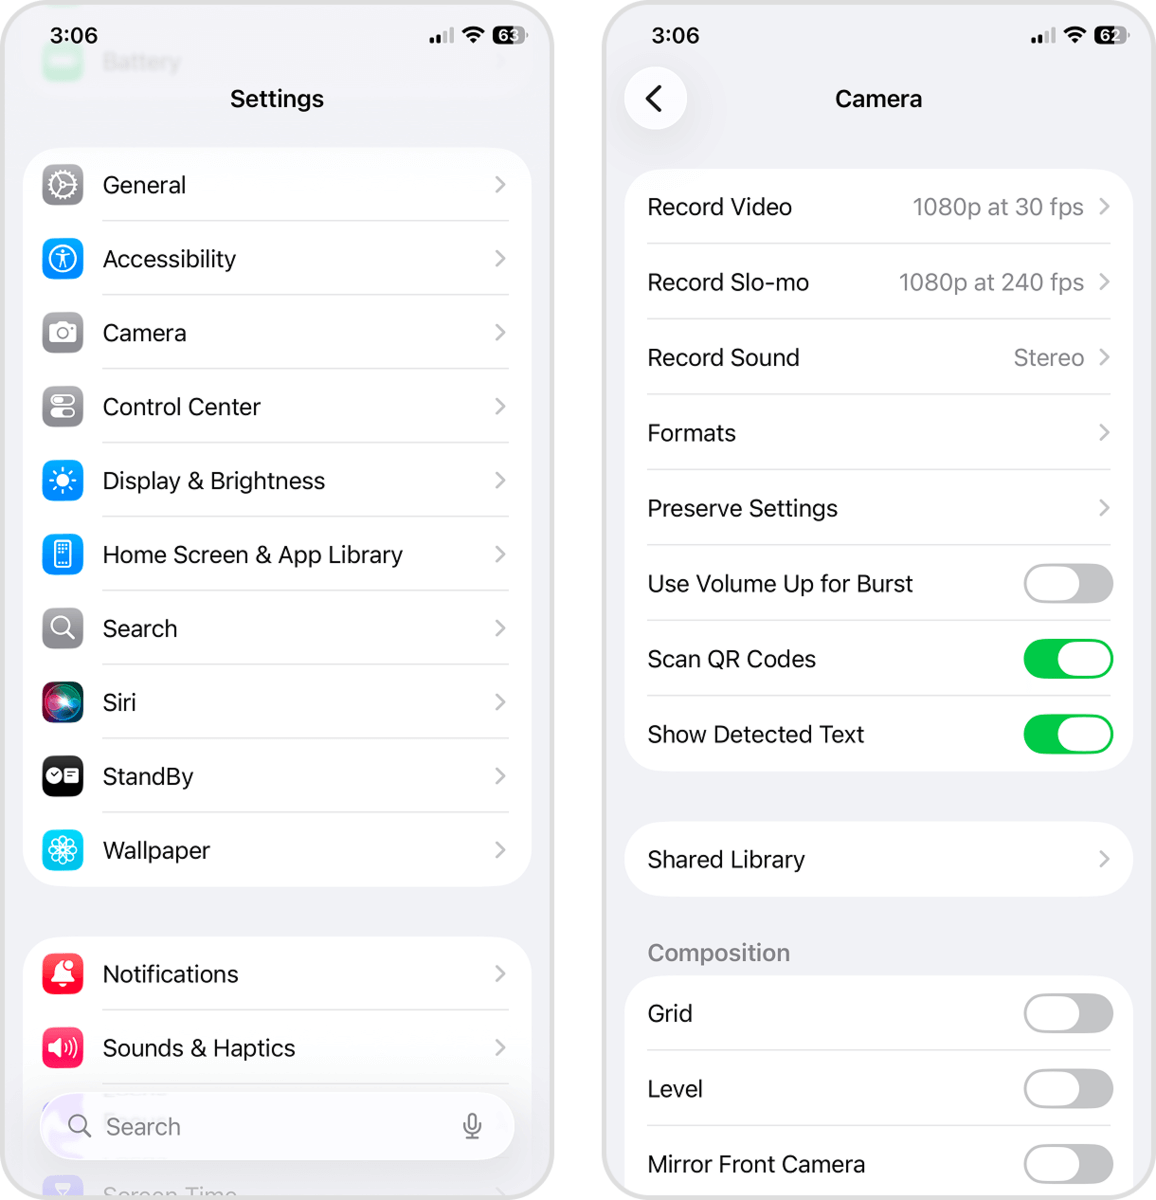
- Beside the Live Photo setting, slide the toggle switch to the ON position (it should turn green).
- Open the Camera app. Then, tap the menu button in the top right corner of the screen.
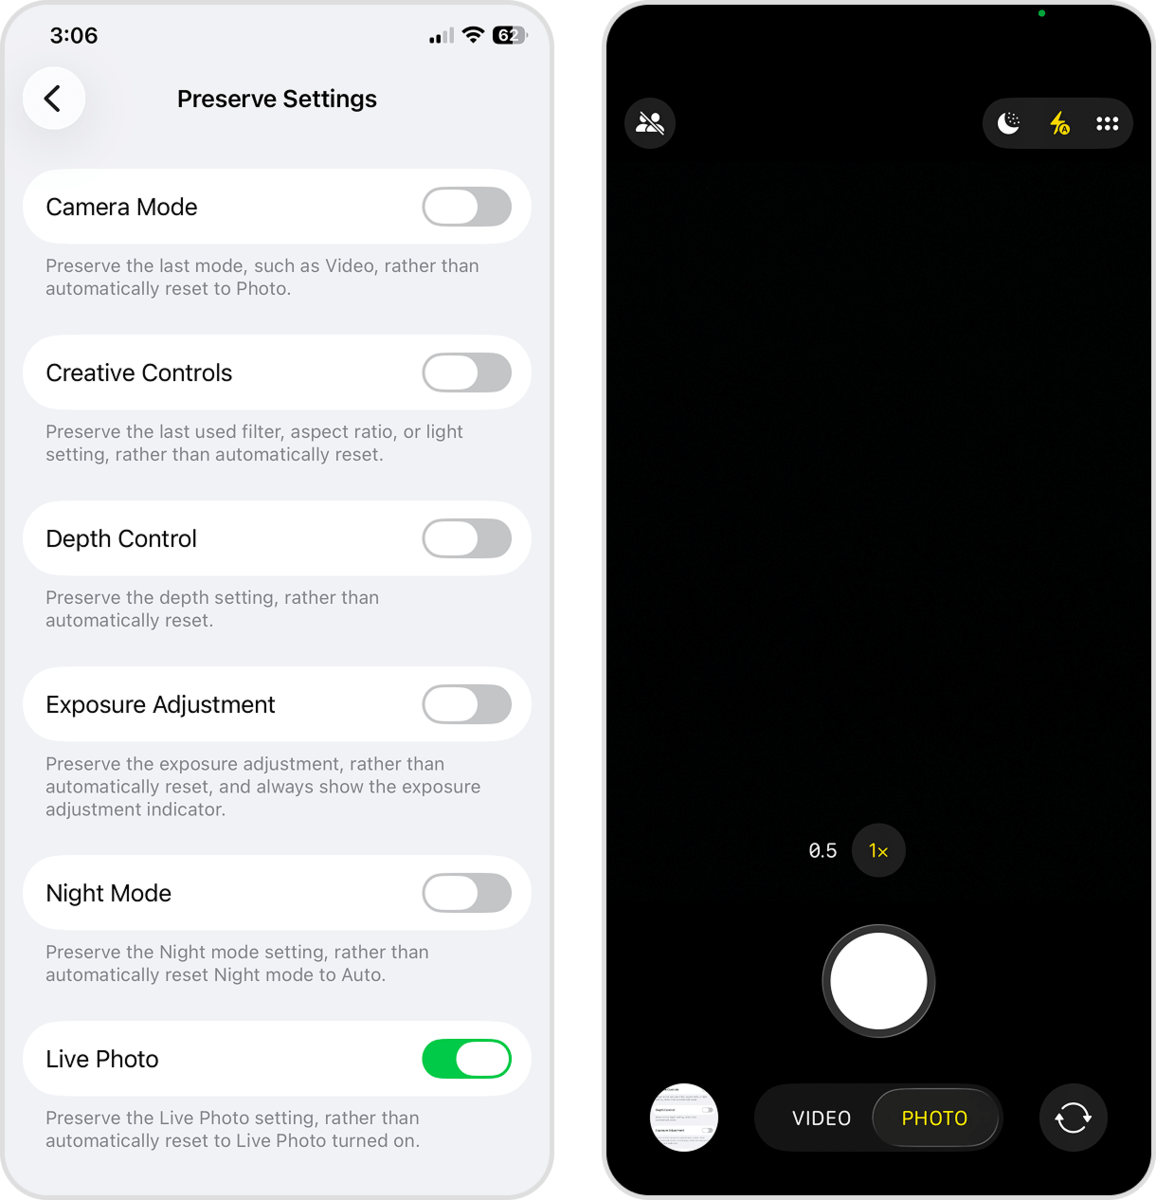
- Tap the LIVE button, ensuring it turns the color gray (which means that the feature is disabled).
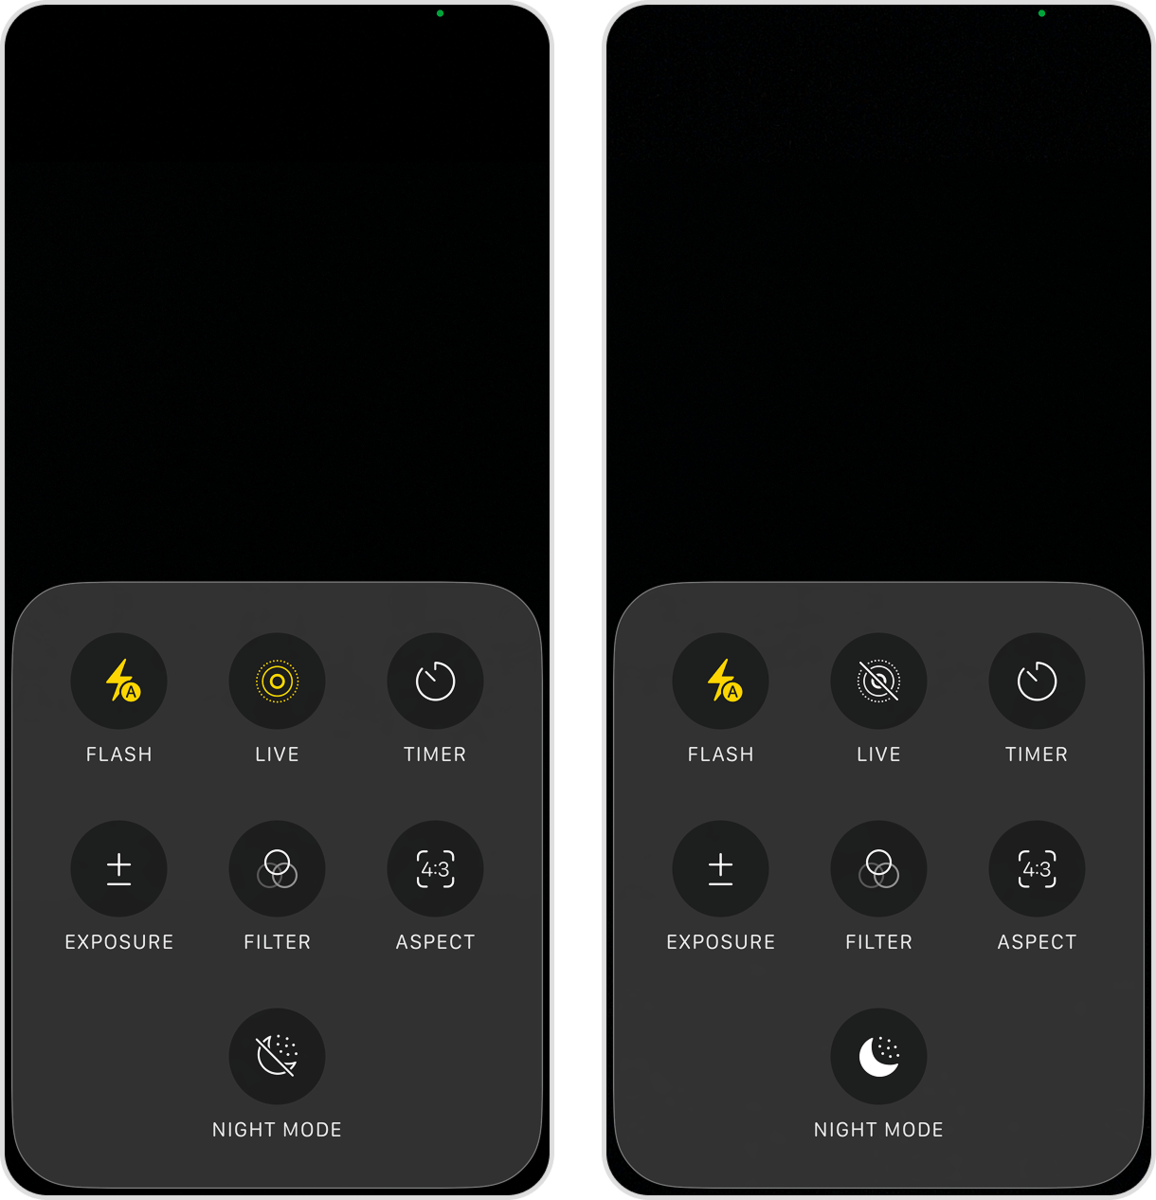
For as long as you take off Live Photos on your iPhone whenever you close the camera app, it will remain off the next time you use your device’s camera.
Bottom Line
Before you go, take a few more tips for the road! If you don’t want Live Photos fully disabled, you can enable the Automatic Live Photo setting. It activates the Live effect when the camera detects movement when the shutter button is pressed. However, note that this can result in many unwanted Live Photos if you don’t have a steady hand.
Live Photos is also disabled automatically when you use ProRAW (and Night Mode) because they conflict wth each other. So if you want to shoot very high-quality photos without the Live part, and without having to worry about settings, use ProRAW or ProRAW Max (if available).
FAQ
Yes! To quickly find all your Live Photos, open the Photos app and scroll down to the Media Types section. Then, tap Live Photos to browse all of your Live Photos conveniently compiled in one place. From there, you can duplicate your Live Photos as still images or delete them altogether.
No, simply turning off the “Live” effect on a photo won’t reduce its file size. It only disables the effect, but the video and audio clips remain stored on your device, in case you want to turn it back on. Instead, you can delete them from the Live Photos Collection (Photos app > Media Types).
Yes, even if you remove the Live part of a Live Photo, its quality will remain the same. Live Photos consist of a still image compiled with very short video and audio clips in a single file. That still image remains when you delete the Live part.
Removing the Live part from a photo will only be reflected in your iCloud; if you remove the Live effect from a photo, the change will also be applied to the iCloud version. But the same change will not be reflected in a Shared Album—you’ll need to delete the Live Photo from the Shared Album, convert it to a still image, then add it to the album again.