Disk Drill’s bootable USB “Create Boot Drive” feature was available in Disk Drill 3 and has been deprecated. Starting with Disk Drill 4, you can run Disk Drill directly from built‑in macOS Recovery Mode (no USB drive required).
- Use this guide for Disk Drill 4+:
https://www.cleverfiles.com/help/disk-drill-recovery-mode.html - Looking for the legacy Disk Drill 3 USB boot steps? See:
https://www.cleverfiles.com/boot-mac-from-usb.html
✅ Recommended method today: Run Disk Drill in macOS Recovery Mode (Disk Drill 4+)
Apple T2 Security Chip: Technical Overview (What It Does and Why It Matters)
The Apple T2 Security Chip is custom Apple silicon used in certain Intel-based Macs. It provides several security features that directly affect boot behavior and data recovery workflows:
- Secure Enclave coprocessor that helps protect sensitive cryptographic operations and keys.
- Hardware-backed storage encryption (including FileVault acceleration) using a dedicated AES engine.
- A hardware root of trust for Secure Boot—startup components are verified to ensure they haven’t been modified.
- Integration of multiple system controllers (for example, the SSD controller and system management functions), which is one reason T2 Macs behave differently than older Intel Macs.
Practical takeaway: T2 Macs are designed to trust the internal boot path by default, and to be cautious about external boot devices unless you explicitly allow them.
Why Secure Boot Can Block USB Booting on T2 Macs
On Macs with the Apple T2 Security Chip, Apple designed startup security to protect against:
- Booting from untrusted operating systems
- Startup disk tampering
- Unauthorized booting from external media (USB, external SSD, etc.)
That’s why a T2 Mac may refuse to start from a bootable USB drive until you explicitly allow it in Startup Security Utility.
Recommended Method Today: Run Disk Drill in macOS Recovery Mode (Disk Drill 4+)
If your goal is safe data recovery from your startup disk, the best approach with modern macOS versions is:
- Boot into macOS Recovery.
- Launch Disk Drill from Recovery Mode.
- Scan and recover data while minimizing the risk of overwriting deleted files.
This newer approach avoids the biggest headache with T2 Macs—having to enable external boot and lower Secure Boot just to start from a USB device.
Legacy (Disk Drill 3) Workflow: Allow Booting From a Disk Drill Boot Drive on a T2 Mac
This section is only relevant if you must boot from a USB drive (Disk Drill 3 legacy boot drive, certain installer USBs, diagnostics, etc.).
Step 1: Start macOS Recovery (Intel Mac)
- Turn on your Mac and hold Command (⌘) + R immediately after you see the Apple logo. This starts your computer in macOS Recovery mode.
- Select Utilities > Startup Security Utility from the macOS Utilities Window.
- Authenticate by clicking Enter macOS Password and enter a valid administrator account and password.
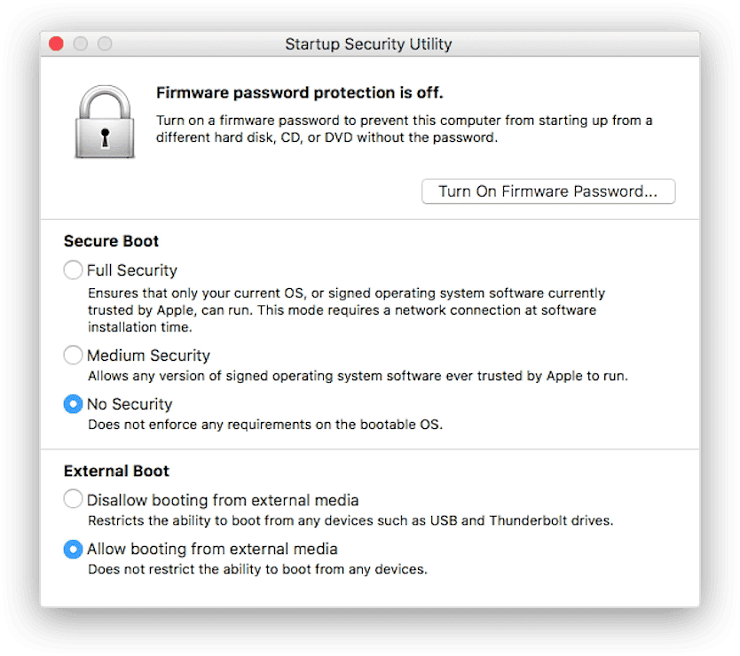
Step 2: Adjust Secure Boot and External Boot settings
- Within the Startup Security Utility, select No Security in the Secure Boot panel.
- Staying in the Startup Security Utility, select Allow booting from external media.
Step 3: Boot from the external drive
- Restart your Mac.
- Hold the Option (⌥) key at startup.
- Select your external boot drive from the Startup Manager list.
Lowering Secure Boot and allowing external boot can reduce your Mac’s protection level. After you finish your recovery task, we strongly recommend returning to Startup Security Utility and restoring:
- Secure Boot: Full Security
- Disable external boot again (if you don’t need it)
FAQ
Usually, no. Disk Drill 4+ is designed to run from built-in macOS Recovery, which avoids the external USB boot path entirely.
Typically one of these is true:
- Your Mac doesn’t have a T2 chip, or
- You’re on Apple silicon, which uses a different startup security flow than Intel T2 Macs.
Because Apple built the T2 platform to verify a trusted boot chain and to limit external booting unless the owner explicitly allows it.