One of the best aspects of owning a Mac is the great upgrade system it is. It will always give you the best, most recent version of macOS for your system, ensuring that you are always up to date with everything. However, there are times when you do not want the latest and greatest out there. During these moments, you need a simple solution to download a previous version of macOS or OS X and create a bootable installer disk for it.
At a Glance (TL;DR)
- Get the installer from Apple only. Use the App Store (for newer macOS), Apple’s direct .dmg links (for older releases), or Terminal’s softwareupdate on Catalina+.
- Build a bootable USB the easy way with Disk Drill’s macOS Installer tool (graphical) or the Apple‑supported createinstallmedia (Terminal).
- Boot and install (Apple silicon: hold Power → Options; Intel: hold ⌥ Option). If your T2 Mac won’t boot from USB, enable “Allow booting from external media.”
Why You Might Need an Older macOS
Legacy app support, testing, or running lab/dev environments often requires Ventura/Monterey/Big Sur or earlier (Mojave/High Sierra/Sierra/El Capitan/Lion). Apple distributes those installers—some via the App Store, others as browser‑downloaded disk images (.dmg).
What You’ll Need
- A compatible Mac (Apple silicon or Intel).
- Stable internet (Recovery/firmware data may be fetched during install).
- A USB flash drive (≥16 GB; 32 GB recommended) if you’ll create a bootable installer.
- Disk Drill for Mac (free to download; includes free macOS Installer tool and optional data‑recovery extras).
- Optionally, a full backup or byte‑to‑byte image before you change OS versions. (Disk Drill offers a free byte‑to‑byte backup module.)
Step 1. Choose the macOS Version and Confirm Compatibility
- Check the realistic floor/ceiling for your Mac. You generally cannot install an OS older than what your Mac originally shipped with; if you try, the installer will fail or the Mac will refuse to boot it.
- Apple silicon (M‑series) Macs require macOS 11 Big Sur or newer; Intel‑only releases (10.x) won’t run natively. When a macOS build is incompatible, installation fails (often with a prohibited symbol).
- Decide where you’ll install: internal disk, an external drive, or a VM (VMs on Apple silicon must match architecture; running Intel‑only macOS in a virtual machine on Apple silicon is not supported by normal virtualization).
Step 2. Download the Official Installer From Apple
Apple provides multiple first‑party ways to get macOS installers. The easiest way to find the right, official download is to start inside Disk Drill and jump straight to the correct Apple page.
A) Disk Drill (Recommended): Jump to the Right Apple Download in Two Clicks
- Open Disk Drill → Extra Tools → macOS Installer.
- Click the Add macOS Installer… button at the bottom.
- In the context menu:
- Current Release of macOS — Click entry displaying current macOS name to go directly to the App Store page for today’s macOS release and download it from Apple.
- Download Older Version — Hover to expand a curated list of older macOS versions (starting from Sierra). Click the version you need to be taken to Apple’s official download page for that release.
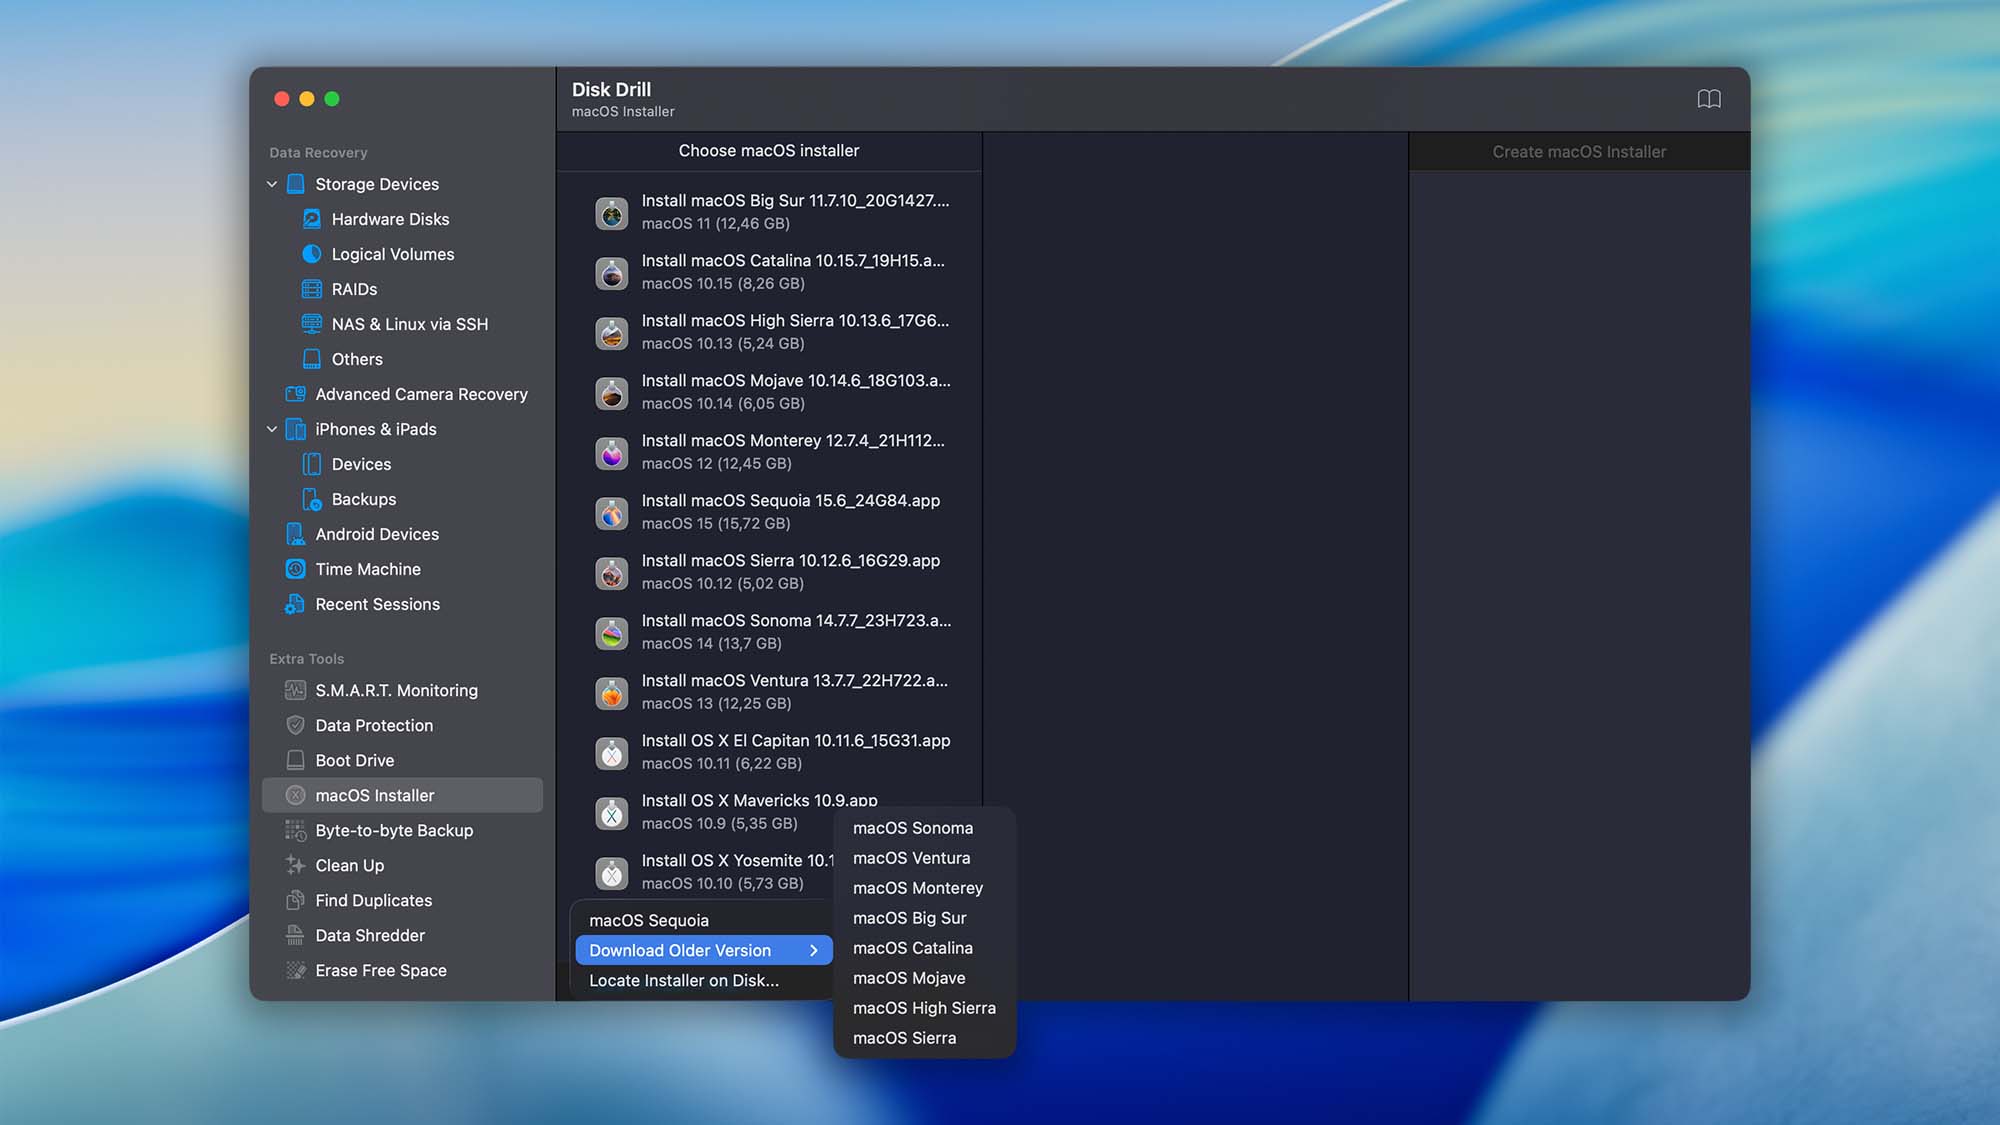
⁉️ What this does: Disk Drill doesn’t host or modify installers; it routes you to Apple’s official App Store pages, so you always get authentic, signed installers. Once the download finishes, the Install [macOS Name].app will appear in /Applications (or Apple will guide you through Software Update for newer releases).
B) App Store & Apple’s Direct Links (Manual Path)
You can also open Apple’s App Store “Get” pages for newer macOS releases (e.g., Sonoma, Ventura, Monterey, Big Sur, Catalina, Mojave, High Sierra). The App Store will download Install [macOS Name].app to /Applications. For older releases (e.g., Sierra, El Capitan, Yosemite, Mountain Lion, Lion), Apple provides .dmg downloads; open the .dmg and run the .pkg to place the installer app into /Applications.
| macOS Version | Direct Download | Product Page |
|---|---|---|
| ⬇️ | – | |
| ⬇️ | ➡️ | |
| ⬇️ | ➡️ | |
| ⬇️ | ➡️ | |
| ⬇️ | ➡️ | |
| ⬇️ | ➡️ | |
| — | ➡️ | |
| — | ➡️ | |
| — | ➡️ | |
| ⬇️ | ➡️ | |
| ⬇️ | ➡️ | |
| ⬇️ | ➡️ | |
| ⬇️ | ➡️ | |
| ⬇️ | ➡️ |
How to Download Very Old OS X (Mavericks, Mountain Lion, Lion, Snow Leopard, Leopard, Tiger)
If you’re trying to download old Mac OS X installers—like OS X Mavericks 10.9, Mountain Lion 10.8, Lion 10.7, Snow Leopard 10.6, Leopard 10.5, Tiger 10.4 (and earlier)—the process is different from modern macOS. You won’t find these by searching the App Store. Apple intentionally hides legacy OS downloads so most users stay current, which is sensible for security—but it’s frustrating when you need a specific legacy version for compatibility or testing.
The best official path is your App Store purchase history. If you previously purchased or downloaded one of these older releases with your Apple ID, you can usually re‑download it:
- Open App Store on your Mac.
- Go to Account → Purchased (on some older App Store versions it’s the Purchases tab).
- Scroll your Purchased list to find the OS X release you need (e.g., OS X Mavericks, OS X Mountain Lion, OS X Lion).
- Click Download. The installer will save to /Applications as Install OS X [Name].app (or Apple may provide an InstallMacOSX.dmg that expands into the installer app).
What to expect by version:
- Mavericks (10.9), Mountain Lion (10.8), Lion (10.7): Commonly re‑downloadable from Account → Purchased. Some older flows deliver a .dmg that, when opened, places the installer into /Applications.
- Snow Leopard (10.6) and earlier (Leopard 10.5, Tiger 10.4): These pre‑App Store releases were historically distributed on physical media. There’s typically no official App Store download. You’ll need original install discs or a system image/backup that you legally own.
C) Terminal (Catalina or Later): Fetch Exact Builds
If you’re on macOS 10.15 Catalina+, you can query and download full installers directly in Terminal:
# List full installers Apple offers for your Macsoftwareupdate --list-full-installers
# Fetch a specific version (replace with your target version)
sudo softwareupdate --fetch-full-installer --full-installer-version 13.6.7
This is ideal when you need a specific point release for lab parity or compatibility testing.
Step 3. Create a Bootable USB Installer
You can do this the easy way (Disk Drill GUI) or the Apple way (Terminal). Both produce a standard bootable macOS installer.
Option 1: Disk Drill’s macOS Installer (point‑and‑click)
- Open Disk Drill → Extra Tools → macOS Installer.
- Select the installer you downloaded. Disk Drill auto‑detects the installer in /Applications, and you can also manually browse to the installer if it’s stored elsewhere (for example, on another volume or a custom path).
- Choose your USB flash drive as the target and click Create macOS installer.


Option 2: Apple’s createinstallmedia (Terminal)
Format a USB drive (Disk Drill or Disk Utility can erase it for you), then run the official command for your macOS version. Examples:
# Tahoe (26)sudo /Applications/Install\ macOS\ Tahoe.app/Contents/Resources/createinstallmedia --volume /Volumes/MyVolume
# Sequoia (15)
sudo /Applications/Install\ macOS\ Sequoia.app/Contents/Resources/createinstallmedia --volume /Volumes/MyVolume
# Sonoma (14)
sudo /Applications/Install\ macOS\ Sonoma.app/Contents/Resources/createinstallmedia --volume /Volumes/MyVolume
# Ventura (13)
sudo /Applications/Install\ macOS\ Ventura.app/Contents/Resources/createinstallmedia –volume /Volumes/MyVolume
# Monterey (12)
sudo /Applications/Install\ macOS\ Monterey.app/Contents/Resources/createinstallmedia –volume /Volumes/MyVolume
# Big Sur (11)
sudo /Applications/Install\ macOS\ Big\ Sur.app/Contents/Resources/createinstallmedia –volume /Volumes/MyVolume
# Catalina (10.15)
sudo /Applications/Install\ macOS\ Catalina.app/Contents/Resources/createinstallmedia –volume /Volumes/MyVolume
# Mojave (10.14)
sudo /Applications/Install\ macOS\ Mojave.app/Contents/Resources/createinstallmedia –volume /Volumes/MyVolume
# High Sierra (10.13)
sudo /Applications/Install\ macOS\ High\ Sierra.app/Contents/Resources/createinstallmedia –volume /Volumes/MyVolume
# El Capitan (10.11)
sudo /Applications/Install\ OS\ X\ El\ Capitan.app/Contents/Resources/createinstallmedia –volume /Volumes/MyVolume –applicationpath /Applications/Install\ OS\ X\ El\ Capitan.app
⁉️ File system note: Sierra (10.12) and earlier install onto HFS+ (Mac OS Extended). High Sierra (10.13) and later are APFS‑aware, and many require or strongly prefer APFS, especially on SSDs. If you hit “not formatted as APFS” or similar messages, format the destination appropriately.
Step 4. Boot From the Installer and Run Setup
Apple silicon (M‑series):
- Shut down the Mac.
- Insert the USB installer.
- Press and hold the Power button until Startup Options appears.
- Select the USB installer → Continue → follow prompts.
Intel Macs:
- Shut down the Mac.
- Insert the USB installer.
- Power on and immediately hold ⌥ Option to open Startup Manager.
- Pick the USB installer and press Return

T2 security chips (2018–2020 Intel models): If you can’t boot external media, open Startup Security Utility in Recovery and allow booting from external/removable media (you can switch it back after installation). 
During install: Keep the Mac connected to the internet—Apple may fetch model‑specific firmware during setup. Incompatibility is signaled by a prohibited icon or failed install.
Step 5. After Installation (and How Disk Drill Can Help)
- Run Software Update to get the latest patches for that major version.
- Restore files using Migration Assistant (from a Time Machine backup or another disk).
- Re‑enable stricter boot security on T2 Macs if you relaxed it earlier.
- If you downgraded and skipped files, consider a byte‑to‑byte image before rearranging data (Disk Drill’s backup module is free).
Final Word
If your goal is to install or downgrade macOS safely, the formula is simple: get the installer from Apple, make a proper bootable USB (Disk Drill makes this painless), and follow Apple’s boot & Recovery flow for your Mac type. Keep backups (Disk Drill’s byte‑to‑byte image is handy), and you’ll be free to move between macOS versions without drama.