Android data recovery on Mac can be challenging, especially on modern Android devices that are heavily locked down. These security measures protect your phone from malicious apps and unwanted system changes, but they also limit direct access to your device’s storage. If you want to recover deleted files from Android using Disk Drill for Mac, you may need advanced access to your device—commonly known as rooting your Android.
Rooting has been part of Android’s history since the first smartphones. In the early days, devices often came loaded with bloatware that drained the battery and wasted storage. Rooting was the only way to remove these unnecessary apps and unlock the phone’s full potential. Similar to jailbreaking an iPhone, rooting an Android device gives you superuser access to the operating system.
Rooting is now mainly required for tasks like Android data recovery. Most phones running Android 5.0 or newer no longer support USB Mass Storage Mode, which means recovery software can’t scan your internal memory without root access. Whether or not this option is available depends on the device manufacturer and sometimes even your mobile carrier.
If your Android phone or tablet doesn’t allow direct memory access, rooting is often the only way to recover deleted data. Once rooted, Disk Drill for Mac can perform a deep scan to retrieve photos, videos, and other lost files. Rooting requires some technical knowledge, but it gives Disk Drill the access it needs to bring your deleted data back.
Step 1. Enable USB Debugging
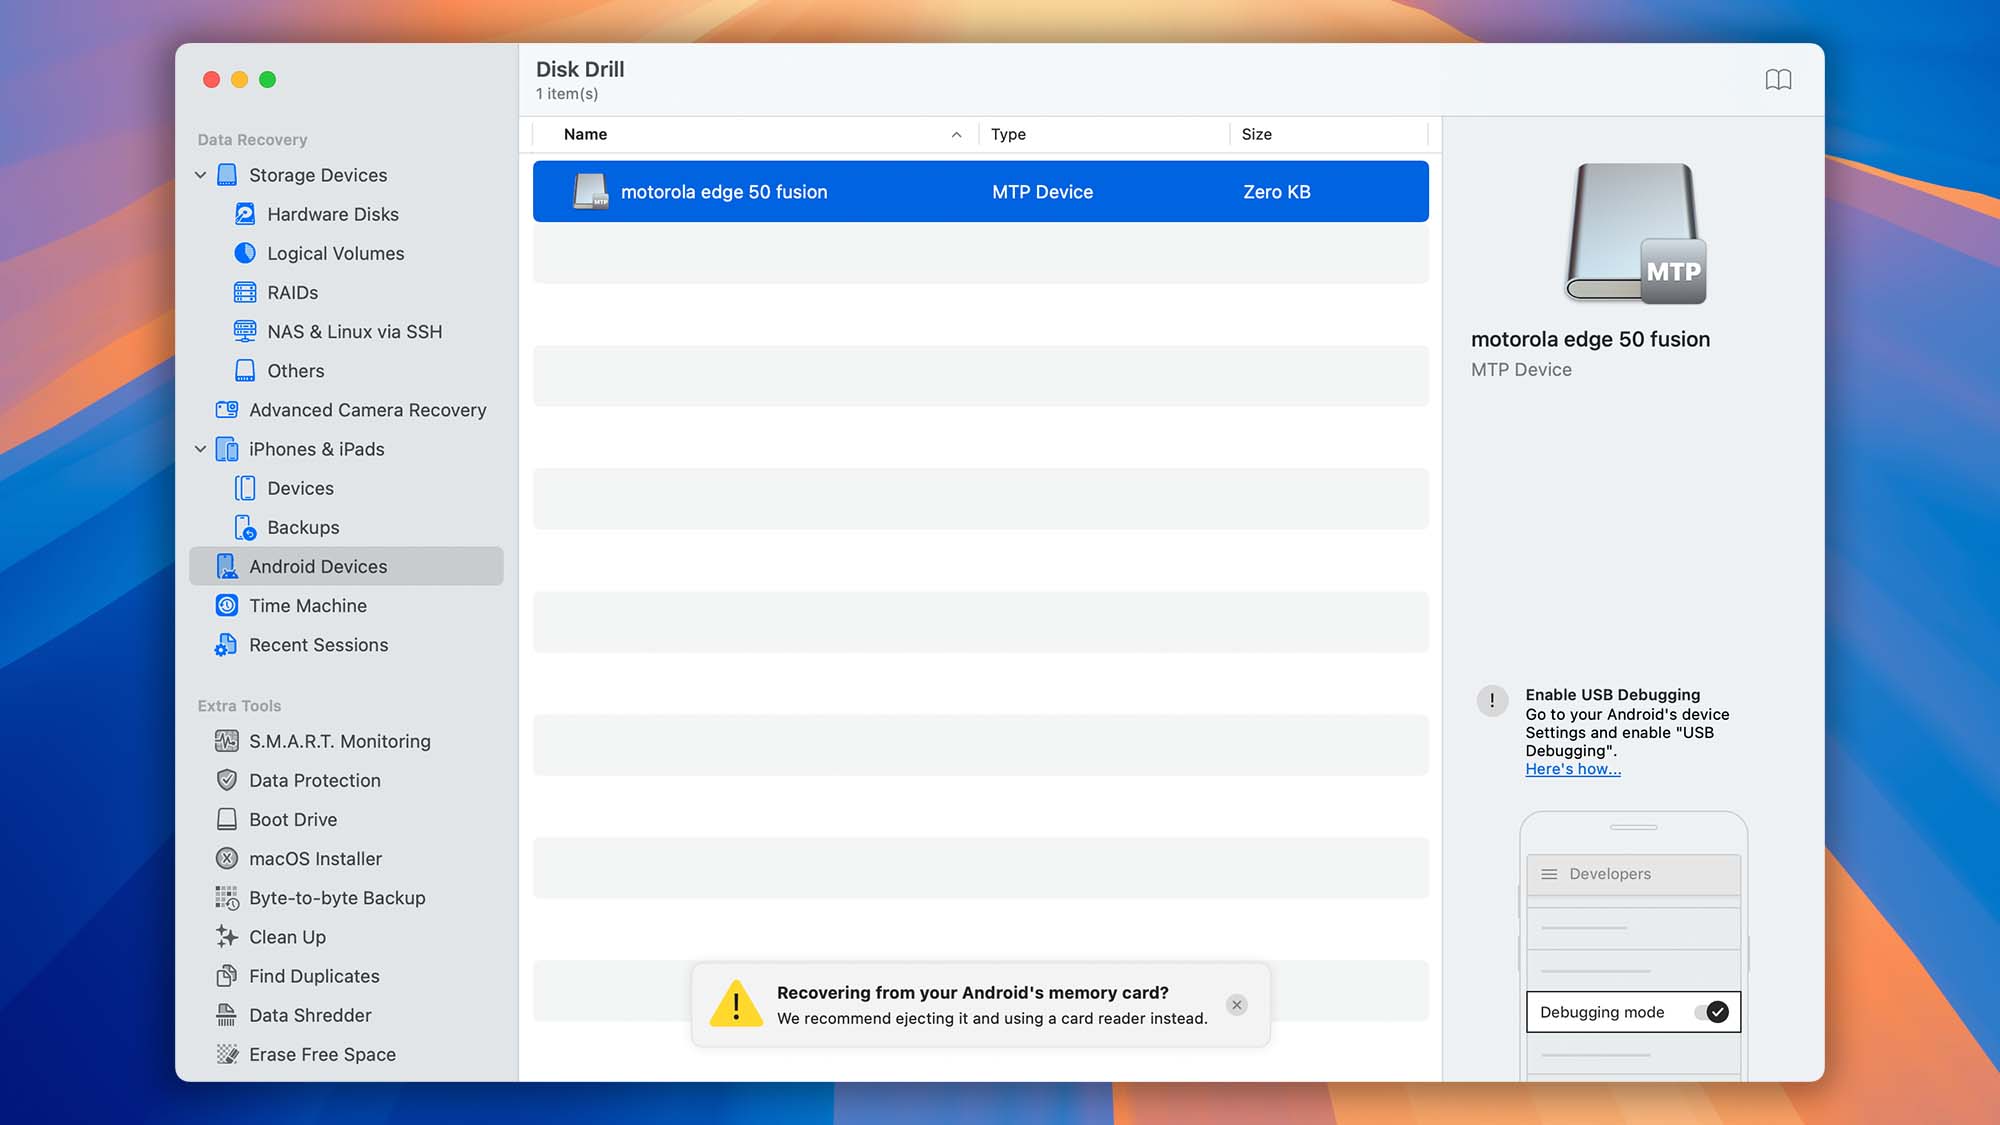
When Disk Drill first detects your Android device, it may initially appear as an MTP (Media Transfer Protocol) device. Don’t worry—this is normal. Simply follow the next steps to properly prepare your device for Android data recovery.
First, connect your Android device to your Mac using a USB cable. Depending on your phone or tablet, it could be a Micro-USB, USB Type-C, or another type of connector. Most modern devices use USB Type-C. There’s no need to remove your SD card at this stage.
Once Disk Drill detects your Android device, it will prompt you to enable USB debugging. To do this, you first need to enable Developer Options on your phone:
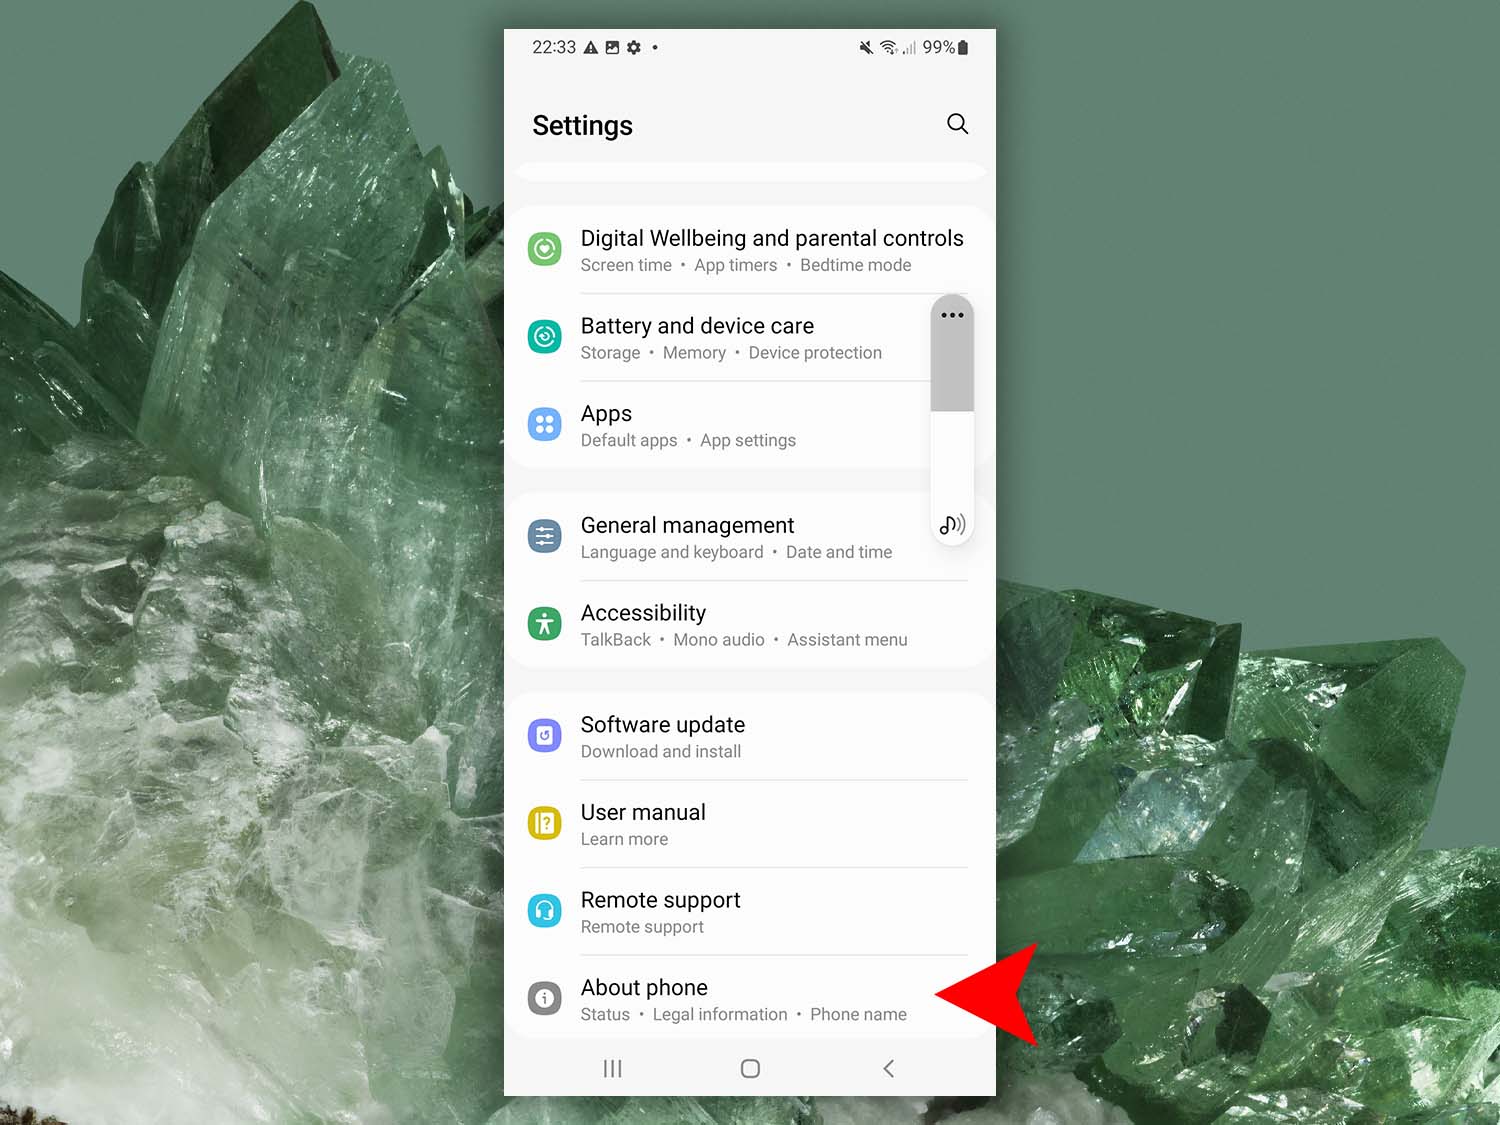
- Open Settings > About phone.
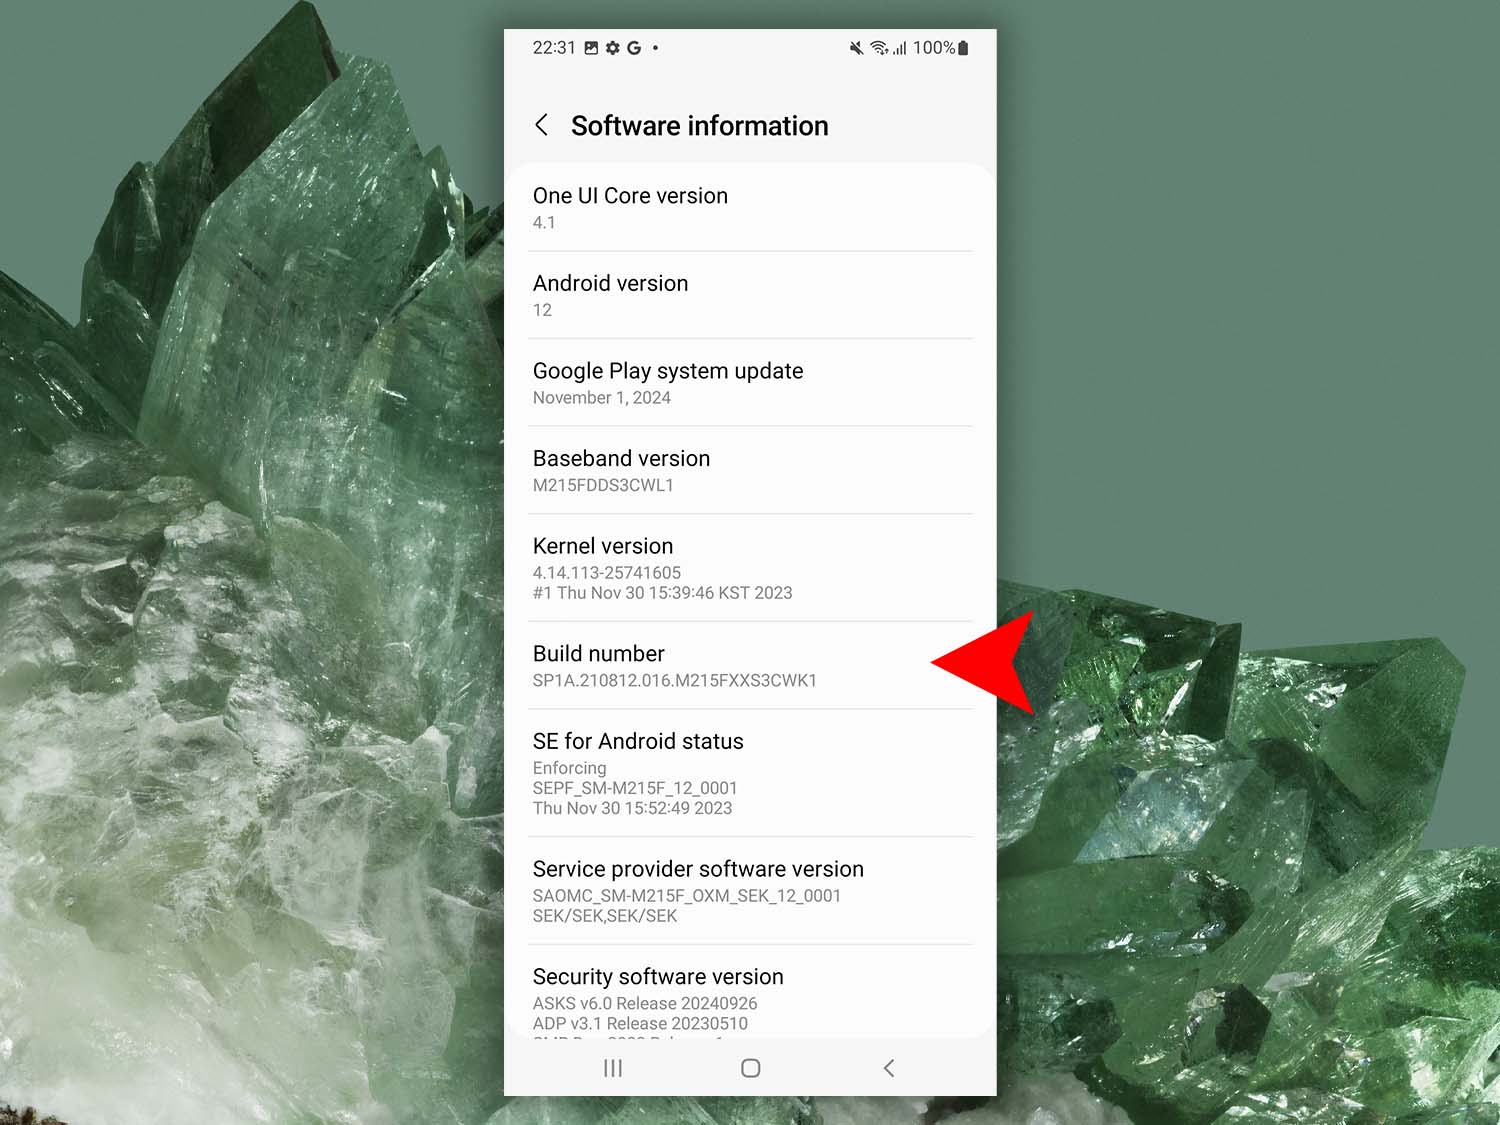
- Tap Build number seven times in a row until you see a message confirming that Developer Mode is active.
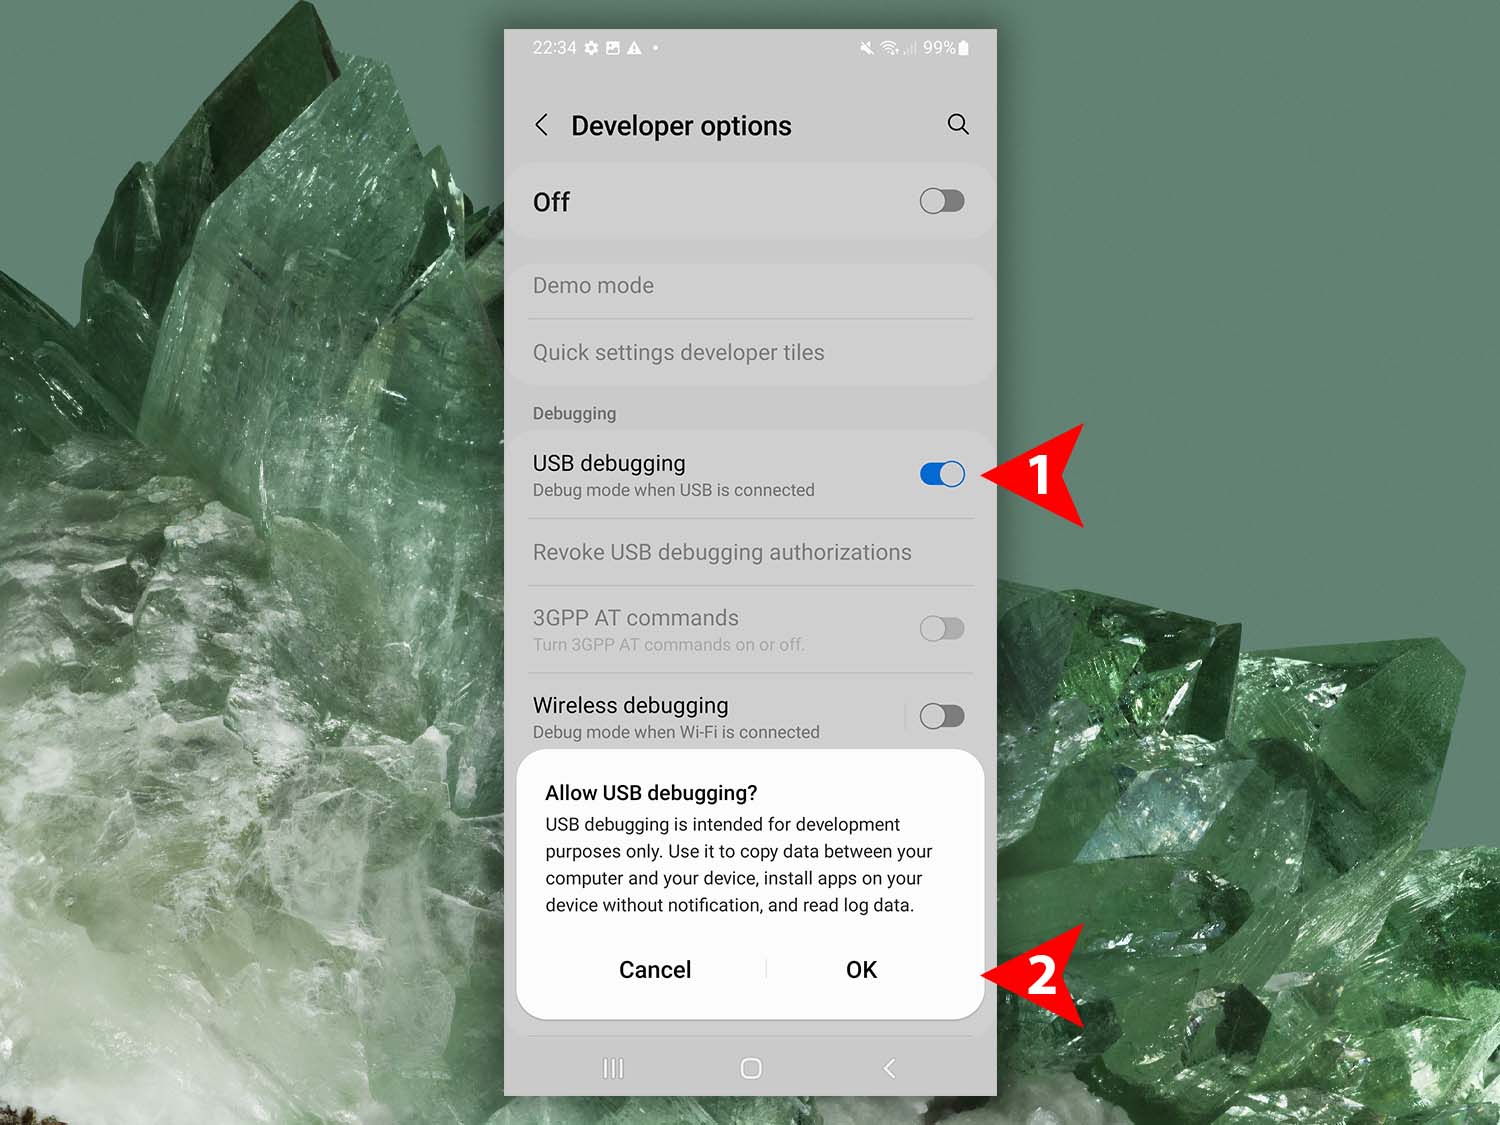
- Go back to the main Settings screen and open Developer Options (usually at the bottom).
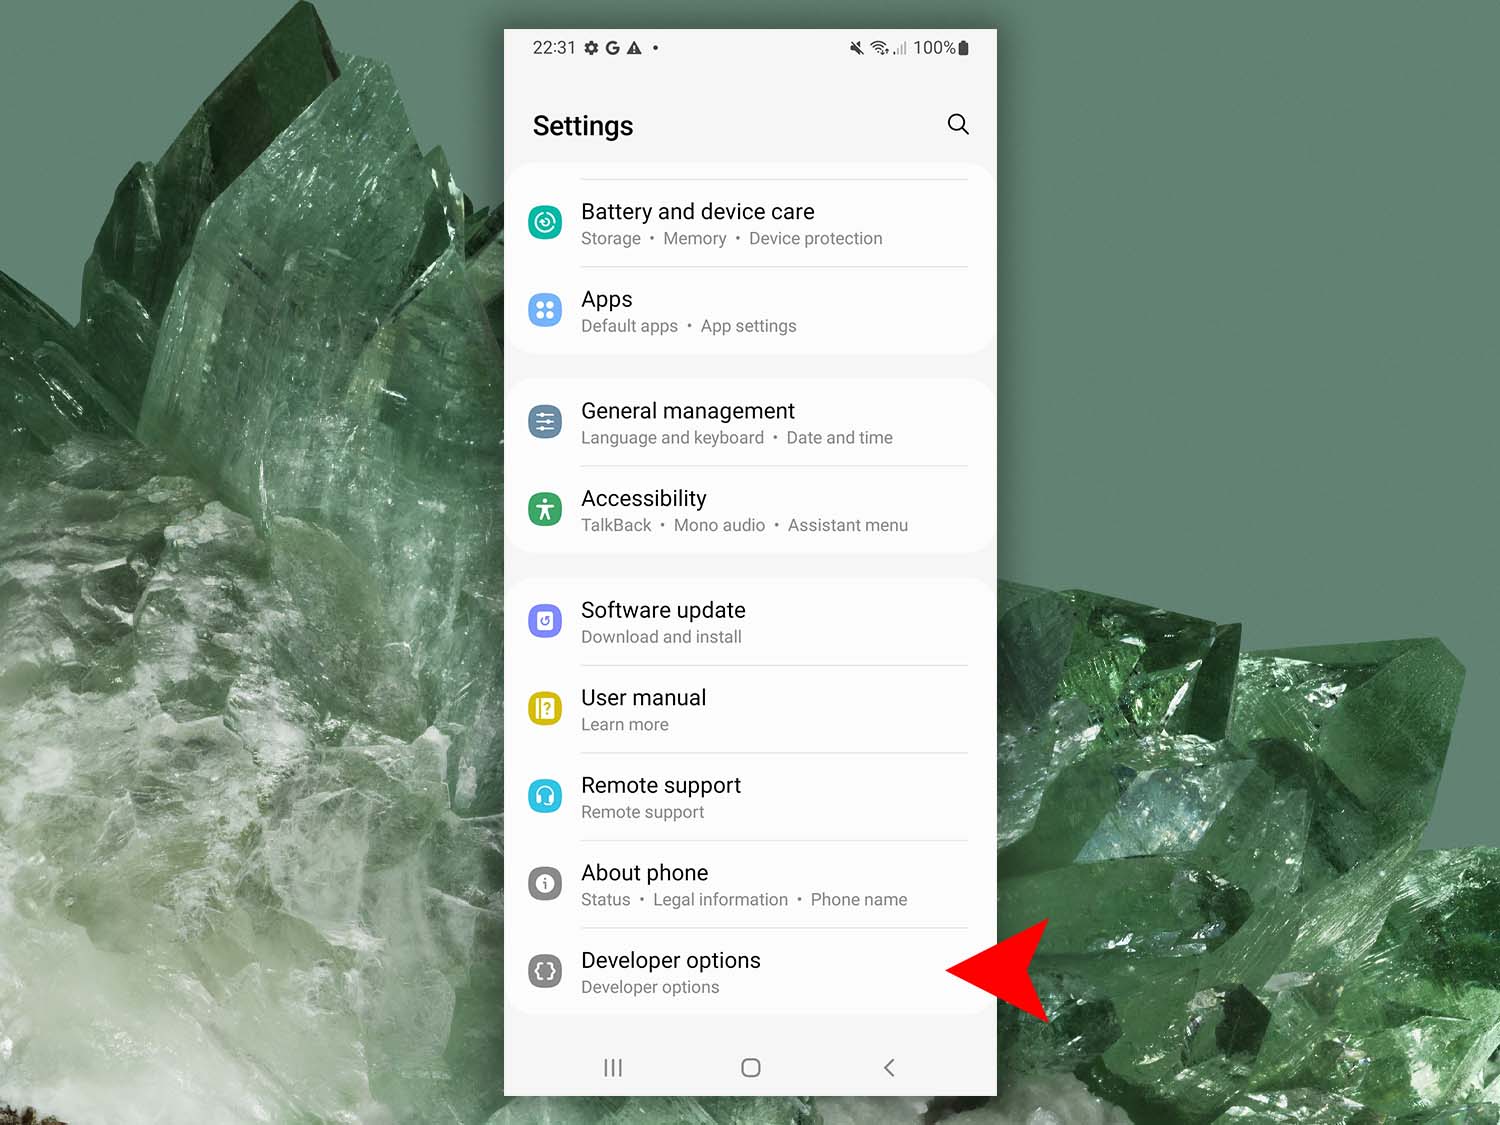
- Enable the USB debugging option.
After enabling USB debugging, you may need to reconnect your Android device to your Mac for Disk Drill to recognize it. If these steps don’t work for your specific device, search online for instructions tailored to your model.
Step 2. Authorizing your computer
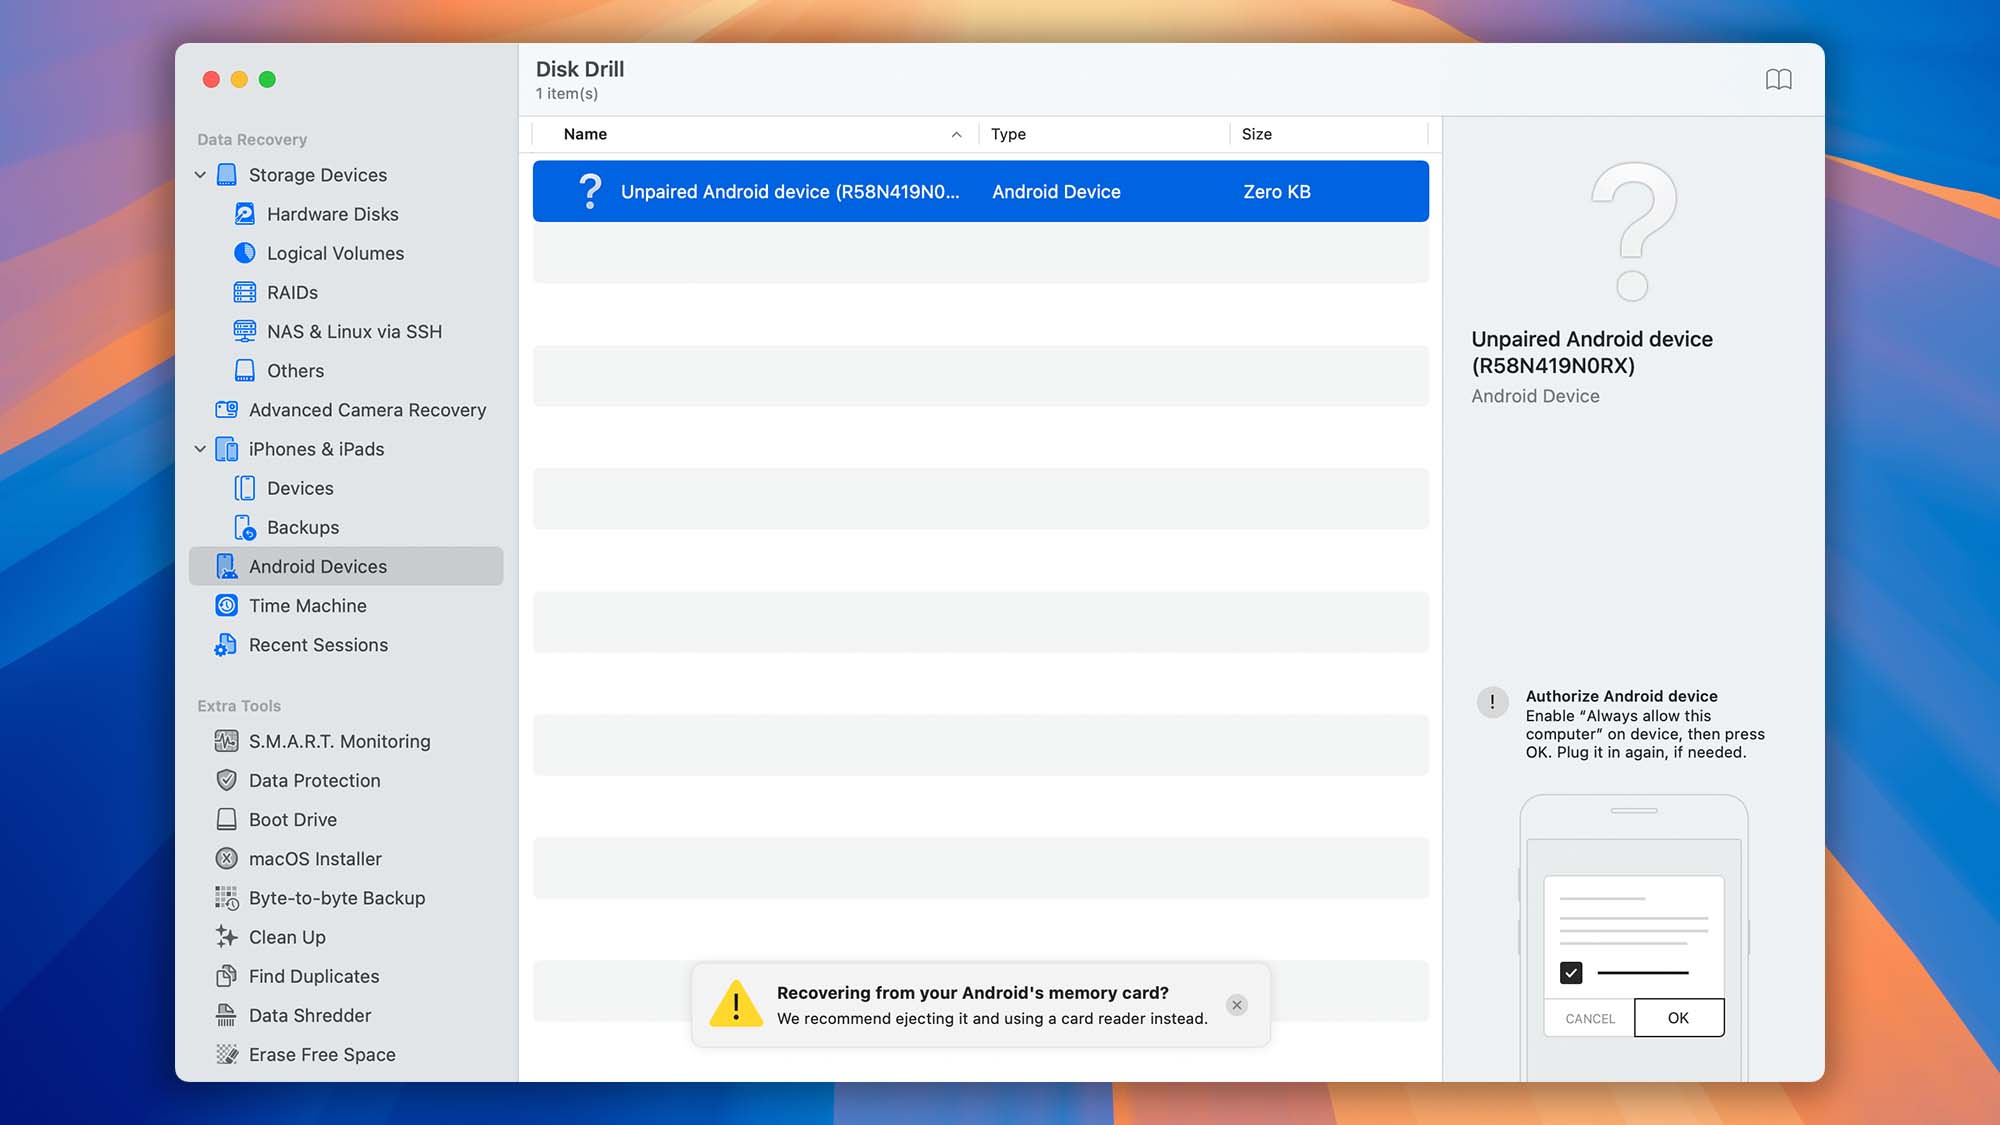
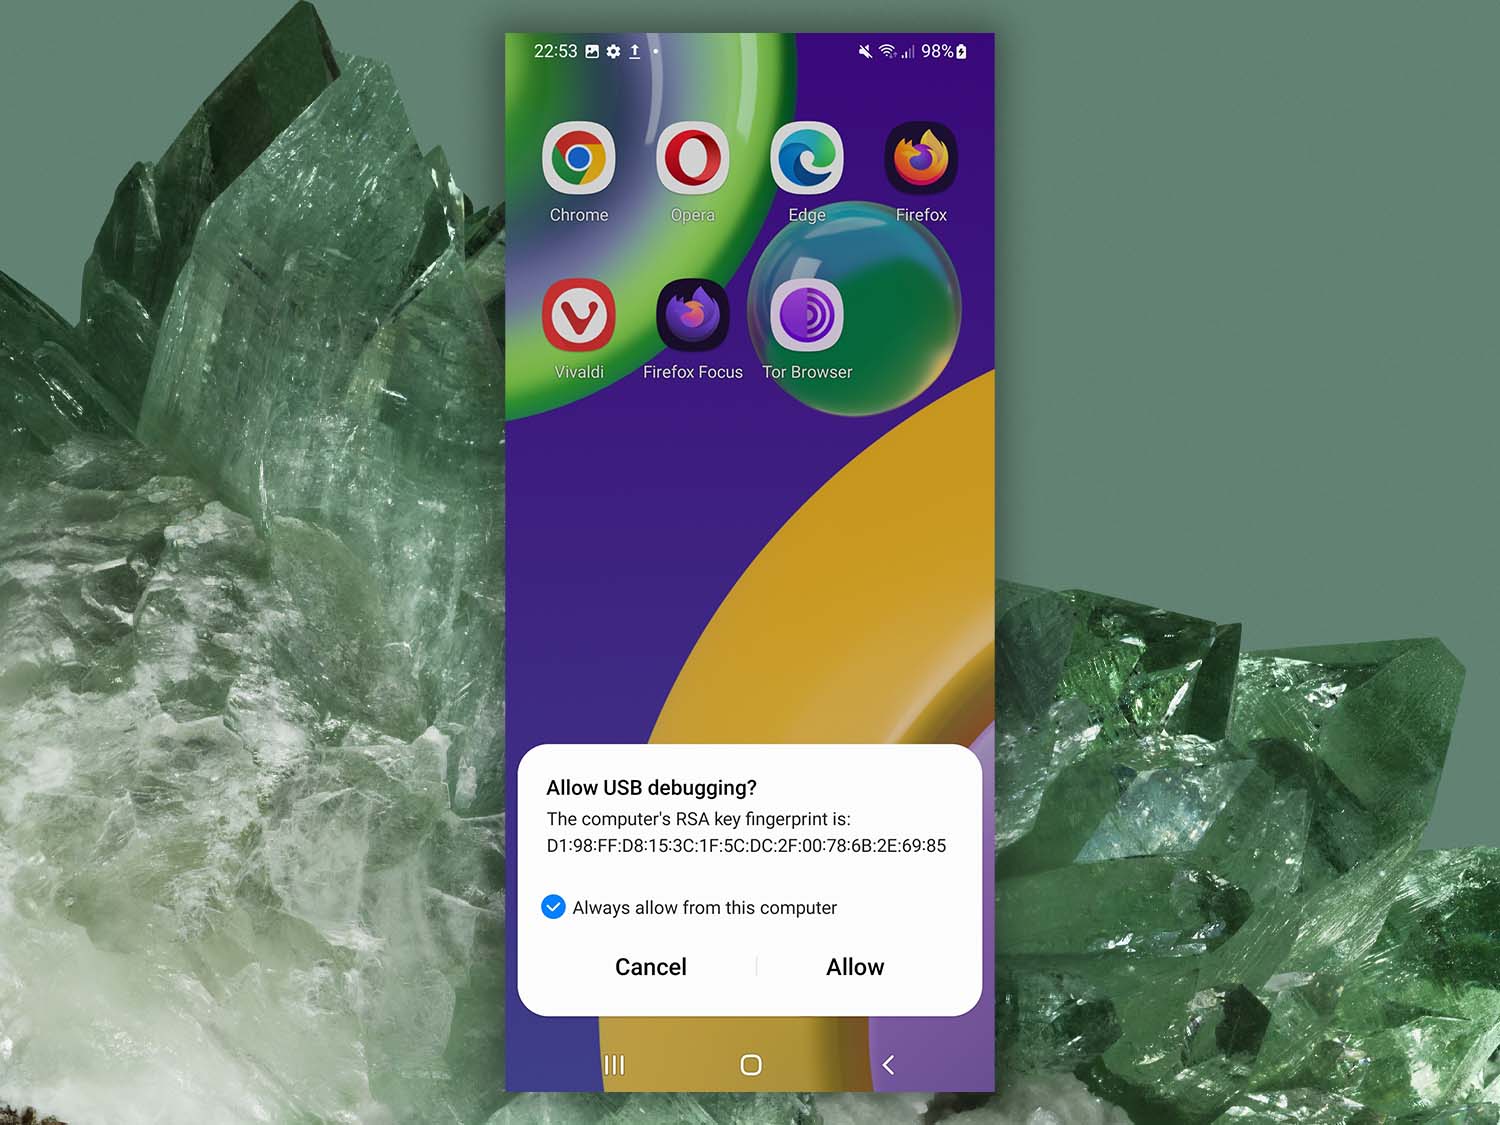
Once Disk Drill detects your Android device, it will request permission to access it. At this point, a prompt will appear on your phone screen asking, “Allow USB debugging?” USB debugging must be authorized on a per-computer basis.
When you see this pop-up, select “Always allow from this computer” and then tap “Allow”. This ensures that Disk Drill for Mac can communicate with your Android device without repeatedly requesting permission.
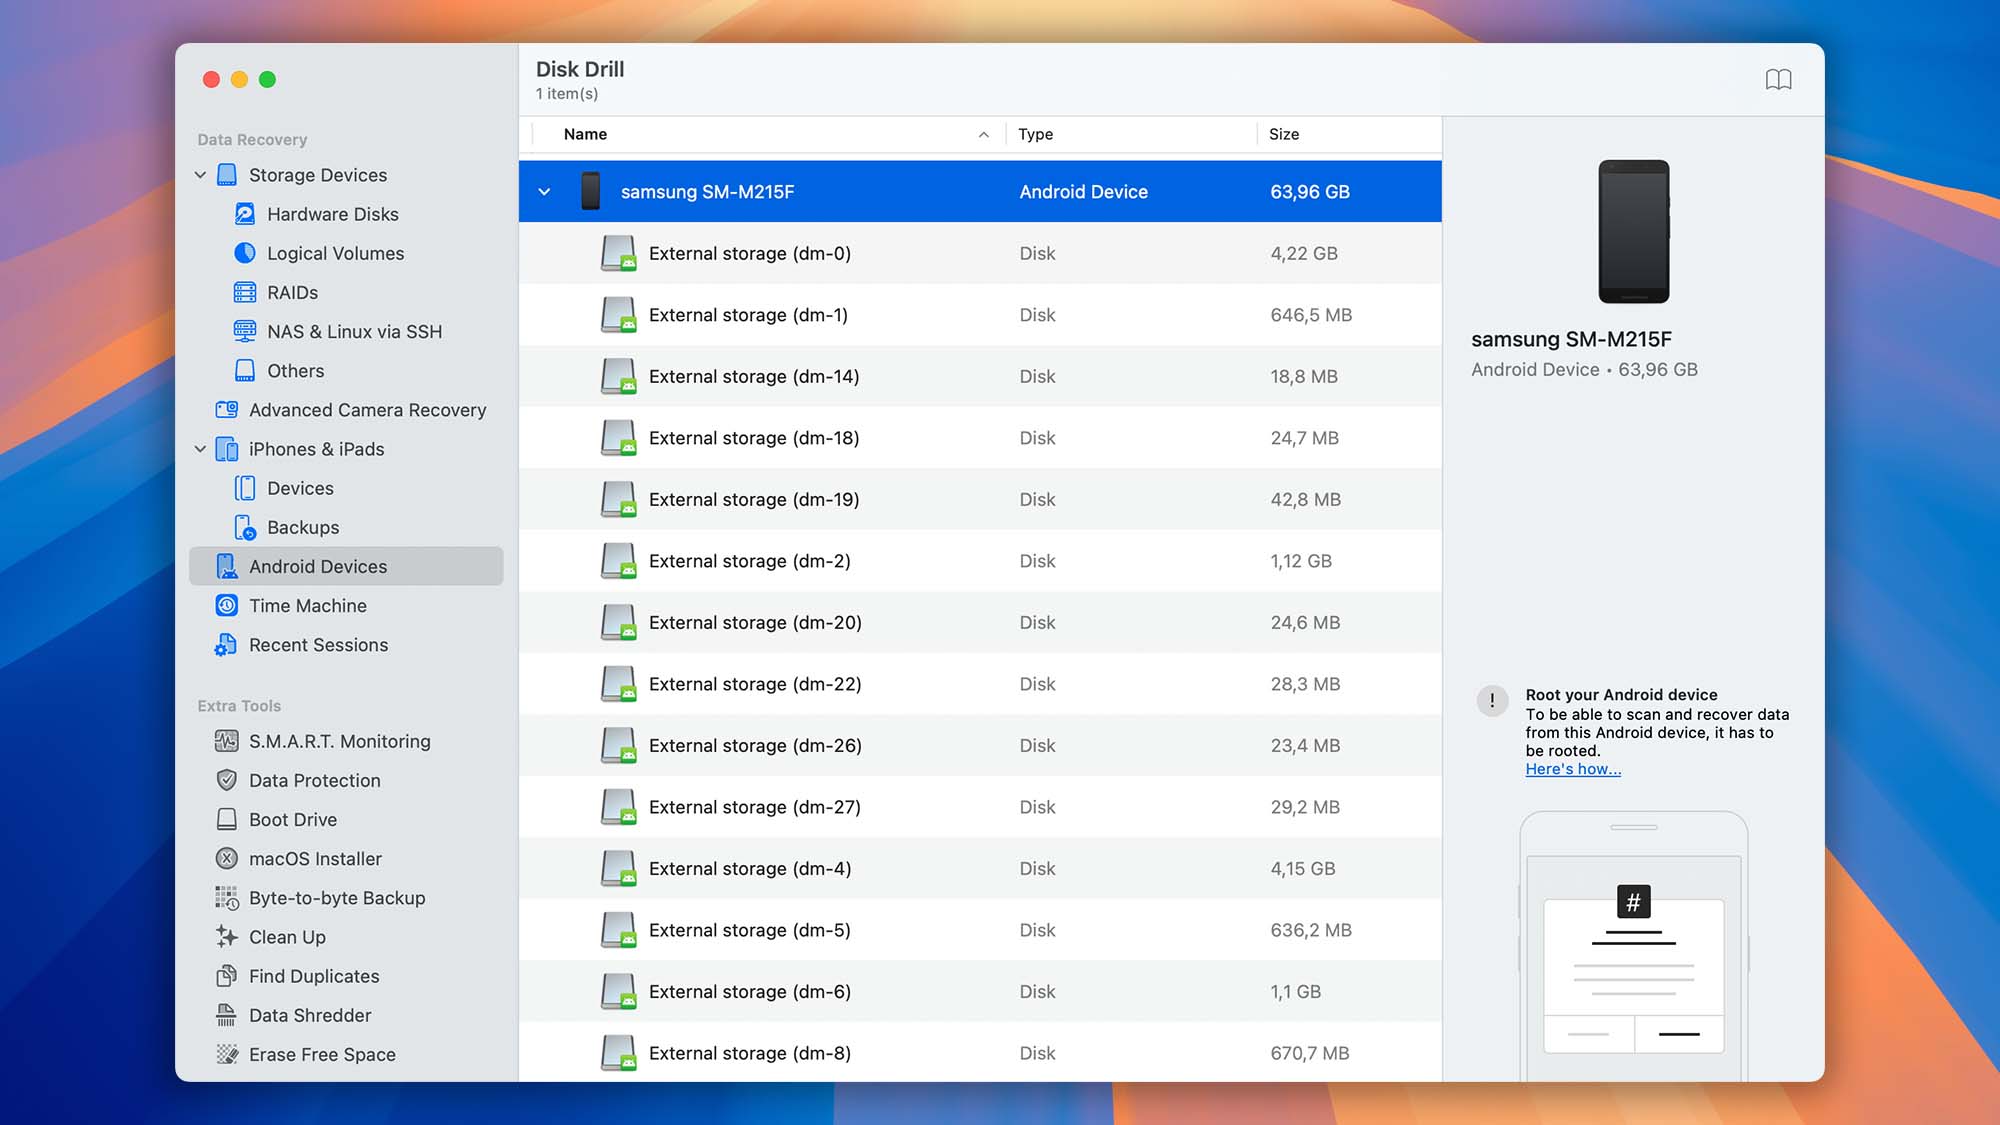
After authorizing the connection, reconnect your device if necessary. This is the moment when Disk Drill will display your Android device along with detailed information, including any internal storage and additional memory cards, so you can proceed with Android data recovery on Mac.
Step 3. Rooting your Android device
Now that your Android device is ready for data recovery, the next step is to gain direct access to its internal memory, which requires rooting. Rooting means obtaining root access, the highest level of control over your Android operating system.
There are several methods to root Android devices, and instructions vary by model. The easiest way to find the correct guide for your phone or tablet is to search online using a query like: root Android [YourDeviceModel]
This will give you the most up-to-date and device-specific instructions. The most professional and trustworthy information can usually be found on the XDA Developers community, which is known for in-depth Android expertise. Reliable sources like Engadget, The Verge, or Android Police also provide safe, updated instructions for rooting popular devices.
Why Root Android Devices?
Android phones and tablets run on a Linux-based operating system with a structure of user permissions and file-system ownership. Every time you use your phone, you are essentially logged in as a regular user. Apps installed on your device also run under their own user accounts based on yours.
On top of this, every Android device has a master user account called “root.” This is true whether your phone runs Android 5.0 or Android 15.0. Normally, you do not have access to this root account—only the manufacturer and sometimes the carrier have that level of control.
For most people, this restriction is beneficial. It prevents malicious apps from taking control of the system and stops users from accidentally breaking critical software. However, if you need full system access for tasks like deep Android data recovery with Disk Drill for Mac, rooting is the only way to unlock the root user account.
Rooting allows you to:
- Remove unwanted pre-installed apps and bloatware.
- Add advanced features or run special apps that require system-level access.
- Enable Disk Drill to scan your phone’s internal memory for deleted files.
Getting Ready to Root Android Devices
The standard approach to rooting begins by putting your device into debug mode and using either the Android SDK or a bootloader unlock tool. To start, you’ll need to:
- Install the Android SDK and the Android USB drivers on your Mac.
- Connect your device to your Mac using a compatible USB cable.
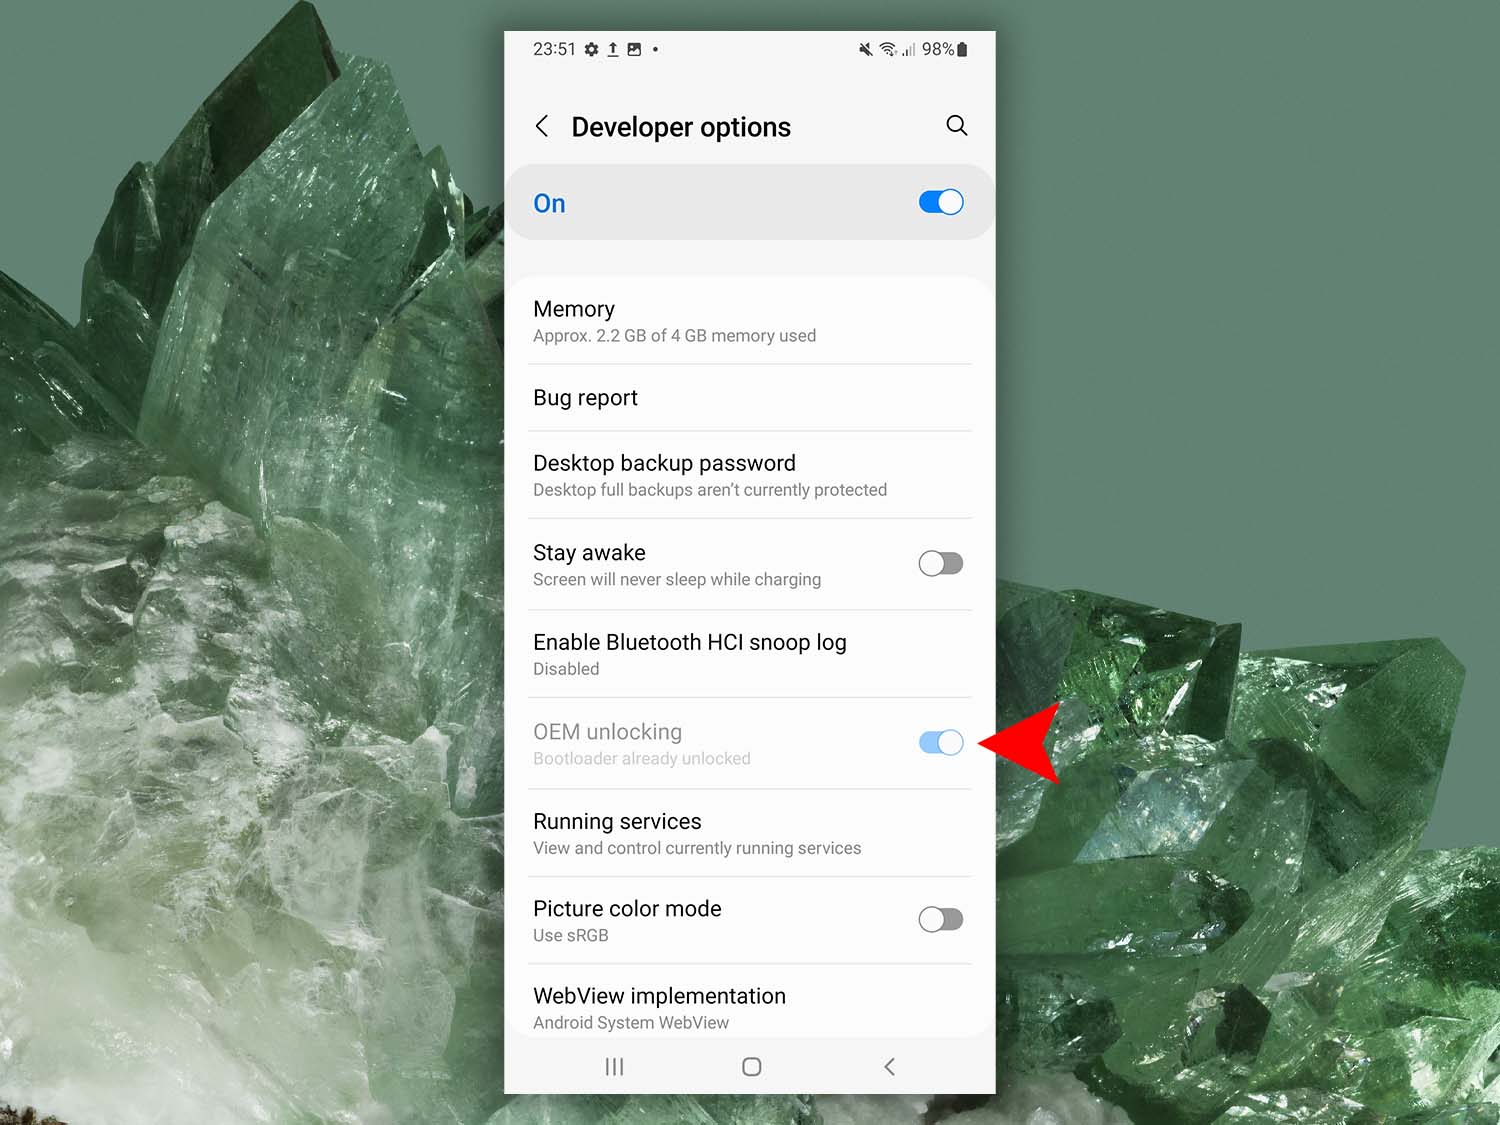
- Enable OEM unlocking in Developer Options. This allows the bootloader to be unlocked. After enabling OEM unlocking, you may need to reconnect your device or even restart it before continuing.
How to Root Android Tablet Devices and Phones
The exact process to root an Android phone or tablet depends heavily on the manufacturer and model. Many brands add extra security layers on top of Google’s standard protections, which means you’ll need a device-specific rooting method.
Some Android devices are easy to root, while others are far more challenging. Once your bootloader is unlocked, you can begin the rooting process. However:
- Not all rooting apps support every device, so always check compatibility first.
- Most apps are generally safe, but you should exercise caution and follow instructions closely.
- Use only trusted rooting tools to reduce the risk of bricking your device or compromising security.
If you’re looking for the most common and widely supported rooting process, here’s a step-by-step guide that works for many Android phones and tablets:
- Reboot your phone into Fastboot mode. Power off your device, then use the specific key combination (varies by model, e.g., Volume Down + Power) to enter Fastboot/Bootloader mode.
- Flash a custom TWRP recovery. TWRP (Team Win Recovery Project) is a popular custom recovery that allows you to install root tools and other system-level modifications.
- Reboot your phone into TWRP Recovery. Once installed, boot into TWRP to gain access to advanced installation options.
- Install Magisk to root your phone. Magisk is one of the most reliable and widely used rooting tools. Use TWRP to flash the Magisk ZIP file.
- Reboot your device into the standard Android OS. After the installation is complete, boot back into the normal system.
- Launch the Magisk app. After rebooting, you’ll find the Magisk app in your app list. Open it and follow the on-screen instructions to finalize the rooting process.
Following these steps will give your device root access, allowing tools like Disk Drill for Mac to scan the internal memory for deleted files and perform deep Android data recovery.
Step 4. Approve Root Access for Disk Drill to Enable Android Data Recovery
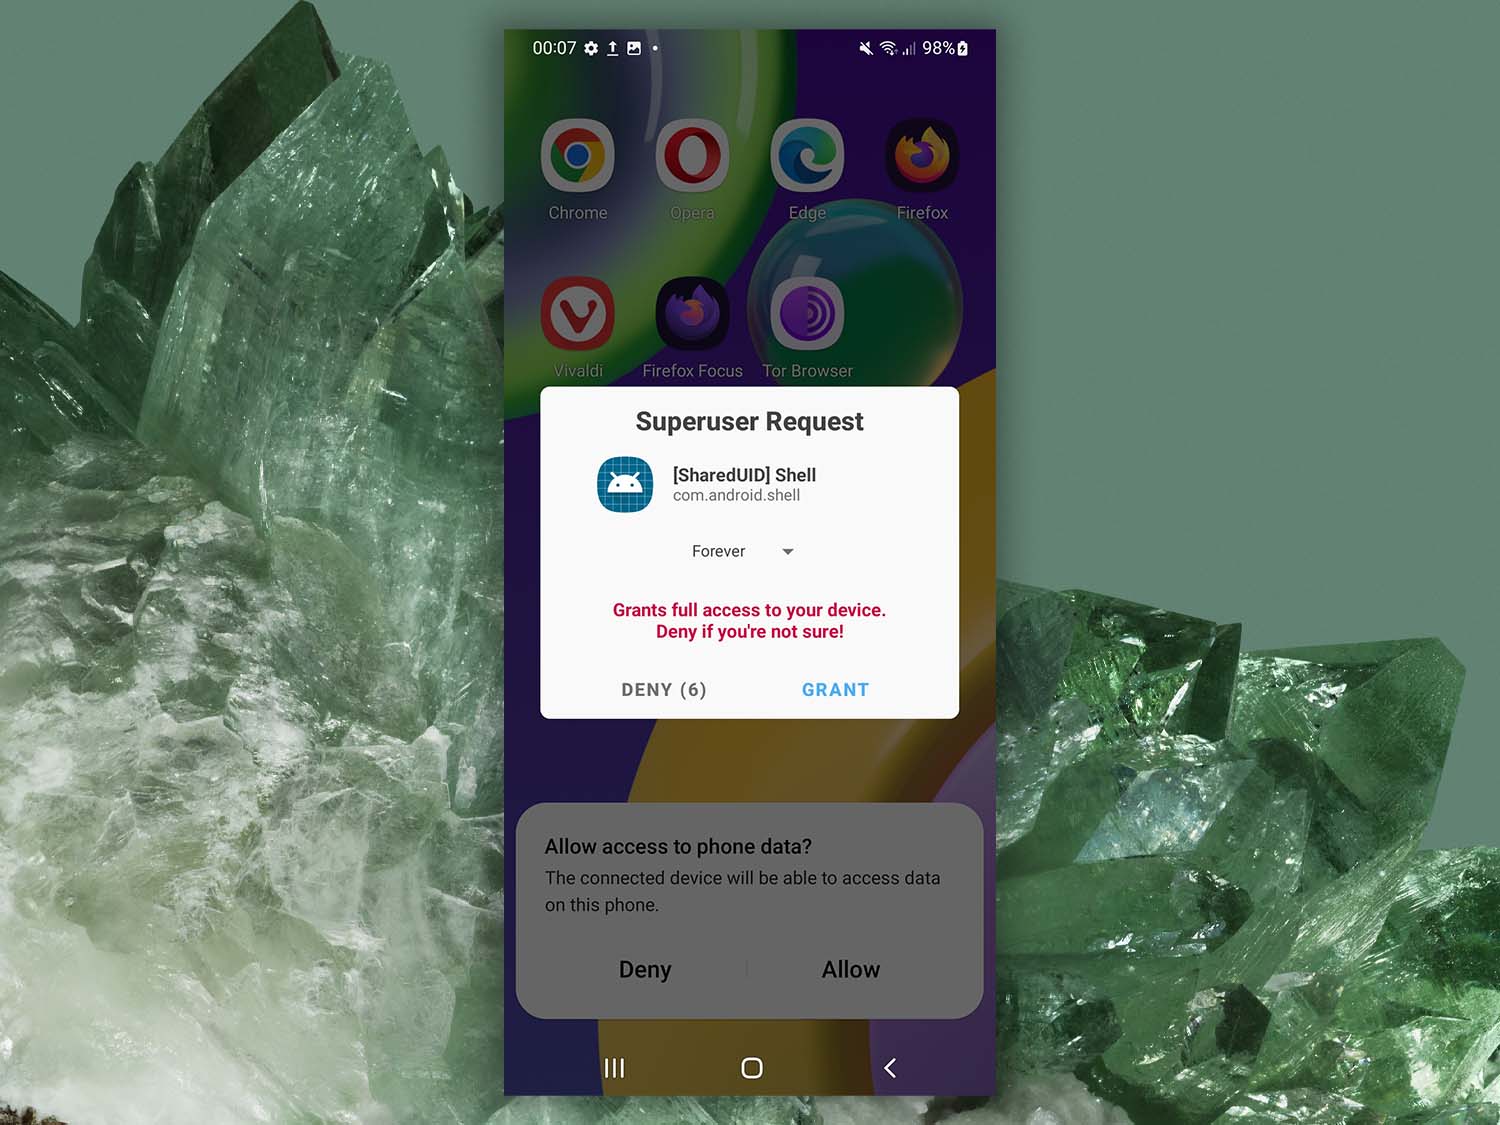
After reconnecting your Android device and having Disk Drill detect it, a Superuser Request prompt will appear on your phone. This is Magisk or your root manager asking whether to grant Disk Drill root access.
Tap “Grant” to approve the request. Once granted, Disk Drill will have full access to your device’s internal memory, allowing it to perform a deep Android data recovery.
Step 5. Choose Android Partitions to Scan with Disk Drill
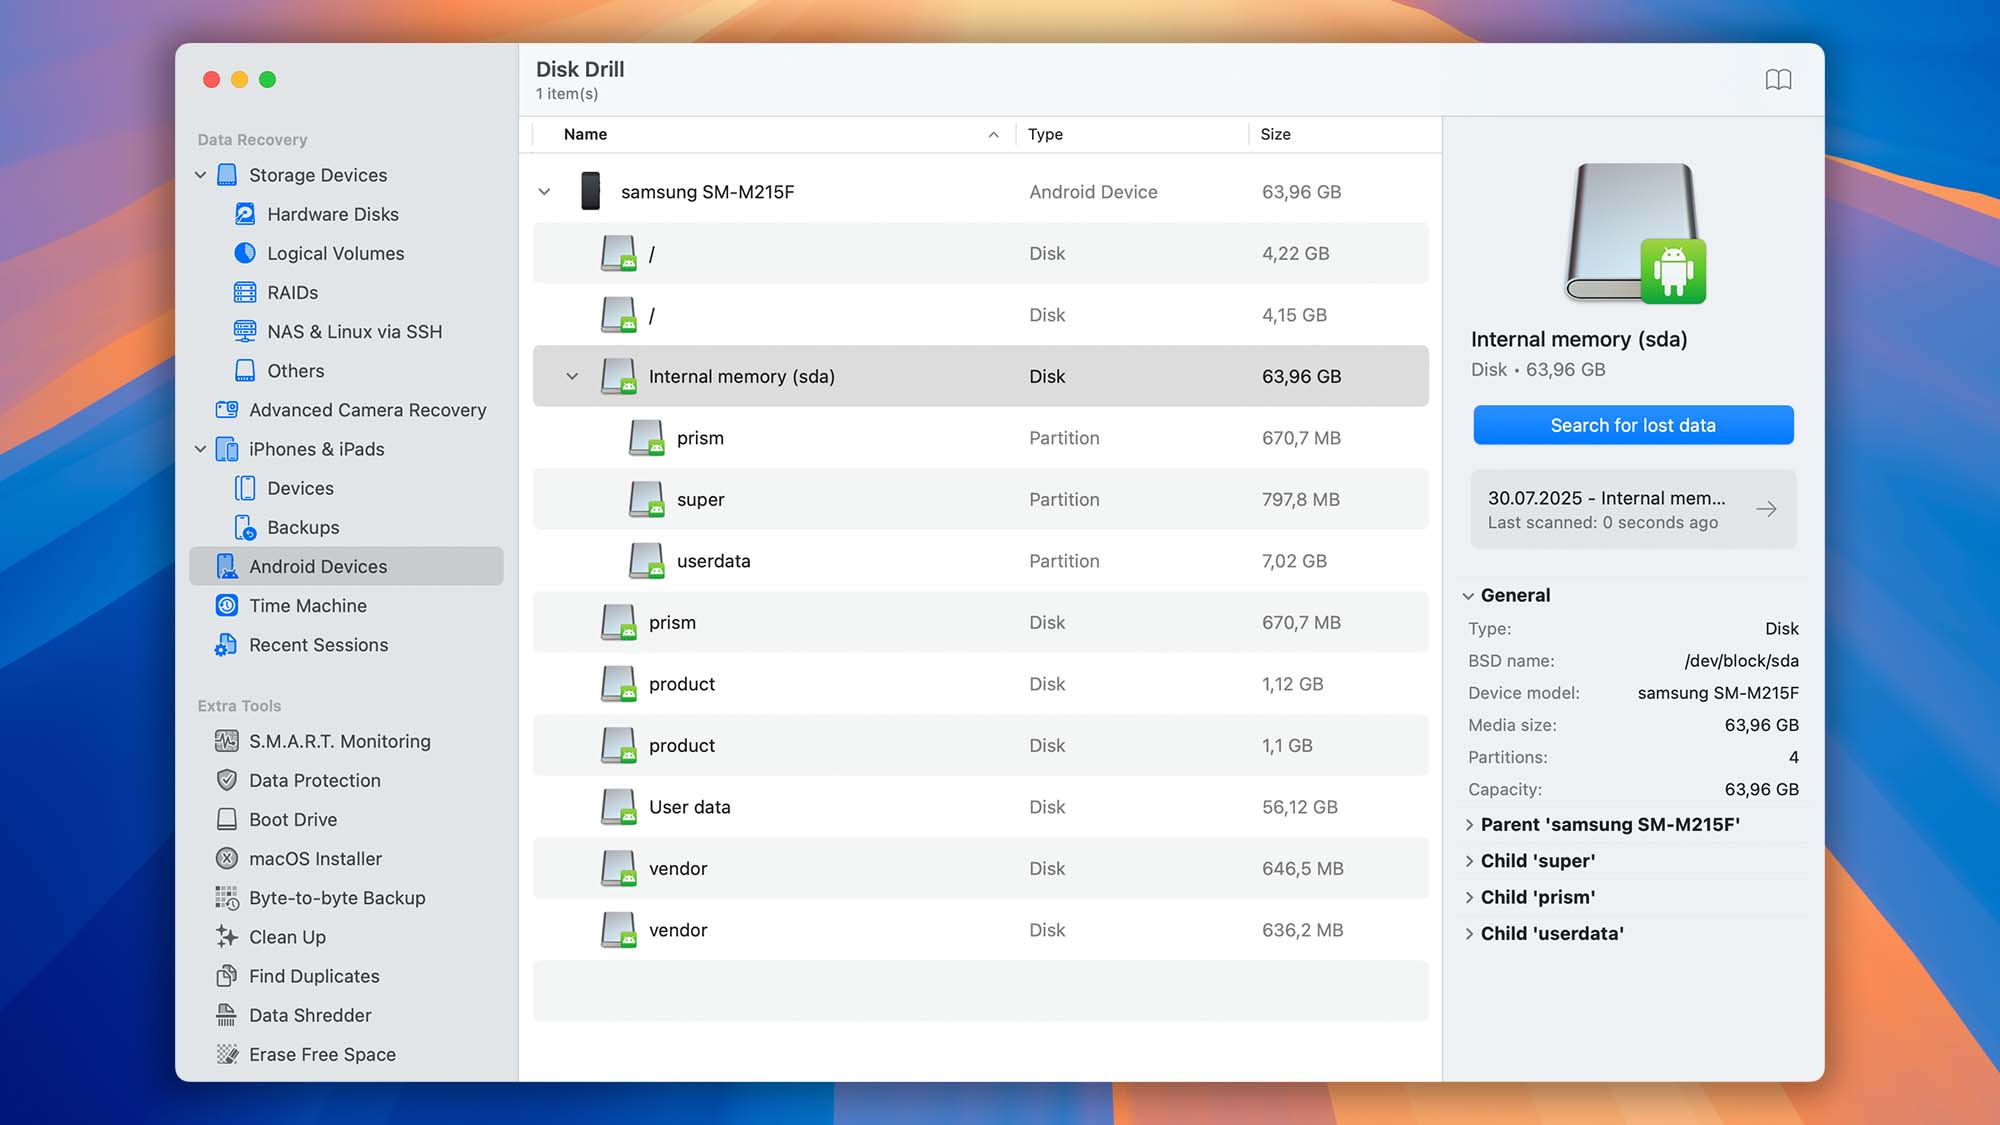
If necessary, reboot your device and open Disk Drill again. Go to the “Android Devices” section in the left-hand panel. Here, you will see a list of all detected Android partitions, including internal memory and any additional storage that supports deep scanning.
Choose the partition you want to recover data from and click “Search for lost data”. Disk Drill will then begin analyzing your device to locate deleted photos, videos, and other recoverable files.
Step 6. Preview and Recover Your Lost Data
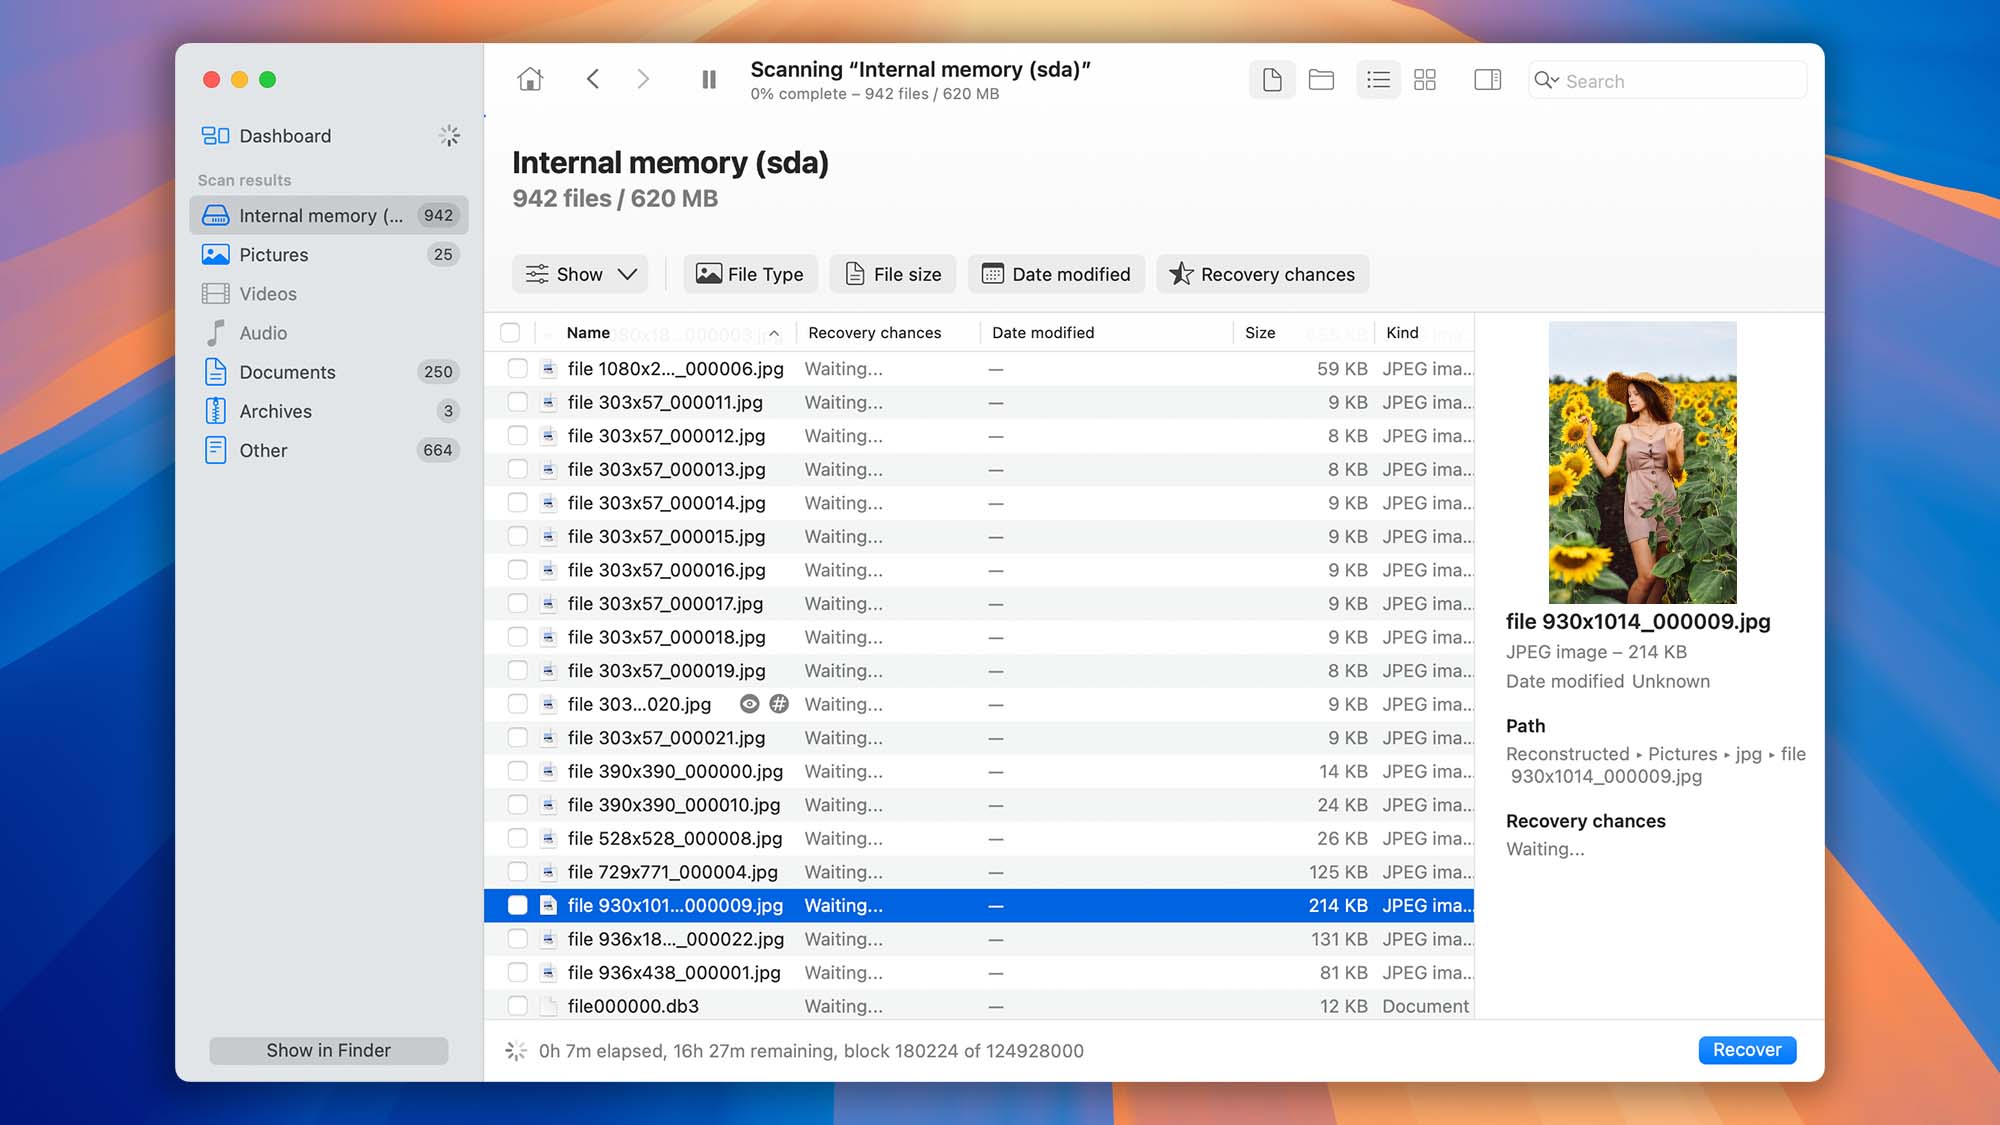
Once Disk Drill completes the scan of your Android device, it will display all the files that can be recovered. You can preview photos, videos, and other data to confirm they’re the ones you want to restore. When you’re ready, simply recover the selected files to a safe location on your Mac. Disk Drill makes the process quick and straightforward, giving you access to the photos, videos, and documents you thought were gone for good.