The “SD card locked” message tends to have terrible timing. It seemingly likes to occur when you’re about to capture that perfect shot or just as you need to save important files. While sometimes it’s a simple fix (just flip that tiny switch!), it can also signal deeper issues like file system corruption or card failure.
Thankfully, you can unlock your SD card in several ways, depending on what caused the problem. In this guide, we’ll walk through solutions for standard SD cards, micro SDs, and even cards with broken switches – from simple physical fixes to recovery software that can help rescue your valuable data.
When, How, and Why Does an SD Card Get Locked?
The little memory card in your hand can refuse to save a single byte for three very different reasons. Knowing which reason you’re fighting can save you a ton of trial and error, so let’s take a closer look at them:
Physical Lock Switch Issues
Most standard-size SD cards come with a small physical lock switch on the left side. This tiny plastic slider can cause an SD card to get locked in several different ways:
- Accidental toggling: Simply carrying your SD card in a pocket or bag can flip this switch. Your camera bag’s friction or even just removing the card can move it to the locked position.
- Wear and tear: After hundreds of insertions and removals, the switch mechanism can become loose or unreliable. This person on Reddit shared an excellent short video that shows a switch that’s become so loose that it moves into the locked position whenever the card is inserted.
- Broken switches: That tiny plastic tab is fragile! A broken switch might leave your card permanently in “locked” mode.
Software-Level Protection
According to the official SD Card specifications, there are actually two different ways SD cards can be write-protected: the physical switch and internal protection. While the physical switch is detected by the card reader or device (not the card itself), the other protection methods are enforced by the card’s internal circuitry or operating system, and they can be activated by:
- Operating system flags: When using your card with computers, Windows or macOS might mark the drive as “read-only” to protect against data corruption.
- App-induced protection: Some camera apps and photo management software have “protection” features that can write-protect your card without clear notification.
Card Deterioration and Corruption
The most concerning cause of SD card locking is when the card itself begins to fail, which can happen for the following reasons:
- Write cycle limitations: SD cards have finite lifespans measured in write cycles (typically 10,000 to 100,000 cycles (translates to around 10 years of regular use), depending on quality). As a card approaches this limit, it may automatically enable write protection to preserve remaining data.
- Sector failures: Bad sectors can trigger built-in protection mechanisms in the card’s controller chip.
- File system corruption: Improper ejections, power loss during writes, or firmware issues can corrupt the file system and make the card appear locked.
How Can You Unlock an SD Card
There are just as many ways to unlock an SD card as there are to lock it. Let’s see the ones that work for most locked SD card scenarios.
Way 1: Manual Unlock
Just last week, I attempted to take photos for a product review, but when I inserted my SD card into the camera, it refused to save anything.
Perhaps fortunately, this wasn’t the first time this has happened to me (I remember not being able to format an SD before a family vacation a few years ago), so I quickly remembered to check the tiny lock switch on the side of the card. To my relief, flipping that small switch instantly solved the problem.
Here’s how you can try the same fix:
- Locate the small switch on the side of the SD card (usually on the top left as you’re looking at its front).
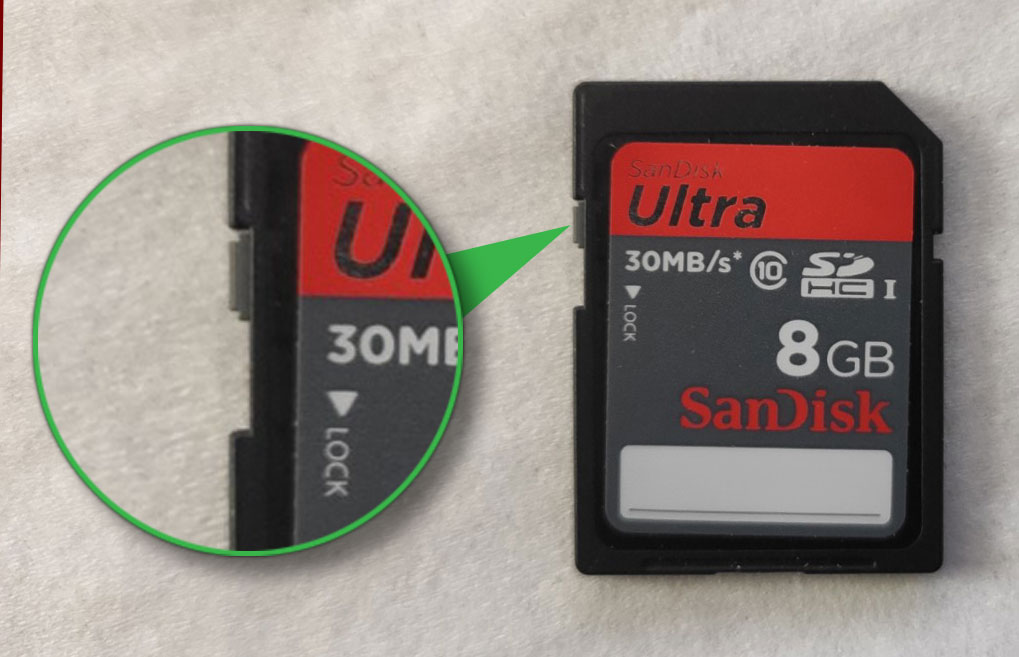
- Slide the switch upwards (closer to the edge of the SD card) to unlock it.
If your SD card switch is nowhere to be found because it has snapped off completely, then there’s one trick you can try to unlock your card:
- Clean the lock area gently with compressed air or a soft brush to remove any debris or fragments of the broken switch that might be causing problems.
- Get some clear tape (Scotch tape or similar transparent cellophane tape works best – avoid electrical tape or duct tape as they’re too thick).
- Cut a small piece of tape about half an inch (1-2 cm) long – just enough to cover the lock groove area.
- Apply the tape over the lock notch area carefully, making sure to position it so the notch appears “closed” (the position that indicates “unlocked” to the reader).
- Trim any excess tape that extends beyond the card’s edge with small scissors or a craft knife.
This DIY fix essentially “fools” the card reader into thinking the switch is permanently in the unlocked position. I’ve seen this rescue thousands of photos on cards with broken switches!
Way 2: Fix Software Write Protection with Native Tools
Your SD card might be perfectly fine physically but still stubbornly refuse to accept new data. This happens when software write protection gets enabled at the operating system level.
Here are typical scenarios that can trigger software write protection:
- You’ve connected your card to a computer infected with malware, and the system applied read-only protection as a defense mechanism.
- Your card was ejected improperly during a write operation, triggering Windows’ protection features.
- Some photo management software or backup programs temporarily lock cards to prevent data corruption.
Whatever the cause, software write protection can often be removed using a tool that’s already included in your operating system regardless of if you’re a Windows or Mac user.
Windows 11
To unlock your SD card in Windows 11, connect it to your PC’s card reader and ensure it’s accessible.
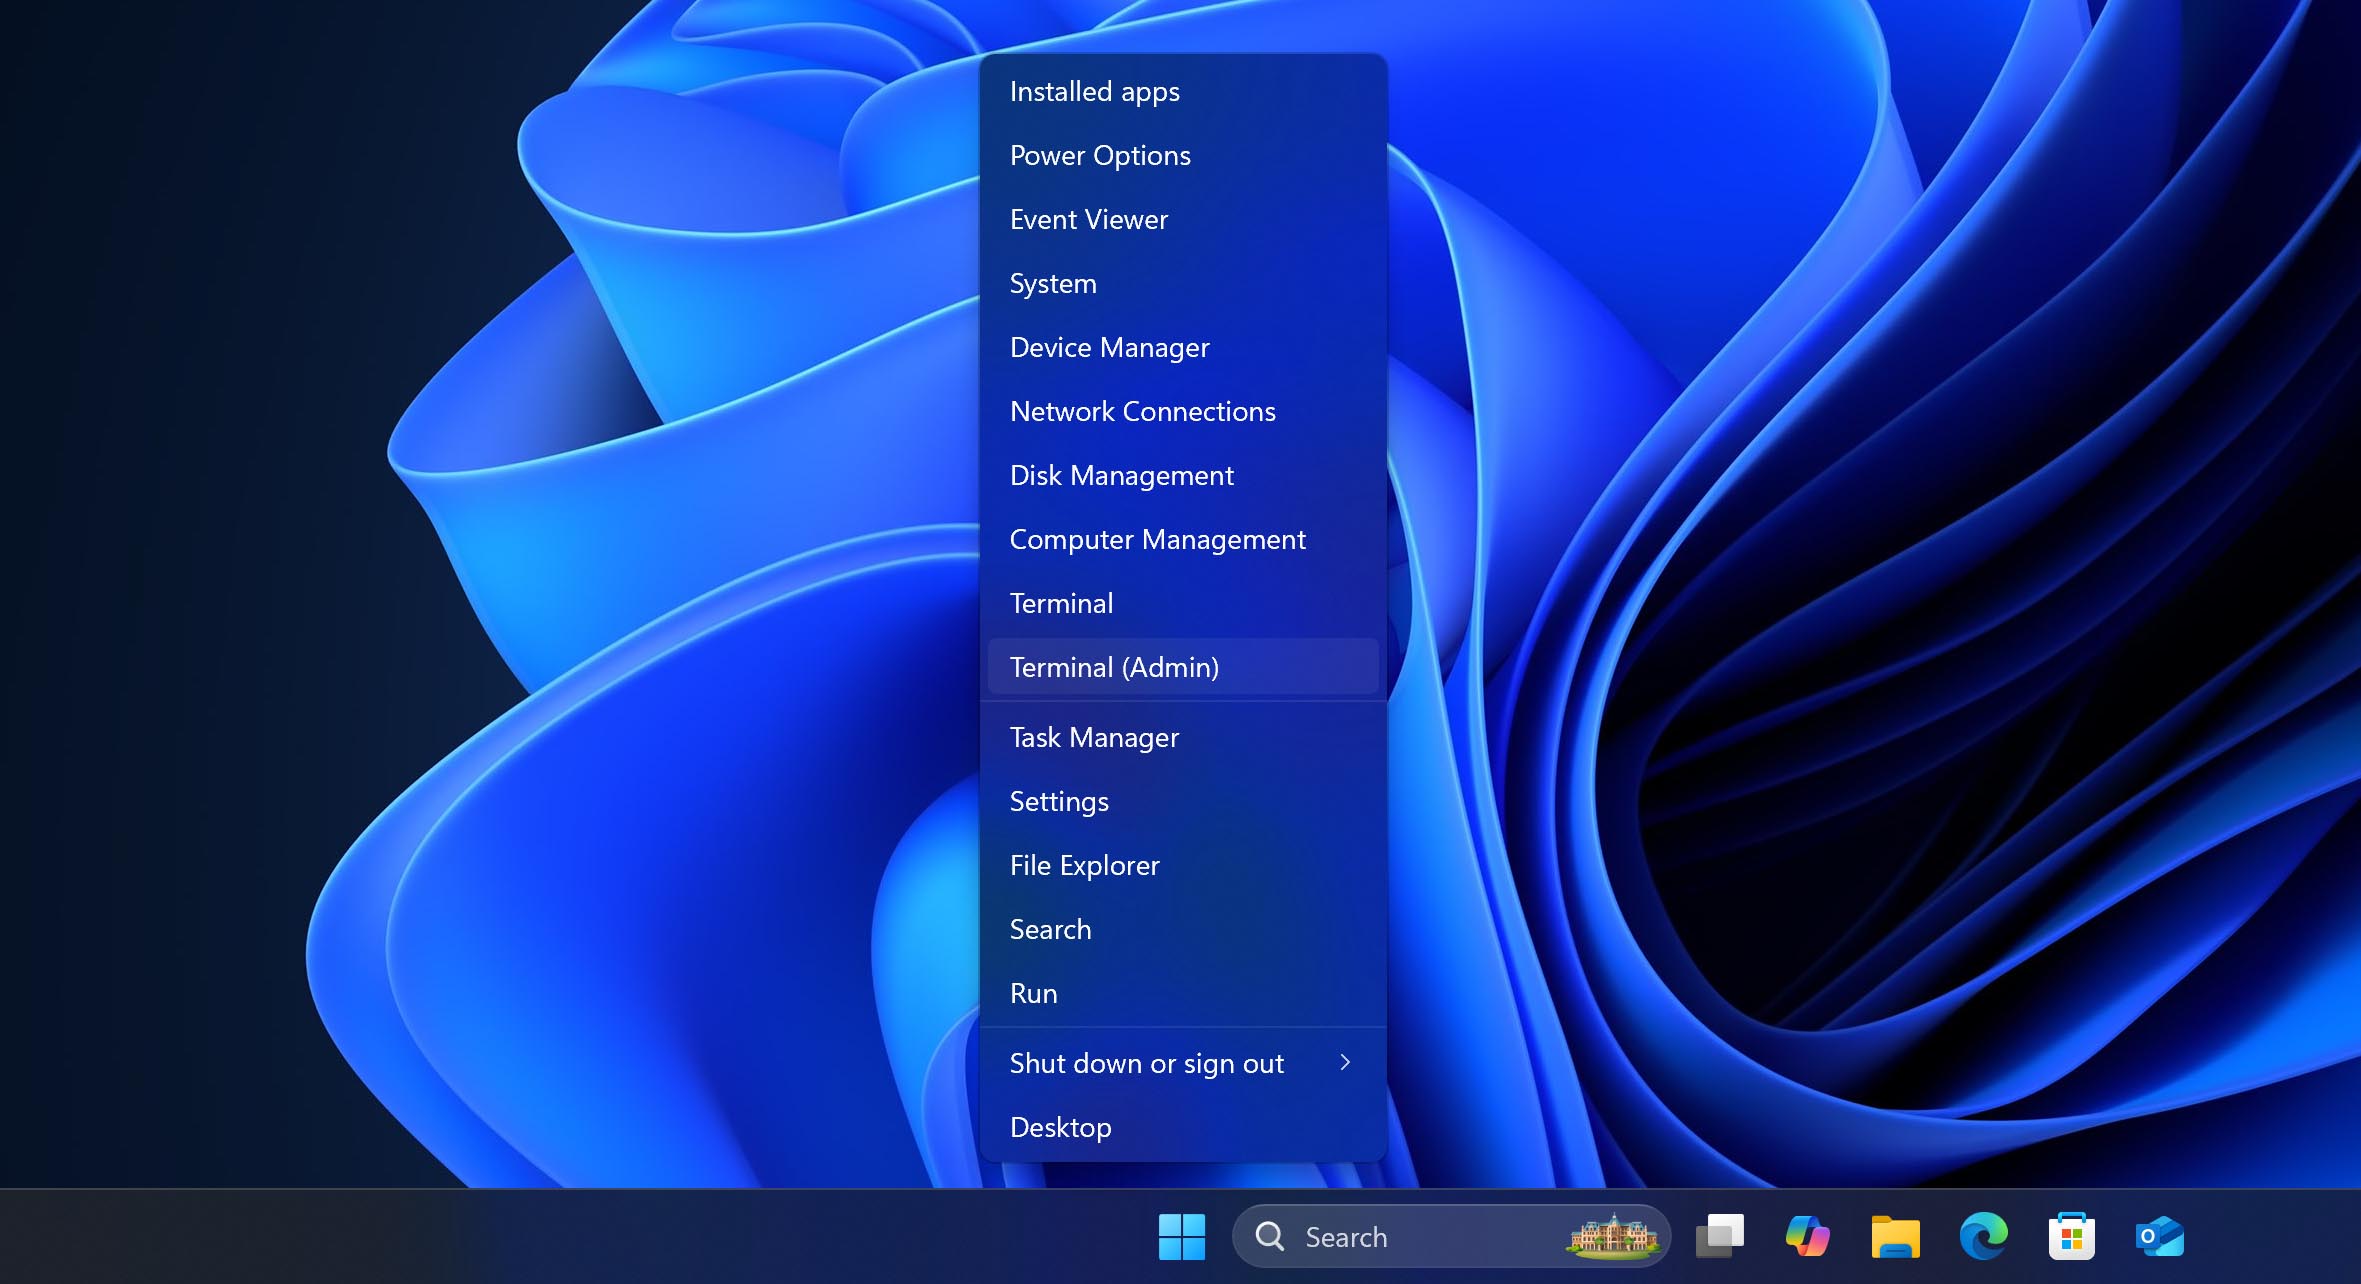
- Press Windows Key + X and run Terminal (Admin).
- Input
diskpartfollowed by Enter to run Windows’ disk and partition management tool. - Enter
list diskand locate your SD card among the listed storage devices. Note its number. - Type
select disk NUMBER, where “NUMBER” is the one for your SD card from the previous step. - With your SD card (“disk”) selected, use the
attributes disk clear readonlycommand to remove the Read-Only flag from it.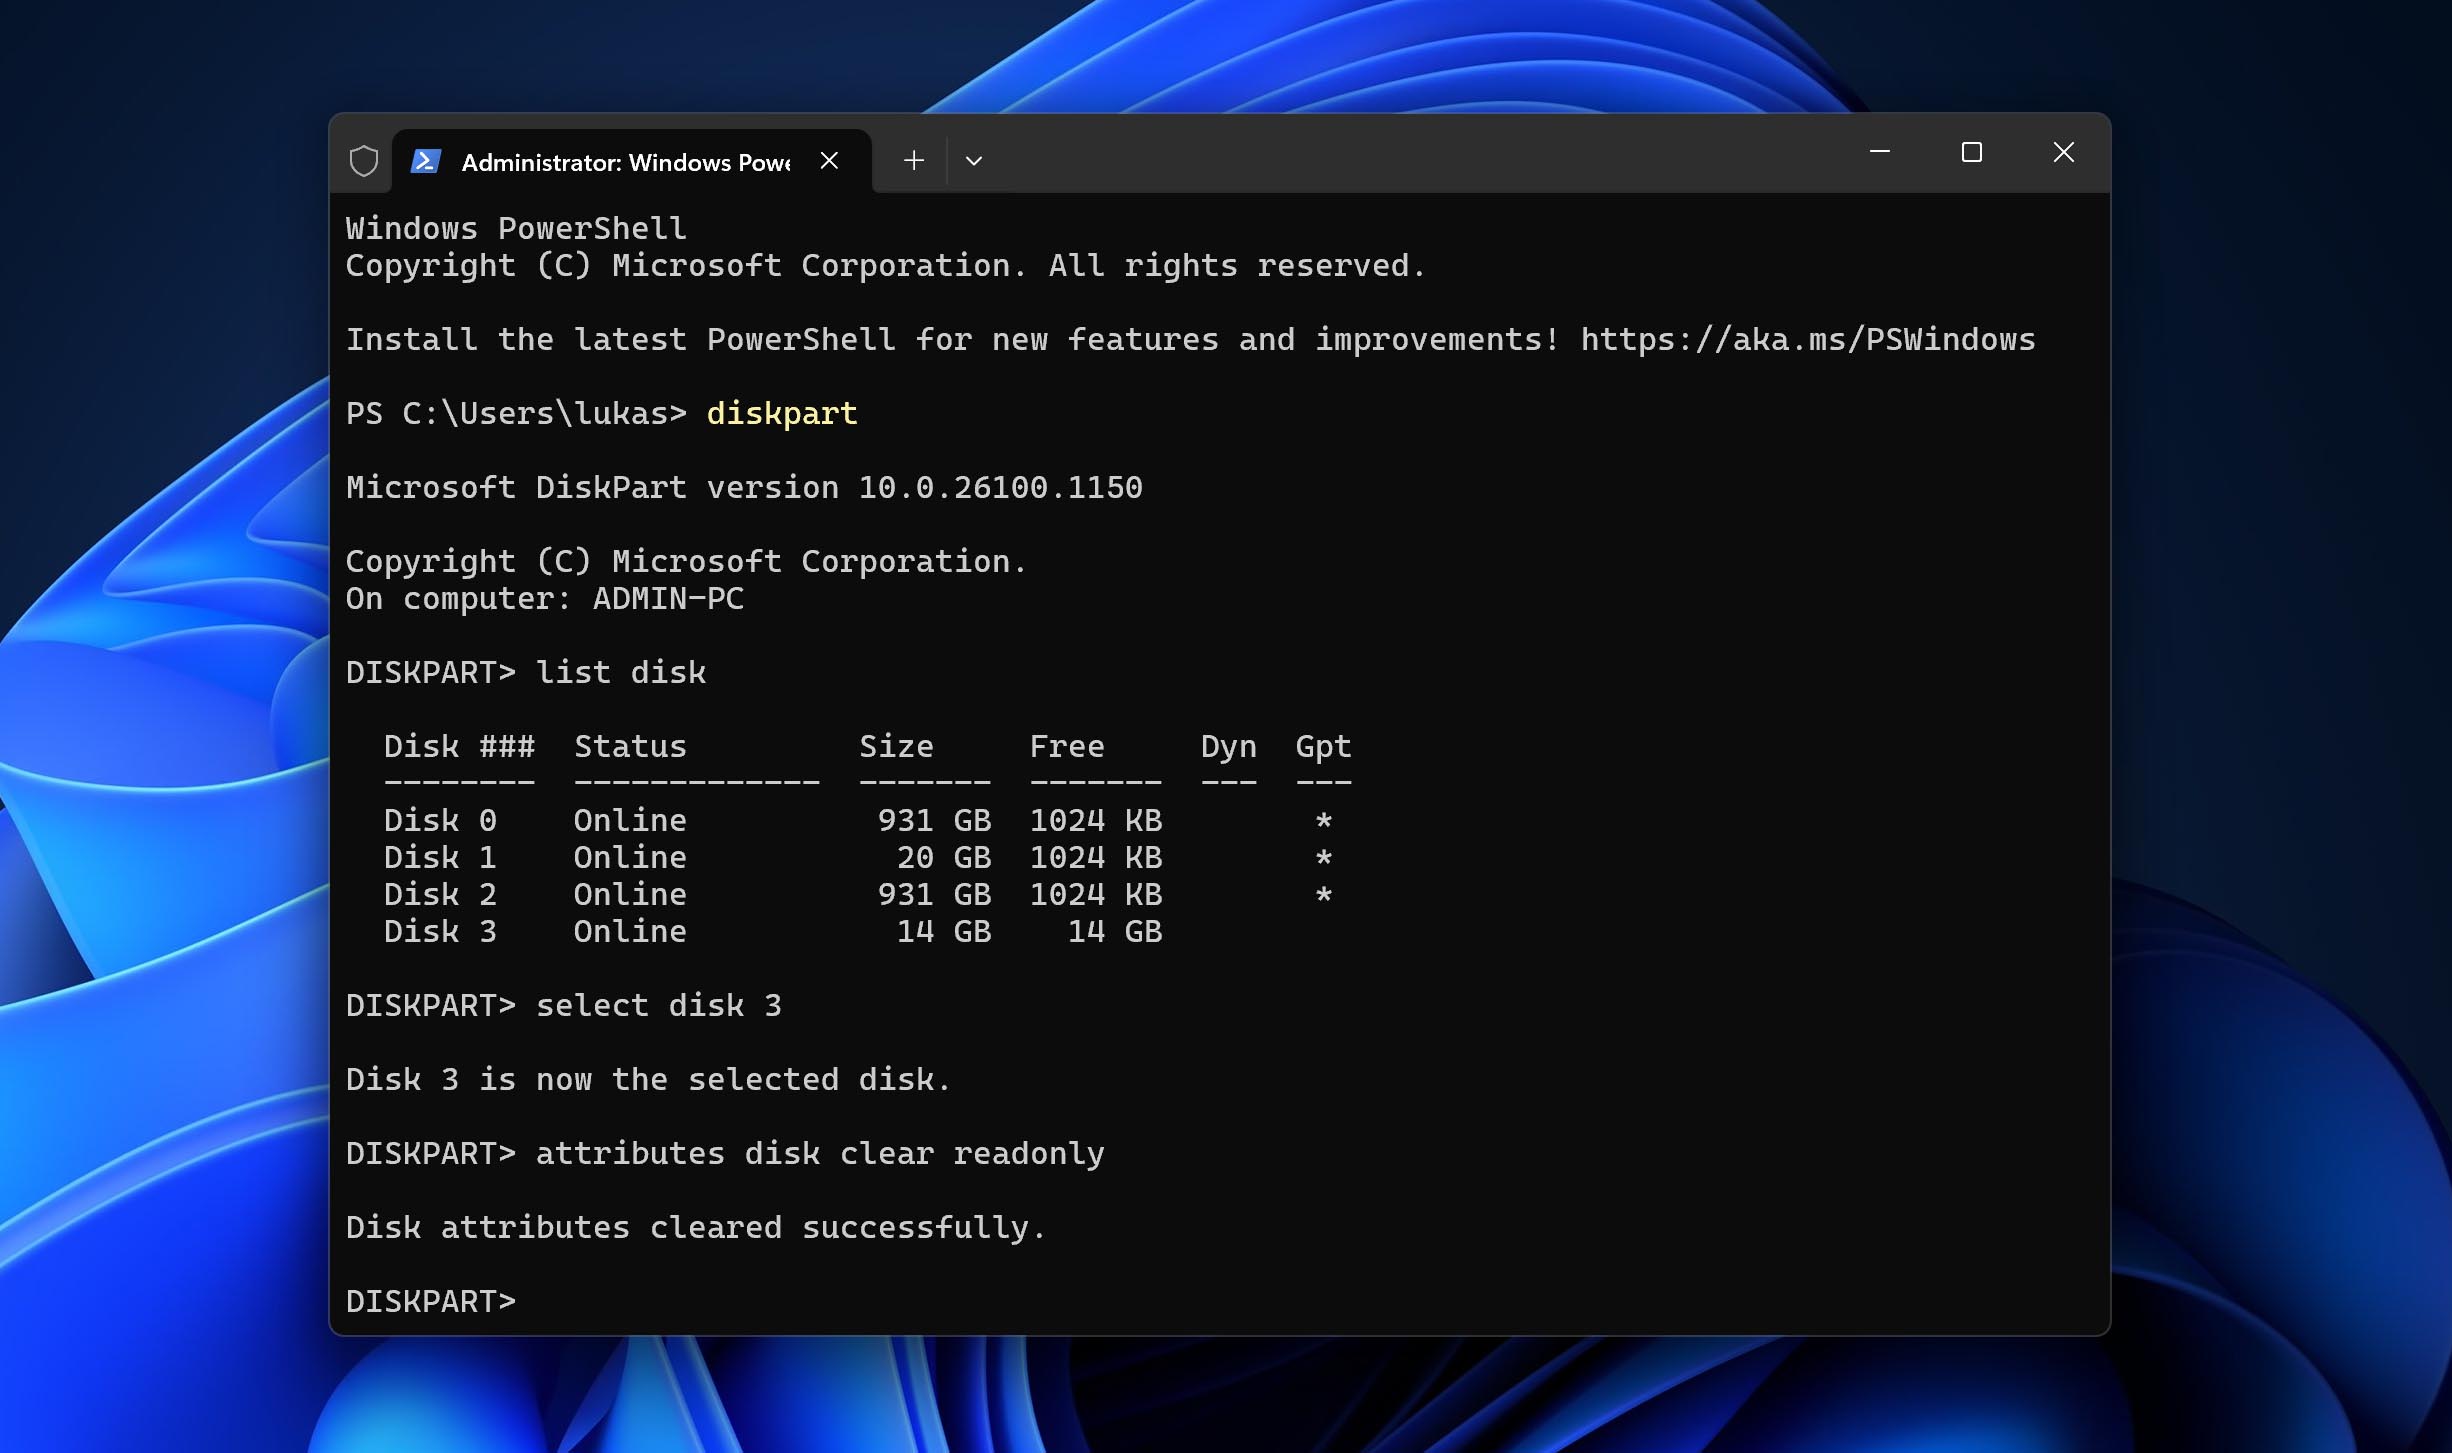
You should see “Disk attributes cleared successfully.” Now try accessing your card again – in most cases, you’ll be able to write to it just like before.
macOS
Mac’s approach to fixing read-only SD cards is straightforward. Instead of messing with commands, you can simply remount the drive:
- Insert your SD card and wait for it to appear in Finder.
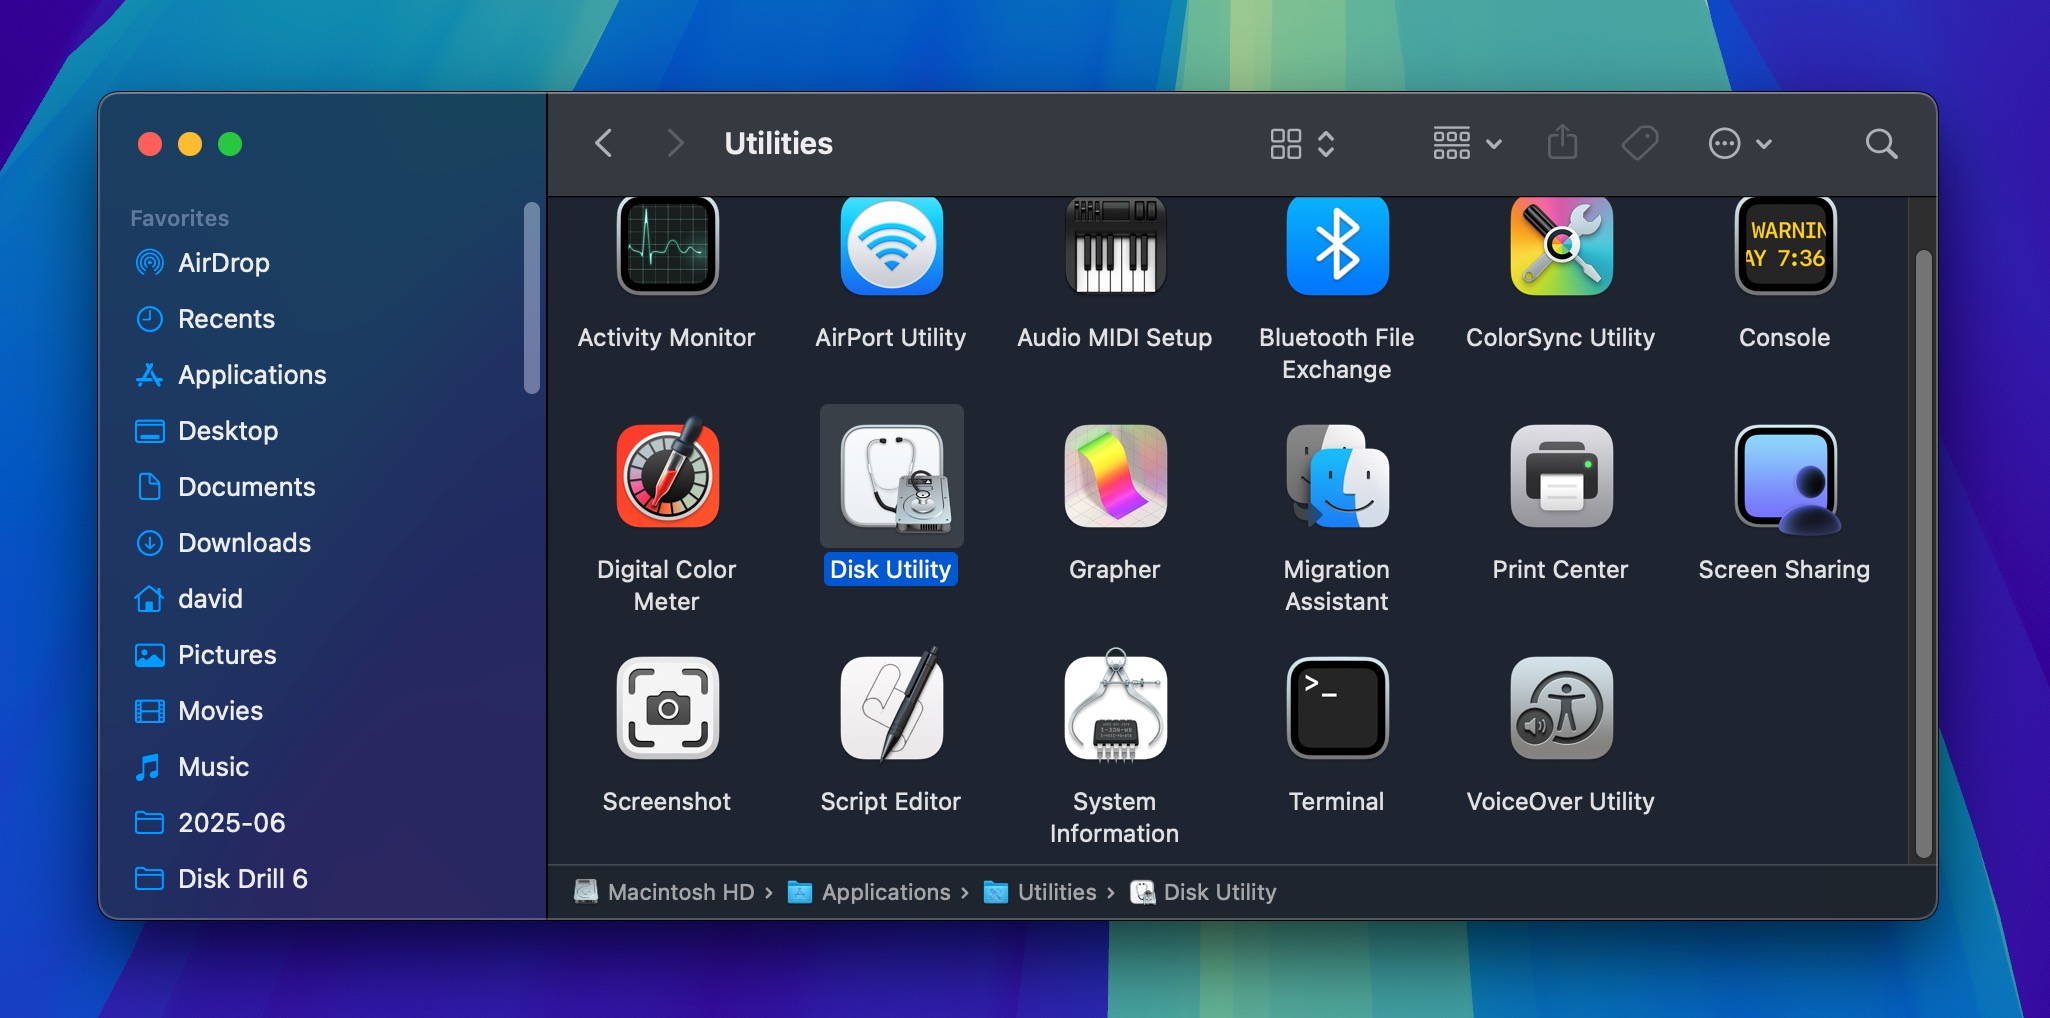
- Open Disk Utility (find it in Applications → Utilities folder or search with Spotlight).
- Select your SD card from the left sidebar.
- Click the Unmount button in the toolbar.
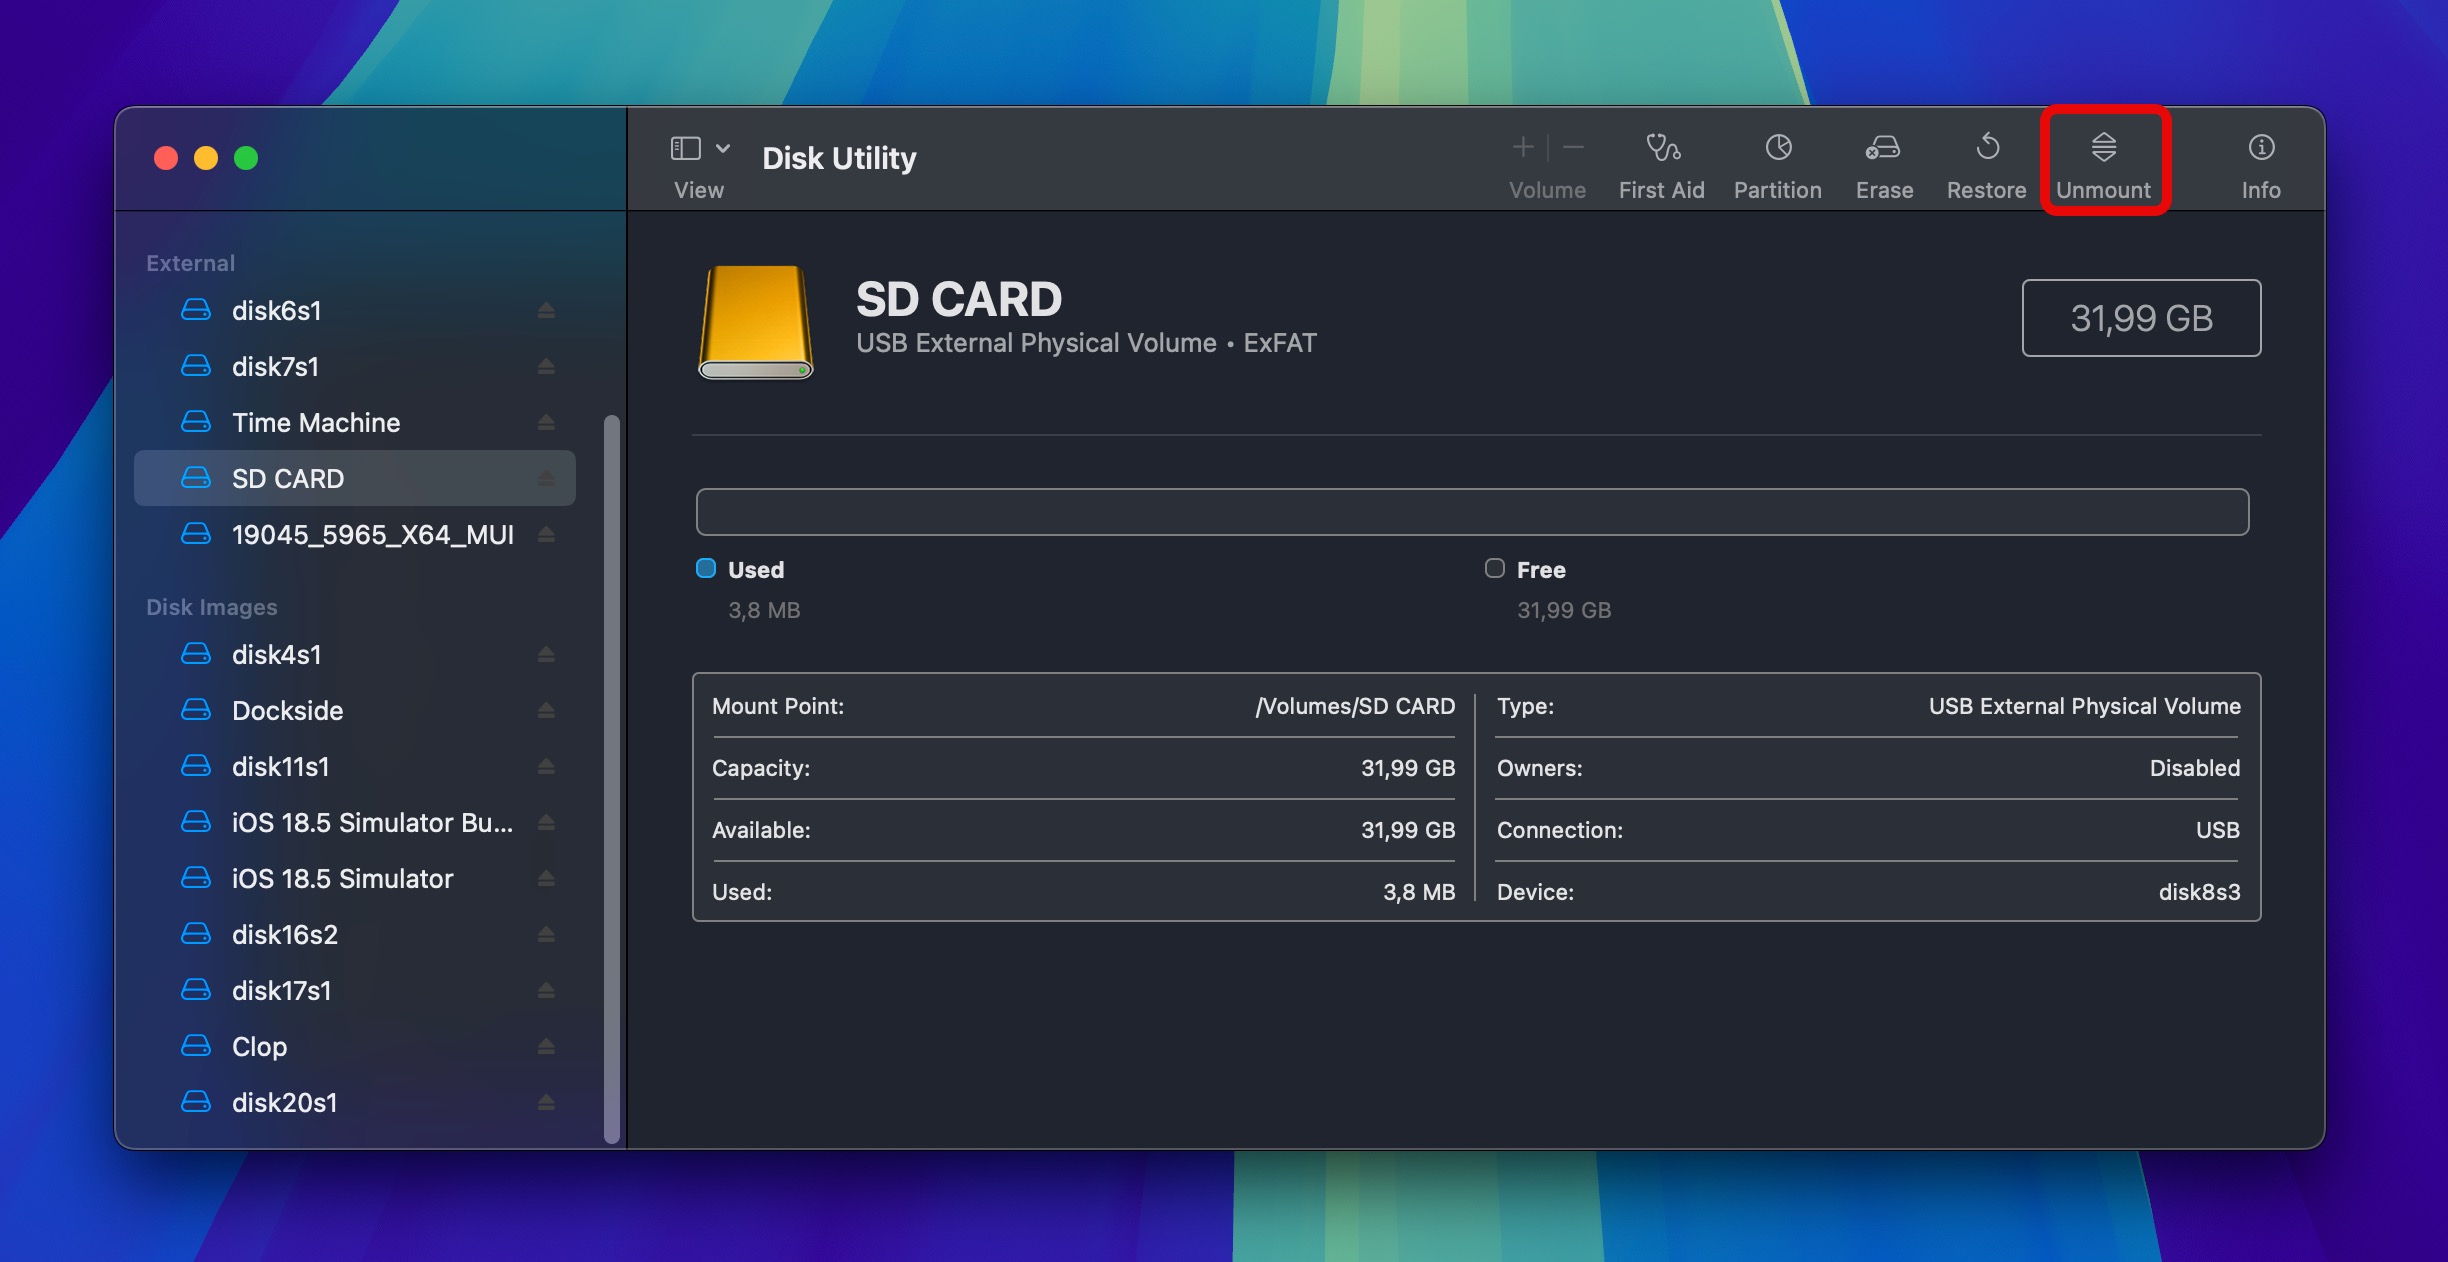
- Once unmounted, click the Mount button to reattach the drive with fresh parameters.
By default, macOS mounts disks without the read-only flag unless it detects a problem. This remounting process effectively gives your SD card a clean slate in terms of access permissions.
Still having trouble? If remounting doesn’t solve the issue, try physically removing the card and then reinserting it.
Way 3: Change File Permissions
Sometimes what looks like a fully locked SD card might actually just be locked files. You might notice this when trying to edit or delete an existing file.
This problem typically happens when transferring files between different operating systems (like from Mac to Windows), but it can also occur when your antivirus software flags certain files as suspicious.
The root cause lies in invisible file attributes – metadata that controls who can do what with your files. Every file on your memory card has these permission attributes that tell the operating system whether the file can be modified, deleted, or only read.
When things don’t go right, your computer might see these files as “owned” by another user or system, preventing you from making changes even though it’s your own memory card.
To change those access permissions on Windows 11:
- Plug your SD card into a card reader connected to your PC and ensure its contents are accessible.
- Locate the problematic files with a file manager like Windows’ included File Explorer.
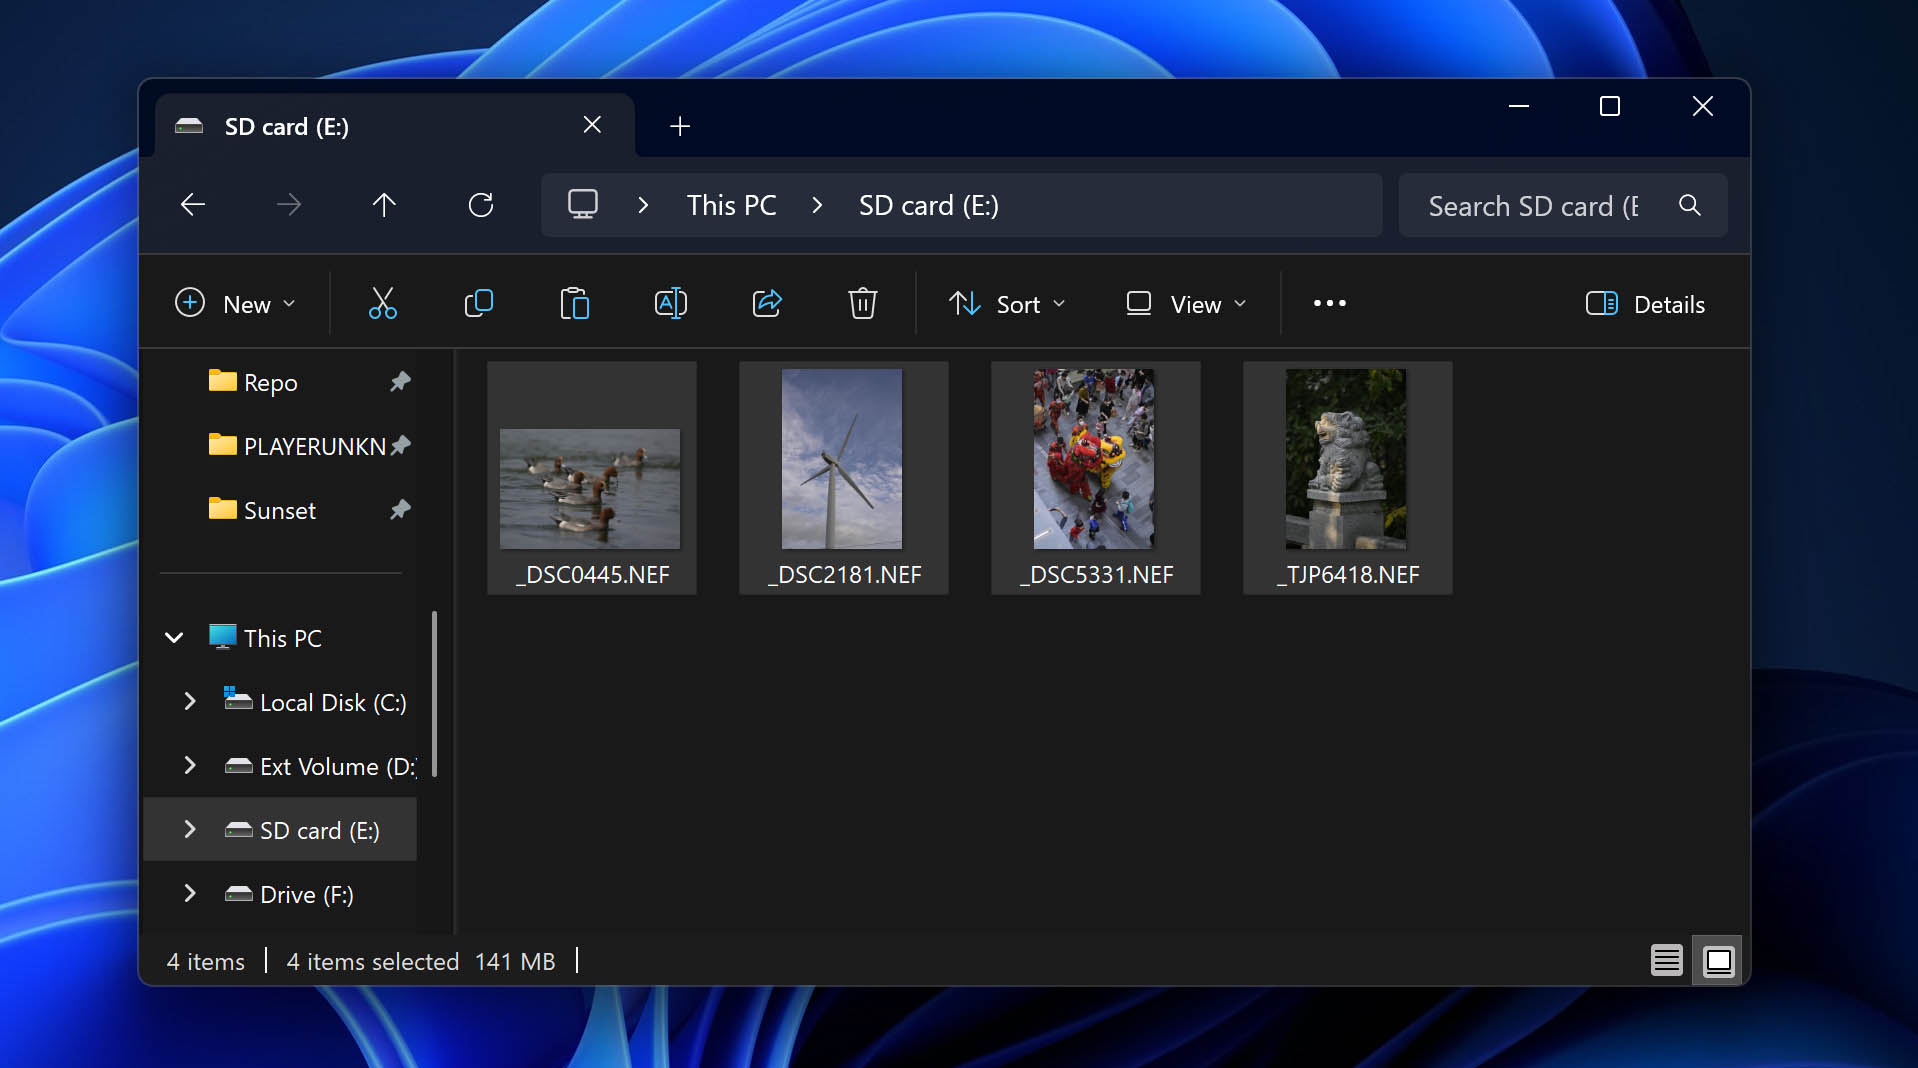
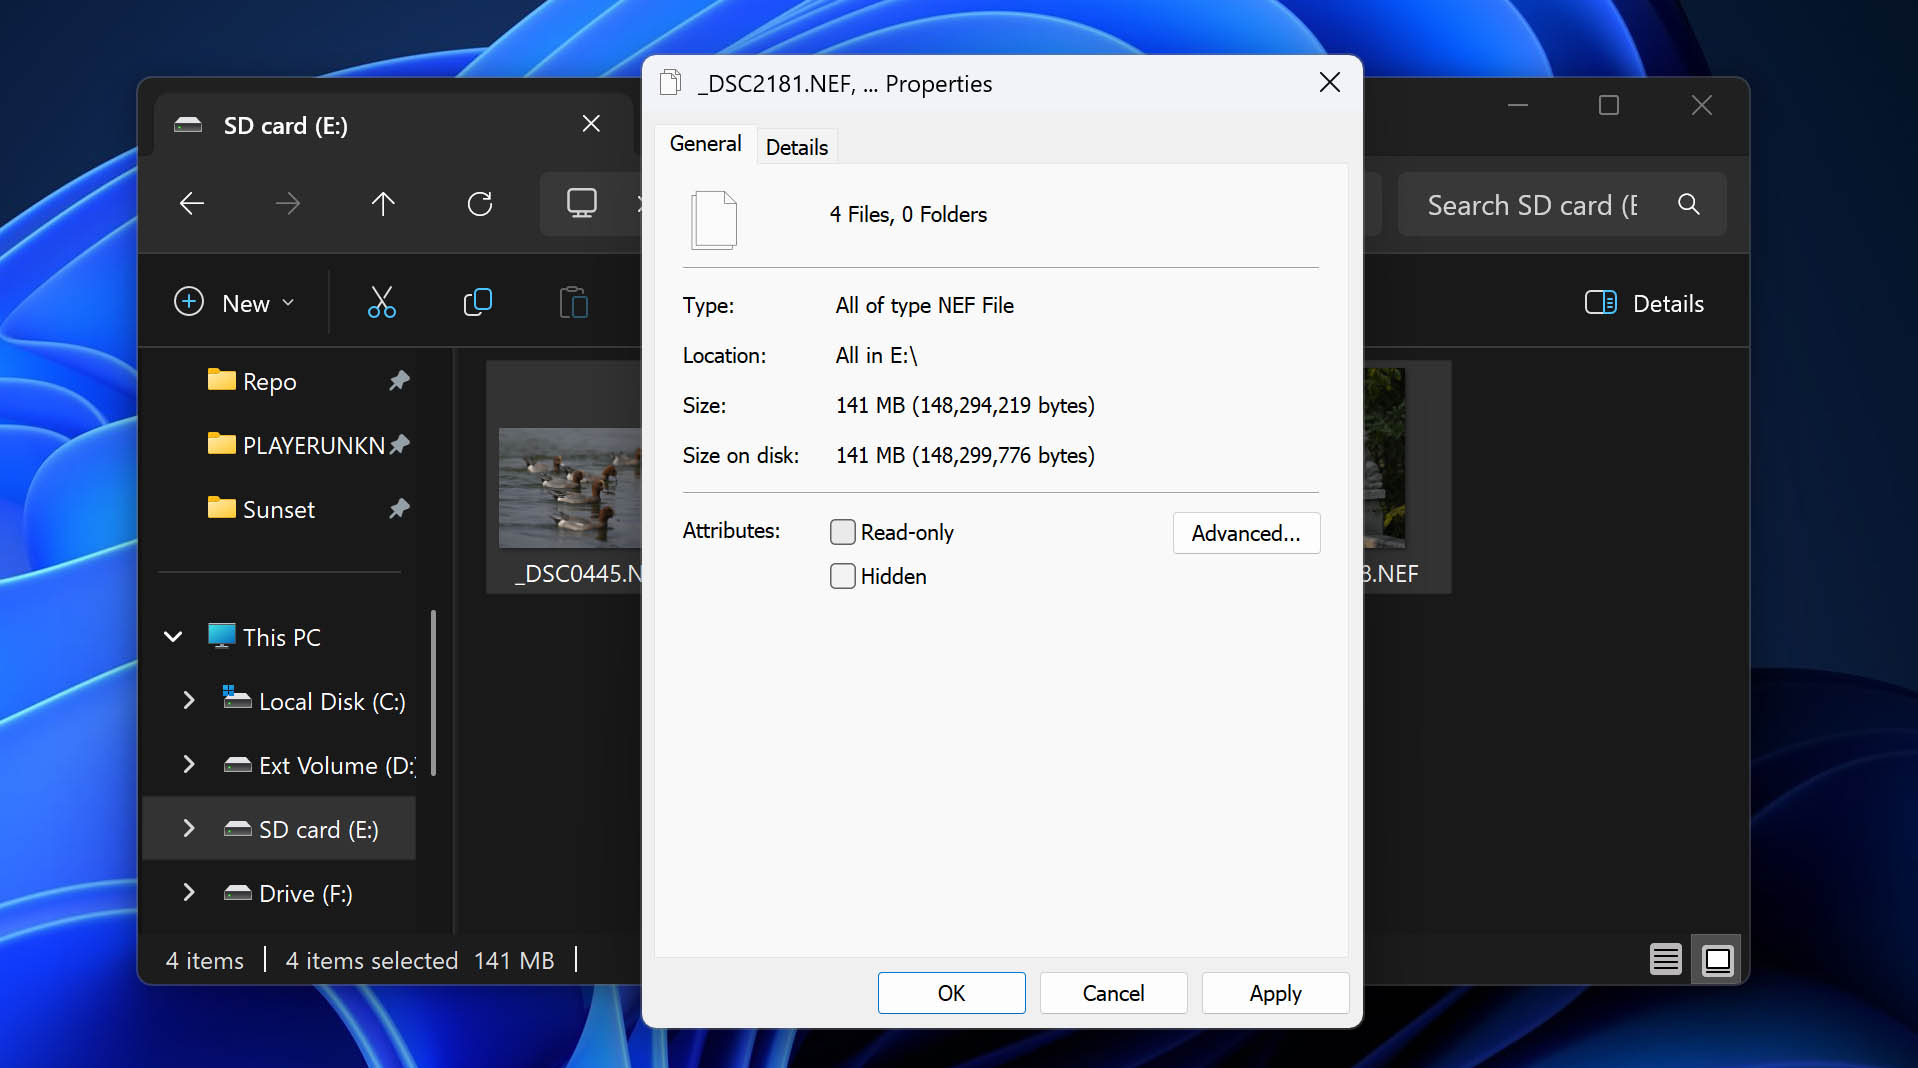
- Right-click on them and choose Properties. Ensure Read-only is deselected.
- Right-click on your locked SD card and choose Properties. Move to the Security tab. Ensure Everyone is listed in the “Group or user names:” list at the top of the window.
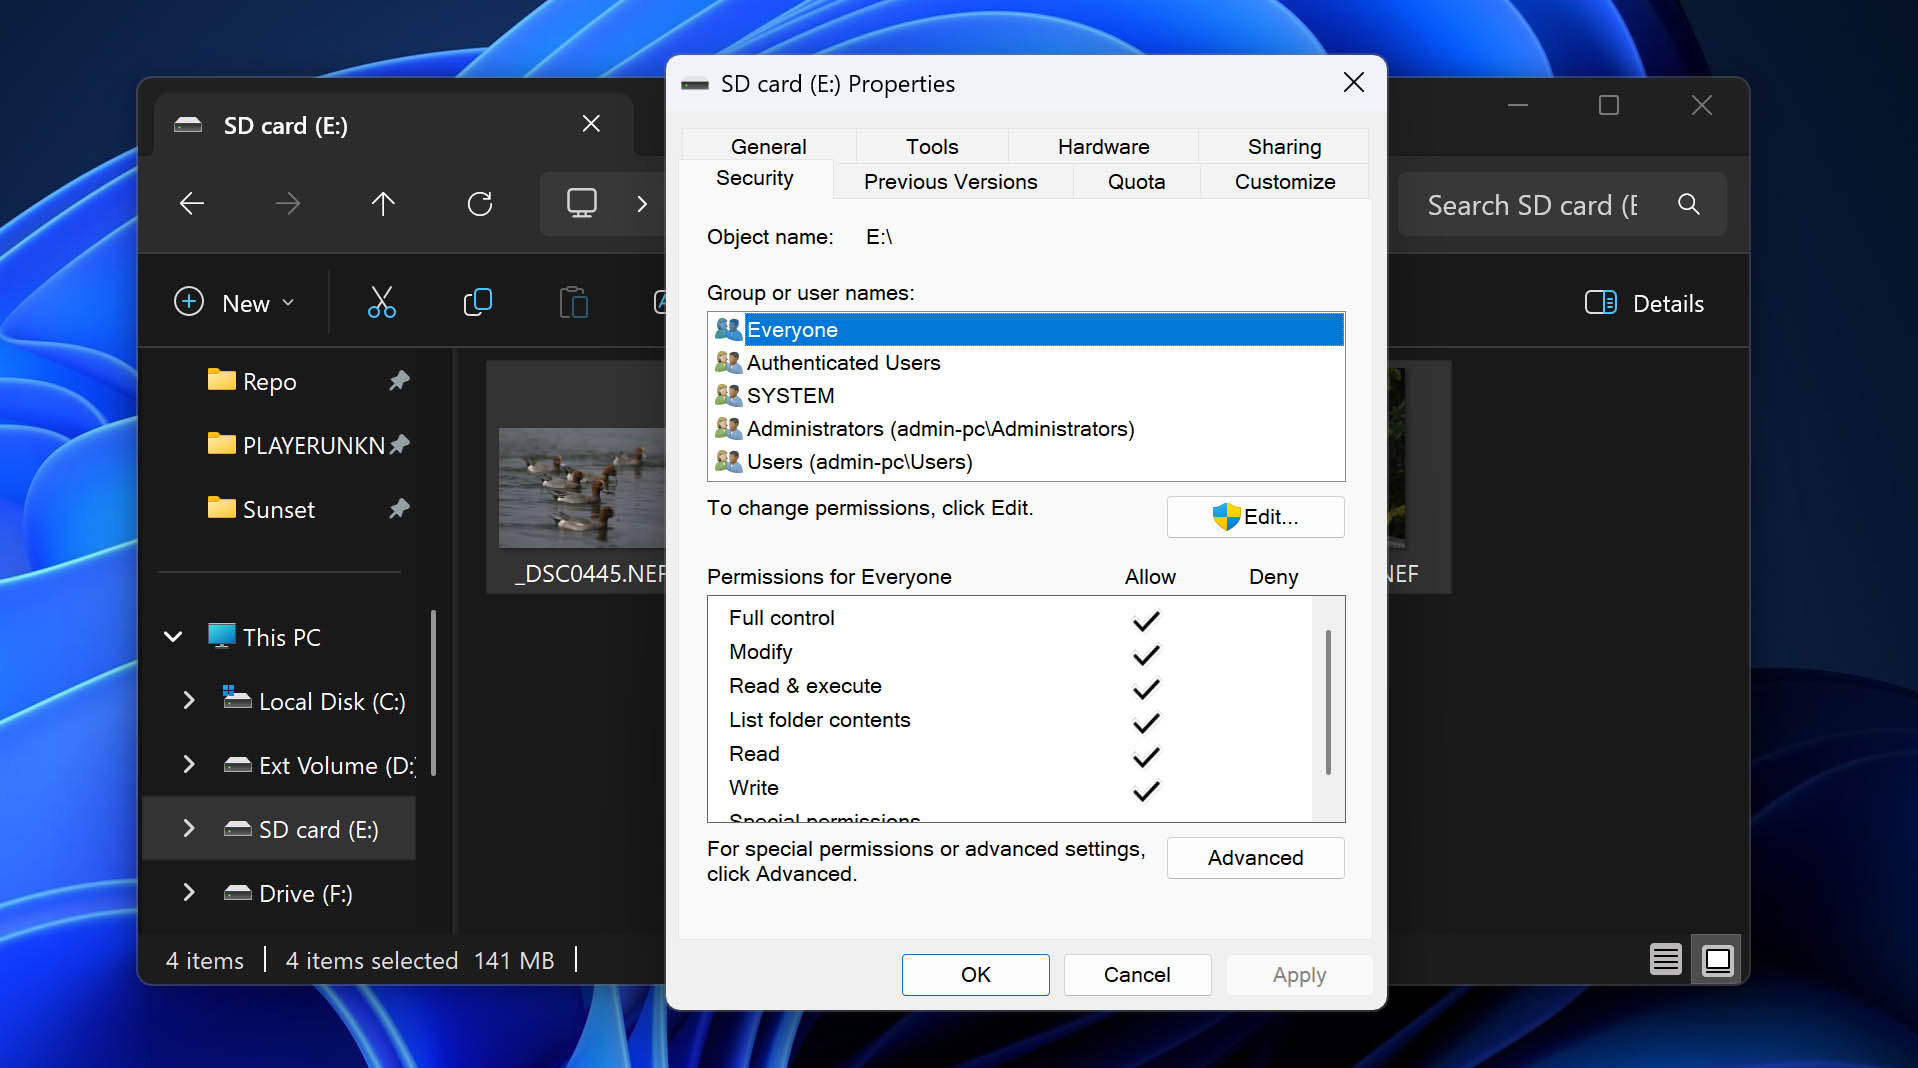
- Click on Everyone to select it. Then use the second list, which will read “Permissions for Everyone”, to change all access options (like Full Control, Modify, Write, etc.) to Allow.
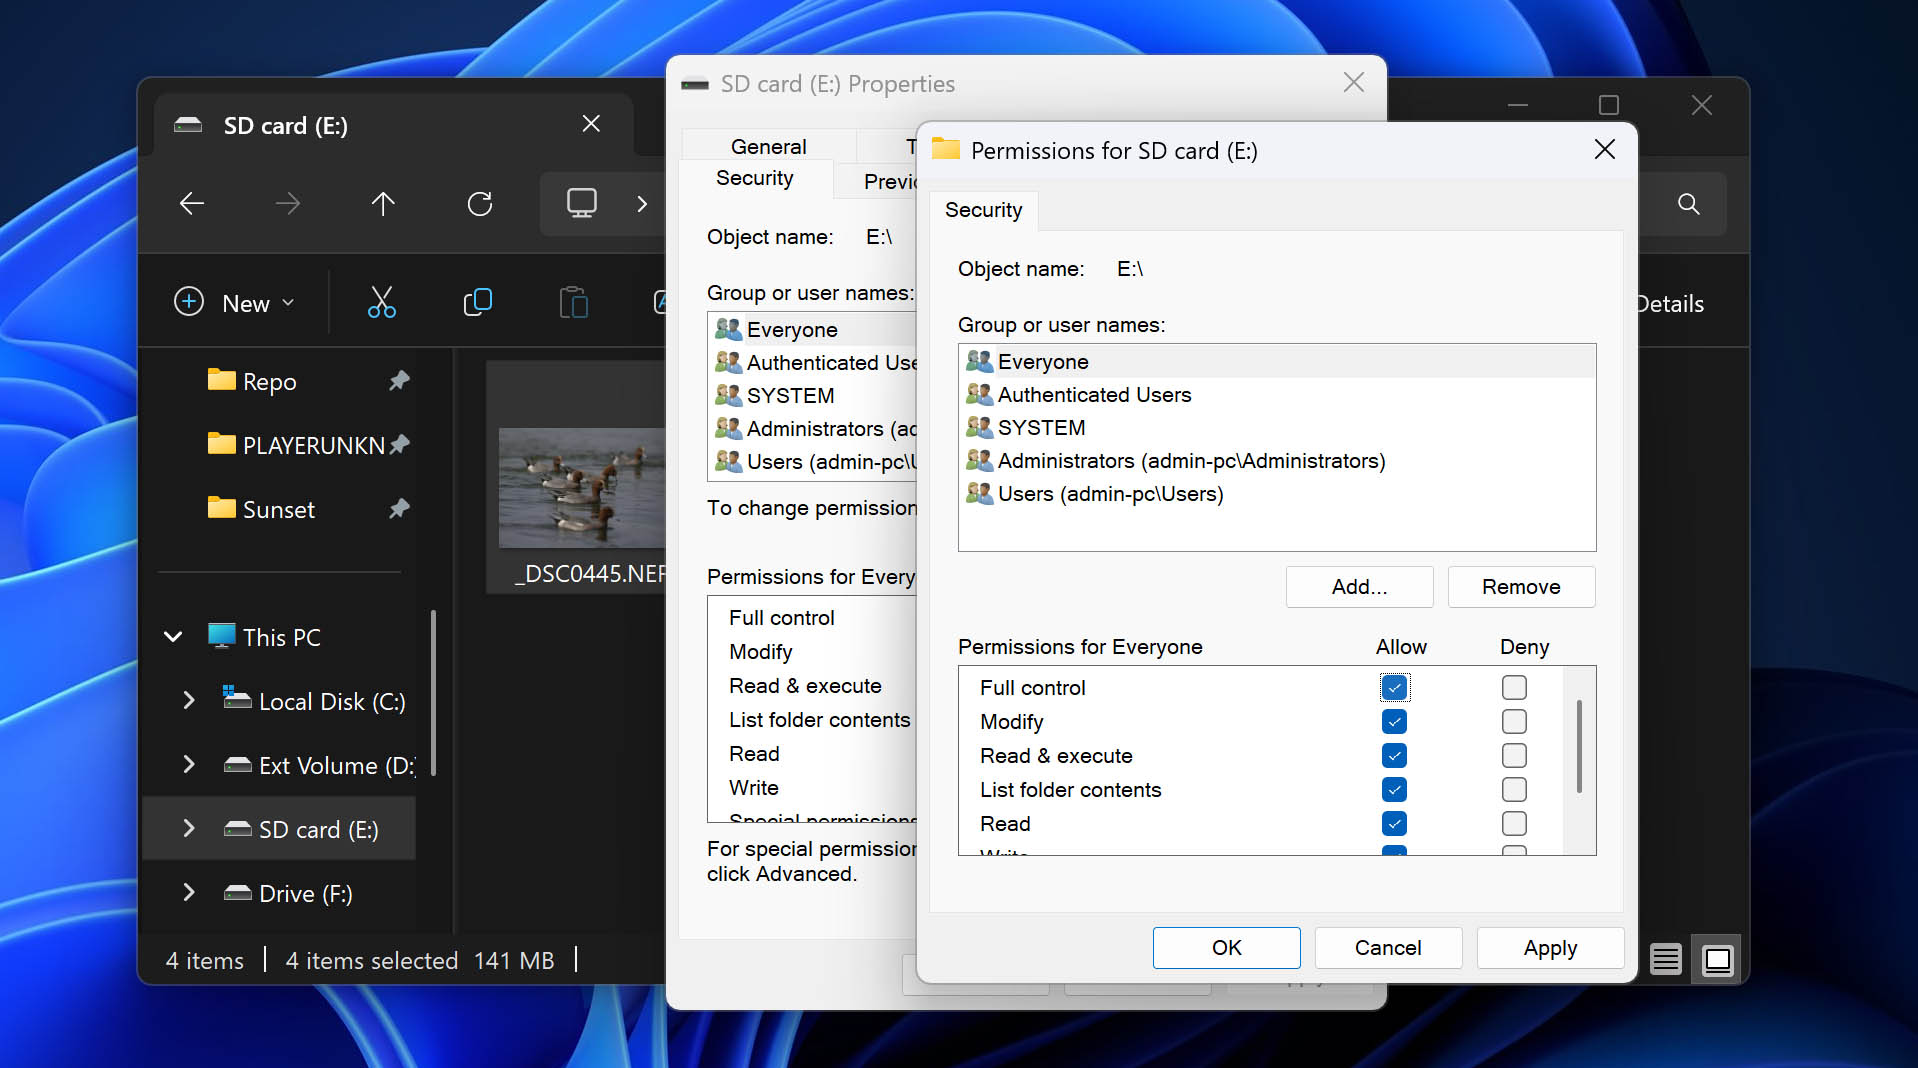
- Click OK to apply your settings and close that window.
Way 4: Format SD Card Using LLFT
When all other approaches have failed and your SD card remains locked, it’s time for the nuclear option. Low-level formatting (LLFT) completely erases and reconstructs the card’s basic architecture in a way that bypasses all software-based write restrictions.
Despite its low-level nature, LLFT is actually easy to perform in practice thanks to a tool called HDD LLF, which works well on SD cards and other flash memory devices regardless of what its name might suggest:
- Download HDD LLF from the official source at HDDGURU.COM.
- Install and run the program with administrator privileges (right-click and select Run as administrator).
- In the device selection screen, carefully identify your SD card – double and triple check you’ve selected the correct drive! Formatting the wrong drive will permanently erase all its data.
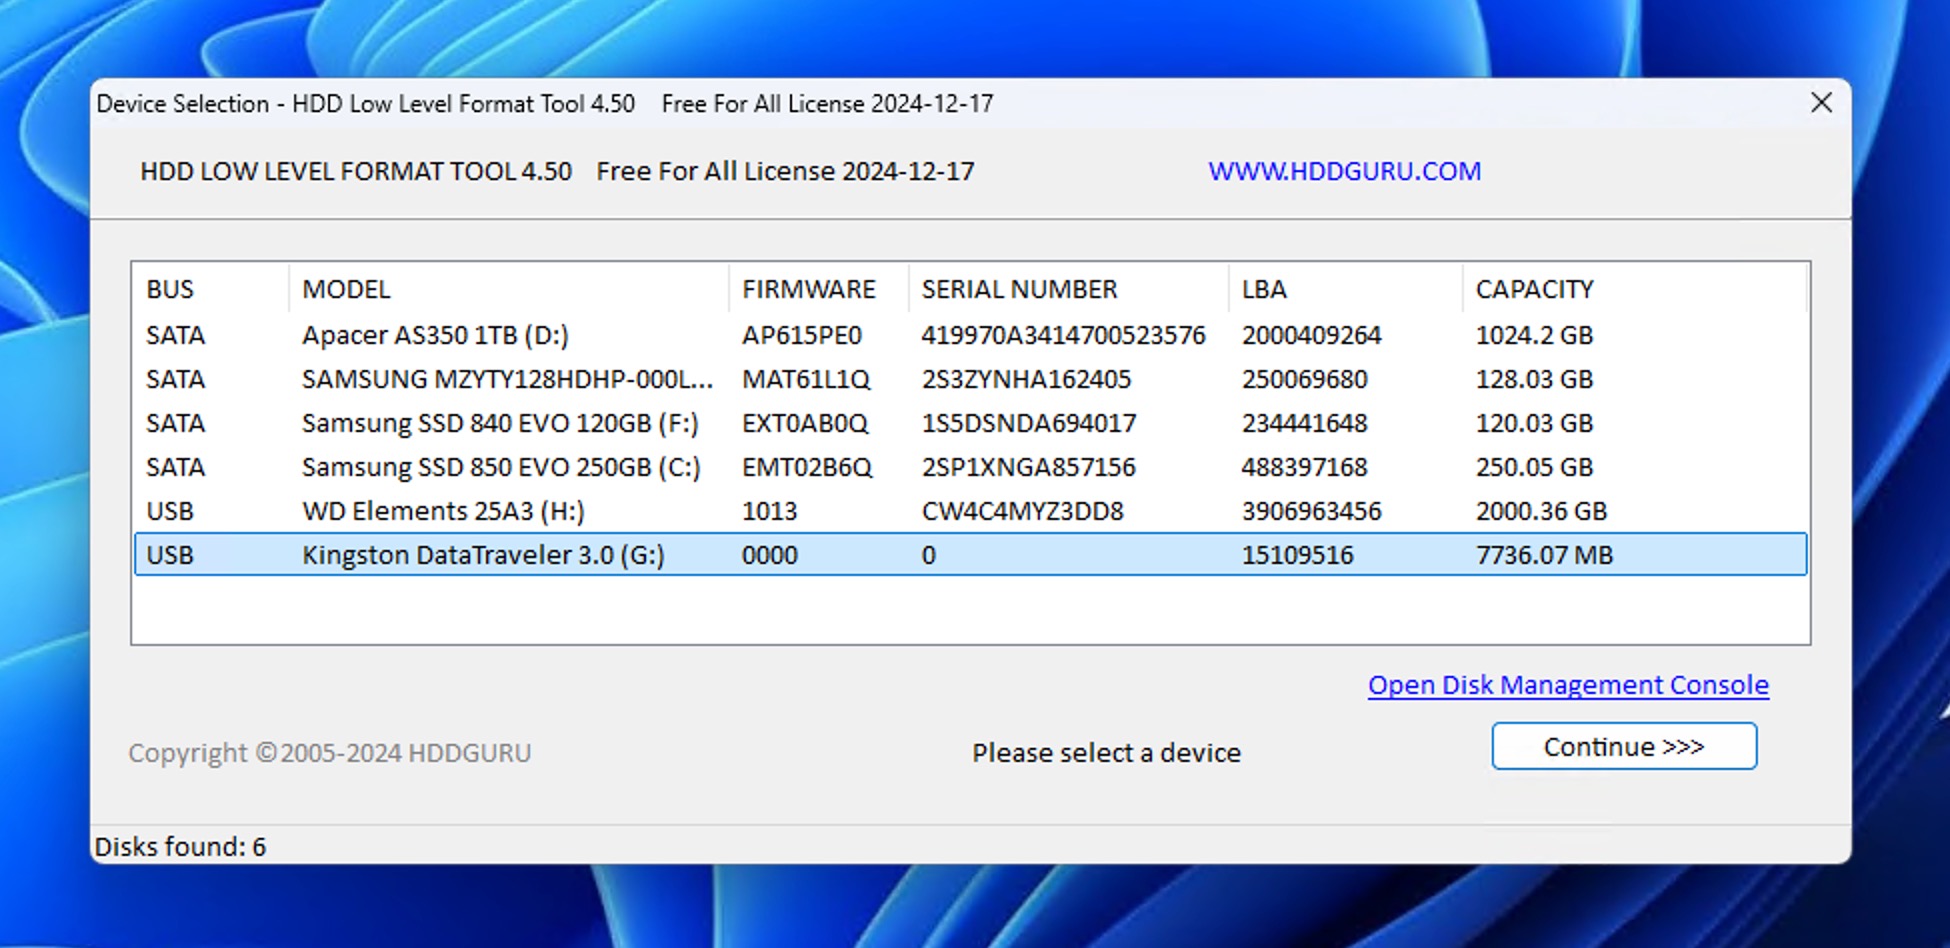
- Click Continue after verifying you’ve selected the correct drive.
- In the next screen, click Format this device to begin the low-level format.
- The process may take anywhere from a few minutes to over an hour depending on your card’s capacity and the extent of corruption.
After formatting completes, Windows should recognize your card as a fresh drive. You’ll need to create a new file system using Windows’ built-in Disk Management tool or File Explorer (right-click the drive and select Format).
How to Recover Lost Files from a Locked SD Card
If your SD card insists on re-locking itself, maybe you’re dealing with file system corruption. In such a case, the first thing to do would be to copy your SD card’s contents to your computer to minimize the chances of data loss.
You can do that with a typical copy process, for example, by using your OS’s default file manager. However, if you’re indeed dealing with file system corruption, some files might end up garbled or invisible, never to be copied.
As a safeguard against such problems, it’s better to use a specialized file recovery tool to back up your SD card’s contents to your computer. For such uses, we tend to prefer Disk Drill, an excellent file recovery tool, because of its straightforward interface, recovery chops, and affordability. Let’s see how you can salvage your files with Disk Drill from an SD card before reformatting it.
Back Up Files from a Locked SD Card in Windows
There are two major ways to back up files from a locked SD card in Windows:
- File-level transfer: This is what happens when you use Windows File Explorer to copy files. While simple, this method only copies what’s visible and what you manually select. It’s problematic when dealing with corruption since File Explorer can’t see files with damaged directory entries, files with changed attributes, or data in unallocated space. You’ll miss potentially recoverable data.
- Byte-to-byte backup: This creates an exact digital clone of your entire SD card, copying every single bit of data regardless of file system status. It captures everything – visible files, deleted content, corrupted structures, and even data in areas marked as empty – giving you the best chance to recover everything.
Needless to say, the latter approach is much better when it comes to recovering from a locked or corrupted SD card. Once you have this complete backup, you can perform multiple recovery attempts without risking further damage to the original memory card. Best of all, you need just one tool to both create a byte-to-byte backup and recover files from it: Disk Drill.
- Connect your locked SD card to your Windows PC using a card reader. If your computer doesn’t have a built-in SD slot, use an external USB card reader.
- Download and install Disk Drill from website.

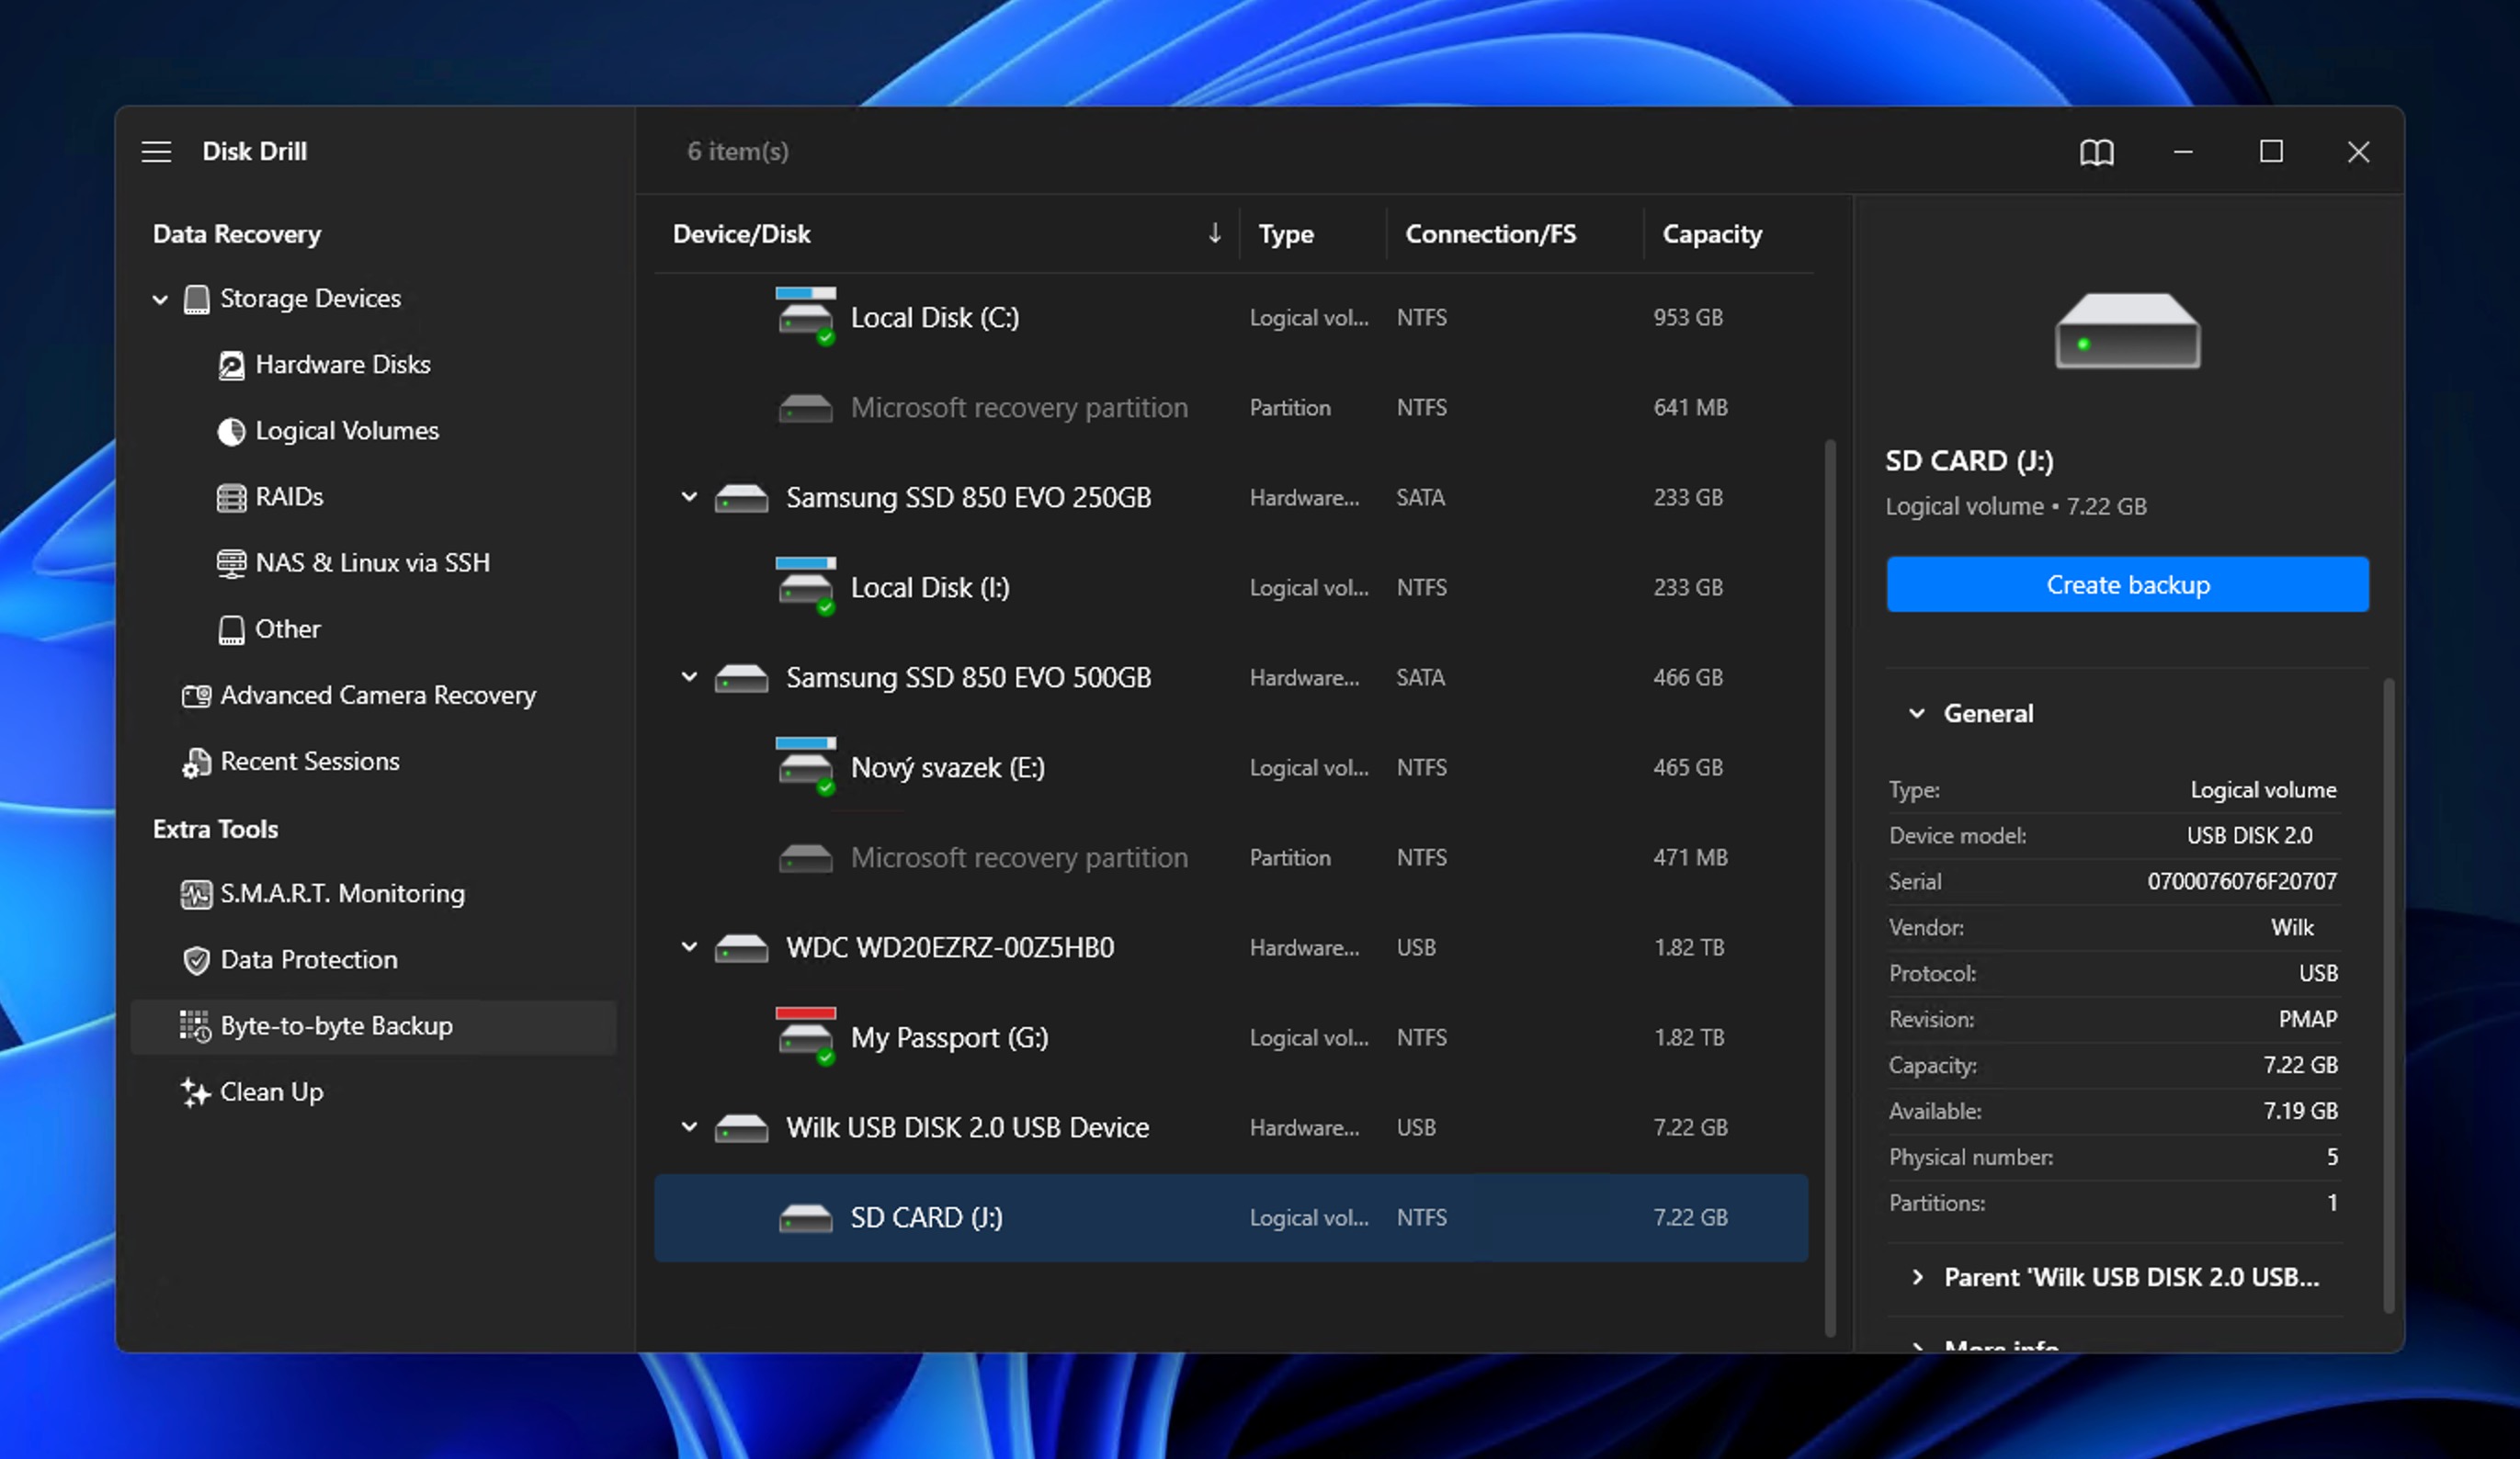
- Select the Byte to byte Backup tool in the left pane.
- Choose your SD card from the list of available devices.
- Click Create backup and select a destination folder on your computer’s hard drive.
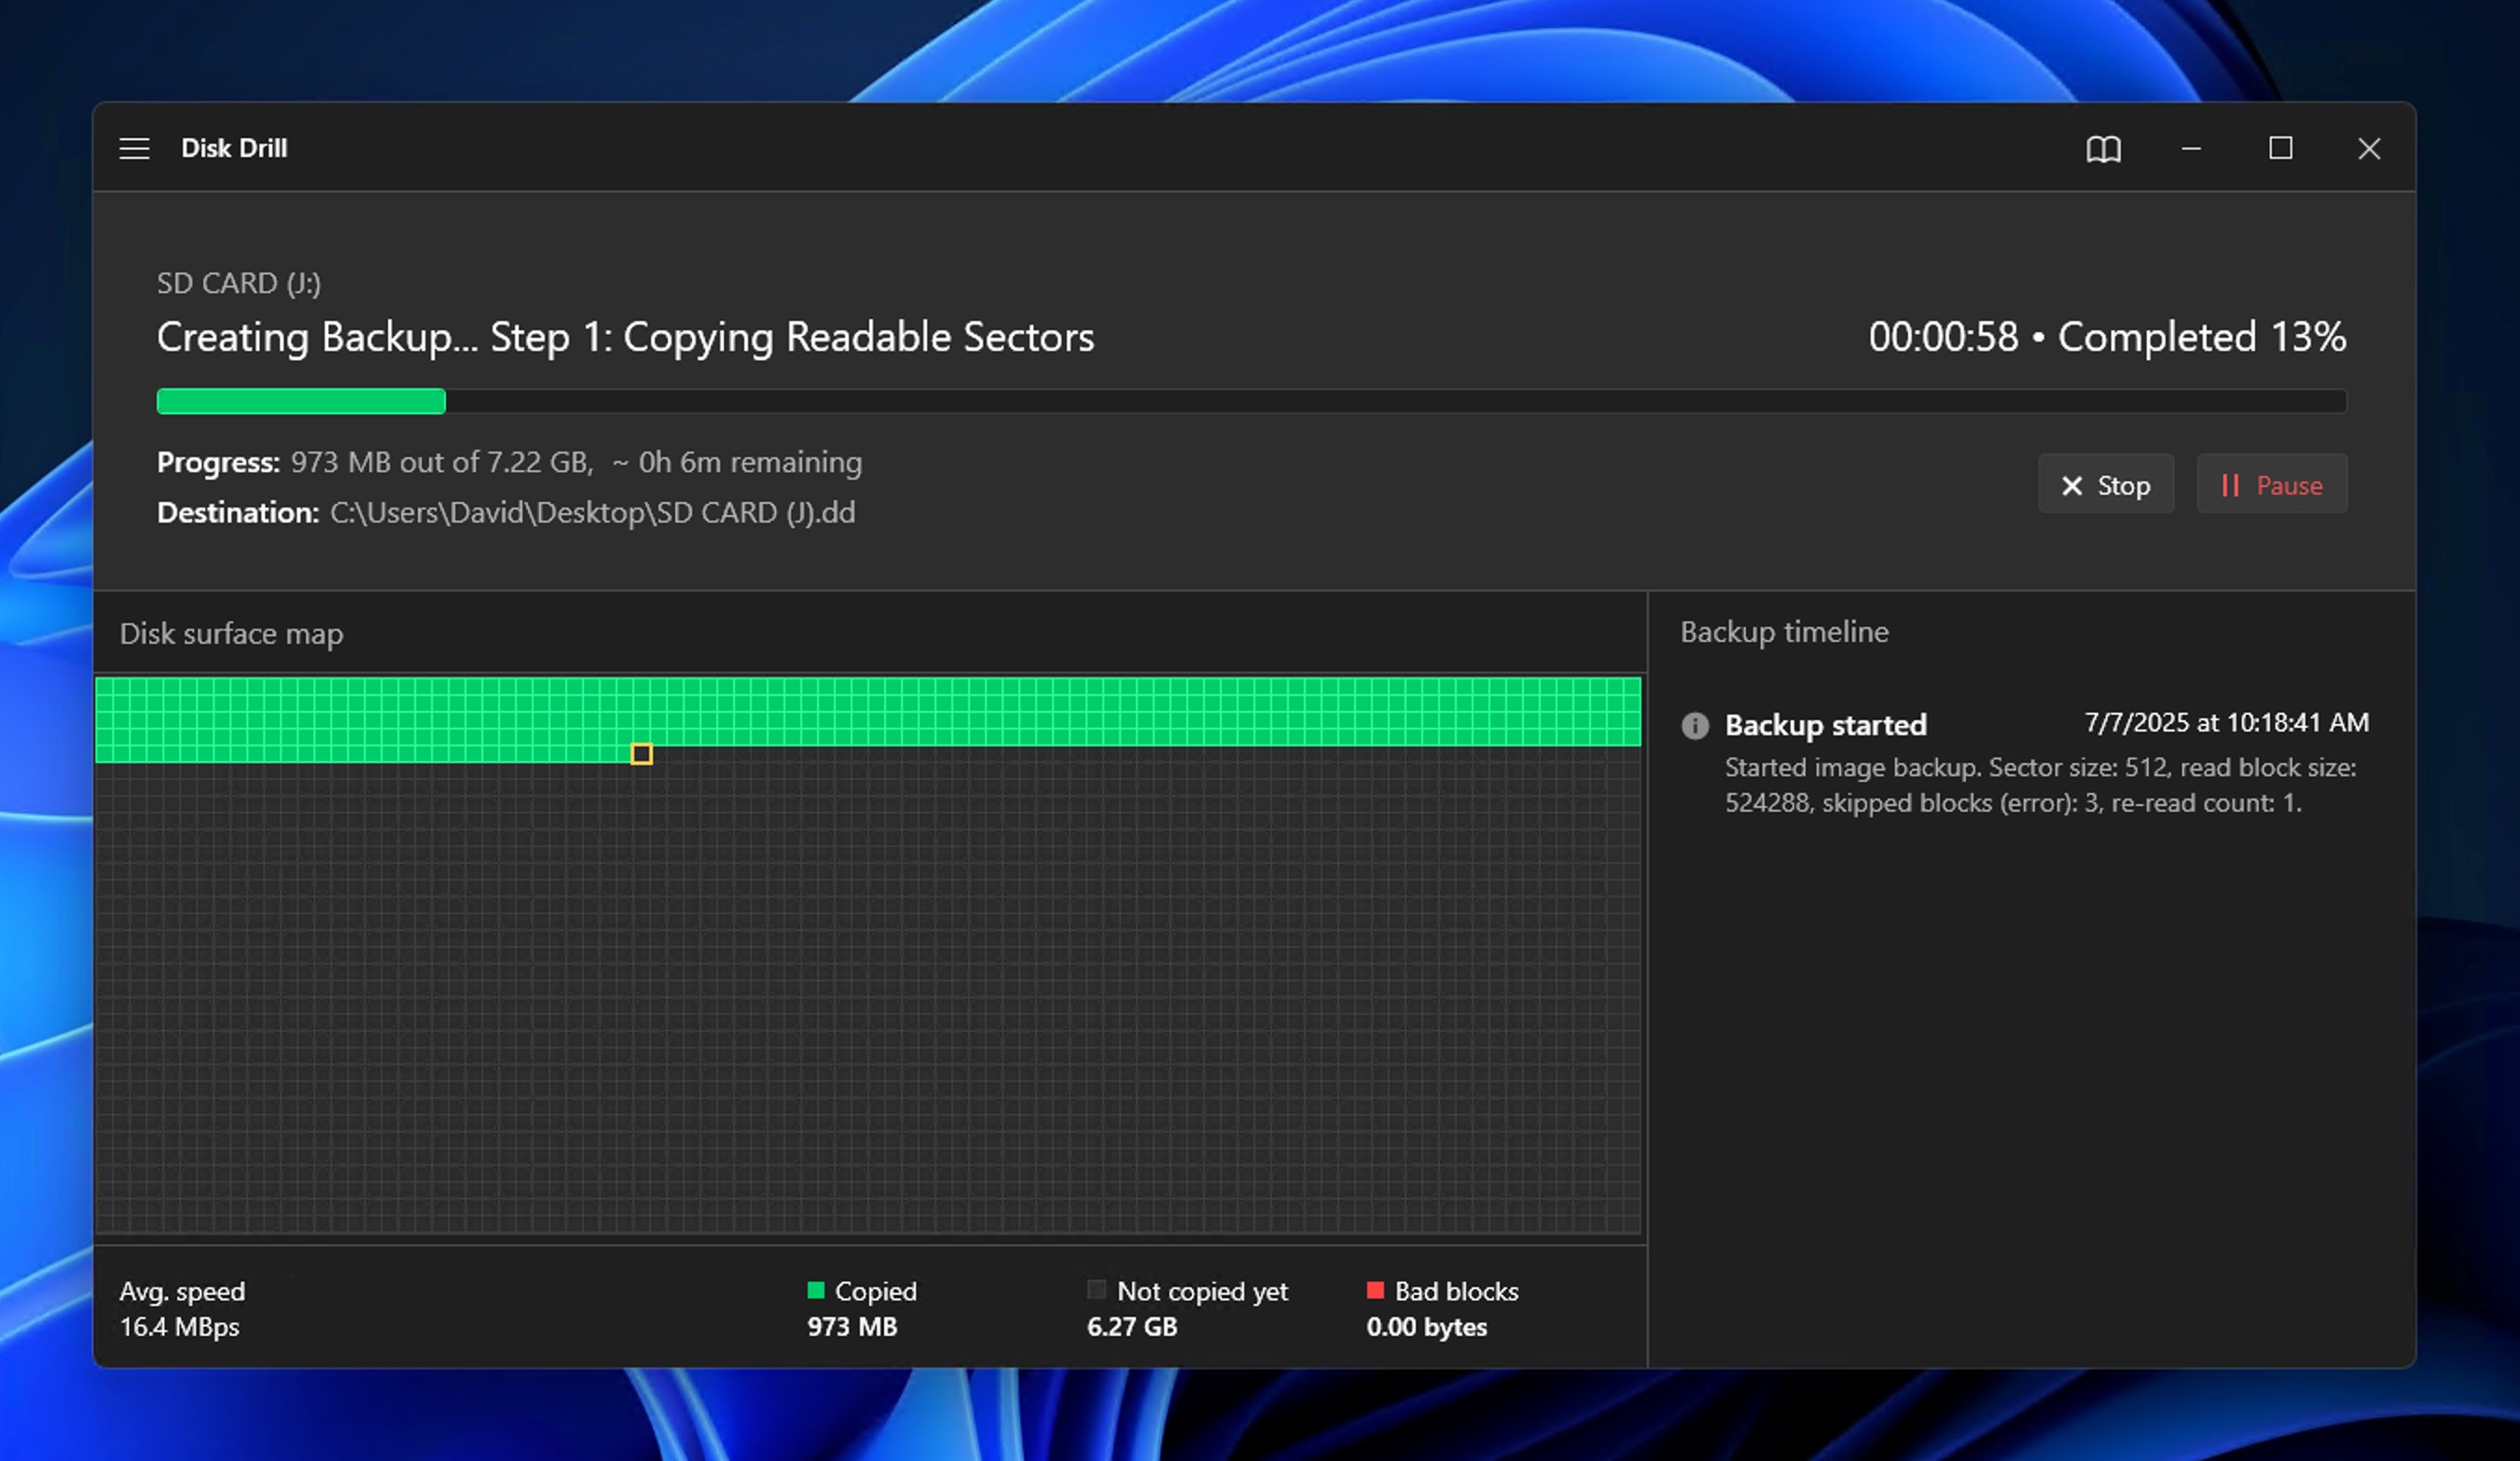
- Give your backup file a descriptive name (like SDCard_Backup_April_2025) and save it.
- Wait for the backup process to complete.
The resulting .dmg file can be mounted and scanned with Disk Drill:
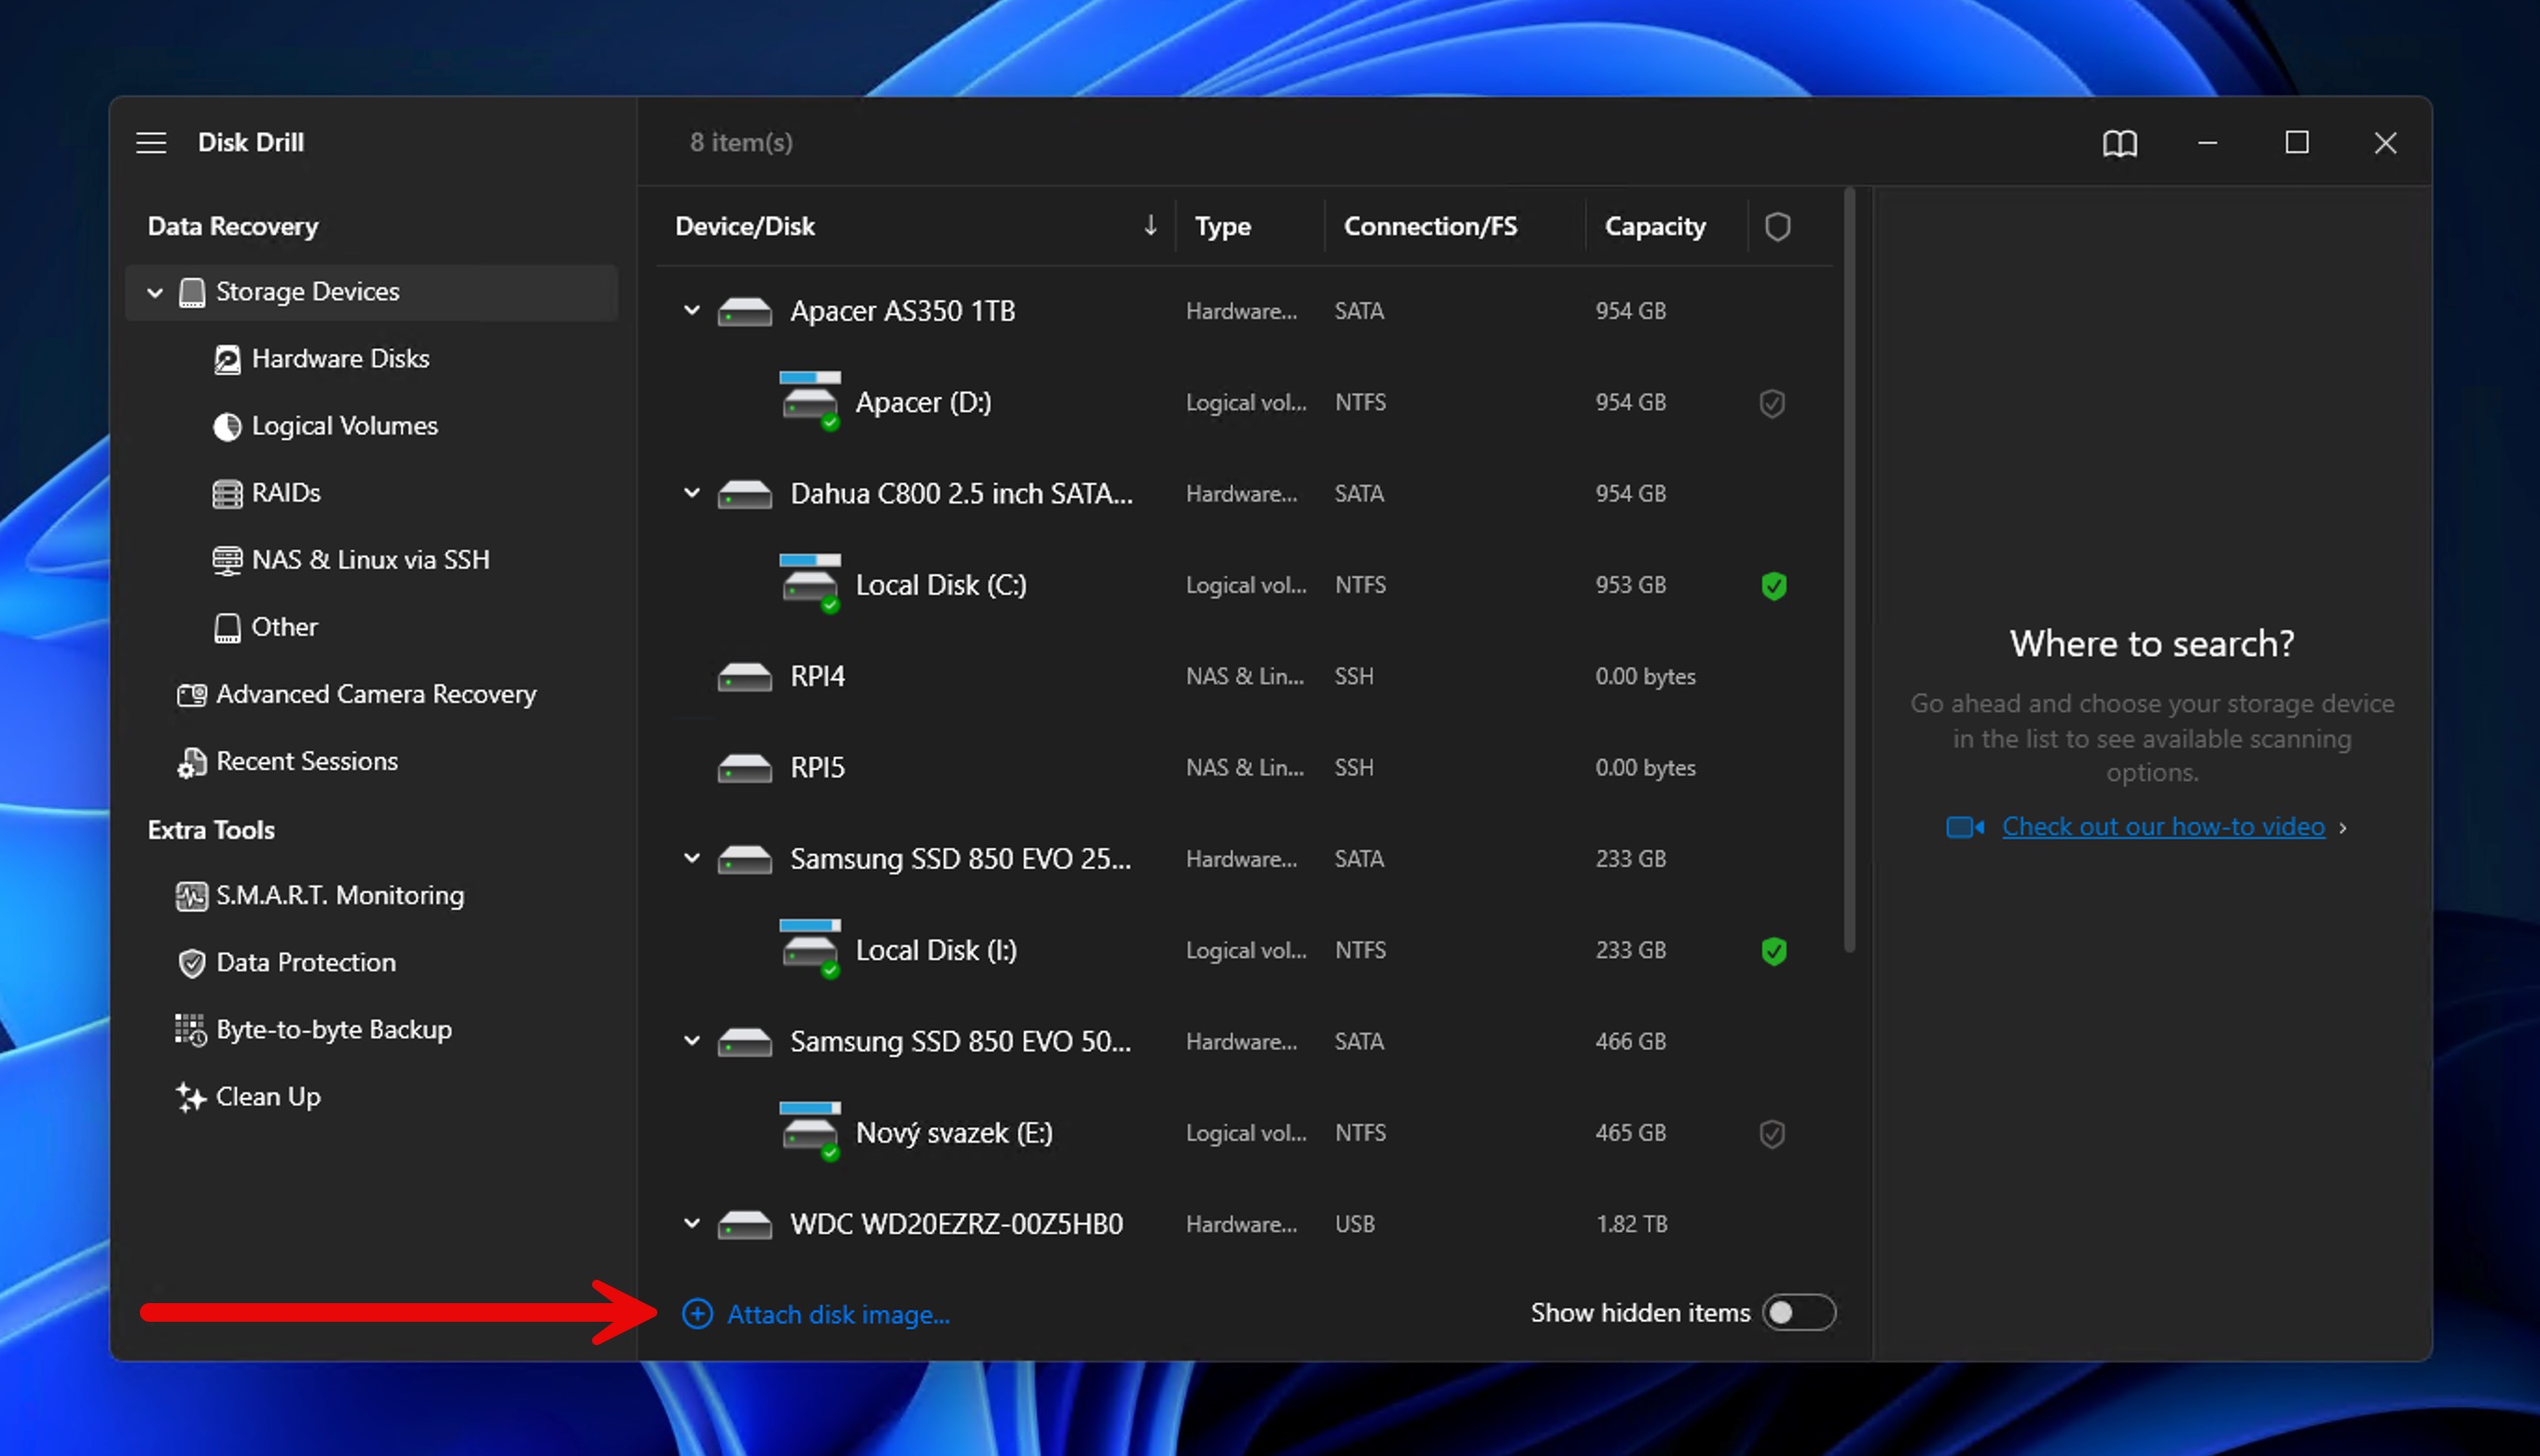
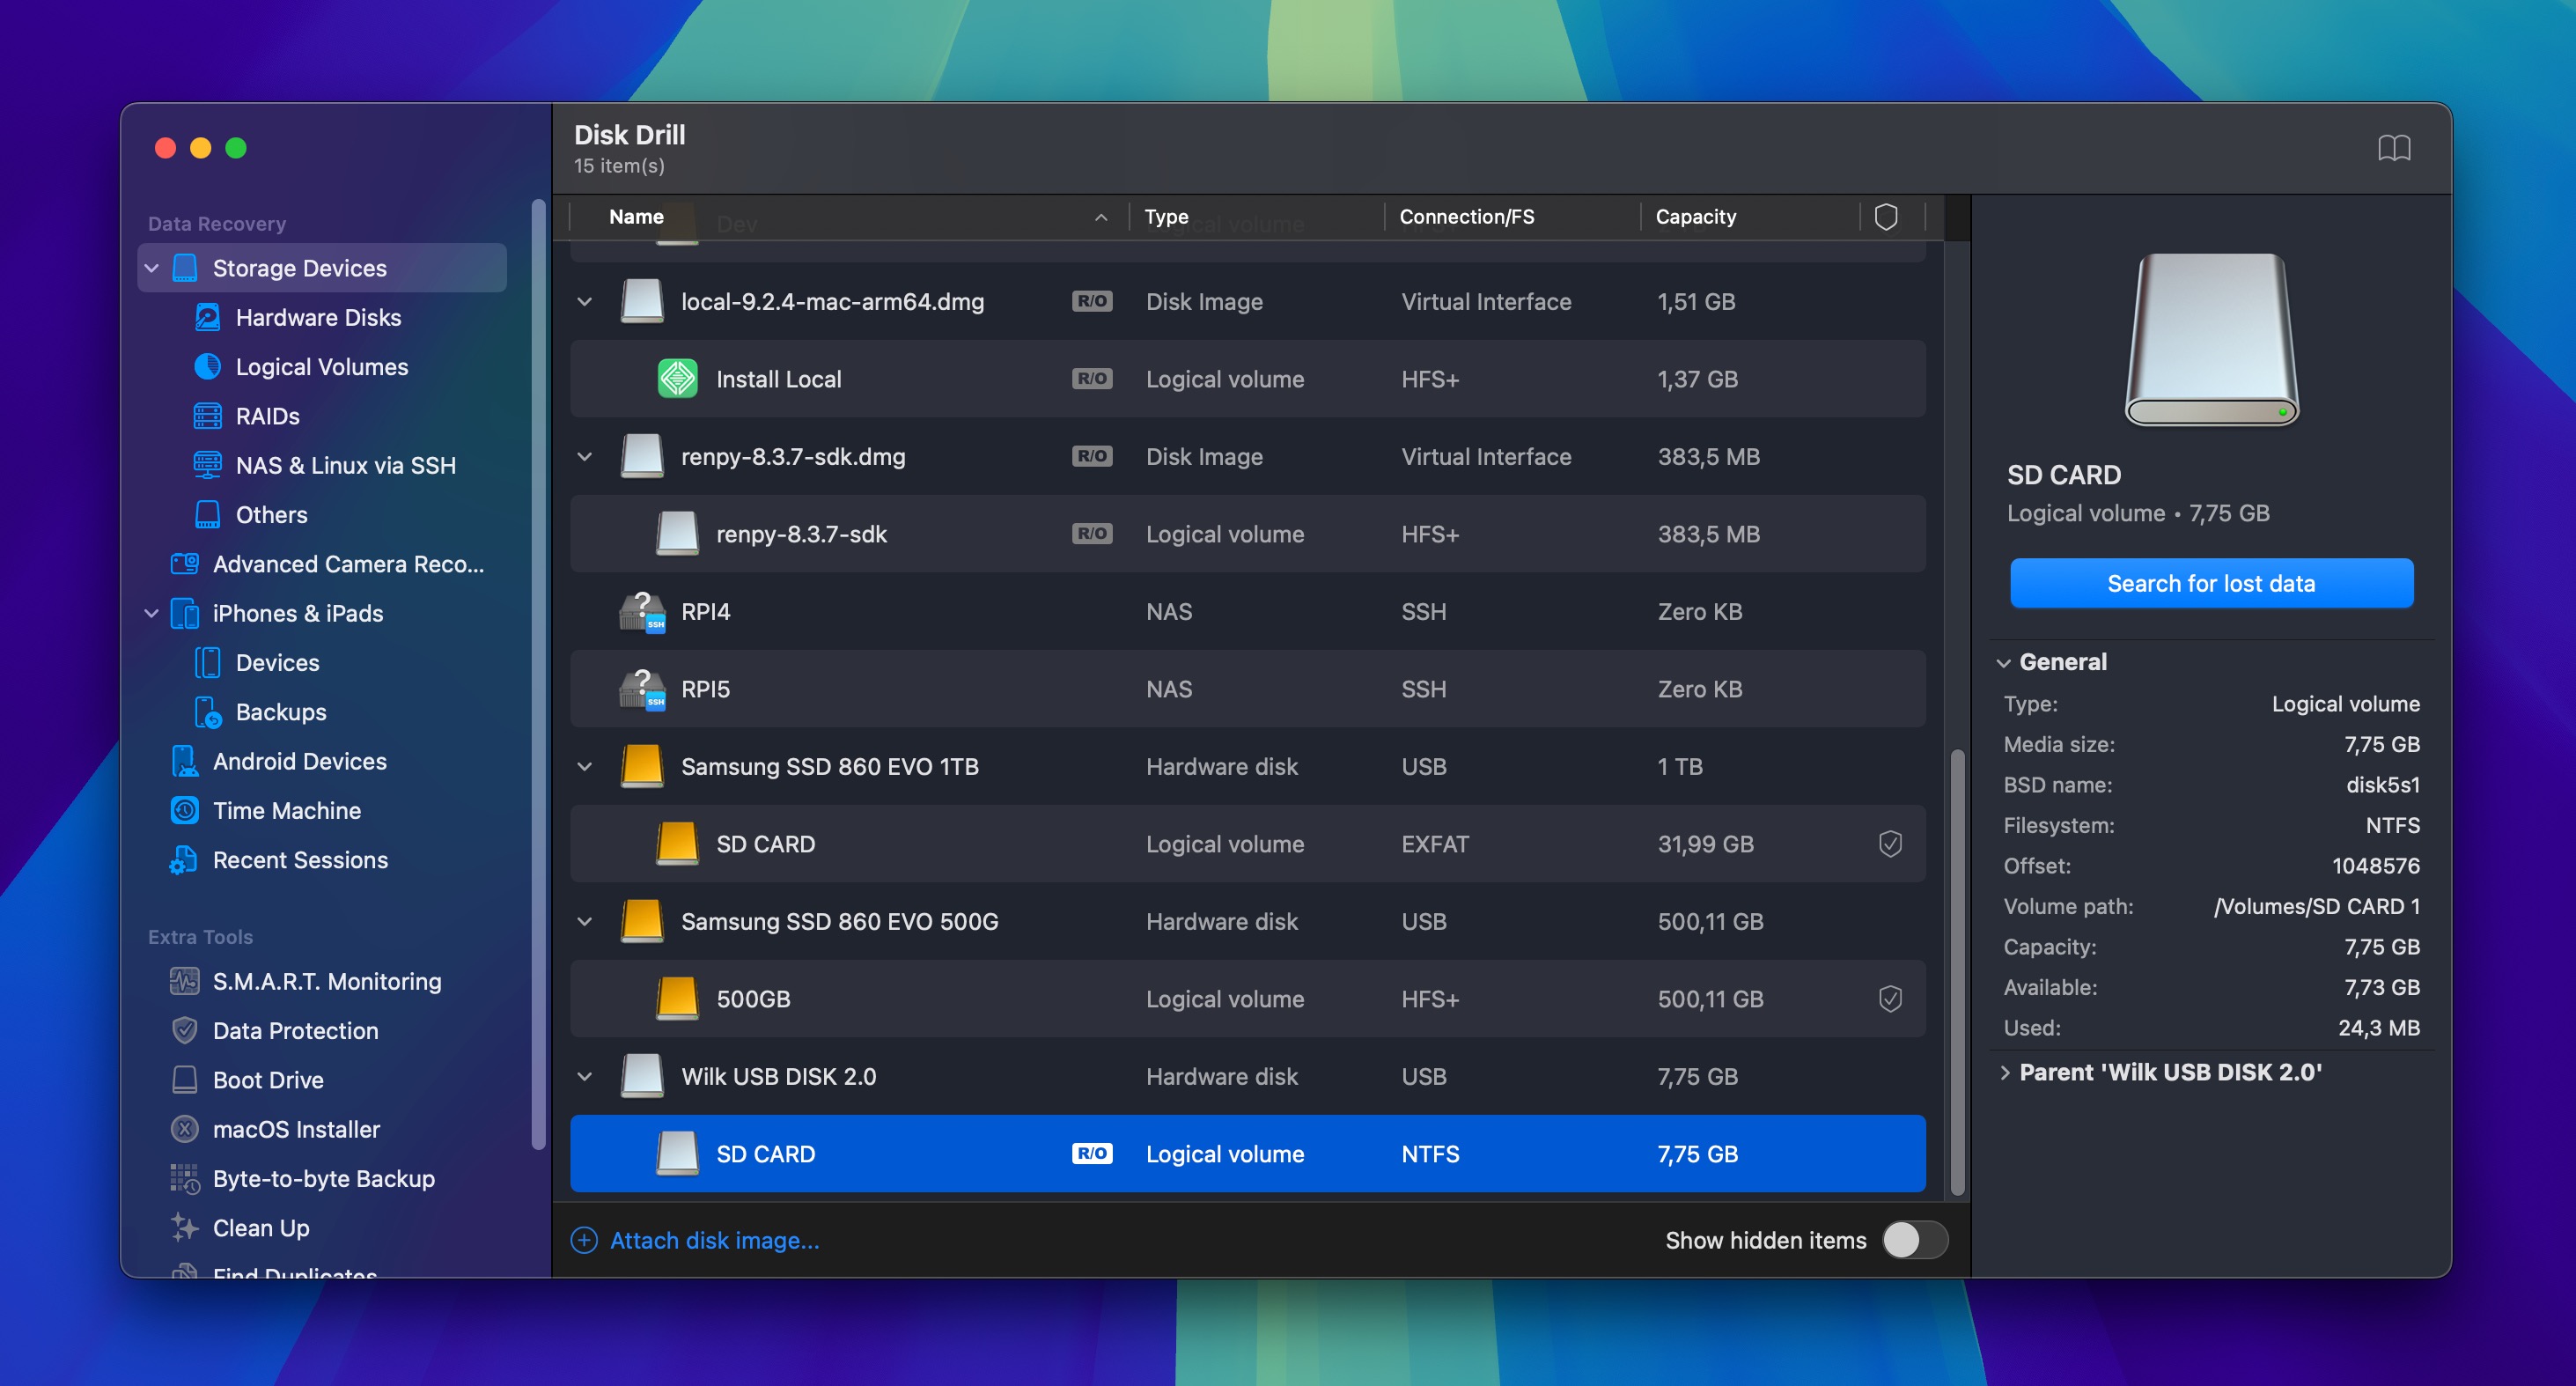
- Run Disk Drill, navigate to the Storage devices section and click Attach disk image at the bottom. Navigate to the byte-to-byte backup image you’ve created and mount it.
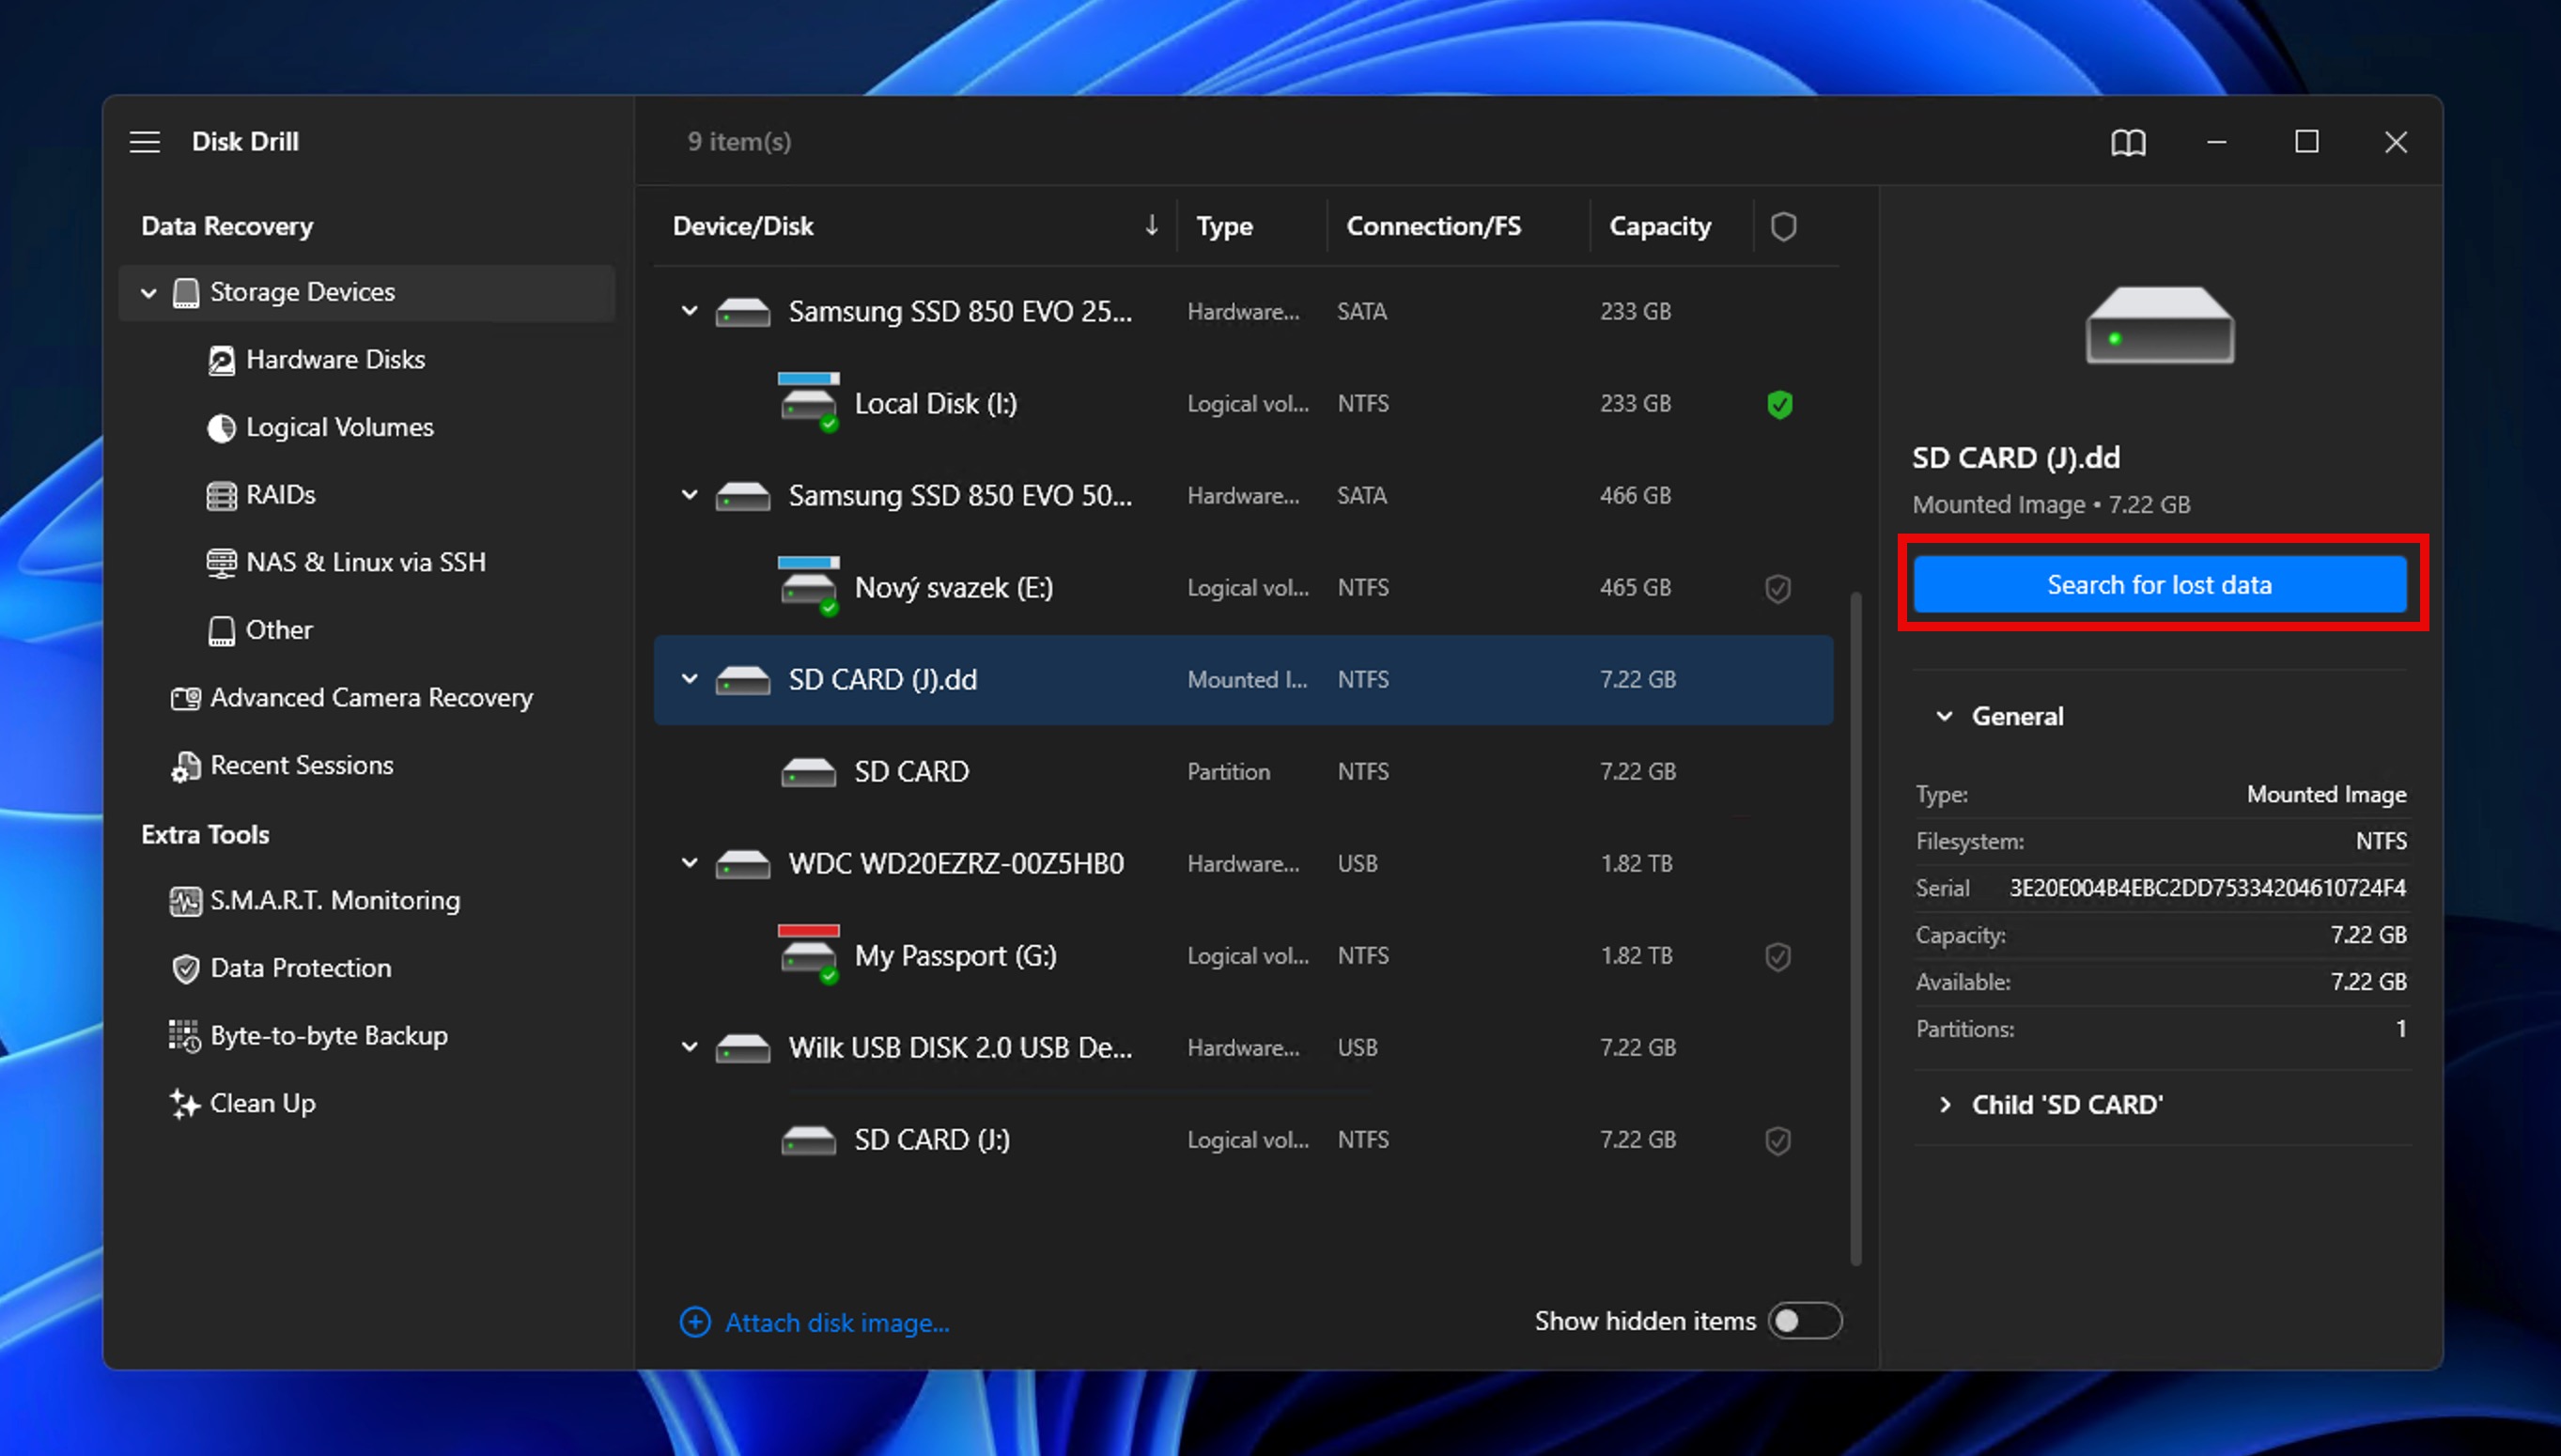
- Select the mounted byte-to-byte backup image and click on the Search for lost data button on the right to scan your SD card with Disk Drill.
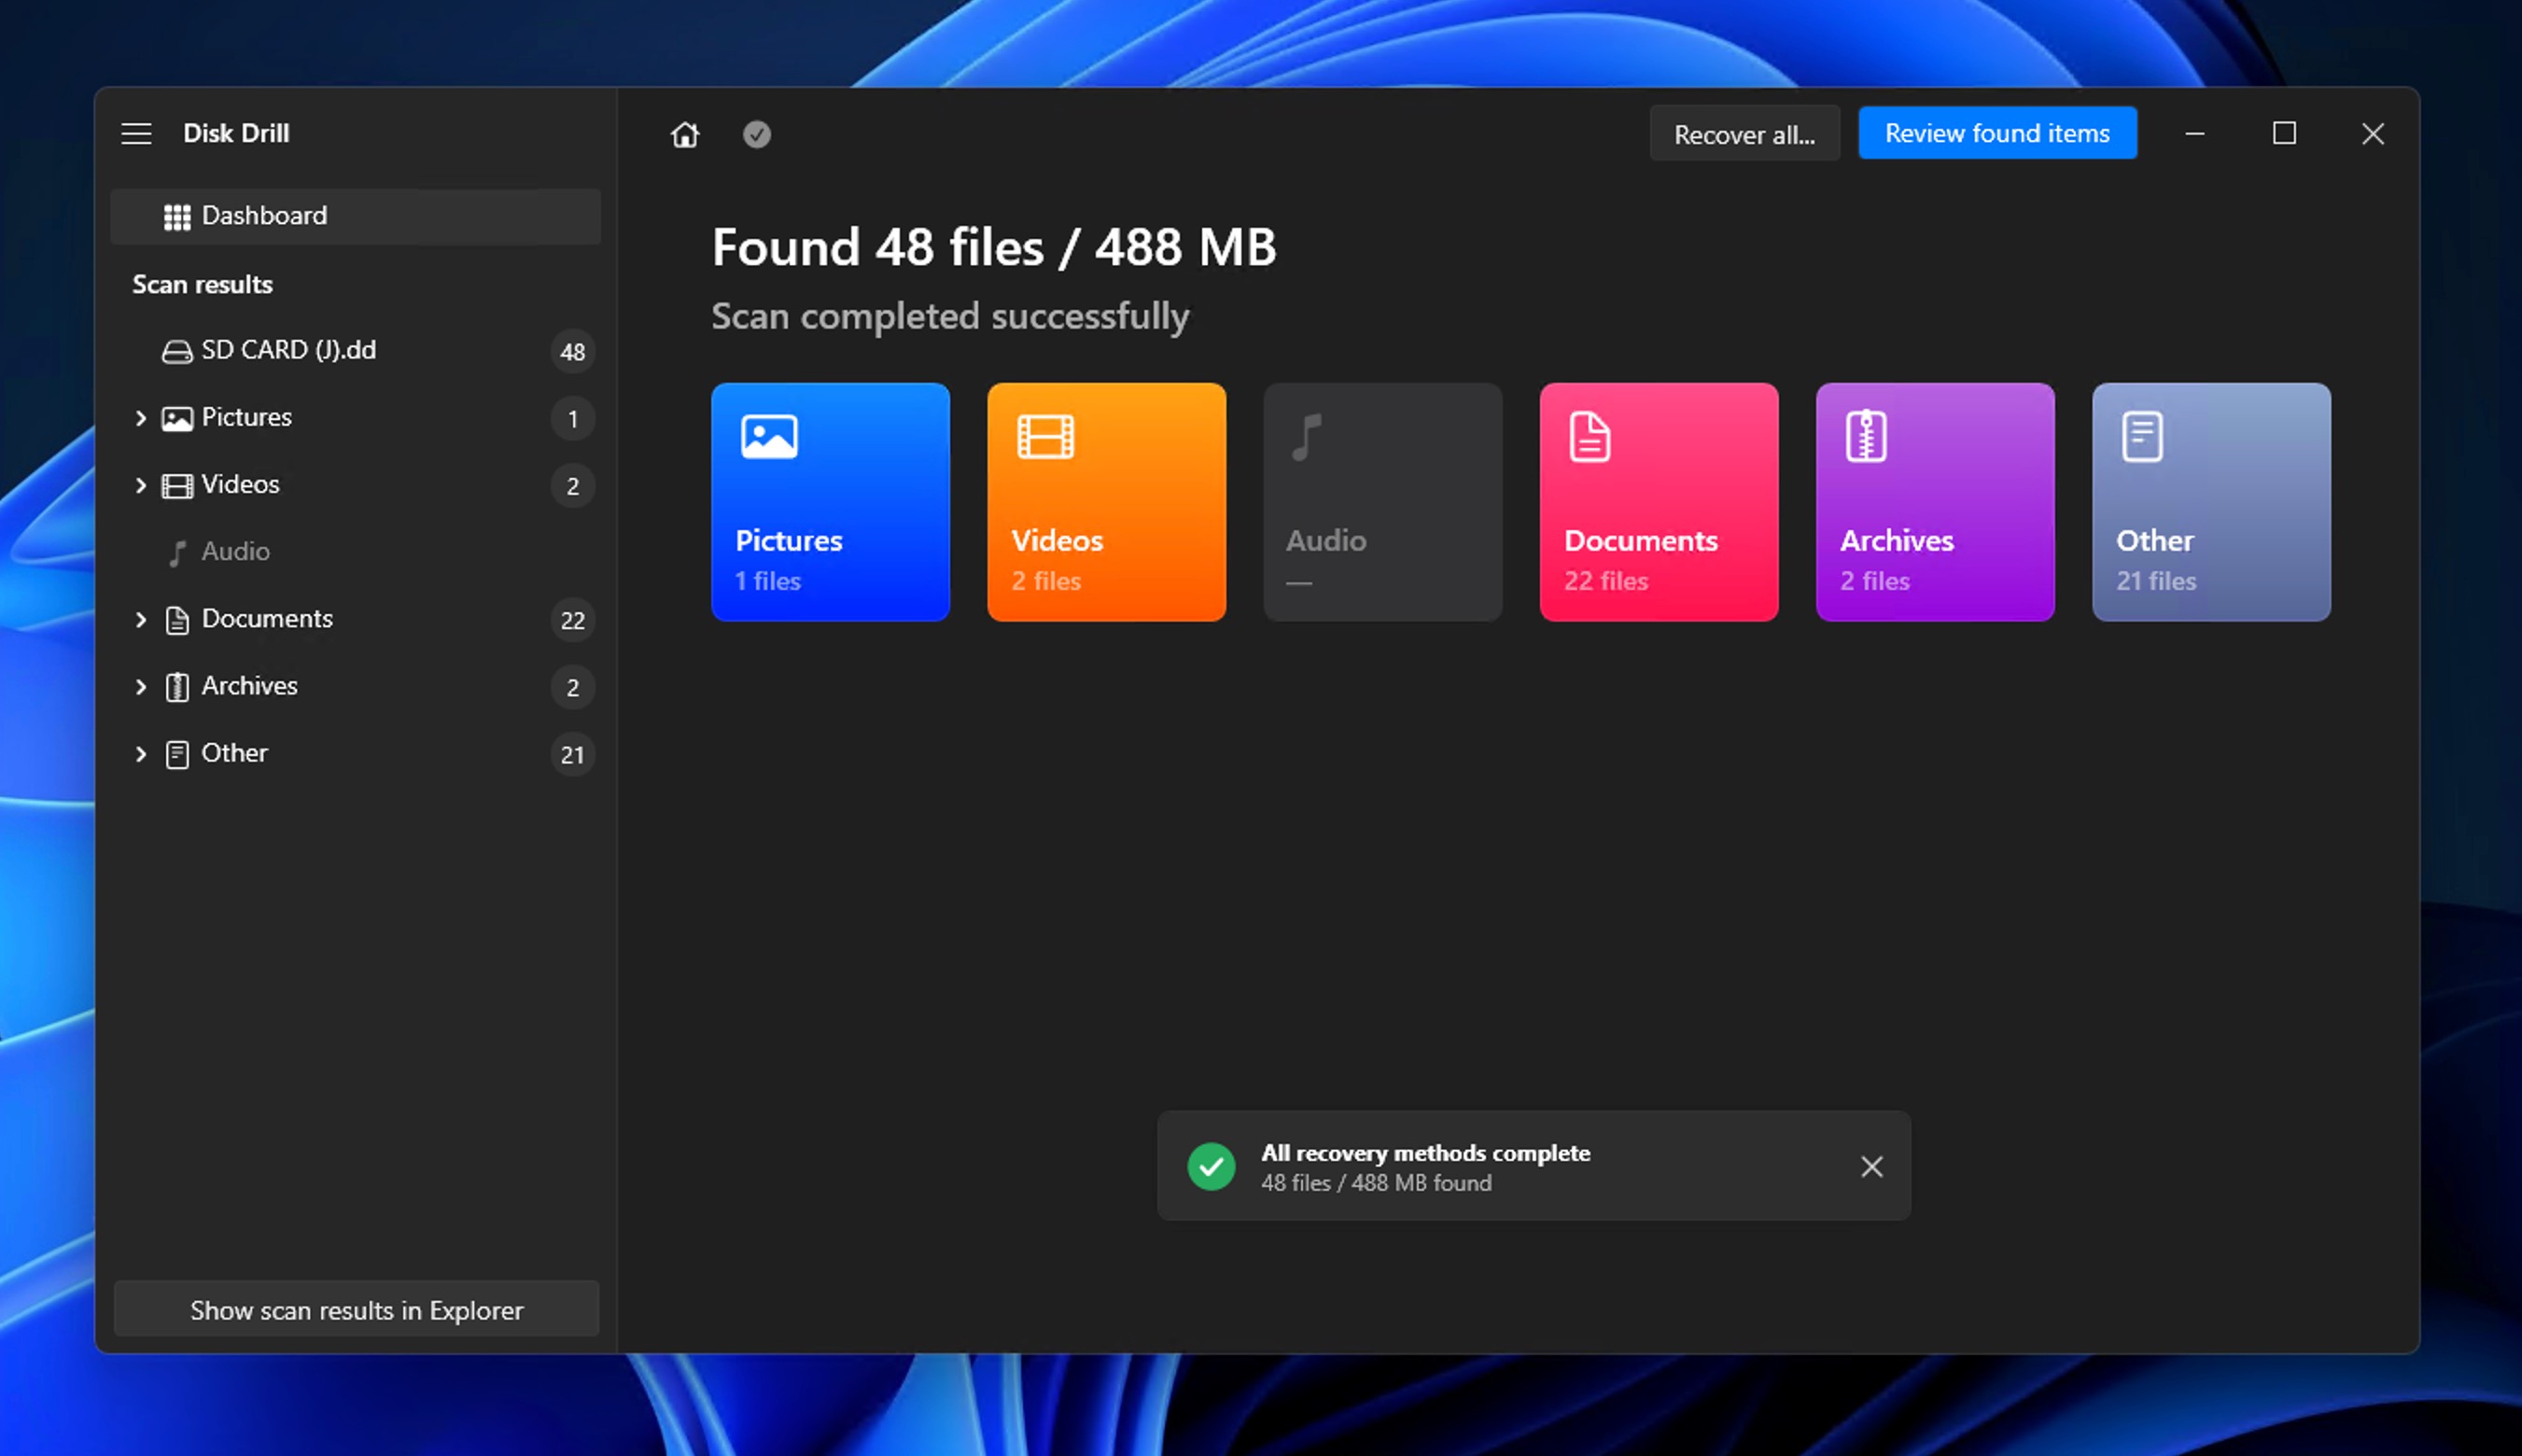
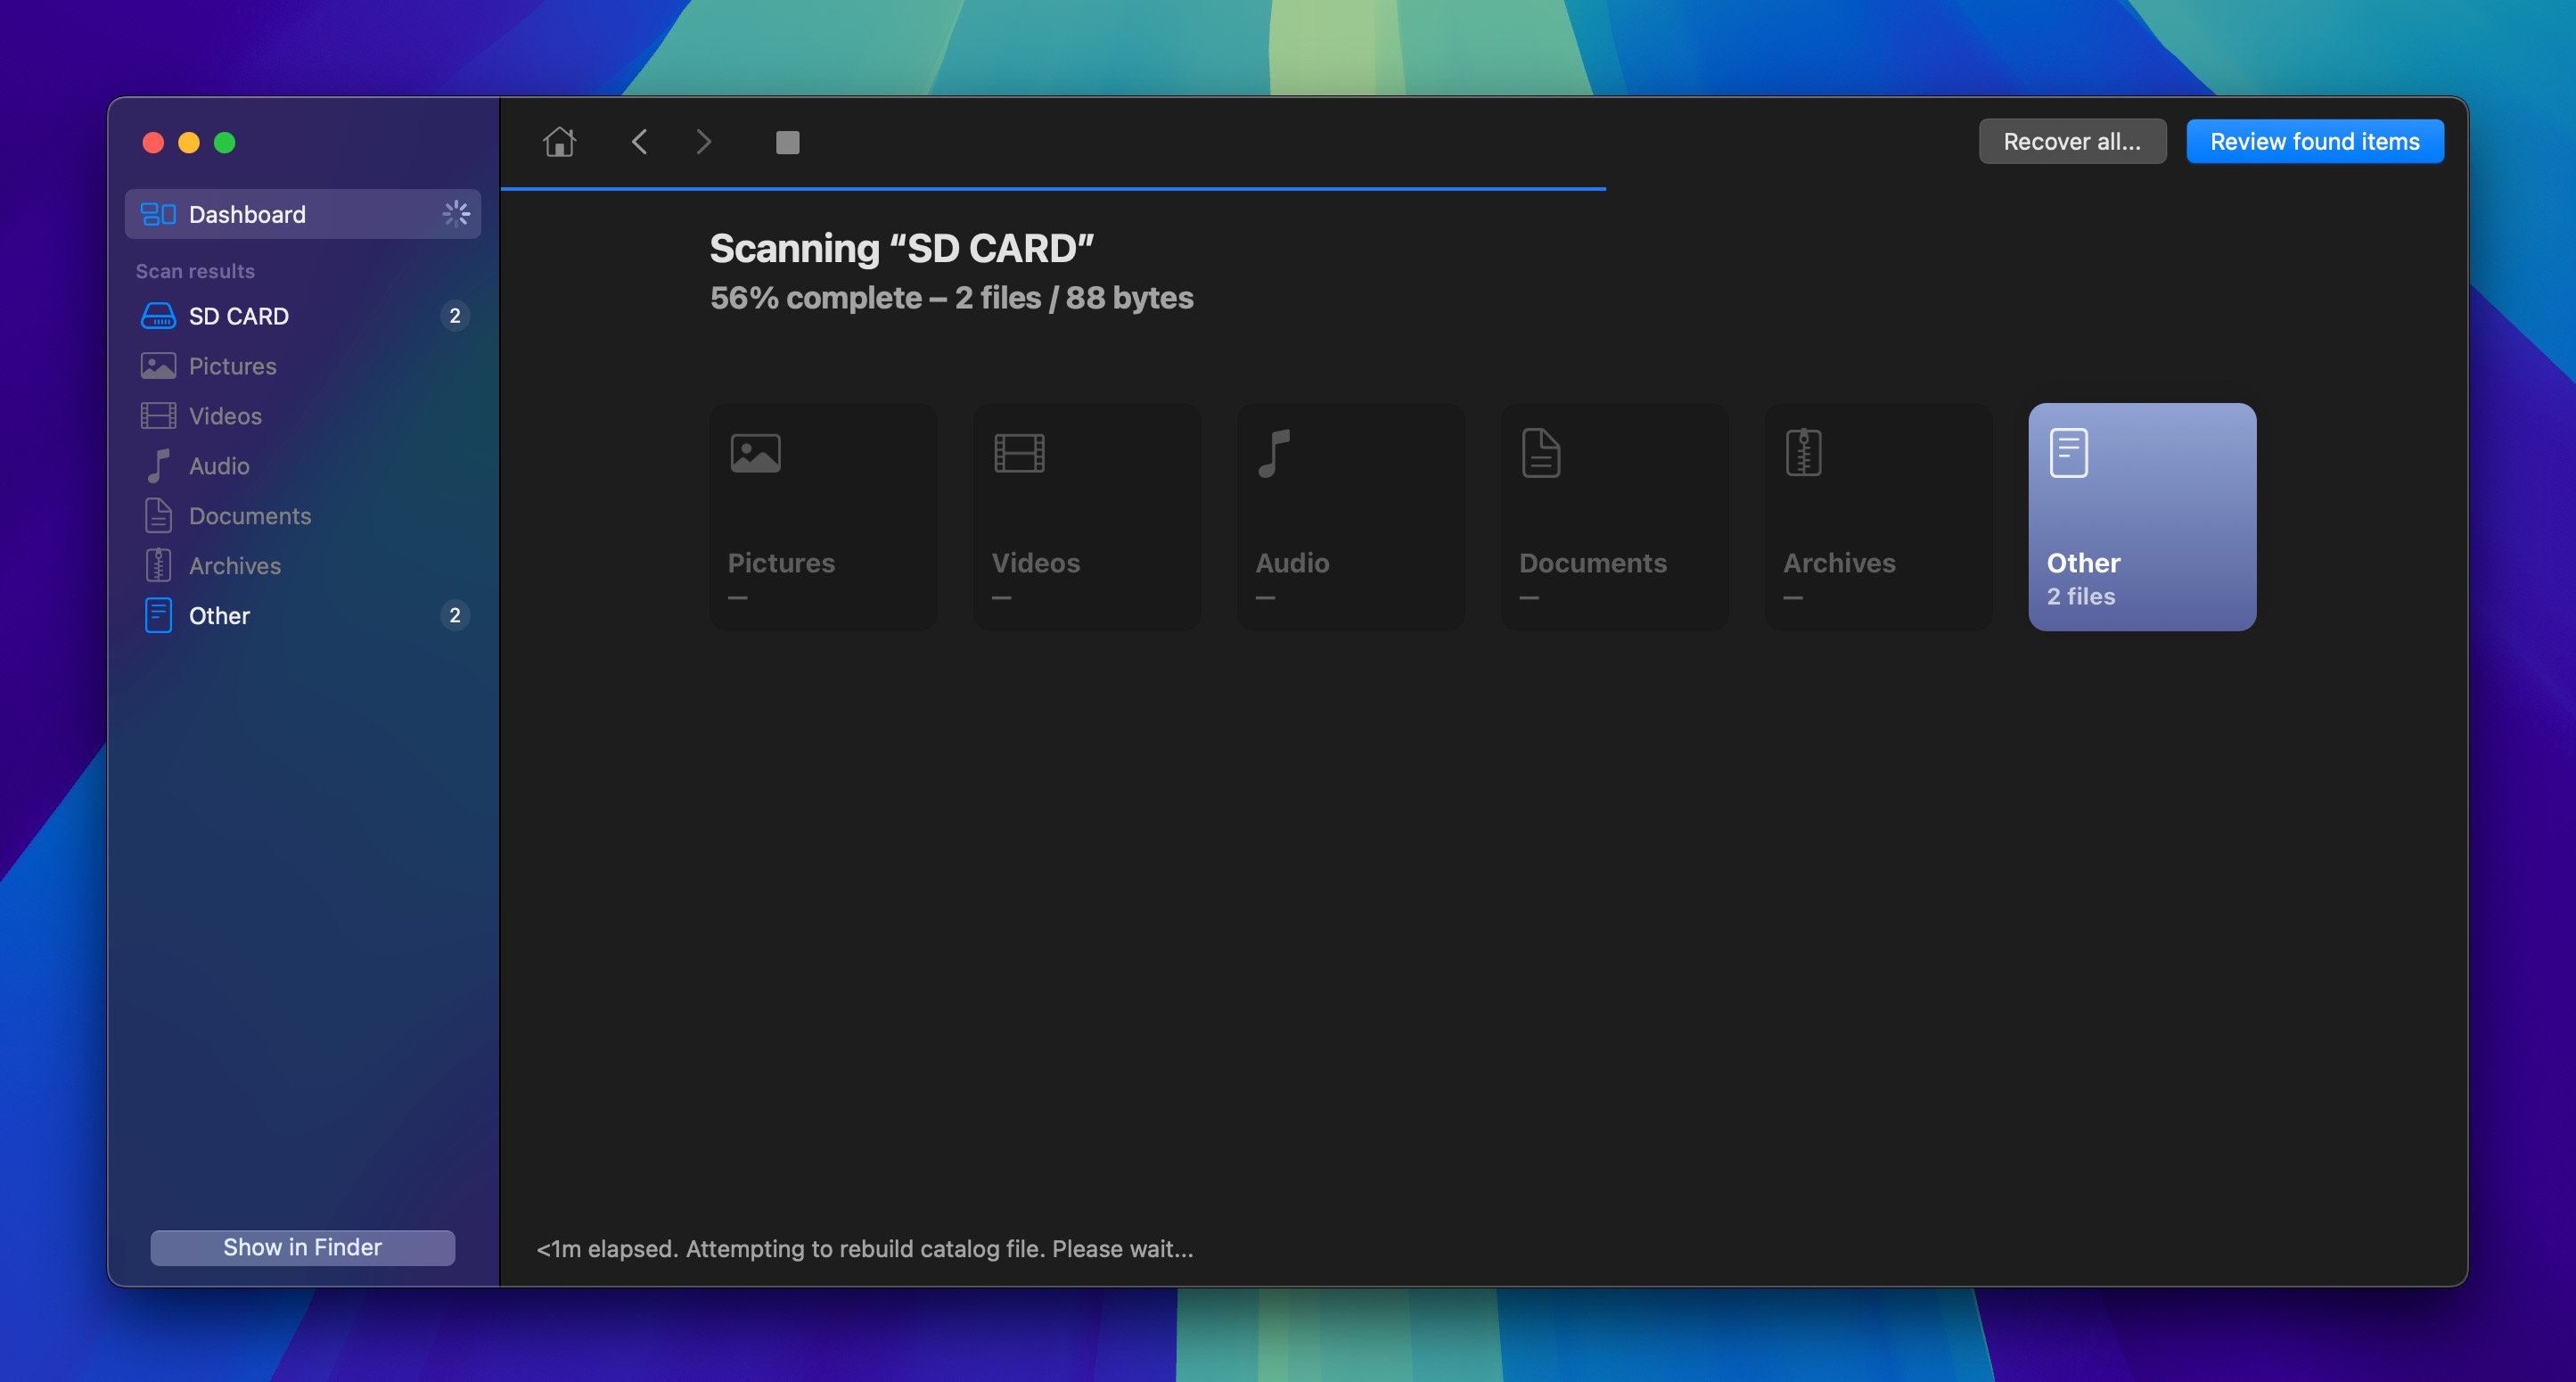
- Be patient during scanning. Larger cards and those with more extensive damage take longer to scan. You can click Review found items at any point to check what’s been found, but letting the scan complete will yield the most comprehensive results.
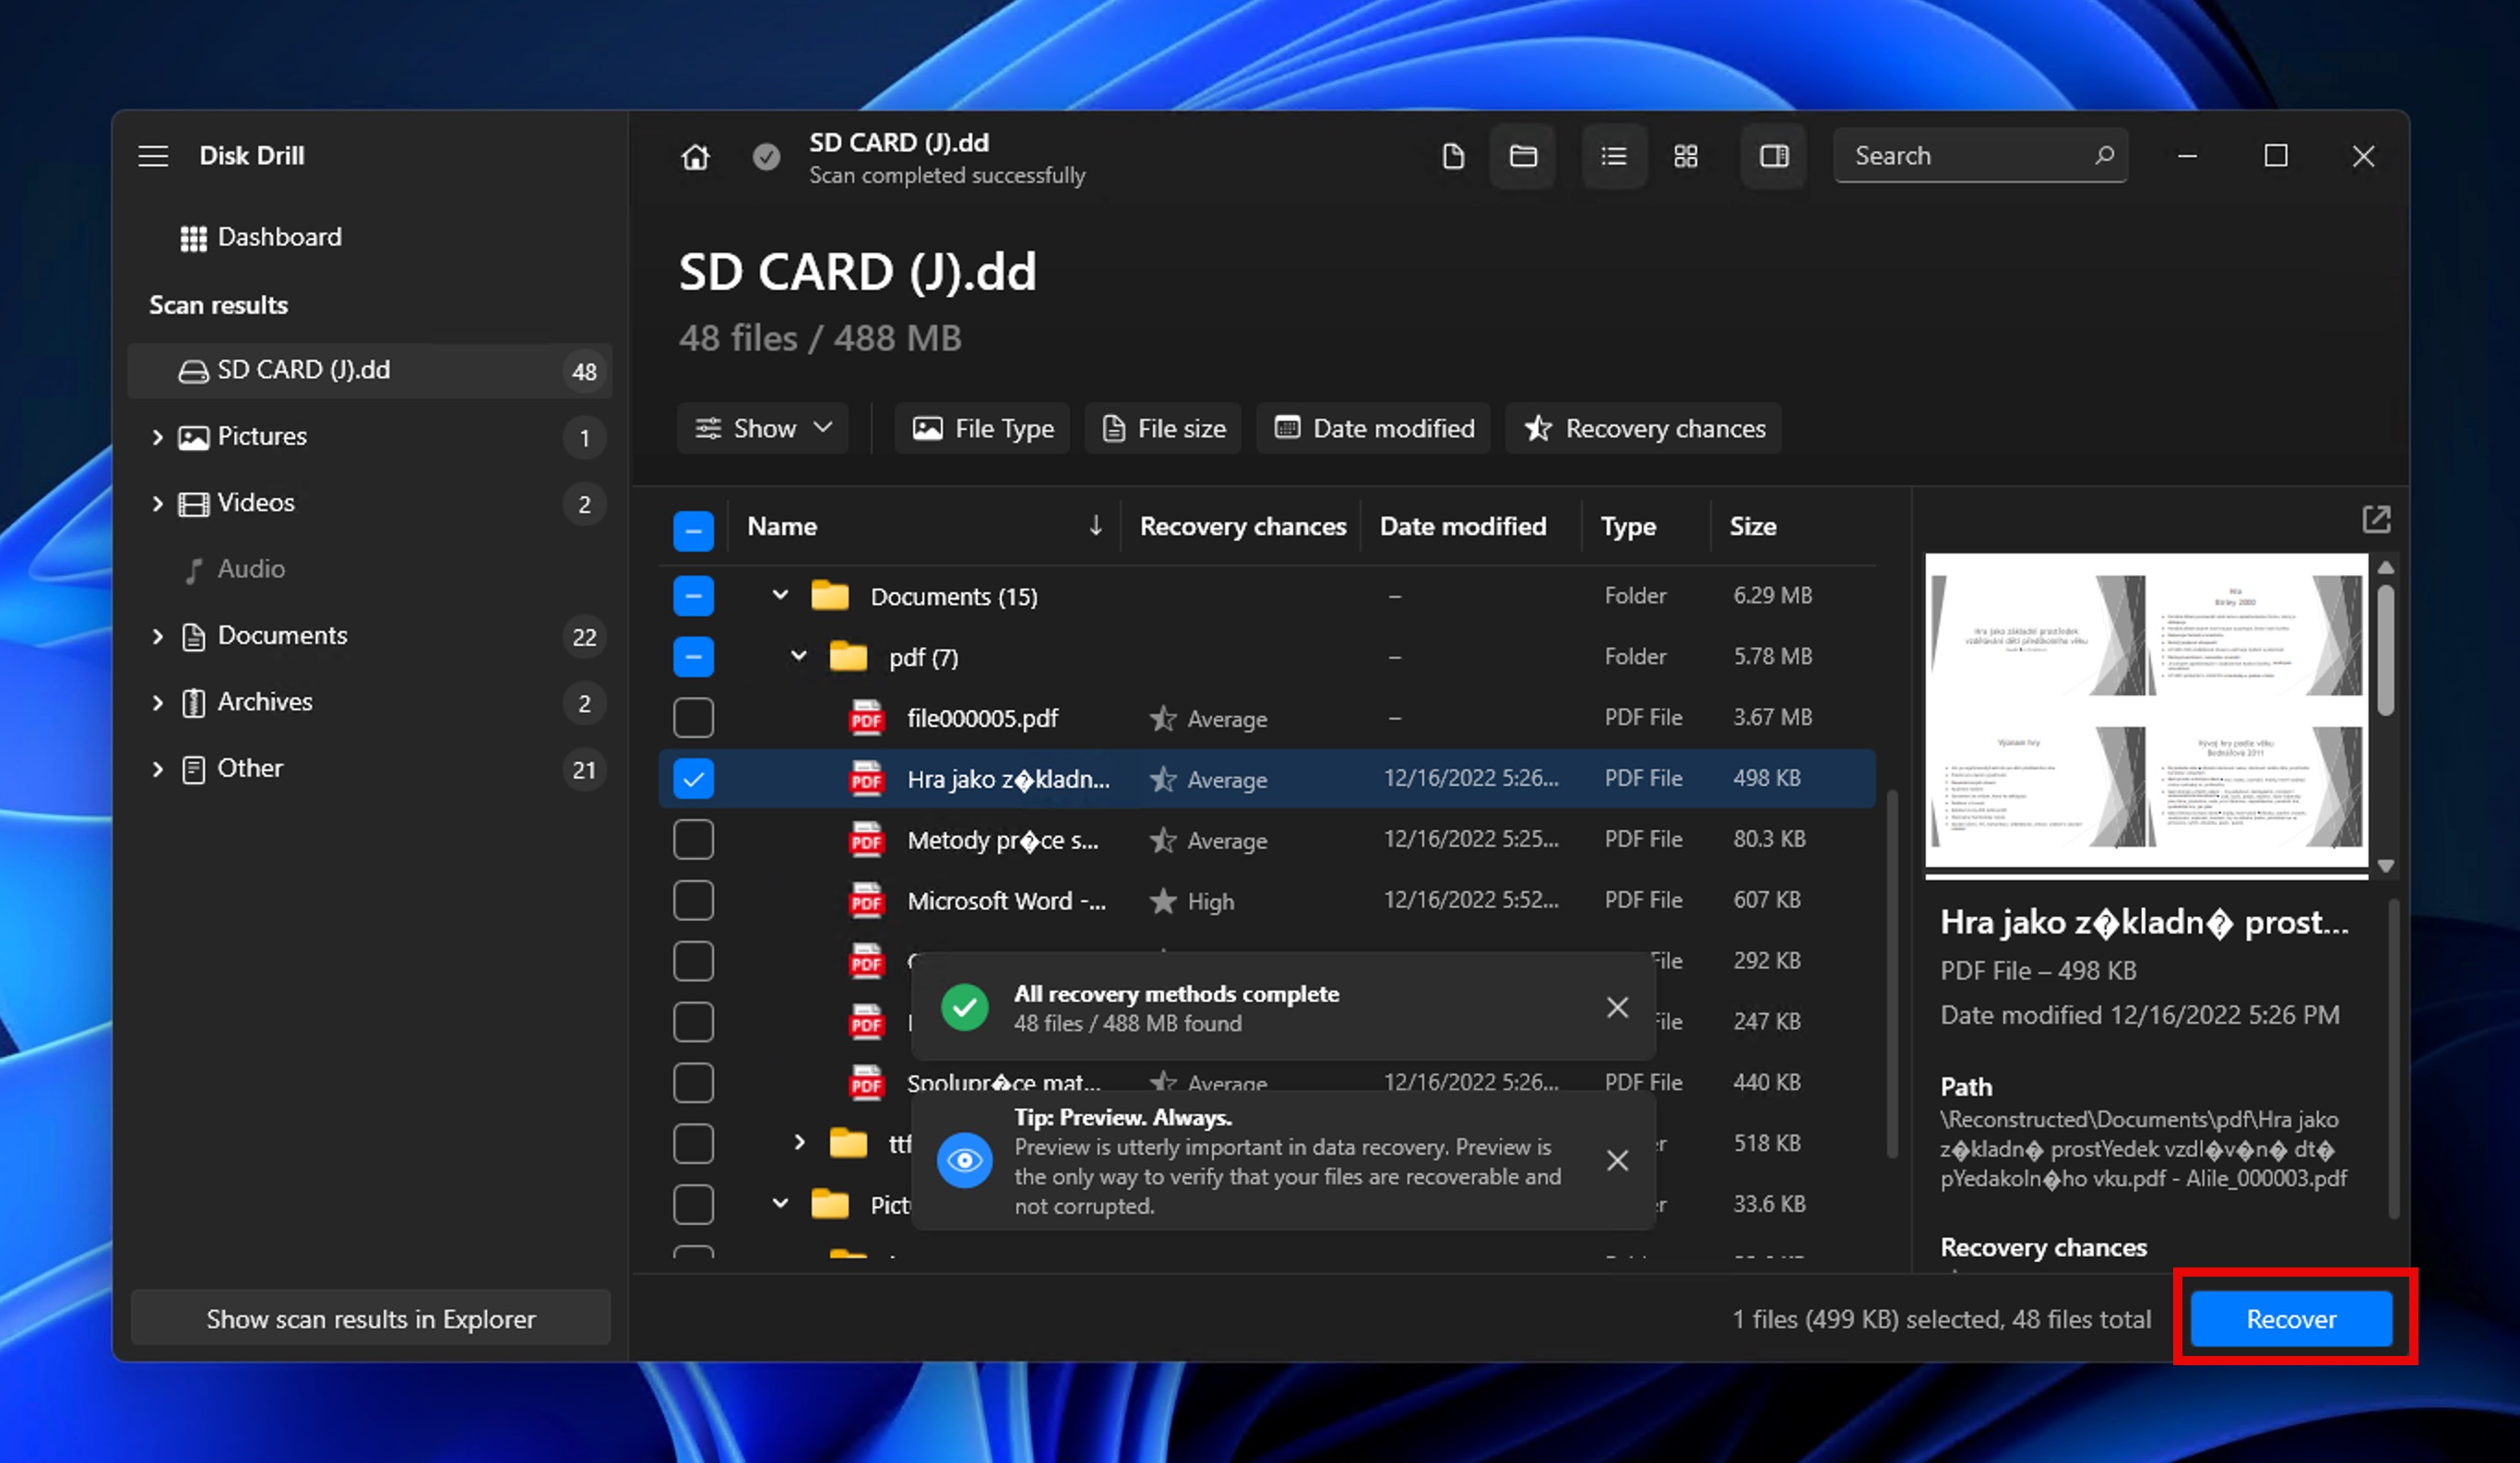
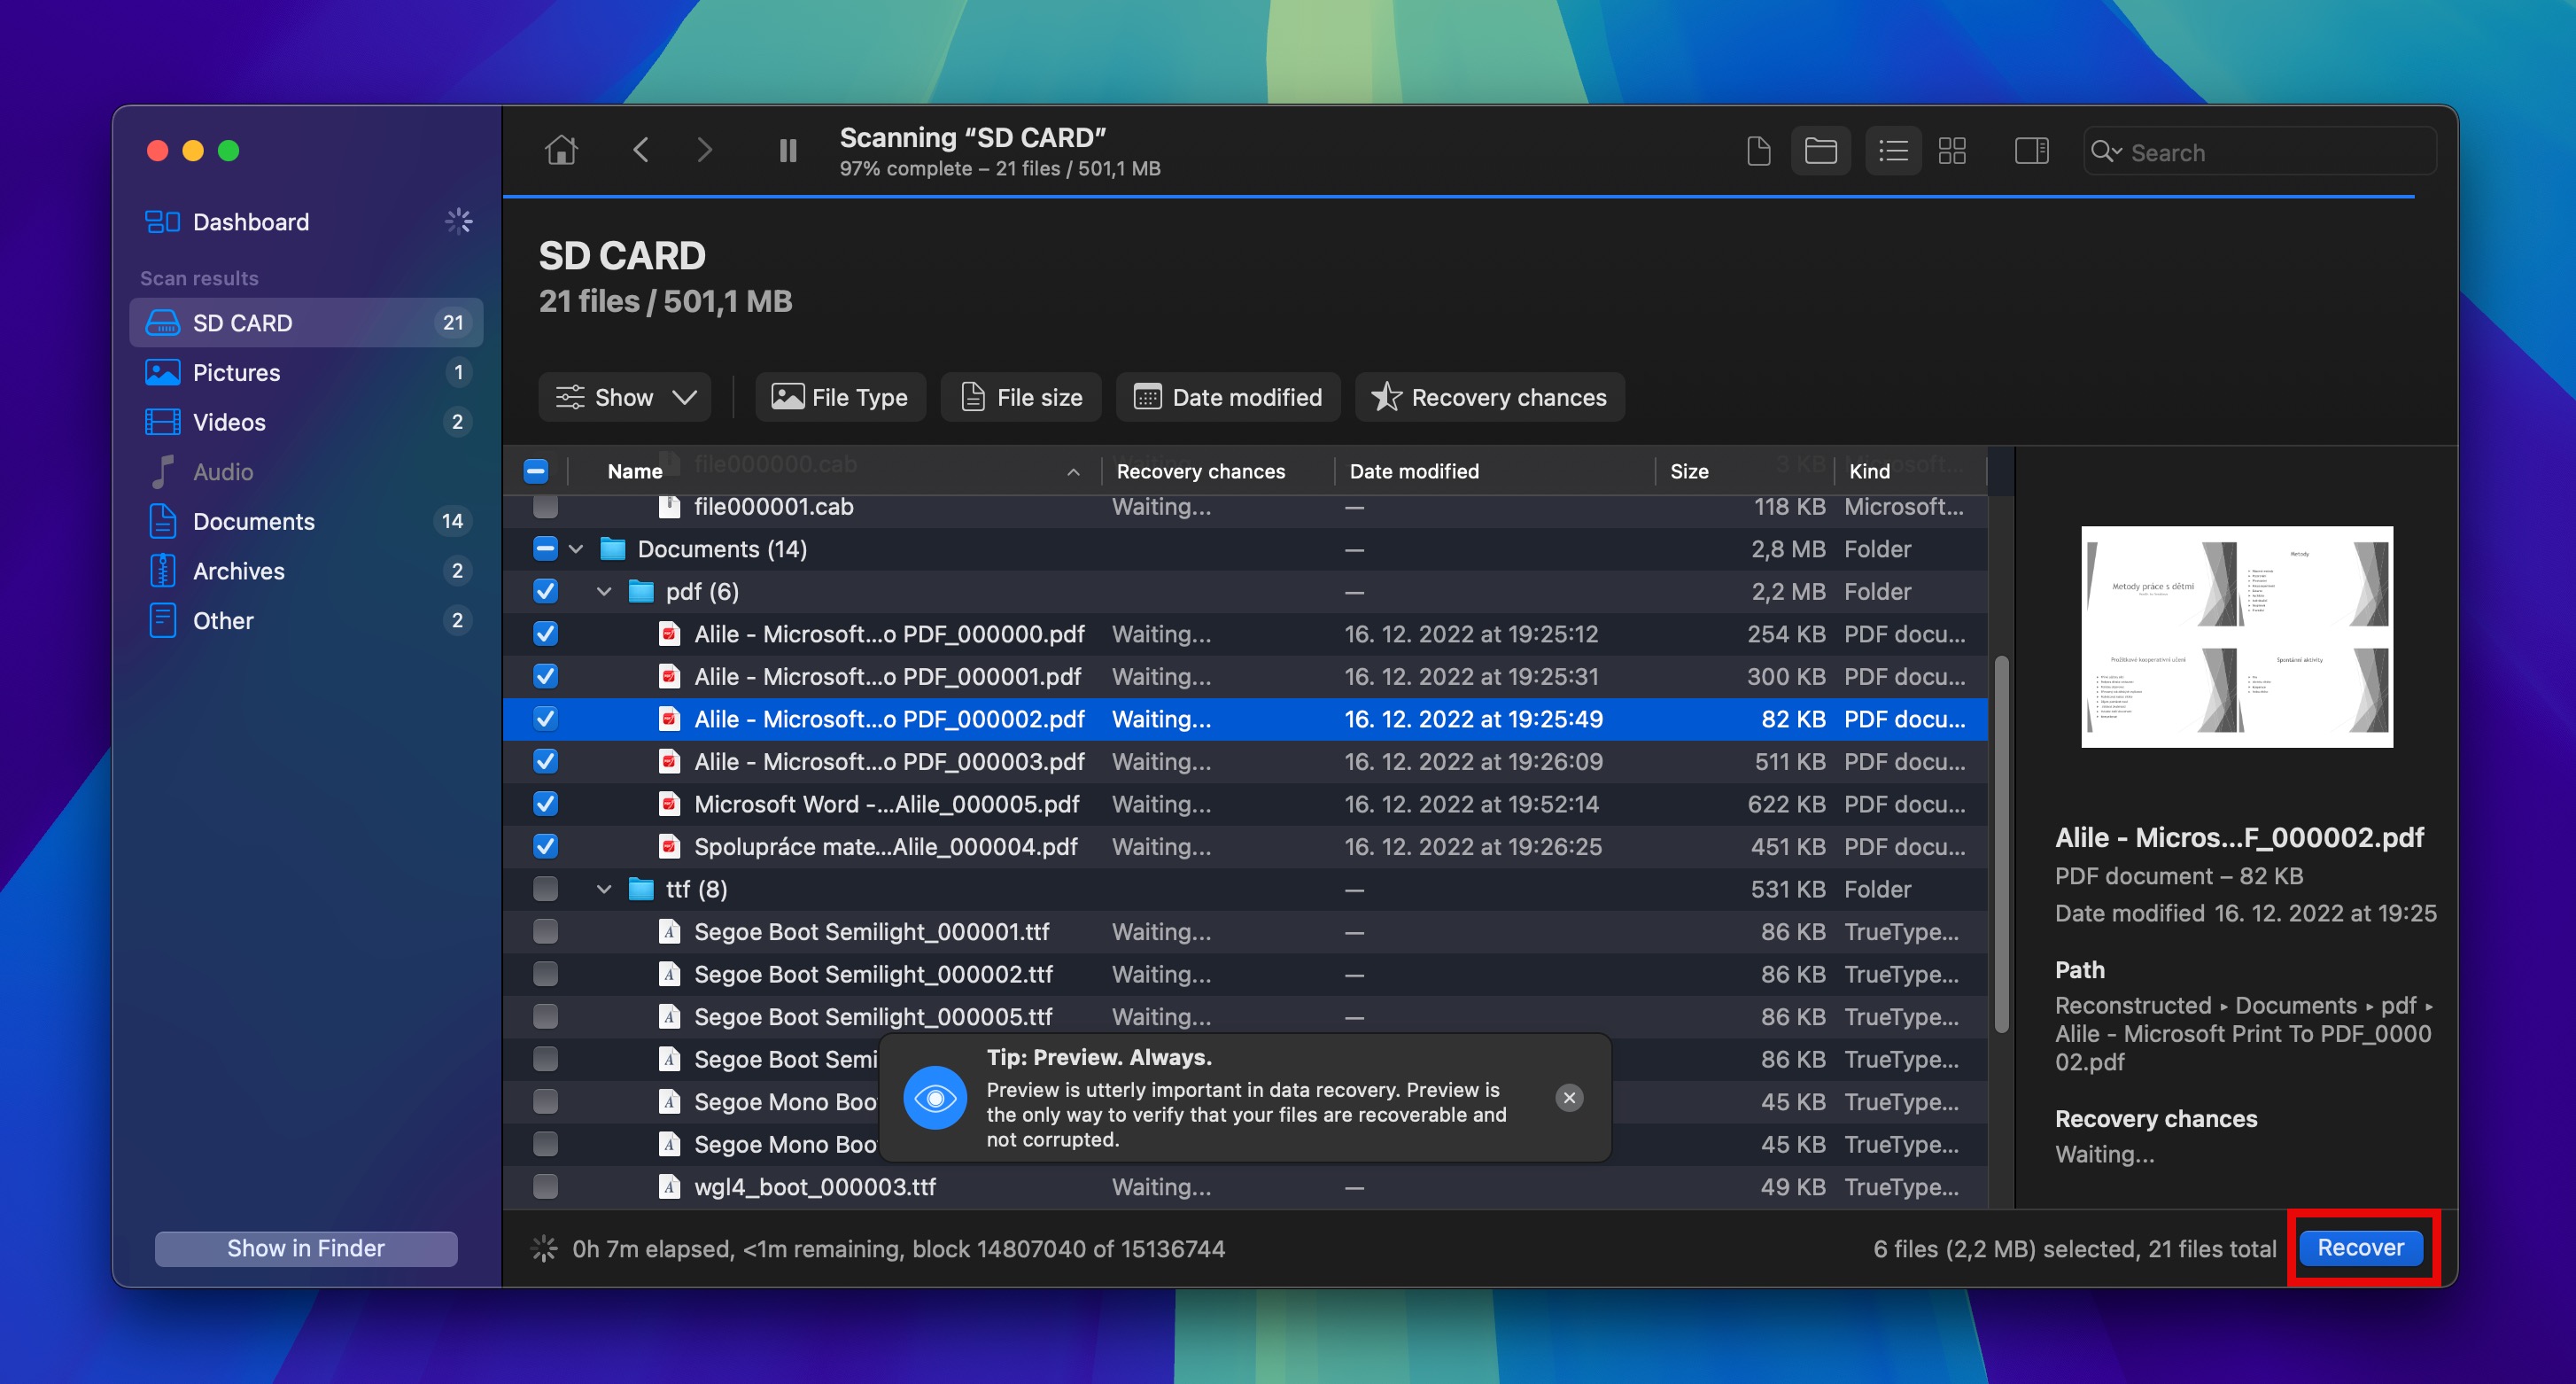
- Place checkmarks next to the files you want to recover. For photos and videos, use the preview feature to confirm file integrity before recovery.
- Click the blue Recover button, then select a destination folder for your recovered files. Always save recovered files to a different drive than the source SD card to avoid overwriting data during recovery.
- When the process is completed, Disk Drill will display a summary of recovered files. Navigate to your destination folder to access your rescued data.
After that, you can proceed to unlocking and reformatting your SD card to start anew.
If, however, that doesn’t work, there are other ways that can help you get your data back from a problematic or corrupted SD card.
Save Your Locked SD Card Files on a Mac
Mac users dealing with locked SD cards have the same backup options we discussed for Windows, but with macOS-specific tools and interfaces:
- Standard Finder transfer: Like Windows Explorer, macOS Finder only sees and copies visible files, so it might miss important data if your card has corruption issues.
- Complete byte-to-byte backup: Creates a perfect digital duplicate of your entire SD card, including hidden and deleted files.
The good news is that our SD card recovery application of choice, Disk Drill, is also available for macOS:
- Start by connecting your SD card to your Mac.
- Download and install Disk Drill.
- Launch Disk Drill and grant the necessary permissions when prompted (macOS requires explicit permission for apps to access storage devices).
- At this point, you can either select the byte-to-byte-backup tool in the left pane and go through the same steps we described in the previous section, or you can scan the SD card directly. If you choose to scan the SD card directly, then you need to select it in the list of Storage devices and click Search for lost data.
- Wait for the scan to complete. The process duration depends on your card’s capacity and health. For large cards (256 GB+) connected using a slow reader, it might take a while, but Disk Drill shows real-time results as it finds files.
- Go through the scan results and mark all important files for recovery. You can preview the most commonly used multiple file formats, and you can also sort and filter the results in a number of different ways.
- Click the Recover button and choose a recovery destination on your Mac (not on the SD card itself) and let Disk Drill complete the recovery process.
Get Data Back from a Locked SD Card in Android
Android offers excellent flexibility, but it doesn’t provide built-in tools specifically for unlocking SD cards or fixing write protection. As such, you need to use a slightly different approach when your SD card gets locked while being used in an Android device. The exact approach depends on how your SD card is set up:
- Removable Storage: If you use your SD card as external storage (where you store photos, music, etc.), the best approach is to physically remove the card and connect it directly to a computer. Then, you can scan it using data recovery software.
- Adopted Storage: If your card is set up as adopted storage (acting as an extension of your phone’s internal memory) and you experience file access issues, then your best option in a situation like that is to connect your Android device to your computer using a USB cable and attempt to copy your files that way. Connecting it to your computer directly won’t help since the card is encrypted.
Assuming you use your SD card as external storage, the steps you need to follow are fairly straightforward:
- Turn off your Android device.
- Physically remove the SD card from the device and connect it to your computer using an SD card reader or adapter.
- Scan the card using Disk Drill as explained in the previous section and recover all important files.
- Connect the card to your Android device again and format it.
- Copy the recovered files back to the SD card if you want to access them from your Android device while on the move.
Once this is done, monitor the SD card closely and pay special attention to any file access or file transfer errors. If you notice your Android device reporting “SD card is damaged” messages repeatedly, unexpected missing files, or slow performance when accessing the card, it’s a clear sign that your SD card is failing. Don’t risk losing your precious photos and videos; invest in a new card immediately.
Conclusion
As we saw, unlocking your SD card can be as simple as flicking the position of a switch in most cases. However, sometimes you might have to use more drastic measures, more complicated solutions. And if your SD card’s failing, you should always begin by backing up its contents before you try fixing it or fiddling with it in any other way.
Still, your precious content is rarely lost, and usually, you’ll also be able to keep using your locked SD card as if it were new. Sometimes, though, like in the case of videos, you might need to follow a somewhat different path to get them back.
Have you ever dealt with such a problem? How did you solve it? Did you end up buying a new SD card? Did you lose your precious data? We’d love to hear more about your adventures with locked SD cards.
FAQ
You can copy the files on your computer with a file manager. However, for best results (and locating lost files), it’s better to use a file recovery tool like Disk Drill. The process is simple:
- Connect your locked SD card to your computer.
- Download, install, and run Disk Drill. Select your SD card from the list of devices.
- Start an “All recovery methods” scan, and when it completes, click on Review found items.
- Select the files you want to copy, click Recover, and choose where you want to save them.
Slide its small locking switch closer to the SD card’s edge. If that doesn’t work, you can try unlocking it from your computer. For example, on Windows 10:
- Press Windows Key + X and run CMD or PowerShell with Admin privileges.
- Type
diskpartand press Enter. - Input
list diskfollowed by Enter. Note your SD card’s number. - Type
select disk NUMBER_OF_YOUR_SD_CARDand press Enter. - Unlock your card with the command
attributes disk clear readonlyfollowed by Enter.
Try the methods we saw to unlock it. For example, on a Mac:
- Connect your SD card to your Mac.
- Run Disk Utility.
- Select your locked SD card from Disk Utility’s list on the left.
- Click on the First Aid button and follow the on-screen instructions.
- If the card appears read-only, select the card, click Unmount first, and then click Mount again. This remounting process often removes the read-only attribute automatically.
Should the problem occur again, it’s probably time to recycle your SD card and purchase a new one.
All SD cards unlock in the same way: change the position of their locking switch to unlocked. If that doesn’t work, maybe your SD card’s file system was corrupted and, with it, some file access permissions. One way to fix them on a PC running Windows 10 would be:
- Connect your SD card to your PC.
- Find the locked files with a file manager like File Explorer.
- Right-click on them and ensure Read-only is deselected.
- Right-click on your locked SD card and choose Properties. Select Everyone in the Security tab and then, from the list below, change all access options to Allow.
Write protection works on the file system level. However, it also depends on the device you’re using. If it’s a camera or smartphone, look into their options for locking and unlocking your SD card’s contents. Alternatively, plug your SD card into your computer and, on Windows 10:
- Press Windows Key + X and run CMD or PowerShell with Admin privileges.
- Type
diskpartand press Enter. Then, typelist diskand press Enter again. Note your write-protected SD card’s number. - Use
select disk SD_CARD'S_NUMBERfollowed by Enter to choose your SD card. - Type
attributes disk clear readonlyto make it writable again.