Using PDF files is something the vast majority of computer users do, whether they use a Mac or a Windows computer. Mac computers are excellent at helping users manage and update PDF files – but every now and then, you may lose track of one or accidentally delete or lost one. If you do that, you’re probably wondering how to recover PDF files on a Mac.
Thankfully, however, it is absolutely possible to recover deleted, lost or unsaved PDF files from your Mac – and there are a few ways to do it. Some of the tools you can use are built straight into the macOS operating system, while other methods may require extra software, like Disk Drill. Thankfully, all of the methods below are relatively easy.
How to Recover Deleted PDF Files from your Mac
Method 1: How to Recover Deleted PDF Files using Time Machine
One way to recover deleted PDF files is by using tools built directly into the macOS operating system. Time Machine creates a full backup of your entire setup – meaning that if you have lost an important file, you may be able to recover it using Time Machine. It’s important to note that you have to have created a Time Machine in the first place to restore your computer to a backup — so if you haven’t been making Time Machine backups, you’ll need to try the next method instead.
Here’s how to restore a deleted PDF file with a Time Machine backup:
Step 1. Navigate to the folder where the file you lost was located.
Step 2. Open Time Machine and the software should show you a preview of all the saves that it has made.
Step 3. Toggle to previous backups with the arrows next to the window, or using the timeline on the far right of the display.
Step 4. Select the file, and click the “Restore” button under the window.
Step 5. The file will then be moved back to the location that it was previously located.
Method 2: Recover Deleted PDF Files using Mac Data Recovery Software
If you haven’t been using Time Machine, you may need to use other software to find and restore PDF files – like Disk Drill. Disk Drill is thankfully very easy to use and should be able to help you find and restore PDF files with ease.
Steps to recover deleted or lost PDF files on Mac:
Step 1. Download and install Disk Drill for Mac.

Step 2. Open Disk Drill and find the drive that your PDF file was located on. For most users, this will be the drive that’s installed in your computer, likely to be called “Apple SSD,” or something along those lines. We lost a file from an external drive, so we’ll use that instead, but the process is the same no matter what drive you use.
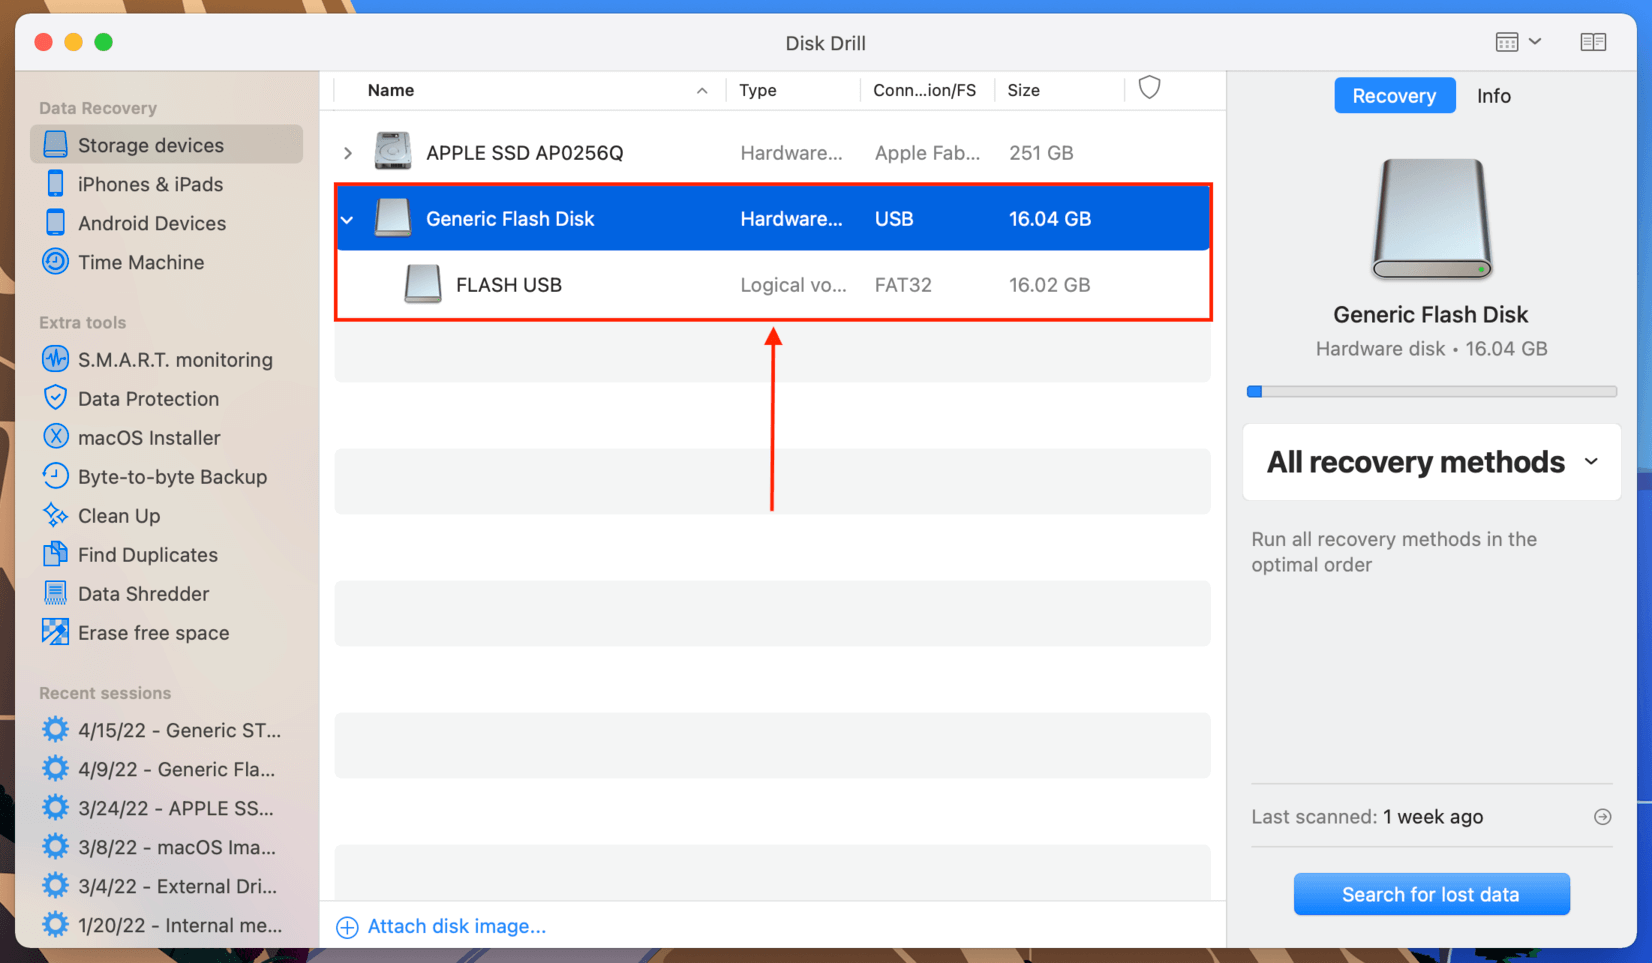
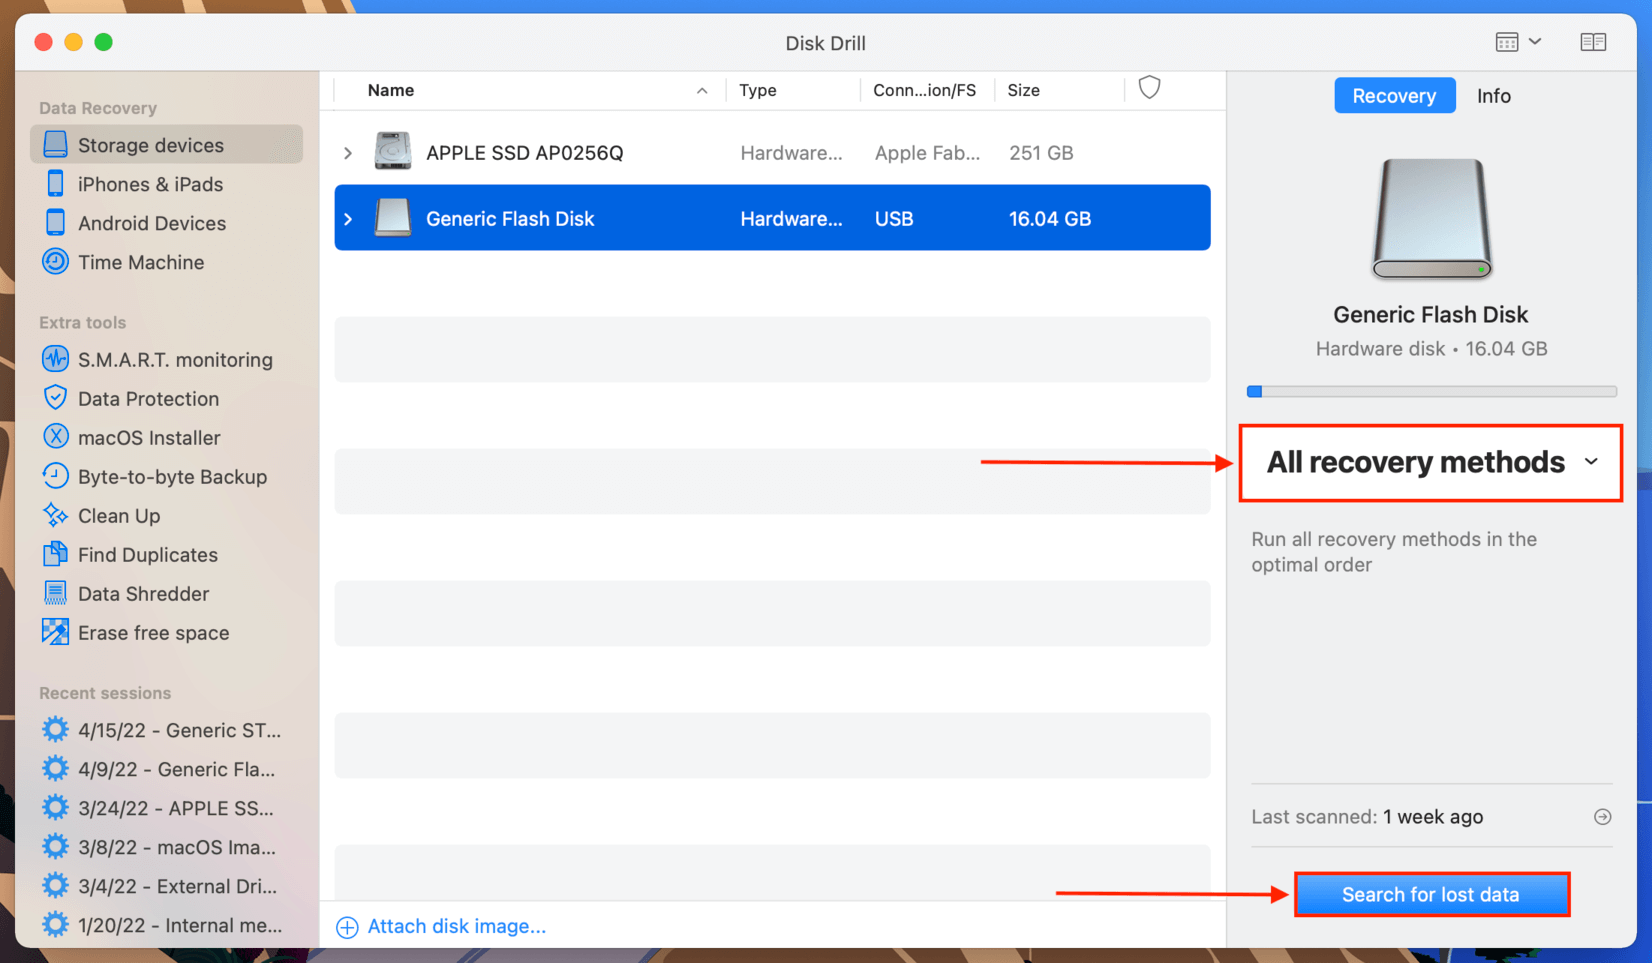
Step 3. Leave scan settings on default for the best results, then click “Search for lost data.”
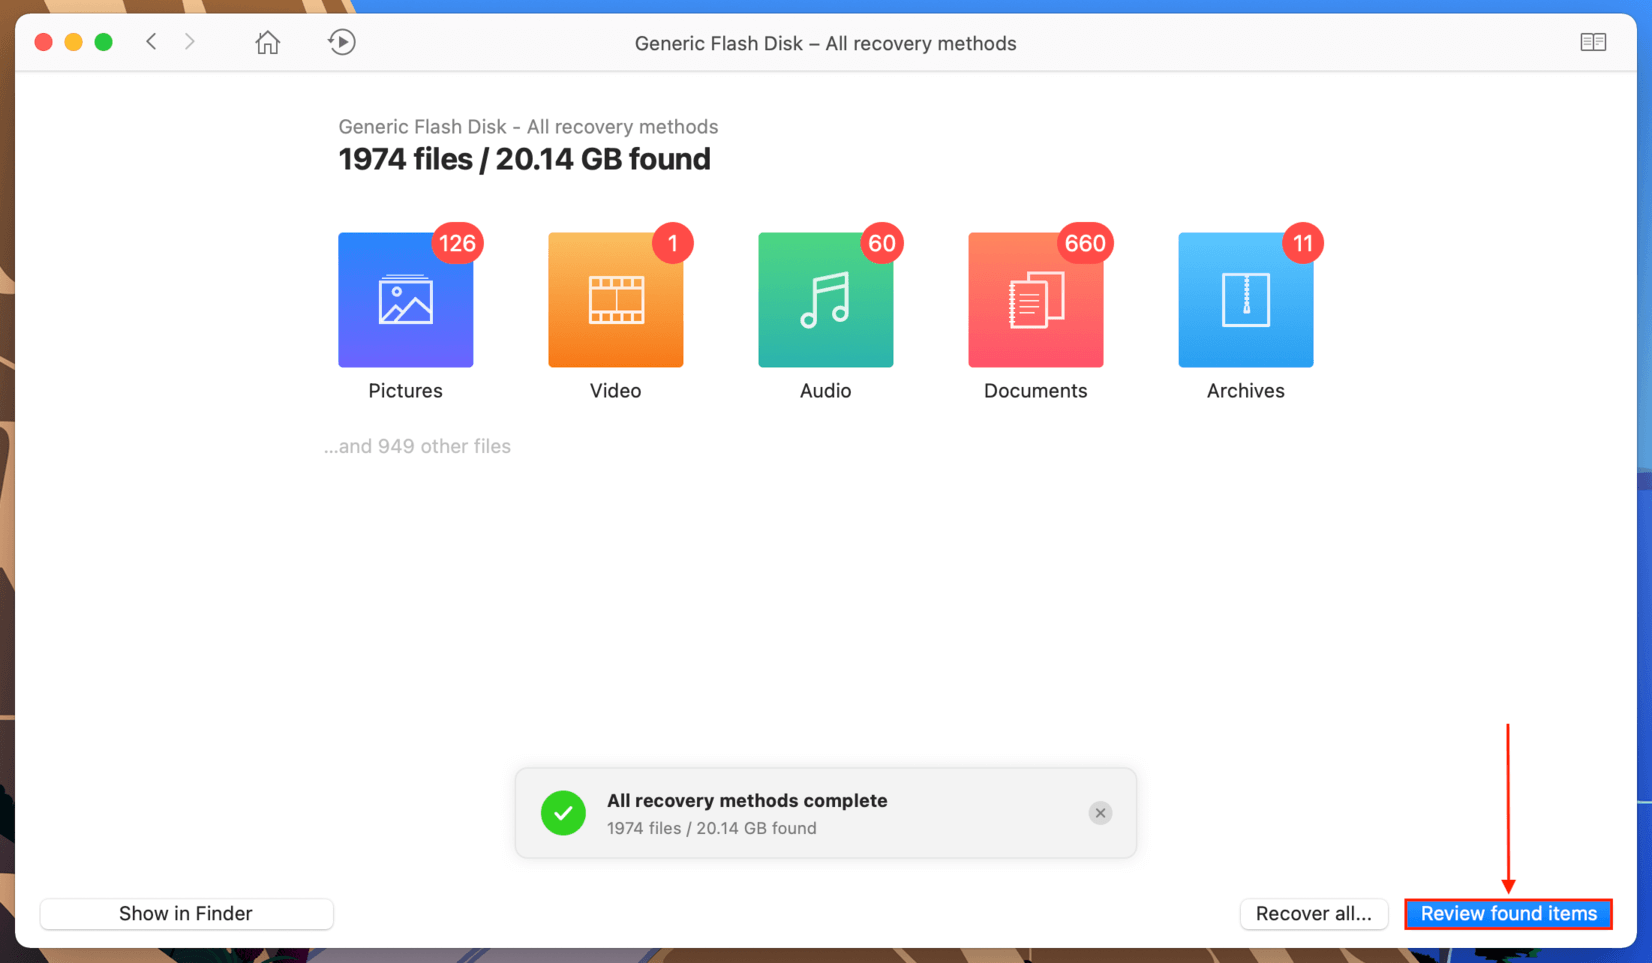
Step 4. Wait for Disk Drill to scan your drive to find deleted files. This process may take a few minutes or hours, depending on how many files it finds. If you’re scanning an external drive, make sure to keep it plugged in and connected, and either way make sure to keep your computer on during the process. Once the scanning process is complete, click “Review found items.”
Step 5. Disk Drill may have found lots of files — but thankfully you can narrow down the selection a little. Use the search bar to add more details to your search, or use the sidebar on the left to browse by file type. Since we’re trying to restore a pdf, put .pdf in the search bar.
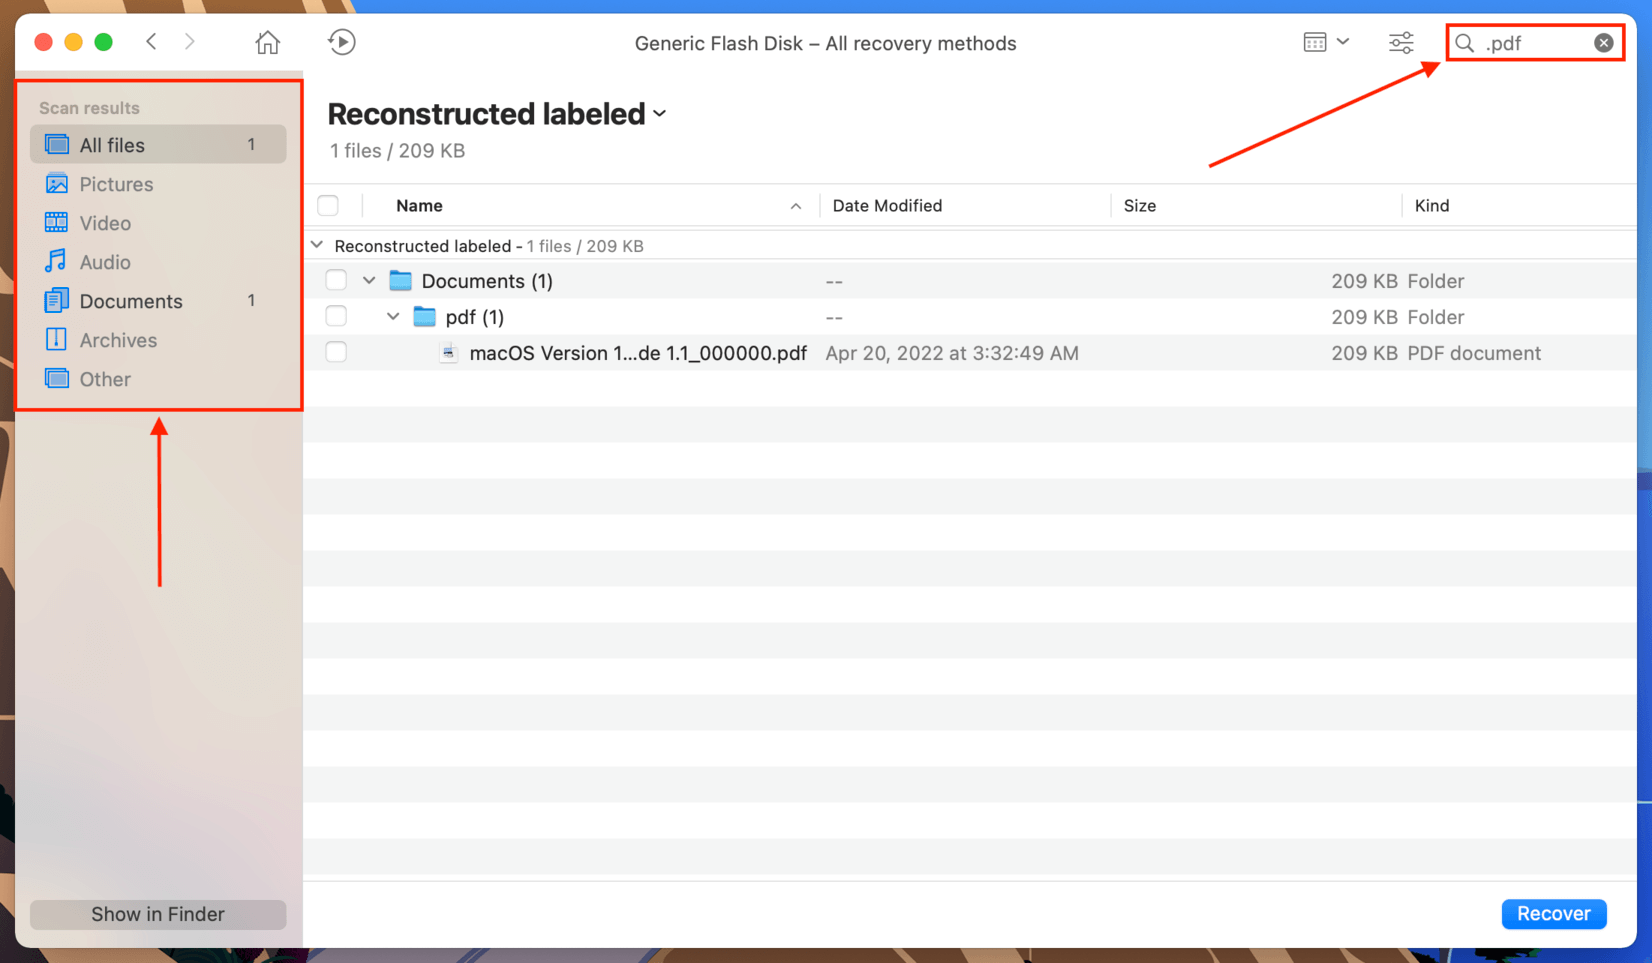
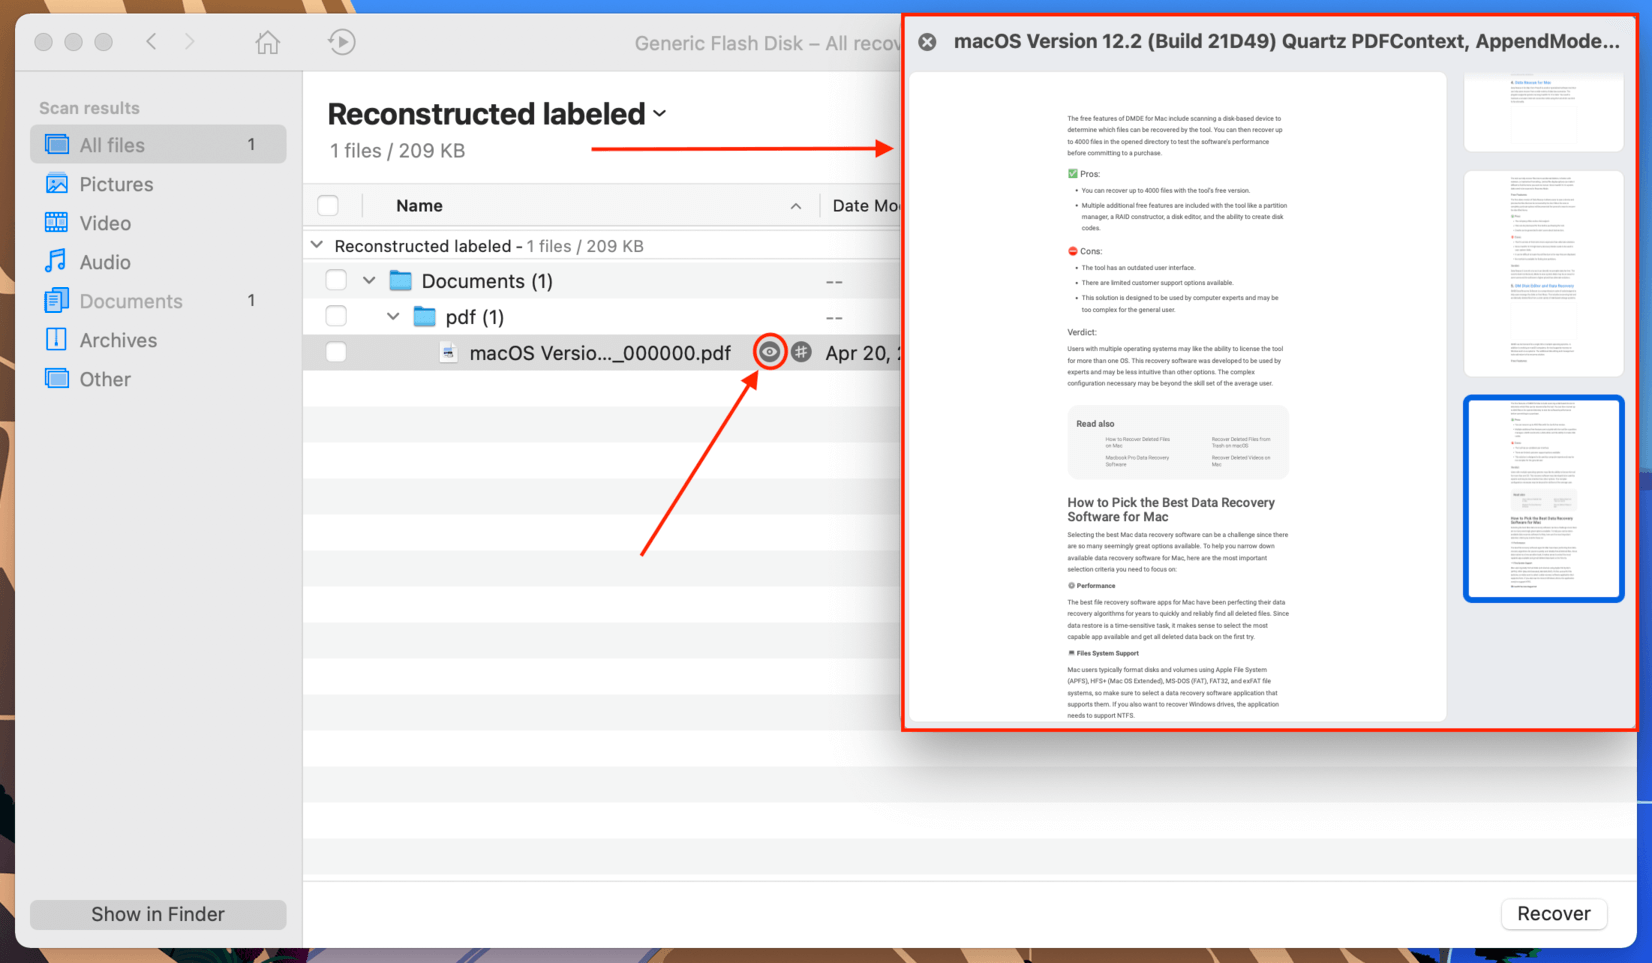
Step 6. You can double-check that you’ve found the correct file by pressing the eyeball “preview” button next to the file. Just hover your mouse pointer to the right of each file name for it to appear.
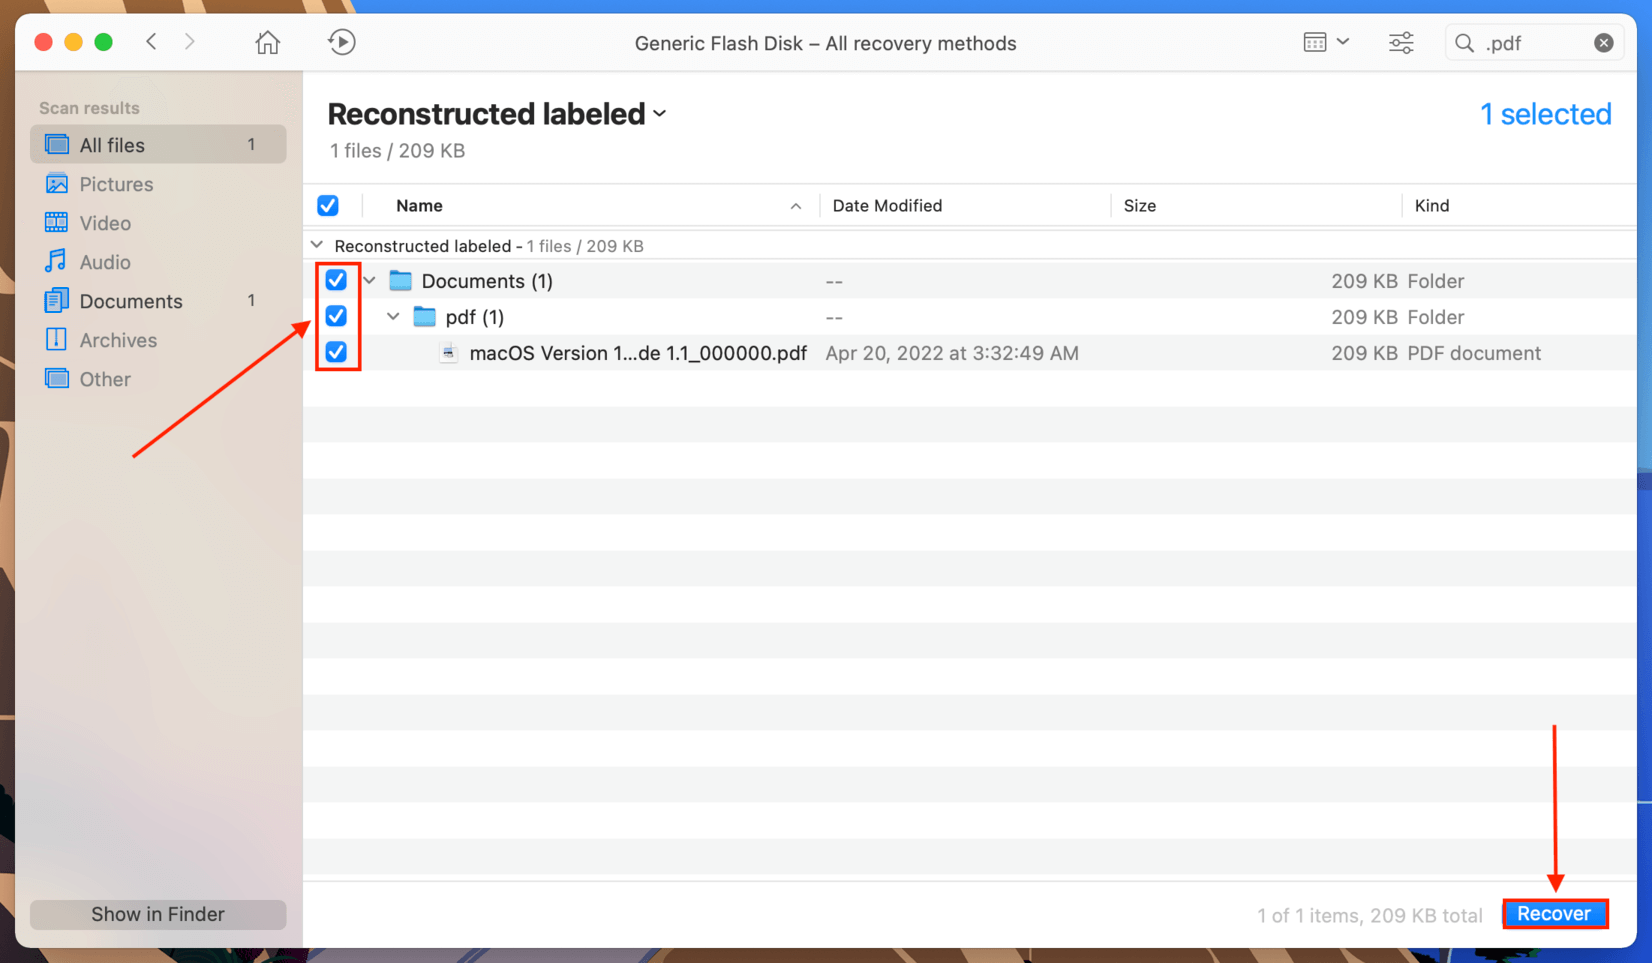
Step 7. If you found the file, tick the box next to it to select it. Once you’ve selected the files you want to restore, click the “Recover” button in the bottom-right corner of the window.
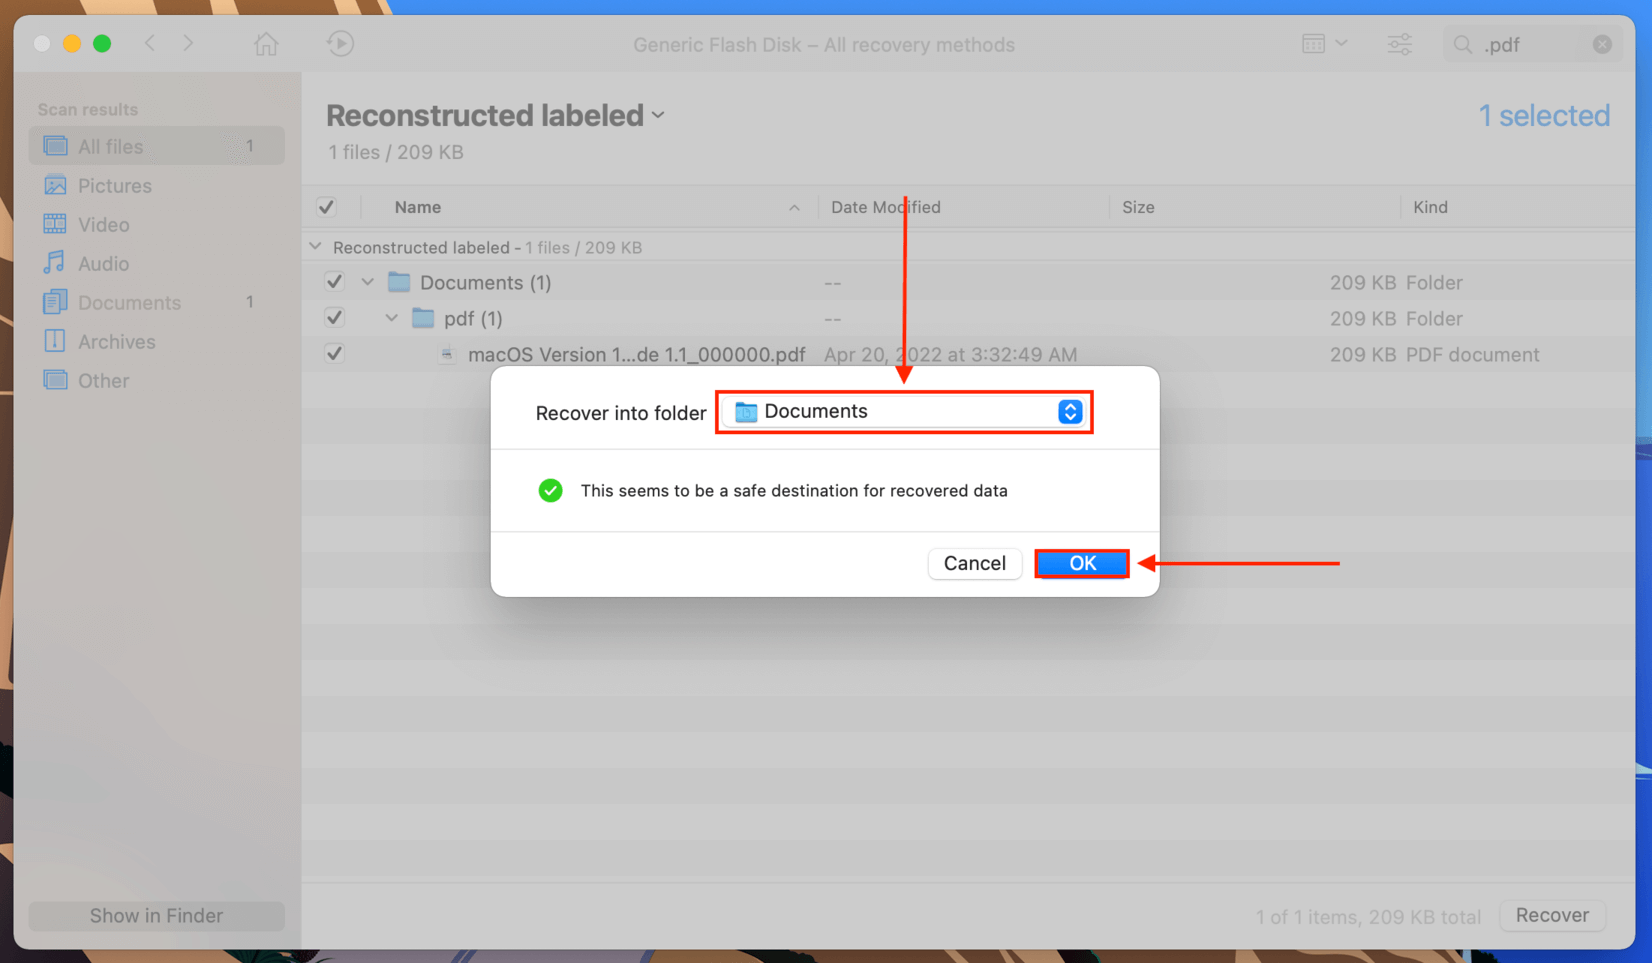
Step 8. Finally, use the dropdown bar to select a location where you want Disk Drill to save the recovered files. Then, hit “OK.”
Method 3: Restore Your PDF File From iCloud
iCloud is Apple’s cloud backup and sync utility. It’s great for productivity, but can be panic-inducing if you don’t realize that it also has the ability to rearrange files to preserve local storage space. Depending on your settings, iCloud will actually delete files from local folders but keep them in the cloud. This could have happened to your PDF. Here’s how to get it back:
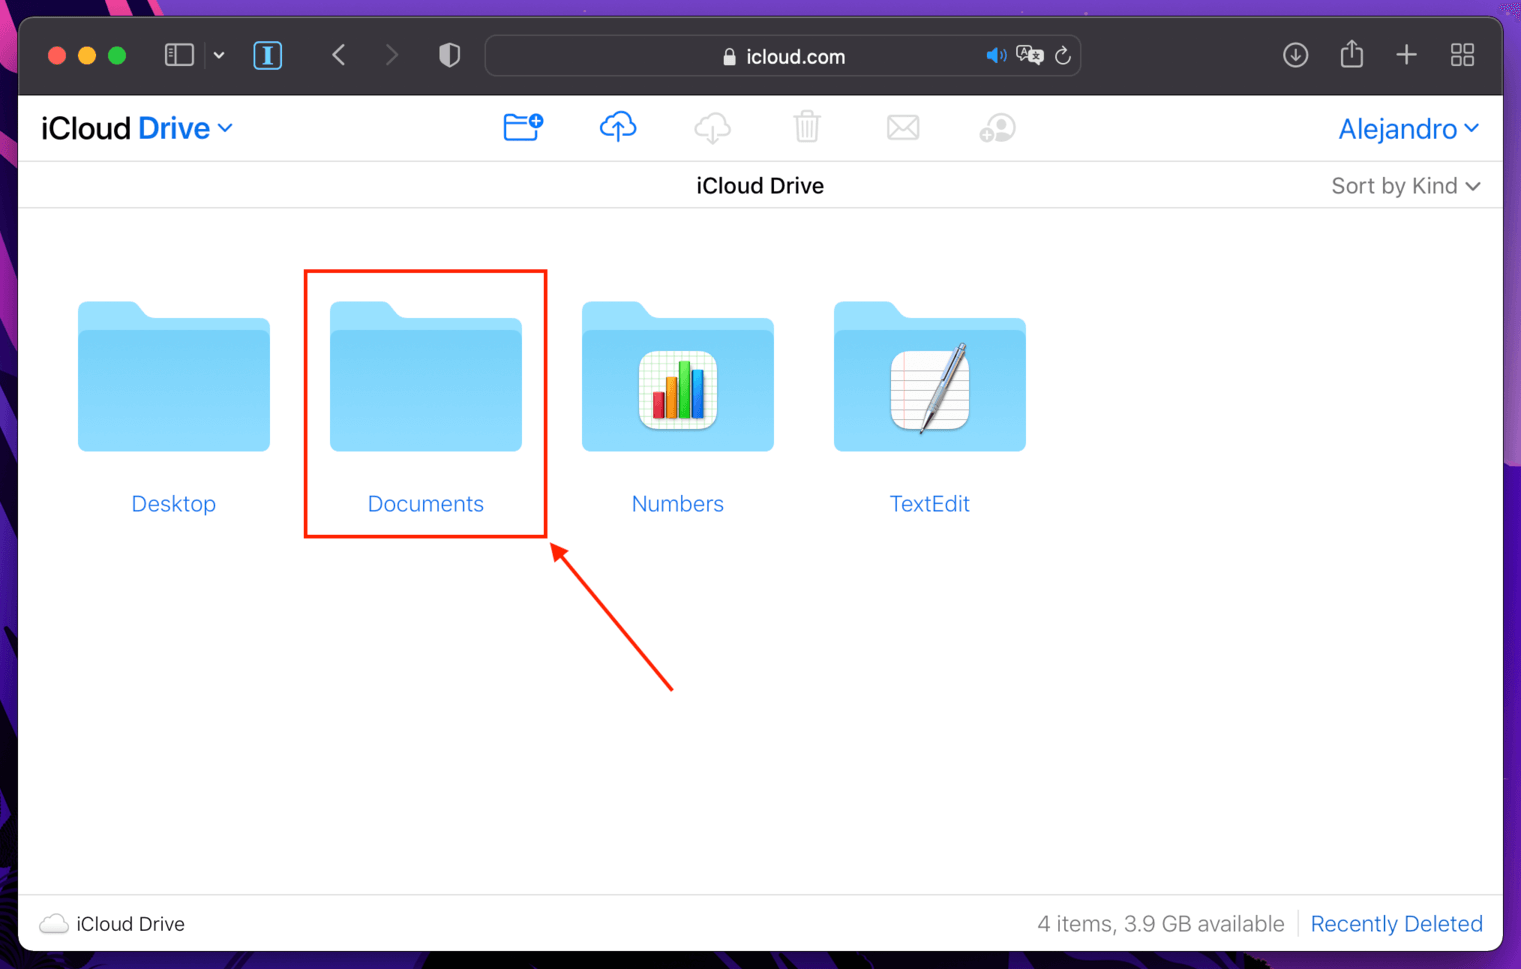
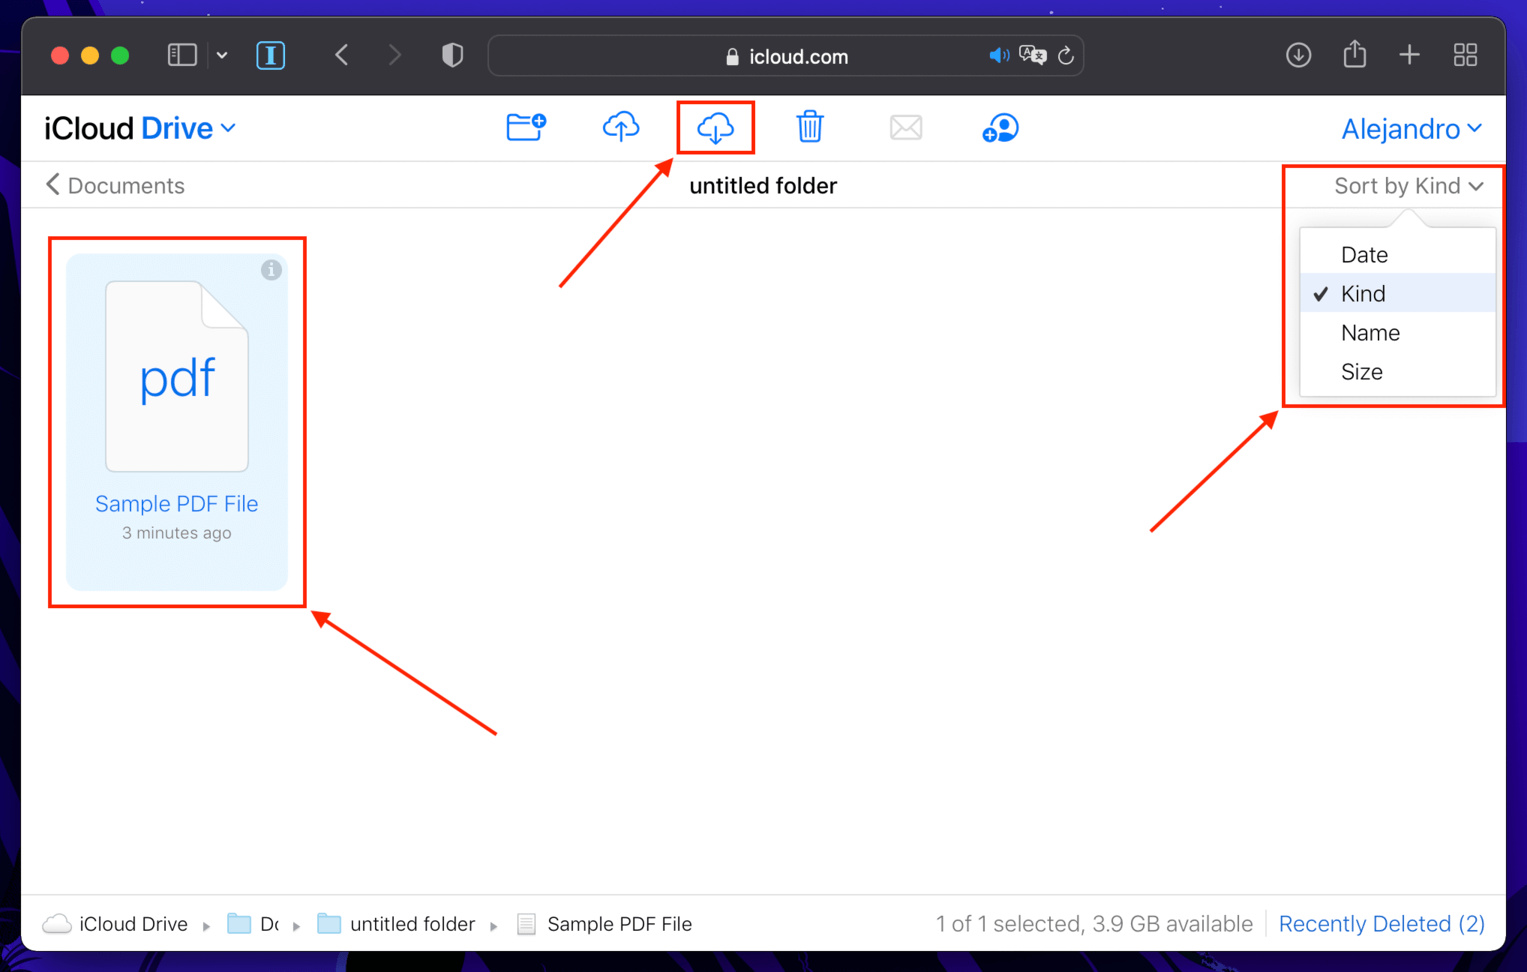
Step 1. On your browser, go to iCloud.com and login.
Step 2. Select “iCloud Drive.”

Step 3. Click on the “Documents” folder (or “Desktop” if you’re a barbarian) and locate your PDF file.
Step 4. Click on the file you want to recover, then click the download button on the top of the window. You can use the “Sort by” button on the top-right corner of the window to group PDF files together (so you can find your file easier).
How to Fix a Corrupted PDF File after Recovery
At times, after you recover a PDF file you may find that the file is “corrupted,” which essentially means that your computer probably can’t open it properly. Thankfully, there are ways to fix corrupted PDF files, and doing so is relatively easy. There are tools that you can download straight to your Mac, or online tools that you can upload your PDF to.
If you’re happy to download a tool to fix a corrupt PDF, then it’s worth checking out PDF2Go. PPDF2Go repair tool can be downloaded straight to your Mac, after which you can use the tool to repair corrupted PDF files. Keep in mind that some files may be too corrupted to repair properly.
Alternatively, you can simply use an online tool like Sejda PDF Online. This tool allows you to upload your PDF files to Sejda’s website, and then download the fixed PDF back to your computer.
How to Recover Unsaved PDF Files on Mac
If you forgot to save your PDF on your Mac, you should be covered too. On a Mac, the main way that you’ll interact with PDF files is through the Mac Preview app, which allows you to open PDF files, edit editable files, sign files, and so on. If you forgot to save your PDF, follow the instructions below to recover the file.
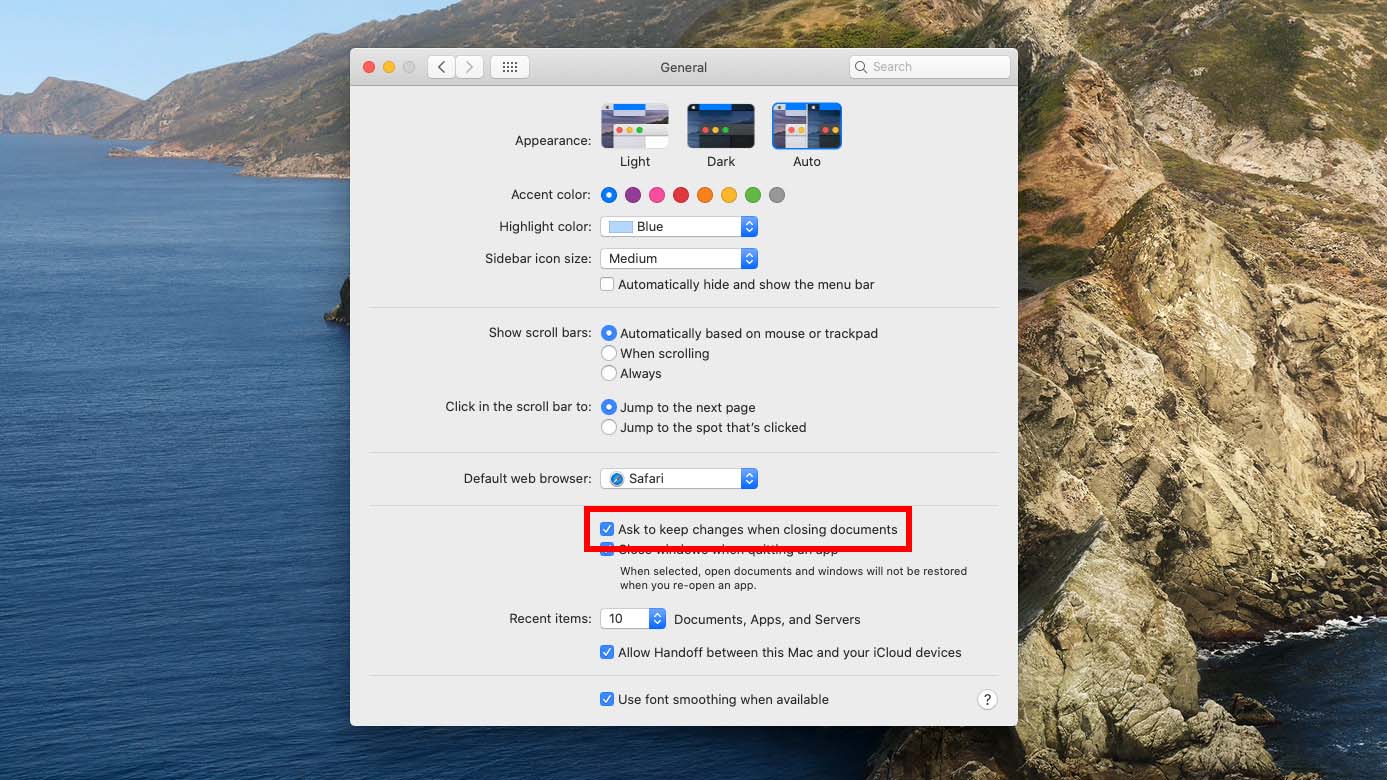
Step 1. By default, Mac computers have an autosave feature turned on for Apple apps. To make sure this feature is turned on, press the Apple button on the top left-hand corner, then tap System Preferences. Tap the General button, then tick “Ask to keep changes when closing documents.”
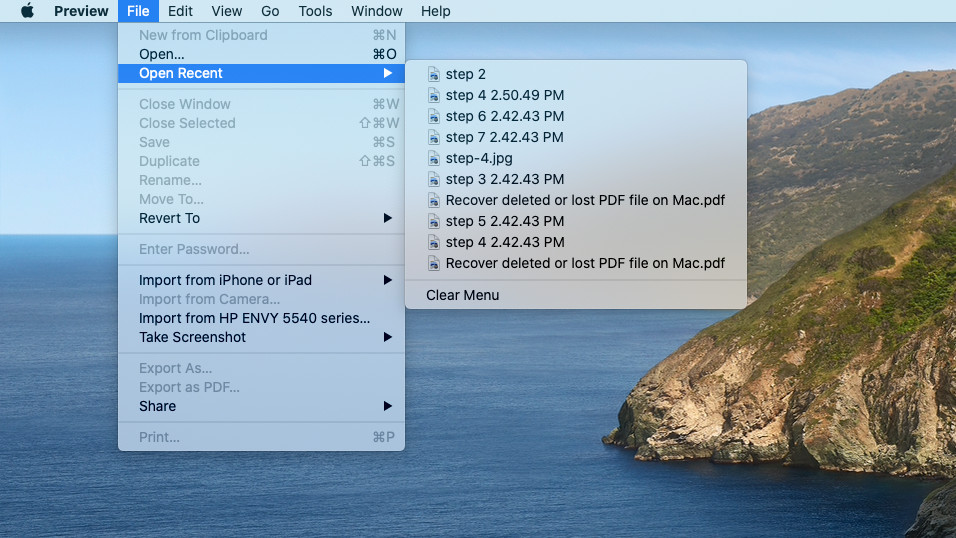
Step 2. Open the “Preview” app.
Step 3. Tap File on the top menu bar, then hover over the “Open recent” button.
Step 4. On the list of PDFs that open, check to see if the one that wasn’t saved is available.
If you can find your lost PDF on the list, then you’re in luck! If not, however, you may have to dig a little deeper in your Mac’s temporary files.
Follow the instruction below to recover an unsaved PDF file:
- Open the Terminal application.
- Type “open $TMPDIR” into the Terminal window, without the quotation marks, and press return.
- Look for your PDF file among the folders that open. You may have a number of folders and files to dig through.
How to Repair a PDF File on a Mac
Repairing a PDF file on a Mac can be handled in different ways. There are tools that attempt to directly fix the file and methods that work around the problem – such as restoring a PDF to previous versions. Let’s explore all the solutions below.
Fix #1: Restore a previous version of your PDF.
Step 1. You may be able to restore a version of your PDF where it was still fully intact. Many apps on Mac allow users to easily do this. Here’s how:
Step 2. Open the file.
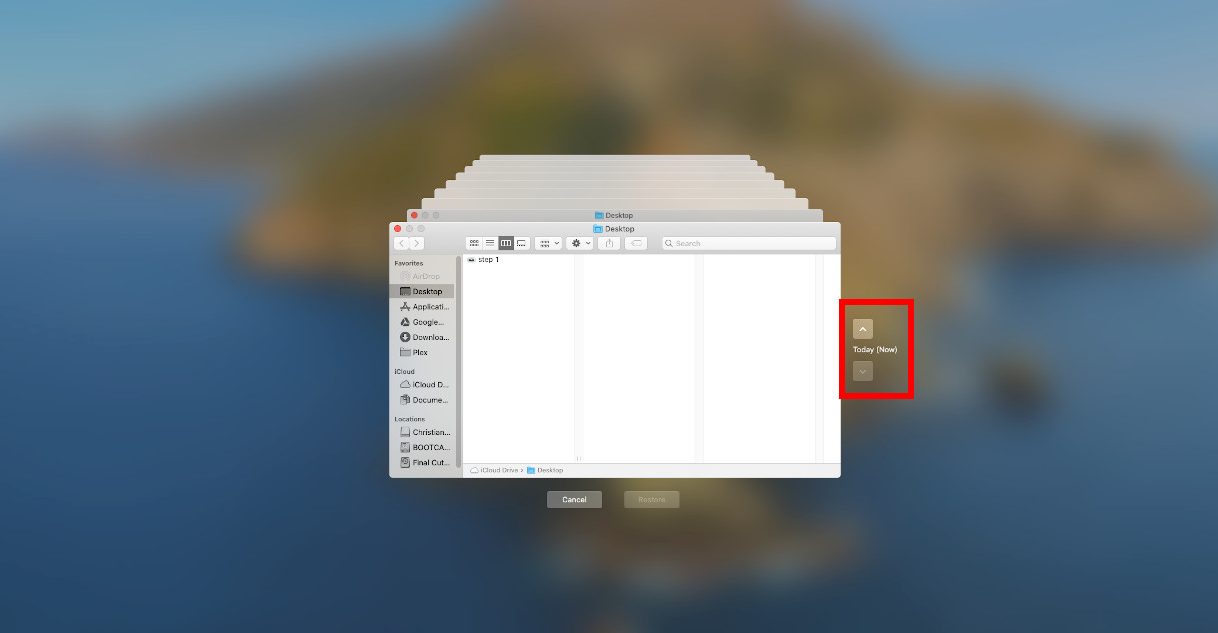
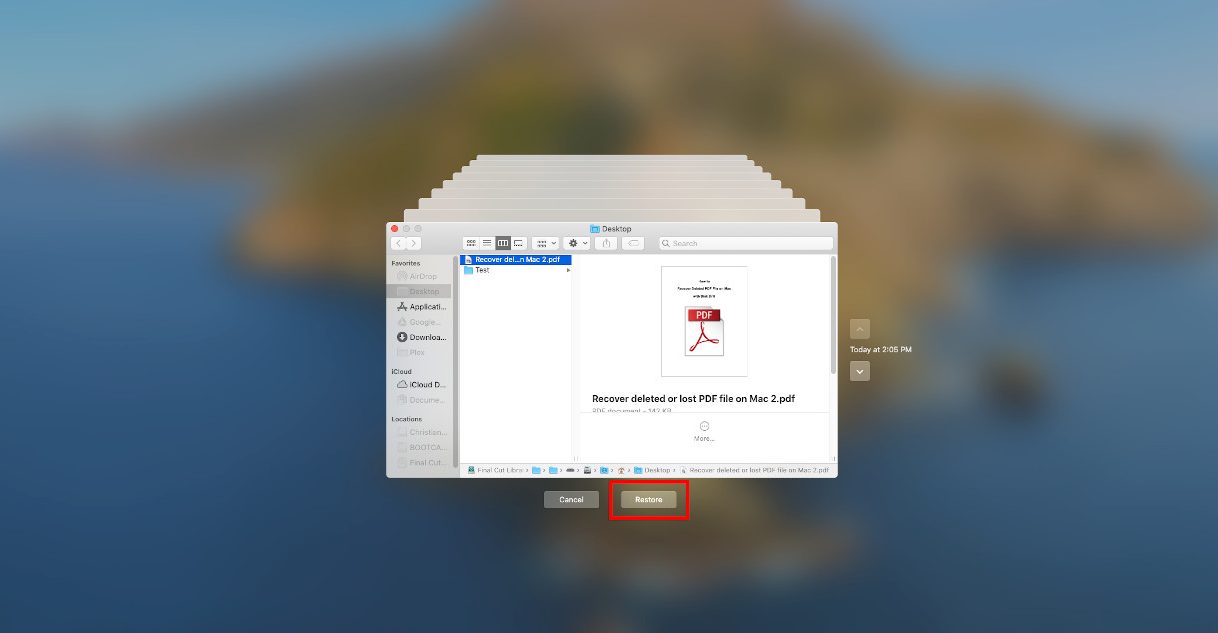
Step 3. On the Apple menu bar, click File > Revert to > Browse all versions…

Step 4. Use the arrows on the right side of the screen to browse the timeline to display the version you want, then click “Restore.”

Fix #2: Repair your Adobe Acrobat installation.
If you use Adobe Acrobat to manage your PDF files, try repairing its installation in case the app itself caused the file to get corrupted.
- Close all open programs on your Mac.
- Launch Adobe Acrobat.
- On the menu bar, click Help > Repair Acrobat Installation.
- Wait for the process to complete, then restart your computer.
Fix #3: Convert your PDF to another document type.
If you can’t repair or restore your PDF file, you can at least extract the information and output it into another document type, such as a Word document (which you can open and edit with Pages). You can do this with Adobe Acrobat, although most PDF editors will have a similar feature and process. You can even use Adobe’s online PDF converter.
To do it with the Adobe Acrobat app, follow these steps:
- Launch Acrobat and open the PDF file.
- Hit “Export PDF.”
- Select Microsoft Word > Word Document, then click “Export.”
- Save it to a secure location.
Fix #4: Repair your PDF using PDF Toolkit (PDFtk).
PDFtk is a swiss army knife PDF tool that can graphically modify pages (split, merge, rotate, etc.) It’s also pretty popular, and like we said – it’s completely free! PDFtk’s only downside is that it’s a command-line tool. In other words, you won’t have an actual interface to work with, and you’ll be executing Terminal-like commands to launch the repair feature.
But don’t worry, you can just follow the steps below and you should be fine. We added screenshots to make it easier.
Step 1. Download and install PDFtk.
Step 2. In Finder, right-click the folder containing your PDF file, then click Services > New Terminal at Folder.
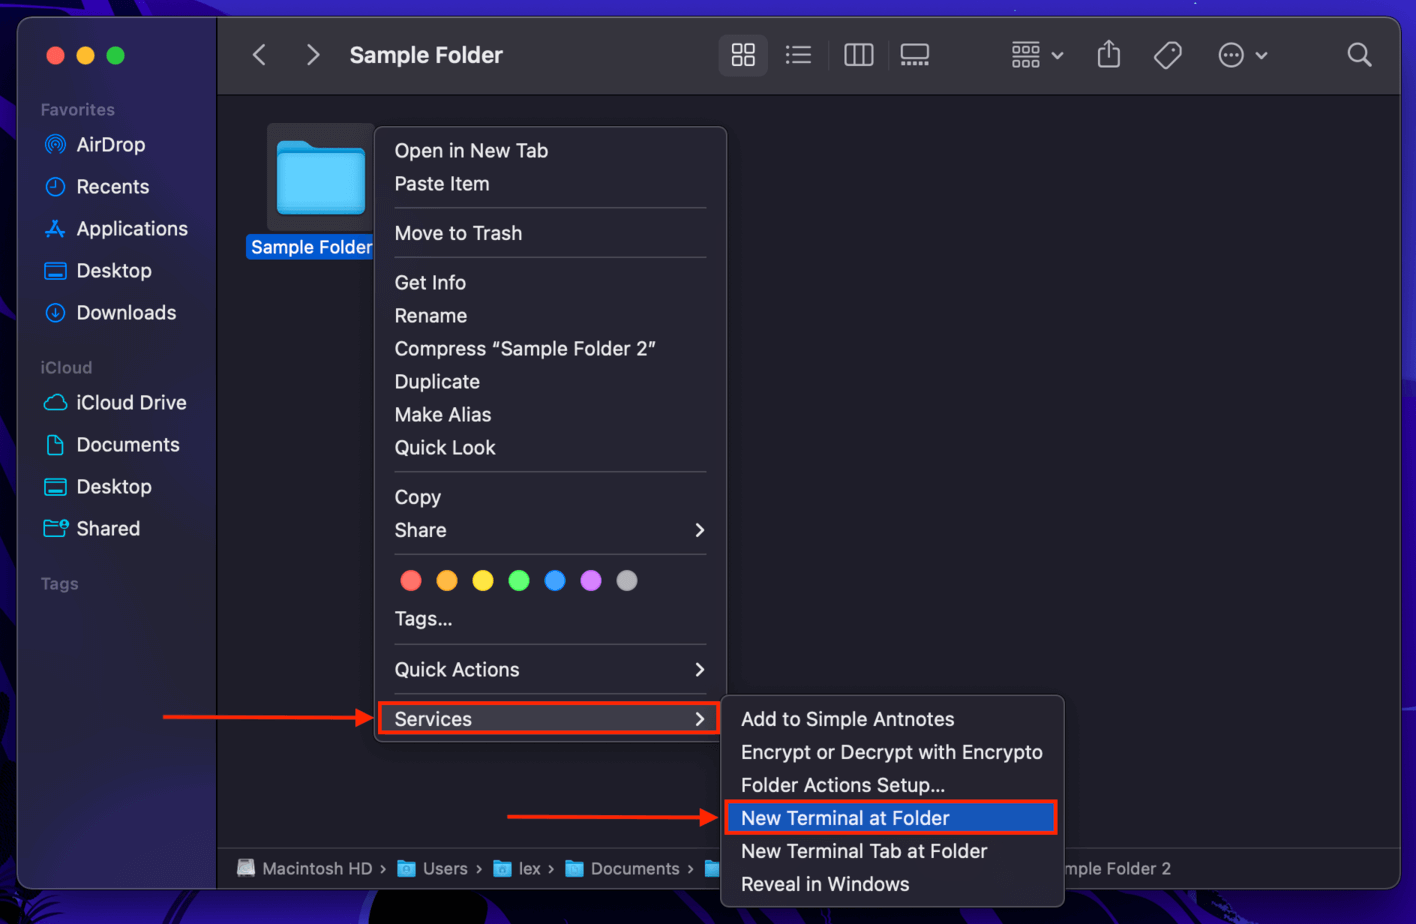
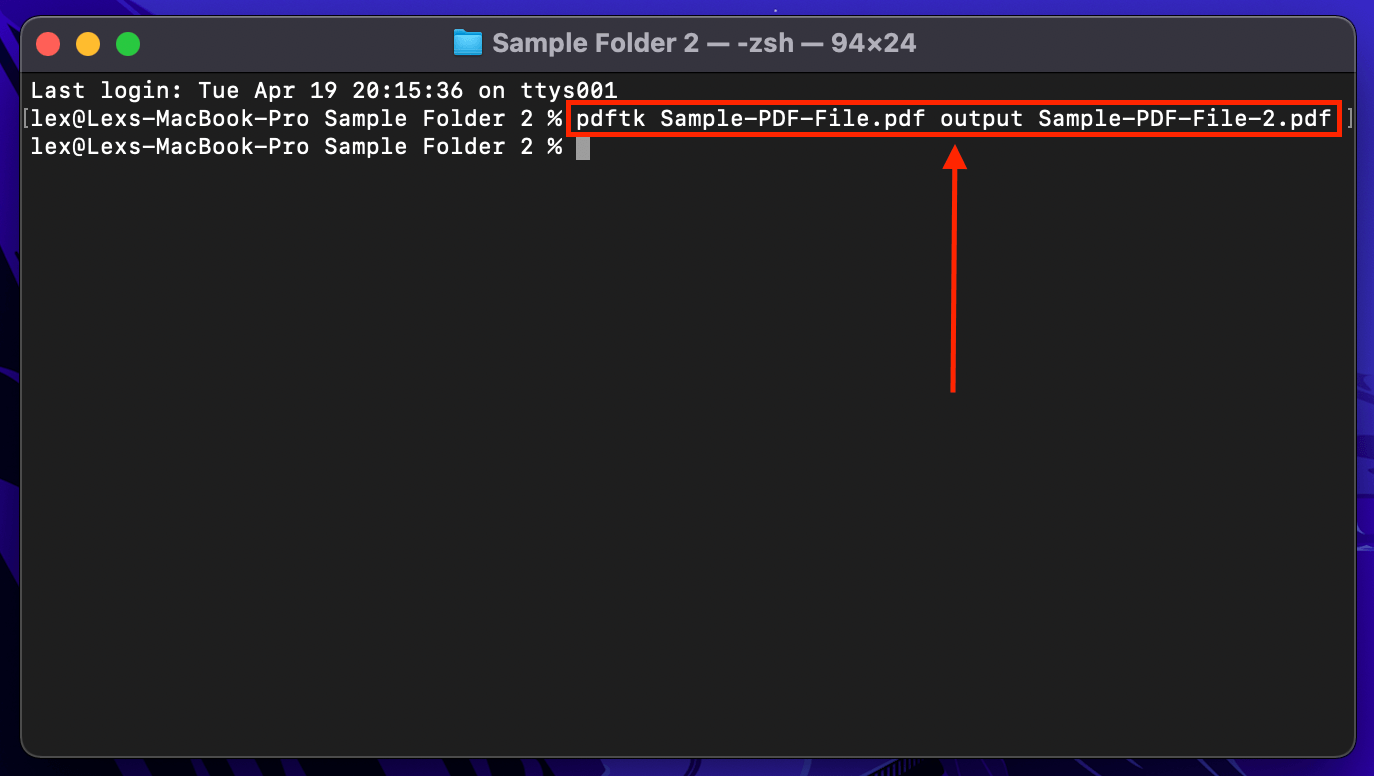
Step 3. Type the following command then hit return:
Pdftk filename.pdf output filename2.pdf
Where filename.pdf should be the exact file name of your PDF, and filename2.pdf will be the file name of your newly repaired PDF. It will appear in the same folder as your original PDF file.
Conclusion
Thanks to its high compatibility, PDF files are used everywhere. It’s a good idea to learn how to repair and/or restore them. Better yet, use backup tools like Time Machine and iCloud to make sure you always have multiple copies of your PDFs.


FAQ
The best way to recover a deleted PDF file on Mac is by using a data recovery software like Disk Drill. Here’s how to do it:
- Download and install Disk Drill.
- Launch Disk Drill and scan the drive that contained your PDF file.
- Preview your file to make sure it’s recoverable, then begin the recovery process.
- Save it to a safe location.
Other ways to recover a deleted PDF file on Mac:
- Restore a previous folder version using Time Machine.
- Download the deleted PDF from iCloud web.
- Copy your PDF file from the Temporary folder.
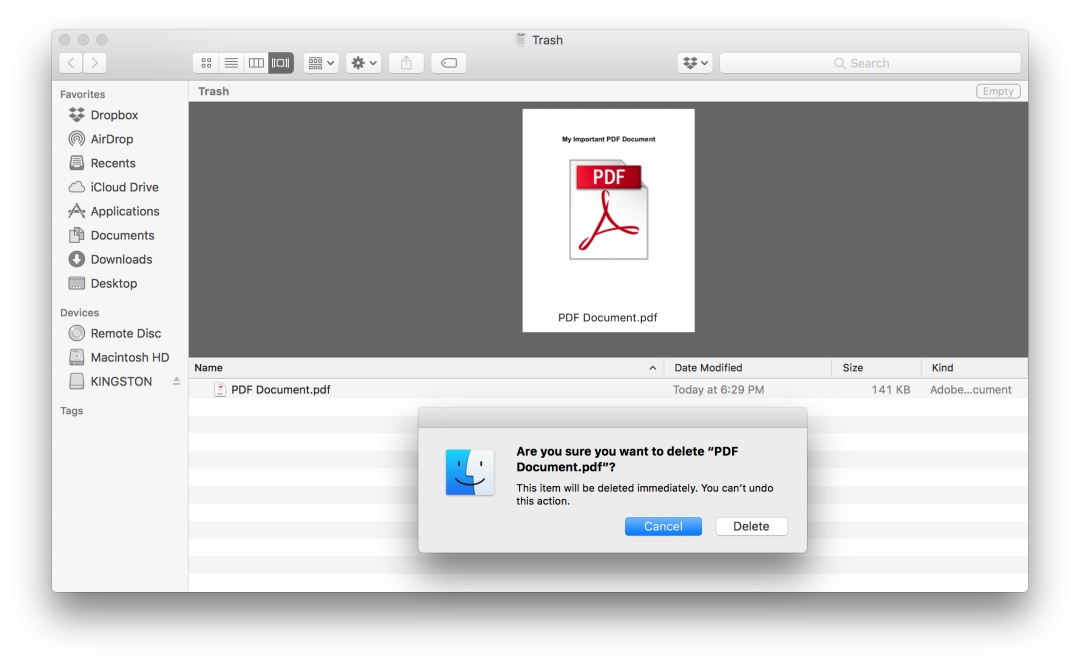
By default, deleted PDF files on a Mac go to the Trash folder. You can access it via your dock or by going to Finder > Go > Go to Folder… and opening this path: ~/.Trash
We recommend using PDFtk to actually repair damaged and corrupted PDF files. Once you’ve download and installed PDFtk, do the following:
- Right-click the folder that contains your PDF, and click Services > New Terminal at Folder.
- Type the following command and hit enter:
pdftk filename.pdf output filename2.pdf
Replace filename.pdf with your file’s actual file name and filename2.pdf with what you want to name the repaired file.
Other ways to repair damaged PDF files on a Mac:
- Restore a preview version of your PDF file.
- Convert PDF to another document type.
- Repair Adobe Acrobat installation (for Adobe Acrobat users only).
To fix PDF not opening on Mac, try the following fixes:
- Try another PDF reader or try updating your current reader.
- Associate PDFs with Preview or another PDF reader of your choice (right-click your file, then click Get Info and modify the “Open with” setting).
- Use Time Machine snapshots to browse through previous versions of your PDF file or the folder that contains it.
- Use PDFtk. Type the following command and hit enter:
pdftk filename.pdf output filename2.pdf
Replace filename.pdf with your file’s actual file name and filename2.pdf with what you want to name the repaired file.