How to Record Audio on Mac
Mac computers are powerful and capable computing devices, aside from the many things you already know your Mac can do, did you know you can easily record audio on your Mac?
Within the next paragraphs we’ll help you learn how to record audio on Mac, record voice on your Mac and also discuss how to record audio from other computers. Audio and voice recording are features natively available on your MacBook, MacBook Air and MacBook Pro.
When you are ready to record audio on your Mac, you can do so easily with the stock app that comes with your computer. Recording audio with the stock app will require no extra software from third-party vendors and usually no extra downloads.
The best way to accomplish audio recording on your Mac natively is by using QuickTime. Many users assume that QuickTime is only for playing videos however it’s actually a useful tool for many different multimedia functions including recording audio on your Mac. Let’s begin by discussing recording on your Mac with a mic.
How to Record Audio on Mac with QuickTime
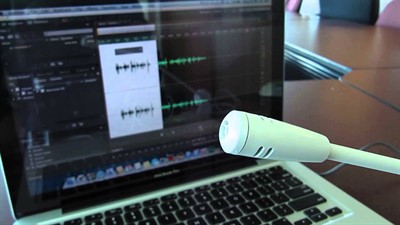
Most Mac computers come with a built-in microphone but if desired you can purchase a microphone separately and achieve better quality with a high-end studio microphone. Even the microphones found at big box retailers or available online generally produce much better quality than the built-in microphones on most computers. If you do have to purchase a microphone separately you will first have to configure the mic so it can work with your Mac computer. We will explain this later on, at the moment we will use the built-in microphone as a sample. So let’s get started with some basic audio recording on your Mac:
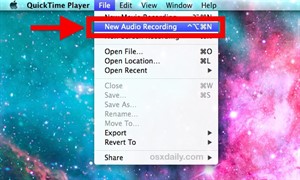
- Go to the QuickTime app on your Mac computer.
- Once you opened the app look for the File menu.
- Next you should select “New audio recording”.
- You can change the settings for this new recording by using the arrow next to the red Record button.
- Change from the built-in mic to the external mic if desired.
- Press on the Red button to start recording from your microphone.
- Once you are finished with your recording, press the Red button again to stop.
- A new window will open, where you can save your recording by entering the name that you want to give to your new audio file.
The file you save will be a MP4 file, MP4 generally means a very good quality for an audio format. This format can be played on a variety of devices which include: iPad, iPhone, iTunes, Windows and most Smartphones. When using this app, you can record as much audio as your free hard disk space allows. As a result, your Mac voice record files can quickly start to consume a lot of space on your computer. Remember to make sure to not utilize too much disk space, it’s always advisable to leave about 20% of your total disk space available at a minimum. There are quite a few reasons for this including better system performance and also to make your chances of data recovery more successful should you ever need to recover data (with a tool such as Disk Drill for example). Did you know that Disk Drill can also help you free up some precious disk space when your computer gets full?
If you record a very large file, you have the option to edit it and save just what you need with QuickTime. Not only can you trim files but you can take your recorded sound and add it to other recordings to create a single merged sound file. Even though you can use QuickTime to record sound files with a microphone, it’s very limited in overall functionality, especially if you want advanced options like recording all audio system output or special effects. There are many solutions out there that can help you record audio from computer Mac offers a bunch of tricks to accomplish that. This is where a few common alternatives come in handy, we will discuss those below.
How to Record Audio on Mac with Microphone and GarageBand
Using your Mac computer to record audio files is very easy because it likely comes with a built-in analog and a digital converter. The analog microphone can be plugged into the Mac line-in port. Using an external microphone is the best way to record voice on Mac computer as the quality will be superior to built-in mics which are best suited for low quality applications such as quick voice or video calls. To help you accomplish recording from your Mac computer, follow these steps:
- Find the line-in port which is usually located on the right side of the MacBook Pro or MacBook Air, usually right next to the USB port. Take your microphone jack and plug it into the port. Make sure the microphone sound level is high enough to be discovered by the analog input on your MacBook Pro.
- Click on the Apple Menu and select System Preferences, then click on Sound. Next, go to the Input Tab, there should be a list of devices that can be used by your MacBook. Then choose the line-in for your input sound device. Make sure your volume is set high enough so your audio is clear, generally about 80% volume should do well. You can now close this window.
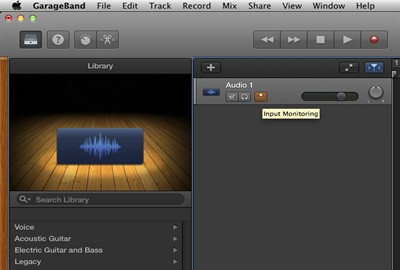
- Start your media software so you can begin recording, in this example we are using GarageBand, this comes preinstalled on most Mac computers. In GarageBand, click on Preferences and choose the built-in audio or an alternate input if applicable.
- Press the Record button to start a new audio recording. You can begin recording through your microphone at this time. Once you are finished recording just press the Record or Stop button. If you have to change something or edit something you should do it before you save the Mac voice record to your computer.
Third-Party Solutions to Record Voice on Mac
There are quite a few apps out there which can help to record audio on your Mac, some are better than others, below we will offer a few popular suggestions. These apps can be obtained for free, there are also some commercial options available. You will also note that we include GarageBand below as a third-party solution. Technically, some versions of Mac OS X do not have GarageBand preinstalled and require additional downloading.
Here are some popular free choices that explain how to record audio on Mac. Many of these apps can also be used to record audio from computer Mac:

Audacity – Audacity is a good app for recording sounds and it has an editing option so you can edit your Mac voice record. Audacity is open-source and entirely free to use. Audacity is quite a bit more powerful than QuickTime and it can record longer files with ease, the included editing, trimming and conversion tools are far superior. Additional plugins can be downloaded for Audacity which extend its functionality.
GarageBand – GarageBand comes installed on most MacBook computers as it’s used for music. Using GarageBand on your MacBook, MacBook Pro or MacBook Air can turn your computer into a portable studio. This app has a lot of features that you will love such as a full library of sounds built-in, an audio synthesizer is also included. The sample sounds include drummers, percussionists, instruments and other useful presets that go well with guitar and voice. GarageBand is available on the App Store if you do not find it pre-installed on your Mac.
iScream – Another popular suggestion from the Apple store is iScream: Free Voice Recorder for Mac. It is a simple application where you can make one-click recordings using the built-in microphone. It’s perfect for making voice notes or short sound recordings. The main attraction to iScream is its limited set of highly targeted features.
When Your Audio Goes Missing
The apps that were mentioned above are good for recording music or Mac voice record. You likely have recorded a large variety of media files like music, live events, maybe even audio from YouTube or other sources. Now we ask, what happens if you accidentally delete something? There’s this old cliche saying: “Once you delete it, you can’t get it back”, right… or is it? Disk Drill is here to save the day or better yet, prevent the stress! Disk Drill is a powerful file recovery tool for Windows and Mac which can recover deleted or lost files. In addition, Disk Drill has many powerful features like Guaranteed Recovery and Recovery Vault which not only help recover files, but help to prevent file loss in the first place.
We offer a free Basic Edition of Disk Drill so you can scan your drive at no charge and see for yourself how well our software works. Disk Drill gives you the powerful data protection features at no charge. Our free audio recovery software also includes Deep Scan, a powerful feature that can be used in any situation. Disk Drill data recovery software supports file systems such as NTFS, FAT, exFAT, HFS+, APFS and EXT3/EXT4.
A wide list of file types is also supported for recovery, such as AVI, MPG, MP4, MP3, JPG, PNG, ZIP, over 300 different file types to be exact. Do not lose your important files, recover them with Disk Drill and keep your data safe!
